
Arai's outgoing Tour-X 4 helmet is still a go-to adventure touring option - here's why

The highly acclaimed, top-spec Arai Tour-X motorbike helmet has been around for decades and I’ve been testing the fourth-generation Tour-X4 for the past three years. It’s designed for adventure and off-road riding, but with the peak removed can be used as a road helmet, or with goggles instead of the visor.
I’ve used it in all conditions on adventure bike launches and group tests in Greece, Spain, Portugal, Sicily and the UK.
It’s now been superseded by Arai’s new Tour-X 5 .
- Read MCN’s previous Arai Tour-X 4 reviews
Arai Tour-X 4
Tested by Michael Neeves for 4000 miles, three years

A clear visor and anti-fog Pinlock come as standard, but I mostly use an accessory dark tinted version. The visor has widescreen field of vision (although you can always see the peak, which I’m not keen on), a classy smoothness in the way it moves and is easy to crack open for extra ventilation.
It isn’t a two-minute job to change the visor, though, with fiddly plastic screws and fixing plates that need to line up with the visor and peak. The new Tour-X5 has a quick release system that gets around the problem. The Tour-X4 doesn’t have a drop-down visor.
Does the Arai Tour-X 4 have good ventilation?
For sweaty off-road rides or sun-baked road trips an adventure lid needs good ventilation. The Tour-X4 has seven strategically placed intake and five exhaust vents that do the job superbly. I’ve worn it as much in the cold and rain, too and it’s nice snug with no drafts or leaks.
Is the Arai Tour-X 4 a noisy helmet?
I’ve only used the Tour-X4 while riding adventure bikes, which have notoriously noisy screens. Despite the racket the bikes make the Arai manages to be surprisingly quiet, although the peak can cause some buffeting and catch in the wind. I wear earplugs so it’s never a problem. I’ve never used it without the peak or with goggles.
Does the Arai Tour-X 4 look good?
The Tour-X4 is a beautiful hand-built creation, as much as a safety device. I’m not a huge fan of the off-road style in general and it looks too storm-trooper-ish with the peak removed. I’d always choose to wear a conventional road helmet, regardless of the style of bike and only pick something like this for practical reasons.
Is the Arai Tour-X 4 good quality?
It’s hard to fault the Tour-X4’s first class build quality, from its plush interior fabrics to the deep, durable white paintwork and the way the vents and trims fit perfectly. There’s nothing about this Arai that feels cheap or plasticky.
Does the Arai Tour-X 4 offer good value for money?
Arai’s Tour-X 4 is unashamedly premium, but now it’s been replaced by the Tour-X 5 there are some stonking deals to be had from retailers’ existing stock.
If the Arai isn’t floating your boat, there are plenty of other adventure helmets available on the market.
The Klim Krios Pro combines cutting edge technology and lightweight materials in a comfortable and great-looking package.
Klim Krios Pro
Tested by Ben Clarke for 4000 miles
Once upon a time, riders looking for a comfortable, peaked adventure-touring helmet pretty much had two choices, an Arai Tour-X or a Shoei Hornet ADV. Like the Arai, the The Shoei is still available on the market today.
Shoei Hornet ADV
Tested by Richard Newland for 5000 miles
Portuguese brand Nexx might not be on the tip of every British biker’s tongue, but their X.WED2 is a really great dual-purpose helmet with very little to be found in the way of negatives. We included it in our adventure helmet product showcase back in 2020 and it won the test with a maximum 5 stars.
Nexx X.WED2
Tested by MCN
Arai Tour-X 4 verdict
If you ride off road, a peaked adventure lid is useful to protect yourself from flying rocks, dust and dirt from other bikes and to keep the sun out of your eyes. The Arai Tour-X4 ticks those boxes, while being every inch a premium helmet that’s as beautifully made and comfortable as any of their top-level road offerings.
But do both on and off-road jobs it’s a compromise. It’s heavier, slightly more fatiguing to wear and the peak is ever-present in your vision and sometimes whips in the wind. Changing the visor is tricky, too, but the updated Tour-X5’s quick release system gets around that problem.
Wearing an adventure helmet is part of my road tester’s ‘dressing-up box’ and useful on the dirt, but I wouldn’t choose to wear one purely for the road just for its looks, even on an adventure bike.
Got an Arai Tour-X 4 of your own? Why not get in touch and find out how you can give an owner review for inclusion on this page!
What our other testers said about the Arai Tour-X 4
Tested by Justin Hayzelden for two years, 5,500 miles Quality 5/5, Value 5/5
Just opening the Arai Tour-X 4 box is an experience in itself. Cleverly packaged without the need for tape or staples, it’s a masterclass in simple origami and opens to reveal the helmet cocooned in a neatly tied, fleecy storage bag, along with stickers, instructions (including a small bottle of silicone lubricant for the visor mechanism) and the Pinlock anti-fog insert.
Slipping it out of the bag and seeing the graphics in the flesh for the first time actually drew oohs and aahs, and then there’s the smell when you first put it on – new Arais have a unique aroma that immerses the wearer in a sensation of quality and craftsmanship.
I’ve yet to find a helmet that is as pleasant to wear as an Arai, and with that cavernous opening, the Tour-X 4 may well be the best in the range. The weight distribution is so good, that it barely feels like there’s anything on your head, even after a full day on the trails.
And that’s from a helmet weighing 1670g (on our scales), hardly the lightest in its class. The double D-ring strap ensures an infinitely secure fit and the extendable chin spoiler does a great job of keeping the wind out when you don’t want it. There’s also very little drag from the aerodynamically designed peak.
The Tour-X 4 isn’t the quietest of helmets, especially with the peak in place, but if you wear earplugs when riding (as I do) wind noise shouldn’t be a problem.
I tend to use goggles when riding off-road and like the fact that the strap fits with the visor installed, regardless of whether it’s open or closed. However, if the going gets messy it can also be removed entirely to prevent damage from mud and grit, turning the Tour-X into a traditional off-road style lid.
It may not be the cheapest, but consider that it’s essentially three helmets in one and the value should become clear – for trail riding, touring or even tearing up the track, the Arai Tour-X 4 could well be the only helmet you’ll ever need.
Tested by Michael Guy for five years, 8400 miles Quality 5/5, Value 4/5
The Tour-X 4 has certainly been my go-to helmet for a significant chunk of riding I’ve completed over the last five years. While Arai claim it works as a grand tourer, adventure helmet and for use on naked bikes with the peak removed the vast majority of my riding has been using it for off-road and adventure.
From events in Italy, to riding the Trans Euro Trail in Northern Spain and most recently a trip to Iceland it’s been my helmet of choice for when I need something I can completely trust and rely on. After all your helmet is the most important piece of safety equipment we all wear.
This is actually my second Arai adventure helmet, I ran the previous X3 model for the five years prior to getting the X4. One of the key factors that keeps me coming back for more is the fit. I wear an XS and unlike other helmets Arai have different outer shell sizes meaning that I’m not wearing a helmet with a large outer shell and lots of padding to make it fit correctly. This in turn makes it feel and look better.
I’ve used the helmet with both clear and a light smoke visor and both give excellent vision and minimal glare. The light smoke visor gives the same quality and contrast as a decent pair of sun glasses. Compared to a motocross helmet the peak is short but it’s enough to act as a sunshade when the sun is low in the sky or give protection from rocks roosted up by the rider in front by simply dropping your head.
Despite the peak the smooth lines of the outer shell make it more than acceptable for sustained motorway speeds. I always expect the peak to make it feel worse than a regular road helmet but in reality, when riding a big adventure bike, it’s the flawed aerodynamics/screen of the bike that are the issue rather than the helmet. My only real gripe is that changing visors is a slow and laborious task which requires removing four easily lose able screws and the peak.
- Just so you know, whilst we may receive a commission or other compensation from the links on this page, we never allow this to influence product selections - read why you should trust us .

By Michael Neeves
MCN Chief Road Tester, club racer, airmiles millionaire.

- Search bike reviews
- Search all bikes
- Search new bikes
- Sell your bike
- Latest news
- Motorcycle Live
- Accessories
- Base Layers
- Communication
- Riding tips
- Learn to ride a motorbike with MCN
- Electric motorbikes
- Maintenance
- Travelling touring
- Insurance guides
- Buying and selling
- Inspiration
- Members' Content
- The Newspaper
- Latest Issue
- #Ride5000miles
- Buy Official MCN Merchandise
- MCN Festival
- London Motorcycle Show
JavaScript seems to be disabled in your browser. For the best experience on our site, be sure to turn on Javascript in your browser.
- HKD - Hong Kong Dollar
- JPY - Japanese Yen
- TWD - New Taiwan Dollar
- RUB - Russian Ruble
- SGD - Singapore Dollar
- ZAR - South African Rand
- KRW - South Korean Won
- AED - United Arab Emirates Dirham
- Create an Account
Arai Tour X4 Full-Face Helmet Review and Road Test and Video
Today, we’ll be taking a look at and road testing the Arai Tour X4 adventure helmet, the helmet that does it all.
If you want a helmet for your more adventurous trips, then the Arai Tour X4 , known as the Arai XD-4 in the US, will be right there with you. You can wear this road helmet three different ways with the visor and the combinations include with the peak with or without the visor, with the peak and a pair of goggles, or even without the peak and just with the visor. So, you can already start to get an idea of how this Arai helmet can range from a street touring helmet to one suited to adventure riding as well. This helmet will be coming in at a recommended retail price of about 650 Euros, or around 720 US Dollars. So, you are getting a premium helmet with all the options. At this price range, the Arai TourX4 will be competing with the Shoei Hornet ADV , AGV AX-9 and the Schuberth E1 .
First, let’s start with the Arai TourX-4 ’s material. The Arai Tour X-4 ’s shell is made of Arai’s Complex Fibre Laminate construction, which is Arai’s own in house shell material that gives the helmet strength and impact flexibility. This also gives you a fairly light weight helmet since when we weighed the Arai Tour Ex-4 , we got a weight of 1620 grams in a size M with all the extras. Though for most helmets, this would be on the heavier end of the spectrum, this helmet was not designed with an explicit focus on weight. The helmet also comes in 5 shell sizes, which is impressive since few helmets come with this many shell sizes. The benefit of more shell sizes is that the helmet’s fit will be better, which will also improve safety since you’re getting a properly proportioned helmet. This will also be a safe helmet since it’s ECE, DOT, and SNELL certified as well. The helmet also has a very round profile, which is what Arai is known for, to focus on the helmet glancing off of any surface during an impact.
Ventilation
Now, looking at the ventilation on this helmet, you’re getting plenty. In the chin, you’re getting a 3 position chin vent with an adjustable set of 12 air intake vents, which should be really good whether you’re out touring or hitting the dirt. You can also close the vent from the inside so you don’t have to breathe in any dust while demisting your visor. In the brow, you’ve got two smaller vents that are also adjustable into open and closed positions to let some air in through the EPS. All this hot air will then come out this neck exhaust vent in the bottom of the helmet and a removable set of exhausts at the top rear of the helmet. So you can also remove them if you need to clean your helmet. Lastly, you’ve also got some side exhausts to help with getting all that warm air out as soon as possible as well.
Onto the visor now and you’re getting a pinlock prepared visor with the anti-fog pinlock insert also in the box. So, this means that even in the worst fogging conditions, your visor should stay as clear as it ever was. This helmet's large visor opening offers plenty of room for a pair of goggles and a good field of view. Looking at the peak, it’s been designed by Arai in such a way as to prevent lifting while you’re riding and instead forcing all that oncoming air into the two brow vents so you get even more cooling. If you want to remove the visor or the peak, it’s pretty straightforward, though you will need a screwdriver. Though from a full-face helmet this does seem a bit high to have to use a screwdriver, given the fact that this helmet is so versatile and a lot of other helmets for motocross are only made for goggles, I’m willing to let it slide.
Now, let’s take a look at the Arai TourX Four ’s liner. To start with, it’s Arai’s Dry-Cool Liner so it’s removable, washable, and moisture wicking. However, you can really see that Arai really went in on the comfort here to try and justify that high price mark. First, this helmet features Arai’s Facial Contour System (FCS) for short, which means the cheek pads have foam spring supports to more effectively have a snug fit without giving too much pressure. To further enhance the helmet’s comfort, it includes 5mm “Peel Away” foam layers on the cheek pads and the temple, so if you need a bit more space in the helmet, you can have it. The helmet should have a more intermediate-oval head fit. Lastly, for safety, the Arai Tour X-IV has an Emergency Release System (ERS) in the cheek pads. To take out the liner is fairly easy and straightforward, first all you need to do is slide out the cheek pads they snap out and slide out from the chin strap. You can see the double d ring chin strap. They’re thick and look comfortable for a good fit. For the res t of the liner, there are 4 snaps on the comfort liner to undo to get them out. What’s nice about the liner is it has multiple levels to help with comfort and ventilation. The only unfortunate thing is we have to EPS grooves in this helmet, but we’ll see how well it ventilates out on the road.
With all the specs over with, let’s see how this helmet did out on the road.
Arai Tour X4 Road Test
Just a reminder for how we measure our road tests. For the temperature, we used a thermometer placed in the top of the helmet to measure helmet’s internal temperature in degrees C. For noise, we used a decibel meter taking measurements from a microphone placed near our rider’s ear. We also used an anemometer to measure the day’s wind speed.
We tested the Tour X4 on a cool day with the sun out so we could also gauge the effectiveness of the Arai’s peak. During our road test, our rider rode on long stretches of highway at about 130 km/h. The day’s wind speed ranged between 110 km/h and 130 km/h. For ventilation, the Tour X-4’s many vents did not let this helmet down since the helmet’s internal temperature was about 8 degrees while it was 7 degrees Celsius outside, so that’s a very good 1-degree difference. For noise, this helmet was also very fairly quiet with about an average of 102 decibels of noise.
Our rider found the helmet to be very comfortable and performed similarly to the Shoei Hornet ADV . Since we rode on a sunny day, he also found that the peak blocked out the sun effectively and didn’t lift too much when looking ahead. He ultimately commented that the Tour X4 was slightly quieter than the Shoei HornetADV , but it was also slightly less comfortable though both still did well in this category with its intermediate oval head fit, double D-ring chin strap, and emergency release cheek pads. Now, let’s see how the Tour X4 ranked.
Arai Tour X4 Champion Helmets Score
For material, since the shell comes in 5 shell sizes and the material is Arai’s super laminate construction, that’s a strong 4 stars. For weight, since this is an adventure helmet it came out about a heavier 1600 grams, giving this helmet 3 stars for weight. For ventilation, this helmet did well, with about a 1 degree difference to the outside temperature, so that’s another 4 stars and a big improvement over the Shoei Hornet ADV. For noise as well, this helmet did well with an average of about 102 decibels giving the Tour X4 3 stars for noise. This helmet was also comfortable, giving the Tour X4 4 stars for comfort. This will bring the Tour X 4 to a total of 3.5 stars with each star costing 30 Euros/star. So, this is ½ a star better than the Shoei Hornet ADV though the Tour X4 is about 4 Euros/star more so it’s a bit more in terms of value for money than the Shoei and the main gripe would be about the visor and peak removal systems.
If you’d like to purchase the Arai Tour X4 , then make sure to check out our website at ChampionHelmets.com where we have a lowest price guarantee and bundle deals with Bluetooth communication systems.
So, that’s all for the Arai Tour X4, it’s a solid premium adventure helmet that will give you all the options you’d like with the performance and safety to match. It was comfortable, the peak was effective, and the ventilation was strong, leaving the biggest failing of the helmet with the visor and peak removal systems requiring a screwdriver. Nonetheless, it does perform better for ventilation than the Shoei Hornet ADV. So, if you grab you Gore-Tex jacket and this helmet, you should be ready for pretty much anything the weather can throw at you. If you’re still curious about the Arai Tour X4, make sure to check out our Arai Tour X4 Review and Road Test Video , and don’t forget to subscribe to our YouTube channel .
- Studio Review
- Buying Guides
- HJC F71 Carbon Road-test & Review
- Dainese Full Metal 7 Review
- Scorpion Exo-1400 Evo Carbon Air 2 Road-Test and Review
- Top 10 Best Entry Level Helmets of 2024
- Nolan N100-6 Review and Road-Test
- February 2024
- January 2024
- December 2023
- November 2023
- October 2023
- September 2023
- August 2023
- February 2023
- January 2023
- December 2022
- November 2022
- October 2022
- September 2022
- August 2022
- February 2022
- January 2022
- December 2021
- November 2021
- October 2021
- September 2021
- August 2021
- February 2021
- January 2021
- December 2020
- November 2020
- October 2020
- September 2020
- August 2020
- February 2020
- January 2020
- December 2019
- November 2019
- October 2019
- September 2019
- August 2019
- February 2019
- January 2019
- December 2018
- November 2018
- October 2010
- schuberth c5
- shark evo gt
- agv tourmodular
- bell qualifier dlx
- shark spartan gt carbon
- shoei gt air 2
- arai rx-7v racing vs arai rx-7v evo
- klim outlander gtx
- dainese freeland gtx
- Motorcycle Clothing
- win a valentino rossi signed helmet
- shark skwal 2.2
- dainese x-tourer
- dainese tempest 3 d-dry
- scorpion exo r1- fabio monster replica
- alpinestars rt-8 gore-tex
- dainese metropolis d-wp shoes
- roof boxxer carbon
- dainese super speed 3
- alpinestars fusion leather jacket
- shark spartan rs carbon skin
- klim badlands pro a3 review
- revit spark air
- how to install insyde in the tourmodular
- shoei neotec 2
- revit expedition gtx
- top 10 best sport-touring helmets of 2022
- revit parabolica jacket
- the best helmets of 2022
- agv pista gp rr
- shoei nxr 2
- icon airflite
- When to replace a helmet
- how to measure motorcycle gear
- dainese atipica air shoes - review
- BMW R1300GS
- x-lite x-1005 ultra carbon
- nolan n100-5 plus
- copper pro denim pants
- klim k fifty
- How to determine helmet size
- torque 2 h2o
- Advice & Inspiration
- Track an Order
- Return an item
- Create an account
- Accessories
Arai Tour X4 helmet review
Customer rating:
Arai’s Tour X4 is the latest version of the incredibly popular adventure helmet, with a redesigned shell shape and added ventilation over the previous Tour X3.
The most immediately obvious changes on the Arai Tour X4 are a whole array of front and rear vents, which provide enough air flow to keep you ice cold when required.
The chin vent is fantastic even when used on its own but there are also metal mesh panels to each side, which are opened from the inside to allow more air to flow into the front of the helmet.
Arai have also added the brow vents that can be seen on most of their range of helmets. On the Tour X4 these work amazingly well, allowing the air to be channelled directly around your head.
There are also top vents to make sure every part of your head is getting blasted with air, and exhaust vents to draw out any warm air rather than letting it get stuck inside.

There is a downside to all of the vents and extra bits stuck on to the shell – the noise. In my experience Arais are noisy and the Tour X4 is no different.
I dislike wearing earplugs and prefer to ride without them, but I’ve had no choice when wearing the Tour X4 because of the noise levels.
The peak creates a lot of the wind noise, which seems to get in and around the peak and causes it to whistle like a camping kettle.
I also found that even with the chin curtain pulled out there was still a lot of wind noise coming through the bottom of the helmet. This was nice in the summer but left me reaching for a neck scarf during the winter months.
The peak can be removed, which does reduce the noise considerably and makes the helmet look incredibly aggressive. Combine that with a dark visor and you’ll look like you’ve escaped from Call of Duty.
The difficulty in removing the peak has to be one of my biggest annoyances and one of the reasons I feel this Arai looks a little antiquated. Arai don’t do quick-release and you need a screwdriver to remove the four plastic bolts holding the peak on.
You need to remove the peak to change the visor, slowing it down even more. I also detest the idea of taking a metal screwdriver to an expensive helmet and I’m not sure everyone has access to a plastic screwdriver.
On the plus side, the wide and deep visor and aperture offer amazing optical clarity and field of vision, which means I can perform a blindspot check with the smallest of head movements. Compared to the Tour X4 the view from a standard road helmet is like looking through a letterbox.
But perhaps the biggest advantage of the large aperture is that it has room to fit goggles. You don’t even have to remove the visor as raising it leaves enough room for the goggles, which is great.
Fitting a dark lens to my goggles and leaving the clear visor on the helmet meant I didn’t need to go through the slow visor change so frequently. As soon as the sun went away I took the goggles off and flicked the clear visor down.
The goggles sit really well and seal perfectly to my face. Although it creates loads of extra wind noise, my eyes are protected.
The visor comes with a Pinlock insert, but the shape of the visor means fitting the insert can be tricky.
It’s a challenge to get it to sit tight to the visor without being too tight, which causes a strange streak to appear, or having it too loose and being useless at stopping visor misting.
Once fitted and adjusted correctly I had no problems at all and it did exactly what you’d expect and kept my visor fog-free.
I found the biggest drawback to the helmet was weight. I’ve used the Tour X4 as a dual-sport helmet and after a few hours on the road or some green laning, its weight does become noticeable.
Having said that, it feels lighter on your head than when carrying it around and it’s nicely balanced so it doesn’t pull your head down while riding.
The weight is because Arai’s philosophy is to make a very robust shell and their argument would be that a lighter shell would be thinner and not as strong or safe – though other brands seem able to make a lighter adventure helmet.
An important feature of the helmet to me, is emergency-release cheekpads. Having had a previous helmet removed by paramedics, I feel this is an overlooked and underrated feature on a helmet.
The orange tabs allow the cheekpads to be removed whilst the helmet is still on. Once the cheekpads are out the helmet just rolls off the rider’s head without putting strain on the neck.
The cheekpads don’t have a pocket or removable foam to fit intercoms speakers, but underneath the cover of the cheekpad there is a recess that’s the perfect shape to accommodate speakers.
The skullpad has a 5mm section that can be removed if the helmet fits too closely – but once it has been torn out it doesn’t go back in, so give it time before ripping this out as you may find the helmet beds in quite nicely without removing it.
The fit on mine loosened to the point where I needed new, thicker padding to restore a close fit, so it’s definitely worth waiting before taking out that section of skullpad.
Overall, the Arai Tour X4 is a seriously good helmet that takes the best bits from its predecessor and builds on it.
It’s not perfect but it’s very well made and it’s easy to see why it’s so popular. If you are looking for an adventure helmet you have to consider the Tour X4.
The visor is huge and the field of vision fantastic. Sometimes you can see the edge of the Pinlock insert and at night, the Pinlock causes distortion to appear around the headlights of oncoming cars.
Ventilation
This is one of the best-ventilated helmets I’ve used. There are many little vents and they’re in awkward places, but they are easy to operate once you know where they are.
Fit & Comfort
I’ve gone for my usual size and it fits me bang-on. The helmet is comfortable, but the weight and noise impede a little.
Build quality
The shell of the helmet and interior are some of the best available. The peak is also very robust, however the vents are glued on and feel a little flimsy.
The features that Arai have added to this helmet are amazingly well made. There are a few things missing that you would expect at this price point.

Arai Tour X4
Is The Arai Tour X4 ADV Helmet A Cut Above The Rest?
This Arai Tour X4 is the most recent version of the Arai adventure helmet. It’s been in their range for nine years already, but it’s still going strong, making many riders very happy.
Some of those riders are on their second or even their third Arai Tour X4, which shows it has a very loyal following.

Arai Tour X4 Review
Table of Contents
Shell Construction
The shell on this helmet is Arai’s super fiber laminate. It’s a composite of fibers designed to deliver the strength needed for the Arai protection philosophy.

Our eye shells tend to be stronger than many other fiber shells, allowing them to use a softer eps impact liner.
Arai strongly believes this makes the helmets more protective than the alternative method, which has a lighter shell and a harder eps impact liner behind it.
Having a stronger shell does mean Arai’s tend to be a little heavier than many other lids. For example, the Tour X4 in a medium-size weighs 1683 grams/3.7 lbs on our scales. But, of course, that’s with the peak and the visor fitted.
It’s not light, but neither is it the heaviest adventure lid, and at least Arai has a solid reason to explain why their helmets weigh a little bit more than your usual helmet.

Ventilation
Venting on an adventure helmet like this is important because if they’re going to be used off-road, airflow is crucial for riders who aren’t just plonked in the saddle all day.
There are two vents behind the peak with simple rocking switches, and then there are two exhaust vents at the rear, which can be opened and closed on these rocker switches.
Arai’s trademark brow vents come on the visor, delivering more cooling air. They come through the vents on the top of the visor, and then they are channeled into ducts at the top of the interior.
The air then flows down the side of your temples, giving you a good amount of inflowing air as you ride along.

The last venting area on this helmet is the one that takes the most description as there are three stages to the chin venting. First, the central vent opens in two stages.
There’s one external shutter on the chin part of the helmet, and then there’s one on the inside of the helmet right in front of your chin. Having both of these open allows air to flow directly to the rider’s mouth.
If you have the outside shutter open and the inside shutter closed, the air forces air up through the chin bar towards the inner surface of the visor.
In addition, air can flow through the grills on the front of the helmet. You operate those with sliding vents just on the inside by your chin.
Anti-Fogging
The Arai Tour X4 adventure is pin lock protected. There’s a pin lock 120 insert in the box. That’s the middle of the three levels that they provide.
Some owners found the pin lock tricky to fit on this helmet, which is understandable on an adventure lid because the curve of the visor is much more exaggerated than normal.
Straightening the visor to fit that insert takes a lot more effort. However, once it is inserted, many people are happy about the anti-miss properties.
First, remove that visor; you need to take off the peak. Unfortunately, there’s no quick-release attachment for the peak on this helmet; you need a screwdriver or a coin to undo the screws holding it in place.
Somewhere along the line, this Tour X4 design has been changed to make removing and refitting the peak easier. When you undo the screws on the side of the helmet, they don’t fall away.
A little retainer plate keeps the retainer in one piece with the peak, making it easier to replace.

You can put the peak back on without refitting the visor, which means you can use this helmet with goggles.
The frames fit snugly in the eye-port, and then there’s room for the straps just underneath the mounting for the peak. You can also put the visor back on without the peak, which gives you a street-styled helmet.
To do that, first, you need to remove the screws. You’ll also need to free them from that retaining plate, and then you have additional pressure plates to refit the visor without the peak being in place.
Peaks like this sometimes cause problems when you’re riding along, and you’ve got drag and some aerodynamic problems, although there’s a fairly clear consensus among the customer reviews for this helmet that it’s not a big issue with the Tour X4 .
I have seen some customer reviews who preferred removing the peak for long journeys, so it is a handy option.
There’s no internal sun visor with this helmet. Aria doesn’t believe in them and doesn’t fit them, so you can’t have one with this. Some Arai’s have the option of an external sun visor, but even that’s not an option with this helmet.
A light reactive pin lock insert is available, but the customer reviews I have seen aren’t great, so you’re likely to want a tinted visor if you need protection from glare. That will mean switching from dark to clear visors depending on the light conditions.
It’s typically an Arai. It’s soft, comfy, and moisture-wicking, so it suits active riding rather than just laid-back touring. It’s fully removable, and you can do a certain amount of tailoring.
There’s a five-millimeter layer of foam on the outer surface of each cheek pad which you can remove, which creates a bit more room on either side of your face.
It’s best to be sure that you need that extra room before removing the layers, as I’m pretty sure you’re not going to be able to put those bits of foam back in there if it turns out you preferred it when it was thicker.
The removable skull pad around the top also has some removable sections. Arai calls them temple pads, which can be taken out to create more space at the side of the head.
The owner’s manual for the helmet says you can stick those back in if you use some double-sided tape, so if you prefer it before, there is at least the option to go back to the original setup.
There’s no official intercom for this helmet, but there’s nothing that I can see to stop a universal intercom from being used. There are plenty of customers amongst the reviews who’ve done that.
Cena also makes an Arai-specific kit that will fit neatly to this helmet. However, it is worth noting that Cena themselves doesn’t recommend the kit for smaller sizes of this helmet.
There’s one neat addition to this lid, and that is a chin curtain. The chin curtain can be pulled down, acting as a wind-deflecting spoiler. This helps keep that cold and noisy air away from the base of the lid.
Safety Straps
The final piece of the interior puzzle is the strap fastener. Again, this is an Arai, so you’ll get a sporty D-ring strap.
One neat touch with that, though, is the covers that protect your skin from wear against that strap can be taken off and washed.
Safety Ratings
As you’d expect, this helmet is fully road approved to ECU 2205 as a full-face helmet. It also has ACU gold approval for use in competitions or on track.
It’s not rated by the UK government’s sharp impact testing program. That’s not unusual as sharp doesn’t appear to have ever tested a helmet that comes supplied with a peak.
For the American market, it is Snell M2020 approved.
In Conclusion
The Arai XD-4 Helmet is a fully adjustable helmet for all types of riding. It has a comfortable headliner fully removable interior with replaceable cheek pads, chin cover, and chinstrap.
In addition, it features Dry Cool technology, which keeps you dry and cool for greater comfort.
The Arai XD-4 Helmet also has FCS (Facial Contour Support) cheek pads with a 5mm peel-away layer that allows easier cleaning and replacement. In addition, the helmet is Snell M2020 approved.
Where To Buy
MotorcycleGear
Keith Mallinson has been a motorcycle enthusiast for the past 20 years. He has owned a variety of bikes during this time, ranging from sport bikes to cruisers. Keith has a passion for all things motorcycle related, including riding, maintaining, and customizing his bikes.In addition to his personal experience with motorcycles, Keith has also kept up to date with industry news and trends. He enjoys sharing his knowledge and insights with others through his motorcycle blog.When he's not out on the open road, Keith can be found tinkering in his garage, planning his next road trip, or spending time with his family.


- Reviews Home
- Motorcycle Reviews
- Product Reviews
- Racing News Home
- Road Racing
- Features Home
- Advanced Riding
- Motorcycle Track Guides
Arai Tour-X4 review | Versatile adventure touring motorcycle helmet

We spent the last few months riding with the Arai Tour-X4 motorcycle helmet, putting the versatile adventure lid through its paces.
If after a versatile do-it-all motorcycle helmet for adventure riding, the Arai Tour-X4 ticks all of the boxes. With a removable peak, interchangeable visors, and the option to remove the visor altogether and run goggles instead, this lid is well worth a look.
Packed with features and designed to the current ECE 22-05 safety standards required in 50 countries, the TX4 certainly meets the high standards set by Arai as a premium supplier.
I ‘debuted’ this helmet on the launch of the Zero DSR/X in Italy, and have since been riding with it on numerous adventure touring rides - including the KTM 1290 Super Adventure R .

Arai Tour-X4 Price & Availability
The Arai Tour-X4 is priced at an RRP of £599, though you tend to regularly find deals online that place it from £400 - £500. It’s certainly a pricey option, but for those looking at the premium brands for protecting your noggin, it’s money spent in the best place.
Available in a huge array of colours, including Diamond White (as pictured), Frost Black, matt colours and colourful variations, even a special Honda Africa Twin design, the TX4 can be grabbed in sizing XS through to XXL - with an outer shell for every two helmet sizes.

Arai Tour-X4 Features
Jumping to the features, the Arai has plenty to note. We’ll start with the peak, which as an adventure lid is one of the more prominent features. I found that the peak itself is fairly lightweight, well-shaped to block glare from the sun, and works in unison with under-peak forehead vents to direct plenty of the captured wind from the peak to your head.
On the point of ventilation, it’s a very well-vented helmet. Dual intakes on the forehead, a three-position chin vent with an inner shutter to block any debris, and side exhausts keep everything nice and cool. There is no chin-curtain, mind, which does mean in adverse weather you can become a bit exposed to debris and water from below.
With an outer shell of Complex Fibre Laminate (CFL) to deliver structural strength and integrity, plus providing impact flexibility to spread any impact force to the entire shell, and though not required for European standard accreditation, Arai performs a 3kg test cone penetration test to ensure safety. Fitted also is an Emergency Release System if things do go south on a ride.

The total weight (with peak and visor installed) is around 1710g. Though not a lightweight, I’ve had no complaints wearing this lid on full-day tours - no neck-ache in sight.
Visibility is top, here, and the visor (which comes with a pinlock) can be removed if you prefer to ride with goggles. I will note that removing the visor for attaching the pinlock is a right faff, where you need to remove the plastic screws for the peak, the peak itself, and pop out the visor before doing it all again to re-install the visor and peak.
Also, when screwing the plastic screws back in, take real care not to over-tighten them with your coin.

Arai Tour-X4 Comfort & Fit
If riding with glasses or sunglasses, there is plenty of room inside, and whilst researching I noted other owners & wearers commenting that specs will fit fine and comfortably.
Riding at normal speeds has a little bit of wind-noise seep in, so riding with earplugs (as always) is recommended, but buffeting is only really noticeable if riding at higher speeds and turning your head to the left or right.

Wind can catch the peak, naturally, but not to the extent you think your head is about to pop off - you can just as easily point your head down to keep everything stable.
Of course, it goes without saying that you’re well advised to test for size in person before purchasing, as sizes vary between manufacturers.

Arai Tour-X4 Verdict
I’d absolutely recommend adventure and touring riders to consider this helmet. Though a high ticket price, it’s up there as one of the best on the market for adventure and touring riders - in true Arai fashion - and many riders will swear by them.
In terms of specs and features, the versatility of the lid is top - you could ride with this on any bike, removing the peak if you’re after a more street-wise lid. If riding off-road or touring, the peak does a lot of work to ensure ventilation and protection, and in any situation the visibility is superb.

Simply put, the Arai Tour-X4 gets the Visordown stamp of approval for adventure and touring riders. There’s a reason they are Japan’s most famous motorcycle helmet manufacturer.
More info found on the Arai website .
Watch the Arai Tour-X4 in action in our Zero DSR/X review.
2023 zero dsr/x review | electric adv in sicily.

- Privacy Policy
- AGV Corsa R/Pista GP RR
- Arai Corsair-X/RX7-V/X
- Arai Defiant-X/Renegade-V
- Arai Quantic
- Arai Quantum-X/Astral-X
- Arai Regent-X/Profile-V
- Arai Signet-X
- Arai XD-4/Tour-X4
- Bell Race Star Flex
- Bell Star MIPS/DLX MIPS
- Bell Qualifier
- Biltwell Gringo
- Biltwell Lane Splitter
- HJC RPHA-11
- HJC RPHA-70 ST
- Icon Airform
- Icon Airframe / Airframe Pro
- Icon Airmada
- Icon Alliance
- Icon Variant
- Schuberth C3/C3 Pro
- Schuberth C4/C4 Pro
- Scorpion EXO-AT950
- Scorpion EXO-R1
- Scorpion EXO-R420
- Scorpion EXO-1400
- Sedici Strada 2
- Shoei GT-AIR
- Shoei GT-AIR 2
- Shoei Hornet X2/ADV
- Shoei Neotec 2
- Shoei RF-1100/XR-1100
- Shoei RF-1200/NXR
- Shoei RF-1400/NXR2/Z-8
- Shoei X-14/X-Spirit III
- Shoei RF-SR/RYD
- Simpson Ghost Bandit
- Simpson Mod Bandit
- Simpson Speed Bandit
- Thor Sector
- X-Lite X-803
- LCD Flip Kit
- Accessories
- --> CHF CHF
- Camera Mounts AGV AGV K1 AGV K3 AGV K5 AGV K6 AGV Corsa R/Pista GP RR ARAI Arai Corsair-X/RX7-V/X Arai Defiant-X/Renegade-V Arai Quantic Arai Quantum-X/Astral-X Arai Regent-X/Profile-V Arai Signet-X Arai XD-4/Tour-X4 BELL Bell MX-9 Bell Race Star Flex Bell Star MIPS/DLX MIPS Bell Qualifier BILTWELL Biltwell Gringo Biltwell Lane Splitter FOX FOX V1 HJC HJC CL-17 HJC i10 HJC RPHA 1 HJC RPHA-11 HJC RPHA-70 ST ICON Icon Airform Icon Airframe / Airframe Pro Icon Airmada Icon Alliance Icon Variant LS2 LS2 Stream LS2 Rapid RUROC Atlas 1.0 Atlas 2.0 Atlas 3.0 Atlas 4.0 Berserker SCHUBERTH Schuberth C3/C3 Pro Schuberth C4/C4 Pro SCORPION Scorpion EXO-AT950 Scorpion EXO-R1 Scorpion EXO-R420 Scorpion EXO-1400 SEDICI Sedici Strada 2 SHOEI Shoei GT-AIR Shoei GT-AIR 2 Shoei Hornet X2/ADV Shoei Neotec 2 Shoei RF-1100/XR-1100 Shoei RF-1200/NXR Shoei RF-1400/NXR2/Z-8 Shoei X-14/X-Spirit III Shoei RF-SR/RYD SIMPSON Simpson Ghost Bandit Simpson Mod Bandit Simpson Speed Bandit THOR Thor Sector VOSS Voss 989 Voss 988 X-LITE X-Lite X-803
Black Friday Sale
25% OFF Everything in Store. Limited Time

How to Mount GoPro on Arai XD-4 / Tour-X4
Mounting procedure.
Mounting a GoPro camera on your motorcycle helmet can be a great way to capture all of the exciting moments of your ride. However, finding the right mount for your specific helmet can be a challenge. In this post, we will show you how to mount your GoPro/Insta360/DJI action to your Arai XD-4 / Tour-X4 using the RideTechMoto GoPro chin mount/camera mount.
The RideTechMoto GoPro custom camera mount is specifically designed for the Arai XD-4 / Tour-X4 helmet, making it the perfect choice for this particular helmet. The mount attaches easily to the chin area of the helmet and provides a secure, stable platform for your GoPro camera. The mount is also adjustable, so you can find the perfect angle for your shots.

Gather the necessary materials Before you begin, make sure you have the following materials:
- RideTechMoto camera mount kit
- GoPro or other action camera
- Allen key (if complete package option is purchased)
Prepare the helmet using provided alcohol wipe, wipe the helmet clean from any dirt or debris.
Step 3: Attach the mount
Take the mount and attach it to the chin area of the helmet. Make sure the mount is securely pressed against the helmet.

Step 4: Attach the camera adapter
Take the camera adapter (Full Package Accessory) and attach it to the mount. This should be a snug fit.

Step 5: Attach the camera
Attach your GoPro or other action camera to the camera adapter. Make sure it is securely fastened and won't move around while riding. The camera can be tightened with the thumbscrew provided.

If you're looking for a reliable, stable and secure way to mount your GoPro camera to your Arai XD-4 / Tour-X4 helmet, the RideTechMoto GoPro chin mount/camera mount is the perfect choice. Additionally, if you own multiple helmets or plan to switch helmets, RideTechMoto's wide variety of custom camera mounts for different helmet brands is a great option to consider. This includes AGV, Arai, Bell, Fox, HJC, Scorpion, Sedici, Shoei, and many more. With RideTechMoto's mounts, you can be sure that your camera will be safe and secure while you're out on the road or on the dirt.
PRODUCTS MENTIONED IN THE ARTICLE

You may also like

- Arai Helmet Manuals
- Motorcycle Accessories
- Instructions for use manual
Arai Helmet TOUR-X5 Instructions For Use Manual
- page of 124 Go / 124
- Table of Contents
Advertisement
Quick Links
- ελληνικά 94
Related Manuals for Arai Helmet TOUR-X5

Summary of Contents for Arai Helmet TOUR-X5
- Page 1 ARAI VAS-A IC (MAX VISION) VISIER. ISTRUZIONI PER L’USO. LEGGERE PRIMA QUESTO LIBRETTO INFORMATIVO! ATTENZIONE: PER IL CASCO ARAI TOUR-X5 USARE SOLO VISIERE ARAI ORIGINALI TIPO ARAI VAS-A IC(MAX VISION). Italian INSTRUCCIONES DE USO. LEA ESTE MANUAL ANTES DEL USO...
- Page 4 English CONTENTS TO OPEN/CLOSE SHIELD ................4 TO REMOVE/REPLACE BREATH DEFLECTOR ..........6 TO ADJUST PEAK ANGLE ................6 TO OPERATE MOUTHVENT................8 TO OPERATE TOP VENTS ................8 TO OPERATE AIRFLOW SPOILER ............10 TO REMOVE/REPLACE PEAK/FACE SHIELD..........10 TO REMOVE/REPLACE BASE PLATES ............16 TO REMOVE/REPLACE CHEEK PADS ............16 TO REMOVE/REPLACE COMFORT LINING ..........22 TO REMOVE/REPLACE CHINSTRAP COVERS ...........24 TO REMOVE/REPLACE NECKROLL ............30...
Page 5: Table Of Contents
- Page 6 English TO OPEN/CLOSE SHIELD Pull the shield latch tab on lower left side of the shield outward to release the latch system and then raise the shield (2). To close the shield, push down the shield until the shield latch tab fully latches into place (3).
Page 7: Pour Ouvrir/Fermer L'écran
- Page 8 English TO REMOVE/REPLACE BREATH DEFLECTOR To remove, grasp either side of the edge and pull upward and toward to opposite end To install, first insert the center of the deflector in the receiving slot and then push in the sides working from the center outwards TO ADJUST PEAK ANGLE Slightly loosen the screw from each side of the peak with a flat blade screwdriver or small coin so that the peak can be moved up and down easily.
Page 9: Pour Enlever/Remplacer Le Déflecteur De Nez
- Page 10 English TO OPERATE MOUTHVENT Simply push the switches/levers on each vent to open/close the vents. Close Close Fermer Fermer Schließen Schließen Open Open Ouvrir Ouvrir Öffnen Öffnen When the shutter inside is open, air is directed to the mouth area to provide fresh air inside the helmet (1).
Page 11: Fonctionnement De La Ventilation De Mentonnière
- Page 12 English TO OPERATE AIRFLOW SPOILER To deploy the spoiler in the down position, simply pull it down by grasping the center of the chin curtain (1). To retract the spoiler, simply push it up with the palm of your hand (2). TO REMOVE/REPLACE PEAK/FACE SHIELD To remove the peak, remove the screw from each side of the pressure plate on the peak with a flat blade screwdriver or small coin (1).
Page 13: Fonctionnement De La Mentonnière
- Page 14 English With the peak and side pods removed, raise the shield fully (1) and remove the shield from the base plates (2). To replace the shield, position the shield on the base plate so that the lower part of the sliding slot of the shield is over the tabs at the base plate's top screw point and the brass stud of the shield is in the upper end of the sliding slot of the base plate, marked in red (3).
- Page 15 French German Avec la visière et les plaques latérales enlevées, lever complètement l’écran Nachdem Sie den Schirm und die Seitendeckel entfernt haben, öffnen Sie das Visier vollständig (1) und entfernen Sie das Visier von den Basisplatten (2). (1) et séparer l’écran des plaques (2). Pour remettre l’écran, le mettre sur la plaque d’appui, afin que la partie Zum Wiedereinsetzen des Visiers positionieren Sie das Visier auf der Basisplatte, inférieure de la fente coulissante couvre les languettes de la vis supérieure...
- Page 16 English Work the shield up and down to confirm proper operation (7). To replace the peak, position the peak over the side pod so that the two holes are in line with the holes on the side pod (8). Position the pressure plate with the locating pin (9) on the back of the pressure plate into the corresponding hole on the rear side of the pod and the front screw hole is in line with the helmet's front side hole on the side pod (10).
- Page 17 French German Ouvrir et fermer l’écran pour vérifier son bon fonctionnement (7). Öffnen und schließen Sie das Visier, um die korrekte Funktion zu bestätigen (7). Pour remettre la casquette, la positionner sur la plaque latérale, afin que les Zum Wiedereinsetzen des Schirms positionieren Sie den Schirm auf dem deux trous soient alignés avec les trous de la plaque latérale (8).
- Page 18 English TO REMOVE/REPLACE BASE PLATES To remove, first remove the shield. Remove two screws from each base plate with a flat blade screwdriver or small coin (1). Remove plates from helmet shell. Note the right and left base plate for proper reinstallation, referring to the mark on it (2). To replace, place base plate over the threaded screw receptacles in the helmet.
Page 19: Pour Enlever/Remplacer Les Plaques D'appui
- Page 20 English WARNING : An exposed release tab strap can catch on your clothing or other objects while you are riding. Never allow more than the tab of the release tab strap to be exposed outside of the cheek pads. Always ensure that the release tab strap is in its proper position before using the helmet.
- Page 21 French German AVERTISSEMENT : WARNUNG : Une languette de déverrouillage exposée pourrait s’accrocher à vos vêtements ou Eine exponierte Notentriegelungslasche kann beim Fahren an Ihrer Kleidung oder à d’autres objets pendant la conduite. anderen Gegenständen hängenbleiben. Ne jamais laisser plus que la languette de la sangle de déverrouillage d’urgence Lassen Sie nie mehr, als nur die Lasche des Notentriegelungsriemens außerhalb exposée à...
- Page 22 English To wash fabric coverings, put them into lukewarm water with small amount of laundry soap or your own shampoo and wash gently by hand. Rinse well with fresh water and wipe off with a soft cloth. Dry them in the shade at ambient temperature. WARNING : Never use petrol, thinner, benzene or any other solvents.
- Page 23 French German Pour laver les habillages en tissu, les placer dans de l’eau tiède avec un peu de Zum Waschen der Textilabdeckungen legen Sie diese in lauwarmes Wasser mit etwas lessive ou de shampooing et laver délicatement à la main. Rincer abondamment Waschseife oder Ihrem eigenen Shampoo und waschen Sie diese vorsichtig mit der Hand.
- Page 24 English TO REMOVE/REPLACE COMFORT LINING The comfort lining is secured to the helmet by 4 plastic bosses (1). To remove the lining, undo 4 bosses by grasping the lining as close to each boss as possible (2) and pulling straight up (3). Note the front &...
Page 25: Pour Enlever/Remplacer La Coiffe
- Page 26 English TO REMOVE/REPLACE CHINSTRAP COVERS To remove the chinstrap covers, first remove the cheek pads as per previous instructions. Steel chinstrap anchor Fixation en acier Stahl-Kinnriemen-Anker Locate the yellow plastic chinstrap anchor attached to the steel chinstrap anchor (1). Yellow plastic chinstrap anchor Fixation de jugulaire en plastique jaune Gelber Kunststoff-Kinnriemen-Anker Grasp the lower part of the yellow plastic chinstrap anchor and lift (2).
Page 27: Pour Enlever/Remplacer Les Habillages De Jugulaire
- Page 28 English Slide the chinstrap cover off the chinstrap (4). Note the right and left, inside and outside of the chinstrap covers for replacement (5). Left chinstrap cover (D-ring side) Right chinstrap cover (long side) Revêtement gauche de jugulaire (du côté de l’anneau en D) Revêtement droit de jugulaire (du côté...
- Page 29 French German Sortir le revêtement de jugulaire en le faisant glisser (4). Schieben Sie die Kinnriemen-Abdeckung vom Kinnriemen ab (4). Identifier les côtés droit et gauche, intérieur et extérieur des revêtements de Achten Sie beim Einsetzen der Kinnriemenabdeckungen auf deren richtige jugulaire pour les remplacer plus facilement (5).
- Page 30 English Angle the yellow plastic chinstrap anchor at about 45 degrees to the steel chinstrap anchor (6). Steel chinstrap anchor Fixation en acier Yellow plastic chinstrap anchor Stahl-Kinnriemen-Anker Fixation de jugulaire en plastique jaune Gelber Kunststoff-Kinnriemen-Anker Push the two tabs on the yellow plastic chinstrap anchor into the two holes in the steel chinstrap anchor (7).
- Page 31 French German Orienter la fixation de jugulaire en plastique jaune à environ 45 degrés par Richten Sie den gelben Kunststoff-Kinnriemen-Anker in einem Winkel von rapport à la fixation de jugulaire en acier (6). ca. 45 Grad zum Stahl-Kinnriemen-Anker aus (6). Pousser les deux languettes de la fixation de jugulaire en plastique jaune Drücken Sie die beiden Laschen am gelben Kunststoff-Kinnriemen-Anker in dans les deux trous de la fixation de jugulaire en acier (7).
- Page 32 English TO REMOVE/REPLACE NECKROLL First remove the cheek pads as per previous instructions. Next, pull out the neckroll end tabs, which are inserted into the chin centerpad at both sides(1). To remove the neckroll, grasp center of the neckroll firmly (2), rotate it to either direction by 3cm - 4cm (1-1/4”...
Page 33: Pour Enlever/Remplacer Le Tour De Cou
- Page 34 Italian CONTENUTI PER APRIRE/CHIUDERE LA VISIERA ............34 PER RIMUOVERE/SOSTITUIRE IL PARANASO ...........36 PER REGOLARE L’ANGOLO DEL FRONTINO ..........36 PER AZIONARE LA PRESA D’ARIA MENTONIERA ........38 PER AZIONARE LE PRESE D’ARIA SUPERIORI ..........38 PER AZIONARE LO SPOILER MENTONIERA ..........40 PER RIMUOVERE/SOSTITUIRE VISIERA E FRONTINO ........40 PER RIMUOVERE/SOSTITUIRE I SUPPORTI INTERNI ........46 PER RIMUOVERE/SOSTITUIRE I GUANCIALI ..........46 PER RIMUOVERE/SOSTITUIRE LA CALOTTINA INTERNA ......52...
- Page 35 Spanish Portuguese CONTENIDO ÍNDICE ABRIR/CERRAR LA PANTALLA ..............35 COMO ABRIR/FECHAR A VISEIRA ............35 QUITAR/REEMPLAZAR EL DEFLECTOR DE ALIENTO ........37 COMO REMOVER/SUBSTITUIR A NARIGUEIRA .........37 AJUSTAR EL ÁNGULO DE LA VISERA ............37 COMO AJUSTAR O ÂNGULO DA PALA .............37 CÓMO UTILIZAR LA VENTILACIÓN DE MENTONERA.........39 COMO UTILIZAR A ENTRADA DE AR FRONTAL .........39 CÓMO UTILIZAR LA VENTILACIÓN SUPERIOR ..........39 COMO UTILIZAR AS ENTRADAS DE AR SUPERIORES .......39...
Page 36: Per Aprire/Chiudere La Visiera
Page 37: abrir/cerrar la pantalla, page 38: per rimuovere/sostituire il paranaso, page 39: quitar/reemplazar el deflector de aliento, page 40: per azionare la presa d'aria mentoniera, page 41: cómo utilizar la ventilación de mentonera, page 42: per azionare lo spoiler mentoniera, page 43: cómo utilizar el alerón desplegable del mentón.
- Page 44 Italian Con il frontino ed i supporti esterni rimossi, sollevare completamente la visiera (1) e rimuoverla dai supporti interni (2). Per rimontare la visiera, posizionarla sul supporto esterno in modo che la fessura di scorrimento della visiera si trovi sopra le linguette del perno di rotazione del supporto interno e che il perno in ottone della visiera coincida con la fessura di scorrimento del supporto interno, contrassegnata in rosso (3).
- Page 45 Spanish Portuguese Una vez que haya retirado la visera y las tapas laterales, eleve la pantalla Depois de ter retirado a viseira e as coberturas laterais, levante a viseira (1) y retírela de las placas base (2). totalmente (1) e remova-a das placas bases (2). Para volver a colocar la pantalla, colóquela en la placa base de modo que la Para substituir a viseira, posicione-a no reparo de modo que a parte inferior parte inferior de la ranura deslizante de la pantalla quede sobre los pestillos...
- Page 46 Italian Azionare la visiera verso l'alto e verso il basso per verificarne il corretto funzionamento (7). Per rimontare il frontino, posizionarlo in corrispondenza del supporto esterno in modo che i due fori siano allineati con i fori del supporto (8). Posizionare la piastrina di supporto con il perno di posizionamento (9) orientato verso il retro facendo in modo che il foro per il passaggio della vite sia allineato con il foro del supporto esterno (10).
- Page 47 Spanish Portuguese Suba y baje la pantalla para confirmar que funciona correctamente (7). Mexa a viseira para cima e para baixo para confirmar a operação adequada (7). Para substituir a pala, posicione-a sobre a tampa lateral de modo a que os Para reemplazar la visera, colóquela sobre la tapa lateral de modo que los dois orifícios fiquem alinhados com os orifícios da tampa lateral (8).
Page 48: Per Rimuovere/Sostituire I Supporti Interni
Page 49: quitar/reemplazar las placas base de la visera.
- Page 50 Italian AVVERTENZA: I tab delle linguette di sgancio, se esposti potrebbero impigliarsi nei vestiti o in altri oggetti mentre si guida. I tab delle linguette di sgancio non devono mai essere esposti all’esterno dei guanciali per una lunghezza superiore a quello della linguetta stessa. Prima di utilizzare il casco, accertarsi sempre che le linguette di sgancio siano nella posizione corretta.
- Page 51 Spanish Portuguese ADVERTENCIA: AVISO: Una lengüeta expuesta puede engancharse en su ropa o en otros objetos Uma alça da presilha de liberação exposta pode se prender em roupas ou em mientras conduce. outros objetos enquanto estiver pilotando. No deje las lengüetas expuesta fuera de las almohadillas de mejilla. Nunca deixe que mais do que a presilha da alça da presilha de liberação fique Asegúrese siempre de que la correa del pestillo de liberación está...
- Page 52 Italian Per lavare i rivestimenti in tessuto, immergerli in acqua tiepida con una piccola quantità di sapone per bucato o con il proprio shampoo e lavarli delicatamente a mano. Risciacquare bene con acqua fresca e asciugare con un panno morbido. Asciugare all’ombra a temperatura ambiente. AVVERTENZA: Non utilizzare mai benzina, diluente, benzene o altri solventi.
- Page 53 Spanish Portuguese Para lavar las fundas de tela, introdúzcalas en agua tibia con una pequeña Para lavar os acabamentos de tecido, coloque-os em água morna com uma pequena quantidade de sabão em pó ou seu próprio xampu e lave-os cantidad de jabón para ropa o su propio champú y lávelas delicadamente a cuidadosamente à...
Page 54: Per Rimuovere/Sostituire La Calottina Interna
Page 55: quitar/reemplazar el interior, page 56: per rimuovere/sostituire le cover del cinturino, page 57: quitar/reemplazar las cubierta de la correa de cierre.
- Page 58 Italian Sfilare le cover dal cinturino (4). Prendere nota di quale cover è installata a destra e quale a sinistra e di quale lato è all’interno e all’esterno, per il corretto rimontaggio (5). Cover cinturino sinistra (lato anello a D) Cover cinturino destra (lato lungo) Cubierta de la cinta de barbilla izquierda (lado de la anilla en D) Cubierta de la cinta de barbilla derecha (lado largo)
- Page 59 Spanish Portuguese Deslice la cubierta de la correa de cierre (4). Deslize o acabamento da cinta jugular para fora da cinta jugular (4). Observe la derecha y la izquierda, el interior y el exterior de las cubiertas de Observe os acabamentos direito e esquerdo, interno e externo da cinta la correa de cierre para su sustitución (5).
- Page 60 Italian L’ancoraggio del sottogola in plastica gialla deve avere un angolo di circa 45 gradi rispetto all’ancoraggio del cinturino in acciaio (6). Ancoraggio del cinturinoin acciaio Fijación de acero Ancoraggio della cover in plastica gialla Pivô de aço da cinta jugular Soporte de plástico amarillo de la correa de cierre Pivô...
- Page 61 Spanish Portuguese Incline el soporte de plástico amarillo de la correa de cierre unos 45 grados Incline o pivô amarelo de plástico da cinta jugular em um ângulo de con respecto al fijación de acero (6). aproximadamente 45 graus em relação ao pivô de aço da cinta jugular (6). Introduzca los dos pestillos del soporte de plástico amarillo en los dos Aperte as duas presilhas do pivô...
Page 62: Per Rimuovere/Sostituire Il Paranuca
Page 63: quitar/reemplazar la almohadilla cervical.
- Page 64 Dutch INHOUD VIZIER OPENEN/SLUITEN ................64 ADEMDEFLECTOR VERWIJDEREN/VERVANGEN ........66 HOEK VAN DE KLEP INSTELLEN ..............66 KINVENTILATIE BEDIENEN ..............68 TOP VENTILATIE BEDIENEN ..............68 KINSPOILER BEDIENEN .................70 VIZIER/KLEP VERWIJDEREN/VERVANGEN ..........70 BASISPLATEN VERWIJDEREN/VERVANGEN ..........76 WANGSTUKKEN VERWIJDEREN/VERVANGEN ..........76 INTERIEUR VERWIJDEREN/VERVANGEN ..........82 KINBANDHOESJES VERWIJDEREN/VERVANGEN ........84 NEKROL VERWIJDEREN/VERVANGEN ............90 LET OP: De klep die bij uw helm wordt geleverd is niet geschikt voor gebruik bij hoge snelheden.
- Page 65 Swedish Finnish INNEHÅLL SISÄLTÖ AVAA/SULJE VISIIRI ................65 ATT ÖPPNA/STÄNGA VISIRET ..............65 HENGITYSSUOJAN POISTAMINEN/VAIHTAMINEN ........67 ATT TA BORT/BYTA UT ANDNINGSDEFLECTOR ........67 LIPAN KULMAN SÄÄTÄMINEN .............. 67 ATT JUSTERA SKÄRMEN ............... 67 SUUVENTTIILIN KÄYTTÖ ............... 69 ATT ANVÄNDA MUNVENTIL ..............69 YLÄVENTTIILIEN KÄYTTÖ...
Page 66: Vizier Openen/Sluiten
Page 67: att öppna/stänga visiret, page 68: ademdeflector verwijderen/vervangen, page 69: att ta bort/byta ut andningsdeflector, page 70: kinventilatie bedienen, page 71: att använda munventil, page 72: kinspoiler bedienen, page 73: att använda hakskyddet för luftflödet.
- Page 74 Dutch Als het vizier en de zijplaten zijn verwijderd, tilt u het vizier volledig op (1) en haalt u het uit de basisplaten (2). Om het vizier terug te plaatsen, plaatst u het zo op de basisplaat dat de onderkant van de geleidesleuf van het vizier over de schroef op het bovenste schroefpunt van de basisplaat ligt en de koperen tapbout van het vizier in het bovenste einde van de geleidesleuf van de basisplaat valt, rood gemarkeerd (3).
- Page 75 Swedish Finnish Med skärmen och sidokkåporna borttagna, höj skärmen helt och ta (1) bort Kun lippa ja sivulevyt on poistettu, nosta visiiri kokonaan ylös (1) ja irrota skärmen från basplattorna. se pohjalevyistä (2). För att byta ut visiret, placera visiret på basplattan så att den nedre delen Jos haluat vaihtaa visiirin, aseta visiiri pohjalevylle siten, että...
- Page 76 Dutch Beweeg het vizier omhoog en omlaag om te controleren of het goed werkt (7). Om de klep te vervangen, plaatst u deze over de zijplaat zodat de twee gaten in lijn liggen met de gaten op de zijplaat (8). Plaats de drukplaat met de centreerpen (9) aan de achterkant van de drukplaat in het corresponderende gat aan de achterzijde van de plaat en het voorste schroefgat in lijn met het gat aan de voorkant van de helm op de zijplaat (10).
- Page 77 Swedish Finnish Dra upp och ned visiret för att kontrollera att det fungerar korrekt (7). Liikuta visiiriä ylös ja alas varmistaaksesi, että se toimii oikein (7). För att byta ut skärmen, placera skärmen över sidokåpan så att de två hålen Jos haluat vaihtaa lipan, aseta se sivukotelon päälle niin, että...
Page 78: Basisplaten Verwijderen/Vervangen
Page 79: att ta bort/byta ut bottenplattor.
- Page 80 Dutch WAARSCHUWING : Een loshangende lus van het noodontgrendelingssysteem kan tijdens het rijden aan uw kleding of andere voorwerpen blijven haken. Laat nooit meer dan het label van de ontgrendelingslus buiten de wangstukken uitsteken. Zorg er altijd voor dat de ontgrendelingslus zich in de juiste positie bevindt voordat u de helm gebruikt.
- Page 81 Swedish Finnish VARNING : VAROITUS : En exponerad utlösningsflik kan fastna i kläder eller andra föremål när du kör. Irroitettu hätäirroituslenkki voi tarttua vaatteisiin tai muihin esineisiin ajon aikana. Låt aldrig mer än utlösningsremmens flik vara exponerad utanför kindkuddarna. Älä koskaan anna hätäirroituslenkin hihnan kielekettä suuremman osan paljastua Kontrollera alltid att utlösningsremmen är i rätt läge innan du använder hjälmen.
- Page 82 Dutch Als u de stoffen bekleding wilt wassen, doet u die in lauw water met een klein beetje zeep of uw eigen shampoo en wast u deze voorzichtig met de hand. Goed afspoelen met schoon water en afnemen met een zachte doek. Droog de bekleding in de schaduw op kamertemperatuur. WAARSCHUWING : Gebruik nooit benzine, thinner, benzeen of andere oplosmiddelen.
- Page 83 Swedish Finnish För att tvätta tygöverdrag, lägg dem i ljummet vatten med liten mängd tvätt tvål Pese kangaspäällysteet haaleassa vedessä, johon on lisätty pieni määrä pyykkiainetta eller ditt eget schampo och tvätta försiktigt för hand. Skölj noggrant med rent tai shampoota, ja pese varovasti käsin. Huuhtele huolella puhtaalla vedellä ja pyyhi vatten och torka av med en mjuk trasa.
Page 84: Interieur Verwijderen/Vervangen
Page 85: att ta bort/byta ut komfortfoder, page 86: kinbandhoesjes verwijderen/vervangen, page 87: att ta bort/byta ut hakremsskydd.
- Page 88 Dutch Schuif het kinbandhoesje van het kinbandje (4). Let op de rechter en linker, binnen- en buitenkant van de kinbandhoesje voor vervanging (5). Linker kinbandhoesje (D-ringzijde) Rechter kinbandhoesje (lange zijde) Vänster hakremsskydd (D-ringssida) Höger hakremsskydd (långsida) Vasen leukahihnan suojus (D-renkaan puoli) Oikea leukahihnan suojus (pidempi puoli) Als u de hoesjes wilt wassen, doet u deze in lauw water met een klein beetje zeep of uw eigen shampoo en wast u ze voorzichtig met de hand.
- Page 89 Swedish Finnish Skjut av hakremsskyddet från hakremmen (4). Liu’uta leukahihnan suoja pois paikoiltaan (4). Notera höger och vänster, insidan och utsidan av hakremsskydden för Huomioi vasen ja oikea sekä sisä- ja ulkopuoli leukahihnan suojassa utbyte (5). vaihdon yhteydessä (5). Jos haluat pestä leukahihnan suojat, laita ne kädenlämpöiseen veteen, För att tvätta hakremsskydden, lägg dem i ljummet vatten med en liten jossa on pieni määrä...
- Page 90 Dutch Maak een hoek van ongeveer 45 graden tussen het gele plastic kinbanklipje en het stalen kinbandoog (6). Stalen kinbandoog Hakremsfäste i stål Geel plastic kinbandklipje Teräksinen leukahihnan ankkuri Gul hakremsfäste av plast Keltainen, muovinen leukahihnan ankkuri Duw de twee haakjes tabs op het gele plastic kinbandklipje in de twee gaten in het stalen kinbandoog (7).
- Page 91 Swedish Finnish Vinkla det gula hakremsfästet av plast i ca 45 graders vinkel mot Käännä keltainen, muovinen leukahihnan ankkuri noin 45 asteen kulmaan hakremsfästet i stål (6). teräksiseen ankkuriin nähden (6). Tryck in de två flikarna på det gula hakremsfästet av plast i de två hålen i Työnnä...
Page 92: Nekrol Verwijderen/Vervangen
Page 93: att ta bort/byta ut halskrage.
- Page 94 Polish SPIS TREŚCI OTWIERANIE/ZAMYKANIE SZYBY ..............94 ZDEJMOWANIE/MOCOWANIE DEFLEKTORA NOSA ..........96 REGULACJA KĄTA NACHYLENIA DASZKA............96 UŻYTKOWANIE SYSTEMU WENTYLACJI UST............98 UŻYTKOWANIE GÓRNYCH ELEMENTÓW WENTYLACJI ........98 UŻYTKOWANIE SPOILERA PRZEPŁYWU POWIETRZA ........100 ZDEJMOWANIE/MOCOWANIE DASZKA/SZYBY ..........100 ZDEJMOWANIE/MONTOWANIE MOCOWANIA SZYBY ........106 ZDEJMOWANIE/MOCOWANIE PODUSZEK POLICZKOWYCH .......106 ZDEJMOWANIE/MOCOWANIE WYŚCIÓŁKI ............112 ZDEJMOWANIE/MOCOWANIE OSŁON PASKA PODBRÓDKOWEGO .....114 ZDEJMOWANIE/MOCOWANIE KOŁNIERZA ............120 OSTRZEŻENIE: Daszek dostarczony w zestawie z kaskiem nie jest przeznaczony do...
- Page 95 Greek Turkish İÇİNDEKİLER ΠΕΡΙΕΧΟΜΕΝΑ VİZÖRÜ AÇMAK/KAPATMAK İÇİN ΓΙΑ ΑΝΟΙΓΜΑ/ΚΛΕΙΣΙΜΟ ΑΣΠΙΔΑΣ ..............95 ..............95 NEFES DEFLEKTÖRÜNÜ ÇIKARMAK/DEĞİŞTİRMEK İÇİN ΓΙΑ ΑΦΑΙΡΕΣΗ/ΑΝΤΙΚΑΤΑΣΤΑΣΗ ΕΚΤΡΟΠΗΣ ΑΝΑΠΝΟΗΣ ........97 .......97 TEPE AÇISINI AYARLAMAK İÇİN ΓΙΑ ΠΡΟΣΑΡΜΟΓΗ ΓΩΝΙΑΣ ΓΕΙΣΟΥ ..............97 ..............97 ΓΙΑ ΛΕΙΤΟΥΡΓΙΑ ΤΟΥ ΑΕΡΑΓΩΓΟΥ ΣΤΟΜΑΤΟΣ MOUTHVENT’İ ÇALIŞTIRMAK İÇİN ..........99 ...............99 ÜST HAVALANDIRMALARI ÇALIŞTIRMAK İÇİN...
Page 96: Otwieranie/Zamykanie Szyby
Page 97: για ανοιγμα/κλεισιμο ασπιδασ, page 98: zdejmowanie/mocowanie deflektora nosa, page 99: για αφαιρεση/αντικατασταση εκτροπησ αναπνοησ, page 100: użytkowanie systemu wentylacji ust, page 101: για λειτουργια του αεραγωγου στοματοσ, page 102: użytkowanie spoilera przepływu powietrza, page 103: για λειτουργια του σποιλερ ροησ αερα.
- Page 104 Polish Po zdjęciu daszka i bocznych elementów mocowania szyby podnieś szybę całkowicie (1) i zdejmij ją z mocowań (2). W celu zamontowania szyby ustaw ją na płytce mocującej tak, aby dolna część szczeliny przesuwnej znalazła się nad uchwytami w punkcie górnej śruby płytki mocującej, a mosiężny kołek szyby był...
- Page 105 Greek Turkish Αφού το γείσο και τα πλευρικά καλύμματα έχουν αφαιρεθεί, σηκώστε πλήρως τη ζελατίνα Tepe ve yan bölmeler çıkarılmışken, siperi tamamen kaldırın (1) ve siperi vizör mekanizmasından (1) και αφαιρέστε τη ζελατίνα από τις πλάκες βάσης (2). çıkarın (2). Για...
- Page 106 Polish Podnieś i opuść szybę, aby sprawdzić, czy działa właściwie (7). Aby wymienić daszek umieść go nad bocznym elementem mocowania szyby tak, aby dwa otwory znajdowały się w miejscu otworów na bocznym elemencie mocowania szyby. (8). Załóż płytkę dociskową, wprowadzając znajdujący się na jej tyle wypust ustalający (9) w odpowiedni otwór w tylnej części elementu mocowania szyby, upewniając się, że przedni otwór na śrubę...
- Page 107 Greek Turkish Σηκώστε και χαμηλώστε τη ζελατίνα για να επιβεβαιώσετε τη σωστή λειτουργία της (7). Vizörü yukarı ve aşağı hareket ettirerek düzgün çalıştığından emin olun (7). Για να αντικαταστήσετε το γείσο, τοποθετήστε το γείσο πάνω από το πλαϊνό κάλυμμα, έτσι Tepeyi değiştirmek için, iki delikle yan bölmedeki delikler aynı...
Page 108: Zdejmowanie/Montowanie Mocowania Szyby
Page 109: για αφαιρεση/αντικατασταση των πλακων βασησ.
- Page 110 Polish OSTRZEŻENIE: W trakcie jazdy wystający pasek zwalniania może zaplątać się w ubranie lub inne przedmioty. Nigdy nie należy pozwalać na to, aby z poduszke policzkowych wystawało na zewnątrz coś więcej niż tylko zasuwka pasek zwalniania. Przed każdym użyciem kasku należy upewnić się, czy pasek zwalniania znajduje się we właściwej pozycji.
- Page 111 Greek Turkish ΠΡΟΕΙΔΟΠΟΙΗΣΗ: UYARI: Ένα εκτεθειμένο λουράκι απελευθέρωσης μπορεί να πιαστεί στα ρούχα σας ή σε άλλα Açıkta kalan bir serbest bırakma tırnağı kayışı, sürüş sırasında giysilerinize veya diğer αντικείμενα ενώ οδηγείτε. nesnelere takılabilir. Μην αφήνετε ποτέ να εκτίθεται περισσότερο από τη γλωττίδα του λουριού απελευθέρωσης Serbest bırakma tırnağı...
- Page 112 Polish Tekstylne osłony należy delikatnie prać ręcznie w letniej wodzie z niewielką ilością proszku do prania lub własnego szamponu. Następnie dobrze je wypłukać czystą wodą i wytrzeć miękką ściereczką. Suszyć w cieniu w temperaturze otoczenia. OSTRZEŻENIE: W żadnym wypadku nie należy używać benzyny, rozcieńczalnika, benzenu ani innych rozpuszczalników.
- Page 113 Greek Turkish Για να πλύνετε τα υφασμάτινα καλύμματα, βάλτε τα σε χλιαρό νερό με μικρή ποσότητα απορρυπαντικού Kumaş kılıfları yıkamak için, az miktarda çamaşır sabunu veya kendi şampuanınızla ılık suya batırın πλυντηρίου ή του δικού σας σαμπουάν και πλύνετε απαλά στο χέρι. Ξεπλύνετε καλά με καθαρό νερό και ve elde nazikçe yıkayın.
Page 114: Zdejmowanie/Mocowanie Wyściółki
Page 115: για αφαιρεση/αντικατασταση επενδυσησ ανεσησ, page 116: zdejmowanie/mocowanie osłon paska podbródkowego, page 117: για αφαιρεση/αντικατασταση καλυμματων λουριου συγκρατησησ.
- Page 118 Polish Zsuń osłonę z paska podbródkowego (4). Zwróć uwagę na to, która osłona paska podbródkowego jest prawa, która lewa, która wewnętrzna i która zewnętrzna, aby je później odpowiednio założyć (5). Lewa osłona paska policzkowego (strona pierścienia-D) Prawa osłona paska podbródkowego (długa strona) Κάλυμμα...
- Page 119 Greek Turkish Σύρετε για να αφαιρέσετε το κάλυμμα του λουριού συγκράτησης από το λουρί συγκράτησης (4). Çene kayışı kılıfını çene kayışından kaydırarak çıkarın (4). Σημειώστε το δεξί και αριστερό, εσωτερικό και εξωτερικού των καλυμμάτων του λουριού Değiştirmek için çene kayışı kılıflarının sağına ve soluna, içine ve dışına dikkat edin (5). συγκράτησης...
- Page 120 Polish Ustaw żółtą, plastikową kotwę paska podbródkowego pod kątem około 45 stopni względem stalowej kotwy paska podbródkowego (6). Stalowa kotwa paska podbródkowego Χαλύβδινη αγκίστρωση λουριού συγκράτησης. Żółta kotwa paska podbródkowego z tworzywa sztucznego Çelik çene kayışı sabitleyicisi Κίτρινη πλαστική αγκίστρωση λουριού συγκράτησης. Sarı...
- Page 121 Greek Turkish Βάλτε υπό γωνία περίπου 45 μοιρών την κίτρινη πλαστική αγκίστρωση του λουριού Sarı plastik çene kayışı sabitleyicisini çelik çene kayışı sabitleyicisine (6) yaklaşık 45 derece συγκράτησης ως προς τη χαλύβδινη αγκίστρωση του λουριού συγκράτησης (6). açıyla yerleştirin. Σπρώξτε τις δύο γλωττίδες στην κίτρινη πλαστική αγκίστρωση του λουριού συγκράτησης Sarı...
Page 122: Zdejmowanie/Mocowanie Kołnierza
Page 123: για την αφαιρεση/αντικατασταση του ρολου αυχενα.
- Page 124 ARAI HELMET, LIMITED 12 Azuma-cho, 2-chome Omiya, Saitama Japan 330-0841 ARAI HELMET (AMERICAS), INC. P.O. BOX 787 Fogelsville, PA 18051-0787 U.S.A. [email protected] ARAI HELMET (EUROPE), B.V. Zuiderinslag 10 3871MR Hoevelaken THE NETHERLANDS [email protected] Printed in Japan 2023_12 TOUR-X5 FUKUYAMA PRINTING CO.,LTD.
Rename the bookmark
Delete bookmark, delete from my manuals, upload manual.
[wpseo_breadcrumb]
Arai Tour-X4 vs. Arai XD-4 (Which Is Better?)
Today we take a look at the difference and a comparison between the Arai Tour X4 vs Arai XD 4 motorcycle helmets.
If you don’t have enough time to read through the whole thing, we’ve featured the winner here and a quick summary of what makes it a better helmet over the other one from Arai.
Arai Tour-X4 vs. Arai XD-4
We believe that the Arai XD-4 is clearly the superior choice between the two. It’s cheaper as well as lighter, making it more comfortable for your shoulders as well as your pockets!
Wait…
If you don’t feel these two helmets match your needs, check out these best-selling motorcycle helmets on Amazon! They’re selling like hotcakes! 🍰 Have a look at least, maybe you’ll like what you see. 😉
 5")
- Boasting a compact, aerodynamic DOT shell design with sharp and aggressive styling for impeccable impact protection to excel whether short-distance street performance or long-distance touring comfort.
- Multiple conscientiously designed ventilation panels effective in streamlining the cooling process to assist with freshening the rider's experience. Large lower vent shutters for ease of use with riding gloves.
- Trendsetting springs for precise functionality ensuring a superior wind and water sealant layer. Unique 3D molded shield designed to ensure a distortion-free view throughout the entire field of vision.
- Removable Breath Guard rerouting the rider’s breath to reduce shield fogging. Inserted Chin Curtain designed to reduce wind turbulence and noise. Quick-Release Chin Strap for effortless usage.
- Fully removable, washable, and replaceable microfiber inner material that absorbs sweat without compromising comfort or security. Plus the GLX One-Year Limited Manufacturer.
 6")
- Communications port no longer built in to helmet. Picture incorrect
- Lightweight polycarbonate/ABS shell construction with removable interior, padded wind collar drastically reduces wind and road noise
- Velocity Flow Ventilation system with FlowAdjust
- This colorway comes with 2 shields, the clear (on the helmet) and dark smoke is included in the box.
- DOT approved. Meets the FMVSS 218 Standard
 7")
- Helmet shown with optional tinted shield. (Ships with clear shield only)
- Lightweight construction with a strong, durable outer shell to provide maximum protection
- NutraFog II shield which is a ClickRelease shield for fast, easy and tool-free shield replacement
- Velocity Flow Ventilation system designed to provide optimal airflow for comfortable wear
 8")
- 2 Visors Included: Clear + Smoked and 1 Neck Scarf for Winter Use
- Streamlined Aerodynamic Design Reduces Wind Noise and Drag
- Advanced and Lightweight Durable ABS Shell
- Quick Release Clasp and Strap and Removable Inner Lining Pads
- Meets or Exceeds FMVSS-218 and DOT Safety Standards
 9")
- Bluetooth technology 3.0 version, 8 hours of talk time and 110 hours of standby. Fully washable microfiber lining and adjustable vents. This Helmet Runs 1 Size Smaller Due to Built-in Bluetooth Module. The size of this helmet: S:55-56,M:57-58CM,L:59-60CM,XL:61-62CM,XXL:63-64CM.
- One Touch Control for Calling, Answering, Rejecting Incoming Calls and Redialing. Incoming Phone Call Overrides Intercom, Music, FM Radio and GPS Navigation Audio.
- Supports a Maximum distance of 1680 Feet Between Two Riders While Using the Intercom Function. Two High Quality Built-in Speakers with Full Stereo Sound to Enjoy Communication or Music.
- Meets or Exceeds FMVSS-218 and DOT Safety Standards. DSP Echo Cancellation and Noise Suppression Technology Delivers High-quality Voice at High Speeds.
- Note: When the Bluetooth System has not been used for a long time, the battery will enter into deep sleep mode and Bluetooth device may not available. Charge the battery for about half an hour to wake it up. The Bluetooth function will be restored after charging. If there is any missing small parts of the item received, welcome to contact ILM customer service for help.
Arai Tour X4 – A Brief Overview
Comes with an easy-to-remove visor.
It is true that the Arai Tour-X4 can be worn without the peak (and without the visor), but most purchasers will choose it because of its extremely high level of sun protection.
Therefore, it is paramount that you comprehend that noise increases and your neck become stronger; peaks aren’t a universal solution for everyone.
It makes biking more safe at night, and it is especially useful for evening rides.
Its venting is less powerful than the Shoei Hornet ADV, and it cannot be used without a peak and visor. But is it better than the Shoei Hornet ADV? It depends on what you want out of a lid.
On the other hand, the visor is a lot easier to remove and replace even with the peak on, so it is a much lighter lid.
It will be a matter of choosing between the more road-focused Shoei or the more off-road-trained Arai to hear the same drumming sound.
A great helmet with excellent venting, the Tour-X 4 is perfect for riders who know the ramifications of riding with a peak.
Arai XD-4 – A Brief Overview
“Just look at that bad boy. Its like I stole it from Master Chief when he wasn’t looking.”
On the XD4, the driver is extremely satisfied with the wide unobstructed field of view provided by the clear and wide face shield, especially outside near the peripherals.
There are not many helmets on the market that offer this level of ventilation.
Arai uses venting in its face shields rather than anti-fogging chemicals to help keep the mask from fogging up.
The mouth guard comes with a standard air intake port on the front of the mouthguard, but in addition, there are two toggles for increased ventilation on the inside of the chin.
A rocker switch is used to control the two top vents.
It can be shut or left half-open, and you can close or open the two exhaust ports located at the lower front of the lid and above the ears.
A retractable chin deflector is included on the helmet, and I realized that it works quite well when it is deployed.
Shell sizes range from XS-XXL internally on the shell while the chin strap is a generic D-ring with no padding.
New comfort headliner styles are available, and they also feature peel away temple pads and proprietary Facial Contour System cheek pads.
A Dry Cool system is present throughout the entire interior to wick away moisture and heat and, in conjunction with the extreme ventilation system, produces a cool, dry interior.
The combination of these features combined make for one of the most comfortable surfaces I’ve ever slept in.
Arai uses a special composite fiber laminate which reduces weight while retaining the rigidity and strength needed in case things go wrong.
There’s a noticeable difference between the noise level of the XD4 and other adventure-style helmets since the XD4 is not as light as a carbon fiber lid.
One feature with this lid is that you can pick any combination of iterations: you can remove the clear face shield and clear visor, or just the clear visor.
A Honda Africa Twin model is the most expensive out of the nineteen paint options available. Five are solid and the rest in graphics.
A nice attention to detail is that the peak visor has matte black inside to reduce glare—not something you would notice right away.
As you might expect given its classic ADVenture-style, the updated version of the Arai helmet received positive reviews.
As a manufacturer, they are known for comfort and safety for serious safety helmets.
It’s pretty expensive, but you pay that for a hand-built product that uses proprietary technologies along with some complex features.
You may also like
- Comparisons
Last updated:
Is Antifreeze And Coolant The Same Thing?
Lt vs ls: what’s the difference.
- Best Motorcycle Glasses
- Best Motorcycle Boots
- Best Motorcycle Helmets
- Best Wireless Earbuds
- Best Sounding Harley Touring Exhaust
© 2022 Let’sGoForARide, All Rights Reserved.
Address: 25293 Telegraph Rd, Southfield, MI 48033, United States Phone: +1 (248) 356-9200 Email: [email protected]
JavaScript seems to be disabled in your browser. You must have JavaScript enabled in your browser to utilize the functionality of this website.
- RX-7V Race FIM
- Freeway Classic
- Full Face Helmets
- Open Face Helmets
- Off Road Helmets
- Sports Touring
- Official IOM TT Collection
- Motorcycle Spares Booklet
- Motorsport Spares Booklet
- Visors & Visor Stickers
- Interior Pads
- Accessories
- Helmet Bags
- Fact Sheets
- Car Approval Specification
Spares & Accessories
Tour-x 4 depart, quick overview.
- Locate Stockist
Be the first to review this product
- Approval: ECE 22-05
- Ventilation: Tour-X4 Ventilation
- Outer Shell Construction: Complex Fibre Laminate (CFL)
- Front Ventilation: Dual intake
- Front Ventilation: Brow vents
- Front Ventilation: Three position chin vent
- Front ventilation: Inner chin (bar) vent shutter
- Rear Ventilation: Neck exhaust vent
- Rear Ventilation: Removable diffuser
- Rear Ventilation: Side exhausts
- Aerodynamics: Pull Down Chin Spoiler
- Visor: Pinlock insert lens
- Interior: Dry-Cool® Liner
- Interior: Replaceable Cheek pads/Ear cups
- Interior: Replaceable Interior
- Interior: Replaceable Chinstrap covers
- Interior: Facial Contour System (FCS)
- Interior: 5mm “Peel Away” Ear cups/Cheek pads
- Interior: 5mm “Peel Away” Temple pad
- Comfort: Emergency Release System (ERS)
- General: Innovative peak
- General: Five times inspected
- General: Washable interior
- General: Handmade
- General: All-day comfort
- General: Penetration tested
- General: Double-D ring device
- General: Smooth shape, better protection
- General: Strong outer shell, soft inner shell
- General: Organic shape
- General: 5-year limited warranty
- General: Different outer shells
- General: Arai In-house test
Additional Information
- Featured Products
- 50 years and counting
- Ambassadors
- Terms and Conditions
- Shipping and Returns
- Privacy Policy
Arai Helmets UK
TO RECEIVE INFORMATION ON THE LATEST LAUNCHES, EVENTS, NEWS UPDATES AND COMPETITION GIVE-AWAYS.

Arai Tour X visors
Fog performance level, suitable pins, product code, learn how to install, adjust & clean your lens.
We offer the following lens colors

Light Smoke

™ ">ProtecTINT ™
This lens fits the following helmets.

Arai Tour-X3

Arai Tour-X4

There is so much more that goes into our lens than meets the eye
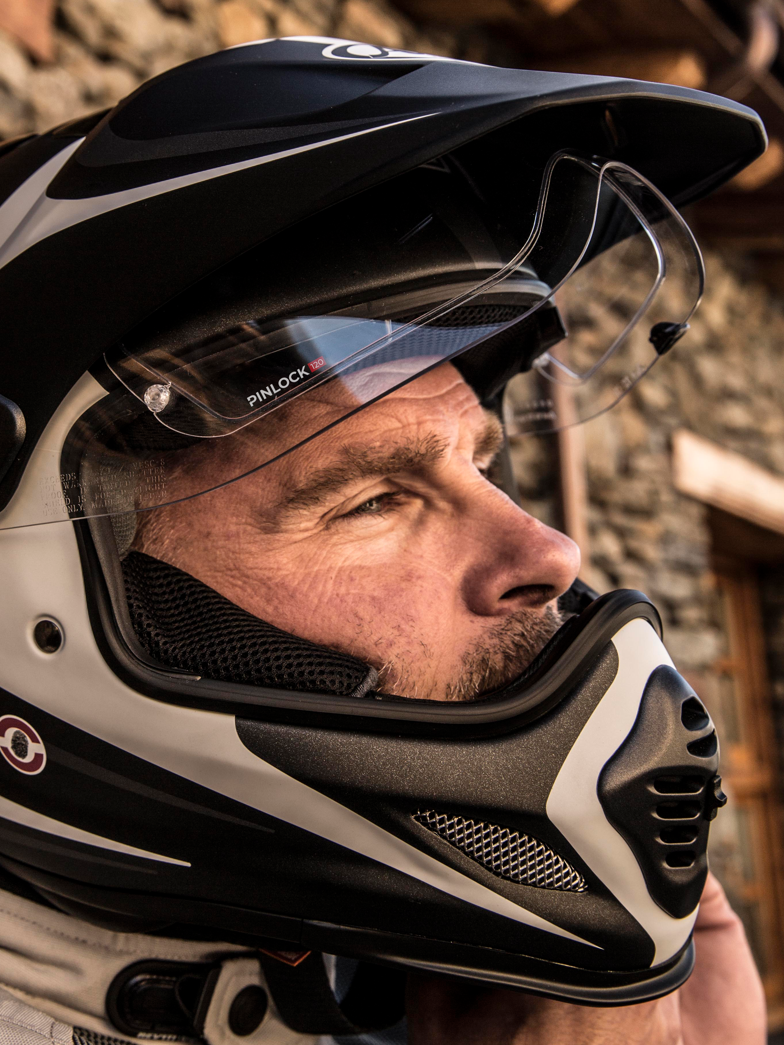
Pinlock 120
From the racetrack to the road. Contains the same material components as used in MotoGP and Formula 1. Proven on the track it will keep you focused in even the toughest conditions.
Anti-fog technology
A Pinlock ® lens is based on two key principles to ensure a fog-free vision. The moisture absorbing surface of the lens effectively attracts and stores water molecules, while the airtight seal creates a thermal barrier together preventing condensation of the visor.
Clear Pinlock ® lens
Our clear lens is compatible with all Pinlock prepared visors in all varieties. Keeping your sight perfectly fog free. In most of the helmets our clear lens is included in the box.

Arai specific pin
Developed by the helmet manufacturer to fit a Pinlock ® lens that is specifically designed for this helmet or visor.
There is more technology inside our lens that meets the eye
COMMENTS
INSTRUCTIONS FOR USE READ THIS BOOKLET BEFORE USE! Search. ... Arai Tour-X4 Instruction Manual. Published on Sep 3, 2019. Arai Helmet (Europe) B.V. Follow this publisher. About.
General Helmet Instructions - All Models: English, Spanish Brochures. 2023 Arai Helmet Line-up Brochure; 2022 Arai Helmet Line-up Brochure; 2021 Arai Helmet Line-up Brochure; 2020 Arai Helmet Line-up Brochure; 2019 Arai Helmet Line-up Brochure; 2018 Arai Helmet Line-up Brochure; 2017 Arai Helmet Line-up Brochure; 2016 Arai Helmet Line-up Brochure
The boxes include a cloth Arai helmet bag, an owner's manual, and a small bottle of lubricant. There is a warning label on the helmet chin strap. Some genuine Arai helmets come with a Max Vision Visor/Max Vision PSS Visor and may also include a Pinlock lens. Only Genuine Arai helmets are covered by the Arai 5-Year Limited Warranty.
Arai conseille fortement de ne pas utiliser ces produits de nettoyage car cela risquerait d'endommager l'écran et autres pièces en plastique. Ne collez pas d'autocollants ni de ruban adhésif sur l'écran car cela endommagerait le revêtement rigide. Un écran teinté ne doit être utilisé qu'en plein jour.
side as per previous instructions. Place the peak, pressure plates and screws, then tighten screws as per previous instructions. To use the helmet with just the shield, place the black spring clips and shield as per previous instructions. Then, place the shield pressure plates, included in package, on the shield (note that the L & R embossed on the
Immediately it's clear the Arai Tour-X 4 is a high-quality lid. It feels bulletproof and sturdy, there's no clunkiness or cheap-sounding creaking as you get to grips with the components, visor and peak. A quick play with the various vents (more on them later) also gives the reassuring impression of premium quality.
Tested by Michael Guy for five years, 8400 miles. Quality 5/5, Value 4/5. The Tour-X 4 has certainly been my go-to helmet for a significant chunk of riding I've completed over the last five ...
The Arai Tour X-4 's shell is made of Arai's Complex Fibre Laminate construction, which is Arai's own in house shell material that gives the helmet strength and impact flexibility. This also gives you a fairly light weight helmet since when we weighed the Arai Tour Ex-4, we got a weight of 1620 grams in a size M with all the extras.
The Arai peak scavenges and forces air into the forehead vent ports for cooling. Maximum protection against sun glare for better vision. 5mm "Peel Away" Giving even more ability to craft the perfect fit and comfort, the cheek pads and the temple crown pads now feature a 5 mm peel away layer for added room if needed. TOUR-X 4 Frost Black
4.9 (257) Review Conditions. Motorcycle: Kawasaki KLX250. Seasons Ridden: All year. Arai's Tour X4 is the latest version of the incredibly popular adventure helmet, with a redesigned shell shape and added ventilation over the previous Tour X3. The most immediately obvious changes on the Arai Tour X4 are a whole array of front and rear vents ...
Weight. Having a stronger shell does mean Arai's tend to be a little heavier than many other lids. For example, the Tour X4 in a medium-size weighs 1683 grams/3.7 lbs on our scales. But, of course, that's with the peak and the visor fitted. It's not light, but neither is it the heaviest adventure lid, and at least Arai has a solid reason ...
Home | Arai
You can find the Arai Tour X4 in our webshop at:https://www.championhelmets.com/en/helmets/arai/tour-x4/You can read more about the Review in our blogpost on...
Arai Tour-X4 Price & Availability. The Arai Tour-X4 is priced at an RRP of £599, though you tend to regularly find deals online that place it from £400 - £500. It's certainly a pricey option, but for those looking at the premium brands for protecting your noggin, it's money spent in the best place. Available in a huge array of colours ...
Short video showing how to take your Arai Tour X4 motorcycle helmet apart for cleaning.
This post provides instructions on how to mount a GoPro or other action camera on a Arai XD-4 / Tour-X4 motorcycle helmet using the RideTechMoto GoPro chin mount/camera mount. The mount is specifically designed for the Arai XD-4 / Tour-X4 helmet and attaches easily to the chin area for a secure and stable platform. The mount is also adjustable for finding the perfect angle for shots. The post ...
Page 4: To Adjust Peak Angle. Put the helmet on and adjust the peak to the desired position. Tighten the screws and take helmet off. Tighten all screws firmly but do not over-tighten. TO OPERATE MOUTHVENT TX-4 / XD4 CLOSE Simply push the switches/levers on each vent to open/close the vents.
Page 124 ARAI HELMET, LIMITED 12 Azuma-cho, 2-chome Omiya, Saitama Japan 330-0841 ARAI HELMET (AMERICAS), INC. P.O. BOX 787 Fogelsville, PA 18051-0787 U.S.A. [email protected] ARAI HELMET (EUROPE), B.V. Zuiderinslag 10 3871MR Hoevelaken THE NETHERLANDS [email protected] Printed in Japan 2023_12 TOUR-X5 FUKUYAMA PRINTING CO.,LTD.
Arai XD-4. We believe that the Arai XD-4 is clearly the superior choice between the two. It's cheaper as well as lighter, making it more comfortable for your shoulders as well as your pockets! Wait…. If you don't feel these two helmets match your needs, check out these best-selling motorcycle helmets on Amazon!
FOR THE ARAI XD31TOUR.X3 ARAI HELMET CAUTION:The peak supplied with your XD3/TOUR-X3 helmet is not suitable for high-speed use. At such speeds air catching a side or main surface of the peak may cause difficulty in re- turning the head to a forward and/or level position. You should experience this effect starting at low speeds and gradually in-
Tour-X 4 Depart. £599.99. The Tour-X 4 must be one of the most versatile helmets ever: adventure, grand touring riding or getting off road, and without the peak looks pretty good on a naked bike too! No matter the riding conditions, the Tour-X 4 is ready for it. This versatile motorcycle helmet can be used without visor with goggles, without ...
Anti-fog technology. A Pinlock ® lens is based on two key principles to ensure a fog-free vision. The moisture absorbing surface of the lens effectively attracts and stores water molecules, while the airtight seal creates a thermal barrier together preventing condensation of the visor.