How-To Geek
How to use your own images with midjourney.
A Picture Is Worth 1000 Prompt Words

Key Takeaways
- Upload your image to the Discord server.
- Copy the link to the image you've uploaded.
- Write a normal MidJourney prompt but insert your image link after the "/imagine" command.
- To further influence the style and composition of the generated art, set the image weight and aspect ratio parameters.
We've marveled as MidJourney just keeps improving, but it's still hard to have precise control of what you get after your prompt is submitted. By starting off with an existing image, you can steer what sort of art you get.
In this guide, I assume you already know the basics of how to use MidJourney. If you don't, it's a good idea to read our MidJourney primer first.
Sending Your Image to The MidJourney Discord Bot
Assuming that you have an existing image that's close to what you want (e.g. a person in the right pose) you first need to send that image to the MidJourney Discord Bot.
Don't submit any sensitive or private images into the Discord chat with the MidJourney Discord bot. If you're using the cheapest tier of the MidJourney service which does not have "stealth" mode, your output images are public, and there's no guarantee that your source image won't ever end up where it shouldn't. Only ever send images in any chat app that you're 100% comfortable showing to anyone.
Using the Discord desktop app , simply upload your image using the "+" upload button, or drag and drop the image into the chat.
Getting the Image Link
Now that you've uploaded your image to the Discord servers and its visible in your chat, we need to extract the link pointing directly at the image file. To do this, right-click on the image and select "Copy link". (If you're on the mobile app, tap and hold the image, then select "Copy media link.") Be careful not to click "Copy image" since this copies the image itself to the clipboard rather than the hyperlink.
If you paste the contents of the clipboard into your chat box or any other text field, you'll see this long string ending in an image extension, in this case . JPG .
Constructing Your Prompt
Start your prompt the usual way by typing "/imagine" and then pressing the spacebar.
Now, paste the image link as the very first part of the prompt.
Now you can write the actual prompt. While you can write anything you like, the idea here is to write something that makes sense based on the image you uploaded. MidJourney will start with your image as the initial point rather than random noise, so in most cases you should get something that resembled the composition of your image.
In this case, I snapped a photo of one of my Star Trek models, and so for this prompt we'll go with "Starship Enterprise Star Trek flying in space epic concept art".
Don't submit the prompt yet, because we have to include two more important parameters.
Setting the Image Weight and Aspect Ratio
The image weight parameter tells MidJourney how closely it should stick to the original picture. The image weight parameter for MidJourney V5 (5.2 is the latest as of this writing) can range from 0-2. With an image weight of 2, the result will be strongly inspired by the image prompt, but something like 0.5 will only loosely inspire it.
Here we're going to add the parameter "--iw 2" at the end of our prompt.
Next, we'll specify the aspect ratio. MidJourney makes square images by default, but that's not always what you need. Our image prompt is square as well, but we're going to widen it to 16:9, which is the most common widescreen aspect ratio . To do this, we add "--ar 16:9" to the end of the prompt.
Now, finally, we're ready to submit.
This hasn't turned out very well at all! This is because the image weight setting is too high. So let's run the same prompt again, but this time at 1.5.
Much better! Let's try again at 0.5.
And now we have a pretty cool result!
Using image prompts isn't an exact science, and it's not like other generative AI techniques such as inpainting, but it does give you significantly more control over where MidJourney starts its process, making more creative choices possible.
If you want to do more with Midjourney, check out our guide to Midjourney models , or how to make awesome wallpapers with MidJourney .
- Industry wise
- Region wise
- Performance Marketing
- Social Media Marketing
- Search Engine Optimization
- Marketplace Management
- Influencer Marketing
- Website Development
- Video production
- Case Studies
- Careers We're Hiring
How to Edit an Existing Photo on Midjourney and Transform Them
While Midjourney AI is being lauded for its image-generation capabilities, little is known about its image-editing skills. Yes, you can edit away its own inaccuracies and misalignments as well as transform your existing images.
This article will show you how to edit an existing photo on Midjourney AI. It offers several tools, from minor light adjustments to advanced tools like changing a specific area. It’s time to unleash your creativity and unlock Midjourney’s full potential.
Let’s explore how Midjourney can transform your images into stunning art.
Table of Contents
Six steps to upload and edit your image with Midjourney AI
1. add the image to midjourney discord.
You can edit an existing image on Midjourney in the same way you can generate a new image. Join the Midjourney Discord server , then enter one of the “newbies” channels to interact with the Midjourney bot.
Once you’re logged in, upload your image to the open chat box. If you can’t add the image to the chat, upload your photo to image-hosting sites like Imgur, Postimage or Kek.gg.
If this is your first time on Midjourney , check this quick Midjourney AI guide .
2. Get the URL of your source image
Once the image is added to Discord chat, you need the image link for the Midjourney bot to use. To get that, right-click the image and choose the Copy image link option. You can also select the Open image in the new tab option, and copy the link from the newly opened tab.
If your image is on a third-party site like Imgur, get the source image URL from that site.
3. Add prompts to generate a new image
Now, it’s time to edit your photo. Type the command /imagine in the message box, paste the image link, and give your editing prompt. Midjourney generates a new image based on your existing photo and the added prompt.
Midjourney doesn’t offer direct photo editing. It can only generate new edited photos based on the prompts you provide.
Need effective Midjourney prompts? Check out Promptrr marketplace
4. Enter Remix mode for better effects
Midjourney allows you to make variations of a generated image easily. To make the variations more specific, turn on the Remix mode. It lets you add a new prompt specifically for variations. In the Remix mode, you can alter the lighting of an image, change the subject, and make other tricky modifications.
To activate the Remix mode, use the command /prefer remix or select Remix Mode from the /settings command menu. However, remember that the Remix mode works only for an image generated by Midjourney AI, not your existing photo directly.
5. Use Vary (Region) to edit specific areas
To make changes to specific areas of an image, you should use Midjourney’s Vary (Region) option. The button appears after a Midjourney AI image has been upscaled.
In the editor, highlight your area, give your editing prompt, and let Midjourney AI take care of the change. You get the option of freehand or rectangular selection to choose the image area you want to regenerate.
6. Review the changes and download
Play around with the available options and prompt parameters, and Midjourney will generate an image (or several) edited to meet your needs. Review each generation and tweak them accordingly. Once you’re satisfied, download and save them for later use.
FAQs about modifying Midjourney images
1. can i use my own photo in midjourney.
Yes, you can add your own photo in Midjourney and change it entirely. Midjourney allows you to upload your photo or use an image saved online for editing. With advanced editing tools like Remix and Vary (Region), you can be pretty specific with your edits.
2. Can Midjourney upscale an existing image?
Midjourney can upscale an existing image, but not directly. First, you need to upload the photo in the Midjourney Discord chat to generate a new image. Then, you can upscale your preferred generated image.
3. How do you add a background to a picture in Midjourney?
You can add a background in Midjourney using the Vary (Region) tool. Here are the steps you should follow:
- Upload the picture to Midjourney’s Discord channel
- Generate a new image using the picture with /imagine command
- Turn on Remix mode with /prefer remix command
- Upscale your preferred Midjourney-generated image
- Choose the Vary (Region) option
- Select the background area of the image
- Enter your prompt to change the background
Start using Midjourney like a pro
As you have seen, Midjourney offers a few ways to make changes and generate new images using a photo. Its Remix mode and Vary (Region) option can be an asset to your tech stack.
Whether you want to add, change or remove objects, Midjourney AI allows you to do so. You can edit an existing photo on Midjourney and change its entire appearance. Make sure to squeeze out its creative powers. It’s time to sprinkle your prompt magic.
Updates Branding Marketing
Previous 7 Working Ways to Monetize Your GPTs in ChatGPT
Latest blog posts.

7 Working Ways to Monetize Your GPTs in ChatGPT

Amazon Product Photography Rates and Negotiation Tips

Is the Amazon Vine Program Available in India?

7 Free Vimeo Alternatives to Maximize the Video Impact for Businesses
Comments are disabled.
Refer a Friend
Your Contact Number*
Referral's Name*
Referral's Contact Number*
Referral's Email
How do you know this person?
Your Email*
Position You're Applying For* —Please choose an option— Content Writer SEO Social Media Performance Marketing Design Marketplace
Relevant Experience —Please choose an option— 0-1 Year 1-2 Years 2-3 Years 3-5 Years 5+ Years
Current Employment Status —Please choose an option— Employed In Notice Period Not Working
Available Start Date
LinkedIn Profile
How did you hear about this Job?
Additional Info
Resume* (pdf)

10,000+ marketers learnt from our blog in the last 30 days. We post high-value marketing related blogs on a monthly basis. Subscribe to never miss out!
We won’t send you spam. Unsubscribe at any time.
Search results for
Affiliate links on Android Authority may earn us a commission. Learn more.
How to modify or edit images in Midjourney
Published on 24 hours ago
People tend to think of Midjourney as a tool for synthesizing entirely new images, but of course, what the AI is actually doing is creating something based on the human-made content it’s trained on. You can use that principle to modify existing images you have, and even refine those edits, though you won’t have complete control by definition. Here’s how to get started.
Before we kick into gear, we’re going to assume that you’re already subscribed to a Midjourney plan and have a verified Discord account. Midjourney subscriptions start at $10 per month or $96 per year. If you have yet to join, the service has a quick start guide.
With that in place, follow these steps:
- Join the Midjourney Discord server , then head to any #General or #Newbie channel. The Midjourney Bot won’t generate images anywhere else, except on third-party Discord servers that have the bot invited.
- Upload your source photo/image to somewhere that will generate a URL for it. If you don’t want to use a third-party hosting site, you can paste an image into direct messaging with the Midjourney Bot.
- Generate an initial image using your reference photo. You can see more details in our linked guide, but a prompt might look something like /imagine http://thisurldoesntexist/image1.jpg Dante’s Inferno set in Texas . If there are any parameter extensions you’re familiar with, feel free to add them to the end of the prompt. We’d suggest using –ar to force an aspect ratio, and –no if there are objects you want to exclude, say lamps or cacti.
- This initial prompt may be enough, especially since you’ll get buttons to try again, zoom out, or generate variations of one of the output images.
If you want to do more, Midjourney has something called Remix Mode.
- Activate Remix Mode using the /prefer remix command in Discord, or using /settings and clicking Remix Mode . You can turn it off the same way.
- Create an /imagine prompt based on a reference photo, as usual.
- When you get your initial results, click Make Variations for one for the images.
- In the Remix Prompt pop-up, enter new text to modify the existing image. This can be as simple as changing lighting to something as complicated as swapping in new styles or subjects. Midjourney uses the example of “balloon-animal shaped stack of pumpkins” as a remix of “line-art stack of pumpkins.” You’ll probably have to experiment to get desired results.
- You can also use parameters in remixes, but if you switch model versions this way, you need to make sure any other parameters are compatible with that model. In fact, the Remix Prompts themselves only support the Aspect Ratio, No, Stop, Tile, and Video parameters — and you shouldn’t change aspect ratios, since that will stretch an image without extending its canvas or filling in content. Try to get as many of your parameters into the initial image generation as possible.
You might like
Want to Become a Sponsor? Contact Us Now!🎉
How to Modify an Image in Midjourney
Published on 4/22/2024
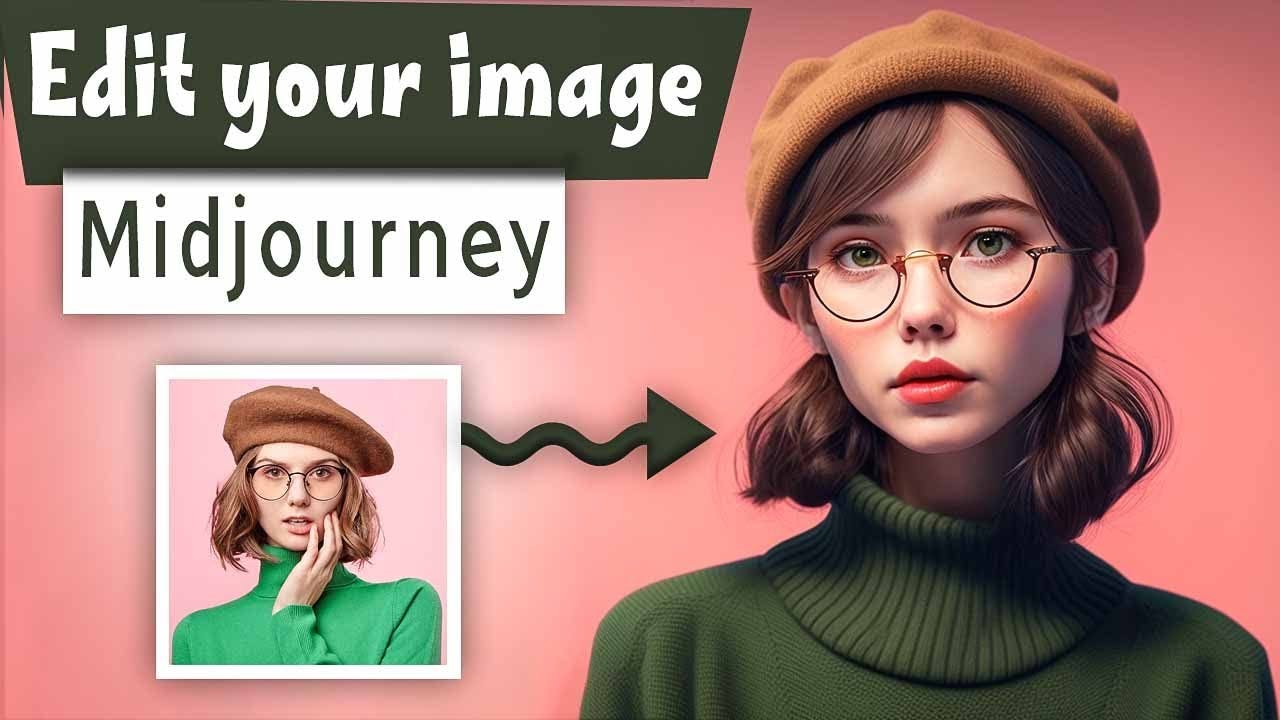
Welcome to the definitive guide on how to modify an image in Midjourney. If you've ever wondered how to take your digital art to the next level using AI, you're in the right place. This article aims to be your comprehensive resource, backed by expert insights and credible sources, to help you master the art of image modification using Midjourney.
Whether you're a seasoned artist looking for new tools or a beginner eager to explore the world of AI art, this guide has something for everyone. We've scoured the internet, consulted with experts, and even dived into YouTube tutorials to bring you the most reliable and up-to-date information. So, let's get started!
Understanding Midjourney for Image Modification
What is midjourney.
Midjourney is an AI-powered tool designed to revolutionize the way we think about image editing. Unlike traditional software that relies on manual input for every little change, Midjourney uses advanced algorithms to understand your creative intent and bring it to life. It's not just an editing tool; it's a creative partner that understands your vision and helps you realize it with unprecedented ease and precision.
Here's a quick rundown of what makes Midjourney stand out:
- AI-Driven : Utilizes machine learning algorithms for intuitive image editing.
- User-Friendly : Easy to use, with a simple interface accessible via Discord.
- Versatile : Offers a range of editing options, from basic color changes to complex object addition.
- Community Support : A large and active community of users and experts to help you out.
Subscription Plans and Prerequisites
Before you can start modifying images in Midjourney, you'll need to choose a subscription plan. Midjourney offers several options to suit different needs and budgets:
- Basic Plan : Free, but with limited features and slower processing times.
- Pro Plan : $9.99/month, includes faster processing and access to advanced features.
- Enterprise Plan : Custom pricing, designed for businesses and large-scale projects.
Once you've chosen a plan, you'll need to verify your Discord account. Midjourney operates primarily through Discord, making it easy for users to upload images and receive modified versions in real-time.
Why Choose Midjourney for Image Modification?
The question isn't why you should choose Midjourney; it's why wouldn't you? With its AI-driven capabilities, Midjourney takes image editing to a whole new level. Forget about spending hours on manual edits; Midjourney understands your creative intent and executes it flawlessly in a fraction of the time.
Here are some reasons why Midjourney is the go-to tool for image modification:
- Speed : Complete complex edits in minutes, not hours.
- Precision : Achieve unparalleled accuracy in your edits, thanks to advanced AI algorithms.
- Flexibility : From basic color changes to adding or removing objects, the possibilities are endless.
So, are you ready to dive into the world of AI-powered image modification? Stay tuned as we delve deeper into the intricacies of Midjourney and guide you through each step of the process. From uploading your images to mastering advanced editing features, we've got you covered.
Uploading Your Images for Modification in Midjourney
How to upload images to midjourney's discord channel.
Uploading images to Midjourney is a breeze, thanks to its seamless integration with Discord. If you're not familiar with Discord, it's a communication platform that allows for text, voice, and video interactions. Midjourney uses Discord as its primary interface, making it incredibly user-friendly and accessible.
Here's a step-by-step guide to uploading your images:
- Open Discord : Launch the Discord app and navigate to the Midjourney channel.
- Select the Upload Option : Look for the upload icon (usually a paperclip) at the bottom of the chat window.
- Choose Your Image : Browse your computer to select the image you want to modify.
- Add a Prompt : Type a brief description or command next to your image to guide the AI. For example, if you want to change the background to a beach setting, you could type "Change background to beach."
- Send : Click the send button, and Midjourney's AI will start processing your image.
It's that simple! Within a few minutes, you'll receive a modified version of your image, precisely as you envisioned it.
Types of Images Suitable for Modification in Midjourney
When it comes to image types, Midjourney is incredibly versatile. Whether you're working with JPEGs, PNGs, or even GIFs, Midjourney can handle it. However, for the best results, consider the following:
- Resolution : Higher resolution images yield better results. Aim for at least 1080x1080 pixels.
- Aspect Ratio : While Midjourney can work with any aspect ratio, a 1:1 or 16:9 ratio is generally recommended for optimal results.
- File Size : Keep in mind that larger files will take longer to process. The Pro Plan offers faster processing times for larger files.
Tips for a Smooth Image Modification Experience in Midjourney
Uploading your image is just the first step; making sure it's optimized for Midjourney is equally crucial. Here are some pro tips to ensure you get the most out of your image modification experience:
- Clarity is Key : Make sure your original image is as clear as possible to get the best results.
- Be Specific with Prompts : The more specific you are with your modification prompts, the better the AI will understand your intent.
- Preview Before Finalizing : Always preview the modified image before finalizing it. Midjourney offers a preview feature that lets you see the changes before you commit to them.
By following these tips, you're setting yourself up for success in your image modification journey with Midjourney. So go ahead, upload that image and let your creativity soar!
Basic Commands for Modifying an Image in Midjourney
Introduction to basic commands in midjourney.
So you've uploaded your image, and you're ready to dive into the world of modification. But where do you start? The answer lies in Midjourney's basic commands. These are simple yet powerful instructions that guide the AI in modifying your image according to your vision.
The Power of Prompts for Image Modification
Prompts are short textual commands that you can use to instruct Midjourney's AI. Think of them as the language that you and the AI use to communicate. For instance, if you want to change the color of a shirt in an image from red to blue, your prompt could be as simple as "Change shirt color to blue."
Here are some commonly used prompts for basic modifications:
- Color Changes : "Change [object] color to [color]"
- Add Objects : "Add [object] to [location]"
- Remove Objects : "Remove [object]"
Sample Codes for Basic Commands in Midjourney
Let's look at some sample codes that you can use as prompts for basic image modifications:
- To change the background color to green: Change background color to green
- To add a hat to a person: Add hat to person
- To remove a tree from the background: Remove tree
Simply type these prompts into the Discord chat window after uploading your image, and Midjourney will take care of the rest.
Why Basic Commands are Essential for Image Modification in Midjourney
You might wonder, why focus on basic commands when Midjourney offers so much more? The answer is simple: mastering the basics is the key to unlocking more advanced features. Once you're comfortable with basic commands, you'll find it easier to explore and utilize Midjourney's more advanced image modification options.
Advanced Techniques for Image Modification in Midjourney
Exploring remix mode for advanced image modification.
Once you've got the hang of basic commands, it's time to level up your skills with Midjourney's Remix Mode. This feature allows you to combine multiple commands into a single prompt, enabling complex and intricate modifications that would be time-consuming or impossible with traditional editing software.
Here's how to activate Remix Mode:
- Type !remix : In the Midjourney Discord channel, type !remix to activate this mode.
- Combine Commands : Now you can combine multiple commands into a single prompt. For example, Change background to beach and add sunglasses to person .
- Send and Wait : After sending your combined commands, Midjourney's AI will process them and send back your modified image.
The Magic of Vary Region in Midjourney
Another advanced feature that sets Midjourney apart is the "Vary Region" option. This allows you to apply modifications to specific areas of an image, giving you more control over the final result.
To use Vary Region:
- Activate Vary Region : Type !varyregion in the Discord chat.
- Specify Area : Use coordinates to specify the area where you want the modification to apply. For example, !varyregion (x1,y1) to (x2,y2) .
- Apply Command : Now apply your desired modification command, like Change color to blue .
By using Vary Region, you can make targeted modifications without affecting the entire image, offering a level of precision that's hard to achieve with other tools.
Mastering Prompts for Image Modification in Midjourney
Crafting effective prompts for precise modifications.
Prompts are the cornerstone of effective image modification in Midjourney. The more precise and descriptive your prompts, the better the AI can interpret your creative vision. For example, instead of saying "Make it better," try something like "Enhance brightness and add a vintage filter."
Here are some tips for crafting effective prompts:
- Be Descriptive : Use adjectives and be as specific as possible.
- Sequence Matters : Order your commands logically, especially when using multiple commands in Remix Mode.
- Test and Tweak : Don't hesitate to experiment with different prompts to see which ones yield the best results.
Pro Tips for Advanced Prompting
For those looking to push the boundaries of what's possible with Midjourney, consider these advanced prompting techniques:
- Conditional Statements : Use "if-then" statements for more complex modifications. For example, "If sky is cloudy, add a rainbow."
- Layering Commands : Use semicolons to separate multiple commands, allowing for layered modifications. For example, "Change background to beach; add sunset; enhance brightness."
Frequently Asked Questions
Can you edit an image in midjourney.
Absolutely, editing an image is one of the core functionalities of Midjourney. The platform uses advanced AI algorithms to understand your creative intent and apply modifications to your images. You can change colors, add or remove objects, and even apply complex edits using features like "Remix Mode" and "Vary Region."
How Do I Use an Existing Image in Midjourney?
Using an existing image in Midjourney is straightforward. All you need to do is upload the image to the Midjourney Discord channel. Once uploaded, you can use various commands and prompts to guide the AI in modifying the image. For example, you can type "Change background to beach" to alter the image background.
How Can We Modify an Image?
Modifying an image in Midjourney involves a series of steps:
- Upload the Image : Use the Discord interface to upload your image to the Midjourney channel.
- Use Commands : Apply basic commands like "Change color" or "Add object" to initiate the modification.
- Activate Advanced Features : For more complex modifications, you can use advanced features like "Remix Mode" or "Vary Region."
- Review and Save : Once the AI has applied the modifications, you'll receive a preview. If you're satisfied, you can save the modified image.
How Do I Edit an AI-Generated Image?
Editing an AI-generated image in Midjourney is similar to editing any other image. Here's how:
- Upload the AI-Generated Image : If the image was generated by Midjourney, it's already in the Discord channel. If not, upload it.
- Apply Commands : Use basic or advanced commands to make the desired modifications. For example, "Enhance brightness" or "Add a vintage filter."
- Use Advanced Features : For intricate edits, activate advanced features like "Remix Mode."
- Review and Save : Once you're happy with the modifications, save the edited AI-generated image.
Conclusion: The Future of Modifying Images in Midjourney
You've made it to the end of this comprehensive guide on how to modify an image in Midjourney, and you're now equipped with the knowledge and skills to take your creative projects to the next level. From basic commands to advanced features like Remix Mode and Vary Region, Midjourney offers a range of tools to cater to both novices and professionals alike.
As AI technology continues to evolve, the possibilities for image modification are virtually limitless. Midjourney is at the forefront of this revolution, continually updating its features to offer users an ever-expanding toolkit for their creative endeavors.
So why wait? Dive in and start your journey of image modification with Midjourney today!
References: Credible Sources for Learning How to Modify an Image in Midjourney
- Android Authority Article (opens in a new tab)
- YouTube Video by altArch (opens in a new tab)
- YouTube Video by Howfinity (opens in a new tab)
- VideoGamer.com Article (opens in a new tab)
Additional Resources: Further Your Skills in Modifying Images with Midjourney
- Midjourney Official Documentation (opens in a new tab)
- Discord Community for Midjourney Users (opens in a new tab)
- Advanced Prompting Techniques Tutorial (opens in a new tab)
- What is ChatGPT?
- How to Use Google Gemini
How to use Midjourney to generate AI images

The era of AI-generated artwork is upon us, and the internet is filled with users trying to create the perfect prompts to lead AIs to create just the right images – or sometimes, just the wrong ones. Sound like fun? One of the more common AI tools is Midjourney, which people use to create dreamlike landscapes and subjects with just a few words.
What You Need
Discord account
If you’d like to experiment with Midjourney, we’ve got good news: It’s free to sign up, and you can start trying out the AI generator in just a few minutes. Here’s everything you need to know about using it for the first time.
How to start using Midjourney
Step 1: Make sure you have a Discord login . Though there is a dedicated site now, it is invite only. For the vast majority of us, Midjourney works entirely on Discord, so you’ll need an account there to use it. Signing up for Discord is also free if you haven’t done it yet.
Step 2: Visit the Midjourney website . Here, choose Join the beta . This will automatically take you to a Discord invite.
- How to delete a Discord server on desktop and mobile
- How to cancel your ChatGPT Plus subscription
- Intel is oddly enthusiastic about AI replacing everyone’s jobs
Step 3: Accept the Discord invite to Midjourney. Choose to Continue to Discord .
Step 4: Your Discord app will automatically open. When it does, select the ship-like Midjourney icon on the left menu.
Step 5: In the Midjourney channels, locate the Newcomer rooms. There will typically be a number of newcomer rooms open, with names like “newbies-108.” You can select any of these to begin.
Step 6: Now you’re ready to begin creating AI art. Before you get started, note that you only have a certain number of prompt options available as part of your free trial. You can create around 25 free images. After that, you’ll have to purchase a full membership to continue. If you would rather not spend any money, it’s a good idea to take some time and think about just what you want to create on Midjourney. If you want, you can type “/help” to get a list of tips to peruse.
Step 7: When ready, type “/imagine” in the Discord chat for your newbies room. This will create a prompt field where you can type the image description. The more precise that you can be with your description, the better the AI will be able to produce good results. Be descriptive, and if there’s a particular style that you are looking for, include it in your description. There are terms of conduct to follow here, but if you keep things clean, you shouldn’t have anything to worry about.
When finished, select Enter to send your prompt.
Step 8: Give Midjourney a minute to generate your images. Typically, the AI will create several different versions based on your description. You now have a number of options to continue.
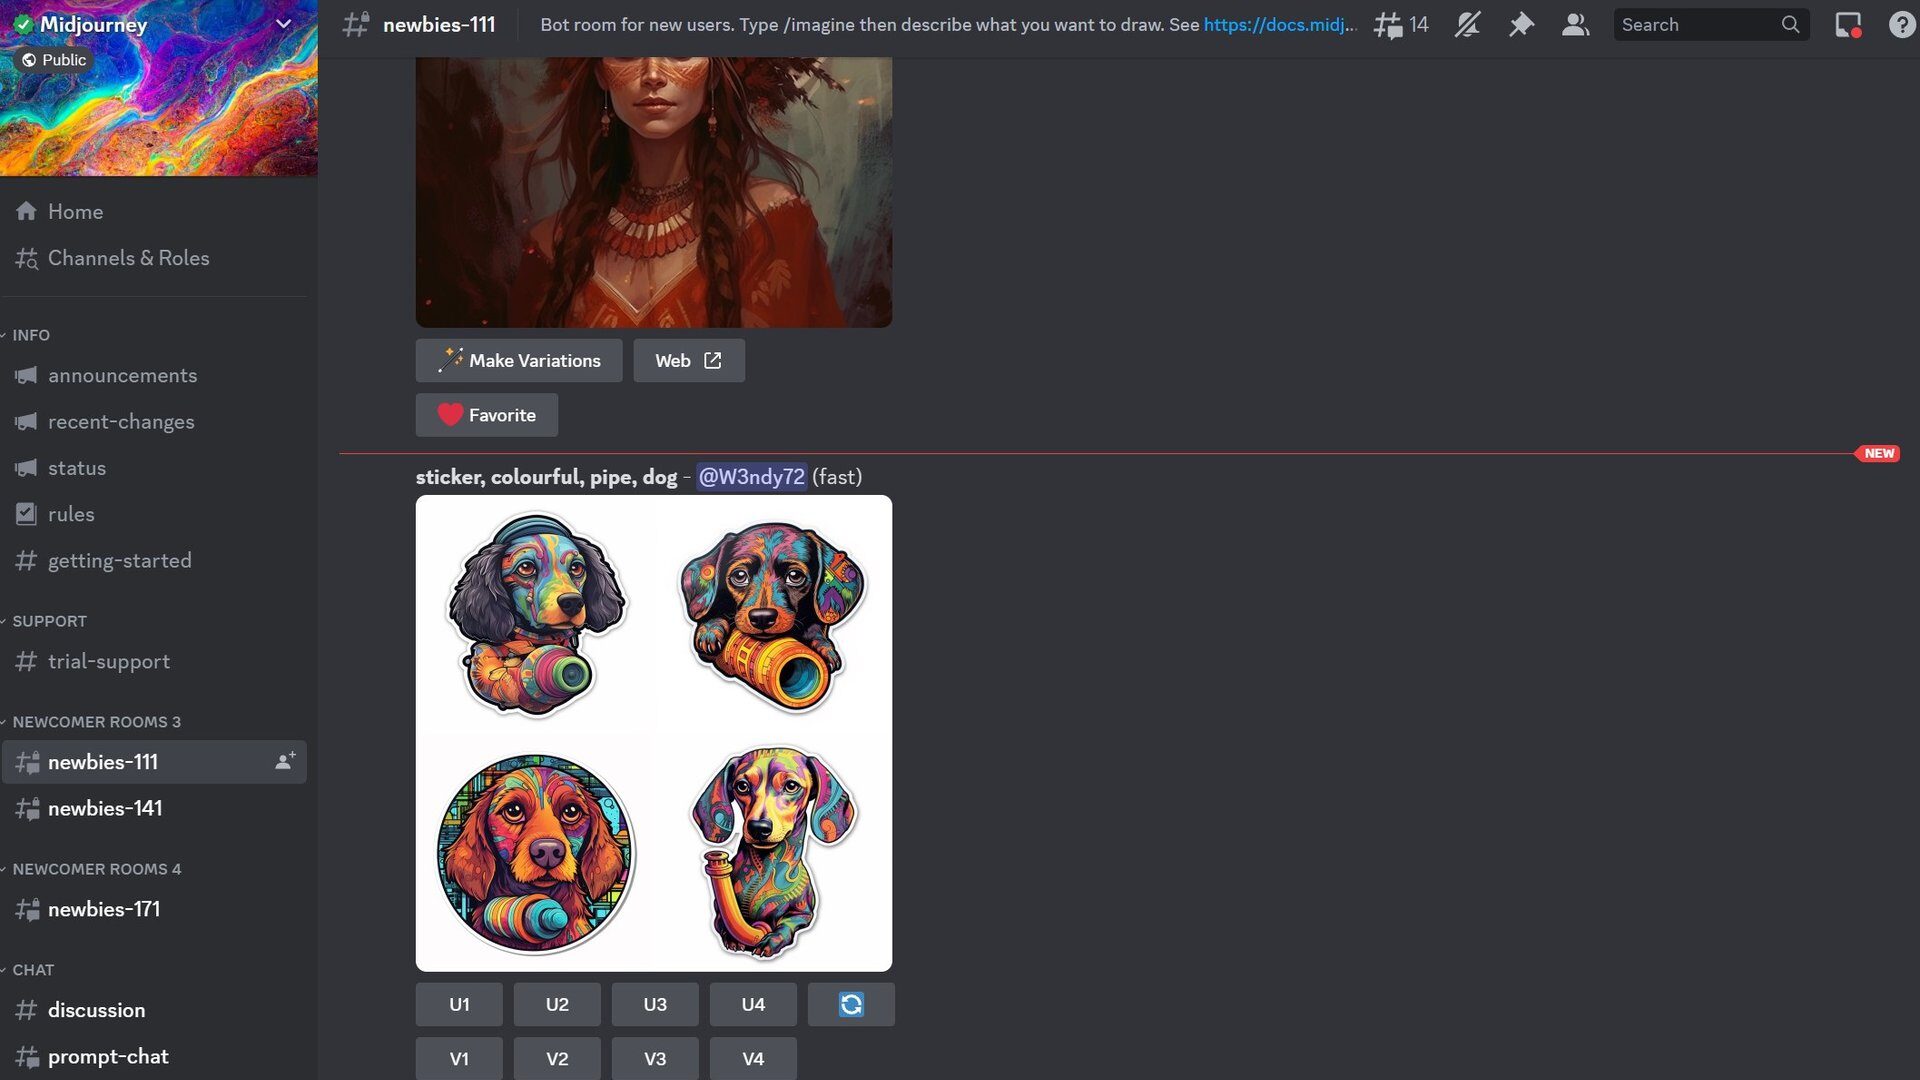
Look below the images, and you’ll see a section of U and V buttons labeled 1 through 4. The numbers correspond to the four images that Midjourney produced. Choosing U will upscale that particular image into a larger, more defined version. Choosing V will create an all-new image based on the present image that you choose. You will also see a refresh button to the side to request a new set of images. Keep in mind that each of these choices will use up some of your available free prompts, so only do it if you are sure you want to proceed.
Step 9: Once you look at a single image, you'll still have some more options about how to alter it: * Vary — Creates four more images that will look somewhat like the selected image. * Zoom Out — Will shrink the image and generate more context-based imagery around it. * Arrows — Will "pan" the image and fill in newly exposed areas with context-based imagery. * Heart Symbol — Will favorite an image, to allow you to find the image easily in your Midjourney Gallery . * Web — Allows you to open the image directly in your Midjourney Gallery.
Step 10: If you plan on using a lot of Midjourney, you can use any bot channel in Midjourney’s Discord and type “/subscribe.” This will create a link that you can follow to pay for a subscription. Those who are really serious about using Midjourney in the long term will also want to take a look at the manual , which will provide you with a greater list of commands and some advice about how to create images.
For more AI image-generating options, check out what Microsoft is doing in the field , too.
Editors' Recommendations
- How to delete or hide chats in Microsoft Teams
- How to delete your ChatGPT account
- How to forget a network on a Mac
- How to leave a Discord server on PC, Mac, and mobile
- How to delete your Discord account
- Artificial Intelligence
- How-To Guides

Fears are already growing over generative AI’s challenge to human talent in the creative industries, and an update from Stability AI on Wednesday will only serve to heighten those concerns.
The London-based startup has just released Stable Audio 2.0, the latest version of its music-generation platform.
ChatGPT, the AI-powered chatbot that went viral at the start of last year and kicked off a wave of interest in generative AI tools, no longer requires an account to use.
Its creator, OpenAI, launched a webpage on Monday that lets you begin a conversation with the chatbot without having to sign up or log in first.
It looks like OpenAI's ChatGPT and Sora, among other projects, are about to get a lot more juice. According to a new report shared by The Information, Microsoft and OpenAI are working on a new data center project, one part of which will be a massive AI supercomputer dubbed "Stargate." Microsoft is said to be footing the bill, and the cost is astronomical as the name of the supercomputer suggests -- the whole project might cost over $100 billion.
Spending over $100 billion on anything is mind-blowing, but when put into perspective, the price truly shows just how big a venture this might be: The Information claims that the new Microsoft and OpenAI joint project might cost a whopping 100 times more than some of the largest data centers currently in operation.
Let's Try Ai
Midjourney Prompts for Existing Images (+ Prompt Examples)
In this guide, I'll show you how you can use Midjourney as a tool for editing existing images.
Written by: Milan K
Published on: June 28, 2023
One of my favorite features in Midjourney is that you can use reference images and add a touch of AI to them. Today, I'm going to talk about how you can use Midjourney as a tool for editing existing images.
I've somewhat covered this topic in my article on Midjourney prompts for self portraits . If you haven't read the article so far, I suggest that you do. But I only covered prompts for portraits in that piece. Now, I'm going to turn it up a notch.
I'll show you how you can use very simple prompts to alter an existing photo.
My brother is a talented photographer, so I decided to use some of his photos from recent trips and see what I could do with them in Midjourney.
How to Edit Existing Photos in Midjourney
You have to be very careful with your prompts if you only want to slightly edit an image. When you're using a reference image in Midjourney, your prompts shouldn't be too long. If they are, your reference image might not be used in the capacity that you want.
From my experience in experimenting with this text-to-image AI model, I've learned that short Midjourney prompts for editing photos give the best results.
Midjourney is an incredibly powerful tool. You will be able to make drastic changes to a photo. All you have to do is try to imagine what you want an image to look like. Think about which changes you'd like to make to the original photo.
I should also mention that you should ideally use a similar aspect ratio as the original photo. If you try to turn a landscape image into a portrait, you might not always get good results. But that shouldn't discourage you from trying. You can turn a landscape photo into a beautiful portrait in Midjourney.
Using Reference Images in Midjourney
One thing you'll have to know before you start editing images in Midjourney is how to use reference images. This whole process is very easy to learn and shouldn't take more than a minute or two.
Here is how you can start using reference images in Midjourney in a few easy steps:
- The first step is to select the photo you wish to use and upload it to one of the channels for image generation in the Midjourney public Discord server. Alternatively, you can upload it to your chat with the Midjourney Bot.
- Once the photo is uploaded, press send.
- You will now be able to right-click on the image and a menu will pop up. Click on the "Copy Link" button.
- Start writing a prompt and paste the link to the image at the beginning of it.
- Finish writing the prompt and press enter when you're done.
That's all there is to it when it comes to using reference images in Midjourney. If you're not sure about the format of your prompts when you're using reference images, here's how it should look like:
/imagine [image link] description --parameters
In the next section of the article, you can see what types of prompts you can write to edit photos.
Midjourney Prompts for Editing Photos
I find that people have an easy time learning how to use Midjourney through prompt examples. That's why I think you'll find this section of the article very fun. I'm going to show you several different prompts I used for editing photos.
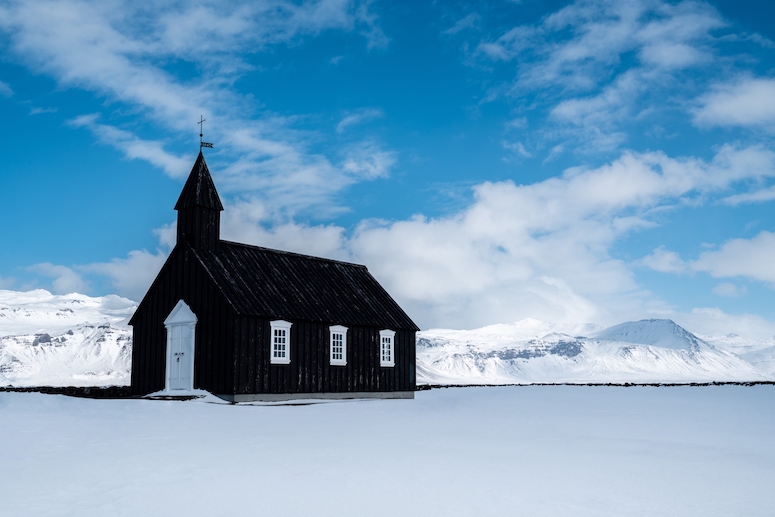
Let's start with this beautiful photo that was taken in Iceland. This is a photograph of a church and almost untouched snow. I love how secluded some parts of Iceland are, where you don't see that many footsteps in the snow.
I wondered how I could change this image, and I ultimately decided that I wanted to remove the snow from it. I wanted to see warmer weather. I used an incredibly simple prompt to edit this photo:
/imagine [image link] springtime --ar 16:9 --v 5
With a reference image and a single word, I was able to change how the image looks. I ran the prompt several times to see the results, and I got images from all angles. Don't expect Midjourney to get even the bigger details right. The church looks slightly different in almost every image the AI model generated.
Here is the result that I got from Midjourney.
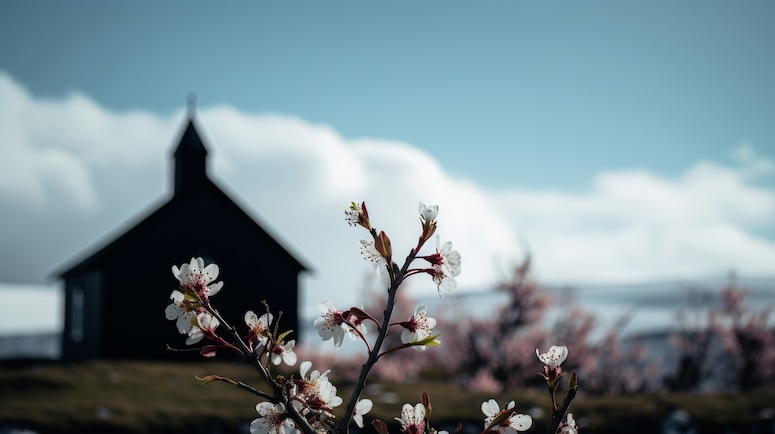
As you can see, it's from a completely different angle. But I really like how it looks, and it shows the power of AI models. It can take an image and create a completely new one. It looks like a real photo and has an artistic charm to it. But let's now move on to the next photo.
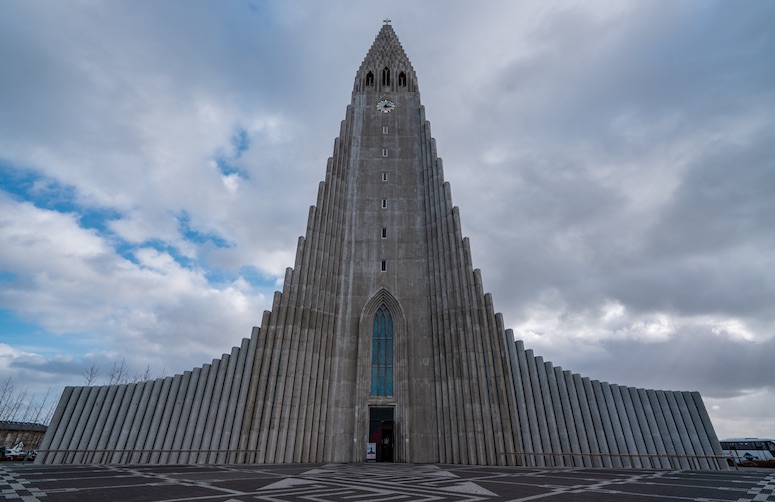
The next image I decided to edit for this article is also one that was taken in Iceland. It shows a church in the country's capital city, Reykjavík. I really admire the architecture here. I wanted to turn the image into a shot from a mystery movie. Here's the prompt I used to get that effect.
/imagine [image link] mysterious building with weird symbols at night, the image should look like a shot from a mystery movie --ar 16:9 --v 5
Here is the result I got.
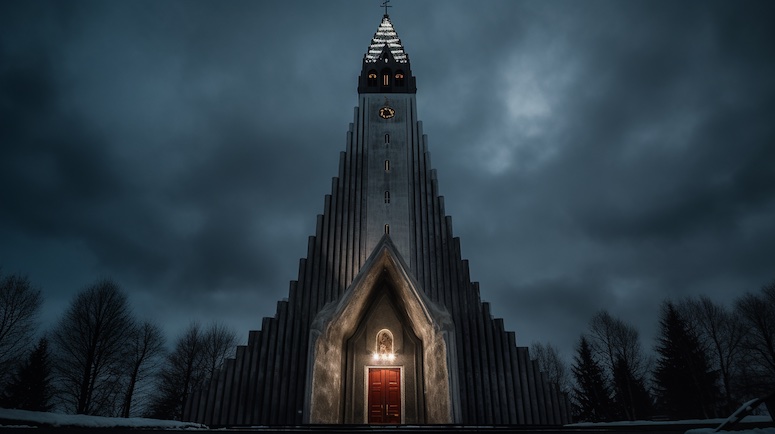
The building was noticeably changed in the edited version, but I still really like the result. You can see how using a reference image can greatly influence what type of result will be generated. If I hadn't used the reference, there is no way I could get the building in the generated image to look like this.
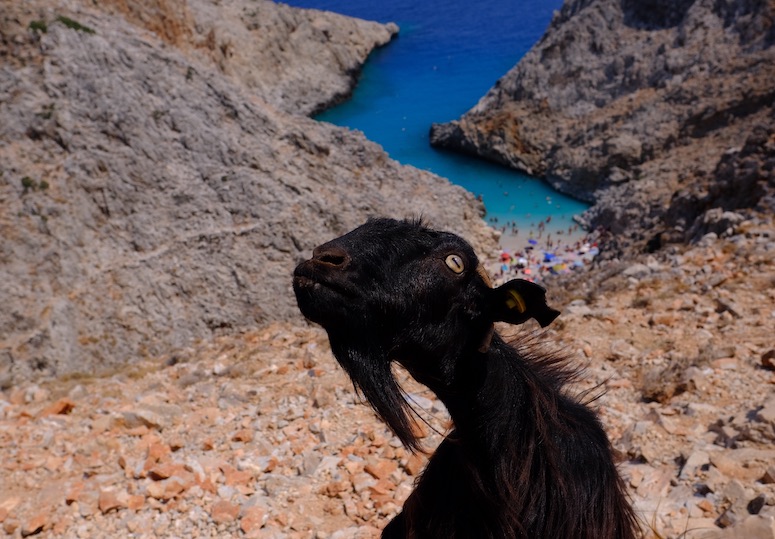
This photograph was taken in Crete, Greece. It shows a goat and a secluded little beach. This is quite a funny photo but when I uploaded it, my creative juices started telling me that I should turn it into something creepy. That's why I wrote the following prompt:
/imagine [image link] creepy, weird, horror movie scene --ar 16:9 --v 5
Here is what the text-to-image AI model generated from my prompt.
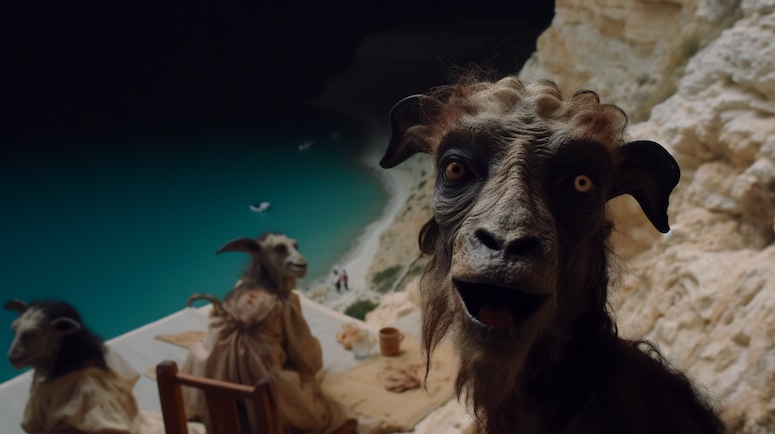
My entire prompt consisted only of three keywords that I felt would describe what I was looking for. The AI model did a great job with this one. It certainly feels creepy, and I could imagine a scene like this in a horror movie.
Let's take a break from the creepy stuff and try something different with the next photo.
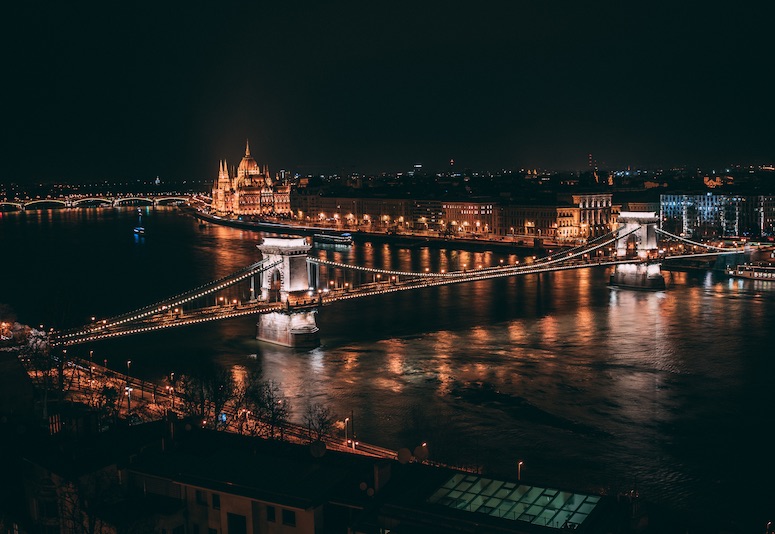
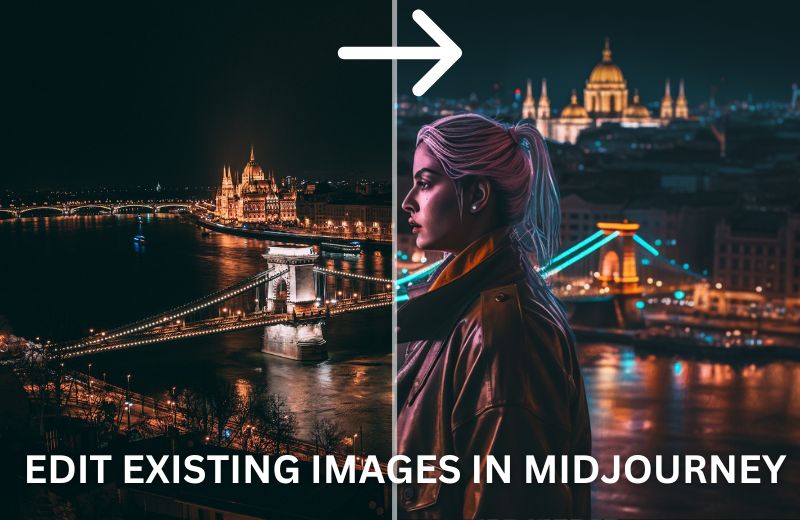
This photo was taken in Budapest, Hungary. It shows the skyline of the city. My brother feels like it's one of the best photos he's ever taken, and I'd agree with that. For this photograph, I decided to add some cyberpunk flair to it. Here's the prompt I wrote:
/imagine [image link] illustrated in a cyberpunk style --ar 16:9 --v 5
I didn't want to include too many details in the prompt. I instead chose to give a very simple instruction to the AI model. Here's the result that was generated.
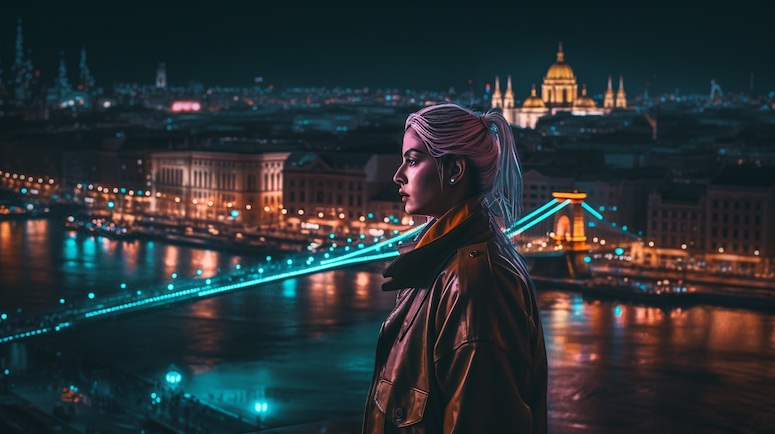
It's obvious that the buildings are slightly changed. Some are even in a completely different position. But if you exclude those details, the model really created a great cyberpunk version of Budapest. After all, you shouldn't expect the city to look exactly the same if the scene is set in the future.
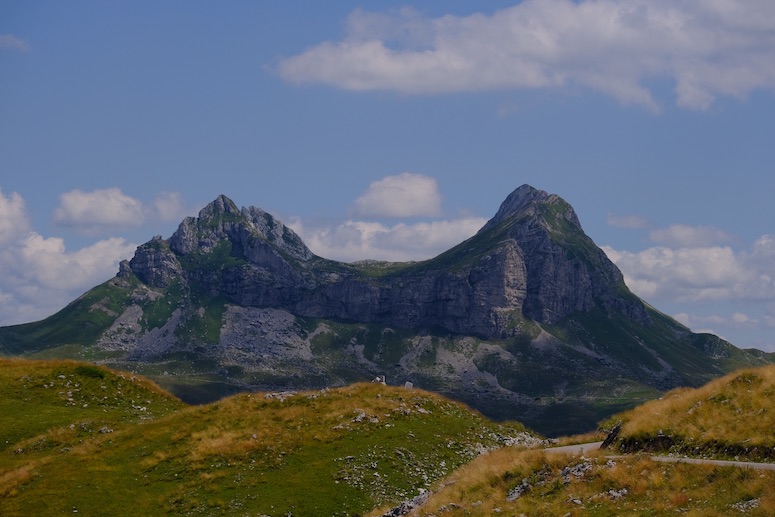
This photo was taken in Montenegro. I don't know why, but for some reason when I saw this photo, I wanted to make something like a Mount Rushmore for animals from it. And that's what I wrote in my prompt.
/imagine [image link] as a mount rushmore for animals, photorealistic --ar 16:9 --v 5
Here is what Midjourney created from my reference image and prompt.
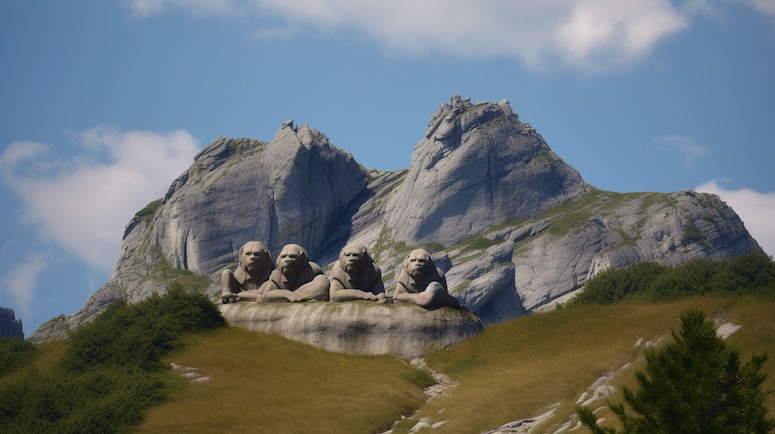
The scene does include some major differences and additional details, but I think the reference image served a good purpose here. The animal statues also look very good, but I couldn't get the model to make statues of different animals.
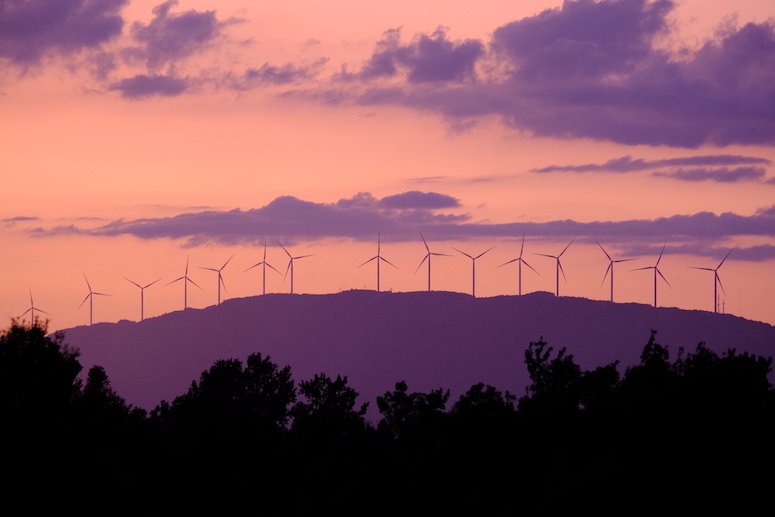
This is also a photo taken in Montenegro. It's such an amazing photograph. I love the colors. I wanted to make a watercolor-type painting using this as my reference image. Here's the prompt I wrote to do that.
/imagine [image link] illustrated in a watercolor art style --ar 16:9 --v 5
Midjourney created the following image from my prompt.
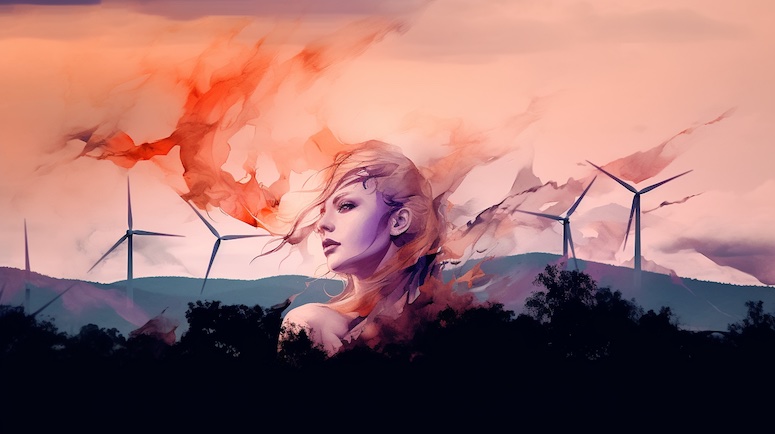
It goes without saying that this image was extremely altered by the AI model. But one thing I really like about this prompt example is that it shows how using a reference image can have an impact on the colors used in the generated image.
Okay, I'm going to edit one more photo in Midjourney and then I'll leave you to experiment with the AI model and try altering images yourself.
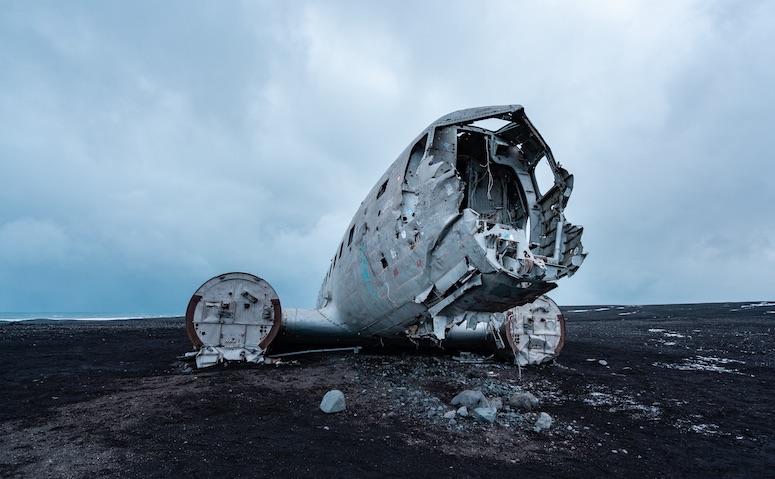
This photograph was taken in Iceland. It shows a crashed US Navy Douglas C-117D that's been there since 1973. It's a popular spot for tourists who love to visit places off the beaten path. When I saw this photo, I was reminded of the TV show Lost and wanted to recreate the crash in a tropical island environment.
/imagine [image link] on a tropical island --ar 16:9 --v 5
This is the incredibly simple prompt I used to edit the photo. Here's what was generated.
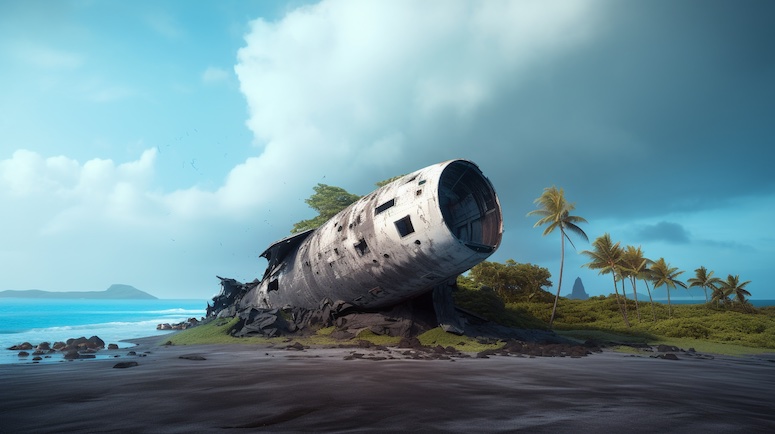
Once again, I got an image from a slightly different angle and the parts of the plane from the first picture are different from the edited image. I do like certain details in the edited image, where you can see the impact of the crash.
My prompts usually consist of 30-60 words, but I have to make them much shorter when I'm editing photos. As you can see, you get great results when you stick to the main instruction you want to give the AI model.
Final Thoughts
Midjourney is a powerful tool for editing photos. You can select any art style and apply it to your photographs. You also have the ability to add or change objects in the image.
At the time of writing this article, you can't really select which parts of the image you want to change or control how much of the image gets changed. After all, you're only writing a few lines of text on Discord.
In the future, Midjourney users will have multiple tools for editing images. You'll be able to control what you edit.
The only current downside to editing photos in Midjourney is that you might end up with an image that's edited more than you'd like it to be. Nevertheless, you can still end up with unbelievably good images.
6 thoughts on “Midjourney Prompts for Existing Images (+ Prompt Examples)”
Do you know if this technique has changed since you posted this? I keep getting the error message " Could not validate this link. Please try again later." I then tried to open the image in a new browser which had the image in a link with a .png at the end, and it told me "Sorry! Could not complete the job! The job has encountered an error. The developers have been notified."
I apologize for the late response. We've been having some spam issues lately so just now seeing the real comments.
The technique is still the same as at the time I wrote the article. I would say that either there was an error with the Midjourney platform in general at the time when you tried prompting or that you weren't using the direct link to the image but instead copied a link to a site that shows the image. The link you're using has to be a direct link to the image, and not to the site showing the image.
hi, is it possible to this intensively with existinng portraits of people? thx
Yes, it's possible to do this with existing portraits of people as well. For instance, you can take a photo of someone and then completely change the setting, the attire they're wearing, etc. You can also turn a photo into an impressionism style painting. There is no limit to what you can do, you just have to be creative with your prompts 🙂
I’m trying to replace an object in an image with a different object. I’ve got an image of a guy holding an apple and I want to replace the apple with a bunch of peppers. Is this possible in midjourney? I’m looking for something like a /replace command
It is possible using the Midjourney inpainting feature. You can check out my guide on how to use the inpainting feature if you want to learn more information on this.
Leave a Comment Cancel reply
Save my name, email, and website in this browser for the next time I comment.
About Milan K
Midjourney Prompts for Book Covers (+ Prompt Examples)
Midjourney prompts for album covers (14 prompt examples).

The Best Photo Editing Software for Mac & PC
The Best Photo Editing Software for Mac & PC
So, you want to take your photo editing skills to new heights? Whether you're an amateur, passionate about photography, or a pro creating content for clients, finding the right photo editing software can make all the difference. I've been there – endlessly scrolling through forums and reviews, hoping to stumble upon that elusive “best” program.
Well, my friend, your quest ends here! In this ultimate guide, I'll break down the top photo editing software options with insider tips on navigating their powerful (and often overwhelming) features. We'll dive deep into each program's strengths, exploring everything from advanced editing tools to user-friendly interfaces. So buckle up – it will be an insightful and hopefully entertaining ride!
But before we begin, let me share a little anecdote…
Table of Contents
My Photographic Editing Journey

I vividly remember the first time I tried my hand at photo editing . Armed with a free software trial and zero clue what I was doing, I set out to “enhance” a good landscape shot. Two hours and countless failed experiments later, I was left with a blurry, oversaturated mess and a newfound appreciation for the art of editing.
From that fateful day on, I became determined to master this craft. I scoured the internet, tried every program under the sun (or at least it felt that way), and learned through a lot of trial and error. Eventually, I found my stride and even made photo editing a part of my career.
The moral of the story? Don't get discouraged if you're just starting! With the right tools and patience, you'll be editing photos like a pro in no time.
Understanding the Different Types of Photo Editing Software
Now that we've gotten the personal anecdotes out of the way, let's talk technicalities. When it comes to photo editing software, there are a few key categories to be aware of:
Raster Image Editors
These programs work with raster graphics (composed of pixels) and typically offer advanced tools for editing, retouching, and creating image compositions. Industry giants like Adobe Photoshop and GIMP fall into this camp.
Vector Image Editors
Conversely, vector image editors use mathematical formulas to create scalable graphics (think logos and illustrations). While not ideal for photo manipulation, programs like Adobe Illustrator and Inkscape can come in handy for adding graphic elements to your images.
All-in-One Editors
As the name suggests, these multifaceted programs attempt to cover all your editing needs – from photo retouching to graphic design . Examples include Photoshop Elements, Pixlr, and Serif's Affinity suite.
Deciding which software best suits your needs depends on your goals and experience level. Are you primarily touching up photos? Opt for a raster editor. Are you looking to create digital art or design assets? A vector program might be more up your alley.
The Crème de la Crème: Top 5 Photo Editing Software
Alright, let's get to the good stuff! I've researched and tested dozens of options, and these five programs consistently rise to the top as the best photo editing software on the market.
1 – Adobe Photoshop

Is anyone surprised to see Photoshop topping the list? This industry-standard behemoth needs little introduction. If you're serious about photo editing (and have the budget for it), Photoshop is hard to beat.
With its vast array of professional-grade tools and seemingly endless capabilities, Photoshop allows you to retouch, manipulate, and composite images in ways that would make Ansel Adams weep tears of joy. This program has everything from advanced selection tools to non-destructive editing and Raw processing.
Photoshop's power comes at a cost – a steep learning curve. Be prepared to invest serious time into mastering its myriad features and shortcuts. But once you do, you'll have a digital editing powerhouse.
Key Features:
- Industry-leading selection and masking tools
- Powerful adjustment layers and blending modes
- Comprehensive Raw processing and camera Raw support
- Vector drawing and type tools
- Video editing capabilities
- Integration with Adobe 's Creative Cloud ecosystem
- $20.99/month for Photoshop + Lightroom (Photography Plan)
- $52.99/month for a full Creative Cloud subscription
2 – Capture One Pro

While Photoshop may reign supreme in general photo editing, Capture One Pro gives it a run for its money regarding Raw processing and tethered shooting. This powerful (yet easy-to-use) program is a favourite among professional photographers and studios.
With its exceptional colour editing tools, customisable workspace , and robust tethering capabilities, Capture One Pro streamline the entire editing process – from import to export. Its brilliant colour rendition, especially with files from higher-end cameras, is simply unmatched.
The program's “Sessions” workflow is ingenious, allowing you to group images based on specific shoots or projects while maintaining a clear folder structure. And let's not forget about those gorgeous black-and-white conversion tools – any monochrome enthusiast would be delighted!
- Unparalleled Raw processing and tethered shooting
- Precise colour editing with various colour editors
- Amazing black-and-white conversion capabilities
- Intuitive image management with Sessions workflow
- Supports over 500 camera models
- Layer tools for local adjustments
- $299 one-time payment for a perpetual license
- Optional annual upgrade plan ($159/year)
3 – Affinity Photo

Are you looking for an affordable yet powerful Photoshop alternative ? Enter Affinity Photo – the budget-friendly dark horse giving Adobe a run for its money. With a one-time purchase fee (no subscriptions required), you can access a full-fledged raster image editor packed with pro-grade features.
Affinity Photo's interface is clean, customisable, and surprisingly easy to navigate, even for newcomers. Its breadth of editing tools rivals Photoshop's, including advanced retouching, HDR merging, panorama stitching, and support for industry-standard plugins. Plus, its Raw processing prowess will satisfy even the pickiest pixel peepers.
While it may not (yet) match Photoshop's video editing or 3D capabilities, Affinity Photo delivers exceptional bang for your buck in the photo editing department. Oh, and is it available for Mac, Windows, and iPad? Talk about versatility!
- Comprehensive photo editing toolkit
- Advanced retouching and adjustment tools
- Customisable interface and workspaces
- Panoramic stitching and HDR merge
- Cross-platform availability (Desktop and iPad)
- Support for Photoshop plugins
- $54.99 one-time purchase (Desktop)
- $19.99 for iPad version
4 – DxO PhotoLab

For the analytically-minded photographers out there, DxO PhotoLab is a revelation. This RAW processing powerhouse leverages an extensive optics and sensor data database to automatically correct flaws and optimise image quality – a godsend for perfectionists.
With DxO's unique PRIME denoising technology and state-of-the-art lens corrections, you can extract every ounce of detail and clarity from your Raw files. The program's DeepPRIME AI even goes so far as to reconstruct missing or corrupted data within an image intelligently.
Beyond its impressive computational prowess, PhotoLab also boasts a full suite of localised editing tools, presets, and creative styles to refine your edits. The program's integration with Adobe Photoshop and Lightroom is seamless for those who prefer a more streamlined workflow.
The only potential downside? DxO PhotoLab's learning curve can be steep, especially for its advanced correction algorithms. But once you've mastered its intricacies, you'll be rewarded with astonishingly crisp, natural-looking photos.
- Industry-leading optics modules and lens corrections
- Unrivalled denoising and PRIME raw deblurring
- Deep learning-powered auto masking and editing tools
- Over 60 creative styles and presets
- Seamless integration with Adobe products
- Specialised tools for portraits, landscapes, architecture, and more
- $139 one-time purchase (Essential Edition)
- $219 one-time purchase (Elite Edition with AI tools )
5 – GIMP (GNU Image Manipulation Program)

For those on a shoestring budget (or just philosophically opposed to pricey software), GIMP is the open-source freeware hero we all need. Don't let its lack of a price tag fool you – this powerful raster editor packs a serious punch when it comes to photo manipulation and editing capabilities.
With a vast array of professional tools and filters at your disposal, GIMP can handle everything from basic touchups to advanced compositing and image creation. While its interface may feel a tad outdated (and admittedly cluttered), a quick tweak of the settings can transform it into a clean, user-friendly workspace.
Sure, GIMP may not offer the cutting-edge AI features or seamless Raw processing of its paid counterparts. But for the cash-conscious photo enthusiast, it's an exceptional (and legal) alternative that delivers impressive results – if you're willing to put in the effort.
- Full suite of photo retouching tools
- Advanced filters and brushes
- Customisable interface and dockable dialogues
- Support for Photoshop plugins and file types
- Layer masks, channels, and paths
- Cross-platform availability (Windows, Mac, Linux)
Taking Photo Editing to the Next Level
While the core editing software is undoubtedly crucial, don't overlook the value of investing in complementary tools and resources to elevate your craft even further. Here are a few suggestions to consider:
Plugins and Extensions
Think of plugins as souped-up additions to your editing arsenal, granting you access to specialised tools and automation. From AI-powered sky replacements to advanced noise reduction and sharpening routines, plugins can streamline complex tasks and take your edits to new heights.
Some programs (like Photoshop and Affinity Photo) even support third-party extensions, opening up additional creative possibilities. Just be judicious in your plugin purchases – those one-click wonders can add up quickly!
Specialised Editing Tools
While general-purpose photo editors are versatile beasts, specific editing tasks may warrant more specialised software. For example:
- RAW Processing: Programs like Capture One Pro and DxO PhotoLab excel at extracting maximum detail and quality from RAW files.
- HDR and Exposure Blending: Dedicated editors like Aurora HDR can easily merge challenging exposure ranges.
- Focus Stacking: Tools like Helicon Focus combine multiple exposures to achieve incredible depth of field.
- Astrophotography: Specialized star trackers and image-stacking software are crucial for capturing celestial wonders.
The key is to identify your photography niche(s) and invest accordingly in the tools tailored to those specific editing needs.
Presets and Actions
Suppose the thought of building complex editing routines from scratch makes you queasy; fear not! Presets and actions can be your best friends, allowing you to apply carefully crafted edits with just a few clicks.
Many editing programs come bundled with basic preset options (like Instagram-esque filters), but the magic happens when you explore third-party preset packs from industry professionals. High quality can shave hours off your workflow while delivering consistent, pro-grade results with finely tuned colour grading, stylistic looks, and efficient editing flows.
Education and Community
Even the most powerful software is nothing without the skills to wield it effectively. As such, investing in top-notch educational resources – be it in-depth video tutorials, comprehensive ebooks, or hands-on workshops – can be a game-changer in accelerating your editing prowess.
Don't underestimate the value of photo editing communities, either. By engaging with like-minded creatives (both online and offline), you'll gain priceless insights and inspiration and stay motivated to keep pushing the boundaries of your craft.
Bringing It All Together
Phew, what a whirlwind tour! This guide has provided a comprehensive overview of the top photo editing software options and valuable insights to aid your selection process.
Remember, no single program is perfect for everyone. The “best” photo editing software ultimately aligns with your specific needs, goals, and workflow preferences. Be bold and try multiple options (many offer free trials!) until you find that magical sweet spot.
Most importantly, have fun with the process! Photo editing is both an art and a science; there's always room to experiment, grow, and unleash your inner creative genius. Embrace the journey, my friend – because that elevates a good photo into a breathtaking masterpiece.
Best Photo Editing Software FAQs
What's the difference between raster and vector image editing.
Raster image editors (like Photoshop and GIMP) work with pixels, making them ideal for manipulating and retouching photographic images. On the other hand, vector editors (such as Illustrator and Inkscape) use mathematically defined shapes and lines, which can be scaled without losing quality. Vector graphics are better suited for creating logos, illustrations, and other scalable artwork.
Is Photoshop the only “professional” photo editing option?
While Adobe Photoshop is undoubtedly the industry standard, it's not the only professional-grade photo editing software available. Programs like Capture One Pro, Affinity Photo, and DxO PhotoLab, offer comparable (and, in some cases, superior) editing capabilities tailored for specific photography workflows and needs.
How much should I expect to spend on photo editing software?
Costs can vary widely depending on your specific requirements. Free options like GIMP provide a robust array of editing tools at no cost. At the same time, professional-grade programs can range anywhere from $50 for a one-time purchase (e.g., Affinity Photo) to $50+/month for a subscription plan (e.g., Adobe Creative Cloud). Remember also to factor in the potential costs of plugins, presets, and educational resources.
Can I use photo editing software on my tablet or mobile device?
Absolutely! Many modern photo editors now offer mobile versions or dedicated tablet apps, allowing you to edit on the go. For example, Affinity Photo has an exceptional iPad edition, while Adobe's Creative Cloud apps can run seamlessly across desktop and mobile platforms.
What are the most important factors when choosing photo editing software?
Key considerations include your photography genre(s) and editing needs, desired workflow and interface preferences, budget constraints, and compatibility with existing tools or file formats. It's also wise to assess each program's learning curve and availability of educational resources to ensure a smooth onboarding process.
Stuart Crawford
Need help building your brand.
Let’s talk about your logo, branding or web development project today! Get in touch for a free quote.
Leave a Comment Cancel reply
Trusted by businesses worldwide to create impactful and memorable brands.
At Inkbot Design, we understand the importance of brand identity in today's competitive marketplace. With our team of experienced designers and marketing professionals, we are dedicated to creating custom solutions that elevate your brand and leave a lasting impression on your target audience.
- Influencers
- Health & Fitness
- Love & Relationships
- Herbalistics
- Entertainment
- Conscious Travel
- Trusted Travel
- Luxury Travel
- Real Estate
- HMG Creative Agency
- Work With Us

The Art of Visual Storytelling: How Photo Editing Elevates Editorial Content
In the realm of magazine publishing, the art of photo editing has undergone a significant transformation. From the days of manually adjusting photographs in dark rooms to the modern era of sophisticated digital tools, the journey of photo enhancement has been as riveting as it’s been revolutionary. This evolution isn’t merely about aesthetics; it’s intertwined with the very essence of storytelling.
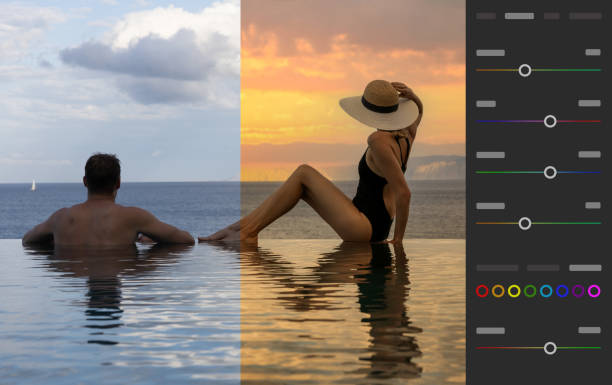
Visuals play a paramount role in how stories are perceived, often invoking emotions, setting tones, or dictating the narrative’s pace. In this ever-evolving landscape, understanding the confluence of photo editing and storytelling becomes vital for anyone aiming to master the craft of compelling editorial content.

The Basics of Editorial Photography
At its core, editorial photography differs from other types because it serves a distinct purpose: to visually narrate a story or idea, often complementing the written word. It isn’t just about capturing a beautiful or striking image but about contextualizing it within the larger framework of the magazine’s narrative.
When readers flip through the pages, these images often grab their attention as a prelude to the story unfolding. High-quality photos are not just visually appealing, they enhance comprehension, retain readership, and elevate the reading experience. In a way, they act as silent narrators, conveying messages before words come into play.
The Power of AI in Modern Photo Editing
In today’s swiftly evolving digital landscape, the influence of Artificial Intelligence (AI) is undeniable. Among the many areas that AI has transformed, photo editing is a domain where this technology is making significant strides. Take, for instance, the technique of AI skin retouching . This innovation automates what was once a painstakingly meticulous process. By leveraging AI, editors can ensure smoother skin, eliminate imperfections, and achieve a flawless yet natural look, all with just a few clicks.
One software that exemplifies this AI-driven transformation is Luminar Neo . Designed with the modern editor in mind, it integrates powerful AI tools that expedite editing without compromising quality. With platforms like Luminar Neo, the possibilities for creating stunning editorial visuals are vast, and the hours spent on manual retouching are drastically reduced.
As we gaze into the future, it’s clear that the role of AI in photo editing is set to expand. With the convergence of machine learning models and increasingly sophisticated algorithms, future tools will refine editing techniques and reshape the essence of visual storytelling.
Balancing Act: Authenticity vs. Perfection
In today’s age of advanced photo editing tools, achieving the “perfect” image might seem like just a few clicks away. But what constitutes perfection? And does perfection sometimes come at the cost of losing authenticity?
Editorial photo editing often teeters between the quest for impeccable visuals and maintaining an image’s genuine essence. Over-editing, while it can polish and refine an image, can also strip away its inherent rawness and emotion. This raises the pivotal question: how much editing is too much?
Achieving a harmonious balance hinges on clearly understanding the image’s narrative intent. What story or emotion is the photograph trying to convey? Is it aiming to depict raw reality or a stylized interpretation? With tools like Luminar Neo, which offers AI-driven features, editors can make precise refinements. But using these advancements judiciously is crucial, ensuring that any enhancements serve the image’s story and not just aesthetic allure.
The mastery lies in recognizing that true perfection in editorial content isn’t just about a visually flawless image. It’s about capturing and preserving the heart of a story, where slight imperfections might add depth and relatability. By intertwining technical prowess with narrative integrity, editors can elevate their visuals, crafting stories that resonate on both an aesthetic and emotional level.
The Role of Editing in Visual Storytelling
At its essence, visual storytelling is the art of communicating narratives using visuals, often accompanied by text. It holds a unique power – to captivate, engage, and influence audiences in ways that words alone cannot. The role of editing within this realm is pivotal. It’s not just about making a picture look “better”; it’s about enhancing the visual to resonate with the intended emotion and message.
Techniques to Evoke Emotions
- Color Grading: Colors have the power to evoke specific emotions. Warmer tones can create feelings of nostalgia or warmth, while cooler tones can evoke calmness or melancholy.
- Cropping and Composition: An editor can emphasize specific elements by strategically cropping an image or adjusting its composition, creating focus, and drawing out desired emotions.
- Shadow and Highlight Manipulation: Shadows can add depth and mystery, while highlights can enhance vibrancy and life. Balancing these elements can guide the viewer’s emotional journey.
- Texture and Clarity: Enhancing or reducing textures can make images feel more rustic or dreamlike, respectively.
Leading the Reader’s Eye and Telling a Story
- Rule of Thirds: This fundamental technique places subjects off-center, creating dynamic, interesting visuals that guide the viewer’s gaze through the image.
- Depth of Field: By blurring the background (or foreground), editors can create a depth that focuses the viewer’s attention on a particular subject.
- Using Leading Lines: Roads, rivers, or any natural lines can lead the viewer’s eyes toward a focal point, creating a visual journey.
- Sequential Imagery: For longer narratives, images that follow a sequence can help depict progression, change, or the passage of time.
In visual storytelling, the editor’s role is akin to that of a film director. They set the scene, dictate the mood, and guide the viewer’s experience, ensuring the story unfolds seamlessly.
In the intricate dance of visual storytelling, editing is the choreographer. It’s not merely about refining an image but sculpting its narrative. Through thoughtful adjustments, editors can evoke deep emotions, guide perceptions, and craft compelling tales. As we recognize and harness this potential, we elevate the art of storytelling to new, visually resounding heights.
Published by HOLR Magazine .
Subscribe to HOLR Magazine

I verify that I am of age to view cannabis related content in my region.

The Latest AIs, every day
AIs with the most favorites on Toolify
AIs with the highest website traffic (monthly visits)
AI Tools by browser extensions
AI Tools by Apps
Discover the Discord of AI
Top AI lists by month and monthly visits.
Top AI lists by category and monthly visits.
Top AI lists by region and monthly visits.
Top AI lists by source and monthly visits.
Top AI lists by revenue and real traffic.

Master AI Photo Editing with MIDJOURNEY: Step-by-Step Tutorial for Beginners
Updated on Jan 08,2024
Table of Contents:
Introduction, getting started with the application, creating an account, uploading and editing your photo, using image functions, adding background designs, enhancing photo details, applying filters and effects, exploring advanced editing options, finalizing and sharing your edited photo.
Are You tired of looking for a user-friendly photo editing application that can help you enhance your pictures with ease? Look no further! In this article, we will introduce you to an amazing photo editing application that will revolutionize the way you edit your photos. Whether you're a professional photographer or just someone who enjoys capturing Memorable moments, this app is perfect for you.
So, let's dive in and discover how you can transform an ordinary photo into an extraordinary work of art using this incredible application. Get ready to unleash your creativity!
Before we get started with the editing process, let's first download and install the application on your smartphone. Visit the Play Store or App Store and search for the application by typing its name. Once you find it, download and install the app on your device.
Now that you have the application installed, let's explore the different features and functionalities it offers. The interface is user-friendly and intuitive, making it easy for anyone to navigate through the app.
To access all the editing features and save your edited photos, you'll need to Create an account. Don't worry, it's a quick and hassle-free process. Open the app and tap on the "Register" button. You'll be prompted to enter your phone number or email address. Choose your preferred method and follow the on-screen instructions to complete the registration process. Once you've successfully registered, you'll be ready to start editing your photos!
With your account created, it's time to upload your photo and start editing. Open the app and tap on the "Upload" button. You can choose to upload a photo directly from your gallery or take a new photo using the in-app camera. Select the photo you want to edit and wait for it to load.
Now, let's explore the various editing options available to transform your photo. The app offers a wide range of tools and features to enhance your photo's appearance. You can adjust brightness, contrast, saturation, and Apply filters to give your photo a unique look. Experiment with different settings until you achieve the desired effect. Don't be afraid to get creative and try out new combinations!
In addition to basic editing tools, the app also provides advanced image functions. These functions allow you to remove blemishes, smooth out skin, and even change the background of your photo. With just a few taps, you can achieve professional-level results. Take AdVantage of these image functions to elevate your photo editing game.
Want to give your photo a more artistic touch? The app offers a variety of background designs that you can add to your photo. From elegant Patterns to stunning landscapes, the options are endless. Simply select the desired background design and adjust its opacity to Blend it perfectly with your photo. This feature allows you to create visually stunning images that are sure to stand out.
Sometimes, it's the small details that make a big difference in a photo. The app provides tools to enhance the details of your photo and make it truly remarkable. From sharpening the image to highlighting specific elements, you have full control over the level of detail in your photo. Don't underestimate the power of these tools in transforming an ordinary photo into an extraordinary masterpiece.
Filters and effects are a great way to add a unique and artistic Flair to your photos. The app offers a wide range of filters and effects, allowing you to experiment and find the perfect style that suits your photo. Whether you prefer Vivid and vibrant colors or a vintage and nostalgic look, there's a filter for every mood and occasion. Go ahead and apply different filters and effects to see which one brings out the best in your photo.
If you're someone who enjoys pushing the boundaries of creativity, the app has got you covered. It offers advanced editing options that allow you to fine-tune every aspect of your photo. From adjusting curves and levels to adding layers and textures, the possibilities are endless. Dive into these advanced editing options and explore the unlimited potential of your creativity.
Once you're satisfied with the edits you've made to your photo, it's time to finalize and save your masterpiece. The app provides options to crop, resize, and apply final touches to your photo. Once you're done, simply tap on the "Save" button to save your edited photo to the gallery.
Now that your photo is ready, why keep it to yourself? Share it with friends, family, and the world! The app allows you to directly share your edited photo on social media platforms or send it to your contacts. Spread the joy and showcase your artistic skills to everyone!
Congratulations! You've learned how to use this amazing photo editing application to transform your ordinary photos into extraordinary works of art. With its intuitive interface, wide range of editing tools, and advanced features, this app is your go-to solution for all your photo editing needs. Unleash your creativity, experiment with different effects, and let your photos speak for themselves. Get ready to take your photography skills to the next level!
The above is a brief introduction to Master AI Photo Editing with MIDJOURNEY: Step-by-Step Tutorial for Beginners
Let's move on to the first section of Master AI Photo Editing with MIDJOURNEY: Step-by-Step Tutorial for Beginners
Most people like

Find AI tools in Toolify
Join TOOLIFY to find the ai tools
Get started
- Discover Leanbe: Boost Your Customer Engagement and Product Development
- Unlock Your Productivity Potential with LeanBe
- Unleash Your Naval Power! Best Naval Civs in Civilization 5 - Part 7
- Master Algebra: Essential Guide for March SAT Math
- Let God Lead and Watch Your Life Transform | Inspirational Video
- Magewell XI204XE SD/HD Video Capture Card Review
- Discover Nepal's Ultimate Hiking Adventure
- Master the Art of Debugging with Our Step-by-Step Guide
- Maximize Customer Satisfaction with Leanbe's Feedback Tool
- Unleashing the Power of AI: A Closer Look
- Transform Your Images with Microsoft's BING and DALL-E 3
- Create Stunning Images with AI for Free!
- Unleash Your Creativity with Microsoft Bing AI Image Creator
- Create Unlimited AI Images for Free!
- Discover the Amazing Microsoft Bing Image Creator
- Create Stunning Images with Microsoft Image Creator
- AI Showdown: Stable Diffusion vs Dall E vs Bing Image Creator
- Create Stunning Images with Free Ai Text to Image Tool
- Unleashing Generative AI: Exploring Opportunities in QE&T
- Create a YouTube Channel with AI: ChatGPT, Bing Image Maker, Canva
- Google's AI Demo Scandal Sparks Stock Plunge
- Unveiling the Yoga Master: the Life of Tirumalai Krishnamacharya
- Hilarious Encounter: Jimmy's Unforgettable Moment with Robert Irwin
- Google's Incredible Gemini Demo: Unveiling the Future
- Say Goodbye to Under Eye Dark Circles - Simple Makeup Tips
- Discover Your Magical Soul Mate in ASMR Cosplay Role Play
- Boost Kidney Health with these Top Foods
- OpenAI's GEMINI 1.0 Under Scrutiny
- Unveiling the Mind-Blowing Gemini Ultra!
- Shocking AI News: Google's Deception Exposed!
- Unraveling Analog Devices Interview Puzzle
- Top 3 AMD Motherboards for RTX 4060
- Intel: The Trusted Foundation of the Cloud
- Unveiling Intel's Open Source Legacy
- Unlocking AI: Insights from Intel's AI Everywhere Head
- Unlocking Tech Insights: Edge Computing & Analytics Evolution
- Unlocking Intel's AI Strategy
- Intel Arc Desktop Lineup Leak: Big Xe vs. Big Ampere
- Unveiling Quantum Computing: A Journey into the Future
- Unveiling 12th Gen: Overclocking Intel's Powerhouse
Unlock Your Email Writing Skills with Email CopyProTable of Contents Introduction Interface Options
Unlock Amazing Features of Google Pixel 6aTable of Contents Introduction Auto Rotate Feature Power
Explosive Revelations: Hunter Biden implicates his own fatherTable of Contents: Introduction The Al

The Best AI Websites & AI Tools Directory
- Most Saved AIs
- Most Used AIs
- AI Browser Extensions
- Discord of AI
- Top AI By Monthly
- Top AI By Categories
- Top AI By Regions
- Top AI By Source
- Top AI by Revenue
- More Business
- Stable Video Diffusion
- Top AI Tools
- How to boost your SQL Coding Efficiency in a Multi-Database Environment
- Unleash Your Potential: Why ITIL Certification is the Smartest Investment for Your Future
- Navigating the Web Unseen: How Dolphin Anty Shields Your Digital Identity
- Human Writing vs. AI Writing: What to Choose for College Education Needs
- Elevate Your Profits By Leveraging Coinrule's AI Trading Advantage
- A Red Carpet-Worthy Arrival At Dubai’s Most Exclusive Hotels And Resorts With Rented Lamborghini
- Design services from WhitePage: a creative approach to solving your problems
- Effortless Editing: Object Removal from Photo Techniques
- Tiktok ads spy tool Review
- Privacy Policy
- [email protected]
- ai watermark remove
- ai voice noise removal
- ai voice background remover
- ai vocal remove
- ai video text remover
- ai video remove watermark
- ai content remover
- ai object removal
- ai text remover
- ai voice remover
Copyright ©2024 toolify

Free Online Photo Editor AI Image Generator and AI Design tools
The suite for all your creative photo and design editing needs directly in your web browser, on your smartphone, or on your desktop, all free. The only limit is your imagination!
Pixlr Editor
Pixlr express, pixlr designer, batch editor, jump right in.
Here we collected the most used Generative AI and Photo Editing features people are looking for!
Generative AI Tools
Explore Pixlr’s new AI Powered Generative Tools unleashing limitless creative possibilities. Perfect for both beginners and seasoned professionals, these tools redefine artistic expression with intuitive AI technology, revolutionizing your creative process.
AI Image Generator magic!
Elevate your creations with the revolutionary Text to Image AI image generator, revolutionizing the way you convert simple text into visually captivating artwork. Unleash your imagination and craft breathtaking, AI-generated masterpieces that are bound to captivate and inspire your audience.
Amazing AI Generative Fill!
From concepting creative ideas to making complex edits and refinements, Generative Fill can help you quickly realize your vision while giving you complete control over every creation.
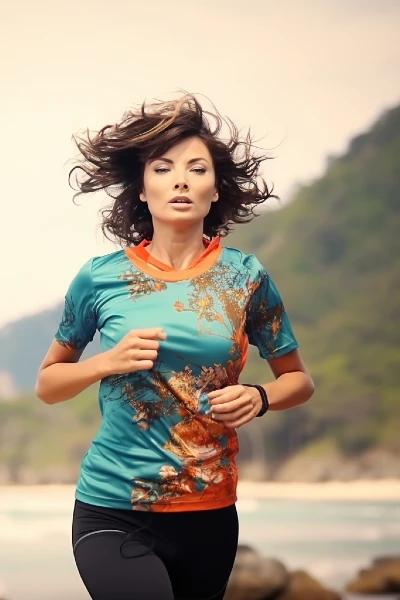
See more with AI Generative Expand!
Explore beyond the borders of your canvas with Generative Expand, make your image fit in any aspect without cropping the best parts. Just expand in any direction and the new content will blend seamlessly with the image.
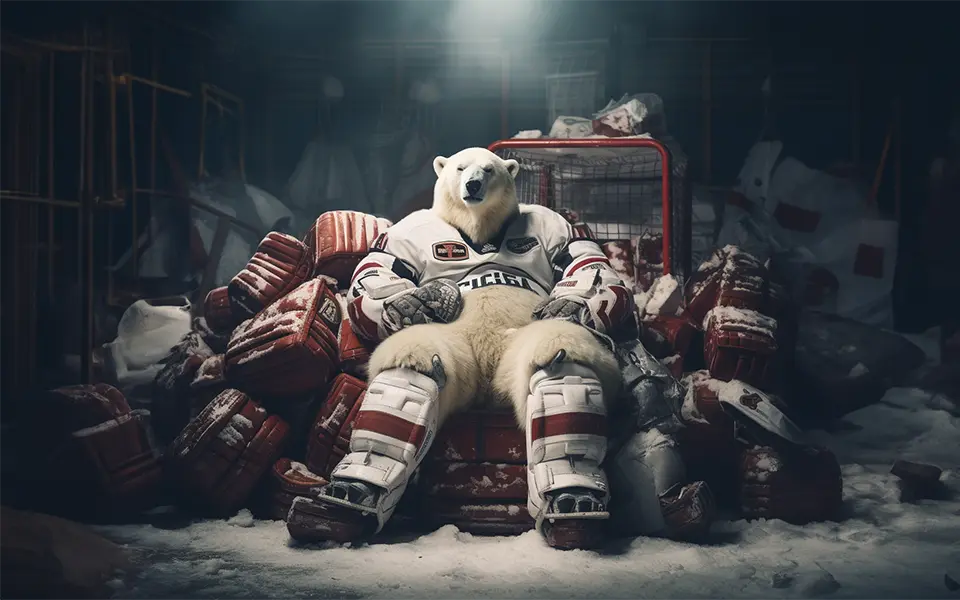
Other EPIC AI Generative Tools!
AI Remove Object
Remove any unwanted object from your image by just drawing a line arround it.
AI Remove Background
One-click background remover, let the AI do the boring work.
AI Face Swap
With the AI face swapper you become anyone you desire: a superhero, a heartthrob, a law enforcer, or an intellectual. Or just switch faces with a friend, there are no limits.
AI Super Scale
Use AI to upscale images and keep a superb quality.
AI Super Sharp
Enhance image clarity and details, bring a new level of precision to your digital photographs.
AI Generative Transform
Separate out object from the image and move, resize or rotate them freely. Just like magic!
AI Remove Noise
Effectively reduce or eliminate unwanted noise from images, ensuring a smoother and cleaner result.
Photo Editing and Design
Over the last 15 years, Pixlr has maintained its position as the top photo editing service on the web. Our commitment to pioneering innovation in online capabilities remains unwavering, ensuring the delivery of excellent retouching, drawing, filter, and effect tools!
Photo Grid Maker
It remains a timeless design choice, continuing to be among the favored layouts for presenting photos on social media, advertisements, or in print. Our auto grid feature effortlessly offers a range of layouts to suit your diverse photo presentation needs, providing convenient options for your creative endeavors.
Product Shot Creator!
Studio looking product images in a few seconds, no more tedious repetitive work to create awe looking product images, just let our AI generate the perfect shot!
Filters And Effects
The Photo effects and filters from Pixlr offer a creative spectrum, enhancing images with various styles, moods, and visual enhancements to elevate and transform the overall aesthetic. Popular filters like Dispersion, Bokeh and Focus, Glitch, Mirror and a large selection of Effects give you ample ways to step up your Photo editing game.
More awesome photo editing and design tools!
Spice up any image with Mimic HDR and make your photo pop, bring up the dark areas and keep the lights intact.
Fokus / Bokeh
Create depth in your photos with background blur, bokeh blur and bokeh lights.
Draw over an area in you image and watch it explode and disperse into small pieces.
Create mesmerizing mirror effects with an array of captivating variations that warp reality and mesmerize the eye.
ransform your photos into playful, distorted masterpieces with the quirky and captivating glitch photo effect.
Single, duo, or tri-tone color effect for that classic looking images.
Join millions of creators!
Great photoshop alternative.
I haven't had access to photoshop in a few years, and I don't especially miss it because of Pixlr. I'm not exactly an advanced user of graphic design products, so I can't speak to that level... But for basic image editing and creation, this gets the job done.
Nicholas, F&B
Best for design.
The software is very easy for photo editing even without special knowledge.
Méo, Graphic Designer
Pixlr - the bigger and better photoshop.
My overall experience with Pixlr has been positive! I have realized how much of a 'hidden gem' this app truly is and I wish that it was more well-known for how amazing it is.
Candice, Medical Practice
Full scope free photo editor.
Overall Pixlr is an excellent tool! I highly recommend for small business designers, especially if you wear multiple hats within your organization.
Braden, Machinery
Best photo editing platform.
As it has all basic image editing tools available on its application so I use it whenever ever I need to edit my business photos as it saves a lot of time and is also easy to understand.
Abhishek, Customer Service
Pixlr is my favorite.
I absolutely love Pixlr and it is my go to software when I need to edit a quick photo or make a quick logo. I would recommend it to anyone looking for a software for photo editing.
Luke, Edu Management
Great for designing beautiful graphics.
Pixlr is used by our organisation as a cheaper and more accessible version of photoshop. We use it to create graphics for our campaigns, as well as posters, report covers and other visual content for our work.
Abhishek, Manage Legal
A fantastic option for doing quick photo work.
I use the software as my go-to for quick photo edits and social media post creation. I've used this for so many uses for simple graphic editing that I can't imagine not having it for image resizing, editing, and social media content creation.
My Ulimate go to Online Photo Editor
Pixlr is so far my best online photo editing applications. I can easily access it through my browser without having to download and install any application on my computer. It pretty much helps me do everything I would do with a more complex and advanced application like Photoshop.
Caroline, Accounting
Pixlr is the best photo editor i have found.
It's super easy to use and delivers fantastic results!
Jennifer, Retail
Excellent photo editor.
AI based photo editor and background remover that delivers!
Your pictures are better quality with Pixlr
The app is extremely easy to use. The interface is simple and user friendly. Instant editing in the application is very successful. It's fun to share instantly.
Barış, E-learning
Pixlr - the best photo editing tool.
Pixlr is a great tool for photo editing. The best part about pixlr is that it is free to use without watermarks. It has user friendly interface and any beginners can use it.
Pixlr is aesthetically pleasing
It's exceptionally user friendly and right on the money. It provides an editing platform like no other platform can. It's well built with high resolution editing experience, which is simple yet very elegant to use.
One of the best photo editing application
This Pixlr application is one of the best photo editing software I have used so far.There are lots of unique features available and the best part of this application is it's clean and user friendly UI.
Great for online photo editing!
It has a very understandable user interface and all the basic tools needed for precise photo editing (crop, clone, blur tools and elements such as filters, adjustment bars, etc.)
Best photo editor with AI image generator
Pixlr has many features that a designer needs which are free as well as premium . It helps me design and edit creatives for my marketing.
Turns boring pictures into eye catching high quality graphics
The autofix and autocontrast features are very useful when time is limited and you have edit multiple images. I use these features to automatically correct the basic adjustments and then tweak few parameters to get the images according to my taste.
Premium Subscription
Get your all-access pass to Pixlr across web, desktop, and mobile devices with a single subscription! Try it out with our 7-day free trial and cancel anytime, no strings attached. More info on the Pricing page. Pixlr is free for Education.
Do you have a Question?
- Luminar Neo
- Luminar for iPad
- Portrait Background
- Structure AI
- Supercontrast
- Composition AI
- Studio Light
- Water Enhancer AI
- Twilight Enhancer AI
- See All 30+ Features
- Extensions Pack
- Supersharp AI
- Focus Stacking
- Background Removal AI
- Noiseless AI
- Magic Light AI
- Panorama Stitching
- Landscape Photography
- Wildlife Photography
- Portrait Photography
- Family Photography
- Wedding Photography
- Newborn Photography
- Photoediting for beginners
- AI Photo Editor
- Real Estate
- E-commerce Photography
- Food Photography
- About Skylum
- Technology Licensing
- Photo Tours
- Ambassadors
- Affiliate Program

New tools. New look. New possibilities.
Special offer: Up to 83% off
February 26, 2022
ACT NOW! SAVE UKRAINE. DEFEND DEMOCRACY.
Team Skylum
Photography
At 5 am on February 24, Russia began the full-scale military invasion of Ukraine. They are violently trying to steal our country.
Russian forces have invaded Ukraine, confirming our worst fears. At this very hour they are attacking us on the streets of many Ukrainian cities. We are at war.
Skylum was proudly founded in Ukraine, and our core development center is based in Kyiv. At this harrowing time, unfortunately we cannot guarantee the on-time delivery of updates to Luminar Neo. We strive for excellence in everything we do, and we will make sure to further develop and improve Neo and to keep you updated on any news.
However, today we ask our community for help and support. Here are some details on what has happened and how you can support Ukraine in this difficult time.
! At 5 am on February 24, Russia began the full-scale military invasion of Ukraine. They are violently trying to steal our country.
! Right now, there are missile strikes and bombardment of peaceful Ukrainian cities. We must hide our families in bomb shelters and protect our land with weapons in our hands as part of the territorial defense forces.
! This disastrous and entirely unprovoked Russian war has already taken the lives of 198 civilians. 33 children have been injured, and 3 have been killed.
! The Armed Forces of Ukraine, young and brave heroes, are fighting all over the country not only for Ukraine but for Peace and Clear Skies in Europe.
As we write to you from a city under attack, we want to be very clear: This war is not just something you see on TV. It is not happening in some distant lands. It is happening right now here in Ukraine, and the Russian forces who are invading our lands and threatening our families may come to your doorstep one day too if we do not stop them.
Sanctions that world governments are currently imposing are not enough. Russia must be completely isolated from all spheres of the civilized world: the financial system, technologies, sports, culture.
Here is a list of simple actions you can take to help Ukraine. We MUST unite to quite literally save the world before it’s too late:
- Contact your local representatives and pressure them to provide more support for Ukraine and stricter sanctions on Russia. We need military and humanitarian aid and Russia must be cut off from SWIFT.
- Donate money to humanitarian aid organizations. Find a full list over here: https://how-you-can-support-ukraine.super.site/
- Follow the news from official channels. Avoid fake news and disinformation!
Twitter: https://twitter.com/ZelenskyyUa
https://twitter.com/DmytroKuleba
https://twitter.com/Hromadske
https://twitter.com/DefenceU
https://twitter.com/backandalive
Telegram: https://t.me/Forbes_Ukraine_official
- Support the Ukrainian Army — Official Account of the National Bank of Ukraine
We stand together
Please share this information with your community.
#Ukrainians #NATO #Ukraine #StandWithUkraine

Experience the power of Luminar Neo
Did you enjoy this post.
Share it on your social media
Advanced yet easy-to-use photo editor
Most Popular
April 04, 2023
GIMP vs. Krita: which one is better for you?
December 02, 2023
GIMP vs Photoshop: Which Photo Editor Is Better?
May 25, 2023
Photography Composition Techniques: A Beginner's Guide
A special perk for our blog readers.
Get a 10% discount on Luminar Neo and dive into professional photo editing today!
I agree to my personal data being stored and used to received newsletters and commercial offers from Skylum.
Thank you for subscribing.
Your gift is waiting in your inbox!
Skylum Blog
The latest news and updates. direct from Skylum
Use Aurora HDR for free for 14 days.
Sent successfully!
Please check your inbox. We've sent you a copy via email.
Looks like you're subscribed already
This is sad. Looks like you’ve earlier unsubscribed from Skylum emails.
Thank you for downloading Aurora HDR
Preparing your download...
Did your download not start? Dont worry, just click here to try again.
Oops! Something went wrong. Don't worry, just click here to try again.
Step 1 Find & Open Aurora HDR Installer
Step 2 Follow the instructions to install Aurora HDR
Step 3 Enjoy new photo editing experience

Get started for free
Try out Luminar Neo for free for 7 days. No credit card needed.
Please check your email
Make sure it's a valid email address

42 Prompts for Extremely Photorealistic People in Midjourney
3 Aug, 2023
Since it's release in early 2022, Midjourney has significantly advanced the applications of generative AI for image creation by offering an integrated, user-friendly (and familiar) interface via Discord.
In this guide, we’ll be going over the ways in which we can craft prompts with Midjourney’s latest v5.2 model to generate Extremely Photorealistic People .
We’ll begin by tweaking some Midjourney settings and then we’ll hop right into a basic prompt template you can use for all your generations.
Getting Started
You’re going to want to ensure that you have RAW mode enabled in your Midjourney settings. For these examples, we are using Midjourney’s Standard Subscription and direct messaging the MJ bot in Discord.
To modify your settings, open a conversation with the Midjourney Bot and type /settings . You should see something similar pop up to the below image. Click on RAW Mode.

If you don't want to turn this setting on for all generations, you can add --style raw at the end of every prompt you give Midjourney.
Otherwise, there are plenty of other neat style parameters & preferences you can customize via the /prefer command. More on this in the Tips & Tricks section below.
Prompt Template
Generally, you’ll want to use some sort of structure for crafting your prompt. For this guide, we went with:
If you find a specific detail that works well with what you’re trying to generate, it is typically a good idea to take note of it to experiment further with the image output you’re given. Also - do not hesitate to experiment with the above structure as it is simply a general outline.
Aspect Ratios
Creating the perfect prompt isn't just about describing the subject of the photo.
It's a delicate balance of aspect ratio , camera & lighting , and environment. Each plays a crucial role in setting the mood and directing focus. Below we'll go over various details you'll want to include in your prompts.
Aspect Ratio 4:3
The 4:3 aspect ratio is widely used in photography due to its harmonious balance, offering a pleasing aesthetic that falls between the square format (1:1) and the wide panoramic views (16:9).
It's the default aspect ratio for most digital cameras and smartphones, making it the common choice for both amateur and professional photographers.

Aspect Ratio 16:9
Tthe 16:9 aspect ratio is great for cinematic style shots. It is most commonly used in film and television.

Aspect Ratio 21:9
The 21:9 aspect ratio, also known as ultrawide, offers an even broader field of view than the 16:9, making it ideal for immersive panoramic photography.

Aspect Ratio 1:1
The 1:1 aspect ratio produces a perfectly square image. It is commonly used on Instagram, as it draws focus to the subject by eliminating background details.

Camera Shot Styles
Shooting styles tell a story: close-ups spotlight emotion, medium and upper-body shots add context, while wide and full-body shots capture a subject's entire milieu.
Each delivers a unique narrative layer, from fine details to grand scenes.

Environment and Composition
You'll want to frame environmental elements in your prompts to spotlight your subject. This way, you can guide the viewer's eye and boost visual appeal.

When writing your prompt, including information regarding the overall lighting is crucial as it determines the mood, depth, and texture of the generated scene.

Modern & Vintage Camera Effects
Camera & film effects.
Adding different real-world camera models into your prompts (such as the Nikon FM2, Canon EOS 3, Pentax Spotmatic, or Minolta Maxxum 7), can affect the way your image turns out.
You'll also want to include the type of film used (such as Agfa Vista 200, Kodak Ektar 100, Kodak Tri-X, or Fujifilm Superia 800) in your cameras, as this plays a key role in determining the contrast, grain, and light sensitivity of your outputs.

Using a specific year
The year or date a photo was taken can influence its appearance through the distinct color palettes, grain, resolution, and even subject matter typical of that era, creating a specific aesthetic often associated with that time.

Putting it all together
Let's go over why the next prompt provides a well-rounded description for generating an image:
- it conveys the subjects (five children)
- setting (treehouse in a suburban backyard, summer of 1985)
- mood (laughter and adventure)
- camera perspective (wide shot, full body)
- equipment used (Pentax K1000 with Agfa Vista 200 film)
- aspect ratio (16:9)
This meticulous specification generate a rich image. The aspect ratio captures the wide scene, the film and camera choice result in vivid colors and clear wood grain, and the bright sunlight of the summer enhances the overall mood of playful adventure.

More Examples

Tips & Tricks
You can save specific parameters via the /prefer command to your Midjourney preferences if you find yourself repeatedly using similar styles. You can even name & create a variety of styling commands which can be called at the end of prompts.
An example of this would be wanting to add a specific camera model style with a specific aspect ratio suffix, as well as raw mode enabled. Here is how you could go about doing this:
We can divide this command up into three parts:
- /prefer option - the command
- set PRv1 - the name chosen for the parameter
- value camera settings: Minolta X-570, Kodak Professional Portra 400 Film, Kiron 75-150mm f/3.8 lens. --ar 16:9 --style raw - the contents of the saved parameters called whenever you use --PRv1 at the end of a prompt
Now, by simply adding --PRv1 at the end of your prompt, you will call the saved settings without having to specify them in your request.
Finally, if you decide you’d like to delete this parameter, you can do so by using the command /prefer option set <PRv1> in Discord.
And there you have it! With plenty of trial and error you can get Midjourney generating a plethora of realistic shots.
There's always a bit of guesswork involved in the image generation process. Midjourney may not be perfect when requesting specific items in your prompts (ex: asking for an image of seven individuals but only generating six). Nonetheless it is very powerful image creation tool.
That's the article! Also check out:
Endless hours and thousands of prompts of experimentation later... I’m happy to release the Midjourney V5 book:
- 94-pages, 200+ prompts, and time saving techniques
- Focus on fantasy and worldbuilding
- Create high quality assets to use in games, concept art, and hobbies
A handbook that helps you improve your SDXL results, fast. Includes:
- Easy step-by-step instructions
- My favorite SDXL ComfyUI workflow
- Recommendations for SDXL models, LoRAs & upscalers
- Realistic and stylized/anime prompt examples
Artist & designer. Based in Montréal.
1 thought on “42 Prompts for Extremely Photorealistic People in Midjourney”
Useful prompts. I really liked the prompts related to lighting. I am definitely going to use these prompts in Midjourney.
Thanks a lot.
Leave a Comment Cancel reply
Save my name, email, and website in this browser for the next time I comment.
Copyright © AiTuts.com 2024

IMAGES
VIDEO
COMMENTS
Capturing and Importing: Begin by capturing the image or selecting one from your gallery. Import the chosen image into your preferred software or app that supports Midjourney. Navigating Editing Options: Familiarize yourself with the editing options provided by Midjourney. These typically include tools for cropping, resizing, and adjusting colors.
Discover the secrets of photo editing in Midjourney with this comprehensive tutorial! Whether you're a beginner or an experienced user, this step-by-step gui...
Upload your image to the Discord server. Copy the link to the image you've uploaded. Write a normal MidJourney prompt but insert your image link after the "/imagine" command. To further influence the style and composition of the generated art, set the image weight and aspect ratio parameters. We've marveled as MidJourney just keeps improving ...
3. Add prompts to generate a new image. Now, it's time to edit your photo. Type the command /imagine in the message box, paste the image link, and give your editing prompt. Midjourney generates a new image based on your existing photo and the added prompt. Midjourney doesn't offer direct photo editing.
Nothing is going to edit in the same way as the Adobe software suite, but tools like Photoshop and Illustrator take a lot of time to learn and cost a lot of money. It's best to start off your photo editing journey with free or inexpensive phone and tablet apps that help you with composition, white balance, lighting, and other basics.
Activate Remix Mode using the /prefer remix command in Discord, or using /settings and clicking Remix Mode. You can turn it off the same way. Create an /imagine prompt based on a reference photo ...
Once you are on Discord, join the Midjourney server. Essentially, what you're going to do is "chat" with the Midjourney bot. All messages, for generating images, start with /imagine prompt. The ...
AI-Driven: Utilizes machine learning algorithms for intuitive image editing. User-Friendly: Easy to use, with a simple interface accessible via Discord. Versatile: Offers a range of editing options, from basic color changes to complex object addition. Community Support: A large and active community of users and experts to help you out.
Set your /Settings. Once in the chat room, type the command "/Settings" and send. A window pops up, set the settings as in the screenshot. It is important to set the settings exactly like this, otherwise, random pictures will be generated instead of your photo.
In this video, i will show you midjourney V4 ai photo editing tutorial for beginners step by step explained or ai cartoon generator (3d cartoon photo editing...
A recap of the importance of photo editing and the journey ahead: Photo editing is an essential skill in the digital age, offering endless opportunities for creative expression and storytelling.
Stylize command: An enhanced feature in version 5.2, it transforms images from surreal to ultra-realistic based on the level of stylization. Varying Stylize values with identical seed images can ...
Step 2: Visit the Midjourney website. Here, choose Join the beta. This will automatically take you to a Discord invite. Image used with permission by copyright holder. Step 3: Accept the Discord ...
In 2 minutes I'll show you how to take your own images or renders and edit them using Midjourney AI.🛑 STOP fussing around with annoying Midjourney prompts.....
I used an incredibly simple prompt to edit this photo: /imagine [image link] springtime --ar 16:9 --v 5. With a reference image and a single word, I was able to change how the image looks. I ran the prompt several times to see the results, and I got images from all angles. Don't expect Midjourney to get even the bigger details right.
Midjourney has released a new editing option that allows people to modify a portion of generated art rather than having to create a new piece, a process known as "inpainting." It's one of the ...
2 - Capture One Pro. While Photoshop may reign supreme in general photo editing, Capture One Pro gives it a run for its money regarding Raw processing and tethered shooting. This powerful (yet easy-to-use) program is a favourite among professional photographers and studios.
Dive into the world of visual narratives and discover how photo editing techniques can evoke emotions, guide the viewer's gaze, and craft compelling stories that resonate. ... Balancing these elements can guide the viewer's emotional journey. Texture and Clarity: Enhancing or reducing textures can make images feel more rustic or dreamlike ...
Open the app and tap on the "Upload" button. You can choose to upload a photo directly from your gallery or take a new photo using the in-app camera. Select the photo you want to edit and wait for it to load. Now, let's explore the various editing options available to transform your photo.
What is Pixlr. Pixlr is a suite of user-friendly online photo editors, design tools and AI tools for browser, mobile and desktop. Now with modern AI tools like AI image generator, AI generative fill, AI remove background, AI remove object and AI image expand. As a versatile photo editing platform, Pixlr offers a wide range of tools and features ...
One of my photographer heroes, Jay Maisel, once said: "When you shoot, that is opportunity number one to make a statement. When you edit, you have opportunity number two to make your statement." Adjustments for emotional impact. I want to give you two very effective ideas on how to approach photo editing from a different perspective.
10 Best Practices for Photo Editing - A Beginner's Guide. Check out more The Journey content at https://bit.ly/GDTheJourney. Read about it here on our blog ...
The last important step of the photo editing journey is touching up — adding subtle yet extremely significant details that level up the quality of your portrait from good to essential. This process encompasses a medley of precise adjustments, from refining minute details to ensuring a cohesive composition. Luminar NEO's diverse set of tools ...
The 4:3 aspect ratio is widely used in photography due to its harmonious balance, offering a pleasing aesthetic that falls between the square format (1:1) and the wide panoramic views (16:9). It's the default aspect ratio for most digital cameras and smartphones, making it the common choice for both amateur and professional photographers.