How-To Geek
How to disable and edit safari’s autofill on macos and ios.
Safari's AutoFill will automatically complete information for contacts, passwords, credit cards and more.

Quick Links
Editing or disabling autofill on safari for macos, editing or disabling autofill on safari for ios.
Safari's AutoFill will automatically complete information for contacts, passwords, credit cards and more. Today we're going to discuss how to turn off or edit those AutoFill entries on macOS and iOS.
Whenever any form data is autofilled, Safari highlights them in yellow.
To turn off any or all AutoFill forms in Safari on macOS, first open Safari's preferences from the Safari menu or press Command+, on your keyboard.
In Safari's preferences, click the AutoFill tab You'll see a list of the things Safari can autofill.
Uncheck any items you don't want Safari autofilling, or click "Edit" next to any of the four items to change the actual data Safari has saved. This includes:
- Using info from my contacts : When you start typing any personal information about you, or any other person in your Contacts, into a form (name, address, phone number, etc.), Safari will autofill the blanks.
- User names and passwords : Clicking "Edit" will simply switch to the Passwords tab, which will let you amend any of your login information contained therein.
- Credit cards : This will open a credit card dialog allowing you add or remove payment information. Double-click on an entry to update a credit card's information including the cardholder's name, card number, and expiration date. Before you can edit any sensitive data, you will have to enter your system password.
- Other forms : Click the other forms "Edit" button to edit or remove any or all form data you have saved for a particular website. This is particularly useful if you frequently visit a website with forms you need to fill in time after time with the same information.
Safari on iOS can also fill in form data automatically. To access the AutoFill settings on iOS, open the Settings and tap "Safari".
Next, scroll down to the General options and tap "AutoFill".
In iOS, the options are slightly different than on macOS. You can still turn off your contact information, names and passwords, and credit cards, but there is no option for other forms.
The My Info option will let you choose another contact to use as your device's main contact, or again, you can edit your own contact information so it is up to date.
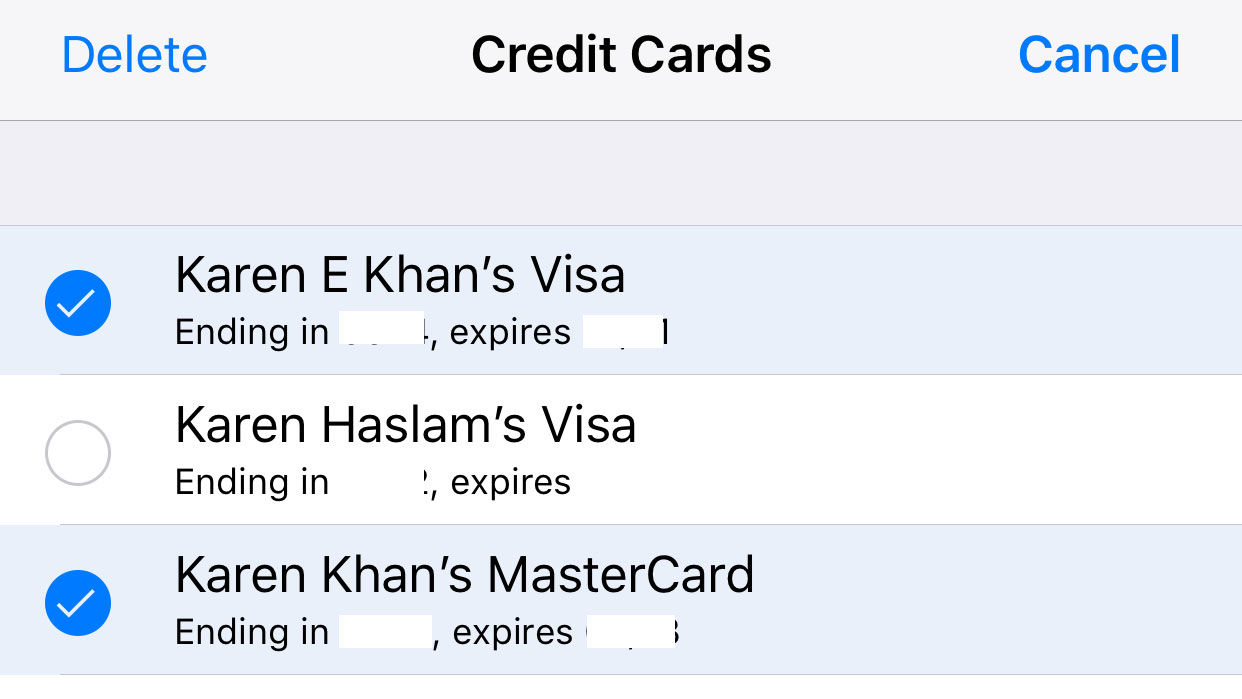
You can also view, add, remove, and edit any saved credit cards.
You may have noticed, in the previous screenshot, that there isn't any obvious way to edit saved login information. To fix any stored usernames and passwords, tap back to the Safari settings, and then tap "Passwords" right above the AutoFill settings.
Keep in mind that AutoFill will automatically populate any forms on your devices, regardless of who is using them. Thus, you should only lend your devices to people you trust, or simply turn off AutoFill if someone else is going to be using your Mac, iPhone, or iPad.
One final note: user login details and credit cards are stored in your iCloud Keychain ( unless they're not set up to sync to iCloud ), so when you add, delete, or edit either of these items on any one device connected to your iCloud account, the information will be populated to your other devices.
Related: How to Sync Contacts, Reminders, and More with iCloud
That's really all there is to it. Safari's AutoFill settings are simple enough to understand. Now, if you no longer want certain information to automatically populate forms, you can turn it off. Similarly, if the information is incorrect, you can fix it.
Tips & Tricks
Troubleshooting, how to edit autofill info on iphone & ipad.

Need to change the autofill information that’s used in Safari to quickly log in, fill in address data, and make payments? Editing autofill info is easy to do on an iPhone and iPad.
There are different kinds of autofill information that are stored by Safari. These include contact information like your address and phone number, payment details like credit card info, and even the login and password data that’s stored in Keychain. All combined, this makes it easy for you to quickly fill out web forms as you make purchases or log on to websites from the Safari web browser. However, this autofill data could get outdated over time if you move, change passwords, or get new credit cards. You’ll want to keep this information updated to make sure you can keep using it. So, let’s find out how you can modify autofill data, right on iPhone or iPad.
How to Edit & Update AutoFill Address, Credit Cards, etc on iPhone & iPad
Editing the autofill information is a pretty simple and straightforward procedure from iOS or iPadOS, follow along:
That will take care of autofill address info, contact details, and credit card info, but if you want to edit autofill logins and passwords that’s done differently and we’ll cover that next.
How to Edit AutoFill Passwords on iPhone and iPad
Unlike contact details and credit card information, the password data that’s used by Safari AutoFill is stored elsewhere, within Keychain. Therefore, the steps to edit saved passwords will vary.

There you go, you can modify any login data saved on your device using this approach.
From now on, whenever you make any changes to your online account login details, contact information and address details, or get a new credit card, make sure you edit the information that’s used by AutoFill in order to keep using it while you’re browsing the web.
This obviously applies to iPhone, iPad, and iPod touch, but if you own a Mac you’ll be able to take advantage of Safari AutoFill on your macOS machine as well.
You can choose to sync the stored credit card information across all your other macOS, iOS, and iPadOS devices with the help of iCloud Keychain. Using iCloud Keychain for AutoFill is incredibly useful for owners of multiple devices and is definitely a nice perk of the cloud service. For this to work however, you need to be signed in to all the devices using the same Apple ID and make sure Keychain is enabled in the iCloud settings, on any of your devices.
What do you think of autofill? Were you able to successfully edit and modify your autofill information as needed? Don’t forget to browse through additional Autofill articles while you’re at it.
Enjoy this tip? Subscribe to our newsletter!
Get more of our great Apple tips, tricks, and important news delivered to your inbox with the OSXDaily newsletter.
You have successfully joined our subscriber list.
Related articles:
- How to Delete Specific Chrome Autofill Suggestions
- How to Add Credit Cards to Safari AutoFill on Mac
- How to Edit AutoFill Information in Safari for Mac OS X
- How to Stop iTunes AutoFilling Unwanted Music Onto an iPhone / iPod touch / iPad
» Comments RSS Feed
My computer is useless to me because it has old telephone numbers old passwords etc. i very seldom even bother with it anymore!
You can update your autofill information with the instructions provided here, hope that helps Lawrence!
Leave a Reply
Name (required)
Mail (will not be published) (required)
Subscribe to OSXDaily
- - How to Connect AirPods to a Smart TV
- - How to Customize the Finder Sidebar on Mac
- - How to Uninstall Apps on MacOS Sonoma & Ventura via System Settings
- - How to Mute a Call on Apple Watch
- - How to Use the Latest GPT 4 & DALL-E 3 Free on iPhone & iPad with Copilot
- - Beta 3 of iOS 17.5, macOS Sonoma 14.5, iPadOS 17.5, Available for Testing
- - Apple Event Set for May 7, New iPads Expected
- - Beta 2 of iOS 17.5, iPadOS 17.5, macOS Sonoma 14.5, Available for Testing
- - Opinion: Shiny Keys on MacBook Air & Pro Are Ugly and Shouldn’t Happen
- - MacOS Ventura 13.6.6 & Safari 17.4.1 Update Available
iPhone / iPad
- - How to Bulk Image Edit on iPhone & iPad wth Copy & Paste Edits to Photos
- - What Does the Bell with Line Through It Mean in Messages? Bell Icon on iPhone, iPad, & Mac Explained
- - iOS 16.7.7 & iPadOS 16.7.7 Released for Older iPhone & iPad Models
- - Fix a Repeating “Trust This Computer” Alert on iPhone & iPad
- - Make a Website Your Mac Wallpaper with Plash
- - 15 Mail Keyboard Shortcuts for Mac
- - How to Use Hover Text on Mac to Magnify On-Screen Text
- - Fix “warning: unable to access /Users/Name/.config/git/attributes Permission Denied” Errors
- - How to Fix the Apple Watch Squiggly Charging Cable Screen
- - NewsToday2: What it is & How to Disable NewsToday2 on Mac

About OSXDaily | Contact Us | Privacy Policy | Sitemap
This website is unrelated to Apple Inc
All trademarks and copyrights on this website are property of their respective owners.
© 2024 OS X Daily. All Rights Reserved. Reproduction without explicit permission is prohibited.
- Apple Watch
- Accessories
- Digital Magazine – Subscribe
- Digital Magazine – Log In
- Smart Answers
- New iPad Air
- iPad mini 7
- Next Mac Pro
- Best Mac antivirus
- Best Mac VPN
When you purchase through links in our articles, we may earn a small commission. This doesn't affect our editorial independence .
How to autofill passwords, bank cards, names and addresses on iPhone

Fed up with entering the same information over and over again whenever you sign up on a website, or buy something online? Hopeless at remembering passwords so you have the same one for everything, even though you know that’s not a good idea?
Luckily Apple is so thoughtful that it is possible for your iPhone to do all this for you – entering your name, address, email, phone number, passwords and more. Here’s how to get that working, and what to do if autofill is autofilling incorrect information.
How autofill works on iPhone
Autofill will kick in when you encounter certain web forms, for example, when you are signing up for a new account and tap on the name field. You will see Autofill suggestions appear above the on-screen keyboard and the fields that are autofilled will have a yellow highlight to remind you to check them.
If you were shopping online you could use autofill to complete your name, email, phone number, address, and even enter your credit card information. The only thing you need to enter yourself is the three digit code from the back of your card.
Before you set your iPhone, iPad and Mac up to use autofill it’s very important that you make sure that it is password protected.
Password protect your iPhone
If you are going to save passwords and credit card info in order to use autofill then it’s really important that you use a passcode to protect your device. Don’t leave your iPhone unlocked because anyone would be able to use it and access your data. Don’t use an easy to guess passcode either – like 0000 or 1234. You can choose to use a multifigure passcode that includes numbers and letters. Read our advice about creating a safe passcode here .
If you are using a 6 digit passcode, or worse a 4 digit passcode, it’s time to update.
- Go to Settings > Touch ID & Passcode (or Face ID & Passcode).
- Enter your current code, then scroll to Change Passcode.

- Here you have the choice of adding a custom alphanumeric code, or a custom numeric code. Choose something that won’t give you a headache everytime you enter it, but keep the folloing in mind…
Of course you can continue to use your fingerprint or face to unlock the phone, but the Passcode is what really protects your data should your phone fall into someone else hands. A passcode that is longer than six digits will be a lot more secure – apparently it could take a few months to hack an eight-digit pin, while a ten-digit pin could take a decade to crack. Alternatively a passphrase that combines numbers and letters and even symbols would be even more secure – but probably more hassle for you every time you need to enter it. Read more about iPhone security here.
How to edit your autofill information, name and address
Over time your autofill information can get out of date. Say you move house or get married. If you want to autofill the correct data you need to make sure your personal card in Contacts is up to date.
Tap on Contacts and locate your own name in the list. Tap on your name from the Contacts list to view your own details, and tap Edit to fill in the information. You should ensure that your telephone number, email and physical address is correct.
- Open Contacts
- At the top you will find your own card, click on that.

Here you will find your phone numbers, various email addresses you use, your home and work addresses, birthday, and medical ID, under which you can list any medical conditions or allergies and your blood type, in case of emergency.
When this information is correct you won’t have to keep entering your data in online forms and the like.
In order for Safari to know to use this information, you may need to update your settings.
- Go to Settings > Safari > Autofill
- Make sure that Use Contact Info is selected.
- Also select Names and Passwords.
There is also the option to Select Credit Cards, which we will look at next.
Note that it may take a while before your Contact Info syncs across your devices.
How to add a debit of Credit Cards to Autofill
Generally the first time you use a new card it will find its way into your Autofill memory, but if you want to add it yourself, here’s what to do:
- Go to Settings > Safari > Autofill.
- Click on the arrow beside Saved Credit Cards.
- Use Touch ID/Face ID or enter your passcode.
- Tap on Add Credit Card.
- You can use the camera to save having to enter all the digits. Otherwise, just tap them in.
How to remove old Credit Cards from Autofill
If you are anything like us, you probably lose your card from time to time, and have to get a new one from the bank. When this happens you can end up with lots of listings for old cards you can no longer use. Here’s how to remove them.
- Click on the arrow beside Saved Credit Cards
- Use Touch ID/Face ID or enter your passcode
- Tap on Edit
- Tap on Delete
This will remove the old cards from the keychain on all your devices.
What to do if your iPhone keeps autofilling the wrong information
Getting fed up with autofill suggesting the wrong details? It’s easy to correct what’s in the autofill memory.
If autofill keeps entering your maiden name, for example, you need to change it on your card in Contacts, as above. Similarly, if you have moved house then enter your new address in your contact card.
If you only have one debit card but every time you pay for something online you have to sift through 12 old cards then you just need to delete the old ones, as above.
If autofill is entering the wrong passwords for sites though that can be a bit more complicated. We’ll look at that scenario next.
How to set up password autofill on iPhone
If you are hopeless at remembering passwords don’t feel bad – we all are. The problem with our inability to remember passwords is that it leads to us choosing one easy to remember password for everything, or we write them down somewhere (like the Notes app on our iPhone). The problem with easy to remember passwords is they are also quite easy to guess, and the problem with using the same password for everything is that once it’s guessed, everything is exposed (including that list in Notes).
Apple endeavours to help you by remembering all your complicated passwords for you, so all you need to remember is one passcode to unlock your iPhone (and use your fingerprint or face the rest of the time) and you can log in wherever you need to.
All your passwords will be stored in your iCloud Keychain, so you will need to set up iCloud Keychain on your iPhone if you haven’t already. Here’s how:
- Go to Settings and tap on your profile at the top.
- Tap on iCloud.
To make sure that you passwords autofill, you may also need to switch things on in Settings, so:
- Make sure that Names and Passwords is on.
When you set up a new login and password on a website using Safari your phone will add the password and user name to your keychain.
How to view all the passwords you have stored in iCloud Keychain
If you are always forgetting your passwords but you don’t want to rely on autofill to complete them (maybe you are using a non Apple device, or sharing your WiFi password with a friend) it is possible to find your password in your keychain. Here’s how:
- Go to Settings > Accounts & Passwords > App & Website Passwords.
- Your Touch ID or Face ID will be requested.
- You will be presented with a list of all the services you have passwords for, listed by domain.
- Scroll through the list until you identify the service you are looking for.
- Tap on it and you will see your password on the next screen.
- If you want to delete a password from the list, tap on it, choose Edit, and tap on the – beside it.
We have more advice about finding your WiFi password here.
Author: Karen Haslam , Managing Editor

Karen has worked on both sides of the Apple divide, clocking up a number of years at Apple's PR agency prior to joining Macworld more than two decades ago. Karen's career highlights include interviewing Apple's Steve Wozniak and discussing Steve Jobs’ legacy on the BBC. Having edited the U.K. print and online editions of Macworld for many years, more recently her focus has been on SEO and evergreen content as well product recommendations and buying advice on Macworld.com.
Recent stories by Karen Haslam:
- How to scan documents on iPhone
- Apple Events 2024: Apple’s event plans
- 2024 iPad Pro: Everything you need to know about Apple’s next flagship tablet
How to Set Up AutoFill in Safari on iPhone

If you find yourself typing the same personal data and credit card information over and over again on your iPhone, it's time to set up Safari AutoFill. Setting up AutoFill in Safari on your iPhone saves you time and ensures the accuracy of the information you enter into forms online. We'll walk you through the Autofill setup process.
Related: How to Auto Fill Credit Card Information Using Your iPhone Camera
To set up Safari AutoFill on your iPhone:

- To add a credit card in Safari AutoFill settings, select Saved Credit Cards .
- Enter your passcode, then tap Add Credit Card .

Once you have Use Contact Info and Credit Cards set up, you can fill in any web forms in Safari with your saved information by selecting AutoFill. To learn more about how to customize your Safari experience on your iPhone, sign up for our free Tip of the Day newsletter.

Author Details
Violet cooper.
Violet is a freelance lifestyle writer. She loves spending time with her husband, enjoys going on adventures, and is an Apple enthusiast.

Featured Products

Most Popular

How to Tell If Someone Blocked Your Number on iPhone

10 Simple Tips To Fix iPhone Battery Drain

How to Schedule a Text Message on iPhone

iPhone Alarm Volume Low? How to Make an iPhone Alarm Louder

How to Tell If a Dead iPhone Is Charging

How To Put Two Pictures Together on iPhone

How to Fix Apple Watch ECG Not Working

How to Hide an App on Your iPhone

How To Turn Off Flashlight on iPhone (Without Swiping Up!)

How to Get Automatic Birthday Reminders on iPhone

Can iPhones Get Viruses? How to Detect & Remove Malware (iOS 17)

How to Transfer Call from Apple Watch to iPhone
Featured articles, why is my iphone battery draining so fast 13 easy fixes.

Identify Mystery Numbers: How to Find No Caller ID on iPhone

Apple ID Not Active? Here’s the Fix!

How to Cast Apple TV to Chromecast for Easy Viewing

Fix Photos Not Uploading to iCloud Once & for All (iOS 17)

There Was an Error Connecting to the Apple ID Server: Fixed

CarPlay Not Working? 4 Ways to Fix Apple CarPlay Today
Check out our sponsors.

- Each email reveals new things you can do with your phone (and other devices) with easy-to-follow screenshots.
- Enter your email to get your first tip immediately!
How to Use AutoFill in Safari on Mac
You can save time when filling out forms on Safari thanks to the excellent AutoFill feature. Here's everything you need to know.
If you’re like most people, you probably don’t remember the login to every online account you have, or recall most of your credit card information. You might have to refer to a saved note to remember your username and password, or have to pull out your credit card every time you need to use it to make a purchase online.
It can be tedious to have to enter that information repeatedly. Thankfully, a Safari feature called AutoFill makes saving and filling in information like login credentials or a credit card simple. We're going to show you how to use it.
What Is AutoFill?
AutoFill is a feature in Safari that allows you to automatically fill out web forms. The first time you fill out a form, AutoFill prompts you to save that information, which you can then re-use every time you fill out the same or similar form. This gets stored locally in Safari by default and in your iCloud Keychain (if you have that enabled.) We've explained the basics of using iCloud Keychain if you're not familiar.
When you are filling out fields in an online shopping cart, or you can’t remember your password to your Netflix account, AutoFill populates the fields with a click. It's incredibly useful in time-sensitive situations, such as when you need to order a ticket for a concert that will sell out quickly. No more time wasted having to enter your information manually.
What Information Can You Use With AutoFill?
AutoFill allows you to use multiple types of information. You can use information such as a username and password to an online account, credit card information, and it allows you to input information from your contacts. AutoFill also allows you to use other information that you may have entered on other forms. That way, when you revisit that website, you don’t have to try to remember the information.
How to Add a Username, Password, and Credit Card to Safari
Adding an account’s username and password through AutoFill is a straightforward process. To add a username and password:
- Open Safari on your Mac.
- Click on Safari in the Menu Bar , then click Preferences .
- Next, click on AutoFill .
- You will now see the multiple AutoFill Forms. Click Edit next to Usernames and passwords .
- Enter your Mac’s password or scan your fingerprint to proceed.
- Click the + symbol .
- You can now enter the website’s name, your username, and the password.
- Next, click Add Password .
If you would like to add a credit card through AutoFill, the process is similar to adding an account login. To add a credit card:
- In the AutoFill tab , click Edit next to Credit cards .
- Enter your password or scan your fingerprint to continue.
- Click Add .
- You can now fill in a description for the card that you want to add, the cardholder name, card number, and the expiration date.
- Once you have entered that information, click Done .
Now that you have added your login information or your credit card, you’re all set. Next time you go to the website to log in or need to enter your credit card, Safari will prompt you to automatically fill in the fields with that information when you click on the web form.
How to Remove or Change Saved AutoFill Information
There may be times when you would like to remove an account, or maybe you received a compromised password alert from Safari and would now like to update the password for AutoFill. Normally, it prompts you to save the new password automatically, but you can also do it manually. You can do this within the Passwords tab in Safari preferences.
- In Preferences , click Passwords .
- Select the website that is associated with your account.
- Click Edit .
- If you would like to update the information, simply remove the old login and enter the new information, then click Save .
- If you want to delete the login altogether, instead of hitting Save , click Delete Password .
- Click Delete Password again .
Can You Use AutoFill Across Apple Devices?
AutoFill information will be accessible on all of your Apple devices if you have iCloud Keychain enabled. You also need to be logged in to the same Apple ID. This means that if you try to sign in to an account on your iPhone that you saved on your Mac, Safari on your phone will automatically offer AutoFill's assistance. In addition to that, any updates or changes made through AutoFill will be saved and shared across your devices.
AutoFill Saves Time and Frustration
Having to enter crucial information repeatedly not only wastes time but is also inefficient. Trying to remember a login or entering a credit card when time is vital can be nerve-racking. Using a feature like AutoFill will remove hurdles when having to complete web forms, and you can use it across all of your Apple devices. It's one of the many handy features that Safari on Mac has to offer.
- The Best Tech Gifts Under $100
- Traveling? Get These Gadgets!
How to Enable or Change AutoFill Information on an iPhone
Update AutoFill for personal info, credit cards, passwords, and more
:max_bytes(150000):strip_icc():format(webp)/ScottOrgera-f7aca23cc84a4ea9a3f9e2ebd93bd690.jpg "safari autofill my info")
- Switching from Android
What to Know
- To autofill contact info or credit cards on your iPhone: Settings > AutoFill and toggle Use contact settings or Credit Cards to On .
- To change your info, go to Contacts > My Card > Edit or Saved Credit Cards > Add Credit Card .
- To autofill passwords: Ensure iCloud access is on, tap Settings > Passwords & Accounts, and toggle Autofill Passwords to On .
This article shows how to add and change the information such as your name, email addresses, credit cards, phone numbers, usernames, and passwords that iPhone's AutoFill feature uses in iOS 12 and later.
Enable AutoFill to Use Your Contact Info
To enable AutoFill to use your contact data:
Open the Settings app.
Tap Safari to open Safari Settings .
Tap AutoFill .
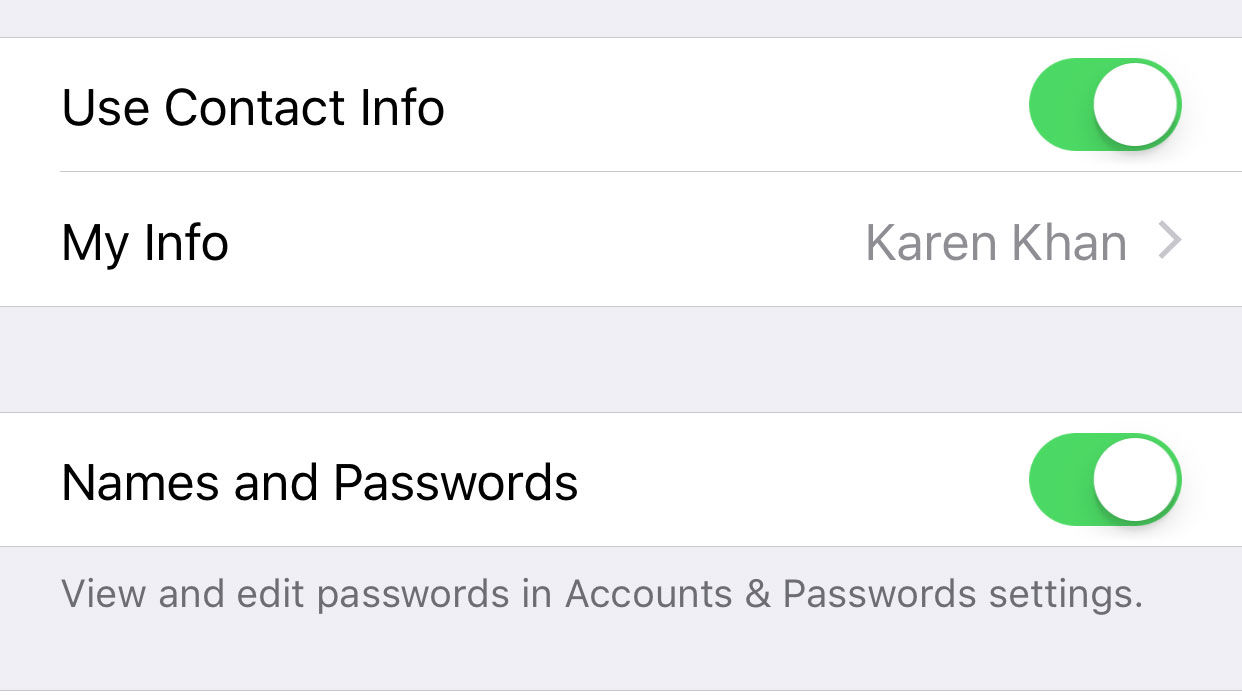
Turn on the Use Contact Info toggle switch.
Tap My Info .
Select your contact info .
Your contact info is now enabled for AutoFill.
To change to a different contact, tap My Info and update it with the new contact.
Change or Update Your Personal Info for AutoFill
AutoFill pulls your personal information, including your name, phone number, and email address, from your My Card contact card in Contacts. Here's how to change or update this information:
Open Contacts .
Tap My Card at the top of the screen.
Change your name or company name, and add a phone number, email address, birthday, URL, and more.
Your personal contact information is changed, and AutoFill will now pull this updated data.
Your phone number is automatically pulled from Settings. You can add additional phone numbers, such as a home number. Similarly, email addresses are pulled from Mail and can't be changed here, but you can add a new email address.
Enable or Change AutoFill for Credit and Debit Cards
To enable AutoFill to use your credit and debit card information, and to add a new credit card to AutoFill:
Turn on the Credit Cards toggle switch to enable Credit Card AutoFill.
Tap Saved Credit Cards.
Enter your iPhone passcode or Touch ID if asked, or use Face ID if supported.
Select Add Credit Card .
Add a credit or debit card manually or use the camera to take a picture of the card.
AutoFill can now access your updated credit card information.
To edit or delete any saved credit card, go to Settings > Safari > AutoFill > Saved Credit Cards , and tap the card you want to edit or delete. Tap Edit and then tap Delete Credit Card or change the credit card information. Tap Done .
Enable or Change AutoFill for IDs and Passwords
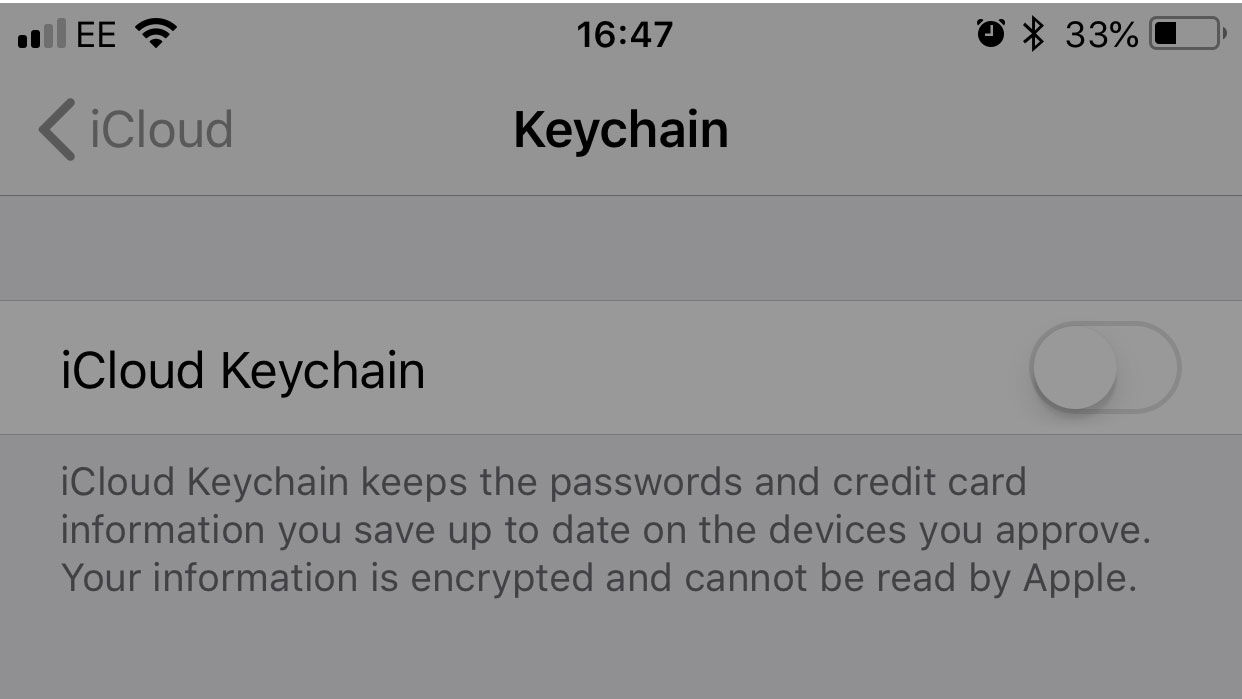
Activate the icloud keychain.
To enable AutoFill to save and use IDs and passwords, the iCloud Keychain must first be activated. To activate the iCloud Keychain:
Open the Settings app and tap your Apple ID banner at the top of the screen.
Tap iCloud .
Scroll down the list and select Keychain .
Turn on the iCloud Keychain toggle switch and enter your Apple ID password if prompted.
Enable AutoFill to Use Saved IDs and Passwords
To allow AutoFill to use your saved IDs and passwords:
Go to Settings and scroll down to Passwords and Accounts .
Tap AutoFill Passwords .
Toggle AutoFill Passwords to On .
Under Allow Filling From , make sure iCloud Keychain is checked.
Open the Chrome app on your iPhone and tap More > Settings . Tap Payment methods or Addresses and more to view or change your settings.
To turn off Chrome Autofill settings , open the Chrome app, tap More > Settings . Tap Payment methods and turn off Save and fill payment methods . Next, select Addresses and more and turn off Save and fill addresses .
In Firefox, go to Menu > Options > Privacy & Security . In the Forms and Autofill section, turn Autofill addresses on or off, or select Add , Edit , or Remove to make changes. You can manage Firefox Autofill settings in several ways, including disabling the settings completely and manually adding contact information.
Get the Latest Tech News Delivered Every Day
- How to Scan Credit Card Numbers in Safari for iPhone
- How to Find a Wi-Fi Password on an iPhone
- How to Manage Android Autofill Settings
- How to Update Apple ID Account Information
- How to Manage Chrome Autofill Settings
- How to Control iPhone Safari Settings and Security
- Using Form Autofill or Autocomplete in Your Web Browser
- How to Use NameDrop on iPhone
- How to Make a Digital Business Card
- How to Set Up and Use Apple Pay Cash
- The 8 Best Apps to Send Money in 2024
- How to Use AutoFill in the Safari Browser
- How to Sync Contacts From iPhone to Mac
- What Is Samsung Pay?
- 13 Hidden iOS 17 and iPadOS 17 Features
- How to Set up a New iPhone
How to Change your Safari AutoFill Data
Safari has a built-in auto-fill tool. This lets you fill out forms easily. Your name, passwords, address or credit cards can be filled in for you. However, sometimes you may need to update or edit your data. For example, if you move to a new address, it would be annoying to see your old address continue to pop up when you want to fill out forms. You can add your new address to your settings so that Safari remembers the correct address. Like with your address, you can change your name or credit card details. In this article, I will show you how to view, edit and clear Safari AutoFill settings. This is a handy feature that enables you to fill out online forms quickly and accurately. It is much easier than entering your address or credit details each time you need them in Safari.
Disable AutoFill in Safari
Let’s start with this one. If you find this feature annoying and prefer to enter details yourself, you can turn off AutoFill. Here is how:
Disable AutoFill on iPhone or iPad
You can turn off AutoFill for passwords or contact or credit card information.
- Settings > Safari > AutoFill . You will see two options: Use Contact Info and Credit Cards . Toggle their switches off to disable them. You can turn off one and keep the other one on if you prefer.

- To turn off AutoFill for passwords, go to Settings > Passwords > [unlock your screen] > AutoFill Passwords , then turn off AutoFill Passwords .

Disable AutoFill on Mac
- On your Mac, open Safari and go to Safari > Preferences > AutoFill . Then uncheck the boxes for Using information from my contacts , User names and password s, and Credit cards .

How to change the AutoFill data
If you want to update your data for AutoFill, you can. You can update your name, address, passwords and credit card details.
Update AutoFill data on Mac
- On your Mac, open Safari. Click on Safari > Preferences , then click the AutoFill tab.
- If you want to update your address or your name, click the Edit button next to the Using information from my contacts . Clicking that will open your contact card. If your details need to be updated, click the edit button. Then you can change your address and other details. After editing, click Done .

- If you want to remove, edit, or add new credit card details, click the Edit button next to Credit cards . You will be asked to enter your admin password. You can add or remove new card details.

Update AutoFill on iPhone or iPad
- On your iPad or iPhone, go to Settings > Safari > AutoFill .
- Tap My Info to open your contacts. Ensure that the correct contact card is selected. If you need to edit details, then open Contacts , select your contact (My Card) and tap Edit .

- Tap Saved Credit Cards to edit and add new credit cards. You can delete current cards or add new cards. To delete, tap the Edit link and select the card you want to remove, then tap Delete . If you want to edit an individual card, tap the card, then tap Edit .

- If you want to update your AutoFill passwords, go to Settings > Passwords > [unlock the screen], then you can remove websites or modify password/site details.

Related articles
- Slow iCloud Keychain Passwords/Forms Autofills On Mac
- Can Private Browsing be Traced on an iPhone, iPad or Mac?
- How To Manage Web Site Usernames & Passwords In Safari (iOS and macOS)
- How To See The Full Web Site Address In Safari URL Bar
Dr. Serhat Kurt worked as a Senior Technology Director specializing in Apple solutions for small and medium-sized educational institutions. He holds a doctoral degree (or doctorate) from the University of Illinois at Urbana / Champaign and a master’s degree from Purdue University. He is a former faculty member. Here is his LinkedIn profile and Google Scholar profile . Email Serhat Kurt .
Similar Posts
Outlook for mac not working: freezes or crashes, fix.
Is Outlook not working correctly? This article explains how you can fix when you have Outlook mail issues on your Mac. More specifically, Outlook may randomly crash or freeze when you want to…

Safari Opens the First Tab Instead of the Most Recent Tab Used, Fix
By default, when you open Safari on iPhone or iPad, the last viewed tab will be opened if you have multiple tabs. In other words, Safari launches with a last visited website. This…
iPhone System Haptics, What They are, Enable or Disable
Some iPhone models include a feature called haptic feedback (also called Haptics or System Haptics). This feature uses the Taptic Engine to provide haptic feedback, combined with an audible tone and/or visual feedback. Taptic…
How to Contact Apple Online Live Chat Support Team
If you need help, Apple provides support for its products and services in many ways. One of them is live chat support. Live chat allows you to use instant / live (real-time) messaging to…
How To Disable Screenshot Thumbnail On Mac
When you take a screenshot or screen recording, a little screenshot thumbnail preview will appear for a few seconds, and if you do nothing and if you ignore it, your screenshot (or video…
Gmail Account Error: Cannot Get Mail, Fix
Some users have said that they are unable to access their Gmail account using the Mail app on their iPhone or iPad. Users have said they get an error message saying “Cannot Get…
Leave a Reply Cancel reply
Your email address will not be published. Required fields are marked *
Categories:
How to change the AutoFill settings on your iPad to make filling out forms easier, or to keep your passwords secure
- You can easily change the AutoFill settings on your iPad by going into the Settings app on your iPad .
- When enabled, this feature is used to store your login information saved from websites, and automatically fill in your username and password.
- Visit Business Insider's homepage for more stories .
If you find yourself often forgetting passwords for online shopping accounts, membership logins, and more, the AutoFill feature on your iPad is great.
AutoFill allows users to save passwords and personal information entered on Safari, and uses that data to automatically fill in forms — and even access that data across all your devices using iCloud.
The AutoFill feature is easy to enable in your iPad 's Settings app, where you can also review, edit, and delete passwords you no longer need.
Additionally, you can disable the feature with a simple switch if you no longer wish to use it. You can also do this from your iPhone or from your Mac computer .
Here's how to do it on your iPad .
Check out the products mentioned in this article:
Ipad (from $329.99 at best buy), how to change the autofill settings on your ipad.
1. Open the Settings app on your iPad.
2. Scroll down and tap "Passwords & Accounts" in the fifth section of options. This will bring you to your password details.
3. If the AutoFill feature is turned on, you will see a green switch labeled "AutoFill Passwords." To turn this off, tap or slide the switch to turn it white.
4. Tap "Website & App Passwords" at the top of the list to view what's already saved. The gray number on the right-hand side shows how many entries have already been saved using AutoFill.
5. Based on your security settings, you may be prompted to enter your passcode or Face/Touch ID. Enter your passcode or biometrics if asked, which will bring you to a list of all of your AutoFill passwords.
6. To delete an entry, first swipe left until a red "Delete" option appears.
7. Tap "Delete" to confirm.
8. You can also tap on any password to view its individual details.
9. Tap "Change Password on Website" to bring you to its webpage on Safari.
10. You can also tap "Edit" in the upper-left hand corner to remove the websites associated with the username and password. What this means is that the password will still be saved, but your iPhone won't associate it with any website. Tap the red minus symbol to the left of a website name to erase it. Most passwords are only linked to one website, but some — like university logins — may connect to multiple, similar pages.
11. Tap "Done" in the upper-left hand corner when you're finished.
Related coverage from How To Do Everything: Tech :
How to fully silence your ipad in 2 different ways, 'why won't my ipad screen rotate': how to turn off the orientation lock on an ipad or troubleshoot its screen, how to leave a family sharing plan on an iphone or ipad, in 2 different ways, how to buy kindle books on your ipad using amazon's website.
Insider Inc. receives a commission when you buy through our links.
Watch: Watch Apple unveil the new iPad that has a 10.2" screen and supports Apple pencil
- Main content
Daily Tip: How to use AutoFill to automatically fill out web forms on iPhone and iPad

Tired of filling out one tedious web form after another, and wondering how to get Safari on iPhone and iPad to automatically fill them out for you? Luckily, deep within the settings of Safari there is a way to setup AutoFill, something which allows you to automatically input your personal data on sites that permit its use.
- If you haven't already, create a contact for yourself in the Contacts app.
- Open up the Contacts app
- Select the plus sign in the top right corner

- Add in your personal information

- Open up your settings app

- Tap on Safari
- Tap on AutoFill
- Toggle "Use Contact Info" to on

- Tap on My Info and select the contact you just created or the one you already had
- Now when you visit a site that needs your information, as soon as you select the first text box your keyboard will pop up and there will be an option called AutoFill

- Tap on AutoFill and Bob’s your Uncle, all your details will be automatically filled in for you

Daily Tips range from beginner-level 101 to advanced-level ninjary. If you already know this tip, keep the link handy as a quick way to help a friend. If you have a tip of your own you’d like to suggest, add them to the comments or send them in to [email protected] .
Master your iPhone in minutes
iMore offers spot-on advice and guidance from our team of experts, with decades of Apple device experience to lean on. Learn more with iMore!

UK editor at iMore, mobile technology lover and air conditioning design engineer.
Apple's 'Made for Business' Today at Apple series will highlight how products can help small business owners
Nintendo emulators on the App Store are a far cry from the heady days of Miyamoto at an iPhone launch
M4 MacBook Pro: Everything you need to know
Most Popular
- 2 Apple accused of using blood minerals from a region 'devastated by grave violations of human rights' in its products
- 3 Did Apple just email you to say your trade-in is canceled? Don't panic, it's a glitch
- 4 On-device iOS 18 AI features tipped as Apple makes new open source LLM tools available online
- 5 This Australian iPhone can use the EU's third-party app stores and more, but it's a messy workaround you probably shouldn't try
How to change Autofill on Mac
Fill 'er up!

Got an Apple , Mac or iOS tech question? We have the answer. This time we have a reader dealing with problematic AutoFill in Safari for Mac OS X . AutoFill is a super-convenient way to get your personal information into online forms and the like, but it can be a big pain when AutoFill insists on providing the wrong info. Fortunately, there's a way to change this behavior — we'll show you how.
How do I change the autofill on my Mac?
Is there a way to control the data used for AutoFill in Safari on my Mac? For example, I want to use my personal information for AutoFill, but my work info keeps coming up!
This has been a lingering issue within OS X for many, many years (in fact, since AutoFill for Safari was introduced), and has yet to be addressed. The problem at hand is that no normal person as a single email address, a single phone number, or a single address. We all have work addresses, work phone numbers, and work email addresses. When you have multiple entries in your contact card, however, AutoFill will only grab the first of each of these entries.

Fortunately, there is a way to fix this issue, even if it's a bit of a roundabout solution. Open your contact card in the Contacts app, and click the "Edit" button at the bottom of the card. (Or, from Safari, open the preferences, go to the AutoFill tab, and click Edit; you'll automatically be redirected to the Contacts app.) Ensure that the address, phone number, or email address that you want to be entered by Safari AutoFill is in the first position for each of the data types. This will likely require moving around a bit of data, since fields cannot be dragged and rearranged in Contacts. Once you do this, however, your Autofill data should come in exactly like you want.
Got an Apple tech question? Email [email protected] .
Get daily insight, inspiration and deals in your inbox
Get the hottest deals available in your inbox plus news, reviews, opinion, analysis and more from the TechRadar team.
Apple could be playing it smart by waiting for its M4 chips before releasing a new Mac mini
Apple's M4 plans could make the latest MacBooks outdated already
Netflix's official Atlas trailer puts Jennifer Lopez in another generic Terminator clone, but with Titanfall-like mechs
Most Popular
- 2 New Deadpool and Wolverine trailer is packed with Marvel Easter eggs – here are 6 of the best
- 3 Sony’s wearable air conditioner is the first step towards a real Dune stillsuit
- 4 Samsung's S90C OLED is our best-rated TV, and it just crashed to a new record-low price
- 5 This Android phone for audiophiles offers a hi-res DAC, balanced output and 3.5mm jack – plus a cool cyberpunk look that puts Google and OnePlus to shame
- 2 Could ChatGPT be the next big cybersecurity worry — researchers say it can crack systems faster than ever before
- 3 DJI drones just got a new rival in the US that licenses… DJI technology
- 4 Sony dropped OLED for its flagship 2024 TV – here's why
- 5 Missed out on the Fujifilm X100VI? New leak suggests the next best thing could land soon
- Accessories
- Meet the team
- Advertise with us
- Privacy Policy
AutoFill feature on Safari saves you time by streamlining your input in various fields. So, you don’t need to manually input your passwords each time you check in to your favorite websites. Interesting, right? In this guide, I’ll show you how to use Touch ID to autofill passwords in Safari on Mac.
How to save or remove username and password in Safari on Mac
How to use touch id to autofill passwords in safari, how to change autofill settings in safari on mac.

- Fill in the following details: Title , Website , Username, and Password . You can also add Notes if you want.

To remove the username and password in Safari on Mac, follow these steps:
- Open Safari → Go to the Sign in section of a website. I’m using Facebook for illustrations.

Voila! You’ve successfully avoided the hassle of typing your username and password.
You can autofill various information depending on the form you are filling. If you don’t want to save your private information or want to remove any saved details, you can change your Mac’s AutoFill settings.
- Go to Safari Settings.
- Head to AutoFill .
- Using information from my contacts: Enabling lets you fill in the basic information on any website using your Contact card. To update your information on the contact card, click the Edit button .
- Usernames and passwords: You may save your usernames and passwords on websites to access them later quickly. Saved passwords will be pre-filled in subsequent fields.
- Credit Cards: You can AutoFill your Credit Card details while purchasing on Safari. Furthermore, manage your saved credit cards by clicking the Edit button beside it.
- Other forms: This feature saves the data you enter in online forms and reuse it to fill out the same form fields quickly. To know websites that have saved AutoFill information, click the Edit button . From there, you can view or delete the saved information.
What to do if AutoFill is not showing the saved password on Mac?
Several things can prevent AutoFill from filling in a saved password on a website. Follow the instructions below to ensure your saved passwords are correctly auto-filled.
- Open Safari Settings .

- Go to Safari Settings → Select Passwords → Enter your Mac’s password .
- Locate the website’s password labeled never saved → Click the info icon .
- Select Delete Password → Confirm by selecting Delete Password .
- Afterward, click the Add button to save the website , username, and password .
- Go to the Apple logo ( ) → Select System Settings .

Is AutoFill different from iCloud Keychain?
AutoFill is a handy feature that quickly fills in your saved usernames and passwords for websites and apps in Safari. It eliminates the need for manually entering login credentials every time.
However, Keychain is a password management tool that is a safe repository for all your login and other private information such as credit card details, Wi-Fi network passwords, etc. It uses robust encryption algorithms and a master password to encrypt sensitive data.
You can disable Touch ID for your Mac’s Safari AutoFill feature. To do so, go to Safari → Settings → AutoFill → uncheck Usernames and passwords .
Unfortunately, you cannot use the AutoFill feature outside the Safari browser on your Mac. However, Chrome offers its own password manager. Besides, you may use password manager apps that support Touch ID to AutoFill passwords across different apps and websites.
Wrapping up…
Using Touch ID on a Mac to automatically fill in passwords in Safari saves you time and increases your online security. So why not give it a shot and see how convenient it is for you. Do you use any third-party password manager on your Mac? Let me know in the comments below!
- How to use AutoFill Passwords on iPhone and iPad
- AutoFill Passwords not working on iPhone or iPad
- How to Change Default Password AutoFill App on iPhone

Bhaskar is a tech guru who turned wordsmith. Hiding his B.Tech degree in a closet, he ditched the corporate path to simplify tech for everyone. For the past 5 years, he's been dishing out how-tos, reviews, and sharp insights. But there's more! He's a witty interview champ and has been sharing his wisdom for 3 years. Furthermore, he has honed his editing skills for 1.5 years and is now delving into marketing to assist newcomers. When not jamming his fingers on those mechanical keyboards, you may find him on strings or engaging in sports. And by evening, his quotes will be appearing on your Instagram feeds.
View all posts
🗣️ Our site is supported by our readers like you. When you purchase through our links, we earn a small commission. Read Disclaimer .
LEAVE A REPLY Cancel reply
Save my name, email, and website in this browser for the next time I comment.
Related Articles
How to install homebrew on mac m1, m2, m3 (2024 updated), how to know if someone has blocked you on imessage (2024), how to fix “cannot connect to app store” on iphone or ipad, how to fix delete key not working on mac.
Safari User Guide
- Change your home page
- Import bookmarks, history and passwords
- Make Safari your default web browser
- Go to websites
- Find what you’re looking for
- Bookmark web pages that you want to revisit
- See your favourite websites
- Use tabs for web pages
- Pin frequently visited websites
- Play web videos
- Mute audio in tabs
- Pay with Apple Pay
- Autofill credit card info
- Autofill contact info
- Keep a Reading List
- Hide ads when reading articles
- Translate a web page
- Download items from the web
- Share or post web pages
- Add passes to Wallet
- Save part or all of a web page
- Print or create a PDF of a web page
- Customise a start page
- Customise the Safari window
- Customise settings per website
- Zoom in on web pages
- Get extensions
- Manage cookies and website data
- Block pop-ups
- Clear your browsing history
- Browse privately
- Autofill username and password info
- Prevent cross-site tracking
- View a Privacy Report
- Change Safari preferences
- Keyboard and other shortcuts
- Troubleshooting
Change AutoFill preferences in Safari on Mac
Open Safari for me
If your Mac or Apple keyboard has Touch ID , you can use Touch ID to fill in usernames and passwords and to fill in credit card information. See Change Touch ID preferences .

How to add, change, or clear autofill data

The autofill feature available in Internet browsers is very useful as it can autopopulate form fields with data, such as addresses or credit card information. Sometimes, saved autofill data is misspelled, outdated, or missing. The following sections show you how to add, change, or clear autofill data. To proceed, select your Internet browser from the list below and follow the steps.
Google Chrome
Mozilla firefox, microsoft edge, microsoft edge legacy, microsoft internet explorer.

To modify your autofill data in Google Chrome, follow the directions in these sections. The first section shows you how to access the autofill options, and the others show you how to edit them.
Access autofill options
Payment methods, addresses and more.
- Open the Google Chrome browser.
- In the drop-down menu , select Settings .

- On the left side of the screen, click the Autofill selector.

- In the middle of the screen, under the Autofill section, you are presented with three choices: Passwords , Payment methods , and Addresses and more .

- Once you know which autofill item you'd like to edit, find it in the sections below and follow the instructions.
The following link shows you how to manage your browser passwords in Chrome.
- How to view, save, and remove browser passwords.
The following section contains details on the payment method autofill options in Chrome.

Save and fill payment methods
Use the toggle switch next to Save and fill payment methods to choose whether or not Chrome should save and autopopulate your payment information going forward ( A ).
Add payment method
To input new payment information, click the Add button ( B ) and type in the appropriate information. When you've finished, click the Save button.

Edit payment methods
The following section contains details on the address autofill options in Chrome.

Save and fill addresses
Use the toggle switch next to Save and fill addresses to choose whether or not Chrome should save and autopopulate your address information going forward ( A ).
Adding addresses
To input new address information, click the Add button ( B ) and type in the appropriate information. In this area you'll also find an autofill for the phone number and e-mail address. When you've finished, click the Save button.

Remove or edit an address

Firefox's autofill capabilities for forms are limited to addresses only. To learn how to access, add, modify, and delete your autofill data in Firefox, follow these steps.
Add autofill data
Change autofill data, delete autofill data.
- Open the Firefox browser.
- Select Settings (called Preferences in macOS and Linux).
- In the next window, select the Privacy & Security tab.

- You should now see a Saved Addresses prompt.
To modify your autofill data in Microsoft Edge, follow the directions in these sections. The first section shows you how to access the autofill options, and the others show you how to edit them.
Payment info
- Open the Microsoft Edge browser.
- In the drop-down menu , near the bottom, select Settings .

- Under the Settings section on the left, click Profiles .

- Under the Your profile section in the middle of the screen, there are three categories to choose from: Passwords , Payments , and Addresses and more .

The following link shows you how to manage your browser passwords in Edge.
The following section contains details on the payment info autofill options in Edge.

Toggle payment autofill
Use the toggle switch next to Save and fill payment methods to choose whether or not Edge should save and autopopulate your payment information ( A ).
Adding a card
To add a credit card to Edge, click the Add card button ( B ). Fill out the payment information, then click the Save button at the bottom.

Edit or delete payment information

The following section contains details on the address autofill options in Edge.

To choose whether or not Edge should save and autopopulate your address information, enable or disable Save and fill addresses ( A ).
Add addresses
To input a new address, click the Add address button ( B ). Fill in the appropriate information, then click the Save button.

Edit or delete an address

To modify your autofill data in Microsoft Edge Legacy, follow these steps.
- Open the Microsoft Edge Legacy browser.
- Select Settings .

Internet Explorer only allows users to enable and disable autofill, or clear its history, but not change specific entries.
- Open the Internet Explorer browser.
- Select Internet options .

- In the window that opens, click the Content tab ( A ), then select Settings ( B ) in the AutoComplete section.

- On the next menu, you have two options: toggle autofill on or off and delete AutoComplete history .

Toggle autofill on or off
- Check or uncheck the box next to Forms and Searches .
Delete AutoComplete history
- Near the bottom of the window, click the Delete AutoComplete history button.
- Check the box next to Form data , then click Delete .
- Click OK twice to exit the two windows.

To modify your autofill data in Opera, follow the directions in these sections. The first section shows you how to access the autofill options, and the others show you how to edit them.
- Open the Opera browser.
- On the left side of the tab that appears, click Privacy & security .

- In the Privacy and security section, scroll down to the Autofill section where you see three options: Passwords , Payment methods , and Addresses and more .
The following link shows you how to manage your browser passwords in Opera.
The following section contains details on the payment method autofill options in Opera.

Use the toggle switch next to Save and fill payment methods to choose whether or not Opera should save and autopopulate your payment information ( A ).
The following section contains details on the address autofill options in Opera.
Use the toggle switch next to Save and fill addresses to choose whether or not Opera should save and autopopulate your address information ( A ).
To input new address information, click the Add button ( B ) and type in the appropriate information. When you've finished, click the Save button.
To modify the Autofill settings in Safari, follow the steps below.
- Open the Safari browser.
- In the Preferences window, click the AutoFill tab ( A ).

- Under AutoFill web forms , uncheck one or more boxes to completely disable any of the four categories ( B ), or access the editing menus for each and customize your preferences ( C ).
Related information
- How to enable and disable autofill in a browser.
- How to export and import browser login information.
- How to delete autocomplete history.
- How to clear the address bar history.
- See the autofill definition for further information and related links.
- Internet browser help and support.
Optimizing WebKit & Safari for Speedometer 3.0
Apr 10, 2024
by Alan Baradlay, Antti Koivisto, Matt Woodrow, Patrick Angle, Ryosuke Niwa, Vitor Ribeiro Roriz, Wenson Hsieh, and Yusuke Suzuki
The introduction of Speedometer 3.0 is a major step forward in making the web faster for all, and allowing Web developers to make websites and web apps that were not previously possible. In this article, we explore ways the WebKit team made performance optimizations in WebKit and Safari based on the Speedometer 3.0 benchmark.
In order to make these improvements, we made an extensive use of our performance testing infrastructure. It’s integrated with our continuous integration , and provides the capability to schedule A/B tests. This allows engineers to quickly test out performance optimizations and catch new performance regressions.
Improving Tools
Proper tooling support is the key to identifying and addressing performance bottlenecks. We defined new internal JSON format for JavaScriptCore sampling profiler output to dump and process them offline. It includes a script which processes and generates analysis of hot functions and hot byte codes for JavaScriptCore. We also added FlameGraph generation tool for the dumped sampling profiler output which visualizes performance bottlenecks. In addition, we added support for JITDump generation on Darwin platforms to dump JIT related information during execution. And we improved generated JITDump information for easy use as well. These tooling improvements allowed us to quickly identify bottlenecks across Speedometer 3.0.
Improving JavaScriptCore
Revising megamorphic inline cache (ic).
Megamorphic IC offers faster property access when one property access site observes many different object types and/or property names. We observed that some frameworks such as React contain a megamorphic property access. This led us to continuously improve JavaScriptCore’s megamorphic property access optimizations: expanding put megamorphic IC, adding megamorphic IC for the in operation, and adding generic improvements for megamorphic IC.
Revising Call IC
Call IC offers faster function calls by caching call targets inline. We redesigned Call IC and we integrated two different architectures into different tiers of Just-In-Time (JIT) compilers. Lower level tiers use Call IC without any JIT code generation and the highest level tier uses JIT code generatiton with the fastest Call IC. There is a tradeoff between code generation time and code efficiency, and JavaScriptCore performs a balancing act between them to achieve the best performance across different tiers.
Optimizing JSON
Speedometer 3.0 also presented new optimization opportunities to our JSON implementations as they contain more non-ASCII characters than before. We made our fast JSON stringifier work for unicode characters . We also analyzed profile data carefully and made JSON.parse faster than ever .
Adjusting Inlining Heuristics
There are many tradeoffs when inlining functions in JavaScript. For example, inline functions can more aggressively increase the total bytecode size and may cause memory bandwidth to become a new bottleneck. The amount of instruction cache available in CPU can also influence how effective a given inlining strategy is. And the calculus of these tradeoffs change over time as we make more improvements to JavaScriptCore such as adding new bytecode instruction and changes to DFG’s numerous optimization phases. We took the release of the new Speedometer 3.0 benchmark as an opportunity to adjust inlining heuristics based on data collected in modern Apple silicon Macs with the latest JavaScriptCore.
Make JIT Code Destruction Lazy
Due to complicated conditions, JavaScriptCore eagerly destroyed CodeBlock and JIT code when GC detects they are dead. Since these destructions are costly, they should be delayed and processed while the browser is idle. We made changes so that they are now destroyed lazily, during idle time in most cases.
Opportunistic Sweeping and Garbage Collection
In addition, we noticed that a significant amount of time goes into performing garbage collection and incremental sweeping across all subtests in both Speedometer 2.1 and 3.0. In particular, if a subtest allocated a large number of JavaScript objects on the heap, we would often spend a significant amount of time in subsequent subtests collecting these objects. This had several effects:
- Increasing synchronous time intervals on many subtests due to on-demand sweeping and garbage collection when hitting heap size limits.
- Increasing asynchronous time intervals on many subtests due to asynchronous garbage collection or timer-based incremental sweeping triggering immediately after the synchronous timing interval.
- Increasing overall variance depending on whether timer-based incremental sweeping and garbage collection would fall in the synchronous or asynchronous timing windows of any given subtest.
At a high level, we realized that some of this work could be performed opportunistically in between rendering updates — that is, during idle time — instead of triggering in the middle of subtests. To achieve this, we introduced a new mechanism in WebCore to provide hints to JavaScriptCore to opportunistically perform scheduled work after the previous rendering update has completed until a given deadline (determined by the estimated remaining time until the next rendering update). The opportunistic task scheduler also accounts for imminently scheduled zero delay timers or pending requestAnimationFrame callbacks : if it observes either, it’s less likely to schedule opportunistic work in order to avoid interference with imminent script execution. We currently perform a couple types of opportunistically scheduled tasks:
- Incremental Sweeping : Prior to the opportunistic task scheduler, incremental sweeping in JavaScriptCore was automatically triggered by a periodically scheduled 100 ms timer. This had the effect of occasionally triggering incremental sweeping during asynchronous timing intervals, but also wasn’t aggressive enough to prevent on-demand sweeping in the middle of script execution. Now that JavaScriptCore is knowledgable about when to opportunistically schedule tasks, it can instead perform the majority of incremental sweeping in between rendering updates while there aren’t imminently scheduled timers. The process of sweeping is also granular to each marked block, which allows us to halt opportunistic sweeping early if we’re about to exceed the deadline for the next estimated rendering update.
- Garbage Collection : By tracking the amount of time spent performing garbage collection in previous cycles, we’re able to roughly estimate the amount of time needed to perform the next garbage collection based on the number of bytes visited or allocated since the last cycle. If the remaining duration for performing opportunistically scheduled tasks is longer than this estimated garbage collection duration, we immediately perform either an Eden collection or full garbage collection . Furthermore, we integrated activity-based garbage collections into this new scheme to schedule them at appropriate timing.
Overall, this strategy yields a 6.5% total improvement in Speedometer 3.0 *, decreasing the time spent in every subtest by a significant margin, and a 6.9% total improvement in Speedometer 2.1 *, significantly decreasing the time spent in nearly all subtests.
* macOS 14.4, MacBook Air (M2, 2022)
Various Miscellaneous Optimizations for Real World Use Cases
We extensively reviewed all Speedometer 3.0 subtests and did many optimizations for realistic use cases. The examples include but are not limited to: faster Object.assign with empty objects , improving object spread performance , and so on.
Improving DOM code
Improving DOM code is Speedometer’s namesake, and that’s exactly what we did. For example, we now store the NodeType in the Node object itself instead of relying on a virtual function call. We also made DOMParser use a fast parser, improved its support of li elements , and made DOMParser not construct a redundant DocumentFragment . Together, these changes improved TodoMVC-JavaScript-ES5 by ~20%. We also eliminated O(n^2) behavior in the fast parser for about ~0.5% overall progression in Speedometer 3.0. We also made input elements construct their user-agent shadow tree lazily during construction and cloning , the latter of which is new in Speedometer 3.0 due to web components and Lit tests. We devirtualized many functions and inlined more functions to reduce the function call overheads. We carefully reviewed performance profile data and removed inefficiency in hot paths like repeated reparsing of the same URLs .
Improving Layout and Rendering
We landed a number of important optimizations in our layout and rendering code. First off, most type checks performed on RenderObject are now done using an inline enum class instead of virtual function calls , this alone is responsible for around ~0.7% of overall progression in Speedometer 3.0.
Improving Style Engine
We also optimized the way we compute the properties animated by Web Animations code. Previously, we were enumerating every animatable properties while resolving transition: all . We optimized this code to only enumerate affected properties. This was ~0.7% overall Speedometer 3.0 progression. Animating elements can now be resolved without fully recomputing their style unless necessary for correctness.
Speedometer 3.0 content, like many modern web sites, uses CSS custom properties extensively. We implemented significant optimizations to improve their performance. Most custom property references are now resolved via fast cache lookups, avoiding expensive style resolution time property parsing. Custom properties are now stored in a new hierarchical data structure that reduces memory usage as well.
One key component of WebKit styling performance is a cache (called “matched declarations cache”) that maps directly from a set of CSS declarations to the final element style, avoiding repeating expensive style building steps for identically styled elements. We significantly improved the hit rate of this cache.
We also improved styling performance of author shadow trees, allowing trees with identical styles to share style data more effectively.
Improving Inline Layout
We fixed a number of performance bottlenecks in inline layout engine as well. Eliminating complex text path in Editor-TipTap was a major ~7% overall improvement. To understand this optimization, WebKit has two different code paths for text layout: the simple text path, which uses low level font API to access raw font data, and the complex text path, which uses CoreText for complex shaping and ligatures. The simple text path is faster but it does not cover all the edge cases. The complex text path has full coverage but is slower than the simple text path.
Previously, we were taking the complex text path whenever a non-default value of font-feature or font-variant was used. This is because historically the simple text path wouldn’t support these operations. However, we noticed that the only feature of these still missing in the simple text path was font-variant-caps . By implementing font-variant-caps support for the simple text path , we allowed the simple text path to handle the benchmark content. This resulted in 4.5x improvement in Editor-TipTap subtest, and ~7% overall progression in Speedometer 3.0.
In addition to improving the handling of text content in WebKit, we also worked with CoreText team to avoid unnecessary work in laying out glyphs. This resulted in ~0.5% overall progression in Speedometer 3.0, and these performance gains will benefit not just WebKit but other frameworks and applications that use CoreText.
Improving SVG Layout
Another area we landed many optimizations for is SVG. Speedometer 3.0 contains a fair bit of SVG content in test cases such as React-Stockcharts-SVG. We were spending a lot of time computing the bounding box for repaint by creating GraphicsContext, applying all styles, and actually drawing strokes in CoreGraphics. Here, we adopted Blink ’s optimization to approximate bounding box and made ~6% improvement in React-Stockcharts-SVG subtest. We also eliminated O(n^2) algorithm in SVG text layout code, which made some SVG content load a lot quicker .
Improving IOSurface Cache Hit Rate
Another optimization we did involve improving the cache hit rate of IOSurface. An IOSurface is a bitmap image buffer we use to paint web contents into. Since creating this object is rather expensive, we have a cache of IOSurface objects based on their dimensions. We observed that the cache hit rate was rather low (~30%) so we increased the cache size from 64MB to 256MB on macOS and improved the cache hit rate by 2.7x to ~80%, improving the overall Speedometer 3.0 score by ~0.7%. In practice, this means lower latency for canvas operations and other painting operations.
Reducing Wait Time for GPU Process
Previously, we required a synchronous IPC call from the Web Process to the GPU process to determine which of the existing buffers had been released by CoreAnimation and was suitable to use for the next frame. We optimized this by having the GPUP just select (or allocate) an appropriate buffer, and direct all incoming drawing commands to the right destination without requiring any response. We also changed the delivery of any newly allocated IOSurface handles to go via a background helper thread , rather than blocking the Web Process’s main thread.
Improving Compositing
Updates to compositing layers are now batched , and flushed during rendering updates, rather than computed during every layout. This significantly reduces the cost of script-incurred layout flushes.
Improving Safari
In addition to optimizations we made in WebKit, there were a handful of optimizations for Safari as well.
Optimizing AutoFill Code
One area we looked at was Safari’s AutoFill code. Safari uses JavaScript to implement its AutoFill logic, and this execution time was showing up in the Speedometer 3.0 profile. We made this code significantly faster by waiting for the contents of the page to settle before performing some work for AutoFill. This includes coalescing handling of newly focused fields until after the page had finished loading when possible, and moving lower-priority work out of the critical path of loading and presenting the page for long-loading pages. This was responsible for ~13% progression in TodoMVC-React-Complex-DOM and ~1% progression in numerous other tests, improving the overall Speedometer 3.0 score by ~0.9%.
Profile Guided Optimizations
In addition to making the above code changes, we also adjusted our profile-guided optimizations to take Speedometer 3.0 into account. This allowed us to improve the overall Speedometer 3.0 score by 1~1.6%. It’s worth noting that we observed an intricate interaction between making code changes and profile-guided optimizations. We sometimes don’t observe an immediate improvement in the overall Speedometer 3.0 score when we eliminate, or reduce the runtime cost of a particular code path until the daily update of profile-guided optimizations kicks. This is because the modified or newly added code has to benefit from profile-guided optimizations before it can show a measurable difference. In some cases, we even observed that a performance optimization initially results in a performance degradation until the profile-guided optimizations are updated.
With all these optimizations and dozens more, we were able to improve the overall Speedometer 3.0 score by ~60% between Safari 17.0 and Safari 17.4. Even though individual progressions were often less than 1%, over time, they all stacked up together to make a big difference. Because some of these optimizations also benefited Speedometer 2.1, Safari 17.4 is also ~13% faster than Safari 17.0 on Speedometer 2.1. We’re thrilled to deliver these performance improvements to our users allowing web developers to build websites and web apps that are more responsive and snappier than ever.
IMAGES
VIDEO
COMMENTS
Set up AutoFill. You can save your personal information or credit card number on your iPhone to speed up filling in online forms and making purchases. Go to Settings > Safari > AutoFill. Set up contact info: Turn on Use Contact Info, tap My Info, then choose your contact card. The contact information from that card is entered when you tap ...
To turn off any or all AutoFill forms in Safari on macOS, first open Safari's preferences from the Safari menu or press Command+, on your keyboard. In Safari's preferences, click the AutoFill tab You'll see a list of the things Safari can autofill. Uncheck any items you don't want Safari autofilling, or click "Edit" next to any of the four ...
Editing the autofill information is a pretty simple and straightforward procedure from iOS or iPadOS, follow along: Open "Settings" from the home screen of your iPhone or iPad. In the settings menu, scroll down and tap on "Safari". Next, tap on "AutoFill" to manage the information stored here. To update contact information and ...
Safari provides an easy-to-use interface to manage your AutoFill information. Open Safari, go to the Safari menu, and select Preferences . The keyboard shortcut to open Safari preferences is Command + , (comma). Place a check next to any of the four AutoFill options you want to use when auto-filling forms on the internet.
Here's how: Go to Settings and tap on your profile at the top. Tap on iCloud. Scroll down to Keychain and tap on it. To make sure that you passwords autofill, you may also need to switch things ...
1. Open the Safari browser. 2. In the top toolbar, select "Safari" and then "Preferences." Click on Preferences under Safari. Devon Delfino/Business Insider. 3. Toggle over to the "Autofill ...
Open Settings. Scroll down and tap Safari. Scroll down and tap on AutoFill. Now toggle on Use Contact Info. The toggle will be green when the feature is enabled. If your name doesn't automatically appear next to My Info, tap My Info. Otherwise, skip to step eight. Select your name from Contacts. Make sure your information is filled in so that ...
Adding an account's username and password through AutoFill is a straightforward process. To add a username and password: Open Safari on your Mac.; Click on Safari in the Menu Bar, then click Preferences.; Next, click on AutoFill.; You will now see the multiple AutoFill Forms.
Open Contacts . Tap My Card at the top of the screen. Tap Edit . Change your name or company name, and add a phone number, email address, birthday, URL, and more. Tap Done . Your personal contact information is changed, and AutoFill will now pull this updated data. Your phone number is automatically pulled from Settings.
Click on Safari > Preferences, then click the AutoFill tab. If you want to update your address or your name, click the Edit button next to the Using information from my contacts. Clicking that will open your contact card. If your details need to be updated, click the edit button. Then you can change your address and other details.
Open the Settings app on your iPad. 2. Scroll down and tap "Passwords & Accounts" in the fifth section of options. This will bring you to your password details. 3. If the AutoFill feature is ...
Tap on and then tap Saved Credit Cards Add Credit Card to add your cardholder information to Safari. When you purchase something online, tap in the credit card field and then tap AutoFill Credit Card. Safari will automatically fill in the credit card information. If you have information for more than one credit card saved, a list of the last ...
Tap on Safari. Tap on AutoFill. Toggle "Use Contact Info" to on. Tap on My Info and select the contact you just created or the one you already had. Now when you visit a site that needs your information, as soon as you select the first text box your keyboard will pop up and there will be an option called AutoFill.
Open your contact card in the Contacts app, and click the "Edit" button at the bottom of the card. (Or, from Safari, open the preferences, go to the AutoFill tab, and click Edit; you'll ...
In order to setup AutoFill in Safari on Mac OS, you can follow below steps: Tap on Safari menu after opening Safari browser. Click on "AutoFill" tab and check appropriate checkboxes. You can setup AutoFill web forms using: Using information from my contacts- This option saves Complete forms with information from any contact card in Contacts.
Open Safari → Click Safari on the menu bar → Select Settings. Select Preferences if you're running macOS Monterey or earlier. Select Passwords → Use your Touch ID or enter your Mac's password. Click the plus (+) icon. Fill in the following details: Title, Website, Username, and Password.
To change these preferences, choose Safari > Preferences, then click AutoFill. Complete forms with information from any contact card in Contacts. To view or edit information, click Edit. Securely save usernames and passwords you enter on web pages, then easily fill in the saved information when you revisit the same web pages. Click Edit to view ...
To edit or remove address info, click the icon next to one of the entries (C), and select Edit or Remove from the drop-down menu. Safari. To modify the Autofill settings in Safari, follow the steps below. Open the Safari browser. In the Apple menu bar, click , and select Settings... from the drop-down menu.
Improving Safari. In addition to optimizations we made in WebKit, there were a handful of optimizations for Safari as well. Optimizing AutoFill Code. One area we looked at was Safari's AutoFill code. Safari uses JavaScript to implement its AutoFill logic, and this execution time was showing up in the Speedometer 3.0 profile.