
HOW TO EDIT TRAVEL VIDEOS
5 ESSENTIAL TIPS

Pin 797 Tweet Share WhatsApp 797 Shares
In a world where everyone and their ten year old niece is making YouTube videos, how do you make your travel videos stand out and be seen? How can you turn those hours of footage into something engaging and captivating? Whether you’re just getting started or looking to up your game, read on and learn how to edit travel videos that will interest, delight, and inspire your audience.
SHOOT GREAT CONTENT
A great travel video doesn’t start on your timeline..
Before you even hit record, you need to have a solid plan and final outcome in mind. Whether you’re creating cinematic travel videos, or vlog style pieces, getting the right shots to begin with is vital. So, what things do you need to consider?
Think about what you want your finished video to convey
What footage do you need to tell this story?
Make a list of the things you want to film
What are the sights, sounds and experiences that capture the essence of the destination?
Think about the different angles you can shoot from to create unique perspectives
From close up detail to wide panoramas, what variety of shots can you get?
Be sure to check your footage regularly
If something’s not working, it’s better to find out there and then when you can still do something about it.
If you keep all these things in mind when shooting, you’ll have the best possible material when it comes to actually cutting and editing your video.

Getting down low to take shots from a different perspective

Getting down low to take those shots from a different perspective
SEE MORE PHOTOGRAPHY & VIDEO POSTS
More photography & video posts.

Gear Review: All-New Wandrd PRVKE Travel Camera Bag

What’s In Our Camera Bag? Our Complete Travel Photography Gear

How to Shoot Cinematic Video With DSLR Cameras
Use the best editing software, choosing the right editing software, and learning how to use it, is vital to creating great travel videos..
If you’re serious about producing the best content you can, save yourself a lot of time, frustration and wasted effort and invest in Adobe Premiere Pro or Final Cut Pro X from the get go. I made the switch to Premiere Pro about a year ago, having tried numerous free and paid editing platforms over the years (Sony Vegas, GoPro Studio, CyberLink PowerDirector, etc.).
The difference is HUGE.
Not only is the actual editing software far superior, it is fast, reliable and efficient. I no longer break down in fits of rage when my software stalls or crashes, losing hours worth of work. I don’t have to painstakingly piece together my video, hoping it will look OK because the software is so slow and lagging that I can’t tell during the edit.
I also don’t need to worry about finding solutions to any problems that do arise – Premiere Pro is so widely used that there are a million tutorials and troubleshooting articles out there. I can resolve an issue in minutes, rather than hours, days, or in one maddening case, weeks.
I’ve learned the hard way that opting for budget-friendly editing programs ultimately leads to wasted time, effort, and money, while producing inferior quality videos. I encourage you not to make the same mistake!
So what happens once you’ve bit the bullet and signed up for pro-level software like Premiere Pro?
learn how to use it.
Start with the basics, and never stop learning. Your aim should be to constantly build on your knowledge and editing skills, using new techniques to keep your latest videos fresh and interesting. A great way to keep expanding your know-how is through YouTube tutorials. Whether you’re trying to figure out how to create a specific effect, or just broadening your general skill-set, there’s a ton of useful info out there. Soak it all up and you’ll be well on your way to knowing how to edit great travel videos.
Two of my favourite channels are Justin Odisho and Peter McKinnon , both of which have loads of easy to follow tutorials specifically focusing on Premiere Pro editing techniques.
There are loads of great tutorials out there to help you learn how to use Premiere Pro, like this one from Peter McKinnon
CHOOSE AWESOME MUSIC
Music can make or break a video..
Even if all the other elements of your edit are great, cheesy music will turn people off. Conversely, great music can capture your audience’s attention, draw them into your story and maintain their interest throughout. Choosing the right tracks for your travel video should be at the forefront of your editing process. It’s certainly not something to be slapped on your timeline as an afterthought. Opt for music that helps drive your story, the tempo of the tune complementing the mood on screen. Vocals can be distracting, so focus on instrumental tracks instead.
So where can you find this great music?
There are several websites and platforms that offer royalty-free or creative commons license downloads that you can use in your travel videos. Some are free, some are paid. My favourite sites for sourcing free music are Thematic and Soundcloud, and we also use the paid service Artlist .
Thematic has a variety of music that you can use, as long as you credit the artist. You can create ‘projects’, which is handy for saving the tracks you like for future use.

Saving the music you like in Thematic Projects makes it easy to access as and when you need it
Music on Soundcloud is not automatically cleared for use on YouTube, etc. You need to do your homework and find songs that are free to use. They’ll either be under an appropriate creative commons license or have express permission from the artist.
An alternative option is the YouTube Audio Library . Great paid subscription sites include Artlist , Epidemic Sound , Music Vine and Music Bed .
We personally use Epidemic Sound. We love how you can choose individual stems, as well as the full mix, of a song, and use this feature a lot. Use our link for a 60 day free trial and see what you think!
It can take time to trawl through all the options, listening to endless songs before you find the right one. But when you hear that perfect beat, it’s all worth it.
BEFORE THE EDITING BEGINS YOU NEED TO GET THE BEST SHOTS, RIGHT?
HERE’S HOW TO SHOOT CINEMATIC FOOTAGE
MAKE IT SNAPPY & INNOVATIVE
You’ve shot your footage, chosen the perfect music and imported it into your editing software. now it’s time to finally make an awesome travel video..
If you want to keep your audience engaged (which you do, obviously) you need to keep your edit snappy and innovative. Your music and visual content should go hand in hand.
First, make it snappy.
Cut your clips to the beat of the track so that what you see and hear is perfectly in sync. Then mix it up so it doesn’t get predictable. Every so often, shift the rhythm of your cuts to the off-beat. If the tempo changes, reflect this in your edit. For example, fast paced cuts to match an epic beat drop, or a slow motion shot during a lull between beats. Your clips should be short and punchy, continually moving the story on. Long, drawn out shots are boring and your audience will quickly lose interest.
Now, it’s time to get innovative.
Once you’ve mastered cutting to the beat and creating a snappy pace, get innovative with other effects. For inspiration, look to other travel videos out there that you enjoy watching. Use these as learning tools. Pick a sequence or effect that you like and figure out how to re-create this in your own video edits. Keep it simple at first, developing your skills one at a time.
Set yourself achievable goals. Don’t expect to be editing something like JR Alli’s Egypt video straight off the bat. Some of the videos I love and have learned different techniques from are Because We Camp’s Thailand and Porto videos, Nico’s Seoul Cinematic and Guilin videos, and pretty much all of Brandon Li’s short films . Ultimately, your goal should be to combine various effects to create your own unique style – a style that will keep your audience coming back and wanting more.
JOIN OUR VIDEO COMMUNITY
CONNECT WITH US ON YOUTUBE
DON’T FORGET THE SFX
If you really want to engage your viewer, drawing them into the heart of the destination you’re portraying on screen, then sound effects (sfx) are crucial..
So often this is the one element of otherwise great travel videos that’s missing. The absence of the right SFX can leave the audience feeling disconnected from what they’re seeing.
When we travel, all our senses are heightened, excited by new smells, tastes, sights and sounds. By incorporating real life sounds into your travel videos, you can convey those sensations and heighten the emotional response of your audience.
Great sound editing can be used to wonderfully dramatic effect, like in the Egypt or Porto videos mentioned above. As a viewer you feel like you’re there, experiencing every moment alongside the filmmaker.
That’s how powerful SFX are. But you’ve got to get them right.
You want your sound editing to be crisp and clear, enhancing your visual content, not distracting from it.
The best way to achieve this is by using a directional mic at the point of filming. Something like the Rode VideoMic Pro will capture the exact audio you want to focus on, and none of the annoying background noise.
Alternatively, you can find SFX that match your clips. Download them and line them up with the footage on your timeline. YouTube has an entire sound effects library , or you can search on sites like Freesound or Zapsplat . It can be fun playing around with different sounds. Layer them on top of one another and create the perfect atmosphere that’ll really bring your video to life.

The list of free sound effects in the Youtube Audio Library is pretty extensive
We hope you’ve found these tips useful for learning how to edit great travel videos of your own. You can connect with us on YouTube where we’d love to check out your work!
*Some of the links in this post are affiliate links – if you purchase a product or service via these links, we may earn a small commission at no extra cost to you . This helps offset the cost of running this blog and keeps us travelling so that we can continue to produce great content for you. We greatly appreciate your support!*
THANKS FOR READING!
If you’ve found this guide helpful, please consider leaving us a small tip. Your support is greatly appreciated and helps cover the costs of running this blog.
Kim and Del Hogg
If you’ve found this guide helpful, please consider leaving us a small tip.
Your support is greatly appreciated and helps cover the costs of running this blog.
Liked This Post? Pin It For Later!
Any questions about how to edit travel videos want to take the discussion further maybe you have some great editing tips of your own whatever’s on your mind, get in touch with us in the comments below., 19 leave a reply.
Superb post love your editing tricks.

Sure, I’d be happy to share my thoughts on the article you linked about how to edit travel videos. I really enjoyed reading this article, as it offers practical advice on how to create engaging and memorable travel videos. The emphasis on storytelling and capturing the essence of a destination is spot on – travel videos are all about transporting the viewer to a different time and place, and creating a sense of wonder and excitement. One aspect I particularly appreciated was the article’s focus on pacing and rhythm in editing. This can be a tricky aspect to get right, … Read more »

This is a great article for anyone wanting to get into travel videography! The tips are essential for anyone wanting to create amazing travel videos.

Thanks for the blog

Superb! i really love your editing tricks. you did an amazing job.

This a really superb post, love all the information that you told about editing. I am also an travel vlogger and this article seems perfect for me.

there is a lot of video editing app available in the market which is easy to video edit with just a few click. but if you want to create a professional video that impacts human nature then you need expert opinion and professional software like abode which has the capability to create any type of video for your travel vlog, event and etc.

I agree that you should have access to an audio library. I need to get a video production specialist to help me out. We have a lot of corporate videos that needs to be edited.

Very useful article. You did wonderful job
You Didn’t miss a single point relating to video editing for traveling. I am so excited to edit my traveling videos. Thanks a lot sir!

You’re welcome, good luck with your edits! Cheers, Kim

Your work is really appreciating, every point is clearly explained about Python Course. It will help me a lot. Thankyou so much to share this wonderful blog.

Thank you for explaining how to edit travel videos. I would imagine that it would be a good idea to use some kind of software programing when editing any kind of film. A software program would make a film look much better.

Anyone interested in beginning their career in travel videography should read this essay! The advice is crucial for anyone who wants to make outstanding trip videos.

hi This is superb blog site. I find many informative messages from this site. Thank’s a lot for sharing.
Thank you! We’re very glad you have found our blog useful. Cheers, Kim

Hey, im kind of new to this, i have made surf and skatboarding films, but i want to Expand my repertoar and make travel film/ guids, but i dont want to do it Vlog style. Do you have any recomadations on how to narrate and tell a good story outside the Vlog format, its hard to find good inspiration for that, when it Sems that most «travle» content is made in that format or in hyper cinematic style like d.eks jr Ali ( which is awsm). If you have any tips or pointer i would be very thankful!!/ by the … Read more »
Hey Are Ole! Narrating over a video is something I’ve never done, but I’ve certainly come across other videos I’ve enjoyed watching that use this storytelling technique (plenty bad ones too : /). The ones that work for me personally combine good editing techniques (snappy pace, a mixture of cuts and editing effects) with relevant and interesting narration that work with the images on screen to tell the story. I think it’s still good to have a clear idea of what you want to film right from the start, but it can be easier to create the actual story afterwards … Read more »

WORK WITH US
We use cookies to ensure we give you the best possible user experience on Going the Whole Hogg. By continuing to browse this site, we assume you're happy with this.
Cookie and Privacy Settings
We may request cookies to be set on your device. We use cookies to let us know when you visit our websites, how you interact with us, to enrich your user experience, and to customize your relationship with our website.
Click on the different category headings to find out more. You can also change some of your preferences. Note that blocking some types of cookies may impact your experience on our websites and the services we are able to offer.
These cookies are strictly necessary to provide you with services available through our website and to use some of its features.
Because these cookies are strictly necessary to deliver the website, refusing them will have impact how our site functions. You always can block or delete cookies by changing your browser settings and force blocking all cookies on this website. But this will always prompt you to accept/refuse cookies when revisiting our site.
We fully respect if you want to refuse cookies but to avoid asking you again and again kindly allow us to store a cookie for that. You are free to opt out any time or opt in for other cookies to get a better experience. If you refuse cookies we will remove all set cookies in our domain.
We provide you with a list of stored cookies on your computer in our domain so you can check what we stored. Due to security reasons we are not able to show or modify cookies from other domains. You can check these in your browser security settings.
We also use different external services like Google Webfonts, Google Maps, and external Video providers. Since these providers may collect personal data like your IP address we allow you to block them here. Please be aware that this might heavily reduce the functionality and appearance of our site. Changes will take effect once you reload the page.
Google Webfont Settings:
Google Map Settings:
Google reCaptcha Settings:
Vimeo and Youtube video embeds:
You can read about our cookies and privacy settings in detail on our Privacy Policy Page.

- Travel Photography and Videography
Mastering Cinematic Travel Videography: 15 Tips to Create Stunning Travel Videos
- 10 minute read
- August 8, 2023

Welcome to the captivating realm of cinematic travel videography, where each frame transforms into a window to the world’s most breathtaking destinations. Whether you’re an aspiring filmmaker or an adventurous traveler with a camera in hand, this comprehensive guide is your passport to creating mesmerizing travel videos that capture the essence of your journeys.
In this digital era, travel videos have become more than mere documentation – they’re immersive experiences that transport viewers across continents, cultures, and emotions. From the warm embrace of the golden hour to the dynamic movement of camera shots, each element plays a pivotal role in painting an evocative tapestry of your adventures. Embark on this journey with us as we delve into the intricacies of planning narratives, harnessing natural light, and mastering camera techniques.
In the pages ahead, we’ll uncover the art of composition that transforms mundane scenes into cinematic masterpieces. We’ll explore the symphony of colors and sounds that breathe life into your videos, adding depth and emotion to every frame. Whether you’re capturing the vivacity of bustling markets or the serene tranquility of hidden landscapes, we’ll guide you through each step to ensure your travel videos resonate with audiences around the world.
- Choosing Amazing Places
The choice of locations forms the foundation of your cinematic travel videos. Look for places that are visually striking and narratively intriguing. These are the places that will engage your audience and make your videos stand out.
- Stunning Views: Seek destinations with awe-inspiring landscapes, architecture, and natural beauty.
- Narrative Richness: Opt for locations with historical, cultural, or personal significance. Places that tell stories on their own.
- Planning Your Story
Creating a cinematic travel video is more than just capturing beautiful visuals; it’s about telling a compelling story. Think of your video as a journey with a beginning, middle, and end. To craft a captivating narrative:
- Structured Approach: Plan your video’s storyline like a roadmap. Outline the sequence of events and shots you want to include. This provides a clear direction for your filming and editing process.
- Emotional Arc: Consider the emotional journey you want your viewers to experience. Will your video evoke excitement, nostalgia, or introspection? Map out how emotions will evolve throughout the video.
- Key Moments: Identify pivotal moments that resonate with your overall story. Whether it’s a breathtaking view, a local interaction, or a cultural experience, these moments will be the pillars of your video’s narrative.
3. Planning Your Story
Crafting a compelling narrative is at the heart of cinematic travel videography. Your travel video is more than a collection of scenes; it’s a story that should engage your audience from start to finish. Here’s how to plan your story effectively:
- Structured Approach: Treat your video like a story with a beginning, middle, and end. Create a storyboard that outlines the sequence of shots and scenes you want to include.
- Emotional Arc: Consider the emotions you want to evoke in your viewers. Think about how you can build up emotions throughout your video to create a captivating journey.
- Key Moments: Identify the highlights of your travel that are essential to your story. These moments should capture the essence of your experience and contribute to the overall narrative.
- Using Natural Light
Natural light is a cinematographer’s best friend, and it can make your travel videos truly cinematic. Here’s how to harness the power of natural light for stunning visuals:
- Golden Hour and Blue Hour: These are the periods just after sunrise and before sunset when the quality of light is magical. The golden hour bathes scenes in warm, soft light, while the blue hour adds a serene, ethereal ambiance.
- Setting the Mood: Use the specific qualities of light during these hours to match the mood of your scenes. Golden hour light can evoke warmth and intimacy, while blue hour light can create a dreamy and contemplative atmosphere.
- Camera Skills Made Simple
Creating cinematic travel videos doesn’t require you to be a professional filmmaker. Here’s how to master camera skills that add cinematic flair to your footage:
Basic Movements: Begin by practicing fundamental camera movements that can instantly enhance the quality of your shots:
- Panning: Slowly move your camera horizontally from one side to another. This is great for capturing sweeping landscapes or revealing scenes.
- Tilting: Rotate your camera vertically, moving it up or down. Tilting is useful for emphasizing tall structures or capturing dramatic skies.
- Tracking: Follow a subject’s movement by moving your camera smoothly alongside it. Tracking shots add dynamism and immersion to your videos.
Stabilizers: Achieving steady shots is essential for a professional look, especially while on the move:
- Gimbals: Invest in a handheld gimbal or stabilizer. These devices counteract any shaky movements, resulting in smooth and cinematic footage.
- Steady Hands: If you’re shooting without a stabilizer, practice holding your camera steadily and walking smoothly to avoid jerky motions.
- Making Pictures Look Great
Composition is a powerful tool for creating visually captivating shots. Mastering composition techniques can significantly enhance the cinematic quality of your travel videos:
Rule of Thirds: Utilize the rule of thirds to create balanced and visually engaging compositions:
- Imagine your frame divided into a 3×3 grid with two horizontal lines and two vertical lines.
- Place your subject or important elements along these lines or at their intersections.
- This technique adds visual interest and guides the viewer’s eyes to key elements in the frame.
Leading Lines: Incorporate leading lines to draw the viewer’s gaze and create depth:
- Look for natural or architectural lines within your scene, like roads, rivers, or fences.
- These lines guide the viewer’s eyes into the frame, adding a sense of movement and perspective.
Foreground and Background: Play with foreground and background elements to add depth:
- Place objects or elements in the foreground to frame your main subject and create layers within the shot.
- This technique adds dimension and makes your shots more visually engaging.
- Colors That Feel Right
Colors have a profound impact on the emotional tone of your videos. Understanding color psychology and applying color grading techniques can elevate your cinematic travel videos:
Color Psychology: Different colors evoke specific emotions and moods:
- Warm Colors (Red, Orange, Yellow): Convey energy, warmth, and excitement. Use them for vibrant scenes and moments of action.
- Cool Colors (Blue, Green, Purple): Evoke calmness, serenity, and reflection. They are well-suited for tranquil and contemplative scenes.
Color Grading: During the editing process, use color grading tools to achieve a cohesive and cinematic color palette:
- Adjust colors to match the mood of each scene. Enhance warm tones for joyful moments and cool tones for introspective scenes.
- Consistent color grading unifies the visual style of your video, making it feel like a cohesive cinematic experience.
8. Getting Extra Shots
Capturing the details adds depth and authenticity to your cinematic travel videos. Consider these techniques to create a richer visual experience:
Texture and Close-ups: Zoom in on textures, patterns, and small details that define the essence of a place:
- Capture close-up shots of textured walls, vibrant textiles, local crafts, and unique architectural features.
- These shots offer a tactile and immersive perspective, allowing viewers to appreciate the finer aspects of your surroundings.
Contextual Shots: Incorporate scenes that provide context to your location and convey a sense of local life:
- Film scenes of bustling markets, people going about their daily routines, or street vendors interacting with customers.
- Contextual shots establish the setting, culture, and atmosphere, making your video more immersive and engaging.
9. Sounds That Capture Moments
Sound plays a crucial role in creating a multisensory cinematic experience. Here’s how to use sound to enhance the immersion of your travel videos:
Ambient Sounds: Capture the sounds that define each location, bringing your audience closer to the environment:
- Record ambient sounds like the chirping of birds, the rustling of leaves, the chatter of a crowded square, or the waves crashing on the shore.
- These sounds transport viewers to the scene, making them feel as if they are right there with you.
Music Selection: Choose music that complements the mood of your video and enhances its emotional impact:
- Select tracks that resonate with the overall tone of your video, whether it’s uplifting, reflective, or adventurous.
- The right music creates a powerful synergy with the visuals, amplifying the emotions you want to convey.
10. Making Scenes Flow
Seamless transitions are essential for maintaining the rhythm and coherence of your cinematic travel video. Here’s how to ensure smooth transitions between scenes:
Transition Techniques: Experiment with various transition effects to keep the viewer engaged and create a natural progression:
- Cut: An instantaneous switch from one scene to another. Use cuts for quick shifts in time or location.
- Fade: A gradual transition where one scene fades out as the next fades in. Fades create a soft and subtle change.
- Dissolve: Both scenes overlap briefly, creating a smooth transition. Dissolves work well for sequences that flow seamlessly.
Logical Progression: Ensure that your transitions make sense within the context of your story and maintain a logical flow:
- Transitions should connect scenes that share thematic, visual, or narrative elements, ensuring a smooth and coherent viewing experience.
11. Slow and Fast Moments
Adding variations in time can infuse your cinematic travel videos with a captivating dynamic. Here’s how to master slow-motion and time-lapse techniques:
Slow Motion: Utilize slow-motion shots to highlight details and evoke emotions in your travel videos:
- Slow-motion footage emphasizes specific actions, expressions, or movements, making them more impactful.
- Use slow motion for sequences like a splash of water, a smile, or a sunrise, creating a sense of wonder and appreciation.
Time-Lapse: Create time-lapse sequences to showcase changes over time and capture the essence of a location:
- Record scenes at a slower frame rate than usual and then play them back at normal speed. This compresses time and captures transformations like shifting clouds, changing light, or bustling crowds.
- Time-lapses reveal the passage of time in a visually compelling way, adding depth to your narrative.
12. Focus on Close and Far
Mastering the focus of your shots adds a cinematic touch by directing the viewer’s attention. Here’s how to play with focus effectively:
Depth of Field: Control depth of field to draw attention to specific elements and create visual interest:
- Use a wide aperture (small f-number) to achieve a shallow depth of field. This blurs the background while keeping your subject sharp and prominent.
- Shallow depth of field isolates your subject, making it stand out from the surroundings and adding an artistic dimension to your shots.
Visual Hierarchy: Guide the viewer’s gaze by using focus to establish visual hierarchy:
- Place your main subject in sharp focus while allowing the background or other elements to remain slightly blurred.
- This technique directs attention where you want it, enhancing the narrative impact of your shots.
13. Moving Camera Tricks
Incorporating camera movement can bring energy and dynamism to your cinematic travel videos. Here’s how to use moving camera techniques effectively:
Walking Shots: Add movement to your shots by filming while walking, creating a sense of exploration and immersion:
- Walking shots allow you to capture scenes from a traveler’s perspective, making viewers feel as if they’re part of the journey.
- Use walking shots to introduce a location, showcase surroundings, or provide context to your narrative.
Stabilizers: Implement stabilizers or gimbals for smooth camera movement, even when you’re on the move:
- Stabilizers counteract unwanted vibrations and shakes, ensuring your shots remain steady and professional-looking.
- Smooth camera movement enhances the cinematic quality of your videos and adds a polished touch.
14. Editing Like a Pro
The editing process is where your cinematic travel video truly comes to life. Here’s how to refine your footage into a coherent and compelling story:
Story Flow: Organize your shots in a logical sequence that follows the narrative arc of your video:
- Start with an attention-grabbing opening that sets the tone and hooks viewers’ interest.
- Arrange shots in a way that maintains a smooth and engaging flow, leading viewers through the journey of your travel experience.
Color Correction: Enhance the visual consistency of your shots by applying color correction:
- Adjust color balance, exposure, and contrast to create a uniform look across different scenes.
- Color correction ensures that your video maintains a professional and polished appearance.
Color Grading: Use color grading to establish a specific cinematic atmosphere that suits your video’s mood:
- Apply color grading presets or make manual adjustments to achieve the desired color palette.
- Color grading enhances the overall visual impact of your video and contributes to its cinematic feel.
15. Telling an Exciting Tale
Bringing all elements together, you’re ready to craft a compelling travel narrative that captivates your audience:
Strong Beginning: Begin with a powerful opening shot or sequence that grabs viewers’ attention and sets the tone for the rest of the video:
- Hook your audience with an intriguing visual or a captivating moment that sparks curiosity.
Effective Storytelling: Use your planned shots to create a coherent and emotionally engaging journey:
- Introduce key moments, showcase unique experiences, and convey the essence of each location you visited.
- Build a narrative arc that keeps viewers invested in the unfolding story.
Memorable Conclusion: Wrap up your video with impact, leaving a lasting impression on your audience:
- End with a shot that encapsulates the essence of your journey or delivers a powerful message.
- The conclusion should resonate with viewers and reinforce the cinematic quality of your travel video.
Conclusion .
As you venture into the realm of cinematic travel videography, remember that this journey encompasses both your creative vision and technical expertise. While the process may appear intricate, every step you take contributes to the creation of videos that transport your viewers to the heart of your travels. Embrace patience as you experiment, learn, and refine your skills, understanding that achieving cinematic quality requires time and dedication.
Dive into the realm of experimentation by exploring different angles and perspectives. Seize the opportunity to capture genuine emotions that define your journey—a breathtaking vista, a heartwarming interaction, or a peaceful moment of reflection. Each destination carries its own unique story, so strive to narrate its distinctiveness and charm through your lens.
Striking a balance between mastering cinematic techniques and embracing the authenticity of your adventure is paramount. Allow the technical aspects to enhance your story without overshadowing the essence of your travel experiences. Embrace a stance of continuous learning, staying attuned to new equipment, software, and trends to ensure your videos remain fresh and engaging.
How much did you like Our detailed Mastering Cinematic Travel Videography: 15 Tips to Create Stunning Travel Videos ? Review Also, please share these Blogs with your friends on social media.
Related Article –
- Road Trips Ideas | 12 Tips to Prepare Your Car for a Long Road Trip?
- 150 Best Places to Visit in the United States In 2023
- Road Trip With Kids
- How to Stay Awake While Driving Long Distances
- Audiobooks to Listen to On Your Road Trip
- How to Create an Epic Itinerary Road Trip
- Best Rental Cars For Travel Adventures
Cinematic Travel Videography FAQs
what equipment do i need to create cinematic travel videos.
To get started, you’ll need a camera (preferably a DSLR or mirrorless camera), a variety of lenses, a stabilizer or gimbal for smooth shots, a tripod for stability, and a quality microphone for capturing clear audio. Additionally, investing in video editing software will be essential for post-production.
How do I choose the right music for my travel video?
Selecting the right music is crucial for setting the mood of your video. Look for music that complements the emotions and pace of your scenes. There are various royalty-free music libraries available online, offering a wide range of genres and styles to suit different atmospheres.
What’s the best way to capture audio while filming on location?
Using an external microphone, such as a shotgun microphone or a lavalier mic, can significantly improve audio quality. These mics can be attached to your camera or the subject you’re filming to capture clear and crisp sound even in noisy environments.
How can I effectively tell a story in my travel video?
Crafting a compelling narrative involves planning your shots to create a beginning, middle, and end. Identify key moments that encapsulate the essence of your journey and structure your video around them. Introduce your destination, share experiences, and conclude with a memorable closing shot.
How do I achieve the cinematic look during editing?
Color correction and grading play a vital role in achieving a cinematic look. Adjust the colors to enhance the mood of each scene and create a consistent visual palette. You can also experiment with adding a slight filmic grain or adjusting contrast to emulate the cinematic feel.
What are some common mistakes to avoid in cinematic travel videography?
Avoid excessive camera movement, overuse of transitions, and shaky footage. Additionally, be mindful of overediting or using too many effects that may distract from the story. Always prioritize the narrative and viewer engagement.
Can I shoot cinematic travel videos with a smartphone?
Yes , smartphones equipped with good camera capabilities can be used to create cinematic travel videos. However, using additional smartphone-compatible accessories like stabilizers, external microphones, and lenses can enhance the quality of your footage.
How can I make my videos stand out from others?
Inject your personal style and unique perspective into your videos. Look for creative angles, experiment with different techniques, and add your own creative touches to your shots. This will help your videos stand out and resonate with your audience.
How long should my cinematic travel video be?
The ideal length of your video depends on the platform you’re uploading it to and the attention span of your audience. Aim for a duration that keeps viewers engaged and tells a compelling story without feeling rushed. Generally, keeping it between 3 to 5 minutes is a good guideline.
How can I improve my videography skills over time?
Continuous learning and practice are key. Study the work of experienced videographers, take online courses, experiment with different techniques, and gather feedback from peers. As you gain experience, your skills will naturally evolve and improve.

Meet David Hoper, a passionate travel Blog writer with 7+ years of experience in travel content. Through his exemplary storytelling and engaging narratives, he shares his experiences and brings destinations to life. With a keen eye for detail and a love for exploration, he has cultivated a diverse portfolio of travel blogs that inspire and inform readers worldwide.
In this article:
Post written by: David Hoper
Leave a reply.
Your email address will not be published. Required fields are marked *
Save my name, email, and website in this browser for the next time I comment.

United states Discover the Hidden Gem: Lake Nokomis Beach in Minneapolis, MN

- August 9, 2023
Travel Photography and Videography Sunset Photography: Expert Tips for Capturing Evening Sunset Shots
You may also like.

The Impact of Drones on Travel Photography and Videography
- 8 minute read

Exploring the World from Above Aerial Adventures with Drones
Sunset Photography: Expert Tips for Capturing Evening Sunset Shots

Mastering Sunrise Photography: Proven Techniques for Stunning Morning Sunrise Shots
- 7 minute read

Vintage Travel Photography: The Charm of Capturing Vintage Travel Photography
- 9 minute read

Top Travel Photography Gear Essentials for Beginners | Must-Have Equipment
- 6 minute read
Our Latest Instagram Posts
@amazingworld.travel8.
Travel - Experience - Share
- Philippines
- Netherlands
- Switzerland
- United Kingdom
- South America
- New Zealand
- Adventure Travel
- Culture & Heritage
- Sustainable & Responsible Travel
- Travel Products & Services
- Travel Tips
- Food & Restaurants
- Hotel & Resorts
- Travel Resources
- Published Work And Features
- Work with Us / Contact Us
- Search for: Search
A Step-By-Step Guide To Editing Travel Videos – 6 Handy Tips

Create amazing travel videos and learn how to edit travel videos. This is a step-by-step guide to editing travel videos.

Have you been travelling to various holiday destinations and want to share your experiences with other travel enthusiasts?
Then it’s time you shared your adventure travels through a travel video! But before you start shooting your video, you need to know the basics of creating videos and editing travel videos that can hook your viewers’ attention.
Table of Contents
Smart Tips for Editing Travel Videos | Beginner’s Guide To Edit Travel Videos
With the tips and tricks to edit travel videos mentioned in this blog post, you’ll be able to create amazing travel videos in no time. From telling an interesting story to presenting high-quality videos that convert viewers into customers, you’ll find all this and more here. This is a step-by-step guide to editing travel videos .
Complete Guide To Editing Travel Videos | Travel Video Tips

Learn how to edit travel videos to keep new and existing travel enthusiasts engaged in your content through tips on how to share a great story and combine the different elements needed for a successful video.
Step 1: Getting Organized For Editing Travel Videos
A great travel video starts with an idea. Are you interested in educating viewers about a place, or do you have a unique story to share? When you are clear about your vision, you need to start researching the location.
There are a lot of online resources that help you learn about a place. These include YouTube videos, blogs, and websites. With greater detail, planning your shots become easier.
After you’ve done your research about the location you want to focus on, create an outline for your video’s story. You don’t need details at this stage, but decide the flow of the video from the beginning to the end. The call-to-action or trigger should also be decided at this stage.
Step 2: Select the Tools for Editing Travel Videos
Before you edit the video online , you need to choose the equipment for shooting the video footage. The quality of your video will depend on knowing the angles from which you film the scenes. You might have to take shots from different angles before you find the best one.
A professional camera with a high-quality, on-camera microphone should be used for filming your video. You can’t compromise audio or picture quality if you want viewers to stay engaged until the end.
To get the best out of your camera, you need to study the manual so that you know the camera controls well. It’s always better to improve your skills before investing in expensive equipment. As you gain experience, keep upgrading your filming equipment.
Step 3: Make Your Story Engaging While Editing Travel Videos
What sells your video is your story, so make sure the story in the video is exciting and intriguing. Some of the most engaging elements of an interesting story are the local people and your journey. To capture the true spirit of a particular destination, feature the everyday lives of people from that place.
Sharing glimpses of people’s lives adds to your video’s emotional quotient and helps engage viewers since they feel like they belong. While you can capture the beauty of a place through drone shots or close-ups of natural scenery, to capture its soul, you need to include the people of that place.
Footage of everyday life lets viewers get a feel of the place and help them decide if they want to visit it or not. When returning to your hotel or ordering food at a local restaurant, include all your experiences since it makes the video more personal.
Step 4: Tweak/Edit Content That’s Not Relevant While Editing Travel Videos
If you want to make videos that hook the audience, cut out portions that don’t add value to your story. When you start filming, shoot some extra footage. This gives you flexibility when editing the video .
Editing videos can be a smooth process if you have planned the shoot down to the last detail. This means you should check your battery power levels and storage space. For longer trips, you should have daily plans ready before you shoot.
With online video editors , editing videos is smooth and hassle-free. Once your video is ready, you can add music to your video that complements the pace and theme of the video. You can either choose the templates provided on the online platform or create your own.
Your video needs to be crisp, unique, and engaging since most attention spans these days are approximately 8 seconds. The video needs to have a strong start since viewers decide whether they want to continue watching the video or not in the first few seconds.
Step 5: Bring all the Elements of the Video Together While Editing Travel Videos
To make a winning video, all the elements in your video need to come together.
It’s possible that your videos are watched by people on the go, so they might watch it on a mobile phone and mute the audio. To ensure you keep your viewers engaged, make sure that you use subtitles so that viewers can understand what they are watching.
Using a top-quality microphone is also important since poor-quality audio can drive viewers away. To get quality video footage , ensure that the video is steady since a shaky video is something viewers might not appreciate. If you want to add graphics, make sure they blend with the theme of your video.
Bonus Tip: Add an Introduction While Editing Travel Videos
The goal of your travel video is to give viewers the information they need about a place. While you need to introduce yourself at the beginning of the video, keep it brief. A long introduction increases the length of your video and does not add value.
The viewer needs to be excited in the first few seconds of the video, so start by giving them an exciting introduction about what they can expect. This improves their chances of watching the entire video, including the call to action at the end.
You can integrate your introduction somewhere in the early part of the video so that the flow of the video is maintained.
With the above-mentioned tips on editing travel videos , you can create videos that not only engage viewers but also get shared by viewers on social media. Remember – the quality of your video depends on your storytelling abilities more than the quality of your equipment.
Even so, editing a video is not as difficult as you think. Free online platforms can help you make professional videos in under 5 minutes. Choose your location, prepare your story, and start shooting your travel video .
Don’t forget to stay trendy on vacation by not only wearing the best outfits but also analyzing the trends that other travel videos are focusing on. This helps you get ideas about what viewers want and improves the engagement potential of your video. Hope you found this post on tips to edit travel videos useful.
Are you planning a last-minute Holiday? Below are some useful resources to help you book flights, hotels, and tours! And also clothes, luggage and accessories for your trip!
Flights – Cleartrip or Makemytrip or IndiGo or Cheapair or Priceline
Tours – Click to book top tours around the world . Book tours and activities here .
Experiences – Book your next unforgettable experience here , with flexible bookings and free cancellations. Reserve tours and activities now and pay later.
Hotels – Click to book the best hotels/resorts . Choose the best stay options with TripAdvisor or Cleartrip or makemytrip or goibibo or Booking.com or HotelsCombined or Agoda
Travel Insurance – Click to book Travel Insurance that covers a range of travel insurance and safety services including medical emergencies, lost luggage, trip cancellation and more
Visas and Travel Documents Application – Click here for Online Travel Visa Check
Online Passport Photo – Get Your Passport Photo Online here

Do You Love Traveling?
Do you want to know how to travel the world? We have put together a very useful travel resources page with the best travel tips . Go check it out now. Thanks for visiting our site Voyager - imvoyager.com and taking the time to read this post! If you wish to collaborate/work with us then reach us at [email protected] We’d love it if you’d comment by sharing your thoughts on this post and share this post on social media and with your friends. Follow our journey on our social media channels: Facebook X Instagram Pinterest YouTube
Start dreaming about your next adventure with Tripadvisor . Book your next unforgettable experience here with flexible bookings and free cancellations.

60+ Million Users Trust TripAdvisor With Their Travel Plans. Shouldn't You?

Explore these posts:
Leave a comment cancel reply.
Your email address will not be published. Required fields are marked *
This site uses Akismet to reduce spam. Learn how your comment data is processed .
Privacy Overview
- Screenwriting \e607
- Cinematography & Cameras \e605
- Directing \e606
- Editing & Post-Production \e602
- Documentary \e603
- Movies & TV \e60a
- Producing \e608
- Distribution & Marketing \e604
- Fundraising & Crowdfunding \e60f
- Festivals & Events \e611
- Sound & Music \e601
- Games & Transmedia \e60e
- Grants, Contests, & Awards \e60d
- Film School \e610
- Marketplace & Deals \e60b
- Off Topic \e609
- This Site \e600
5 Essential Hacks For Making the Perfect Travel Editing Set-Up
Are you an editor who is on the road a lot these tips and tricks will have you working like a pro in no time..

Sometimes you run into the unavoidable issue of having to do work while traveling. If you're an editor, maybe you're running to meetings or shuttling between different offices or sets.
Or maybe you're traveling for the holidays and still want to keep on top of your deadlines!
Zach Ramelan recently posted a video going through all the gear and hacks he uses while he's editing projects on the road. He offers five key suggestions for making mobile work easy and organized.
Watch the video below!
1. Buy cases for hard drives and cards
You definitely want to protect the brains of your project, and especially keep your cables and cards organized.
The case Ramelan uses here is made by Jelly Comb and Ramelan says it holds four hard drives. However, you could buy one that's slightly larger that will also fit a laptop.
Don't forget to protect your SD cards , too!
2. Get travel-ready hard drives
This may seem like a no-brainer, but buy hard drives that will hold up under the strain of travel.
Try the ArmorATD from G Tech . The one Ramelan uses is the LaCie Rugged Mini .
If you don't have a rugged hard drive, consider turning its packaging into a protective case .
3. Use velcro
When you're traveling, you want to make sure all your gear is secure and in one place.
Ramelan uses an ingenious but simple hack -- velcro.
Stick velcro to the back of your hard drive and the top of your laptop. Secure the hard drive to your laptop. If you're on public transportation, or if you need to move and bring your whole set-up to another nearby location, this method allows it to travel together, compactly and safely.
4. Get a good bag
This is one of your most important investments. For editors that travel, they likely need something lightweight but durable enough to protect their gear.
You could check out the Veer 18 for simple traveling with your camera, or maybe the more heavy-duty DUO daypack , which has space for your laptop, too.
After that, check out all the basic necessities you need to put in your new traveling bag.
5. Label your hard drives
If you're working on multiple projects and using hard drives that all look the same, do the smart thing and label each one.
You can do this with a fancy label-maker, or just slap a piece of tape on the drive and label it using a marker or Sharpie.
You don't want to go digging through hard drives, adding frustration before you even start working!
What's next? Dig into more tips for filmmaking on the road
Here are five tips for traveling with gear , what you should pack , and ten tips for shooting in remote locations .
Do you have any tips for working while traveling? Let us know in the comments!
Source: Zach Ramelan
How Heat Shapes Your Career With Oscar-Nominated Producer Chris Moore & Team
“go out and make something you think you would pay for.”.
Heat is important to your film career. It means that you and your work are gaining attention and recognition, which can lead to more opportunities in the future. So how can you generate and navigate heat at an industry level? What contributes to “positive heat” or “negative heat?”
In today’s episode, No Film School’s GG Hawkins and Jason Hellerman speak with Chris Moore, Katie Marpe, and Dennis De Nobile to discuss:
- How Chris, Katie, and Dennis entered the industry and how they met
- Why you need to promote yourself and your work
- The One Moore Hollywood Podcast and the topics they discuss
- The difference between “in the business heat” and “out of the business heat”
- Seeing big corporations gravitating toward original ideas
- How audiences decide whether they will watch a movie or not
- Getting feedback on your ideas
- Why your idea may be better suited for a different medium
- Good Will Hunting - Generating authentic heat with the script
- When you realize a script isn’t working
- How your attitude and behavior affect the type of heat you generate
- Sensing tension of the cast and crew while watching a movie
Subscribe to the No Film School Podcast on:
- Apple Podcasts
Listen to more episodes of the No Film School podcast right here:
This episode of The No Film School Podcast was produced by GG Hawkins .
What Are The Best Thriller Movies of All Time?
How good is sora actually an interview with the filmmakers behind "air head", directly upload to davinci resolve with new blackmagic camera 8.6 public beta, canon improves servo zooming and cfexpress usage in latest r5 and r3 updates, highly-requested firmware updates for sony a1 and other alpha cameras finally arrive, insta360’s free desktop editor studio takes major step forward with latest update, why is everyone saying “survive 'til '25” in hollywood, screenwriter michael arndt on how to write insanely great endings, go behind the scenes of fx's hit series 'shogun', how to craft a diverse spoken word short with "night swimming".


11 Techniques of Shooting and Editing an Outstanding Travel Film
Last Updated on April 13, 2022
Making memories is nice. Because they keep our life going. Given our hectic daily life, we all are victims of stress. Traveling is the ultimate liberator that rejuvenates and boosts us to be on our track. It opens one’s mind to new ways of living and looking at the world. The most rewarding aspect of traveling around is that it keeps one alive. And this is the reason why every year hundreds of wacky travelers take the road. All the adventures and misadventures, new people, new places, unique landscapes – documenting these can help others find the motivation of coming out of their comfort zone and travel through the world.
Shooting an informative travel film is a great way of telling the world of your adventures.Well, if you are one of them and want to inspire others by taking your experience to another level, this blog is meant for you then.We would help you as to how to make a travel film and understand the way you can effectively capture, record and document your treks. Your chronicles can possibly instill a wanderlust on the viewers.
A travelogue involves a number of things to be taken care of, be it you shoot with your crew members, or alone. Not only you have to keep your equipment handy, but also you have to think about the travel, food and lodging arrangements. So let’s start with the tips of creating top-notch adventure travel movies.
The Equipment:
Mirror-less cameras
Forget DSLRs. Undoubtedly they have magical battery life and renders really amazing photos, but what about that big burning hole in your pocket? While shooting a travel film, you must also maintain a strict budget. So opt for the mirror-less cameras that are equally effective. And for all the good reasons, the new Sony A7iii is a perfect option for adventure travel films.
Alternatively, you may try the slightly older version Sony A6300, but which sports similar features of its successor.
You can shoot excellent pictures from various angles by shooting with a gimbal. Take cinematic smooth shots with a gimbal that has its own stand. This will help you capture jungle shots or if you plan to take an interview of someone you come across in the midst of your sojourn.
But, consider the weight of the gimbal, the microphone and ND filter of the gimbal while buying one.
Lenses: a prime, a zoom, and a wide
While shooting, these three are the aces that would give you the ultimate photographic experience.
To capture all those low light moments, have an arty prime lens as handy. But only when you do have some time to spare on.
For zoom lenses, just ensure you get one that is image stabilized. The 24-105mm f4 zoom lens for a highly stable shot that will ease your editing works. For wildlife documentaries, try the 70-200mm lens but they come with heavy weight and length.
The wide lens of 16-35mm or wider will empower you to capture things even in the tightest of spaces. Shots that cover people and crowd, are perfect to be shot by a wide lens. You get a great landscape view!
Travel film companies have a high budget for drone shooting. But some countries are sensitive about drones and see them as unethical journalism. So whether you have a big crew with you or you are a solo traveler, be extra cautious about these flying gadgets. Anything like that can put someone behind bars for years as per the country’s law.
So do your homework beforehand if you plan to take a drone with you. If you get a ‘go ahead’, then get something like DJI spark that is lightweight and handy, and gives outstanding landscape shots.
Your video won’t create that desired impact if the sound quality is inadequate. So don’t ever think your mic is later option. People usually tend to overlook this vital element. But to pick up the ambiance of where you are, microphones are indispensable. Since they add a bit of weight to the gimbal, try choosing a lightweight mic.
Now the Rules:
Talking about the rules of shooting a travel film, your film must play by the rules. Whether you like it or not, travel shoots are tests of tenacity and are made of rules that must be taken good care of.
#1. First thing first, keep your camera kits to a minimum. The lesser is the weight, the more you can jump around and take incredible shots. Filming in extreme locations can already make your pace slow. If unnecessary weight is added on, your travel documentary will take months to shoot.
#2. Don’t move the camera if you want to take the shots like a pro. Don’t fidget with the zoom as that might cause some shakes and jerks. Jerks are repellent for people watching a video, so aim for a smooth experience for them.
#3. To be a bit closer to being a pro and create a stellar travel film, take transitional shots, moving from one place to the other. Transitional shots break the monotony and make you closer to being pro.
#4. Some R&D is also needed for the kind of clothes you should carry. Because when you are shooting the film, you must also keep yourself warm or cold. Carrying the right type of clothing for the respective locations solve this.
#5. Keep your camera cleaning kit handy if any cleaning is required while filming. You never know when would you need it, but keeping it clear from dust and water is the best thing you can think of.
#6. Variety as that spices up life. From a cinematic perspective also, this is applicable. So don’t stick to one kind of shot throughout. Nobody will like to make it to the end of your film and all your efforts would go waste. Mix your shots in both focal length and composition, use your wide lens to get an intimate shot or low tracking shots that covers through the grass.
Then zoom it away and take wide shots of the landscape. While editing, toss them and mix’em up! Make your movie come alive.
#7. Don’t get too carried away by the beauty of the sceneries and the location and stray from your actual story. Or from your characters! A remarkable location is ought to impress your audience, but it cannot create that desired impact without a compelling story and enthralling characters.
#8. Water, and light Refreshments – It is highly essential to keep yourself hydrated and full to keep you going. But unfortunately, while you are engaged in a shooting, rarely would you get a chance to refuel yourself. So in those times, light refreshment or snack keeps you positive.
#9. Finally the Editing – So you are back home now and ready with all your footage. It’s time for some storytelling.First, sort out the good and the not so good footages, this will help you to make your choice. Then gradually frame a linear flow as to which scenes you want to show first, and mainly what would be the intro.
Focus on a strong intro as that would entice your audience to wait for more to happen.Structure your story in a way that it draws the onlookers in gently. This requires constant control on the pacing. Once you get the pace correct, you are halfway done.
#10. Next comes the sound selection. This includes, the foley sound, the background score and the effects. Sound design is a vital element in creating an engaging travelogue. Irrelevant or lousy background score can turn incredible action-packed travelogues into comedy travel movies in no time. Hence give ample time to sound mixing and find a score that compliments your video.
But as you know, sometimes silence is golden, so let some shots pass by sans music.
#11. Another rule of thumb is the duration of your video. If it is your first time trying your hands on travel documentary, then stay happy within 5 to 60 minutes. Once you gauge the response of your audience, then you may think of escalating your duration.
So you are done. Now what?
Sharing is caring! One of the best things about travel filmmaking is, you can capture people, moments, and places that can be shared with the world.
So once you are done with the final phase of your video and is satisfied with the outcome, take a deep breath, and start uploading it on your YouTube or Vimeo channel.
Share it on your social media handles too. The more you share, the higher will be your number of audience. Subtly request them to share your video.You may also upload the video on websites that allow online streaming or download. Who knows it would be counted among one of the best travel movies and feature next on Netflix! 🙂
If you have some more valuable tips to add, please share them in the comments section below. And in case you have footage of your travels that you want to give a shape of video, you may try us . We would give your video a professional look with excellent sound mixing and editing. Because in the end it all depends on how perfectly you edit your video.So, good luck to you. Start traveling!
Related Posts

How Video Content Improves Your User Experience and Why Adding Subtitles to Your Videos is Important

10 Ways to Leverage Interactive Video Content for your Business

10 Amazing Business Benefits of Whiteboard Animation
Make Your Next Travel Video Shine With These Five Editing Tips
Creating cinematic travel videos can be a rewarding way to share your experience of visiting a new place. Once you've returned from your trip and have all your footage loaded into the video editor, here are five tips to help create your best work.
In this video, Jordy Vandeput for Cinecom.net shares a few of his secrets he learned that helped him create his newest travel video, " NICELAND ." One challenge that travel videos face is that the viewer wasn't there, so it's up to the editor to piece footage together in a way that conveys the emotion, which is usually excitement, fascination, and curiosity.
To create emotion, it's important to submerse the viewer in the video, and a major part of this is through sound design. Any memorable travel video I've seen has had the sound design carefully crafted. Vandeput shows you how he did it with "NICELAND" here, and I would put it on the top of your list of what to take away from this.
Check out the full video above for all of his editing tips to use on your next cinematic travel video. Do you have anything else to add onto the list? Let us know your tips in the comments.

Ryan Mense is a wildlife cameraperson specializing in birds. Alongside gear reviews and news, Ryan heads selection for the Fstoppers Photo of the Day.

FootLoose Dev
Travel blog by an Indian travel blogger.

7 Tips To Edit Your Travel Videos Like A Pro
Editing videos is a difficult task, and editing travel videos is even more challenging. People like to see every glimpse of places in perfect bright light and a descriptive manner in travel videos.
Clear views inspire people to travel to places they are seeing. Keeping this in mind, if you are a travel blogger who posts videos on your social media page or YouTube channel, it becomes necessary to provide your viewers with the kind of videos they would want to see. But, most of the time, YouTubers fail to produce such content to keep their viewers engaged for a long time.
You will find plenty of travel videos online. But, how many of them inspire you to travel? If you find most of them boring. Then, imagine what effort you need to put across to make your travel videos worth watching.
Through this post, we will walk you through some essential travel video editing tips. These tips will help you create attractive travel videos for your audience so that they don’t get bored easily and take inspiration from what you are showing.
7 Tips To Edit Your Travel Videos
Capture Amusing Shots
Before editing, comes the part of shooting. Taking clean shots is imperative for travel videos. To begin with, you must use an excellent quality camera to take footage. Do all the settings you need for recording beforehand to avoid wasting any time.
It’s not that your camera needs to be costly for capturing good footage, you can also use your mobile. Just ensure that it produces crisp picture quality. Additionally, take as many shots as you can. The more the number of shots, the more choices you can make while editing and compiling.
Also, pay attention to the angles, formats, and styles that enhance the beauty of what you are shooting, after all your travel video should be compelling. When it comes to formats and styles, consider watching other travel videos online to get more ideas about the shooting.
Invest In A Video Editor
If you have ever made any video, you might know the importance of having a decent video maker by your side.
After recording, the next essential step is editing. If your video is perfectly edited, consider it a hit. Many options for video editors are available online. You must search for a suitable video editor based on user reviews to make the best choice.
Using a video editor, you can easily adjust, tweak and improve the quality of your footage by adding special audio, visual and animated effects.
The online video editors feature many customizable templates to let you create astonishing content without having you brainstorm your mind and waste extra time.
Smart Arranging Your Travel Videos
While editing your videos, the first thing to do is to sort and trim the footage using a decent video trimmer . If you are a beginner at editing, doing the same can be quite daunting, as you cannot be sure what footage to add and what to trim.
The best way to do trimming and arranging is by opting for the shots and footage with the best angle perspective. Your footage should look clear. Therefore, avoid cluttering.
Besides, give an optimum length to your video, as no one likes to see lengthy content. While you arrange the shots, think of an order or flow that can make people stay to watch your video completely.
When it comes to video trimmers and editors, plenty of options exist. But, you must go for a video trimmer that is easy to use and provides good after-sales services to get the job done timely.

The secret to a successful video is an impressive storyline. To make your video binge-worthy, you must possess a creative mindset while being professional at the same time.
Creating a story for your travel video can be tricky, but if you invest some time talking to the local people and collecting interesting facts about the place, you can easily make the story. Make sure that the facts and figures collected are genuine by performing research online.
If you are travelling to someplace that doesn’t have any history or much to reveal, you can always showcase your lifestyle and natural assets. Then, think of finding one common link between the footage to try to weave a beautiful story to keep viewers engaged.
Transitioning affects
How will it be to witness a sudden transition while watching a travel video? Well, honestly, no one would like to experience it as it is a sign of disturbing quality.
To get the most out of your video, use a reliable video editor for smooth transitioning. Video editors provide many transition effects for shifting from one scene to another seamlessly.
Additionally, you can opt for a motion blur effect and incorporate changing effects to add life to your travel video content without compromising quality and visuals.

Audio Effects
Adding attractive visual effects is one side of enhancing the appeal of your travel video. Simultaneously, you must also add crisp audio effects to change the entire aura of the video you are creating.
Depending on your video type and style such as adventurous, vintage or ancient, add a suitable music effect. Music plays an important role to keep viewers engaged. It acts as a driving factor to ensure that viewers can feel the pace of your content.
When you add music and other audio effects, it not only makes your video interesting but also adds to the quality. However, it is not advised to overdo with audio effects. You can add music in some parts while leaving some parts blank. Too much music can also ruin your effort while making your video look over and chunky.
Many royalty-free and copyright-free video makers are available online that features uplifting music like ancient, soothing, etc. You can opt for any good option depending on the music resources they are providing.
Animation And Graphics
Last but not least, you can add graphics and animated effects to make your video lively. With the right graphics and animations, you can highlight small details about the places. For instance, if you are revealing any fact about the destination, then that portion can be highlighted with animation or graphics.
So, to spice up your travel videos, don’t forget to play with animations and graphics.
Editing Your Travel Videos Like A Pro: The Conclusion
Editing travel videos can be intimidating as it requires roasts of skills and noticing the key highlights. However, if you know the right ways to edit your travel videos, nothing can stop them from trending. You can take some guidance from these travel video ideas and tips to create engaging content.

Just wanted to pop in and say thanks for this article!
I mostly shoot videos through by phone camera. Please recommend some video editing phone apps.
Leave a Reply Cancel reply
Your email address will not be published. Required fields are marked *
How to Make a Travel Video: 15 Tips to Help PERFECTLY Capture Your Adventure
We’re teaching you how to make a travel video, including capturing quality footage, developing a comprehensive story, and creating an interesting edit.

Making a great travel video is so much more involved than turning on your camera or iPhone and pushing record. Whether you are starting a YouTube channel or you are just making a memorial of your family vacation, you want the absolute best quality video footage to remember your trip by. In this guide, we are going to dive into how to make a travel video or vlog for beginners. We’ll focus on basic tips to create quality video footage, a comprehensive story, and an interesting edit.
Stop for Scavenger Hunts During Your Travels
Let’s Roam creates app-guided adventures for explorers in hundreds of cities around the world . These scavenger hunts , art walks, pub crawls , or ghost hunts combine competitive spirit with interesting trivia and photo ops. Each one offers a fantastic and unique experience! Find one in a nearby city , or download an Explorer Pass and try them all.
How to Make a Travel Video
1. pick your destination.
If you are making a travel video for personal memories, you likely already have a destination in mind. If you are making a professional video for YouTube, you may need to do some keyword research first and find a location that ranks highly in the SEO world. Using something like Google’s Keyword Planner can be very helpful for ideas.
2. Decide What Kind Of Video You Want To Make
There are several different types of travel videos that might interest you. The best way to figure out what type of video you want to make is to watch a lot of travel videos. Hop on Youtube or Vimeo and get to watching. Don’t just watch for entertainment value though, pay attention to things you like and don’t like. Do you like the videos with live narration or do you like voiceovers? Do you like YouTube videos with music and beautiful b-roll footage, or do you really like videos focused on information? There is no right or wrong answer, just preference.
Types of Videos to Consider
· Travel Vlogs – Vlogs or video blogging is a form of videography that is very personal. Generally, they are informal, based on reality, and require limited editing. They are often filmed in selfie-mode and have a friendly vibe. They rely on the audience trusting the vlogger and experiencing the destination through their eyes.
· Travel Guides – Travel guide videos focus more on what to do in a destination, for instance, “Top 10 Things To Do In Chicago.” They are focused on delivering information on the place, instead of personal information. These videos generally take more planning, require you to shoot much more footage, and take longer to edit. They can be highly SEO-driven though and produce a high number of views.
· Niche Videos – If you are making a family memoir, then this doesn’t apply so much to you, but if you are getting into professional video making, you need to find your niche. Do you want to focus on food, culture, or adventure? Think about your target audience and your passion! If you make videos about what you love, it will translate to your audience. They will feel your excitement and connect to your channel.
3. Write A Story
It is important to have a story in mind. You may film your whole trip and have great footage, but it can be really hard to put it together into something that makes sense. It is actually much easier to take some time before filming and figure out what your storyline is. This will help you decide what to film, what order to film in, and how to organize your video clips. If you are planning on posting your video professionally, keeping viewers’ attention is huge! You may have beautiful footage, but if people are bored with you, and your story is all over the place, you will lose them. Pulling people into an organized and interesting plot, keeps them hooked and coming back to see where you will take them next!
4. Decide What You Want To Film
Once you have a story in mind, begin to line out what exactly you want to film. This will naturally go along with your travel planning. What do you want to see? What are your interests in your target destination? Start with a general list of sights. Organize them into an itinerary that makes sense travel-wise. Then, begin to think about how you want to film them.
Again, go back to what others have done. While you don’t want to copy anyone else’s work (it’s always best to be creative and original), you can get great ideas from those who have gone before you. Think about angles, specific shots, pans, and what information you would like to present. Do you want to just have great footage and do a voiceover later? Do you want to present the information in vlog style, taking the viewer along as you go? Perhaps, you want each family member to have a part? Do you just want it to be natural and let what happens happen? Again, there is no wrong answer, only preferences.
We recommend making a list of exactly what video clips you want to get. It doesn’t have to be technical or use formal, filmmaking language, as long as you know what you mean. It can be scratched on a napkin or kept in a formal Google Spreadsheet, whatever fits your style! For instance, if you are filming the Eiffel Tower, you may make a list something like this:
- Slow pan up from bottom to top.
- Slow pan down from top to bottom
- Still view floating by from river cruise
- Panoramic pan from the top
- Long view from Champ-de-Mars
- Distant view The Trocadéro
- Zoom in from a distance
- Close-up still footage of twinkling lights at night
- Time-lapse at sunset as lights come on.
- Zoom out focusing on lights
5. Gather Your Equipment
The best equipment to use is the equipment you have! If you are making a family memoir or just starting out on YouTube, don’t worry too much about getting professional equipment to make travel videos. Actually, the learning curve is quite steep on some professional camera equipment, and you will find that your video quality is not as good as it is on your iPhone, GoPro, or point-and-shoot camera. So, don’t feel like you need to go spend a fortune on equipment. If you would like to snag a starter camera, the Canon PowerShot G7X Mark III is a great one. It has an articulating screen so you can keep an eye on what’s in your frame, a lightweight structure, and it takes great footage.
6. Use Multiple Cameras And Angles
One of the most important aspects of making a good travel video is making it visually stimulating. The same pan from left to right, the same eye level shots over and over, the same focal length throughout, makes for a visually boring video. Spice it up. Cinematic videos use footage from all different angles, above, below, the side, from the bottom up, etc! Get creative, if you don’t like it, you don’t have to use it! If you are planning on using the film for social media, then you need to consider what apps you will be using and film the scene in the correct orientation. For instance, you need a horizontal orientation for YouTube, but you are going to need a vertical orientation for your marketing on Instagram.
If you are traveling with family members or a partner, each of you carry a camera. This allows for multiple views, of the same subject, that you can splice together in editing software to create an interesting clip. Also, two creative brains are better than one. Your partner may see something in a different way than you do, and catching as many viewpoints as you can will help you create a video that many different kinds of people will enjoy watching.
Some cameras are better for specific footage. For instance, a DSLR camera is great for still footage, they are difficult to stabilize when moving heavily. GoPros are better for stabilization in active situations. Obviously, for aerial views, you need a drone. It may be easier to catch an unexpected moment on your phone. Use it all!
7. Keep It Steady
Video stabilization and sound are nemeses of travel videographers. They are the hardest two things to control. While most cameras and expensive lenses have internal stabilization, you will find that large cameras are still very hard to stabilize. If you are considering making YouTube your career, consider a gimbal for your camera. This will allow you to move and walk and talk, without shaky footage. Use a tripod or set up your camera on a steady surface when you want to do a monologue. Use a GoPro with stabilization when doing something active. When doing a pan, something as simple as holding your breath can make a huge difference. Most of all, when you turn on the camera, think about what you are shooting. Don’t just turn it on and slap record. Think about the composition. Think about your body stance. Get set, and then shoot.
8. Over Film Everything
You can never have too much footage. Film it, then film it again. You may think you got good footage, and then you get to editing and realize that it is overexposed, the sun is blocking out everything, or you didn’t allow it to focus well. You may find that you thought you were recording and you weren’t. All these things happen. So, we recommend filming the scene, rewatching it on your screen or phone, adjusting for mistakes, and then refilming it. You may have to film a certain thing multiple times. This isn’t always possible, but when it is, take the time to film it a few times. There is no such thing as too much footage.
9. The Camera Is Not As Fast As The Eye
Remember your camera is a machine. Depending on the quality of your camera, it can take time to focus. When you begin a vlog or monologue, give it 5-6 seconds to focus before your begin talking. When you are panning a landscape, go incredibly slow, as the camera is having to refocus multiple times on the way through to keep sharp. You can speed up the footage in your video editor. Make sure you give it time to focus.
10. Follow The Light
Lighting is of utmost importance in filmmaking. Before you begin filming, do a test. If you are vlogging, make sure your face isn’t under a shadow. Shooting into the sun will often produce starbursts in your footage. Low light footage often looks noisy. Sometimes just turning around the other direction, or turning on a lamp, will completely change your video quality.
If shooting in the middle of the day, your camera will tend to overexpose the footage. Remember that it is much easier to brighten something in post than it is to correct overexposure. Err on the underexposed side. You may need to manually adjust this on your DSLR or mirrorless camera when filming in direct sunlight.
11. Offer Some Information
We find that the best videos give us a behind-the-scenes take on your travel experiences. People want to know what they are looking at. Why is it important? Don’t overdo it. You don’t want to bore people but bring in some historical, cultural, or experiential information to keep the audience interested. If you are making a video for your own memoirs, this is how you are going to remember your trip, so include funny things that happen, how you feel in the moment, and what is going on behind the scenes. These are your memories, make them personal, and include the information that will help you remember the best parts of your trip.
12. Organize Your Footage
When shooting on several cameras, organization is key. You need a single place to bring together all your footage. We recommend investing in a good hard drive. Solid-state drives are more expensive, however, they are more sturdy for being thrown in and out of your travel backpack. We also recommend backing up your footage in multiple places.
Once you get all your footage in one place, begin to watch and label it. If you have 5 pan-ups of Mount Rushmore, label which one you think is the best. If you want to use a number system to grade the quality, that’s great too. Label your videos with descriptive names, letting you know what they are for future use. For instance, do not label your footage, “hot air balloons in Cappadocia.” Label it, “best left to right slow pan of blue balloon,” and put it in the “Cappadocia Hot Air Balloon Ride” folder. The more descriptive the better.
If filming an entire vacation or work trip, you will have footage from several different locations and sights. Break down your footage into appropriate folders. You want to be able to find it quickly! If you know what videos you are going to make for YouTube, separate the footage by video title, keeping all the footage for each video together. This may mean you have footage from several places in one folder.
If you are making a montage for personal use or you aren’t sure exactly what travel videos you are going to make yet, then separate them by location. We find that setting up multiple layers of folders and being as precise as possible takes a lot of time at the front end, but saves you time in the long run. Whatever system you decide to use, use it consistently.
13. The Magic Is In The Post
While getting good footage is obviously important, so is putting it together in a way that makes sense, flows smoothly, and provides visual and audio interest. There is no way we can cover all the ins and outs of editing in the scope of this article, but here are a few general concepts to think about.
14. What Editor Should You Use?
What video editor you use depends on a lot of things, like what equipment did you film on? If you filmed on your phone, and you only have your phone, then you are going to use a video editing app like InShot . If you are filming primarily on an iPhone, then you may want to use iMovie.
Using multiple cameras to produce a full-length travel video or vlog for YouTube or Vimeo, requires true video editing software. Which one you choose, depends on your equipment and your editing style. Many PC users like Adobe Premiere Pro. Those who really want control over every detail of sound and color grading may like Davinci Resolve . Adobe is quite expensive, prone to crashing and freezing, and export issues. We wouldn’t recommend it or any expensive software for beginners.
Adobe does make a web-based video editor called Premiere Rush that is free and has a medium level of control, allowing you to splice video, color grade, and improve the sound. It has premade graphics and allows for adding text and video transitions. It’s a great editor for beginners! Davinci is not as user-friendly, but it does offer incredible control and is free. Mac users tend to use Final Cut , which again might be too expensive if you are just starting out or making videos for fun.
· Add Music
Music can make or break your video. Take some time to find music that fits the emotion of your footage. Find something upbeat for your intro. Make sure that music used when speaking is turned down and doesn’t have too many lyrics or crazy beats that make it hard to understand your words. You want your music to add emotion and interest to your video, not distract the viewer. It should be present, but not overpowering.
If you are posting your video anywhere on social media, you must make sure that you use only royalty-free music. There are paid platforms like Epidemic Sound , Bensounds , or Soundstripe that most YouTube professionals use. Good royalty-free music is generally not free to use. However, most of these subscriptions do have a free trial period.
· Go Easy On The Transitions
Creative video transitions can add to the visual interest of your video. However, you are not making a Powerpoint presentation, so use transitions, especially premade ones, sparingly. Instead, think about transitions when you are filming and use a camera drop, hand to the camera, or spin to transition from one clip to another. Be creative and think it out beforehand.
· Pay Attention To Consistency
When making a travel video, remember that the goal is to create a story. As much as possible, the viewer should not be able to tell when you switch cameras. Part of great editing is to adjust your color and sound to be consistent throughout the video. It takes some practice and a lot of time. So, be patient with it. It’s good advice to take it slow. When necessary, step away for a while and come back and look at it with fresh eyes. Your software will likely need to catch up anyway.
15. Be True To You
If we can offer one piece of advice, especially for those entering the YouTube world, it would be to stay true to yourself. Not only will it make you more successful, as you will attract true fans that want to engage and invest in your channel, but you will be happier with your content. There is nothing worse than watching a video you made 6 months ago and being embarrassed about how fake it feels. You should identify with your own creations. Make it beautiful. Tell a good story, but above all, make sure it is true to who you are!
Closing Thoughts
While this guide is nowhere near comprehensive, we hope it gives you a good foundation to start. Video making is an art, and it takes time to learn. Just like any art form, you need to practice. It will take trial and error. It will involve experimenting and failures, but that is half the fun!
What are your favorite videography tips? Let us know in the comments!
Want to get ahead of the game on filming new destinations? Check out our list of “ Emerging Travel Destinations”, and get there first!
Does your new adventure include traveling with a partner? Check out our guide on “ How to Travel As A Couple: Tips For An Amazing Adventure. “
Frequently Asked Questions
Making a great travel video starts with capturing fantastic footage. Composition, lighting, and stabilization are things to think about. Include info like travel tips and historical facts to add interest!
These 15 tips for producing travel videos will help you ensure that you capture your adventure in a fun and professional way
Picking what to shoot is an important part of making a travel video . Consider doing a tour or a city scavenger hunt of your destination. This will allow you to get a glimpse of the local attractions.
Featured Products & Activities
Create travel videos that inspire wanderlust.
Learn how to plan and execute a video of your globetrotting expeditions. Get pro tips and advice to make stunning travel stories out of your adventures.
Not sure which apps are best for you?
Take a minute. We'll help you figure it out.
Immortalize your travels with a video.
Travel videos are a great way to document your trip, tell a specific story for a client, or just share the sights and sounds you experienced with the world. Whether you’re exploring the pyramids of Egypt, the skyscrapers of New York City, or the tropical waters of Thailand, learn how to make a video of your trip that you’ll want to watch over and over again.
Prepare for your trip.
When it comes to making travel videos, any time spent planning is time well spent. The preparation phase might not be as fun as filming or traveling, but it will help you make the most of your time, and it’ll give you the best chance to come away with the footage you need to make the best travel video you can.
Gather inspiration.
The first step is to research your travel destination and find inspiration. If you’re going on an expedition to Antarctica, this could mean finding out how to dress for the weather. If you’re going to Barcelona in Spain this might include looking up architectural points of interest. Logistics, location scouting, and getting familiar with the local culture will all help you plan your trip and your video.
“I find travel inspiration on social media,” says photographer and videographer Tiffany Nguyen. “So whether it’s Instagram, Pinterest, or a blog I saw, I usually have things bookmarked into a folder on my phone.” Next, Nguyen pins the different locations she wants to visit on Google Maps and color codes them in order of priority. “That way I can plan out a route, and I am not wasting my time jumping from point A to point B,” she says.

Map your story.
After you’ve done your scouting, start to visualize the narrative arc of your video. This process is also known as storyboarding . Your storyboard could be as simple as loose sketches, or it could describe the sequence of your video shot by shot. “Video is very time consuming and the window when you have good light is very small, so it’s important to have a good game plan,” says Nguyen.
One advantage of going through the storyboarding process is that you realize what shots you’ll need for your video. Now you can write a shot list to help you keep tabs on what footage you have and what you still need.
“If you have a strong storyboard and shot list, it’ll be a lot easier for you to put the timeline together and create the sequence for the video,” says Nguyen. “The most important part is being able to tell a story. You may have a bunch of epic clips, but if you don’t know how to tell a story and put it all together, it falls apart.”
Working with a client.
If you’re working with a client, the pre-production process is almost identical, except that you’ll likely be given creative direction or a certain script to follow.
“It all starts with research. I have a client meeting, and then I sit down with my producer and we figure out how we’re going to execute this project. Then I write the script,” explains videographer Bevan Waite.
“The script dictates the next series of preparation documents, which would be the shot list, the call sheet, and any travel logistics that need to be organized. All of these organizational documents reference the script and ensure there’s an allotted time and location for every aspect of the script to be executed,” says Waite.
Find the focus of your film.
From the moment you start planning to the final edit you make, the most important thing to do is keep the big picture in mind; let it drive all your decisions as a filmmaker.
Another way to think about this is to ask yourself what your goal is, what the purpose of your video is. Are you making a travel guide for the Amalfi coast, a documentary of your road trip through Scotland, or a sponsored travel adventure through the Amazon rainforest? Or do you simply want to make an epic travel video as a keepsake of your trip?
Once you have your overarching purpose figured out, the rest of the planning, filming, and editing process will fall into place much more easily. Whether you’re a vlogger who wants to show their subscribers a day in Bali or a blogger who wants to add a video component to your post about the best way to see the Grand Canyon, there’s no limit to what you can do with the video format and a desire to explore.
“Some trips I totally fly by the seat of my pants. And that’s okay; sometimes you can schedule time to not know what the next thing is,” says Waite. “But it’s always a good idea to have that larger vision in the back of your mind, so you know what you’re trying to accomplish.”

Pack your camera bag.
Now that you’ve got your vision, it’s time to pack your bags. The best strategy in the gear department is to keep your kit as minimal as possible. “Especially on travel shoots, where you’re going to four or five different locations a day, you want a really compact, organized camera bag. That’ll allow you to move more easily,” says Waite.
Mirrorless cameras are your best bet for cutting the bulk without sacrificing image quality, but you can use whatever camera you have that can film video. If you’re making a video for a client, it’s a good idea to bring two camera bodies so you have a backup in case one breaks, gets stolen, or gets lost.
“You don’t want to have a huge camera, because that draws attention to you and makes it hard to capture candid moments,” says Nguyen. GoPros and other action cameras are always a good idea to bring, since you can mount them anywhere and they take up virtually no space.
Finally, consider bringing a drone for those stunning aerial shots. “I love having aerial footage in the intro of my videos,” says Nguyen. “An aerial clip grabs your attention right away.” If you do decide to bring a drone, make sure you’re licensed and can legally fly in your chosen location.
“I almost always carry multiple lenses,” says Nguyen. “I have a wider lens, like a 16–35mm, and I also have a couple prime lenses.” While prime lenses are less versatile in focal length , they are more compact and their image quality is often superior to zoom lenses. To round out her kit, Nguyen brings a telephoto zoom lens, which allows you to capture subjects you can’t get close to. These lenses also create a beautiful compression effect for your scene.
But if you want to go minimal, a solid midrange zoom lens such as a 24–70mm can make a great all-in-one kit.

Stabilizers
Nguyen also recommends using a gimbal or other stabilization system. “This is how you’re going to get those smooth cinematic shots,” she says. “When you capture videos with the gimbal you have more usable footage versus a handheld shot, since a lot of those shots can be really shaky and unusable.”
How much does gear matter?
Don’t let gear get in the way of what really matters: the journey itself. Most cameras with video capability can film exceptionally high-quality footage, even an iPhone. The difference is in the story you tell and how you choose to tell it. Your audience isn’t going to be dialed in to pixel differences, but they will care about craftsmanship and how well the story captures their attention.

Tips for filming your video.
Pay attention to light..
Light is one element you should always look out for, since the quality of your light will determine the look and feel of your video. Golden hour is a favorite time for most photographers and videographers, as the soft, warm, directional light close to sunset is flattering for subjects.
“If you have outdoor locations you want to visit, go there at the beginning or end of the day, and then go to your indoor locations in the middle of the day,” advises Waite. “That way you’re still getting a good quality of light inside the buildings, but you’re not getting that harsh daylight outside.”
Vary your shot types.
Consider the variety of shot types you’re collecting as you travel. Just like a favorite food, it may be delicious, but if it was the only food you could eat you’d soon grow tired of it. In the same way, “if you just have static shots or all gimbal shots, the video won’t be as enticing to viewers,” says Nguyen. Wide shots, detail shots, candid moments, lively action shots contrasted with still tripod shots, and time lapses are all shot types you can use to keep your video interesting.
Embrace the unexpected.
When traveling, things are bound to go sideways or veer from your plan at one point or another. Try not to get discouraged when you can’t eliminate all unknowns during your trip. Part of the beauty of travel is your encounter with the unexpected. As long as your camera is ready to roll, you’ve got the opportunity to capture one-of-a-kind footage as the scene unfolds.
“Being able to think on your feet is a very essential skill to have as a filmmaker,” says Waite. “No matter how much prep you do before a shoot, you’re always kind of making it up as you go.”
Get consent from the people you film.
If you’re doing commercial work, you’ll want to make sure you’re squared away legally when it comes to showing people’s faces. The last thing you want is to run into any legal issues down the road, so make sure you get consent or a model release right after you’ve filmed them.
“That’s something you want to be upfront about,” says Nguyen. “Most of the time, if you let them know what you’re doing, I find that people are open to it and think it’s really cool.”
More travel vlog tips here .
Edit with the story in mind.
Back it up asap..
The first thing you want to do after a day of filming is back up your footage onto a hard drive. If you can, have at least two backups of the footage, because you never know what could happen.
Once your footage is safely stored and organized, go through it and start to pick your favorite shots. Pull those clips into the video editor of your choice. Nguyen uses Adobe Premiere Pro.

Make your cuts cohesive.
Now that you’re ready to put it all together, pull out your storyboard again. This is going to be the difference between a clip montage and a story. While it may not be a feature-length documentary, every travel video has a story arc, even if it’s just a chronological retelling of your steps.
“It’s always good to have a bigger picture of what you’re doing in the editing room, rather than just putting a nice video clip next to another nice video clip,” says Waite. “Even if it isn’t clear to other people, as long as you know there’s an inherent structure to the way you’re doing things, I think that’s good enough.”
Waite likes to group similar shots together to create mini-scenes. “If the establishing shot is a drone shot of the ocean at sunrise, the next two to five shots should be of that same scene, shot in different ways,” Waite explains. No matter how you sequence your film, always do it with intention. Think about how your clips connect to each other and work together to move the viewer through the story.
How long should my video be?
That depends on what type of video you are making. “For regular Instagram posts, I find that 45 seconds is the sweet spot,” says Nguyen. “It’s really hard to create a video in just 30 seconds because usually I have so much footage. And I find that one minute is a bit too long, because usually the travel videos you see on Instagram are fast paced.”
Other platforms like a YouTube channel or IGTV are better suited for longer stories, but longer doesn’t necessarily mean better. As long as the story supports the length, you should be good. Just keep in mind that the longer your video gets, the more likely your audience will lose focus, so if you want a long video make sure you’ve got a compelling story to back it up.
Don’t forget sound.
Between voice-overs, interviews, and ambient music that complements your video, audio is one element that can really elevate your video. Collect sound bites from some of your filming locations to use alongside their respective video clips. Whether it's rainforest sounds in Brazil, water lapping at the beach in the Philippines, or even Los Angeles traffic, sound activates another sense and helps immerse the viewer into the scene.
Balance client expectations.
When you work for a client, Waite’s advice is to “put your own creative spin on it as an editor. But go with the direction you’ve been supplied.” It can be tricky at first to strike this balance, but the chances are your client hired you because they like your unique style or personality, and it’s okay to let that show in your editing.
Begin your journey as a travel filmmaker.
There’s a lot to keep in mind as you start to make a travel film, but the most important thing to remember is to relax and enjoy the journey. Don’t worry about being technically perfect so much that you don’t immerse yourself in your location and culture. Your passion and perspective will be much more noticeable than which gear you used or how big your budget was.
“Be shameless and just go for it,” advises Waite. “It’s all about self-confidence. When it comes down to it, it’s really just organization, vision, execution, and editing. None of those steps is rocket science. People can make careers out of just one of those steps.”
From Turkey to Tuscany, Peru to Prague, or New Zealand to Norway, wherever you may find yourself, you’ve got all you need to get out and film your own epic travel video.
Contributors
Tiffany Nguyen
Share this article
Do more with Adobe Premiere Pro.
You may also like
Language Navigation
Never second-guess again. The new Creator License covers personal projects online and on social media. See details .
Home » Video Production » 14 Video Editing Tips for Cutting a Documentary

Cover image via
14 Video Editing Tips for Cutting a Documentary
From file management to lower thirds, these fourteen video editing tips will help you shape your documentary film..
Weeks, months, and sometimes years after you’ve captured all your footage for a documentary, you have to put it together. Whether you captured everything you needed or not, miracles can happen in the editing room. So can disasters, but let’s focus on the positives.
In the editing room, you’ll find the story and put it together to craft a narrative. Of course, that’s after you’ve done the tedious work of organizing and backing up all of your footage and transcribing interviews. Then, you can start making action cuts, L cuts, J cuts—all the cuts. Have fun.
Kidding aside, cutting a documentary takes time, patience, and skill. We can’t help you with that. What we can do is offer advice. Below you’ll find fourteen tips for cutting a documentary.
1. Back up Your Footage

Whether it’s because you misplaced the storage device or the data corrupted, losing footage is never ideal, especially when shooting a documentary. You just can’t recreate some scenes. You need to back up footage to ensure that it doesn’t get lost. Ideally, you’ll want to back up footage in at least two separate locations.
Backing up footage at the office is the obvious choice, but don’t forget to also back it up on a portable drive, such as a portable SSD . That extra layer of protection secures the files if the original is deleted, lost, or corrupted. Using the cloud as a secondary option is also a good idea, and it allows access to your footage from wherever there’s an internet connection.
2. Organize It All

Having an organized file structure makes it easier to find everything you need later on. You can create an in-depth file structure, breaking up all your footage and assets into a specialized folder. Or, you can use Digital Rebellion’s PostHaste , a piece of free software that creates file structures based on your project. It’s available to download for PC and macOS devices.
Though the software is a huge timesaver, it doesn’t do miracles. You’ll need to put all the files in the folders yourself, but at least you’ll know where to put them. Tori’s piece on footage archival is an excellent read, diving into the pros and cons of physical versus cloud storage and how to organize files.
3. Transcribe Every Interview
I’ve done my fair share of interviews over the years, and transcribing is second nature at this point. Doing it isn’t fun, but it helps a lot down the road in two ways. First, it helps me become more acquainted with the interview, picking up interesting quotes that I may have missed the first time around. Second, finding any quote is as easy as searching for a keyword within Google Docs or Word. Transcribing everything will take some time, especially when talking about transcribing interviews for a feature-length documentary. But, it’s worth it. You’ll also want to place a timestamp after every quote so you can quickly locate it within the footage.
If you have the budget, hire someone to help. If that’s not in the budget, I suggest using Otter , which is free for the first 600 minutes of audio it transcribes every month. The app uses AI to transcribe in real-time, and it also works on uploaded recordings. Apart from adding timestamps, it knows who’s speaking, though you’ll have to identify the people before it can attribute lines to them. If Otter messes up, you can edit within the app. The Pro version is $100 for one year, and it’s worth every cent, with 6,000 minutes of transcription every month.
4. Use Close-ups and Medium Shots over Wide Shots

How a shot is framed matters. Framing too wide for anything other than an establishing shot can lead the viewer to wander and lose the plot. You’ll want to use medium shots for most interviews. A medium shot frames a subject from the waist up. The medium shot feels the most natural when a person is talking, but when you emphasize or add tension/drama to a scene, the close-up is the way to go.
A close-up frames the subject above the neck, but it can sometimes just frame the subject’s face. The close-up can also be used as a way to transition between interviews, which feels less jarring than transitioning between two identically-framed interviews. The close-up is also perfect for capturing and highlighting small details.
5. Avoid Jump Cuts with Multiple Camera Angles or B-Roll

People don’t speak perfectly like in the movies. Real life is rife with filler words, such as “umms” and “ahhs,” which you’ll have to edit out. The problem is that cutting out those filler words mid-sentence results in jump cuts . Jump cuts look unprofessional, and while they may get a pass on YouTube , documentaries are different.
One idea is to cut to a different camera angle when you need to make a cut. The problem is you need to shoot an interview with multiple cameras, which can eat into a tight budget.
The other solution is to cut to B-roll instead, which adds context to the story. When an interview subject says “ahh,” cut to a close-up of their hands, a cityscape, a bowl of fruit. It doesn’t matter, though it should be somewhat related to the story. It’s better to cut to something that visualizes what the interview subject is saying. If they’re speaking about their childhood, maybe cut to a picture from their yearbook or a home video. You get the idea.
6. Cutting on Action
Much like low-quality sound, viewers only notice bad transitions when done poorly. Cutting on action is one of the most straightforward cuts for a seamless transition. As the subject moves and grabs the viewer’s attention, that’s when you cut to the following clip, and no one’s the wiser. When I say action, I don’t mean movie action. It’s more like motion, and it can be something as simple as an interview subject looking off-camera or shifting in their seat.
7. Lead into the Next Clip with a J Cut or L Cut
The J cut leads into a clip by extending its audio to the preceding clip. If you’re showing B-roll , start playing the audio for the next clip, then match the audio with the matching video. You can see an example in Logan’s video above (#3 1:05). This kind of cut is everywhere on TV shows and movies, but most people don’t acknowledge them because they’re so smooth.
The L cut (which you can also check out in the video above) is the opposite of the J cut. To perform an L cut, cut to the next clip while the preceding clip’s audio is still playing. This creates a temporary audio overlap that ends up feeling seamless, as well.
Both of these cuts are excellent ways to transition naturally.
8. Keep Graphics and Lower Thirds Easy to Read and Bring Them up More than Once
Want to make your documentary look more professional? Add lower thirds . These titles can introduce interview subjects, locations, and time. You’ll want to choose something that fits with your project. You can start with our 15 free lower thirds or learn how to make one .
One of my pet peeves about documentaries is that I forget everyone’s names halfway through if there are too many interview subjects. Sometimes, the period between appearances for interviewees can be an hour or longer, by which time I’ve forgotten who they are and how they relate to the story.
I know I’m not alone, and the fix is simple. Just bring up the lower thirds introduction a few times throughout the film for each character, especially if more than thirty to forty-five minutes have elapsed. And, take it easy on the motion graphics. A simple lower third with a drop shadow will do just fine.
9. The Ken Burns Effect—Use Photos When You Don’t Have Footage
Ken Burns is one of the most successful documentary filmmakers in history. One of the tricks he often employs is rightfully deemed the Ken Burns effect , which is the simple effect of zooming or panning an image—common practice seen in many documentaries. Zooming and panning add motion to an otherwise static shot of a single image, making the shot more visually interesting. While the Ken Burns effect is used mostly out of necessity due to a lack of footage, it’s still effective at providing visual context to the viewer.
While the specific steps to recreate the effect will vary between NLEs, the process is simple enough. On DaVinci Resolve , I open up the Inspector tab on the Cut page, click the Video tab, and under Transform , I create a Zoom keyframe at the beginning of a shot, zoom in , and then create another keyframe at the end. To pan the shot, I do the same with the Position setting.
10. Kill Your Darlings
Back when I took a creative writing class, my professor always told us this. Killing your darlings is knowing when to let go for the sake of the project.
In Werner Herzog ’s Masterclass, especially the episode on editing, he says something along the same lines. He discusses how, in the editing room, you may find scenes that you loved while shooting but just don’t fit anymore. Instead of shoehorning it where it doesn’t belong, it’s best to kill your darlings at that point. He also mentioned that he’s ruthless with his editing, and deletes his outtakes completely after finishing a project. That may be taking it too far, but he’s not wrong. Be ruthless, trim the fat, kill your darlings.
11. Construct a Narrative
In Ken Burns Masterclass, there’s a chapter on crafting narratives that is a must-watch, where he says that he and Steven Spielberg approach writing narratives in a similar fashion, except that Spielberg can make it up.
Though fiction provides unlimited creative opportunities to craft a narrative, there’s a lot of room for creativity within non-fiction storytelling. Crafting the narrative is telling a story, and every story starts somewhere. You need to find that starting place and cut the footage together in a way that tells a story with a clear beginning, middle, and end. Real life has a way of unraveling unpredictably. Your job is to pull on every thread until the story unravels itself. Find the narrative that’s already there.
12. Use Music to Set the Tone

In filmmaking, music is as important for setting the tone as anything else, and it’s no different when making documentaries. Unlike film, however, music in documentaries is often more subtle. What some would call “cinematic” music—lots of strings and piano. When done right, the music feels natural. These types of tracks fade into the background, but still convey emotion and punctuate the scene. Here are some things to remember when picking music for a documentary film .
PremiumBeat has a huge selection of such tracks, and they’re easily searchable from this very site. Just hit the “Music” link at the top of this page and search for what you need. You can search for songs based on mood, genres, instruments, or by keywords such as “documentary,” “cinematic,” “film,” and so on. Take a listen.
13. Use Stock Footage
Stock footage can help any project. Whether you forgot to capture B-roll for a specific scene or need an establishing drone shot of a city, Shutterstock can help. Shutterstock has thousands of royalty-free clips in both 1080p and 4K resolutions, ranging from nature footage to slow-motion clips to incredible animations .
For productions on a tight budget, licensing stock footage may be more cost-effective than traveling to capture B-roll or renting special equipment, such as a drone or high frame rate camera for slo-mo shots. Use Shutterstock’s search bar to find what you need.
14. Walk Away for a Fresh Perspective
Sometimes, you need to go for a walk, have a cup of coffee, or splash some water on your face to separate yourself from the work. It works. I can’t tell you how many times I’ve walked away from a writing project only to return hours later energized and with a fresh perspective. When you’re in deep editing, it’s essential to step back and not lose sight of the forest for the trees.
Don’t take the work home with you, either. In Cal Newport’s book Deep Work , which I recommend every creative read, he makes a case for strictly mapping out your work hours and only doing work—deep work—in those hours. He says that thinking about work drains you mentally, zapping you of your energy for the next day. When it’s time to work, get rid of all distractions and do just that. Afterward, forget you have a job and enjoy your life. Let the mind rest until tomorrow.
For more filmmaking tips, tricks, and advice, check out these articles:
- Iconic Cinematography: Our 5 Favorite Shots from Reed Morano
- Video Editing 101: How to Edit a Video from Start to Finish
- Tips from Renowned Cinematographers for Your Next Film
- Iconic Cinematography: Our 5 Favorite Shots from Bradford Young
- Tips for Keeping Your Camera Cool on a Hot Summer’s Day
Cover image via Soloviova Liudmyla .
Never second-guess again. The new Creator License covers personal projects online and on social media
- Skip to primary navigation
- Skip to main content
- Skip to primary sidebar
The Epicurean Traveler
Inspiring Cultural Exploration Through Culinary Travel

How to Make a Travel Video: 10 Tips for Beginners to Create Compelling Travel Videos
Are you interested in learning how to make a travel video? Maybe you’re hoping to become the next big travel content creator, or perhaps you are an intrepid traveler seeking a way to share your travel memories with friends and family back home.
In this guest post, the pros at the online video editor InVideo share 10 practical tips for making travel videos that grab interest and engage your audience. With these 10 actionable tips for beginners, you can inspire wanderlust among your friends and followers through your own engaging travel videos!
Disclosure: This beginner’s guide on how to make travel videos contains affiliate links. When you click on or make a purchase via one of these links, I may earn a commission.
For the last two years, we were faced with travel restrictions as the world grappled with a global health crisis. Now that many restrictions are being lifted, those of us itching to travel are making plans for our next vacation.
Perhaps more than ever, we want our vacations to be memorable, and we want to share those travel memories with our friends and family through social media. The best way to capture and revisit the moments of a great trip is to create travel videos.
While we may shoot every thrilling activity, scenic view, and delicious meal during the trip, editing travel videos prudently will make them more engaging for your friends, family, and social media followers.
Now, let’s look at some of the practical tips for making a great travel video!
1. Choose the Right Camera for You
Whether you want to start a travel-centric YouTube channel or simply share your trip memories in Instagram reels with your friends, the first step to creating travel videos is acquiring the necessary camera gear. Most importantly, having the correct equipment to create great travel videos begins with choosing the right camera for you.
For example, it is better for those who are not familiar with aperture and shutter speed to opt for a camera with user-friendly automatic settings. Instead of investing in an expensive DSLR like professional travel videographers may use, beginner-level travel video creators can opt for a compact or mirrorless camera that captures high-resolution video at a lower price point.
Therefore, we recommend the Sony ZV-1 for beginner travel vloggers. It’s an excellent camera for shooting travel videos for several reasons.
First of all, this camera was specifically designed with content creators in mind. Therefore, it comes with a 3-inch LCD flipscreen, which is handy when recording yourself. Secondly, the automatic exposure tracks faces to ensure you or whomever you are shooting is well-lit. Third, image stabilization reduces camera shake as you walk around landmarks, national parks, and historic sites on your travels while recording 4K high-resolution video.
At a time when short and full-length feature films have been filmed on smartphones , you may already have your go-to travel camera in your hand as you read this post. In particular, the Sony Xperia 1 III is highly rated for video recording, and Apple’s iPhone 13 Pro and larger iPhone 13 Pro Max offer professional-level capabilities for capturing both travel videos and still photography.
2. Use an Easy Tool for Editing Travel Videos
So many video editing applications for mobile devices and traditional video editing software programs are on the market these days. You may be overwhelmed with the options and wonder which is best for editing travel videos.
For beginners, there is an awesome easy video editing software . It’s a powerful tool with filters, effects, templates, stickers, and more to streamline the video editing process. With this video editor, you can make travel videos to share across various platforms, such as YouTube, Instagram, and TikTok.
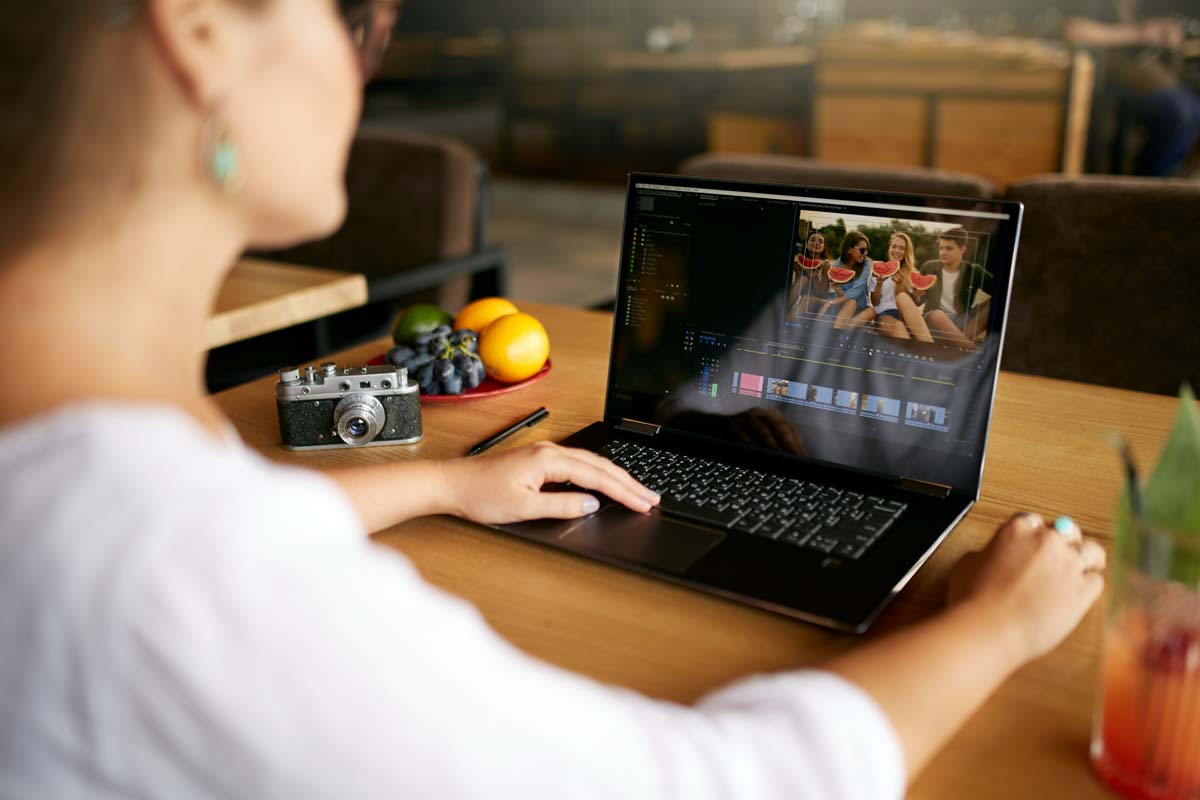
3. Watch Travel Videos for Inspiration
Making travel videos may not be as easy as you might have thought! So, first, watch existing travel videos on YouTube, Instagram, TikTok, or other social media platforms to gather ideas.
By watching other travel content creators’ videos, you’ll be inspired to create your own while learning some tricks for framing beautiful shots.
4. Pick Your Favorite Platform
Every website and social media platform has its own video specifications that you need to follow before uploading your travel videos. Hence, it is good to select the platform first before you start your hard work.
Before you even begin shooting your video, you should become acquainted with your desired platform’s specifications. Then upload some videos to test how the platform performs.
5. Prepare Your Camera Settings
Once you have practiced shooting videos at home and are ready to take your trip, you’ll want to keep your camera settings ready. Changing a photo setting while you are traveling can be cumbersome. Therefore, having two memory buttons set to 4K and 25fps will be a good idea.

6. Plan Your Travel Video Shoots Ahead of Time
When creating a travel video, planning your shoots ahead of time is key.
Most importantly, you need to think about when to shoot for the optimal natural light. Early mornings and just before dusk — often called the golden hour — are usually best for getting breathtaking shots.
Also, as you plan your travel shoots, keep in mind that shooting too little footage will not let you have enough shots when you begin to edit videos after your trip.
At the same time, overshooting will make your task of editing videos lengthy and cumbersome.
Striking the right balance will take some practice, but, don’t worry, you will get there soon.
7. Tell a Story Through Your Travel Videos
Storytelling is the best way to keep your audience engaged with your travel video. After you complete your trip , try to find a common thread and weave a story out of it.
Of course, the places of historical importance will have their own stories, which you can include while editing videos after your trip .
While you are traveling, record some short clips of the locals and the people you meet during your trip. You can weave their voices and commentary into your video for an interesting contrast to your own voice. This also gives your viewer a break from listening to your voiced-over monologue for the entire video. 😉
8. Keep Video Clips Short and Sweet
Your audience likely has a short attention span , and social media users today move from one post to the next very quickly losing interest faster than a goldfish!
Therefore, you want to keep your travel videos concise and attention-grabbing. For a platform like Instagram, your travel videos should be 90 seconds or shorter and easily understood without sound.
Instead of capturing everything from your vacation in one video, you can create shorter travel videos highlighting various parts of your trip.
9. Shoot Your Travel Video Using the Rule of Thirds
The rule of thirds is taught in most photography classes, and for good reason. It’s a cardinal rule of both photography and videography.
Usually, in videos, your main subject should not fill the entire frame. Instead, think of your shot’s frame as being divided into thirds both horizontally and vertically. Rather than placing your subject in the center of the shot, you want the main object, person, or animal set off to the side. The photo above is a prime example of this concept.
10. Add Music to Your Travel Video
Lastly, though you want your travel video to tell a story, that is not always accomplished with explanations and voiceovers. Using music will help your viewers emotionally connect with your video.
Therefore, when you have captured the scenic beauty of a destination, it is often better to infuse background music that syncs with the video’s theme.
Final Thoughts on How to Make a Travel Video
Before you book your flights and hotel rooms for your next vacation, begin practicing shooting and editing videos at home. For example, you can take a local day trip and shoot the entire day’s activities keeping the rule of thirds and short clips in mind.
Then, using the video editing platform we shared, get to the work of editing videos . It will require a good amount of practice before you master the art of creating engaging travel videos, but with the tools and tips mentioned in this post, you will be on your way.
Bon Voyage and happy shooting!
Find More Travel Tips!
- Five Tips to Successfully Navigate Travel with Friends
- Five International Travel Documents You May Need to See (and Taste) the World
- Ditching Wings for Wheels: Road Trip Tips for Safer Travel
- Why GPS-Guided Travel Articles Make Sightseeing Easier
- Five Travel Tips for Digestive Health on the Road

Save the image above to your travel video tips board on Pinterest to easily refer back to this post!
What are your best tips for making a travel video?
Please share your thoughts and tips in the comment section!

About Erin Klema
Erin Klema is the founder and editor of The Epicurean Traveler, combining her journalism background with her passion for culinary travel. When she isn't exploring the world through unique, local culinary experiences, she enjoys cooking with her husband, planning her next trip, and reading or watching a good rom com.
Reader Interactions
Leave a reply cancel reply.
Your email address will not be published. Required fields are marked *
Notify me of new posts by email.
Privacy Overview
- 116 Pinterest
- More Networks
Trending cameras
Blackmagic Design
Trending purposes
Cinematography
Live streaming
Documentary
iPhone filmmaking
Photography
Popular from community
How it works
Wedio Buyer Protection
Trending cities
Get started
How it works?
Wedio Global Coverage
Can I cancel my rental?
How much fee do I pay?
How do I get verified?
Gear guarantee program
Ultimate BMPCC 6K Pro Review
Easyrig Minimax Review
ZHIYUN WEEBILL 2 Pro Combo: The Ultimate Review by Malcolm Modele.
Create listing
Wedio Seller Protection
Tips for seller
What is my gear worth?
How to stand out?
Lead-in program
What does it cost?
How does shipping work?
When do I get paid?
Sell as professional dealer
Sell camera equipment with Wedio
Sell as a professional
20 tips for Sellers
How much can I earn?
How to set a good price?
Lender checklist
Pickup and return policy
Vacation mode
Private listings
Personalized offers
Referral program
Boost your rental rate
How to rent out in confidence?
How to build a successful rental business?
Learn filmmaking
Filmmaking basics
Video editing
Travel vlogging
Film lighting
All in filmmaking
Learn photography
Photography basics
All in photography
Learn film gear
Film gear basics
All in gear
FPV Drone Guide by Adam Sadílek
Maria Fernanda’s Surf Photography
Ultimate Guide on Film Editing for Complete Beginners by Rory Nichols
All masterclasses
Masterclasses
Gear reviews
Creator lists
Travel Filmmaking | 11 Tips and Techniques You Can Use Today
Rent film gear from local filmmakers.

Save up to 40%. Global Coverage included.
from £10 /day
Watch Masterclass
Getting paid to travel sounds like a dream to many. For few committed filmmakers and creatives, it's reality!
Are you debating whether travel filmmaking and cinematography are right for you? If you're ready to invest yourself and dive in, read on to learn about:
- What travel filmmaking really is,
- Tips you should consider before starting a project,
- Techniques to master,
Pst... We are diving deep into the caves of travel filmmaking. So, if you were looking for general filmmaking tips – this is for you.
Travel filmmaking: A professional's insider tips
Interested in Travel Filmmaking? Meet your new instructor Thomas Alex Norman, who will go through the corners of travel filmmaking in this Masterclass session.
e1SxnYLM6CQ
CvYeduoeCCc
Tom's journey
Cinematic look
Getting started
Tips & tricks
Camera equipment
A-roll importance
Meet Your Instructor
3vnXk9dDVMU
What you’ll learn
Composition: How to overcome the typical beginner mistakes.
Movements: How a gimbal help you achieve the cinematic look.
Show your best work: Why saving the best for last is a misstake.
Planning: Why prepping is the most crucial phase for your film.
Cinematic look: How a-roll is often forgotten and why you shouldn’t.
Authenticity: How to be natural in front of your camera lens.
What is travel filmmaking?
Travel filmmaking or cinematography is somewhat vaguely defined as the art of creating films about traveling and exploring a region or country. However, making captivating visual stories about your adventures is often more complex than it sounds.
Following the tips and techniques below will help elevate your craft and give your films a professional, cinematic feel that stands out.
Travel filmmaking vs travel vlogging
Before we get started, let's get our terminology straight. What is the difference between travel filmmaking, travel cinematography and travel vlogging?
The differences can be subtle. So subtle in fact, that filmmaking and cinematography refer to practically the same thing: the art and craft of making motion pictures. This consists of many things, like lighting, composition, depth of field and much more.
Travel vlogging is marginally different. It's the personal reflection of tourists and travelers, in a video format. There is often overlap, but ultimately you don't have to be a cinematographer to vlog, and you don't need to be a vlogger to work with travel filmmaking either. If you want to learn more, check out our article about travel vlogging!
Tips to improve your travel cinematography
Before you get started, there are a few things you should consider. Spending a little extra time in the preproduction or planning phase can really pay off, so try to stop for a minute and think about your vision.

1. Do you research
It's hard to make decisions if you don't know what your options are. Before committing to any big choices, go to YouTube or Vimeo and explore the travel videos out there. Don't try to copy your peers, just gather inspiration!
Travel films come in different styles and aesthetics. Do you want to make something fast-paced, with high energy and a lot of stunts? Or would you rather showcase the local culture and cuisine over chill Lo-Fi beats? Having your vision set means you're ready to get the shots you need for a coherent project.
Pros of planning and cons of overpreparation
Doing your research during preproduction is necessary to avoid a chaotic editing phase since your footage just doesn't fit together.
Learn at least a little about your destination before arrival. Having an overarching story or key points planned for your travel film can help tie things together.
But be warned: having your travel film planned out scene-by-scene, and shot-by-shot is a surefire way to turn your vacation into a full-time filming gig.
2. Adjust your attitude
Make the decision in advance: are you on holiday? The dedication to visit Bondi Beach or the Taj Mahal and not take a day off is impressive, but it's up to you whether it's necessary. You can go with the flow and take breaks from filming, or you can shoot every second you spend adventuring.
To avoid burnout and a generally disappointing experience, decide in advance and adjust your attitude. Commit to work, vacation, or a set balance between the two and roll with it!
3. Find the balance
Are you camera shy? Whether you're really into travel vlogging or want to make objective documentaries, you should decide the broad split between commentary and visuals in advance.
Generally speaking, you should try to aim for some consistency. But rules are meant to be broken! Just make sure you don't regret not commenting on location or getting extra footage of an event.
4. Master A-roll and B-roll
As a travel filmmaker, the temptation to go all-in on the B-roll can be overwhelming. Once again, aim for a balance. You'll need both beautiful nature or urban shots of your environment, and close-ups of the action, the locals and your company.
As a rule of thumb, always shoot more than the main action. Capturing the small details of your surroundings can immerse the viewers, so they'll feel right at the moment with you.
Techniques to master

If you have a general narrative thread for consistency, you're onto traveling and production. While having the right gear for travel filmmaking has a great impact, it's the skill and techniques of the filmmaker that makes or breaks a production.
The techniques below will ensure that you'll create the right feel and a cinematic look to your footage. Hop on a plane, boat or train and get started!
5. Shot variety
To captivate the audience and never bore them, it's important that you don't just vary your topics and environments, but also your shot sizes.
Using a wide variety of shots, like opening with an extreme wide shot and then drawing attention to the details of an antique vase creates movement and flow that your viewers will love to follow. Play with shot sizes, angles and camera movement to achieve your desired look.
If you're ready to film, consider downloading our shot list template . Need to brush up on your knowledge in this area? We got you covered too! Check out our complete shot size, angle and movement overview .
Composition is key. Any expert travel filmmaker could tell you that!
You can use classic composition techniques to elevate your footage and fool the viewers into thinking that they're watching the work of a large-scale, professional production team.
Are you familiar with the rule of thirds, leading lines, and negative spaces? Are you comfortable with your choices about headroom?
If you're feeling a bit uncertain, don't fret! There's plenty of awesome resources and guides out there, like Thomas Alex Norman's YouTube channel . He gives tips and tricks to filmmakers looking to improve the way they're creating content. He also shares his own adventures! Definitely worth checking out.
7. Movement
When it comes to camera movement, smooth shots are key. Unless you're a neurosurgeon by day, you probably don't have the steady hands to pull off a perfect tracking shot or any random movement without the help of the stabilizer.
If you don't already own a gimbal or steadicam, you can always consider buying one or renting a stabilizer with Wedio.
8. Time-lapses and slow-mo
If you're thinking about travel filmmaking staples, you can't miss out on slow-mo and time-lapse shots. They're stunning, cinematic ways of captivating the audience, but nowadays you can even pull them off with a newer smartphone!

When all the footage is recorded, and you might have returned home with that typical 'vacation glow', it's time for editing! Post-production will pull all your shots together into a cohesive unit. If you're editing your own travel video, here are some things you need to know.
Pacing is absolutely crucial if you want to pull off a professional look. No matter how great your footage is, if it drags on forever or it's too difficult to follow, no one will take the time to watch it. Make sure you edit with pacing and coherence in mind.
10. Transitions
While regular cuts will get the job done, you can really spice up your footage by using transitions!
Master techniques like the speed ramp transition, mask and in-camera transitions, or a zoom and swipe to dazzle your watchers. If you're not sure where to get started, check out Skillshare's editing courses .
Add some music to make the magic happen. You can use this to evoke the culture and charm the viewers. You can find copyright-free music to use at many places, or even make and use your own soundtrack.
Closing thoughts

Starting out on the journey of filming your adventures is a daunting task – I would be intimidated!
Get prepping and keep learning on the go and you're sure to improve your travel filmmaking fast. Don't forget to send me a postcard!
Happy filming!
About the instructor
Thomas Alex Norman
Videographer
London, United Kingdom
Thomas Alex Norman is a professional filmmaker, YouTuber, and musician. He regularly posts videos about travel filmmaking, editing, gear, and more.
Popular listings for rentals

Regina Dörflinger
Regina is a digital marketing associate who enjoys creating content for the community. In her free time, she likes baking for her friends and writing all sorts of things, including fiction.
Recommended for you
15 best places to rent camera lenses in london, 5 best places to rent drones in london.

The 8 Best Documentary Cameras for Filmmaking in 2023
No results for your search, please try with something else.
IMAGES
VIDEO
COMMENTS
Weave them all together to tell a unique and engaging story that will inspire people to follow in your footsteps and do the same. 6. Diversify your Shots. As mentioned before, travel videos don't have the luxury of having a proper structure and an engaging story to keep the audience interested.
It is a time-consuming process that may take at least 2 days, but I think it is the best way to keep my video interesting and unique. 4. Add Missing Footage. While editing, if you find yourself lacking certain footage to create the connection and flow you want in your travel videos, you can also use stock videos.
Every so often, shift the rhythm of your cuts to the off-beat. If the tempo changes, reflect this in your edit. For example, fast paced cuts to match an epic beat drop, or a slow motion shot during a lull between beats. Your clips should be short and punchy, continually moving the story on.
Yes, I am talking about pancakes because it's National Pancake Day, but also because it's a really helpful and effective editing technique. There's not a whole lot to it other than stacking timelines on top of each other so you can 1.) easily scrub through and see what kinds of clips you have, and 2.) drag and drop chunks of one timeline onto ...
Tilting: Rotate your camera vertically, moving it up or down. Tilting is useful for emphasizing tall structures or capturing dramatic skies. Tracking: Follow a subject's movement by moving your camera smoothly alongside it. Tracking shots add dynamism and immersion to your videos.
This time, the camera's on him. Professional documentary maker, and mentor for the annual World Nomads Travel Film Scholarship, Brian Rapsey shares advice that can only come from years of experience. He sits down with us to offer his best filmmaking tips, from how to optimize your planning and equipment to approaching the edit.
Step 2: Select the Tools for Editing Travel Videos. Before you edit the video online, you need to choose the equipment for shooting the video footage. The quality of your video will depend on knowing the angles from which you film the scenes. You might have to take shots from different angles before you find the best one.
2. Get travel-ready hard drives This may seem like a no-brainer, but buy hard drives that will hold up under the strain of travel. Try the ArmorATD from G Tech. The one Ramelan uses is the LaCie Rugged Mini. If you don't have a rugged hard drive, consider turning its packaging into a protective case. 3. Use velcro
How to Edit a Documentary: Step-by-step. 1. Ingest & Backup Footage. The first thing I do to get ready for editing my documentary is ingest all the footage straight after the shoot. I use a piece of software called Hedge to do this as it allows you to make multiple backup copies of the media at the same time. If you don't want to use Hedge ...
Step 1: Organize Your Footage. Back up and organize your footage before anything else. The jewels captured in documentary film production can be impossible to recreate, so save all your video, audio, and still images to two different locations. The sheer volume of video you'll have means you'll need to create a simple file structure and naming ...
Improve your Travel Videos and Vlogs using these editing techniques to help take your audience to a whole new world! Start telling your stories with HitFilm ...
Jerks are repellent for people watching a video, so aim for a smooth experience for them. #3. To be a bit closer to being a pro and create a stellar travel film, take transitional shots, moving from one place to the other. Transitional shots break the monotony and make you closer to being pro. #4.
Creating cinematic travel videos can be a rewarding way to share your experience of visiting a new place. Once you've returned from your trip and have all your footage loaded into the video editor ...
Insert a reenactment scene. Use the "wallpaper" technique. Mix up raw footage and stock footage. Try parallel editing cuts. Add subtitles and a voiceover. Make it a montage. Create a documentary-style video for free. While a documentary is all about facts, it can still be cinematic and creative. Using a documentary, you can aim to inform ...
Travel Filmmaking Video Editing for Beginners: a Guide To Doing it Right ... Travel Filmmaking 5 Tips to Master The Art of Communication for Filmmakers. Experienced travel documentary maker Brian Rapsey reveals how understanding communication can help your filmmaking practice. Travel Filmmaking
Capture Amusing Shots. Before editing, comes the part of shooting. Taking clean shots is imperative for travel videos. To begin with, you must use an excellent quality camera to take footage. Do all the settings you need for recording beforehand to avoid wasting any time.
In this video, our lead editor Rhea gives you 10 pro tips for documentary filmmaking and editing, all through the lens of a recent documentary we created for...
This would also be a great opportunity to use some music pacing technique earlier and match the cuts to the beat. 22. Editing Techniques: Uncategorized Tips: In this final editing section, I'll talk about some random tips that don't really fit in a specific category. But there's still good to know. Group your events or keep similar shots together.
6. Use Multiple Cameras And Angles. One of the most important aspects of making a good travel video is making it visually stimulating. The same pan from left to right, the same eye level shots over and over, the same focal length throughout, makes for a visually boring video.
While it may not be a feature-length documentary, every travel video has a story arc, even if it's just a chronological retelling of your steps. "It's always good to have a bigger picture of what you're doing in the editing room, rather than just putting a nice video clip next to another nice video clip," says Waite.
Kidding aside, cutting a documentary takes time, patience, and skill. We can't help you with that. What we can do is offer advice. Below you'll find fourteen tips for cutting a documentary. 1. Back up Your Footage. Back up footage in at least two different spots. Image via Nor Gal.
Therefore, having two memory buttons set to 4K and 25fps will be a good idea. A camera on a stabilizer records a beautiful view at twilight (© tonefotografia/Adobe Stock) 6. Plan Your Travel Video Shoots Ahead of Time. When creating a travel video, planning your shoots ahead of time is key.
Regina is a digital marketing associate who enjoys creating content for the community. In her free time, she likes baking for her friends and writing all sorts of things, including fiction. Getting paid to travel and make films is a dream to many. Are you ready to get started with travel filmmaking? Find the best tips and techniques here.