Log in or Sign up

- Search titles only
Separate names with a comma.
- 1543453203" id="search_bar_group_pages_after" class="AutoChecker" data-uncheck="#search_bar_nodes" /> After page 1
- Display results as threads

Useful Searches
- Recent Posts
You are using an out of date browser. It may not display this or other websites correctly. You should upgrade or use an alternative browser .
Welcome to Tacoma World!
- Participate in all Tacoma discussion topics
- Communicate privately with other Tacoma owners from around the world
- Post your own photos in our Members Gallery
- Access all special features of the site

Cruise Control Fuse
Discussion in ' 2nd Gen. Tacomas (2005-2015) ' started by BakoTruck , Nov 26, 2018 .

#1 BakoTruck [OP] Well-Known Member
Hello, could anyone tell me which is the Cruise Control fuse or fuses? I've tried looking in the owners manual on pages 386-387 in the fuse section, could not find. My CC works half the time, and goes out. I would like to replace the fuse before I spend the time replacing the CC assembly. Thanks guys. 2005 Toyota Tacoma PreRunner V6, Auto.

#2 Clearwater Bill Never answer an anonymous letter
A bad fuse won't work 'sometimes'. It's either working or not. Spiral cable under the steering wheel (literally) is a much more likely suspect. Especially if the horn is intermittent as well as the CC.
#3 BakoTruck [OP] Well-Known Member
Clearwater Bill said: ↑ A bad fuse won't work 'sometimes'. It's either working or not. Spiral cable under the steering wheel (literally) is a much more likely suspect. Especially if the horn is intermittent as well as the CC. Click to expand...

#4 Jimmyh Well-Known Member
 Retired Bubblehead")
Even still... It is the most likely culprit. Spiral Cable.

#5 Zuba987 Well-Known Member
Yes, my truck had this issue and I replaced the spiral cable (clock spring) and it fixed the problem. Just beware a good oem one is pricy. $300ish or so. If you had the recal done back in 2013 see if there is any extended warranty and if they can fix it for you. If not your out of luck. My horn worked fine but my cc would only turn on intermittently.

#6 wilcam47 Keep on keeping on!

BakoTruck [OP] initial post: ↑ Hello, could anyone tell me which is the Cruise Control fuse or fuses? I've tried looking in the owners manual on pages 386-387 in the fuse section, could not find. My CC works half the time, and goes out. I would like to replace the fuse before I spend the time replacing the CC assembly. Thanks guys. 2005 Toyota Tacoma PreRunner V6, Auto. Click to expand...
#7 Jimmyh Well-Known Member
wilcam47 said: ↑ is it standard or auto? Click to expand...

#8 06Tacooo Earth Czar
...or a bad ground somewhere.
#9 BakoTruck [OP] Well-Known Member

#10 andrew61987 Well-Known Member
My cruise control did that for awhile before stopping working completely. While idling turn your wheel all the way to the left and try cruise control, then all the way to the right and try again. Bet it works better in one or both of those conditions because the spiral cable is failing.

#11 12TRDTacoma Powered by Ford, GM, VW, and Mercedes

#12 Jimmyh Well-Known Member
12TRDTacoma said: ↑ This is going to sound out there, and even now it is out there to me, but definitely on one of my "top 10 strangest things I've seen in automotive." Fuses do sometimes not work, but are whole, and a simple matter of pulling it then reinstalling it restores functionality to the circuit again barring that the fuse is physically not blown. I have noticed it to be something that affects micro fuse equipped fuse boxes like the ones we have. It has definitely happened on my own truck before. So to say they won't work sometimes and that it either works or not is simply not true. At least not true in all the years of my experience. Click to expand...
#13 Jimmyh Well-Known Member
BakoTruck [OP] said: ↑ It's an auto. Well crap, yeah I hooked up a cheapo scan tool and it showed nothing. Do you guys think it could be the Cruise Control Switch Assembly? $135 Toyota Genuine Cruise Control Main Switch https://www.amazon.com/dp/B00IEJFJQ4/ref=nav_timeline_asin?_encoding=UTF8&psc=1 Click to expand...

#14 D2. Well-Known Member
Jimmyh said: ↑ I think you are mistaken either a fuse is blown or it is not blown. If it is, blown it will not conduct current. If it is NOT blown, it will conduct current . This is not a sometimes thing. That being said if it is not blown and not plugged in correctly then that could explain why you thought what you did. And when you unplugged it and re-plugged it back correctly it fixed the problem of not being plugged in all the way. Click to expand...
#15 Jimmyh Well-Known Member
D2. said: ↑ Devil's advocate here, **what if** there is some corrosion or oxidation on the leads, and by pulling and re-installing you are making a new contact. Food for thought. Click to expand...

#16 bagleboy Well-Known Member
Awe common, show some imagination. While a fuse is either blown or not, mechanical contact failure is not unknown so why not at least check all the inexpensive possiblities before forking over a roll. I'm not saying how likely it is but it hurts nothing to see. Also, I read in another post how improperly plugging in the spiral cable resulted in a bent pin and malfunctioning CC so try an RI of the cable checking the connector for obvious problems, could be a bad crimp on one of the wires or the tech just didn't push the connector all the way in. CC isnt a critical system so you have the time to get forensic. In the mean time start saving up for the more likely eventuality.
#17 12TRDTacoma Powered by Ford, GM, VW, and Mercedes
A lot of possibilities here really. Sometimes things aren't so cut and dry.

#18 Bebop Old fashion cowboy
Possible bad brake light switch as well
#19 BakoTruck [OP] Well-Known Member
Alright, so I agree with all above conversations. If I knew where that fuse was for the CC, I would replace with a new one. Can anyone tell me where it's at? Bad Brake Light switch? I don't know what that is, my brake lights seem to be working fine to me. Anyone want to tell me what to check for this?
#20 BakoTruck [OP] Well-Known Member
As mentioned above it has been going in and out, I was able to use it on the highway after 30-40 mins of driving. Damn thing wouldn't turn off, had to slam on the brakes. Kinda makes me think it's the CC switch assembly that's messed up.
Products Discussed in Entire Site Forum: 2nd Gen. Tacomas (2005-2015) Thread: Cruise Control Fuse
- No, create an account now.
- Yes, my password is:
- Forgot your password?

Fuse Box Diagrams
All automotive fuse box diagrams in one place
Toyota Tacoma (2005-2015) fuses and relays
Ad vertisements
In this article, we consider the second-generation Toyota Tacoma, produced from 2005 to 2015. Here you will find fuse box diagrams of Toyota Tacoma 2005, 2006, 2007, 2008, 2009, 2010, 2011, 2012, 2013, 2014 and 2015 , get information about the location of the fuse panels inside the car, and learn about the assignment of each fuse (fuse layout) and relay.
See other Toyota Tacoma:

Fuse Layout Toyota Tacoma 2005-2015

Cigar lighter (power outlet) fuses in the Toyota Tacoma are the fuse #6 “PWR OUTLET” in the Instrument panel fuse box, and fuses #38 (2005-2012: “AC SKT” / 2013-2015: “INV”) .
Table of Contents
Passenger Compartment Fuse Box
Fuse box location.

Fuse box diagram

Engine Compartment Fuse Box

Learn more:
Toyota Tacoma Electrical Fuse Replacement Guide How to check or change a blown electrical fuse or a faulty relay in a 3rd generation 2016 to 2021 Toyota Tacoma.
Copyright 2024 � PaulsTravelPictures.com All Rights Reserved �
Privacy Policy About Paul & Author Contact Info

Fuse box diagrams, fuse layouts and assignment
Toyota Tacoma (1998-2000) Fuse Diagram
Advertisements
Fuse box diagram (fuse layout), location, and assignment of fuses and relays Toyota Tacoma (Regular Cab, Xtracab) (1998, 1999, 2000).

Checking and Replacing Fuses
The fuses are designed to blow before the entire wiring harness is damaged. If any of the electrical components do not operate, a fuse may have blown. If this happens, check and replace the fuses as necessary.
- Turn the engine switch off and turn off all electrical accessories.
- Open the fuse box cover.
- See diagrams below for details about which fuse to check.
- Remove the fuse.
- Check if the fuse is blown – if the thin wire inside is broken, the fuse has blown.
- Replace the blown fuse with a new fuse of an appropriate amperage rating.
- Never use a fuse of a higher amperage rating than that indicated, or use any other object in place of a fuse, even as a temporary fix. This can cause extensive damage or even fire.
- Always use a genuine Toyota fuse or equivalent.
- Do not modify the fuses or fuse boxes.
- If the replaced fuse blows again, have the vehicle inspected by any authorized Toyota dealer or repairer, or another duly qualified and equipped professional.
Passenger Compartment

- Back-Up Light Relay
- Integration Relay
- Power Window Main Relay
- Shift Lock Control Relay (Column A/T) / 4WD Control ECU (with Rear Differential Lock ECU)
- Circuit Opening Relay
- Auto Antenna Control Relay
- Daytime Running Light Relay №4
- Engine Control Module
- ADD Control Relay
- Cruise Control ECU (Except 5VZ-FE)
- A/C Assembly
- 4WD ECU (2-4 Selector)
- Center Airbag Sensor Assembly
- Shift Lock Control Relay (Floor A/T)
- Daytime Running Light Relay (Main)
Passenger Compartment Fuse Box Diagram
The fuse panel is located behind the cover on the driver’s side of the dashboard.

Engine Compartment

- Cruise Control Actuator with ECU (5VZ-FE)/ O/D Cut Relay (2RZ-FE)
- ABS Actuator with ECU
Engine Compartment Fuse Box Diagram


- Forum Listing
- Marketplace
- Advanced Search
- Toyota Truck, SUV and Van Forums
- Tacoma Forum
- Tacoma 2nd Generation (2005-2015)
2013 Tacoma 2TR-FE M/T Cruise Control Install Guide
- Add to quote
WARNING! Read through this thread before buying parts to attempt this install. This guide is for the 2013 Tacoma 2.7L(2TR-FE) w/ Manual Transmission that is NOT PRE-WIRED . If you don't have this year exact model I don’t know if it will work. Parts List 84632-08021 Cruise control switch(Stalk) 45186-0C020-B1 Steering wheel cover 88280-14030 Clutch switch 84633-04020 Cruise control wire 2x 1/2" 10/32 screws Ebay Kit: “2009-2015 Tacoma Cruise harness for M/T” sold by ysfaelksca Splice Connector Tool List T-30 Hex driver 10mm socket (long) 3" extention 14mm wrench Socket wrench Razor Knife Linemans Pliers Flat Head Precision Screwdriver Flexible Claw Pick Up Tool Trim Tool A Lot of Patience I will be referencing the Rostra Instructions(RI) for Part # 250-1836. http://www.rostra.com/manuals/250-1836_Form5188F.pdf I cannot be responsible for any damages that may occur because of your negligence. Please be careful and have someone qaulified to do this if you are unable or unwilling. Verify that all parts have been reinstalled correctly to factory specifications and retorqued to proper specs. For the first 9 steps I didn’t take pictures so refer to: http://www.toyotanation.com/forum/6...-2005-2015/171992-diy-oem-cruise-control.html 1 Remove negative battery connection(10mm bolt) wait a few minutes before proceeding. While you wait block the back tires, make sure the parking brake is engaged(you will be engaging and disengaging the clutch so you can’t count on that keeping the truck from moving). 2 Removing both cover plates on left and right side of steering wheel. Use the trim tool to avoid scratching the plastic. 3 Undo T-30 Hex bolts from left and right side. 4 Remove red and black connectors from the back of the airbag(keep you body clear encase the airbag deploys). Then remove black ground connection from the bottom of the air bag. 5 Remove ground wire at the white connector. 6 Attach new wire # 84633-04020 in place of old ground wire. 7 Place cruise control stalk into mount and fasten with two 1/2" 10/32 screws. Then connect wire(84633-04020) to connector on stalk. 8 Reconnect the 3(red, black and new ground) connectors to airbag and fasten bolts(per Toyota specs). 9 Reinstall trim pieces(the new one with the hole in it goes over the stalk) on sides. 10 I removed all the dash and trim piece before attempting any electrical work and stored them away because you are going to want all the room in the world. First on the drivers side remove door sill plate by pulling it straight up. Remove the foot rest and the plastic bolt underneath. Pull the trim piece that is located to the left of the foot rest underneath the dash off. 11 Pull the trim piece that covers the shaft of the parking brake. Remove the 10mm bolt on the bottom left side of the dash. Then using a flat head screwdriver remove the trim piece below the parking brake and remove the 10mm bolt underneath. Gently pull the lower dash off and remove the hood release switch, tire pressure reset, traction control switch and any other switch attached to the panel. 12 Turn the steering wheel and remove the screw that are hidden behind it. If the steering wheel doesnt turn, then put the key in the ignition and turn it to the on position. Remove the plastic cover using the trim tool and be very careful because the plastic scratches if you look at it the wrong way. 13 Open the glove box and remove piston from the right side. Remove the glove box but make sure you spill out its entire contents on the floor. Clean up said spill. 14 On the steering column locate and disconnect the S8 connector(RI page 5, figure 16,17). Remove the connector and place the red wire(from eBay kit) in Pin 1 and the black wire in pin 2. Route the wires down the steering column and under the dash to the ECM, which is located behind the glove box on the right hand side. Use a flexible claw pickup tool to pull the wires behind the center of the dash. Leave the wires unconnected it gets attached later. PICTURE AT THE BOTTOM 15 Loosen the 4 or 5(can’t remember how many) 10mm bolts that hold the fuse panel. Move the fuse panel out of the way as much as possible but make sure you dont strain the wires. 16 Behind the fuse panel you will see the clutch stop bolt, note how far the bottom of the bolt sticks through. Loosen the stop with a 14mm wrench and remove. You can access it over the top of the fuse box or underneath it. Replace the stop bolt with the Clutch Stop Switch use the bolt to space it the same as the original stop bolt. Locate the clutch wiring connector by the bolt, it should be wrapped in electrical tape. Cut the wires that attach to factory installed clutch wire connector. I didnt take any pictures of this part so refer to RI page 6 for a picture of the stop bolt. However it wont tell you to cut the OEM terminal. 17 Remove the wires from the clutch wire connector. Loosen the tab on the top of the connector and the release the spring clip on the front of the terminal with a small screwdrive. PICTURE AT THE BOTTOM 18 Remove the heat shrink from around connectors(this allows them to fit inside the connector) on both pieces of blue wire that came with the eBay kit. PICTURE AT THE BOTTOM 19 Stick contacts that you removed the head shrink from in the connector. Make sure that the connectors are pushed all the way into the connector. If the fit loosely then apply hot glue at the back of the terminal to ensure they stay seated. PICTURE AT THE BOTTOM 20 Attach the connector to the Clutch Switch. Route the short blue wire over the fuse box and run the long blue wire over to the ECM, which is behind the glove box on the right hand side. 21 Cut the spade connector off of the short blue wire. I did this because I couldnt find a T-Tap anywhere in my shop. 22 Using page 6 of the Rostra instructions locate the 1C connector and the light green wire in pin #14. Attach the splice connector to the light green wire and attach the short blue wire with it(the end that you cut the spade connector off of). PICTURE AT THE BOTTOM 23 Go to the passengers side of the truck and use page 7 of the Rostra Instructions to attach to the ECM. You will use the guide for the E22 connector and the diagrams are FACE VIEW, so dont get confused by looking at the back of the connector. For the Cruise Switch pin #14 attach the red wire from the S8 connector and for Clutch Switch pin #9 use the long blue wire from the Clutch Switch. Reconnect the E22 connector. Its a tight fit inside the connector so zip tie the other wires out of your way. Make sure that you feel the connector lock into place. 24 Underneath the dash behind the glove box, attach the black wire(that was run with the red wire from the S8 connector) to the bolt to use as a ground. PICTURE AT THE BOTTOM 25 Reinstall the glove box. 26 Reverse all the disassembly process on the fuse box and dash trim and put it back together. 27 Reattach the negative battery cable. Take the truck out for a spin. Test that the cruise control functions properly. Make sure to test that when the press the clutch and the brake pedal are pressed the cruise disengages(if not you screwed up the wiring).
Attachments

I just went through this with my 2013 with manual transmission. I left the green wire an the clutch switch connector since it was the same as the one as the instructions told me to add the T splice to and I cut off and spliced the other blue wire on the connector to the provided blue wire which went to the ECM. My biggest problem was my own stupidity/understanding of where the wires went into the ECM connector. It clearly states face view and I took that to mean from the wire side. It means the blank side where the pins go in so it is mirror image of what you are looking at. I finally ended up calling Rostra tech support and they immediately told me that putting the wires in the wrong side was why most folks had the problem so I am not the first. There are numbers on the "face" of the connectors but my old eyes had trouble finding them even with a magnifying glass. Works fine once I got it wired properly. I spent way too much time trying to loosen the lock nut on the original clutch stop bolt. I should have just cut off a 14 mm or 9/16 open end wrench so it would turn. I never did find a clear path to route the wires under the dash to the ECM and finally ended up running them along a wire cable along the floor with tie wraps. I certainly do not understand why Toyota did not include the wires to the ECM from the clutch and cruise switch. I would seem like making different wire harnesses would be more expensive than just including the two extra wires.
- ?
- 593.1K members
Top Contributors this Month

2008 Toyota Tacoma fuse box diagram
The 2008 Toyota Tacoma has 2 different fuse boxes:
Toyota Tacoma fuse box diagrams change across years, pick the right year of your vehicle: 2023 2022 2021 2020 2019 2018 2017 2016 2015 2014 2013 2012 2011 2010 2009 2008 2007 2006 2005 2004 2003 2002 2001 2000 1999

Did you find the website helpful?


- Company Profile
- Company Policy
- Mission and Vision
- Certificates
- Aluminium Windows
- Aluminium Doors
- Aluminium Sliding Elements
- Aluminium Curtain Walls
- Aluminium Skylight Elements
- Aluminium Frames for Safety and Security
- Aluminium Conservatories
- Metal Panel Sheet Claddings
- Aluminium Entrance Frames
- Glass Structures
- Complementary Items
- Lightweight Steel Structures
- Human Resources OPEN
First successful projects, then lasting relationships!
As it has been in the past 40 years, Mimsa believe in providing competitive prices without compromising their principles of quality. We have managed to create lasting relationships based on honesty and cooperation while adding new customers each year.
Nothing is more important for us than Customer satisfaction!
Mimsa prioritizes customer satisfaction in the services they provide, and strives to understand the customers’ requests thoroughly in order to fulfil their needs and expectations. According to Mimsa Aluminium, every single customer should always be provided with the quality and services above expectations.
Every single completed project is the beginning of a lasting relationship for us.
Mimsa executes every project with experience and knowledge, while continuously improving itself and its high-quality production. Therefore, Mimsa never regards a project as a completed business. Every single project is a successful representation of lasting relationships. Thus, Mimsa pay great attention to post-sale support and keep on supplying uninterrupted support to their customers after completion.
It is very important for us that every single project we execute creates value to our workers, community and environment!
Aiming to create value for the community, environment and humankind in each project. Mimsa perceive that the occupational training of its employees and the new entrants to the workforce gets these individuals well equipped for the industry and community, and so does whatever needed without second thoughts.
OUR MINISTER

Dr. Joseph Lozovyy was born into a Christian family in Elektrostal, Moscow Region, and was raised in a pastor’s home. From the age of fifteen, he began actively participating in the music ministry of the Baptist Church in Mytishchi, where his father served as a pastor, and also played in the orchestra of the Central Moscow Baptist Church. From 1989, he participated in various evangelistic events in different cities of Moscow Region and beyond. From 1989 to 1992, as a member of the choir and orchestra “LOGOS,” he participated in evangelistic and charitable concerts, repeatedly performing on the stages of the Moscow State Conservatory, the Bolshoi Theatre, and other concert halls in Russia and abroad. In 1992, his family moved to the United States. In 2007, after completing a full course of spiritual and academic preparation, Joseph moved to Dallas, Texas, to engage in church ministry. In 2008, he founded the Russian Bible Church to preach to the Russian-speaking population living in Dallas, Texas.
– Bachelor of Arts in Music (viola) from the Third Moscow Music School named after Scriabin, Russia (1987-1991)
– Master of Theology (Th.M); Dallas Theological Seminary, Texas (1999-2003);
– Doctor of Philosophy (Ph.D) Hebrew Bible (Books of Samuel): University of Edinburgh, Scotland, United Kingdom (2007).
– Doctoral research (2004-2005) Tübingen, Germany.
– Author of a theological work published in English: Saul, Doeg, Nabal and the “Son of Jesse: Readings in 1 Samuel 16-25, LHBOTS 497 [T&T Clark/Continuum: Bloomsbury Publishing]).
https://www.bloomsbury.com/us/saul-doeg-nabal-and-the-son-of-jesse-9780567027535/
Joseph and his wife Violetta and their son Nathanael live in the northern part of Dallas.
Saul, Doeg, Nabal, and the “Son of Jesse”: Readings in 1 Samuel 16-25: The Library of Hebrew Bible/Old Testament Studies Joseph Lozovyy T&T Clark (bloomsbury.com)
Joseph, his wife Violetta and their son Nathaniel live in North Dallas, Texas where he continues ministering to Russian-speaking Christians and his independent accademic research.
Published Work
1. bloomsbury:, 2. buy at christian book distributors:, 3. buy on amazon:.
- Bahasa Indonesia
- Eastern Europe
- Moscow Oblast
Elektrostal
Elektrostal Localisation : Country Russia , Oblast Moscow Oblast . Available Information : Geographical coordinates , Population, Area, Altitude, Weather and Hotel . Nearby cities and villages : Noginsk , Pavlovsky Posad and Staraya Kupavna .
Information
Find all the information of Elektrostal or click on the section of your choice in the left menu.
- Update data
Elektrostal Demography
Information on the people and the population of Elektrostal.
Elektrostal Geography
Geographic Information regarding City of Elektrostal .
Elektrostal Distance
Distance (in kilometers) between Elektrostal and the biggest cities of Russia.
Elektrostal Map
Locate simply the city of Elektrostal through the card, map and satellite image of the city.
Elektrostal Nearby cities and villages
Elektrostal weather.
Weather forecast for the next coming days and current time of Elektrostal.
Elektrostal Sunrise and sunset
Find below the times of sunrise and sunset calculated 7 days to Elektrostal.
Elektrostal Hotel
Our team has selected for you a list of hotel in Elektrostal classified by value for money. Book your hotel room at the best price.
Elektrostal Nearby
Below is a list of activities and point of interest in Elektrostal and its surroundings.
Elektrostal Page

- Information /Russian-Federation--Moscow-Oblast--Elektrostal#info
- Demography /Russian-Federation--Moscow-Oblast--Elektrostal#demo
- Geography /Russian-Federation--Moscow-Oblast--Elektrostal#geo
- Distance /Russian-Federation--Moscow-Oblast--Elektrostal#dist1
- Map /Russian-Federation--Moscow-Oblast--Elektrostal#map
- Nearby cities and villages /Russian-Federation--Moscow-Oblast--Elektrostal#dist2
- Weather /Russian-Federation--Moscow-Oblast--Elektrostal#weather
- Sunrise and sunset /Russian-Federation--Moscow-Oblast--Elektrostal#sun
- Hotel /Russian-Federation--Moscow-Oblast--Elektrostal#hotel
- Nearby /Russian-Federation--Moscow-Oblast--Elektrostal#around
- Page /Russian-Federation--Moscow-Oblast--Elektrostal#page
- Terms of Use
- Copyright © 2024 DB-City - All rights reserved
- Change Ad Consent Do not sell my data
IMAGES
VIDEO
COMMENTS
2009 Tacoma - access cab 4x4 2TR-FE. Cruise Control install. Intermittent wipers Hood lights Bed Lights Sliders 3" lift 886's on Billy 5100's Icon AAL 285/75 R16 Falken Wildpeak AT3W's. Jimmyh said: ↑. I think you are mistaken either a fuse is blown or it is not blown.
Cigar lighter (power outlet) fuses in the Toyota Tacoma are the fuse #6 "PWR OUTLET" in the Instrument panel fuse box, and fuses #38 (2005-2012: "AC SKT" / 2013-2015: "INV ... Wireless remote control system, air conditioning system, multiplex communication system, meter and gauge, front passenger occupant classification system, garage ...
The cruise control fuse is called the "set/coast" fuse. It is located in the fuse box under the hood. Check the brake light switch as you pull up the pedal. When a cruise is stopped, this switch turns off the lights and allows the cruise to restart. If a wire is loose, it could be an easy case of wires not connecting properly.
This is a video describing my struggle with my 2009 Toyota Tacoma cruise control not working. The part that fixed the issue was new spiral cable AKA clock s...
The fuse panel located on the driver's side of the truck comes with a fuse box diagram, which is also provided in your owner's manual. By referring to the diagram, you can easily locate the fuses for the ignition, taillight, windshield wiper, radio, and cigarette lighter to name a few. Figure 1. Here's the location of the dome light fuse, for ...
Fuse box diagram (fuse layout), location, and assignment of fuses Toyota Tacoma (Regular Cab, Xtracab) (1995, 1996, 1997). Skip to content. Fuse box diagrams, fuse layouts and assignment. ... Gauges and meters, back-up lights, cruise control system, power antenna, power door lock control system, electronically controlled automatic transmission ...
The most common reasons a Toyota Tacoma cruise control isn't working are failed control module, sensor or switch issues, or throttle actuation problems. 0 %. 10 % of the time it's the. Control Module. 0 %. 10 % of the time it's the. Sensor. 0 %. 80 % of the time it's the.
Check out the DIY tutorial for checking or changing a blown electrical fuse in a 2016 to 2021 Toyota Tacoma truck -https://www.paulstravelpictures.com/2016-2...
Transmission Control Relay; Cruise Control ECU; 4WD ECU (2-4 Select SW) / O/D ECU (2RZ-FE with A/T) Shift Lock Control Relay; Daytime Running Light Relay (Main) Center Airbag Sensor Assembly . Passenger Compartment Fuse Box Diagram. The fuse panel is located behind the cover on the driver's side of the dashboard.
Toyota Tacoma Electrical Fuse Replacement Guide ... 2019, 2020, 2021 and probably also the 2022 and 2023 model years) Toyota Tacoma pickup truck in checking or changing a blown fuse or a faulty relay in either the engine bay or the interior passenger compartment electrical panels. ...
Fuse box diagram (fuse layout), location, and assignment of fuses and relays Toyota Tacoma (Regular Cab, Xtracab) (1998, 1999, 2000). Checking and Replacing Fuses. ... Fuse Box; Cruise Control Actuator with ECU (5VZ-FE)/ O/D Cut Relay (2RZ-FE) ABS Actuator with ECU .
Attach new wire # 84633-04020 in place of old ground wire. 7. Place cruise control stalk into mount and fasten with two 1/2" 10/32 screws. Then connect wire (84633-04020) to connector on stalk. 8. Reconnect the 3 (red, black and new ground) connectors to airbag and fasten bolts (per Toyota specs). 9.
See more on our website: https://fuse-box.info/toyota/toyota-tacoma-2005-2015-fuses-and-relayFuse box diagram (location and assignment of electrical fuses an...
Toyota Tacoma (2003 - 2004) - fuse box diagram. Year of production: 2003, 2004. Engine compartment (without daytime running light system) ... Cruise control system, anti-lock brake system, automatic transmission shift lock system, SRS airbag system: 17: TURN: 10: Turn signal lights, emergency flashers: 18:
2008 Toyota Tacoma fuse box diagram. The 2008 Toyota Tacoma has 2 different fuse boxes: Engine compartment diagram. ... (IG1 NO.2) Anti-lock brake system, vehicle stability control system stop lights, charging system, multiport fuel injection system/sequential multiport fuel injection system, air conditioning system, instrument panel light ...
Welcome to the 628DirtRooster website where you can find video links to Randy McCaffrey's (AKA DirtRooster) YouTube videos, community support and other resources for the Hobby Beekeepers and the official 628DirtRooster online store where you can find 628DirtRooster hats and shirts, local Mississippi honey and whole lot more!
Toyota Tacoma mk2 - fuse box - instrument panel. Fuse. Ampere rating [A] Circuit. 1. IGN. 15. Multiport fuel injection system/sequential multiport fuel injection system, anti-lock brake system, traction control system, vehicle stability control system, SRS airbag system, front passenger occupant classification system.
Mission and Vision. Mission. First successful projects, then lasting relationships! As it has been in the past 40 years, Mimsa believe in providing competitive prices without compromising their principles of quality. We have managed to create lasting relationships based on honesty and cooperation while adding new customers each year.
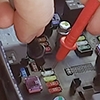
Showing the location of cruise control in a Toyota Tacoma. Toyota Tacoma Hacks and Instructions Playlist: https://www.youtube.com/watch?v=xeSSjsisML0&list=PL...
EDUCATION: - Bachelor of Arts in Music (viola) from the Third Moscow Music School named after Scriabin, Russia (1987-1991) - Master of Theology (Th.M); Dallas Theological Seminary, Texas (1999-2003);
Elektrostal Geography. Geographic Information regarding City of Elektrostal. Elektrostal Geographical coordinates. Latitude: 55.8, Longitude: 38.45. 55° 48′ 0″ North, 38° 27′ 0″ East. Elektrostal Area. 4,951 hectares. 49.51 km² (19.12 sq mi) Elektrostal Altitude.