Paris Map Tour
In this chapter, you'll build an app that lets you create your own custom guide for a dream trip to Paris. And since a few of your friends can't join you, we'll create a companion app that lets them take a virtual tour of Paris as well. Creating a fully functioning map app might seem really complicated, but App Inventor lets you use the ActivityStarter component to launch Google Maps for each virtual location. First, you'll build an app that launches maps for the Eiffel Tower, the Louvre, and Notre Dame Cathedral with a single click. Then you'll modify the app to create a virtual tour of satellite maps that are also available from Google Maps.

What You'll Learn
- The Activity Starter component for launching other Android apps from your app. You'll use this component here to launch Google Maps with various parameters.
- The ListPicker component for allowing the user to choose from a list of locations.
Designing the Components
Create a new project in App Inventor and call it "ParisMapTour". The user interface for the app has an Image component with a picture of Paris, a Label component with some text, a ListPicker component that comes with an associated button, and an ActivityStarter (non-visible) component. You can design the components using the snapshot in Figure 6-1.
The components listed in Table 6-1 were used to create this Designer window. Drag each component from the Palette into the Viewer and name it as specified.
Figure 6-1. The Paris Map Tour app running in the emulator
Table 6-1. Components for the Paris Map Tour
Setting the Properties of ActivityStarter
ActivityStarter is a component that lets you launch any Android app-a browser, Google Maps, or even another one of your own apps. When a user launches another app from your app, he can click the back button to return to your app. You'll build ParisMapTour so that the Maps application is launched to show particular maps based on the user’s choice. The user can then hit the back button to return to your app and choose a different destination.
ActivityStarter is a relatively low-level component in that you'll need to set some properties with information familiar to a Java Android SDK programmer, but foreign to the other 99.999% of the world. For this app, enter the properties as specified in Table 6-2, and be careful —even the upper-/lowercase letters are important.
Table 6-2. ActivityStarter properties for launching Google Maps
In the Blocks Editor, you'll set one more property, DataUri , which lets you launch a specific map in Google Maps. This property must be set in the Blocks Editor instead of the Component Designer because it needs to be dynamic; it will change based on whether the user chooses to visit the Eiffel Tower, the Louvre, or the Notre Dame Cathedral.
- Download the file here metro.jpg metro.jpg to load into your project. You’ll then need to set it as the Picture property of Image1 .
- The ListPicker component comes with a button; when the user clicks it, the choices are listed. Set the text of that button by changing the Text property of ListPicker1 to "Choose Paris Destination".
Adding Behaviors to the Components
- When the app begins, the app loads the destinations into the ListPicker component so the user can choose one.
- When the user chooses a destination from the ListPicker, the Maps application is launched and shows a map of that destination. In this first version of the app, you'll just open Maps and tell it to run a search for the chosen destination.
Creating a List of Destinations
Table 6-3. Blocks for creating a destinations variable
Figure 6-2. Creating a list is easy in App Inventor
Letting the User Choose a Destination
The purpose of the ListPicker component is to display a list of items for the user to choose from. You preload the choices into the ListPicker by setting the property Elements to a list. For this app, you want to set the ListPicker's Elements property to the destinations list you just created. Because you want to display the list when the app launches, you’ll define this behavior in the Screen1.Initialize event. You'll need the blocks listed in Table 6-4.
Table 6-4. Blocks for launching the ListPicker when the app starts
How the blocks work
Screen1.Initialize is triggered when the app begins. As shown in Figure 6-3, the event handler sets the Elements property of ListPicker so that the three destinations will appear.
Figure 6-3. Put anything you want to happen when the app starts in a Screen1.Initialize event handler
Test your apps. First, you'll need to restart the app by clicking "Connect to Device. . ." in the Blocks Editor. Then, on the phone, click the button labeled "Choose Paris Destination." The list picker should appear with the three items.
Opening Maps with a Search
Next, you'll program the app so that when the user chooses one of the destinations, the ActivityStarter launches Google Maps and searches for the selected location.
Table 6-5. Blocks to launch Google Maps with the Activity Starter
Figure 6-4. Setting the DataURI to launch the selected map
Since you already set the other properties of the ActivityStarter so that it knows to open Maps, the ActivityStarter1.StartActivity block launches the Maps app and invokes the search proscribed by the DataUri .
Test your app. Restart the app and click the "Choose Paris Destination" button again. When you choose one of the destinations, does a map of that destination appear? Google Maps should also provide a back button to return you to your app to choose again-does that work? (You may have to click the back button a couple of times.)
Setting Up a Virtual Tour
Now let's spice up the app and have it open some great zoomed-in and street views of the Paris monuments so your friends at home can follow along while you’re away. To do this, you'll first explore Google Maps to obtain the URLs of some specific maps. You'll still use the same Parisian landmarks for the destinations, but when the user chooses one, you'll use the index (the position in the list) of her choice to select and open a specific zoomed-in or streetview map.
Before going on, you may want to save your project (using Save As) so you have a copy of the simple map tour you’ve created so far. That way, if you do anything that causes issues in your app, you can always go back to this working version and try again.
Finding the DataUri for Specific Maps
- On your computer, browse to http://maps.google.com .
- Search for a landmark (e.g., the Eiffel Tower).
- Zoom in to the level you desire.
- Choose the type of view you want (e.g., Address, Satellite, or Street View).
- Click the Link button near the top right of the Maps window and copy the URL for the map. You'll use this URL (or parts of it) to launch the map from your app.
To view any of these maps, paste the URLs from Table 6-6 into a browser. The first two are zoomed-in satellite views, while the third is a street view.
You can use these URLs directly to launch the maps you want, or you can define cleaner URLs using the Google Maps protocols outlined at http://mapki.com . For example, you can show the Eiffel Tower map using only the GPS coordinates found in the long URL in Table 6-6 and the Maps geo: protocol:
geo:48.857942,2.294748?t=h&z=19
Using such a DataUri , you'll get essentially the same map as the map based on the full URL from which the GPS coordinates were extracted. The t=h specifies that Maps should show a hybrid map with both satellite and address views, and the z=19 specifies the zoom level. If you're interested in the details of setting parameters for various types of maps, check out the documentation at http://mapki.com .
To get comfortable using both types of URLs, we'll use the geo: format for the first two DataUri settings in our list, and the full URL for the third.
Defining the dataURIs List
You'll need a list named dataURIs , containing one DataURI for each map you want to show. Create this list as shown in Figure 6-5 so that the items correspond to the items in the destinations list (i.e., the first , dataURI should correspond to the first destination, the Eiffel Tower).
The first two items shown are DataURIs for the Eiffel Tower and the Louvre. They both use the geo : protocol. The third DataURI is not shown completely because the block is too long for this page; you should copy this URL from the entry for "Notre Dame, Street View" in Table 6-6 and place it in a text block.
Modifying the ListPicker.AfterPicking Behavior
In the first version of this app, the ListPicker.AfterPicking behavior set the DataUri to the concatenation (or combination) of "http://maps.google.com/?q=” and the destination the user chose from the list (e.g., Tour Eiffel). In this second version, the AfterPicking behavior must be more sophisticated, because the user is choosing from one list ( destinations ), but the DataUri must be selected from another list ( dataURIs ). Specifically, when the user chooses an item from the ListPicker , you need to know the index of his choice so you can use it to select the correct DataUri from the dataURIs list. We'll explain more about what an index is in a moment, but it helps to set up the blocks first to better illustrate the concept. There are quite a few blocks required for this functionality, all of which are listed in Table 6-7.
When the user chooses an item from the ListPicker , the AfterPicking event is triggered, as shown in Figure 6-6. The chosen item-e.g., "Tour Eiffel"-is in ListPicker.Selection . The event handler uses this to find the position of the selected item, or the index value, in the destinations list. The index corresponds to the position of the chosen destination in the list. So if "Tour Eiffel" is chosen, the index will be 1; if "Musée du Louvre" is chosen, it will be 2; and if "Cathédrale Notre Dame de Paris" is chosen, the index will be 3.
The index can then be used to select an item from another list-in this case, dataURIs -and to set that entry as the ActivityStarter 's DataUri . Once this is set, the map can be launched with ActivityStarter.StartActivity .
Test your app. On the phone, click the button labeled "Choose Paris Destination." The list should appear with the three items. Choose one of the items and see which map appears.
- Create a virtual tour of some other exotic destination, or of your workplace or school.
- Create a customizable Virtual Tour app that lets a user create a guide for a location of her choice by entering the name of each destination along with the URL of a corresponding map. You'll need to store the data in a TinyWebDB database and create a Virtual Tour app that works with the entered data. For an example of how to create a TinyWebDB database, see the MakeQuiz/TakeQuiz app.
- List variables can be used to hold data like map destinations and URLs.
- The ListPicker component lets the user choose from a list of items. The ListPicker’s Elements property holds the list, the Selection property holds the selected item, and the AfterPicking event is triggered when the user chooses an item from the list.
- The ActivityStarter component allows your app to launch other apps. This chapter demonstrated its use with the Maps application, but you can launch a browser or any other Android app as well, even another one you created yourself. See http://appinventor.googlelabs.com/learn/reference/other/activitystarter.html for more information.
- You can launch a particular map in Google Maps by setting the DataUri property. You can find URIs by configuring a particular map in the browser and then choosing the Link button to find the URI. You can either place such a URI directly into the DataUri of your ActivityStarter , or build your own URI using the protocols defined at http://mapki.com .
- You can identify the index of a list item using the position in list block. With ListPicker , you can use list position to find the index of the item the user chooses. This is important when, as in this chapter, you need the index to choose an item from a second, related list. For more information on List variables and the ListPicker component, see Chapter 19.
Map Tour App Mobile CSP Hour of Code
Open each section of the tutorial below or click on the numbers above and follow along. Click on images and videos to enlarge them.
2. App Inventor User Interface
- Look up your town at https://www.latlong.net/ and grab its latitude and longitude to put in the CenterFromString property of your map.
- Add 3 markers and 3 buttons for the 3 landmarks in your tour.
- Add an Image component and find 3 images of your landmarks and upload them in the Media section.
- Click on the Media section and drag in a TextToSpeech component.
3. Code the Map Tour
- Click on the Blocks button at the top right to switch to the Blocks editor where you add the code to make your buttons and other components work.
- Click on Button1 and drag in a When Button1.Clicked event handler block.
- Click on Map1 and drag in a Map1.PanTo block and click on Marker1 to get Marker1.latitude and Marker1.longitude blocks and a Math 0 block to set the zoom level to 15.
- Drag in a set Marker1.fillColor block and choose a color, and a Marker1.showInfoBox block.
- Drag in an set Image1.Picture block and copy in the exact filename of the image that you uploaded for your first landmark.
- Drag in a TextToSpeech.Speak block and type in a fact about that location in a Text block .
- Right click the Button1.click event handler and choose duplicate. Change the duplicated block to Button2 and Marker2 and put in the fact and image for the second landmark. Right click to duplicate again and change it for Button3 and Marker3.
4. Connect and Run
Click here if you don't have a device and here if you don't have WiFi available.
1. Download Companion App
If you can't use the Play Store click here .
2. Connect to the Companion
If you have problems, make sure your mobile device and your computer are on the same WiFi or other network. If the app seems frozen, try Connect/Reset Connection and then try Connect/AI Companion again. See the Troubleshooting page or try another method of connecting your device such as USB or using the emulator .
Certificate

- Table of Contents
- Course Home
- Assignments
- Peer Instruction (Instructor)
- Peer Instruction (Student)
- Change Course
- Instructor's Page
- Progress Page
- Edit Profile
- Change Password
- Scratch ActiveCode
- Scratch Activecode
- Instructors Guide
- About Runestone
- Report A Problem
- 3.1 Unit Overview
- 3.2 Paint Pot Tutorial
- 3.3 Representing Images
- 3.4 Paint Pot Projects
- 3.5 Paint Pot Refactoring and Procedural Abstraction
- 3.6 Error Detection
- 3.7 Parity Error Checking (optional)
- 3.8 Map Tour Tutorial
- 3.9 Map Tour With TinyDB
- 3.10 Impacts of CS Electronic Documents
- 3.11 Wrap Up
- 3.8. Map Tour Tutorial" data-toggle="tooltip">
- 3.10. Impacts of CS Electronic Documents' data-toggle="tooltip" >

3.9. Map Tour With TinyDB 
Time estimate: 45 minutes, 3.9.1. introduction and goals ¶.
- Adding Destinations to the Tour. We will allow users to click on the map to add new destinations to the map tour.
- Data Persistence. We will incorporate TinyDB , MIT App Inventor's database component, which will enable the app to save new destinations for the user. Locations that are added to the destinations list will be saved to the database and re-loaded into the app when it starts up again.
3.9.2. Learning Activities 
- text-version
- short handout
- YouTube video
- TeacherTube video
- YouTube video - Tiny DB
- TeacherTube video - Tiny DB
What is TinyDb?
Up until now, the data in our apps has been stored either in global variables or as the value of the properties of the app’s various components. For example, when you store a piece of text in a Label, that data is stored in the computer’s main memory, in its RAM — random access memory. And as we’ve learned, RAM is volatile , meaning that any data stored there will be destroyed when the app is exited.
By contrast, data stored in the computer’s long-term storage — e.g., on the phone’s flash drive — will persist as long as the app is kept on the device. There are various ways to store data permanently on a computer. For example, you could store it in a file, such as a document or image file. Another way to store persistent data is in a database . MIT App Inventor provides us a very simple, easy-to-use database in its TinyDb component. Any data that we store in the TinyDb, will not disappear when the app is exited. Instead, it will persist between uses of the app -- even if you turn off the device.
Before working on incorporating TinyDb into our app, the following video provides a brief overview of this very important component. ( Teacher Tube version )

Map Tour with TinyDB Tutorial
To get started, you can use the app you created in the previous lesson and follow along with the video tutorial or the Text Tutorial or for an additional challenge, the Short Handout .
Enhancements
- Text To Speech: Add a TextToSpeech component to the UI, and when the user picks an item from the list, call TextToSpeech.speak to say the selected item.
- Add a ListPicker to the UI to Delete destinations.
- In ListPicker.BeforePicking, set the ListPicker.Elements to the destinations list.
- In ListPicker.AfterPicking, use the remove list item block from the Lists drawer to remove the item at the ListPicker.SelectedIndex from both of the lists (destinations and destinationsLatLong). Save both lists in TinyDB. Use Notifier.Alert to tell the user the destination was deleted.
- Refactor your code to add a saveToDB procedure to save both lists in TinyDB and call it from ListPicker.AfterPicking and Notifier.AfterTextInput.
- Add My Location: If you have a device and location where GPS works. when you click on the My Location block, add that location to the destinationsLatLong lists using the Add Item to List block and use the Notifier.ShowTextDialog to get the location name for the destinations list (this will call the already written Notifier.AfterTextInput procedure).
3.9.3. Summary 
3.9.4. self-check ¶, check your understanding.
Complete the following self-check exercises.
Q-2: Which of the following statements are true for a TinyDb component. Choose all that apply.
- a. Data stored in a TinyDb can easily be shared with other devices and users.
- This is challenging, but rewarding!
- b. Data stored in a TinyDb will persist between different uses of the app.
- That's right! Data stored in a TinyDb persist between uses of the app, but these data are stored on the device (not in the cloud) and cannot be shared with other devices or users. A TinyDb can store strings or numbers or lists.
- c. Data stored in a TinyDb disappears when you quit the app.
- d. Data stored in a TinyDb is stored in the cloud.
- e. Only strings (text) can be stored in a TinyDb.
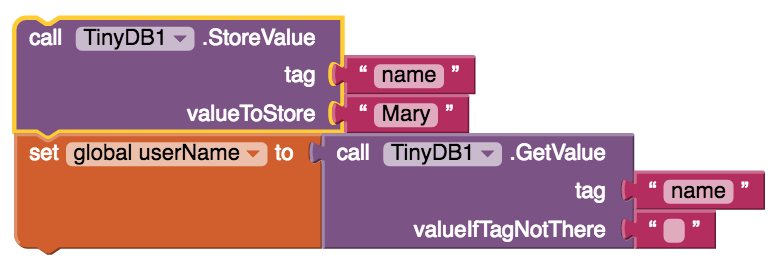
Q-3: What value would the global variable userName have after the blocks shown here are executed? Type your answer into the textbox. Spelling counts.
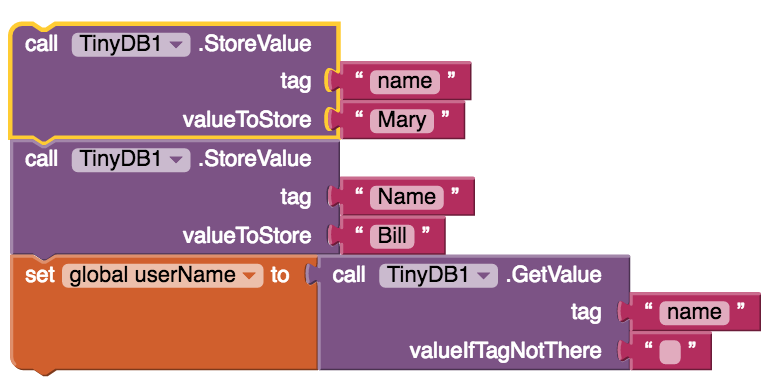
Q-4: What value would the global variable userName have after the blocks shown here are executed? Type your answer into the textbox. Spelling counts.
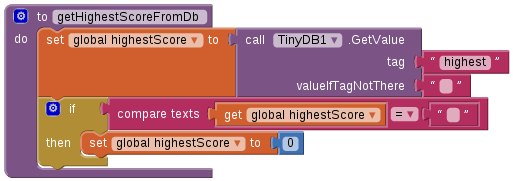
Q-5: In the block shown here why is it necessary to test whether the highestScore equals the empty string?
- a. Because that would be a bad score.
- OK, so you didn’t get it right this time. Let’s look at this as an opportunity to learn.
- b. Because that would be the value returned by TinyDb if nothing had yet been stored under the tag "highest".
- Good. If TinyDb does not find anything in the Db under the tag "highest" it will return the empty string. This is how you check that TinyDb does contain a value for a given tag.
- c. Because TinyDb can only be used to store numbers, not strings.
- d. Because TinyDb returns an empty string whenever the network is not available.
Consider the following depiction of the contents of a TinyDb for an app.
And suppose your app just executed the following block:

Which of these statements best describes the current state of the database?
- There are now two colleges, Trinity and Bowdoin, associated with the tag 'school'.
- No. This is not the correct choice. Associating a value with a tag is not the same as adding new values to the tag.
- This would cause an error because the tag 'school' has already been used.
- No, this is a valid statement.
- The tag 'school' would now be associated with 'Bowdoin College' instead of 'Trinity College'.
- Yes. The value 'Bowdoin College' will now be associated with the tag 'school' in the TinyDb, replacing 'Trinity College' as the value of that tag.
- The tag 'school' is still associated with 'Trinity College'.
- No, we are associating a new value with the tag 'school'.
Q-7: True or False: It is possible to have an empty list – i.e., a list with no elements.
- Yes, a list can be empty. It's important in computer programming to be able to model a list with no elements. For many problems that is the list's initial state -- before items are added to it. A empty list has a length of 0.
- Mistakes are welcome here! Try reviewing this; in computer programming is it a list is often considered to be empty in it's initial state -- before items are added to it.
3.9.5. Reflection: For Your Portfolio 
Answer the following portfolio reflection questions as directed by your instructor. Questions are also available in this Google Doc where you may use File/Make a Copy to make your own editable copy.
App error: The operation select list item cannot accept the arguments: , [1], [0]
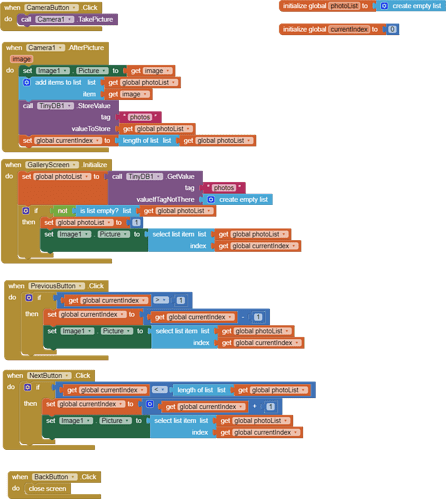
maybe you need to change that by "set currentIndex=1" instead of photoList?
If these blocks are all on the same screen, then this will fail with that error when the app is first run.
I'll try that. I'm following the tutorial from the official book so everything has been fine up to this point.
This is only on the Gallery block screen.
From the complete aia for the tour guide:
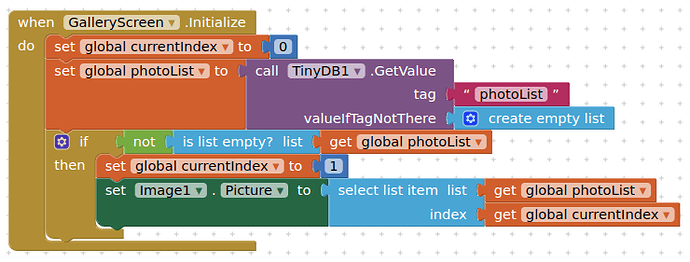
Thanks to you both. It is currently working correctly. I'll study this so I understand why.
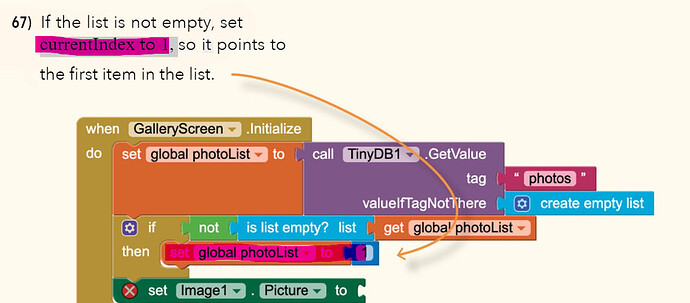
yes...that is the index used to select the Image from the photoList list. It must be >0 in AI2.
Suggestions or feedback?
MIT News | Massachusetts Institute of Technology
- Machine learning
- Social justice
- Black holes
- Classes and programs
Departments
- Aeronautics and Astronautics
- Brain and Cognitive Sciences
- Architecture
- Political Science
- Mechanical Engineering
Centers, Labs, & Programs
- Abdul Latif Jameel Poverty Action Lab (J-PAL)
- Picower Institute for Learning and Memory
- Lincoln Laboratory
- School of Architecture + Planning
- School of Engineering
- School of Humanities, Arts, and Social Sciences
- Sloan School of Management
- School of Science
- MIT Schwarzman College of Computing
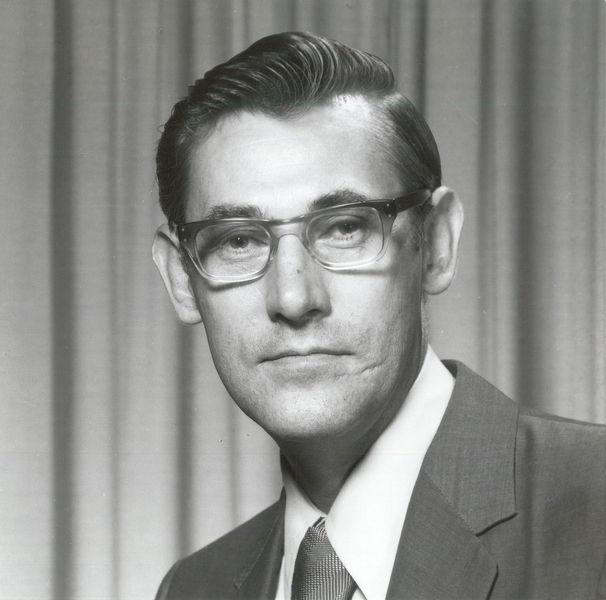
Professor Emeritus David Lanning, nuclear engineer and key contributor to the MIT Reactor, dies at 96
Previous image Next image
David Lanning, MIT professor emeritus of nuclear science and engineering and a key contributor to the MIT Reactor project, passed away on April 26 at the Lahey Clinic in Burlington, Massachusetts, at the age of 96.
Born in Baker, Oregon, on March 30, 1928, Lanning graduated in 1951 from the University of Oregon with a BS in physics. While taking night classes in nuclear engineering, in lieu of an available degree program at the time, he started his career path working for General Electric in Richland, Washington. There he conducted critical-mass studies for handling and designing safe plutonium-bearing systems in separation plants at the Hanford Atomic Products Operation, making him a pioneer in nuclear fuel cycle management.
Lanning was then involved in the design, construction, and startup of the Physical Constants Testing Reactor (PCTR). As one of the few people qualified to operate the experimental reactor, he trained others to safely assess and handle its highly radioactive components.
Lanning supervised experiments at the PCTR to find the critical conditions of various lattices in a safe manner and conduct reactivity measurements to determine relative flux distributions. This primed him to be an indispensable asset to the MIT Reactor (MITR), which was being constructed on the opposite side of the country.
An early authority in nuclear engineering comes to MIT
Lanning came to MIT in 1957 to join what was being called the “MIT Reactor Project” after being recruited by the MITR’s designer and first director, Theos “Tommy” J. Thompson, to serve as one of the MITR’s first operating supervisors. With only a handful of people on the operations team at the time, Lanning also completed the emergency plan and startup procedures for the MITR, which achieved criticality on July 21, 1958.
In addition to becoming a faculty member in the Department of Nuclear Engineering in 1962, Lanning’s roles at the MITR went from reactor operations superintendent in the 1950s and early 1960s, to assistant director in 1962, and then acting director in 1963, when Thompson went on sabbatical.
In his faculty position, Lanning took responsibility for supervising lab subjects and research projects at the MITR, including the Heavy Water Lattice Project. This project supported the thesis work of more than 30 students doing experimental studies of sub-critical uranium fuel rods — including Lanning’s own thesis. He received his PhD in nuclear engineering from MIT in fall 1963.
Lanning decided to leave MIT in July 1965 and return to Hanford as the manager of their Reactor Neutronics Section. Despite not having plans to return to work for MIT, Lanning agreed when Thompson requested that he renew his MITR operator’s license shortly after leaving.
“Because of his thorough familiarity with our facility, it is anticipated that Dr. Lanning may be asked to return to MIT for temporary tours of duty at our reactor. It is always possible that there may be changes in the key personnel presently operating the MIT Reactor and the possible availability of Dr. Lanning to fill in, even temporarily, could be a very important factor in maintaining a high level of competence at the reactor during its continued operation,” Theos J. Thompson wrote in a letter to the Atomic Energy Commission on Sept. 21, 1965
One modification, many changes
This was an invaluable decision to continue the MITR’s success as a nuclear research facility. In 1969 Thompson accepted a two-year term appointment as a U.S. atomic energy commissioner and requested Lanning to return to MIT to take his place during his temporary absence. Thompson initiated feasibility studies for a new MITR core design and believed Lanning was the most capable person to continue the task of seeing the MITR redesign to fruition.
Lanning returned to MIT in July 1969 with a faculty appointment to take over the subjects Thompson was teaching, in addition to being co-director of the MITR with Lincoln Clark Jr. during the redesign. Tragically, Thompson was killed in a plane accident in November 1970, just one week after Lanning and his team submitted the application for the redesign’s construction permit.
Thompson’s death meant his responsibilities were now Lanning’s on a permanent basis. Lanning continued to completion the redesign of the MITR, known today as the MITR-II. The redesign increased the neutron flux level by a factor of three without changing its operating power — expanding the reactor’s research capabilities and refreshing its status as a premier research facility.
Construction and startup tests for the MITR-II were completed in 1975 and the MITR-II went critical on Aug. 14, 1975. Management of the MITR-II was transferred the following year from the Nuclear Engineering Department to its own interdepartmental research center, the Nuclear Reactor Laboratory , where Lanning continued to use the MITR-II for research.
Beyond the redesign
In 1970, Lanning combined two reactor design courses he inherited and introduced a new course in which he had students apply their knowledge and critique the design and economic considerations of a reactor presented by a student in a prior term. He taught these courses through the late 1990s, in addition to leading new courses with other faculty for industry professionals on reactor safety.
Co-author of over 70 papers , many on the forefront of nuclear engineering, Lanning’s research included studies to improve the efficiency, cycle management, and design of nuclear fuel, as well as making reactors safer and more economical to operate.
Lanning was part of an ongoing research project team that introduced and demonstrated digital control and automation in nuclear reactor control mechanisms before any of the sort were found in reactors in the United States. Their research improved the regulatory barriers preventing commercial plants from replacing aging analog reactor control components with digital ones. The project also demonstrated that reactor operations would be more reliable, safe, and economical by introducing automation in certain reactor control systems. This led to the MITR being one of the first reactors in the United States licensed to operate using digital technology to control reactor power.
Lanning became professor emeritus in May 1989 and retired in 1994, but continued his passion for teaching through the late 1990s as a thesis advisor and reader. His legacy lives on in the still-operational MITR-II, with his former students following in his footsteps by working on fuel studies for the next version of the MITR core.
Lanning is predeceased by his wife of 60 years, Gloria Lanning, and is survived by his two children, a brother, and his many grandchildren .
Share this news article on:
Related links.
- MIT Nuclear Reactor Laboratory
- Department of Nuclear Science and Engineering
Related Topics
- Nuclear science and engineering
- Nuclear power and reactors
Related Articles

Professor Emeritus Sow-Hsin Chen, global expert in neutron science and devoted mentor, dies at 86

Professor Emeritus Michael Driscoll, leader in nuclear engineering and beloved mentor, dies at 86

Sara Hauptman: Learning to operate a nuclear reactor
Retirement dinner honors 155 community members.
Previous item Next item
More MIT News
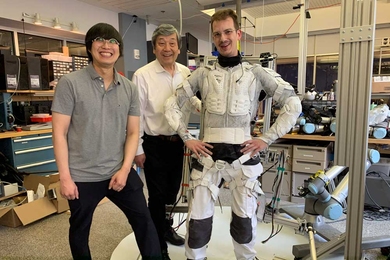
Robotic “SuperLimbs” could help moonwalkers recover from falls
Read full story →
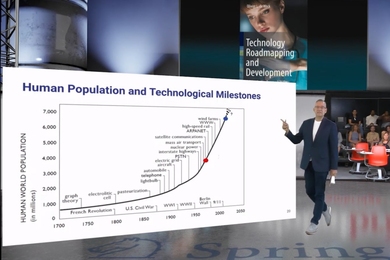
3 Questions: Technology roadmapping in teaching and industry

Five MIT faculty elected to the National Academy of Sciences for 2024
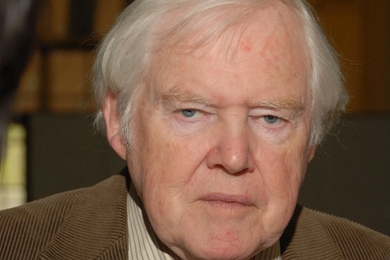
Professor Emeritus Jerome Connor, pioneer in structural mechanics, dies at 91
MIT’s Master of Applied Science in Data, Economics, and Design of Policy program adds a public policy track

Astronomers spot a giant planet that is as light as cotton candy
- More news on MIT News homepage →
Massachusetts Institute of Technology 77 Massachusetts Avenue, Cambridge, MA, USA
- Map (opens in new window)
- Events (opens in new window)
- People (opens in new window)
- Careers (opens in new window)
- Accessibility
- Social Media Hub
- MIT on Facebook
- MIT on YouTube
- MIT on Instagram

IMAGES
VIDEO
COMMENTS
Connect to the App Inventor web site and start a new project. Name it "MapTour", and also set the screen's Title to "MapTour". Open the Blocks Editor and connect to the phone. Introduction. You'll design the app so that a list of destinations appears. When the user chooses one, the Google Maps app is launched to display a map of the destination.
How To Make a Tour Guide App Using MIT App Inventor 2 In this video, we will create an app that can display information about famous places, you can mark the...
Build the Map Tour App. In this tutorial, you'll build MapTour, an app for visiting French vacation desitination with a single click. Users of your app will be able to visit the Eiffel Tower, the Lourve, and Notre Dame in quick succession. ... Download app to Android device. Download App Inventor source. Scan the QR code with your Android ...
Time Estimate: 45 minutes. 3.8.1. Introduction and Goals ¶. The Map Tour App tutorial showcases some features of the Map component in MIT App Inventor to create a map tour of different destinations. You will learn about an important data abstraction called Lists to keep track of the destinations. Mobile CSP Map Tour Preview (Revised) - YouTube.
Table 6-1. Components for the Paris Map Tour. Setting the Properties of ActivityStarter. ActivityStarter is a component that lets you launch any Android app-a browser, Google Maps, or even another one of your own apps. When a user launches another app from your app, he can click the back button to return to your app.
In this video, MIT App Inventor Lead Software Engineer Evan Patton introduces Map and related components of App Inventor. Each component is presented in deta...
This chapter introduces the following App Inventor components and concepts: The Activity Starter component for launching other Android apps from your app. The WebViewer component for showing web pages within your app. How to use list variables to store information for your app. 100 Chapter 6: Paris Map Tour.
Hour of Code: Map Tour Preview. Welcome to the Mobile CSP Hour of Code! Mobile CSP is a free high school course in Computer Science Principles using MIT's App Inventor to build mobile apps. There is a Toggle Tutorial button in the green bar at the top that you can use to open and close this tutorial pane: Open each section of the tutorial ...
3.9.1. Introduction and Goals ¶. In this lesson we will extend the Map Tour App by adding two new features: Adding Destinations to the Tour. We will allow users to click on the map to add new destinations to the map tour. Data Persistence. We will incorporate TinyDB, MIT App Inventor's database component, which will enable the app to save new ...
The Tutorial. This tutorial demonstrates how to use the MIT Map component to display a large number of run time location Markers, calculate the distance from the Android device to all the displayed locations and display that information. A bubble sort creates a list of locations in ascending distance from the device.
Part II Custom Map Overlay .. Show the user on the Map and a Custom Map Overlay. Add map 'control' information to the Display. How to Build this App Part I to this tutorial explained how to make the Custom Map Overlay. This part explains ways to animate and do interesting things with the overlay using the Maps control's object Properties. This is the map overlay playground experiments Designer ...
The AI2 Flat Map Tutorial provides a 'tile substitute' that is accurate but not precise. The technique makes use of the Canvas and the LocationSensor to provide a surface to plot coordinates. You can use this technique offline. Are you aware that the Map component caches previously visited tiles.
About Press Copyright Contact us Creators Advertise Developers Terms Privacy Policy & Safety How YouTube works Test new features NFL Sunday Ticket Press Copyright ...
Map on "tour Guide" app only shows grid - Bugs and Other Issues - MIT App Inventor Community. Jason_Smith March 4, 2022, 6:02pm #1. Hello, In the fall I was able to have kids make a tour guide app which showed a map behind "place settings." Today as kids were trying to make the app, Mit App Inventor only showed grid lines.
App Inventor Tutorials and Examples: Coordinates | Pura Vida Apps. 1 Like. SteveJG May 13, 2024, 12:42pm 3. Eng_A.Abdelaty: using Activity Starter ... Use either the Google Map api or use the MIT Map component with an OpenStreetsMap tile image. Eng_A.Abdelaty May 13, 2024, 1:41pm 5. The problem with using mit map : not working and always ...
ion app that lets them take a virtual tour of Paris as well. Creating a fully functioning map app might seem really complicated, but App Inventor lets you use the ActivityStarter component to launch Google Maps for each virtual location. First, you'll build an app that launches maps for the Eiffel Tower, the Louvre, and Notre Dame Cathedral ...
if you know the marker's latitude and longitude, you could use this to 'convert' coordinates to an address. How to: Reverse Geocode with an API and App Inventor App Inventor can reverse geocode using your the Location Sensor and your geocoordinates but it cannot reverse geocode using arbitrary coordinates. This tutorial describes a way to use ...
Hola a todos. Tengo una inquietud: como puedo por medio de un botón desde mi aplicación de app inventor, llamar a otra app externa como es MAPinr o Maps, pasándole las coordenadas. Leí algo al respecto y adjunto imagen de lo que hice pero aún cuando si carga la app, no me lleva directamente a esa coordenada o a ese punto en especial. sino que se queda en donde yo me encuentro actualmente ...
Thanks to you both. It is currently working correctly. I'll study this so I understand why.
In a letter to the App Inventor community, Lao highlighted the foundation's commitment to equitable access to educational resources, which for App Inventor required a rapid shift toward AI education — but in a way that upholds App Inventor's core values to be "a free, open-source, easy-to-use platform" for mobile devices. "Our ...
MIT Professor Emeritus David Lanning, a founding member of the MIT Reactor and an early contributor to nuclear research, was involved in Physical Constants Testing Reactor, and designing MITR-II. April He died on April 26 at age 96.