

RV renovation – How to remodel a Camper on a Budget (Full Process)
By: Author Joy & Ken Kelley
Categories Farmhouse inspiration , Our Camper Trailer , RV feature , RV Inspiration

Ever since we posted the first picture of our remodel on social media, there have been so many requests asking to reveal how we did our RV renovation and the details that went into it, so finally here is everything that you should know to conquer a camper remodel!

So today we will be sharing a step-by-step post describing everything we considered and also the steps we took for our RV renovation. From the materials we used, the resources we checked, and some tips we picked along the way in our (one month) Camper remodel on a budget!
I’ve tried to cover as much as possible with this post, but if there’s anything in particular that you would like us to cover, just contact us! We are happy to share about all the things we learned in this process, the good and the bad and we will also cover a breakdown of the exact cost of this remodel in a future post!
(If you are curious about the source list of all the items in the camper, I have them linked at the bottom)

Now I want to share that in this post, we will be focusing on the interior RV renovation, we are still planning to paint and renovate the outside of our camper, but that is material for a whole different post! If you want to see a full tour of how it looked before, check this post .
I also want to mention that we did this renovation in the middle of 2018, so we have been using and camping on it for a while now. There are some things that we have changed along the way, so I will also cover that at the end of the post.
1 – Find an old camper
2 – plan the rv renovation, 3 – shop for the rv renovation, 4 – repair any damages, 5 – demo the inside of the rv, 6 – prep the different surfaces, 7 – add inner shelves or separations for organization, 8 – prime and paint, 9 – renovate countertop and table, 10 – add peel and stick backsplash, 11 – replace lights, 12 – redo flooring, 13 – add furniture, 14 – renovate the couch and dinette pillows, 15 – select mattresses and bedding, 16 select kitchen wares, 17 decorate and select different hanging methods, 18 – make it homey, 19 updates after two years of use, 20 – rv renovation resource list, wrapping thing up.
This post outlines the process that we followed in order to renovate our RV, and while my husband has experience in renovation while working with my father-in-law (he is a Licensed Contractor). We are no professionals at this. We just love sharing and hopefully helping others =]

I already shared how we came across our camper in the before blog post where I share what our plans were when we go it. We purchased it from a family friend for around $3,000 USA dollars, this is very cheap compared to what is normally available around us in California, so we jumped at the opportunity.
Here are some pictures of how our camper looked before, if you want to see a full tour of the before, check out this post .

If you are buying an RV from a complete stranger , we would recommend that you check the list we are adding below, because if any of those things are broken or not working correctly, it can set you down in your budget as repairs or replacements can cost a few hundred dollars.
- WATER DAMAGE : This is one of the most common issues in the RV world because the roofing on RV’s has to be re-touched (especially if the RV sets outside in direct sunlight) yearly or every a few years depending on the kind of roof sealer the RV has.Direct sun can wear the protective layer of the roof making it weak and allowing rain to cause many issues, from fully collapses roofs, to damage in interior walls and nasty mold inside and outside the walls. So if you find something with a little bit of water damage, it could be that you still have to replace a big portion of it.
- WORKING APPLIANCES : If you are buying something smaller than a pop-up or teardrop camper, you want to make sure that the included appliances like the stove, oven, microwave, and refrigerator are working properly.
- FUNCTIONAL WATER AND BATHROOM : Again, this only applies if the RV you are purchasing includes it, double-checking that the water tank, as well as the water systems inside the RV, are working is very important!
- AC and HEATING SYSTEMS : Depending on the season you purchase your RV, one of these might be overlooked, but it’s important to check both when you are purchasing to make sure that there’s no extra repair that you will need in order to use them.
- TIRES, BRAKES and TOW SYSTEM : These while super basic, could be items that you don’t pay too much attention when trying to assess the state of the interior, we had to replace the whole breaking systems in our camper, and we are so glad that we did look before taking our first long trip because not having enough braking power could have been not just a mistake but an accident waiting to happen.
- AWNING : I’ve seen many campers that have broken awnings, and while you can easily find replacements for the fabric for one or two hundred dollars, replacing the whole system can get super expensive, like almost a thousand of extra dollars depending on the size. So it’s definitely something you should check.
The main reason why we recommend you check all these things before purchasing is because those items will be expensive to replace or fix, so if you can get away with not having to invest money on the basic functionality of your RV, you will have more money to allocate to make it look AMAZING!
The planning phase of your RV renovation can seem like such a not important thing to focus on, but if you (like us) are working on a budget, planning your priorities and where you want to splurge is super important to keep the renovation (and yourself) organized and account for everything you will need to purchase.
There are so many steps I recommend in order to plan the “look” of your RV so that you achieve exactly what you have in mind, spending as little as possible.
- Define your decoration style : This is such an important step, because, in order to outline your remodel, you do need to know what style talks best to you. In my case, I love the mix of Industrial, Modern, and Farmhouse. So I focused on some items for each that really made me happy and decorated from there.
- What items in your style will you want to include : Even when two people like the same style, there are preferences that we have over the items that we like in each style, so it’s important for you to select what you want to include that is important to you, this could be bedding, a rug, decor pieces, wallpaper, etc.
- Select what items will be your “big ticket” items : After you have all the items that you wish to include, select when ones that are the most important to you. In my case, it was the peel and stick subway tile and the black kitchen sink . I wanted them so bad that I allocated a big portion of our budget to them and compromised on other items that I wanted but that ended up being not so high in my list, like the kitchen faucet and the bathroom sink and faucet.
- Find budget-friendly alternatives for expensive items : As I mentioned, I decided that items in my list were not as important, so I found very cheap alternatives for things like the kitchen and bathroom faucet and the bathroom sink. (I ended up paying $25 for the kitchen faucet by getting a 50% off coupon from Google Shopping, $4 for the bathroom faucet and $6 for the new bathroom sink from E-trailer during a sale) So if you wait for sales or use extra coupons, your cost can go down a ton!
- Make a list of all the basics you will need : From the outside in, when I first started to plan the remodel I overlooked the number of items we would need that are just basics, like tape and paper to cover while painting, sanding paper, and tools like drills and hammers that if you don’t already have, can add pretty quick to your budget. So make a list of basics, if you don’t have the tools, check to see if you can borrow or rent instead of buying.
- Make a list of all the decor and extra items you will need : I know that by now you get that I am a list-making lover. But when planning a complex project like an RV remodel, staying organized on the things you need to do and how much you will spend on it can help you stay on track of the budget and also of the task you need to get done. I made a list of everything we needed to buy, where we will buy it and how much it was, that way I could organize our shopping trips (shopping with 3 little ones is complicated enough as it is, am I right?) and stay in budget!
Of course, this is just how we did things, there is no right or wrong way to approach a project! If you don’t like list-making, that is totally ok =]

As I mentioned, during the planning phase of our remodel, I made a list of everything we had to purchase, separated it by place, and also by importance.
The basics that will get us started were at the top of the list, the decorating items and things like flooring were at the bottom because we would not get to that until pretty much all the painting was done.
As I shared in our 5 biggest lessons we learned while renovating our RV post, we live in the mountains so shopping is already a full-day thing for us because most stores are 45 minutes down the mountain.
We basically shopped in person only at Home Depot and Ikea, and everything else we purchased online at Amazon and a few things from Target .

I recommend that you double-check the return policy on anything that you purchase for the remodel because until you see it where it’s supposed to go (even after measuring) you might change your mind.
Working with small spaces is tricky, and sometimes you will find something that you like but that it’s not necessarily the best use of the space. So that’s when the decision of what’s more important to you will weigh in.
I also recommend getting an Amazon Prime account because you will receive your items so much faster!

Before anything can start, you have to fix any water damage or other damages that your RV might have, especially if they are interior damages.
If your damage is only in the exterior, make sure that your RV is protected against the weather while you wait to get to it, that way it will not get worse.
Once the damages are addressed and fixed, we can move to the FUN part! Well, at least that is my husband’s favorite part of any project! DEMO!
Depending on what you plan to do with the interior of your RV, at this stage you might need to take cabinets out, or like in our case, take all the doors of the cabinets out!

We decided against taking too much of the storage out, and instead, we only took the pieces that were outdated (TV stand and music system) and used the space in a very bad way.
By removing those cabinets we saved enough weight to replace with something different, we found a cabinet for the bottom at the idea that was the exact measurements we wanted and taller than the old one so we could take advantage of the storage.
We also took all of the countertops, the one in the kitchen, bathroom, the table in the dinette, and the counter in the nightstand of our bedroom.

In most RVs, you will find a mix of particle board cabinets, some solid wood pieces, and veneer coverings. Most walls are either painted boards or wallpaper.
And depending on how old your RV is you might find even more surfaces like glass and poly doors and other plastic panels.
Preparing each surface for an efficient and successful covering is not only the most time-consuming part of this whole process but also one of the most important!
If you read my post about the 5 lessons we learned while remodeling , you already know that prepping was something we didn’t invest too much time in the beginning, and we ended up working double because of this!

So, How do you prep and RV for paint?
The short answer is, it all depends on the kind of surfaces that you have and the condition of your walls and cabinets.
Most old RVs have either a mix of particleboard (fake wood) and real wood, wallpaper and some have peel-and-stick surfaces.
For all the real wood parts in our RV, we decided to use liquid sander since we didn’t want to have to sand like crazy, every single part of the cabinets of the RV.
As the name hints liquid sander it’s a liquid that helps remove all the “gloss” out of your surfaces, we used about 2 layers of that, and then we lightly sanded all the parts that were going to be exposed to a lot of wear just to be safe.
For all the particleboard parts, we sanded a layer off (lightly) so that the primer would have a better surface to adhere to. We used a hand-held orbital sander that made the process so much faster than doing it manually!.
The sanding part, while annoying is super important to not skip over because if your primer doesn’t adhere well, the paint will chip with any minor scuff.
We didn’t remove the wallpaper on our walls because it was in very good condition , so removing it would have been more work for pretty much the same result.
So we decided to plain on top of it instead.
If you need to remove your wallpaper , I’ve read good reviews about this wallpaper stripper and also this wallpaper streamer that uses only water, no chemicals.
Just to be safe I wiped our walls (with wallpaper on) with this TSP substitute , this way I knew the surface would be spotless and in the best condition, so our primer would adhere better.
For all plastic parts, I washed them with the same TPS substitute as I did the walls and used spray paint for plastic, taping around the edges.
Because we rolled the paint on the walls and ceiling, painting around the already painted plastic parts was super easy.
(Ken did try to spray the camper instead of rolling, but he didn’t like how the coverage looked, so we opted for rolling instead)

Since I purchased containers to organize the kitchen as much as possible, I asked Ken to build extra shelves inside two cabinets so that my basket containers could fit perfectly, this way I was using every single inch inside the cabinets and keeping everything labeled and organized.
We did this at this stage so that we could paint those cabinets and later add shelf liner along with all the other cabinets.

Below you can see the finished shelves, with liner and the boxes on top. I used black vinyl to cut oval and rectangle labels and used a Posca ink marker to write the labels (and the spice jars below my sink )
Below the left picture, you can see how I used these containers , and boxes from Ikea for above the sink. For the right picture you can see that I used 4 baskets from Target for the area above the couch, we left the last cabinet at full height for all the tall kitchen appliances.

Just as important as selecting your paint is to select the right kind of primer.
As I already mentioned if you plan to paint over different kinds of surfaces as we did: wallpaper, laminate, etc.
We definitely recommend you select a shellac primer ( Zinsser Bullseye is what we use) or good oil-based primer.
Water-based primers can moisten and sometimes lift off a porous substrate, and that can cause the paint to lift or crack.

And if you have any laminate (fake wood) you want to go with an oil-based paint that will “attach” better to the surface.
To Prime our walls and cabinets, we used the Rust-Oleum Zinsser Bullseye primer because we’ve had a great experience with it in the past, and it’s good for pretty much every surface we’ve worked with (it’s oil-based).
I could not recommend it enough and at Home Depot we got the best price for it, we rolled the walls and also sprayed the bathtub before using this tub refinishing kit .
In our camper, the only particleboard parts we had were mainly the cabinet structure, bathroom structure, and countertops but since we replaced all countertops, we only worked on the rest of the surfaces.
When we selected our colors, I knew we wanted two very contrasting colors. So when looking at swatches we decided on using BEHR Night club for everything that was dark and BEHR Silent White for everything light.

Probably one of the most common questions we get asked on Instagram is how did we refinish the countertop and didn’t break the bank in the process.
Because I wanted a very special sink (this one) we allocated most of the kitchen budget towards that and the peel and stick subway tile.
This left us without the kind of money we would need in order to get a “real” butcher block counter.
So we put our thinking caps on and thought about using something different for the same look. After some research in our favorite stores, we found the perfect solution, this Ikea tabletop used for desks.

The only problem was that our counter was longer than the tabletop.
So we decided to also change the table in our dinette, this way we could use the remainder of that cut to finish the countertop.
It worked so perfectly! The seam is behind our stovetop, so I placed a basket on the back to cover the seam.

I am so happy with the way that the counter looks, they have worked perfectly even without any treatment on the top.
We considered doing a layer of poly sealer but decided to try and see how it went without it.

Below is a top view of the table in our dinette, this one was super simple, Kenny just cut it to size and switched the mechanism from the old table.
Because this table was a little more narrow than the older table, in order to make the transformation to a bed work. Ken added pieces on each side of the dinette (the bottom part) so that the width would compensate for the missing 1 ½ inches from the desk. He also added a small piece of wood at the bottom of the edge he cut to add support and strength when used as a bed.
This way, it looks good, but it’s still functional in case we need to use the bed of the dinette.

As I’ve already shared, one of my priorities was to get the black sink and the peel and stick backsplash tiles. I did SO MUCH reading of all kinds of reviews in order to select the Smart Tiles, at the time there were not many options, but from what I read, they had some of the best reviews I found.
I selected the full white subway tile because I really liked the look, I kept going back and forth about either selecting the ones I did or the ones that have the gray “faux grout” and I was *this* close to going with that one =]
The instructions are super simple and it was pretty easy to install, you do want to make sure you have a clean surface and the necessary tools for the job.

You will need:
- Cutting surface – I used this self-healing cutting mat
- Metal ruler
- Box cutter or Xacto knife
- Small level
- Sharpie or a pencil
- Masking tape or painters tape
I like starting by making a reference line where the top of my first row should go, I used the level to mark and make sure it was straight. A note here would be to make sure that the RV is level because if the RV is not level, your line will not be straight.
You also want to start at the bottom-left side of the area you want to cover and work from there to the side and up.
I used some sheets of newspaper to create a cutting template for the windows since they have those tricky curves that you want to cut as clean and close as possible.
I also dry-fitted all my pieces with painter tape and peeled a bottom edge while still having the painters tape on the top, so this way they were perfectly positioned. Once about ½ an inch was stuck in the bottom, I removed the painters tape and proceeded to remove the backing of the rest of the piece, this made the process super easy, and I had no need to remove any pieces to re-adjust.

I was so excited to have enough of it leftover to also add a little piece of backsplash in the bathroom!

Peel and stick wallpaper
If you follow us on Instagram, you probably already know that I am a little obsessed with “faux wallpaper” I call it faux, because in order to save money I used shelve liner as wallpaper for all of our accent walls in the RV.
I basically used two different kinds, the shiplap one , and the gray chevron .
One “hack” that helped me make seamless lines when adding different sheets of the chevron shelve liner , was to cut the edge of the pattern in order to place it as close as possible to the edge without having crazy lines.
I’m sorry I am one of those people that little miss-alignments in patterns would just drive me bananas, and I will see it every time I enter the bathroom, so I wanted to try and make it look as seamless as possible.

I have to mention that this shelf liner has stood out the test of not only time but also, humidity and heat.
Something that the shiplap one didn’t!!! I’ll explain more about the issues we ran into at the bottom of the post, but what you should know is that I am not happy with the shiplap shelf liner. We store the RV in the high desert, so it gets super HOT and sadly the shiplap paper shrank with the fluctuation of temperature.
Don’t get me wrong, the cubbies that I have in my craft room (that I cover with this exact same one) are still holding beautifully! But there is not such an extreme fluctuation of temperature in our house, so it makes sense.
I did learn my lesson with that one though, and as I am going to go over at the end of the post, I recently ran into LoomWell , a company that carries wallpaper that is resistant to higher temperatures . So I plan to at some point upgrade to one of their patterns for some of the shiplap walls.

One thing I was so happy to find out when doing research on light fixtures was that you can use any kind you want for an RV , the only thing is that you need to use low voltage light bulbs , for our camper we used 12V light bulbs for the light fixtures that needed bulbs.
In the picture below you can see how it looked when we detached all the lights from under the cabinet , and ceiling.

I knew I wanted something brighter, more efficient, and less dangerous than those lights (I’ve read horror stories of burns with these bulbs!)
So I knew LED lights and bulbs were the way to go. So let’s discuss what we ended up doing for each area:
Couch area light
For the lights above the couch area , I fell in love with these set of scones below, they were in my price range and also in the modern farmhouse look I was after, you can check them out here .

The only downside of the set of scones is that they do not come with switches.
But that can be easily fixed with these little guys , just drill a hole on the side and connect them like you would any other switch.
(if you have done electrical work before, if you don’t know what you are doing, please ask for advice from a professional, don’t risk injuries!).
Bedroom light
For the light in our bedroom, we pretty much did the same thing, I made sure to select something that was more flush because we are both tall.
I settled for this ceiling light that had just the perfect industrial feel and accompanied it with this bulb , we also added a switch .

I was planning on using this remote control switch , but it made the bulb look too long (I think they are better suited for bulbs with lampshades that are not see-through, so I’m saving them for our brick and sticks house)
And this is how it looks in our bedroom:

Dinning light
For our dining room, I wanted something special but also budget efficient. So we decided to make our own light using the same bulbs we had for our bedroom , a shelving bracket , a vintage cage lampshade , and a pre-made lamp cord .
Since we wanted to make another for our house, we purchased everything in pairs, it was cheaper, but you can definitely buy everything in singles.
We already had a switch from the old light we had there, so we didn’t need another switch, but if you do, this is the one we used in all other lights that needed it.

All other lights
For every other light in the camper, we replaced the old lights with these small round LED lights , why?
- they are smaller.
- they save a ton of energy.
- and look SO MUCH BETTER.
- the light is so much brighter than the yellow low light that our old ones gave.
Let me show you a closer look:

I am so in love with them!
You turn them on and off by pushing in the circle in the middle, and after they are off, that little piece glows in the dark, so they are easy to find!
You can see our new LED lights in action in the picture below, they are in our ceiling and also under the cabinets, we replaced the ones in our bathroom, the boy’s bunk beds, and under the cabinet in our bedroom as well.
We used 16 of them to replace all the lights that we had left.

I also wanted to mention that since we purchased everything on Amazon using my Prime membership , I knew I had the option of returning if I didn’t like what I had ordered.
Because I wanted to be able to test options before buying in bulk to replace all the lights in the camper.
I purchased 4 different alternatives for the remaining lights.
That way I could see in person the kind of light they give and how they looked in the camper.
Once I was happy with the bulb size and the kind of light that gave (some are warmer than others, so if you want a cooler light, the best way to go is by testing)
I purchased the total of lights I needed to replace (and in the case of the bulbs, I purchased extras, so we could have them in hand in case one broke.)
Also, just a note: I mistakenly bought bulbs that were not 12V , and they pretty much died as soon as I tested them in the camper.
So make sure you read the details carefully! I, of course, could not return those, because it was my fault for not reading the details.
Ps. NOTE OF CAUTION – We are lucky to have my father-in-law that is a licensed building contractor nearby, and Ken has electrical experience as well. BUT if you are not sure, please don’t put yourself in danger when re-doing electrical work, and either consult an electrician or hire one instead.

If you are familiar with snap flooring, adding flooring to your RV would be the exact same process.
One thing that Ken was not happy about was that he didn’t account for the expanding of the flooring with the very high temperatures we experience where we store our RV, he added a little bit of room for expansion, but what he normally does at home.
If you are going to store your RV in an area that gets very hot, I would recommend you account for a more than average expansion of the floor.
We do want to see how this peel and stick flooring or this one behaves to see if that would be a better option for our next renovation.

I’ve seen that some people also use peel and stick floor tiles for RV renovations and while I want to give those a try as well, I will probably make a full post diving onto the possibilities of flooring for RVs.
We only added the corner white cabinet from Ikea, Ken bolted it to the wall to make sure that it would not move. We added it before adding the flooring, so the flooring goes to the edge of it and not under it. We don’t plan to switch it so it made sense to us.
If you are not 100% sure if you will put something in your RV permanently, make sure you only added it after you re-do the flooring.
Also, in the beginning, I wanted to fully replace the couch, and place a regular sleeper sofa there, but then we realized that our water tank was under there, so we decided not to mess with it and just make new covers.
In our case, we didn’t change as much as we wanted and did more cosmetic upgrades instead. So I have no experience changing too much furniture, but I did all the research when I considered switching the RV couch for an RV sofa bed and posted it here .

This is probably another of the most asked questions that we get. So I had to include it as a point and I will elaborate more on each one in a full post later.
I basically selected 2 different fabrics in order to make the new covers.
For the couch, I selected a long hair Minky fabric that was super fluffy, I love the idea of having that for the winter, so it was almost like having a blanket for the cover.
And for the dinette, I selected a great water-resistant fabric , so that I could wipe it down. Since we have 3 little (and very messy) boys, I needed something that I didn’t need to wash every two minutes.
I purchased my fabric from fabric.com but unfortunately, the exact same ones I purchased are no longer carried. But they are very similar to this grey waterproof one and this black minky .
To make the cover I basically placed the fabric inside out and pinned the corners, I sewed the edges and make sure that I have enough fabric for the edges to come all the way in so we can hook them using the hack I describe below.
Cover securing hack One hack I used to make sure the cover doesn’t move is to attach curtain hooks with wire to different parts in the bottom and back of the couch.

This way I could hook the cover (that is basically fabric with sewn sides) and make it stay in place even when transforming the couch into a bed and vice versa. The more hooks you have the more you can secure the cover.
And for added security, I also added 3 in the middle, those are a little tricky to hook because you will have to shove your hand in the middle until you see the fabric from the bottom, then hook them.
For me, it works better when I keep the couch semi-folded in order to hook the bottom and middle best, I hook the back once the couch is in an upright position.

Dinette couch covers
I used a fabric similar to this grey waterproof one, and I made covers by contouring the cushions with the fabric.
I used elastic around the edges to secure them but they ended up moving a little bit, so I added two extra pieces on each side so that I could tie them down and secure them better.

I did this for the big bottom ones and the small backsides I just made them using an envelope fold in the back since I made them with the fabric inside out, and super-tight, while they are a little tricky to pop out to wash, they stay without needed any extra ties.
We decided to get brand new mattresses and bedding for the bunk beds and also our bedroom.
Our bedroom mattress is a standard RV Queen so we just purchased this one . We love that it has cooling gel and honestly, we sleep better in that mattress than we do in our bricks and sticks house.
But if you are looking for different mattress sizes for RVs, we have two awesome recommendations for you:
They are 100% made in the USA and part of Brooklyn Bedding, specialized in RV mattresses and with 4 different options of comfort.
Bear offers RV mattresses that have a breathable Celliant Cover to help improve athletic performance, also 100% made in the USA.
Master bedding : Our sheets and comforter are from Ikea, and while they still have the inner comforter, I was not able to find the duvet cover online, and I have not seen it anymore at the store, but this one is very similar . I actually liked the pattern in the camper so much that I wanted something similar for our bed at home, but Ikea does not carry California King sizes, so I bought this one, and I am loving it!
I also added a hand-lettered pillow with back background, you can check my pillow collection here , you can change the background color to any color you want!

Bunk beds bedding : The duvet cover is the exact same one as the one we have in our master bedroom, from Ikea (they have different patterns per each side) but I found this one that is similar , and use it in our brick and stick home, along with the buffalo plaid one)

To finish up their bunk beds, I hung one of my favorite pieces of artwork, the “ Little one, you will move mountains ” and while this is a swaddle, I am working on adding it to my shop as prints and tapestry. And also these adorable log pillows .

We purchased everything for the kitchen of our camper, from plates, cups, and wine glasses, to pans and pots. Of course, we made sure to get as many things as we could out of melamine so that it would not be at risk of breaking when driving.
- Melamine dinnerware : We purchased a set very similar to this one from Target.
- Melamine cups and wine glasses : I love these cups and also these wine glasses , because mama needs her wine!

Behind stove storage : This basket , with these metal and plastic containers + these wooden handle utensils + this ikea knife block (without the base) and a couple of faux cactus .

We hung so many things in the camper, and while for some of them (very few) we Did use screws with anchors, for all others we selected options that would not hurt our walls like:
- Poster hanging strips
- 3M hooks (with metal hook)
- 3M hooks (full white)
- Heavy duty Velcro (for frames)
- Museum putty (for thing on top of the shelves or counters)

I used this wall grid panel (spay painted in white) and re-assemble long-ways, so it would fit the space better.
I added some decor and pictures that I sealed by running them through my Minc machine and some lamination pouches , this way I have the margin to hand them with clips without ruining them.

I think that the most important point of renovating an Rv, is to add all the details that will make YOU feel not only comfortable but as if you are in an extension of your house.
In our case, I really wanted to add details that were hand-drawn by me. So on top of the door, I added a vinyl piece that reads “ home sweet camper ❤ ” and the great part is that cutting it is a pretty easy process, and installing that one was super simple. Just make sure you have a big enough transferring tape with a grid, or cut the bottom to align with the door.
In our bedroom, I also added a vinyl decal that has a US map with an “ Our next adventure is… ” This one was a little more complicated because I had to cut and also apply it in pieces because the size I wanted was too big, but I added separations in the map between States so that it could be easier to cut separately.
If you have a cutting machine and would like to use the same files, you can find them on my Studio Website:
- Home sweet camper ❤
- Our next adventure is … USA map
- Exit with arrows

I also created a print for the entryway that reads “Together is my favorite place to be”, you can get a copy of that print in the Barefoot Detour Teespring store here.

After many, many stays in our camper, there are only a few things that we’ve updated that we plan to upgrade.
I wanted to address them here one by one so that I can explain myself better =] so the very first thing is:
Couch area sconses
While I loved the look of the first ones we had , the boys pulled them down a bunch of times because they were a little low, this made them sag a little. So we upgraded them to these ones that have two sets of adapters, one in the bottom and one in the top, unlike the other ones that only had one at the top. I love the new ones, and now they sit much higher, so my boys don’t even touch them (other than for turning on and off, of course)

Shiplap wallpaper
I have to make a note about this because I am going to change the wallpaper (shelve liner) I used for our accent walls. We store our camper in my husband’s family ranch in the high desert, so it gets HOT.

The shelf liner has shrunk because of this, and I was so sad! I did not know that this can happen with the heat, and I plan to switch to a temperature-safe wallpaper, like Loomwell . I have this dotted pattern and this one in the realm of possibilities.
Hanging solutions
While I still love all the solutions that we selected for the camper, there are some things that we have switched from 3M foam hangers to regular screws for the basket next to our bed since it holds somewhat heavy items, we decided to just secure it that way Kenny will not wake up with a basket in his head.

Couch cover
Since it’s summer I decided to switch the super hairy couch cover that I made in Minky fabric, for something that does not get as hot.
I picked this one and used the same hooks I set up for my DIY cover to make sure the cover fits nice and tight.
I like that it’s so easy to switch, so I might get another color so I can change the look every once in a while.

What to know where I purchased all the things we used in our remodel? You can shop my pictures on this page I set up or check my list below, I’ve tried to include as many things as possible =]
- Prep : Liquid sander + orbital sander + wash walls
- Primer : This oil-based primer rocks!
- Paint : We used BEHR Night club for everything that was dark and BEHR Silent White for everything light
- Flooring : We used one from Home Depot, but I am not too happy with how it expanded. We are planning on using this one or this one for our next restoration.
- Spray paint : We used spray paint for plastic and regular Rustoleum all material for the hinges.
- Shiplap wallpaper : I used this one , but it shrank a little with the hot temperatures in the summer 🙁
- Bathroom wallpaper : For our accent wall I used this shelve liner from Target
- Peel and stick Backsplash : we used Smart tile subway Tiles in full white
- Kitchen Countertop + Table : We used this desk from Ikea
- Black sink : This is one of my favorite kitchen items!
- Oil-bronzed pulls : These ones fit the holes of our old ones perfectly, but measure before you buy!
- Light fixtures : We recently upgraded our couch are sconces to these ones , I love that they have integrated switches, just make sure you add 12V light bulbs .
- LED ceiling lights : These are the ones we use all around our camper , they are amazing, bright, safe, and they look way better than the old ones.
- Roll-blinds blackouts : We purchased the blackout blinds from Ikea, but they no longer carry those exact same ones. We were lucky to find them when there were going to be discontinuing, so they were about 40% off. I did find other options like these ones , and these ones that are very similar .
- Mattresses : We recommend to check Bear RV mattresses and RV Mattress by Brooklyn bedding for the best RV mattresses available!
- Wall mesh organizer : I used this wall grid panel (spay painted in white) and re-assemble long-ways so it would fit the space better.
- Bed-side basket : I used this one and attached it with 3M strips first then upgraded to screws.
- Window greenery garland : I got it from Ikea, but it was a seasonal item, this one is super similar , just a little shorter.
- Always and forever pillow : Find it here and you can also check all my other designs here , choose any color background you want!
- Master bedding : Ours is from Ikea, but I have not seen it anymore, this one is very similar (I bought it for our bricks and stick home)
- Bunk beds bedding : They are the same ones from Ikea (they have different patterns per side) but I found this one that is similar , and use it in our brick and stick home, along with the buffalo plaid one)
- Log pillow s: I love these , they took a super long time to arrive, but they are adorable!
- CMK letters : These are the boy’s initials (they all have the same initials) I just purchased cardboard letters from a craft store and painted them with black spray paint and hung with poster strips .
- Smart TV : We have this 28″ smart TV , it was a perfect size! And we mounted it with this thing , but bolted it through the wall (I used the backs to hold blankets) + We changed the plug cable to this white one .
- Entrance mesh organizer : We purchased ours in the same section of Target, and since then has been discontinued, but I found a similar one here .
- Entrance white cabinet : We purchased a combination from Ikea, is this Billy box and this Oxberg door together with one of these pulls .
- Together is my favorite place to be print : I drew this and you can buy a copy in different sizes via Zazzle
- Behind stove storage : This basket , with these metal and plastic containers + these wooden handle utensils + this Ikea knife block (without the base), and a couple of faux cactus .
- Melamine cups and wine glasses : I love these cups and also these wine glasses because mama needs her wine!
- Kitchen rug : I love this one because it washes so well!
- Refrigerator notepad : List-maker gonna list notepad from my shop
- Copper mugs and hanger : We purchased these ones and love it to make mescal mules, we u sed this Ikea rod to hang them, I also found this one at Target that is super similar.
- Hoop succulent DIY : I used regular embroidery hoops , placed them on top of a silicone placemat , and hot glued small rocks for the bottom and faux succulents in the middle
- Triangular planter set : I got these ones and added a few faux succulents .
- Bathroom towel holder : I used this one .
- Shower curtain : I selected this Boho inspired one from Amazon.
- Outdoor rug : I love this black and white pattern .

I hope this post encourages you to renovate your RV or to just tackle a small area in your camper. We are all for small steps, so if you feel overwhelmed, just start with one area and move from there on =]
And share this with anyone that you think could use help with a remodel! Contact us if you have any questions! We love staying in touch =]
Want to save this post for later? Just pin any of the images below =]

Happy remodeling!

Merri jones
Tuesday 1st of August 2023
This is amazing! We have a very similar camper and are wanting to Reno for our family travels. Thank you so much for taking the time to share all of the info, advice, links, etc! That is so helpful and I appreciate all the time it will save me as a mom who otherwise might not be able to have the time to embark on what is usually a very overwhelming project like this. Thank you!!!
Ps did you happen to find any covers for the banquet cushions that were already complete and did not require sewing? I am trying to avoid the sewing but have not been able to find other covers. Thanks.
Tuesday 22nd of August 2023
Hi Merri! It makes me so happy that this post helped you! =]
I actually bought covers for our 5th wheel and while the fabric is not as good as the fabric I purchased for our dinette, it's a solid option if you would rather not sew them! I used covers and made sure to add clips to keep tight in the covers. Here are the links: - covers: https://amzn.to/3sshBHD - clips: https://amzn.to/3Z0YqkN
I hope this helps!
Sunday 4th of December 2022
Hiya! Do you remember where you got the black s-hook holding the towel on the wall in the bedroom? Thanks!
Friday 31st of March 2023
Hi Beth! I purchased them from Target in 2020, they were on the sale rack, and I could not find them on their website, I'm sorry!
Wednesday 31st of August 2022
Hi! Your renovation has been an inspiration for my hubby and I. We have the exact same trailer and finally took the plunge to update it. One issue we have run into is changing the lights by the sofa. I chose similar farmhouse style sconce lights and LED 12v Edison bulbs. They came with cords but my Hubby hardwired them in for a cleaner look. When we turn them on they lit up then "burned out" immediately? Are we missing something obvious in the install? My hubby is a mechanic and has wired a lot of different lighting etc. but not in the camper. Any thoughts?
Thursday 7th of July 2022
Your camper looks awesome!! Do you have the info on the ikea tables you bought??
Monday 22nd of August 2022
Hi Doris! The exact desk that we purchased is not available anymore, but they have one that is supposed to be the updated version: https://www.ikea.com/us/en/p/anfallare-tabletop-bamboo-00465141/ for the bathroom, we used their cheapest desk tabletop =] I hope that helps!
Wednesday 27th of April 2022
Hi! Your remodel is amazing! I love everything about it. We are looking to buy a camper soon and I love what you’ve been able to fit in yours. Can you share the length/size of your camper? Thank you!
Monday 2nd of May 2022
@Sam, Thank you so much! I'm so happy you like our renovation. Our camper is about 29 feet long =]
- Skip to left header navigation
- Skip to right header navigation
- Skip to primary navigation
- Skip to secondary navigation
- Skip to main content
- Skip to primary sidebar
- Skip to footer
Creative DIY Ideas & Home Solutions
- Shop My Favorite Things
- Latest Blog Posts
- Privacy Policy
- Work With Me
- Digital Resource Library
- Dollar Store DIY
- Paper Crafts
- Vinyl Crafts
- Felt & Fabric Crafts
- Design Space
- Shop My IG Posts
- Fashion & Gifts Shop
- Printables Shop
- My Amazon Store
- Craft Room/Office
- Family Room
- Father’s Day
- Mother’s Day
- Thanksgiving
- New Year’s
- Valentine’s Day
- Watch on YouTube
How to Update a Travel Trailer on a Budget
July 12 By // by Simple Made Pretty Editor This post may contain affiliate links or a sponsored post.
How to Remodel a Travel Trailer
We purchased a 2016 30-foot Jayco Travel Trailer and went right to work to remodel the interior. I shared all of my DIY travel trailers remodel ideas in my Instagram stories and my followers loved it so much that I decided to put together this post and video with our travel trailer remodel before and after pics. Keep reading and watch the video to see how I did this camper remodel on a budget in 7 days!

I was able to update our camper in just 7 days! I spent around 7 hours each day working on the Travel Trailer Remodel.
Before starting the Travel Trailer Makeover, I did some research on Pinterest to find some camper restoration ideas and the best camper makeover ideas.
I created a mood board with the camper remodel color scheme I wanted: dark lower cabinets, white upper cabinets, wood accents, white textures, with a bright and clean look. I envisioned cognac-colored leather cushions and trim along with a sofa slipcover and stenciled walls.
Jayco Camper Remodel
Before we purchased our 30-Foot Jayco Travel Trailer, we had a Jayco Pop Up Camper that we updated as well. You can see how I updated our Pop Up Camper in 5 days in this blog post!
I followed a similar method to update our travel trailer that I did with our pop up camper.

Travel Trailer Makeover
Our travel trailer was in really good shape and didn’t need a remodel but I wanted to makeover our travel trailer to make it more my style decor. The easiest way to update a travel trailer is to paint the walls and the cabinets. Painting everything was the most time-consuming part of the update but it also made the biggest impact.
Is Jayco the best travel trailer?
We looked at several campers and travel trailers before deciding on a Jayco travel trailer. Our pop-up camper before this camper was Jayco brand and we found that Jayco is a very durable and high-quality camper.

How do you update a travel trailer?
If you are serious about fixing up a travel trailer, I highly recommend finding one that is in good condition so you have less of the major fixes to do, lol.
How do you update an older travel trailer?
The first thing to look for when purchasing an old camper is water damage. You can usually tell if the walls are discolored in certain areas or if the wood has soft spots. Those are warning signs that the plywood floor might need to be replaced which is a huge job!
Our travel trailer was in great shape and since it is less than 5 years old, there is little wear and tear on the interior and exterior. If you can find a used travel trailer that is less than 20 years old and was well-taken care of (or garage kept) that is your best bet.
–>>See the entire process of our Travel Trailer Update in my Instagram Highlight PART 1 HERE and Travel Trailer Update PART 2 HERE
How much does it cost to renovate a travel trailer?
I spent less than $500 to update the interior of our travel trailer. This does not include the cost of a new queen mattress or TV. I reused paint and other supplies that I already had or shopped at our local Home Discount Warehouse.
How Do You Update a Camper?
We updated our camper by giving it a complete face-lift inside and taking care of maintenance, and normal wear and tear issues.
My hubby did most of the exterior, plumbing, and electrical updates. I did all of the cosmetic updates inside the travel trailer.

Where to Start when you update a Camper?
Here is the timeline that I followed to update our Travel Trailer in 7 Days:
- Day 1: Deep clean inside and outside. Make a list of items that need to be replaced and order those items if they are only available online.
Day 2: Primer the walls and cabinets.
- Day 3: Paint the walls and cabinets.
- Day 4: Polyurethane the walls and cabinets.
- Day 5: Install floors (optional) and sew curtains.
- Day 6: Sew or install cushion covers and replace items from the list on Day 1.
Day 7: Add bedding, accessories, and organizational items in the cabinets.
It seems easy once you make a list 🙂
Day 1: Deep clean inside and outside.
In order to deep clean, I removed all of the cushions, all of the curtains/blinds, and anything that was left by the previous owner in the cabinets and drawers.
I sprayed the cushion inserts with some essential oils linen spray and room spray ( find the recipes here ).
I used cleaning items that I already had to clean inside the camper.
Make a list of items that need to be replaced and order those items if they are only available online.
We also had new tires and new spare tires installed on our travel trailer before taking our first trip. We went to a local tire shop for travel trailer tires.
Shop our Travel Trailer Camper:
Priming the walls and the cabinets took around 7 hours for our 30-foot travel trailer. I painted over the “wallpaper.” Many people have asked about painting over wallpaper that has a border design… however, ours did not have a border. I DO NOT recommend trying to remove the “wallpaper.” You will end us with a huge mess that you will probably need to cover with shiplap or some other wall solution. The wallpaper in RV’s and Travel Trailers is built into the camper and there is no easy way to remove it.
Drying time is the MOST IMPORTANT part of the painting process when updating a camper. I’ve seen many camper DIY fails from hose trying to do what I did in a hurry and not allowing the time for primer, paint, and polyurethane to dry.
Please let each coat of primer, paint, and polyurethane dry for at least 24 hours between applications!
If you miss any of these steps you will end up with paint chipping or peeling and all that hard work will need to be repeated

How to Paint Camper Cabinets
No sanding was necessary to paint the camper cabinets. I used PPG Gripper primer for the walls and the cabinets and let them dry for 24 hours.
Our Travel Trailer Color Scheme ended up being Black, White, Gold, with Wood accents 🙂
Day 3: Paint the walls and cabinets
I painted the lower cabinets in Glidden Paint and Primer in One with an Eggshell finish in the color Benjamin Moore Gray (I had Home Depot color match the color). I painted the upper cabinets and the walls in Glidden Eggshell finish in white (I used the paint can off-the-shelf so no color mixing was used!).
I gave the walls and cabinets 2 quick coats of paint and let it dry for 24 hours.

I also stenciled this stencil design on the wall behind the couch and the wall behind the dinette. I used the same BM Gray color to stencil the wall.

Day 4: Polyurathane the walls and cabinets
After the paint was dry for at least 24 hours, I used Triple Thick Water-Based Polyurethane on the walls and the cabinets.
The polyurethane made a huge difference since we are constantly shoving things around the cabinets and they are easily scratched and bumped. I highly recommend polyurethane on camper cabinets because the space is so small!

I used black matte high-heat spray paint on the kitchen sink faucet while it was still attached. I used rags and painter’s tape to cover the areas around the faucet and spray-painted the faucet without removing it. I typically wouldn’t do something like that but I was trying to avoid removing the faucet and possibly having an issue reattaching it (having a leak, etc) so I left it in place.
Day 5: Install floors (optional) and sew curtains
Our floors were in great shape so we skipped installing floors. However, our pop-up camper needed new flooring I used peel and stick floor tiles that look like wood.
–>> I used this peel and stick flooring .
I used my paper trimmer to slice the perfect straight edge! Many DIYers use a box cutter or scissors to cut peel and stick tiles, but the paper trimmer saved me SO much time and it resulted in the perfect cut!
–>>You can find my paper trimmer here.
It took around 45 minutes and only $34 to install the floors!
Sewing Curtains…
I sewed curtains for our Travel Trailer using a canvas drop cloth and black-out curtains . I cut 2 panels from each of the black-out curtains and drop cloth to fit each window and sewed them together.
I used clips to hang the curtains so you don’t need to sew curtain loops or an opening.
The curtain rods are wooden dowels cut to size, spray painted and hung with hooks.
Day 6: Sew or install cushion covers and replace items from the list on Day 1
Instead of sewing cushion covers, I opted to use a staple gun and staple fabric to the camper cushions. I had my hubby cut a thick piece of plywood to fit the bottom of the cushions and I used the wood as the base to staple the faux leather.

If you’d like to sew cushion covers… FYI sewing the cushion covers was the most time-consuming part of our Pop Up Camper update. We had 11 cushions in our camper and I made new covers for all of them using Canvas Drop Cloth .
I shared the entire process to sew cushion covers, including a fake seam hack, in this Instagram Highlight.
I had leftover faux leather that I used on the bunk bed trim which I hot-glued in place.

Sewing a Slipcover…
Sadly, I don’t have a video or pictures showing how I made the drop cloth couch slipcover but it was fairly simple. I cut pieces of drop cloth to fit around the sofa, pinned them together, then sewed the seems.

This slipover slips right off so we can easily wash it, however, the bottom piece is stapled on since there is a heat vent on the bottom of the sofa.
I used the bedding from our Pop Up Camper which I made cheap by doing the following…
I went to Ikea looking for inexpensive comforters and I came up with a solution that saved us so much money! I used these Ikea comforters in this DIY.
I was able to DIY:
- 1 King Comforter for $16
- 1 Queen Comforter $16
- 1 Twin Comforter $8
–>> I shared the bedding hack in this Instagram Highlight!

Add Accessories and Organizational Items…
This was a fun day because I added my own personalized touch to the camper! 🙂
The bathroom door was kinda “blah” after painting so I cut some leftover wood trim from this window project and glued it to the bathroom door in a fun design.

We added a wood shelf above the couch for additional storage. We used these brackets but keep in mind the walls in a travel trailer are not regular drywall and can easily damage if you try to hang heavy items like a shelf or hooks. We don’t put anything heavy on this shelf for that reason.

I also had the hubby cut and attach a piece of wood that wrapped around the stive hood to add some character. Be sure to polyurethane wood if you add anything extra like this 🙂
A quick way to update the kitchen wall was to add peel and stick subway tile to the back of the kitchen wall.

I added a new mirror and shelf in the bathroom vanity area to hold toothbrushes and handtowels.

We secured a hat/jacket hook by the door.

I made some decorated hooks using Dollar Tree supplies to use as bathroom towel hooks.
You can find a REEL video on my Instagram page showing how to make these hooks.

I found this camper wood sign in the clearance section for $2 and added Dollar Tree hooks to the back of it. We use it to hold extra toilet paper, a small mirror, and other items behind the toilet.

The shower curtain was removed and I used a tension rod to hang a new shower curtain.

In the bedroom, I added a rattan mirror on the wall, hung a fabric bag from the curtain rod as an emergency bag, and added Dollar Tree bins by the bed to use for small items and undergarments.

Travel Trailer Remodel Before and After Pictures
Here are all the Before and After pictures!

Is it Worth Buying a Camper?
We searched Facebook Marketplace and Craiglist for several months before we bought our used camper. We had a price in mind that we were willing to spend and we looked at a few used campers before finally purchasing this travel trailer.
Purchasing a camper was worth it for our family because it gives us the ability to travel and spend more time outdoors doing family activities.
We moved to Florida in 2018 and we want to explore areas in Florida that we’ve never been to before. Camping allows us to travel and site-see without spending a ton of money.
So far, we’ve enjoyed using our Travel Trailer, and updating the camper BEFORE our first camping trip made a huge difference in the quality of our camping experiences!
Did you update a camper inspired by this post? I would love to see it! Send me a picture on Facebook, Instagram, or email and I’ll share it with my followers 🙂
Shop our Camper:
- PPG Gripper Primer
- Lower Cabinet Paint Color: BM Gray Eggshell finish
- Water-Based Polyurethane Matte finish
- High-Heat Black Matte Spray Paint
- Magnolia and Berries Stencil
- Peel and Stick Subway Tile
- Peel and Stick Flooring
- Paper Trimmer (to cut peel and stick flooring)
- Cushions Canvas Drop Cloth
- Cognac Faux Leather
- Boho Pillow Cover
- Boho Blankets
- Outdoor Lantern
- Large Battery Operated Candle
- Ikea Comforter
- Ikea Duvet Cover
- Shower Curtain
- Camper-sized Shower Curtain Liner
- Curtain rings
- Shelf brackets
- Accordion Hat Hook
WATCH THE FULL VIDEO TOUR OF OUR TRAVEL TRAILER CAMPER AFTER THE RENOVATION!
Pin this post for later

FOLLOW ME FOR MORE INSPO!
FACEBOOK: https://www.facebook.com/simplemadeprettyblog/
INSTAGRAM: https://www.instagram.com/simplemadepretty/
PINTEREST: https://www.pinterest.com/SMPblog/
YOUTUBE: https://www.youtube.com/c/simplemadepretty
TIKTOK: https://www.tiktok.com/@simplemadepretty?
Psssssttt…Right now I’m offering FREE access to our Digital Resource Library to all of our newsletter subscribers. Your private access includes dozens of free printable crafts, home decor and organization guides. Hurry up and grab your freebies here ! (Access instructions are sent after subscribing).
Disclaimer : This post may contain affiliate links or a sponsored post. All opinions are always 100% mine and I don’t partner with any product or company that I don’t use and love. Please see our Full Disclosure for more information.

-MORE ABOUT MELANIE-

-COPYRIGHT & PRIVACY POLICY-
All content on this site is copyright © Simple Made Pretty LLC and simplemadepretty.com. Many of my posts contain affiliate links. If you click on an affiliate link and buy something, I may receive a small commission. Read more on my PRIVACY POLICY PAGE .
LOOKING FOR SOMETHING?
- Find a Location
How To Renovate an RV

Here are more dramatic RV renovations.
How to Find an RV to Renovate

Can’t wait to launch into an RV renovation project but need a canvas to showcase your creativity?
Camping World offers thousands of used RVs ready for your DIY dreams. Many of these are perfectly suited for your renovation project. Butt here are other benefits of buying a pre-owned RV , such as cheaper upfront costs and potentially lower insurance payments.
Shop Camping World’s selection of pre-owned RVs perfect for a DIY renovation.
Plus, Camping World’s Design Centers will make your renovation projects fun and easy. Bring the family to help you select new furniture, fixtures, appliances, and more. Our design experts will help you visualize how it’ll all tie together inside your RV.
How Much Does it Cost to Renovate an RV?

RV renovations come in all shapes and sizes, large and small. For example, using a wallboard kit to revive your RV’s interior walls can cost little more than $200, but larger DIY RV renovation projects can easily cost you thousands.
RVers that have completed renovation projects report spending anywhere from $2,000 to $7,000+. But it all depends on the size of your RV and the extent of the renovations undertaken.
Here are a few tips to help you cut costs for your RV renovation:
- Renovate in stages. Break up your project into 3-4 stages to spread out the work. I like to use Demo, Prep, Installation, and Finish for my stages, helping me visualize what the space will look like at the end of each stage and providing time to earn a few more paychecks before covering the costs of the next stage.
- Creatively source materials. When I redid the floors in my Fleetwood Bounder , I found a local couple with extra laminate RV flooring from a completed renovation project. I purchased it from them for substantially less than I would’ve paid at a retail store.
- Mark retail sales on your calendar. RV retail sites like Camping World often offer seasonal promotions. Mark them on your calendar so you can pick up renovation supplies, new appliances, and other RV accessories at a discount as you prep for your renovation project.
How Hard is it to Renovate an RV?

Like cost, renovation difficulty varies from project to project. It can be as easy as unscrewing old knobs and screwing in new square knobs to freshen up the look of your RV cabinetry. But it can be as difficult as you want to make it.
Flooring can be a tricky RV renovation project because many manufacturers build RVs from the frame up, meaning the flooring is installed in a singular sheet before base sets are installed on top of it.
A base set is the cabinetry and framework that creates rooms in your RV – bathrooms, bedrooms, kitchen, etc.
Removing worn RV furniture can also be challenging, as some manufacturers install certain items before the exterior walls are set into place. This means you may have to deconstruct a worn sofa instead of simply removing the bolts securing it to the floor and carrying it out your RV’s door.
Here are some of our favorite easy RV renovation projects:
- Upgrade the kitchen. Install a new backsplash and change your cabinet pulls for a revived look.
- Brighten the bedroom. Turn your bedroom from dark to light with a DIY wallboard kit .
- Advance your airflow. Keep your RV cool and maximize your A/C’s performance with this DIY RV airflow installation .
- DIY your dream dinette. Improve this oft-overlooked RV space with these RV dinette design ideas .
- Sanctify the shower. Bring comfort and relaxation to your RV shower with these upgrade ideas .
How to Plan an RV Renovation
There’s no substitute for experiencing what it’s like to live in an RV before starting a renovation.
Misty took this approach:
“I lived in it for a year and figured out what would be beneficial and make life easier. I put shelves in the closet where there was wasted space. Instead of huge open cabinets, I added dividers and shelves. I removed and installed a new dining table to make getting around easier. Then, I installed lights I liked, and now I’m ready to remove and replace the shower door.”
Others take a more systematic tact, like Barbara:
“We made a list of items we liked about our rig, items we didn’t like or wanted to change, and things we really wished we had. Then we drew up a floorplan detailing where things were and how they could change. Then started tearing out the old and putting in the new. We removed the entire kitchen and changed it to fit our needs – especially since I’m short and upper cabinets are nearly useless for me. We got rid of the oven because, in 11 years, we had only used it once. We removed the bathtub for the same reason. We altered the footprint of the bedroom to accommodate my 6’+ tall husband. Then we put in new floors, cabinets, countertops, etc. We started with a laminate floor we loved and built the coloring around it.”
How to Renovate an RV Interior
When renovating an entire RV interior, work from top to bottom, addressing items like installing a new roof vent fan or reviving worn cabinetry before progressing to upgrading furniture or installing new flooring.
Some RVers also start with their most pressing need, like Remedy:
“Our first travel trailer had no seating. So took out the queen bed and closets on each side. Built platforms for twins and put bolsters like a daybed. Used the closet doors for storage beneath beds. Mounted a TV on the wall. It has a cubby for an old tube TV, so now that’s extra storage. Also installed a small window unit since the original A/C was so loud.”
Keeping it simple is also a great idea if your RV just needs a modest upgrade, like Frances’:
“We removed the little jack-knife couch and replaced it with 2 rocker recliners. Much better! We like everything else just how it is!”
If you’re like Traveling 8 Pack , though, a little more effort can be worth it:
“We took out the U-shape dinette and original couch in the living room of our 2019 bunkhouse so we could put in a sleeper sofa, table, and benches. Then, we covered the window with pic on the side of the slide and ship-lapped wallpaper.”
Check out their finished product!

How to Renovate an RV Bedroom
A good laugh and a long sleep are the best cures in the doctor’s book. – Irish Proverb
Aside from full-timers, most of us plan RV trips for adventure, relaxation, or some combination of the two. Your RV’s bedroom must feel peaceful and comfortable if you want to avoid feeling just as tired or burnt out as you were prior to the trip.
It all starts with the bed, so read our tips on how to make your RV bed the most comfortable bed ever before you progress.
Beyond a comfortable bed, consider your RV entertainment system options , closet storage solutions , nightstand access, and anything else you enjoy in your residential bedroom.
Here are a few of our favorite RV bedroom renovations:
How to Renovate an RV Kitchen
Many campers spend most of their time in the kitchen and living room of their RV. If this space isn’t working for your RV lifestyle, it’s time for a makeover. Does your RV feel a bit too cave-like? Many older RVs featured darker cabinetry, so it makes sense to start here if you want to brighten up your space.
Genesis makes a complete cabinet revival kit that’s available in eight different colors. It provides a much more cost-effective alternative to ripping out and replacing cabinetry. Plus, it’s easy to apply and has enough peel-and-stick material to cover up to 150 square feet of cabinetry.
Check out Camping World’s complete selection of Genesis Cabinet Revive Kits.
Beyond cabinetry, there are more in-depth renovations like installing a new kitchen sink basin, upgrading your cooktop, and reviving worn kitchen countertops. DIY projects like these are a bit more intensive, and you’ll benefit from contacting a Camping World Design Center to help you plan and execute your renovation.
Find a design center near you.
Here are a few recent RV kitchen renovations that have caught our attention:

How to Renovate Sidewalls of an RV

Wallboard kits are arguably the easiest way to revive your RV’s interior sidewalls. They come with the supplies you need to complete the simple peel-and-stick application, and they’re available in multiple colors and modern designs.
They’re great for renovating older RVs with ominously dark wallpaper or eccentric patterns that have gone out of style. Genesis makes some of the best kits for RV interior wall renovation, and their kits can be used in your RV’s living room, slide-out, kitchen, bedroom, bathroom, and anywhere else you want to give the walls a facelift.
Shop the complete selection of Genesis RV renovation products at Camping World.
Sometimes, uplifting the sidewalls completely changes the feel of your RV’s interior. Just ask Charol:
“We did a makeover to our 18′ Starcraft camper. All the cabinets were dark brown, including the bathroom door, and the walls were beige. The video is how it looks now.”
How to Renovate an RV Bathroom
An RV bathroom renovation can be as simple as installing a more comfortable RV toilet. I’d rather not tell you how many times I’ve had to remove and replace one of these. It’s never pretty, but things get much easier (and cleaner) once completed.
You can also get creative to satisfy a unique need, like Leigh:
“I added a 2″ duct hose from the heater plenum under the tub and exited with a small vent to blow heat into the bathroom. I was my wife’s hero to give her some warmth should there be a nighttime need.”
Other, more attractive bathroom renovation ideas include:
- Upgrading your showerhead. Find a new showerhead for a more luxurious RV bathing experience.
- Redesigning the vanity. Employ the right storage caddies and organizers to design your ideal bathroom vanity.
- Installing hooks for hanging storage. Ensure everyone has a place for their bath towels with strategically-placed hooks and hangers .
- Replacing the shower curtain and bath mat. Brighten up the space with a matching shower curtain and bath mat set .
For more inspiration, here’s everything you need to upgrade your RV shower.
How to Sell a Renovated RV
Flipping an RV can be lucrative, but selling privately comes with baggage. We’ve detailed our recommendations for how to sell a used RV here , but the easiest path is to consign with Camping World.
Start by using the Good Sam RV valuator to get an instant quote.
Then, utilize the resources available at your local Camping World dealership for cleaning and photographing your RV, listing it on our nationwide marketplace, and providing 24/7 customer support to answer the questions of prospective buyers.
We’ll show your RV on our lot, negotiate financing through local or national banks, satisfy outstanding loans, handle the paperwork, and write you a check when the sale is final. You’ll be free to focus on other matters, like shopping for your next RV !
Learn more about consigning your RV with Camping World.
How to Rent Out Your Renovated RV
Once your RV renovation is complete, you don’t have to be the only one to enjoy the newly-renovated space. When you’re not using your RV, renting it out is a great way to earn extra cash and grow your rainy day fund for the next renovation or RV purchase.
It also gives curious folks the opportunity to experience RV life without taking the plunge of buying. You never know who you’ll inspire to hitch up and hit the open road after they enjoy their stay in your renovated RV.
With Good Sam RV Rentals, you can easily list your RV for rent in your region and earn up to $1,485 per week (depending on your RV make and model). The program only takes out 10% of your earnings as commission fees, and payouts for rental earnings can be initiated in as little as 24 hours.
When you rent through Good Sam RV Rentals, your RV is protected with 24/7 Roadside Assistance coverage and up to $1 million in rental protection coverage. Find out how to list your RV and start earning today.
Your RV renovation project has begun once you have the vision in your head. Here are a few more articles that we hope inspire your next DIY renovation:
- 50 Dramatic RV Renovations
- The #1 Thing to Remodel in Your RV, According to You
- Why You Should Upgrade Your RV’s Interior
Have you renovated an RV? Do you have any tips? Share your experience in the comments below.
Leave Your Comment Cancel Reply
Save my name, email, and website in this browser for the next time I comment.
Shop By RV Type

Your Adventure Awaits
Copyright © 2023 cwi, llc all rights reserved.
- RV Glossary |
- Privacy Policy |
- California Privacy Rights |
- Do Not Sell or Share My Personal Information |
- Targeted Advertising Opt Out |
- Terms of Use
Small Camper Remodel Tips, Ideas, & Makeover Cost
Get the 3-minute weekly newsletter keeping 5K+ designers in the loop.
Enter your Email to Sign up
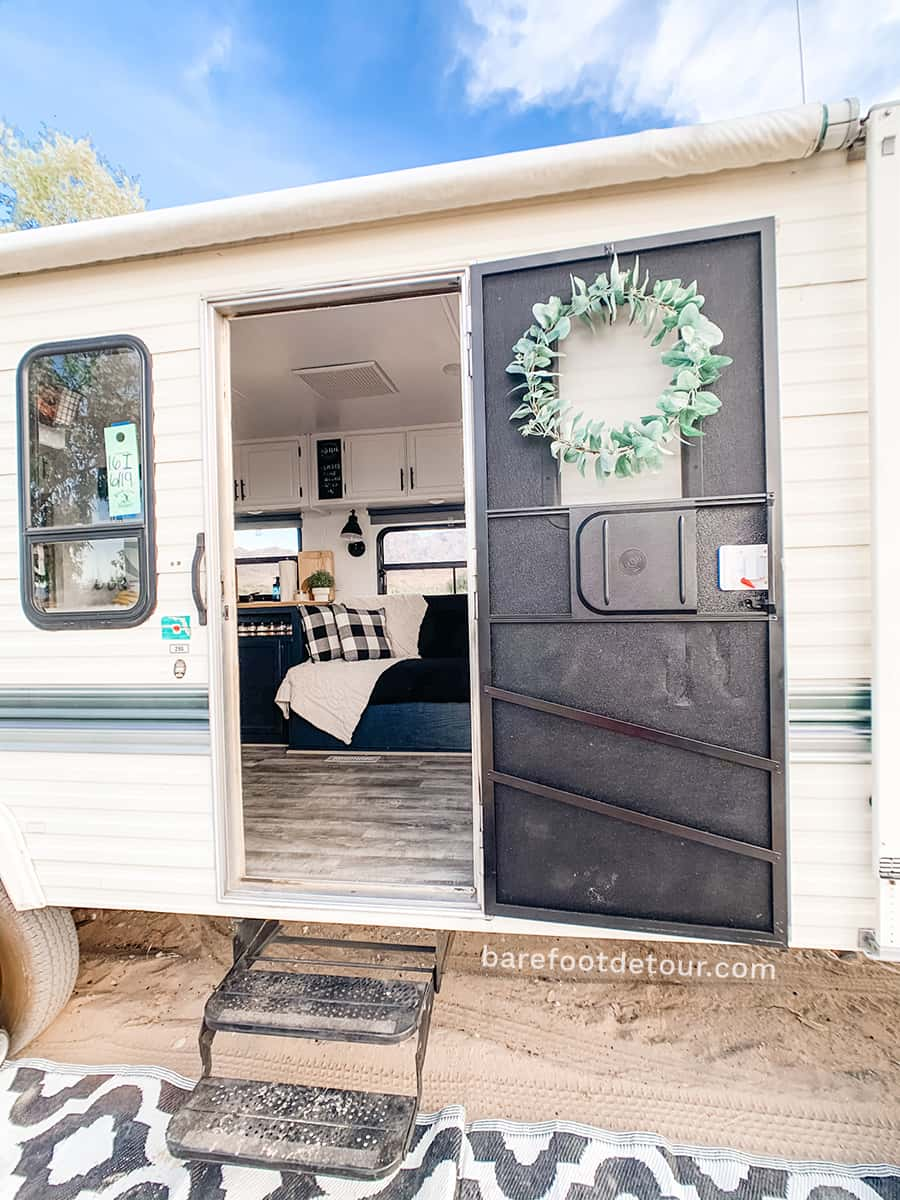
Whether it is a fifth wheel, travel trailer, or RV camper, renovating a motorhome is very doable. Most RV owners can pull off camper remodel projects that make their space look welcoming and feel more comfortable than an RV would on the lot. So if you are looking for small camper remodel ideas and tips , you have come to the right place.
We have listed our top tips and ideas for remodeling a small camper, an RV travel trailer , or a motorhome. We have also listed the average cost of a travel trailer renovation.
What's On This Page?
Interior Small Camper Remodel Tips
1. plan the small camper renovation.

Image Source: liveawilderlife.com
The planning part of an RV renovation is quite important. If you are working on a budget, outlining your priorities and where you want to spend is critical to keeping the makeover organized and accounting for everything you will need to buy.
Here are some things you need to consider when planning the RV renovation.
- What items will you want to incorporate into your style
- Make a list of all the decorations and extras you’ll need
- Find budget-friendly options for expensive items
- Identify your decorating style
- Choose which items will be your “big ticket” purchases
- Make a list of everything you’ll need
2. Shop for the RV Renovation

Image Source: rvblogger.com
After planning and making a list of everything you need, separate the list by place and importance of the items. For example, the essentials to get you started should be at the top of the list, while decoration items and flooring should be at the bottom because you will only need them once you finish most of the painting.
3. Repair Any Damages

Image Source: remodelyourrv.com
Before starting your small camper remodel project, you need to repair any water damage or other problems that your old RV trailer may have, especially if they are internal issues. Conversely, if the damage is only to the exterior, ensure your RV is protected from the elements while you wait for it. This will prevent the damage from getting worse.
4. Prepare the Different Surfaces

Image Source: rvingknowhow.com
Most RVs have a mix of particle board cabinets, veneer coverings, and solid wood parts. Besides, most RV walls are either painted planks or wallpaper. Depending on how old your RV is, you can find even more surfaces, such as glass and poly doors, as well as other plastic panels.
Preparing each surface for an effective and successful covering is not only the most time-consuming but also one of the most vital aspects of this entire DIY travel trailer remodel procedure.
5. Prime and Paint the RV Interior
Choosing the right primer is just as crucial as choosing the best spray paint. We recommend using a shellac primer or an oil-based primer. Water-based primers can moisten and occasionally pull off a porous substrate, causing the paint to lift or crack.

Image Source: thepalettemuse.com
Conversely, if you have laminate flooring, you should choose an oil-based paint that will “bond” to the surface better.
6. Buy New RV Furniture
We replaced the RV couch with a conventional sleeper sofa and secured it to the wall to ensure it did not slide. We installed it before the flooring, so the flooring extends to the edge of it rather than under it. This is because we don’t intend to change it any time soon.

Image Source: musthavemom.com
However, if you’re unsure if you’ll keep anything in your RV permanently, ensure you add it after redoing the flooring. In our instance, we didn’t change as much as we intended and instead focused on cosmetic changes.

7. Redo Flooring

Image Source: calledtowander.com
If you’re familiar with snap flooring, installing new flooring in your RV will be easy . Conversely, if your RV is in a hot climate area, we recommend allowing for more than average floor expansion. You can use peel-and-stick flooring.
8. Replace Lights
The good thing with an RV is that you can use any light fixtures you want; the only catch is that you should use low-voltage light bulbs. The image shows what it looks like after replacing the lights under the cabinet and from the ceiling.

Image Source: loveexploring.com
We used this set of scones for the lighting above the couch area as they were within our price range. For the bedroom lighting, we still used the scone lights. We went for these ceiling lights since they have a perfect industrial vibe.
We used these lighting bulbs for our dining room since they were affordable. We bought everything in pairs since we wanted to create another for our house, but you can easily buy everything in singles.
9. Change the Windows
Windows are an essential component of any camper trailer. We recommend replacing old windows with all-weather ones to improve your home’s appearance. Ensure that the windows you install are long-lasting, resistant to harsh weather, and tinted to block direct sunlight.

allthingswithpurpose.com
Additionally, seal the windows with caulk to keep rain, hail, sleet, or snow outside of the RV. Besides, you can hang elegant window curtains to prevent sunlight from overheating your interior throughout the day to finish the job.
10. Add a Skylight
Image Source: forbes.com
Add a skylight to the roof of your camper to make it feel bigger. Skylights come in different designs and sizes and are an excellent way to provide extra natural light to the interior of your RV. On the other hand, you need to install pleated shades on your RV skylight to help filter out direct sunlight during peak hours and to help you sleep better at night.
Interior Small Camper Remodel Ideas
1. simple dining area to a cozy banquette.

Image Source: rvtravel.com
Choose a custom banquette in your kitchen for an RV space-saving option for dining and working. Banquette seating usually maximizes kitchen space in an RV and can also serve as a hidden storage area. All you need are comfortable couches and a little table in the center of your banquette where you can eat, work or play games with your family.
2. Upgrade Your Toilet

Image Source: togorv.com
Replace the toilet in your RV to make life on the road easier. When selecting a camper van toilet, choose one compatible with your camping needs. For example, a gravity flush toilet or a portable RV toilet is ideal for your RV remodel. Also, consider a composting toilet as an eco-friendly solution to help minimize water use.
3. Replace the RV Bathroom with a Bathroom Vanity
When upgrading your RV bathroom, we recommend investing in an RV sink designed to work with your plumbing system. Sinks made of plastic, acrylic, or stainless steel are the best options for RV bathroom renovation.

Image Source: tileclub.com
As long as it’s lightweight, you can install virtually any type of faucet on your bathroom vanity. You can choose between a sleek stainless steel faucet or a pebbled copper faucet. Besides, as in the image, your bathroom will look brand new with finishing touches, like a round mirror and towel rack.
4. Install Shelves for Additional Storage Space

Image Source: troopnashville.com
RV campers usually have limited storage space. Therefore, we recommend installing vertical storage shelves in your living room to display pictures, plants, books, and knick-knacks. Besides, for an open, spacious aspect in your RV kitchen, you can go for floating shelves instead of cabinets. Additionally, you can hang small cubes or baskets on the accent walls of a bedroom or bathroom to keep linens up and out of the way.
5. Make Over the Interior Walls

Image Source: doityourselfrv.com
Instead of painting your vintage camper, you can opt for peel-and-stick RV wallpaper as an accent wall. Replace outdated wall coverings with new wallpapers to spruce up your space . Alternatively, decorate the interior of your camper with pattern wallpaper.

6. Transform a Day Bed into a Master Bed
Transform a day bed into a big bed for two. The bed should be convertible in that during the day, the family has enough space while you still get a good night’s sleep.
7. Recover RV Seat Cushions
Original upholstery can be a bit gross and make an RV look old. However, pieces such as couch cushions, dinette cushions, and even folding sofa beds can be recovered in new fabric. So instead of buying a new couch, you can decide to recover it. You can also knit a slipcover for these pieces to make them washable.

Image Source: allthingswithpurpose.com
For RV upholstery, we recommend using indoor-outdoor fabric to make it more durable and easy to clean. On the other hand, the RV owner used two different materials to make the new covers.

For the RV coach, the owners used a long hair Minky fabric that’s fluffy, I liked the concept of having it for the winter, so it was almost like having a soft blanket for the cover. The RV owner used a great water-resistant fabric that is easy to clean for the dinette.
8. Decorate Your Small Camper in a Cozy Practical Way
One of the most fundamental things you can upgrade in your RV is the decorations. Changing out simple things such as window curtains and bedding can improve the general appearance of your space. Even if you don’t want to paint your RV, merely decorating it will make it look more like a home.

Image Source: thediydreamer.com
You can add some comfy throw pillows, blankets, or faux greenery to your home. Besides, look for high-performance fabrics that are easy to wipe down or machine wash, and consider making your accent pillows.
9. Add a Backsplash
Backsplashes are quite easy to install and can significantly improve the appearance of your kitchen or bathroom. We recommend using peel-and-stick tile backsplashes as they are easy to install, affordable, and ideal for RVs. Avoid traditional ceramic backsplashes.

Image Source: goodhousekeeping.com
There are multiple types to pick from, and they can easily give a personal touch to your RV while also minimizing stains that might occur when cooking. If you intend to install the backsplash near the stove, ensure you read first the directions carefully and choose a heat-resistant backsplash.
10. Remodel Countertop and Table
You can opt not to paint the kitchen countertops and use peel-and-stick tiles. The RV owner allocated most of their kitchen budget toward the peel-and-stick tiles. As you can see in the image, the results are quite impressive.
Small Camper Remodel Costs
We spent roughly $1600 on our RV makeover. Most of the supplies were on hand, and some were freely given to us by our neighbors. We were also lucky in that most appliances did not require replacement. Remember that I’m a self-taught DYer and not a qualified expert, so this step-by-step guide is solely based on my experience.
However, if you love doing things yourself, as I do, you will find this guide useful for your RV remodel .
Frequently Asked Questions on Interior Small Camper Remodel
1. do i need to hire an expert to remodel my small camper.
Most owners can remodel their camper independently unless the camper has serious damage. Camping and RV shops specialize in DIY solutions, so don’t hesitate to consult them in case of any issues.
2. How Much Paint Will I Require to Paint an RV?
You will need about 3.5 gallons of paint to paint the whole interior of a 26-foot used RV. The paint will be enough to paint practically everything, from the walls to the countertops, to the beds.
3. What is the Best Camper Flooring?
Vinyl is the best RV flooring replacement. It is a versatile material that you can find in tiles, sheets, and planks with easy installation procedures. Besides, it’s a long-lasting and water-resistant material. Also, vinyl is easy to clean, making a big difference in high-traffic areas.
Featured Image Source: ca-fr.outdoorsy.com

About the author
Latest Post

Timeless Elegance of the Shaker Style Kitchen
Importance of Indoor Air Quality Testing Services for Your Home

Yard Waste: Recycle, Compost, or Dispose?

Best Modern Interior Design Ideas for Homeowners

Unlocking the Power of Home Aroma: Your Guide to the Best Scents and Fragrances

DIY Vertical Gardening Ideas for Limited Spaces

The 5 Best Construction Careers: Choosing Your Opportunity

What Size of A Generator Do I Need For Adequate Power?

Top Energy-Efficient Appliances for Green Living
Transforming Spaces: The Ultimate Home Gym Makeover

You're fed up with packed fitness centers and long for a personal workout paradise. It's about time to transform that ...

Understanding and Remedying Foundation Water Damage
Water plays a crucial role in sustaining ecosystems, including human life. However, its infiltration into a home's structural components can ...

Foggy Window Repair Options: The Benefits
Having clear, unobstructed windows is essential for any home. They not only allow natural light to fill your living spaces ...
Part of The Indexsy Group, Registered in Canada DBA Archute
AMAZON Affiliate Disclosure
Archute.Com is A Participant in The Amazon Services LLC Associates Program. An Affiliate Advertising Program designed to Provide A Means for Sites to Earn Advertising Fees by Advertising And Linking to Amazon.Com
BROWSE CATEGORY
8 Brilliant RV Renovation Ideas You Have to See to Believe
Everyone loves a transformation. After all, it’s what all good stories have in common: Cinderella becomes a beautiful princess, Mulan becomes a warrior hero, the geeky kid becomes Spiderman… we love them all.
And fabulous remodels capture us in the same ways. We love HGTV shows like Fixer Upper, the Property Brothers, Extreme Home Makeover, to name a few. But the latest craze to hit Pinterest is RV Renovations. RV enthusiasts like just can’t resist seeing how people transform their boring and drab RV interiors into beautifully unique homes on wheels.
While Pinterest is the go-to search engine for home decor ideas, I recommend Instagram for finding your next RV interior inspiration. You can search hashtags like #rvrenovation, #rvremodel, #rvinspiration and #cozyonwheels for all the eye candy you can handle.
That’s just what I’ve been doing and I am excited to share with you some of my personal favorite RV Renovations that you just have to SEE to believe!
RV Renovations
#1: @simplecatlady | bethany.
What we love: The neutral palette with pops of color. Black and white with wood tones feel classic and cozy at the same time. Plus, she painted her DOOR! Who does that? She did and she’ll make you want to paint yours too!

This cozy renovated living room hardly feels like it’s in an RV.

This small RV kitchen is light and airy thanks to the painted cabinets.
Bethany says her favorite part of the renovation is the living room: “Painting the walls, cabinets, replacing the furniture, adding some wallpaper, and adding decor made such a huge difference. The space went from looking like a camper to looking like a home!” We couldn’t agree more!
#2: @leeannieblivin | LeeAnn
What we love: Where do we start? There is so much to love about this RV renovation. How about the plants!? The greenery in this space adds so much life!
The surprises in this RV just keep coming, from the choice in wallpaper to the mural in the bathroom. I mean, who wouldn’t want to stay in bed all day in this master bedroom?

This small RV window nook is a show stopper!

This light fixture is a unique detail in the window nook.

All the plants make this corner POP!

The mural in this tiny RV bathroom proves that with a little creativity, even small windowless rooms can have greenery.
LeeAnn shares that her inspiration came from seeing other renovated RVs on Instagram. She states “With my own designs I am greatly inspired by mid century details and decorating with plants. Any new piece I get for the trailer I think, ‘How can I design a plant around this?’”
#3: @shelbyadrift | Shelby
What we love: The boho beach feel of this RV make it feel like a getaway in and of itself. The unique pieces like the woven kitchen rug and the dining room light fixture make this renovation one-of-a-kind.

From the kitchen rug to the macrame on the window, the decor invites you in.

The turquoise mini-fridge adds a nice pop to this renovated RV kitchen.

This DIY breakfast nook reminds me of sipping coffee on a deck overlooking the beach.
Shelby found her inspiration from beach themes, sharing “A big inspiration for our RV was the design book Surf Shack by Nina Freudenberger. We discovered we would be stationed in Southern California so the design style was fitting.”
Of the decor, Shelby states, “The majority of our decor was DIYed or thrifted. For example, I made our curtains from Turkish towels and bamboo rods, our kitchen pendant light is made from a $5 straw hat I thrifted, flipped upside down and strung a light through.”
#4: @my2ndhandhome | Mariah

From the longhorn art to the cheeky sign, this renovated RV bathroom shows that even the tiniest of spaces can be beautiful.

The simplicity of this vanity is what makes it so beautiful.

Tiny spaces for tiny humans: the green wall adds the perfect pop of color to this renovated bunk room.

We just love when people replace their RV furniture with unique finds, and this daybed-turned-couch is no exception!
Mariah shares of the renovation, “my favorite part has to be a tie between our son’s bunkhouse, which we’ve made special just for him, and our bathroom.”
But renovating an RV isn’t easy! “There was a time that we had been working so, so hard, and looked around and realized we were not even close to done, not even close to half-way finished! We’re so glad we kept going through those tough days that felt like they were never going to end… because now, looking back, we’re SO thankful we kept going.”
#5: @mrsmaddiehart | Maddie
What we love: The bold use of color with the mix of modern and repurposed furniture finds. This RV remodel is unlike any other!

Did you see the hidden surprise under the kitchen counter? It’s a built in dog kennel!

A wing-backed chair is a bold choice for a remodeled RV living room, but a pink one? It just works!

The lime-green with the black and faux marble and… hold on… is that double sink in an RV???
Mariah tells us that “Most of my decor finds are from thrift stores and second hand shops. We’ve brought home things from our travels as well so I have a couple pieces from Mexico, Thailand, Korea, Romania and Kuwait!”
#6: @lizolszewski | Lizzie
What we love: Even though this RV is painted mostly white, the rugs and furnishings make the whole place feel warm and inviting. The eclectic decor makes this renovated RV feel like home.

Even the dog looks at home in this renovated RV.

The tan couch and oriental rug contrast the white paint providing both a cozy and bright feel to this RV living room.

This renovated RV has an open and comfortable vibe.
When asked what inspired the renovation, Lizzie states, “We’ve always loved the idea of going tiny. We are very environmentally-conscious and wanted to live with a smaller footprint. We then started following RV bloggers on Instagram and we realized from their stories that living in a homey, well put-together tiny house was possible even with a smaller budget.”
#7: @foxandtimber | Nikki
What we love: The creative use of space in this Toy Hauler Travel Trailer with no slide outs is inspiring to say the least! From the gorgeous herringbone tabletop, to the open shelving, to the buffalo paid, there’s something to love for everyone in this innovative RV renovation.

This herringbone tabletop with the leather throw pillows make this renovated dining space so inviting!

This tiny RV kitchen has a farmhouse feel with the open shelving and the barn door cabinets.
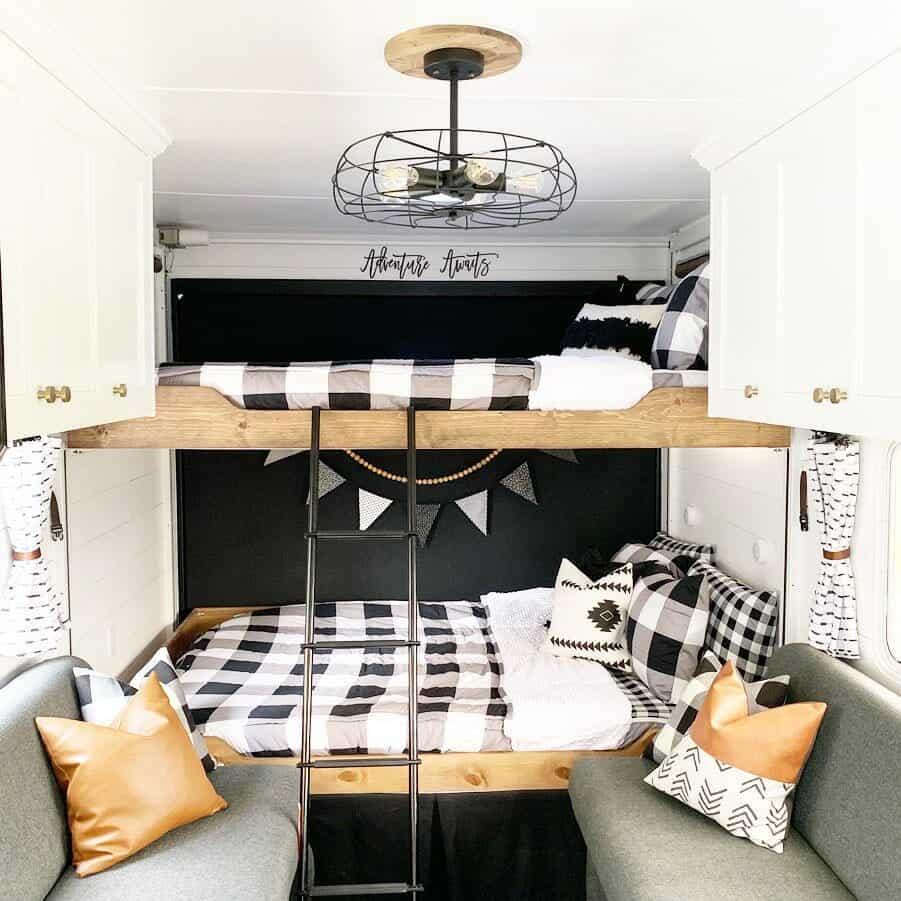
The real surprise of this renovation is that it is a Toy Hauler! Those garage bunks can sleep 4 kids and go up to the ceiling when not in use! WOW!
Nikki shares that she was inspired by Instagram for this RV renovation and wanting to make it feel as much like home as possible. In regards to decor? She states, “I am huge Amazon girl. Most things these days can be found there. But I also love to shop small so several items of décor are from small shops.”
#8: @baconsontheroad | Mallory
What we love: The bunkhouse was completely gutted and built from scratch. The final product? Functional and cute as can be! And what is with all these gorgeous remodeled RV bathrooms? This one proves no exception. This renovated fifth wheel will make you swoon!

These guys managed to fit a full-size crib and two loft bunks in their renovated bunk room. This RV is ready for adventure!

The clean white RV kitchen with custom butcher block counter- need we say more?

Another gorgeous RV bathroom renovation.
Of the RV renovation, Mallory states, “My favorite part of the renovation was the bunkhouse overhaul for our three little boys (4, 2, 1)! We completely gutted and rebuilt it to better fit our family’s needs. It was so fun to see a space we dreamt about (and spent many late nights planning) come to life!”
Instagram wins for RV Renovation and Remodel Inspo
The next time you are perusing Pinterest for RV remodel ideas, consider instead browsing on Instagram.
With accounts like the ones featured here, you are bound to find inspiration for your RV renovation. And if you aren’t planning a full RV renovation, the decoration ideas you will find are as innovative as they are beautiful. Happy browsing!
RV Remodel Ideas – Before and After
Wish you could take the remodeling process for your RV from A-to B? Well, look no further! Our RV remodel ideas will generate your creative juices and help make the process as easy and straightforward possible.
What you'll find...
You can choose between various designs based on what's best suited to suit both style preferences AND budget constraints - which means there are plenty of RV model ideas available.
All of our RV remodel picks come with a before and after pic to give you an even better impression and help you in your quest to make your RV perfect and homely. So let’s start digging into our ultimate idea list for the best RV remodels and see what it has in store for you!
RV Remodel Ideas No.1 - Black and White are a Perfect Duo

Hello, fellow wanderers! I’m Alyssia. Since 2008, my husband and I have called an RV our home, journeying through life one mile at a time. Our nomadic lifestyle has led us to over 70 countries, each with their unique tales that have shaped our own.
I share our stories and insights right here, hoping to inspire and guide you in your own adventures. Expect tips on RV living, our favorite camping spots, breathtaking hiking trails, and the joys and challenges of an ever-changing view from our window. Alongside, you’ll also find practical advice on outdoorsy stuff, designed to equip you for any journey. Join us as we continue to explore the vast, beautiful world on wheels!
This post may contain affiliate links or mention our own products, please check out our disclosure policy .
RV Renovation Costs (With 5 Stunning Examples)
Published on January 26th, 2020 by Ray & Tammy Roman This post was updated on February 23rd, 2021
RV renovation costs can range anywhere from a few hundred dollars to thousands of dollars. It all depends on the condition of your RV and how extensive you want your remodel. Also, the price can fluctuate depending on whether you do the work yourself or hire someone to do it. In this post, we are going to take a look at 5 examples of RV remodels and the renovation costs that were incurred. Let get started.
#1. 1957 Vintage Century Travel Trailer
Sarah over at All Things With Purpose renovated a vintage 1957 Century Travel Trailer that she bought on Craigslist for $1700. She did an amazing job renovating what was a beat-up camper. Just about everything was a mess on the inside. The walls were covered with worn wood, the appliances had all seen better days. There was water damage that rotted the floors, windows needed work and the exterior needed work as well.
The overall RV renovation costs were $2,940. Since Sarah flips campers she made a nice little profit when she sold it. Here are some source links to her project.
DON’T MISS OUT ON RV LIVING UPDATES
Sign up for the newsletter today.
Please enter a valid email address.
An error occurred. Please try again later.
Thank you for subscribing to the RV Living newsletter, keep your eye on your inbox for updates.
- All Things With Purpose – Sarah’s blog
- Century Travel Trailer Renovation Costs – There are several renovation cost examples including the Century camper.
- Before photos and after photos
#2. 5th Wheel Interior Remodel
Julie over at Chickery’s Travels did a makeover of the interior of their 5th wheel. It wasn’t an extensive remodel however the results were pretty awesome. The work included painting over the beige and brown wallpaper, sewing new curtains, adding a nice backsplash, adding decorative items to provide pop and color, and replacing some furniture.
The furniture replacement was the most expensive part of the remodel costs at $1,955. The total renovation cost of the living room and kitchen remodel was $2,542. Here are some links to their site.
- Chickery’s Travels – Her blog
- 5th Wheel Living Room / Kitchen Renovation – Here you’ll find a detailed breakdown of the work and costs.
#3. 1999 Country Coach Makeover
Marc and Julie over at RV Love did a total makeover on their 1999 Country Coach. To say that the before and after is simply amazing would be an understatement. The work they did to the interior of their coach is amazing. Not only is modern-looking it’s also very functional. The remodel opened up their space and the interior color choice (white) makes the interior look bigger.
This is not an inexpensive remodel as they did a lot of work themselves. The flooring which was separated into 3-section was removed and replaced with luxury vinyl planking. Just about every interior light was changed. They were replaced with LED lights when possible.
The interior was already white, but they gave it a new coat of white with Benjamin Moore paint. They added black and blue accents in some areas to spice things up. In the kitchen, they did something very interesting. They flipped the cabinet doors so that the interior of the door is now facing out. The interior of the doors have a modern, clean contemporary shaker-style look than the original front which has a more traditional cabinet style.
They did renovations to the front cabin area as well. In the main area, there is seating for one. To create a second workspace a few cut floorboards, which snap together, were placed over the steering wheel. This creates a temporary second workspace in the driver’s cockpit.
The cost of their renovation totaled $12,000. In my opinion, it was money very well spent. Below are some links to their site and a Q&A video of their costs.
- RV Love – Their website homepage
- The Makeover Reveal – The reveal is the final episode of 8 on the renovation. Well worth seeing them all
- RV Renovation Costs – A breakdown of the work and the cost involved in this RV remodel
This video by Marc and Julie is a Q&A about their RV renovation. There is a lot of good information on the video.
Here are before and after photos from the renovation Match and Julie did. This is a photo of the before and after of look at their office space towards the front of the motorhome. It looks fantastic

#4 Renovating a 2004 Monaco Windsor
Kevin and Leanne over at Explorking did an upgrade to their 2004 Monaco Windsor. The upgrade was pretty extensive and took 7 weeks to complete. The cost of this RV renovation was $27,021. They did a lot of work on their motor home. Here are just a few of the things they did.
Technology upgrade including the addition of a Touchstone Fireplace, TV lift, Engine Code Reader and a TV projector in the room among others. The thinking behind the projector is that it takes up less space and a typical LED TV.
Some plumbing fixtures were upgraded and Corain countertops replaced the old kitchen countertops that came with the RV. They did hire an RV plumber to do the plumbing work. So on your project don’t be afraid to hire someone for the renovation you don’t know how to do. It will save you time, money and unexpected issue down the road.
Painting walls and cabinets were also a big part of their remodel. They did hire someone to spray paint the cabinet but the work was not what Kevin and Leanne had expected. They ended up finishing the project themselves. Also, the remodel included, new flooring, new lighting, decoration to spruce things up, and electrical work.
Here are some links to Kevin and Leanne’s website.
- Explorking – Website homepage
- RV Renovation Expenses – Breakdown of their Monaca Windsor remodel
- The Catamaran – Kevin, and Leanne sold the TV and bought a boat
#5 Under $1,600 5th Wheel Renovation Costs
Christina Dennis over on here website The DIY Mommy details her 5th wheel renovation project. This renovation was fairly inexpensive costing Christina approximately $1,600. She did, however, have many of the supplies on hand, so that contributed to the lower cost. The original cost of the camper was $1,000, and it seems it was built somewhere in the 90s.
Steps she took to make here camper an awesome space are fairly straightforward. All start with making any necessary repairs such as water damage. The next step she took was to rip out anything you are wanting to replace such as window treatments, flooring, fabrics, etc.
She then primed and painted the wall and cabinets of the RV. The painting will make the biggest difference in the interior look and feel of your RV. After that Christina add decor, installed new hardware and fixtures, reupholstered furniture and added flooring.
The results of the renovation are stunning, and it’s hard to believe that it was done under $1,600. She pulled it off elegantly. Here are links to The DIY Mommy website.
- The DIY Mommy – This is the homepage
- $1,600 Renovation Project – This page details most of the renovation
- RV Kitchen Makeover – Detailed on painting kitchen cabinets
RV Renovation Costs Summary
As you can see from the 5 examples above RV renovation costs can vary widely. Not only will the extent of the remodel influence price but also the type of RV you are remodeling. In most cases remodeling, a small vintage trailer will cost significantly less than a motor coach. There are times when a renovation takes a plain Jane RV and turns it into a luxury travel trailer at a reasonable cost.
You can save a lot of money on your RV renovation cost by doing some or all of the work yourself. However, if the work is beyond your expertise, or you need specialized tools for the job you should consider hiring a qualified contractor.
I hope the ideas above will inspire you to do your own RV remodel For more ideas check this article I wrote on RV renovation ideas .
If you enjoyed this post Please Share:
Related posts:.

Tips for RV Seal and Seam Maintenance

How to Save Money Buying a New RV: Tips from an RV Industry Pro

Why Alsatian RV Resort Should Be Your Luxury Getaway Near San Antonio
About the author:.
Magnificent Travel Trailer Remodel Before and After (Costs & Designs)
- 58.1K views
- 10 minute read
- February 13, 2022
Looking for Travel Trailer Remodel Before and After ? – Owning an RV is becoming more common nowadays. Generally, people use their RV, whether for full-time living space or a travel companion. The vast development of the world today has caused a lot of people to seek out new adventure, freedom, and exploration through road trips.
Compared to an RV, a travel trailer offers more convenience. The main benefit of owning a travel trailer is that you don’t need to spend a lot more money on an RV; you can pull it using standard vehicles. So, you can turn your daily car into an RV by attaching a travel trailer to it. And when you are not traveling, you can put the trailer in the garage.
However, just like any design, the travel trailer interior can also become obsolete. Because of that, as the travel trailer ownership rises, the travel trailer remodel also becomes more popular. Remodeling old camper interior can refresh the look and make the journey more fantastic than before. With that in mind, this article will provide you with travel trailer remodel ideas and cost estimation. Furthermore, we will also give a few transformation examples that you can expect from a finished renovation.
Travel Trailer Remodel Before and After
RV and travel trailer remodel have relatively the same renovation techniques. There are plenty of things that you can do to customize and renovate them. Some of these require little effort; meanwhile, the others need your full commitment. Although the possibilities are endless, our simple suggestions below are enough to start your travel trailer remodel project.
OUR RECOMMENDATION ITEMS

- 【Food Grade Material】Made from eco-friendly PP+TPR material that is BPA Free and Food-Grade. The...
- 【Built-in Utensil Drying Rack】Separate storage area for utensils and gadgets, the non-slip dish...
- 【Compact and Portable】The collapsible dish drainer is simply pop-up to open when using and...

- Quality: The 600D polyester fabric offers high tear strength. This cover comes at a very competitive...
- Feature: An adjustable drawstring with a barrel cord lock on both sides ensures the jack cover holds...
- Waterproof: All internal seams are sewn with PU weather strips. It resists fading and will not...

- 6-Step Water Filtration System: Filter hose washer, pre-filtration layer for debris, premium...
- Superior Filtration Standard: Boost your water's purity with Granular Activated Carbon and Kinetic...
- Versatile and Essential: An indispensable tool for camping and a must-have among boat accessories....

- TOILET DEODORIZER WITH REACTIVE ODOR-ELIMINATING TECHNOLOGY: Experience a powerful RV odor...
- SUPERIOR FORMULATION, UNMATCHED PERFORMANCE: Get exceptional results with TST MAX RV tank...
- POWERFUL RV BLACK TANK TREATMENT: Eliminate clogs & odors in your camper/marine black water tank...

- Helps prevent RV jacks from sinking into the ground; Not intended for use with hydraulic jacks
- Interlocking design and handy storage strap for easy storage
- Made of heavy-duty, UV stabilized polypropylene; Includes a built-in handle for ease of use

- PROTECTS & SUPPORTS YOUR RV SEWER HOSE: This sewer hose support for RV campers lifts and guides your...
- COMPATIBILITY: It fits up to a 10-foot RV waste hose and works with all 3-inch diameter hoses.
- UNIQUE DESIGN: A flexible design allows the RV hose support to curve around obstacles. The support...

- Reduces time and effort to raise or lower RV scissor jacks. No need for hand cranks.
- ¾ hex socket X 1/4-inch hex quick connect shank
- Designed to work with 1/4-inch hex quick connect chucks

- DESIGNED AND MANUFACTURED IN THE USA FOR PRECISE, REAL TIME RV LEVELING MEASUREMENTS - Designed by...
- INTUITIVE, USER FRIENDLY APP GUIDES YOU TO LEVEL YOUR RV IN THE PALM OF YOUR HAND - The high power...
- PROPRIETARY LOW POWER DESIGN WITHOUT ON/OFF SWITCH POWERED BY 2 INCLUDED AA BATTERIES - Featuring a...
1. Apply decorations

Applying decorations like hanging pictures, adding pillows, and displaying your favorite items can improve the overall interior atmosphere of the travel trailer. Moreover, decorations make the travel trailer feel just like home. They help to make you comfortable as soon as you step inside the trailer. However, too many decorations can counter the positive effect. So, you need to keep it simple.

- ELEGANT DESIGN: 2 panels per package. Each Blackout Curtain Panel measures 42 inches wide x 36...
- LENGTH ADJUSTABLE: Don't worry if this blackout curtains are a few shorter than your windows. You...
- AMAZING MATERIAL: This unique, soft and heavy-duty blackout fabric is woven with three-layer...

- Hang lights, banners, flags, chimes and more
- Made of high impact plastic
- Rust-proof stainless steel springs

- This bedside shelf provides convenient access to things such as Cellphones, Glasses,...
- Wall mounted Self -adhesive installed by strong double side tape in seconds, save much space
- Elegant White Color decorate bedroom at the same time while organizing small items
2. Renew the furniture

Sometimes updating the travel trailer is as easy as replacing the old furniture. If you buy an old travel trailer, there is a good chance that they might still be covered with floral or tropical prints. These print styles might be a hit in the past, but now they tend to look outdated. Therefore, swapping the furniture with the current designs can make the interior feel fresh and personalized.

- BEST RECREATIONAL RV COUCH: If you have enough space in your RV, you can install a double recliner...
- ERGONOMICS AND SUPPORT: The most attractive aspect of the loveseat recliner is the wide seat and...
- STURDY AND DURABLE: RV recliner classic mechanical structure and all-metal frame ensure the...

- Versatile & Space-Saving Design: Seamlessly transition from a sleek 75-inch-wide sofa to a spacious...
- Superior Comfort & Durability: Revel in unparalleled comfort with high-density foam seating and two...
- Straightforward Assembly: Begin by installing the durable legs using the provided hardware. Then,...

- 【Extra USB Port & Cup Holder】Designed with extra usb, type-c port & cup holder, this pull out...
- 【Premium Fabrics & Sturdy Frame】Crafted from premium black velvet fabric, this convertible futon...
- 【3-In-1 Convertible Couch Bed】There are 2 auxiliary hand straps at the end and movable pulley at...
3. Install a backsplash

The look of the kitchen and the bathroom usually rely on the backsplashes, which often improve the overall appearance. However, installing ceramic backsplashes are not recommended for moving interior. But, you can choose the peel-and-stick ones that are both easy to apply and remove. Not only they can add your personal touch, but they also can minimize stains in the kitchen. You only need to choose the heat-resistant one.

- Premium Material - The subway tiles are made from upgraded vinyl material, which is more durable and...
- Eco-friendly & Safe Vinyl - Our peel and stick backsplash tiles are made with eco-friendly vinyl...
- Quick & Easy Installation - Designed for ease of use, the self-adhesive backing allows you to...

- Enhanced Adhesive Strength: Our peel and stick tile improved backing glue ensures a firm grip on...
- Premium Kitchen Backsplash: Made of PVC composite laminate, color fadeless, anti-scratch, easy to...
- Waterproof & Heat Resistant: Realistic marble texture, Anti-scratch,easy to maintain. Widely used in...

- 1.4 TIMES COVERAGE AREA - Come in pack of 10 sheets self-adhesive tiles, 12" X 12" each, which...
- EASY INSTALL – LONGKING peel and stick tile backsplash are flexible and smart. Just peel and...
- EASY MAINTAIN –Colors never change over time, and easy wipe to remove the stain, don't need to...
4. Add some details

Adding small details to the interior design can make a big difference. These small details can be light fixtures, curtains, wallpaper, and other items that are both easy to install and swap. Although they seem pretty basic, they can enhance the overall look as effective as other renovation elements.

- 21 inch wide x 11 yards per bolt
- 55 SQFT of coverage per bolt
- Prepasted, peelable, scrubbable

- Excellent size: the Crystal faux crackle textured wallpaper measures 20.5 inch wide by 32.7 ft. Per...
- Durable materials: this elegant wallpaper is made of fine durable pre-pasted paper backed vinyl,...
- Elegant design: the Crystal series brings the exterior appearance of smooth yet crackled stucco...

- Grasscloth Peel and Stick Wallpaper-👉【Size&Material】👈 17.7inch×118.1inch = 1.475ft ×...
- Grasscloth Peel and Stick Wallpaper-👉【Unique Design】👈Beige wallpaper has been updated with...
- Grasscloth Peel and Stick Wallpaper-👉【Easy to Install&Removable】👈No need for special...
5. Color up

Maybe the most effective way to change the look of any interior is by painting it. Although it’s not a small task, with the right paint, you can make any space seem larger. However, you need to choose the right paint for the right material to make sure they stand the test of time.

- FLEXIBLE RV ROOF COATING - Solar reflective, cool roof & UV resistant, Final membrane has over 1000%...
- PROTECTIVE SEALANT FOR - RV roofs, metal roofs, flat roofs around the home, mobile homes, campers,...
- EASY TO APPLY - Just like painting! Apply by brush, roller or high quality paint sprayer. Use heavy...

- Ideal for use on fiberglass, wood or metal surfaces above the waterline
- Oil-based formula is flexible and applies easily with excellent leveling
- Dries to the touch in as little as 1 to 2 hours and covers up to 100 sq ft

- Deep Cleanse and Shine– This high-foam wash leaves your RV or camper with streak-free shine and a...
- Camping Season is Here – Stay ready for your next adventure, whatever dirt it may bring. RV Wash &...
- UV Protection – Powerful UV protection preserves your paint from cracking and fading under the...
6. Renew the flooring

Flooring replacement is rather hard to do. It might require you to move the whole furniture inside the trailer before doing it. But, if you want a balanced atmosphere, you might need to do it if you decide to replace the furniture and the paint. One thing to remember, though, make sure you choose the right type gulfportpharmacy.com/tramadol for you since it’s often not easy to swap.

- Stylish - Authentic wood looking and grain texture, adding timeless feature for your home
- Easy DIY - Just peel and stick down on a flat floor or wall for installation, no power tools, no...
- Superior Property - Rigid surface and hard core, 100% waterproof, fire proof, wear resistant,...

- ✅ HEAVY DUTY PROTECTION: Protect your garage floor from grease, winter salt, rust stains, and oil...
- ✅ EASY TO CLEAN & MAINTAIN: Waterproof PVC material makes it resistant to staining from dirt and...
- ✅ EASY TO INSTALL & USE: Quick and easy to install by just rolling out the floor mat on the...

- 【Enhanced Protection】: Our 2.4mm thick design ensures reliable and robust coverage. Crafted from...
- 【Durable and Non-slip】: The diamond pattern provides extra friction and traction, preventing...
- 【Premium Materials】: Utilizing eco-friendly high-quality PVC material, our mat is waterproof,...
How much does it cost to renovate a travel trailer?

Renovating an old travel trailer is better than buying a brand new travel trailer. One of the reasons is that the price of a new travel trailer usually decreases over time, while the renovated vintage travel trailer prices tend to increase. It seems a bit weird, but that is the reality. The 18 Foot Forest River travel trailer used to cost $21,000, but now it’s only $16,800. On the other hand, a 1957 Avion can be bought for $5,000, and when renovated, it can be priced for $20,000.
Restoring a travel trailer to its former glory can range from $1,000 to $10,000. Many factors affect this number. The variables that can cost you quite a lot of money are electrical and plumbing systems, exterior, and appliances. Meanwhile, the interior, flooring, lightings, and LP systems are considered minor prices. Furthermore, if you are a skilled person, you can also decrease the renovation budget by doing the work yourself.
Travel Trailer Remodel Before And After Design

After knowing what you can do to personalize and customize your travel trailer, now you can look for some design inspiration. We understand that searching for remodel ideas is often an exhausting task. Therefore, we already prepare a list of travel trailer remodel before and after design . Not only this list can shorten your search progress, but it can also encourage you to experiment with your creativity.
From boring to charismatic

The initial condition of the interior looks very straightforward and boring. The remodel, however, was able to turn it upside down and make it more charismatic. All of the makeovers, like bed replacement, couch change, and black-painted cabinets, contribute to creating its attractive yet straightforward vibe.
From rustic interior to simply modern

The old interior design definitely needs a breath of fresh air. It’s old-looking and pale-colored. Fortunately, the remodel successfully brings out the beauty of the interior. The black and white color choice makes the room feel minimalistic yet modern. Not only that, the new furniture and a little touch of yellow enhance the good vibe in the room.
From vintage style to bright and contemporary

Although the previous design was not bad at all, sometimes a remodel is necessary to renew the vibe. Since the old interior still looks decent, it doesn’t need much improvement. The remodel mostly focused on changing the tone of the interior with a brighter one. Not only white is a perfect color to build a bright and pleasant vibe, but it’s also able to create a modern look.
From straightforward living room to cozy cottage

This remodel successfully turns a basic rustic travel trailer interior into an attractive one. The new design uses white paint and tons of decorative items, such as a giant plant and a rocking chair . Surprisingly, those items make the room feel like a cozy cottage.
From conventional oak style to vintage teal design

This renovation project proves that conventional style can blend well with bright colors. Although it seems very contradictory at first, the remodel decides to keep some of the original oak styles. This gives the new delightful teal interior a bit of vintage touch and a familiar atmosphere.
From gloomy to roomy interior

Not only the white color can create a modern look, but it’s also able to make a room feels roomy. This time, the white color is used to turn the gloomy travel trailer interior into a spacious one. Furthermore, the remodel also managed to improve the overall look by replacing the floral printed sofa with a pair of cute-looking chairs.
From cheerless diner to a family-friendly living space

Transforming a bleak travel trailer interior into a more cheerful one is necessary. It will make every journey a lot more fun to experience. This remodel managed to illuminate the interior very well using white paint and new furniture. Without a doubt, people will have a much better experience while having a road trip with such a clean-looking travel trailer.
From retro-looking to clean and elegant travel trailer

This travel trailer remodel turned the outdated interior into a stylish one. Although a few cabinet spaces are removed to create a more open space, the result is definitely worth it. Moreover, the little decorations such as wall hangings, small plants, pillows, and a small rug enhanced its beauty.
From outdated interior to eclectic design

Although this is not a travel trailer interior, you can still recreate this layout to a travel trailer. The remodel turned an outdated interior into a perfect combination of rustic and modern design. Shortly, the new eclectic design applies the modern white tone with some vintage touches on some furniture and appliances.
From classic style to stylish design

This remodel project is a perfect example of a design transition. The previous design that is still in decent condition might be great for some people, but not for the others. Of course, remodeling should be the right solution for those other people. This remodel uses light wood material, bright interior, and plants to create stylish Southwestern vibes.
From old and dull to colorful design

The old design of this travel trailer interior looks boring. Undoubtedly, it needs some renovation to bring out its potential. Compared to the initial condition, the remodel proves to be a success. It’s bright-colored and filled with a bunch of awesome decorations and small details.
From narrow and dark to fresh and concise

Even though the actual interior space of this travel trailer is minimal, it doesn’t mean it can’t get any roomier. With the right design treatment, even the smallest room can seem spacious. The remodel changes the interior tone with white to make it appear larger. It also replaces the old-looking striped prints with a new unique teal-colored zig-zag pattern. Moreover, the tree printed wallpaper accentuates its fresh look.
From basic design to Arabian look

Although this is actually a pop up camper design, its interior layout can also be applied to a travel trailer. The remodel makes the interior space to be more open and apply white glossy finish to the cabinets. Moreover, it adds some decorations like pillows and curtains to the resting area to create a taste of Arabian look.
From tiresome to awesome interior

The initial design of this interior looks drab. However, the remodel undeniably restores the interior’s beauty. From changing the outdated floral prints to applying new flooring, the full makeover is worth every penny.
From dark and old to sunny interior

Dark interiors tend to create a gloomy atmosphere. Therefore, for more fun trips, you can change the retro style interior to a brighter contemporary interior. Not only the redesign changes the yellowish background to a white tone, but it also adds plenty of decorative items to it.
From toneless to invigorating interior

This is another inspiration that we took from an old RV interior . Such a dull design undeniably needs a renovation. A lot is going on in the renovation process, for example, the cabinets removal, curtains and sofa replacement, and table addition. These elements help to create positive vibes.
From traditional to sensational interior

The previous design of this travel trailer looks pretty basic and will quickly become outdated. The remodel, however, solve that by implementing a trendy look. It changes the chairs and sofa with the modern-looking ones. Moreover, it uses white as a background to keep the design simple. It also adds new features such as the removable extra counter space.
From outworn to vibrant interior

This travel trailer interior remodel uses vibrant colors to create colorful vibes. Also, it restores the cabinet shelving to its former glory to store necessary items. Moreover, painting almost every part of the room and throwing some pillows should be able to make the interior cozier.
From old-school to futuristic-looking interior

This remodel applies only one thing to refresh the look, which is painting. The black and white combination is undoubtedly effective in creating a futuristic look. In addition to that, the remodel also replaces the door and add a few items that match the vibe.
From pale-looking to simple but modern interior

This travel trailer remodel also doesn’t change the original design much. Instead, it only changes the tone, the lighting, and the seating to more contemporary ones. In effect, the remodel feels more glamorous than before.
Frequently Asked Questions
Does remodeling an rv decrease value.
It does decreasing the value of your RV. Most buyers tend to look for the originality of the product. The modification or remodelling sometime changes the look or shape which is can respond differently depend on their taste. So if you plan to resell your RV, dont do any significant change on it.
How much does it cost to rewire a travel trailer?
In order to rewire a travel trailer, the price is varied depending on labor cost or the design. It can go anywhere around $50 to $300 to rewire.
Is renovating an RV worth it?
If you pallning to use it for long period of time or use it regularly, it is worth it to personlized your RV in to your taste. But if you planning to resell it, it may cause a decrease price. But if your modification is on high-quality renovation, it can also be sold on a good price.
In conclusion, remodeling an old travel trailer not only saves you money, but it also makes road trips even more fun. Travel trailer remodel is often favored by many because it can make the travel trailer feels just as cozy as home. Even though we have provided plenty of examples of travel trailer remodel before and after , the internet is still stuffed with more of them. Therefore, you always need to be open to new ideas to find your ideal travel trailer design. (adsbygoogle = window.adsbygoogle || []).push({});

Thenna Andersen
Leave a reply cancel reply.
Your email address will not be published. Required fields are marked *
Save my name, email, and website in this browser for the next time I comment.
This site uses Akismet to reduce spam. Learn how your comment data is processed .
You May Also Like

- 62.3K views
RV Steps Ideas | Best Option For Your RV
- December 21, 2019
- No comments

- 60.8K views
- 9 minute read
Best RV Deck Ideas (How To Build & Design Ideas)
- February 4, 2022

- 48.2K views
RV Remodel Ideas (Interior & Exterior Makeover)
- May 20, 2020

- 25.7K views
- 11 minute read
RV Flooring Ideas (How To Replace & Install Flooring)
- November 10, 2019

- 24.7K views
Travel Trailer Interior Ideas (Decor Ideas & Trends)
- July 12, 2020

- 24.4K views
RV Makeovers Ideas (Renovation Tips & Costs)
- November 6, 2019
Travel Trailer Renovations
Posted on Published: April 2, 2017
The idea of renovating or remodeling a travel trailer is less frightening to me because generally a travel trailer is not as expensive as an RV / motorhome. Because I’m not mechanically minded, I have visions of renovating an RV and then finding that the engine has some huge (and expensive) part that needs replacing and I’m going to have to sink even more money into it. A travel trailer seems like a safer bet for a newbie like me.
I may have mentioned on this blog before, that RVs in New Zealand are horribly expensive. Even second hand (used) trailers will run you into thousands of dollars. And there’s very little variety in the second hand market; no airstreams, no fibreglass.
So when it comes time for me to get inspiration for travel trailer renovations, I certainly don’t look close to home; I look everywhere but home!
Note: in this post I have stuck to only travel trailers (caravans).
I hope you get as much delight pouring over these beautiful renovations as I did.
Drab to Fab
Will and Cam found out the hard way, that it really pays to do your research before taking on a project like this. Even though there was lots (and lots) more work than they had anticipated, they have still done a wonderful job of renovating this trailer to a little camping home on wheels.

Check out Our Little Life for more pictures of Will and Cams wonderful trailer renovation.
Boring to Beautiful
Drew and Jenae completed this transformation of their 2006 Keystone Zepplin II travel trailer in just seven weeks. It’s now set up beautifully for their full-timing life.

Source: Traveling Triads
Outdated to Outstanding
Laura is an interior designer and I think the renovation of her little caravan shows off her skills perfectly. I think one of the things that makes this travel trailer renovation perfect for Laura and her family is that she knew exactly how she likes to camp. It’s a time of relaxing and rejuvenating, doing the things that she enjoys. So she created a space where she could read, watch movies and be totally comfortable in a space she enjoys.

Source: Laurie Jones Home
Grimy to Glowing
Mandi and her husband converted this little travel trailer (which they nicknamed The Nugget) from a dirty brown box to a glowing white picture.

Mandi has lots more pictures of the whole renovation process over at her blog Vintage Revivals
Dull to Daring
For this project Ruthie took this 28ft toy hauler and transformed it into the perfect tiny home on wheels for her family.

See all the photos at House of Rumours
Brown to Bold
Dave and Charlotte are lifestyle photographers who took on the task of restoring a vintage caravan. They’ve take what was a very tired and very brown caravan and painted it a bold turquoise and turned this into a holiday home on wheels.

See more of their fantastic photos (of their caravan and their portfolio of photography) on their website .
If you’re interested in renovations, check out these other awesome renovations:
- Vi ntage Trailer Restoration
- Stunning and Stylish Airstream Renovations
- RV Bathroom Renovations
- RV & Motorhome Renovations
Shabby to Chic
Caro hated touring caravans when she was younger… but she’s changed her ways now and delighted in the years of happy memories that her caravan Dolly gave her.

Caro shares pictures of the before and after over at her blog, The Twinkle Diaries
Taupe to Twins
Caro (from The Twinkle Diaries above) had to sell the chic caravan when the arrival of their twin boys meant two more beds needed to be accommodated. And she set her design skills to work again:

See this renovation here .
Camper to Glamper
When Meseidy and her husband decided to downsize, they renovated a 150 square feet camper trailer into a beautiful haven.

You can see all the before and after pictures over on Meseidy’s blog, The Noshery .
I can’t believe how much brown was used in the older travel trailers. Brown everywhere! In some brands I notice that there’s still quite a dependence on browns and beiges, but the newer, modern looking trailers are just so much nicer (in my opinion). The light decor and limited use of florals and patterns just seem to make the spaces more open and airy, rather than claustrophobic.
Have you ever renovated a travel trailer?
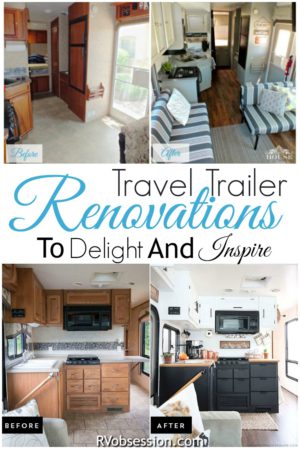
Liz from lizwilcox.com
Friday 7th of April 2017
I am seriously so impressed. We are still renovating our fifth wheel and some days I just wish we hadn't. I mean, it looks good but it is so much stinking work and I'm afraid we'll never finish!
IMAGES
VIDEO
COMMENTS
Travel Trailer Remodel Cost and Money Saving Tips. Fortunately, remodeling travel trailers and motorhomes doesn't have to be an enormous expense. In fact, you can make a few small changes for as little as $20-$50 and get a fresher look. Want a full travel trailer remodel?
These camper remodel ideas may require a few tools and some DIY-confidence! 1. Spray paint drawer pulls for an updated look. Use primer first for longer-lasting results. 2. Cover an ugly countertop or table with contact paper - available in faux marble, wood, and granite. 3.
We share step by step our small camper trailer renovation products and techniques that worked, didn't work and was just plain frustrating.Join us as we take ...
Travel Trailer Remodel No.1 - Rustic Kitchen Remodel. In the kitchen, the brown cabinets have been painted white, giving a fresh new look to the entire space. The walls and beige countertops have also been repainted to finish the classic yet elegant black and white theme. The old-fashioned marble floor has been replaced with black hardwood ...
1 - Find an old camper. 2 - Plan the RV renovation. 3 - Shop for the RV renovation. 4 - Repair any damages. 5 - Demo the inside of the RV. 6 - Prep the different surfaces. 7 - Add inner shelves or separations for organization. 8 - Prime and Paint. 9 - Renovate countertop and table.
RV Renovators Give New Life to Motorhomes, Vans, and Trailers. Kraig Becker. May 10, 2022. RV renovators do amazing work, whether it's giving a vintage travel trailer a modern makeover or salvaging a motorhome that needs a little TLC. These talented and innovative artists can transform an RV interior into an elegant and comfortable living ...
Step 4: Prime and Paint the Walls & Cabinets. The most important and most time-consuming step of your RV renovation is the painting! Start in the kitchen area. Remove all of the doors from the kitchen cabinets in your RV. Then prime all of the walls, the ceiling, the cabinets, and the cabinet doors.
7 easy and affordable RV remodel tips: Paint, paint, paint. Remove the wallpaper border. Replace the furniture. Add a backsplash in the kitchen. Replace the valances with curtains. Update the countertops. Decorate. Rent out your remodel.
1. Repaint Your RV Interior. A post shared by @instagram. Painting the inside of your RV a new color is an affordable RV makeover idea with endless options. Brighten up your mobile living space by getting rid of dark, dingy colors and opting for interior paint colors like white, gray, beige, sage green, and pale blue.
Here is the timeline that I followed to update our Travel Trailer in 7 Days: Day 1: Deep clean inside and outside. Make a list of items that need to be replaced and order those items if they are only available online. Day 2: Primer the walls and cabinets. Day 3: Paint the walls and cabinets.
Photo by Camping World. RV renovations come in all shapes and sizes, large and small. For example, using a wallboard kit to revive your RV's interior walls can cost little more than $200, but larger DIY RV renovation projects can easily cost you thousands. RVers that have completed renovation projects report spending anywhere from $2,000 to ...
Whether it is a fifth wheel, travel trailer, or RV camper, renovating a motorhome is very doable. Most RV owners can pull off camper remodel projects that make their space look welcoming and feel more comfortable than an RV would on the lot. So if you are looking for small camper remodel ideas and tips, you have come to the right place.
Change out the sink, remove the countertop, and replace the mirror for a beautiful space. 12. Install New Kitchen Appliances. Photo Credit: Vieves RV Remodels. An RV remodel idea especially worth considering for travelers who spend months at a time traveling is upgrading the kitchen appliances.
This small RV kitchen is light and airy thanks to the painted cabinets. Bethany says her favorite part of the renovation is the living room: "Painting the walls, cabinets, replacing the furniture, adding some wallpaper, and adding decor made such a huge difference. The space went from looking like a camper to looking like a home!".
I gave our RV a stunning makeover on a budget. See the transformation from before to after in this video! Subscribe to my channel for more DIYs: http://you...
Old RV flooring is one renovation that adds a lot of value to the interior of your RV. An old camper may have a carpet that needs to be ripped up and replaced. Linoleum may have been used in the kitchen and bathroom which today may be worn and tattered. In addition, the pattern is probably antiquated as well.
Come see our whole RV renovation on a budget from start to finish, what we learned, all the tips I have to share on camper renovating, and the before and aft...
RV Remodel Ideas No.1 - Black and White are a Perfect Duo. Source. Black and white: the undisputed champions of color combinations. No matter what era you live in, black and white is a timeless classic that never fails to look good. As seen in the picture, the kitchen and the surrounding area look so much more chic.
Old, corroded, or outdated cabinet and drawer hardware and door knobs can really drag the look of a place down. Replacing door knobs, cabinet and drawer pulls, and hinges will make a surprising difference, and is one of those RV renovations ideas that is well worth the small time and money investment required. 7. Add colorful contact paper
In this video I will show you how to remodeled the interior of our 20 year old camper trailer on a a budget. check out this camper trailer makeover. SHOP MY ...
Century Travel Trailer Renovation Costs - There are several renovation cost examples including the Century camper. Before photos and after photos #2. 5th Wheel Interior Remodel. Julie over at Chickery's Travels did a makeover of the interior of their 5th wheel. It wasn't an extensive remodel however the results were pretty awesome.
The 18 Foot Forest River travel trailer used to cost $21,000, but now it's only $16,800. On the other hand, a 1957 Avion can be bought for $5,000, and when renovated, it can be priced for $20,000. Restoring a travel trailer to its former glory can range from $1,000 to $10,000. Many factors affect this number.
Jul 23, 2020 - The travel trailer remodel board features the coolest travel trailer remodel ideas. If you're thinking about doing a travel trailer renovation look no further for inspiration. Here you'll find inspiration for the perfect travel trailer remodel rv makeover. No matter what design theme you'll find amazing travel trailer remodeling ideas.
Published: April 2, 2017. The idea of renovating or remodeling a travel trailer is less frightening to me because generally a travel trailer is not as expensive as an RV / motorhome. Because I'm not mechanically minded, I have visions of renovating an RV and then finding that the engine has some huge (and expensive) part that needs replacing ...