How to enable Safari push notifications on iPhone or iPad
iOS 16.4 lets you optionally receive Safari push notifications, but the process isn't straightforward.
Back in 2022, Apple promised to introduce a long-overdue feature in 2023: Safari push notification support on newer versions of iOS 16 and iPadOS 16 . And the day has finally come.
If you have a recent iPhone , such as the iPhone 14 Pro Max , or an iPad running version 16.4 or later, you can follow the steps below to enable Safari push notifications for specific websites. By doing so, you will receive alerts similar to those of native iOS apps, helping you know when your favorite websites publish timely content.
- Launch the Settings app on your iPhone or iPad running iOS/iPadOS 16.4 or later.
- Scroll down and navigate to Safari.
- Click Advanced and then Experimental Features .
- You will find a Push API toggle at the bottom of the list. Make sure it's enabled.
- Now launch the Safari app and visit the website you'd like to receive push notifications from. Note that the website has to support push notifications for this feature to work. For demonstration purposes, we will be choosing Twitter.
- Tap on the Share button in the middle of the bottom bar
- Choose Add to Home Screen .
- Optionally rename the web app, then tap Add in the top right corner.
- It will now appear on your Home Screen as a native app. Launch the newly-added web app.
- Find the website's notifications settings and enable push notifications.
- iOS will ask for your permission to enable them.
Now, the web app will be able to notify you as long as you keep it on your Home Screen. If you delete it, then the permission is revoked automatically, and you won't be able to receive alerts from it until you add it again.
As you can see, the process to enable Safari push notifications on iOS and iPadOS is more complex when compared to macOS because you need to add the web app to the Home Screen for it to work. On new Macs , you can just allow or deny website permissions without needing to bookmark it in any way. Regardless, it can be done now on newer versions of iOS 16.
- PRO Courses Guides New Tech Help Pro Expert Videos About wikiHow Pro Upgrade Sign In
- EDIT Edit this Article
- EXPLORE Tech Help Pro About Us Random Article Quizzes Request a New Article Community Dashboard This Or That Game Popular Categories Arts and Entertainment Artwork Books Movies Computers and Electronics Computers Phone Skills Technology Hacks Health Men's Health Mental Health Women's Health Relationships Dating Love Relationship Issues Hobbies and Crafts Crafts Drawing Games Education & Communication Communication Skills Personal Development Studying Personal Care and Style Fashion Hair Care Personal Hygiene Youth Personal Care School Stuff Dating All Categories Arts and Entertainment Finance and Business Home and Garden Relationship Quizzes Cars & Other Vehicles Food and Entertaining Personal Care and Style Sports and Fitness Computers and Electronics Health Pets and Animals Travel Education & Communication Hobbies and Crafts Philosophy and Religion Work World Family Life Holidays and Traditions Relationships Youth
- Browse Articles
- Learn Something New
- Quizzes Hot
- This Or That Game New
- Train Your Brain
- Explore More
- Support wikiHow
- About wikiHow
- Log in / Sign up
- Computers and Electronics
- Smartphones

How to Enable Push Notifications on iOS
Last Updated: February 26, 2024 Tested
This article was written by Bryzz Tortello and by wikiHow staff writer, Nicole Levine, MFA . Bryzz Tortello is a Phone Repair Specialist and the Owner & CEO of Tortello Repair Services. With over ten years of experience, she specializes in iPhone and iPad ranging from screen and battery replacements to microsoldering and data recovery. Bryzz attended The College of the Canyons. The wikiHow Tech Team also followed the article's instructions and verified that they work. This article has been viewed 161,652 times.
Want to receive instant push notifications from apps on your iPhone or iPad? Turning on notifications is super easy, and you can even customize how they appear on the screen. This wikiHow article will teach you how to enable notifications for apps like Mail, Messages, and social media apps, as well as emergency notifications from your local authorities.
Enabling Push Notifications for Apps

- Select Always to allow all notifications to show previews.
- Select When unlocked to only show notification previews when your screen is unlocked. This is a good option if you don't want people to see your notifications on your locked phone screen.
- Select Never if you just want to see the name of the app that has a notification available without any identifying details.

- Check Lock Screen to see push notifications on the lock screen.
- Check Notification Center to see notifications when you pull down the Notification Center from the top of your iPhone's or iPad's screen.
- Check "Banners" to see pop-up notifications each time the app wants to notify you.
- Tap Banner Style to choose Persistent notifications (notifications that stay on the screen until you swipe them away or Temporary (notifications go away after displaying for a few seconds on the screen).

- You can choose custom notification sounds for many Apple apps, including FaceTime and Messages.

Enabling Government and Emergency Notifications

- Depending on your region, you may be able to enable or disable notifications that can alert you to emergencies, such as extreme weather and conditions or imminent threats to your safety. These notifications are enabled by default, but you can turn them on or off as needed. [4] X Research source
- Some regions do not allow you to disable government alerts.

Expert Q&A
- If you're not receiving notifications, make sure you haven't enabled a Focus Mode. Open the Control Center by swiping down from the top-right of the screen (or swiping up from the bottom), and then tap the moon icon to disable the current Focus Mode. Thanks Helpful 0 Not Helpful 0
- Some apps have additional push notification settings within the app itself. For example, there are many ways to customize your Twitter notification in the Twitter app that you won't be able to manage in your iPhone or iPad's Settings app. Thanks Helpful 0 Not Helpful 0
- Depending on your Focus Mode preferences, you may not receive notifications while you're in Sleep, Driving, or other Focus Modes. Thanks Helpful 0 Not Helpful 0

You Might Also Like

- ↑ https://support.apple.com/guide/iphone/change-notification-settings-iph7c3d96bab/ios
- ↑ https://support.apple.com/en-us/HT201925
- ↑ https://support.apple.com/en-us/102516
- ↑ https://www.ready.gov/alerts
About This Article

1. Open Settings . 2. Tap Notifications . 3. Tap an app. 4. Toggle on "Allow Notifications" for that app. Did this summary help you? Yes No
- Send fan mail to authors
Is this article up to date?

Featured Articles

Trending Articles

Watch Articles

- Terms of Use
- Privacy Policy
- Do Not Sell or Share My Info
- Not Selling Info
Keep up with tech in just 5 minutes a week!
- Become a Contributor
Enable Safari Push Notifications on iOS: Step-by-Step Guide
Last updated on aug 08, 2023.
Push notifications are the most efficient and fastest way for publishers to reach out to their readers. These notifications have been pretty straightforward to enable and access on the desktop and on Android smartphones. However, iOS didn’t offer this ability. Things have changed now and Apple has introduced Safari push notifications in iOS 16.4 .
So, why should you care you ask? A significant chunk of website visitors use an Apple iPhone, and can now be reached via push notifications. According to StatCounter, iPhones account for 28% market share globally, now that’s a healthy chunk of the audience you can reach out to. If you are a US-based news publisher, the metrics are completely different. In the US, iOS accounts for over a whopping 56% market share followed by Android at 42%. If iPhone users are a sizeable chunk of your audience, here is how you can help them receive push notifications on their smartphones.
Enabling Safari Push Notifications on iOS
If you want to reach out to your audience on iOS devices such as the iPhone and the iPad, you will need them to enable Push API in Safari settings and then add your website to their home screen. I’ll break this down into two steps.
Enable Push API on Safari
For readers to receive push notifications they need to enable the Push API toggle in Safari settings. This is a one-time step and isn’t required to be done for every website.
- Go to Settings and then scroll down to Safari .
- Click Advanced and then Experimental Features
- The reader has to switch on the Push API toggle.

- The reader must use the Safari browser on an Apple iPhone running iOS 16.4 or above.
- In Safari, get them to click the Share button and scroll down to the Add to home screen option.
- Users can then save the app to their home screen.
- Once the app is on their home screen they can now click it to access your website.
- They need to click subscribe, followed by accepting the default iOS prompt for notifications.
- All done, your subscriber can now receive notifications on their iPhone.
This is a complex process and will need you to handhold your reader through this process. For starters, you can add a banner on the website prompting iPhone users to enable push notifications. You can reach out to your repeat users using an iPhone first since they are more likely to be willing to go through this entire process. They are your loyal users after all.
Getting your readers to add your website to the home screen is a big win in itself and is likely to increase repeat visits to your website.
You can try a bottom banner for Safari on iOS like the one we see here. Check it out on GitHub

Aditya Shenoy
Lists by Topic
- Browser Push Notification (86)
- Publisher Strategies (49)
- iZooto Updates (43)
- App push notifications (7)
- Messenger Push Notifications (5)
- Android push notifications (3)
- iOS push notifications (3)
- wordpress plugins (2)
- Spotlight (1)
- audience engagement (1)
- audience growth (1)
- best seo plugins (1)
- best wordpress seo plugins (1)
- iZooto Updates (1)
- mobile ad network (1)
- seo plugins (1)
- startups, startup culture (1)
- wordpress (1)
Get More Stuff Like This In Your Inbox
Stay up-to-date on topics of your interest. Subscribe now to join 10,000+ marketers who receive high-quality articles every fortnight.

Join The List!
Subscribe to join our list of 10,000+ marketers and receive high-quality articles on topics of your interest in your inbox every fortnight
Related Posts
5 ways publishers can monetize newsletters.
Newsletters are owned channels that allow publishers to reach their au[...]
- Vaishnavi Ramkumar
- Apr 03, 2024
Diversify Revenue Streams: 5 Monetization Alternatives for Media Publishers
There are around nine different monetization options considered as the[...]
- Mar 27, 2024
What is Comscore? What is it Used for?
The primary focus of news publishers or advertisers today is to attrac[...]
- Punya Batra
- Mar 22, 2024

- Steller Subscription Experience
- Audience Engagement Guide
- Content Engagement
- Website Engagement Tools
- Web Push Notifications Guide
- Messenger Push Notifications Guide
- App Push Notifications Guide
- Push Notification Marketing
- Push Notifications Examples
- Best Time To Send Push Notifications
- Understanding Your Audeince
- Engaging Your Audience
- Push Notifications Advertising Guide
- Overcoming Monetization Challenges
- Checklist For Push Monetization
- Monetization Strategies
- Dynamic Paywall
- Best Paywall Solutions
- Exit-Intent Recommendations
- Show Latest
- Magic Notifications
- Segmentation
- Personalization
- RSS Automation
- Web Push Notifications
- Messenger Push Notifcations
- App Push Notifications
- Email Newsletter
- On-Site Interactions
- iZooto vs OneSignal
- iZooto vs Feedify
- iZooto vs Push Engage
- iZooto vs SendPulse
- iZooto vs Aimtell
- iZooto vs Pushnami
- iZooto vs Pushly
- Switch To iZooto
- Success Stories
- Testimonials

© 2023 Copyright iZooto. All rights reserved.
- Copyright Terms
- Privacy Policy

How to Turn on Push Notifications on iPhone 13: A Step-by-Step Guide
Turning on push notifications on your iPhone 13 is a breeze. Simply head over to your settings, find the Notifications option, and toggle the switch for the apps you want to receive notifications from. You’ll stay updated on all the important stuff without having to constantly check your phone.
Step by Step Tutorial to Turn On Push Notifications on iPhone 13
Gone are the days of constantly refreshing apps to see if there’s anything new. Push notifications are like little digital assistants that pop up to tell you what’s up. Let’s get those set up on your iPhone 13, shall we?
Step 1: Open Settings
Tap on the ‘Settings’ app on your iPhone 13.
The ‘Settings’ app is usually found on your home screen with a gear icon. It’s the control center for all the tweaks and changes you can make to your phone.
Step 2: Scroll to Notifications
Swipe up or down to navigate through the menu and find ‘Notifications’.
‘Notifications’ is where all the magic happens for alerts. This is where you can fine-tune which apps can disturb you and when.
Step 3: Choose an App
Select the app for which you want to turn on notifications.
Every app that you’ve installed and that supports push notifications will be listed here. Just tap on the one you’re interested in.
Step 4: Toggle Allow Notifications
Switch the ‘Allow Notifications’ toggle to ON.
When this toggle is green, it means that the app is allowed to send you push notifications. If it’s grey, you won’t receive any alerts from that app.
Once you’ve turned on push notifications for your selected apps, you’ll start receiving alerts as they happen. Whether it’s a message from a friend or a reminder about an upcoming event, you’ll be in the loop without having to open the app.
Tips for Managing Push Notifications on iPhone 13
- Tip 1: Prioritize your notifications by choosing the ‘Banner Style.’ You can select Temporary or Persistent depending on how long you want the notification to stay on your screen.
- Tip 2: If you’re someone who hates notification sounds, you can turn them off by toggling the ‘Sounds’ switch to off.
- Tip 3: Don’t want notifications popping up on your lock screen? No problem. Just adjust the ‘Show Previews’ option to ‘When Unlocked’ or ‘Never.’
- Tip 4: Use the ‘Notification Grouping’ feature to keep your notifications organized by app, which can prevent your notification center from becoming cluttered.
- Tip 5: If you find yourself overwhelmed by notifications, the ‘Scheduled Summary’ feature can group them together and deliver them at a more convenient time for you.
Frequently Asked Questions
Can i turn on push notifications for all apps at once.
No, you’ll need to enable notifications for each app individually.
How can I stop notifications from appearing when I’m using my iPhone 13?
You can activate ‘Do Not Disturb’ or ‘Focus’ mode to silence notifications when you’re busy.
What if I change my mind and want to turn off notifications for an app?
Just go back into the Notifications settings and toggle ‘Allow Notifications’ to off for that app.
Is there a way to see notifications I’ve dismissed by accident?
Yes, you can view all recent notifications by swiping down from the top of your screen to access the Notification Center.
What’s the difference between a ‘Temporary’ and ‘Persistent’ banner style?
A Temporary banner will disappear on its own, while a Persistent banner will stay on your screen until you interact with it.
- Open ‘Settings.’
- Scroll to ‘Notifications.’
- Choose an app.
- Toggle ‘Allow Notifications’ to ON.
Staying connected and informed has never been easier with push notifications on your iPhone 13. With a few simple steps, you can ensure that you never miss an important alert or message. Just remember to manage your notifications effectively to avoid getting overwhelmed. You now have the power to control which apps can send you notifications and how they appear, so take a moment to customize them to your liking. We live in a fast-paced world, and push notifications on iPhone 13 can help keep you a step ahead.

Matthew Burleigh has been writing tech tutorials since 2008. His writing has appeared on dozens of different websites and been read over 50 million times.
After receiving his Bachelor’s and Master’s degrees in Computer Science he spent several years working in IT management for small businesses. However, he now works full time writing content online and creating websites.
His main writing topics include iPhones, Microsoft Office, Google Apps, Android, and Photoshop, but he has also written about many other tech topics as well.
Read his full bio here.
Share this:
Join our free newsletter.
Featured guides and deals
You may opt out at any time. Read our Privacy Policy
Related posts:
- (5 Options) How to Turn Off AirPod Notifications on an iPhone
- How to Print a Banner in Word: A Step-by-Step Guide
- How to Make a Banner on Word 2019: Easy Steps for Beginners
- How to Turn on Instagram Notifications on iPhone 13
- 15 iPhone Settings You Might Want to Change
- How to Turn Off Flash Notification on iPhone (2024 Guide)
- What are Badges on iPhone?
- What is Banner Style on iPhone for Notifications?
- How to Show Missed Calls on the iPhone Lock Screen [2023 Guide]
- How to Make All Columns the Same Width in Excel 2013
- How to Turn Off iPhone Email Sounds in iOS 10
- iOS 17 – How to Stop Flash Notifications on iPhone
- How to Turn Off App Store Notifications on the iPhone 5
- What Does Hide Alerts Mean on iPhone 13?
- How to Get Rid of Push Notifications on the iPad: A Step-by-Step Guide
- How to Enable or Disable Missed Call Notifications on iPhone 14
- Why Is There a Moon Next to My Text Message on an iPhone? (or a Bell in Newer Versions of iOS)
- How to Turn Off Apple Watch Calendar Notifications
- How to Turn Off AirPod Notifications on iPhone 15: A Step-by-Step Guide
- How to Turn Off Email Notifications on the iPhone 5
How-To Geek
Safari on mac, iphone, and ipad will allow web notifications.
Apple will finally allow websites to send notifications on iPhone and iPad.
Apple's Safari web browser has lagged behind some features in recent years, especially with background services. After years of waiting, it seems like Safari will finally support web push notifications on all platforms.
Following today's WWDC event , Apple published a post on the WebKit Blog explaining what's new in the Safari 16 Beta. Perhaps the most surprising addition is Web Push support, which is already functional on the macOS Ventura beta release. The feature will allow web sites and web apps to send push notifications, even when they are not open.
"Web Push is coming to Safari 16 on macOS Ventura," Apple said in the blog post. "This lets you remotely send notifications to users of your websites and web apps --- and deliver those notifications even when Safari isn't running. It uses the same combination of web standards you may be familiar with from other browsers: Push API and Notifications API, along with Service Worker."
Similar to Firefox , Safari will only allow a website to show a prompt to enable notifications after you've interacted with the page --- for example, you won't see the popup message right after a page loads, but you might see one after you click a link or button. That won't stop the pages from showing buttons in the page for enabling notifications, but it will prevent Safari itself from spamming you.
Safari on macOS has technically supported push notifications since Mac OS X 10.9, but Safari's notifications worked differently than push notifications other browsers --- sites had to register for a paid Apple developer license, and the technology for sending alerts wasn't similar at all. This new implementation uses the same push standard that every other browser uses, and sites don't have to pay for Apple developer accounts to provide visitors with notifications.
Importantly, Apple says Web Push will arrive on the iPhone and iPad sometime in 2023. That's a massive win for web apps on mobile Apple devices --- you could always use alternative browsers on Mac if you needed push notifications, but Apple doesn't allow third-party browser engines on iPhone and iPad. Web Push will make Progressive Web Apps better than ever on iPhone and iPad, as long as Apple doesn't introduce any strange limitations or missing features.
Source: WebKit Blog
- Using array.splice
How to send PWA Push Notifications in Safari IOS 16
Keep an eye out for web push on ios and ipados in 2023..
After long delays IOS 16 is finally adding push notifications for PWA's. But how do you actually implement it and make it work with JavaScript?
Starting September 2022 you can add native Push Notifications to your PWA. Until then...
First...you need to turn on Push API in experimental mode on your IOS 15
The Push Notification API is already available in IOS 15, but only in "experimental mode".
While Push API already exists by default it is turned off. So you need to turn it under Settings.
How to enable Push API While waiting for IOS 16 you can turn on Push API on your iPhone by going to Settings , typing Safari in search, click on Safari , scroll all the way down and go to Advanced and tap on Experimental Features . Now scroll down to where it says "Push API", and enable it by tapping on green switch button to turn it on.
Some preliminary setup is required. Here's step-by-step JavaScript tutorial.
Step 1: How To Create and Register a Service Worker (serviceworker.js)
First, create your service worker JavaScript file and place it in root directory of your PWA. I named my service worker serviceworker.js but the name can be anything.
Then, we will need to register this JavaScript file as your service worker.
The serviceWorker object and its method register() reside on the built-in navigator object.
In the next example, let's use JavaScript to check if a service worker is already registered. If not this code will register a service worker . Additionally, you might want to run this code from your DOMContentLoaded event.
More coming soon...
Why was this tutorial written?
When team here at Ghost Messenger heard of this news we got excited and decided to implement it on our PWA. In this tutorial we will explain how we got it to work in our app and hopefully others can follow in our footsteps to install Push API in their own PWA.
The rest of this article is coming soon.
HTML comments above are special tags, they will be replaced with H1 title and your author info. If you don't want to include that in your article delete or modify comment.
Place additional scripts or CSS above tag.
You can create bold text and lists as follows:
Example of an UL list
Example of an OL list
You can create source code tags by wrapping text in back-tick quotes.
You don't have to use p tags to create paragraphs, but you still can.
It's recommended to keep author tag so that readers who come from search engine traffic can also discover your social network links and bio.
Note: You can use regular HTML in this article but be careful not to break anything.
Comments (2) New! (You can now post comments on articles!)
Join 25,000+ Business Owners and Grow Your Business Faster with Push Notifications
See All Features
Documentation, Reference Materials, and Tutorials for PushEngage
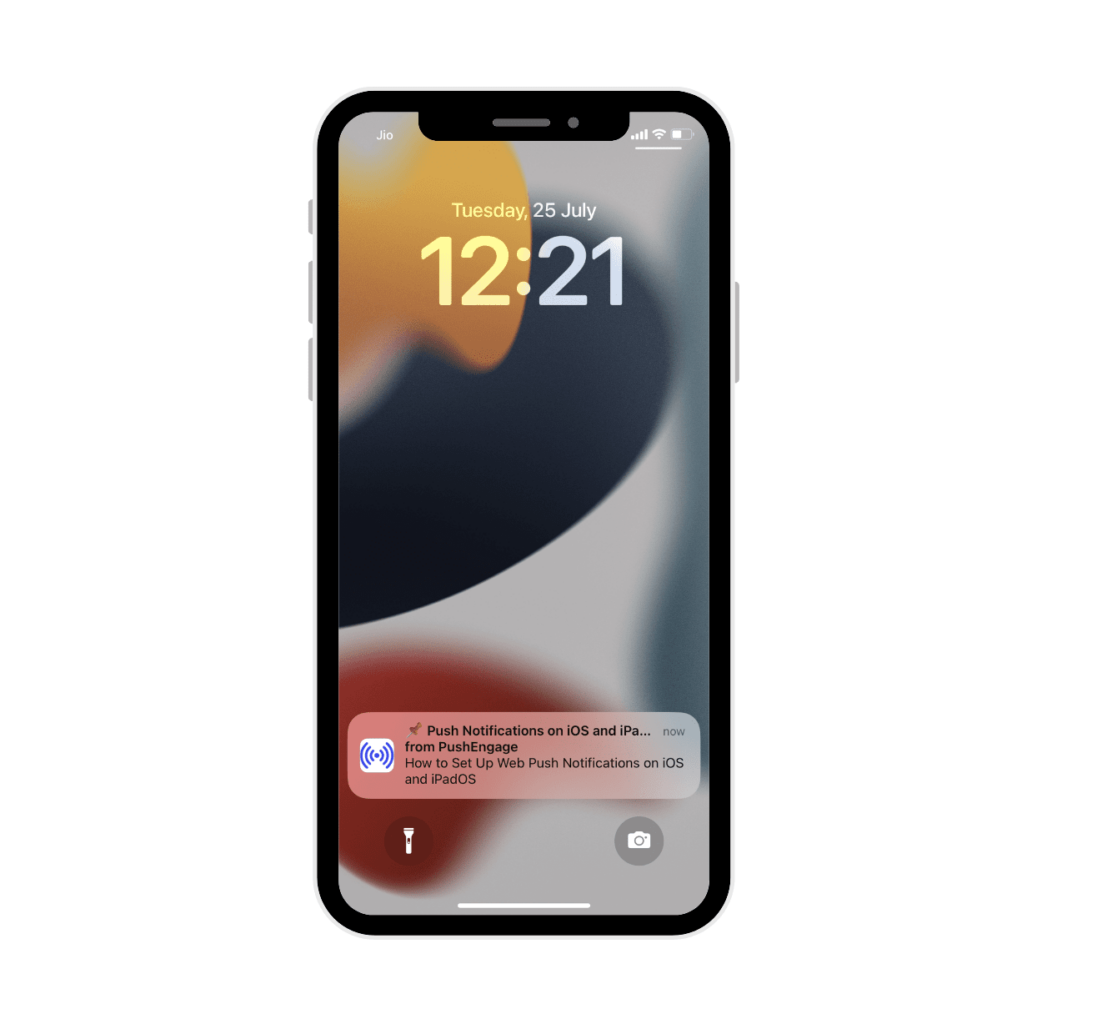
Setting Up Web Push Notifications on iOS and iPadOS
Notice: There is no legacy documentation available for this item, so you are seeing the current documentation.
Apple has released iOS and iPadOS 16.4, which supports web push notifications for web apps added to the Home Screen on iPhone and iPad devices. In this guide, we help you set up your website to send notifications to iPhone and iPad users visiting your website.
Web Push Notifications are available for Safari browser, Google Chrome, and Edge on iPhone and iPad with iOS and iPadOS 16.4. iOS requires the user to add your website to their Home Screen and then open the Web App by tapping its icon. The web app opens like any other native app on iOS or iPadOS instead of opening in a browser. Users can grant permission to receive push notifications and then manage those permissions in Notifications Settings just like any other app on iPhone and iPad.
Before You Start
You require a few things to have the web push campaigns running on iOS devices.
- Your web app must serve a Web Application Manifest file (manifest.json) with its display member set to standalone or fullscreen.
- The users must be on iOS or iPadOS 16.4 or later.
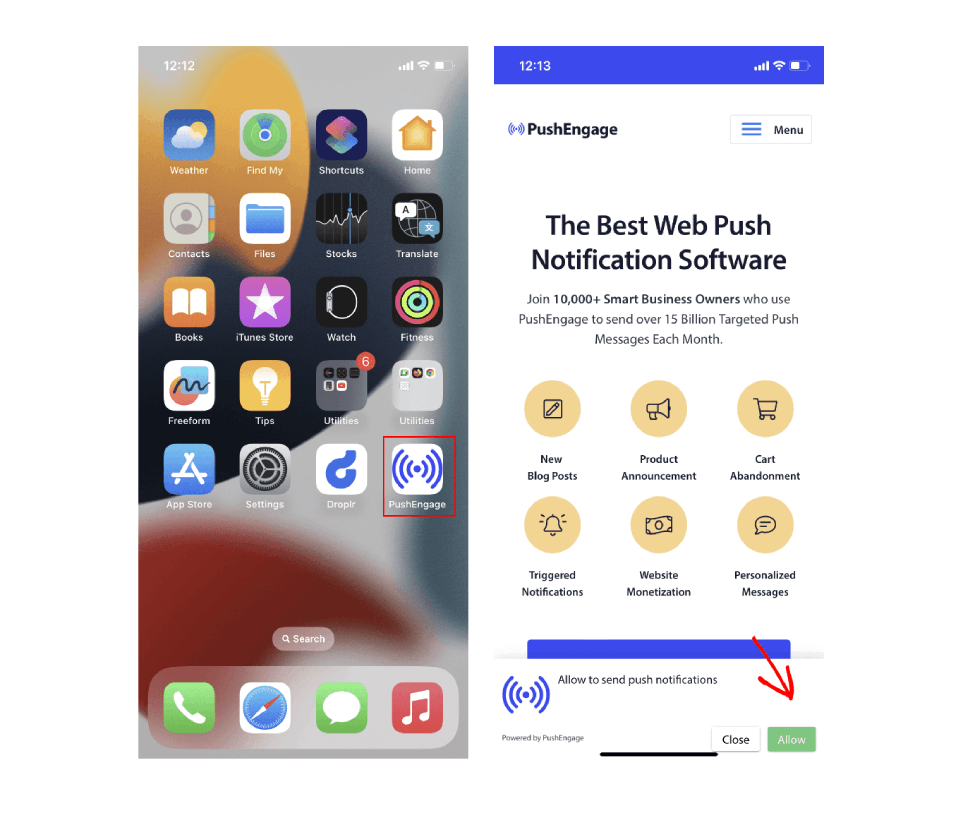
- The user needs to install the web app to their Home Screen by tapping the Share button to open the Share menu, and then tapping “Add to Home Screen”.
- A user gesture, such as a click or tap on a button is required to show the native permission prompt and allow the permission to receive push notification.
If your website is already a Progressive Web App (PWA), you do not need to make additional updates to prepare for iOS/iPadOS Web Push. If unsure whether your website is a PWA, check with your development team or use Lighthouse in Chrome DevTools .
Setting up your Website for iOS and iPadOS Web Push Notification
Follow the steps to enable and send push notifications to Safari on iPhone and iPad:
- 1. Add a Web App Manifest file to your website.
- 2. Integrate PushEngage on your website.
- 3. Deploy and test your website manifest.
- 4. Test Subscription Dialog Box modal and permission prompt.
1. Add a Web App Manifest file to Your Website
The web app manifest is a JSON file that tells the browser about your Progressive Web App (PWA) and how it should look and behave when installed on the user’s desktop or mobile device. It contains metadata such as your web app’s name, description, icons, color scheme and the URL that should be opened when the app is launched.
You can use any online tool to generate a manifest file quickly. The manifest file can have any name but is commonly named manifest.json and should be uploaded to the root directory of your website. If you need help adding code to your WordPress site, try the WPCode plugin.
A typical manifest looks something like this:
Note: The value of display member in the manifest must be set to either standalone or fullscreen .
After creating the manifest file, reference the manifest in the HTML page of your website using a <link> tag in the <head> section of the page.
For Example:
2. Integrate PushEngage on Your Website
The next step is to integrate PushEngage on your website to handle registering and installing Service Worker on the page.
If you have not completed the installation, here is the guide to installing PushEngage. If you are a WordPress user, you can use PushEngage WordPress Plugin , which will handle the service worker registration.
You can follow the steps mentioned here if you already have your service worker and need to merge it with PushEngage’s service worker .
3. Deploy and Test Your Website Manifest
Once you have uploaded the manifest and integrated the PushEngage, the next step is to test your web app to ensure that your web app manifest was implemented correctly. You can test your website on various devices and browsers by adding it to your home screen.
Follow these steps:
- 1. Open the website in Safari browser running on iOS 16.4 or later
- 2. Click on the “Share” button to open the share menu.
- 3. Click on the “Add to Home Screen” option.
- 4. Save the app on your Home Screen.

If your website has been successfully configured for web push, it will open the web app like any other app on iOS or iPadOS instead of opening in a browser and acting merely as a shortcut.
You should inform your user by showing a banner on the app screen, prompting the user to add your app to the home screen of their iOS device and subscribe to the web push notifications.
4. Test Subscription Dialog Box
A Home Screen web app on iOS and iPadOS requires direct user interaction, such as tapping on a button on the page to display the Subscription Dialog Box for permission. Follow these steps to test that the permission prompt is working:
- 1. Open the web app by tapping the app icon from the home screen on your device.
- 2. Wait for the PushEngage Subscription Dialog Box to appear on the page.
- 3. Click the “Allow” button on the PushEngage Popup modal to display the permission prompt.
- 4. Click the “Allow” button on the permission prompt.
Note : The Subscription dialog box will only appear if your website is HTTPS and the app has been launched from the home screen. You can customize the design and behavior of the Subscription Dialog Box from the PushEngage dashboard.
Send Web Push Campaign to iOS and iPadOS users
Once you have completed the above steps required for iOS and iPadOS web push notifications, you can now begin sending a push notification using the PushEngage dashboard .
Web Push Notifications on iOS works similar to other native apps. Web Push notifications are displayed on the screen as a heads-up notification, in the notification center and also on the lock screen. Users can also manage their notification preferences from iOS Settings. Once you click on the notification, it will take you to the desired landing page within the web app.
The Structure of an iOS Web Push Notification
iOS Safari push notifications do not currently support rich media, animated GIFs or videos. Once these features are added, we will enable them as well. Please follow the guidelines below to craft your notifications for iOS users.

Web push notifications on iOS and iPadOS include the following elements:
- 1. Icon – The icon specified in the manifest file. It can’t be changed for individual messages.
- 2. Title – The title is restricted to 30-40 characters, after which it gets truncated.
- 3. App Name – The app name is given in the manifest file and cannot be changed for individual messages.
- 4. Message – The text is restricted to 120-150 characters, after which it gets truncated.
- 5. Timestamp – This shows how long ago the notification was delivered to the device.
This is all you need to start collecting subscribers and sending campaigns to your iPhone & iPad users.
If you run into any issues, please contact us by clicking here. Our support team will be able to help you.
Engage and Retain Visitors AfterThey’ve Left Your Website
Increase the value of every web visit with Push Notifications that are hard to miss.
- Forever Free Plan
- 5 Star Support
Over 100 billion notifications sent
100% Secure and GDPR Compliant
Trusted by customers in 150+ countries
How to Enable and Disable Web Push Notifications in Apple Safari
Pablo Diaz Gutierrez March 5, 2022 Comments Off on How to Enable and Disable Web Push Notifications in Apple Safari
Web push notifications are a way for Priority Matrix to alert you about important events (due dates, reminders, assigned tasks…) even if you’re not currently using the app.
If you have configured web push notifications , as long as your Safari browser is open, we will be able to notify you. In this document, we will show you how to control web push notifications for Priority Matrix in Safari. The one exception is when you’re browsing in incognito mode , in which case you will not receive notifications.
How to enable and disable push notifications in Safari
The easiest way to control web push notifications for a website is to first go to that website, and then open the settings popup directly with your browser. Specifically for Priority Matrix, follow these steps:
- Open Priority Matrix on Safari
- Go to Safari in the top menu
- Select Preferences
- Go to Websites > Notifications
- You will find the websites listed out. Find Priority Matrix (listed as sync.appfluence.com or prioritymatrix.com ) and select “Enable”.

Conversely, if you want to disable web push notifications, just make sure that the notifications selector is set to “ Deny”.
Push notifications in other browsers and platforms
If you’re using a browser other than Safari, we have your back. Here are instructions to control web push notifications in different platforms:
- Web push notifications in Firefox
- Web push notifications in Google Chrome
- Web push notifications in Microsoft Edge
- Early Access to Priority Matrix Versions with TestFlight
- How to Enable and Disable Web Push Notifications in Microsoft Edge
- How to Enable and Disable Web Push Notifications in Firefox
- How to Enable and Disable Web Push Notifications in Chrome
- How to pin Priority Matrix for all Microsoft Teams users
iOS 16.4 adds Web App Push Notifications: here’s how you can use and manage them
Set up and manage push notifications for web apps with this simple guide!
Progressive Web Apps (or PWAs) provide a quick and unique way to access websites and their services without installing a dedicated application. Now, this means they come without occupying a large chunk of storage on your phone and are an easy solution to quickly visit your favorite sites that don't have an app.
Despite iOS letting users create and use web apps for a long time, they have some limitations. And one popular missing feature was support for Push Notifications. But users running iOS 16.4 (and iPadOS 16.4) can now enable these for PWAs, and here we will look into how to set up and manage such notifications.
How to set up and manage Push Notifications for Progressive Web Apps on iOS
When it comes to receiving alerts from Progressive Web Apps, the setup procedure can range from being as simple as a single tap or involve more steps.
For this guide, we are using the web app for Twitter, which has a few steps to enable push notifications.
Once you've created the Twitter Web App and logged into your account, head into its Settings and Support section and follow the steps listed below:
- Choose the Notifications options.
- On the next screen, tap on Preferences.
- Then choose Push notifications and enable the feature.
- After enabling the feature within the web app, head into Settings on your iPhone and tap on the Notifications submenu.
- If you already had the Twitter app on your phone – as I did – you will now see another option for Twitter.
- Tapping on this option will allow you to manage notifications exactly how you would for any application installed from the App Store.
Deleting the PWA from your phone will also remove the configured settings.
Progressive Web Apps are now more useful on iPhone and iPad
Notifications for PWAs were a feature Apple announced last year at WWDC 2022, alongside a release date set for sometime in 2023. With iOS 16.4, Apple has finally delivered its promise, making web apps more useful and user-friendly. You may find this feature extremely convenient if you use communication apps like WhatsApp, which has a PWA but no dedicated application on iPad.
This website uses cookies. Learn more
Safari Notifications: Enhancing User Engagement on iPhone and Mac
X2 Private Limited

Understanding Safari Push Notifications
Implementing safari notifications on iphone, implementing safari notifications on mac, troubleshooting safari notifications.

Introduction
In today's digital world, user engagement is crucial for the success of any website or application. One effective way to engage users is through push notifications. With Safari Notifications , website owners can send notifications directly to their users' devices, even when Safari is not running. In this article, we will explore the features and benefits of Safari Notifications, how to implement them on both iPhone and Mac and troubleshoot common issues that may arise.
Safari Push Notifications function similarly to push notifications for mobile apps. They allow website owners to send notifications to users' devices, keeping them informed and engaged. When a Safari Push Notification is received, it displays the website's icon and notification text, which users can click to navigate directly to the website.
Benefits of Safari Push Notifications
Safari Push Notifications offer several benefits for website owners and users alike. By implementing Safari Notifications, website owners can:
1. Increase user engagement : Push notifications allow website owners to reach users even when they are not actively browsing the website, increasing the chances of user engagement and interaction.
2. Drive traffic to the website : With a single click on the notification, users can be directed straight to the website, promoting traffic and potentially boosting conversions.
3. Enhance user experience : By providing timely and relevant information, Safari Notifications can enhance the overall user experience and inform users about important updates or promotions.
4. Stay ahead of the competition : Safari Notifications provide a competitive edge by allowing website owners to leverage the power of push notifications, similar to popular mobile apps.
How Safari Push Notifications Work
To enable Safari Push Notifications, website owners must use the Apple Push Notifications Service (APNS) . This service is the intermediary between the website and the user's device. When a website sends a push notification, the APNS delivers it to the user's device, displaying it as a Safari Notification.
Implementing Safari Notifications on iPhone requires following steps to ensure proper setup and configuration. Here's a step-by-step guide:
Step 1: Enroll in the Apple Developer Program
Before implementing Safari Notifications on iPhone, you must enroll in the Apple Developer Program. This program provides the necessary resources and tools to develop and distribute your app or website.
Step 2: Generate Certificates and Identifiers
To enable Safari Notifications, you need to generate certificates and identifiers. These certificates and identifiers link your website to the APNS and ensure secure and reliable communication between your website and users' devices.
Step 3: Configure Your Website for Safari Notifications
Once you have the required certificates and identifiers, it's time to configure your website for Safari Notifications. This involves adding specific code snippets to your website's HTML and JavaScript files.
Step 4: Request User Permission
Before sending any push notifications, you need to obtain user permission. User permission is crucial for maintaining a positive user experience and complying with privacy regulations. Apple provides a built-in prompt that you can use to request user permission.
Step 5: Send Safari Notifications
With the necessary setup and user permission, you can now send Safari Notifications to your users. Safari Notifications can be triggered based on specific events or user actions, such as new content updates or personalized messages.
Step 6: Analyze and Refine
After implementing Safari Notifications, analyzing their performance and user engagement is essential. Analyzing click-through rates and user feedback metrics can help refine and improve your notification strategy.
Implementing Safari Notifications on Mac follows a similar process to the iPhone. However, there are a few platform-specific considerations to keep in mind. Here's a breakdown of the steps involved in implementing Safari Notifications on Mac:
As with the iPhone, enrolling in the Apple Developer Program is the first step in implementing Safari Notifications on Mac. Ensure you have the necessary membership to access the required resources and tools.
Generating certificates and identifiers is also necessary for Safari Notifications on Mac. The process is similar to the iPhone, where you link your website to the APNS using the appropriate certificates and identifiers.
Configuring your website for Safari Notifications on Mac involves adding the necessary code snippets to your website's HTML and JavaScript files. However, there may be slight differences in the code implementation compared to the iPhone.
Requesting user permission on a Mac is similar to the iPhone. You must prompt users to grant permission to receive push notifications from your website. This ensures a positive user experience and compliance with privacy regulations.
Once user permission is obtained, you can send Safari Notifications on Mac. Like on iPhone, you can trigger notifications based on specific events or user actions.
Analyzing the performance of Safari Notifications on Mac is crucial for optimizing user engagement. Monitor metrics such as click-through rates and user feedback to refine your notification strategy and improve the overall experience.
While implementing Safari Notifications, you may encounter some common issues. Here are a few troubleshooting tips to help you overcome these obstacles:
5. Ensure proper certificate and identifier configuration : Double-check that you have generated and configured the necessary certificates and identifiers for iPhone and Mac.
6. Verify code implementation : Review your website's HTML and JavaScript files to ensure the code snippets for Safari Notifications are correctly implemented.
7. Check user permission settings : Confirm that you have correctly requested user permission and that it is enabled in the user's device settings.
8. Monitor APNS status : Stay updated on the status of the Apple Push Notifications Service to ensure that it is functioning correctly and not causing any issues.
Safari Notifications offer a powerful way to engage users on both iPhone and Mac devices. By implementing Safari Notifications, website owners can enhance user engagement, drive website traffic , and provide a seamless user experience. With the step-by-step guides in this article, you can successfully implement Safari Notifications and leverage your website's full potential for push notifications. Stay ahead of the competition and keep your users informed and engaged with Safari Notifications.
For more information and detailed documentation, refer to the official resources provided by Apple Developer:
- Notification Programming Guide for Websites link
- Local and Push Notification Programming Guide link
- Troubleshooting Push Notifications link
Remember, successfully implementing Safari Notifications requires careful attention to detail and continuous analysis to refine your notification strategy. Start engaging your users today with Safari Notifications on iPhone and Mac!
Additional Information:
- It is essential to consider the privacy and user experience aspects when implementing Safari Notifications. Respect user preferences and ensure that notifications are relevant and non-intrusive.
- Safari Notifications can be integrated with Firebase Cloud Messaging (FCM) further to enhance your notifications' delivery and targeting capabilities. Explore the possibilities of combining Safari Notifications with Firebase for a comprehensive push notification strategy.
#pushnotifications
#Clickthroughrate
#userengagement
#safari notifications
#ApplePushNotification
#SafariPushNotifications
Truepush is a web push notification tool that allows website owners and marketers to send real-time push notifications to their website visitors
You may also want to read

The Impact of iOS 17.3.1 Update on iPhone Users: Truepush
Knowledge Base
Beyond the Glass Ceiling: Empowering Tales of Technology Pioneering in STEM Fields
Beyond Traditional Advertising: Modern Approaches to Boost Business Visibility
View in English
Safari Push Notifications
Use the Apple Push Notifications Service to send notifications to your website users, right on their Mac desktop — even when Safari isn’t running. Safari Push Notifications work just like push notifications for apps. They display your website icon and notification text, which users can click to go right to your website.

Reference and Videos
- Notification Programming Guide for Websites
- Local and Push Notification Programming Guide
- Troubleshooting Push Notifications
Related Resources
- Certificates, Identifiers & Profiles
- Certificates FAQs
Post questions and discuss Safari Push Notifications with other developers and Apple engineers.
New Safari features will make iPhone web apps feel more like native apps
Apple’s Safari browser in iOS and iPadOS 16.4 is gaining support for features like web push notifications, making iPhone web apps work more like native apps.
The browser now supports new technologies like web push notifications to improve the experience of using Progressive Web Apps (aka web apps) on the iPhone.
Apple also has relaxed some of the restrictions related to third-party browsers, which are now permitted to add web apps to the Home Screen.
Safari is adopting several new web features
- Safari will support push notifications from web apps such as Google Maps, Uber and Instagram. Once approved, web notifications will show up in the Notification Center and on the Lock Screen, just like notifications from native apps.
- Third-party web browsers like Google Chrome can now add web apps to the Home Screen. Before iOS 16.4, only Safari could do that.
- Extension syncing will ensure you use the same Safari extensions on your iPhone, iPad and Mac, making the user experience more consistent.
Web push notifications
Web apps won’t be permitted to send you notifications without permission. Web notifications will only work for web apps you’ve added to your Home Screen. Furthermore, web developers must explicitly enable support for this feature.
Additionally, you’ll need to turn on notifications in the web app’s settings and respond positively to a prompt asking whether you’d like to allow notifications.
Brady Eidson and Jen Simmons, WebKit blog :
A web app that has been added to the Home Screen can request permission to receive push notifications as long as that request is in response to direct user interaction—such as tapping on a Subscribe button provided by the web app. iOS or iPadOS will prompt the user to give the web app permission to send notifications.
From that moment, notifications from said web app will appear in the Notification Center, Daily Summaries, on the Lock Screen and your paired Apple Watch alongside notifications from native apps (this is already supported on macOS).
Web apps will display the number of unread notifications on icon badge, just like native apps. You’ll be able to manage web notifications and how they appear in your notification settings, just like you would notifications for native apps.
You will also be able to filter web notifications using Focus modes.
Adding web apps to the Home Screen
With iOS 16.4, you can add a web app to the Home Screen using a third-party browser like Chrome. Before iOS 16.4, only Safari could add a web app to the Home Screen. You’ll choose Add to Home Screen from the share sheet, which will bring up an interface to add a web app to your Home Screen.
Saving a web app to the Home Screen ensures it launches in fullscreen, with no browser interface visible. Another significant change: Such web apps will launch in the third-party browser that added them to the Home Screen.
Previously, these things opened exclusively in Safari.
Developers can even provide an iOS-sized icon for their web app to appear on the Home Screen. Yet another exciting change: you can add multiple instances of the same app to the Home Screen.
iPhone web apps are about to become much more powerful
Summing up, Safari in iOS 16.4 and iPadOS 16.4 has adopted several web technologies, including the Push API, Notifications API, Badging API, WebCodecs API, Screen Wake Lock API, Import Maps, Media Queries, Service Workers, additional codecs for video processing (AV1), device orientation APIs and more.
The move will make web apps on the iPhone behave much more like their native counterparts. Web apps will be able to automatically adapt their interface between portrait and landscape modes, prevent your device from going to sleep when using a web app, and more. All told, there are 135 new features for Safari in iOS 16.4.
Useful Safari tutorials
- How to fix Safari tabs disappearing on iPad and iPhone
- How to show the full URL in the Safari address bar
- How to pin tabs in Safari on iPhone, iPad and Mac
- How to download videos from Safari on iPhone
- How to customize Safari on iPhone and iPad
- Tech Gift Ideas for Mom
- Hot Tech Deals at Target Right Now
How to Manage Website Push Notifications in Safari for OS X
Control which notifications you receive from websites
:max_bytes(150000):strip_icc():format(webp)/ScottOrgera-f7aca23cc84a4ea9a3f9e2ebd93bd690.jpg "enable push notifications safari iphone")
What to Know
- In the Safari menu, select Preferences > Websites . Choose Notifications in the left pane.
- Use the menu next to any website that has requested permission to send notifications to allow or deny the request.
- Clear the box next to Allow websites to ask for permission to send push notifications to prevent sites from asking permission.
This article explains how to manage website push notifications in Safari for OS X. It includes information on viewing notification-related settings in the Notification Center . This information applies to Safari 9.x and above on Mac OS X.
Change the Safari Permissions
A website must ask your permission before it can push notifications to your desktop, usually as a pop-up question when you visit the site. While useful, these notifications can prove unwieldy and intrusive.
Here's how to deny or allow permissions for push notifications:
Go to the Safari menu and select Preferences .
Select Websites .
Click Notifications in the left menu pane.
The right side of the window contains a list of the sites that asked for permission to send you notifications. Use the menu to the right to either allow or deny those requests.
The Allow websites to ask for permission to send push notifications option is enabled by default. This option allows websites to ask you if you want notifications, usually when you first visit their site. To disable this option and prevent sites from asking permission to show alerts, clear the check box.
To reset a site's permissions, select it and click Remove . The next time you visit the URL, it asks for permission again, assuming you left the previous option active.
Change Notification Settings
To view more notification-related settings in the Notification Center:
Open System Preferences either by clicking its icon in the Dock or selecting it from the Finder's Apple menu.
Click Notifications .
Select Safari from the list of applications in the left menu pane.
Notification preferences specific to the browser appear on the right side of the window. To turn off all notifications, turn off the Allow Notifications from Safari toggle switch.
The Safari alert style section contains three options, each accompanied by an image.
- None : Disables Safari alerts from displaying on the desktop while keeping notifications active in the Notification Center.
- Banners : Informs you when a new push notification is available.
- Alerts : Notifies you and includes relevant buttons. Alerts stay on the screen until you dismiss them.
Below this section are five more settings, each accompanied by a check box and enabled by default. These settings are as follows:
- Show notifications on lock screen : When enabled, push notifications generated by your allowed websites display when your Mac is locked.
- Show notification preview : Specify whether macOS shows previews (which contain more detail about the alert) always or only when the computer is unlocked.
- Show in Notification Center : Leave this option on to see alerts you might have missed by opening the Notification Center in the upper-right corner of the Finder.
- Badge app icon : When enabled, the number of Safari alerts to be viewed displays in a red circle overlaying the browser's icon on the Dock.
- Play sound for notifications : When enabled, an audio alert plays each time you receive a notification.
Get the Latest Tech News Delivered Every Day
- How to Manage Push Notifications in Your Web Browser
- How to Turn Off Notifications on a Mac
- How to Manage Edge Notifications
- How to Manage Tabbed Browsing in Safari for macOS
- Manage Smart Search in Safari for Mac
- Allow or Deny Access to Your Physical Location Settings
- How to Turn off Notifications on Chrome in Windows 10
- How to Pin Sites in Safari and Mac OS
- Select a New Mail Notification Style in Mac OS X Mail
- Set up Your Mac to Integrate With Facebook
- How to Manage Plug-Ins in the Safari Web Browser
- How to Manage Notifications on the iPhone
- How to Save Web Pages in Safari for OS X
- How to Enable Cookies in Your Browser
- Speed Up Safari With These Tuneup Tips
- How to Manage Your Browsing History in Safari

Push Notifications Across Various Devices on iOS and Android
Push notifications have become one of the most effective ways for content publishers and website owners to engage their audiences and bolster their income. The best part is that push alerts are effective across all devices and operating systems, plus they are also suitable for almost all industries.
With that in mind, there are many ways these alerts can be delivered, not to mention the fact that the device being used also impacts how users react to them. Understanding these nuances will help you leverage push notification strategies for iOS, Android, and desktop devices.
This article will discuss everything you need to know about push notifications. We will cover the similarities between web push notifications , mobile web push notifications, and in-app push alerts.
iOS Push Notifications: Iphone, iPad
Ipads and iphones – mobile push notifications, opt-in request and user’s consent: how to enable push notifications on iphone, message customization, purpose of push notifications, delivery to wearable devices.
iPads and iPhones – Web Browser Notifications
Opt-In Request and User’s Consent
Web notification across multiple devices, android app push notifications, android browser push notifications, macos push notifications, safari notifications for macos, macos push notifications for chrome and other browsers.
First, let’s review the nuances of push notification iOS campaigns, starting with some big news.
Apple recently gave Safari the ability to send push notifications on the latest iOS and iPadOS releases. It will work like this:
- Users can add Safari websites to their home screen
- From there, the website can prompt users and request iPhone push notifications access
- Once granted, websites can send web push notifications through Safari
There is no doubt that Apple devices have always been more challenging for push notification users, mostly due to the brand’s policy on notifications .
However, this update shows a change toward accepting push notifications and transforming them into an integral part of the user experience.
As you probably know already, push notifications look like system alerts. However, there are some differences in the way they’re presented, what they contain, and how they behave based on the device.

How to reduce customer churn with push?
Mobile push notifications, which are sent directly to the user’s device, come from apps installed on smartphones and similar devices. These send the users to the same app, so they get redirected to the application where the notification is originating from or to the user’s preferred web browser.
Let’s take a look at these alerts in the context of an iPad and iPhone Apple push notification service.
Like all other devices, Apple push notifications require prior consent before being delivered. This means that you need to display an opt-in request and get acceptance from each person before they start seeing your alerts.
If you’re wondering how Apple push notifications work, the answer is: similar to other push platforms. If you use an iPhone or iPad, you’ll be able to customize your messages and include emojis as well as images.

Top Notix features to apply in your push strategy
Push notifications on iOS devices can be used to:
- Re-engage users through reminders, updates, and promotional content
- Bolster usage metrics in your app or website, like time spent on page
- Monetize the traffic you’re already generating
It’s important to note that Apple Watches support two types of push notifications, which are those forwarded from mobile devices and those that come from independent apps.
When the screen is off, or the device is resting, alerts sent through iOS and iPadOS are forwarded to the Apple Watch.
iPads and iPhones – Web Browser Notifications
Publishers and content creators have been waiting for Apple to enable browser iOS push notifications — and the wait is finally over. Now, you have the ability to send push notifications through iOS that originate from Apple’s own Safari browser.
The biggest thing to remember here is that you need to add Safari websites to your home screen before they’re allowed to send you push notifications.
So, in order for your site to have this ability, you need to ask users to add you to their home screen or even automate the process and simply ask for permissions.
With that in mind, let’s review a few other variables you should consider about Apple push notifications.
Browser push notifications on iOS also require the user’s consent before you’re able to send them out. So, once your page is added to the user’s home screen, you need to display an opt-in alert. Once this is approved, the user will start receiving your notifications.

What if users don’t subscribe to your notifications?
The push notification sent to the user in this example is the exact same one they receive with any other type of system alert. Here are the available customizations:
- Description
- JPG or PNG image
Whether it’s on iPad or iPhone, you can send push notifications through both the apps and through the mobile browser once you get the user to subscribe.
Here, it’s important to note that the only difference between the two is where the message originates. In-app notifications can come from games, utility apps, and similar platforms.
Mobile browser notifications also come directly from an app but in this case it’s always a web browser, so these always originate from Chrome, Firefox, or another tool designed to explore the Internet.

The reception of the alerts in multiple devices depends on the device. For example, if you subscribe to web notifications on your MacBook’s Safari, you won’t receive them on your iPad unless you subscribe to them separately.
Depending on the context and timing, iOS web notifications may be used to:
- Deliver new content
- Re-engage inactive users
- Personalize the messages being delivered
- Reduce churn on your platform or service
It’s important to understand that the delivery of push notifications to wearable devices depends on device support.
Generally, iOS web push notifications support forwarding to Apple smartwatches. Likewise, it’s possible to forward push notifications from iOS browsers to Android watches by bridging the alerts on WearOS (Android’s wearables software).
Android push notifications are an exceptional tool to connect with users utilizing devices based on this operating system.
These appear as system notifications, which makes them a powerful resource in terms of user engagement.
Let’s take a closer look at the details of Android OS push notifications.
While previous versions had different default settings, all devices that feature Android 13 and newer operating systems require users to subscribe before receiving push notifications.
With the above in mind, the opt-in request should be standard, follow current best practices, and include information about the type of content that will be sent to the user.
As with Chrome push notifications and other notifications, you can customize several fields in your Android pushes. This includes:

How to choose a push provider?
The device through which push notifications are delivered affects how users reach when they receive these messages.
Additionally, note that you can’t use the permission collected on Android to send notifications across different gadgets. So, you need to obtain permission to send to each individual device.
As with any push browser notification, Android notifications are extremely dynamic because they allow you to:
- Reduce user churn
- Elevate engagement and re-engagement metrics
- Generate additional revenue from your traffic
Content creators and campaign managers can set up Android notifications to be forwarded to WearOS devices, and the setup process for this is already streamlined.

What’s the difference between web and in-app push?
While Android browsers are also applications, there are a few key differences between push notifications delivered through platforms like Chrome and conventional applications.
Let’s take a closer look.
As with other applications, browsers have to request permission through an opt-in in order to send notifications to users.
The main difference is that this message comes from individual websites and displayed through the browser, rather than originating directly from the app.
The message customization options are the same for Android apps and browsers. To find out specifics, it’s best to review your provider’s requirements.

Android browsers don’t deliver web notifications across multiple devices. Notifications delivered on different devices need to be set up individually, so you need to show a new opt-in request for each gadget you want to send notifications through.
Also, it’s important to note that all devices on Android 8 or newer (API 26) require all notifications to be assigned to a channel.
Chrome and other browsers create separate channels for each website that uses push notifications. So push notification permission for a specific site can be revoked or managed by accessing notification channels in the mobile Chrome and similar browsers.
This gives users the ability to control which notifications they receive through each individual channel independently.
Browser Android push notifications serve similar purposes as on other platforms, so they can be used to:
- Minimize churn
- Improve engagement
- Generate sales or leads
Chrome and other browsers that are available for WearOS allow you to forward notifications to wearable devices, a bridging process that’s already well known .
MacOS push notifications can be sent directly from your servers to users on MacOS, which means that they’re actually browsing on a desktop or laptop device.
These push alerts can be divided into two major categories, which are push notifications sent through Apple’s native Safari browser and notifications delivered via other web browsers including Chrome.

Push Notifications Click-Through-Rates
Safari push notifications have been available for some time.
It’s important to note that notifications on the MacOS web push notifications originate from your servers and delivered through the browser.
Publishers and content creators have to ask for authorization before sending push notifications to users, just like with other channels.
Here, the message displayed to users can be the same alert as in other opt-in requests, like in-app push notifications for example.
Likewise, message customization is relatively standard in this channel. You’ll have the ability to edit the:

Publishers that collect user consent through Safari MacOS push notifications will also be able to send them across other devices, including iOS and Android.
Safari push notifications give you the ability to:
- Re-engage with users who have lost interest in your content
- Send alerts to new users to check out your publications
- Monetize the traffic you create
- Minimize the number of users who cancel your subscription
Safari push notifications support forwarding to both iOS devices and Android mobile gadgets.
Apple also supports web push notifications for Chrome, Firefox, and other browsers on MacOS. Let’s take a closer look at the nuances of these alerts.
Similar to other platforms, push notifications for Chrome and other browsers on MacOS require the collection of an opt-in before the alerts are delivered.
Apple also supports cross-browser notifications, so you may also be able to send notifications via Safari and have them delivered to other browsers depending on your push service provider.
Different elements of web browser notifications on MacOS can be personalized, including the title, body text, link, and the featured image.

In addition to cross-browser support, MacOS supports push notifications across different devices.
As long as you work with a platform that also supports push notifications across multiple devices, like Notix, you’ll be able to collect opt-ins through your MacOS browser and send alerts to Chrome and other iOS browsers.
Push notifications on MacOS browsers are extremely dynamic. They can be used for engagement and traffic generation. Not only this, but these are also perfect for lead generation and sales, making MacOS push notifications a great choice for retailers and digital product companies.
MacOS web push notifications support forwarding to both WatchOS devices and WearOS gadgets.
Want to find out more about using push notifications to boost your content’s engagement and overall performance?
Create your own Notix account today and start sending out alerts today!
- Português ( Portuguese (Brazil) )
- Español ( Spanish )
Safari User Guide
- Change your homepage
- Import bookmarks, history, and passwords
- Make Safari your default web browser
- Go to websites
- Find what you’re looking for
- Bookmark webpages that you want to revisit
- See your favorite websites
- Use tabs for webpages
- Pin frequently visited websites
- Play web videos
- Mute audio in tabs
- Pay with Apple Pay
- Autofill credit card info
- Autofill contact info
- Keep a Reading List
- Hide ads when reading articles
- Translate a webpage
- Download items from the web
- Share or post webpages
- Add passes to Wallet
- Save part or all of a webpage
- Print or create a PDF of a webpage
- Customize a start page
- Customize the Safari window
- Customize settings per website
- Zoom in on webpages
- Get extensions
- Manage cookies and website data
- Block pop-ups
- Clear your browsing history
- Browse privately
- Autofill user name and password info
- Prevent cross-site tracking
- View a Privacy Report
- Change Safari preferences
- Keyboard and other shortcuts
- Troubleshooting
Customize website notifications in Safari on Mac
If you let websites send you notifications, each notification appears in the top-right corner of your screen. You get notifications from websites even if they’re not open—and even if Safari isn’t open.
Open Safari for me
Use Siri suggestions
If you let Siri make suggestions in Safari , and you book an event on a website, such as a dinner reservation, you can quickly add it to Calendar.
Accept a Siri suggestion: Click the notification to review the event, then click Add to Calendar.
Respond to a notification from a website
Click the notification to go to the site.
See all of your recent notifications
Click the date or time at the right end of the menu bar, or swipe left with two fingers from the right edge of your trackpad, then click Notifications.
If you’re away from your Mac, you can see all the notifications you missed when you get back.
Change preferences for notifications
Stop receiving notifications from a website: Choose Safari > Preferences, click Websites, then click Notifications. Find the website in the list, then select Deny.
Open Notifications preferences for me
Stop seeing requests for permission to send you notifications in Safari: Choose Safari > Preferences, click Websites, then click Notifications. Deselect “Allow websites to ask for permission to send push notifications.”
From now on, when you visit a website that wants to send you notifications, you aren’t asked.
Open Siri preferences for me
Meta shares more details on Threads API ahead of June release
Meta confirmed last month that it plans to launch the official Threads API for developers in June . With the API, developers will be able to create apps and other tools that integrate with the social networking platform. Now the company owned by Mark Zuckerberg has shared more details about what to expect from the Threads API.
Threads API to enable third-party apps
“Over the past few months, we have been building the Threads API to enable creators, developers and brands to build their own unique integrations, manage their Threads presence at scale, and easily share fresh, new content with their communities,” Meta said in a blog post .
But what exactly will developers be able to do with this API? According to Meta, the API will let apps authenticate, publish, and fetch content. There are also capabilities to manage replies (including hiding or unhiding specific replies) and insights to get key metrics, such as number of likes and views. The Threads API will also let apps provide push notifications.
Meta has also released detailed documentation on the Threads API , which confirms that the API has a limit of 250 posts and 1,000 replies every 24 hours. The supported image formats are JPEG and PNG, and videos can be up to 5 minutes long. Just like the official Threads app, the API has a limit of 500 characters per post.
With the Threads API, developers will be able to create tools to automate posts and even third-party clients – something that X (formerly Twitter) no longer allows. Meta invited a small number of partners to test the Threads API beta before its launch in June.
- Instagram and Threads users can now opt to limit political content in their timeline
- Threads app will now show sports scores starting with NBA games
- Threads joining the fediverse; Trending posts fully rolling out in the US
- Threads adds quick access to camera and option to save drafts in the app
- TikTok reportedly working on new app to compete with Instagram’s photo feed
FTC: We use income earning auto affiliate links. More.
Check out 9to5Mac on YouTube for more Apple news:

Filipe Espósito is a Brazilian tech Journalist who started covering Apple news on iHelp BR with some exclusive scoops — including the reveal of the new Apple Watch Series 5 models in titanium and ceramic. He joined 9to5Mac to share even more tech news around the world.
Tips & Tricks
Troubleshooting, how to enable do not disturb on apple watch.

Do Not Disturb is one of the most useful features for Apple Watch, and every other Apple device too for that matter. With Do Not Disturb, you can minimize distractions and interruptions, without completely silencing your Apple Watch or turning off all notifications completely.
Using Do Not Disturb on Apple Watch is one of those features you’ll want to know how to enable and disable, so that you can get the most out the functionality and its benefits. You can toggle it on and off at will, or, you can even run Apple Watch in constant Do Not Disturb mode, if you find the default Apple Watch alerts and notifications to be annoying and distracting.
Turning on Do Not Disturb on Apple Watch is super easy, here’s how it works on the newest models:
- Look at your Apple Watch, and press the long pill-shaped side button on Apple Watch to open Control Center
- Scroll down and look for the crescent moon icon, and then tap on that to turn on and enable Do Not Disturb on Apple Watch

- Optionally, you may see another series of screens with different “Focus” modes, simply tap on “Do Not Disturb” and then “On” to enable Do Not Disturb on Apple Watch*
Now Do Not Disturb mode is enabled on the Apple Watch, meaning all alerts, vibrations, and notifications will be silenced on the device.
This is a very valuable feature to use when you want to focus, or simply not be pestered by the myriad Apple Watch notifications.
* Whether or not you see the secondary menu screen options when toggling Do Not Disturb on with Apple Watch depends on if you have multiple Focus modes saved and used on other devices that may be syncing to Apple Watch, or with Apple Watch directly. You can simplify that list by deleting those focus modes . Focus Modes is one of the most over engineered features to exist for something that should be as simple as simply toggling Do Not Disturb on or off , but it is very powerful and has a lot of benefits as well like scheduling , if you can overcome the associated obstacles with setting it up.
How to Disable Do Not Disturb on Apple Watch
Knowing how to disable Do Not Disturb on Apple Watch is equally important, so that you can turn it off and get notifications again on the device:
- On Apple Watch, press the the oblong side button (it’s pill shaped) on Apple Watch to open Control Center
- Scroll down to locate the moon icon, tap on it again to disable Do Not Disturb mode on Apple Watch
Turning off Do Not Disturb mode on Apple Watch will allow it to again start receiving notifications, sounds, alerts, and vibrations.
How do I know that Do Not Disturb / Focus is Enabled on Apple Watch?
You can instantly tell if Do Not Disturb or Focus is enabled on Apple Watch by looking for the crescent moon icon at the top of the Apple Watch screen when in Control Center.
Simply open Control Center (by pressing the oblong pill shaped button on the side) and look at the icons at the top. If you see the crescent moon icon, then Do Not Disturb is enabled on Apple Watch.

Why would I want to use Do Not Disturb / Focus on Apple Watch?
Do Not Disturb is a beneficial feature for when you want to minimize interruptions and distractions, and there are many such situations you may find this useful.
For example, if you’re in a meeting, doing a presentation, if you’re sleeping or taking a nap, if you’re exercising, if you’re watching a movie, if you’re at a concert or performance, if you’re driving and don’t want distractions, if you simply want some time to focus and perform a particular task, if you want some undisturbed personal time, if you’re at an appointment where concentration matters, and many other circumstances.
Using Do Not Disturb, or Focus, on Apple Watch, allows you to easily control how you receive notifications on your device, and is a great productivity and focus aid. Master this feature, and you’ll be a happier Apple Watch user!
Enjoy this tip? Subscribe to our newsletter!
Get more of our great Apple tips, tricks, and important news delivered to your inbox with the OSXDaily newsletter.
You have successfully joined our subscriber list.
Related articles:
- How to Enable Do Not Disturb on Mac
- How to Use Do Not Disturb on iPhone or iPad
- How to Enable Workout Do Not Disturb on Apple Watch
- Set Up “Do Not Disturb” Mode on iPhone & iPad with Schedules
Leave a Reply
Name (required)
Mail (will not be published) (required)
Subscribe to OSXDaily
- - How to Check Disk Health on Mac with smartctl
- - How to Enable Do Not Disturb on Apple Watch
- - 3 Mac Tips for Working with International Teams
- - How to Disable ChatGPT Chat History & Training Data Usage
- - What Does the Bell with Line Through It Mean in Messages? Bell Icon on iPhone, iPad, & Mac Explained
- - MacOS Ventura 13.6.6 & Safari 17.4.1 Update Available
- - Using M3 MacBook Air in Clamshell Mode May Reduce Performance
- - First Beta of iOS 17.5, macOS Sonoma 14.5, iPadOS 17.5 Released for Testing
- - iOS 16.7.7 & iPadOS 16.7.7 Released for Older iPhone & iPad Models
- - WWDC 2024 Set for June 10-14, Expect iOS 18, macOS 15, visionOS 2, etc
iPhone / iPad
- - Fix a Repeating “Trust This Computer” Alert on iPhone & iPad
- - Create a Resume with Pages on Mac, iPhone, iPad
- - How Secure are Personal Hotspot Connections from iPhone?
- - You Can Play Flappy Bird in the Mac Finder
- - How to Convert MOV to MP4 on Mac Free with ffmpeg
- - Fix “warning: unable to access /Users/Name/.config/git/attributes Permission Denied” Errors
- - How to Fix the Apple Watch Squiggly Charging Cable Screen
- - NewsToday2: What it is & How to Disable NewsToday2 on Mac
- - Why Did My iPhone Alarm Stop Automatically & Turn Itself Off?

About OSXDaily | Contact Us | Privacy Policy | Sitemap
This website is unrelated to Apple Inc
All trademarks and copyrights on this website are property of their respective owners.
© 2024 OS X Daily. All Rights Reserved. Reproduction without explicit permission is prohibited.
IMAGES
VIDEO
COMMENTS
Launch the Settings app on your iPhone or iPad running iOS/iPadOS 16.4 or later. Scroll down and navigate to Safari. Click Advanced and then Experimental Features . Close. You will find a Push API ...
To enable push notifications, follow this general approach in your webpage or web app: Ask the user for permission to send them push notifications. Provide a method for the user to grant permission with a gesture, such as clicking or tapping a button. When the user completes the gesture, call the push subscription method immediately from the ...
4. Tap the app you want to manage. Each app on your iPhone has its own push notification settings. 5. Toggle the "Allow Notifications" switch to On . As long as this switch is enabled, you'll receive push notifications for this app. 6. Choose your alert preferences. By default, all three alert types are enabled.
Push notifications are the most efficient and fastest way for publishers to reach out to their readers. These notifications have been pretty straightforward to enable and access on the desktop and on Android smartphones. However, iOS didn't offer this ability. Things have changed now and Apple has introduced Safari push notifications in iOS 16.4.
Tip 1: Prioritize your notifications by choosing the 'Banner Style.'. You can select Temporary or Persistent depending on how long you want the notification to stay on your screen. Tip 2: If you're someone who hates notification sounds, you can turn them off by toggling the 'Sounds' switch to off. Tip 3: Don't want notifications ...
Go to Settings > Notifications. Choose how you want notifications displayed on the Lock Screen: View just the number of notifications: Tap Count. View the notifications grouped into stacks by app: Tap Stack. View the notifications in a list: Tap List. When notifications arrive, you can change the layout by pinching the notifications on the Lock ...
Now, according to Apple's website, iOS 16 and iPadOS 16 will finally enable web push notifications - but there's a catch. Apple says the feature will come in 2023 with a future update of iOS ...
To enable Safari Push Notifications on newer versions of iOS 16 and iPadOS 16, users must first give permission to receive notifications from the website. Once permission is granted, the website can send notifications to users even when they are not currently browsing the site. It is important to note that if a website fails to present push ...
Mobile Web Push Requirements: Must be on iOS or iPadOS 16.4+. Web app must be served alongside a web application manifest file with the correct display setting. The web app is added to the user's Home Screen from Safari. User has to initiate an action before being prompted for push permission. If your website is already a Progressive Web App ...
By Corbin Davenport. Published Jun 6, 2022. Apple will finally allow websites to send notifications on iPhone and iPad. Apple's Safari web browser has lagged behind some features in recent years, especially with background services. After years of waiting, it seems like Safari will finally support web push notifications on all platforms.
Setting up your Website for Mobile iOS Web Push Notifications. Here are the 5 steps to enable and send push notifications to Safari on iPhone and iPad: Create a Web Application Manifest for your website (manifest.json) Prompt and encourage users to install your web app to their iPhone or iPad Home Screen.
Bring better notifications to your websites and web apps in Safari on macOS with Web Push. We'll show you how you can remotely send notifications to people through the web standards-based combination of Push API, Notifications API, and Service Workers. Have a question? Ask with tag wwdc2022-10098. Learn more about bug reporting. Notifications API.
So you need to turn it under Settings. How to enable Push API While waiting for IOS 16 you can turn on Push API on your iPhone by going to Settings, typing Safari in search, click on Safari, scroll all the way down and go to Advanced and tap on Experimental Features. Now scroll down to where it says "Push API", and enable it by tapping on green ...
Follow the steps to enable and send push notifications to Safari on iPhone and iPad: 1. Add a Web App Manifest file to your website. 2. Integrate PushEngage on your website. 3. Deploy and test your website manifest. 4. Test Subscription Dialog Box modal and permission prompt.
Open Priority Matrix on Safari. Go to Safari in the top menu. Select Preferences. Go to Websites > Notifications. You will find the websites listed out. Find Priority Matrix (listed as sync.appfluence.com or prioritymatrix.com) and select "Enable". Conversely, if you want to disable web push notifications, just make sure that the ...
Choose the Notifications options. On the next screen, tap on Preferences. Then choose Push notifications and enable the feature. After enabling the feature within the web app, head into Settings ...
To enable Safari Push Notifications, website owners must use the Apple Push Notifications Service (APNS). This service is the intermediary between the website and the user's device. ... Implementing Safari Notifications on iPhone requires following steps to ensure proper setup and configuration. Here's a step-by-step guide: Step 1: Enroll in ...
Use the Apple Push Notifications Service to send notifications to your website users, right on their Mac desktop — even when Safari isn't running. Safari Push Notifications work just like push notifications for apps. They display your website icon and notification text, which users can click to go right to your website.
Safari is adopting several new web features. Safari will support push notifications from web apps such as Google Maps, Uber and Instagram. Once approved, web notifications will show up in the Notification Center and on the Lock Screen, just like notifications from native apps. Third-party web browsers like Google Chrome can now add web apps to ...
On February 16, 2023 Apple announced support for web push notifications on their mobile Safari web browser on iPhones and iPads, via iOS and iPadOS. This announcement has been highly anticipated, both because Safari was the last remaining browser to add web push support, and because this change will allow a category of websites called Progressive Web Apps to behave more like mobile apps.
Here's how to deny or allow permissions for push notifications: Go to the Safari menu and select Preferences . Select Websites . Click Notifications in the left menu pane. The right side of the window contains a list of the sites that asked for permission to send you notifications. Use the menu to the right to either allow or deny those requests.
iOS Push Notifications: Iphone, iPad. First, let's review the nuances of push notification iOS campaigns, starting with some big news. Apple recently gave Safari the ability to send push notifications on the latest iOS and iPadOS releases. It will work like this: Users can add Safari websites to their home screen
In the Safari app on your Mac, do any of the following:. Stop receiving notifications from a website: Choose Safari > Preferences, click Websites, then click Notifications.Find the website in the list, then select Deny. Change how website notifications appear: Choose Apple menu > System Preferences, click Notifications , select Safari on the left, then change the Safari alert style and other ...
The Threads API will also let apps provide push notifications. Meta has also released detailed documentation on the Threads API , which confirms that the API has a limit of 250 posts and 1,000 ...
Look at your Apple Watch, and press the long pill-shaped side button on Apple Watch to open Control Center. Scroll down and look for the crescent moon icon, and then tap on that to turn on and enable Do Not Disturb on Apple Watch. Optionally, you may see another series of screens with different "Focus" modes, simply tap on "Do Not Disturb ...