How to Export iPad Safari Bookmarks
When you use your Apple ID on your iPad, iPhone, and Mac computer you make it much easier to share information between all of those devices.
One type of information that is shared is the bookmarks that you save in Safari.
Our guide below will show you how you can use the Safari browser on your Mac computer to export the bookmarks from your iPad to your Mac.

How to Export Browser Bookmarks from an iPad
- Confirm that you are signed into iCloud and your Apple ID on your iPad.
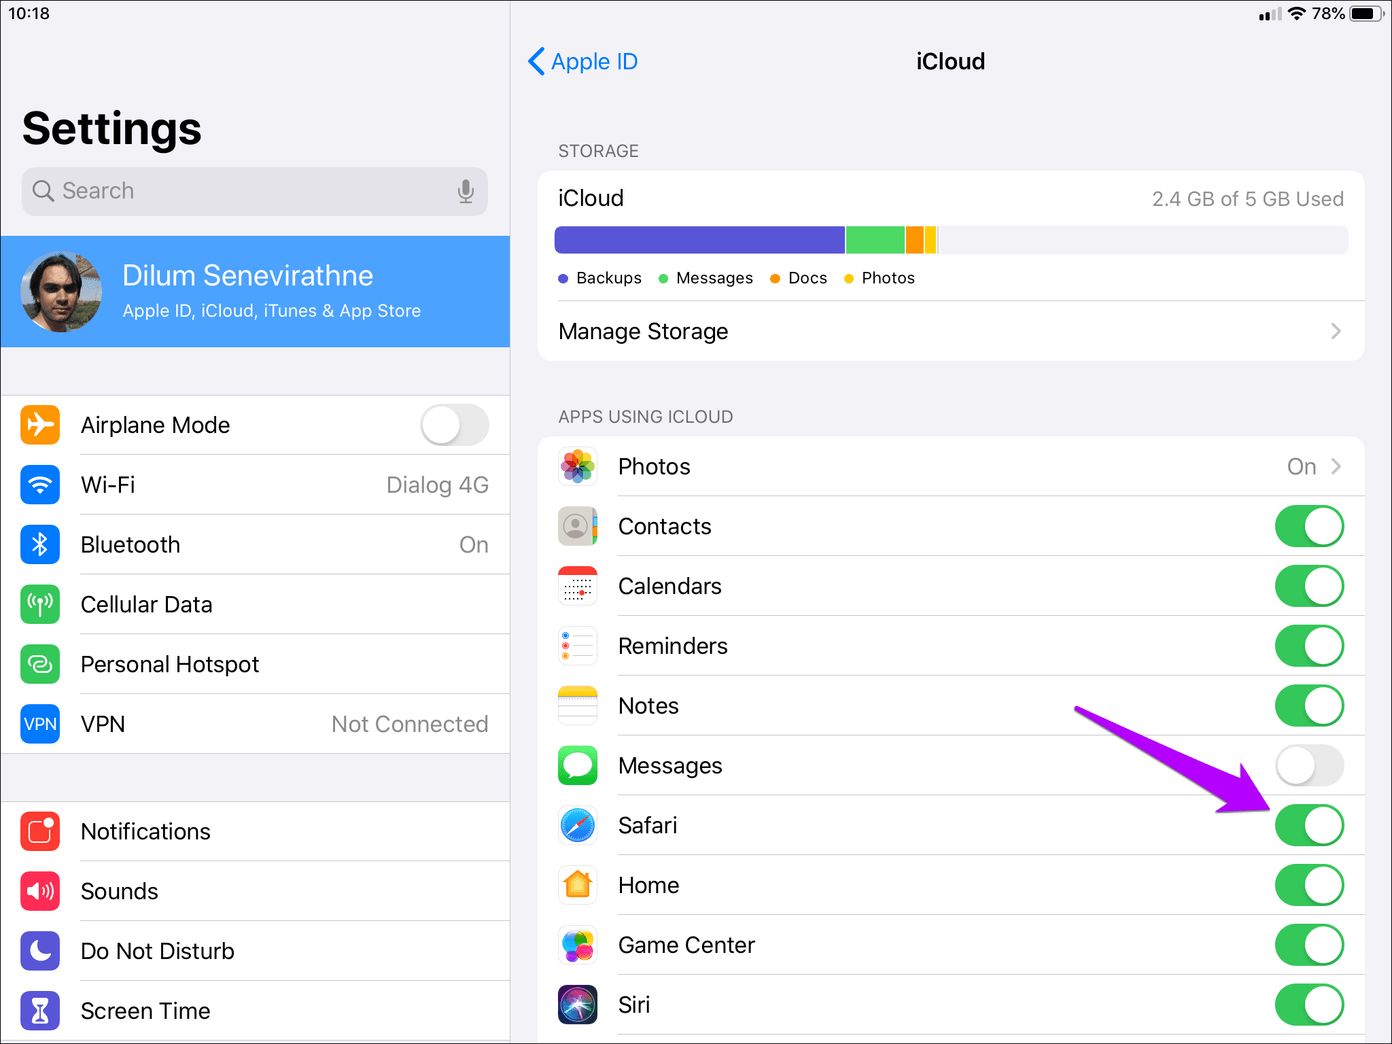
- Go to Settings > Apple ID > iCloud and make sure that Safari is checked.
- Select the Apple icon at the top of the screen > System Preferences > Apple ID > iCloud and make sure the Safari option is checked.
- Open the Mac Safari Web browser.
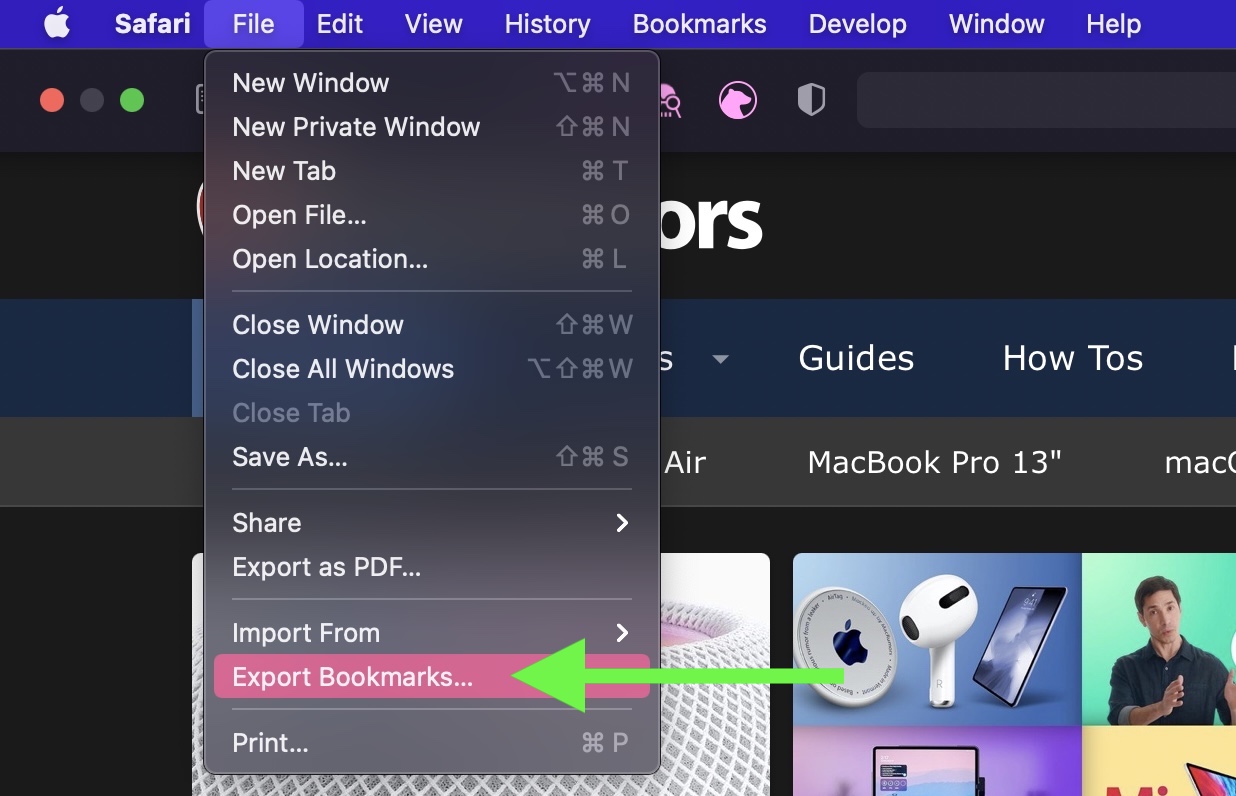
- Click File , then Export Bookmarks .
- Give the file a name and click Save .
Our guide continues below with additional information on how to export iPad Safari bookmarks, including pictures of these steps.
Related: Visit this page about Chrome bookmarks location if you use Google’s browser and would like to save or back up your bookmark file.
Do you find that you are doing more and more Web surfing on your iPad?
You are definitely not alone, as an increasing number of people are finding that the ease of using an iPad for normal Web browsing is far more convenient than getting out a laptop computer and waiting for it to boot up.
As a matter of fact, I find that I use my iPad more frequently than my laptop, and tend to only use my laptop if I need to specifically use a powerful program on the computer, like Photoshop, or if I have to do a lot of typing.
But my increase in iPad Web browsing has led to the majority of my bookmarks being located on the iPad, which can make it inconvenient to find that bookmark later on my computer.
You can rectify this problem by using iCloud to export bookmarks from your iPad to your computer.
Check out our how do I delete favorites in Safari article if you would like ot learn more about managing the favorites in the Safari Web browser on your MacBook.
How to Export Safari Bookmarks from iPad (Guide with Pictures)
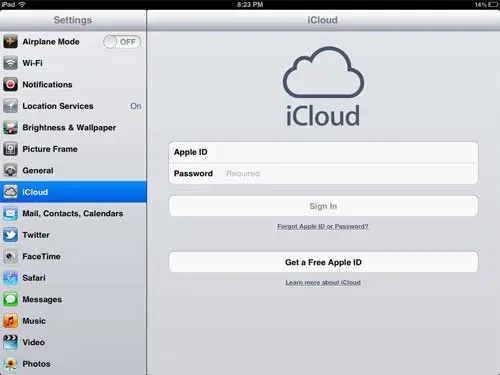
The first thing you need to do is configure iCloud on your iPad. You can do this by tapping the Settings icon on your iPad. Note that this process is also a good way for you to learn how to backup your iPad Safari bookmarks .
Tap the iCloud option at the left side of the window, type your Apple ID and password into the fields at the center of the window, then tap the Sign In button. You will receive a few notifications about merging contacts and uploading some data to iCloud, so choose the options that you would like to use.
Tap the Bookmarks button so that it says On .
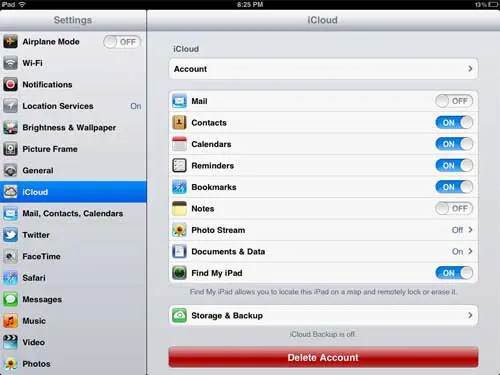
You are now done configuring your iPad to share the bookmarks from your Safari browser. The next step is to get iCloud on your PC and configure that to store your iPad Safari bookmarks.
How to Transfer Bookmarks from iPad to PC
While it would seem like you could control iCloud from iTunes, that is not the case. You actually need to download an extra program to your Windows PC called the iCloud Control Panel. Fortunately this program is available for free, and you can download it at Apple’s website from this link .
Click the Download button at the right side of the window, then save the file to your computer.
Double-click the downloaded file, then follow the instructions until the installation process has completed.
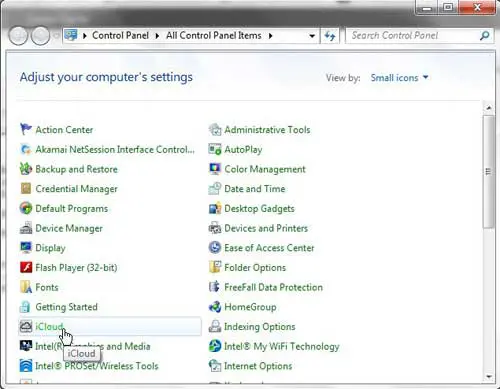
Once the iCloud Control Panel has been installed, you can click the Start button at the bottom-left corner of your screen, then click the Control Panel button at the right side of the menu.
Click the drop-down menu at the top-right corner of the window, click the Small icons option, then click the iCloud option. Take note of this location, as you may be inclined to look for the program in the All Programs menu.
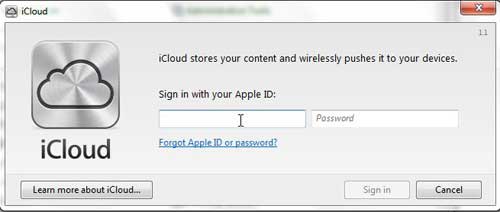
Type your Apple ID and password into their respective fields at the center of the window (these need to be the same values that you used when you set up iCloud on your iPad) then click the Sign In button at the bottom of the window.
Check the box to the left of Bookmarks , then click the Merge button to merge the bookmarks on your computer with the bookmarks on your iPad.
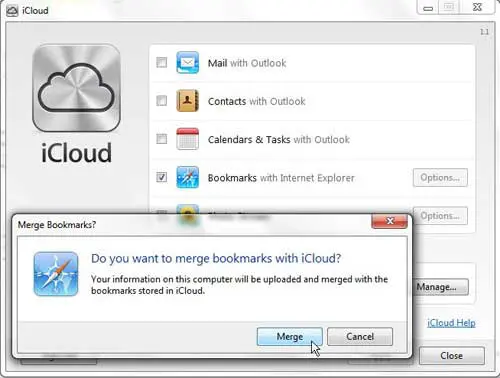
Click the Options button to the right of Bookmarks , then select the browser that you want to use your iCloud bookmarks with. After selecting the desired browser, click the OK button.
This will return you to the original iCloud Control Panel window. Click the Apply button at the bottom of this window to apply the changes that you have just made.
You should now be able to open the browser that you selected and see all of your iPad Safari bookmarks have been exported to the chosen browser on your PC.
Additional Sources

Matthew Burleigh has been writing tech tutorials since 2008. His writing has appeared on dozens of different websites and been read over 50 million times.
After receiving his Bachelor’s and Master’s degrees in Computer Science he spent several years working in IT management for small businesses. However, he now works full time writing content online and creating websites.
His main writing topics include iPhones, Microsoft Office, Google Apps, Android, and Photoshop, but he has also written about many other tech topics as well.
Read his full bio here.
Share this:
Join our free newsletter.
Featured guides and deals
You may opt out at any time. Read our Privacy Policy
Related posts:
- How to Show Bookmarks Bar in Safari on iPad
- How to Download Bookmarks from Chrome (An Easy 4 Step Guide)
- Safari History iPhone: How to See It [2023 Guide]
- How to Delete Favorites in Safari on a Mac
- 15 Ways to Fix Safari Not Working on iPhone in 2023
- Where Are the Chrome Bookmarks Stored?
- How to Bookmark on iPhone (2023 Guide)
- Organizing Bookmarks in Google Chrome
- How to Change iCloud Settings
- How to Export Emails to a Flash Drive in Outlook 2013
- How to Bookmark on iPhone 11 to Save Websites to a Browser
- How to Download a Google Sheet as an Excel File
- How to Export Outlook 2013 Contacts to Excel
- iOS 17: How to Easily Delete a Bookmark on Your iPhone
- How to Get to Your Apple Reminders on PC
- 3 iPhone Safari Tips You Might Not Know
- How to View Saved Passwords in Google Chrome (3 Methods)
- How to Get Safari Back on iPhone 13
- How to View a Google Calendar File in Excel
- How to Silence Apple Watch
Leave a Comment Cancel reply
You must be logged in to post a comment.

How to Export Safari Bookmarks from iPhone
How to Export Safari Bookmarks from iPhone and Import to Chrome/Firefox
How to export Safari bookmarks?
Nowadays, when it comes to Safari, most of you may think of iPhone/iPad/iPod touch (iOS devices). Yes, it is the exclusive browser designed for iOS and macOS. It is the built-in browser on your iOS device. As iPhone users, you could use it to search for your favorite sites, and add bookmarks to your preferred sites for the next visit.
However, not all the sites are comfortable to view on your iPhone. Compared to small screen on your iPhone, you may prefer to watch movie sites on your Mac. For a web containing a document file with thousands of words, no one would like to read it by scrolling frequently on iPhone to turn pages.
Reading it on PC with several clicks is an ideal choice. So at this point, you may want to know if you could import Safari bookmarks to Chrome or Firefox for a synced surfing. Yes, you can make it. It is convenient to Export Safari bookmarks using correct methods. Keep reading to get the two ways of exporting bookmarks from Safari to Chrome/Firefox.
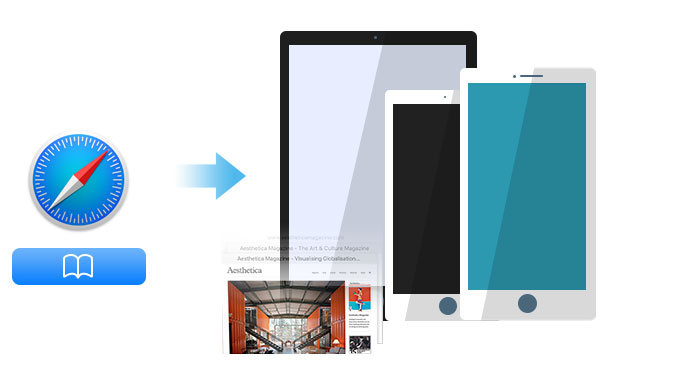
Export Safari Bookmarks from iPhone
- Method one: Sync iPhone Safari bookmarks to Chrome/Firefox with iCloud
- Method two: Import iPhone Safari bookmarks and browsing history to Chrome and Firefox
Method one: Sync iPhone Safari Bookmarks to Chrome/Firefox with iCloud
iCloud is the tool to back up data. And you could also use it to restore iPhone from iCloud backup . In the first way, you will apply iCloud backup to help you to export Safari bookmarks from iPhone and then import it to Chrome/Internet Explorer/Firefox.
Back up Safari bookmarks from iPhone to iCloud/iTunes
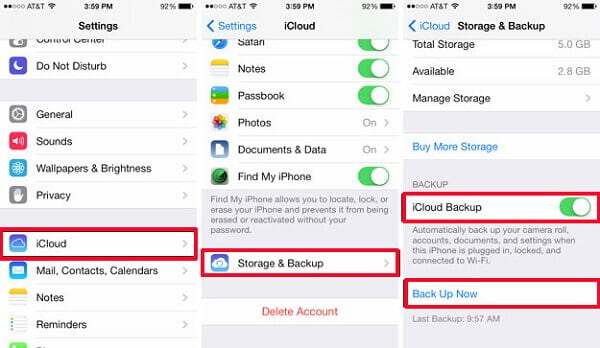
There are two ways to back up Safari bookmark from iPhone to iCloud. On your iPhone, go to "Settings" > "iCloud" > Make sure "Safari" button is on > Scroll to the bottom to tap "Backup" > "Back Up Now" to back up Safari bookmarks to iCloud.
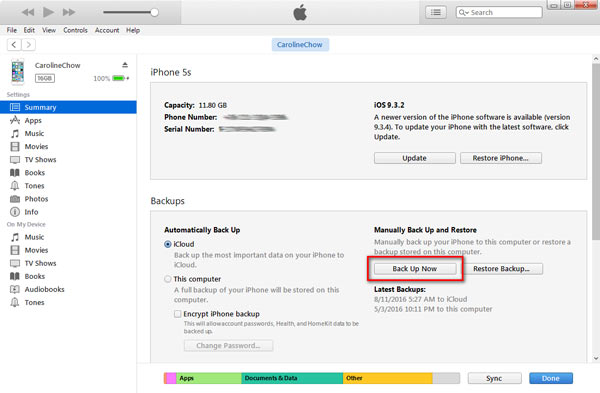
Alternatively, you could back up all data to iTunes. Plug iPhone to PC with USB cable > Launch iTunes on your PC, and click your iPhone icon > In the right "Backups" interface, choose "iCloud" > "Back Up Now" to make Safari bookmarks backup.
Export Safari bookmarks on iCloud backup to Internet Explorer
Download iCloud to your computer. Sigh in your iCloud account to export Safari bookmarks to Internet Explorer . Click "Bookmarks" > Checkmark "Internet Explorer" in the pop-up window > Click "Apply" to allow to exporting bookmarks in Safari > Click "Merge" in the pop-up reminder that says, "Do you want to merge bookmarks with iCloud?" After you have done that, Internet Explorer will automatically add all Safari bookmarks on iCloud. You could manage all bookmarks in Internet Explorer easily.
Import Safari bookmarks into Chrome/Firefox
Open your Chrome browser on your PC, click "Settings" icon (next to the star), find Bookmarks > Select Import bookmarks and settings > Select Microsoft Internet Explorer and tick Favorites/Bookmark > Click Import to import Safari bookmarks from Internet Explorer to Chrome . Similarly, you are able to import bookmarks from iPhone Safari to Firefox in this way.
When you follow the above way to sync iPhone Safari bookmarks to Chrome or Firefox with iCloud, you need to pay attention to several points:
◆ When you back up iPhone Safari bookmarks to Chrome or Firefox, you have to import all Safari bookmarks, no option of selecting preferred Safari bookmarks. And the Safari bookmarks include iPhone Safari bookmarks, and those bookmark backups before on iCloud. That may lead to some duplicated bookmarks.
◆ When you export Safari bookmarks from iCloud backup, you had better select "Internet Explorer" for fast exporting. If you select other browser on your computer, like Chrome or Firefox, then you are required to install a plug-in to import Safari bookmarks to Firefox or Chrome.
◆ When you import Safari bookmarks to Firefox or Chrome, you may notice that you are only allowed to choose "Favorites/Bookmarks". As for your Safari "Browsing History", you will find no way to import.
◆ You are allowed to use this way to import your Safari bookmarks on iPad and iPod touch to Chrome or Firefox.
Export Safari Bookmarks from iCloud to PC (using iCloud Control Panel)
Safari history cannot be accessed directly to your computer unless you install a tool called iCloud Control Panel. Here we are going to show you how to export and download iPhone Safari bookmarks to computer.
1. Download iCloud Control Panel and install the tool following its instructions.
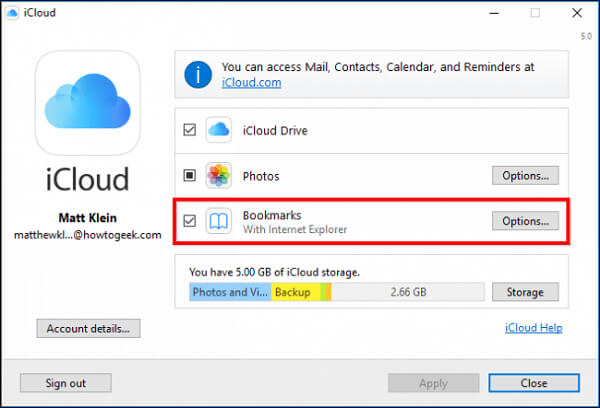
2. Open iCloud Control Panel. Enter your Apple ID and password then click the Sign In button.
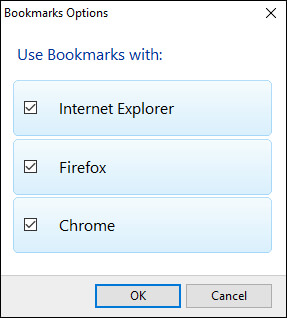
3. Check Bookmark > Options . A window will pop up with options to let you choose one or more browsers like Internet Explorer, Firefox, Chrome, etc. you want to export bookmarks to. After that, click OK to return to iCloud interface.
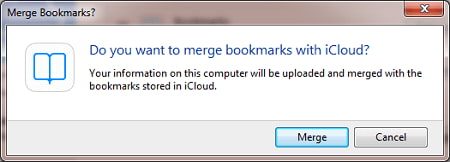
4. Click Apply button when you finish that. A window will prompt you to acquire whether you'd like to merge the bookmarks between your browser and the bookmarks that are stored in iCloud. But you only have the merge option, click Merge to continue.
5. If you want to use iCloud sync with Chrome, you'll need to download the iCloud Bookmarks extension.
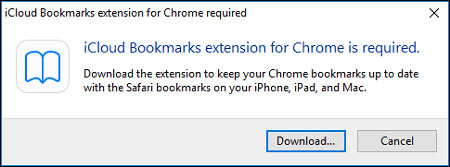
6. After that, click Add to Chrome and the iCloud Bookmarks extension will show with all your other extensions. In the similar way, the browser will open to the extension page and you will need to click "Add to Firefox" to install it.
Method two: Export iPhone Safari bookmarks and browsing history (Highly Recommended)
If you only want to export part of Safari bookmarks on iPhone to PC for importing to Chrome or Firefox, or want to import the browsing history on iPhone Safari, you are capable of trying the second way. Firstly, you need to download iPhone Data Recovery , one Safari Bookmark Exporter, and install it on your PC.
1 Launch this program on your PC, and connect iPhone to computer with USB cable.

2 Click "Recover from iOS Device", and then click Start Scan to scan your iPhone data.
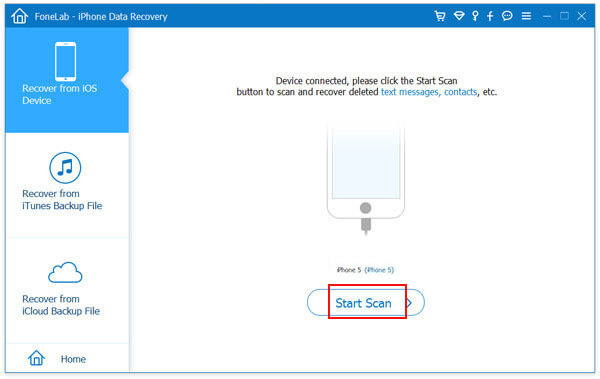
3 Click Safari Bookmark , and select the bookmarks. Click Recover to download it to PC.
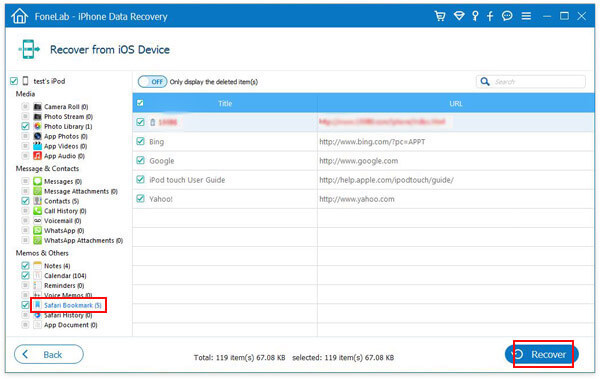
When you use this way to export iPhone Safari bookmarks, you should focus on the following points:
◆ If you want to export Safari browsing history, click "Safari History" to export it to your PC. Also you could use this software to retrieve your Safari history to your computer for backup.
◆ Not only the existing Safari bookmarks on iPhone, you are able to recover deleted Safari iPhone Safari bookmarks, so that you can import the deleted Safari bookmarks to your Chrome or Firefox. (The red words are those deleted bookmarks, and the existing bookmarks are marked black.)
◆ This app also enables you to recover deleted data from iOS device and back up data to PC, like recover deleted photos from iPhone, back up iPhone contacts, etc.
What do you think of this post?
Rating: 4.9 / 5 (based on 167 votes)

May 10, 2018 14:33 / Posted by Louisa White to Recover iOS Data
Is there any way to transfer photos from iPhone to computer? Of course there is a way!
Read this article to restore your bending iPhone data easily and quickly.
How to backup iPhone (12 included) securely? This article introduces three methods for you to backup iPhone.

How to recover deleted files from iPhone? The post introduces you with one best way to help you get back the deleted files from iPhone.
Want to reset network settings iPhone? What is reset network settings? You can learn to make iPhone reset network settings in this post.
Potential solutions are provided here to the most common iOS Update problems on iPhone, iPad and iPod touch.
About | Privacy | Resource
Copyright © 2024 Aiseesoft Studio. All rights reserved.

How to Export Bookmarks on Your iPad
Are you an iPad user who needs to export and save your bookmarks? Do you want to sync your iPad bookmarks across other Apple devices? If so, this blog post is for you!
Exporting your bookmarks from Safari on your iPad is a simple process. To start, first, open the Safari app. Once in Safari, go to File in the menu bar at the top of the screen and select “Export Bookmarks”. You will then be prompted to enter a name and target for where the bookmarks file should be saved (the default target is the desktop). Once you have entered this information, click “Save” and your bookmarks will be exported.
You can also sync your iPad bookmarks across all your other Apple devices. To do this, go to Settings on the device you want to sync with and tap on your name at the top of the list. Then select iCloud and scroll down to Safari. Flip the switch next to Safari to green, which will turn sharing on – if you already have bookmarks on your iPad device, you will also be asked if you want to merge them with existing local bookmarks.
Once syncing is complete, all of your saved websites will be accessible across all of your Apple devices – saving time by not having to re-enter information each time!
We hope this blog post has been helpful in guiding you through exporting and syncing your iPad bookmarks!
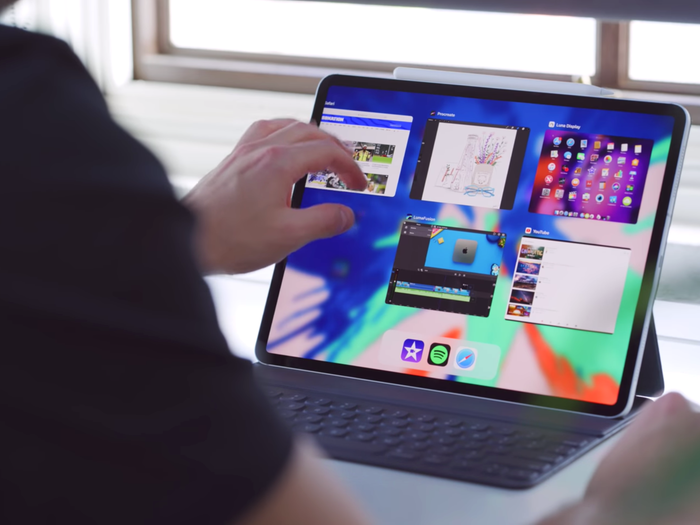
Exporting Bookmarks from Safari on iPad
To export bookmarks from Safari on your iPad, first, open the Safari app. Then, tap the “Bookmarks” icon at the bottom of the screen. Next, select “Edit” in the top right corner and choose which bookmarks you’d like to export by tapping on them. Finally, tap on “Share” in the top left corner and select how you’d like to share your bookmarks – you can share them via email or save them to an external storage device such as a USB drive. Once you’ve selected how to share your bookmarks, simply follow the instructions to complete the export process.
Transferring Bookmarks From One iPad to Another
Transferring bookmarks from one iPad to another is a simple process, provided you have both devices set up with the same Apple ID. First, make sure that Safari’s iCloud bookmark sync feature is enabled on both iPads. To do this, go to the Settings app, tap your name at the top of the list, and then tap iCloud. Scroll down to Safari and make sure the switch next to it is turned green. Once this is done, any bookmarks stored in your iCloud account will be synced across devices with the same Apple ID. If you would like to transfer bookmarks from one iPad to another without using an iCloud account, you can use iTunes or a third-party file-sharing app such as Dropbox or Google Drive. Just export your bookmarks from one device using iTunes or your preferred file-sharing app and import them into your other device.
Saving Bookmarks on an iPad
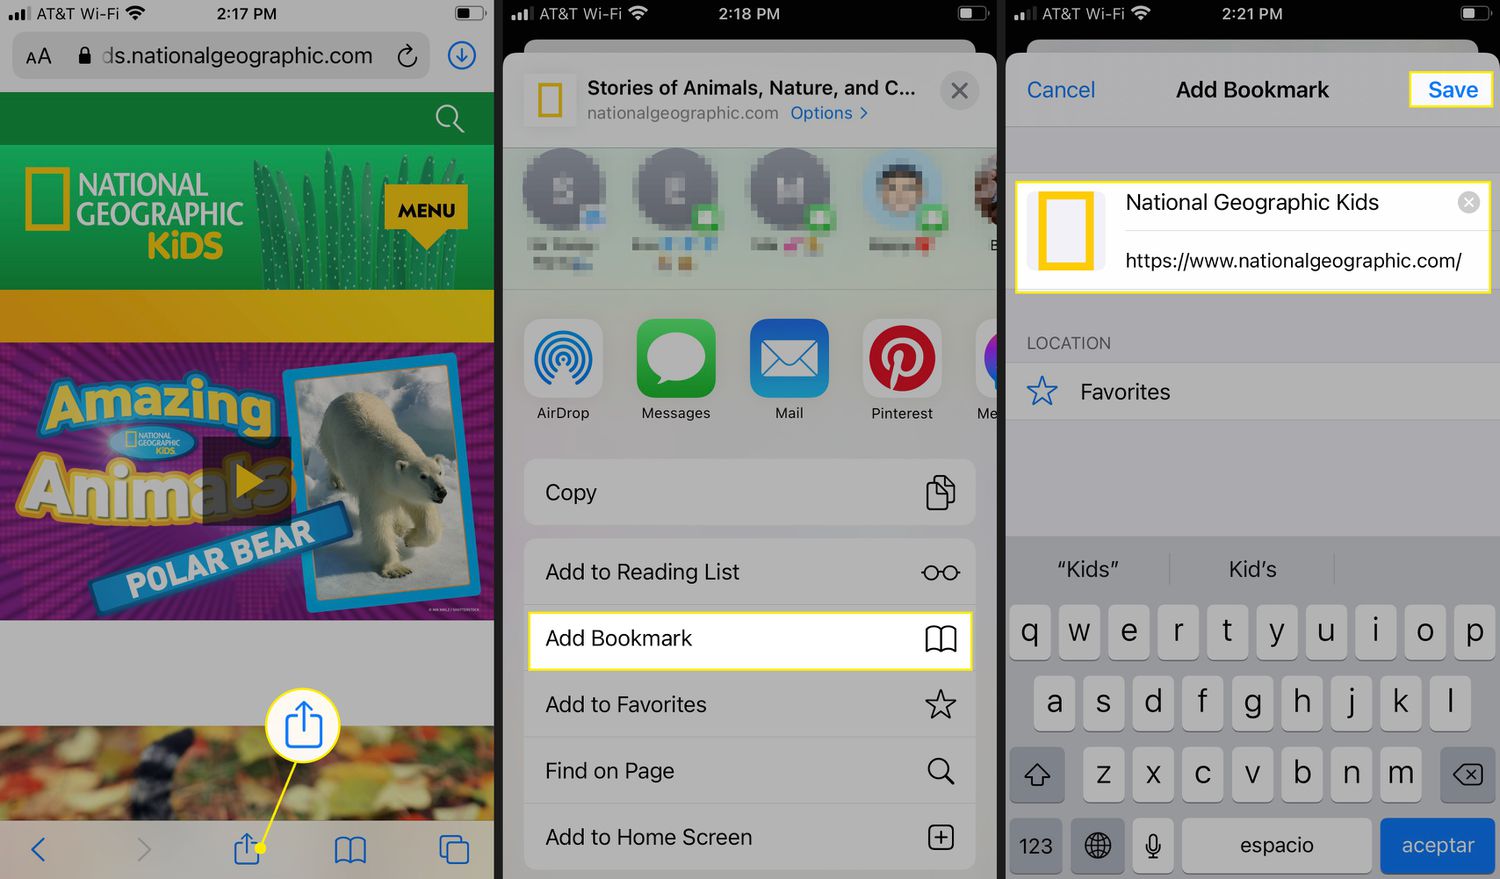
Yes, you can save bookmarks on your iPad using the Safari app. To do this, open Safari and navigate to the website you want to bookmark. Then tap the Share button, which looks like a square box with an arrow pointing out of it. This will open up a menu of options, from which you can select “Add to Favorites” or “Add to Home Screen” to save the page as a bookmark. You can access your bookmarks at any time by tapping the Bookmark icon in Safari.
Where Are Safari Bookmarks Stored on an iPad?
Safari bookmarks on iPad are stored in iCloud. To access your bookmarks, open the Safari app and go to the Bookmarks tab. All of your bookmarks will be organized under the iCloud folder. You can also find them from within other apps, such as Notes and Pages, by tapping the Share button and then tapping Bookmarks.
Transferring Bookmarks from Safari to Chrome on iPad
Transferring bookmarks from Safari to Chrome on an iPad is easy. First, open Safari and go to File > Export Bookmarks. Save the file somewhere you can easily find it, like your desktop.
Next, open the Chrome app on your iPad and go to Bookmarks > Import Bookmarks and Settings… In the window that appears, select Safari in the dropdown. Check the box next to Favorites/Bookmarks. Select the Bookmarks HTML file in the dropdown, then click Choose File and select the Safari-exported file. Finally, click the Import button.
Your bookmarks from Safari should now be imported into Chrome!
Transferring Bookmarks from Tablet to Computer
To transfer your bookmarks from your tablet to your computer, you will need to first enable sync on both devices. To do this, open the Chrome app on both devices and navigate to the ‘Settings’ menu. On each device, select ‘Turn on sync’ and choose the same Google Account for both devices. Then, select ‘Combine my data’ and create a passphrase. Once that is done, the bookmarks should automatically sync between your tablet and computer whenever you log in with the same account.
Syncing Safari Bookmarks with iPad
Yes, you can sync Safari bookmarks with your iPad. iCloud allows you to easily sync your bookmarks across multiple devices, including your iPad. All you need to do is enable iCloud on both your Mac and iPad. On your Mac, open System Preferences, click on iCloud, and sign in with your Apple ID. Then select the boxes next to Safari and Keychain to enable syncing of those items. On your iPad, open Settings and then tap on iCloud. Log in with the same Apple ID and then make sure that the Safari switch is turned on for syncing bookmarks between the two devices. Once enabled, any changes made to bookmarks on either device will automatically be reflected on the other device shortly after.
Exporting Chrome Bookmarks from an iPad
To export Chrome bookmarks from your iPad, you first need to open the Chrome app. Then tap on the menu icon in the upper right corner of the screen and select Bookmarks. This will take you to a list of all your saved bookmarks. At the top of the page, you’ll see an option called ‘Export’. Tap on it and then choose where you want to save your exported file (e.g., iCloud Drive, Dropbox, or Google Drive). Once exported, you can open the file on a computer or other device and use it to import your bookmarks into another browser.
In conclusion, exporting bookmarks from an iPad is a simple process that allows for easy access to websites and information. To export bookmarks from Safari, one must open the Safari app, select “File” in the menu bar, click “Export Bookmarks” and enter a name and target for the bookmarks file. Additionally, users can sync their iPad bookmarks with other Apple devices by turning on sharing in iCloud settings. Finally, users can also export bookmarks into an HTML file which can be used in other browsers. With these steps, iPad users are now able to easily store and access their most frequently visited websites.
Related posts:

James Walker
iPad User Guide
- iPad models compatible with iPadOS 17
- iPad mini (5th generation)
- iPad mini (6th generation)
- iPad (6th generation)
- iPad (7th generation)
- iPad (8th generation)
- iPad (9th generation)
- iPad (10th generation)
- iPad Air (3rd generation)
- iPad Air (4th generation)
- iPad Air (5th generation)
- iPad Pro 10.5-inch
- iPad Pro 11-inch (1st generation)
- iPad Pro 11-inch (2nd generation)
- iPad Pro 11-inch (3rd generation)
- iPad Pro 11-inch (4th generation)
- iPad Pro 12.9-inch (2nd generation)
- iPad Pro 12.9-inch (3rd generation)
- iPad Pro 12.9-inch (4th generation)
- iPad Pro 12.9-inch (5th generation)
- iPad Pro 12.9-inch (6th generation)
- Setup basics
- Make your iPad your own
- Keep in touch with friends and family
- Customize your workspace
- Do more with Apple Pencil
- Customize iPad for your child
- What’s new in iPadOS 17
- Turn on and set up iPad
- Wake and unlock
- Set up cellular service
- Connect to the internet
- Sign in with Apple ID
- Subscribe to iCloud+
- Find settings
- Set up mail, contacts, and calendar accounts
- Learn the meaning of the status icons
- Charge the battery
- Show the battery percentage
- Check battery usage
- Use Low Power Mode to save battery life
- Read and bookmark the user guide
- Learn basic gestures
- Learn advanced gestures
- Adjust the volume
- Find your apps in App Library
- Switch between apps
- Zoom an app to fill the screen
- Quit and reopen an app
- Drag and drop
- Open two items in Split View
- Switch an app window to Slide Over
- View an app’s windows and workspaces
- Multitask with Picture in Picture
- Move, resize, and organize windows
- Access features from the Lock Screen
- Perform quick actions
- Search on iPad
- Get information about your iPad
- View or change cellular data settings
- Travel with iPad
- Change or turn off sounds
- Create a custom Lock Screen
- Change the wallpaper
- Adjust the screen brightness and color balance
- Customize the text size and zoom setting
- Change the name of your iPad
- Change the date and time
- Change the language and region
- Organize your apps in folders
- Add, edit, and remove widgets
- Move apps and widgets on the Home Screen
- Remove apps
- Use and customize Control Center
- Change or lock the screen orientation
- View and respond to notifications
- Change notification settings
- Set up a focus
- Allow or silence notifications for a Focus
- Turn a Focus on or off
- Customize sharing options
- Type with the onscreen keyboard
- Dictate text
- Move the onscreen keyboard
- Select and edit text
- Use predictive text
- Use text replacements
- Add or change keyboards
- Add emoji and stickers
- Take a screenshot
- Take a screen recording
- Write and draw in documents
- Add text, shapes, signatures, and more
- Fill out forms and sign documents
- Use Live Text to interact with content in a photo or video
- Use Visual Look Up to identify objects in your photos and videos
- Lift a subject from the photo background
- Subscribe to Apple Arcade
- Play with friends in Game Center
- Connect a game controller
- Use App Clips
- Update apps
- View or cancel subscriptions
- Manage purchases, settings, and restrictions
- Install and manage fonts
- Buy books and audiobooks
- Annotate books
- Access books on other Apple devices
- Listen to audiobooks
- Set reading goals
- Organize books
- Create and edit events in Calendar
- Send invitations
- Reply to invitations
- Change how you view events
- Search for events
- Change calendar and event settings
- Schedule or display events in a different time zone
- Keep track of events
- Use multiple calendars
- Use the Holidays calendar
- Share iCloud calendars
- Take photos
- Take a selfie
- Take a Portrait mode selfie
- Take videos
- Change advanced camera settings
- Adjust HDR camera settings
- View, share, and print photos
- Use Live Text
- Scan a QR code
- See the world clock
- Set an alarm
- Use the stopwatch
- Use multiple timers
- Add and use contact information
- Edit contacts
- Add your contact info
- Send Contacts on iPad
- Use other contact accounts
- Hide duplicate contacts
- Export contacts
- Get started with FaceTime
- Make FaceTime calls
- Receive FaceTime calls
- Create a FaceTime link
- Take a Live Photo
- Turn on Live Captions
- Use other apps during a call
- Make a Group FaceTime call
- View participants in a grid
- Use SharePlay to watch, listen, and play together
- Share your screen in a FaceTime call
- Collaborate on a document in a FaceTime call
- Use video conferencing features
- Hand off a FaceTime call to another Apple device
- Change the FaceTime video settings
- Change the FaceTime audio settings
- Change your appearance
- Leave a call or switch to Messages
- Block unwanted callers
- Report a call as spam
- Connect external devices or servers
- Modify files, folders, and downloads
- Search for files and folders
- Organize files and folders
- Set up iCloud Drive
- Share files and folders in iCloud Drive
- Share your location
- Add or remove a friend
- Locate a friend
- Get notified when friends change their location
- Notify a friend when your location changes
- Add your iPad
- Get notified if you leave a device behind
- Locate a device
- Mark a device as lost
- Erase a device
- Remove a device
- Add an AirTag
- Share an AirTag or other item in Find My on iPad
- Add a third-party item
- Get notified if you leave an item behind
- Locate an item
- Mark an item as lost
- Remove an item
- Adjust map settings
- Get started with Freeform
- Create a Freeform board
- Draw or handwrite
- Apply consistent styles
- Position items on a board
- Search Freeform boards
- Share and collaborate
- Delete and recover boards
- Get started with Health
- Fill out your Health Details
- Intro to Health data
- View your health data
- Share your health data
- View health data shared by others
- Download health records
- View health records
- Log menstrual cycle information
- View menstrual cycle predictions and history
- Track your medications
- Learn more about your medications
- Log your state of mind
- Take a mental health assessment
- Customize your Sleep Focus
- Turn Sleep Focus on or off
- View your sleep history
- Check your headphone audio levels
- Use audiogram data
- Back up your Health data
- Intro to Home
- Upgrade to the new Home architecture
- Set up accessories
- Control accessories
- Control your home using Siri
- Use Grid Forecast to plan your energy usage
- Set up HomePod
- Control your home remotely
- Create and use scenes
- Use automations
- Set up security cameras
- Use Face Recognition
- Configure a router
- Invite others to control accessories
- Add more homes
- Get music, movies, and TV shows
- Get ringtones
- Manage purchases and settings
- Magnify nearby objects
- Change settings
- Detect people around you
- Detect doors around you
- Receive image descriptions of your surroundings
- Read aloud text and labels around you
- Set up shortcuts for Detection Mode
- Add and remove email accounts
- Set up a custom email domain
- Check your email
- Unsend email with Undo send
- Reply to and forward emails
- Save an email draft
- Add email attachments
- Download email attachments
- Annotate email attachments
- Set email notifications
- Search for email
- Organize your email in mailboxes
- Flag or block emails
- Filter emails
- Use Hide My Email
- Use Mail Privacy Protection
- Change email settings
- Delete and recover emails
- Add a Mail widget to your Home Screen
- Print emails
- Use keyboard shortcuts
- Get travel directions
- Select other route options
- Find stops along your route
- View a route overview or a list of turns
- Change settings for spoken directions
- Get driving directions
- Report traffic incidents
- Get cycling directions
- Get walking directions
- Get transit directions
- Delete recent directions
- Get traffic and weather info
- Predict travel time and ETA
- Download offline maps
- Search for places
- Find nearby attractions, restaurants, and services
- Get information about places
- Mark places
- Share places
- Rate places
- Save favorite places
- Explore new places with Guides
- Organize places in My Guides
- Delete significant locations
- Look around places
- Take Flyover tours
- Find your Maps settings
- Measure dimensions
- View and save measurements
- Measure a person’s height
- Set up Messages
- About iMessage
- Send and reply to messages
- Unsend and edit messages
- Keep track of messages
- Forward and share messages
- Group conversations
- Watch, listen, or play together using SharePlay
- Collaborate on projects
- Use iMessage apps
- Take and edit photos or videos
- Share photos, links, and more
- Send stickers
- Request, send, and receive payments
- Send and receive audio messages
- Animate messages
- Change notifications
- Block, filter, and report messages
- Delete messages and attachments
- Recover deleted messages
- View albums, playlists, and more
- Show song credits and lyrics
- Queue up your music
- Listen to broadcast radio
- Subscribe to Apple Music
- Listen to lossless music
- Listen to Dolby Atmos music
- Apple Music Sing
- Find new music
- Add music and listen offline
- Get personalized recommendations
- Listen to radio
- Search for music
- Create playlists
- See what your friends are listening to
- Use Siri to play music
- Change the way music sounds
- Get started with News
- Use News widgets
- See news stories chosen just for you
- Read stories
- Follow your favorite teams with My Sports
- Subscribe to Apple News+
- Browse and read Apple News+ stories and issues
- Download Apple News+ issues
- Solve crossword puzzles
- Search for news stories
- Save stories in News for later
- Subscribe to individual news channels
- Get started with Notes
- Add or remove accounts
- Create and format notes
- Draw or write
- Add photos, videos, and more
- Scan text and documents
- Work with PDFs
- Create Quick Notes
- Search notes
- Organize in folders
- Organize with tags
- Use Smart Folders
- Export or print notes
- Change Notes settings
- Delete, share, or copy a photo
- View and edit Photo Booth photos in the Photos app
- View photos and videos
- Play videos and slideshows
- Delete or hide photos and videos
- Edit photos and videos
- Trim video length and adjust slow motion
- Edit Live Photos
- Edit Cinematic videos
- Edit portraits
- Use photo albums
- Edit, share, and organize albums
- Filter and sort photos and videos in albums
- Make stickers from your photos
- Duplicate and copy photos and videos
- Merge duplicate photos
- Search for photos
- Identify people and pets
- Browse photos by location
- Share photos and videos
- Share long videos
- View photos and videos shared with you
- Watch memories
- Personalize your memories
- Manage memories and featured photos
- Use iCloud Photos
- Create shared albums
- Add and remove people in a shared album
- Add and delete photos and videos in a shared album
- Set up or join an iCloud Shared Photo Library
- Add content to an iCloud Shared Photo Library
- Use iCloud Shared Photo Library
- Import and export photos and videos
- Print photos
- Find podcasts
- Listen to podcasts
- Follow your favorite podcasts
- Use the Podcasts widget
- Organize your podcast library
- Download, save, and share podcasts
- Subscribe to podcasts
- Listen to subscriber-only content
- Change download settings
- Make a grocery list
- Add items to a list
- Edit and manage a list
- Search and organize lists
- Work with templates
- Use Smart Lists
- Print reminders
- Use the Reminders widget
- Change Reminders settings
- Browse the web
- Search for websites
- Customize your Safari settings
- Change the layout
- Use Safari profiles
- Open and close tabs
- Organize your tabs with Tab Groups
- View your tabs from another device
- Share Tab Groups
- Use Siri to listen to a webpage
Bookmark a website
- Bookmark a website as a favorite
- Save pages to a Reading List
- Find links shared with you
- Annotate and save a webpage as a PDF
- Automatically fill in forms
- Get extensions
- Hide ads and distractions
- Clear your cache
- Browse the web privately
- Use passkeys in Safari
- Check stocks
- Manage multiple watchlists
- Read business news
- Add earnings reports to your calendar
- Use a Stocks widget
- Translate text, voice, and conversations
- Translate text in apps
- Translate with the camera view
- Subscribe to Apple TV+, MLS Season Pass, or an Apple TV channel
- Add your TV provider
- Get shows, movies, and more
- Watch sports
- Watch Major League Soccer with MLS Season Pass
- Watch multiple live sports streams
- Control playback
- Manage your library
- Change the settings
- Make a recording
- Play it back
- Edit or delete a recording
- Keep recordings up to date
- Organize recordings
- Search for or rename a recording
- Share a recording
- Duplicate a recording
- Check the weather
- Check the weather in other locations
- View weather maps
- Manage weather notifications
- Use Weather widgets
- Learn the weather icons
- Find out what Siri can do
- Tell Siri about yourself
- Have Siri announce calls and notifications
- Add Siri Shortcuts
- About Siri Suggestions
- Change Siri settings
- Set up Family Sharing
- Add Family Sharing members
- Remove Family Sharing members
- Share subscriptions
- Share purchases
- Share locations with family and locate lost devices
- Set up Apple Cash Family and Apple Card Family
- Set up parental controls
- Set up a child’s device
- Get started with Screen Time
- Protect your vision health with Screen Distance
- Set up Screen Time for yourself
- Set communication and safety limits and block inappropriate content
- Set up Screen Time for a family member
- Set up Apple Pay
- Use Apple Pay in apps and on the web
- Track your orders
- Use Apple Cash
- Use Apple Card
- Use Savings
- Manage payment cards and activity
- Power adapter and charge cable
- Use AirPods
- Use EarPods
- Use headphone audio-level features
- Apple Pencil compatibility
- Pair and charge Apple Pencil (1st generation)
- Pair and charge Apple Pencil (2nd generation)
- Pair and charge Apple Pencil (USB-C)
- Enter text with Scribble
- Draw with Apple Pencil
- Take and mark up a screenshot with Apple Pencil
- Quickly write notes
- Preview tools and controls with Apple Pencil hover
- Wirelessly stream videos and photos to Apple TV or a smart TV
- Connect to a display with a cable
- HomePod and other wireless speakers
- iPad keyboards
- Switch between keyboards
- Enter characters with diacritical marks
- Use shortcuts
- Choose an alternative keyboard layout
- Change typing assistance options
- Connect Magic Trackpad
- Trackpad gestures
- Change trackpad settings
- Connect a mouse
- Mouse actions and gestures
- Change mouse settings
- External storage devices
- Bluetooth accessories
- Apple Watch with Fitness+
- Share your internet connection
- Make and receive phone calls
- Use iPad as a second display for Mac
- Use iPad as a webcam
- Use a keyboard and mouse or trackpad across your Mac and iPad
- Hand off tasks between devices
- Cut, copy, and paste between iPad and other devices
- Stream video or mirror the screen of your iPad
- Use AirDrop to send items
- Connect iPad and your computer with a cable
- Transfer files between devices
- Transfer files with email, messages, or AirDrop
- Transfer files or sync content with the Finder or iTunes
- Automatically keep files up to date with iCloud
- Use an external storage device, a file server, or a cloud storage service
- Get started with accessibility features
- Turn on accessibility features for setup
- Change Siri accessibility settings
- Open features with Accessibility Shortcut
- Enlarge text by hovering
- Change color and brightness
- Make text easier to read
- Reduce onscreen motion
- Customize per-app visual settings
- Hear what’s on the screen or typed
- Hear audio descriptions
- Turn on and practice VoiceOver
- Change your VoiceOver settings
- Use VoiceOver gestures
- Operate iPad when VoiceOver is on
- Control VoiceOver using the rotor
- Use the onscreen keyboard
- Write with your finger
- Use VoiceOver with an Apple external keyboard
- Use a braille display
- Type braille on the screen
- Customize gestures and keyboard shortcuts
- Use VoiceOver with a pointer device
- Use VoiceOver for images and videos
- Use VoiceOver in apps
- Use AssistiveTouch
- Use an eye-tracking device
- Adjust how iPad responds to your touch
- Auto-answer calls
- Change Face ID and attention settings
- Use Voice Control
- Adjust the top or Home button
- Use Apple TV Remote buttons
- Adjust pointer settings
- Adjust keyboard settings
- Adjust AirPods settings
- Adjust Apple Pencil settings
- Control a nearby Apple device
- Intro to Switch Control
- Set up and turn on Switch Control
- Select items, perform actions, and more
- Control several devices with one switch
- Use hearing devices
- Use Live Listen
- Use sound recognition
- Set up and use RTT
- Flash the LED for alerts
- Adjust audio settings
- Play background sounds
- Display subtitles and captions
- Show transcriptions for Intercom messages
- Get Live Captions (beta)
- Type to speak
- Record a Personal Voice
- Use Guided Access
- Use built-in privacy and security protections
- Set a passcode
- Set up Face ID
- Set up Touch ID
- Control access to information on the Lock Screen
- Keep your Apple ID secure
- Use passkeys to sign in to apps and websites
- Sign in with Apple
- Share passwords
- Automatically fill in strong passwords
- Change weak or compromised passwords
- View your passwords and related information
- Share passkeys and passwords securely with AirDrop
- Make your passkeys and passwords available on all your devices
- Automatically fill in verification codes
- Sign in with fewer CAPTCHA challenges
- Two-factor authentication
- Use security keys
- Control app tracking permissions
- Control the location information you share
- Control access to information in apps
- Control how Apple delivers advertising to you
- Control access to hardware features
- Create and manage Hide My Email addresses
- Protect your web browsing with iCloud Private Relay
- Use a private network address
- Use Advanced Data Protection
- Use Lockdown Mode
- Receive warnings about sensitive content
- Use Contact Key Verification
- Turn iPad on or off
- Force restart iPad
- Update iPadOS
- Back up iPad
- Return iPad settings to their defaults
- Restore all content from a backup
- Restore purchased and deleted items
- Sell, give away, or trade in your iPad
- Install or remove configuration profiles
- Important safety information
- Important handling information
- Find more resources for software and service
- FCC compliance statement
- ISED Canada compliance statement
- Apple and the environment
- Class 1 Laser information
- Disposal and recycling information
- Unauthorized modification of iPadOS
- ENERGY STAR compliance statement
Bookmark a website in Safari on iPad
Tap Add Bookmark.
Bookmark open tabs
Pinch closed with three fingers to view all your tabs.
Touch and hold one of your tabs, then tap Add Bookmarks for [ number of ] Tabs.
View and organize your bookmarks
Tap Edit, then do any of the following:
Create a new folder: Tap New Folder at the bottom left, enter a name, then tap Done.
Rename bookmarks: Tap the bookmark, enter a new name, then tap Done.
See your Mac bookmarks on iPad
Tap Show All (below Apps Using iCloud), then make sure Safari is turned on.
Note: You must also have Safari turned on in iCloud settings on your Mac and be signed in with the same Apple ID. See Set up iCloud for the Safari app on all your devices in the iCloud User Guide.
Add a website icon to the Home Screen
You can add a website icon to your iPad Home Screen for quick access.
The icon appears only on the device where you add it.
Note: Some websites may ask for permission to send you notifications. You can change your notification settings at any time. See Change notification settings .
How to add bookmarks on an iPad, and sync them across all of your Apple devices
- Using Apple's Safari browser, you can easily bookmark your favorite websites on an iPad .
- You can see the same bookmarks on your iPad as on your Mac or create a unique set of bookmarks for each device.
- You can even add an icon for a favorite website to your iPad's home screen — no browsing required.
- Visit Business Insider's homepage for more stories .
The version of Safari you have on your iPad has some nifty features that make web browsing convenient and easy.
You can add any webpage as a bookmark, and even turn your favorite websites into buttons on your home screen to access with a single click, like you would an app.
How to set and delete a bookmark in Safari on iPad
Creating a bookmark on your iPad takes just a few steps.
1. Open the webpage you want to bookmark in Safari.
2. Press and hold the bookmark icon on the upper left of the screen.
3. A box will pop down that gives you the option to add the page to your reading list or add a bookmark. Choose "Add Bookmark."
4. Another box pops down that gives you options for where to save your bookmark. The default is Favorites. When you add a bookmark to Favorites, its icon appears on your screen every time you open a new Safari tab. A drop down box with your favorites also appears when you tap into the search field. You can open a favorite by touching the icon. Your other basic location option is a folder called Bookmarks. Tap "Location" and a list of available locations for your bookmark will drop down.
You can also create a bookmark using the share icon on the upper right corner of your screen.
2. Tap the share icon. A box drops down with sharing options. Drag the bottom line to the left to see bookmarking options.
3. Choose "Add Bookmark" to add to your bookmarks. A box will drop down that allows you to choose your bookmark location.
4. If you know you want to add the bookmark to your favorites, tap the "Add to Favorites" icon from the bottom line of the drop-down menu.
5. Tap "Save" to save your bookmark.
You can toggle a list of your bookmarks on the left side of your browser screen by tapping the bookmarks icon. To delete a bookmark, simply swipe left on the line with the website name. A red Delete box will appear. Click "Delete" and the bookmark will disappear.
How to organize your bookmarks
To change the order of your bookmarks, open Bookmarks by tapping the icon. Touch and hold a bookmark and drag it up or down.
If you have a lot of bookmarks, you may want to organize them into folders. You can put a folder in Favorites, so it will appear in each new browser window.
1. Tap the bookmark icon to display your bookmarks.
2. Tap "Edit" at the bottom right of your bookmarks list.
3. New Folder will appear at the bottom left. Tap that.
4. Name your new folder and choose its location. The default location is Favorites. Tap Location for a drop-down list of possible locations. Favorites and Bookmarks are the two locations where all bookmarks live. If you don't want your folder to appear on the Favorites page, choose Bookmarks at the location.
5. Your folders will appear in the locations dropdown menu. You can add new bookmarks and new subfolders to your existing folders. To add an existing bookmark to a new folder, tap the sharing icon, then tap the Add Bookmark icon. The drop-down box will let you edit your bookmark location. You can also edit bookmark location in the bookmarks list on the right of your screen.
How to sync your iPad bookmarks across your other Apple devices
If you use the Safari browser on your Mac , iPhone , or other Apple devices, you can use the same bookmarks, including your favorites, as your iPad . All devices must be signed into the same iCloud account to share bookmarks.
1. Go to the Settings app and tap the box with your name at the top of the list.
2. Tap iCloud.
3. Scroll down to Safari and flip the switch to green to turn sharing on. If you have bookmarks on your iPad, you'll be asked to merge your local bookmarks. Note: if you later turn off sharing on you iPad, you'll lose the local bookmarks you set up before you turned sharing on.
You can also turn a webpage browser window into an icon on your iPad home screen.
1. Open the webpage for which you want an icon.
2. Tap the sharing icon at the top right side of the screen.
3. A box will appear with sharing options. Drag the bottom row to the left until you see the Add to Home Screen icon. Tap this icon.
4. An icon will appear on your home screen. When you tap it, you'll be taken to a browser window for the webpage.
For more information on that process, check out our article, " How to add link shortcuts to Business Insider and INSIDER on your iPhone or iPad ."
Read more coverage from How To Do Everything: Tech :
How to sync your iphone and ipad with your email, photos, text messages, and more, how to move apps and create app folders on any iphone model, how to stop robocalls and other spam calls from reaching your iphone, how to print a file from your iphone or ipad in a few easy steps.
Watch: Watch Apple unveil the new iPad that has a 10.2" screen and supports Apple pencil
- Main content

- Gihosoft iManager
- File Encryption
- Free iPhone Data Recovery
- Free Android Data Recovery
- Android Recovery for Mac
- Mobile Phone Transfer
- Free Photo Recovery
- Free Photo Eraser
- Free Video Converter
- Free Video Cutter
- Free Video Joiner
- Free YouTube Downloader
- Free HEIC Converter
- Android Recovery
- iPhone Recovery
- Phone Transfer
- Android Transfer
- Data Recovery
- Windows Topics
- Mobile Tips
- iPhone Tips
- Manage iPhone Data
- Android Tips
- More Topics
3 Ways to Export Safari Bookmarks from iPhone to Computer
Safari allows users to bookmark a webpage so that they can revisit the page later easily. You may have lots of pages bookmarked in Safari on your iPhone or iPad and want to export these Safari bookmarks to your Mac or PC for backup or other purposes. The easiest way to complete this task is by syncing your Safari bookmarks on iPad or iPhone to the computer with iCloud. We will explain in detail how this method is used as well as the other ways to export the bookmarks in Safari from iPhone without iCloud.
- 1. Sync Safari Bookmarks from iPhone to Mac/PC with iCloud
- 2. Export Safari Bookmarks from iPhone to Computer by iTunes
- 3. Export iPhone Safari Bookmarks using Third-Party App
1.Sync Safari Bookmarks from iPhone to Mac/PC with iCloud
iCloud is far more a cloud storage, it also acts as a data syncing center for bookmarks, email, contacts, calendars, reminders, photos, and other data on your iOS, macOS, or even Windows devices. To export Safari bookmarks from iPhone to your Mac or PC, you need to enable Safari in iCloud on your iPhone and the computer you want to sync with first.
On your iPhone or iPad, go to Settings > iCloud and toggle on the Safari option. As the specific steps for doing this are different for Mac and Windows, so we talk about this separately.
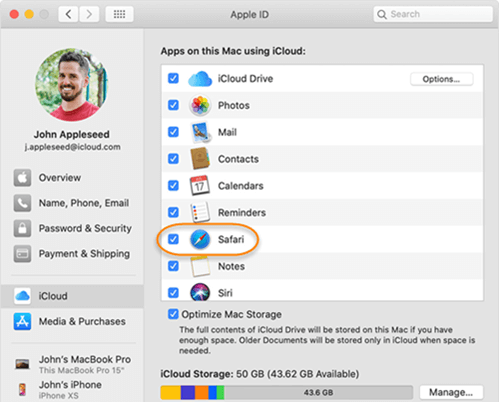
- Specify a place the exported Safari bookmarks and click the Save button.
- Now you should be left with an HTML file that contains all your bookmarks. You can import your bookmarks to Safari again, or other web browsers like Chrome or Firefox.
On Windows PC
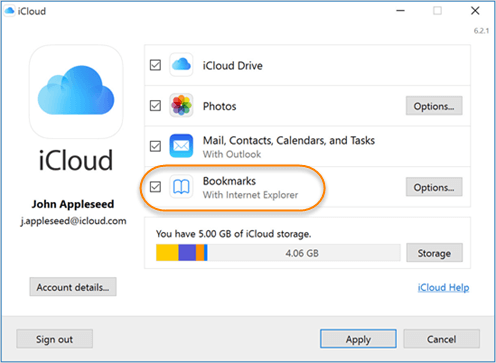
- Download and install iCloud for Windows from Apple’s website. Then launch it and log in your iCloud account.
- Make sure you have a check mark in the Bookmarks checkbox.
- Click the Options button to choose the web browser to want to sync your iPhone Safari bookmarks with and click OK .
2.Export Safari Bookmarks from iPhone to Computer by iTunes
iTunes is another decent choice to export bookmarks from Safari on iPad/iPhone to your computer. But if you use a Mac with OS X 10.9.5 or later, you are not allow ed to sync Safari bookmarks via iTunes or Finder. In this case, you need to turn to another two methods.
Please put it in mind that the Safari bookmarks which are being synced with your iPhone over the air from iCloud cannot be synced to the computer through iTunes. So you have to turn off iCloud Safari on your iPhone first.
- Go to Settings > iCloud and disable the Safari option on your iPhone.
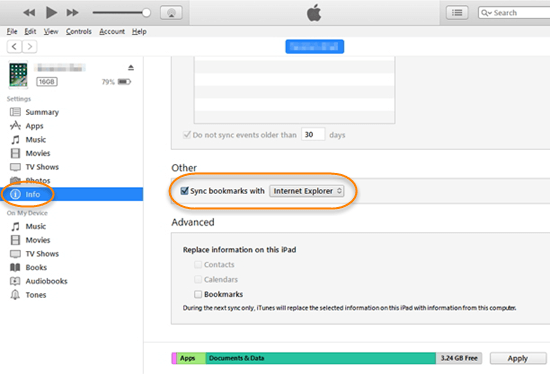
- Open iTunes on your computer and connect your iPhone or iPad to the computer using a USB cable.
- Click on the device icon and select Info .
- Put a check mark in the Sync Bookmark With checkbox .
- Choose a web browser from the extendable menu.
- You can see a Bookmarks checkbox under Advanced section. Don’t tick it.
3.Export iPhone Safari Bookmarks using Gihosoft iManager
If you cannot sync your bookmarks in Safari from iPad/iPhone to the computer with iCloud or iTunes, Gihosoft iManager is an alternative way for you. The program enables you to back up iPhone to external drive or any places you like and export the data you want from the backup to readable formats like HTML, TXT, PDF, etc. It also allows you to access, view and export all data from your iTunes backup files.
Here is how to export Safari bookmarks from iPhone to computer with Gihosoft iManager:
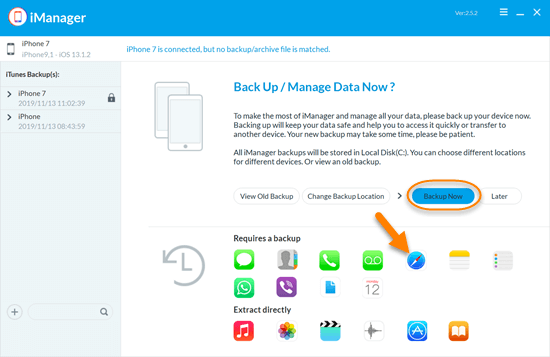
- Download, install and run Gihosoft iManager on your computer.
- Connect your iPhone or iPad to the computer via a USB cable.
- Click Backup Now to create a backup for your iPhone to your PC.
Extra Tip: Import Chrome Bookmarks to Safari on Mac
If you have switched your default browser on Mac from Google Chrome to Safari, you might want to know how to import your Chrome bookmarks to Safari and access you favorite webpages there. Actually, this task is much easier than you think.
The first time you open Safari on the Mac after using Google Chrome, it automatically import your bookmarks and history. You can choose to keep the imported items or remove them. You can also import the items at another time. If you want to import specific bookmarks and history manually, you can go to File > Import from > Google Chrome and select the items you need. If you have exported your bookmarks from the Chrome browser, you can import the bookmarks file by choosing File > Import From > Bookmarks HTML file and select the file.
Final Words
Now you have read all the three ways to export Safari bookmarks from iPhone/iPad to a Mac or PC. The best choice is undoubtedly using iCloud. But like iTunes, sometimes you cannot use iCloud transfer your bookmarks in safari to the computer. In this case, you might as well make use of a third-party tool like Gihosoft iManager which can back up, extract, and export your Safari bookmarks and many other data from the iPhone to a computer. We hope this article is helpful to you. If you have any other queries or suggestions, please let us know in the comment section below.
Related Articles
- iMobie AnyTrans Review: Great Way to Manage iPhone’s Files
- How to Delete Documents and Data on iPhone/iPad
- 5 Simple Tips to Transfer Videos from iPhone to PC
- How to Extract Photos from iPhone Backup on Computer
- 2 Easy Ways to Transfer Music from iPhone to Computer
- 5 Best Free iPhone Backup Software on Windows & Mac
- How to Fix iTunes Sync Error 54 on Windows 10
- How to Fix iPhone Not Showing Up on PC (Windows 10/8/7)
- How to Delete Photos from iCloud to Free Up Space
- 8 Tips to Fix Touch ID Not Working on iPhone or iPad
- How to Change iTunes Backup Location on Windows and Mac
- How to Transfer Videos from Computer to iPhone with/without iTunes
- 7 Tips to Fix iPhone Not Syncing with iTunes Issue
- How to Transfer Photos from Computer to iPhone 11/XS/XR/X/8/7
- 4 Ways to Transfer Voicemails from iPhone to Computer
Copyright © 2024 GIHOSOFT . All Rights Reserved.
How To Export Bookmarks In Safari

- Software & Applications
- Browsers & Extensions
Introduction
Safari, Apple's native web browser, is renowned for its sleek interface, robust performance, and seamless integration with the Apple ecosystem. Whether you're a casual user or a seasoned professional, Safari's bookmarking feature is a valuable tool for organizing and accessing your favorite websites with ease. However, there are instances when you may need to export your bookmarks, such as when migrating to a new device or backing up your browsing data.
In this guide, we'll walk you through the process of exporting bookmarks in Safari, empowering you to preserve your carefully curated collection of saved websites. By following these simple steps, you can safeguard your bookmarks and ensure that they remain accessible across different platforms or in the event of unexpected data loss.
Let's embark on this journey to unlock the potential of Safari's bookmark export feature. Whether you're a digital nomad, a tech enthusiast, or simply someone who values the convenience of having your favorite websites at your fingertips, this guide will equip you with the knowledge to safeguard your browsing treasures. So, without further ado, let's delve into the world of Safari bookmark exportation and take control of your online browsing experience.
Step 1: Open Safari
To begin the process of exporting bookmarks in Safari, you first need to launch the Safari web browser on your Mac or iOS device. Safari is seamlessly integrated into the Apple ecosystem, offering a user-friendly interface and a wide array of features designed to enhance your browsing experience.
On a Mac, you can easily open Safari by clicking on the Safari icon located in the Dock or by searching for Safari in the Applications folder and launching it from there. Alternatively, you can utilize Spotlight search by pressing Command + Space, typing "Safari," and hitting Enter to open the browser swiftly.
If you're using an iOS device such as an iPhone or iPad, you can access Safari by locating the Safari app icon on your home screen and tapping on it to launch the browser. With its intuitive design and smooth navigation, Safari provides a seamless browsing experience on both Mac and iOS platforms.
Once Safari is up and running, you're ready to proceed to the next step of exporting your valuable bookmarks. This marks the initial stage of the bookmark exportation process, setting the stage for the subsequent steps that will enable you to safeguard and transfer your bookmark collection with ease.
By opening Safari, you've taken the crucial first step towards unlocking the potential of Safari's bookmark export feature. With the browser at your fingertips, you're now poised to delve into the realm of bookmark management and preservation, ensuring that your cherished collection of saved websites remains secure and accessible across various platforms.
Now that Safari is open, let's move on to the next step and delve into the process of accessing your bookmarks within the browser, setting the stage for the subsequent steps that will culminate in the successful exportation of your bookmarks.
Step 2: Access the Bookmarks
After launching Safari, accessing your bookmarks is the next crucial step in the process of exporting them. Safari offers a seamless and intuitive method for accessing your saved bookmarks, allowing you to effortlessly navigate through your collection of favorite websites.
On both Mac and iOS devices, accessing bookmarks in Safari follows a similar approach. In the Safari browser, you can find the bookmarks bar located just below the address bar. By clicking on the bookmarks icon, represented by an open book symbol, you can reveal a dropdown menu displaying your bookmarked websites. This convenient feature provides quick access to your saved bookmarks, enabling you to explore and manage your collection with ease.
Furthermore, Safari offers a dedicated Bookmarks menu in the top menu bar on Mac, allowing you to access your bookmarks with a single click. By clicking on the "Bookmarks" option in the menu bar, you can effortlessly navigate through your bookmarked websites, streamlining the process of managing and organizing your saved webpages.
On iOS devices, accessing bookmarks in Safari is equally straightforward. By tapping on the bookmarks icon, represented by an open book symbol, you can reveal your bookmarked websites, providing instant access to your collection of saved webpages. This user-friendly approach ensures that you can easily explore and manage your bookmarks on the go, enhancing the overall browsing experience on your iOS device.
In addition to the bookmarks bar and the Bookmarks menu, Safari also offers a dedicated Bookmarks sidebar on Mac, providing a comprehensive view of your bookmarked websites. By clicking on the sidebar icon in the Safari toolbar, you can reveal the Bookmarks sidebar, offering a convenient way to access and organize your saved websites within the browser.
By accessing your bookmarks in Safari, you're one step closer to preserving and exporting your valuable collection of saved websites. With the bookmarks readily accessible within the browser, you're now poised to proceed to the next steps, culminating in the successful exportation of your bookmarks.
Now that you've accessed your bookmarks in Safari, let's move on to the subsequent steps, empowering you to export your cherished collection of saved websites and ensure their accessibility across different platforms.
Step 3: Export Bookmarks
Once you have accessed your bookmarks in Safari, the next pivotal step is to initiate the process of exporting them. Safari provides a seamless method for exporting bookmarks, allowing you to preserve your carefully curated collection of saved websites for future use or migration to another device.
On both Mac and iOS devices, Safari offers a straightforward approach to exporting bookmarks. To commence the exportation process, navigate to the "File" menu on the Safari toolbar. Within the "File" menu, you will find the "Export Bookmarks" option, which serves as the gateway to exporting your valuable collection of saved websites.
Upon selecting the "Export Bookmarks" option, Safari presents you with the opportunity to specify the destination for the exported bookmarks file. You can choose a suitable location on your device where the exported file will be saved, ensuring that it remains easily accessible for future use or transfer to another platform.
Safari allows you to name the exported file, providing the flexibility to assign a descriptive and recognizable name to the file. By giving the exported file a meaningful name, you can easily identify and locate it when needed, streamlining the process of managing and utilizing your exported bookmarks.
Furthermore, Safari offers the option to select the file format for the exported bookmarks. You can choose between the HTML and the JSON format, each offering distinct advantages based on your specific requirements. The HTML format is widely compatible and can be easily imported into various web browsers, while the JSON format is ideal for advanced users and developers seeking to manipulate the bookmark data programmatically.
By offering these customizable options, Safari empowers you to tailor the exportation process according to your preferences and intended use of the exported bookmarks. Whether you prioritize compatibility, accessibility, or advanced manipulation of bookmark data, Safari provides the flexibility to accommodate your unique needs.
With the exportation settings configured to your preference, you can proceed to initiate the export process, generating the file containing your valuable collection of saved websites. By following these simple steps, you can safeguard your bookmarks and ensure their availability for future use, migration, or backup purposes.
By exporting your bookmarks in Safari, you have taken a proactive step towards preserving your browsing treasures, ensuring that your carefully curated collection of saved websites remains secure and accessible across different platforms. This marks a significant milestone in the process of managing and safeguarding your online browsing experience, empowering you to maintain control over your valuable bookmark collection.
Step 4: Choose the Destination
After initiating the export process in Safari, the next crucial step is to choose the destination for the exported bookmarks file. Safari provides users with the flexibility to specify the location where the exported file will be saved, ensuring easy accessibility and seamless integration into their browsing ecosystem.
When prompted to choose the destination for the exported bookmarks file, users can navigate to the desired location on their device. This can include the desktop, a specific folder, or any other preferred directory where the exported file will be easily retrievable. By offering this level of customization, Safari empowers users to organize their exported bookmarks according to their individual preferences, streamlining the process of managing and utilizing their valuable collection of saved websites.
Furthermore, Safari allows users to assign a descriptive and recognizable name to the exported file. By naming the file in a meaningful and identifiable manner, users can effortlessly locate and distinguish it from other files on their device. This naming flexibility enhances the overall organization of the exported bookmarks, ensuring that users can readily identify and access their valuable collection of saved websites when needed.
In addition to specifying the destination and naming the exported file, Safari presents users with the option to choose the file format for the exported bookmarks. Users can select between the HTML and JSON formats, each offering distinct advantages based on their specific requirements. The HTML format is widely compatible and can be easily imported into various web browsers, ensuring seamless accessibility and integration. On the other hand, the JSON format is ideal for advanced users and developers seeking to manipulate the bookmark data programmatically, offering a versatile approach to managing and utilizing bookmark data.
By providing these customizable options, Safari enables users to tailor the exportation process according to their unique preferences and intended use of the exported bookmarks. This level of customization ensures that users can seamlessly integrate their exported bookmarks into their browsing environment, whether for personal use, migration to another platform, or backup purposes.
With the destination chosen and the exportation settings configured to their preference, users can proceed to save the exported bookmarks file, finalizing the export process. By following these intuitive steps, users can effectively manage and safeguard their valuable collection of saved websites, ensuring their accessibility and preservation for future use.
This marks a pivotal stage in the process of exporting bookmarks in Safari, empowering users to take control of their browsing treasures and maintain seamless access to their favorite websites across different platforms.

Step 5: Save the Exported File
Once you have configured the exportation settings and chosen the destination for the exported bookmarks file, the final step is to save the file, completing the export process in Safari. This pivotal stage ensures that your carefully curated collection of saved websites is preserved in a convenient and accessible format, ready for future use, migration, or backup purposes.
Upon finalizing the export settings, Safari prompts you to confirm the saving of the exported file. By clicking the "Save" or "Export" button, depending on your device, the file containing your valuable collection of saved websites is generated and stored in the specified destination. This seamless process ensures that your bookmarks are safeguarded and readily available for integration into your browsing ecosystem.
By saving the exported file, you solidify the preservation of your browsing treasures, empowering you to maintain control over your favorite websites across different platforms. Whether you're transitioning to a new device, seeking to create a backup of your browsing data, or simply organizing your bookmark collection, this final step ensures that your valuable bookmarks remain secure and accessible.
Furthermore, the saved exported file serves as a versatile asset, offering the flexibility to import your bookmarks into various web browsers or platforms. The HTML format, widely compatible and easily importable, allows for seamless integration into different browsing environments, ensuring that your favorite websites are readily accessible wherever your online journey takes you.
For advanced users and developers, the JSON format provides a versatile approach to manipulating bookmark data programmatically, offering a myriad of possibilities for managing and utilizing your bookmark collection. This level of flexibility ensures that your exported bookmarks can be tailored to suit your specific needs and preferences, enhancing the overall utility of your saved websites.
By completing the process of saving the exported file, you have successfully preserved your cherished collection of saved websites, empowering you to maintain seamless access to your favorite online destinations. This marks the culmination of the bookmark exportation process in Safari, providing you with the assurance that your browsing treasures are safeguarded and ready for use whenever the need arises.
Leave a Reply Cancel reply
Your email address will not be published. Required fields are marked *
Save my name, email, and website in this browser for the next time I comment.
- Crowdfunding
- Cryptocurrency
- Digital Banking
- Digital Payments
- Investments
- Console Gaming
- Mobile Gaming
- VR/AR Gaming
- Gadget Usage
- Gaming Tips
- Online Safety
- Software Tutorials
- Tech Setup & Troubleshooting
- Buyer’s Guides
- Comparative Analysis
- Gadget Reviews
- Service Reviews
- Software Reviews
- Mobile Devices
- PCs & Laptops
- Smart Home Gadgets
- Content Creation Tools
- Digital Photography
- Video & Music Streaming
- Online Security
- Online Services
- Web Hosting
- WiFi & Ethernet
- Browsers & Extensions
- Communication Platforms
- Operating Systems
- Productivity Tools
- AI & Machine Learning
- Cybersecurity
- Emerging Tech
- IoT & Smart Devices
- Virtual & Augmented Reality
- Latest News
- AI Developments
- Fintech Updates
- Gaming News
- New Product Launches
Learn To Convert Scanned Documents Into Editable Text With OCR
Top mini split air conditioner for summer, related post, comfortable and luxurious family life | zero gravity massage chair, when are the halo awards 2024, what is the best halo hair extension, 5 best elegoo mars 3d printer for 2024, 11 amazing flashforge 3d printer creator pro for 2024, 5 amazing formlabs form 2 3d printer for 2024, related posts.

How To Transfer Bookmarks From Safari To Chrome
How To Save Safari Bookmarks
How To Import Bookmarks From Safari To Chrome
How To Transfer Safari Bookmarks To Chrome

How To Move Bookmarks From Safari To Chrome
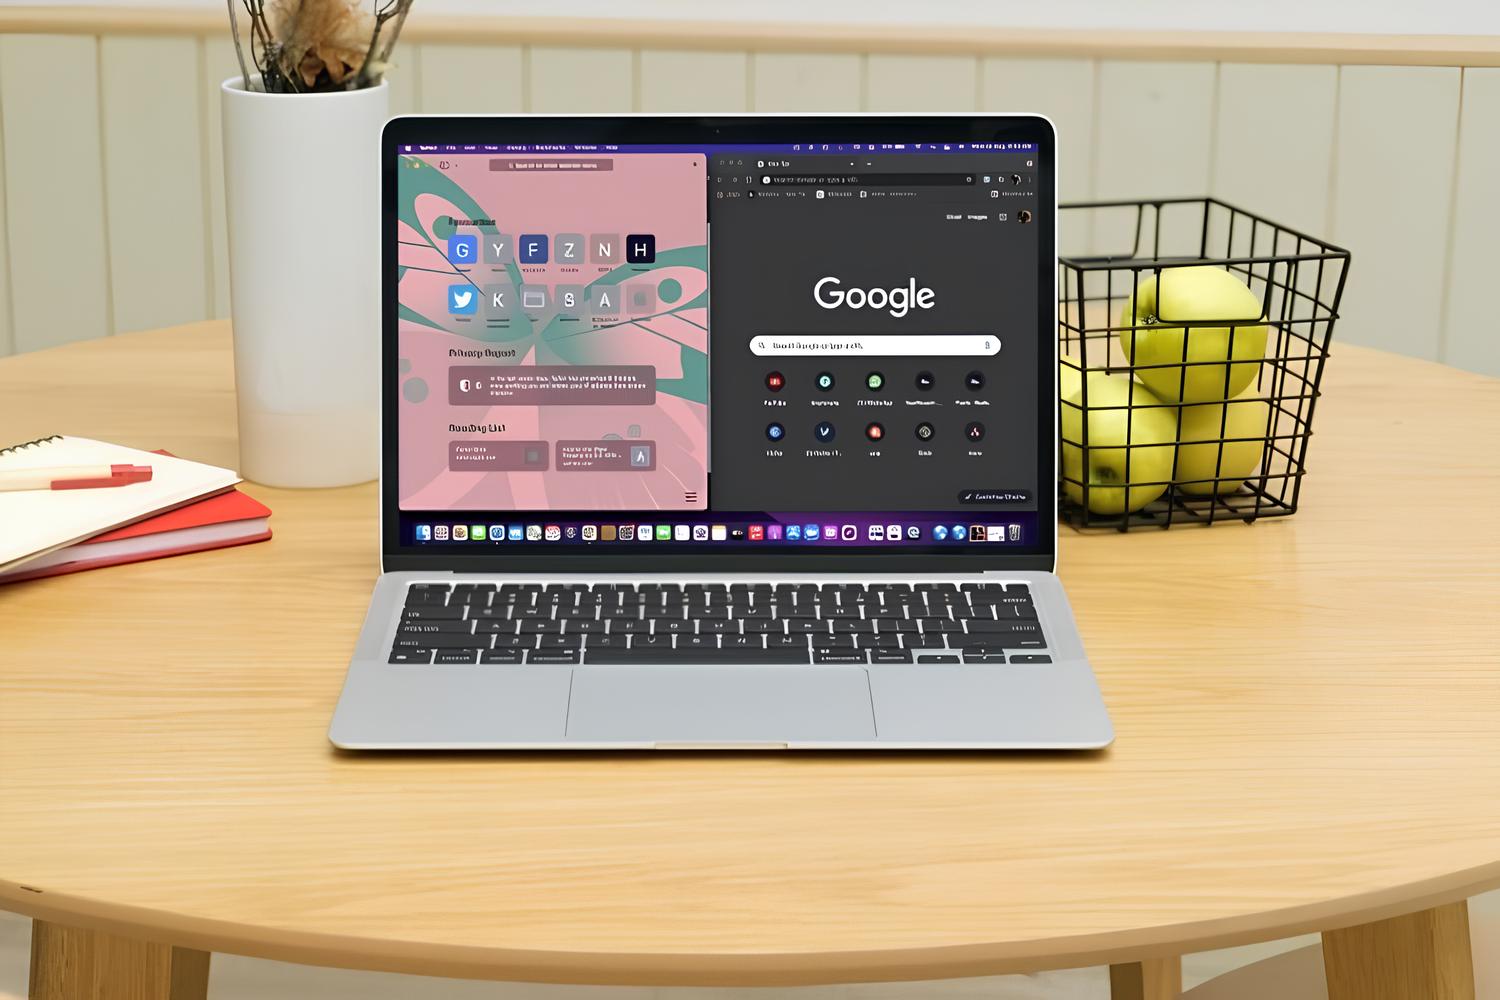
How To Copy Bookmarks From Safari To Chrome

How Do I Import Bookmarks From Safari To Chrome
How To Sync Chrome With Safari
Recent stories.

Fintechs and Traditional Banks: Navigating the Future of Financial Services

AI Writing: How It’s Changing the Way We Create Content

How to Find the Best Midjourney Alternative in 2024: A Guide to AI Anime Generators

How to Know When it’s the Right Time to Buy Bitcoin

Unleashing Young Geniuses: How Lingokids Makes Learning a Blast!

- Privacy Overview
- Strictly Necessary Cookies
This website uses cookies so that we can provide you with the best user experience possible. Cookie information is stored in your browser and performs functions such as recognising you when you return to our website and helping our team to understand which sections of the website you find most interesting and useful.
Strictly Necessary Cookie should be enabled at all times so that we can save your preferences for cookie settings.
If you disable this cookie, we will not be able to save your preferences. This means that every time you visit this website you will need to enable or disable cookies again.
How-To Geek
How to sync any browser's bookmarks with your ipad or iphone.
Apple makes it easy to synchronize bookmarks between the Safari browser on a Mac and the Safari browser on iOS, but you don't have to use Safari -- or a Mac -- to sync your bookmarks back and forth.
Quick Links
Safari on a mac, internet explorer, firefox, or chrome via icloud, google chrome sync, manual bookmark sync in itunes.
You can do this with any browser. Whether you're using Chrome, Firefox, or even Internet Explorer, there's a way to sync your browser bookmarks so you can access your same bookmarks on your iPad.
Apple's iCloud service is the officially supported way to sync data with your iPad or iPhone. It's included on Macs, but Apple also offers similar iCloud bookmark syncing features for Windows.
On a Mac, this should be enabled by default. To check whether it's enabled, you can launch the System Preferences panel on your Mac, open the iCloud preferences panel, and ensure the Safari option is checked.
Related: Safari for Windows is (Probably) Dead: How to Migrate to Another Browser
If you're using Safari on Windows -- well, you shouldn't be. Apple is no longer updating Safari for Windows . iCloud allows you to synchronize bookmarks between other browsers on your Windows system and Safari on your iOS device, so Safari isn't necessary.
To get started, download Apple's iCloud Control Panel application for Windows and install it. Launch the iCloud Control Panel and log in with the same iCloud account (Apple ID) you use on your iPad or iPhone.
You'll be able to enable Bookmark syncing with Internet Explorer, Firefox, or Chrome. Click the Options button to select the browser you want to synchronize bookmarks with. (Note that bookmarks are called "favorites" in Internet Explorer.)
You'll be able to access your synced bookmarks in the Safari browser on your iPad or iPhone, and they'll sync back and forth automatically over the Internet.
Google Chrome also has its own built-in sync feature and Google provides an official Chrome app for iPad and iPhone. If you're a Chrome user, you can set up Chrome Sync on your desktop version of Chrome -- you should already have this enabled if you have logged into your Chrome browser.
You can check if this Chrome Sync is enabled by opening Chrome's settings screen and seeing whether you're signed in. Click the Advanced sync settings button and ensure bookmark syncing is enabled.
Once you have Chrome Sync set up, you can install the Chrome app from the App Store and sign in with the same Google account. Your bookmarks, as well as other data like your open browser tabs, will automatically sync.
This can be a better solution because the Chrome browser is available for so many platforms and you gain the ability to synchronize other browser data, such as your open browser tabs, between your devices. Unfortunately, the Chrome browser is slower than Apple's own Safari browser on iPad and iPhone because of the way Apple limits third-party browsers, so using it involves a trade-off.
iTunes also allows you to sync bookmarks between your computer and your iPad or iPhone. It does this the old-fashioned way, by initiating a manual sync when your device is plugged in via USB. To access this option, connect your device to your computer, select the device in iTunes, and click the Info tab.
Related: How to Never Use iTunes With Your iPhone, iPad, or iPod Touch
This is the more outdated way of synchronizing your bookmarks. This feature may be useful if you want to create a one-time copy of your bookmarks from your PC, but it's nowhere near ideal for regular syncing. You don't have to use this feature, just as you really don't have to use iTunes anymore . In fact, this option is unavailable if you've set up iCloud syncing in iTunes.
After you set up bookmark syncing via iCloud or Chrome Sync, bookmarks will sync immediately after you save, remove, or edit them.
- Free Download
How to Backup Safari Bookmarks on iPhone iPad
How to backup Safari bookmarks on iPhone iPad? There are 3 ways in which you can easily backup Safari bookmarks on iPhone iPad or iPod.

iPhone Backup Tips
Backup iphone data.
- Backup iPhone Contacts
- Backup iPhone Text Messages
- Backup iPhone Notes
- Backup iPhone Safari Bookmarks
- Backup iPhone Apps
iPhone Backup Locations
- Backup iPhone to Google Drive
- Backup iPhone to Flash Drive
Backup iPhone to Computer
- Backup iPhone to iTunes
- View iPhone Backup on PC/Mac
- Combine Two iPhone Backups
- iPhone Backup Extractor
- Backup Disabled iPhone
- Backup iPhone in Recovery Mode
- Find iPhone Backup Password
- Fix iPhone Won’t Backup to iCloud
We know that Safari on our iPhone, iPad and iPod touch keeps tracking of our web browsing history and saving bookmarks for our frequently used websites. And when we visiting these websites, bookmarks offer us a shortcut to enter the target page without re-typing the URL again, which vastly improves our work efficiency and offers us a better experience of online surfing.
However, you may lose these important safari bookmarks due to many reasons, such as, mistaken deletion, device crash, a failed iOS upgrade, jailbreak, even get your iPhone iPad iPod to touch lost, broken or stolen. Therefore, in this post, we will offer you 2 ways to quickly backup Safari bookmarks from iPhone iPad.
- Method 1. How to Backup Safari Bookmarks from iPhone iPad to iCloud
- Method 2. How to Save Safari Bookmarks to Computer or Another iOS Device with AnyTrans
- Method 3. Backup Safari Bookmarks to Computer with Ease
Can’t Miss: How to Recover Deleted Safari Bookmarks on iPhone >
Method 1: Backup Safari Bookmarks via iCloud
You know, iCloud allows us to backup iOS contents whenever when we connect our device to a Wi-Fi network. Naturally, you can easily backup Safari bookmarks with iCloud. If you are green hand to iDevices, follow us to back up Safari bookmarks to iCloud with the steps below:
Tap on your device, go to Settings > iCloud > Safari > Turn on Safari if it is off > Click Merge to merge bookmarks with iCloud.
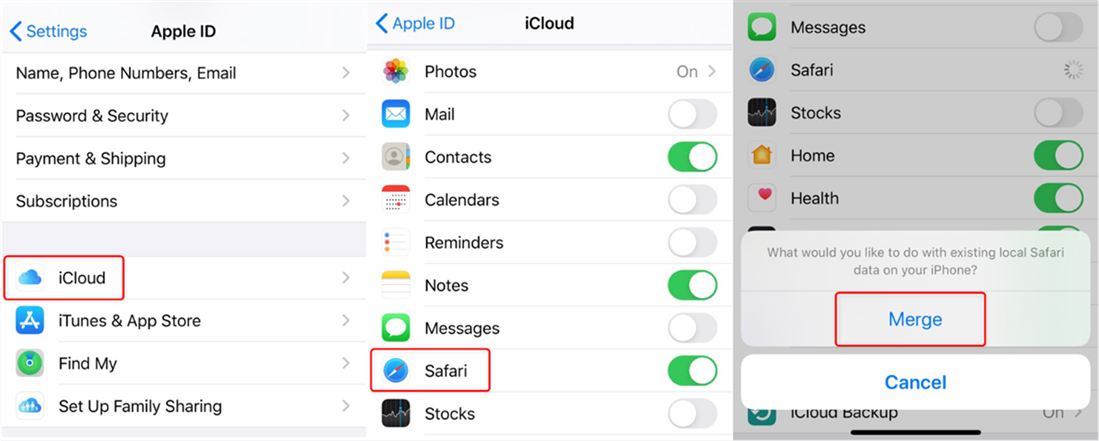
How to Backup Safari Bookmarks via iCloud
Important Note: Once the Safari bookmarks backed up to iCloud, you can’t access them unless you want to merge the current data with that on iCloud.
If you want to backup Safari bookmarks to computer or store them in HTML format, read our post to learn the second way to back up Safari bookmarks.
Also Read: How to Increase iCloud Backup Speed >
Method 2: Backup Safari Bookmarks to Computer or Another iOS Device
Unlike Android smartphones, the iPhone’s system folders can’t be opened or viewed. Naturally, you can’t explore or manage your iPhone iPad iPod touch files, let alone backup Safari bookmarks to the computer. Here we’ll introduce you to a powerful iPhone iPad Management Tool – AnyTrans , which allows you to backup, manage, export your Safari bookmarks as you want.
Download and install AnyTrans on your computer firstly, and then follow us to backup Safari Bookmarks to computer or another device with a few clicks
Step 1. Run AnyTrans > Click Device Manager > Tap More to scroll down in the category box.
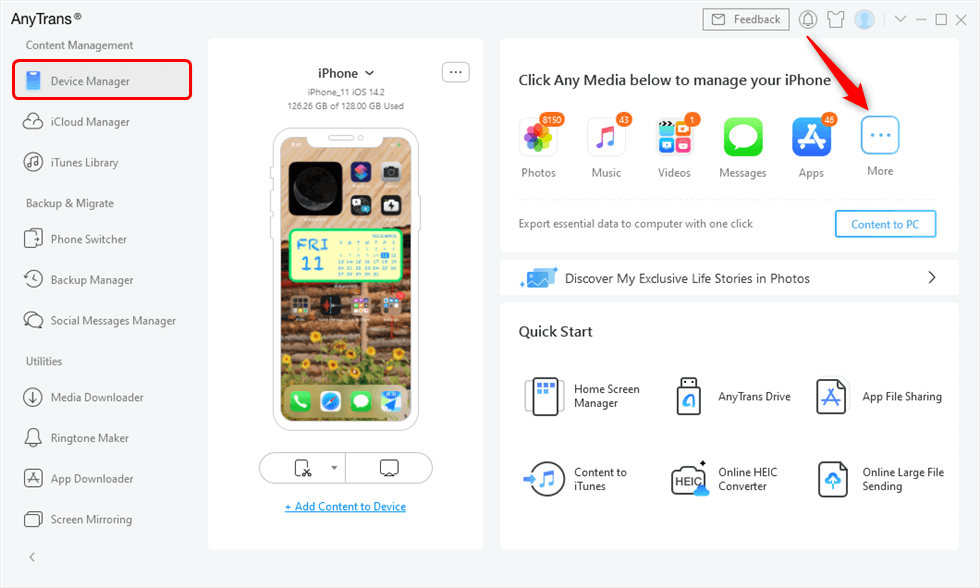
Click More Button to Find Ringtones
Step 2. Slide to find “Safari”, and then “Bookmarks” > Select bookmarks you want to backup or export > Click “Send to PC” to save them to a computer, or Click “Send to Device” to transfer them to another iOS device.
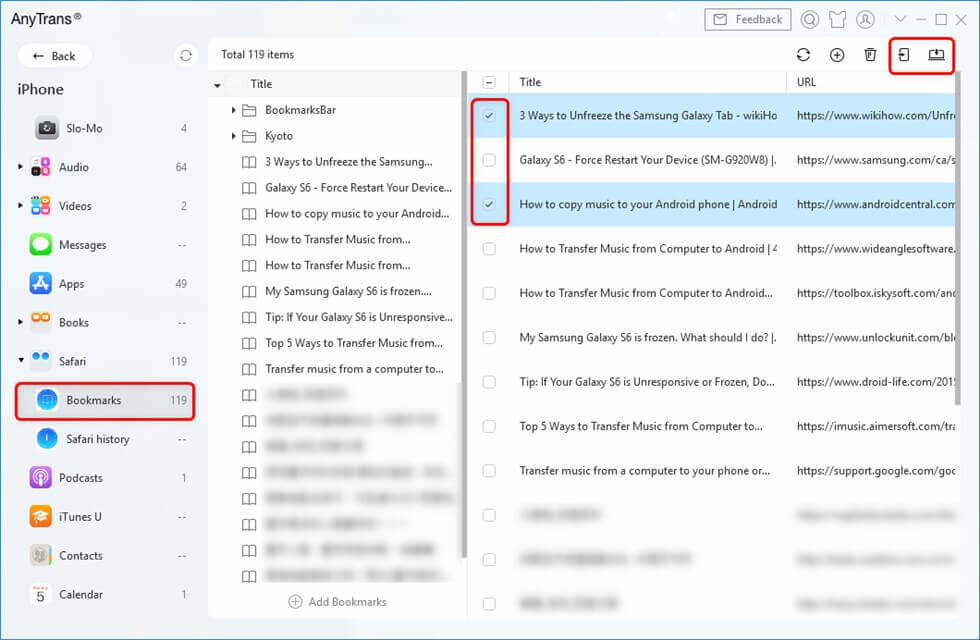
Backup Safari Bookmarks from iPhone to Computer or Another Device
– No matter you are working with Windows or Mac computer, you can back up Safari bookmarks with AnyTrans with the tutorial above.
You May Like: How to Transfer Contacts from Old iPhone to New iPhone >
Method 3. Backup Safari Bookmarks to Computer with Ease
As a professional phone backup tool, you can use PhoneTrans to selectively or fully backup your iPhone’s data to the computer with just a few clicks. With the Selective Backup function, you can backup about 17 types of iOS data and 12 types of Android data. And you won’t risk any data loss while the backup process.
PhoneTrans – Phone to Phone Data Transfer
- Backup iPhone/Android data to the computer in 1-click.
- Support transfer data between Android and iPhone, iPhone to iPhone.
- Will not erase any existing data in the target and source device.
Free Download 100% Clean & Safe
Free Downloa * 100% Clean & Safe
Now, please free download PhoneTrans to backup the Safari bookmarks to your computer.
Step 1. Install and launch PhoneTrans on your PC/Mac computer > Choose the Phone Backup function at the left panel > Click on Selective Backup option.
Choose Selective Backup on PhoneTrans
Step 2. Then connect your iPhone/iPad to your computer, PhoneTrans will detect your iOS device automatically > Click on the Back Up button.
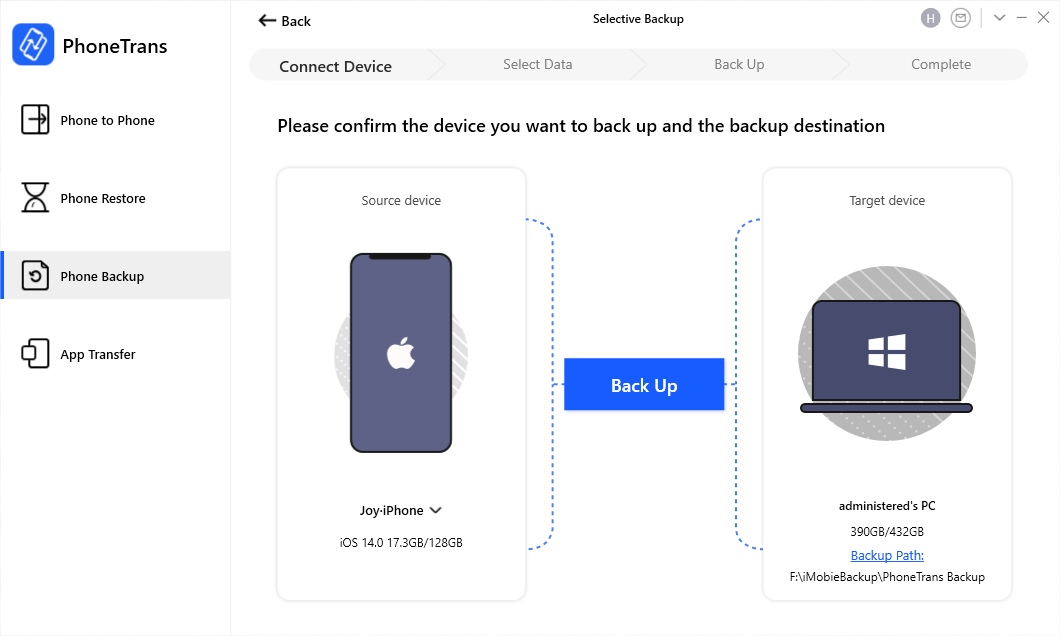
Step 3. Now please choose the data you want to backup.
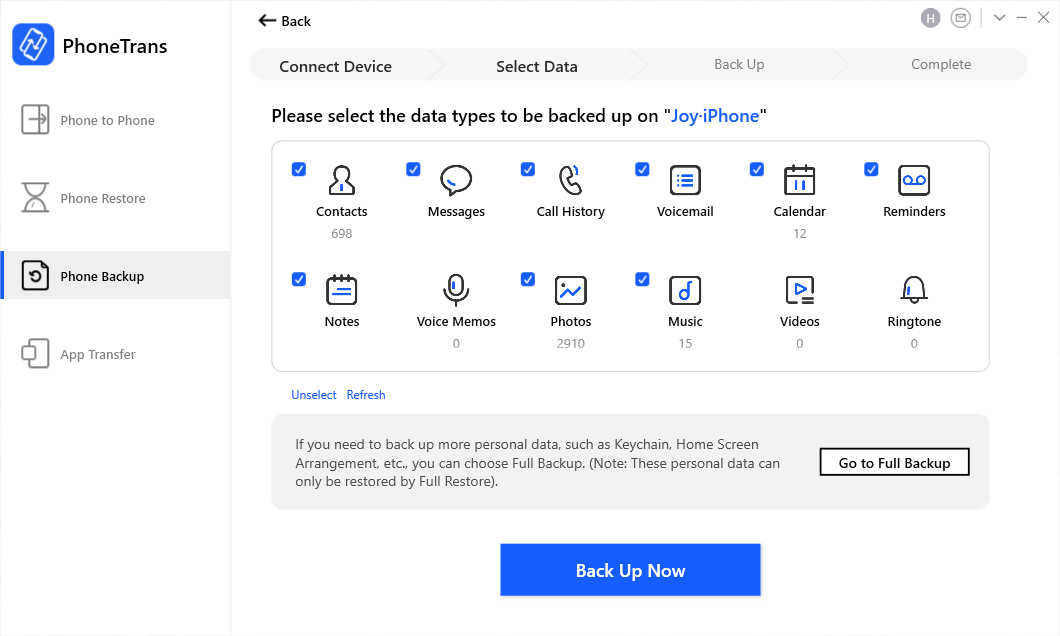
Choose Data to Selectively Back Up Data
The Bottom Line
Although you also can backup Safari bookmarks to computer by syncing your device to iTunes, this means backing up all the contents on your iPhone/iPad/iPod touch, and you can’t access these bookmarks unless you plan to restore them to your device with this iTunes backup. While AnyTrans offers you a way to selectively backup Safari bookmark to computer and exports them to HTML or CSV format. Why Not Download AnyTrans to Start free trial Now >

Member of iMobie team as well as an Apple fan, love to help more users solve various types of iOS & Android related issues.
Product-related questions? Contact Our Support Team to Get Quick Solution >

export safari bookmarks on ipad
I can't find a file menu for Safari on my ipad that will let me export my bookmarks to a file. all current on iOS
iPad Pro, iPadOS 17
Posted on Jan 17, 2024 10:04 AM
Loading page content
Page content loaded
There are no replies.
How to save all open Safari tabs as bookmarks on iPhone and iPad
Have you ever been researching something in Safari on iPhone or iPad and wanted to save the links for all of those open tabs? Sure, you can bookmark each one individually , but that’s a tedious task that takes longer than it should. If you follow the steps below, you can save significant time by bookmarking all open Safari tabs in just a few taps.
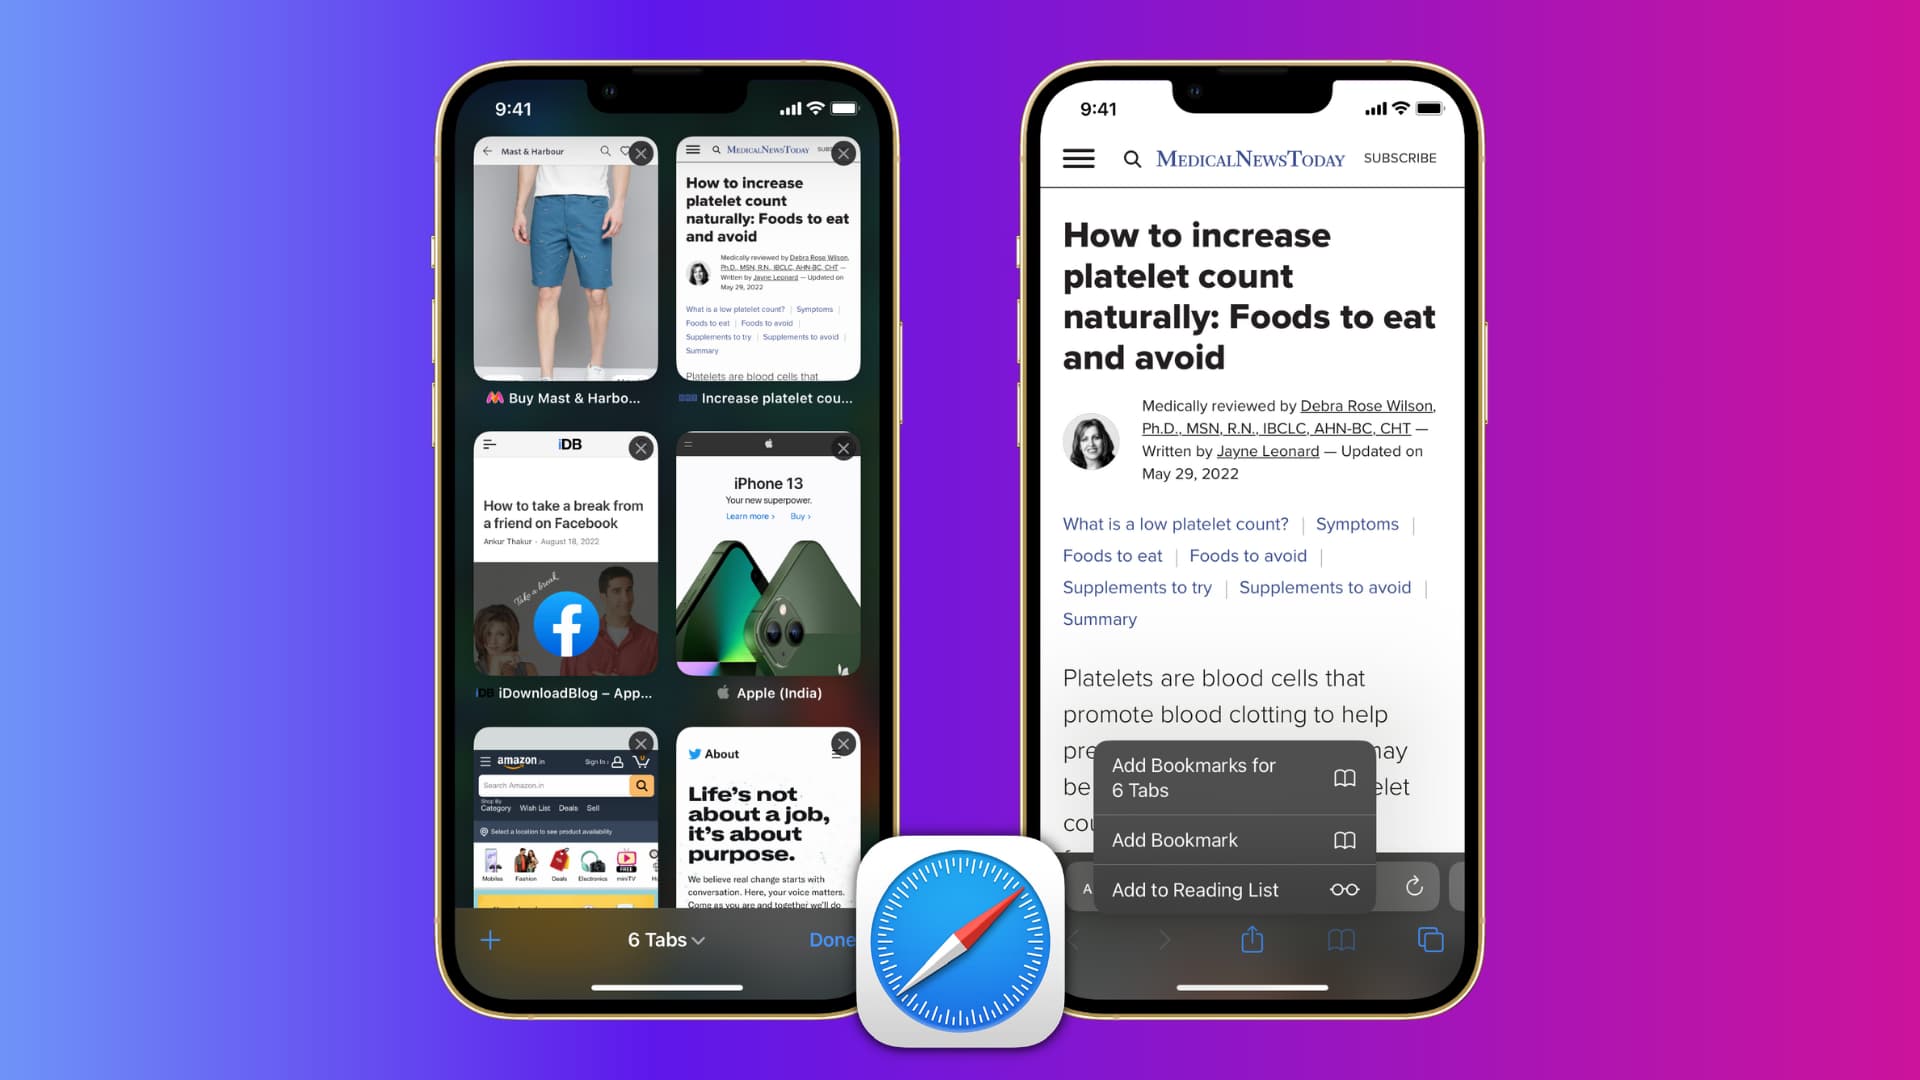
Save all open tabs in Safari on iPhone or iPad
With Safari open along with the tabs you want to save, just follow these steps to bookmark those links as a group:
1) Tap and hold the Bookmark button (open book icon) at the top on iPad or bottom on iPhone.
2) Select Add Bookmarks for [number] Tabs .
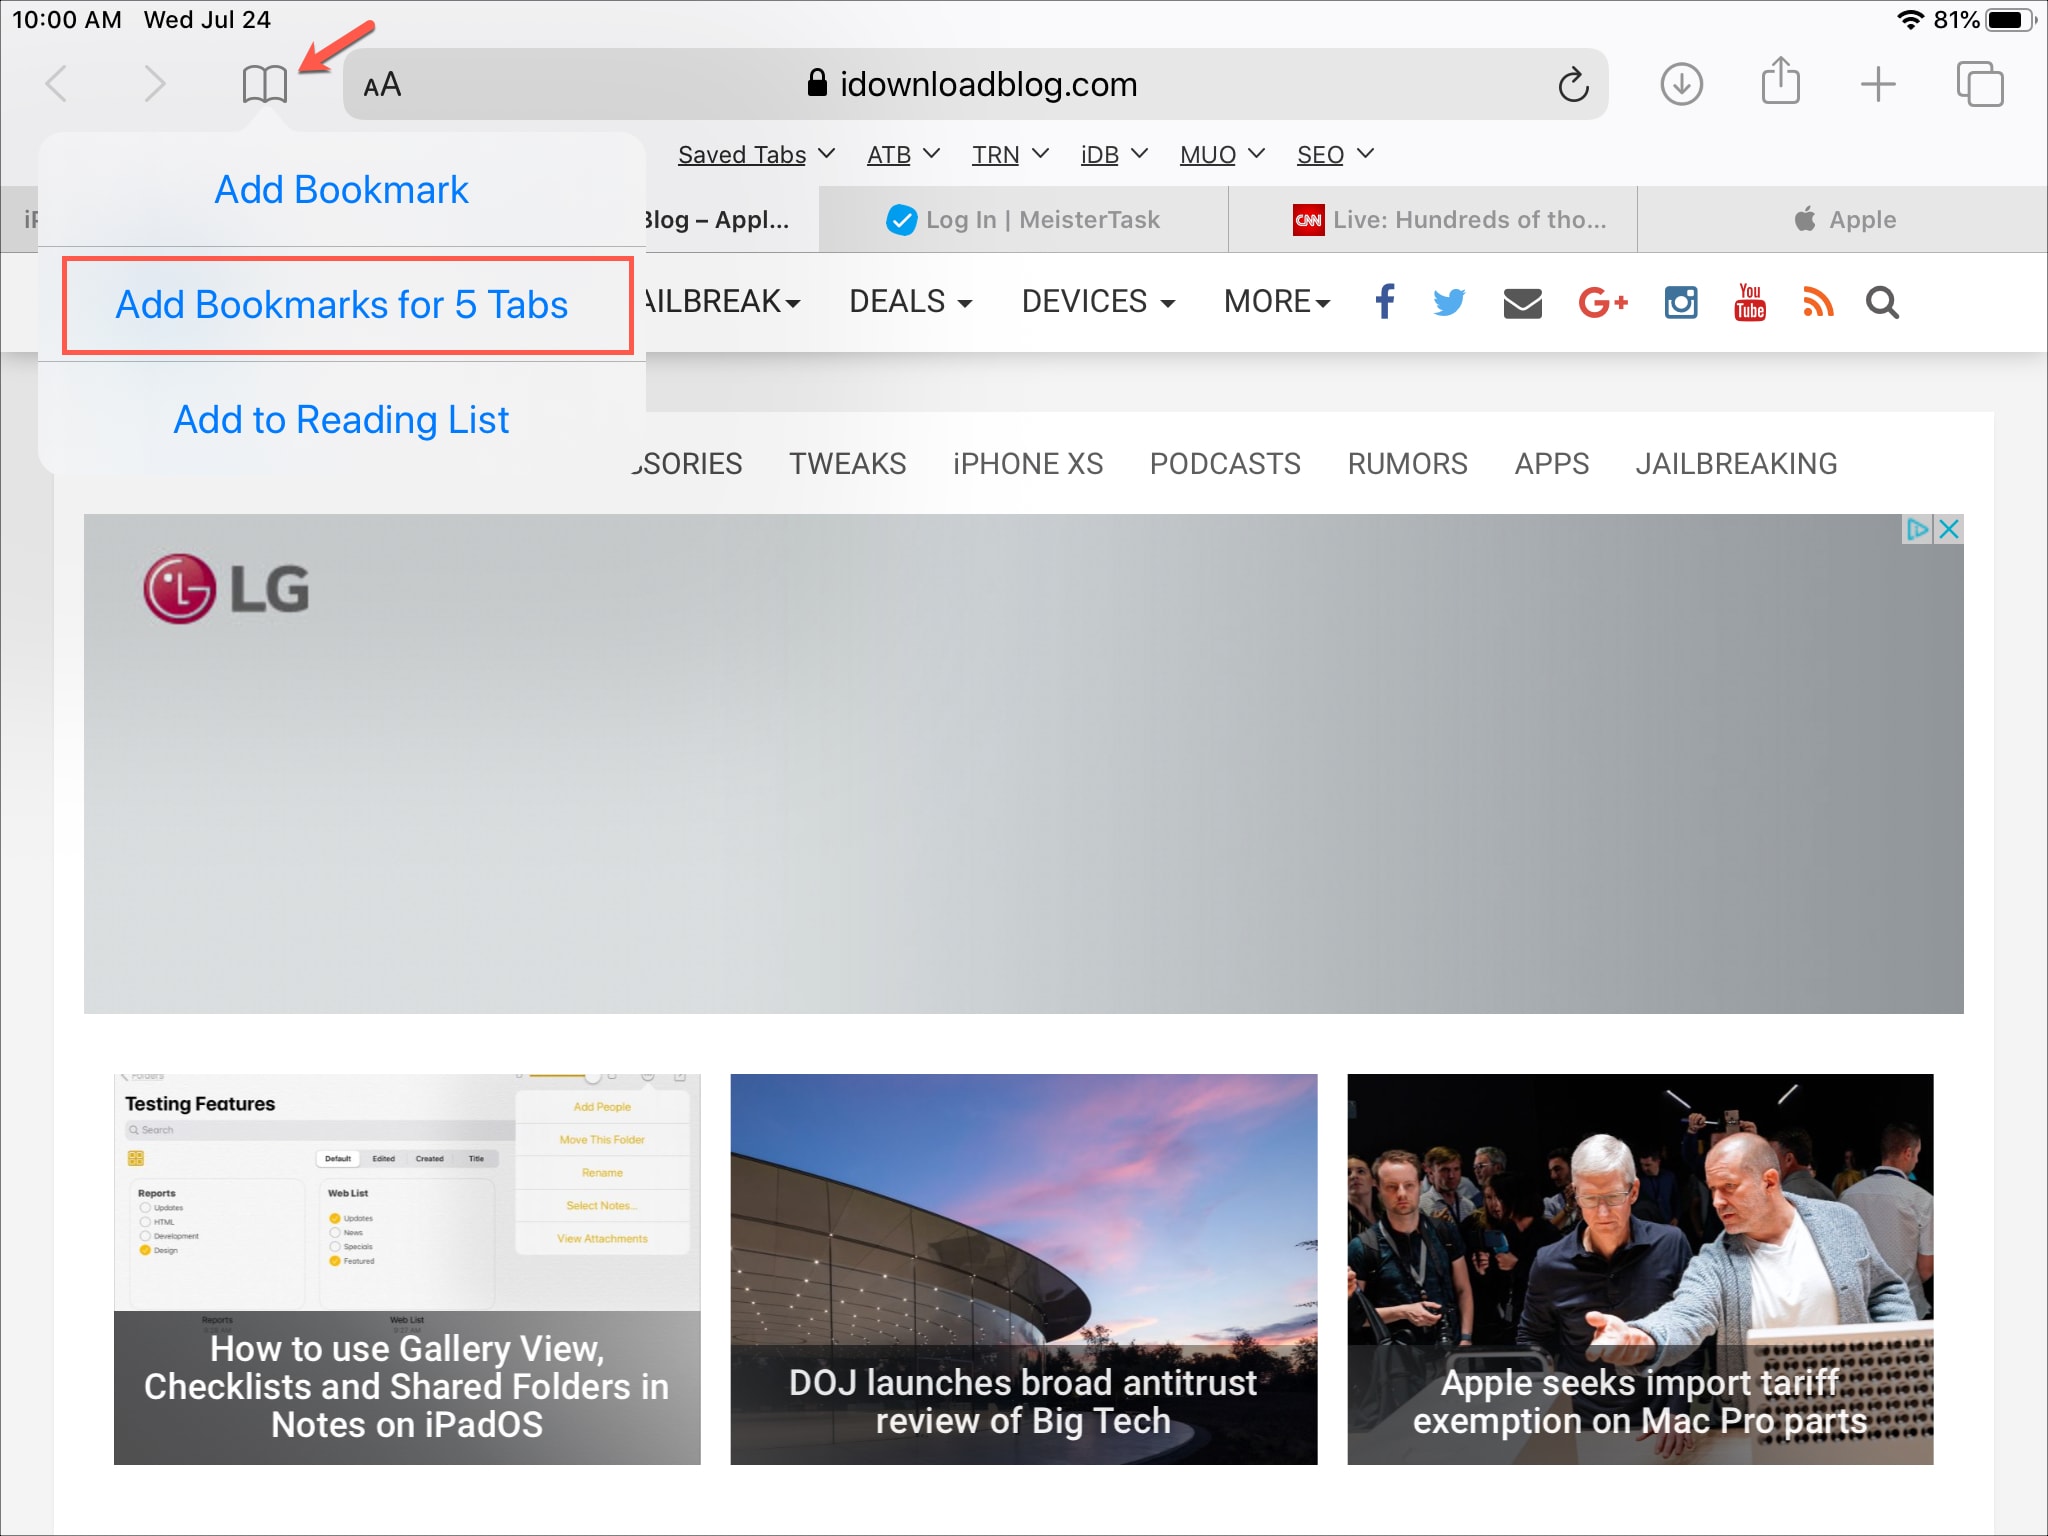
3) This will create a new folder for those tabs. So, give your folder a name and select the location .
4) Select Save .
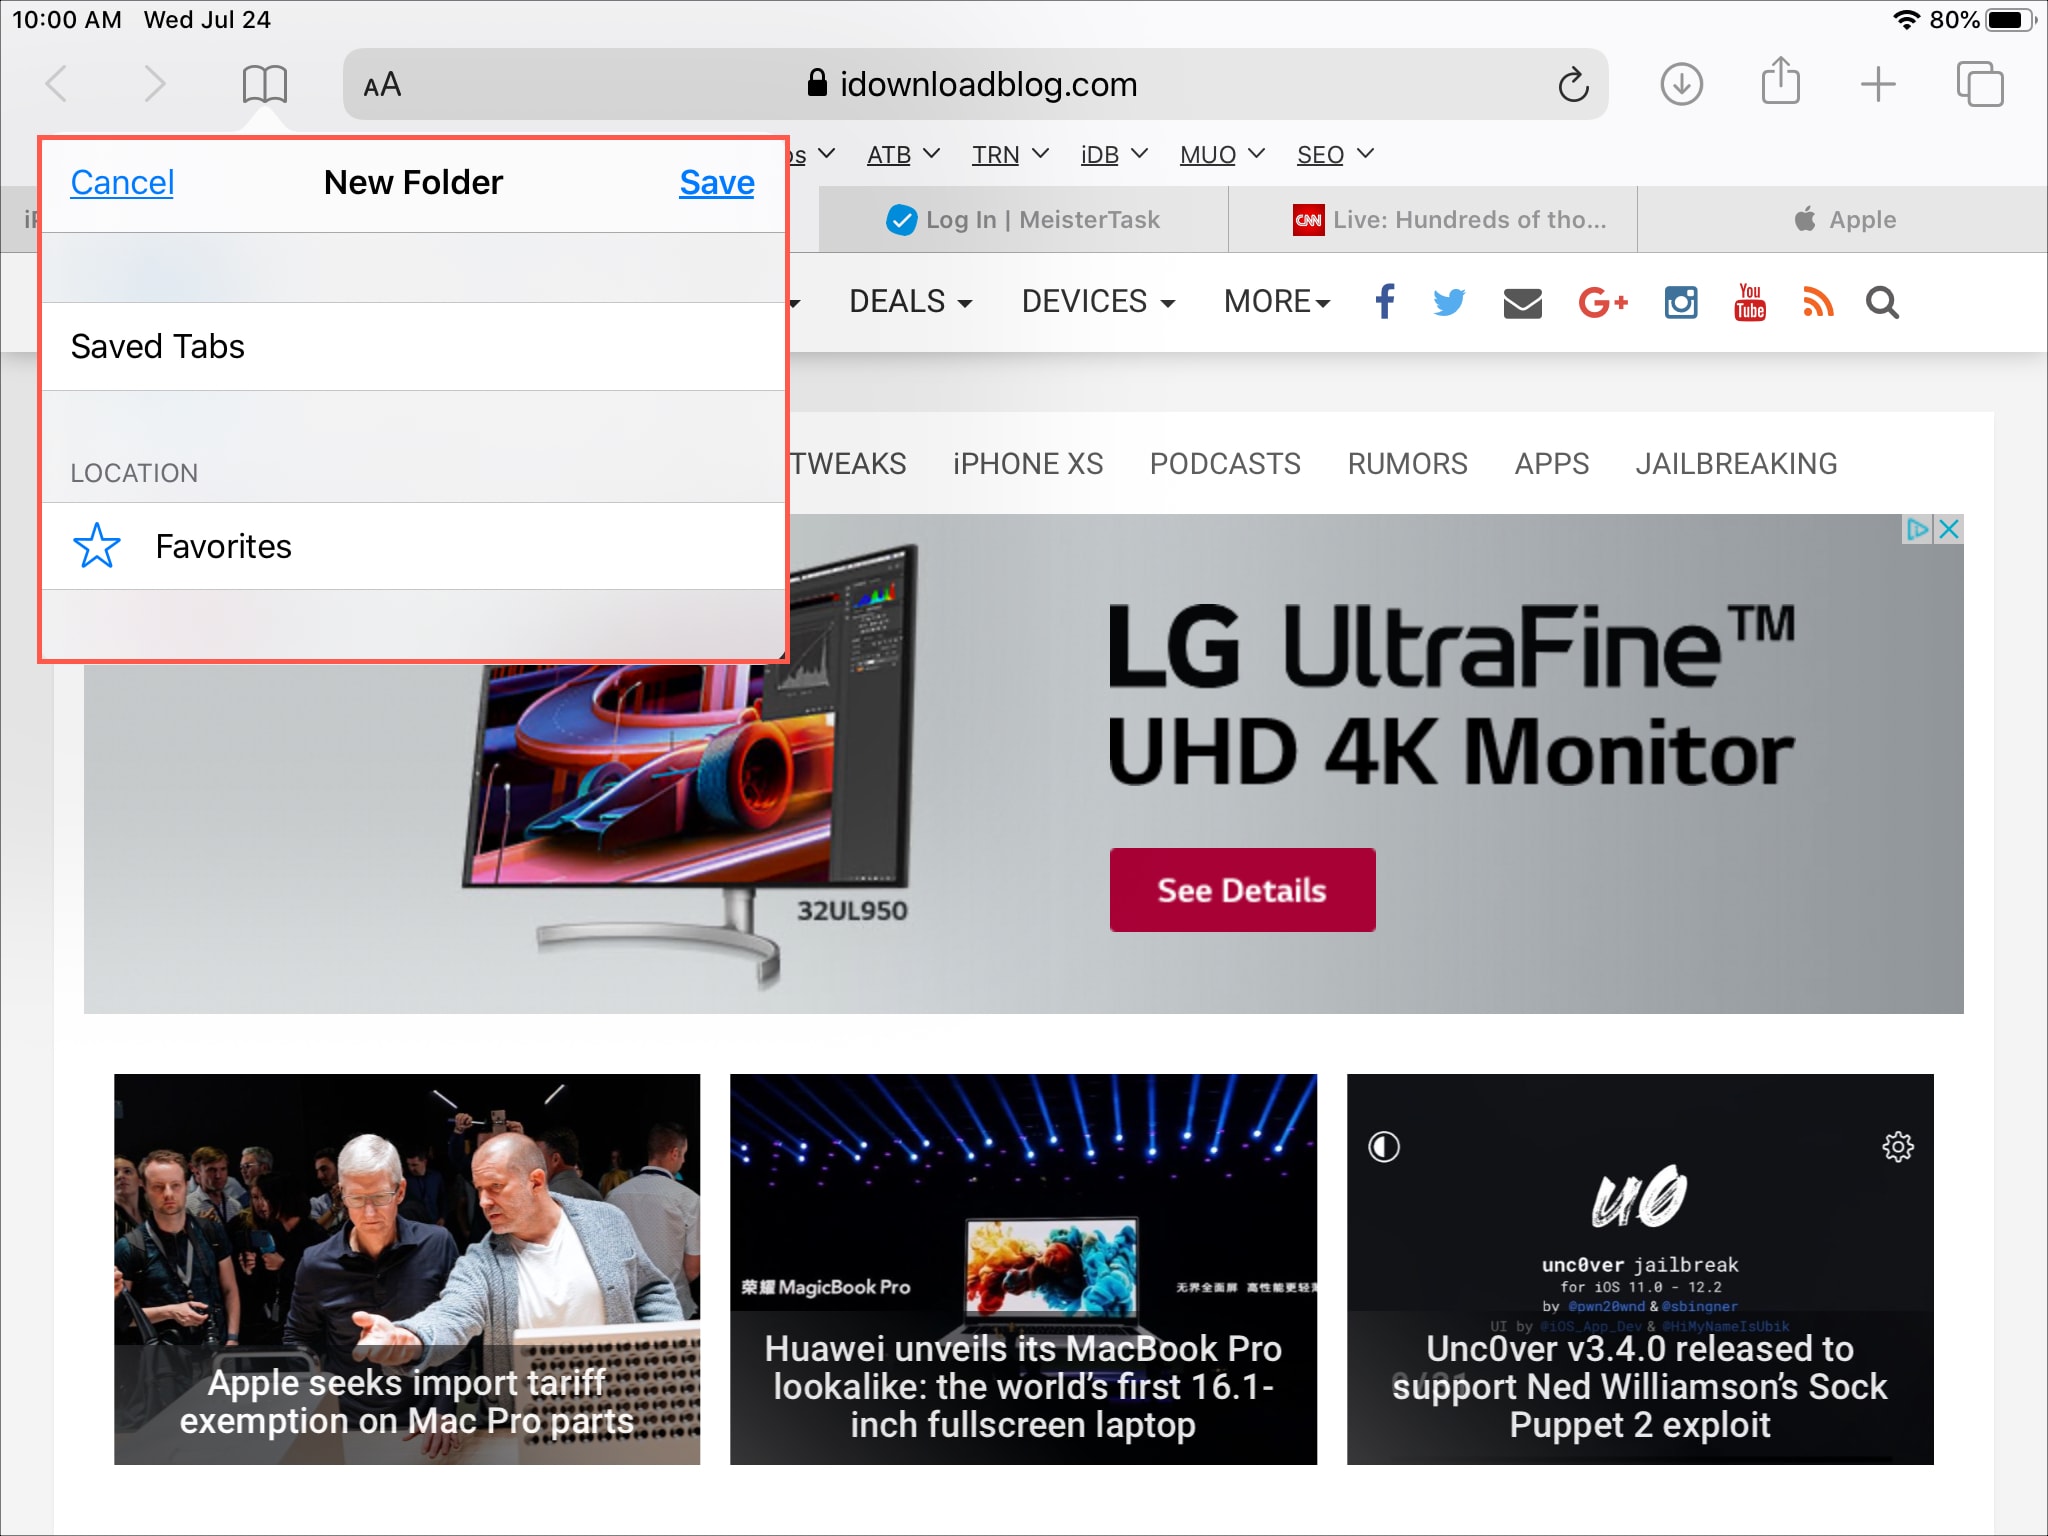
Done and done!
This new feature really is a handy one for those who open multiple tabs in Safari and want to keep them all.
For someone who needs to save handfuls of bookmarks, this is a terrific feature for Safari on iOS and iPadOS and a true time-saver.
What are your thoughts on this new feature? Is it one you’ve been waiting for as well? Feel free to share what you think about it in the comments below.
Helpful Safari tips:
- How to save all your open Safari tabs on Mac
- How to export Safari bookmarks from your iPhone or iPad to a Mac or PC
- 11 tips to customize and personalize Safari on iPhone and iPad
- How and why to update Safari, Chrome, and other web browsers on iPhone and Mac
- How to fix Safari tabs disappearing on iPad and iPhone
- PRO Courses Guides New Tech Help Pro Expert Videos About wikiHow Pro Upgrade Sign In
- EDIT Edit this Article
- EXPLORE Tech Help Pro About Us Random Article Quizzes Request a New Article Community Dashboard This Or That Game Popular Categories Arts and Entertainment Artwork Books Movies Computers and Electronics Computers Phone Skills Technology Hacks Health Men's Health Mental Health Women's Health Relationships Dating Love Relationship Issues Hobbies and Crafts Crafts Drawing Games Education & Communication Communication Skills Personal Development Studying Personal Care and Style Fashion Hair Care Personal Hygiene Youth Personal Care School Stuff Dating All Categories Arts and Entertainment Finance and Business Home and Garden Relationship Quizzes Cars & Other Vehicles Food and Entertaining Personal Care and Style Sports and Fitness Computers and Electronics Health Pets and Animals Travel Education & Communication Hobbies and Crafts Philosophy and Religion Work World Family Life Holidays and Traditions Relationships Youth
- Browse Articles
- Learn Something New
- Quizzes Hot
- This Or That Game New
- Train Your Brain
- Explore More
- Support wikiHow
- About wikiHow
- Log in / Sign up
- Computers and Electronics
- Internet Browsers
- Safari Browser
3 Easy Ways to Transfer and Import Bookmarks with Safari
Last Updated: April 8, 2024 Fact Checked
Importing Chrome or Firefox Bookmarks (Desktop)
Importing a bookmarks file (desktop), importing bookmarks to safari (mobile), troubleshooting.
This article was co-authored by wikiHow staff writer, Rain Kengly . Rain Kengly is a wikiHow Technology Writer. As a storytelling enthusiast with a penchant for technology, they hope to create long-lasting connections with readers from all around the globe. Rain graduated from San Francisco State University with a BA in Cinema. This article has been fact-checked, ensuring the accuracy of any cited facts and confirming the authority of its sources. This article has been viewed 166,330 times. Learn more...
Are you trying to back up or import your bookmarks to Safari? It's an easy process if you're using a computer! If you want to sync your bookmarks to your iPhone or iPad, you'll need to do a few extra steps. This wikiHow article teaches you how to import bookmarks to Safari whether you're moving from Google Chrome, Firefox, or any other browser.
Quick Tips to Move Your Safari Bookmarks
To import bookmarks from another browser in Safari, click File , Import From , and then select a browser. You can also export your bookmarks into an HTML file in Chrome, Firefox, or another browser, and then import it with Safari.

- Use this method if you want to import bookmarks from Google Chrome or Mozilla Firefox into Safari on your Mac device.
- If this is your first time opening Safari, importing from Chrome or Firefox can be automatic if you choose Keep your imported items . If you didn't opt for that, continue reading to manually import bookmarks from Chrome and Firefox.

- If this button is greyed out and unclickable, make sure Chrome or Firefox is not open in the background.
- If you imported passwords, you may need to enter your admin password before you can continue.

- Click ⋮ in the top-right corner.
- Hover over Bookmarks and lists .
- Click Bookmark manager .
- Click Export bookmarks . [3] X Research source
- Select a save location.
- Click ☰ in the top-right corner.
- Click Bookmarks .
- Click Manage bookmarks .
- Click Import and Backup .
- Click Export Bookmarks to HTML… [4] X Research source

- Imported bookmarks will appear under "Bookmarks" in the sidebar. [7] X Research source

- Safari is unavailable for Windows devices.

- Enter your password if prompted.

- You may need to tap Show all to see it. [12] X Research source

Community Q&A
- Keep a copy of your bookmarks' HTML file on hand as a backup in case you lose your bookmarks. Thanks Helpful 0 Not Helpful 0
- You can continue to add bookmarks to your library from within Safari by pressing ⌘ Command + D . Thanks Helpful 0 Not Helpful 0
- To see a non-Safari browser's favorites on mobile, export that browser's HTML file to your desktop, import it into Safari, and then sync your mobile with iCloud. Thanks Helpful 0 Not Helpful 0

You Might Also Like

- ↑ https://edu.gcfglobal.org/en/safari/bookmarking-in-safari/1/
- ↑ https://support.google.com/chrome/answer/96816?hl=en
- ↑ https://support.mozilla.org/en-US/kb/export-firefox-bookmarks-to-backup-or-transfer
- ↑ https://support.apple.com/en-al/guide/safari/ibrw1015/mac
- ↑ https://support.apple.com/en-us/102314
- ↑ https://support.apple.com/guide/iphone/bookmark-favorite-webpages-iph42ab2f3a7/ios
About This Article

1. Open Safari. 2. Go to the File tab and hover over Import From . 3. Click Google Chrome or Firefox . 4. Select the items you want to import. 5. Click Import . Did this summary help you? Yes No
- Send fan mail to authors
Is this article up to date?

Featured Articles

Trending Articles

Watch Articles

- Terms of Use
- Privacy Policy
- Do Not Sell or Share My Info
- Not Selling Info
Keep up with the latest tech with wikiHow's free Tech Help Newsletter
- Get One: Tornado Alert Apps
- The Best Tech Gifts Under $100
Back up or Move Your Safari Bookmarks to a New Mac
Easily back up or share your bookmarks with any Mac you use
Tom Nelson is an engineer, programmer, network manager, and computer network and systems designer who has written for Other World Computing,and others. Tom is also president of Coyote Moon, Inc., a Macintosh and Windows consulting firm.
:max_bytes(150000):strip_icc():format(webp)/ryanperiansquare-de5f69cde760457facb17deac949263e-180a645bf10845498a859fbbcda36d46.jpg)
- Western Governors University
What to Know
- Navigate to Home Directory / Library / Safari . Then, hold down the option key and drag the Bookmarks.plist file to a new location.
- You can also right-click the file and select Compress Bookmarks.plist . This creates a .zip file you can move anywhere on your Mac.
- To move the file to a new Mac, email it to yourself or use a cloud storage service like Dropbox or iCloud.
This article explains how to backup your Safari bookmarks for safe-keeping or move them to a new Mac without using the Bookmarks manager to sort through the imported bookmarks and manually putting them where you want them.
Backup Safari Bookmarks
Safari stores bookmarks as a plist (property list) file named Bookmarks.plist. It's located under Home Directory / Library / Safari . Bookmarks are stored on a per-user basis, with each user having their own bookmarks file. If you have multiple accounts on your Mac and want to back up or move all of the bookmarks files, access the above directory location for each user.
To back up your Safari bookmarks, copy the Bookmarks.plist file to a new location. You can do this in one of two ways.
Open a Finder window and navigate to Home Directory / Library / Safari .
With OS X Lion , Apple hid the Home Directory/Library folder, but you can still access the Library folder in a variety of ways. Once you gain access to the Library folder, you can proceed with the instructions below.
Hold down the option key and drag the Bookmarks.plist file to another location. By holding down the option key, you ensure that a copy is made and that the original stays in the default location.
The other way to back up the Bookmarks.plist file is to right-click the file and select Compress "Bookmarks.plist from the pop-up menu. This command will create a file named Bookmarks.plist.zip , which you can move anywhere on your Mac without affecting the original.
Restore Your Safari Bookmarks
All you need to restore your Safari bookmarks is to have a backup of the Bookmarks.plist file available. If the backup is in the compressed or zip format, you will need to double-click the Bookmarks.plist.zip file to decompress it first.
Quit Safari, if the application is open.
Copy the Bookmarks.plist file you backed up earlier to Home Directory / Library / Safari.
A warning message will display: "An item named "Bookmarks.plist" already exists in this location. Do you want to replace it with the one you're moving?" Select Replace .
Once you restore the Bookmarks.plist file, launch Safari. All your bookmarks will be present, just where they were when you backed them up. No importing and sorting required.
Move Safari Bookmarks to a New Mac
Moving your Safari bookmarks to a new Mac is essentially the same as restoring them. The only difference is that you will need a way to bring the Bookmarks.plist file to your new Mac.
Because the file is small, you can easily email it to yourself. Other options are to move the file across a network, store it in the cloud using a storage solution such as Dropbox or iCloud, or put it on a USB flash drive or external hard drive .
Once you have the Bookmarks.plist file on your new Mac, use the steps outlined above to make your bookmarks available.
iCloud Bookmarks
If you have an Apple ID, you can take advantage of iCloud's bookmarks feature to sync Safari bookmarks across multiple Macs and iOS devices. To gain access to the iCloud-synced bookmarks, you need to set up an iCloud account on each Mac or iOS device that you wish to share bookmarks between.
For sharing bookmarks, make sure there is a checkmark next to the Safari item in the list of iCloud services. As long as you're signed in to your iCloud account on each Mac or iOS device you're using, you should have all of your Safari bookmarks available across multiple devices and platforms.
When you add a bookmark on one device, the bookmark will appear on all devices; more importantly, if you delete a bookmark on one device, all the devices that are synced via iCloud Safari bookmarks will also remove that bookmark.
Use Safari Bookmarks on Other Macs or PCs
If you travel a lot, you may want to bring along your Safari bookmarks. One method is to store your bookmarks in the cloud, so you can access them from anywhere you have an internet connection. This is helpful when you need to access your bookmarks from a public computer.
When you use Safari's Export Bookmarks option, the file Safari creates is actually an HTML listing of all of your bookmarks. You can take this file with you and open it in any browser, just like a normal web page. Of course, you don't end up with bookmarks per se; instead, you end up with a web page that has a clickable list of all of your bookmarks. Though not as easy to use as the bookmarks in a browser, the list can still come in handy when you're on the road.
Here's how to export your bookmarks.
Select File > Export Bookmarks .
In the Save dialog window that opens, select a target location for the Safari Bookmarks.html file, then select Save .
Copy the Safari Bookmarks.html file to a USB flash drive or to a cloud storage system.
To use the Safari Bookmarks.html file, open a browser on the computer you're using and either drag the Safari Bookmarks.html file to the browser's address bar or select Open from the browser's file menu and navigate to the Safari Bookmarks.html file.
Your list of Safari Bookmarks will display as a web page. To visit one of your bookmarked sites , just select the corresponding link.
Get the Latest Tech News Delivered Every Day
- How to Recover Lost Safari Bookmarks
- How to Back Up or Move Calendar Data to a New Mac
- How to Add, Edit, and Delete Bookmarks in iPhone's Safari
- How to Move Your Apple Mail to a New Mac
- How to Add Safari Bookmarks on iPad
- How to Add Safari Bookmarks on an iPhone or iPod Touch
- How to Back up Chrome Bookmarks
- The Top 10 Internet Browsers for 2024
- How to Back Up Firefox Bookmarks
- How to Import Bookmarks and Other Browsing Data to Firefox
- How to Bookmark on an iPad
- Keyboard Shortcuts for the Safari Bookmarks Toolbar
- How to Organize Safari Bookmarks and Favorites
- How to Back up Microsoft Edge Favorites
- How to Transfer Files Between an iPhone and a Mac
- How to Fix: Can't Add Bookmarks in iPad's Safari
Pencil - PDF Paper Notepad 4+
Handwriting, writing & sketch, kairoos solutions sl, designed for ipad.
- 4.0 • 1 Rating
- Offers In-App Purchases
Screenshots
Description.
Intuitive. Easy. Fast. Precise. Feel the paper and ink on your notes and PDF documents with your Apple Pencil (or other styluses). Pencil Notepad is a new, modern, powerful yet easy to use note-taking, draw and PDF markup app that allows you to create useful and beautiful notes, edit and annotate PDF documents and books and sketch your ideas quickly, and easily using your Apple Pencil, Stylus or even finger! It lets you feel the ink and paper thanks to the intuitive, fast and pixel-perfect precise control of your Pencil with useful tilt and pressure sensitivity, and support for palm rejection. Pencil Notepad means also smart notes: it uses machine learning and artificial intelligence algorithms to draw perfect shapes, convert your handwritten notes to text using Scribble, scan documents with automatic page frame recognition, search by text your photo library and insert them on your notes and other innovative smart features. Main features: + Use advanced 7 Ink tools to write and sketch: Marker, Pen, Pencil, Monoline, FountainPen, Watercolor and Crayon. + Floating bar to choose from 8 customizable colors and stroke width. + Open multiples documents side by side using multi-windows and multitask. + AI Assistant: What’s that word? Allow the AI Assistant to explain. Need a brief? Ask it to summarize. Language barrier? Request for a translation. Your assistant is ready to lend a hand. Chat with the AI Assistant about your document! + Convert handwritten text into editable text and share it. (No Internet needed!) + Convert locally (No Internet needed!) on your device all kind of documents like Excel, PowerPoint, JPEG& PNG images, etc. to PDF and annotate them. + Lets you feel the ink and paper thanks to the intuitive, fast and pixel-perfect precise control of your Apple Pencil with useful tilt and pressure sensitivity, and support for palm rejection. + Powerful document browser integrated with Files app and any cloud services like iCloud, Dropbox, Box, GDrive, oneDrive, etc. to import, export and sync your files. + Full-text search makes finding PDFs files much easier and faster, so you don’t have to waste time opening folder after folder trying to find that one document you need. + Powerful PDF reader with search, bookmarks, highlighting and voice read aloud. + You can use your iPad and Apple Pencil (and other supported styluses) to write by hand in any text field in the PDF or in your own rich text boxes, like the search field in Safari or a text field in Mail. All handwriting and conversion to text happens on your iPad, keeping your writing private and secure. + Reader mode interface for distraction free moments. + Dark mode support in documents. Ready for aviation use. + Paper background guides (squared, lined, coloured, etc.) for your handwriting and sketching. + Use the iOS camera to scan documents then edit and annotate them. + User Interface available in multiple languages including Right to Left like Arabic and other like English, Japanese, Chinese Simplified, French, Italian, German, Spanish, Portuguese, Russian, etc. Privacy Policy http://www.noteswriter.com/Kairoos_Privacy_Policy.html EULA https://www.apple.com/legal/internet-services/itunes/dev/stdeula/
Version 1.3.5
- Improved stability and fixed minor bugs.
Ratings and Reviews
App privacy.
The developer, Kairoos Solutions SL , indicated that the app’s privacy practices may include handling of data as described below. For more information, see the developer’s privacy policy .
Data Not Collected
The developer does not collect any data from this app.
Privacy practices may vary, for example, based on the features you use or your age. Learn More
Information
English, Arabic, French, German, Italian, Japanese, Portuguese, Russian, Simplified Chinese, Spanish
- 1-Month AI Assist Subscription $2.99
- App Support
- Privacy Policy

Family Sharing
Some in‑app purchases, including subscriptions, may be shareable with your family group when family sharing is enabled., more by this developer.
Notes Writer: Note-Taking PDF
Notes Writer Pro 2024
Textilus Pro Word Processor
Scrivo Pro - Scrivener Writers
Good Templates - Notes, Papers
You Might Also Like
Notator | Annotate Documents
Reader's Bench
Surfed Pro History & Bookmark
Note Mate - Template Manager

IMAGES
VIDEO
COMMENTS
Go to Settings > Apple ID > iCloud and make sure that Safari is checked. Select the Apple icon at the top of the screen > System Preferences > Apple ID > iCloud and make sure the Safari option is checked. Open the Mac Safari Web browser. Click File, then Export Bookmarks. Give the file a name and click Save.
On your iPhone, open the Safari app. Tap on the bookmarks icon. Tap on the bookmarks tab at the bottom of the screen. Tap on the Edit button in the top-right corner of the screen. Tap on the bookmark you want to export. Tap on the Share button (it looks like a box with an arrow coming out of it).
Firstly, you need to download iPhone Data Recovery, one Safari Bookmark Exporter, and install it on your PC. 1 Launch this program on your PC, and connect iPhone to computer with USB cable. 2 Click "Recover from iOS Device", and then click Start Scan to scan your iPhone data. 3 Click Safari Bookmark, and select the bookmarks.
To export your iPhone's Safari bookmarks to your Mac or PC, you need to have iCloud syncing enabled for Safari on your iPhone and the device you want to sync with. Follow these steps to do that: Open the Settings app on your iPhone, iPad, or iPod touch. Tap your name from the top. Hit iCloud > Show All and make sure the switch next to Safari ...
To export bookmarks from Safari on your iPad, first, open the Safari app. Then, tap the "Bookmarks" icon at the bottom of the screen. Next, select "Edit" in the top right corner and choose ...
Step 1: Catch iCloud. As a user of the iPad, you have already saved your important bookmarks in safari; firstly, open the App settings and catch iCloud to your device, then tap on it. Step 2: To Synchronize Select Safari. To find the safari option, scroll down, tap into it, and activate the function.
Tap , then tap Bookmarks. Create a new folder: Tap New Folder at the bottom left, enter a name, then tap Done. Move a bookmark into a folder: Tap the bookmark, tap the Location, then tap a folder. Tap to return to your bookmarks. Delete bookmarks: Tap . Rename bookmarks: Tap the bookmark, enter a new name, then tap Done.
Press and hold the bookmark icon on the upper left of the screen. 3. A box will pop down that gives you the option to add the page to your reading list or add a bookmark. Choose "Add Bookmark ...
Click More Button to Find Bookmarks. Step 2. Slide to find "Safari", and then "Bookmarks" > Select bookmarks you want to backup or export > Click "To PC" to save them to a computer, or Click "To Device" to transfer them to another iOS device. Transfer Your Bookmarks. Step 3.
Open Safari on your iPhone or iPad and access your bookmarks using the method outlined in Step 1. Tap the bookmarks icon at the bottom of the screen to bring up your bookmarks and bookmark folders. Tap "Edit" at the bottom of the bookmarks screen, then select "Export Bookmarks." This action will generate a file containing your bookmarks.
Go to Settings > iCloud and disable the Safari option on your iPhone. Open iTunes on your computer and connect your iPhone or iPad to the computer using a USB cable. Click on the device icon and select Info. Put a check mark in the Sync Bookmark With checkbox. Choose a web browser from the extendable menu.
Step 1: Open Safari. To begin the process of exporting bookmarks in Safari, you first need to launch the Safari web browser on your Mac or iOS device. Safari is seamlessly integrated into the Apple ecosystem, offering a user-friendly interface and a wide array of features designed to enhance your browsing experience.
Apple makes it easy to synchronize bookmarks between the Safari browser on a Mac and the Safari browser on iOS, but you don't have to use Safari -- or a Mac -- to sync your bookmarks back and forth. ... Chrome, Firefox, or even Internet Explorer, there's a way to sync your browser bookmarks so you can access your same bookmarks on your iPad ...
Step 1. Run AnyTrans > Click Device Manager > Tap More to scroll down in the category box. Step 2. Slide to find "Safari", and then "Bookmarks" > Select bookmarks you want to backup or export > Click "Send to PC" to save them to a computer, or Click "Send to Device" to transfer them to another iOS device. Note:
If bookmarks aren't syncing, the following article from Apple can help: If your iCloud or Safari bookmarks aren't syncing. Once synced across your devices, if you have a Mac, you can use the following steps to export your bookmarks, under, "Export a bookmarks file": Import bookmarks and passwords from other browsers in Safari on Mac
If you're just wanting to transfer your Safari Bookmarks, then: In Safari, on your old Mac, you can export the bookmarks, Safari > File > Export Bookmarks ... Moving websites saved to the iPad Home screen to Safari bookmarks on Mac. 4. Import Chrome bookmarks to Safari under iOS. 2.
View and export your Safari data to various formats. Dig into iMazing or iTunes backups and recover important links. Privately, without iCloud, iMazing grants you better control over your iOS Safari data. Browse and back up all bookmarks. Export the ones you need to HTML. Dedicated section for reading lists featuring rich summaries of pages.
export safari bookmarks on ipad. I can't find a file menu for Safari on my ipad that will let me export my bookmarks to a file. all current on iOS. iPad Pro, iPadOS 17. Posted on Jan 17, 2024 10:04 AM. There are no replies. export safari bookmarks on ipad. . Support. Community.
With Safari open along with the tabs you want to save, just follow these steps to bookmark those links as a group: 1) Tap and hold the Bookmark button (open book icon) at the top on iPad or bottom on iPhone. 2) Select Add Bookmarks for [number] Tabs. 3) This will create a new folder for those tabs. So, give your folder a name and select the ...
Click Bookmarks HTML File. The Finder will open so you can find your files. 5. Navigate to and select the HTML file to import. You can double-click the file name in Finder or you can single-click it to select it, then click Import . Imported bookmarks will appear under "Bookmarks" in the sidebar.
Navigate to Home Directory / Library / Safari. Then, hold down the option key and drag the Bookmarks.plist file to a new location. You can also right-click the file and select Compress Bookmarks.plist. This creates a .zip file you can move anywhere on your Mac. To move the file to a new Mac, email it to yourself or use a cloud storage service ...
This tutorial will show you how to export bookmarks from Chrome to Safari on iPad & iPhoneDon't forget to check out our main channel https://www.youtube.com/...
Intuitive. Easy. Fast. Precise. Feel the paper and ink on your notes and PDF documents with your Apple Pencil. Pencil Notepad is a new, modern, powerful yet easy to use note-taking, draw and PDF markup app that allows you to create useful and beautiful notes, edit and annotate PDF documents and books and sketch your ideas quickly, and easily using your Apple Pencil, Stylus or even finger!