Table of contents

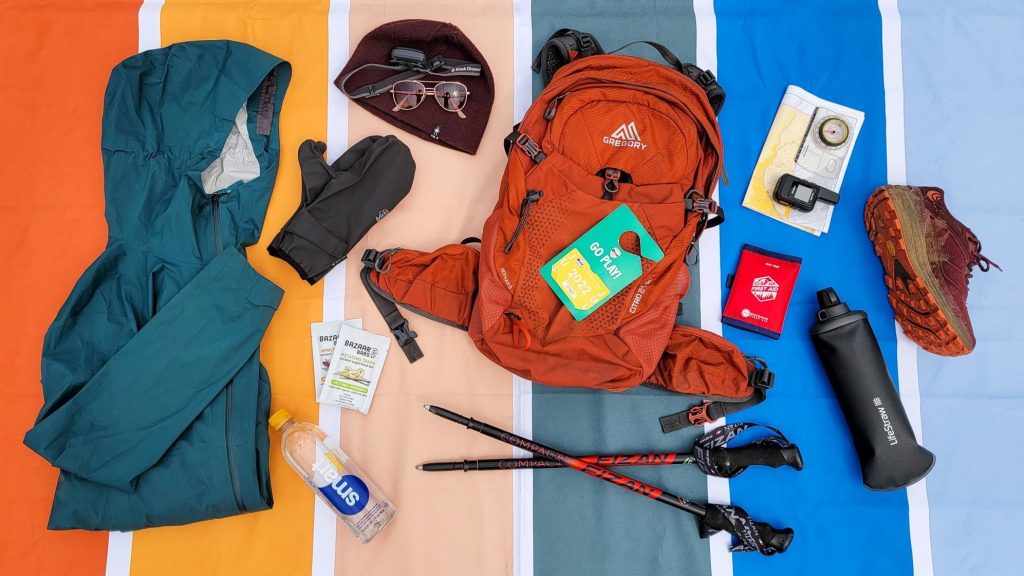
Ultimate Day Hiking Checklist

Some of the links on this page are affiliate links
Last updated: March 1, 2024
We love a good checklist to help us prepare for a trip – even if we’re just going out for a day hike. Use this Day Hike Checklist every time you hit the trail to make rounding up your gear quick and easy, and to give you peace of mind that you aren’t forgetting something critical.
Day Hiking Checklist
DOWNLOAD OUR PRINTABLE CHECKLIST
You won’t need all the items on this list for every trip, but it’s worth thinking through each of them as you gather your gear. Grab the basics first, then use the categories at the end to tailor your gear list to your specific needs.
- Apply for any required permits
- Call ranger station for trail conditions & regulations
- Check if trailhead requires a parking pass or cash/card for pay station
- Check current weather
- Charge electronics & check batteries
- Update emergency contacts and turn on SOS / emergency notification features on your phone
- Study topo map/take photos of guidebook pages
- Download GPS phone app & appropriate maps or GPS area
- Download driving directions for offline use (we use maps.me )
- Leave an itinerary with a friend & under your car seat
- Pack your bag

WATERPROOFING
Based on your pack choice, choose one or more of the following to keep your stuff dry:
- Pack liner or trash bag
- Waterproof stuff sack(s)
TOOLS & ACCESSORIES
- Wallet (containing cash, ID, credit card, insurance card)
- Phone in protective case
- First aid kit & prescription Rx
- Sunscreen & lip balm
- Poop kit (toilet paper, hand sanitizer & trowel )
- Light pocket knife or multitool
- Ultralight chair / sit pad or hammock
- Trekking poles
NAVIGATION EQUIPMENT
- Topo map(s)
- Waterproof map bag / Ziploc
- GPS phone app
Choose one of the following to carry your gear:
- Hydration pack
- Extra shoulder or hipbelt pocket
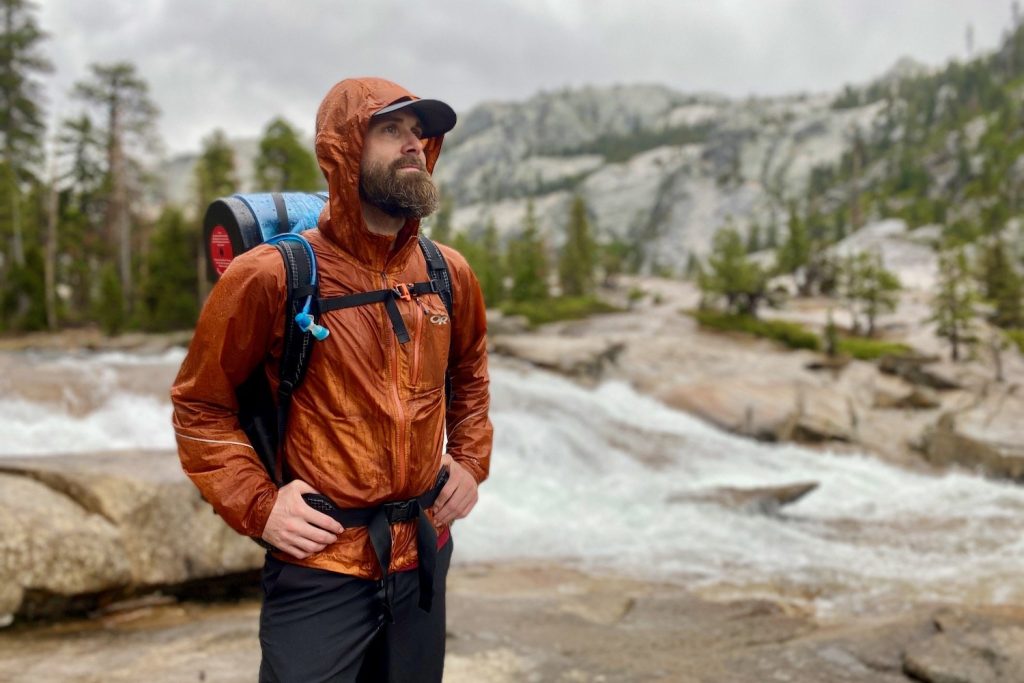
Some worn, some packed. Layer clothing based on season and weather conditions. For fabrics – think lightweight and quick-drying (no cotton).
- Hiking pants ( Men’s / Women’s ), leggings , or shorts ( Men’s / Women’s )
- Quick-dry underwear
- Shirt ( sun shirt , base layer , or short sleeve / tank)
- Jacket(s) ( rain , down , fleece , windbreaker – possibly a combo)
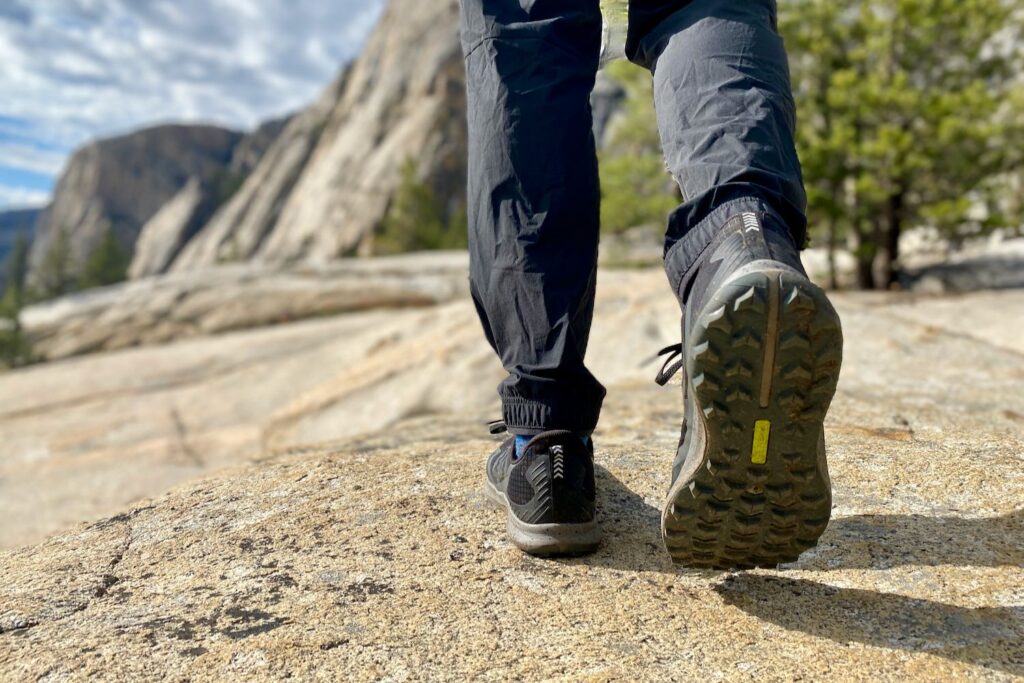
- Shoes / boots
- High-quality socks
- Gaiters (for talus, sand, snow, or fast/long trips)
- Hat(s) ( warm or for sun )
PACK IN CAR
- Parking pass or cash / card
- Itinerary or note under seat
- Clean clothes & comfy shoes to change into
- Gallon of water to refill bottles
- Cooler with post-hike refreshments
- Blanket or camping chairs (for tailgating)
FOOD & WATER
- Full water bottle(s) or hydration bladder
- Food & snacks
- Empty Ziploc (for garbage)
- Drink mixes
- Travel mug & coffee / tea
Additional Gear For Specific Trips
Rain & snow.
- Rain jacket
- Rain mittens
- Traction devices or snowshoes
- GPS / phone app (for route finding in snow)
MOSQUITOS & TICKS
- Pre-treat clothing with Permethrin
- Treat skin with Picaridin
LONG HIKES / REMOTE LOCATIONS
- Extra food for emergencies
- Duct / Tenacious Tape (for repairs)
- Small lighter & fire starters
- Water filter or treatment pills
- Collapsible water containers (for carrying lots of water in dry locations)
- Satellite Messenger / PLB
- Emergency blanket / shelter
GRIZZLY BEAR COUNTRY
- Bear canister
PHOTOGRAPHY
Backup photos, clear storage, and clean lens.
DSLR or Point-and-Shoot
- Holster or camera clip
- Remote shutter
- Microfiber cleaning cloth
- Rain cover / dry bag
- Extra battery
- Extra camera card
- Phone ( Apple or Android )
- Shoulder pouch or hipbelt pocket
- Smartphone tripod mount
- Small carabiner (to keep track of remote)
- Waterproof case or Ziploc
- Power bank (for long trips)
- Short charging cable
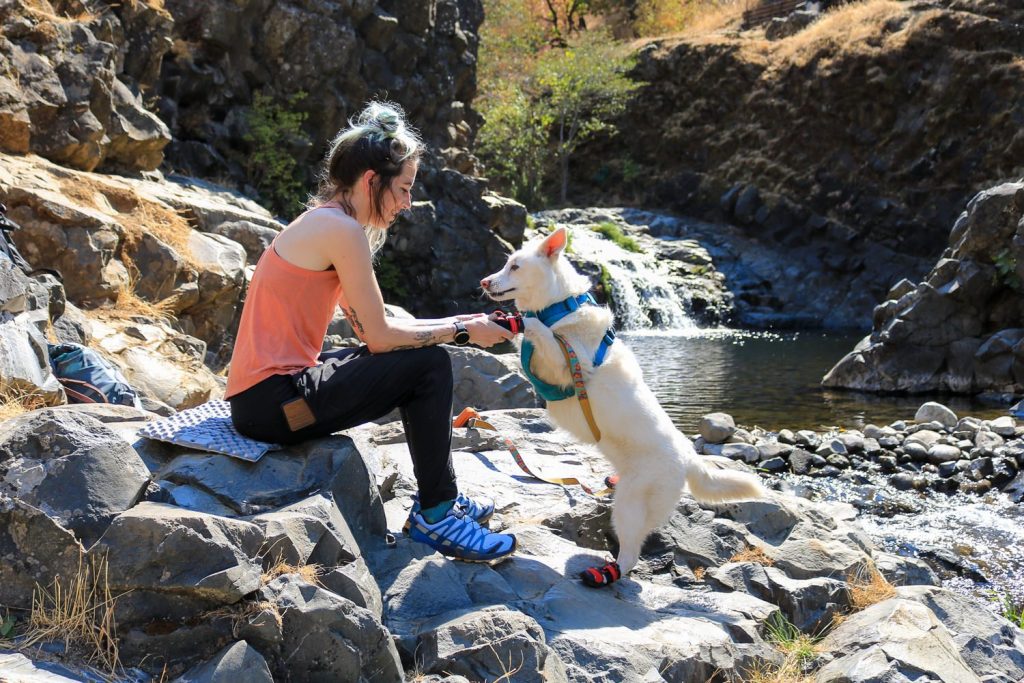
For the trail
- Collar / harness
- Food & collapsible bowl
- Extra water (you carry)
- Treats & treat pouch
- Dog boots / Musher’s Secret Wax (to protect the paws)
- Poop bags & gallon Ziploc or OPsak (to pack out waste)
- Dog backpack
- Dog jacket (for dogs with low cold tolerance)
- Foam pad (to insulate you and your dog from the cold/wet ground during breaks)
- Dog first aid kit (or add stuff to human first-aid kit )
- Collar light (check battery pre-trip)
Leave in car
- Quick-dry towel
- Dog car hammock (seat protector)
- Extra dog food in airtight container
Overnight Trips
Prepping for a multi day adventure? We also have checklists for backpacking , camping , and winter camping .
Day Hiking Tips
Finding a balance of pack weight & preparedness.
A lightweight backpack is far more comfortable to carry. This will help you conserve energy so you can hike further and enjoy your time outdoors more. That said, we never advise skipping essentials like a map, food, water, rain jacket , and a basic first-aid kit when venturing into the backcountry. Learn more about ways to reduce your pack weight here .
Most people use a daypack or hydration pack (comes with a bladder ) for day trips for their useful capacity, comfortable carry, and convenient pockets to keep gear organized and easily accessible. Daypacks come in a variety of sizes, but we prefer those that have about 20-30 liters of volume. Fanny packs are also a great option for small gear loads or for extra capacity in addition to a daypack.
WHAT TO WEAR FOR HIKING
The clothing you wear and pack for a day hike will depend on the conditions you expect to encounter on specific trips, but the basics remain the same. Wear layers made of quick-drying (synthetic or wool) fabrics so you can stay comfortable no matter the weather. Lightweight, breathable footwear and high-quality, non-cotton socks also make a huge difference in reducing fatigue and avoiding blisters . Get specific recommendations on the best down jackets , rain jackets , hiking pants , base layers , and more on our Gear Guide Homepage .
Why trust us?
We understand how tough it is to find trustworthy gear advice, and that’s one of the main reasons we built CleverHiker. We live for outdoor adventure, and we take these guides very seriously.
- Our recommendations are completely independent and based on hands-on experience.
- We test outdoor gear for a living – we’ve logged over 20,000 trail miles and 1,000 nights in the wilderness.
- Our team has thru-hiked some of the most iconic long trails, including the Continental Divide Trail, Pacific Crest Trail, Appalachian Trail, Colorado Trail, Long Trail, Oregon Coast Trail, Arizona Trail, Pinhoti Trail, Superior Hiking Trail, as well as extensive peak bagging, and international treks.
- We field test every product we recommend, which is sadly not the norm.
- We travel to industry trade shows to stay up-to-date on product innovations.
- We continuously update our guides throughout the year and when new products launch.
- We treat recommendations to our readers as if they were for our family and friends.
- We’re lifelong learners and we’re always open to feedback. If you think we’ve missed a worthy product or got something wrong, we’d love to know about it.
Related Content
Hiking Boot & Shoe Soles for Grip, Traction & Different Terrains

How to Lace Hiking Boots & Shoes

How to Clean Hiking Shoes & Boots
100 Best Gifts For Hikers, Backpackers & Campers 2024

7 Best Trekking Poles of 2024

10 Best Rain Jackets of 2024
Platypus QuickDraw MicroFilter System Review
C.A.M.P. Corsa Ice Axe Review
Enlightened Equipment Visp Rain jacket Review

10 Best Hydration Mixes & Electrolyte Powders of 2024

10 Best Stuff Sacks of 2024
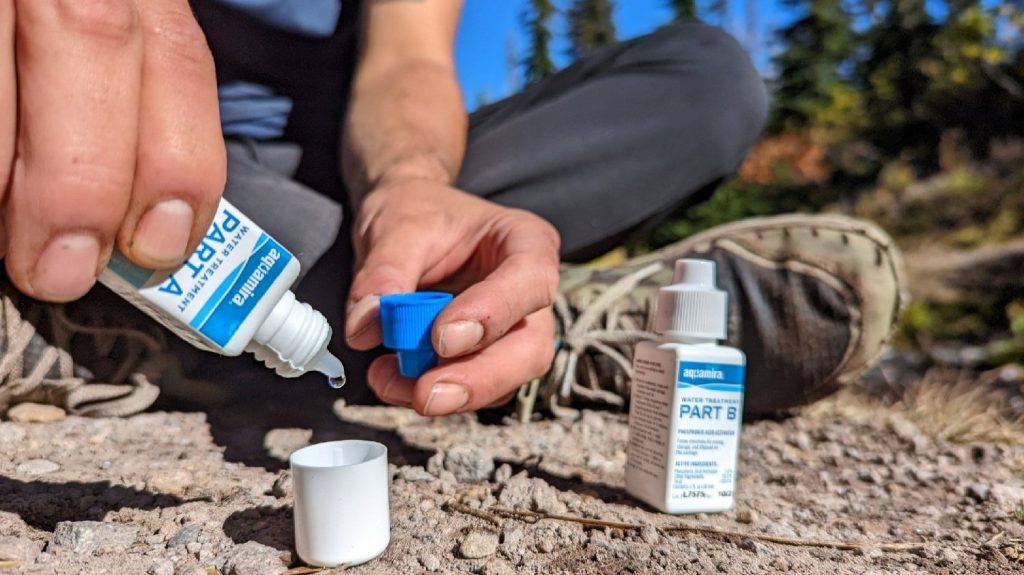
Aquamira Water Purification Drops Review
Get the best content from cleverhiker & around the backpacking world.
Social media is great, but our bi-weekly newsletter is a much better way to stay in the know.
Sign up to get our curated emails with the best content from CleverHiker and around the backpacking world. You’ll be turned on to new videos, trip reports, gear reviews, inspiring outdoor stories and much more. So get in the mix!

A Step-by-Step Guide To Planning A Perfect Hiking Trip

Hiking is perhaps the most accessible, healing outdoor activity that exists. But if you don't develop a plan, you may find yourself in a sticky situation. Fortunately, planning a hiking trip is an exciting (and critical) activity that will send you on your way to a successful hike.
Are you questioning whether or not you really need that much water? Or if you can just walk out your front door and wander wherever the wind takes you? If so, this guide is for you.
I love a one-mile hike just as much as I love a 15-mile hike. I have run out of water, gotten terrifyingly lost on unfamiliar trails, and suffered sunburns that affected me for weeks. With each learning experience, I have discovered how to form the ultimate hiking plan.
Below, I'll help you learn how to make a hiking trip go as smoothly as possible. From pre-trek research to a guide on hiking essentials, I've got you covered. Let's start planning and hit the trail!
Step One: Plan The Route
Hike planning is essential to executing a worry-free, rewarding hiking trip. Learn ahead of time if you need any permits for parking or hiking. Fortunately, there are no specific requirements for an awesome hike — you can hike for a mile, or you can hike for 20 miles.
As a beginner hiker, you’ll want to start small. Perhaps with one to three miles and not a whole lot of elevation gain. It’s also important to understand both total elevation gain and elevation gain over a specific distance. For example, gaining 1,000 feet of elevation over five miles is significantly less strenuous than gaining the same amount of elevation over one mile.
Learn the trail before you start your trek — at least a couple days before. Know the trail's profile, forks, and the locations of water sources. Nothing feels quite as hardcore as whipping out a paper trail map and a compass, and this is certainly a basic skill you should develop as you become a more experienced hiker.
Nonetheless, you can easily learn and download a trail map on your smartphone using navigation apps . My personal favorite is Alltrails; there are usually reviews and trail condition reports left by other users in the recent past, and it’s incredibly user-friendly.
Choose a hiking trail that starts relatively nearby so you’re not driving a long distance after exhausting yourself. And of course, opt for a trail that offers a rewarding view — a lake, blooming wildflowers, or a distant summit. You want to enjoy your early experiences to encourage future hiking!
Step Two: Estimate Your Trip Time
The average hiker covers between two and two & a half miles per hour. This can serve as a rough estimate for planning your trip time. If you are brand new to hiking, it’s likely that you’ll hike at a slightly slow pace, and that’s a-okay!
This means that if you are hiking three miles at the average hiking pace, you can expect it to take about an hour and a half. If you are on a 6-mile hike, you’re looking at about three hours. These are approximate times. More strenuous or technical trails will increase the time it takes you to complete your hike. Allow extra time for rest and water breaks, unexpected obstacles, and of course, enjoying rad views.
Step Three: Check The Weather Forecast
Check the weather conditions a few days in advance to help you prep for your hike. Check them again the night before and even again right before you leave in case there are last-minute changes. This will help you choose and organize your gear in advance, so the morning of your hike is hassle-free.
Step Four: Plan Your Food & Water
The amount of food you'll need for a day hike is dependent on the duration, intensity, and your personal metabolism. For an all-day adventure of high intensity hiking, you may find yourself requiring 2,500–5,000 calories. You should certainly eat before you go , then bring plenty of snacks and something for lunch.
Foods that are high in protein are perfect for dinner the night before, breakfast the day of, and even a post-hike recovery meal. Eggs, lean meats, and soy are superb protein sources. Include some energy-packed carbs in your breakfast and snacks. Oatmeal, granola, and fruit are excellent choices.
{{article-cta}}
Nut butter or nuts are awesome both before and during a hike as a slow-burning energy source. Steer clear of highly processed foods like candy and cheese.
If you're only spending a couple hours on a relatively flat hiking route, you'll be able to get by with just a snack. Munch on some gorp or a piece of fruit, and drink plenty of water.
How much water you'll need varies with the length of your adventure. A good rule of thumb for hydration is drinking half to one liter of water per hour of hiking. This recommendation can fluctuate, however. Variables include trail intensity, outside temperatures, your sweat rate, and your fitness level. It's always better to err on the side of caution and bring a bit more water than you think you'll need.
If you know that there are water sources along the trail, you can opt to carry less water knowing you'll have the chance to refill. Using your map or navigation app, estimate the time it will take you to reach the drinking water source. Then, only carry the amount of water you'll need to reach the source.
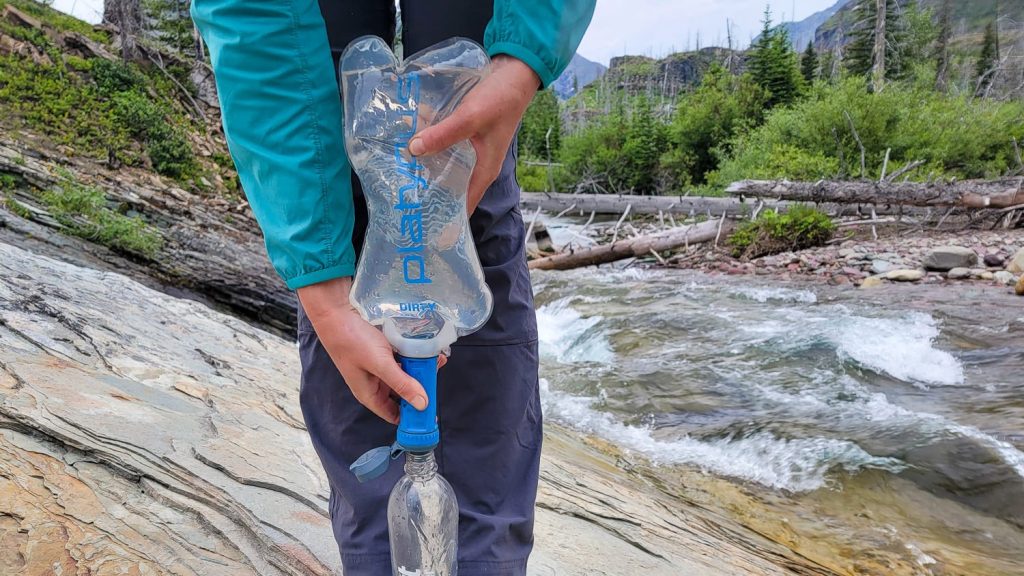
In my personal experience, water straight from an alpine stream is unmatched. It’s delicious and invigorating after miles of hiking. However, indulging in fresh stream water will require a water filter of some sort.
Step Five: Get Your Gear In Order
If you're unfamiliar with the 10 Essentials for first aid and emergency situations, take a moment to read up on this list from the National Park Service.
Once you're set in the emergency department, the fun stuff begins! Keep your pack as light as possible, but don't sacrifice any must-haves. Here are five sub-steps to prep your essential hiking gear for meandering along a stream or bagging a mountain peak.
1. Prepare your layers
Since you've already checked the weather, you know what to expect for temperature. But you should still prepare layers, since the temperature will fluctuate throughout the day. You should have at least a sweat-wicking base layer, a warm mid-layer, and a shell for rain or high winds.
2. Break in your hiking footwear
For weeks in advance , spend time breaking in your hiking boots or shoes . Hiking footwear is designed to be rugged, stable, and protective. As a result, they often feel stiff at the beginning.
If your hiking shoes are new, wear them around your house and on nearby walks. Start small — gradually build up the length of your break-in walks until your boots are broken in. It's also helpful to have a high quality pair of hiking socks to keep your feet happy.
3. Invest in a high-quality water container
My personal preference is a water or hydration bladder because it keeps my hands free, and I can drink on the move. Some packs come with built-in hydration reservoirs, making water access easy-peasy.
A durable water bottle is also a perfectly adequate option. I do advise caution here, however: If you carry a water bottle in your pack, it's less accessible, which may lead you to ignore your hydration needs for longer. Carry your water bottle in your hands to encourage better hydration.
4. Pack your hiking daypack
Any dry food can go in the night before, as well as a jacket in case of unexpected inclement weather. Pack your safety essentials, which should include sunblock, insect repellent, a first aid kit, and a headlamp.
5. Pack a “luxury” item
If you're up for extra weight on your hiking trip, pack a luxury item. To elevate your trek from a trying trudge to an epic hike, bring your camera , a sketch pad, or some binoculars.
Step Six: Implement Safety Measures
- Always provide your hiking itinerary details to a responsible friend or family member, especially if you don't have a hiking partner.
- Hitting the trail with a hiking buddy is almost always a good idea, but sometimes it's tough to find someone who wants to send it as hard or as often as you do. Stay on the trail, and use your navigation tools.
- Learn and share emergency contact numbers, such as the park ranger office and the local sheriff. If you have cell service during your hike, you can call in an emergency. Provide the responsible party with a time they should call emergency services if you have not returned.
- Check online for dangers in the area, such as natural disasters, poisonous plants, and dangerous animals. You can often find these reports on a hiking navigation app or on a state or national park website.
- If you are a frequent hiker (or intend to become one), a personal locator beacon is a must. Especially when hiking alone. This will allow you to send out a signal using a satellite to get help in an emergency.
Now you're all set to get on the trail. Remember the basics:
- Learn your route in advance
- Estimate time for your trip, including extra time for delays
- Check the weather forecast, and bring layers for variation
- Bring food and water — a little extra of each
- Pack your gear early, but keep your pack as light as possible
- Share your itinerary, and stick to it
Just like anything else, successful adventures take practice. Don't expect perfection the first few times, and make notes of ways to improve after each hike. Get out on a trail, and have some fun!

Living and working in the Grand Canyon, Emmi has decades of experience organising and leading hikes around the world.
*The information on this site is based on research and first-hand experience but should not be treated as medical advice. Before beginning any new activity, we recommend consulting with a physician, nutritionist or other relevant professional healthcare provider.

The 13 Different Types of Climbing

Where To Buy Used Mountaineering Gear

Why is Climbing Everest So Deadly? A Data-Driven Report
Item added to your cart
Gear guides.
- Ultralight Backpacking Gear
- Best Ultralight Backpacks
- Best Ultralight Sleeping Bags
- Best Ultralight Tents
- Best Camp Shoes
- Best Down Jackets
- Best Rain Jackets
- Best Minimalist Sandals
Tips and How-To's
- Ultralight Backpacking Tips
- Animal Tracks ID Guide
- Contour Lines and Topo Maps
- How to Read Trail Signs
Food and Water
- Backpacking Food Ideas
- Backpacking Meal Recipes
- Best Meal Replacement Powders
- How Many Calories Do I Burn Backpacking?
- The Triple Crown of Hiking
- Appalachian Trail Map
- Gifts for Hikers
- What is Naked Hiking?
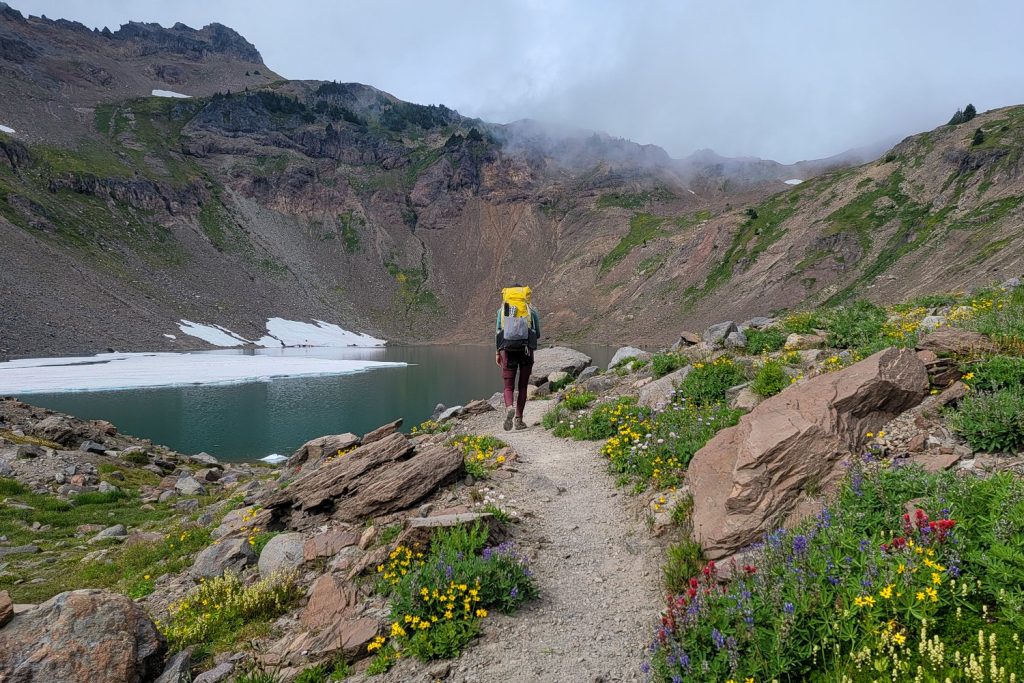
THE Ultimate Backpacking Checklist

Photo by @kaylinb1231
The following backpacking checklist pinpoints all the things you need to think about before and after your trip, as well as essential gear items to have in your pack. We start off with the list and continue with a description of each individual item. If you want to download the list a PDF, click here.
Backpacking Checklist
Click here to download this backpacking checklist as a PDF.
Trip Planning and Preparation
Sleep system, first aid kit, accessories, optional extras, once you're back, before you head out, 📅 figure out the logistics.
First, pick the hike you want to do and the direction you want to go, the season and month you’re beginning your hike in may influence this decision. Then, check trail conditions and do some research into the parking and logistics of getting to the trailhead ahead of time.
How are the roads? Are there any current closures? Are there shuttles in the area? What's the parking situation like? Can you park your car overnight, and what passes and permits are required for the area?
Since you might lose cell reception on the drive to the trailhead, it’s also not a bad idea to have a print-out of the directions and a map of the area.
Our free trail guides contain all the information you need to know.
⛈️ Check the Weather Forecast
Temperatures won’t be the same at ground level vs. 3,000 ft. up a mountain. Even in the desert , temperatures can range reaching into the 100’s during the day and down below freezing at night, which means you’ll need a variety of clothing for your hike.
Moisture-wicking, quick-dry fabrics are a good place to start and packing extra socks, liners and layers are valuable to change into for avoiding hypothermia in wet or sweaty conditions.
Checking weather predictions and average yearly temps ahead of time will give you some ideas into what to expect, and from there you can zero in on footwear and any extras you’ll need (sunglasses, sunblock, gaiters, etc.) by looking into the climate and terrain of where you’ll be hiking.
📞 Alert an Emergency Contact
Whether going on a day hike, an overnight backpacking trip or beginning the first leg of a thru-hike, informing someone about your plans ahead of time is always a good strategy. Nature can throw some curveballs your way, and in case you do get injured, lost, or don’t return on the day you originally planned for, it’s reassuring to know there’ll be someone to send out the search parties.
Here are three things you should share with a family/friend prior to beginning your hike:
- A detailed trip plan
- A map with the exact location of where you’ll be hiking
- When you think you'll be back
To avoid having search parties sent out looking for you, be sure to let your family, loved ones or whoever you designated to be your contact person know that you’ve made it home safe and sound following your trip.
Hiking Hack: Cairn App is a great new real-life tracking app that allows you to select a “safety circle” you can share your hiking progress and location with in case of an emergency. It also automatically alerts your circle in case you’re overdue from your trip.
🚰 Map Out Water Sources
One of the most important things to locate on a trail is available water sources, especially if you're hiking in dry desert climates where water is especially sparse.
Knowing how many miles lie between water stations will help you determine how much water you’ll need to carry on you between re-fills. It’s also important to consider your water purification system , whether that be drops, a filter, boiling, etc.

📦 Plan Your Resupplies
Food resupply can either take a little or a lot of planning, depending on how you go about it. Since you only have so much room available for food at a time, you’ll need to come up with a system for restocking your food supply along the way. Whether you stick with one method or combine a few, here are some of the most popular food resupply options:
- Buy food at towns, gas stations and resupply points along the trail.
- Set-up a “bounce box” where you take what you need and put the rest back in the box and keep mailing it ahead from point to point.
- Have food boxes arranged ahead of time to get shipped and held at post offices.
- Have someone drop food off at certain locations for you to pick up.
- Rely on hiker boxes and eat whatever’s available (not necessarily the most reliable plan.)
- “Cache” your food: stash food at certain points along the trail ahead of time for pickup.
🤝 Distribute Your Gear
If you’re hiking with a few mates, then why not disperse the weight? Chances are there are a few heavy items you’ll all want to use, and hiking is definitely the time to adopt the sharing is caring mentality. Plan ahead with your group on who’s bringing what.
You can even trade off on carrying things like the stove, the bulk of the water or food supply or any other items that could be mutually used among the group.
📝 Get Insurance (Optional)
Planning an exciting excursion abroad? Trip insurance could be one of the most important purchases you make prior to your backpacking trip. There are several different plans you can choose from, and it can be worth the peace of mind knowing you’re protected against accidentally racking up a whopping $50,000 medical bill overseas. Here’s a further look into why trip insurance may be right for you: The 5 Best Travel Insurances .
💲 Make a Budget (Optional)
Living in the great outdoors should be cheap, right? Not necessarily. Buying the proper gear, supplies, and food ahead of time can add up quickly, and if you’re planning to be gone for an extended period, you’ll also have bills back home to account for months in advance. Creating a budget can help lay out a plan and manage your finances. Some key things to consider when planning your budget include trip length, transportation and travel costs, bills, food, lodging, misc. expenses on the trail, your emergency cash stash and costs of buying gear.

Backpacking Essentials
Your backpack is one of your most important pieces of gear. Make sure to choose a pack that weighs less than 2 lbs, rests comfortably on your pack and is made of a breathable material like Dyneema or nylon. As for capacity, we recommend 40L to 65L, depending on the length and duration of your trip. And remember, the bigger the pack, the more stuff people tend to shove in it and the heavier their pack ends up being.
A liner helps protect your backpack and its content from the rain. If you don't own a liner, you can use a trash compactor bag instead. It is just a effective.
Trail shelters, tents, tarps and hammocks all can work for shelter. However, depending on the environment you’ll be spending your nights in one option may certainly be preferable over the other. Bugs, weather, and terrain can influence shelter selection.
Relying on camp shelters can be hit or miss in availability.
Hammocks are great on saving weight—as long as you’ve got somewhere you can hang them.
Tarps can work, but the no walls thing can be a bummer.
For harsher climates ultralight tents can come in handy and are surprisingly durable, however, they can cost a pretty penny.
🛏️ Sleep System
Sleep systems consist of a sleeping pad, sleeping bag, a liner and a pillow (if you want one).
The sleeping pad is your comfort and protection from the ground. It’s advised to test it out ahead of time in a few different settings to ensure it's comfortable and has enough insulation. Sleeping pads come in a variety of lengths, thicknesses, and they can be inflatable or foam.
Sleeping bags should fall between 1-3 pounds. Depending on the environment and temperature range you’ll be in, you can choose between down or synthetic insulation, a summer, three-season or winter bag, and the style (mummy, quilt, rectangular, etc.).
Liners are a good way to keep the inside of your sleeping bag clean and provide some extra insulation, although not indispensable.
Cooking equipment is all about ease and multi-purpose use. Take a spork, for example. The little utensil is light, practical, and gives the best of both worlds. On the note of utensils, plastic silverware can be tempting over steel or titanium because of its weight and cost, but it’s not durable.
You’ll also want to pack a good cutting knife, dishware (a steel cup or bowl should do) and plan on bringing something to boil water with like either a pot or jet boil with fuel .
Lastly, you can choose your clean up method: hot water and scrubbing or a biodegradable soap option .
🥑 Food and Water
As a rule of thumb, plan to carry 2 lbs of food for each day of hiking. For example, if your next resupply point is 5 days away, you should have about 10 lbs of food in your pack. A great way to optimize your food load is to stick with options that have a high calorie-per-ounce ratio. Here are some great candidates .
As for water, it highly depends on how far water sources are from another. If water is abundant on the trail, you might get away with not carrying any water at all—simply drink at the source. If water sources are scarce however, you'll want to fill up one or two 1-L bottles and take those with you on the trail. More on this topic here .

👕 Clothes (Worn and Packed)
Climate and weather will be the biggest determinants here. This is also where layering comes in handy.
You want to pack at least one set of clothes for hiking and another set for camp (including shoes). Your hiking clothes are unavoidably going to get wet from either sweat or rain. So when you'll be done hiking for the day, you'll be glad to to have dry, warm clothes to change into.
Hiking in cold weather? You'll have to pack a few extra items to stay warm—down jacket, rain shell, wool beanie, gloves, etc.
📍 Navigation
There are many GPS, Satellite or downloadable app options to choose from for navigation. Many apps even allow you to pre-load trail maps on your phone so you can use them both on and offline.
But, how you plan your trail navigation is all about preference—and how linked into technology you want to be. If you do decide to go the tech route, it’s not a bad idea to have a backup navigation plan… just in case.
Having a compass , a map or a guidebook of the trail that marks campsites, water sources and other notable features can be a great resource.
Headlamps are the most popular lighting option since they allow hikers to go hands-free and are multipurpose (many have floodlights, red beams, distress signals, adjustable lighting). There are even rechargeable headlamps you can choose from.
But, there are still hikers out there that prefer the good old flashlight, lantern or tent light instead. Since lighting options come in all different shapes and sizes, some starting steps to help decide what’s right for you is to consider the desired light output level and time estimate (lumen count), beam distance, battery type, water-resistance rating and activity you’ll be using the light for.
🧼 Toiletries
Just because you’re hiking for days on end with no shower, doesn’t mean you need to forgo all of your personal hygiene rituals. Toothpaste, a toothbrush, soap, washcloths and hand sanitizer can go a long way. Biodegradable wipes can also be great for a quick wipe-down when there’s no water around. Toilet paper is always an option too.
🚑 First Aid Kit
You never know what can happen on the trail. From cuts and blisters to fever, a complete first aid kit can take the worry out of your outdoor adventures. No need to overdo it though. A pair of tweezers, some gauze pads, antiseptic, band-aids and a handful of pain killers can go long way. To avoid excessive weight, repackage everything and stick to about a week's worth of supplies. If you find yourself running low, stock up at the next trail town.

🔥 Backpacking Accessories
Going hiking near a lake, or during the peak of mosquito season? Might want to bring along some bug spray . Does your hike lead into bear territory? Many parks require bear bags or canisters for overnight stays.
Ever heard how duck-tape can fix everything? It’s true, a roll can repair tears and rips and also be used as protection against an oncoming blister. A pocket knife or waterproof matches are a few other items you might want to consider packing.
☂️ Optional Extras
Depending on where you’ll be hiking, it may be valuable to pack gaiters, an ice ax, sunglasses, a sun hat, lip balm or a hiking umbrella . Some hikers even bring things like whistles, earplugs and trekking poles.
Then, there’s always the fun stuff you could bring along like a deck of cards, a journal to record your backpacking trip or a book for those evenings by the fire. What’s important to have on your thru-hike is up to you. Everyone’s experience is uniquely theirs, and after some time out on the trail you’ll pinpoint what extras you don’t want to go without.
✂️ Optimize Your Gear
Anything you can do to cut weight in your pack, do it! This could include re-packaging items, cutting off extra straps or tags on your pack or losing your toothbrush handle (who really needs that, anyway?) Whatever isn’t a necessity should get the boot, and there are tons of ways you can do this. Ultralight packing and living with the bare minimum is key here. Your back and legs will thank you.
After Your Trip
🧺 wash and store your gear.
You made it! You accomplished your trip and have had the experience of a lifetime. Congrats! Now before you start celebrating there are a few things you need to do first—like properly clean, dry out and store all your backpacking gear.
When washing clothes, shoes, sleeping bag, tent, jackets, etc. stick with specifically formulated washes rather than regular detergents, and always make sure you store your supplies when they’re fully dry.
Products like Nikwax (a DWR re-waterproofing agent) and Active Wash (a wash that removes odors) work well on a variety of items. Cleaning your gear will help it last and it also gives you a good opportunity to go through and inspect it for repairs (busted seams, tears, etc.)
📖 Record Your Memories
Like anything in life, practice will make you better at it. Backpacking is the same way. After a few trips, you’ll take note of the things you can and cannot go without. After each backpacking trip, take a moment to go back to your original packing list and make notes. Add things that were vital to you and cross out others you didn’t need, and do this while the experience is still fresh in your mind so you’ll already be setting yourself up for success next time around.

About Katie Licavoli
About greenbelly.
After thru-hiking the Appalachian Trail, Chris Cage created Greenbelly to provide fast, filling and balanced meals to backpackers. Chris also wrote How to Hike the Appalachian Trail .

Related Posts

- Choosing a selection results in a full page refresh.
A Complete Packing List
Tips for Hiking With Kids
Tips for Hiking With Dogs
Mapping and Navigating Your Route
10 Essential Safety Tips
Tech for Backcountry Communication
Best Hikes in US National Parks
Amazing Mountain Hikes in the US
Best Hiking Trails in Canada
Best Hikes in Europe
Best Hikes in Africa
Best Hikes in South America
Best Hikes in Southeast Asia
World's Best Long-Distance Hikes
Hiking Boots, Shoes, and Sandals: How to Choose
Buying and Breaking in Hiking Boots
Hiking Boots
Lightweight Hiking Shoes
Men's Hiking Boots
Men's Hiking Sandals
Waterproof Hiking Boots
Women's Hiking Boots
Women's Hiking Sandals
List of Essential Gear
Hiking Pants
Hiking Shirts
Hiking Socks
Baby Carriers
Hiking Watches
Trekking Poles
Planning a Hiking Trip: The Complete Guide
:max_bytes(150000):strip_icc():format(webp)/S.Dundas-10cbc6f42e3449bdaad307da059bdd72.jpg "hiking trip planning checklist")
- Choosing a Route
- Planning and Preparing
- What to Pack
- Safety Tips
One of hiking's biggest draws is that it's one of the most accessible outdoor activities on the planet. There's no minimum distance that constitutes a hike, so it's a very personal experience and open to anyone to take part in. The only real "requirements" you could say are that you're traversing dirt, sand, or rocks; you've got some essential gear and items with you; and you have a route or location picked out. Beyond that, as long as you're enjoying the outdoors and breathing in the fresh air, that makes it a hike, regardless of whether you're covering two miles or 20. Metrics like speed and distance don't define whether you're a "good" hiker, making it an ideal activity for people across the athletic spectrum.
Instead, being a "good" hiker is more about being safe and prepared. You should commit to memory some basic skills and best practices to keep you, your fellow hikers, and the environment safe and healthy.
Here are the basics of what to know about planning a hike. Use this info as a jumping-off point—online hiking resources are endless, and experienced hikers are almost always happy to share their knowledge with enthusiastic beginners.
TripSavvy / Linda Strauta
Choosing a Route for Your Trip
Lots of factors go into how to choose your route. Unless you're prepared for a backcountry trip and have expert navigation skills, you'll want to select an established trail.
Decide on a Location
If you haven't hiked in a while, choose a day trip near your home. Your legs may be tired after a long hike, and you'll appreciate having a shorter drive home.
Next, decide if you prefer a hike at a park or in wildlands. Spaces designated as national or state parks usually have very well-maintained trails. That means they're well-marked, generally routed to avoid extremely steep climbs or rocky terrain, and patrolled by park staff, which can be helpful if you find yourself in need of assistance. Park trails aren't necessarily easy, but they're designed for hikers of all levels. Wildlands (like national forests or official wilderness areas) are also protected by federal or state governments, but they're usually less developed and less crowded than parks.
Evaluate the Trails
You can learn relevant and timely information about trails using tools like MapMyHike.com or AllTrails.com . (You can also see how difficult other users think the trails are, though of course, reviews are subjective to the hiker's ability and their experience that day.) When evaluating a hike, gauge your ability to do it based on distance, elevation gain (how many feet you'll gain during the hike), and the trail profile, which means how gradually the trail gains elevation. A hike that slowly gains 500 feet will be easier than a hike that gains all 500 of those feet in one mile. Remember that on out-and-back trails (as opposed to loop trails), you only have to hike as far as you want—what matters is enjoying yourself, not making it to the top.
Consider Seasons and Elevation
If you live at sea level, expect to get exhausted and dehydrated quicker if you choose a trailhead that starts at several thousand feet above sea level. And just like with skiing or hitting the beach, trails have seasons. Trails in mountainous areas like Lake Tahoe and Colorado will be covered in snow all winter followed by mud in early spring, while trails in places like Joshua Tree or Everglades national parks may be unbearably hot in the summer.
Planning and Preparing for Your Trip
You’ll discover your personal hiking strengths and weaknesses as you become a more experienced hiker. Start small and slow, and work your way up to multi-day trips.
Assess Your Fitness Level
Fitness is important for hiking, but you can't necessarily gauge how fast or efficient you'll be as a hiker based on your weight or age. Hiking requires strong legs and glutes, so if you don't have them, you'll start building them as you hike more. Or if your trip is a few months out, you have time to get in proper shape. If you ever find yourself getting exhausted quickly on a trail, though, you can just turn around and aim to cover a little more distance next time. What is more important is being free of injuries. If you have medical issues like joint inflammation or balance issues, you'll want to ask your doctor about extra precautions and safety measures you may need to take.
Know Your Route
Study it in advance of your trip, and have multiple copies of your map on hand, too. It's always helpful to have both paper and electronic maps, and taking a picture of any maps posted at the trailhead can provide a quick reference when you're looking for an intersection. Many hikers also use wearable real-time trackers like Fitbit or Garmin watches.
Read Up on Specific Trail Requirements
Read up on your hike before you go. Do you need a permit? If so, where do you get it? Is the hike free of snow and mud? Where should you park? Is your dog allowed? All this information will be readily available on park websites or on trail websites and phone apps.
Buy and Break in Proper Footwear
Always break in your shoes before starting a hike. Not only are blisters painful, but they can lead to infections and make it uncomfortable to wear shoes for days after. Choose hiking shoes with extra grip and traction on the outsoles since walking through terrain can quickly wear away at gym and running shoes. In general, the longer the hike and the more weight you're carrying, the stiffer and more supportive you'll want your shoes to be.
What to Pack for a Hike
As a general rule, if you don’t need to carry any supplies, it’s probably a walk, not a hike. If you’re going hiking, you’ll need some or all of the following:
- The 10 Essentials: Many hikers subscribe to the " 10 Essentials " theory of what to pack while hiking, including items like rain gear, shelter, a knife, and more. If you're unsure what to expect on your specific trail, packing the 10 essentials, as listed by the American Hiking Society, can cover your bases .
- Food: Strenuous, uphill hiking can easily burn upwards of 900 calories an hour. Bring enough food to keep your body powered. Energy-packed foods like those made with honey or protein-packed foods like nuts and jerky will help your body more than heavy carbs or overly processed foods.
- Water (and a water filter): As a general rule, bring as much as you can carry when starting—at least a liter per two miles. After a few hikes, you'll be able to gauge your consumption better. Remember to drink water frequently; ideally, before you even feel thirsty, as thirst is the first sign of dehydration. If you find yourself not having to urinate for several hours, you're probably not drinking enough. Backpacks with built-in hydration reservoirs make it easy to sneak sips on the go, while water filters can be useful on hikes near streams and rivers.
- Clothing: While you’re unlikely to need a full change of clothing for a day hike, you should bring clothing that will accommodate both day and nighttime temperatures in the very unlikely event that you find yourself still on the trail come nightfall. It’s also a good idea to bring a rain and wind jacket, even if the forecast calls for sunny skies.
- Fun extras : If you love birdwatching, carry binoculars. If you’re artistic, bring a sketchbook and pencils. Trail logs can also be a fun way to keep track of your hikes.
Backpacking (or overnight hiking) has a much more robust list of needs, including a larger backpack, cooking supplies, a tent, extra clothing, and potentially wildlife-related items like bear bins or bear spray. If you've never gone backpacking before, it's best to take your first trip with someone who has so you can learn the basics. You can go with a friend, or take a guided backpacking trip near your local park. Try REI Adventures for affordable weekend-long trips around the country.
Important Safety Considerations
Nearly everything in this entire article relates to safety, from choosing the right shoes to properly evaluating a trail. But the tips below are especially important.
- Have a plan: You always need to know where you’re going before you leave the house. Not only is knowing which trail you’ll take essential to packing and prep, but you absolutely must let someone know where you’re going and when you’ll be back. That person is responsible for taking action if you’re not back by then.
- First aid: Always carry a first aid kit , and make sure you know how to use the supplies. You can twist your ankle just as easily on a one-mile hike as a 15-mile hike.
- Rescue: Know how to get help if you need it. That means having phone numbers for emergency rescue services as well as a way to get in touch with help if you don’t have cell service. Devices like a Garmin InReach or Spot X use satellite comms and are worth the investment for frequent hikers. And a whistle is a lightweight but powerful item for alerting your presence to other nearby people if needed.
- Flora and fauna: In general, wildlife tend to avoid humans, but they can sometimes react defensively if surprised by your presence. Make noise while hiking in bear country, carry bear spray when hiking in grizzly country, and wear ankle boots when hiking in areas with rattlesnakes. If you’re hiking in an area with poisonous plants, you’ll want to wear pants, tall socks, or gaiters to protect yourself from accidental contact.
American Hiking Society. "The Ten Essentials of Hiking."
The 9 Best Men's Travel Shoes of 2024, Tested and Reviewed
Everything to Know About Hiking With Your Dog
The 8 Best Hoka Shoes of 2024, Tested and Reviewed
Packing List for an Overnight Hike
What to Wear Hiking: Experts Share the Best Hiking Clothes
What to do if You Encounter a Bear in the Wilderness
Everything You Should Pack for a Hiking Trip
The Best Daypacks for Hiking of 2024, Tested and Reviewed
How to Pee While Hiking
How to Choose and Prepare for a Hiking Trip
The 9 Best Women’s Travel Shoes of 2024, Tested and Reviewed
Navigation 101: Skills and Tools for Finding Your Way on a Hike
Everything You Should Pack for a Camping Trip
The Complete Guide to Climbing Morocco's Mount Toubkal
How to Go Hiking With Your Kids
Day Hiking Essentials Checklist: Pack Right for Your Hike

Okay, I’ll admit it: years ago, I would never have been qualified to tell you what to bring on a hike.
I used to set off on trails completely unprepared for the twists and turns that lay ahead.
I’ve left my rain jacket in my car, and hiked unsuspectingly into chilling alpine storms. Dehydration has made me so thirsty that I’ve gnawed the windburned crust off of a snowbank. I’ve wandered off-trail, become completely lost, and bushwhacked my way into a backcountry meltdown.
Luckily for me, I’ve always come out in one piece, but my failure to prepare could have sent me to the hospital, put other hikers in danger, or worse. Underestimating mother nature is never a good idea.
That’s why I’ve created this essential day hiking checklist for you , fellow hiker. Because years of mistakes have taught me that preparation is everything in the world of hiking. How you plan your trip can be the difference between chaos and bliss.
Want to avoid making the same mistakes that I did?
Stay tuned, I’ve got you covered.
What to Bring on a Day Hike: The Essentials
10 Essentials for Day Hiking
Backpack & storage, worn clothing & carried gear, cold and/or rainy weather gear, food, water & purification, navigation & communication.
- Emergency Gear
Health & Protection
Photography equipment, personal items.
- Final Thoughts: Day Hiking Essentials

Let’s start with the day hiking building blocks.
Listed below are the uber-important survival items that day hikers should consider packing before every trip. This ‘Ten Essentials of Hiking’ list is universally agreed upon in the hiking community and should serve as a baseline for all the necessary supplies you need to bring along on any given day hike.
1. Navigation : map, compass, GPS device, personal locator beacon, altimeter 2. Illumination : headlamp, flashlight, lantern, extra batteries 3. Sun Protection : sunglasses, sunscreen, lip balm, sun-protective clothes 4. First Aid Kit : including medication, bug repellent, and foot care 5. Gear Repair Kit : knife, multitool, repair tape, rope 6. Fire : lighter, matches, fire starter 7. Emergency Shelter : emergency blanket, bivy, tarp 8. Extra Food : extra day’s portion of calories 9. Extra Water : plus water storage, water purification system 10. Extra Clothing : sufficient layers to survive worst-case scenario weather
Beyond these ten essentials, I’ve prepared a more detailed day hiking checklist, broken down into nine different categories. The list is purposely exhaustive and is meant to cover any and all items you might need on a given day hike. Throughout the checklist, I’ll recommend hiking products that I know and love.
The length, weather, and difficulty of your upcoming hike should dictate which items you choose to bring along and which items you leave behind. Use your best judgment and always err on the side of caution.
Study your hike thoroughly, check the forecast, and use the following 52-item checklist to gather all the essential gear you need before your upcoming day hike.

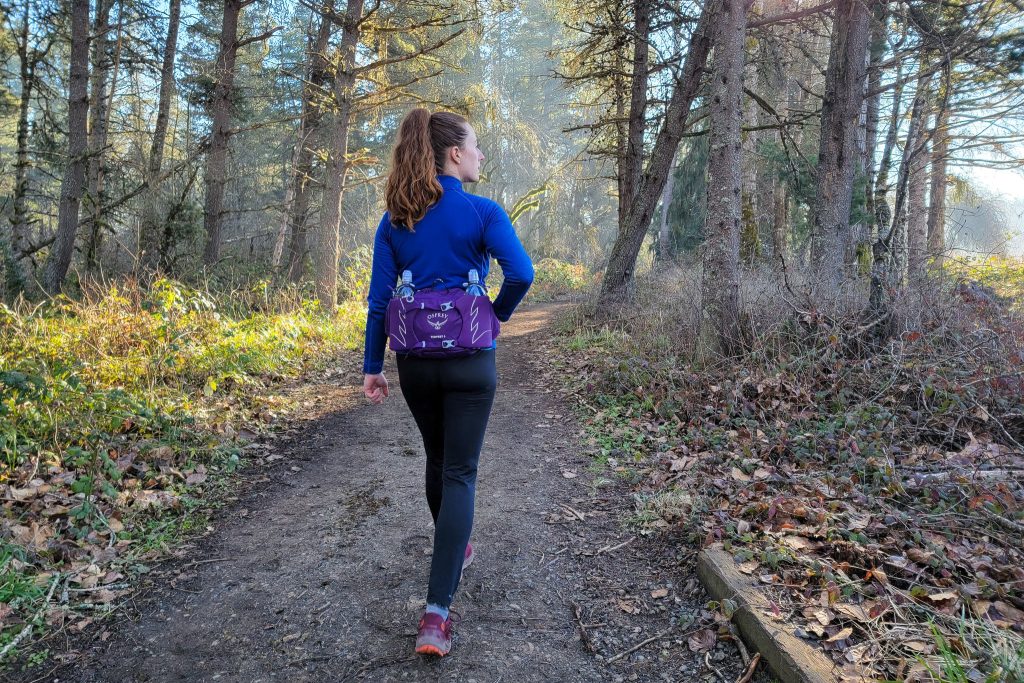
DAYPACK – Use a practical daypack to carry your food, water, gear, and extra clothing while you’re day hiking in the backcountry. No need to get fancy, as a lightweight daypack between 10 and 30 liters should get the job done.
HIP PACK – It’s nice to have quick, easy access to snacks and supplies while hiking, which is why I load up and strap on my hip pack before I hit the trail. Want to hike without a day pack? An intelligently stocked hip pack with slots for water bottles might just be all the storage you need.
PACK COVER/LINER – If your daypack doesn’t come with built-in water protection, then moisture could become an issue. When the rain starts pounding down, you’ll need the contents inside your pack to remain dry at all costs. Bring a waterproof pack cover or pack liner to keep all the gear inside your backpack safe and dry.

When choosing your trail clothes, try to avoid 100% cotton. When the pros say “ Cotton kills ,” it’s because the wetter cotton clothing gets, the more body heat you lose in cold and/or windy conditions.
Opt for synthetic materials instead, or cotton/polyester blends made from breathable and moisture-wicking fabric. These materials will pull sweat and moisture away from your body to the outer layer of the garment, keeping you dry and warm.
SHIRT/TOP – Stock your day hiking wardrobe with breathable athletic tops. I usually don a long-sleeved shirt for my day hikes. It gives me great protection against the sun, blocks wind, and helps keeps me warm when temperatures drop.
PANTS/SHORTS – Your hiking pants/shorts/etc. should be comfortable and unrestrictive. Avoid jeans or bulky slacks and instead wear breathable hiking bottoms that allow for a wide range of movement.
FOOTWEAR – Feet are finicky and everyone’s body is different, so wear hiking footwear that works for you. Hiking boots that enclose your ankles provide the most support, whereas shorter hiking shoes, trail runners ( I wear these ), and minimalist hiking sandals are less restrictive but also less protective.
UNDERWEAR – Ill-suited underwear can make your day hike unpleasant in a hurry, so don’t cut corners when it comes to choosing your skivvies. Pick a lightweight, breathable, and snug pair of hiking underwear that will wick moisture away and prevent chafing.
SOCKS – Hiking socks should be comfortable, breathable, and prevent blisters. For me, those socks are the Darn Tough Hikers , which are made from high-quality Merino wool and offer an unconditional lifetime guarantee.
HAT – A good hat will keep the sun out of your eyes, protect your skin from harsh UV rays, and tame your sweaty hiker hair. I wear a mesh-back trucker hat and will use my Buff underneath to create earflaps if I need extra sun protection.
SUNGLASSES – Bring a pair of polarized sunglasses to protect your eyes from harmful UV rays and prevent damage down the road. Sunglasses don’t have to be expensive either, as you can find affordable pairs online for under $15 .
TREKKING POLES – For hikers with sensitive knees, trekking poles are a godsend. Bringing a lightweight and sturdy set of sticks will give you two more points of contact with the ground and help ease the pressure off of your knees.

Before your day hike, it’s important to understand the potential weather you might face on the trail. Study the forecast, research typical conditions, and pack your bag accordingly. While you may not need to bring every item listed below during a day hike, pack all that’s essential for staying warm and dry during a worst-case scenario.
LIGHT JACKET/THERMAL – If you anticipate a chilly hike, pack a light jacket or thermal base layer to protect against the cold. You can layer this with your hiking top, rain jacket, and down jacket to stay comfortable as temperatures drop.
RAIN JACKET – Have a lightweight rain jacket on hand if there is even the slightest hint of precipitation in the forecast. Getting stuck in the wilderness with no protection from rain can leave you vulnerable and at the mercy of the elements.
WINTER JACKET – A packable, lightweight winter jacket is a must-have for day hikes where wind chill temperatures might dip close to freezing. The layers of insulation in your jacket will help trap body heat and keep you warm when things turn nasty.
RAIN PANTS – If your day hike forecast includes the possibility of substantial rain, bring along a pair of packable rain pants to pair with a rain jacket. A solid set of rain pants can mean the difference between ‘shivering, stumbling, and cursing’ and ‘dry, warm, and happy.’
LONG UNDERWEAR – When day hiking in cold weather, bring a pair of long underwear to provide an extra layer of insulation for your legs. Conserving heat in your legs will regulate your body temperature and allow you to push on as temperatures plummet.
WINTER HAT – During cold-weather day hikes, body heat escapes from your head faster than any other part of your body. Pack a warm winter hat to help stabilize your body temperature, and you will expend less energy trying to stay warm.
GLOVES – Day hiking in cold weather with exposed hands can suck the fun out of your day, along with your body heat. It can also lead to hypothermia or frostbite in extreme cases. Protect your digits with a quality pair of waterproof gloves when chilly and/or wet conditions threaten your well-being.
FACEWEAR – Constant exposure to the elements — wind, dust, rain, snow, and sun — can do a number on your face, so bring along some proper protection for your next day hike. Multifunctional facewear can be used in a myriad of ways and will shield your face from almost anything nature throws its way.
GAITERS – If significant rain is in the forecast, consider packing a lightweight pair of gaiters — especially if your footwear isn’t waterproof. Proper gaiters will block water and debris from entering the opening of your shoe, keeping your feet dry and undisturbed in the process.
CRAMPONS – When hiking on packed snow and ice, crampons should be an essential part of your day hiking gear checklist. An effective set of crampons will penetrate ice and grip frozen trails, preventing slips and falls that could derail your adventure.

Food and water are your hiking fuels, so kick start your day hike with plenty of calories. A strenuous, full-day hike can easily burn 3,000 calories. Some of those calories can be consumed right before you hit the trail, and the rest should be close at hand in your day pack. Here’s a calories burned calculator to see how much food you should pack.
Always bring at least an extra day’s worth of calories, in case of emergency.
SNACKS – Healthy hiking snacks will be the day hiking fuel that keeps you going, so be sure to pack enough calories to sustain yourself for a long day of hiking. Bring calorie-dense, ready-to-eat foods like nuts, jerky, and meal bars that will keep you going all day on the trail.
LUNCH – Snacks alone can get boring, so consider packing a lunch for a mid-day morale boost. If you want a hot meal, pack a lightweight stove and a dehydrated meal. Or pack something as simple as a sandwich to reward yourself for a long day of hiking.
WATER – Staying hydrated is as important as consuming enough calories on your day hike. Bring enough water! Or purify as you go, providing there are reliable water sources along the trail. Consume at least one liter of water per two hours of hiking, and even more on hot, strenuous, high-altitude hikes.
WATER PURIFICATION – If there are multiple, year-round water sources along the trail, a lightweight water purification system is a good option for filtering as you go. Other options include using iodine tablets or zapping your water with UV rays. All these methods allow you to carry less water weight as you hike and will allow you to clean water sources in case of an emergency.
WATER STORAGE – You’ll need to carry liquids while hiking, so choose a water storage system that works for you. Large-volume hydration packs, insulated containers, collapsible pouches , or old water bottles — the choice is yours.

Losing your way in the backcountry can be stressful and even life-threatening, so come prepared. Arm yourself with an accurate map (print and/or digital), a reliable compass, and the skills to stay on track even when the unexpected happens.
MAP – Though many trails are very easy to follow, always bring a detailed print map for less-established day hikes into the backcountry. Should you get lost or disoriented, a good topographical map will show you the contours of the land and guide you back to civilization.
COMPASS – If you don’t know your direction of travel, a map alone might not be enough to get back on the right trail. Always pack a reliable compass — magnetic or digital — and use it in conjunction with your map to keep moving in the right direction.
CELL PHONE – Many hiking purists choose to travel with only a printed map, but the truth is that smartphones can also be excellent tools for navigating the wilderness. Just make sure your smartphone is equipped with GPS technology that doesn’t rely on cell phone tower connections. And keep your battery charged and a backup map close at hand.
POWER BANK – Your cell phone won’t do you much good if its battery dies, so pack a lightweight power bank to charge your cell phone as needed. You likely won’t need a power bank on most day hikes, but it’s a good piece of gear to have in case you get sick, lost, or injured and need to spend the night on the trail.
OFFLINE DIGITAL MAPS – Many smartphone navigation apps allow you to download an offline map of your hike before you hit the trail. Doing so will let you trace your live location along the trail route without the need for cell service. My personal favorite app is Gaia GPS .
Emergency Day Hiking Gear

Nobody ever intends to get into an emergency situation on a day hike, but it’s important to come prepared for a worst-case scenario. Whether you become lost, threatened , injured, or sick on your hike, bringing along the all-important emergency gear will help you right the ship and return to civilization safely.
FIRST AID KIT – Prepare for injuries both big and small and pack a basic first aid kit on your next day hike. You can purchase a lightweight first aid kit or piece together one from your medicine cabinet. Here’s a helpful first aid kit checklist to ensure that you don’t leave anything behind.
WHISTLE – If you become lost or injured on your day hike, a loud, piercing emergency whistle can attract & guide rescuers to you, even if they’re miles away. Some hikers keep their whistles close at hand, but many modern-day packs have whistles built into their buckles. Choose & learn your preferred method for summoning help in a potential emergency.
BEACON – Personal locator beacons can be expensive, but they consistently save the lives of hikers in emergency situations. These beacons have technology that tracks your location anywhere in the world, and some can also download maps, send SOS messages, and load weather forecasts.
LIGHTER/MATCHES – Bring a lighter, matches, or a fire starter in case an emergency leaves you lost, injured, or stranded during your day hike. The ability to start a controlled fire to signal for help or to keep warm in the cold could be life-saving.
MULTITOOL/POCKET KNIFE – Though you hopefully won’t need to use one on your day hike, always pack a multitool or a pocket knife to help deal with the unpredictable. A basic multitool can repair gear, assist in first aid, make kindling, and prepare food in an emergency.
HEADLAMP – If your day hike stretches into the night, you’d better have packed a headlamp to help you find your way. A powerful light source can safely guide you down dark trails or can help you signal to rescuers for help if you’re lost or injured.
EMERGENCY BLANKET – In the dreadful event that you get stranded overnight on your day hike, a lightweight emergency blanket could save your life. An emergency blanket’s reflective qualities will trap your body heat and protect you against hypothermia when temperatures drop and you need to hunker down for the night.
BEAR SPRAY – If your day hike takes you into an area known to have bears, bring some potent bear spray to defend yourself against any aggressive ones. The highly-concentrated pepper spray will temporarily blind and disorient the bear from as far away as 35 feet, giving you time to make a quick getaway.

Take care of your body and the environment on your day hike by packing the items needed to manage your basic health along the way. The items below will help protect you against sun, bugs, bacteria and allergies, all while leaving no trace.
MEDICATION – Bring along an assortment of medication, prescribed or otherwise, that you might need during your day hike. Backpacker Magazine has written two great posts on this topic: one for over-the-counter meds and one for doctor-prescribed meds . If you have any allergies to food or medication, let your hiking partners know beforehand and tell them how to help in case of a serious reaction.
SUNSCREEN – Bring along a heavy-duty sunscreen (30 SPF or higher) to protect against the sun’s powerful UV rays and prevent sunburns that can lead to skin cancer. Sure, hiking hats and UV-rated clothing often do well in protecting against UV rays, but they’re not always enough.
BUG SPRAY – Insects can often overwhelm you in the backcountry, so bring some effective bug repellent if you anticipate pesky insects on your day hike. By keeping mosquitos, ticks, and others at bay, you’re protecting yourself from such harmful diseases as malaria and Lyme disease.
CHAPSTICK/LIP BALM – Cracked, chapped, and sunburnt lips are common among day hikers but are incredibly easy to prevent. Be sure to pack a tube of long-lasting, UV-rated chapstick — especially on dry and sunny hikes — and your lips will thank you later.
HAND SANITIZER – Hand washing in the backcountry is cumbersome and not always environmentally friendly, so bring an alcohol-based hand sanitizer to keep clean while you hike. Always use hand sanitizer before you eat to neutralize any bacteria, parasites, or viruses that you may have encountered along the trail.
TROWEL – If the urge to go #2 presents itself on the trail, make sure you’re prepared to bury your waste properly with an ultralight hiking trowel . Dig a hole at least six inches deep — 200 feet from any water sources, trails, and campsites — and bury your waste entirely, letting it compost naturally into the earth below.
TOILET PAPER – Always, always bring toilet paper on your day hike, even if you don’t think you’ll need it. And always pack out your TP and avoid burying it at all costs. Many brands of toilet paper have harmful chemicals that will be released into the earth when buried.
WASTE BAGS – While digging a cathole and burying your poo properly is classic hiking etiquette, some trails require that you pack all of your waste out. If that’s the case, come prepared with wilderness waste pouches that allow you to pack your messiest waste out safely and odor-free.

Though photography equipment isn’t essential day hiking gear, it will help to capture the stunning beauty you encounter along the trail. Hikers and backpackers tend to opt for lightweight and durable photography gear that can withstand the rigors of the trail.
CAMERA – While smartphones are the simple solution to capturing photos during your day hike, a packable camera can take your backcountry photography to the next level. Mirrorless cameras are popular among hikers and backpackers because they are compact and capture high-quality photographs.
EXTRA LENS(ES) – If you’re bringing your camera along on your day hike, don’t forget to pack any extra lenses you might need to capture the adventure. Wide-angle lenses are great for capturing epic landscapes, whereas zoom lenses are better for long-distance photos of wildlife.
TRIPOD – Bringing a lightweight and compact tripod on your hike will make you a more versatile photographer in the wilderness. Tripods will allow you to snap stunning backcountry portraits and also help stabilize the camera, capturing more clear and vivid photos.
WATERPROOF BAG – Cameras and water don’t play together well. You can use a Ziploc or a simple rolltop dry bag to give your photography gear the extra layer of protection it needs. Consider using a silicon lens cover to prevent lenses from fogging and accumulating water during especially humid conditions.
PEN & PAPER – While a pen and paper are great for taking notes or doodling during your day hike, their usefulness could help save your life in case of an emergency. Whether you’re forced to leave a note to communicate with rescuers or you need help starting a fire, a weatherproof hiking journal and reliable pen will be there for you when things go awry.
WALLET/IDENTIFICATION – In the event of an emergency, it’s important to provide rescuers with your medical profile and basic personal information. With this info, they’ll have a better idea of how to help you. If you have serious allergies, leave an allergy information card in your wallet, as it will alert medics to any medications or food to avoid.
Final Thoughts: What to Bring on a Day Hike

I’ve learned over the years that day hiking is more than just throwing some food and water in a bag and hitting the trail. Hiking is about preparation, diligence, and respect for mother nature. Reckless decisions can lead to life-threatening emergencies when you’re at the mercy of the backcountry.
And that’s why I created this extensive 52-item day hiking essentials list for you. I’ve experienced firsthand how risky failing to prepare can be. Day hikes, both big and small, deserve thoughtful preparation.
So, get ready for your next day hike the right way. Utilize my extensive checklist, get your hands on the proper gear, and hit the trail relaxed and full of confidence.
And, next time you ask yourself, “What should I bring on my day hike?” I think you know exactly where to get started.
More Hiking & Backpacking Resources
- Essential Backpacking Gear: The Items I Can’t Hike Without
- 8.2 lb Ultralight Backpacking Gear List for 2024
- Waterproof Backpacks to Keep Your Gear Dry
- Backpacking Food: Meal Plan Tips & Ideas for Your Next Hike
- Best US Cities for Hikers: Visit (or Live) Here for Primo Hiking
- Get Paid to Hike: 10 Jobs to Make Money on the Trail
- Best Gifts for Hikers: Unique Hiking Gifts for Any Budget
PIN THIS POST!

Are there any day hiking essentials that should have made my list? What essential hiking advice would you give to a beginner? What piece of gear do you bring on every single day hike? Let me know by leaving some feedback in the comments below!
Last Updated on March 19, 2024

Noel Krasomil
Affiliate Disclosure : Some of the links in this post may be affiliate links. If you click an affiliate link and make a purchase, we may receive a small commission at no extra cost to you. Affiliate links help support this website and keep it 100% ad-free.
Leave a Comment Cancel reply
This site uses Akismet to reduce spam. Learn how your comment data is processed .
What to Bring On a Hike: The Ultimate Hiking Checklist
Table of Contents [Show]
- 1. Key Takeaways
- 2. Making a Hiking Checklist
- 3. Basic Day Hiking Checklist
- 3.1. Necessities and Emergency Gear
- 3.2. Tools and Equipment
- 3.3. Clothing and Footwear
- 3.4. Hygiene and Health
- 3.5. Navigation
- 3.6. Food and Drink
- 3.7. Basic Day Hiking Extras
- 4. What If You're Hiking Overnight
- 4.1. Overnight Hiking Gear
- 4.2. Cookware and Food
- 4.3. Hygiene and Protection
- 4.4. How to Go to the Bathroom in the Woods
- 4.5. Overnight Hiking Extras
- 5. Camping Activities And Games
- 5.1. Go On a Scavenger Hunt
- 5.2. Ball Games
- 5.3. Have a Water Balloon Fight
- 5.4. Hide-And-Seek
- 5.5. Card Games
- 5.6. Board Games
- 5.7. Charades
- 5.8. Tug-of-War
- 6. Tips for Planning Your Hiking Trip
- 7. Final Thoughts
- 8.1. What not to take on a hike?
- 8.2. How do I prepare my body for a long hike?
- 8.3. What is the difference between hiking and trekking?
- 8.4. Is it OK to hike on an empty stomach?
- 8.5. What time of day is best to start a hike?
- 8.6. What are the 3 basic skills in hiking?
Embarking on a hiking journey is not just an adventure; it's an exercise in meticulous planning. A well-crafted hiking checklist serves as your roadmap for what to pack for a hike, leading to a more enjoyable and worry-free experience. While it's tempting to pack for every possible scenario, the art of smart packing lies in balancing hiking essentials with items that are less crucial. Overpacking can be as detrimental as underpacking, both affecting your overall experience on the trail.
What to bring on a hike varies widely based on several factors: the type of trail, weather conditions, time of the year and even the terrain you'll be traversing. This comprehensive guide aims to be your go-to hiking essentials list, complete with optional items that are "nice to haves” while out on the trail. Whether you're a seasoned hiker or just starting out, this hiking packing list is designed to adapt to your specific needs, making your next outdoor expedition both fulfilling and memorable.
Key Takeaways
- Preparation is key: A well-thought-out hiking and camping checklist is your first step toward a safe and enjoyable adventure.
- Essential gear varies: Depending on the type of hike, season and duration, your hiking essentials list will differ.
- Safety first: Always prioritize hiking must-haves like first aid kits, navigation tools and emergency gear.
- Comfort and convenience: Additional items like hiking extras and overnight hiking gear can enhance your hiking experience.
- Plan ahead: From choosing the right hiking outfits for the season to selecting the best hiking gear, planning is crucial for a successful hike.
Making a Hiking Checklist
A hiking checklist is more than just a list of items to pack; it's a strategic plan that ensures you are well-prepared for your adventure into the wild. It serves as a guide that covers all the bases, from essential safety gear and navigation tools to food, clothing and optional comfort items. By following a well-thought-out checklist, you can avoid common pitfalls like forgetting essential hiking gear or overpacking unnecessary items.
Your hiking gear list acts as your safety net, helping you prepare for various scenarios you might encounter, whether it's a sudden change in weather, an unexpected injury, or navigational challenges; anything can happen. A checklist also allows you to tailor your gear to the specific type of hike you're planning, taking into account factors like duration, terrain and seasonal conditions. In essence, a hiking checklist is your roadmap to an overall better experience.

Basic Day Hiking Checklist
What to bring on a day hike shouldn’t be too complicated. Some solid hiking shoes, a backpack, water and some snacks should do it. But, there are a few items you may not have thought of. Here’s a list of day hiking essentials, or general things to bring hiking, that everyone should think of before taking a day trip.
Necessities and Emergency Gear
- First Aid Kit : A well-stocked first aid kit is a hiking essential for beginners and seasoned hikers alike. It should include bandages, antiseptics and pain relievers, among other items. For a more comprehensive list, you could review this first aid checklist .
- Water Bottle : Staying hydrated is key, especially during hikes when you don’t have easy access to water. A reusable, insulated water bottle is recommended to keep your water cool. Or, if you have the space, you could use a camelbak for easy access.
- Emergency Shelter : Even for a day hike, carrying a lightweight emergency shelter like a space blanket can be a lifesaver in unexpected situations.
- Sun Protection : A hat, sunglasses and sunscreen are essential for protecting yourself from harmful UV rays, especially during long hikes.
- Flashlight : Even if you plan to return before dark, a flashlight with extra batteries is a vital addition to your day hike packing list.
- Backpack : Of course you’ll need somewhere to put all this stuff. A comfortable backpack is a must have for all your hiking necessities. It doesn’t have to be a big pack though, something like a 25L pack works great for a day hike.
- Permits: Many places that you’d like to go hiking require day permits, so make sure you have what you need before you take off.
Tools and Equipment
Your hiking equipment list for a basic day hike should include a variety of items that can help you navigate the trail and handle minor repairs.
- Trekking Poles : These are particularly useful for longer hikes or uneven terrain, providing additional balance and reducing stress on your knees.
- Repair Kit : A basic repair kit with items like duct tape, safety pins and a multi-tool can be a lifesaver for fixing a torn backpack or broken shoelace.
- Knife : A good knife is one of the most versatile tools you can carry. Whether you need to cut a rope, prepare food or make emergency repairs, a multi-tool or Swiss Army knife is a must-have.
Clothing and Footwear
The right clothing and footwear can make a significant difference in your comfort and mobility on the trail. Here's what you should consider:
Spring/Summer
- Hiking Pants : Lightweight, moisture-wicking pants offer flexibility and comfort. They are a staple in men’s outdoor wear for hiking.
- Trail Runners : These shoes provide better grip and are generally lighter than traditional hiking boots, making them ideal for less rugged terrains.
- Long Sleeve Shirt : Opt for a breathable fabric that can protect you from the sun while keeping you cool.
- Additional Tips : For more specialized advice on summer hiking clothing, check out this guide on hiking outfits for summer .
Fall/Winter
- Rain Jacket : A waterproof yet breathable rain jacket is essential for protection against unpredictable weather. Check out this guide on outdoor clothing for more information.
- Extra Layers : Thermal underwear and a fleece jacket can provide the extra warmth you need when the temperature drops.
- Hiking Boots : Choose hiking boots that offer good ankle support and have a high-quality grip suitable for slippery or icy conditions.
- Wool Socks: Warm socks are some of the best things you can have out on the trail. It also doesn’t hurt to bring an extra pair just in case.
- Hat & Gloves: Hat and gloves will keep you warm in the winter months.

Hygiene and Health
Maintaining good hygiene and health is crucial when you're spending time outdoors. Here are some items to include in your hiking necessities:
- Hand Sanitizer : Compact and easy to carry, this helps you maintain cleanliness when washing facilities are not available.
- Toilet Paper : Biodegradable toilet paper is a responsible choice for maintaining hygiene while minimizing your environmental impact.
- Sunscreen : Protecting your skin from harmful UV rays is essential, especially during long hikes.
Navigating through unfamiliar trails requires some basic tools. Here's what you should pack:
- Map and Compass : These are basic yet effective tools for hiking navigation. Always carry a physical map and compass as a backup to electronic devices.
- GPS App : Download a reliable GPS app on your smartphone as an additional navigation aid.
- GPS Device : In today's digital age, a GPS device is an invaluable hiking necessity. It offers real-time tracking and updates, making it easier to navigate unfamiliar trails.
Food and Drink
Keeping your energy level up is crucial during a hike. When it comes to food and drink ideas, here are some ideas for what to bring on a day hike:
- Energy Bars : Compact and packed with nutrients, these are a quick source of energy on the trail.
- Trail Mix : A combination of nuts, dried fruits, and perhaps some chocolate provides a balanced snack.
- Sandwich: Pack your favorite sandwich for something that’s a bit more filling than energy bars and trail mix. You may even want to pack for a picnic if you’re bringing the family with. Check out these picnic food ideas .
- Water : At least 2 liters of water is essential.
If you’re interested in learning more about how to dehydrate your own food, or what type of food to bring on a hike, give this hiking food article a read. Alternatively, you can also check out our guide on the best backpacking meals .
Basic Day Hiking Extras
Sometimes it's the little things that make a big difference. Here are some additional items to think about when you’re considering what to take hiking:
- Camera : Capture the beauty of the great outdoors with a lightweight camera or your smartphone.
- Notebook and Pen : Whether it's jotting down thoughts or sketching the landscape, a small notebook can be a nice addition.
- Insect Repellent : Particularly important in wooded or wet areas, an insect repellent can make your hike much more comfortable.

What If You're Hiking Overnight
Overnight hiking trips require additional planning and gear compared to day hikes. The essentials remain the same, but you'll need to consider extra things to take hiking if you plan on camping, cooking and spending extended periods of time in the forest.
Overnight Hiking Gear
When you're planning to spend the night outdoors, some additional hiking supplies become essential:
- Tent : A lightweight, weather-appropriate tent is crucial for shelter. Make sure it's easy to set up and take down.
- Sleeping Bag : Depending on the season, you'll need a sleeping bag that offers the right level of insulation.
- Sleeping Pad : This provides an extra layer between you and the ground, offering both comfort and warmth.
- Headlamp : More versatile than a flashlight, a headlamp allows you to have both hands free, which is particularly useful when setting up camp in the dark.
- Microfiber towel: A quick-drying towel, or even a bandana, will help you out in multiple situations.
- Rope: Having rope, or paracord on you is crucial. You may need this for shelter, or as a way to hang your food in the trees away from bears.
Cookware and Food
Cooking in the great outdoors requires some specialized gear and food items:
- Portable Stove : A lightweight, easy-to-use stove is essential for cooking hot meals.
- Cooking Utensils : A portable cooking set that includes a pot, pan, and utensils is a must-have for preparing easy camping meals .
- Non-Perishable Food : Items like canned beans, pasta, and dehydrated meals are ideal as they have a long shelf life. Here's more on camping food storage , if you want to learn some prepper tips.
Hygiene and Protection
Extended time outdoors means you'll need to take extra precautions for hygiene and protection. Here are some additional things to take on a hike if you plan on spending the night.
- Biodegradable Soap : This is essential for washing dishes and yourself, and it's eco-friendly.
- Toothbrush and Toothpaste : Don't forget about oral hygiene; a travel-sized toothbrush and toothpaste are sufficient.
- Bear Spray : In areas where you might encounter wildlife, bear spray is a safety must-have.
- Emergency Whistle : This can be a lifesaver in situations where you need to signal for help.
How to Go to the Bathroom in the Woods
When nature calls out in nature, it's crucial to be respectful of the environment. Here are some tips on how to go to the bathroom while hiking:
- Find a Secluded Spot : Make sure you're at least 200 feet away from any water source to prevent contamination. Look for a secluded area where you won't be easily seen.
- Dig a Hole : If you need to go number two, dig a hole at least 6-8 inches deep to bury your waste. A lightweight trowel can be handy for this.
- Use Biodegradable Toilet Paper : If you use toilet paper, make sure it's biodegradable and pack it out in a sealed plastic bag. Some hikers prefer to use natural materials like leaves or moss, but make sure they are safe to use.
- Pack Out Sanitary Products : If you're menstruating, make sure to pack out all sanitary products. Do not bury them as animals may dig them up.
- Hand Sanitizer : Always carry hand sanitizer and use it liberally after doing your business to maintain hygiene.
Overnight Hiking Extras
While the essentials are non-negotiable, here are some extras that can make your overnight hiking trip more enjoyable:
- Portable Charger : Keeping your devices charged can be crucial, especially if you're using them for navigation or emergencies.
- Lightweight Backpacking Chair : For those who prefer a bit more comfort around the campfire, a portable chair can be a welcome luxury. For a more detailed list of overnight hiking essentials, take a look at our backpacking checklist as well as our guide on ultralight backpacking .
- Star Chart : If you're hiking in a remote area, stargazing can be a magical experience. A star chart can help you identify constellations and planets.
- Book or Kindle : For some, there's nothing like enjoying a good book in the great outdoors.

Camping Activities And Games
While camping, hiking isn’t the only way to enjoy the great outdoors. It's also an opportunity to have some fun and games. Here are some camping activities you can enjoy while out in nature:
Go On a Scavenger Hunt
A scavenger hunt is a fantastic way to explore your surroundings while having fun. Create a list of items or landmarks to find around the campsite or along the trail. This can be an enjoyable and educational activity for kids and adults alike. You can even add a competitive element by timing each team or individual.
Simple ball games like catch, soccer or even a mini-game of basketball can be a great way to unwind and enjoy some physical activity. All you need is an open space and a suitable ball. These games are not only fun but also a good way to get some exercise during your camping trip.
Have a Water Balloon Fight
If you're camping near a water source and the weather is warm, a water balloon fight can be a refreshing and entertaining activity. Make sure to use biodegradable balloons to minimize environmental impact. This game is best suited for a hot day and can be a fantastic way to cool off and have some laughs.
Hide-And-Seek
Hide-and-seek is a classic game that takes on a whole new dimension when played in the great outdoors. The natural landscape provides numerous hiding spots, making the game more challenging and exciting. However, it's crucial to set boundaries to keep everyone safe and within a designated area. Always make sure to check for any potential hazards in the area, like steep cliffs or bodies of water, before starting the game.
Card games are a fantastic way to unwind after a day of hiking and exploring. Whether it's a simple game of Go Fish, a challenging round of Poker or a strategic game of Bridge, all you need is a deck of cards. A deck of cards is lightweight and easy to pack, making it a perfect addition to your overnight hiking extras.
Board Games
If you have room to pack them, board games can provide hours of entertainment. Opt for games that have fewer pieces to keep track of, like Connect Four or Tic-Tac-Toe. Some companies even produce travel-sized versions of popular board games, which are ideal for camping trips.
Charades is a game that requires no equipment and can be enjoyed by all ages. One person acts out a word or phrase without speaking, and the other players try to guess what it is. This game can be particularly fun around the campfire, and you can make it more interesting by choosing themes related to nature or camping.
Tug-of-war is a classic game that's as simple as it is fun. All you need is a sturdy rope and an open area. Divide into two teams and mark a line on the ground. The team that manages to pull the other across the line wins. It's a great way to engage in some friendly competition and get a little exercise at the same time.

Tips for Planning Your Hiking Trip
Planning is the cornerstone of any successful hiking trip. Here are some tips to help you prepare when deciding what to bring hiking :
- Research the Trail : Before you set out, make sure you know the trail's length, difficulty and any potential hazards. This will help you decide what to pack for hiking and set realistic expectations.
- Check the Weather : Always check the weather forecast and prepare for sudden changes. This will influence your hiking essentials list and what you wear. If you're hiking in rainy conditions, here are some tips on rain gear you should take.
- Know Your Limits : Be realistic about your physical capabilities. If you're new to hiking, start with shorter, less challenging trails.
- Leave No Trace : Always follow the Leave No Trace principles to minimize your impact on the environment.
- Invest in Quality Gear : The best hiking gear and clothing can make a significant difference in your comfort and safety. For top-notch options, check out women's hiking clothing and men's outdoor wear .
Final Thoughts
Hiking is fun! It offers both physical and mental rewards while you get to enjoy the fresh air and beautiful scenery. Whether you're a seasoned hiker or a beginner, a well-thought-out hiking trip packing list is your best friend for any adventure. And just like every adventure into nature, remember whatever you pack in you should also pack out. Follow the Leave No Trace principles, respect the local wildlife and enjoy your travels.
What not to take on a hike?
Now that we’ve covered things to bring on a hike, it’s a good idea to know what not to take on a hike: jeans, which are heavy and don't wick moisture, unnecessary electronics like laptops or iPads, excessive amounts of food and water. Pack according to the hike's length and difficulty.
How do I prepare my body for a long hike?
Preparing your body for a long hike involves a mix of cardio exercises and strength training. Start with regular cardio activities like jogging, cycling or swimming to build endurance. Complement this with strength training exercises that focus on your legs and core muscles. As you get closer to your hiking date, try some practice hikes that gradually increase in length and difficulty to acclimate your body to the hiking experience.
What is the difference between hiking and trekking?
While both hiking and trekking involve walking in natural environments, they differ in scope and requirements. Hiking generally refers to day walks on well-marked trails and is less strenuous. Trekking, on the other hand, is a multi-day activity that often involves more challenging terrain and requires a higher level of fitness and self-sufficiency, including carrying your own food, water, and shelter.
Is it OK to hike on an empty stomach?
Hiking on an empty stomach is not recommended. Your body needs fuel to function on a trail. Eating a balanced meal or snack before you hit the trail ensures you have the necessary energy to enjoy your adventure and tackle challenges. The proper food and beverage choices are important to think about when wondering what to take on a hike.
What time of day is best to start a hike?
Early morning is often considered the best time of day to start a hike. Trails are less crowded, allowing for a more peaceful experience. Additionally, temperatures are generally cooler, which is especially beneficial for strenuous hikes or when in hot climates. An early start also provides ample time to complete the hike and return before dark.
What are the 3 basic skills in hiking?
The three basic skills essential for hiking are navigation, first aid and basic survival skills. Navigation skills involve reading maps and using a compass or GPS to find your way. First aid skills include knowing how to treat minor injuries, blisters or insect bites. Basic survival skills encompass fire-making, finding water and signaling for help in emergencies.

Emily is an avid traveler and has been all around the world from Alaska and Iceland to Peru and Bali. Her home base is Nashville, TN and when not traveling you can find her hiking, practicing yoga or cooking/baking!
DON'T MISS NEW STORIES AND STYLES
Get all the news right in your mail

KÜHL’s Guide to Pine Needle Tea - Benefits And Nutrition
In the vast world of herbal teas, there's a unique, forest-derived variety that might not be on your radar yet – Pine Needle…
SEASONAL FEATURETTE

Road Less Traveled: Arizona Storm Chasing
Have you ever wondered what inspires and attracts one to chase monsoon storms?
- View All >
- Adventure >
- Travel >
- Food + Drink >
- Social >
- DIY / Craft >
- Wellness >
Day Hiking Checklist
We cover all you need to hit the trail for the day, from clothing and gear essentials to extras like sunscreen and snacks.

Switchback Travel ( Brian McCurdy )
We use affiliate links and may receive a small commission on purchases. Read more about us .
A day hike can be as simple as walking a well-maintained trail near your home, or as complex as a dawn-to-dusk journey through a remote wilderness. The items you bring may vary slightly depending on the difficulty and length of the hike, but no matter how you travel, it’s always nice to be prepared. Below, we list the most important items for day hiking, including clothing items such as a rain jacket and hiking pants, essential equipment like a daypack and trekking poles, and extras and personal items . For more information on each category, many of the headings link to our detailed product articles. And for all our recommendations in one place, see our hiking gear reviews .
Day Hiking Footwear and Clothing
1. hiking shoes or trail runners.

2. Hiking Socks
As we mentioned above, happy feet make for a happy hiker. Once you’ve settled on a pair of shoes or trail runners, it’s important to look for a set of hiking-specific socks to complete your setup. We prefer wool socks to those made with cotton or synthetic materials: Wool has an incredible ability to regulate temperature, stays warm when wet, and dries much faster than cotton. Our favorite socks for keeping our feet happy are the Darn Tough Micro Crew Cushion , which also come with a lifetime warranty. In terms of height, most hikers prefer crew-cut socks for protection against low branches and debris, but quarter-height and no-show designs are lower-profile and cross over well for use with sneakers and trail runners.
3. Hiking Pants or Shorts
.jpg "hiking trip planning checklist")
6. Down Jacket or Synthetic Jacket
Whether you’re walking through a canyon, ascending a mountain ridgeline, or just taking a break in the shade, you’re likely to encounter a range of temperatures throughout your hike. It’s a good idea to have an insulated layer stowed in your backpack so you can stay warm regardless of activity level or weather. Down packs into a tiny package, is feather-light, and provides a surprising amount of warmth, making it our favorite type of insulation for hiking. That said, some will prefer a synthetic jacket instead, which insulates even when wet and surpasses down in terms of breathability. Two of our favorite insulated jackets for hiking are the down-filled Mountain Hardwear Ghost Whisperer/2 and the synthetic Patagonia Nano-Air Hoody .
Day Hiking Equipment
.jpg "hiking trip planning checklist")
13. Navigation
Even if you’re familiar with the area where you’ll be hiking, it’s a good idea to bring along some sort of navigational tool. A high-tech GPS device will cover all your bases, but it’s a bit overkill for a day hiking application. In fact, a paper topographical map—especially when laminated or printed on waterproof paper—is the most sure form of navigational help, as it does not rely on battery power. That said, our favorite means of tracking location are GPS-powered navigational apps on our phone. Apps such as TopoMaps, Gaia, and Hiking Project can pinpoint your location at any given moment—even when cell phone service is non-existent—and even give details like hiking pace, elevation, and mileage.
14. Satellite Messenger

Along with water, it’s essential to pack enough food for your hike (and even a little more). In general, we recommend eating between 300 and 400 calories per hour of hiking, depending on your body type and level of exertion. High-energy foods like nuts, bars, cheese, and dried fruit provide great nutrition and calories while keeping weight low. Some of our favorite energy bars are Kate’s Real Food Bars , delicious high-calorie snacks made with quality ingredients in the small town of Victor, Idaho. Additionally, Snickers bars and sandwiches provide easy trail food solutions at a lower cost.
Extras and Personal Items
- Insect repellant
- Toilet paper and trowel
- Bear spray (depending on the area and season)
- Simple repair kit (a bit of duct tape and paracord should be plenty)
- Multitool or Swiss Army knife
- Emergency blanket or bivy
- Lighter or waterproof matches
- Whistle for emergencies
- Winter traction devices and gaiters (depending on conditions)

Where to Buy Hiking Gear
Although much of this gear can be found online, we first recommend visiting your local gear shop or consignment store. There’s simply no substitute for looking at items up close, trying on clothing, backpacks, and footwear, and receiving personal advice from the experts. If you do choose to shop online, REI Co-op and Backcountry are two of the most reliable retailers when it comes to hiking gear. Both have impressive selections, provide free shipping on orders over $50, and offer generous return and exchange policies. And as a bonus, REI has over 175 brick-and-mortar stores across the country, so you can try on before you buy or pick up your order in store. Finally, for cheaper items and those who need gear quickly, it’s hard to beat Amazon and the sheer volume of their inventory. Back to Our Day Hiking Checklist See Our Hiking Gear Reviews
Learn More About Outdoor Gear

Hiking Gear Reviews

Best Hikes in El Chaltén, Argentina

Best Hiking Shoes of 2024

Best Satellite Messengers of 2024

Backpacking Checklist for 2023

Best Windbreaker Jackets of 2024

10 Great Day Hikes from Seattle

Best Women’s Hiking Shorts of 2023

Mountain Hardwear Ghost Whisperer/2 Hoody Review
Mobile Menu
Megamenu - desktop hamburger menu.
- Hiking Gear
- Backpacking Gear
- Biking Gear
- Camping Gear
- Footwear Reviews
- Climbing Gear
- Skiing Gear
- Winter Gear Reviews
- In-Depth Gear Reviews
- Hiking Shoes
- Hiking Boots
- Trail Running Shoes
- Mountain Bike Shoes
- Approach Shoes
- Climbing Shoes
- Beginner Climbing Shoes
- Mountaineering Boots
- Winter Boots
- Rain Jackets
- Down Jackets
- Synthetic Jackets
- Fleece Jackets
- Hardshell Jackets
- Softshell Jackets
- Windbreaker Jackets
- Ski Jackets
- Winter Jackets
- Hiking Pants
- Hiking Socks
- Trekking Poles
- Baby Carriers
- Running Vests
- Backpacking Tents
- Backpacking Packs
- Backpacking Sleeping Bags
- Backpacking Sleeping Pads
- Backpacking Stoves
- Backpacking Food
- Water Filters
- Altimeter Watches
- Handheld GPS
- Mountain Bike Helmets
- Mountain Bikes
- Mountain Bikes Under $1,000
- Mountain Bikes Under $2,000
- Gravel Bikes
- Bike Brands
- Kids' Bikes
- Hitch Bike Racks
- Camping Tents
- Rooftop Tents
- Camping Sleeping Bags
- Camping Mattresses
- Camping Chairs
- Camping Stoves
- Duffel Bags
- Rock Climbing Shoes
- Climbing Helmets
- Climbing Harnesses
- Climbing Quickdraws
- Belay Devices
- Climbing Ropes
- Climbing Backpacks
- Winter Gloves
- 4-Season Tents
- Ski Helmets
- Ski Goggles
- Ski Backpacks
- All-Mountain Skis
- Ski Bindings
- Backcountry Skis
- Backcountry Ski Boots
- Skis for Beginners
- Hardpack Skis
- Mirrorless Cameras
- Full-Frame Cameras
- DSLR Cameras
- Point-and-Shoot Cameras
- Travel Cameras
- DSLR Lenses
- Mirrorless Lenses
- Lofoten Islands
- Lofoten Hiking
- Hardangervidda
- Jotunheimen
- 10 Great Norway Hikes
- Public Huts
- Torres del Paine
- Chalten and Glaciares
- Lake District
- Patagonia National Park
- Milford Sound
- Abel Tasman
- Marlborough
- Great Walks
- Adventure Towns
Add adventure to your inbox
- Privacy Policy
- Terms of Use
© 2024 Switchback Travel. All Rights Reserved. No part of this site may be reproduced without our written permission.
The ultimate backpacking checklist
Any hiking trip will have its own particular challenges, so read up on the conditions before you go and adjust your packing list accordingly. If the trail is muddy, gaiters might be backpacking essentials. If you need to cross big snow patches, bring a lightweight ice axe . And if you’re going to cook in super-buggy conditions, a bug hat might become your favourite thing of all time.
The 11 essentials for backpacking
Sun protection
Illumination
First-aid supplies
Fire starter
Repair kit and tools
Emergency shelter
Communication device
Wondering what else you need for a hiking trip? Use the backpacking checklist below when planning an overnight hike or tackling a multi-day adventure on an established route.
Camp and kitchen gear
The best ingredients to enjoy a weekend in the wild? A good night’s sleep and tasty meals (plus plenty of snacks). If you’re building up your backpacking kit, think about quality: the gear you buy now can last for ages if it’s designed to last. Better quality also means a more comfortable experience – a good sleeping bag will keep you cozy without cold spots, a durable tent will keep you dry in case of rain, and nice camp kitchen gear helps you make five-star dinners in the forest.
- Tent and tent footprint
- Sleeping bag
- Sleeping pad
- Stove and fuel
- Pots and pot grabber
- Dishes and cup
- Water treatment or filter
- Hydration system or water bottles
- Food + coffee
- Lighter or waterproof matches and fire starter
- Lightweight cord
Safety essentials
Part of the joy of backpacking is escaping from the usual routine of home, but it also means you’ll need to be prepared for the unexpected. Be sure you bring a first aid kit to be ready to deal with things like cuts, scrapes or bug bites. While you’re at it, check out a first aid course to get a full understanding of how to look after your crew when you’re far from home – it’s helpful and empowering to learn. Other safety essentials? Maps, a compass and GPS to make sure you stay on track, as well as a compass and headlamp. Always make sure to leave a trip plan with a trusted friend too.
- First aid kit
- Repair kit and multi-tool
- Route guide and map
- GPS / compass
- Headlamp or flashlight + batteries
Clothing (warm conditions)
Prepping for hot weather should be taken just as seriously as prepping for the cold. Heat exhaustion is a very real thing, so keep an eye on the conditions and adjust your plans accordingly. Sweat-wicking and breathable clothes keep moisture moving off your body so it can evaporate, and sunglasses and a hat with a sizeable brim keep harsh rays away from your eyes.
- Wicking T-shirt
- Long-sleeved shirt
- Pants or shorts
- Hiking socks and liner socks
- Hiking boots
Additional clothing (cool or wet conditions)
Make sure to pack enough layers for the conditions. Check the forecast and keep in mind that weather can change quickly, especially in mountain environments. To help you plan, learn how to properly choose mid-layers and base layers to build a great layering system. Insulating layers made of fleece, wool, down or synthetic materials pack down small and keep you warm. Rain is often a possibility, so make sure to bring waterproof shells to keep you nice and dry. Don’t have a waterproof outer layer? Learn how to choose a rain jacket .
- Insulating top or jacket
- Rainwear pants and jacket
- Base layer top and bottom
- Gloves or mitts
Personal items and additions
As you’re packing, think about the things at home that are part of your morning and nightly routine, whether it’s the specific stuff you use to wash your face and brush your teeth, or things you can’t sleep without (like earplugs). Careful not to overpack though – a heavy pack will slow you down. Once you’ve covered the absolute essentials, you can see if there’s a little room for fun additions like binoculars, a deck of cards, or a novel to pass time in the tent.
- Trekking poles
- Toothbrush and toiletries
- Toilet paper
- Biodegradable soap
- Phone or communication device
- Insect repellent / bug-proof shirt or hat
- Sandals or camp footwear
- Trail permit
- Bear spray and bear safety gear
- Stuff sacks
Before you leave for the trailhead, always remember to check weather forecasts, tell someone about your trip plans and when you expect to be back, and stash a copy of your trip plan in the car at the trailhead.
Related articles
- How to pack a backpack
- The 10 essentials for hiking and camping
- 7 ways to camp and hike responsibly
Recent articles

April 30, 2024
Yamnuska: The Ragged Edge
Get behind the scenes with filmmaker John Price. This film follows modern day adventurers on a rock climbing journey through time, celebrating one of Canada’s most iconic climbing cliffs.

How to build a lightweight bikepacking setup
Features and gear picks we recommend for your off-road missions.

April 22, 2024
Innovative gear that puts the planet first
Sustainably minded equipment from brands doing big things for the planet.

April 4, 2024
Earth Month 2024
Big things happening all month long, from events and workshops to recycling old socks – every effort counts.
3-Day Backpacking Checklist (with Printable Packing List)
This complete backpacking checklist includes all the lightweight gear you’ll need when packing for an overnight trip in the backcountry.

Are you planning a backpacking trip and feeling overwhelmed with figuring out what gear and supplies you need to bring? Don’t worry, you’ve come to the right place.
In this post, we’ll share our ultimate 3-day backpacking checklist (tailored for women) to help ensure you have everything you need for a successful and enjoyable trip.
From essentials like shelter and a comfortable sleep system to practical clothing choices, we’ve thought of all the basic essentials you’ll need to be comfortable on a weekend-long backpacking trip – nothing more, nothing less.
While this is a comprehensive list, I encourage you to adjust your checklist based on your own needs. That being said, I also encourage you to try and stick to the essentials. You may be surprised at how little you need!
The Big Gear Items
These are the essential pieces of gear that should always be on your backpacking checklist for every single trip you plan.
Backpacking Pack
I’ve tried many backpacking backpacks, and funny enough, the least expensive one I’ve owned has also been my favorite.
At 4 lbs. 8.7 oz., the Deuter Aircontact Core 60 + 10 SL Women’s Pack isn’t super lightweight, but it still weighs nearly 2 pounds less than my old Gregory backpack and it seamlessly molds to my body.
Deuter’s Aircontact series packs can adjust for a variety of torso lengths and also comes in a men’s model .
The 60 +10 SL pack is plenty big for a multi-day trip. In fact, this is the pack I took on my 22-day John Muir Trail hike, a 10-day backpacking trip in Alaska, and my Trans Catalina Trail backpacking trip .
For a shorter backpacking trip or if you’re splitting carrying gear with a partner, check out the smaller 45 + 10 SL version . This version is what BFT Director Linda uses on backpacking trips.
Shop Deuter Aircontact Core 60 at:

Backpacking Tent
Your tent choice can make the biggest difference in weight out of all the big gear items. However, the lighter your tent, the more money you’ll spend.
If you know you’ll be doing a lot of backpacking, I recommend investing in a good-quality, ultralight tent like the Zpacks Duplex . At just over 1 lb 5 oz, it’s one of the lightest tents on the market yet still roomy enough so you don’t feel like you’re sleeping on top of your partner.
It’s important to note that this Zpacks Duplex is a semi-freestanding tent. It does require two trekking poles (or the Duplex Flex Kit ) and guy lines (included) to set up.
Shop The Zpacks Duplex Tent at:
If you would like more room or backpack with a pooch, the Zpacks Triplex is just a half-ounce heavier and gives a bit extra space. My partner Ryan and I use the Triplex for backpacking trips which fits us and our 2 dogs, Charlie and Gumbo.
Read next: Interested in the Zpacks Duplex, but want to learn more? Head over to our detailed review to see if it’s the tent for you.

If $600+ is too much to spend on a tent (we don’t blame you!) or you want a freestanding tent, the REI Half Dome SL 2+ is a more budget-friendly option. It is a few pounds heavier at 3 lbs 15 oz, but still a great lightweight option.
Shop REI Half Dome SL 2+ at:
Sleeping Pad
I currently use the women’s Sea to Summit Comfort Light Sleeping Pad and love it. It’s lightweight, packs up small, and still manages to be warm and comfortable.
It’s also easy to inflate and comes with a pump integrated into the stuff sack, and it’s made out of durable ripstop nylon.
There’s a unisex version too in case you want something a little bigger.
Shop The Sea to Summit Comfort Light at:

Sleeping Bag
More and more backpackers are opting for quilts over sleeping bags because they are more lightweight and versatile yet still keep you nice and cozy at night.
The Enlightened Equipment Revelation Quilt is our pick for a backpacking quilt. It’s incredibly lightweight at 1 lb 3 oz (850-fill, 30-degree) and we also love that you can customize it to your needs and preferences.
When ordering, you can choose between 850 and 950 fill power, select a temperature rating between 0 to 50-degree, and even customize your quilt length.
The Revelation Quilt is truly a revelation and one piece of gear I don’t leave at home when I’m heading out on a multi-day trip.
If you’re backpacking with your partner and prefer to cuddle, check out our post on the best double sleeping bags for backpacking .
Shop The Enlightened Equipment Revelation Quilt at:
More Big Gear Items
Backpacking accessories.
There are tons of backpacking accessories you can choose to pack, but here we list the most important ones that will keep you safe and comfortable on the trail.
Trekking Poles
On those uphill climbs, trekking poles help take some of the weight off your hips and legs by utilizing your arm strength. On the downhill, they help ease the pressure on your knees. And on those stream crossings, these puppies have saved me more times than I can count by helping me balance.
The Black Diamond Distance Carbon Z Trekking Poles are Black Diamond’s lightest foldable poles made of carbon fiber and come in 4 sizes to meet your height.
Shop The Black Diamond Carbon Z Trekking Poles at:

The BioLite Headlamp 325 is my new go-to headlamp for backpacking. It’s ultralight, low profile, and very bright with four lighting modes including red light so you won’t blind your basecamp buddies or compromise your night vision.
I also love that it is battery-free and USB-chargeable (just be sure to fully charge it before you head out!).
Shop The BioLite 325 Headlamp at:
Emergency Communication Device
I like to carry a tracking device with me that I can use to send a help signal in case of an emergency.
The Garmin inReach Mini 2 allows for two-way custom texting and also has GPS that you can use for navigating.
The Mini is much smaller and lighter than the regular Garmin inReach so I prefer it for hiking and backpacking when every ounce matters.
Shop the Garmin inReach Mini at:

First Aid Kit
You should always have a first aid kit when you are hiking in the backcountry. This ultralight, waterproof medical kit comes with the minimum supplies that you will need to address minor wounds, as well as travel-sized packs of some handy medications. I
In addition to what comes in this kit, you should supplement it with some extra blister band-aids and any medications that are specific to the hikers in your group .
Shop the Adventure Medical Kit at:
Read next: Prefer to put together your own medical kit? Read our guide on How to Build Your Own First Aid Kit .
Backpacking Chair
Packing a lightweight chair is definitely not essential for a backpacking trip, but it’s a nice-to-have item if you plan to spend a lot of time relaxing at camp. The Helinox Chair Zero packs down to roughly the size of 2 Nalgene water bottles and weighs only 1 pound, making it the perfect luxury item.
Shop the Helinox Chair Zero at:
Camping Accessories
Backpacking kitchen gear.
Next on our backpacking checklist is your camp kitchen gear. I tend to keep my cooking setup simple when backpacking. I mainly boil water for coffee or tea and oats in the morning and for backpacking meals in the evening.
Backpacking Stove & Fuel
The Jetboil Flash Cooking System is the most efficient backpacking stove I’ve found, especially if you are only boiling water.
Together, the stove and pot only weigh 13.1 oz. For a 3-day trip, one 230-gram fuel canister ( sold separately ) should be enough if you are using your stove for coffee, breakfast, and dinner.
Shop the Jetboil Flash at:

Water Bottles or Hydration Reservoir
I like to pack a few of these lightweight Platypus Soft Bottles that can be rolled up when they are empty. Compared to a hard water bottle like a Nalgene, these are much lighter and take up less space when backpacking.
Depending on water availability, I’ll bring up to three of these on my backpacking trips.
I also tend to use these instead of a hydration pack since a reservoir can be a pain to pull out of my backpacking pack each time it needs to be refilled.
But if you like to backpack with a hydration reservoir for easy water access while you hike, the Osprey Hydraulics Reservoir is a great option.
Shop the Platypus Soft Water Bottles at:

Backpacking Water Filter
The Platypus GravityWorks Water Filter System is absolutely the easiest way to filter your water in the backcountry, in my opinion.
This system relies on gravity to push water through, eliminating the need to pump by hand or manually squeeze water through a filter – meaning you can save your energy for the hike.
At 11.5 ounces you will barely notice this thing in your bag, and what’s really cool is you can connect the hose directly to your water bottle or any standard hydration reservoir.
I’ll also mention that it’s always good to carry a backup in case your water filter fails. These Katadyn Micropur Purification Tablets are great because they are super small and you can just throw a few in your first aid kit.
Shop the Platypus GravityWorks Filter at:

Lightweight Camping Mug
You’ll need something for that morning coffee and evening tea. The GSI Outdoors Infinity Backpacker Mug is lightweight and will keep your beverage warm in the coldest of conditions with its insulated wrap and sip lid. It even has a lightweight fabric strap as a handle.
Shop the GSI Outdoors Camp Mug at:
Eating Utensil
A girl’s gotta eat! Ramen, backpacker meals, oatmeal. This TOAKS Long-Handled Spoon is the only utensil you need, and it weighs shockingly little at 0.65 ounces!
It also has a long handle and can easily reach the bottom of that Mountain House bag.
Shop the TOAKS Long-Handled Spoon at:
Some people like to carry a multi-tool, but personally, I’ve always been able to get by with a simple, small knife.
This Gerber Mini Paraframe Knife can cut paracord or be used to prepare food and only weighs 1.4 ounces.
Shop the Gerber Mini Knife at:
Bear Canister
You may or may not need a bear canister depending on where you are hiking. They are required by law in California’s Sierra Nevada Mountains, spots in Alaska, Washington, Idaho, Wyoming, and more.
In some places, they may be available for rent but be sure to check before heading out.
If you are on a short trip and only carrying food for yourself, the Bear Vault 450 is a good inexpensive option. Or for a duo or longer trips, go for the larger version .
Shop the Bear Vault 450 at:
Backpacking Kitchen
Backpacking toiletries.
My beauty routine while backpacking is pretty limited and is focused purely on hygiene. That is what I’ve reflected in this backpacking checklist. No deodorant, no makeup, no hairbrush, etc.
The mountains can suck the moisture right out of those beautiful lips leaving them cracked and dry. Plus, your lips are just as vulnerable to sunburn as your face, so SPF is key.
Sun Bum Mineral SPF 30 has natural, organic ingredients and will keep your lips hydrated and protected.
Shop the Sun Bum Lip Balm at:
At high elevations, you can burn way quicker than you think, and all those hours hiking in the sun add up.
This Sun Bum sunscreen comes in a small tube, is water-resistant , and provides SPF 50.
Shop the Sun Bum Sunscreen at:
Toothpaste & Toothbrush
It’s all about those travel-size toiletries when backpacking. This Dr. Bronner’s Travel Toothpaste comes in a 1 oz size and is all-natural, fair trade certified, and the packaging is completely recyclable.
Shop the Dr. Bronner’s Toothpaste at:
Poop Kit – Trowel, Toilet Paper, & Ziploc Bag
In order to comply with the 7 Leave No Trace Principles , you need to dig a cathole that is at least 6-8 inches deep when you go #2.
You may think “I don’t need a shovel… I’ll just use a rock or stick.” I’ve made that mistake myself only to find that sometimes the dirt is so hard, you can’t dig a hole. And then panic ensues.
Make life easier for yourself by grabbing a BoglerCo Ultralight Trowel . It’s super lightweight and there’s really is no excuse to not bring it with you.
Also, when you go #2, you need to pack out your dirty toilet paper in order to maintain campsite and trail conditions for future campers.
There’s nothing grosser than finding a bunch of used dirty TP when you’re camping. I like to bring a Ziploc bag for my TP and then I store that in a small (not-see-through) stuff sack that I can rinse out later.
Shop Ultralight Trowel at:

While this might sound strange to you at first, bringing a pee rag on your backpacking trip, like this specially made, antimicrobial Kula Cloth , is super helpful.
Instead of having to wipe with TP each time and pack it into your zip lock bag, and instead of not wiping at all which can result in odors and discomfort, just wipe with this reusable cloth!
When going to the bathroom, I drip dry and then pat myself off with this in order to keep my lady parts clean.
Then, I use my water bottle to rinse off the towel 200 feet from any water sources (as recommended by Leave No Trace) and hang it from my pack to dry.
Shop the Kula Cloth at:

Quick Dry Towel
A lightweight quick-dry towel is always handy, whether it’s for drying your hands and face, doing dishes, or going for a swim and doing some sunbathing.
They come in a variety of sizes so you can pack what you need and nothing more.
Shop the REI Multi Towel at:
Hand Sanitizer
A travel-size hand sanitizer is a must before eating and after going to the bathroom while in the backcountry.
I prefer hand sanitizer to soap because it’s easier to follow Leave No Trace. If you do choose a biodegradable soap, like this one by Dr. Bronner’s , be sure to abide by Leave No Trace and rinse 200 feet away from water sources.
Shop Dr. Bronner’s Hand Sanitizer at:
For shorter trips, you might be able to get away without wet wipes, especially if you’re using the pee rag method and you want to save weight in your pack.
However, if you want a little refresh, these Sea to Summit Wilderness Wipes are soft and gentle on both your skin and the environment. They’re unscented (better for not attracting wildlife) and even come in an extra-large size in case you want to wipe your whole body down after a hot sweaty day on the trail. Be sure to pack them out in your ziplock trash baggie to dispose of them properly.
Shop Sea to Summit Wilderness Wipes at:
Backpacking Clothing
How much clothing should you bring on a 3-day backpacking trip? The absolute minimum you need to be comfortable.
You’ll appreciate it when you start to feel the weight of your pack after a couple of hours of hiking.
You really only need 1 hiking outfit and 1 set of dry, warm clothes to change into when you get to camp and for sleeping.
The only thing I bring extra of is underwear and socks and maybe an extra shirt I can swap out depending on how many days I’m backpacking.
Helpful Tip
Avoid cotton.
When backpacking, you want to avoid cotton because it retains moisture, takes a long time to dry, and tends to harbor smells. Instead, opt for quick-dry materials that wick sweat and resist odors.
Insulated Jacket
A lightweight, packable, insulated (down or synthetic) jacket is key for when the temps drop in the evenings.
I prefer something with a hood so I can keep my head warm when it’s windy or extra cold, so I pack my Arc’teryx Atom Hoody .
Shop the Arc’teryx Atom Hoodie at:

Rain Jacket
Always check the weather before you set out. Even if it’s looking like nothing but sun, I like to bring a lightweight rain jacket and the Arc’teryx Beta AR Rain Jacket is my top pick. It is definitely pricey (catch it on sale!) but once you invest in a piece like this, you’ll have it forever. It’s the rain jacket I wore on a backpacking trip in Alaska where it rained nearly every day.
For a more budget-friendly option, check out the REI Co-op Ranier Rain Jacket – it’s what Linda, BFT’s Director of Operations, currently uses and loves.
Also, if there is any chance of showers, I throw in a pair of rain pants too.
Shop the Arc’teryx Beta AR Rain Jacket at:

Base Layer Top
A warm, wool base layer is handy for changing into when you’re ready to get out of your sweaty hiking clothes and get warm at camp. It can be cozy to sleep in too.
I like the Icebreaker 200 Oasis Half Zip because it’s super soft and odor-resistant. I also opt for Icebreaker over other Merino wood brands because they have strong animal welfare standards.
Shop the Icebreaker 200 Oasis Top at:
Hiking Pants
I prefer to backpack in leggings (if it’s too cool for shorts that is). The REI Flash Hybrid Tights are a Bearfoot Theory team favorite because they’re designed specifically for hiking with thoughtful details such as snag-resistant fabric, a zippered pocket for keys, and a comfortable high-rise waist that won’t dig in or roll down while you’re hiking.
Shop the REI Co-op Flash Hybrid Tights at:
Moisture Wicking T-Shirt
I always hike in a non-cotton, quick-dry, moisture-wicking t-shirt, and most often it’s the Patagonia Cool Capilene T-Shirt .
As I get older, though, I’m preferring the long-sleeve version because it provides more protection from the sun. These shirts are lightweight, so even with the long sleeves, I stay nice and cool.
Shop Patagonia Capilene Tees at:

Hiking Shorts
I like to backpack in spandex shorts when the weather’s nice, but lately, I’ve been liking these REI Co-op Active Pursuits Shorts .
They’re comfortable and stretchy and offer a little more breathability than spandex.
Shop the REI Active Pursuit Shorts at:
Sports bras are my go-to even when I’m not hiking, and these days I’m personally loving the lululemon Run Times Bra .
It’s perfect for backpacking because it doesn’t shift around, my breasts are fully supported, and don’t bounce around AT ALL. I also love the thick straps becuase they don’t dig into my shoulders.
Shop the lululemon Run Times Bra at:
Quick Dry Undies
The lululemon InvisiWear Mid-Rise Boyshorts are lightweight and have a barely-there feel, making them great for backpacking.
I’ve tried two other cuts of these InvisiWear underwear, and the boyshorts stay in place the best out of all of them.
Shop the lululemon InvisiWear Boyshorts at:
Hiking Socks
I alternated between 2 pairs of Darn Tough Hiking Socks on my John Muir Trail hike. That was years ago, and I still wear these socks hiking.
They are extremely durable and stay put while you’re hiking so you don’t end up with nasty blisters. Plus, Darn Tough offers a lifetime warranty. Free socks for life!
Shop Darn Tough Socks at:
Hiking Boots
I’ve always been a big fan of Oboz and recently upgraded to a new pair of Bridger BDry Hiking Boots after wearing my last pair out through years of hiking and backpacking.
The mid-height helps support your ankles, plus they are waterproof and have a stiff sole, so you get plenty of support on those steeper, rockier slopes.
Shop the Oboz Bridger BDry Boots at:

Camp Sandals
It’s always nice to take those hiking boots off when you get to camp to let your feet breathe, and for that reason, a pair of camp sandals are a must on my backpacking checklist.
These Teva Universal Trail Sandals are lightweight (1 pound for the pair) and provide structure and grip for walking around camp.
They have padding around the ankle and anywhere there is a buckle to prevent rubbing, and they are one of the most comfortable pair of sandals I’ve ever owned.
Plus, they are made from recycled water bottles, so it’s a win-win! See my full review here .
Shop the Teva Universal Sandals at:
Even if you’ll be hiking in the woods or the forecast looks cloudy, you’ll want to bring a sun hat to protect your face, neck, and shoulders from harmful UV rays. Not only do hats ward off sunburns, but keeping your skin shaded can also help prevent dehydration and heatstroke.
The Wallaroo Sedona Hat has been my favorite for years. I love the wide brim, stylish look, and that it can pack down without losing its shape.
Shop the Wallaroo Sun Hat at: (Use the code BEARFOOT20 for 20% off)

Don’t forget your shades at home! You probably already own a pair of sunglasses, but if you’re in the market for some new backpacking sunglasses, Goodr makes fun, affordable options. We also love that they are a member of 1% For The Planet.
Shop Goodr Sunglasses at:
I also highly recommend packing a buff – a versatile piece that you can wear around your neck for sun protection, around your face and ears if it’s windy, and even as a headband soaked in water to help keep you cool.
Shop Buffs at:
If it’s going to be cold, you’ll also want to bring a pair of gloves. I like these lightweight Smartwool liners . They’re touchscreen compatible and not bulking, so they work well with trekking poles.
Shop the Smartwool Liner Gloves at:
It’s a good idea to pack a lightweight, quick-drying beanie to wear at night or if temps drop during the day. The REI Ribbed Beanie is a simple hat that does the trick.
Shop the REI Ribbed Beanie at:
Backpacking Clothes
Need help planning or preparing for your trip? Check out these helpful backpacking how-to guides:
- How to Train for Hiking & Backpacking
- How to Pack a Backpacking Pack for a Multi-Day Trip
- How to Plan a Backpacking Trip in 12 Simple Steps
- Backpacking for Beginners: Wilderness 101 Tips
- Beginner Backpacking Mistakes to Avoid
- Tips for Backpacking With a Dog
Save this post to Pinterest

What’s on your backpacking checklist that we missed? Is there anything you’d add or subtract? Do you have any questions about what to bring backpacking? Let us know in the comments below.

With two decades of hiking and seven years of van life under her belt, Kristen has dedicated her life to helping people experience the positive effects of nature. As a pioneer in the outdoor blogging space, she founded Bearfoot Theory in 2014 and has since authored more than 350 blog posts about outdoor travel, hiking, camping, and van life. Her work has been featured in National Geographic, Outside Magazine, and Backpacker, and when she’s not on the road, she lives in Park City, Utah with her partner Ryan, their son, and two adventure pups.
Leave a Reply Cancel reply
Your email address will not be published. Required fields are marked *
Save my name, email, and website in this browser for the next time I comment.
59 Comments
Pretty nice list! I need to have a look at the Nemo sleeping pad, my Thermarest is annoying me so much recently.. Need something light and rectangular.
I’m totally with you re: trying to find a comfortable and convenient way to carry photography gear. Have you tried the Peak Design capture clip? I’ve used it for day hikes and have liked it so far but am not sure how it will work for weekend backpacking trips. Of course, even with the clip you’d need some decent bag for protection if you’re going through rough terrain or if the elements don’t cooperate. I like your approach with the sling though. 🙂
I have tried the Peak Design clip. They are pretty cool and I might be taking one with me on my upcoming trip to Nepal.
Check out Cotton Carrier’s Strapshot camera holster for your DSLR. It wraps around your backpack shoulder strap and provides a secure place to hang your camera with a 1/4 turn quick release and safety tether. I use it and have the full chest harness. (I’m not at all associated with them, just find their gear really convenient.) Thanks for the good read.
I also use the cotton carrier system – a disc screws into the tripod attachment of my camera (I pack in a Sony a6000 with an 18-200mm lens) and then there’s a holster that clips/velcros on to my backpack strap on my shoulder. You keep the strap around your neck for safety (more than twice I’ve been over, the camera unhooked from the carrier and I would have dropped it without the neck strap!) and then the camera is easily accessible when you want to shoot something. The downside is no protection from dust/moisture, so on dusty trails I’m brushing off the lens a lot. But it went with me to Everest Base Camp, Kilimanjaro and numerous 2-7 day backpacking trips with a large ziplock in my bag for water protection if needed. Love this setup.
I love my cotton carrier. I carry a full sized Nikon on it..have for 3 years… zero accidental disconnects… its tough for a piece of plastic too….
Great list Kristen, these checklists are so handy for people that are new to doing these kind of hikes. Have a great holidays! Stephen – Uncharted Backpacker
This is an awesome and very specific list! It’s very helpful you listed brands that you specifically like to use!
Just got the Montrail hiking boots. Loving it so far. Great list.
I THINK I obtained permits for Havasu Falls for this spring (I received confirmation emails, but still have a fear something may go wrong, but I’m hoping for the best). Starting to plan and struggle with what camera equipment to bring. I have a Nikon d7100 that I love, but would like to get by with just my 35 mm/1.8 lens. Think that’s wide enough to get good waterfall shots?
Hey Des, I’d highly recommend a wide angle lens. I brought a 16-35mm last time and it worked out perfectly. Have fun!
Amazing list! Seems to be the go-to stuff when comparing to other lists. That said, I\’d strongly suggest bringing a compass and map! On a longer trip would you change change the gear or simply bring a few more items of clothes?
Thanks Sean for the added recommendation of a compass and map! For a longer trip I would just recommend having at least one change of clothes in case of weather or for added layering. I backpacked the entire PCT for 5 months with only 2 shirts and 2 pairs of bottoms, so you definitely don’t need to expand on bringing more items necessarily.
A great list and this is going to be so useful to me. I go on treks very frequently and usually don’t get much time for backpacking. Thanks a lot for posting!
You literally just saved my life. Thank you for making this list!
Its always good to have a small extra knife just to be sure and ready for everything. A roadeavour knife wont add that much. only a size of a credit card. but very reliable.
Also a good thing to have is a collapsible water bottle like the one in roadeavour
n NZ if I went hiking with an umbrella, I would be laughed out of the hills. It would be really good to see exactly what you take in all the small bags, as this is wear weight accumulates and my pack gets heavy. Thanks for sharing.
Hey man, this is a very specific and a great list. Thanks for sharing with us such a awesome list.
Great list Kristen. Thanks for taking the time to put this stuff together. Your site is full of great info. I do the same stuff on a much less professional level on my youtube channel. Your site always has a few gems that even experienced hikers can find useful. Keep up the good work!
Thanks good stuff
Wow you hit the lottery? Most hikers couldn’t afford have your list. Anyone can go into a REI and buy the best available but a true backpacker can use whats handy and go on a trip. I am an assistant scout master for a Boy Scout troop and do trips including gas for a 3 hour trip, food for 12 and snacks for around 12 bucks each using basic gear for 3 days on the trail. Contact me and I can teach you how to hike on a tight budget.
I am so grateful to have stumble across your website. I am a beach bum. I have only done one day hikes. But, I have been invited to a three day hike in Korea. I will be doing the Jirisan Nature Reserve over three days. I have a bag and sleeping bag. That’s it. What elae do I need to prepare for this three day trek? It will be in September. Your help would be appreciated. I am an Expat teaching in Korea. I am exploring Korea through Hikes and wone tasting. I am open to suggestion.
Hi Gabriela, we are so glad you found us! Will you need a tent for your trek or will they be provided? We would recommend a sleeping pad as well. If you’d like to reach out and email us at [email protected] we can provide you with additional links to great articles and packing lists on our site to help you prepare for your trip. Sounds like an incredible adventure you have ahead of you!
Just what I was going to say. This is nice list of gear for anyone who has, say, a couple of thousand dollars to drop on a three-day (two-night?) backpacking trip.
What is your total weight of your pack?
Hi Rolando, that really depends on how long you are going to be backpacking. For a 3-day backpacking trip, we recommend trying to keep your pack weight as minimal as possible, depending on if you need to carry water or not. A good rule of thumb is not having your pack weight more than 20% of your body weight.
It is interesting that trekking poles can help manage the weight on your hips and legs by using your arms. My wife and I are going on our first backpacking trip in three months and we are trying to get everything together. We may consider going to a few camping stores near us to see what they recommend we bring too.
Hi James, So exciting to hear you and your wife are getting into backpacking! Trekking poles are a game-changer on the trail. We have a ton of comprehensive blog posts here about backpacking that you’ll probably find helpful. I suggest you start here: https://bearfoottheory.com/backpacking-101/ Let us know where you go and if you have any questions!
On my must pack list is a brightly colored bandana or two. So many uses; shade, neck warmer/cooler, dishrag, splint maker, wash rag, hunter safety gear (thus, brightly colored), and on and on. Thanks for great list, Kristen!
My thoughts, exactly…Black Diamond everything! If I’m going to spend $1000, might as well be in a hotel. There are countless other, just as good, options out there. Off-Brand does not always mean that you are compromising durability and/or performance. Do yourself a favor and think logically–don’t always believe sites like this. Some great info in here, I’ll agree, but focus on being “prepared,” and not showing off at the trailhead as you unload from your Volvo.
Ho! these are some really good checklist, thanks for sharing 🙂
Thank you. I will try everything on my first hike this fall.
Thanks for reading, happy hiking!
What are your thoughts on a woman hiking solo? Safe?
We thinking hiking solo as women can be done safely. In fact, it can be fun and empowering. Check out this blog post for more on this topic as well as safety tips for solo hiking: https://bearfoottheory.com/hiking-alone/
Thanks for this list, I’m planning out my first backpacking trip for myself and my husband and struggling to find a minimalist approach! I don’t want to pack everything and the kitchen sink but every blog seems to have twenty million things that are unnecessary. I’m looking forward to following your list! Any tips on seating? My husband is struggling with not being able to pack his giant camping chair.
Hi Claire – we know what you mean! Taking only what you need to be safe and comfortable will help you have a better experience. If you’re suffering under the weight of your pack it’s hard to have a good time. The Helinox Chair Zero in the blog post below is a good option. It’s super lightweight and packs down small making it great for backpacking. The REI Trail Chair in the same blog post is a good option as well if you don’t mind sitting on the ground. Another option is a lightweight, folding stool (just search “camp stool” online and you should be able to find a few options). Happy hiking!
https://bearfoottheory.com/best-camp-chairs/
Look up thermarest trekker chair. It converts/folds your sleeping pad into a sitting position.
That’s a great suggestion, thank you!
I will definitely keep this in mind in my next travels. thank you!
Thanks for reading!
What is your total weight including pack for 3 days? Also check out Lume deodorant on line. Some folks can go 72 hours with out stink. Safe for any body part. And no I don’t work for Lume, just having great results.
It varies depending on a few factors including the weather (how much warmth, rain gear, and shelter we have to pack for example) and whether a bear canister is needed which adds a little weight as well. I’d say our standard pack weight is anywhere from 15-30 lbs depending on how lightweight we’re going. And thanks for that deodorant recommendation!
Hi, thanks for taking the time to write these articles and share them, much appreciated. I have shared them on my own webpage/blog with my own followers as well – spreading the love.
Thanks Tania!
I was meant to find this post. I am a woman about to go on my first 3 day hiking/backpacking trip. I can’t tell you how helpful this info is. Thank you so much!
You’re welcome – happy trails!
The point is that if you’re looking to list existing products – it pays to ensure that you’re using the most effective techniques to instill trust, desire, and confidence in your buyers.
I love the mansplainers out there shaming her for touting nice gear. We all like to spend on different things. Some of us might go to REI to pick up a fun toy or two, and the rest of us probably have the brains to know how to substitute a cheaper item or repurpose something we have. First timers can also borrow gear from friends or neighbors before they commit to more frequent backpackers. It’s a great way to figure out what you like. This list was very helpful, Kim. Thanks.
Where’s your straw hat from though?? So cute!
It’s a Wallaroo Sedona Hat . My favorite wide-brimmed hat!
As others have said…THANK YOU. I have not backpacked in 8+ years and this was a great reminder and check list. I actually cannot believe some of the folks who harassed you about buying quality gear…guess their Momma never told them that “if you can’t say something nice, don’t say anything”…you would think they would have learned that on the trail. Their packs must get heavy carrying all that hate around…lose the weight! Franklly, I am always looking for ways to time weight and cost, but that is part of the fun and the process. Thanks again for a great list/refresher as I plan a 3 day in the Smokey’s!
So glad to hear you found this helpful! Enjoy your trip to the Smokey’s, and welcome back to backpacking! We actually have a fall travel guide for the park here in case you need help planning: https://bearfoottheory.com/smoky-mountains-fall-guide/
This is a very nice list, but if you put all these things together, the weight is not going to be ideal. The tent and sleeping bag is just about 6 lbs for start. All these are good products, but for the weight conscious, I would definitely be going for lighter items, if you don’t mind the weight, great list.
Hi Nikki, thanks for the input! These are the gear items we’ve personally carried when backpacking, even though they might not be the lightest on the market. For someone just starting out, buying gear can be really expensive so we’ve tried to strike a good balance between cost and weight in our recommendations. However, we’re working on an ultralight backpacking gear guide at the moment which will focus more on lightweight items.
Do you have an article on what you pack for food for a three day hike? I have always day hiked, and know my go to list for snacks, but haven’t ever done overnights, so not sure what to bring for calorie packed real meals. Thanks.
Hi Melanie, this blog post gives tips for what to pack for backpacking food, how much to bring, and our personal favorites: https://bearfoottheory.com/backpacking-food-ideas/
Thanks since I’ve become an old man I haven’t backpacked in a few years. So this was a good reminder. Appreciate you taking the time to post this. All the best for a safe and healthy season. Dave H Fort kent, Maine
7-Day Backpacking Checklist (Printable PDF & Editable)

So you want to take camping to a whole new level and try hiking and trekking for a week or so. It’s a great idea and you’ll have lots of fun and learn a heap of things about yourself – BUT it’s very different from car camping.
You’ll need to ditch lots of stuff that you can carry in a car and lighten the load as much as you can so that you have the essentials and don’t want to put too much pressure on your feet and knees with an unnecessarily heavy load.
So what exactly will you need on your first week-long hiking trip and what can you ditch? We have compiled a list of what you will need for the week along with hints, tips and suggestions for people attempting a 7 day backpacking trip for the first time.
Check out what you will and won’t need in our 7-day backpacking checklist!
Cooking & Eating
Wet weather protection.
Take merino wool socks if you can. One for camp, two for walking and, if you want, an additional thick pair of socks for cold nights.
First Aid Kit
Personal protection, useful things.

Hints, tips, and hacks for first time 7 day backpackers
- Use a list. Don’t forget any of the essential things that you will need.
- The big four that weigh the most and take up the most room are your backpack, tent, sleeping bag, and sleeping pad. These are the items to cut the most weight from by getting the lightest ones you can.
- Think about using a hammock with a rain fly and bug net, a Bivy or a Tarp setup rather than a tent to save even more weight.
- If the ground is soft enough, you may be able to leave the tent footprint behind.
- Don’t take too many clothes. It’s a typical beginner’s miscalculation. Embrace the dirt and save your back, knees, and feet. A warm base layer, two sets of alternate hiking clothes, and a dry, warm set for camp are all you will need. Truly.
- Get a pack that fits you properly. Seven days is a long time to be uncomfortable…
- Ziploc bags are your backpacking friend. They keep items dry and waterproof and can retain the smell of used toilet paper and food scraps really well as well. Don’t skimp on the quality of a ziplock bag!
- Pack the lightest gear first (yes, Your sleeping bag goes on the bottom) and keep the heavy gear towards the top of your pack close to your body to keep your balance when walking rough terrain.
- Eat your heaviest foods first. Your neck, back, and shoulders will thank you as the days roll on!
- Plan your meals. Don’t take random food and try to create meals from what you bring along. You can get away with that when you are car camping and can bring food “just in case,” but out in the backcountry, you need to have enough good high calorie food each day.
- Bring a treat to look forward to each day. A chocolate bar, some boiled lollies, and a few gummy bears can make all the difference to your mood!
- Use your cooking pot as a mug, cup, plate, and bowl to save weight and space.
- A long-handled spoon and a knife will be all you need to open packets, cut things up, stir and eat with. Don’t bring a whole dinner set of cutlery. Let as many things as you can multi-task or have multiple uses.
- Always wear shoes that have already been broken in. A week’s hiking trip is not the place to test or break in new shoes.
- A pro tip: Waterproof boots and shoes take a lot longer to dry out than non-waterproof footwear does once you get it wet in a creek or river..
- Cotton is not the best material for hiking. It absorbs moisture, doesn’t wick away from the skin, and is a poor insulator. It also retains odors really well… Go with woolen or synthetic hiking clothes for durability, warmth, and performance.
- Drink as much as you can at every opportunity. Water is heavy and best carried in your stomach than on your back.
- Make sure you are fit enough before you leave by training with your (full) backpack and boots so you know what needs adjusting.
- If you rely on electronics for maps, cameras, navigation, etc, bring along a power pack to recharge it.
A seven-day backpacking trip is a fantastic trip to plan and actually finish. The sense of accomplishment on completing a week of living off your back is just incredible and can up your self-confidence no end. But the devil is in the detail, so make sure you plan and prepare for these types of trips and don’t attempt them on a whim.
Pack and repack. Check and recheck. You don’t want to be out on your first night without food, water, matches, or a tent! Make sure you are fit enough and have used everything you are taking with you before you leave. Don’t wait until it’s dark and raining and you’re wet and hungry to figure out how to use that brand new camp stove!
The more often you do multi-night hikes, the more you will know what works for you and what doesn’t. You’ll be able to know what gear you need for your level of comfort and what your body can handle. The best way to make decisions about gear is to use it in the field!
This list has been compiled to give you an idea of how much (or how little) you will need to do these 7 day backpacking hikes and to start you thinking about planning and working towards knocking over one of your own first-week long hiking trips!
Happy Hiking!😊
Next up: Looking for a shorter trip? Check out our 3 day backpacking checklist .
Next up: How do all the different types of tent poles stack up? Find out in our guide to aluminum vs fiberglass tent pole comparison .
Save my name, email, and website in this browser for the next time I comment.

GO-BACKPACKING .COM

Planning Resources
Please feel free to download and use any of the planning resources below. it is ultimately your responsibility to ensure you are prepared for your adventures, but we hope that these resources will save you some time and effort in organizing your planning process. if you have any questions or comments, please feel free to contact us ..

Backpacking Gear Checklist
This is the backpacking gear checklist Mark and Katie use for 3+ Season trips (most summer, spring, and fall conditions and locations). For winter trips, or for more extreme conditions, they change the items on this list. This list is considered “Light” but not “Ultralight”.

Backpacking Preparation Checklist
Use this checklist to make sure you are prepared for your backpacking trip. Remember, it is YOUR responsibility to ensure you have, know, and do everything you need to have a safe and enjoyable trip.

First Aid Kit Checklist
Use this checklist to make sure you have everything you need in your backpacking first aid kit. NEVER go backpacking without a first aid kit and make sure you know how to use the items inside. See our Emergencies in the Backcountry section on the "Learn" page for more information.

Mark's Gear List
This is Mark's personal backpacking gear list. He does not take every item on this list on every trip, and some trips require additional items that are not on this list. Take a look.

Sample Topographic Map
This topographic map depicts a route through Sage Creek Wilderness Area in Badlands National Park in South Dakota. Use it as an example for your creation of personalized topographic maps using online or downloadable software.

Sample Waypoints
This is an example of a waypoints list you would print on waterproof paper and take with you on your backpacking trip. This particular list is a 22-mile, 3-day loop through Badlands National Park in South Dakota.

Backpacking Itinerary Template
Microsoft Word Document
Fill out this itinerary template for your next backpacking trip. Leave a copy in your car, and give a copy to someone who will be responsible for calling the authorities if you do not return by the expected date and time.

How to Pack a Backpack
Another great REI resource: Packing a backpack is pretty simple, but there are some tips to make the process easier and to get you better results. Check out this video to learn how to load your pack properly.

REI Backpacking Checklist
This is a comprehensive backpacking checklist from REI, which is one of Katie and Mark's top choices for outdoor equipment and information. Their backpacking checklist is "your tried-and-true guide to packing smart. The list is intentionally comprehensive so you don’t forget anything important."
REI Ultralight Backpacking Checklist
Ready to take the next step in backpacking comfort? Try going ultralight. This checklist from REI will help you get started with this new and innovative style of backcountry travel.

Wilderness Medicine
Amazon Book
Katie and Mark have the privilege of calling Dr. William Forgey, MD a personal friend. He has been called the Father of Wilderness Medicine, and rightfully so. With more backcountry experience than anyone we have ever met, Dr. Forgey (or “Doc” to his friends) is the authority on wilderness medicine. His book, Wilderness Medicine: Beyond First Aid, now in it’s 6th edition, is an invaluable resource for the backcountry traveller.Katie and Mark have the priv
Press Herald
Account Subscription: ACTIVE
Questions about your account? Our customer service team can be reached at [email protected] during business hours at (207) 791-6000 .
- Arts & Entertainment
Calling all Swifties: Take our quiz and see photos of the star in Kennebunkport in 2010
Prove your fandom with our trivia questions.

You are able to gift 5 more articles this month.
Anyone can access the link you share with no account required. Learn more .
With a Press Herald subscription, you can gift 5 articles each month.
It looks like you do not have any active subscriptions. To get one, go to the subscriptions page .
Loading....

Singer-songwriter Taylor Swift released her 11th album, “The Tortured Poets Department,” on April 19, and the response to it just about broke the internet (along with a streaming record).
During all of the excitement, we unearthed a trove of Press Herald photos of Swift from when she visited Kennebunkport in 2010 for a special outdoor performance.
Check out these sensational images from staff photographer Derek Davis and then try your luck at our Taylor Swift quiz!
Success. Please wait for the page to reload. If the page does not reload within 5 seconds, please refresh the page.
Enter your email and password to access comments.
Forgot Password?
Don't have a commenting profile? Create one.
Hi, to comment on stories you must create a commenting profile . This profile is in addition to your subscription and website login. Already have a commenting profile? Login .
Invalid username/password.
Please check your email to confirm and complete your registration.
Create a commenting profile by providing an email address, password and display name. You will receive an email to complete the registration. Please note the display name will appear on screen when you participate.
Already registered? Log in to join the discussion.
Only subscribers are eligible to post comments. Please subscribe or login first for digital access. Here’s why .
Use the form below to reset your password. When you've submitted your account email, we will send an email with a reset code.
Send questions/comments to the editors.
Member Log In
Please enter your username and password below. Already a subscriber but don't have one? Click here .
Not a subscriber? Click here to see your options
IMAGES
VIDEO
COMMENTS
Foam pad (to insulate you and your dog from the cold/wet ground during breaks) Dog first aid kit (or add stuff to human first-aid kit) Collar light (check battery pre-trip) Leave in car. Quick-dry towel. Blanket. Dog car hammock (seat protector) Extra dog food in airtight container.
Step One: Plan The Route. Hike planning is essential to executing a worry-free, rewarding hiking trip. Learn ahead of time if you need any permits for parking or hiking. Fortunately, there are no specific requirements for an awesome hike — you can hike for a mile, or you can hike for 20 miles.
Nothing more. This is a complete backpacking checklist that you can download as a PDF. It encompasses everything you need to think of to prepare for an long-distance hike. Includes trip preparation (resupply points, insurance, emergency precautions) and essential gear items (food, clothing, navigation and much more).
Water (and a water filter): As a general rule, bring as much as you can carry when starting—at least a liter per two miles. After a few hikes, you'll be able to gauge your consumption better. Remember to drink water frequently; ideally, before you even feel thirsty, as thirst is the first sign of dehydration.
This 'Ten Essentials of Hiking' list is universally agreed upon in the hiking community and should serve as a baseline for all the necessary supplies you need to bring along on any given day hike. 1. Navigation: map, compass, GPS device, personal locator beacon, altimeter. 2.
Embarking on a hiking journey is not just an adventure; it's an exercise in meticulous planning. A well-crafted hiking checklist serves as your roadmap for what to pack for a hike, leading to a more enjoyable and worry-free experience. While it's tempting to pack for every possible scenario, the art of smart packing lies in balancing hiking essentials with items that are less crucial ...
1 hour for every 3 miles. +. 1 hour for every 2,000 feet of ascent. 1 hour for every 5 kilometers. +. 1 hour for every 600 meters of ascent. Before you go on any hike, you need to ensure that you have the physical and mental ability to actually complete it. The same goes for anyone who is planning to hike with you.
See our detailed day hiking checklist, including footwear, clothing, first aid ... especially for those who only use it occasionally, is Garmin's service subscription price—the most basic plan requires a $34.95 annual program fee plus a $14.95 monthly fee. ... Of all the outdoor activities we cover here at Switchback Travel, hiking is ...
Get this free, printable hiking gear checklist. This guide covers the 30+ items you need for your next hike, from the 10 hiking essentials to the luxury items to enjoy your adventure. Download the free hiking gear checklist here. The Ten Hiking Essentials. You'll hear about the ten hiking essentials if you read an article on hiking for ...
Trail permit. Bear spray and bear safety gear. Stuff sacks. Pack cover. Binoculars. Camera. Before you leave for the trailhead, always remember to check weather forecasts, tell someone about your trip plans and when you expect to be back, and stash a copy of your trip plan in the car at the trailhead.
The Jetboil Flash Cooking System is the most efficient backpacking stove I've found, especially if you are only boiling water. Together, the stove and pot only weigh 13.1 oz. For a 3-day trip, one 230-gram fuel canister ( sold separately) should be enough if you are using your stove for coffee, breakfast, and dinner.
This backpacking checklist goes over everything you might need on a 3-5 day backpacking trip (with a printable checklist), p. ... This list isn't fully optimized for really long thru-hiking trips though, since that takes a LOT more planning and coordinating, and your gear strategy will be a bit different. However, most of the gear items will ...
Clothing. Wool or synthetic base layer - that you literally won't take off. Long-sleeved mid-layer. 1x Hiking bottoms. Synthetic. Insulating jacket, top layer, down or synthetic. 1x Rain pants - check your guide to see if you'll need them on your trail. 1x Rain and wind jacket. Woolen gloves, if it will be cold.
Disclaimer: Almost all posts on this site contain affiliate links, and this one about 15 Essential Hiking Tips and Tricks for Beginners (Plan, Prepare, Pack etc) is no different. This means that if you click on any of the links in this post (and make a purchase) I may receive a small commission at absolutely no cost to you.Each post is carefully crafted to (hopefully!) answer all your ...
Acquire all necessary gear. Update settings for satellite-enabled devices (e.g. SPOT, inReach) Wash, renew, and repair gear, fabrics, and insulations that need it. Check and possibly charge batteries, e.g. camera, smartphone, headlamp, GPS watch, satellite communicator, backup charger. Insert an empty memory card into camera.
Checklist for Planning a Hiking Trip When planning a hiking trip, you'll need to prepare well in advance to trek through the backcountry or that national park safely. Hiking and last-minute packing really don't make the best mix, so let's dive into some best practices.
Backpacking Gear Checklist. This is the backpacking gear checklist Mark and Katie use for 3+ Season trips (most summer, spring, and fall conditions and locations). For winter trips, or for more extreme conditions, they change the items on this list. This list is considered "Light" but not "Ultralight".
Whether you prefer weeks-long backpacking trips, or cushy car camping weekends, spending your nights outside allows you to explore new places in a unique way. Credit: Jason Wanlass. Camping Checklist. Whether you are planning the maiden voyage in your brand-new tent or are a veteran camper, figuring out what to pack can be tricky. ...
Singer-songwriter Taylor Swift released her 11th album, "The Tortured Poets Department," on April 19, and the response to it just about broke the internet (along with a streaming record).