Quilt Safari, Part One: Instructions & Free Pattern
Hello to all of you Quilt Safari travelers, do you have everything you need for the safari in your suitcase? Straw hat, camera, khaki shorts…. ohh, I meant of course: sewing machine, fabrics and patterns, LOL 😀. Today we begin the Quilt Safari 🦁🦒🐘🦓🦏, and I have a free pattern for you to start with: the Diamond Border quilt block for our quilt.

We Are Sewing the Diamond Border
Today we are sewing the first block – the Diamond Border block! For all of those who have purchased the Safari quilt pattern, you have this pattern as a bonus pattern in the Safari quilt pattern .

In this post, we cover all the details of foundation paper piecing so that even beginners can learn this technique and join in the quilt safari. In addition to the step-by-step instructions, there are two video tutorials.
Over the next few weeks, we will be sewing the other blocks one by one. We’ll start with the simpler blocks and gradually increase the level of difficulty.
Are You Ready?
Are you ready, have you all gotten your “Safari Quilt” pattern and chosen and organized your fabrics? Do you know the schedule and have you chosen a nice spot in our safari jeep? Then you’re ready to go!
If not, that’s no problem either. You can join this quilt along at any time. If this is your first time hearing about the Quilt Safari, read the following blog article in which I summarize the most important information:
Welcome to the Quilt Safari.
Together we will sew a quilt with FPP blocks featuring fantastic wild animal designs.

The patchwork instructions are published block by block on WeAllSew. Here you can find an overview of all the blog posts that have been published so far.
There is no time pressure with the Safari. You can follow your own rhythm and roam the savannah at your own pace. There is only one date to keep in mind: If you want to take part in the final giveaway (and there are fantastic prizes to be won!) you have to show a photo of your finished quilt top on social media or in the community section of the blog by June 16, 2024.
Material Overview – What Do You Need?
Fabric selection is one of the most important things when making a quilt. It is super important to choose your favorite fabrics because you will be spending a lot of time with them.
For Foundation Paper Piecing you will also need the following 10 things:

1. Sewing Machine and Needles
Any standard sewing machine is suitable for sewing foundation paper piecing patterns. I use the BERNINA 770 QE PLUS Kaffe Edition. I usually use 70 mm needles, but 80 mm needles are also suitable. Change the needles more often than usual, as sewing through paper puts a little more strain on the needles than sewing through fabric alone.
Ironing is essential for foundation paper piecing. The more the fabric and the segments are ironed, the flatter and smoother the seams will be, which makes it much easier to sew the individual segments together. This ensures the all-over accuracy and size of the quilt block.
There are various paper options for foundation paper piecing. You can read about the individual advantages and disadvantages here on my blog . I prefer to use standard printer paper (80 g) here and in general. It’s the easiest to get a hold of and it is usually already in my printer. It is the cheapest and, in combination with a fabric glue stick, the simplest and most effective option in my personal opinion.
4. Light Box (not necessary for this quilt, if you’re using solids like me)
A light box is only necessary if you do a lot of fussy cutting . Then it is a lot easier to place your pattern piece on the fabric. For the safari quilt, I almost exclusively use solid fabrics, except for the zebra and the giraffe, which do not require a light box. I just wanted to mention this for the sake of completeness.
5. Cutting Tools: Rotary Cutter, Cutting Mat, Scissors
Basically, you can’t have too many cutting mats. In the photo above you can see a small 12″ x 12″ cutting mat that I always have next to my sewing machine.
Dull scissors are like an ill-fitting shoe, you don’t immediately notice what’s wrong and annoying, but over time it becomes unbearable. Nice sharp scissors and rotary cutter blades are half the battle when sewing.
6. Fabric Glue Stick
Since I usually work with standard printer paper, I use these fabric glue sticks all the time. It’s much easier to work with than with pins. As it is only a temporary glue, there is no glue residue left on the fabric or on the needle/sewing machine.
7. Acrylic Rulers
The options here are truly endless. However, a small 12″ acrylic ruler is perfect for foundation paper piecing.
Of course, it is important to use a good thread for sewing as well as good fabric. I use Silk Finish Cotton 50 from Mettler, either in white or cream, which matches most of the fabric combinations I choose.
9. Tailor’s Clapper
This is one of my favorite tools. You iron the segments and then leave the clapper on top, which results in wonderfully flat seams. Here you can read what the clapper can do for you. Of course, you can also sew the Safari patterns without a Tailor’s Clapper. It just makes your workflow a lot easier.
10. Tweezers
These help to remove small pieces of paper.
Now that you have a detailed overview of my favorite tools, we can get started, right?
Instructions for the Diamond Border
My fabric selection.
Here is my fabric selection for the Diamond Border:
- Chocolate brown
- Bright pink
The border consists of 30 4″x 8″ blocks.

Let’s Go! We Are Sewing a Diamond Border Quilt Block
Before you think, “Oh my goodness, 30 blocks for the border”, that’s too much printer paper, ink, etc. – don’t worry, there are several ways to save on this.
- As the first option, I’ll introduce you to a method where you only need one template that can be reused
- You can use previously printed paper, the reverse side is completely sufficient.
- You can of course print in grayscale, which saves color cartridges
- You can have the segments printed out in a copy shop, which is often really inexpensive
So let’s start with the border block.
If you don’t have it yet, you can find the pattern for the complete quilt here on my website.
Or here is the free download for the Diamond Border in the size 4 “x 8” only.

The Classic Foundation Paper Piecing Method
This is the classic FPP method where we sew through the paper.
1. There are a total of 30 border blocks to sew for this quilt, they are 4 “x 8” in size. First, you print out all the parts of your pattern with letters and numbers. Of course, you do not have to print out the instructions and overview.

2. Cut out the pattern pieces along the dotted line. The more precisely you cut out, the easier it will be for you to join the individual pieces together.

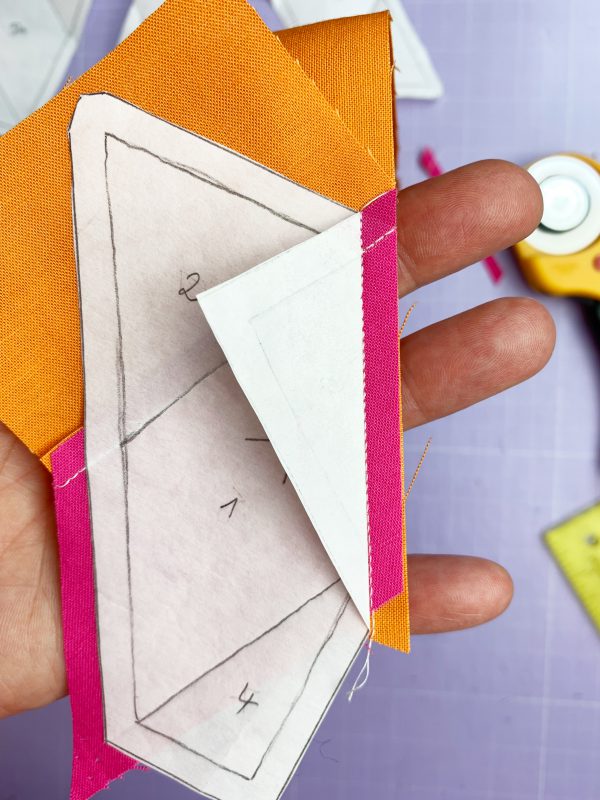
3. It is now important that you understand that the quilt block is created on the back of the pattern! This fact often leads to misunderstandings. The pattern is not placed on the fabric and then cut out, as it is done with classic sewing patterns, but the pattern serves as the foundation for sewing, the quilt block is created on the back.
4. Set your sewing machine to a small stitch length. I like to use 1.2 mm to 1.5 mm. The small stitch length makes it easier to pull out the paper in the end, when you’re done sewing. I also use the sewing machine foot with transparent sole #34D. This allows me to sew super accurately on the line.

5. This is how you start: Turn the first segment (marked with the letter A) to the wrong side so that the wrong side is facing you. Place the fabric that is to cover part 1 with the wrong side on the pattern.

Wrong side of the fabric against the wrong side of the pattern!
Make sure that the fabric covers the entire area of 1, plus 1/4″ to 1/2″ seam allowance. You don’t have to pay attention to neat edges or the grainline. This will look like in the photos below. It shows the view from both sides.
Pin this piece of fabric in place with a pin or, if you want to work like me, use the fabric glue stick.

6. Turn the segment so that the printed side is facing you. Fold the pattern on the line between 1 and 2. It is best to use a postcard for this step, as you can achieve a nice crisp fold like this. The line between 1 and 2 is also the line that you will sew first.

The segment with the printed side is facing you.

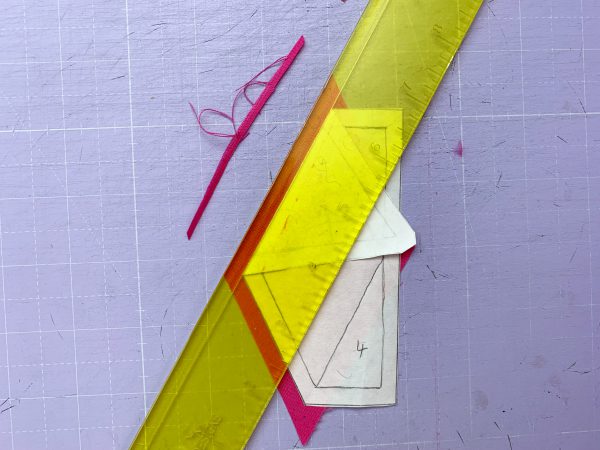
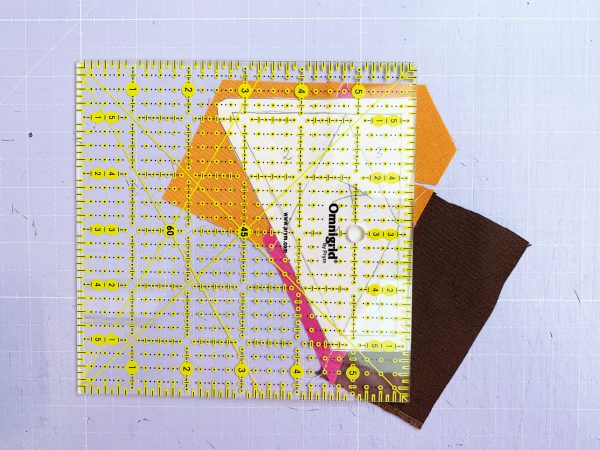
7. Cut the seam allowance to 1/4″. Use the acrylic ruler and the rotary cutter for this:

8. Choose a piece of fabric for the part of the segment numbered 2. Make sure that the piece of fabric covers the whole area of 2, plus 1/4″ to 1/2″ seam allowance. Be generous at the beginning. When you have sewn a few blocks later on, you can use slightly smaller pieces of fabric.
Lay the fabric for part 2 right sides together on the first fabric and align the edges of the seam allowance exactly on top of each other:

9. Sew exactly on the line between 1 and 2. It doesn’t matter if you make a few stitches before and after. The transparent presser foot sole of the sewing machine foot with the transparent bottom #34 and the patchwork foot #97 are both absolutely perfect here. I like to use both for FPP all the time.

The seam between 1 and 2:

10. Now unfold the fabric from 2 so that you can see both right sides of the fabric and press this with the iron or finger press.

11. Now continue sewing the same way in numerical order. Next is the seam between 1 and 3. First fold along the seam with the postcard and trim the seam allowance. Place the piece of fabric for 3 aligning the edges of the seam allowance of 2 and sew along the line between 1 and 3. Now finish this segment in numerical order.
12. Sew all 4 segments of the diamond border block in this way.
Video Instructions
I have created a video in which I show the steps just mentioned.
It will help you – especially if you are new to FPP. Many things are easier when you see them in a video.
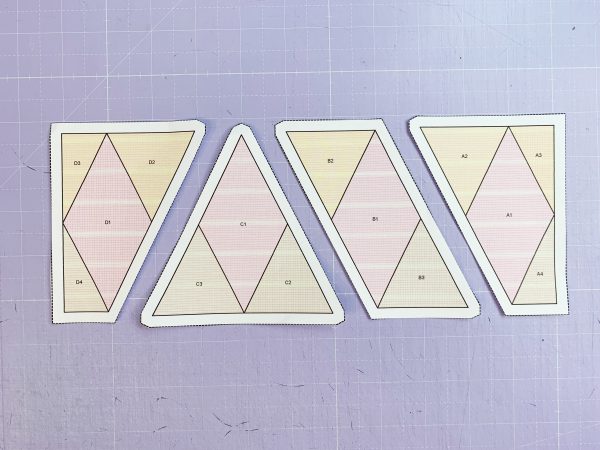
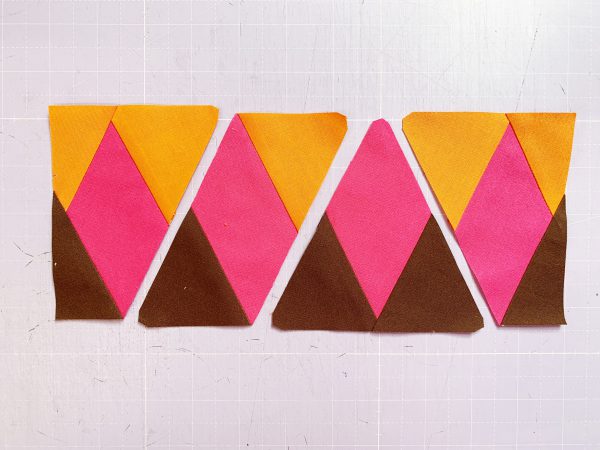
13. Cut back the excess fabric along the outer edges of the segments back to the seam allowance. Lay out the individual pieces as shown in the overview.

All the segments:

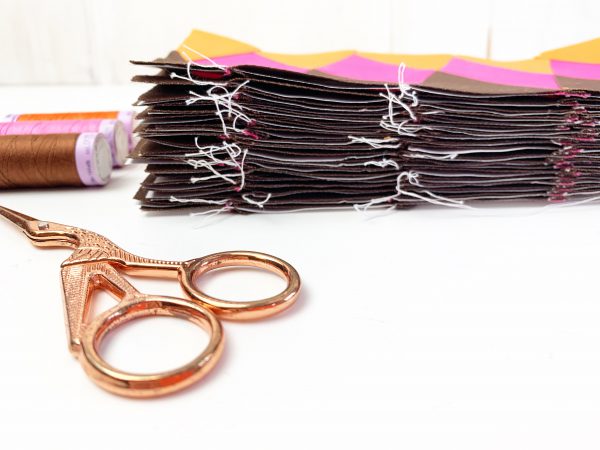
14. Join the segments in the order mentioned in the pattern. If you have sewn two segments together, remove the paper from the seam allowance only and press the seams open. This is where the Tailor’s Clapper comes into play, it helps to ensure that the seams are nice and flat.
There is another YouTube video for finishing the FPP pattern
Now the first block for the Border is finished! Let’s move on to the next one 🙂
The Second Method of FPP With Reusable Freezer Paper Template
In this method, we use freezer paper and do not sew through the paper.
1. What is freezer paper?
Freezer paper is a coated paper that is usually used to wrap food so that it can then be stored in the freezer. The coating is a kind of waxy plastic, like a film, and is intended to help prevent freezer burn. This paper is also frequently used in the creative and craft sector.
The waxy coating can be pressed to fabric with an iron without sticking. Making this paper ideal for templates of all kinds.
Freezer Paper is available from specialist creative and craft shops and, of course, online. Freezer Paper is available as a roll or for printing on your printer, which is the luxury version.
The advantage of freezer paper is that you don’t need as much paper and you don’t have to pull out the paper at the end.
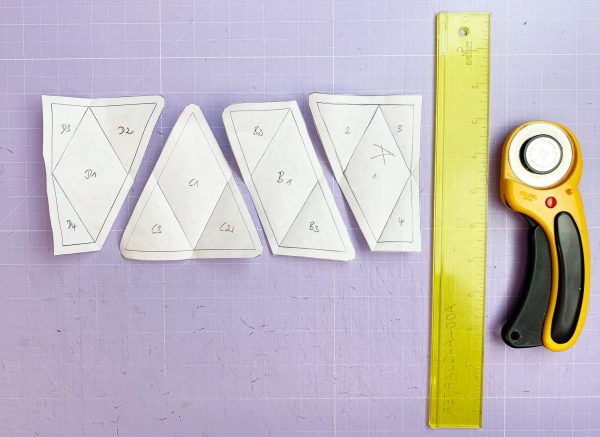
2. First take your printed templates (you have to print them out once) and cut them out along the dotted line as with the classic method of FPP.
I have used a Freezer Paper roll here. Trace your templates onto the paper side of your Freezer Paper. If you have one, use a light box. It doesn’t matter if you don’t have a light box, you can just trace the templates on a window onto the Freezer Paper, this works just as well.
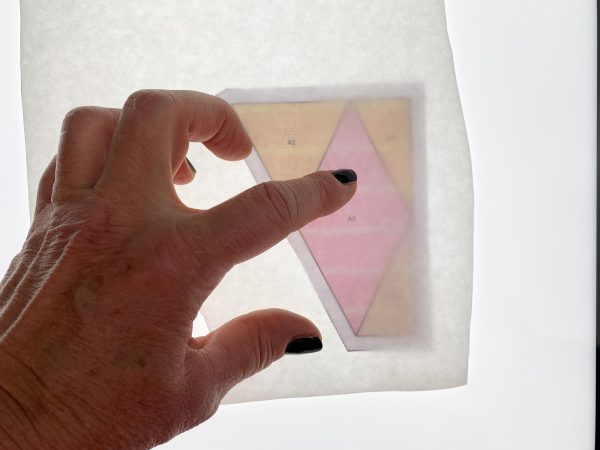
3. Label your templates exactly as they are labeled on the paper templates. Transfer the numbers and letters exactly.
4. Now work exactly the same way as you would in the classic version. Take your fabric for part 1 and place it against your template, wrong sides together. The fabric must cover part 1 generously.
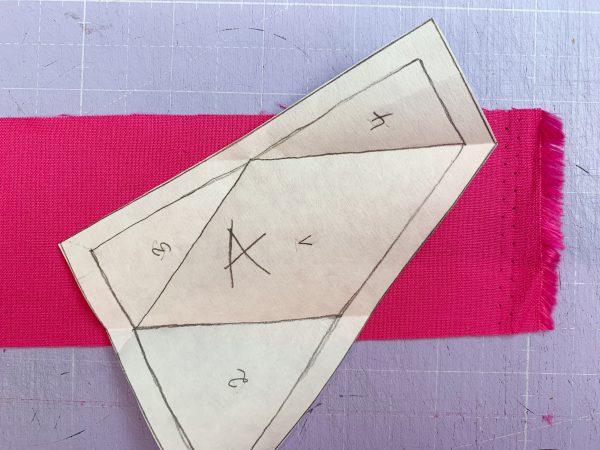
5. Instead of using the fabric glue pen, press your template onto the fabric (part 1 only). If you like, you can also use a mini iron or a travel iron to press more precisely.
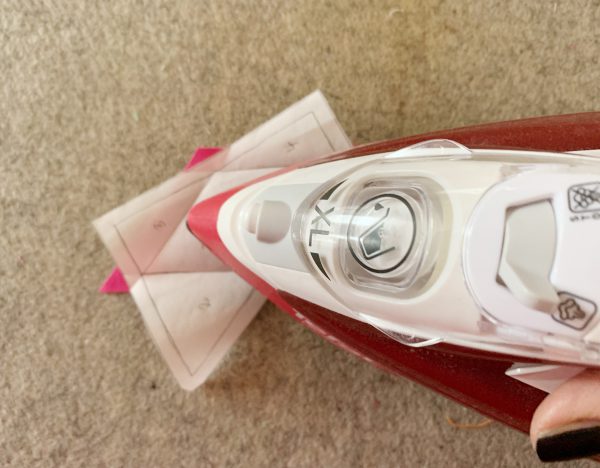
6. Continue as with the classic version. Fold between 1 and 2 along the seam that now needs to be sewn, again preferably using a postcard. And cut the seam allowance back to 1/4″.
7. As with the classic version, place your fabric for part 2, aligning the seam allowances, right sides together.

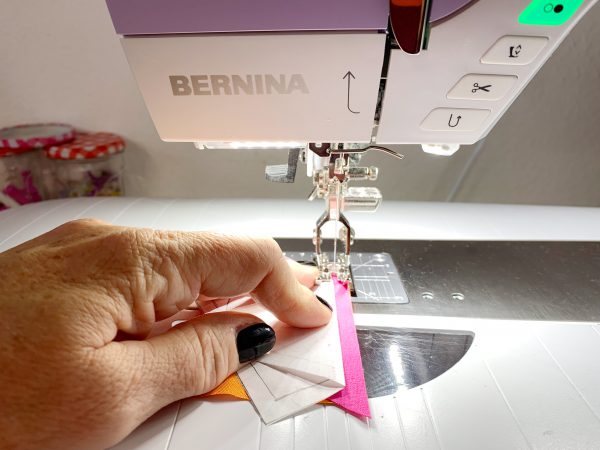
8. Now this is the step that is different from the classic version! You do not sew through the paper, but the template remains folded back and you sew exactly next to the fold.
The patchwork foot #97 is a great help here, as the edge of the foot aligns perfectly with the edge of the seam allowance.
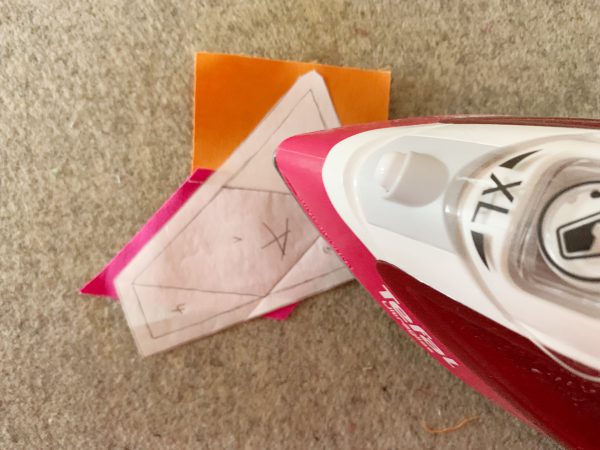
9. Now fold the fabric back and press part 2 against the freezer paper. Then continue as with the classic version.
10. Now fold the seam between 1 and 3 with a postcard. Lay the fabric for part 3 aligning the allowances, right sides together. And sew again exactly along the folded edge.
11. Finish your segment in this way and cut the segment back to the seam allowances, just like in the classic version.
12. Now you can simply peel off your Freezer Paper and use it again.

13. Sew all 4 segments of this block and then join them together. If you have traced and sewn very accurately and cut back the seam allowances precisely, the pieces will fit together perfectly and your diamond corners will also match perfectly. As previously mentioned, the patchwork foot #97 is a real blessing for this work.
Here is a YouTube video for this freezer paper foundation paper piecing method:
I much prefer sewing on paper and don’t mind pulling out the paper afterward at all. I just like the extra base. That’s just my personal opinion. You can of course decide for yourself, I look forward to your feedback.
Show Me Your Diamond Border Blocks!
I’m looking forward to seeing the photos of your blocks. Share them on Instagram and Facebook by tagging @berninausa, or in the Community Section of WeAllSew!
Always use the hashtag #quiltsafari on Instagram and Facebook. In the community section of the blog, don’t forget to select the “Quilt Safari” campaign.
See you again very soon, Ingrid
PS: Did you take part in the giveaway? Thanks so much to all the participants – and congratulations to the winner: Amy S.! Don’t forget to keep an eye out for future giveaways!
Used Products

What you might also like

Quilt Safari, Part Three: Zoe the Zebra

- Quilt Safari, Part Eight: Acacia Trees

We’re Going on a Quilt Safari
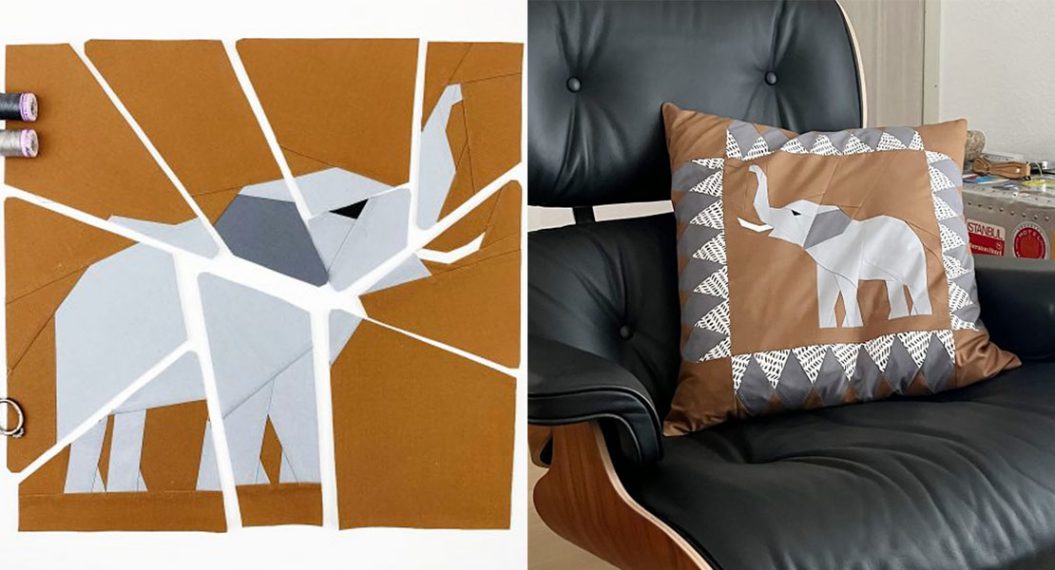
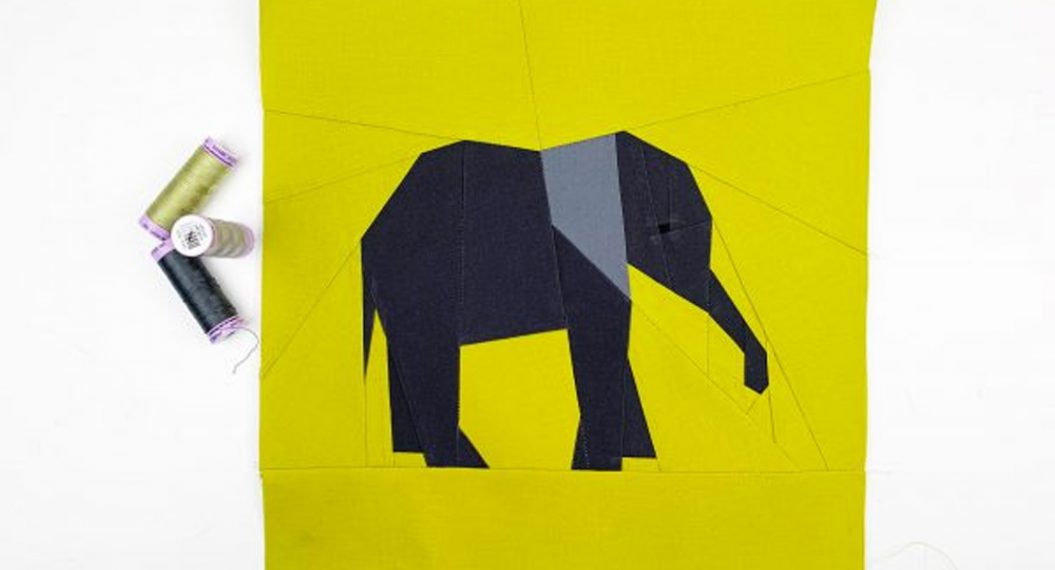
Quilt Safari, Part Two: Elli the Elephant
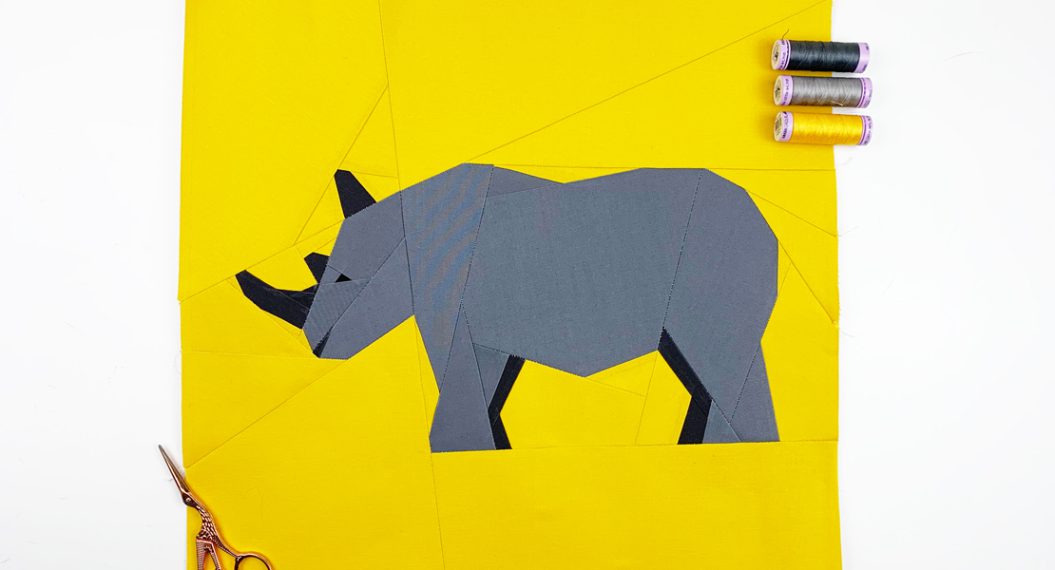
Quilt Safari, Part Five: Sewing the Rhino
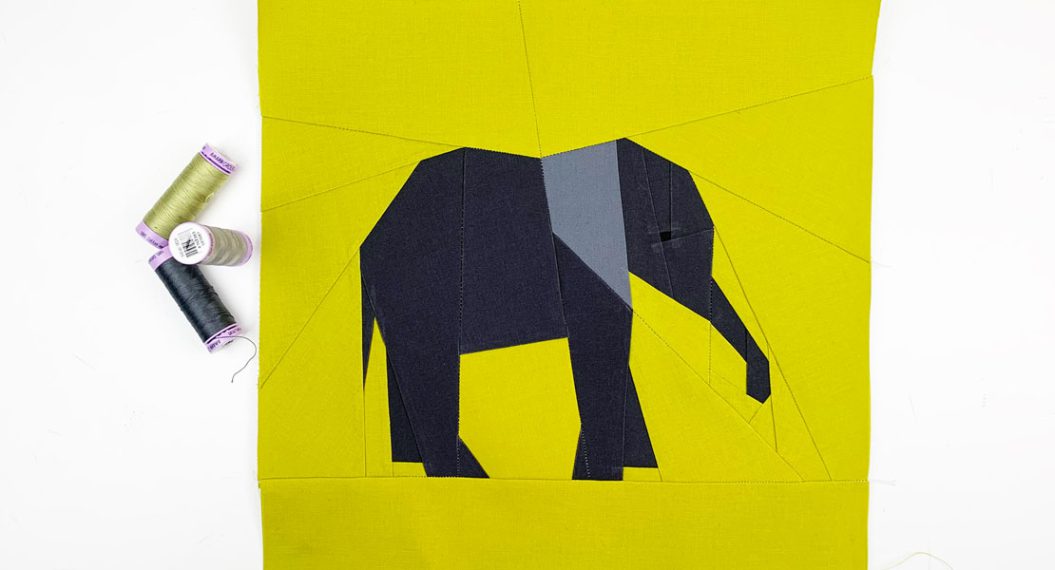
Quilt Safari, Part Six: Sewing the Baby Elephant
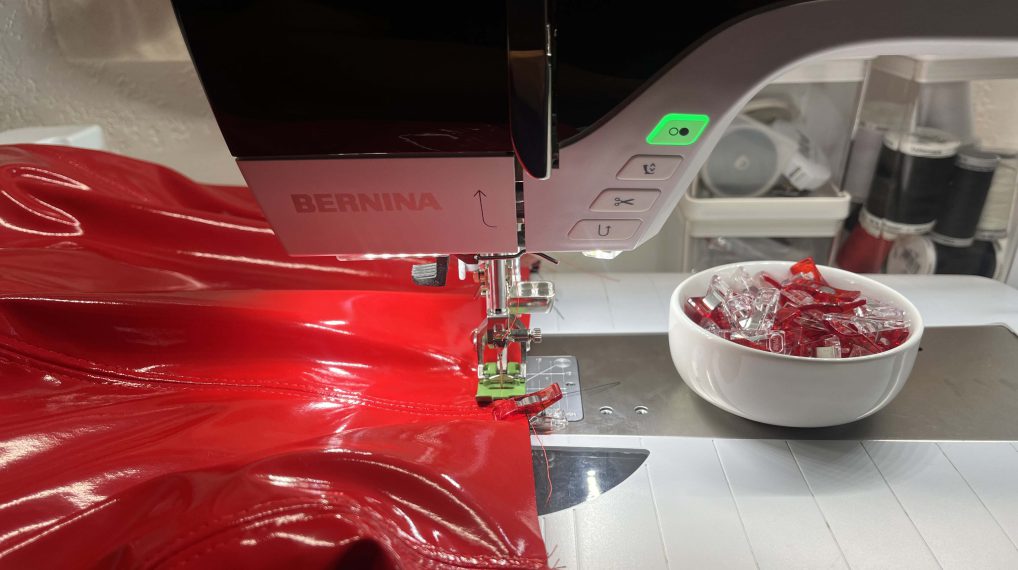
Faux Leather Skirt, Part One: Drafting the Pattern

Quilt Safari, Part Four: Standing Elephant
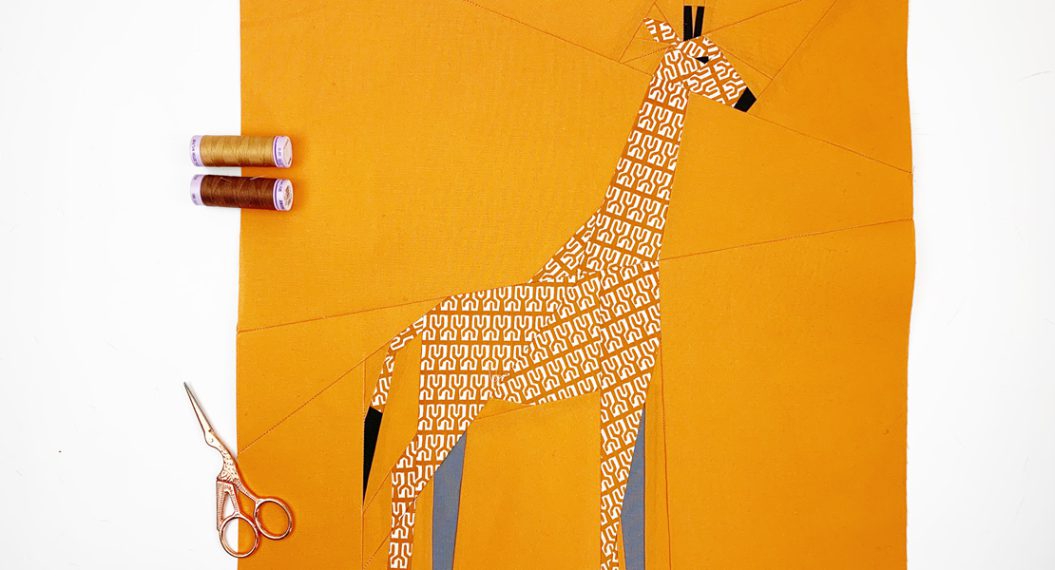
Quilt Safari, Part Seven: Sewing the Giraffe

Stardust Quilt-along: Part One

One Shirt Pattern Three Ways, Part Three: Patchwork Ruffles

Baby Quilt Serger Series, Part One

Fast Forward Quilt Along, Part One

Chandelier Quilt-Along: Week One – Fabric Requirements and Cutting Instructions

How to Make a Temperature Quilt, Part One
Quilt Safari: Material Requirements + First Giveaway

Diamonds 2 Quilt Along, Part 2: Quilting Row One
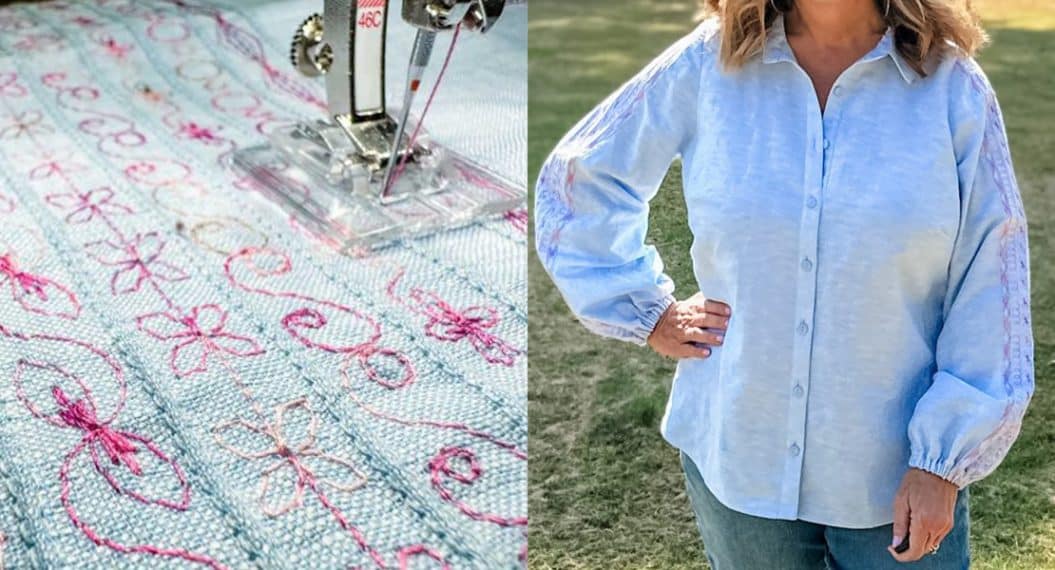
One Shirt Pattern Three Ways, Part Two: Pintucks & Decorative Stitches

Tic-Tac-Toe on the Go, Part One

Computerized Quilting on the B 790 PRO, Part One
4 comments on “quilt safari, part one: instructions & free pattern”.
Finally worked my way to the first post. Assume we need to find the post in We All Sew. I was waiting for a notification. So I started with the trunk up elephant. Got it now…doing border first.
I have tried to download the free pattern, but all that happens is it goes back to this page when I click checkout. I also couldn’t comment on that page. https://www.joejuneandmae.com/store/p491/Diamond_Border_Quilt_Block_-_PDF_pattern______.html
Been out of town so just starting. Is there a part of the instructions that gives a rough size to cut each piece of fabric before placing under the paper to stitch? Most patterns come with a pre-cutting to save fabric.
I had commented about this very early on as there are 30 border blocks so it seemed easy to give the cutting dimensions. But my comment was deemed unacceptable, I suppose, so never was posted.
Leave a Reply Cancel reply
You must be logged in to post a comment.

Recent Blog Posts
- Piping with a Serger and Sewing Machine
- Decorate Your Home With a Serger + Giveaway
- Easy Kid’s Apron Tutorial
- Easy Ribbon Embellishment on the Overlocker
Subscribe to our newsletter!
- February 2024
- January 2024
- December 2023
- November 2023
10" H x 20" W x 0.78" D Beautiful View in To Moscow City - City Moscow Print on Natural Pine Wood
See More by Wildon Home®
Rated 0 out of 5 stars.

- Play Mute Mute Closed Captions Full Screen

Get it between
Fri. Apr 19 – Mon. Apr 22
Select Size:
10" H x 20" W x 0.78" D
24" H x 32" W x 0.78" D
30" H x 40" W x 0.78" D
Product Overview

Artist: Unknown

Made to Order
Description
- 100% handmade in Canada on natural pine wood.
- Using the highest quality ink which will not fade over time.
- Arrives ready to hang on the wall with hanging kit included.
- Made in Canada.
Weights & Dimensions
Size: 10" h x 20" w x 0.78" d, specifications, about the shop.
Rated 4.5 out of 5 stars.
Wildon Home offers affordable, stylish solutions for nearly every space in the home. A diverse selection of well-made furniture is what sets Wildon Home apart from the competition.
More About This Product
Compare similar items.

Beautiful View in To Moscow City - City Moscow Print on Natural Pine Wood
by Wildon Home®

Beautiful Eiffel Tower in Paris II - City Paris Print on Natural Pine Wood
by Red Barrel Studio®

The Equatorial Jungle by Rousseau - Painting on Canvas
by Oliver Gal

" Lanes In Moscow City " 3 - Pieces Painting on Canvas

Vintage Paris Stroll Rainy Day With Classic Car And Eiffel Tower On Canvas Print
by House of Hampton®
Ratings & Reviews
Our Community Guidelines help customers write honest reviews.
Unfortunately, this product has no reviews.
Shipping & Returns
Free shipping.
Ground Delivery
Your order means a lot to us. That’s why we offer fast, safe and reliable delivery options for every item.
30-Day Return
Not loving it? We offer returns for most items within 30 days of delivery for a refund or store credit.
Customers Also Viewed
White Grey Peony Blooms In Motion IV " White Gray Peony Blooms In Motion IV " Print on Canvas
Rated 5 out of 5 stars. 8 total votes
This beautiful art is printed using the highest quality fade-resistant ink on canvas. This wall art is printed on premium quality cotton canvas, using the finest quality inks which will not fade over time. Each giclee print is stretched tightly wood sub-frame ensuring the canvas is stretched and does not buckle. The canvas print is inserted into a wooden frame. Every canvas print arrives ready to hang on the wall, with the hanging kits included.
- Premium quality cotton canvas.
- Arrives ready to hang on the wall
- Easy to hang
" Gouache Sapphire On Gray " Painting on Canvas
by East Urban Home
Rated 5 out of 5 stars. 15 total votes
This print is printed using the highest quality fade resistant ink on canvas. Every one of framed giclee prints is printed on premium quality canvas, using the finest quality inks which will not fade over time and then mounted .This framed art print is available in many different color frames. All of framed art prints are carefully packaged with corner protectors, fragile labeling, and sturdy boxes to ensure a safe delivery. Every framed art arrives ready to hang on the wall, with the hanging kit included.
Arunveer " White Orchid Tree Garden Of Branches VII " Print on Canvas
by Lark Manor™
Rated 4 out of 5 stars. 53 total votes
This white orchid tree wall art print adds a touch of elegance to your living space. The piece features a cotton canvas with a delicate orchid tree, printed in crisp detail. It's mounted on a solid wood frame, ensuring a refined look for your home. We love that the square shape and versatile hanging orientation make it easy to display in either landscape or portrait mode. This wall art includes two wall hooks for effortless installation right out of the box.
Abstract Gray/Blue/White Palais - Painting on Wrapped Canvas
Rated 4 out of 5 stars. 18 total votes
Make any space in your home innovative and unique by adding this modern & contemporary art piece made by real artists. With an overarching Blue color and Metallic texture that will add a dynamic feel to your home décor. This abstract wall décor is printed using ultra-premium and fade-resistant inks to guarantee high definition and vivid colors. Each piece is made with museum-grade canvas professionally hand-stretched in a 1.5-inch-thick wood frame. Our wall art is carefully wrapped with a layer of shrink-wrap that protects the surface and then wrapped with a heavy-duty bubble cushion, ensuring its safe arrival to its new home. This abstract art print is the perfect finishing touch to your home décor theme.
- It is sustainable and forest friendly

" Worthersee Lake " by Pkazmierczak Print on Canvas
by Highland Dunes
" White House In Summer Village " 3 - Pieces Painting on Canvas
This beautiful canvas art is printed using the highest quality fade resistant ink on canvas. Every one of our fine art giclee canvas prints is printed on premium quality cotton canvas, using the finest quality inks which will not fade over time. Each giclee print is stretched tightly over a wood subframe for small size prints ensuring the canvas is taught and does not buckle.
- This canvas giclee print is gallery-wrapped (the design continues on the sides), giving it a real art gallery feel.
- Arrives ready to hang on the wall.
- Easy to hang.
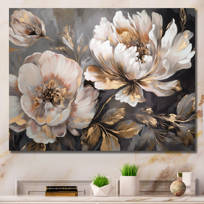
" Marble Pink Gold Peony Flower III " Print on Canvas
by Mercer41
Rated 5 out of 5 stars. 58 total votes
This beautiful "Marble Pink Gold Peony Flower III" Wrapped / Framed Canvas Art is printed using the highest quality fade-resistant ink on canvas. This Floral Peony Wall art is printed on premium quality cotton canvas, using the finest quality inks which will not fade over time. Each giclee print is stretched tightly over a 1-inch wood sub-frame for small-size prints or a 1.5-inch wood sub-frame for large-size prints ensuring the canvas is stretched and does not buckle. The canvas print is inserted into a wooden frame for the 1.5" floating frame. This Floral & Botanical framed art print is available in many different frame colors. All of our Wrapped / Framed canvas prints are carefully packaged with plastic protection, fragile labeling, and sturdy boxes to ensure safe delivery. Every canvas print arrives ready to hang on the wall, with the hanging kits included.
- Framed Canvas available in several frame colors.
- Easy to Hang.

" Lake Baikal " by Sbelov Print on Canvas
" Liquid Ink Spiralscape I " Print on Canvas
Rated 4 out of 5 stars. 4 total votes
This beautiful "Liquid Ink Spiralscape I" wall art is printed on premium quality cotton canvas using the finest fade-resistant ink. The wall art is stretched tautly over a sturdy wooden frame, giving your artwork a sleek, borderless appearance. For those who desire a touch of elegance and depth, our wall art is the ideal choice. The canvas is delicately mounted within a floating frame, creating a striking visual contrast between the artwork and the frame. Timeless and classic, our picture-framed canvas art exudes tradition and refinement. The canvas is enclosed within a carefully selected frame, enhancing the artwork's beauty and providing a sense of structure to your wall decor. Our collection offers an array of frame colors to complement your interior design, ensuring that your artwork seamlessly integrates with your home or office decor.
" Colorful Wildflowers Meadow Blooms I " Print on Canvas
by Winston Porter
Rated 4 out of 5 stars. 6 total votes
This beautiful "Colorful Wildflowers Meadow Blooms I" wall art is printed on premium quality cotton canvas using the finest fade-resistant ink. We offer a versatile range to cater to your unique aesthetic preferences. The canvas art is stretched tautly over a sturdy wooden frame, giving your artwork a sleek, borderless appearance. For those who desire a touch of elegance and depth, our canvas art is the ideal choice. The canvas is delicately mounted within a frame, creating a striking visual contrast between the artwork and the frame. Timeless and classic, our canvas art exudes tradition and refinement. The canvas is enclosed within a carefully selected frame, enhancing the artwork's beauty and providing a sense of structure to your wall decor. Our collection offers an array of frame colors to complement your interior design, ensuring that your artwork seamlessly integrates with your home or office decor.
More to Explore
2018 Primetime Emmy & James Beard Award Winner
R&K Insider
Join our newsletter to get exclusives on where our correspondents travel, what they eat, where they stay. Free to sign up.
A History of Moscow in 13 Dishes
Featured city guides.
IMAGES
VIDEO
COMMENTS
Linen Duvet Cover and Pillowcases, Safari Green Linen Bedding Set, Linen Doona Cover with Shams, Linen Quilt Cover, Queen King Linen Bedding. (7k) $228.91. $269.31 (15% off) FREE shipping.
VIVIHOME 2PCS Safari Animal Duvet Cover, Twin Bedding, Boys Kids Bedding, Zoo Jungle Animal Tiger Lion Elephant Zebra Giraffe African Wildlife Wild Animal Comforter Bedspread Quilt Cover, 1 Pillowcase. 4.0 out of 5 stars 107. $36.99 $ 36. 99. $3 delivery Dec 22 - Jan 8 . Options: 4 sizes +36.
Safari Kids Duvet Cover Set Queen, 100% Cotton Bedding for Boys Girls Teens Lion Elephant Rhino Giraffe Zebra Zoo Print on White, 1 Full Soft Comforter Cover 2 Pillow Shams ... Zoo Jungle Animal Tiger Lion Elephant Zebra Giraffe African Wildlife Wild Animal Comforter Bedspread Quilt Cover, 1 Pillowcase. Options: 4 sizes. 4.0 out of 5 stars. 118 ...
Safari Kids Duvet Cover Set Queen, 100% Cotton Bedding for Boys Girls Teens Lion Elephant Rhino Giraffe Zebra Zoo Print on White, 1 Full Soft Comforter Cover 2 Pillow Shams. Options: 2 sizes. 4.5 out of 5 stars. 137. $55.99 $ 55. 99. FREE delivery Fri, Mar 15 . More results.
ANHOPE Safari Animal Duvet Cover Set 3 Piece Bedding Set Zoo Giraffe Elephant Lion Print Pattern Soft Comforter Cover with 2 Pillowcases Quilt Cover with Zipper for Kids Boys Girls Single. 98. £2599. Save 5% on any 4 qualifying items. Get it Thursday, 14 Dec.
This Lion duvet cover set is 100% Cotton with a 300 Thread Count. Dramatic and elegant in any bedroom. Reversible Duvet Cover with vibrant Lion print on one side and solid black color on the other side. Measurements. 5-piece duvet cover set (1-Duvet Cover, 2-Pillow Shams, 2-Decorative Pillows) 1-Full Size Duvet Cover 76" x 90"
Tiger Bedding Set King Size,Red Rose Flower Comforter Cover for Boys Girls,African Safari Animals Duvet Cover,Big Cat Wild Animal Skin Quilt Cover,Romantic Garden Floral Bedroom Decor. Options: 4 sizes. 4.1 out of 5 stars. 1,434. $42.99 $ 42. 99. List: $47.99 $47.99. 5% coupon applied at checkout Save 5% with coupon.
When you buy a Indigo Safari Duvet Cover online from Wayfair, we make it as easy as possible for you to find out when your product will be delivered. Read customer reviews and common Questions and Answers for Indigo Safari Part #: W004435681 on this page. If you have any questions about your purchase or any other product for sale, our customer service representatives are available to help.
Cot Bed Pillowcase: 40cm x 60cm. Single Duvet Cover: 135cm x 200cm. Single Pillowcase: 48cm x 76cm. Brand. Dunelm. Care Instructions. Iron on a cool setting, Machine washable, Tumble dry on a low heat setting. Composition. 52% Recycled Polyester, 48% Cotton.
For all of those who have purchased the Safari quilt pattern, you have this pattern as a bonus pattern in the Safari quilt pattern. In this post, we cover all the details of foundation paper piecing so that even beginners can learn this technique and join in the quilt safari. In addition to the step-by-step instructions, there are two video ...
Fun and colourful, why not add this stunning Safari Duvet Cover and Pillowcase Set to your bedding collection. Featuring a stunning Safari animals print with a smooth and soft feel with a matching reversible print in a rich teal colourway. This bedding set comes complete with matching standard pillowcase (s) and is finished with a secure button ...
BlueBlue Safari Kids Duvet Cover Set Queen, 100% Cotton Bedding for Boys Girls Teens, Tropical Lion Elephant Rhino Giraffe Zebra Zoo Pattern Print on White, 1 Full Soft Comforter Cover 2 Pillow Shams. 4.5 out of 5 stars 133. $56.99 $ 56. 99. 5% coupon applied at checkout Save 5% with coupon. FREE delivery Mon, Jan 8 .
Walking tour around Moscow-City.Thanks for watching!MY GEAR THAT I USEMinimalist Handheld SetupiPhone 11 128GB https://amzn.to/3zfqbboMic for Street https://...
Alas, a modern take on wood wall art. Once typically a wall art piece found only in rustic or farmhouse style decor settings, this buildings & cityscapes wood wall art will easily fit into even the most contemporary of designs. Using the highest quality color Canon UV ink, this city Moscow wood wall art incorporates several aspects of fine design into one stunning piece. with its slightly ...
LAYENJOY Safari Duvet Cover Set Twin 100% Cotton Bedding Leopard Cheetah Animals Print on Pink 1 Cartoon Comforter Cover with Zipper Closure 2 Pillowcases for Kids Teens Boys Girls . Brand: LAYENJOY. 4.5 4.5 out of 5 stars 1,288 ratings. $42.99 $ 42. 99. FREE Returns . Return this item for free.
1: Off-kilter genius at Delicatessen: Brain pâté with kefir butter and young radishes served mezze-style, and the caviar and tartare pizza. Head for Food City. You might think that calling Food City (Фуд Сити), an agriculture depot on the outskirts of Moscow, a "city" would be some kind of hyperbole. It is not.
Leopard Bedding Set for Girls Boys Kids Rose Cheetah Print Comforter Cover Set Room Decorative Leopard Pattern Duvet Cover Safari Yellow Red Bedspread Cover Room Decor Quilt Cover Full Size. 4.7 out of 5 stars 15. $37.99 $ 37. 99. 5% coupon applied at checkout Save 5% with coupon. $5.99 delivery Sep 22 - Oct 6 .