- Apple Watch
- Accessories
- Digital Magazine – Subscribe
- Digital Magazine – Info
- Smart Answers
- New iPad Air
- iPad mini 7
- Next Mac Pro
- Best Mac antivirus
- Best Mac VPN
When you purchase through links in our articles, we may earn a small commission. This doesn't affect our editorial independence .

How to use Safari on a Mac

Safari is the web browser app bundled with all Macs as part of macOS. You don’t have to use it – if you prefer to use Chrome or Firefox, for example, you can install those apps for your web surfing needs. But in our experience, Safari is a good option – and as you can see from our round-up of best web browser apps for the Mac , it’s pretty much the best you can get.
If you are new to Safari this article will help you find your way around the app. And if you are a seasoned Safari user we will reveal a few Safari tips and tricks that you might not know, including some of the fab new features in Safari 11, the latest version of Safari for Mac.
If you’d like to read about using Safari on the iPad or iPhone, read this .
How to get the latest version of Safari for Mac
First things first. You will want to make sure you have the latest version of Safari. At the time of writing the most up-to-date version is Safari 11.1.
Here’s how to find out which version of Safari you are running:
- Open Safari.
- Click on Safari > About Safari in the menu.
- The resulting window will reveal the version number.
As long as your copy of MacOS – the Mac operating system – is up to date your copy of Safari should be because Safari is bundled as part of an operating system update.
However, you don’t have to be using the latest version of macOS to have the latest version of Safari. Apple is bundling Safari 11 with High Sierra, Sierra and El Capitan versions of the Mac OS. If you need to update your version of MacOS read this: how to update your Mac operating system software .
Now that you have the latest version of Safari you can start enjoying some of the new features that we will discuss below.
Safari basics
If you are a surfing novice you might want to familiarise yourself with these tips.
We’ll start off with the basics, such as how to get into Safari, how to search, and other useful pointers. You can skip this bit if you aren’t a Safari beginner, there are plenty of tips below that you might find useful.
You can find Safari in the Dock at the bottom of your Mac’s screen. Its icon looks like a compass.
How to use Safari
The big bar at the top of the Safari window is where you can enter a website URL or a search term to either take you directly to a website, or to a list of pages that match your query.
It will automatically search in Google (but you can change it so it defaults to another search engine).
You rarely have to enter a complete URL for a website. Once you have visited a site once you only need to type a few letters of its name and it will autofill the rest of the URL.
For example, type: ‘Face’ and it will autofill the rest of the URL and when you press enter it will take you straight to Facebook.
How to make it easy to find your favourite sites in Safari
There are lots of ways of making it easy to get to websites you frequently visit.
When you open a new tab (see below for details of how to do that) you will see your Favourites view including Frequently Visited Sites. You could also choose to see a Top Sites view, set a Homepage, just see an empty page, or have the Same Page show up. These are all options you can access in Safari > Preferences > General. Just click on the menu beside New tabs open with.
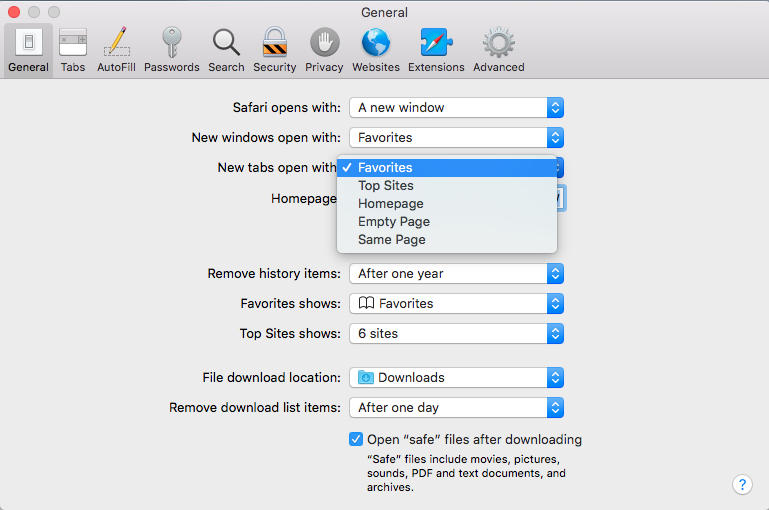
If you choose the Top Sites view you can adjust it to show 6, 12 or 24 sites. To add and remove Top Sites hover over the preview until you see an x and a pin icon. Pin those sites you wish to keep and click x on those you don’t image you will want to find again. The sites that appear in Top Sites tend to be those you visit most frequently.
You can choose one of these views for every time you open a new Safari window.
How to Pin a site in Safari
In Safari you can also ‘Pin’ favourite sites to the menu bar – a simple way of adding a shortcut to Facebook, YouTube or any site you visit frequently.
When you Pin a site you will see a small icon representing that site on the left of your tabs.
To Pin a particular web page right- or control-click on the tab and choose Pin Tab. Then it’s very easy to go straight to that site.

Using tabs in Safari
Back to tabs. You can open multiple tabs in a Safari window, this means that rather than having a different Safari window open for every website you are on, you can just have one Safari window open and multiple pages accessible through that.
To open a new tab press Command + T.
There are two ways that you can see a preview of the different tabs you have open:
- You can see a short summary of the name of the web page on the tabs themselves. This might be sufficient if you only have one or two tabs open, but once you have more than eight you’ll probably find the summary is too short to be useful.
- Or, you can click on the icon that looks like two boxes on the right of the search/URL box. This will show a thumbnail view of all the web pages you have open.
While we’re on the subject of Tabs, you can close a single tab just by hovering over the tab and clicking on the x that shows up in the corner of that tab.
It’s also possible to close all but one tab. Just hold down the Option/Alt key when you click on the x to get rid of all the other tabs that are open, except for the page on that tab.
How to tell which Safari tabs are playing audio
Not everyone wants to surf the web in silence though. There is lots of very worthy audio and video content available on the web and no doubt many surfers wouldn’t want to miss out on that.
The problem is when you have multiple web pages open and more than one of them is blaring out audio.
Luckily there is another Safari tip to fix that.
You can identify which of your open tabs is playing audio by the speaker symbol that appears in the far right of the Safari tab associated with that web page.
It’s possible to mute the audio with a single click on the speaker symbol without even opening the tab.

And if more than one Safari webpage is playing audio you can choose to mute them all at once. Just click on the speaker symbol in the URL bar and choose Mute all Tabs.
Alternatively, you can Option/Alt-click on the speaker icon of the tab you do wish to listen to and mute the audio on all the other tabs.
How to reopen all windows from the last session
Here’s another useful tip. You can easily reopen all the tabs you had open last time you were using Safari.
Click History > Reopen All Windows from Last Session to quickly recover all the windows you were recently looking at. You might also find this helpful: How to export bookmarks from Chrome to Safari
How to show the full URL in Safari
Another handy Safari tip. In Yosemite Safari stopped showing the whole URL – a feature designed to help avoid users being taken in by phishing scams, wherein the URL is obfuscated. In other words, if you’re visiting https://macworld.co.uk/this/page/that/page then all you’ll see in the address bar is macworld.co.uk.
If this isn’t what you want, perhaps you want to see the full URL of the article you are reading, you can change things so that the whole URL is shown.
Open Safari’s preferences dialog box (Cmd+,) then click the Advanced icon and put a check alongside Show Full Website Address.
How to change how you view websites in Safari
One of our favourite features in Safari 11 is the extra control we have over the web. You can tweak the settings of specific websites so that they suit you for example.
How to change the font size on a website
You can tweak your settings so that when you visit a specific site the images and text are bigger – perfect if you are frustrated to find that the text on a favourite website is a bit too small for your eyes.
Here’s how to enlarge (or reduce) the font size on a particular website so that it stays that size whether you visit:
- Go to Safari > Preferences.
- Click on the Websites tab.
- Click on Page Zoom.
- Find the site you want to customise (any site you have open or have recently visited will be listed here).
- Choose a number bigger or smaller than 100% depending on how large you want the text and images to be.
You can do this on a per website basis, or if you frequently find that the text on websites is too small for you, you can choose to default to the percentage that suits you wherever you go on the web. Note that not all websites are created the same so some will naturally have larger type than others.

To choose the zoom percentage for all websites, click in the drop down box beside “When visiting other websites”.
Another benefit of having access to these controls that allow you to change the way you view the web is that it enables you to stop seeing ads and auto-playing videos. We’ll look at that below.
How to stop ads and auto-playing videos in Safari
Another enticing feature of Safari is the way you can choose to adjust the settings so that you never see another ad or auto-playing video again. We’ll look at how to do that next.
How to stop autoplay audio and video in Safari
Perhaps you are frustrated by auto-playing video blaring out every time you visit a website.
With Safari 11 you can disable autoplay video, so you will never again have to hear voices while you are browsing the web. Here’s what to do:
- Open the offending website.
- Click on Safari > Settings for This Website (or right-click the URL box and select Settings for This Website).
- Allow All Auto-Play
- Stop Media with Sound
- Never Auto-Play
Stop Media with Sounds is the default option, and it will essentially stop any video from starting if the sound is set to be on. If the video is set to play silently it will still run but you won’t hear it, unless you choose to.
If you would rather not let auto-playing video play, you can choose Never Auto-Play.
Remember that if you adjust the settings this way it will only apply to autoplay videos on that website. If you’d like to never see an autoplaying video again follow these steps:
- Go to Safari > Preferences and click on Websites.
And there is an option below to choose the same settings “When visiting other websites”.
We have a complete tutorial that explains how to use this feature here: How to stop autoplay video in Safari & Chrome on Mac .
We also cover how to stop Safari asking to use your location data here .
How to stop seeing ads on websites in Safari
While ads pay a part of our wage, we realise that some ads can really reduce the enjoyment of web browsing. Usually these are ads that have something wrong with the way they have been coded and aren’t behaving as intended, or even worse they are spam ads that have crept onto the ad networks. We are honestly as frustrated as you are!
One of the big changes Apple bought to Safari 11 was the ability to really manage the ads that you see – this was part of Apple’s effort to make the web work better. Effectively, if Apple can remove ads that aren’t behaving as intended and are jamming up page loading times and the like, then Safari will perform quicker, which means that the surfer has a better time surfing.
There are a few ways you can take advantage of these anti-ad related features in Safari 11.
One way is to choose to surf the web – or certain pages – in Reader mode.
Reader mode is a way of viewing webpages that Apple introduced back in 2010 in Safari 5. Reader displays just the text and images from a webpage, without any of the other page furniture. We think it is a bit like reading a Word document or a PDF. The feature hasn’t changed much over the years, but in Safari 11 it’s became possible to choose for a site to always be viewed in Reader Mode.
First, here’s how to view a site in Reader mode:
- Click on the stack of lines to the left of the URL bar.
- This will automatically change the webpage to Reader view.
- Click on the stack of lines to turn Reader view off.
It’s worth checking how a site appears in this mode before switching over to it because not all sites implement it particularly well (sometimes you will find that an article stops abruptly because only one page has been carried into Reader view). Some sites don’t have a Reader view at all (such as Apple, for example).
And here is how to customise your settings so that whenever you visit that site the pages are viewed in Reader mode:
- Click on Reader.
- Find the site you want to customise (any site you have open, or have recently visited will be listed here).
- Toggle the drop-down menu beside that site to On.
A quicker way to do this is to right-click or control-click on the stack of lines beside the URL and choose Use Reader Automatically.
Or, as long as you are on the website you wish to change the setting for, you can click on Safari > Settings for this Website, and choose Use Reader When Available.
How to surf in private using Safari
Another useful feature in Safari is the option to use a private browsing window. This doesn’t just keep your browsing habits private from someone else who has access to your Mac, it also means that you are incognito – in other words even the websites you are visiting don’t have any information about you.
Go to Safari > File > New Private Window (or shift-cmd-n). You can tell if a window is private because the search bar will be grey. Any new tabs you open in this window will be private.
Alternatively, to open a Private Browsing window you can click shift, command and N.
You can tell it’s a private window because the URL field will be greyed out.
Hold down Option/Alt while picking Private Browsing to quickly switch it on and bypass the ‘Do you want to switch on Private Browsing?’ alert window if you happen to see it frequently. We have a complete guide to private browsing on Safari here .
For even more privacy, you can choose to always search with privacy-obsessed DuckDuckGo as your default search engine. Go to Safari > Preferences > Search, and click on the Search Engine. Then select Duck Duck Go from the Search Engine dropdown list. You can choose from Google, Bing, Yahoo or DuckDuckGo.
How to delete your histroy in Safari
If you didn’t search using a private browsing window you can still delete your history and evidence of what you were up to.
- Click on History.
- Scroll down and click on Clear History.
- You can choose to clear history for Today, the last hour, today and yesterday, or all history.
- You’ll see a warning that Clearing history will remove related cookies and other website data. Basically this is warning you that if you go ahead and Clear History you may find that you have to log onto websites, or shopping cart information may disappear.
- If you are happy with that then click on Clear history.
We have a complete tutorial all about how to delete your browser history on a Mac here .
How to delete cookies in Safari
Another new feature that came in Safari 11 was the introduction of privacy protection, a feature that’ll stop those annoying Amazon adverts showing you products after you’ve bought them.
Safari actively tries to block the cross-site tracking data that powers targeted adverts. While it won’t completely stop it, it should have a noticeable effect when using the browser.
According to Apple this isn’t an attempt to block ads, but rather to protect your privacy.
This means that you should no longer need to delete cookies if you want to stop seeing targeted ads (cookies have also been known to affect the price for goods if you have previously shown an interest in a product so deleting cookies could avoid such practices).
If you want to go a step further regarding cookies in Safari 11 there are some preferences changes you can make.
- Beside Website tracking click on Ask websites not to track me.
- Beside Cookies and website data click on Block all cookies.
If you aren’t using Safari 11 you can still delete cookies.
- Click on the Privacy tab.
- Click on Remove All Website Data…
Here’s how to add your own background image to Safari.
Author: Karen Haslam , Managing Editor

Karen has worked on both sides of the Apple divide, clocking up a number of years at Apple's PR agency prior to joining Macworld more than two decades ago. Karen's career highlights include interviewing Apple's Steve Wozniak and discussing Steve Jobs’ legacy on the BBC. Having edited the U.K. print and online editions of Macworld for many years, more recently her focus has been on SEO and evergreen content as well product recommendations and buying advice on Macworld.com.
Recent stories by Karen Haslam:
- How to copy and paste on a MacBook or Mac
- How to scan documents on iPhone
- How to back up a MacBook or Mac
How to Use Safari Browser

Apple's Safari browser is the pre-loaded default on all of the company's desktop and mobile devices, making it the most important application on MacBooks, iPads and iPhones. Safari offers great performance and ease of use, whether you're reading Web pages on a 5-inch handset or a 15-inch laptop.
However, you can also dig deeper behind the scenes to enable new features and change settings to fit your needs. Our list of Safari tips and tricks will teach you how to block cookies, pin tabs, show a full URL while you browse and much more.
Check out the tutorials below to make the most Safari on both OS X and iOS .
Safari Browser Tips
- Previous Tip
- Manage Your Passwords in Safari
- How to Merge All Windows in Safari
- How to Block or Enable Plug-ins for Specific Sites in Safari
- Make Safari Read a Web Page Aloud to You
- Force Safari to Sync with iCloud
- How to Sync Safari Bookmarks with Chrome, Firefox and Internet Explorer
- Hide Top Sites in Safari
- See the Entire URL in Safari's Address Bar
- Quickly Close Open Tabs in Safari
- How to Delete Cookies and Stored Website Data in Safari
- How to Block Cookies in Safari
- How to Restore Recently Closed Tabs and Windows in Safari
- Search for Text Within a Web Page in Safari
- Pin a Tab in Safari
- How to Turn Off Website Notifications in Safari
- How to Mute Tabs in Safari
- How to Subscribe to RSS Feeds in Safari
- How to Send Safari Pages Between Devices
Stay in the know with Laptop Mag
Get our in-depth reviews, helpful tips, great deals, and the biggest news stories delivered to your inbox.
How to convert PDF to JPG, PNG, or TIFF
How to add Outlook Calendar to Google Calendar
Windows 12 isn't Microsoft's only missing operating system
Most Popular
- 2 5 AI tools for students: Use AI to help you study, summarize content, and edit papers
- 3 How to get M3 MacBook Air, Pro for all-time low prices at Best Buy this weekend
- 4 The Zephyrus G14 gaming laptop is flawed, but I still love it — and you might, too.
- 5 How to switch devices on Google Meet: Seamlessly transfer from phone to laptop
- macOS Monterey
Here’s what’s new with the redesigned Safari in macOS Monterey and how it works
9to5Mac is brought to you by CleanMyMac X . Find hidden junk, large old folders, unused apps, and heavy memory consumers. You can also use CleanMyMac X to remove malware, unwanted pop-ups, and virus extensions. Try it for free .
Apple features a redesigned Safari with macOS Monterey but as it happens, the biggest UI change isn’t seen with the default version. Let’s jump into what’s changed, what’s new, and how Safari in macOS Monterey looks and works.
Apple made its way through a lot of Safari iterations during the macOS Monterey beta period and it even changed from the 12.0 build that comes installed on the 2021 MacBook Pro to the official Monterey public 12.0.1 release.
- Apple reverts to more traditional Safari tab design in macOS Monterey RC following controversy
- Apple moves Safari favorites bar back where it’s supposed to be in Monterey beta 10
While the default Safari experience on Monterey 12.0.1 and later looks very much like what came with Big Sur, you can opt for the new modern and minimal new tab design by heading to Safari > Preferences > Tabs > Compact.
- Hands-on: 100+ macOS Monterey changes and features [Video]
Beyond the default classic and optional super modern UI, Safari in Monterey includes new tab groups, a redesigned sidebar, the new Quick Note feature, UI/button changes, and more.
Safari in macOS Monterey: What’s new and how it works
The start page in the new Safari looks about the same with your Favorites up top, followed by Frequently Visited, Privacy Report, and Reading List. Like Safari in Big Sur, you can customize your start page background image with the included options or your own. You can drag to reorder the different sections or turn them on/off.
New in Safari for macOS Monterey/iOS 15 is that background images automatically sync across devices via iCloud. You’ve also got the new “Use Start Page on All Devices” option and a checkbox to turn on/off iCloud Tabs for the start page.
You can head to the bottom right corner 3-line icon to customize your start page, including the background image.

Safari’s new unified tab/search/toolbar
Just like Safari in Big Sur, you can right-click at the top to customize the new unified tab/search/toolbar with more buttons (or in the menu bar, click View > Customize Toolbar).
By default, the toolbar includes five buttons: Sidebar/Tab Groups, back/forward, downloads, share button, and new tab + icon.
Here’s a look at how it comes and what’s available when you customize:
If you choose to stick with the default Safari in Monterey, you’re getting the same tab UI experience you’re used to with macOS Big Sur and earlier.
But for the new modern UI, it’s quite an aesthetic change. Head to Safari > Preferences > Tabs > Compact to use the new design:
This is how the modern, “ Compact ” tab design looks:
And here’s the default/traditional UI, what Apple calls “ Separate ” tabs:
Using tabs and tab groups in the new Safari
You can drag tabs or the URL/search bar to the left to pin a tab/open page. However, the mechanics can feel a little clunky in the modern Compact UI. For example, reordering pinned tabs requires some precision and patience.
With the new Sidebar/Tab Groups button (in either the Separate or Compact UI), click the dropdown arrow to pull up saved Tab Groups or create new ones:
You can create a new empty tab group or quickly make a new Tab Group your existing open tabs.
As you’ve already guessed, you can make multiple tab groups to quickly switch between different sets of saved web pages to work and play more seamlessly.
Just click the Tab Groups drop-down arrow anytime to get back to your saved groups. And alternatively, you can click the Sidebar button to see your Tab Groups.
Finally, you can click the Tab Overview button (four squares icon) to see all open tabs.
Refreshed Sidebar
For the new Sidebar, you’ll see “Start Page” up top with your Tab Groups below.
Under that, you’ll see links that have been shared by others, then Bookmarks and your Reading List at the bottom.
When the Sidebar is enabled, you’ll also have the two-window + icon show up to quickly create a new empty tab group.
Creating Quick Notes
Quick Notes are new for macOS Monterey and iPadOS 15. There are a couple of ways to use the feature with the new Safari.
You can click the three-dot icon in the URL/search bar > Add to Quick Note with the Compact UI.
With the Separate tabs UI, you can click the share button (square with up arrow > Add to Quick Note).
Or, when you highlight text on a webpage and do a right-click, you can choose Add to Quick Note.
Safari in macOS Monterey wrap-up
After a lot of changes for Safari throughout the Monterey beta, Apple seems to have landed on a build that satisfies people who want the classic browsing experience and tab design as well as including an all-new UI for those ready to change things up.
What do you think of the new Safari in macOS Monterey? Are you using the new tab UI or the default? Share your thoughts in the comments below!
9to5Mac is brought to you by CleanMyMac X . Find hidden junk, large old folders, unused apps, and heavy memory consumers. You can also use CleanMyMac X to remove malware, unwanted pop-ups, and virus extensions. Try it for free .
FTC: We use income earning auto affiliate links. More.

Check out 9to5Mac on YouTube for more Apple news:

A collection of tutorials, tips, and tricks from…

Michael is an editor for 9to5Mac. Since joining in 2016 he has written more than 3,000 articles including breaking news, reviews, and detailed comparisons and tutorials.
Michael Potuck's favorite gear

Satechi USB-C Charger (4 ports)
Really useful USB-C + USB-A charger for home/work and travel.

Apple Leather MagSafe Wallet
My slim wallet of choice for iPhone 12

Manage push notifications
Sign up for our daily newsletter
- Privacy Policy
- Advertise with Us
Customize Safari on Mac with this Ultimate Guide

For most Mac owners, Safari is the gateway to the World Wide Web. Given that it’s probably your most used application, knowing tips, tricks and new features is the best way to get the most out of it. While Safari does not have the extension libraries of Chrome, it still has a few tricks up its sleeve for Mac owners. Read on to learn how to customize Safari on your Mac.
1. Pin Tabs

You probably visit a couple of sites on a regular basis, and keeping them close can make it easy to refer back to them. When a tab is pinned in Safari, it stays docked as the farthest-left tab. Pinning a tab is incredibly easy: right-click on any open tab and select “Pin Tab.” Rearranging pinned tabs is as easy as dragging the tabs around one another until you have a setup you prefer.
2. Mute Tabs

We have all been there as you open a new tab expecting to read new content and are instead hit with an auto-play video. In Safari, when a new tab is opened with audio playing, you’ll see a little speaker icon in the tab. Click the speaker icon, and it will automatically mute the tab.
3. Rearrange Tabs
For anyone who has more than a few tabs open at a time, organization can become an issue. To help with this, Safari enables you to get at least some semblance of order.
1. Open the “Window” menu on the Mac bar.

2. Choose “Arrange Tabs By.”

3. You can now choose between “Title” and “Website.”

For many, choosing to sort by website will be the most useful. That way, if you have multiple tabs open, they will all be next to each other.
4. Customize Safari Toolbar
The Safari toolbar is where your most important buttons will go for daily use. That includes your Home button, Sidebar, Tab overview, and so on.
1. Right-click anywhere on the toolbar and select “Customize Toolbar.” You can then drag any item into the toolbar.

2. Once you have dragged all of the icons you want to use, click “Done.” Then, all of your changes will be saved.

5. Change Your Search Engine
Safari, like most browsers, will let you choose between a few different default search engines. Google is the default search engine in Safari, but it’s not your only available option.
1. Go to “Safari -> Preferences” and open the Preferences window.

2. Click the “Search” tab.

3. You will immediately see a drop-down that allows you to choose between Google, Yahoo, Bing, Ecosia, or DuckDuckGo.

At this time, there is no way to add your own search engine. For now, Safari has chosen to add the most popular options.
6. Save Pages as PDFs
If you ever need to export a website as a PDF, Safari makes it super simple. Head to the page you want to save, then click on File and “Export as PDF.”

The last remaining step is to choose where on your hard-drive you want to save the page. You can then refer to the PDF at any time, and it will automatically open in Safari, Preview or your PDF viewer of choice.
7. Handoff Continuity
As Safari is the default browser for iOS and Mac, Apple has long explored how to make it seamless between the two systems. Enter Handoff , Apple’s solution for starting an email on Mac and picking it up on iOS. This also works incredibly well with Safari.
1. Start by signing in to your iCloud account on both devices.
2. On your Mac computer, go to “System Preferences -> General,” and click on the box next to Handoff to allow it.

3. On iOS or iPad OS, go to “Settings -> Handoff” and move the switch so that it’s active.
4. Once activated, you can go about your regular browsing business on your Mac. When you want to pick up wherever you left off on your Mac on your iPhone or iPad, a little icon will appear above your Safari icon. Tap on Safari and it will allow you to select whatever page you want to continue browsing.
Also read: Safari Not Working on Your iPhone? Here’s How to Fix It
8. Reading List
Bookmarks were yesterday’s news. Today, it’s all about Safari’s Reading List. We have all come across interesting articles that we want to read but don’t have time at the moment. Across all Apple devices, Reading List is enabled via the Sidebar icon on Safari on Mac or by using the book icon on Safari on iOS/iPadOS. You can choose the eyeglasses icon to view your entire article list. To add a new article, you have two options on Mac.
1. The first is to hit the “+” sign that appears next to the website URL. The article or site will automatically save itself to your reading list.

2. Alternatively, you can click on the Share Sheet icon, and the first option in the drop-down is “Add to Reading List.” Select that and the article will automatically save itself to your Reading List.
If you want to read these articles offline, say while you are on a plane, go to “Safari -> Preferences -> Advanced” and click on “Save articles for offline reading automatically.”

9. Safari Reader
Safari Reader strips away all of the distractions from any site where it’s available, allowing for an uninterrupted view of your chosen content. Note that it does not work on every website but definitely works on many.
1. To activate Reader, click on the four-line icon that appears next to the “+” button to the left of the URL.

2. A single press of that button will enable Reader view. Clicking on it again will take you out of reader view.
10. Set Custom Safari Icon
If you want to customize your Safari icon, doing so is surprisingly straightforward.
1. While holding down the Ctrl button, click the Safari logo and select “Options -> Show in Finder.”

2. When Finder loads, you’ll find yourself on the Applications page. Click the Safari logo again while holding Ctrl and choose “Get Info.”

to the top-left corner of the Get Info window, you’ll see a tiny Safari icon next to “Safari.app”. Click on it to highlight it, then drag your replacement icon image to replace it.
11. Customize Safari Theme
When you first use Safari on your Mac, you’ll see the standard white and grey interface. This is fine, but it can get a little boring for some users. Fortunately, you can customize your Safari theme in several ways.
Change to Dark Mode
For instance, you can change your browser to show dark mode.
1. Go to the Apple icon in the top left of your toolbar and choose “System Preferences … ” in the drop-down.

2. Select “General.”

At the top of the next window, you’ll see the “Appearance” option. Click on “Dark.”

Change Safari’s Background Image
Another way you can customize Safari’s theme is by tweaking the background image on your homepage.
1. Click on the “+” button in the top right of your Safari browser to open a new page.
2. Select the icon showing three lines with sliders in the bottom-right corner.
3. Make sure the box next to “Background Image” is ticked. Then, choose from one of the custom background images beneath it.

In addition to using the background images included with Safari, you can add your own. Click the “+” icon instead of one of the other images.
Choose the picture you want to have as your background image for Safari.

Once you’ve picked your image, you should see the changes take place immediately.
If you want to clear your background later, you can click on the screen while holding the Ctrl button and choose “Clear Background.”

12. Customize Safari Homepage
Once you’ve customized the theme of Safari, you can fine tune the homepage.
When you see your “Frequently Visited” section, all pages in this area will initially appear as smaller versions of the actual web pages. However, you can make them show up as icons again.
1. Click on one of the pages while holding down the Ctrl button.
2. Select “View as Icons.”
You can also remove some of your Favorites from view. As with changing the “Frequently Visited” pages to icons, click on one of the pages and simultaneously hold the Ctrl button. Select “Delete” from the dropdown menu, and your changes will take effect.

13. Create Custom Bookmark Folders
When customizing Safari on your Mac, you’ll want to think about productivity and not just aesthetics. One of the best ways to organize your most-visited pages is by creating custom bookmark folders to put all of them in.
1. Click on the icon in the top left that sits next to the red, yellow, and green circles.
2. On the bookmark tab, click anywhere while holding Ctrl .
3. Select New Folder and give it a name.

4. Drag to add pages to this folder.
14. Customize Safari Location
Like your iPhone, your Mac can easily track where you are in the world. It uses this for several reasons, such as changing the date and time on your device.
However, websites can also track you – and some users may want them to do so. If you don’t want specific sites knowing where you are in Safari, follow these steps:
1. Click on “Safari” next to the Apple logo and choose “Preferences … ” from the drop-down.

2. Go through your currently open websites and choose whether you want to allow or deny access.

You can also block future visited websites from tracking you. Go to the bottom where it says “When visiting other websites.” If you want to revoke permission, open the drop-down and select “Deny.”
Also read: How to Make Mobile Safari Save Your Passwords on iOS
Frequently Asked Questions
1. can i change the color of the safari browser.
Besides tweaking from light to dark mode, you can’t customize Safari’s color on your Mac without third-party software.
2. Can I change my Mac’s default browser?
Yes. To change your Mac’s default browser, go to “System Preferences -> General -> Default Web Browser.” Open the drop-down and change to the browser of your choice.
3. Why won’t my Safari icon change on my Mac?
In some cases, you may find that the Safari icon on your Mac doesn’t change. You may need to close and reopen the app. If that doesn’t work, try changing the “Read & Write” privileges on your device.
Wrapping Up
Safari is one of the most important native Apple apps, and customizing it will both let you show off your personality and improve productivity. The above tips to customize Safari are only the tip of the iceberg. Don’t forget that you can also add extensions to extend its functionality . Do you use Safari on your Mac or one of the strong alternatives ?
Our latest tutorials delivered straight to your inbox

Danny has been a professional writer for over five years. Now based in Copenhagen, Denmark, he plied his trade working for various companies in the UK — where he was born — before taking the leap into freelancing. He specializes in iOS and Mac.
The latest user agents for Safari
Apple's Safari web browser runs on mobile devices (iPhones, iPads and iPod Touches) and macOS computers. Depending on which platform you're using (or want to pretend you're using!) the user agent will be a bit different.
Here we have the latest user agents for Safari on mobile and computer platforms.
Unlike some other popular browsers and platforms, we've noticed that Safari definitely seems to have less "extra" stuff in its user agent - standard Safari will never announce the exact model number of the device being used, and there's generally much less additional fragments added by installed addons/apps - toolbars and so on.
That said, you're welcome to explore our huge listing of various Safari user agents to see the different variations of user agents.
Latest Safari on macOS User Agents
Latest safari on ios user agents, special notes, safari on ios 13.
You may have already noticed, but Safari on the latest version of iOS (version 13) no longer includes fragments to indicate that Safari's running on iOS... instead the user agent is indistinguishable from the desktop version of macOS.
As such, it's not possible to provide valid sample user agents for them any more.
Build numbers and OS version numbers
Test it out.
You can use our User Agent Parser page to try out different user agent varieties, or to test if your user agent switcher is working properly.
Database of user agents
If you're interested in our database of many millions of user agents, please check out our API which provides access to our user agent database . You can perform very detailed and specific queries on it to find user agents that match your exact criteria - version numbers, hardware types, platforms and so on.
Clear cache & history
Do i need to clear my cache.
Not sure why you've been asked to clear your cache? We can explain. Why you need to clear your cache
What is a cache?
Before you consider clearing your browser cache, you should know what it is! Learn a little bit about browser caches
Is it safe to clear my cache?
Are there any risks to clearing your cache? Find out if it's ok to clear your cache
Update my web browser
Do i need to update my browser.
Find out if your browser is out of date Is my browser out of date?
Why should I update my browser?
There are very good reasons to, find out here! Why update your browser?
Is it free to update Chrome?
Find out about the cost of updating Chrome... Does Chrome cost anything?
What does "Update browser" mean?
What does it actually mean? What does it mean to update your browser
Get help with our guides
How to enable javascript.
Change your JavaScript settings Guide to enabling Javascript
How to enable Cookies
Configure your cookie settings for privacy Guide to enabling cookies
Related articles
I can't log in to a website..
We've got a detailed guide to help you solve login problems How to fix website log in problems
Why do websites use cookies?
Why are cookies useful? Do you need them? What's the deal with cookies?
How to update your browser
Old software puts you at risk. Keep your browser fresh and up to date
Clear Cache, Cookies and History
How to reset your browsing history How to reset your browser
Try a different web browser
Different web browsers have different features - try a different one to see if you prefer it. Experiment a bit!
Use a VPN to hide your IP address
We recommend NordVPN to hide your IP address or to unblock websites. Hide your IP Address
How To Update Safari On Your Mac: A Step-By-Step Guide

It's no secret that Safari is the go-to browser for many Mac users . Sure, other browsers like Google Chrome have their advantages , especially if you're deep into Google's ecosystem, but using third-party browsers other than Safari on your Mac has downsides. Safari is optimized for macOS and integrates seamlessly with your other Apple devices like your iPhone and iPad by using Handoff.
If you've been a part of the Apple ecosystem for a while now, you're probably aware of Handoff, a very convenient Apple feature that allows you to begin a task on one of your devices, and pick up where you left off on another device.
Safari is no exception — Handoff allows you to start reading or watching something on your iPhone or iPad, and pick up where you left off on your Mac. This not only saves you the time of looking for a webpage but also makes jumping from one task to another extremely simple. Like any application, keeping Safari up to date is extremely important. Not only do new Safari updates come with newer features, but Apple also frequently rolls out updates to address security threats.
Now that you know it is a good idea to install Safari updates whenever they're rolled out, the real question is: How do you update Safari? Strangely enough, if your Apple device is updated to macOS Ventura or later , the only way to update Safari is to update your Mac itself.
How to update macOS
While you can't update Safari without updating macOS, you can check which version of Safari you're currently using. To do so, open the Safari app on your Mac and click on Safari from the menu bar. Now, select About Safari from the dropdown menu. Once you do so, a dialogue box will appear. The version of Safari you're currently using should be mentioned below the "Safari" text.
If you'd like to update Safari, follow the steps below to update macOS:
Click the Apple menu in the menu bar and select System Settings from the dropdown menu.
Select General from the sidebar on the left.
Click Software Update and wait for a few seconds.
Now, if a new update is available, click Update Now next to Updates Available.
If a Safari-specific update is available, you can click More Info and select Safari from the "Updates are available for your Mac" section.
To avoid having to update macOS manually to update Safari, we recommend enabling automatic updates. This way, you won't miss out on new features and can rest easy, knowing that Apple has fixed any known security threats . To do so, click the info icon next to Automatic updates and toggle on the switch next to Download new updates when available, Install macOS updates, and Install Security Responses and system files.
Safari: A Beginner’s Guide for iPhone or iPad Users
Safari can be intimidating to learn when you first start using it, but this guide will help you get used to it.
On Apple devices, the default web browser is called Safari. It shares a lot of similar features to other common browsers, like Chrome, Firefox, and Edge. But if you’re new to using Safari, you may feel a little lost because the interface is slightly different to the others.
So, here’s a beginner’s guide on how to use the Safari app to browse the web on your iPhone or iPad.
How to Search for Content in the Safari App
As with all web browsers, you’ll need to first enable your iPhone’s mobile data or connect to a Wi-Fi network to access the internet.
Then, to search in Safari, simply type a term, phrase, or URL into the Smart Search bar at the bottom of the screen and tap Go on your keyboard. The Smart Search bar is a combination of the address bar and search bar. As you type, you’ll see search suggestions based on your keyword as well as results from your bookmarks and browsing history.
How to Navigate a Webpage in Safari
Once you obtain your search results, you tap on a link you’re interested in. Now let’s look at how you can navigate the webpage once it’s loaded.
How to Jump Back to the Top of Webpage
After swiping to scroll down a long article, you may want to go back up to access the website’s menu. To instantly jump back to the top of the webpage, just tap the topmost edge of your screen.
How to Go Backward (or Forward) a Webpage
After tapping on a link, perhaps the webpage isn’t quite something you’re looking for. To go back to your search results, swipe from left to right from the edge of your screen.
To go forward on a webpage, swipe from right to left instead.
Related: Essential Safari iOS Tips & Tricks for iPhone Users
How to Reveal the Safari Address Bar
Your Safari address bar is automatically hidden away when you’re scrolling down a webpage. To bring it back, tap the bottom edge of the screen that shows the website’s main URL.
How to Work With Multiple Tabs in the Safari App
Having multiple tabs opened in Safari can help you to compare information between webpages and search for new content without having to close your current webpage. Here’s how to work with multiple tabs in Safari on your iPhone or iPad.
How to Open a New Tab
To open a new tab, select the Tabs icon in the bottom-right corner, which looks like two overlapping squares. Then tap the Plus (+) to open a new tab.
How to Switch Between Tabs
Again, hit the Tabs icon. You’ll see a gallery of all your opened tabs in Safari. Select a tab to visit the webpage you want.
Since the release of iOS 15, Apple introduced a new feature in Safari: tab groups. Many of us are probably guilty of having way too many opened tabs. Therefore, organizing tabs into groups makes them more manageable. Learn more about how to use tab groups in Safari on your iPhone .
How to Open a Link in a New Background Tab
When you read long articles, you’ll likely come across a link or two within the content that sparks your interest. To avoid disrupting your reading process, you can make Safari open the link in the background, in a new tab. To do so:
- Go to the Settings app.
- Select Safari .
- Scroll down and tap Open Links .
- Choose In Background .
Next time you want to open a link, long-press it. Then, select Open in Background . When you want to visit that link, select Tabs to view all your opened tabs and choose the loaded webpage.
Saving and Sharing Webpages in Safari
The internet gives you access to a whole new world of information. Save a webpage to refer to it later, or share it with your family and friends.
How to Bookmark a Safari Webpage
To bookmark a webpage to read later, tap the Share icon in the middle of the bottom of the screen (it looks like an arrow coming out of a square) and select Add Bookmark . Type in a bookmark name.
To access your bookmarked webpage later, tap the Bookmark icon (an opened book) and browse through your bookmarks, reading list, and history to find what you’re looking for.
Besides the bookmark option, you’ll also notice that you can add a webpage to your favorites or reading list. Marking a webpage as a favorite will make it show up on your Safari home page. It’s useful if you visit the website often.
To learn more about reading lists, you can visit our guide on the differences between a bookmark and a reading list .
How to Share a Link From the Safari App
Stumble upon an interesting DIY project? A promising recipe you’d like to share with your family? You don’t have to bookmark and remind yourself to show the webpage to them later. You can share the link directly from the Safari app.
Tap the Share icon. You can then select the receiver’s name from the horizontal list of recent contacts, or choose your preferred communication app to send the Safari link to them.
Erasing Your Digital Footprint in Safari
If you’re an aspiring crime writer, having a friend notice your crime-filled search history when they peer over your shoulder is inevitably awkward. Hence, there are some things we’d prefer to keep private and erase all traces of once we exit a web browser.
Safari has a few features to help you with this.
How to Close a Tab
If you don’t close your tabs, old webpages will just auto-load again the moment you head into Safari. Having too many opened tabs affects your browsing speed as well.
Closing a tab is simple. You just need to tap the Tabs icon and then tap the Close (x) button in the corner of the tab.
How to Browse Privately in Safari
Similar to Google Chrome’s Incognito Mode, Safari has a feature called Private Browsing Mode. Your autofill information and browser history won’t be saved when you use this function. Here’s how to use it:
- First, tap the Tabs icon.
- Select the center Tabs button with an arrow next to it.
- Choose Private .
- To open a new private tab, tap the Plus (+) button.
Whenever you’re in doubt about whether you’re in Private Browsing Mode, just check the Smart Search Bar. It will be dark grey instead of white when you’re browsing privately.
How to Clear Your Safari Browsing History
If you forgot to use Private Browsing while searching for confidential information, don’t worry. You can still clear your history in Safari. Just follow these steps:
- Tap the Bookmarks icon.
- Select History (the clock icon).
- Tap Clear .
- Choose the time length from which you want Safari to clear your history.
Use the Safari App to Surf the Internet on Your iPhone
The Safari app has all the features you need for a seamless browsing experience. Once you’re familiar with these basic functions, you can check out and download Safari extensions from the App Store to enjoy more helpful features while surfing the internet on your iPhone or iPad.
Beginner's guide to using MacBook, MacBook Air, MacBook Pro, or Mac

So, you've purchased your new Mac and you've got it all set up . Now, you're sitting in front of your screen, wondering what to do next. Lucky for you, we've got this useful guide to understanding the basic anatomy of your desktop or laptop . So, if you're new to Mac, welcome to the family. Now it's time to learn where everything is and what it does.
Touch ID and Apple Pay
Auto unlock.
- The Touch Bar on MacBook Pro
The Menu bar
Desktop background images and the screensaver, the mac app store, right-clicking, the trackpad & magic mouse, full screen mode, taking screenshots, the mail app, icloud and continuity, troubleshooting the mac.

Apple added support for Touch ID with the latest model MacBook Pro. With it, you can log into your account with one touch, and even set up multiple users with Touch ID. You can also use it to make online purchases thanks to Apple Pay on the web.
- How to use Touch ID on the MacBook Pro
- How to set and manage Apple Pay on the Mac
- How to use Apple Pay on the Mac

You can set up your Mac with a super strong password without having to worry about the inconvenience of having to retype it every time you lock your screen. Auto Unlock makes it possible for you to unlock your Mac with your Apple Watch just by being in proximity to it. So, you can set a 14-digit password that not even the most super of computers could figure out, but still unlock your Mac in a split second.
- How to enable Auto Unlock on your Mac and Apple Watch
The Touch Bar

Apple added a big new feature to the latest model MacBook Pro. The Touch Bar is an OLED panel that sits at the top of the keyboard and replaces the row of function keys. It is contextual, meaning what appears on the panel will change, depending on what app you are currently using. It is also customizable, which will allow you to set up different apps (including third-party apps that support customization) to improve your workflow.
- How to use the Touch Bar: The ultimate guide
- Best Touch Bar apps for MacBook Pro

The Dock is what you can consider the "favorites" section on your Mac. It stores all of the apps, files, and folders you consider to be the most important for quick access. It also temporarily holds apps, files and folders that are currently open, so you can get to them with one click, instead of sifting through all of your open windows and programs.
- Learn how to use the Dock on your Mac

The Menu bar sits at the very top of your Mac's screen. It houses the Apple menu, which will get you to all of your system settings, the app menu, which is specific to the app you are currently using, computer status shortcuts and third-party quick look tools, Spotlight, and Siri.
- Learn how to use the Menu bar on your Mac

Finder is the one-stop shop for every shred of data on your Mac. It is sometimes the best way to find what you are looking for (though Spotlight really gives it a run for its money). The best part is that you have direct access to cloud-based programs in Finder, too. So, you don't have to go digging around in the Dropbox app or iCloud Drive.
Master your iPhone in minutes
iMore offers spot-on advice and guidance from our team of experts, with decades of Apple device experience to lean on. Learn more with iMore!
- How to use Finder on your Mac

No computer seems right until you've made it your own with your personal background image or screensaver. Even if you use the built-in content, you are still the one choosing your look, and that's what makes it feel just right.
- How to change the desktop and screen saver on your Mac

The Mac App Store is where you will find some of the best apps and games for your desktop or laptop. It's also the place you go to when you need to update the Mac operating system and other software programs. Visit often to see new content that will really make your Mac shine. You'll need an Apple ID to purchase and download content from the Mac App Store. So, if you don't already have one, create an Apple ID before you start.
- Learn how to download apps from the Mac App Store
- Learn how to check for macOS and app updates in the Mac App Store

The Mac isn't like other computers. The included mouse or trackpad doesn't actually come standard with a right-click function. But, you can still get the right or control-click usability. You just have to set it up first.
- Learn how to set up right-clicking functionality on your Mac

The trackpad on a Mac laptop and the included Magic Mouse for a Mac desktop have some amazingly useful features, including but not limited to, gesture-based functions that will zoom, swipe, scroll, and more. Get to know your trackpad or Magic Mouse. You'll be amazed at what they can do.
- Learn how to customize your mouse on the Mac
- Learn how to customize the trackpad on your Mac

Going full screen helps you stay productive and avoid distractions. On the Mac, you can split up your screen and have two programs running at half-full side-by-side. This is useful for when you want to work in one app but reference another. You can really make full-screen mode work to your advantage if you know how to use it.
- How to use full screen mode on the Mac

So, you've finally got the high score in Super Hexagon and you want to show off that final screen to your friends, or maybe you want to save a cute picture to your desktop, but can't seem to find a way to save it from a website. Take a screenshot! Just like on iPhone and iPad, you can take a screenshot on your Mac with a simple keyboard shortcut.
- Learn how to take a screenshot on your Mac

Spotlight is basically the most robust search program around. It digs through your personal files, folders, apps, emails, and other content to produce results that you were most likely to be looking for in the first place. It also searches the web to cover all the bases. If you're looking for something, chances are Spotlight will find it for you.
- Learn how to use Spotlight on your Mac

You can use Siri on the Mac just like you would on your iPhone or iPad. In fact, Siri on the Mac can access even more data than its iOS counterpart. Ask Siri to schedule events, remind you of a task, tell you the weather, search your hard drive for files, look up pictures, and a whole lot more. Instead of putting out so much effort yourself, let Siri do the work for you.
- Learn how to set up and use Siri on your Mac

The launchpad is where all of your apps and games are displayed. Think of it as the Home screen on your iPhone or iPad. You can organize apps and games into folders, delete them by clicking and holding until they go into jiggly mode, and search for something specific using the search bar.
- Learn how to use Launchpad on your Mac

Safari is the default Mac browser. You might be used to a different way to surf the internet, but you should, at least, give Safari a try before you switch. Because it is integrated with the Mac operating system, it has some very awesome features you might end up loving too much to let go of, especially if you use Safari on your iPhone or iPad.
- Learn how to start using Safari on your Mac

When you've connected your mail client to the built-in Mail app, you can get notifications whenever a new message arrives in your inbox. you can also set up filters for VIP contacts, unread messages, emails with attachments, and more.
- Learn how to set up and use the Mail app on your Mac

You can use Messages on the Mac the same way you do on your iPhone or iPad. You can even set it up to receive text messages from contacts that don't use an iPhone (including those friends that don't even use a smartphone at all). When chatting with other iPhone users, you can view rich links, and even see some of the bubble effects
- Learn how to set up and use Messages on your Mac

When you create an Apple ID, you will automatically get 5 GB of iCloud storage for free. You can use it for little things like saving your iPhone backups and syncing app data. You can also use it for bigger things, like storing all of your music and photos in the cloud and optimizing your Mac's storage. If 5 GB isn't enough, you can upgrade for as little as $0.99 per month. When you connect your Mac and your iOS devices to iCloud, you can take advantage of Apple's Continuity feature, which allows you to start something on one device, then pick up and continue on another.
- Learn how to set up and use iCloud on your Mac
- Learn how to set up and use Optimized Storage on your Mac
- Learn about iCloud and your photos
- Learn about iCloud and your music
- Learn everything you need to know about Continuity on mac and iOS

Just like with all forms of technology, sometimes, things don't go right. Luckily, the Apple community is incredibly helpful. If something is wrong with your Mac, chances are, someone has already found the solution. You can get help directly on your Mac, from the iMore forums, and from Apple support. Just remember to relax and breath. A solution is waiting for you, you just have to know where to find it.
- Learn about the channels you can go through to troubleshoot your Mac

○ MacBook Air with M1 review ○ iMac (2020) review ○ iMac Pro review ○ 16-inch MacBook Pro review ○ Apple Macbook forums ○ Apple desktop forums ○ Buy at Apple

Lory is a renaissance woman, writing news, reviews, and how-to guides for iMore. She also fancies herself a bit of a rock star in her town and spends too much time reading comic books. If she's not typing away at her keyboard, you can probably find her at Disneyland or watching Star Wars (or both).
Apple's 1-month old M3 MacBook Air gets its first major discount — Get a 13-inch 256GB model for just $999
Apple’s 15-inch MacBook Air is already $100 off at Amazon
New Apple Pencil report makes it sound like the PS5 controller - no, really
Most Popular
- 2 iPad Pro M3 (2024): Everything you need to know
- 3 Apple could be springing a big surprise with M4 chip debut on iPad Pro
- 4 Apple has realized what the iPad's best feature is after 14 years
- 5 Mimestream, my favorite Mac email app, is getting an iOS version
How to Use a MacBook
In this article you will find the following:
Using a Mac isn’t difficult. They’re generally seen as being more user-friendly than most Windows PCs. But if you’ve never used one before, then there's a bit of learning involved, especially if you’re accustomed to Windows.
In this Mac beginner’s guide, we’ll cover all the basics you’ll need to help you learn how to use a Mac. We’ll show you how to get used to the change from a Windows device to a Mac laptop, as well as share our tips on getting you set up. There will also be step-by-step instructions from our team to help you navigate Mac operating systems for troubleshooting.
Before we start: If you’re just getting started with Mac and new to macOS specifics, don't let the intricacies of a new system overwhelm you. Instead, why not let some helpful software make the transition easier for you to navigate? We’re talking about MacKeeper . This all-in-one app, created by our expert developers, would automatically assist you with keeping your apps up-to-date, your storage clutter, and your Mac system safe. Our experts recommend you start with our Antivirus tool to ensure your laptop is protected against any cyber threats from day one. To use MacKeeper’s Antivirus for your peace of mind: Download MacKeeper and install it. Open the app and choose Antivirus from the left panel menu. Enable real-time protection to protect your device 24/7. Click Start Scan , and if anything is found, choose to Move to Quarantine .
- Mac introduction
Ready for our new Mac user tutorial? It's more than just a laptop—it’s a device that you’ll wish you started using sooner. Work or play, a Mac laptop or iMac can accommodate all the essentials and more. With different macOS and device versions, like the popular M1 or newer M2 model, there’s no limit to what you can do. Get set to jump into the awesome world of Mac, where innovation and simplicity are the name of the game.
Here are all the important aspects for your intro to Mac:
What operating system does Mac use
Difference between macbook air and pro.
- What can you do on a MacBook
- Is MacBook user-friendly
Mac operates on macOS, a user-friendly system perfect for anyone seeking seamless integration on a fast and reliable device. If you're looking to do work with MacBook, macOS provides an innovative platform through Sonoma integration that can work efficiently with your laptop needs. So, whether you’re a beginner or a seasoned user, the macOS operating system ensures simplicity and innovation.
The MacBook Air model prioritizes functionality and affordability, making it more popular for those getting started with a Mac. On the other hand, the MacBook Pro also excels in performance and caters to users looking for advanced features with the integration of the M2 chip. We’ve examined hardware and processor differences among the two most popular models to ease up your choice:
What can you do on a MacBook?
An Apple MacBook opens up a world of possibilities, perfect for both beginners and seasoned users, making the MacBook user-friendly for all. It offers a versatile platform for users to work, create, and entertain. The MacBook laptop is all about customization, efficiency, and exploring all the essentials with tools like Launchpad. It’s more than just a laptop, as you can do so much on a MacBook, including:
- Boosting productivity with various work and study apps.
- Engage in creative design and video editing tools.
- Enjoy music, Apple TV, and games for entertainment.
- Stay connected through messaging, video calls, and social media.
- Surf the internet seamlessly with Safari.
- Ensure safe browsing with built-in security features.
- Personalize your MacBook with colorful backgrounds, themes, and settings.
- Easily collaborate on projects with colleagues or friends.
Is MacBook user-friendly?
MacBooks are renowned for their user-friendly design, making them an ideal choice for beginners. With the integration of cool features and an optimized macOS, you can ensure a smooth learning curve. Whether navigating with the touchpad, exploring through Finder, or customizing your experience with AirPods, your MacBook experience is tailored to work efficiently and comfortably for your needs.
- If you’re switching from Windows to Mac
Microsoft Windows has been the dominant operating system for decades. Today, it still holds around 87% of the market . But Macs have a strong following, too. Many Windows users switch up their laptops and decide to upgrade to a Macintosh Apple machine for its reliability, impressive processor speed, and beginner-friendly design.
And when they start using MacBook, they’re going to notice a few big differences:
Standard hardware, all made by Apple
A different operating system, no start menu, different shortcuts.
Microsoft licenses Windows to computer makers and sells it to individuals. So it’s designed to run on hardware made by many different companies. Apple does things quite differently. Apple developers don’t sell the macOS software to anyone. It’s exclusive to Mac users, meaning it’ll only run on computers that Apple itself makes.
There are some drawbacks to this, but one big plus point is compatibility. Because Mac software and peripherals only have to work with a small set of computers, they’re much less likely to have compatibility problems than Windows PCs. Therefore, all Mac users can start using MacBook knowing that both the hardware and integrated macOS are robust as well as reliable.

Apple computers use their own operating system, called macOS, which used to be called Mac OS X. Based on Unix, this is different from Windows both inside and out. At first, it may take time to adjust as it might be hard to use Mac after Windows, but it’s easy once you learn all the setup tips and cool tricks. It’s a bit like starting a new job. You need to have a look around to find where everything is and what everything does, and then you’ll quickly get the hang of everything.
On Windows, you can access many of the integrated features of your computer through the Start menu. And you can open that menu using the Windows key on your keyboard. But there's no startup menu on macOS, meaning all apps and files are organized differently. Interestingly, there are third-party add-ons that can add a Start menu to macOS , which might be worth checking out if you want to further customize your Mac experience. With time and simple Mac training, you’ll get used to not having a start menu; it’s not necessary for an optimized laptop experience.

If you're transitioning from Windows to macOS, here's a helpful tip for first-time Mac users: familiarize yourself with the Command ( Cmd ) key. If you’re coming over from Windows, you’ll be accustomed to using the Ctrl key for most keyboard shortcuts like copying and pasting. On macOS, you’ll use the Command (Cmd) key for most Mac keyboard shortcuts , which will have either a picture of an Apple on it or a cloverleaf symbol. This subtle difference may be confusing initially, but it's a fundamental part of understanding how to use Mac effectively. Once you’ve had the chance to get familiar with these keys and uncover all Mac’s secret shortcuts, you’ll soon be working away on your laptop efficiently.
- Finding your way around macOS
Navigating macOS shares some similarities with Windows. They’re both window-based visual interfaces operated by mouse and keyboard. Basic actions like right-clicking to open files, clicking and dragging items into folders, and utilizing a trash bin for deleted files are universal. But there are some big differences, too. In this guide, we'll spotlight essential elements of macOS to assist beginners in getting acquainted with the system.
We’ll help familiarize yourself with:
The App Store
Activity monitor, system preferences.
Running along the bottom of the screen, you have the macOS Dock. This is a set of essential shortcuts to apps installed on your iMac or Apple laptop. It includes apps your Macintosh came with and ones you’ve installed yourself. You can click and drag app icons here to create your own customized shortcuts. You can arrange and delete the shortcuts anytime you wish by dragging them off your Dock (don’t worry, it doesn’t delete the apps themselves). If you want to see more options on the Apps located in your Dock, right-click, and more options will be displayed.

Spotlight is the name given to the macOS search function. As well as searching your Mac, Spotlight will look for things on the internet, in the App Store, and in various other places. It’s a cool feature that is perfect for all your essential daily tasks; it’s also super easy to help you use Mac effectively.
You can access Spotlight by clicking the magnifying glass icon at the top right of your screen or press Cmd + Space . In the Spotlight search window, just type what you’re looking for, and it’ll start giving you suggestions.

At the top of your screen, you’ll find the macOS menu bar that can help make your MacBook user-friendly. This will change depending on which app you’re currently focused on. So if you’re using Safari, you’ll see options and settings for Safari. On the far left, there’s an Apple icon. This stays the same, no matter what app you’re in, which provides an integration of system shortcuts and options to shut down, log out, or restart. Therefore, it's quick and easy for Mac beginners to get used to. On the right side of the menu bar is your notification area, which includes essential shortcuts to apps and settings, including Wi-Fi, date, and time.

Like iPhones, Macs come with their own App Store. The big difference with macOS is you don’t have to use it. You can download and install apps from anywhere. A major advantage of using the App Store is that Apple controls what’s allowed, therefore protecting you from suspicious apps containing malware. The App Store is stocked with apps created by Apple developers, which are all compatible and safe for laptop or iMac use. Just be cautious if you download apps from third-party sites. Consider reading online reviews to ensure you are getting started with Mac safely.

Just as Windows has its Task Manager, macOS has an Activity Monitor. You can find this under Applications > Utilities , or you can open it using Spotlight. The data may look complicated and overwhelming at first, but it’ll show you your laptop or iMac’s memory , CPU , energy , disk , and network use. All Mac users, beginners or pros, can use Activity Monitor to select processes and force them to close, which is useful if you’re having problems with an app when learning how to use a Mac.

Another first-time Mac user tip that Apple beginners will find helpful is to get familiar with Safari. This web browser is made especially for Macs and is well-supported in the Macintosh development community. It has plenty of plugins available, and it's popular among users, too. It has everything you’d expect from a modern browser, including a private browsing mode . You don’t have to use Safari, though. The browser you were using before is likely to still be available on a Mac laptop or iMac, which includes Chrome. All the most popular browsers are available for macOS.

Siri is Apple’s voice assistant—the same one it uses on iPhones. It allows you to do all kinds of things, from opening apps to searching for things on the internet. To open Siri, click the Siri icon in the top right of your menu bar or press and hold Cmd + Space . This is a great tool to utilize in your Mac training, as it can make search functions and other general tasks on your laptop easier to perform.

Something that might make MacBook complicated to use for beginners is not taking the time to understand how Mac Apps work first. On macOS, your apps are stored efficiently in the Applications folder, which can be accessed via Finder. Unlike on Windows, the Applications folder doesn’t generally contain any other folders. That’s because macOS apps are usually self-contained , so they’re represented by just one single icon, which you double-click to run. Some apps may need other files to run, which are stored in other parts of your Mac. In those cases, there may be some leftover files to deal with after you delete the main app.

This is basically like Windows’ Control Panel. It’s where you can tweak system settings and control how your Mac runs. You can get to System Preferences in several ways, the most popular method is by clicking on the Apple icon in your menu bar . From here, you’ll be taken to your laptop settings, which you can customize and change or keep as the default. This includes altering displays, Bluetooth, networks, printers, and so on. There’s quite a bit there, so it’s worth going in and having a look yourself to help you understand and use Mac effectively. Just don’t change anything if you’re unsure what it does.

- Setting up a new Mac
Getting your new Mac is exciting. Before diving in, our experts offer essential tips for first-time Mac users. Tailored for beginners, our guide plans to cover everything from essential setup tasks to understanding seamless integration, ensuring an efficient start.
We'll walk you through how to do the following on your new Mac device:
Set up internet
Change scroll direction, visual customization, set up your printer, get your backups ready, install cybersecurity.
To kick-start this new Mac user tutorial, let’s first help you set up your internet. If you use an Ethernet cable for internet access, you just need to plug it into the back of your Mac as normal.
To set up your connection for Wi-Fi, you’ll need to do the following:
- Click on Apple Icon and select System Settings .
- Click on Wi-Fi and make sure it’s turned On .
- Use the drop-down menu to search and connect to your Wi-Fi. You’ll need to enter your password and wait a few seconds to connect.

During your initial Mac training, you may find that when you scroll, by default, it goes in the opposite direction to what you might be used to. You can customize and change your Mac’s scroll direction by following these steps:
- Click on the Apple Icon and select System Settings .
- Select Accessibility> Pointer Control .
- From here, you’ll be able to customize the Mouse and Trackpad Options to your preferred scroll direction and click speed.

As you might expect, you can customize the look of macOS. You can change the desktop background, screensaver, and color elements, all accessible via your System Settings. For a personal touch, you can even change your login image to something unique and cool. Let our new Mac users tutorial walk you through steps on how to change your macOS to alter visual customization:
- Click on the Apple Icon and open System Settings .
- Click Appearance to open the customization panel. From here, you can alter your desktop features to your preferences.

Connecting printers to your Mac is usually pretty easy, even for beginners. Especially if your printer is already connected to your network. Here’s how you can set up your printer on your Macintosh laptop:
- Open System Settings via the Apple Icon .
- Scroll down until you see Printers & Scanners and click on it.
- Your device will automatically scan for available printers, but if your printer isn't found or listed, then you’ll need to click the Add Printers, Scanners, or Fax button to manually add your printer.

If you’re connecting via USB, then you might need to install some extra software, but even that should be trouble-free.
Apple rather handily has its backup software integrated into macOS, and it’s called Time Machine. It’s a lifesaver for new Mac users looking to work with MacBook. The feature is a handy tool for automatically backing up your essential files and apps. It also makes recovery a breeze if anything goes wrong. Time Machine can be set to automatically back up your Mac , so if anything goes wrong, you can reinstall your files and apps exactly how they were.
Here’s how you can get your backups ready with Time Machine:
- Open System Settings by clicking the Apple Icon or Spotlight search.
- Go to General > Time Machine .
- Click Add Backup Disk , select your backup space, and click Set Up Disk .

If you’re not going to be the only new person using your new Mac, then you might want to set up some new users . Adding users means everyone will be able to log into the shared Mac and have their own cool apps and customized settings.
Follow the steps below for our basic Mac tutorial on how to add users:
- Open System Setting from your Dock or by clicking the Apple Icon .
- Select Users & Groups and click the Add User button. Admin verification will be required to add any new users to your Mac laptop.

Using a Mac without antivirus used to be common practice, but these days it’s not recommended. There’s a lot more malware for macOS than there used to be, including ransomware. That’s why it’s a good idea to install our app MacKeeper as soon as you start using a MacBook. Among the other perks, our built-in Antivirus will offer you real-time protection and on-demand scans .
Here’s how MacKeeper’s Antivirus can be used to protect your MacBook:
- Launch the MacKeeper app.
- Select the Antivirus features from the left-hand side panel.
- Enable Real-time protection and allow full disk access.
- Click Start Scan , and if anything is found, choose to Move to Quarantine .

- Essential tips and tricks for new Mac users
So you’ve got your new Mac, and it’s all set up. You might now be thinking, what next in my Mac training? In this second half of this guide, we’ll now cover the essential tips and tricks for Mac beginners to master:
- Screen grabs and recordings
Force apps to quit
Save your battery, find your cursor, share files wirelessly, right-clicking.
- Auto unlock with Apple watch
Use multitouch gestures
Screen grabs and recording.
macOS has built-in screen grab and screen recording functionality integrated into its system that are both cool tools to have in your tool belt. It’s all done through the Screenshot app, which you’ll find in the Utilities folder. In older versions of macOS, it was called Grab .
To learn how to use a Mac screen grab and recording technology, you can use these keyboard shortcuts:
- Press Cmd + Shift + 3 to screen grab your whole screen.
- Press Cmd + Shift + 4 to grab a portion of your screen.
- If you follow that shortcut by pressing Space , you can switch to grabbing a screenshot of a particular app or window.
- Press Cmd + Shift + 5 to open a screenshot, where you can access all features, including video recording.
Although you can force quit Mac apps from Activity Monitor, there's a quicker way. In this MacBook user guide for beginners, we’ve included the steps to demonstrate how you can safely force quit apps:
- Press Option + Command + Escape to open the Force Quit Applications tool.
- Then select the app, and click Force Quit .
- macOS will ask if you really want to quit, so choose either Cancel or Force Quit .

This feature is useful to remember if you ever need to deal with an app refusing to close or if the Mac keeps shutting down unexpectedly.
Sorting out your battery use is one of those essential Mac training tasks everyone should know about, including beginners as well as regular Apple users. Whether you’re using a MacBook Pro or MacBook Air, you’ll want your battery to last as long as possible.
Here’s how to efficiently enhance the device battery to help make it last longer:
- In System Settings , click on Battery .
- Choose how long it takes your MacBook to go to sleep if it’s not being used. You can also track battery usage, and health, as well as put your device in Low Power Mode to conserve energy.

When you’re deep in the middle of a piece of work or engrossed in a web article, you might lose track of where the mouse cursor is. Our handy tip, especially for beginners, is to move your mouse around or move your finger around on your MacBook’s trackpad . This quick cursor visibility trick ensures a smoother experience as you start using a MacBook.
If you have an iPhone, Apple has made it easy to share all your essential files or images between your phone and your Mac by using AirDrop. Assuming it’s enabled on both devices, here’s how you can easily share files wirelessly:
- Make sure your Mac and iPhone Wi-Fi and AirDrop settings are both turned on.
- Then, on your Mac, right-click the file that you want to share.
- In the menu that appears, hover over Share and click on AirDrop .
- Click on the recipient iPhone from the list to send the file.
- Click Done .

Hint from our team: If you’re experiencing connection issues when using AirDrop, you might need to follow our guide on how to make Wi-Fi faster on Mac .
With earlier Macs, there was no right mouse click. By default, Mac users would have to hold down the Ctrl key while clicking to access context menus and so on. Today, macOS supports right-clicking on the laptop trackpad and mouse, making it easier to learn how to use a Mac.
Auto unlock with Apple Watch
Apple Watch owners can set their Mac to unlock when the two devices are near each other automatically. This software integration saves you from having to type in your password to unlock your Mac. Another first-time Mac user tip worth knowing is that you can also use your Apple Watch to approve other password requests on macOS.

Using your MacBook trackpad or an external Apple trackpad, you can use various multitouch gestures to control macOS. They include swiping with two fingers to scroll, pinch zooming, and two-finger tapping for right-click. These gestures are perfect for beginners and developers alike, as they’re not complicated to get the hang of.
Here’s how you can explore the multitouch gestures to enhance your integration into macOS Sonoma:
- In System Settings , scroll until you see a Trackpad , and click on it.
- Customize your multitouch gestures to meet your preferences.

- Troubleshooting your Mac
Most of the time, your Mac will probably run smoothly, but all computers can run into problems from time to time. To help show you how to use Mac efficiently, here are a few common issues you might encounter and need to troubleshoot to fix these Mac problems :
Mac freeze-ups
If your mac won’t turn on.
- Problems with sound
Slow performance
Running out of space.
One of the last things you want when you first start using a MacBook is for it to freeze up. You can be right in the middle of an essential work task or download, and then out of nowhere, your system just stops responding. You might be able to move the mouse cursor, but you can’t do much more. There are many reasons this might happen and several different ways to stop your Mac from freezing up , but the most common cause is an overloading processor.
Note from our experts: It might also be worth checking how much storage you have on your laptop, as too much can cause lagging and performance issues. We recommend you go into Finder and delete duplicate photos and files you find to relieve your storage space. You can also use MacKeeper's Duplicate Finder to do it all automatically, with no effort spent.
Getting your Mac to power up should be easy. If it doesn't turn on, there are some steps you can take to get it working again quickly so you can continue important work with a MacBook or an iMac. This can be as simple as checking your power cables and plugs, or it can involve resetting various settings, including factory resetting your Mac.
Problems with sound
Without sound, you can’t, of course, enjoy music or videos on your Mac. For starters, you should check your speakers and headphones to make sure they’re working and plugged in properly. Then you should start digging into the settings in the System Settings . Check different apps, try your audio hardware on a different computer, and see if your Mac needs updating.

Sometimes you might find your Mac does everything it’s supposed to, just very, very slowly. There are many reasons why your Mac might be running slowly . The most common explanations behind the slow performance include:
- Having too many apps or processes running at once
- Hardware failures
- Malware infections or cyber-attacks
To fix your Mac, you should try to use a process of elimination to find the cause. If you still need help, you should contact an expert to get professional help to solve the issue. When you suspect there might be malware on your Mac, use an antivirus app like MacKeeper to help quickly find and remove malware.
This is particularly a problem with newer Macs, which might come with fast processing chips like the M2 or M3 pro, but limited solid-state drives (SSDs). The smallest one Apple offers at the moment is 256GB, which can easily fill up if you download a lot of cool content or essential apps for work or gaming. If you find you’re running out of space, you can clear caches and log files, delete unneeded downloads, and erase old email attachments. These are just a few of the ways you can quickly get back Mac storage space.
- Enjoy using your Mac
Throughout this in-depth intro to Mac for Windows users, we covered subjects that are still just the tip of the iceberg. The more you learn how to use your Mac, the more you’ll discover tricks, secret shortcuts, and cool things you can do with it. Our guide is just a Mac and MacBook 101, but the possibilities are endless, so perhaps the best advice from our team is to simply enjoy using your Macintosh laptop or iMac computer.
You’ll find it even easier to benefit from your Mac experience if you’re spending less of your own time performing maintenance and system checks. That’s why allowing our MacKeeper app to assist you along your journey is a good idea. Let MacKeeper focus on keeping your device optimized, up-to-date, and free from cyber threats with a host of optimization and Antivirus tools. That way, you’ll spend more time enjoying your Mac and having fun.
You’ll love exploring your Mac with us.
Oops, something went wrong.
Try again or reload a page.

- Delete unnecessary system files and caches
- Free up GBs of storage space
- Easily find and delete duplicate files
Exploring Mac functionality? Our tech support can help you master it.

MacKeeper - your all-in-one solution for more space and maximum security.

We respect your privacy and use cookies for the best site experience.
Privacy Preferences Center
We use cookies along with other tools to give you the best possible experience while using the MacKeeper website. Cookies are small text files that help the website load faster. The cookies we use don’t contain any type of personal data meaning they never store information such as your location, email address, or IP address.
Help us improve how you interact with our website by accepting the use of cookies. You can change your privacy settings whenever you like.
Manage consent
All cookies
These cookies are strictly necessary for enabling basic website functionality (including page navigation, form submission, language detection, post commenting), downloading and purchasing software. The website might malfunction without these cookies.
Download MacKeeper when you're back at your Mac
Please enter your email so we can send you a download link
Check your email on your Mac
Install MacKeeper on your Mac computer to rediscover its true power.
Run Application

Click Continue

Click Install

Your macOS version is lower than OS 10.11. We’d like to offer you MacKeeper 4 to solve the cleaning, privacy, and security issues of your macOS.
- Computers & Technology
- Networking & Cloud Computing
Enjoy fast, free delivery, exclusive deals, and award-winning movies & TV shows with Prime Try Prime and start saving today with fast, free delivery
Amazon Prime includes:
Fast, FREE Delivery is available to Prime members. To join, select "Try Amazon Prime and start saving today with Fast, FREE Delivery" below the Add to Cart button.
- Cardmembers earn 5% Back at Amazon.com with a Prime Credit Card.
- Unlimited Free Two-Day Delivery
- Streaming of thousands of movies and TV shows with limited ads on Prime Video.
- A Kindle book to borrow for free each month - with no due dates
- Listen to over 2 million songs and hundreds of playlists
- Unlimited photo storage with anywhere access
Important: Your credit card will NOT be charged when you start your free trial or if you cancel during the trial period. If you're happy with Amazon Prime, do nothing. At the end of the free trial, your membership will automatically upgrade to a monthly membership.
Buy new: $9.24
Download the free Kindle app and start reading Kindle books instantly on your smartphone, tablet, or computer - no Kindle device required .
Read instantly on your browser with Kindle for Web.
Using your mobile phone camera - scan the code below and download the Kindle app.

Image Unavailable

- To view this video download Flash Player

Follow the author

Safari User Guide for Seniors: How to use Safari Browser for Beginners Paperback – January 29, 2021
Purchase options and add-ons.
If you own an Apple device, you probably must have found out that the Safari App is your defaultbrowser.
Over the years, the Safari browser has seen a quite number of upgrades from a fairly stable browser to a world class browser.
With these upgrades come many tips and tricks you need to master, especially if you’re just using the Safari for the first time.
This book is written to make your browsing experience a delight.
- How to enable Safari Reader View
- View multiple pages side by side
- Use picture-in-Picture mode
- Save open tabs as bookmarks
- View Privacy Reports in Safari
- Safari Tips and Tricks
Whether you rock the new iPhone, iPad or iMac, don’t forget to get this friendly manual for your consumption.
- Print length 75 pages
- Language English
- Publication date January 29, 2021
- Dimensions 5.5 x 0.19 x 8.5 inches
- ISBN-13 979-8701984231
- See all details

Product details
- ASIN : B08VCH8SY2
- Publisher : Independently published (January 29, 2021)
- Language : English
- Paperback : 75 pages
- ISBN-13 : 979-8701984231
- Item Weight : 5.3 ounces
- Dimensions : 5.5 x 0.19 x 8.5 inches
- #186 in Internet Web Browsers
- #4,362 in Internet & Telecommunications
About the author
Mary c. hamilton.
My name is Mary Hamilton, the CEO of TechVerse, a renowned software developing organization formed by tech gurus from around the world.
I am also a tech and gadget reviewer, and I've written numerous “how to” manuals for users to get to know their devices better.
Top magazines and tech websites have referenced most of my books as the gold standard for “User guides.”
I am currently living in a small town in Texas, with my only daughter, where I continue to write bestseller books to help improve the tech world.
Customer reviews
Customer Reviews, including Product Star Ratings help customers to learn more about the product and decide whether it is the right product for them.
To calculate the overall star rating and percentage breakdown by star, we don’t use a simple average. Instead, our system considers things like how recent a review is and if the reviewer bought the item on Amazon. It also analyzed reviews to verify trustworthiness.
No customer reviews
- Amazon Newsletter
- About Amazon
- Accessibility
- Sustainability
- Press Center
- Investor Relations
- Amazon Devices
- Amazon Science
- Sell on Amazon
- Sell apps on Amazon
- Supply to Amazon
- Protect & Build Your Brand
- Become an Affiliate
- Become a Delivery Driver
- Start a Package Delivery Business
- Advertise Your Products
- Self-Publish with Us
- Become an Amazon Hub Partner
- › See More Ways to Make Money
- Amazon Visa
- Amazon Store Card
- Amazon Secured Card
- Amazon Business Card
- Shop with Points
- Credit Card Marketplace
- Reload Your Balance
- Amazon Currency Converter
- Your Account
- Your Orders
- Shipping Rates & Policies
- Amazon Prime
- Returns & Replacements
- Manage Your Content and Devices
- Recalls and Product Safety Alerts
- Conditions of Use
- Privacy Notice
- Consumer Health Data Privacy Disclosure
- Your Ads Privacy Choices
- a. Send us an email
- b. Anonymous form
- Buyer's Guide
- Upcoming Products
- Tips / Contact Us
- Podcast Instagram Facebook Twitter Mastodon YouTube Notifications RSS Newsletter
Apple Releases Safari Technology Preview 193 With Bug Fixes and Performance Improvements
Apple today released a new update for Safari Technology Preview , the experimental browser Apple first introduced in March 2016. Apple designed the Safari Technology Preview to test features that may be introduced into future release versions of Safari.

The current Safari Technology Preview release is compatible with machines running macOS Ventura and macOS Sonoma , the latest version of macOS that Apple released in September 2023.
The Safari Technology Preview update is available through the Software Update mechanism in System Preferences or System Settings to anyone who has downloaded the browser . Full release notes for the update are available on the Safari Technology Preview website .
Apple's aim with Safari Technology Preview is to gather feedback from developers and users on its browser development process. Safari Technology Preview can run side-by-side with the existing Safari browser and while designed for developers, it does not require a developer account to download.
Get weekly top MacRumors stories in your inbox.
Top Rated Comments
I'm always curious about these Safari Tech Preview posts. Are they just a quick way to add another headline? I suspect so, as I don't see many people trusting these builds as their daily driver. I've tried that in the past, but it never stuck.
Popular Stories

iOS 18 Rumored to Add These 10 New Features to Your iPhone

Apple Releases Open Source AI Models That Run On-Device

Apple Announces 'Let Loose' Event on May 7 Amid Rumors of New iPads

Apple ID Accounts Logging Out Users and Requiring Password Reset

Best Buy Introduces Record Low Prices on Apple's M3 MacBook Pro for Members

Apple's Regular Mac Base RAM Boosts Ended When Tim Cook Took Over
Next article.

Our comprehensive guide highlighting every major new addition in iOS 17, plus how-tos that walk you through using the new features.

App Store changes for the EU, new emoji, Podcasts transcripts, and more.

Get the most out your iPhone 15 with our complete guide to all the new features.
A deep dive into new features in macOS Sonoma, big and small.

Revamped models with OLED displays, M3 chip, and redesigned Magic Keyboard accessory.

Updated 10.9-inch model and new 12.9-inch model, M2 chip expected.

Apple's annual Worldwide Developers Conference will kick off with a keynote on June 10.

Expected to see new AI-focused features and more. Preview coming at WWDC in June with public release in September.
Other Stories

2 days ago by Tim Hardwick

3 days ago by Joe Rossignol

3 days ago by MacRumors Staff

4 days ago by Joe Rossignol

5 days ago by Tim Hardwick
Random Apple ID password resets and lock-outs are plaguing iPhone, iPad and Mac users
It's a weird weekend for Apple

If you were inexplicably logged out of your Apple ID this weekend and had to reset your password, you're not alone. It's been happening since Thursday (April 25), according to a slew of reports on social media of people turning on their iPhones, iPads, Macs and other Apple devices only to find they’ve been logged out. Worse still, nobody seems to know why.
Though I'm team Android, I can confirm the issue as a friend of mine with one of the best iPhones ran into it on Thursday. At the time, we were in a mad dash to catch her first Metra trip into Chicago, so I assumed Apple was prompting her to reset her password because of some issue with connecting her card to the train's fare app. Imagine my surprise when I logged on this weekend to see reports of the very same thing happening to many other Apple users.
In some cases, folks are finding that their Apple ID accounts have been logged out and they only need to log back in. But for some users, logging back in with the original password actually locks you out of the account until you update your password. Even more perplexing is that Apple’s System Status webpage shows no current issues with any of its services, so it’s not clear how widespread an issue this has been. That said, at least one Forbes contributor and several members of the crew at 9to5Mac report being affected.
Apple hasn't yet offered an explanation about what could be behind it, but we've reached out for comment and will update this once we know more. One Mastodon user who managed to get in touch with Apple's support team said they were told “sometimes random security improvements are added to your account.” Meanwhile on Reddit, a person posted in a thread about the issue that Apple support told them their password “was changed around midnight" on Saturday.
All of this is to say that if your Apple devices are acting strangely this weekend, you're in good company. Worst-case scenario, you may have to reset the password for your Apple ID. While you're at it, be sure to check out our round-up of the best Apple deals you can snag right now.
More from Tom's Guide
- iPhone 16 vs iPhone 15: Biggest rumored upgrades
- Apple, please don’t remove the iPhone’s buttons
- Forget the iPad — it's the iPhone 16 Pro that needs Apple Pencil 3 support
Sign up to get the BEST of Tom’s Guide direct to your inbox.
Upgrade your life with a daily dose of the biggest tech news, lifestyle hacks and our curated analysis. Be the first to know about cutting-edge gadgets and the hottest deals.

Alyse Stanley is a news editor at Tom’s Guide overseeing weekend coverage and writing about the latest in tech, gaming and entertainment. Prior to joining Tom’s Guide, Alyse worked as an editor for the Washington Post’s sunsetted video game section, Launcher. She previously led Gizmodo’s weekend news desk, where she covered breaking tech news — everything from the latest spec rumors and gadget launches to social media policy and cybersecurity threats. She has also written game reviews and features as a freelance reporter for outlets like Polygon, Unwinnable, and Rock, Paper, Shotgun. She’s a big fan of horror movies, cartoons, and miniature painting.
iPhone 16 Pro vs Pixel 9 Pro: Which phone should you plan on buying?
iPhone 15 vs. Samsung Galaxy S24 zoom face-off: Which phone is better for close-ups?
Netflix top 10 movies — here’s the 3 worth watching right now
Most Popular
- 2 Netflix top 10 movies — here’s the 3 worth watching right now
- 3 Hurry! The current-gen Apple Watch 9 just crashed to its lowest price ever at Amazon
- 4 iPhone 16 Pro vs Pixel 9 Pro: Which phone should you plan on buying?
- 5 You don’t need the gym to build full body strength — use this 6 move dumbbell workout instead
iOS 17 and iPadOS 17

Updated April 24, 2024
See the new Change Log for details
Apple’s first official design kit for Figma contains a comprehensive set of components, views, system interfaces, text styles, color styles, materials, and layout guides. All the core ingredients you need to quickly create highly realistic iOS and iPadOS apps designs.
Some key features include:
- Comprehensive set of components, from Alerts to Widgets and everything in between
- Home Screen and Lock Screen widget templates
- Notification design templates
- Templates for tabbed apps, parent / child apps, split views, and sheets
- Full dynamic type chart with accessibility sizes
- Built in iOS system colors, materials, text styles and vibrancy effects
If you have requests, find bugs, or have other feedback for us, please use Feedback Assistant. Select Developer Tools > Apple Design Resources.
Important: Make sure to install the latest version of SF Symbols before using this library.

More From Forbes
Mother's day gift guide 2024: the best mezcal.
- Share to Facebook
- Share to Twitter
- Share to Linkedin
This Mother's Day there are plenty of options for the mezcal loving mom.
Mezcal is one of the fastest-growing spirit categories and more than a few moms I know are “mezcal moms.” The best mezcals for Mother’s Day were chosen for their ability to appeal to mezcal connoisseurs as well as moms who are new to the world of mezcal — perhaps drawn by one of the increasingly popular mezcal cocktails available. From low-smoke to smoke bombs and mezcals bursting with vegetal freshness, there’s something on this list for every mezcal-drinking mom out there.
Desolas, $42.99
Founded in 2020 by GG Mirvis, a Miami spirits entrepreneur and sometimes DJ, Desolas swaps out the smokiness normally associated with mezcal and replaces it with an agave-forward garden’s worth of herbal flavors. Its low-smoke profile makes it one of the best mezcal’s for Mother’s Day moms who are just dipping their toes into the mezcal world, and even for some moms who dislike mezcal in general. But don’t be fooled, though approachable, this is a complex spirit made with Salmiana agave from San Luis Potosi, Mexico, that has earned many industry accolades and been the standout star in all my recent blind mezcal taste tests. It’s not only become one of my favorite mezcals but one of my favorite spirits overall. Find out where to purchase Desolas here .
Banhez Mezcal Artesanal Joven, $39.99
Owned and operated by the U.P.A.D.E.C Co-operative in Ejutla, Oaxaca, which consists of family farmers, Banhez Mezcal Artesanal is a great Mother’s Day mezcal for a mom who is intrigued by mezcal and looking to explore the spirit category further. It’s a complex mix of fruit and floral notes with a clear but not overpowering smokiness. The spirit is fermented in open-air wooden vats via wild yeast. Find out where to purchase Banhez Mezcal here .
Bosscal Mezcal Joven, $55.99
This approachable 100 organic and naturally fermented mezcal, is a wonderful starter mezcal for moms (and anyone, of course). It’s got citrus-forward flavors against a smoke backbone that lets you know you are drinking mezcal but doesn’t hit you over the head with that fact. As such, it’s a fun substitution for many cocktails that ordinarily call for tequila as it can add some smokey character without fundamentally changing the drink. Find out where you can purchase Bosscal Mezcal Joven here .
Granja Nómada Tepeztate Mezcal
This intriguing mezcal bursts with fresh sweet and earthy aroma and smokiness that grows stronger as you sit with each sip. Granja Nómada is built on the concept of nomadic farming (that inspires the brand’s name as well) and the company works with different farmers to help produce a more sustainable mezcal. All mezcals are made with traditional methods including open air wild fermentation. You can find out where to purchase Granja Nómada Tepeztate Mezcal here .
Earth’s New ‘Second Moon’ Is As Big As The Statue Of Liberty—And Scientists Just Found Its Origin
Whatsapp brand new iphone feature just launched that s much easier to use, suicide squad kill the justice league announces huge emergency changes, mezcal amaras cenizo, $89.99 usd.
Made with 14-year-old Durangensis agave from Durango and naturally fermented in open-air vats, this is a mezcal for the mom who is serious about their mezcal drinking. Intense with smoky and citrus notes, it is worth spending a little more on. You can learn more about purchasing Mezcal Amaras Cenizo here .
Dos Hombres Espadin, $51.99
This mezcal from Breaking Bad’s Aaron Paul and Bryan Cranston is perfect for moms who are fans of peak prestige TV. Consumers these days are rightly skeptical of celebrity brands but the first taste of this mezcal eliminates that skepticism. Smoky with some of the fresh green flavors that are found in all the best mezcals, this is a serious product and not some celebrity vanity act. You can purchase Dos Hombres Espadin here .
Illegal Mezcal Joven, $45.99
A great mezcal for mixologist moms who like to incorporate mezcal into cocktails, Illega Mezcal Joven has a clean, smoke-forward flavor, that is thankfully legal. This makes it ideal for adding signature mezcal smoke flavors to cocktails such as The Naked & Famous, Oaxacan Old Fashioned, or just a smokey margarita. You can purchase Illegal Mezcal Joven here .

- Editorial Standards
- Reprints & Permissions
- Create an email message
- Suggested recipients
- Use @mentions
- Create a signature
- Add attachments
- Check spelling
- Add a reaction
- Out of office replies
- Delay or schedule
- Recall a message
- Automatic forwarding
- Read receipt
- Save a file or draft
- Change display name
- Create a folder
- Use inbox rules
- Conditional formatting
- Use Favorites
- Custom views
- Message font size
- Message list view
- Focused Inbox
- View as conversations
- Filter and sort messages
- Number of messages
- Chat with recipients
- Share an email
- Status in Outlook
- Phishing and suspicious behavior
- Blocked senders
- Protected messages
- Open a protected message
- More to explore

Create and add an email signature in Outlook
In Outlook, you can create one or more personalized signatures for your email messages. Your signature can include text, links, pictures, and images (such as your handwritten signature or a logo).
Note: If the steps under this New Outlook tab don't work, you may not be using new Outlook for Windows yet. Select Classic Outlook and follow those steps instead.
Create and add an email signature
On the View tab, select View Settings .
Select Accounts > Signatures .
Select New signature , then give it a distinct name.
In the editing box below the new name, type your signature, then format it with the font, color, and styles to get the appearance you want.
Select Save when you're done.
With your new signature selected from the list above the editing box, go to Select default signatures and choose whether to apply the signature to new messages and to replies and forwards.
Select Save again.
Note: If you have a Microsoft account, and you use Outlook and Outlook on the web or Outlook on the web for business, you need to create a signature in both products.
Create your signature and choose when Outlook adds a signature to your messages
If you want to watch how it's done, you can go directly to the video below .
Open a new email message.

Under Select signature to edit , choose New , and in the New Signature dialog box, type a name for the signature.
Under Edit signature , compose your signature. You can change fonts, font colors, and sizes, as well as text alignment. If you want to create a more robust signature with bullets, tables, or borders, use Word to create and format your signature text, then copy and paste it into the Edit signature box. You can also use a pre-designed template to create your signature. Download the templates in Word, customize with your personal information, and then copy and paste into the Edit signature box.

You can add links and images to your email signature, change fonts and colors, and justify the text using the mini formatting bar under Edit signature .
You can also add social media icons and links in your signature or customize one of our pre-designed temlates. For more information, see Create a signature from a template .
To add images to your signature, see Add a logo or image to your signature .
Under Choose default signature , set the following options.
In the E-mail account drop-down box, choose an email account to associate with the signature. You can have different signatures for each email account.
You can have a signature automatically added to all new messages. Go to in the New messages drop-down box and select one of your signatures. If you don't want to automatically add a signature to new messages, choose (none). This option does not add a signature to any messages you reply to or forward.
You can select to have your signature automatically appear in reply and forward messages. In the Replies/forwards drop-down, select one of your signatures. Otherwise, accept the default option of (none).
Choose OK to save your new signature and return to your message. Outlook doesn't add your new signature to the message you opened in Step 1, even if you chose to apply the signature to all new messages. You'll have to add the signature manually to this one message. All future messages will have the signature added automatically. To add the signature manually, select Signature from the Message menu and then pick the signature you just created.
Add a logo or image to your signature
If you have a company logo or an image to add to your signature, use the following steps.
Open a new message and then select Signature > Signatures .
In the Select signature to edit box, choose the signature you want to add a logo or image to.

To resize your image, right-click the image, then choose Picture . Select the Size tab and use the options to resize your image. To keep the image proportions, make sure to keep the Lock aspect ratio checkbox checked.
When you're done, select OK , then select OK again to save the changes to your signature.
Insert a signature manually
If you don't choose to insert a signature for all new messages or replies and forwards, you can still insert a signature manually.
In your email message, on the Message tab, select Signature .
Choose your signature from the fly-out menu that appears. If you have more than one signature, you can select any of the signatures you've created.
See how it's done

Top of page
Note: Outlook on the web is the web version of Outlook for business users with a work or school account.
Automatically add a signature to a message
You can create an email signature that you can add automatically to all outgoing messages or add manually to specific ones.
Select Settings at the top of the page.
Select Mail > Compose and reply .
Under Email signature , type your signature and use the available formatting options to change its appearance.
Select the default signature for new messages and replies.
Manually add your signature to a new message
If you've created a signature but didn't choose to automatically add it to all outgoing messages, you can add it later when you write an email message.
In a new message or reply, type your message.

If you created multiple signatures, choose the signature you want to use for your new message or reply.
When your email message is ready, choose Send .
Note: Outlook.com is the web version of Outlook for users signing in with a personal Microsoft account such as an Outlook.com or Hotmail.com account.
Related articles
Create and add an email signature in Outlook for Mac
Create an email signature from a template

Need more help?
Want more options.
Explore subscription benefits, browse training courses, learn how to secure your device, and more.

Microsoft 365 subscription benefits

Microsoft 365 training

Microsoft security

Accessibility center
Communities help you ask and answer questions, give feedback, and hear from experts with rich knowledge.

Ask the Microsoft Community

Microsoft Tech Community

Windows Insiders
Microsoft 365 Insiders
Find solutions to common problems or get help from a support agent.

Online support
Was this information helpful?
Thank you for your feedback.
Apple Business Manager User Guide
- Intro to Apple Business Manager
- Program requirements
- Participate in beta features
- Get support
- Provide feedback
- Edit preferences
- Configure locations
- Link to new domains
- About domain conflicts
- Disconnect federation from a domain
- Intro to federated authentication
- Use federated authentication with Google Workspace
- Use federated authentication with Microsoft Entra ID
- Use federated authentication with your identity provider
- Change a user’s domain information
- Transfer Apple services when federating
- Sync user accounts from Google Workspace
- Sync user accounts from Microsoft Entra ID
- Sync user accounts from your identity provider
- Get notified about user name conflicts
- Resolve Apple ID conflicts
- Resolve Google Workspace sync conflicts
- Resolve Microsoft Entra ID OIDC sync conflicts
- Resolve identity provider OIDC or SCIM sync conflicts
- Use Managed Apple IDs
- Customize user access to certain apps and services
- Use Sign in with Apple
- Intro to users and user groups
- Manually add users
- Manage existing users
- Add user groups
- Create or reset user passwords
- Intro to roles and privileges
- View and assign roles
- Add Content Managers to locations
- Add or reset verification phone numbers
- Intro to buying content
- Review content payment and billing information
- Select and buy content
- Learn about Custom Apps
- Manage content tokens
- Transfer licenses
- Migrate content tokens
- Invite VPP purchasers
- Plan for migration to Apps and Books
- Device workflow
- Manage device suppliers
- View device information
- Get device order progress reports
- Add devices from Apple Configurator
- Intro to MDM servers
- Link to a third-party MDM server
- Edit a third-party MDM server configuration
- Delete a third-party MDM server
- Review device assignments
- Assign, reassign, or unassign devices
- Assign a device that was serviced or replaced
- Release devices
- Create Shared iPad passcodes
- Sign in to Shared iPad
- Shared iPad and Managed Apple IDs
- Sign federated users out of devices
- How to search
- View activity
- Read log files
- Keyboard shortcuts
- Document revision history
Intro to buying content in Apple Business Manager
The App Store features thousands of apps. Fortunately, Apple Business Manager gives your organization a simple way to acquire and manage these apps in the Apps and Books Store. Using device management, you can install and update apps remotely, even if the App Store is disabled on the device.
Note: Depending on your local tax requirements, you may be required to provide tax information when you initially set up your organization to buy content.

Distributing apps
Besides buying apps, you can also revoke and reassign apps to different devices and users. In this way, you always retain full ownership and control of apps you bought. You can assign the apps you bought through Apple Business Manager to any devices or users in any country or region where those apps are available from that location’s App Store. (The App Store Country or Region is determined by the address submitted when your organization signs up for Apple Business Manager. For example, if your organization signed up with an address in the United States, the App Store locale is set to United States.)
App distribution works best when the app is assigned before devices are configured or given to users. After the user receives the device and completes the Setup Assistant, Apple Business Manager can send the user an invitation by email or push notification. When the user accepts the invitation, the user has access to all of the apps—which are then remotely installed on the user’s devices.
Note: In-app purchases and subscriptions aren’t compatible with volume purchasing, Managed Apps, or Managed Apple IDs . Developers may offer a separate full-featured version of their apps (sometimes as a Custom App) for education or enterprise customers that need to deploy apps at scale.
Distribute Apple Books
Apple Books bought through Apple Business Manager can be distributed only to users, not devices. They can’t be revoked and reassigned. When books are assigned to users, those books follow the same country and region download restrictions as apps.
Note: Some Apple Books content isn’t available in certain countries or regions. To learn whether certain Apple Books content is available in your country or region, see the Apple Support article Availability of Apple programs and payment methods for education and business .
Recommendations
To simplify your deployment, it’s highly recommended that you assign apps to devices instead of users. With device-based app assignment, there’s no invitation process or requirement to use an Apple ID on the device. Books can’t be assigned to devices.
To alleviate bandwidth saturation during the initial mass deployment, consider distributing only the apps necessary for the first day of deployment, and then make additional apps available to users for download over time. If the device is supervised, apps are installed silently.
App and book assignment summary
The table below shows the types of apps or books, and the criteria for assigning them to devices and users.
IMAGES
VIDEO
COMMENTS
To explore the Safari User Guide, click Table of Contents at the top of the page, or enter a word or phrase in the search field. If you need more help, visit the Safari Support website. Use Safari on your Mac to customize browsing, shop securely, read articles, and stop interruptions.
Use Safari on your Mac to customize browsing, shop securely, read articles, and stop interruptions.
Open the offending website. Click on Safari > Settings for This Website (or right-click the URL box and select Settings for This Website). You will see a pop-up window with the option Auto-Play ...
2. Customize the Toolbar. Having a functional toolbar with the buttons you use most is key to using Safari. If you never use the Home button, for instance, you can remove it. And if you want a button for the Sidebar, you can add it. To make changes, right-click on the toolbar and select Customize Toolbar.
Learn how to use Safari on macOS and iOS. Explore bookmark management, toolbar customization, browsing tips, settings customization and more.Table of Content...
Apple's Safari browser is the pre-loaded default on all of the company's desktop and mobile devices, making it the most important application on MacBooks, iPads and iPhones. Safari offers great ...
Quick Notes are new for macOS Monterey and iPadOS 15. There are a couple of ways to use the feature with the new Safari. You can click the three-dot icon in the URL/search bar > Add to Quick Note ...
Open the "Window" menu on the Mac bar. 2. Choose "Arrange Tabs By.". 3. You can now choose between "Title" and "Website.". For many, choosing to sort by website will be the most useful. That way, if you have multiple tabs open, they will all be next to each other. 4. Customize Safari Toolbar.
Overview. The Develop menu is home to the tools available to design and develop web content in Safari, as well as web content used by other applications on your Mac and other devices. The Develop menu also provides quick access to Changing Developer settings in Safari on macOS and Changing Feature Flag settings in Safari on macOS.. Note. If you haven't already enabled features for web ...
Private Browsing in Safari hides browsing history, autofill details, downloads, and locks tabs after inactivity. Safari on Mac groups private and non-private tabs, while on iPhone it shows all tabs regardless of mode. To use Private Browsing in Safari, identify it by a dark address bar, "Private" indicator, or "Private" next to the site URL.
How to use Bookmarks and Reading List in Safari on iPhone and iPad. Reading List is Apple's take on a read-it-later service: Built into the Safari browser for iPhone and iPad, Reading List let you save any articles you stumble across while browsing the web for offline viewing; you can then go back and peruse them at your convenience.
The latest user agents for Safari. Apple's Safari web browser runs on mobile devices (iPhones, iPads and iPod Touches) and macOS computers. Depending on which platform you're using (or want to pretend you're using!) the user agent will be a bit different. Here we have the latest user agents for Safari on mobile and computer platforms.
Alternatively, you can just open the Safari app and then hit the hotkey Command + comma (,) to bring up Safari Preferences. Go to the Advanced tab from the General tab. The Safari Preferences menu Advanced tab. At the bottom of the Advanced tab, checkmark the checkbox for the setting Show Develop menu in menu bar. 2.
Safari User Guide. for macOS Ventura. Search this guide Clear Search Table of Contents. Get started with Safari on Mac. Learn the basics to quickly get up to speed. Go to a website, search the web, set your homepage and bookmark websites you want to revisit. How to get started with Safari ...
Click the Apple menu in the menu bar and select System Settings from the dropdown menu. Select General from the sidebar on the left. Click Software Update and wait for a few seconds. Now, if a new ...
To avoid disrupting your reading process, you can make Safari open the link in the background, in a new tab. To do so: Go to the Settings app. Select Safari . Scroll down and tap Open Links . Choose In Background . Next time you want to open a link, long-press it. Then, select Open in Background.
Finder on the Mac (Image credit: iMore) Finder is the one-stop shop for every shred of data on your Mac. It is sometimes the best way to find what you are looking for (though Spotlight really gives it a run for its money). The best part is that you have direct access to cloud-based programs in Finder, too.
For help, please refer to Mac Identification. Complete technical specifications from EveryMac.com are linked on the left and the correponding instruction manual in PDF format is linked on the right. 1 Apple Mac Instruction Manuals 1 eMac G4/700 Instruction Manual (PDF) 1 eMac G4/800 Instruction Manual (PDF) 1 eMac G4/800 (ATI) Instruction ...
In this MacBook user guide for beginners, we've included the steps to demonstrate how you can safely force quit apps: Press Option + Command + Escape to open the Force Quit Applications tool. Then select the app, and click Force Quit. macOS will ask if you really want to quit, so choose either Cancel or Force Quit.
Safari User Guide for Seniors: How to use Safari Browser for Beginners [Hamilton, Mary C.] on Amazon.com. *FREE* shipping on qualifying offers. Safari User Guide for Seniors: How to use Safari Browser for Beginners ... If you own an Apple device, you probably must have found out that the Safari App is your defaultbrowser. Over the years, the ...
Use Safari on your Mac to customize browsing, shop securely, read articles, and stop interruptions. Open Menu Close Menu; Apple; Apple; ... Safari User Guide. for macOS Ventura. Get started with Safari on Mac. Learn the basics to quickly get up to speed. Go to a website, search the web, set your homepage, and bookmark websites you want to ...
Apple's aim with Safari Technology Preview is to gather feedback from developers and users on its browser development process. Safari Technology Preview can run side-by-side with the ...
Contact Apple for support and service. To explore the macOS User Guide, click Table of Contents at the top of the page, or enter a word or phrase in the search field. If you need more help, visit the macOS Support website. Learn how macOS features and apps help make your tasks easier and your work private and secure.
In some cases, folks are finding that their Apple ID accounts have been logged out and they only need to log back in. But for some users, logging back in with the original password actually locks ...
Safari is the default browser when you first set up your Mac, but another browser you install can become the default unexpectedly. On your Mac, choose Apple menu > System Preferences, then click General. Click the "Default web browser" pop-up menu and choose Safari. Some apps open webpages in a browser other than your default browser. On ...
Updated April 24, 2024 See the new Change Log for details Apple's first official design kit for Figma contains a comprehensive set of components, views, system interfaces, text styles, color styles, materials, and layout guides. All the core ingredients you need to quickly create highly realisti...
Banhez Mezcal Artesanal Joven, $39.99. Owned and operated by the U.P.A.D.E.C Co-operative in Ejutla, Oaxaca, which consists of family farmers, Banhez Mezcal Artesanal is a great Mother's Day ...
Under Edit signature, compose your signature.You can change fonts, font colors, and sizes, as well as text alignment. If you want to create a more robust signature with bullets, tables, or borders, use Word to create and format your signature text, then copy and paste it into the Edit signature box.You can also use a pre-designed template to create your signature.
On a Mac with macOS Catalina or later, open a Finder window. On a Mac with macOS Mojave or earlier, open iTunes. If iTunes is already open, close it, then open it again. Find out which macOS your Mac is using. On a PC, open the Apple Devices app or iTunes. Connect your iPad to your computer using a USB cable.
Besides buying apps, you can also revoke and reassign apps to different devices and users. In this way, you always retain full ownership and control of apps you bought. You can assign the apps you bought through Apple Business Manager to any devices or users in any country or region where those apps are available from that location's App Store.