Joyful Derivatives » DIY Home Improvement

How to Paint RV Cabinets the Easy Way
This post contains affiliate links. Read the full disclosure here.
This post is sponsored by Wagner Spray Tech . As always, opinions are all my own.
Follow this simple tutorial to completely transform your RV cabinetry with paint! We’ll show you how to paint RV cabinets without sanding so you can get your outdated RV kitchen looking updated and stylish on a budget.

I am so excited to share this project with you all!
Some of our very close friends live full-time in their fifth-wheel RV and in an effort to bless them, we offered to help them with a mini kitchen-makeover. 😉
Our long-term plan is to paint all of the wood in the entire trailer, but this was the much-needed first step.
Before we talk about what we did, I just HAVE to show you a quick before/after because it seriously blows my mind!
Take a look at this…

Amazing, right?!
In addition to painting the cabinets, we spray painted all the hardware black, installed some peel-and-stick faux subway tile backsplash, and covered the counter tops with marble contact paper.
Just a few simple changes and this kitchen looks like a fabulous, modern space for under $350!
In today’s post, I’m going to share with you what we believe to be the easiest and most effective way to paint oak cabinets white without sanding.
I hope this tutorial helps you get your outdated kitchen looking snazzy!
YOU WILL ALSO LOVE: HOW TO PAINT SHIPLAP THE EASY WAY

How to Paint Oak RV Kitchen Cabinets
Can you paint over oak kitchen cabinets.
The one thing you’ll want to consider is the wood grain.
If you paint over oak cabinets without filling the grain first (this can be done with wood filler, spackle, or a special grain-filling paint) then you will still see it through the paint.
We chose not to fill the grain in this kitchen (mostly because it adds a lot of work) and I think it still looks fabulous.
But if you don’t like seeing the grain under your paint and you want yours to be perfectly flat, you’ll want to fill the grain first.
Here’s a great tutorial for doing that.
What type of paint do you use to paint camper cabinets?
I believe the best paint to use on cabinets (whether in an RV or not) is with oil-infused cabinet paint.
The fact that it isn’t fully oil-based makes it easier to work with but still gives it the durability of oil paint.
Every experience we’ve had with it convinces me a bit more – it levels out really well, covers just about anything, and stands up to all sorts of wear-and-tear.
It’s a bit more expensive than the typical water-based paint, but well worth the cost.
RELATED: THE BEST FARMHOUSE PAINT COLORS FOR HOME INTERIORS
Does it make sense to paint kitchen cabinets?
Absolutely!
I believe it makes sense to do whatever is going to make you love your home (or home on wheels, in this case.) 😉
If that means painting your kitchen cabinets, then DO IT!
And honestly, the return on investment you’ll get from a painted kitchen is huge.
Painted cabinets are extremely popular and so the “sellablility” of your home will increase along with your home’s overall style.
DIY Painted RV Cabinets
For a printable copy of the materials and instructions, scroll down.
Materials Needed:
- Pre-Paint Cleaner
- Liquid Sandpaper
- Painter’s Tape
- Plastic Drop Cloth
- Cabinet Paint
Tools Needed:
- Screwdriver or Drill
- Wagner FLEXiO 5000 Paint Sprayer
- Painter’s Tripods
- Painting Tent (optional)
How to Paint Oak Cabinets White Without Sanding
Step 1: remove all doors and drawers..
The first step is to use your screwdriver or drill (with a driver bit) to remove all the cabinet doors, drawers and hardware.
As you remove each face, use painter’s tape to number the space where it goes (on the inside of the cabinet) and the door itself.
This will make the re-installation much easier!

Store the doors and drawer fronts somewhere where you will have enough room to clean them and place all the hardware in a baggie.
STEP 2: Apply the liquid sandpaper.
Next, wipe down all of your cabinets, doors and drawer fronts with liquid sandpaper.
Be sure to follow the application instructions on the liquid sandpaper bottle.
We wore gloves and used one rag to apply the sandpaper and another to dry them off afterwards.
Let them dry for about 24 hours after this step.
RELATED: HOW TO PAINT A PANELED DOOR PERFECTLY IN AN HOUR
STEP 3: Wash with pre-paint cleaner.
After the liquid sandpaper has dried, deep clean all of the cabinets, doors and drawer fronts with a heavy-duty, pre-paint cleaner.
This step is critical – don’t skip it and don’t speed through it!
If you don’t get all the built-up grease, dirt and grime off the wood, your paint won’t adhere or cover well.
Be sure to follow the application instructions on your cleaner bottle.

STEP 4: Mask the space.
After your cabinet frames, doors and drawers have been thoroughly cleaned, it’s time to paint!
We always choose to paint the cabinets themselves first, so that the use of the kitchen can go back to normal as quickly as possible.
Since we recommend spraying the frames for a quicker, more even coat of paint, the first step is to prepare the space with tape and drop cloths.
For each of the cabinet openings, use painter’s tape to tape around the inside edges and then adhere plastic drop cloth to the tape creating a barrier for what’s inside the cabinet.

Place plastic over the sink and appliances.

For each edge of the cabinets (along the counter tops, walls, ceiling and floor) lay down plastic drop cloth and tape up to the edge of the wood.

In essence, you want plastic to be covering up anything other than the wood cabinetry so that it’s protected from the paint.
We also chose to hang a piece down the middle of the RV so that our friends’ furniture on the other side of the space wouldn’t get any over-spray on it.

Take your time with this step and use good quality painter’s tape – the last thing you want to deal with is your tape falling off in the middle of your painting!
RELATED: 25 CHEAP AND EASY DIY UPDATES FOR YOUR KITCHEN CABINETS
STEP 5: Prime and paint the cabinets.
Now comes the fun part!
Using your Wagner FLEXiO 5000 paint sprayer , apply a coat of high-quality, stain-blocking primer and two coats of cabinet paint, letting it dry thoroughly between coats.

We love how easy this sprayer is to use and how well it covers.
Not to mention it takes about 15 minutes to paint what would be 3 hours of painting with a brush and roller!
My favorite part is seeing the dark wood turn bright white as we spray… the transformation is almost instant.

Since this project is in such a tight space, be sure to wear a paint suit or clothes you don’t mind getting covered in paint.
And don’t forget to wear a mask as well!

After the paint has dried for 24 hours, carefully go around and remove all the tape and plastic.
Be very careful when pulling the tape away, as sometimes it can get a bit of paint build-up on it and it will pull the paint off the cabinet.
If you notice that starting to happen, use a razor blade to cut the edge between the cabinet and tape before pulling the tape off.
RELATED: 34 SPRAY PAINT CRAFTS AND PROJECTS FOR THE HOME
STEP 6: Prime and paint the doors and drawer fronts.
If you plan to paint your doors outside, set up some tables with drop cloths on top and then use painter’s tripods to prop up and lay out all of your doors and drawer fronts face-down.

If you’re wanting to paint the doors inside a shop or garage, consider setting up a spray tent with a drop cloth on the ground and then placing the doors with their tripods on the floor.

This process is the same for both painting and priming, so use these basic steps to apply one coat of primer and two coats of paint, allowing them to dry for at least 3-4 hours in between.
Begin by priming the back face of your doors and drawers with your sprayer.
Again, we used the smaller attachment on our Wagner FLEXiO 5000 for this part of the project since the doors are smaller and more detailed.
I love that the FLEXiO 5000 has two different sized nozzles to use depending on the size of your project!

After the back is completely painted, carefully grab the sides of each door or drawer front and flip each of them over on top of their tripods.
Then, spray the fronts.

Be sure to go around your table and paint them with an even coat from every angle – that’s what gets them covered best.
The amazing thing about spraying the cabinet doors is that it’s pretty quick and there aren’t any brush marks or streaks to worry about.
You’re able to get a perfect finish for a lovely kitchen!
STEP 7: Rehang your doors and drawer fronts.
After you’ve let all your paint dry for 24 hours, you’re ready to reassemble!
Use your numbers to remind you which door/drawer front goes where and hang each door and drawer front using your drill or screwdriver.
If you’re planning to replace hardware, now would be the time to do so.
And that’s it! You should now have a lovely painted RV kitchen!
I still can’t believe how stunning my friends’ RV turned out…

As you’ve seen, updating RV kitchen cabinets with paint isn’t hard, but it is time consuming, so be prepared to put a bit of elbow grease into the project.
But it’s SO WORTH IT!!
I mean, look at this before/after…

Dreamy, right?! 😉
RELATED: 13 DIY COUNTERTOP IDEAS FOR CHEAP!
I hope this tutorial has been helpful in showing you the how to paint RV cabinets!
Feel free to ask me any questions you may have in the comments.
As promised, here are the printable instructions:
How to Paint RV Cabinets

Transform your RV cabinets from outdated oak to modern paint with this easy-to-follow painting process!
- Painter’s Tape
- Wagner Flexio 5000 Paint Sprayer
- Painter's Tripods
Instructions
- Use a screwdriver or drill to remove all doors and drawer fronts (being sure to number them using painter's tape for re-installation.)
- Wipe down all the cabinets, doors and drawer fronts with liquid sandpaper.
- Clean all the cabinets, doors and drawer fronts with a pre-paint cleaner.
- Mask all the edges and interiors of the cabinet frames using painter's tape and plastic drop cloths.
- Use your Flexio 5000 paint sprayer to apply one coat of primer and two coats of paint to your cabinets frames.
- Carefully remove all the masking after the final coat of paint has dried for 24 hours.
- Lay out your doors and drawers on tripods and use your FLEXiO 5000 paint sprayer to spray the backs with primer.
- Gently turn them over on their tripods, spray the fronts with primer and let them dry for 3-4 hours.
- Turn them back over and repeat this process for two coats of paint.
- Rehang the doors and drawer fronts and you're done!
To avoid seeing the wood grain under the paint, paint with a wood grain filler before applying the cabinet paint.
Happy painting!

DON’T FORGET TO FOLLOW ALONG!
INSTAGRAM | PINTEREST | FACEBOOK

17 thoughts on “How to Paint RV Cabinets the Easy Way”
Because it isn’t oil-based, and only oil-infused, it does not have the typical strong odor. Our friends were able to sleep in there the night after we painted, no problem. I do believe they left the windows open for ventilation, but you’d want to do that no matter what. Hope this helps!
Thanks for the excellent tutorial! I was wondering – with the oil infused primer, wasn’t there a strong odor afterwards? I am wondering if it’s possible to sleep in the rig right after painting…
We love to use Kilz Primer – it works great!
We left them as-is! You could spray them as well, but our friends didn’t want to take everything out to do that. If it was a renovation on an RV people weren’t using yet, I probably would have painted the inside as well. 🙂
What did you do about the inside of the cabinets?
What type of primer do you suggest?
I agree they’re more durable, but they are also much harder to work with as a DIY’er. I was giving the easiest route for someone trying it on their own. 🙂
Thank you!! Wish I could help everyone. 😉
Will you be my friend and paint my RV?! 😃 Looks amazing!
Oil-based paint is preferable for pop-up camper cabinets if you want a more durable finish. When completing trim work, oil-based paints are favored since they are more durable.
I blog frequently and I seriously want to thank you for the detailed information. This article has really piqued my interest. I’m going to take a note of your site and keep checking for new information about once per week.
Hi Chelsea! There was really only one kind of liquid sandpaper available at my local Home Depot, so I just went with it. Here’s the one. And I used this TSP cleaner because it’s one of the best!
Hey there! Do you have a preferred liquid sandpaper and pre-paint cleaner brand?
I don’t have one too close up, but I can tell you the paint finish was as smooth as you can expect from painting over oak cabinets without a grain filler. The grain was still visible underneath the paint from a texture standpoint, but my friends liked the look so we went with it! 🙂
Hey! Do you have a close up photo of the paint finish and how smooth it is? Thank you!
Great idea! We’ll have to put those tutorials together too!
Excellent tutorial! What a difference!! Will you have a post about the back splash and counter too? Or some close-up pictures of how they came out?? I’m very interested!
Leave a Comment
- How to Paint RV Cabinets the Right Way: Easy DIY Guide
It’s become quite popular recently for people to renovate their RVs. One of the most common things people want to learn to do is how to paint RV cabinets and walls.
This is a great way to refresh any space instantly and fairly easy. Today I want to share with you a step-by-step guide on how to paint your RV cabinets!
The most recent project in our 5th wheel was painting our kitchen island, which I will likely be referring to most often in this post. However, the things I’m sharing with you apply to any cabinet painting projects in your RV.
Update: In 2023, we repainted the lower RV kitchen cabinets and the island a light green and painted the kitchen cabinets a light grey. We also replaced the slide trim in our RV .
You can find all the details of our RV kitchen renovation in our detailed blog post next.
Ok, let’s get right into how to paint RV cabinets!
This post may contain affiliate links. As an Amazon Associate, I earn from qualifying purchases. I may receive a small commission when you make a purchase using my link. Thank you for your support!

Table of Contents
How to do the Proper Prep Work for Painting RV Cabinets
Prepping is perhaps one of the most important parts of any RV painting project. If you don’t prep things correctly, you might end up with problems like paint peeling or even a bigger mess.
We like to do a few things to prep for our projects before we ever crack open a can of paint. These steps are all necessary whether you have real wood or fake wood cabinets in your RV.
Remove any hardware, drawers, and doors
The first thing you need to do is grab a drill and remove everything from the cabinet base. This includes hardware like handles, drawer stops, and cabinet doors or drawers. You’ll also need to remove any outlets or other accessories where you’ll be painting.
You can either keep the hardware original, paint it, or replace it. We chose to use spray paint and paint ours black.
All of the following steps will need to be done on any drawer fronts and cabinet doors as well. I like to take them outdoors and paint them there to help with fumes as well as spread out my workspace.
Repair and sand all surfaces thoroughly
If there are any chips or unwanted holes in the real wood of your cabinets, you can use a wood filler to repair them. Make sure to let them properly dry according to the directions on the filler you’re using.
Sanding is a super important step! Trust me, it’s not a fun one and makes a huge mess, but it’s definitely worth it!

We tested out skipping sanding on some of the cabinets during our bathroom renovation and found that the paint doesn’t stick as well.
Sanding allows the paint to grab hold better and lets the paint stick. This means it is less likely to peel off.
We (and by we, I mean Tucker haha) sanded the island really well and have had zero issues with paint peeling even though it’s been over a year since then.
I know you wish I weren’t telling you this, haha! But trust me, don’t skip sanding.
Clean up from the sanding
After you’re done sanding, make sure to clean everything up really well. Personally, I used a microfiber cloth with just water and it got everything up.
You don’t want any dirt or sawdust being left behind as it can get into your paint job and mess up the texture/finish.
Another thing I’ve started doing is having two cleaning buckets. One with water and a dash of vinegar, and one with just plain water.
I start by wiping everything down with a rag dipped in the vinegar water, and then I follow up one more time with a rag and the plain water.
I’ve noticed that doing this system can make a huge difference!
Tape everything off
Next up, grab your painter’s tape! I like to use this 1/2-inch painter’s tape , but you can use whatever you’d like.
Very carefully place the tape around any surfaces that need to be protected.
I usually put it on the floors, any walls I’m not painting, around light fixtures, and electrical outlets.

Some people choose not to tape anything, but I am far too messy of a painter and need the extra protection!
If you’re excellent at cutting and not making messes, go for it! I am not, haha!
You can also lay down drip clothes or newspapers to protect the floor and any furniture that may be nearby.
Pro tip: Puppy pads actually make a great mobile drip cloth. When I painted our RV island, I used a puppy pad to set my paint can on and scooted it around the island as I painted.
It caught several drips and was super easy to clean up and throw away when I was done!
Prime the cabinets before you paint
Now that your prep work is complete, you’re ready to prime your RV cabinets.
By the way, these are the same steps you would take if you were going to put wallpaper in your RV .
The best primer for RV cabinets
One of the most common questions I am asked is what primer I like to use. I use Kilz oil-based primer for all of my RV painting projects.
It works really well, and it also dries quickly. I recommend using an oil-based primer instead of a water-based one.

You can get it at most hardware stores and I believe even most Walmarts carry it in-store.
I like to keep a gallon on hand when working on projects, although it stretches pretty far. I also use the same primer for our camper walls.
Make sure that you are in a well-ventilated area when using it. If there are windows nearby, open them to let the fumes escape.
This primer is very strong and has a strong odor. It usually makes my eyes water/burn, so use protective glasses if needed.
I only apply one coat of primer. As I mentioned earlier, it dries very quickly. It’s usually dry to the touch in about 30 mins and I’m able to paint shortly after that. Use your own discretion according to what the can of primer says.
Painting your RV cabinets
Finally! You’ve prepped and primed, and you’re ready to paint! I like using a paintbrush for primer and paint, but you can also use foam rollers if you’re more comfortable with that.
Some people even choose to use a paint sprayer which saves time and eliminates brush strokes.
I always do 2-3 coats of paint depending on the color. Darker paint colors tend to need a third coat.
You can always go over it and touch up a few spots without applying an entire third coat of paint as well if needed. I recommend you paint over all surfaces at least two times.

The best paint for RV cabinets
What type of paint you use is really a personal preference. I know many RVers have used chalk paint on their camper cabinets, but I don’t have any personal experience with that. There are a lot of possible paint types you can use and a lot to learn about paint types.
I like to use EasyCare Ultra Premium Satin Interior paint from the local hardware store. It is an acrylic latex paint that is easy to clean.
Do your research and decide what paint is going to be best for you and your needs.

Don’t forget to also do these same steps for your cabinet doors and pull-out drawer fronts.
Finishing up
Yay! Now you know how to paint RV cabinets and all that’s left is a few finishing steps.
Cleaning up is the easy part. Pull any tape off and throw it away, clean up any accidental splatters of paint on unwanted surfaces, and reinstall the hardware and drawers/doors after everything is properly dried.
If you choose to follow up with a clear coat of sealer, you can, but we don’t find that it is necessary to add a top coat with the type of paint that we use.
How to paint RV walls
The steps for how to paint RV cabinets and walls are very similar. The only main difference when painting RV walls is that you do not want to sand them.
You will still need to clean them very thoroughly, but skip the sanding and go straight to the primer. If you sand your RV walls, they will lose their texture and the paint will have a harder time adhering to the walls.
What kind of paint do you use on RV cabinets?
The best paint to use on RV cabinets is satin interior paint. Whatever paint you choose to use, just make sure you prep and prime it in advance. Other popular choices are oil-based paint and chalk paint.
How do you get paint to stick to RV cabinets?
The best way to get paint to stick to RV cabinets is by using 220 grit sandpaper to rough up the surface before you paint. This gives the paint something to grip and decreases the chance of the paint peeling from your RV cabinets.
Is it worth painting RV cabinets?
Painting RV cabinets is hard work, but the end result is SO worth it! Painting your RV cabinets can allow you to make your RV more homey and personalized to your style and preferences. It’s amazing what a new coat of paint can do.
Can you paint RV cabinets without sanding?
Yes, you can paint RV cabinets without sanding. However, I don’t advise that you do so. Skipping the sanding step of painting RV cabinets can result in the paint not adhering well and peeling off. It’s worth the extra time to sand first.
How long does it take to paint RV cabinets?
It takes 4-8 hours to paint RV cabinets, depending on how many you are doing. If you only paint an island or a small cabinet, you could be done in 3-4 hours. If you are painting a large amount of cabinets or walls, it could take up to 2 days.
In Closing: How to Paint RV Cabinets
I hope that this post about how to paint camper cabinets has been helpful and that painting the cabinets in your RV is not a daunting thought anymore.
RV renovations can take a long time, but the end result is totally worth it!
I really love how our cabinets have turned out so far, and I’m excited to finish up our projects!
Find More RV Renovation Inspiration & Tips:
- 21 Stunning RV Renovations & How They’re Decorated
- 21 Gorgeous RV Bedroom Makeovers
- 21 Beautiful RV Kitchen Renovations
- 21 Colorful RV Renovations
- 21+ Cozy RV Bunk Room Ideas For Renovating & Decorating an RV
- Our 5th Wheel RV Kitchen Remodel: Lessons Learned and Tips
- How to Replace RV Slide Trim: Easy Step-by-Step Guide
- 26 RV Bathroom Renovations and Remodel Ideas for 2023
Find More RV Renovation Guides & Tips:

How to Paint RV Cabinets
Total Time: 1 day
Do the prep work
Remove any hardware, drawers, and doors from your RV cabinets. Repair any necessary surfaces and then sand everything thoroughly. Clean from the sanding and tape everything off.
Prime your RV cabinets
After prepping, apply a coat of Kilz oil-based primer to your RV cabinets. Allow plenty of dry time for the primer to fully cure before adding the cabinet paint.
Paint your RV cabinets
After the primer has dried, apply 2-3 coats of paint to your RV cabinets. Allow time for the paint to dry in between coats.
Finishing touches
Retouch any necessary places with paint, remove all tape, and rehang any hardware, drawers, and doors on your RV cabinets.

About the Author
14 thoughts on “how to paint rv cabinets the right way: easy diy guide”.
We just replaced our bathroom cabinet and now I want to paint all the things 🤣 thanks for this! Will definitely be referring back to it ☺️
Haha! Have fun with your projects!
Great information! We used chalk paint for our cabinets which does not require primer, but it is harder to keep clean.
I haven’t personally used chalk paint but what I’ve seen others do with it is gorgeous!
This is a great walkthrough of the process! Thank You!!
You’re so welcome!
Great tips! Now if I could only bottle your energy…
Very helpful post, Janae! And I love that you included a video 🙂 I foresee cabinet painting in my future and appreciate the tips and tricks!
Yay! So glad you found it helpful!
This was really helpful! I needed all of this when we painted our RV!
Your renovations turned out beautifully Jen!
Janae this is SO WONDERFUL!! Seriously I have been so nervous to do anything with our rv and this makes me feel like I at least have a heads up on it all!! And I always have you to turn too!🙌🏼❤️ I can’t wait to share!
I can’t wait to see what you do! 😍
Leave a Comment Cancel reply
You must be logged in to post a comment.
Privacy Overview
- Find a Location
How To Paint RV Cabinets

Before any painting begins, remove all cabinet doors, drawers, and hardware such as hinges. These items are easier to paint properly when not in and/or attached to your cabinets and will make the painting of the actual cabinets a lot easier.
Consider relocating doors and cabinets to a large space such as a garage where you’ll be able to set up your painting workshop and knock that part of the job. Ideally, you’ll have space where all cabinets and drawers can be laid out and worked on simultaneously but if not, work in batches or one at a time.
Make sure you have a flat place to keep cabinets doors while you are working on them. Painter’s triangles on a garage floor or multiple sawhorses are an idea. Also, make sure you label any pieces that come off your cabinets. This includes all doors and hardware. This will make life much easier when the job is done!
Preparation
Proper preparation before you starting painting is key to a job well done. First, you’ll want to make make sure all cabinets, doors, and drawers are clean.
Using something like Thetford is a great way to remove dirt and grease. The next step in preparing your cabinets for paint is sanding. A thorough sanding will remove any old gloss, giving your new paint and primer something to stick to. An electric sander will get the job done quickly.
The last step in preparing your RV cabinets for paint is primer. You may think a good sanding will allow you to skip priming, but again, proper preparation is the best way to get the results you are looking for!

It’s finally time to paint. To avoid brush strokes, use a roller when possible on the doors, drawers, and cabinet frames. If you have access to a paint spray gun, even better!
A small brush might be needed for any molding on cabinet doors our around the frames. Avoid using too much paint as that can cause drips. After the first coat is done, wait, then follow the manufacturer’s directions on the paint can.
Generally, at least two coasts with a sanding in between will be needed. No matter what, don’t rush the process. Let the paint sit for more than enough time between coats.
Finishing Up
Once your final coat has had time cure, you can start putting your masterpiece back together again. Curing usually takes several days, so again, don’t rush the process!
Once you are sure all paint is hard, reapply hardware and consider using felt pads on cabinet doors to avoid banging and chipping paint. Now take a moment to step back, take it all in, and touch up any places that need some extra attention.
While the process of painting your RV cabinets may seem tedious and complicated, the end result is well worth the time and work you put in. While you’re at it, pick up some new hardware to make your RV cabinets, even more, your own, unique style.
Camping World’s Design Center

Speaking of unique style, Camping World Design Centers offer the products, resources, and installations you need to plan and execute your ideal interior design projects with the latest products from exclusive brands. With the help of a Design Specialist, you’re able to transform the interior of your RV into the RV of your dreams. From painting cabinets to walls and replacing furniture and lights, the Design Center can help you turn your design vision into reality!
You will feel so happy and proud every time you step foot in your fifth wheel or Happier Camper and see how your hard work completely changed the look and feel of your space.
Do you have anything you think should be added? Leave a comment below!

- Comment (2)

We used BEYOND PAINT to paint cabinets in an outdated RV. The coverage was good and overall I am happy with the results. For us, it did not go as far as other reviews stated. One quart did about 6 cabinet fronts and 4 drawers. Not sure I would buy again due to the price. We painted the remainder of the cabinets with paint and primer in one and they came out just as well.

I am not sure if the cabinets in my Rv are all wood and have no idea how to determine. Just wondering if the process would be the same if the cabinets are Not all wood or covered in a thin vinyl finish.
Leave Your Comment Cancel Reply
Save my name, email, and website in this browser for the next time I comment.
Shop By RV Type

Your Adventure Awaits
Copyright © 2023 cwi, llc all rights reserved.
- RV Glossary |
- Privacy Policy |
- California Privacy Rights |
- Do Not Sell or Share My Personal Information |
- Targeted Advertising Opt Out |
- Terms of Use
Travels with Ted
Painting RV Cabinets the Easy Way (No Primer Needed)

This post may contain affiliate links. See our affiliate disclaimer here.
Painting the cabinets in your camper is an easy way to brighten up the standard dark interior. Most RV remodelers recommend sanding the cabinets and applying multiple coats of primer, but there is an easier method. But I didn’t want to do all of that work!
In this article, I detail the process of painting RV cabinets with chalk paint, which does not require any sanding or priming. Keep reading to learn how to paint RV cabinets the easy way!

For more RV renovation tips, see our favorite easy RV remodel projects and our affordable RV bedroom makeover . Also check out a full description of our DIY RV kitchen remodel .
- 1.1 Where to Buy Chalk Paint
- 1.2 Downsides of Chalk Paint
- 2.1 Step 1: Remove Cabinet Doors and Drawers
- 2.2 Step 2: Clean the Cabinets and Doors
- 2.3 Step 3: Tape Cabinet Edges
- 2.4 Step 4: Paint the Cabinets
- 2.5 Step 5: Remove Tape
- 2.6 Step 6: Apply Topcoat
- 2.7 Step 7: Rehang Doors
- 3.1 Step 1: Remove Cabinet Doors and Drawers
- 3.2 Step 2: Sand Cabinets
- 3.3 Step 3: Clean the Cabinets
- 3.4 Step 4: Tape Cabinet Edges
- 3.5 Step 5: Prime the Cabinets
- 3.6 Step 6: Paint the Cabinets
- 3.7 Step 7: Remove Tape
- 3.8 Step 7: Rehang Doors
- 4.1 Tip 1: Test the Color
- 4.2 Tip 2: Scratch Test
- 4.3 Tip 3: Don’t Forget the Backside
- 4.4 Tip 4: Buy Multiple Brushes
- 4.5 Tip 5: Pay Attention to Cure Time
Chalk Paint for RV Cabinets
Chalk paint (also known as chalky paint or chalked paint) is a type of paint designed to be used on furniture made of wood or metal and other hard to paint surfaces. Since most RV cabinets are made from wood or wood-based materials, chalk paint is a great option.
Since chalk paint is thicker and has better adhesion than regular paint, sanding and priming are not required before painting. We used three coats of chalk paint on our RV cabinets and it went on easily and has held up great.

Where to Buy Chalk Paint
Chalk or chalky paint can be purchased at home improvement stores. We used Krylon Chalky Paint , which is available at Lowe’s Home Improvement and can be tinted in a variety of colors.
We used the white chalky paint on our upper cabinets, and tinted the paint blue for our upper cabinets. Our blue tint selection is called Deep Space. Click here to see the full list of Krylon’s Chalky Paint tint colors.
Downsides of Chalk Paint
While I think painting RV cabinets with chalk paint is the best method, there are some downsides to consider. The first con to chalk paint is the price. Chalk paint cost more than other typical interior paints.
However, these extra costs are most likely offset by the savings from not purchasing primer or sanding tools.
The second downside of chalk paint is the need to apply a topcoat (usually wax) after painting. The required topcoat creates some additional work, and needs to be re-applied every few years.
However, the wax also makes the paint extremely durable with a finish that is resistant to scuffs.
How to Paint RV Cabinets with Chalk Paint
Below is a step-by-step guide to painting RV cabinets with chalk paint. Follow these steps precisely for a beautiful final result.

Step 1: Remove Cabinet Doors and Drawers
Remove the doors from all cabinets that will be painted. Also remove the hinges and hardware. As you are removing the doors, label each cabinet set (door, hinge and cabinet) with a corresponding number.
While some cabinets in your RV are the same size, they may not have been drilled in place the exact same way. Labeling cabinets and doors will prevent you from having to drill new holes. Also, pull all of the drawers out and label each drawer and its corresponding hole.
Step 2: Clean the Cabinets and Doors
Although sanding and priming are optional when painting RV cabinets with chalk paint, cleaning is not. Thoroughly clean all cabinets to ensure no stains or debris remain.
Step 3: Tape Cabinet Edges
Use painter’s tape to tape the edges of each cabinet and the interior edges of cabinet doors with glass.
Step 4: Paint the Cabinets
Apply the first coat of chalk paint using a brush or roller. Keep in mind that chalk paint is thick, so be careful not to put too much paint on the brush.
Wait for the paint to dry (about 20 to 30 minutes). Then, paint a second coat on the cabinets. Allow paint to dry and add additional coats if needed.
Step 5: Remove Tape
Once the paint is dry. Remove the painter’s tape.
Step 6: Apply Topcoat
There are two topcoat options for chalk painted cabinets. The first option is finishing wax . Wax enhances and deepens the paint color and gives the cabinets a nice matte sheen. Simply use a wax brush to apply a thin coat of wax on all painted surfaces.
The second top coat option is a polycrylic . Polycrylic topcoats can be purchased with matte or glossy finishes. It is an ideal top finishing coat for surfaces that will get wet.
Apply to cabinets with either a bristle or foam brush, roller or spray. We recommend applying a thin layer, letting it dry and applying a second layer for added protection.
Step 7: Rehang Doors
After allowing the paint to fully dry, re-install the hardware, put the drawers back in place and hang the cabinet doors back up. Then, sit back and enjoy your work.
How to Paint RV Cabinets with Regular Paint
If you do not wish to use chalk paint. Follow the below steps for painting your RV cabinets with standard cabinet paint, such as latex paint.

Step 2: Sand Cabinets
Sanding the cabinets ensures that the paint will properly adhere to your RV cabinets. Use a 180-grit sandpaper and sand all cabinet surfaces that will be painted. An electric palm sander will significantly speed up the the process.
Step 3: Clean the Cabinets
Once you are done sanding you need to clean all the dust off of your cabinets. Slightly dampen a clean, soft cloth and wipe down all of your cabinets and drawers. If cabinets need to be degreased, clean them with TSP . Allow cabinets to dry before proceeding.
Step 4: Tape Cabinet Edges
Step 5: prime the cabinets.
When painting RV cabinets, select a bonding primer or gripper primer with strong adhesion power. Brush or roll a coat of primer on all of the cabinets. Allow the primer to dry as long as directed on the can. Apply a second coat of primer.
Step 6: Paint the Cabinets
Select a semi-gloss paint with a high sheen, which holds up best in high traffic areas like kitchens. Apply at least two coats of paint to your RV cabinets. Refer to the paint for instructions on how much time to allow between coats.
After two coats have fully dried, look over the cabinets and apply an additional coat if needed.
Step 7: Remove Tape
Tips for painting rv cabinets.
The following tips for painting RV cabinets will ensure an awesome finished result.

Tip 1: Test the Color
After cleaning and/or sanding the cabinets, paint a small patch of cabinet with your desired color. Painting a test patch on your RV cabinets will prevent you from moving forward with a color you do not really love.
Not sure what color to start with? Check out these 10 chic RV remodel color schemes .
Tip 2: Scratch Test
Also use the test patch to perform a quick scratch test. After the first coat of paint or primer has completely dried, run your fingernail down the surface using medium pressure. If you can scratch any paint off, you need to better prepare your surface or use a different paint or primer.
Tip 3: Don’t Forget the Backside
For a fully finished look when painting RV cabinets, paint the inside and outside of cabinet doors. Paint one side on all the cabinets first, then allow them to dry while you paint the cabinet bases. Once dry, flip the doors over and paint the other side.
Tip 4: Buy Multiple Brushes
With all the small nooks and corners in an RV, you will need a variety of brush sizes to reach every cabinet surface. Have some small detail brushes on hand as well as large brushes or rollers for bigger areas.
Tip 5: Pay Attention to Cure Time
While most paint dries to the touch within a few hours, it does not fully cure for several days. Before painting RV cabinets, check the paint’s cure time. Try to remain stationary and avoid slamming doors until the paint is fully cured.
If painting RV cabinets sounds like more work than it is worth, consider purchasing an RV with pre-painted cabinets. These 9 RVs come straight from the factory with white cabinets and other modern interior design features.
While you are painting your cabinets, also select RV cabinet latches to secure them on travel days.
Do plan to paint your RV cabinets and drawers? If so, do you plan to use chalk paint? Share your plans with us in the comments section below.

Christina Pate is a seasoned full-time RVer who, along with her husband Justin, has journeyed across the US, Canada, and Mexico. Drawing from her extensive travels, RV repairs and RV renovations, she founded Travels with Ted to guide and inspire fellow RV enthusiasts. Christina is also the co-author of The Owner’s Guide to RV Maintenance and the creator of My RV Log Book .
1 thought on “Painting RV Cabinets the Easy Way (No Primer Needed)”
I’ve never remodeled my home before, so I really don’t know where to start. Luckily, I found the best paint for my RV cabinet. It’s a paint kit from Nuvo. This paint is highly recommended as it’s a safe, easy, and cheap solution when you just need to add some color to your interior.
Comments are closed.

How to Paint RV Cabinets
Skill level.
One way to completely transform the interior of your RV is by painting your cabinetry. Check out this step-by-step guide on how to paint your RV cabinets.
What is the Best RV Paint?
If you’ve decided to paint your RV cabinets, unfortunately, you can’t just slap whatever paint you have laying around on your cabinets and hope for the best. When it comes to RV paint, there are 3 different types:
- Latex paints
- Oil-based paints
- Water-based paints
Latex Paint
Latex paint tends to be the most affordable option and is also user-friendly. Once dry, it’s very easy to clean up.
That being said, latex paint can require a lot of prep work and a clear top coat to ensure it stands up to daily use.
Oil-based Paint
Oil-based paints are a popular choice for RV renovations because it’s very durable. This type of paint is also easy to clean (perfect for RVs) and tends to have minimal brush strokes.
However, oil-based paints have a strong odor. This can make painting in a small space (like an RV interior) a challenge. You’ll want to wear a mask and have proper ventilation.
Water-based Paint
The third RV interior paint option is a water-based paint. This type is ideal for RVs because it requires very little prep work. (For anyone thinking that there will be a paint that requires no prep work, think again – they all do).
The downside of water-based paint is that it can be more expensive than oil-based.
RV Cabinet Paint Recommendations
These are the paints that are recommended for painting RV cabinetry and referenced in this guide:
- Behr Cabinet & Trim Enamel
- Benjamin Moore Advance
- Sherwin Williams Emerald
- Behr Ultra Scuff Defense (This is a flat finish and I’ve had great results with durability)
Whether you’re completely remodeling your RV to live in, or just need to freshen up your RV rental, painting your cabinets is a great way to update your RV’s interior.
Let’s jump into how to paint your cabinets!
Shopping List
- 220 Grit Sand Paper
- Dap Extreme Stretch Caulk
- BIN Shellac Primer
- Flood Floetrol (optional if using a spray)
- Cabinet Bumpers
- Poly (optional)
- Foam Roller
- Paint Brush
- Graco Paint Sprayer (optional)
Instructions on how to paint your RV cabinets
Remove the hardware.
Remove all the doors and hardware from your RV cabinets.
It’s easier to clean, sand, and paint without having to cut around the hardware. If you choose to replace your cabinetry hardware, this is the time to do it!
Check out these stylish matte black drawer pulls .
Use a good degreaser and wipe down all the RV cabinets.
You want to remove any oily residue to ensure proper paint adhesion.
Sand the cabinets
Use 220 grit sandpaper and sand all parts of the RV cabinets and doors.
This step is very important and should never be skipped. Sanding allows the primer and paint to adhere properly and will prevent any chips in the future.
If your RV cabinets are laminated and not solid wood, be careful not to take off the veneer. Older RVs may have solid wood cabinets and doors.

Caulk any gaps
Use a little caulk to fill the space if you have any small gaps on the front of the RV door panels. Wipe any excess off.
Important: Be sure you use a DAP extreme stretch caulk when painting RV cabinet doors. Since RVs are susceptible to frequent temperature changes, you don’t want your caulk to crack!

Now that you’ve cleaned and sanded the cabinetry, it’s time to prime the surface. Use a good primer like BIN Shellac Primer . Shellac primer has the best adhesion and prevents the oils from the wood coming through your paint.
Do one coat of primer on all parts of the cabinets. Wait 24-48 hours, then lightly sand and wipe down all the surfaces with a damp cloth or tack cloth to remove any debris before applying your first coat of paint.
Plan your RV renovation accordingly – you need to wait 24-48 hours before applying your first coat of paint.
Important : Do not skip priming! This step is important so that your paint doesn’t flake or scratch off in time.
After waiting at least 24 hours after priming, it’s time to paint your RV cabinets.
Let your first coat of paint dry for about 24-48 hours, then apply a second coat in the same manner. Again, wait 24-48 hours, and once the second coat is dry, be sure to lightly sand and wipe down between the coats.
Tips for getting the best finish when painting RV walls:
- Get good quality paint. At least an eggshell or satin finish is recommended.
- Use a brush to get in the corners of the cabinet doors and use a foam roller to smooth the finish and remove brush strokes. You could also use a paint spray for a flawless finish. I recommend the Graco Magnum paint sprayer .
- To hide any brush strokes, roller marks, or even to get a spray finish smooth as glass, it’s highly recommended to use Flood Floetrol . Mix 8oz in 1 gallon of paint.
RV cabinet paint recommendations:
- Behr Ultra Scuff Defense (This is a flat finish and I’ve had great results with durability)

Seal with a poly coat
This step is optional, but it will seal your cabinets to prevent chipping. Use a matte water based polyurethane to seal the paint and prevent a long-lasting finish.
Replace the hardware
Put hardware and doors back on.
Be sure to use bumpers on the corners of the doors and drawers, so the paint doesn’t stick together.
Be careful with the freshly painted cabinets for about 2 weeks. They take awhile to fully cure and have a durable finish.
More RV Renovation Ideas
After painting your RV cabinets, you may be on a roll with your RV renovations. Luckily, Happy Glamper Co is an expert in all things DIY RV renovation and has tons of guides to help with your next project.
Upgrade your RV window treatments with DIY curtains .
Do the interior walls need an update or refresh? Check out this complete guide for painting RV walls.
Love the look of shiplap but not the price tag? Try this $1 Sharpie Shiplap for a timeless look.
Make the exterior look as good as the inside. Check out this guide for painting your RV’s exterior walls .
Read this next

How to Build an RV Trash Can Cabinet

The Importance of RV Slide Awnings and How to Install

How to Paint Interior RV Walls

How to Install RV Flooring

How to Do Sharpie Shiplap

How to Repair Water Damage on RV Slide Floors

How to Winterize Your RV

How to Install a RV Keyless Door Lock
Find inspiration from our rv renovations.
Check out all the RV renovations that are in progress, or we have completed so far. You can find links to all the products used, paint colors, and other helpful resources.
Find products we've used in our RV renovations
Shop all the products we use in our renovations and other recommended products that work well for RVs.
- Books & Merch
- Gear We Use
- National & State Parks
- Best RV Campgrounds in New Hampshire
- Best RV Campgrounds in NC Mountains
- Best Florida Beach RV Campgrounds
- South Dakota
- The Great Lakes
- Campers Swear By This Portable Device That Keeps Dogs Safe -The Best Portable Dog Fence for Camping (2024)
- Mosquitos and bugs
- Camping Clothes
- Camping Gifts
- Camping Internet
- 5 Best RV Backup Cameras for RV & Trailer
- 7 Best Screen Tents for Camping (2024)
- Best RV Campgrounds in California
- 5 Best Key West RV Parks
- 9 Best RV Campgrounds in New Jersey
- Camping Reservations
- Campground Comparisons
- Cheap or FREE RV Camping Sites
- Best RV Campground Memberships & Clubs
- Boondocking 101
- Boondocking Adventures
- RV Internet
- What Do Flamingos and Upside Down Pineapples Mean?
- Where to Find FREE or Cheap RV Sites Camping
- RV Winter Camping
- RV Show List for 2024
- 17 Best Camper Vans 2024 (New Class B RVs Available!)
The Best Paint for RV Cabinets & Tips
Here are some tips and the best paint for rv cabinets..
- 1 Here are some tips and the best paint for RV cabinets.
- 2.1 Latex Paints
- 2.2 Oil-Based Paints
- 2.3 Water-Based Paints
- 3 Best RV Paint Manufacturers
- 4 How to Paint RV Cabinets
- 5.1 1. BEYOND PAINT All-in-One Refinishing Paint
- 5.2 2. Nuvo Cabinet Paint
- 5.3 3. KILZ Adhesion High-Bonding Latex Primer
- 6 If you enjoy looking at how other RVers are doing their DIY and painting projects – come on over to the Facebook RV Lifestyle Group and see what's posted.
- 7 Once you get your RV ready – look into our collection of travel guides to help you explore this great country.
Do you have an older, outdated RV? Or just one in need of a modern refresh or a new look?
The good news, it is not that hard or expensive to do! One great place to start is with the cabinets. Painting your RV's cabinets makes a huge difference and is one of those RV renovations that is DIY-friendly!
3 Types of RV Paint
In life, you get what you pay for. While you will not need to buy top-shelf paint, you do not want to skimp on the paint either. Set a sensible budget for yourself to give your RV a fresh makeover.
Before you start your paint project, you will want to know a little more about RV paint before making your purchase. Here are the main types of RV paint to choose from.
Latex Paints
Latex paint tends to be the most affordable. In addition, it is very easy to clean once it is dry!
However, it can require a great deal of prep work, as well as a good top coat to make it durable. Furthermore, latex paint can peel. If you spend a good deal of time in your RV, it may not be your best choice.
Oil-Based Paints
Oil-based paint is a very popular choice among RV owners because of its durability. It is also easy to clean and tends not to leave brush strokes during the painting process. Overall, it requires fewer coats than latex paint usually does.
This paint does have a strong odor. When using it, you will want to be sure to use a mask. You will also want to open the doors and windows in the RV.
Water-Based Paints
Water-based paint is ideal for RVs. That is because it requires very little prep work to be used.
One downside is that it is more expensive than oil-based paint, and does not last quite as long.
Best RV Paint Manufacturer s

There are a few very good RV paint manufacturers. I was fortunate enough to recently interview Dave and Jo Driscoll . They just completed a DIY RV Remodel of their 18-year-old motor home. They gave their RV a fresh facelift, and it feels like a whole new RV.
I think the top two brands are BEYOND PAINT and Nuvo. Dave and Jo Driscoll used BEYOND PAINT and are very happy with the results.
KILZ, INSL-X, Rust-O-Leum, Amitha Verma, and Retique It are other very solid brands.
How to Paint RV Cabinets

In general, these are the steps that you will be taking when you paint your cabinets.
Step 1: The first thing you want to do is prepare the cabinet surface. It is a good idea to remove parts and paint them outdoors. Paint odor inside the RV interior can be very strong.
Step 2: Apply a coat of primer to achieve the best results. Coat the cabinets with or two coats of primer depending on how damaged your cabinets are. It is always the best way to ensure good adhesion of the paint.
This also helps immensely to achieve a bold color if you are going with white cabinets.
Step 3: Paint the cabinets. You may need several coats of paint. Be sure to mask off areas that you do not want painted, like wall edges and light fixtures, with painter's tape.
You may also want to follow up with a thin layer of clear coat of sealant to help keep them looking nice for a long time.
Best Paint for RV Cabinets & Primers
The following paints are the best paint for RV cabinets on the market.
If you buy something through our links, we may get a small commission at no extra cost to you. It helps keep our lights on so we can continue to provide helpful resources for RVers. Read our full affiliate disclosure here.
1. BEYOND PAINT All-in-One Refinishing Paint

If your camper cabinets need a new coat of paint, BEYOND PAINT is an excellent choice. It gives your RV a modern look, without having to put in a lot of work.
The paint has a thick consistency and is great for first-time painters. It can help hide flaws and make a huge difference on cabinets that are not in good condition.
This paint does such an excellent job of covering square footage, that you will only need to paint one or two coats. Some customers have said that it covered their cabinets well enough from the first coat!
2. Nuvo Cabinet Pain t

Not only does this interior paint provide good coverage, but it also does not have as strong an odor as other brands. That can make painting in a small space a little more enjoyable.
Another great selling point for this paint is that it does not require that much preparation. That means it is an excellent choice for those weekend warriors! People that do not have a lot of extra time for DIY projects will love their quick new paint job.
Many people that have used this product were surprised by how little paint they needed for excellent coverage. They also love the paint's durable finish, which is necessary for all of that bumping and moving.
3. KILZ Adhesion High-Bonding Latex Primer

When it comes to primer, you want to be sure to use a good one. It can be the difference between a paint job that lasts for a long time or one that peels.
The KILZ brand primer provides good bonding for tough to paint surfaces. This actual primer provides a great surface for the paint to adhere to. Especially on cabinets that may have peeling wood finishes, or other issues.

If you enjoy looking at how other RVers are doing their DIY and painting projects – come on over to the Facebook RV Lifestyle Group and see what's posted.
So which is the best paint for RV cabinets? Do you have your favorite brand of paint for an RV? Post it below or bring it to the Group! We love seeing your DIY projects.
Once you get your RV ready – look into our collection of travel guides to help you explore this great country.
Published on 2021-10-08
Mike Wendland is a multiple Emmy-award-winning Journalist, Podcaster, YouTuber, and Blogger, who has traveled with his wife, Jennifer, all over North America in an RV, sharing adventures and reviewing RV, Camping, Outdoor, Travel and Tech Gear for the past 12 years. They are leading industry experts in RV living and have written 18 travel books.
3 Responses to “The Best Paint for RV Cabinets & Tips”
May 24, 2022at10:05 pm , 17 Best Products to Clean Your RV Interior Walls said:
[…] the way, we wrote an article on the best paint for RV cabinets you might want to check […]
October 08, 2021at9:01 am , Doug said:
One tip re: primer – TINT IT to match final color if you are doing any color other than white. This will make it easier to get better color with fewer final coats, especially if doing a deep, rich color.
October 08, 2021at8:41 am , Karen said:
The first step in painting anything, especially something already painted, varnished or finished in other ways is sanding.
Leave a Reply Cancel reply
Your email address will not be published. Required fields are marked *
Related Posts
 7")
Want a Portable Theater?! (Best Projector for RV 2024)
 8")
RVers Face a Worsening Tick Menace (Tick Season 2023)
 9")
7 Best Camping Fans to Keep Cool (2024)
Get our new recipes and projects in your inbox! Join the Refresh Camping community

How to Paint RV Cabinets to Last (Easy DIY Guide)
Painting the cabinets in your RV or pop up camper is a quick and easy way to completely transform the look of your camper.
Although it’s very similar to painting kitchen cabinets in a home, there are a few things to keep in mind when painting RV cabinets for a beautiful, long-lasting finish.

I’ve painted my fair share of both kitchen and RV cabinets, and I’m here to share with you everything you need to know to about how select the best paint for RV cabinets, how to paint camper cabinets to last, as well as tricks for making the job easy but also look beautiful.
The best way to update your RV interior, especially in a used RV, is with a coat of fresh paint on your cabinets!
In this post you’ll find:
- How to Paint RV Cabinets – Step-by-Step Guide
Best Paint for RV Cabinets
- How to Paint RV Cabinets without Sanding
- How to Paint Over Silicone Caulk
This post contains affiliate links. Read my full disclosure policy here.
Cabinets, both in a home or in a travel trailer, are high use items. They will get hit and touched and, in the case of an RV, experience sometimes drastic temperature and humidity changes throughout the year.
Even though there are a lot of reasons that painted RV cabinets might not last, as long as you follow the steps and recommendations in this post, you’ll have beautifully painted cabinets with a finish that will last for a long time.
I painted the cabinets in my pop up camper and my hybrid camper using the steps in this tutorial and they have held up extremely well!
Before walking through the steps on how to paint camper cabinets, you’ll want to be sure to select the right type of paint for your project.
Alkyd enamel paint is the best kind of paint to use on the cabinets in your RV or pop-up camper. I’ve used a form of this paint on three different campers and the finish and durability is phenomenal. (More on this specific type of paint later in the post. Or, jump to that section now: Best Paint that Doesn’t Require a Topcoat )
Now, there are a couple of other options that still work well on camper cabinets. I will share these other options with you later in the post.
Keys Steps in Painting RV Cabinets
Using the following steps to paint your cabinets will ensure a durable, beautiful finish on your newly painted cabinets.
1. Remove cabinet doors and drawers
The first step is to remove the hinges by unscrewing the screws from the cabinet frames and the backs of the cabinet doors. Also, take out the drawers.
2. Properly clean cabinet frames and doors
Properly cleaning camper cabinet doors before painting is probably the most important step in painting your RV cabinets. Especially in an environment that withstands fluctuating temperatures and a lot of movement, you want to be sure your paint adheres well to the cabinet surface, and it can’t do so if there’s anything left on the cabinets.
It’s essential that you properly clean every part of the cabinet that will get painted – doors, frames, sides, etc. This ensures that the paint will stick well. No one wants peeling paint!
Use Krud Kutter or TSP (trisodium phosphate) substitute to thoroughly remove all grease, dirt, dust and anything else that may be on the surface.
To clean the cabinets, spray some of the cleaner on the cabinets and scrub with a kitchen sponge with the scouring side. Then, use a damp cloth to wipe off the cabinets. Follow right afterwards with a dry cloth to dry the surface.
3. Scuff sand the cabinets (with one way to skip this step)
Depending on the type of paint you choose to use, you may be able to get away with skipping this step. However, every professional painter I’ve ever talked to about painting kitchen and bathroom cabinets states they would never paint cabinets without sanding and applying a coat of primer. Just throwing that out there.
Jump ahead to read more on how to skip sanding and priming below.
For those of you that want to paint your cabinets like the pros, you’ll want to do the prep work to sand and then prime your cabinets. To sand, use 220 grit sandpaper to lightly scuff up the surface.
Alternatively, you can apply liquid sandpaper all over the surface and then clean it off following the directions on the bottle. I actually find using sandpaper to be quicker (and cheaper) than the liquid stuff, but either way works!
4. Prime the camper cabinets
Priming cabinets helps the paint to adhere well to the surface. It prevents chips and nicks in the paint and is always a step I recommend when painting cabinets.
To prime RV cabinets, use a simple primer like Zinsser 1,2,3. Generally speaking, you’ll be able to use this type of primer on most RV cabinets with great results.
If you want a more heavy-duty primer to be sure to block all bleed through, choose a primer like Zinsser Shellac Primer. This primer will block any water stains, smoke stains, smells, or wood tannin bleed through.
5. Prime any silicone caulk
Campers and RVs are known for having large amounts of silicone caulk used to connect panels and surfaces. Paint will not adhere to silicone caulk and a special primer must be used first before painting.
If you don’t properly prime (or cover) the silicone caulk, the paint will almost immediately bead up and peel away from the silicone.
There are two different ways to cover the silicone caulk to be able to paint it. One option is to apply paintable siliconized caulk to cover any areas where the paint is pulling away (thus anywhere with silicone caulk).
Or, you can use a more heavy duty primer to cover the silicone caulk.
I tested three different primers to see which one covered the silicone caulk the best. All three of these primers will work to cover silicone: shellac-based primer, oil-based primer and clear nail polish. I found the nail polish to actually work the best.
I am writing a full post comparing all of these different methods, which I’ll link here when it’s complete.
6. Paint cabinet frames and doors
Allow the primer to dry for at least 24 hours before moving on to paint your cabinets.
To paint your RV cabinets, you can choose to use a paint sprayer or to use a roller and brush. Spraying the cabinet doors will give the smoothest finish, but it’s entirely possible to get smooth results by rolling and brushing as well.
Velour or foam rollers give the smoothest finish when rolling and brushing.
I wrote a full post on my best tips on how to paint cabinet doors for a smooth finish , and these same tricks can be used on RV cabinets. Basically, I recommend brushing the edges and frames, then following up with a roller to paint the flat surfaces.
Allow the first coat of paint to dry following the dry times on the can of paint. Before the second coat, you can lightly sand with 220 grit sandpaper for an even smoother finish. Then, remove the excess sanding dust using a tack cloth before painting the next coat.
For the smoothest finish, it’s best to apply lighter coats of paint, rather than trying to lay it on thick to just get the job done.
7. Apply a top coat (if needed)
If you choose to use a chalk paint (or another paint not recommended in this post), you may need to apply a clear topcoat over your layer of paint. Always wait 24-48 hours after your final coat of paint before applying a water-based sealer top coat.
Alkyd enamel paint (my top choice for painting cabinets) does not need a topcoat. In fact, I would recommend against applying one with this type of paint (as do the manufacturers).
Follow the dry time on the paint or topcoat before moving on to the next step.
8. Attach hardware, hinges, and rehang doors
When possible, try to clean and reuse the old hinges. This saves you the hassle of trying to find the same hinges or from drilling new cabinet hinge holes. After installing the hinges on the doors, you can attach them back to the cabinet boxes in your RV.
Replacing the old cabinet hardware with new pieces will make your cabinets look completely new. Just be sure to measure the distance between the holes (if you have drawer handles) to purchase the same size pulls.
6. Allow paint to fully cure
Although paint may feel dry to the touch after the dry time listed on the can some types of paint can take up to 3 weeks to fully cure. I always recommend leaving the cabinet doors open and the drawers slightly pulled out for a couple of weeks after painting.
If the paint hasn’t fully cured and it comes in contact with other paint that hasn’t fully cured (for example, a recently painted cabinet door and frame), the paint will cure together and end up pulling off from one of the surfaces when it’s separated.
After this extended dry/cure time, you can place the bumpers on your doors and drawers and close them up.
RV Cabinet Paint Options
Best rv cabinet paint that doesn’t require a topcoat.
Alkyd enamel paint is a hybrid paint that applies like a water-based paint but dries to the finish of an oil-based paint.
This makes it very easy to use AND it dries to a smooth, durable finish without the need for a topcoat. Plus, it doesn’t have the strong odor that a traditional oil-based paint has.
Every major manufacturer of paint makes a version of this hybrid alkyd paint. I have a full post comparing everything about all of these brands of alkyd paint if you’d like to dive in a take a close look.
In short, here are the different brands and where you can purchase them. (Paints listed in order of cost – most expensive to least expensive.)
After trying out every single one of these paints, I have two favorites for painting cabinets.
The best overall paint for RV cabinets is Sherwin Williams Emerald Urethane Enamel. Sherwin Williams stores are always running sales – many as high as 40% off of cans of paint. I always buy my paint during these sales which drops the price to cheaper than a can of Valspar Oil-Enriched Enamel!
My favorite budget friendly RV cabinet paint is Dutch Boy Alkyd Enamel paint. I was very pleased with this version of alkyd paint after comparing it next to the other brands. In fact, I used this brand of paint on the cabinets in my hybrid camper !
The only drawback to this type of paint is that I would recommend priming before applying it. I find the finish to be much more durable when primer is used first (more information on this below).
Best RV Cabinet Paint that Doesn’t Require Sanding
If you’re hell-bent on not sanding or priming your cabinets before painting, I would recommend using a chalk-based paint. The benefit to this type of paint is that is adheres really well to most surfaces.
The two drawbacks to using chalk paint on cabinets are that it won’t dry to a super smooth finish (you’ll most likely see some brush strokes) and you need to apply a topcoat. So, the time you save by skipping the sanding and priming you’ll have to use applying a topcoat.
After testing all 13 major brands of chalk paint side by side , I found a favorite brand that will work the best for cabinets.
Behr Decorative Chalk Paint is the best chalk paint for RV cabinets because it can be tinted to any color, adheres very well, and also finishes with minimal brush strokes (there will still be some, though, because it’s chalk paint). Just be sure to use a water-based polyurethane in satin finish as a topcoat.
“All-in-One” Paint for RV Cabinets
In the last few years, there have been a bunch of independent paint companies that have marketed their paint as “all-in-one”. The claim is that you don’t need to prime or apply a topcoat when using this paint.
The most common “all-in-one” paint brands include:
- Beyond All-in-One Paint
I’m in the middle of a side by side test of all of these paints, but I will say that almost every one recommends scuff sanding the surface before painting. This is the same step I recommend above in the steps on how to paint camper cabinets, so that doesn’t actually save you from doing that step at all.
If you use an all-in-one paint, you’ll skip the priming step, but pay a hefty price tag for this. All-in-one paints are definitely the most expensive of any of the types of paint I’ve included in this post.
Essentially, you’re paying more for skipping the priming stage, when you could instead just spend less on a can of primer and then use less cabinet paint because you’ve already primed. Either way, you’ll apply the same number of coats of paint/primer in the end!
As you can see, I’m definitely not sold on these “all-in-one” paints. I think they’re just a way to charge way more for paint by making it seem “easier”. In the end, you’re going to be doing the same amount of steps no matter what paint you choose!
Painting the cabinets in your RV is a great way to make a huge difference in such a small space, because the cabinets take up a large amount of the interior of your camper.
Leave a Reply Cancel reply
Your email address will not be published. Required fields are marked *
Save my name, email, and website in this browser for the next time I comment.
How to Paint RV Cabinets: A Step by Step Guide with Tips
This post contains affiliate links.
RVs are notorious for having dark, dated, dingy cabinets. Our 1994 Safari Trek was no exception. We wanted to give our cabinets a new lease on life for minimal cost so paint was our best friend.
We took the following steps to refresh our cabinets with paint
- Clean and Degrease
- Repair and Patch
- Sand and Degloss
- Prime – one coat of surface appropriate primer
- Paint – two coats of high-quality semi-gloss
- Clear Coat – recommended but optional
They say painting is 90% prep and 10% painting and I couldn’t agree more. It’s a time-consuming process to get your cabinets ready for paint but it’s well worth the work to have refinished cabinets that will last.

Table of Contents
Getting Started
Before you get started painting your cabinets there are a few you should do to prepare.
First gather all your supplies, you’ll need
- screwdriver (probably a Phillips)
- ziplock bags
- coarse sponge
- several clean soft rags
- wood filler
- small putty knife
- wood glue (Amazon link)
- 180 grit sandpaper
- palm sander (Amazon link)
- several quality mini rollers – at least 3
- a high-quality paintbrush – this is my favorite paintbrush
- mini roller tray
- 220 grit sandpaper
Once you’ve got all your supplies it’s time to start deconstructing. You’ll start by disconnecting your cabinet doors from the boxes.
It’ll depend a little on the type of hinge you have but most will require you to unscrew the hinge from the box. A Phillips screw is most commonly used.
As you remove the cabinet doors from the boxes you’ll want to label where the doors go. Labeling makes it easier to reinstall your doors in the correct spots once finished.
Labeling is easily done by numbering the box and door in a hidden spot that won’t be covered in paint or by tagging them with a little piece of numbered tape.
Once the doors are removed you’ll need to finish unscrewing the hinges from them. Put all the hinges and screws in a ziplock bag to prevent losing any bits.
Next, remove the drawers from the cabinets. Of course, it’ll depend on the style of drawer slide for how they are removed. Our drawers were center mount slides and had a little catch that needed to be depressed to remove them.

Then you’ll unscrew the handles and knobs from the doors and drawers. Place all the hardware in another ziplock with the screws, if you are reusing them, put in a safe spot, if not you can donate them if they are in good shape or just chuck ’em.
Now that you have the cabinets taken apart you can set the doors up in your painting space. Where ever you choose to set up make sure it is well-ventilated.
We used our garage and set up saw horses with 2x4s on them. Since we were painting in the summer we could have the garage door open to allow proper airflow.
You should also decide if you are painting the inside of your cabinets or not. We chose to so they would look nice and bright. I didn’t want to have beautifully painted cupboards then open the door and see dark brown wood.
Should you choose to paint the insides it is adding a bit of work but it’s totally worth it. You’ll prep and paint the inside of the cabinets the same way you paint the cabinet faces, doors, and drawers.

Step 1: Washing and Degreasing
Now that the setup is complete, it’s time to get to work. To start you’ll need to clean your cabinets up.
I always swear by TSP for cleaning anything before painting. TSP is short for Trisodium Phosphate, it is a chemical cleaner so it should be used with care.
It works great for removing grease and grime and is recommended for cleaning surfaces prior to painting.
Mix up some TSP according to the directions and glove up, it can be irritating to the skin. Grab your rough sponge and start scrubbing down your cabinets with a bit of elbow grease.
Most cabinets shouldn’t be too dirty but pay special attention to the areas around the handles and knobs as well as any cabinet above the stove. You’ll wash down the cabinet faces, drawers, and both sides of all the doors.
Tip: While cleaning, pay extra attention to areas of high hand contact, these will be extra grimy
Once you’ve thoroughly cleaned all the surfaces, grab some fresh water and a clean cloth and wipe everything down again. This will remove any residue from the TSP.

Step 2: Repair and Patch
Now that your cabinets are sparkling clean it’s time to fix them up. Any used RV is sure to have a few scars. Now is the time to patch them up so your paint has a smooth surface to adhere to.
Carefully go over your cabinets and pick out any that need a little help. Little knicks and scratches will be the most common but some might need a little more help.
Give any of the surface blemishes a light sand first to rough the surface up. Then apply some wood filler and smooth it out with the putty knife.
For laminate or veneer cabinets, glue down any areas where the surface is peeling off the plywood or MDF underneath. In areas where the veneer is chipped or missing use wood filler to patch the gap.
If your veneer is in really rough shape you could try to peel it off but this would be very time consuming to do.
If you have any cabinets in need of major repairs now is the time to fix them. I had one cabinet door starting to separate so I stuck some wood glue into the creases and then clamped the door tightly till the glue set.
Tip: Wipe away excess glue before it dries. Dried wood glue is difficult to sand
If you have any cabinets with mirrors or inlaid glass that you wish to replace now would be a good time. We had two cabinet doors in the bathroom with recessed mirrors that I wanted to switch to plain wood.
I carefully unstuck the mirrors from the back of the cabinet using a paint scraper. Then I cut a 1/8″ project board to size and glued and clamped it in place. Once I had sanded the cabinet (in the next step) I used some paintable caulking at the seams to finish it off.
At this point, you need to decide if you are reusing the old hardware or not. If you are, go ahead to step 3, if not you will probably need to patch the holes from the handles.
It’s a good time to at least narrow down your options for what type of hardware you want on your cabinets if you haven’t already done so.
If you already know and have the handles in hand, compare them to the existing holes and see if you can reuse them. Should you need to fill them, follow your wood filler’s directions for deep holes. You will likely need several coats to get them filled properly and smoothly and don’t forget the back of the doors and drawers.
Step 3: Sanding
Sanding has to be my least favorite part of the entire refinishing process. You end up getting everything that you just cleaned, dirty and dusty. The main reason you wash and degrease your cabinets before sanding is to prevent all that dirt and grime from prematurely clogging up your sandpaper.
If you have a small electric palm sander now is the time to break it out. An electric sander will make short work of all your flat surfaces.
Detailed areas will take a bit more time and effort to sand by hand. I found rolling small pieces of sandpaper to work into curved edges got the job done.
Any areas that needed to be glued or filled should be sanded first with coarser grit sandpaper like 120 or 150. Gently sand these spots until smooth and flush with the rest of the surface.
Tip: Sand with the grain of the wood to reduce scratch marks
For the rest of the cabinets, we used 180 grit sandpaper to give all our cabinets a good once over. This is to degloss the surface and get it ready so it’ll take the paint well.
180 grit is fine enough that it won’t leave sandpaper marks but coarse enough to give the paint a little more purchase. Sanding with anything finer isn’t useful since the paint itself will provide a smooth final surface.
Once you are done sanding you need to clean all the dust off of your cabinets. Slightly dampen one of your clean, soft cloths and wipe down all of your cabinets. You want your cloth just a little damp to help pick up the dust if it’s too wet it could damage the wood.
Step 4: Priming
It’s finally time to start painting! Well, priming. It’s important to pick the right primer for your surface.
We were lucky that all our cabinets were made of solid wood so we used a water-based primer. Specifically Kilz Latex primer, sealer, and stain blocker.
Using a stain-blocking primer is important for wood since during the sanding process you may have taken your cabinet down to bare wood. The primer will prevent any bleed through of color from the wood. The primer will also seal any wood filler and bare patches so your paint will roll on evenly.
If you have laminate or veneer cabinets you’ll want to read the directions on your primer very carefully to make sure it will adhere to your surface properly. Many RVers with laminate cabinets swear by Zinsser Oil based primer.
Apparently, this stuff sticks to anything. But it is oil based so prepare to chuck your brushes when you are done or else you’ll need mineral spirits to clean up. And don’t worry, it’s perfectly fine to put latex paint over oil primer, just not the other way around.
Tip: Use the scratch test to see if your primer has adhered properly.
If you aren’t sure you have the right primer, do a test piece then perform the scratch test. Run your fingernail down the surface using medium pressure and see if you can scratch any paint off. If you can you need a different primer if you can’t, sweet, time to prime.
Now some people swear by foam rollers but I am not one. I find they apply a too thin coat and don’t cover very well. I prefer to use a high quality, shed resistant, woven , nap roller that is 1/4″ thick.
We also used a high quality, 2 inch, angled paintbrush with a short handle because I liked the way it felt. These are what we used for painting our cabinets and they turned out beautifully.
It’s up to you what style of roller and paint brush you use just make sure you get ones that are good quality and shed resistant. There is nothing worse than having to pick bits off of your freshly painted surface.
When we set up our doors to paint, we laid them all face down so the inside of the door was exposed. I chose to paint this side first in case of any drips, I could clean off any globs before painting the fronts. I also covered my 2x4s with wax paper, this prevented my doors from sticking once they were flipped over.
Beau and I worked as a team, I went ahead of him using the paintbrush in any nooks, crannies, and corners and he came behind with the roller to cover the larger flat surfaces.
Once all the backsides of the doors were done we let them dry overnight then flipped them over to paint the fronts following the same process. While the doors and drawers were drying we primed all the cabinet faces in the RV as well as inside of the cupboards.

Step 5: Painting
Now onto the fun part, PAINT! I always find after priming, the cabinets look worse than before but that’s just because primer is always so streaky.
We chose to paint our cupboards a soft, medium tone grey. We also used a plain bright white for the interior of the cupboards but just used what we had leftover from the walls.
If you aren’t sure about your color, then painting a test door is a great idea. You don’t want to go to the trouble of painting all your cabinets just to decide you don’t like them, then, have to repaint them.
Picking a high-quality paint that is meant for cabinets is a good idea so you know all this work you are doing will last. We used Behr Marquee Interior Semi-Gloss Enamel, which is a latex paint. I’ve also used SICO Furniture and Cabinet Melamine finish paint on another kitchen project and it has stood up amazingly.
Semi-gloss or a similar finish with a high sheen is good for high traffic areas like a kitchen since it is much more friendly to being wiped down and cleaned.
In general, we followed a very similar process to the primer. Like with the primer, we started with the back sides of the cabinets doors let it dry then painted the fronts.
We applied two coats of paint to all the surfaces even though our paint was supposed to be one coat coverage. I have never found one coat coverage paints to cover in one coat, but they do an amazing job of covering.
Tip: Keep your roller and paint brush in the fridge, wrapped in plastic to prevent drying out between coats
I’ve always wrapped my wet roll and paintbrush in plastic and kept them in the fridge in between coats to prevent them from drying out. This cuts down on the work of cleaning out my roller and brush. If you are going to be away from your painting for more than a day or two, stick them in the freezer but be sure to let them defrost before continuing painting.
Once you’ve finished painting all your cabinet faces, doors and drawers you are going to want to let them cure a bit before sealing and reinstalling. How long they need will depend on the paint but a couple of days should be good if you are sealing them if you aren’t, then leaving them for a week would be ideal.
We personally chose to roll on our paint and primer because we didn’t want to deal with the mess of a paint sprayer. But you can spray paint your cabinets with no problem. If you don’t have a paint sprayer, cans of spray paint will cost you more than a gallon of roll on paint.
You can get a smoother finish with spray paint but it does take some practice to develop a good technique. That being said I think our cabinets turned out pretty smooth with a roller.

Step 6: Clear Coat
I’m going to start off by saying we did not clear coat our cabinets. I’m not a hundred percent sure we made the right decision, or even why we opted to not, but only time will tell.
If you decide to clear coat your cabinets there are a few options available you can use wax, a water-based sealer or oil-based sealer.
Wax is usually used with chalk paints to seal them. Some people swear by wax to finish everything but most don’t recommend using it in high traffic, high moisture, and high heat areas, like a kitchen, bathroom, or RV.
Tip: Use a waterbased sealer on light colors to prevent yellowing.
A better alternative is a water-based sealer. Water-based sealers are easier to clean up than oil-based and tend to not yellow over time like an oil based sealer.
Oil-based will be the most durable option you can buy but you will have to make the call if the extra clean up is worth it to you or not.
Most sealers require 2 or 3 coats with a light sanding of very fine grit sandpaper in between. I prefer to use a foam brush for applying a clear coat since I don’t have to worry about brush marks and I can throw out my brush when finished.
So there you have it, the steps we took to refinish our RVs cabinets. It was a lot of work but didn’t cost too much and the final product is stunning! Check out our articles to see how our cabinets look in our fully renovated kitchen and bathroom .

Cabinet Painting Products
Fix it yourself rv maintenance course.
The most costly parts of RV ownership are repairs and maintenance. That’s why I recommend learning to do your own RV repair and maintenance.
The Fix It Yourself RV Maintenance Course is the perfect way to learn how to do the most common repairs and maintenance on your RV. A Certified RV Technician wrote and filmed the course so you know the information is actually correct.
Plus it’s downloadable so you can access it from anywhere, even when boondocking in the middle of nowhere with no service.
Find out more about the best RV Maintenance and Repair Course available !

Diane is a lover of all things travel. She and her young family wanted to explore North America from the comfort of their own home so they bought an RV. After fully rehabbing a 1994 Safari Trek, they set out to explore both Canada and the USA.
Recent Posts
Why You Need to Disconnect Your RV Battery When Not In Use
It's always fun to get the RV ready for another adventure after it's been in storage but what isn't fun is finding out your house batteries are dead. Without your house batteries, most of the...
Best Campgrounds in Yellowstone National Park for RVs
Yellowstone National Park is one of those places that should be on your bucket list. And one of the best ways to get there and enjoy the park is in your RV. Whether you are looking for a full...

The Pop Up Princess
Adventures of a Pop Up Camping Princess

Painting Camper Cabinets: All Your Questions Answered
September 1, 2019

Painting your camper cabinets can have a huge impact on the look and feel of your camper remodel. We originally wrote this post several years ago, after the paint on our first camper was about two years old. Amazingly, three years later, the paint is still in the exact same shape. We’ve since taken on another camper project and seen countless other renovations. We’ve learned quite a few things in our five years since starting our renovation journey. Since the tips in this post are still really relevant–especially for newbie renovators–we thought we’d update it and pass on a few things we’ve learned along the way. Enjoy! 😀

PAINTING CAMPER CABINETS: YOUR QUESTIONS ANSWERED
Question: my pop up camper cabinets are not real wood. they seem to be covered in some sort of wood grain printed plastic paper. can i still paint them.
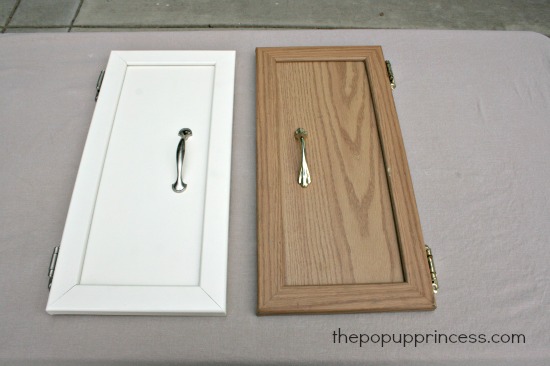
Question: The paper coating on my cabinets is peeling in some places. Can I still paint them? How do you fix this?
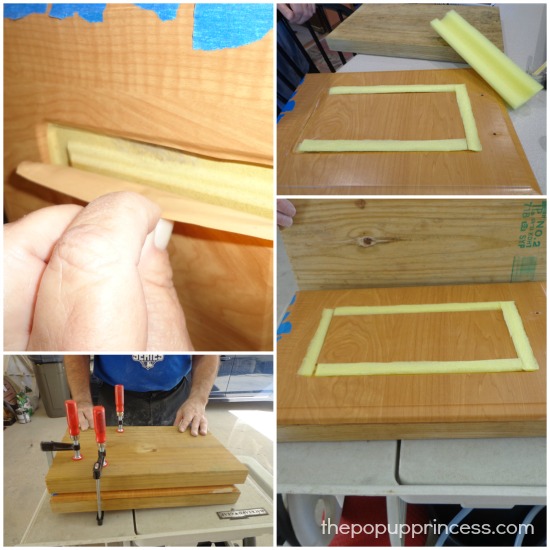
I featured Monte & Marie’s makeover on the blog, and they had the exact same issue. Monte used wood glue to re-adhere the paper to the cabinets, but in the recessed areas, he really got creative. He used sections of pool noodle cut to size to hold everything in place while it dried.
Question: What if large sections of the paper coating are missing? How can I still paint the cabinets?

Question: Do I have to sand (or prime) my cabinets before I paint?
Answer: Well, no… you don’t have to do anything… but I highly recommend it. 🙂 Remember that your cabinets are probably not made of real wood. They’ve got that plastic paper coating on them–and that means paint won’t want to adhere well to them without some help. Primer–especially the Zinsser brands we like–is specially formulated to stick to tough-to-cover surfaces, and it really does make a difference. Sanding your cabinets lightly gives the primer some “tooth” to hold on to, and it will give you a very durable finish when it is all done. Your cabinets are going to get some abuse, so sanding and priming will ensure all your hard work lasts past the first trip out. We’ve heard from a lot of readers, and many who skimped on the prep work have to frequently touch up chips and flaking paint.
Question: What kind of paint should I use?
Answer: We used an oil-based paint on the Coleman camper cabinets. You can read more about that here . You don’t have to use an oil-based paint, but you will get a far more durable finish. Oil-based paints are often used on trim work, because they can withstand abuse. Latex paint makes for easy clean-up, but it is less durable in the long run. With our Rockwood camper, we used alkyd paint from Dunn Edwards. I really like alkyd paint because it is a hybrid. It has the durability of an oil-based paint, but it cleans up with water. It really is the best of both worlds. If you want to see how we painted our Rockwood cabinets, check out our post here .
Question: Can I use latex paint and primer in one?
Answer: You can. I’m not a fan of latex paint for cabinetry, and it wouldn’t be my first choice. I have featured quite a few makeovers where readers have used latex paint with no problems to report, though. I would still suggest preparing and priming your cabinets in the same way you would if you were using any other paint. In our experience, you’ll just get better results if you use a separate primer. It might be a little more time consuming, but we’ve found that a little extra prep work often makes all the difference in a good paint job.

Question: Can I use chalk paint?
Answer: Chalk paint sounds so easy, right? It comes in amazing colors, and you don’t even have to sand or prime first! How awesome is that? Felicia used chalk paint in her makeover, which you can find here , and it looks awesome! There is a catch, though. I’ve used chalk paint on a few projects around my house, and while the application and prep work are easy, it does require some finish work. Chalk paint is porous and requires a top coat. Most people finish their chalk paint projects with wax, but you can also finish with a polyurethane. If you skip this step, you’ll have a hard time sealing out the dirt.
Felicia sold her camper not long ago, and I was so excited to hear from the new owners. They love their new camper–how could they not? 🙂 However, they did tell me that they will likely have to repaint and add a top coat to the cabinets in the future because that chalk paint is just so porous. So, yes, you can use chalk paint and it will look beautiful if you do it right, but it isn’t quite as easy as it sounds. There is some additional work involved.

Question: Can I paint the plastic trim?

Question: We want to change out the hardware on our cabinet doors, what did you use? The standard drawer pulls at stores don’t seem to fit.

If you want to avoid that issue, you can always paint the original hardware. I’ve featured makeovers from several readers that have done just that, and it looks amazing. Check out Tiffany’s camper here for a great example of how a simple coat of spray paint can transform your cabinet hardware. As with your cabinetry, you’ll want to make sure you prep and prime your hardware, too. We painted the hinges on our Rockwood, and before we broke out the spray paint, we used a Scotch Brite pad and some acetone to scrub them down. Then we used a metal etching spray primer to coat the hinges. Once the primer was dry, we gave them two good coats of gold spray paint. Make sure you let the spray paint cure for several days–we gave them a week–before you install and use the hardware. It will ensure that your finish is durable and doesn’t chip.
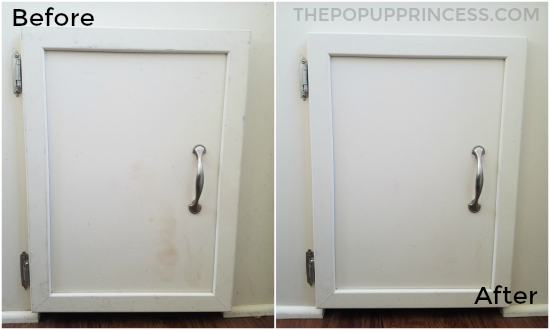
Question: I really want to paint my cabinets white, but I have kids. Do white cabinets show all the dirt, and how well do they held up to abuse?
Answer: I really love our white cabinets. I’ve got some dark cabinetry at home, and I feel like it shows the dirt far more than our light colored camper cabinets. If the paint chips at all, it is much more noticeable on a dark cabinet. Yes, we have kids, and yes, they have abused our camper a bit. We have traveled over 10,000 miles in this little PUP. We have accidentally packed our dirty dutch oven next to a white cabinet door. I find dirty feet propped up on the camper walls often, 😛 but our cabinets don’t seem to show much of that dirt.

We do have to do an occasional wipe-down with a Magic Eraser to remove smudges, but I feel like we would have done that regardless of the color. Once a year, we do our annual spring cleaning, and I really give the cabinets a good scrub down. You can see a before and after picture I snapped during spring cleaning. There was a year’s worth of grime in the camper, but it cleaned up so easily. I’m very pleased with how well our cabinets look three years later. I would not hesitate to paint my cabinets white again.

Question: Now that it has been a few years since you painted your cabinets, how are they holding up?
Answer: Beautifully! I snapped a picture during spring cleaning to give you an idea of just how great they look after three years. Yes, Mr. TypeTwoFun gave me a whole lot of grief for the bowl of willow balls, but it was totally worth it. 😉 After five whole years of camping–two years after this photo was taken–they look exactly the same. The cabinets don’t look a whole lot different than they did when we first painted them.

I think that answers most of the questions I get asked on a regular basis. If you didn’t see your question answered here, feel free to post it in the comments section below. And keep those reader makeovers coming. I love seeing how creative y’all are!
Happy Camping!

April 17, 2017 at 8:00 am
This is great! You mentioned the option of painting hardware, but didn’t say if it holds up. I’m super curious about that!
One of the other things i am always leery about with the makeovers i see here is the stick down flooring. With the extreme temperatures campers are exposed to, i worry about the adhesives failing in a few years. This is the main reason we went with vinyl flooring on a roll. But i’d be curious how the peel/stick flooring is holding up 5 years later!
Happy trails!
May 20, 2017 at 2:48 pm
As far as painting Hardware, Rust-Oleum makes some really durable paint in a quart size cans that you can spray on with paint sprayer or brush on by hand. I use Rust-Oleum hammered effect at a nursing home. It has held up extremely well. It does take at least a couple of days to cure before becomes really durable
October 30, 2017 at 5:58 pm
I want the answer to this as well!
April 17, 2017 at 10:40 am
I am just finishing up our cabinets and hardware. I chose an oil based paint and primer in one from Lowe’s and it’s working beautifully. I have done two coats so far and it looks great. There should be only touch ups left when I’m done. I did chose to spray paint the hardware, but I’m wishing I had filled in the holes and started over as I found some beautiful pulls. Loving your blog as a guide! It has been so helpful as we just bought a 2003 Coleman Niagara in January. We’ve taken it out twice and we are starting to get the hang of it!
April 17, 2017 at 6:38 pm
I want to paint so badly but the slide makes it impossible to reach everything. Has anyone painted their Bayside?
May 11, 2017 at 5:58 am
We have a Niagara. I just finished painting the cabinets. I have left the spots by the slide “as is” and it isn’t even noticeable. Everything else looks so bright and nice that you don’t notice those two small areas. One day, it might bother me, but not now at all. If it does, I have read on the comments here that you can use a tiny roller to get in the two tight areas.
May 24, 2017 at 8:44 pm
I’m in the process of painting my Bayside right now! I’m planning to paint the one side that I can get to, which is the long bench side. We aren’t planning to pull out the cabinet with the fridge, so I’ll have to just update the molding there and I’ll paint the inside piece that’s facing the dinning set.
July 13, 2017 at 11:40 am
I just left the part inside the slide alone and honestly you can’t even tell
April 18, 2017 at 7:36 pm
I’ve spray painted pulls and doorknobs in our house-the paint just doesn’t hold up to something that you touch frequently. Maybe in a camper it is different, but I don’t know. If you’ve got the hardware off and you’re painting anyway, I’d just buy new. Chances are you might have to in the long run. I’d rather do that when everything is torn apart rather than go back and redo it.
April 22, 2017 at 9:46 pm
I do have a couple of painting questions. I have a similar era Coleman. I want to paint the walls, is there any special prep work for that? And, as I’m sure is the same in yours, there is this big mechanism for raising and lowering the kitchen, did you paint that and how?
April 24, 2017 at 8:07 pm
I used Glidden Gripper on the walls to prime them, Jessica. Then I used plain latex paint to give them some color. I did not paint the swing galley bar.
April 24, 2017 at 3:06 pm
I’m not planning on taking my cabinets out when we remodel our Viking pop up, only removing doors & hardware, so I won’t be spray-painting. I have found Zinsser primer & Behr oil-based paint but am wondering if I’ll need to buy a whole gallon. I saw on one post they only used about a fourth of their gallon. I know it is cheaper that way, but don’t think I’ll have need for that much leftover paint.
April 28, 2017 at 10:46 am
Hello, I’m in LOVE with your blog! We’ve had a pop up camper that my parents bought for us to use and for a while we were sharing it with a couple other people (scheduled weekends etc). They recently gave us ownership of the camper and I started planning all the renovations I wanted to do. My problem though is I store the pup at my uncle’s house and it is not easily accessed when its not in use so I’m limited to actually completing the remodel while we are camping. I was wondering if you had any advise for painting the cabinets while at camp? I figure the flooring will be easy enough to do but to paint the cabinets while we are using the trailer might be a bit difficult. Any suggestions would be appreciated please!
April 30, 2017 at 10:28 am
Hmmm… that might be difficult, Serena. I mentioned your situation to Mr. TypeTwoFun, and he remarked that he would be very angry if he pulled our PUP out to a campground and set up camp next to someone who was renovating their camper. Most everyone goes out to camp to get away from the bustle of daily life. The smell of paint or constant noise of a camper remodel can be very off-putting. You’ll have to be very respectful of the campers around you, and you will have to check with the forest service or campground hosts/rangers to find out if this is even allowed. Additionally, there are probably rules against rinsing paint out in campground sinks or spigots, and you definitely should not dispose of paint rinse water on the ground. Is there any possibility that your uncle would let you paint the cabinets at his place? That seems like a far better option. 🙂
April 30, 2017 at 12:02 pm
Its not a campground we camp in (actually middle of nowhere without any people for miles around us) and its usually with my uncle and extended family who are all eager to help. There are no sinks or facilities where we camp so rinsing things out is into buckets which are hauled out of the woods for disposal later. I’m more concerned with the time frames of things as our trips are usually 2 days and between priming and painting dry times is there any advice on how to keep the cabinets from ‘sticking’ once they’re dry during the curing stages? When we close up the camper there isn’t a lot of air flow to speed the curing process so I’m not sure which paint to attempt? Oil vs latex vs alkyd? Wondering if you or Mr.TypeTwoFun have any experience with preventing the cupboards from sealing shut while in the camper or if its pretty much best to leave the cupboards off and reinstall them on the next trip?
Painting then at my uncles isn’t a problem for him but he lives 2 hours away from us so its hard for us to get up to his place for more than a day to do any work on the popup. Its going to be a challenge but I’m hoping to just get a few little things done each trip after the cabinets are done. More of a facelift than a complete reno. And we live in BC Canada so the rain keeps us limited (we have to weatherproof our canvas while at camp too…..that’s going to be interesting as well nut we’ve got that one covered for now!)
May 28, 2017 at 5:32 pm
We bought a used jayco popup. The kitchen sink doesnt work (we prefer to use an outside sink anyway) the stove is missing and doesnt have a place for a fridge. (We have a not so mini fridge that we use) the ac unit doesnt work either, so we use a portable unit that we vent out one of the windows. We are starting a remodel of this camper this week. I was telling hubby my ideas. One of the things i would lile to do is lose the sink and cut a cabinet to allow the fridge to stay in the camper (we currently have to remove it to close the camper) since the fridge will be inclosed in a cabinet do i need to have a vent somehow in that cabinet?
May 30, 2017 at 8:18 am
What type of fridge is it, Tammy? If it runs on propane, you’ll need to vent it to the outside. If it is an aftermarket electric fridge, I’m not entirely sure. You might want to ask that question on the Pop Up Portal , as someone there could likely give you an experienced answer. 🙂
May 31, 2017 at 8:11 am
Hi Larissa! We are huge fans of your website. We recently purchased a 2-yr old Flagstaff Highwall pup, and we want to repaint all that nasty fake wood. Just came across this ACE All-in-one furniture paint product, which claims to preempt the need to prime or sand any surfaces. Sounds too good to be true – would love to get your opinion on this: http://www.acehardware.com/product/index.jsp?productId=127749346
June 2, 2017 at 11:52 am
I have never used that type of paint, Sam, so I can’t comment, but you want to keep in mind that most kitchen and bathroom cabinets are solid wood. Pop up camper cabinets are usually laminated MDF or something similar. It is a little tougher to get paint to stick on those surfaces long term. I would never forgo the prep work—no matter how daunting it is. Good prep work is the key to a great finish that lasts. 🙂
August 15, 2017 at 12:38 pm
The All-In-One paint is a flat finish, that will most likely be very hard to clean. I’m a retailer that sells a chalk paint line and although I’ve painted lots of vintage furniture with it; turning a few into bathroom vanities, I will use an oil base in my camper. With all the moving it will do, the closeness of everything, and dirt from the great outdoors, I’ll stick with non-chalk paint for this project. I usually have to do 2-3 coats of paint and then a topcoat….painting with oil paint I’ll only need two good coats, most likely not a third and that sounds R E A L good to me.
July 4, 2017 at 4:16 am
Im so inspired by these “pup”makeovers . Just purchased an 86 Rockwood . Inside is perfect just dated . Just so impressed by everyone’s ideas and accomplishments . A little overwhelmed as to what color scheme to go with as I like them all !! Looking forward to getting started on mine .
July 24, 2017 at 10:27 am
I love all the pictures! We just bought a 2008 Forest River Flagstaff pup. I will follow the great ideas for the cabinets but I’m confused on what to do for the counter tops. What did you use? I’ve been looking at the sand stone paint but I want white cabinets and a darker top but the sand stone is either tan or gray.
August 20, 2017 at 5:09 pm
We used Rustoleum’s Countertop Transformations kit. You can read all about it here . I absolutely love how they turned out.
July 31, 2017 at 2:02 pm
My canvas has a couple rips on it, I’m trying to find a good patch kit, which ones do you recommend?
August 20, 2017 at 5:05 pm
I’ve heard good things about Tear Mender , Jen. Most people I have spoke with just find a Sunbrella fabric that matches their tenting and use the Tear Mender to adhere it. Make sure you waterproof the new patch, too. 🙂
August 7, 2017 at 3:30 pm
Ok. I have a disaster on my hands and I don’t even know how to fix it! I used liquid sander on my cabinets to degloss them. Painted them with enamel Olympic paint that I had mixed at lowes. It’s been about 4 hours worth of drying and when I began to pull the tape off and the paint basically peels off if you nic it. Any suggestions?☹️
August 20, 2017 at 5:00 pm
Hmmm…. That is a bummer. I tend to think the only solution is to sand the cabinets down and start over. I don’t use liquid sander on laminate, as I’ve never had good results. I prefer to sand lightly and use a good primer. Let me know what you end up doing and how it goes. 🙂
August 10, 2017 at 10:01 am
Hi Larissa, We are mid-makeover of our 88 sequoia and I am concerned about my paint choice. I have sanded and prepped and I am using oil based primer and rustoleum satin finished spray. Should I be using semi-gloss instead? Worried about smudges and dirt. Your thoughts?
August 20, 2017 at 12:35 pm
We used satin, and I love it, Lisa. It is really a matter a preference. The satin wipes clean just as easily as semi-gloss. 😀
August 23, 2017 at 8:06 am
My wife just painted all of our cabinets, but noticed when we were installing the hardware that they were chipping very very easily. She then tried to get a protective coating for them, but it looked horrible. What should we be using to protect the paint from chipping?
August 23, 2017 at 8:47 am
What a bummer! What type of paint and primer did she use?
August 23, 2017 at 10:27 am
She used a multi-purpose primer and sealer and a latex paint.
September 21, 2017 at 7:52 am
Could you tell me what site off amazon that you got the flexible t molding
October 4, 2017 at 10:01 am
Sure! This is the trim we used, Maggie. 🙂
3/4 Smooth White T-Trim
September 23, 2017 at 8:10 pm
I love this website and this post is super helpful. We don’t have a pop up, we have an old hideous class C motor home that we are planning to remodel! So, thank you for all of your helpful posts. (And just the eye candy, let’s face It, these campers are beautiful!) On my list: oil based paint and primer, and rustoleum for the hardware!
November 9, 2017 at 5:06 pm
Has anyone fully replaced the lightweight MDF cabinets with something more durable?
December 8, 2017 at 5:20 pm
Hi Larissa, the plastic film on the cabinet walls are bubbling and so are some areas on the walls. How should I prep these before painting?
January 3, 2018 at 2:31 pm
I have heard from readers that simply glued the laminate back to the cabinet before painting, but I have also heard from some who have removed it completely. If you remove it completely, you’ll have some sanding and filling to do. My choice would be to glue it back in place if at all possible. 😉
March 8, 2018 at 5:21 pm
I love your blog and you have done such cute and functional things!! But I have a completely non-renovation related question. What is the adorable enamel cook pots you have in the pictures?! I love them and even at home you cane never have enough smallish pots!
March 10, 2018 at 8:52 am
World Market, Leah! I haven’t actually used it yet, because it is too cute, so I’m not sure how functional it is. Lol. 😀
April 26, 2018 at 4:01 pm
I was inspired by this blog to revamp our “new to us” pop up. I primed with an oil based primer and just painted the first coat of oil based paint. When I’m done, do I need to seal it? I painted it white.
April 26, 2018 at 4:34 pm
We did not, Sasheen. Oil-based paint is very durable and will wipe clean easily. 🙂 Can’t wait to see pictures!
June 16, 2018 at 11:27 am
Prepping to paint a 2002 Santa Fe. How did you deal with the metal strip on the front of the galley cabinet?
PS, thanks for the blog. It’s basically the only way I was able to convince my wife to buy a pop up 🙂
June 19, 2018 at 5:59 pm
We just used a spray primer for metal and spray painted it, Sam. It worked really well. Can’t wait to see how yours turns out. 🙂
August 2, 2018 at 8:09 pm
Do you have a tutorial for painting the cabinets?
August 16, 2018 at 9:04 am
Sure do, Jaleesa! You can find that post here .
August 19, 2018 at 12:04 pm
Did you use spray paint (primer and paint color) for all of your cabinets? We just bought our fiat pop up and also live in AZ… I’m trying to decide what type of paint is best for our climate. I have done interior cabinets before with latex, but I was considering trying out chalk paint with the wax sealer…. I hadn’t considered spray paint. Would love your thoughts!
January 9, 2019 at 2:54 pm
The spray paint has worked out fabulously for us, Kari. I would do it again (or maybe roll on an oil-based paint) if I was doing another remodel. It does well in the AZ heat. I have heard that the wax sealer can get tacky in hot temps. Maybe coat your chalk paint with a polyurethane instead?
August 20, 2018 at 8:27 am
When painting the cabinets, can I use ANY oil based paint? Does the brand matter? (As long as it’s a reputable brand?)
September 14, 2018 at 3:47 pm
I like Rustoleum, Brandy, but it doesn’t have to be a specific brand. 🙂
September 17, 2018 at 6:09 pm
Hi! We are looking into painting an RV and I’m wondering if people paint the inside of the cabinets? Or just the outside and have the outside and inside mismatch?
April 1, 2019 at 5:07 pm
We did not paint the inside of *most* of our cabinets. We did paint one cabinet with drawers, and when the drawers slide in and out, it scrapes the paint off the inside. As a result, we usually have a fine powdery white paint on inside our dish drawer. I really wish we would have left the inside unpainted.
May 13, 2019 at 11:02 am
I wanted to paint my pop-up cabinets and the walls what brand of paint do you recommend?
May 14, 2019 at 1:58 pm
You can read all about how we painted our cabinets here , Debbie. For the Rockwood we are currently remodeling, we are using a Dunn Edwards alkyd paint. I really like that as well. I think Sherwin Williams makes a comparable product.
June 18, 2020 at 9:02 pm
What color green are the cabinets in your new camper? I have such a hard time finding a green I like enough to commit to in such a small space, even though its my favorite color, and I love the one you used! Love your blog so much btw, it has so many great tips for a new camper owner. Thank you!
July 22, 2020 at 1:36 pm
We actually did a post about our new cabinets here . The color is called Fresh Thyme from Dunn Edwards. 🙂
March 31, 2021 at 3:58 pm
Larissa- Love your remodels/tutorials! I had planned to remove all of my cabinets and rebuild them, but am a little chicken to do so. I am considering just paining them and redoing the counters with something like Rustoleum counter solutions. My cabinets are metal-does this affect my process at all?
May 11, 2021 at 3:24 pm
Deb – I repainted my vintage metal kitchen cabinets 20 years ago, and they still look great. I sanded off about 9 coats of UGLY paint, cleaned the surface well, and used Rustoleum primer paint for metal. Then I finish-coated with Rustoleum in satin White. The kitchen cabinetry has survived two decades and kids/dogs/grandkids and looks just as pretty as it did when brand new (70+ years ago…) Use an oil-base paint for durability, sand that surface and clean it, and primer for your first coat!
May 16, 2021 at 3:50 pm
My 1980 travel trailer is set on a permanent slab. I want to change out the hardware on cabinets. It’s the locking style knobs. Can I do that ?
June 7, 2021 at 12:22 pm
I have seen people spray paint that locking type of hardware with good results, Susan. I’ve also seen campers who have replaced their hardware with regular cabinet drawer pulls and then added magnetic catches to the doors and frames to keep the doors closed while towing. We added doors to our dinette booth and used the magnetic catches, and they have worked really well. I don’t see why you couldn’t just use them on your doors, and you’d have so many more styles from which to choose, too. 🙂
May 26, 2021 at 9:03 pm
My husband and I are renovating a 92 Jayco 806. My cabinets are made of 1×1 with really thin panelling type wood. Really thin but not ready to rebuild the cabinets because we are having to replace rotted wood in roof and on corners of the trailer. So, will primer and paint hold up well on this chintzy wood?
June 7, 2021 at 12:14 pm
Without seeing it in person, it’s impossible to say for sure. Our ’95 Rockwood had similar cabinets, and although we rebuilt them from scratch, I did do some sample painting on the original cabinets to test durability and sheen. The paint had no problem sticking to those cabinets. Proper prep work is the key! Don’t skimp on sanding and primer.
[…] Modern Life The Pop-Up Princess DIY […]
Leave a Reply Cancel reply
Your email address will not be published. Required fields are marked *
Yes, add me to your mailing list.
Make sure the latest news ‘Pops Up’ in your inbox!
Trending Post : 7 Mid-Century Modern Kitchens That Inspired My Own

Painting RV Cabinets (and what I did wrong)

Y’all…I did it. I finished painting the cabinets in the RV. Somebody get me a drink.
I’d love to tell you a wonderful, uplifting tale about how it was an easy project and I enjoyed every second of it, but that would be a lie. This project sucked and I’m really glad it’s over. I CAN tell you it was worth it though, so at least this story has a happy ending. I mean, just look at how much brighter and less depressing the kitchen looks with bright white cabinets. Worth it .

Alright, let’s talk details (so you don’t make the same mistake I did).
As it turns out, RV cabinets aren’t the best. I’m sure there are RV’s out there with decent quality cabinets, but ours is not one of them. The cabinetry in our camper is made to be extra lightweight, so it is made of thin pressboard and covered in a wood look paper. These cabinets make cheap laminate cabinets look like the holy grail of quality craftsmanship.

So when we decided to paint them I wasn’t really concerned with them turning out perfect, because that just isn’t realistic. The goal here is to remodel the RV as cheaply as possible, while having it still look freaking fantastic. And the cheapest way to do something is by using what you already have.
So I went up to the attic and sifted through all the leftover paint, and came down with a bucket of primer and a bucket of leftover latex shiplap paint . I figured these would work well enough…after all, they’re just crappy RV cabinets that will only be taking intermittent abuse.
I started by giving all the cabinets a light sanding to help the primer stick to the slick paper. Then I taped everything off and started in with the primer, which was a water-based Kilz.

I primed the entire kitchen with this stuff before giving it the scratch test …and realizing that the primer did not even remotely adhere to the cabinets. Instead, it came right off at the slightest touch. So me, being me, decided everything would be okay in the end, and adding latex paint over top would probably solve the problem.

As you may have guessed, more paint was not the solution. It still scratched right off, revealing my nemesis…that stupid, slick, fake wood paper. I, of course, have zero photo evidence of this, which I blame on my overly optimistic denial of the problem.
Time for plan B, which involves doing things the right way. For $8.

That’s right, $8 worth of oil-based primer is all I needed to end the shenanigans.
This primer is amazing , it is what I used for all the cabinets in the house and it is pretty much bulletproof. If you are painting anything that isn’t drywall or bare wood, use this . The downside is that it is oil-based, so it smells terrible and is a pain to clean up… but a disposable foam brush and some good ventilation will make it bearable.
Anyway, I primed the rest of the RV with this stuff. I didn’t even have to sand first, that is how well it worked. As far as what I had already primed, some of it I left, some of it I sanded and re-primed, and some of it I re-primed without sanding. How it all holds up will be an interesting experiment.
Despite the excellent primer, it still took five coats to cover the dark wood. FIVE COATS. If you are wondering what I did with my little bit of kid-free time this summer….well, this is it.
Also, caulk + painter’s tape is your best friend in situations like this; it makes your “I’m so over this” sloppy paint job look much more presentable.

Anyway, here are some more pictures of the finished product!

The color on the cabinets is Alabaster by Sherwin Williams, and I didn’t seal them. Not sealing cabinets is a really bad idea , but since this kitchen isn’t used often, I’m willing to risk it. Plus, I just couldn’t bring myself to spend any more time on these cabinets…I’m ready to move on to the walls!
If you prefer your information in video format, I have that too –
*** CLICK HERE TO SEE ALL THE RV REMODEL POSTS ***
Similar Posts

Nursery Sign Semi Fail

Ten home improvement projects I won’t be repeating

Vaulted Wood Ceiling (from cedar fence pickets)

Best Peel-and-Stick Wallpaper for Textured Walls

Muffin Tin Advent Calendar (My Original Idea That Wasn’t)

Mason Jar Pendant Light
28 comments.
You. Are. Insane. :) They look stunning!
Great advise about using oil based primer. I would have done the same thing – who doesn’t like the easy clean up of water based products? Anyway, your cabinets look great and I can’t wait to see what you will do next!
WOW ! It looks great ! Your trailer looks so bright and fresh . Can not wait to see your finished projects with your trailer.
Looks great! what are your plans for the walls?
I was scrolling through the WOW party and saw your picture. I had to stop in and say hi. I painted our trailer last summer and I absolutely love it. I know you will love yours as well. I agree that the cabinets in campers are so cheap that it isn’t going to look perfect but that is okay. Are you going to redo the couch? I can’t wait to see the rest of the remodel. It’s a lot of work but it’s worth it.
Thanks Katie! The cabinets really were a pain, but we just finished painting the walls and (much to my surprise) they weren’t bad at all. I am going to redo the couch, though I’m not great at sewing so it should be interesting. I think I’m just going to get creative with safety pins ;)
Your story is my exact story right now! I’m so thankful to find your post! I primed with regular latex primer, came right off. So I went to sherwin williams and they sold me a latex bonding primer and said if that didn’t work they had no clue. We did as the said, we wiped all of the latex primer off with denaturized alcohol to remove the primer. We painted one cabinet with the special latex bonding primer and allowed it to dry. I did the scratch test today and it didn’t come off as easily as the regular primer did but it defiantly would scrape off. I was about in tears! I have some question: After priming with the oil based primer did you use oil based paint from sherwin williams as a top coat? and Have you noticed if it is holding up well not sanding the latex primer off first? Thank you so much for your post!
I’m so sorry that happened to you too! I had only painted some of the kitchen cabinets before I realized my mistake, and I wasn’t sure what to do with the latex primer. I sanded it off a bit (not great) and went over it with oil primer in some spots and just latex paint in others. No consistency in my method at all. So far it is fine, but we haven’t started abusing it yet either (that starts this weekend!).
What a difference that makes in appearance of the RV! So much less cave-ish. Do you think that would be a good primer to use for painting laminate furniture?
You did a great job, I think I would have left some of the natural wood alone. Just to much white for me.
Your camper looks Great!Thanks for the info on cabinets. About to tackle my sons RV for a makeover. Unfortunately a previous smoker had it so smelly oil base paint it is. Will picking up paint brush recommended. Floors will be another headache I’m sure.
How did you paint the cabinets, roller, brush, or spray? I’m using a product called beyond paint and it recommends a roller, but can’t use a roller on the frame work. Not enough room for roller. Any suggestion would be appreciated. Linda Cross [email protected]
Hey! I saw on your previous post that you used eggshelf finish for the walls. Did you use the same finish on the cabinets? I’m planning on painting my walls and cabinets the same white but I’m stuck if I should use the same finish! I’d love to be able to just buy the same paint but I’ve read a few articles about using satin on cupboards.
Ashley, Thanks for the tips. Your RV. Looks so bright and cheery. I’m curious to know what type of RV did you do this painting remodel to? Did you ever paint the walls?
That sounds great! This is a perfect way to make up for my cabinet so I have no reason to not try it. I will complete it before starting my new trip next month and I am very expecting about it. Thanks for sharing!
I tried your way with Nuvo paint 10 days ago and the result I received over my expectation. I love this paint, it goes on smooth and drys with a beautiful shiny smooth finish. 2.5 quarts did my whole kitchen and a huge cabinet thing I have. I first bought the kit but needed a bit more for everything I needed to do. It does scratch if you drag something over it pretty roughly. But that is typical. So happy with my purchase
Hi, I am attempting to paint my motorhome cabinets and used the primer you suggested. I painted everything! Today I went out and it is scratching off! It is not sticking! I am so upset! What the heck! It did NOT work for me! Now what????
I’m considering doing my 5th wheel cabinets. It is now (retired) my home (Canada).
Thanks for the visuals. Truly great story…
Awesome. This is super helpful! Thanks!
I would have suggested a universal bonding primer from Menards. I just finished painting my 1980s RV cabinets without a hideous smell- it’s not oil based, and with only 2 coats, because we used cheap rollers with a bad nap.
I love, love, love your honesty!! Thank you so much for sharing. I plan on doing my camper this spring. Your post gave me an epiphany! I will do the cabinets and leave the walls for the next project!! I was planning on doing it all at once. I am curious if you will use the same colour on your walls as your cabinets…
Camper from Canada
Painting an rv is the second most fun I’ve had in my life!!! I have found, by error, that using frog tape is very important cause I’m not a good painter, not even close. I am also not able to move the furnature so more taping is necessary. I was thinking about hiring a painter but I’m too cheap so I will just plug along, but the more I think about doing this job the more I procrastinate. Your pictures and explanations will help motivate me. thanks Curt
Your camper looks great!!! Now after looking at this my wife wants to do this on our Class A Motorhome, guess who’s doing the work…me!! HAHAHA well, hopeully it’ll take me a day but I have a feeling it will take me much longer but by looking at your pictures white really does make everything POP!! So I guess, I’m going to be painting my RV as well and will using all your suggestions. Thanks for all the pictures and it looks wonderful!!
BEAUTIFUL BEAUTIFUL job. BRAVO!
What kind of primer did you use the first time? I usually use kilz 2 but i realize that is water based .
Quick question! Will your trailer have to go through a harsh winter? Where I live we have relatively warm summers (+35-40C) but incredibly cold winters (-35-45C). I sooooo want to paint my trailer cabinets but terrified to see what will happen to them with the transition into winter and those super cold months.
On a side note, your cabinets turned out beautiful! You’re frustrating shenanigans paid off, lol!!!
I’m in South Texas so I can’t comment to how it will hold up in the cold. It easily survived the crazy crazy heat though, and my gut says the cold wouldn’t effect the paint.
Thanks for showing. Very helpful!
Leave a Reply Cancel reply
Your email address will not be published. Required fields are marked *
- What’s Your Design Style? Take the Quiz!
- White Paint Colors (The ultimate guide!)
- Blanket Ladder Plans + Dimensions Worksheet
- Gift Guides
- Room Reveals
- Budget Decor
- Fall/Thanksgiving
- DIY Home Improvement
- RV Remodels
- Tools & Tips
- Paint Color Guides
- Painting Resources & Tips
- Condo Renovation
- Our Current RV
- Our First RV
- Our First House
- Shop My Products
- Shop Our First RV
- Loving Lately
- My Amazon Storefront
How to Paint RV Walls
Use these RV interior painting ideas and tips to learn exactly how to paint RV walls. We’re breaking down the exact steps we used to paint our RV walls, cabinets and ceiling to give our camper a brand new look! This is a RV remodel project you don’t want to miss.
RV Interior Painting Ideas & Tips
Paint is o ne of the easiest ( and cheapest ) ways to transform any space. That’s especially true when it comes to remodeling an RV. Painting the interior of an RV can be intimidating , but don’t worry, you can handle the project!
Today we’re breaking down the exact process we used to paint our RV. I’m not gonna lie, it isn’t an easy – but in the end it is SO worth it! Trust me!
How to Paint RV Walls: Video Tutorial
Since writing this post, we’ve painted a second RV and recorded each step of the process.
Check out the video tutorial below to see each of the steps below in action, or continue reading to see the full step-by step written format.
Subscribe and watch more of our RV renovation videos over on our YouTube channel !
Alright, before we get into the RV painting steps, here’s a little before & after motivation.
Painting RV Walls – Before & After
And here’s the same view after 2 long days of work.
See what I mean? Worth it!
Alright, let’s get into the steps. Here’s everything you need to know BEFORE you paint RV interior walls (and cabinets, ceiling, trim, etc.).
How to Paint an RV Interior Step-by-Step Tutorial
This post contains affiliate links, please see my disclosure here for more information.
Supplies Needed:
- Wood filler
- Painter’s tape
- General purpose masking paper
- Hand-masker dispe nser
- TSP surface cleaner
- Oversize Sponge
- Nitrile Gloves
- KILZ Adhesion Bonding Primer
- Paint (we used a the color Alabaster by Sherwin Williams)
- Paint brush & roller
- Graco Magnum paint sprayer (seriously WORTH IT!)
- Disposable Coveralls
Step 1: Prep The Walls For Paint
Whether you’ve completely gutted your RV or just wanting to give it a fresh paint job, you’ve probably got some imperfections in the walls.
Sanding The Walls
While sanding the walls of an RV, you want to be careful not to destroy the outer layer of the RV wall panels. This outer layer seems kind of like wallpaper, but it’s actually usually made from vinyl.
It’s possible to give the whole wall a light sanding without ruining the vinyl coating, and the vinyl seam tape that you find every 4FT between wall panels. Vinyl seam tape is what hides the seams between the the interior wall panels.
I recommend using 220 grit – fine sandpaper (Amazon) to do a quick sanding on all of the wall, ceiling, and cabinet surfaces that you plan to paint. This light sanding will help the primer adhere properly to the walls and other surfaces.
Next, find and fill any holes in your walls using wood filler. We used Elmer’s Carpenter wood filler from Amazon . Our trailer had tons of random small holes from screws, especially in the areas were we removed walls, cabinets and window valances.
Once the wood filler dries, sand it down to create a smooth surface.
Wash the Walls with TSP
Once you’ve finished sanding, and filling all the holes, it’s time to clean the walls to prepare for paint.
While it’s always a good idea to wash down an area before painting, it’s extra important to do so before painting RV walls and ceilings. With all the hauling, camping, and in our case, demo-ing, the interior of RVs can get dirty quick.
RV indoor walls are notoriously difficult to paint because the it’s really difficult for the primer to adhere to the vinyl ‘wallpaper’ coating. Because of this, you want to do everything you can to help it adhere properly.
Doing a light sanding helps, and then finishing your prep with a TSP wash essentially guarantees that your primer will adhere properly.
TSP is a heavy duty cleaner that is preferred by painting professionals to remove pretty much anything from any surface.
Because we bought our RV used, we wanted to make sure there wasn’t any hidden grime on any of the surfaces. We used TSP on every inch of the interior.
The TSP worked great and it’s really easy to use. We simply followed the instructions on the packaging and mixed the powder with water, applied to the area with a sponge and then followed up with a clean sponge to rinse.
Important: There are many important factors like temperature, and humidity that will affect how paint adheres to a surface, so make sure to follow the manufacturer recommendations for your primer and paint. See Step 3 of this tutorial to see which primer I recommend.
Step 2: Tape Off Windows, Doors & Floors
To help this step go by quickly, we used tape-and-paper dispenser from Amazon . The dispenser applies tape to a roll of paper in one step so you can easily tape off large windows and doors quickly.
Make sure to cover up any and all surfaces that you don’t want painted. Since we were replacing the flooring in our trailer, we didn’t have to worry about covering it up.
However, if you’re not replacing your floors then you’ll need to cover them.
Step 3: Use A Bonding Primer
This step is super important! I repeat, DO NOT skip this step.
Like I mentioned in the previous step, RV walls aren’t made of sheetrock like in a normal house, so you need to use a specific type of primer to prep the walls for paint.
Although this isn’t specifically labeled as RV Paint – it’s perfect for the job.
We used KILZ Adhesion Primer from Amazon and highly recommend it. KILZ Adhesion is a unique latex primer developed to bond securely on slick surfaces where traditional water or oil-base primers will not adhere properly.
This couple from Mountain Modern Life used Glidden Gripper Primer (Home Depot) when remodeling and painting their class A motorhome.
Step 4: It’s finally time for paint!
Now that your RV walls are smooth, cleaned, and primed – you’re ready to pick a color, and start those final coats of paint.
If you want some help choosing a color, I wrote a White Paint Color Guide that helps you choose the perfect paint color for your unique house or RV. The color we chose in our RV is Alabaster by Sherwin Williams (SW 7008).
Tip: Once you’ve narrowed your search down to a few favorite colors, test them out with Peel-and-Stick paint samples from Samplize! The Peel-and-Stick vinyl samples use real paint, and make it easy see how a color looks on your walls.
Once you’ve picked a color, it’s time to choose an application method. You can choose to use a paint brush, a roller or, a paint sprayer.
Each of these three options have unique advantages. However, I choose to use an airless sprayer whenever possible!
To paint the walls and ceiling in our RV, we used a paint sprayer. On the cabinets, we used a combination of the paint sprayer, and paint brushes to get even coverage around all of the corners and grooves.
( These are my go-to paint brushes & rollers when I’m not using the sprayer.)
Why Use An Airless Paint Sprayer To Paint RV Walls?
Using an airless paint sprayer will save a ton of time when painting large walls, ceilings, and cabinets. That time savings gets even bigger when you consider doing multiple coats.
We used a sprayer to apply almost every drop of paint inside our RV. After the initial coat of primer, we ended up spraying two coats of finish paint.
Tip: If you choose to paint use a sprayer, be sure to use a respirator . Your lungs will thank you.
I was surprised at how affordable this Graco Magnum airless paint sprayer was from the listing on Amazon.
It worked extremely well for me, and I’ve used it for several projects since then. So far, it has held up great and I highly recommend it.
Depending on the color, you should be able to achieve a flawless looking finish with one coat of primer, and 1-2 coats of paint.
Using quality primer will help make this very feasible. We recommend using this high quality Kilz Adhesion Primer from Amazon .
Because we painted the interior of our RV white, a second coat of finish paint was applied just to be safe, and to ensure that no dark spots, or stains showed through.
Update: We lived fulltime in this RV for just under 2 years and the paint held up amazingly!
5 Tips For Using A Paint Sprayer
These tips will help you get started using a paint sprayer, and maximize your painting productivity.
- Mix your paint thoroughly before spraying. This helps to prevent clogs. (We learned this one the hard way.)
- Prime the sprayer thoroughly. Follow all the priming instructions that come with your specific model of paint sprayer.
- Practice the technique on a test wall (a sheet of plywood, or an extra large cardboard box work well).
- Paint with long, even strokes. You’ll have to develop your own technique with practice, but you’ll catch on quickly!
- Don’t make your coats of paint too thick. It’s tempting to try to pack on all the paint you can in one coat, but thick coats don’t always try properly, and have a tendency to drip, and run. If you end up with drips that you have to sand down and start over, you’ll regret it!
Related: RV Remodel Ideas & Tips – 9 Projects That Will Transform Your RV
Final Thoughts On Painting RV Walls
The interior walls in recreational vehicles are usually made from thin plywood panels and have a special vinyl coating. The special covering is similar to wall paper, and it’s not really designed to be painted.
Because of this, painting the interior of an RV is more difficult than painting standard walls in a residential home. Being meticulous with your prep work is key for painting a RV successfully.
For the best results, be sure to use bonding primer , and follow all the steps in this tutorial.
I hope these tips helped give you the confidence to start painting your RV! It may be a tedious job, but with a little elbow grease, it will make your RV look brand new.
Thanks for reading this How to Paint RV Walls post. Pin it below to reference later.
UP NEXT: RV Remodel Ideas & Tips – 9 Projects That Will Transform Your RV
How to paint rv walls.

How to DIY Two Toned Paint in an Older RV
P ainting your RV kitchen two-toned can be a fun and creative way to give your RV a fresh look. Here’s a step-by-step guide to help you with the DIY two toned paint project.
Similar posts you may like:
- 1972 Streamline Vintage Travel Trailer Renovation Part 8
- 1972 Streamline Trailer Renovation Part 4
- 1972 Streamline Trailer Renovation Part 7
This post may contain affiliate or sponsored content.
Materials you’ll need:
- Painter’s tape
- 320 grit Sandpaper or scuff pad
- Primer (if your paint does not come with primer in it)
- Two different paint colors (one for the upper cabinets and one for the lower cabinets)(I really like Behr paint and would highly recommend it) I chose white for the top cabinets and heritage park green for the bottom. * see note
- Paintbrushes and paint rollers
- Screwdriver (to remove cabinet hardware) or drill with bits for faster job
- Paper towels
- Rubbing alcohol
- *Note: Make sure you get latex paint (not acyrlic) for cabinets.
- **Find inspiration of what color paint to buy, go to Home Depot and check the paint cards.
Directions:
Buy the paint and materials first..
We decided to paint the bottom cabinets heritage park green/grey by Behr. I didn’t want to do white on the bottom because the dirt and fingerprints are way too noticeable. I really like this green shade, it gives it a vintage look especially with the original gold/white hardware.
We removed the microwave because we never use a microwave and haven’t in 10 years. Removed two upper doors and made floating shelves and made a beautiful tea/coffee station. We made the shelves out of pine lumber that we sanded and cleared with Behr Polyurethane Clear Finish. It turned out beautiful.
Preparation
Remove all cupboard doors and all hardware from the doors. Remove drawers and hardware. Use painter’s tape to mask off any areas you don’t want to be painted.
Cleaning and Sanding
Thoroughly clean all surfaces to be painted to remove any grease, dirt, or debris. Lightly sand the cabinets to create a better surface for the primer and paint to adhere to. Wipe away any dust after sanding with rubbing alcohol and a paper towel.
Apply a coat of primer to all the surfaces you plan to paint. Primer helps the paint adhere better and can also block any stains or dark colors from bleeding through your new paint. Let the primer dry according to the manufacturer’s instructions. Remember to check if your paint comes premixed with primer.
Paint the upper cabinets
Start with the upper cabinets. Using your chosen paint color, apply a thin and even coat of paint to the cabinet frames. Start with a brush to get into the edges and corners and then using a roller paint the larger flat surfaces. Paint the cupboard doors outdoors in a clean area. Allow the first coat to dry completely before applying a second coat if needed.
Paint the lower cabinets and drawers
Once the upper cabinets are dry, move on to the lower cabinets using your second paint color. Apply the paint in the same manner as you did for the upper cabinets, using a roller for flat surfaces and a brush for corners and edges. Paint the cupboards and doors outdoors. Allow the first coat to dry, and if necessary, apply a second coat.
Reassemble and Finishing Touches
Once the paint is fully dry, carefully remove the painter’s tape. Reassemble the cabinet doors and reinstall any hardware that you removed. Take your time to ensure everything is back in its place and looks tidy.
Spray paint the vent covers
We painted the orange vent and heater covers black with a spray paint by Behr satin (found at Home Depot).
Conclusion:
Remember, patience is key during this DIY two toned paint project, and it’s essential to follow the manufacturer’s instructions on the paint cans for drying times and other recommendations. By the end of this process, you’ll have a beautiful two-toned kitchen in your RV that you can be proud of!
We purchased a 1996 Mallard 5th Wheel and slowly remodeling it while living in it. If you want to follow along on our journey find us on IG @ shakanranch
The post How to DIY Two Toned Paint in an Older RV appeared first on Shakan Ranch .


40 Facts About Elektrostal
Written by Lanette Mayes
Modified & Updated: 02 Mar 2024
Reviewed by Jessica Corbett

Elektrostal is a vibrant city located in the Moscow Oblast region of Russia. With a rich history, stunning architecture, and a thriving community, Elektrostal is a city that has much to offer. Whether you are a history buff, nature enthusiast, or simply curious about different cultures, Elektrostal is sure to captivate you.
This article will provide you with 40 fascinating facts about Elektrostal, giving you a better understanding of why this city is worth exploring. From its origins as an industrial hub to its modern-day charm, we will delve into the various aspects that make Elektrostal a unique and must-visit destination.
So, join us as we uncover the hidden treasures of Elektrostal and discover what makes this city a true gem in the heart of Russia.
Key Takeaways:
- Elektrostal, known as the “Motor City of Russia,” is a vibrant and growing city with a rich industrial history, offering diverse cultural experiences and a strong commitment to environmental sustainability.
- With its convenient location near Moscow, Elektrostal provides a picturesque landscape, vibrant nightlife, and a range of recreational activities, making it an ideal destination for residents and visitors alike.
Known as the “Motor City of Russia.”
Elektrostal, a city located in the Moscow Oblast region of Russia, earned the nickname “Motor City” due to its significant involvement in the automotive industry.
Home to the Elektrostal Metallurgical Plant.
Elektrostal is renowned for its metallurgical plant, which has been producing high-quality steel and alloys since its establishment in 1916.
Boasts a rich industrial heritage.
Elektrostal has a long history of industrial development, contributing to the growth and progress of the region.
Founded in 1916.
The city of Elektrostal was founded in 1916 as a result of the construction of the Elektrostal Metallurgical Plant.
Located approximately 50 kilometers east of Moscow.
Elektrostal is situated in close proximity to the Russian capital, making it easily accessible for both residents and visitors.
Known for its vibrant cultural scene.
Elektrostal is home to several cultural institutions, including museums, theaters, and art galleries that showcase the city’s rich artistic heritage.
A popular destination for nature lovers.
Surrounded by picturesque landscapes and forests, Elektrostal offers ample opportunities for outdoor activities such as hiking, camping, and birdwatching.
Hosts the annual Elektrostal City Day celebrations.
Every year, Elektrostal organizes festive events and activities to celebrate its founding, bringing together residents and visitors in a spirit of unity and joy.
Has a population of approximately 160,000 people.
Elektrostal is home to a diverse and vibrant community of around 160,000 residents, contributing to its dynamic atmosphere.
Boasts excellent education facilities.
The city is known for its well-established educational institutions, providing quality education to students of all ages.
A center for scientific research and innovation.
Elektrostal serves as an important hub for scientific research, particularly in the fields of metallurgy, materials science, and engineering.
Surrounded by picturesque lakes.
The city is blessed with numerous beautiful lakes, offering scenic views and recreational opportunities for locals and visitors alike.
Well-connected transportation system.
Elektrostal benefits from an efficient transportation network, including highways, railways, and public transportation options, ensuring convenient travel within and beyond the city.
Famous for its traditional Russian cuisine.
Food enthusiasts can indulge in authentic Russian dishes at numerous restaurants and cafes scattered throughout Elektrostal.
Home to notable architectural landmarks.
Elektrostal boasts impressive architecture, including the Church of the Transfiguration of the Lord and the Elektrostal Palace of Culture.
Offers a wide range of recreational facilities.
Residents and visitors can enjoy various recreational activities, such as sports complexes, swimming pools, and fitness centers, enhancing the overall quality of life.
Provides a high standard of healthcare.
Elektrostal is equipped with modern medical facilities, ensuring residents have access to quality healthcare services.
Home to the Elektrostal History Museum.
The Elektrostal History Museum showcases the city’s fascinating past through exhibitions and displays.
A hub for sports enthusiasts.
Elektrostal is passionate about sports, with numerous stadiums, arenas, and sports clubs offering opportunities for athletes and spectators.
Celebrates diverse cultural festivals.
Throughout the year, Elektrostal hosts a variety of cultural festivals, celebrating different ethnicities, traditions, and art forms.
Electric power played a significant role in its early development.
Elektrostal owes its name and initial growth to the establishment of electric power stations and the utilization of electricity in the industrial sector.
Boasts a thriving economy.
The city’s strong industrial base, coupled with its strategic location near Moscow, has contributed to Elektrostal’s prosperous economic status.
Houses the Elektrostal Drama Theater.
The Elektrostal Drama Theater is a cultural centerpiece, attracting theater enthusiasts from far and wide.
Popular destination for winter sports.
Elektrostal’s proximity to ski resorts and winter sport facilities makes it a favorite destination for skiing, snowboarding, and other winter activities.
Promotes environmental sustainability.
Elektrostal prioritizes environmental protection and sustainability, implementing initiatives to reduce pollution and preserve natural resources.
Home to renowned educational institutions.
Elektrostal is known for its prestigious schools and universities, offering a wide range of academic programs to students.
Committed to cultural preservation.
The city values its cultural heritage and takes active steps to preserve and promote traditional customs, crafts, and arts.
Hosts an annual International Film Festival.
The Elektrostal International Film Festival attracts filmmakers and cinema enthusiasts from around the world, showcasing a diverse range of films.
Encourages entrepreneurship and innovation.
Elektrostal supports aspiring entrepreneurs and fosters a culture of innovation, providing opportunities for startups and business development.
Offers a range of housing options.
Elektrostal provides diverse housing options, including apartments, houses, and residential complexes, catering to different lifestyles and budgets.
Home to notable sports teams.
Elektrostal is proud of its sports legacy, with several successful sports teams competing at regional and national levels.
Boasts a vibrant nightlife scene.
Residents and visitors can enjoy a lively nightlife in Elektrostal, with numerous bars, clubs, and entertainment venues.
Promotes cultural exchange and international relations.
Elektrostal actively engages in international partnerships, cultural exchanges, and diplomatic collaborations to foster global connections.
Surrounded by beautiful nature reserves.
Nearby nature reserves, such as the Barybino Forest and Luchinskoye Lake, offer opportunities for nature enthusiasts to explore and appreciate the region’s biodiversity.
Commemorates historical events.
The city pays tribute to significant historical events through memorials, monuments, and exhibitions, ensuring the preservation of collective memory.
Promotes sports and youth development.
Elektrostal invests in sports infrastructure and programs to encourage youth participation, health, and physical fitness.
Hosts annual cultural and artistic festivals.
Throughout the year, Elektrostal celebrates its cultural diversity through festivals dedicated to music, dance, art, and theater.
Provides a picturesque landscape for photography enthusiasts.
The city’s scenic beauty, architectural landmarks, and natural surroundings make it a paradise for photographers.
Connects to Moscow via a direct train line.
The convenient train connection between Elektrostal and Moscow makes commuting between the two cities effortless.
A city with a bright future.
Elektrostal continues to grow and develop, aiming to become a model city in terms of infrastructure, sustainability, and quality of life for its residents.
In conclusion, Elektrostal is a fascinating city with a rich history and a vibrant present. From its origins as a center of steel production to its modern-day status as a hub for education and industry, Elektrostal has plenty to offer both residents and visitors. With its beautiful parks, cultural attractions, and proximity to Moscow, there is no shortage of things to see and do in this dynamic city. Whether you’re interested in exploring its historical landmarks, enjoying outdoor activities, or immersing yourself in the local culture, Elektrostal has something for everyone. So, next time you find yourself in the Moscow region, don’t miss the opportunity to discover the hidden gems of Elektrostal.
Q: What is the population of Elektrostal?
A: As of the latest data, the population of Elektrostal is approximately XXXX.
Q: How far is Elektrostal from Moscow?
A: Elektrostal is located approximately XX kilometers away from Moscow.
Q: Are there any famous landmarks in Elektrostal?
A: Yes, Elektrostal is home to several notable landmarks, including XXXX and XXXX.
Q: What industries are prominent in Elektrostal?
A: Elektrostal is known for its steel production industry and is also a center for engineering and manufacturing.
Q: Are there any universities or educational institutions in Elektrostal?
A: Yes, Elektrostal is home to XXXX University and several other educational institutions.
Q: What are some popular outdoor activities in Elektrostal?
A: Elektrostal offers several outdoor activities, such as hiking, cycling, and picnicking in its beautiful parks.
Q: Is Elektrostal well-connected in terms of transportation?
A: Yes, Elektrostal has good transportation links, including trains and buses, making it easily accessible from nearby cities.
Q: Are there any annual events or festivals in Elektrostal?
A: Yes, Elektrostal hosts various events and festivals throughout the year, including XXXX and XXXX.
Was this page helpful?
Our commitment to delivering trustworthy and engaging content is at the heart of what we do. Each fact on our site is contributed by real users like you, bringing a wealth of diverse insights and information. To ensure the highest standards of accuracy and reliability, our dedicated editors meticulously review each submission. This process guarantees that the facts we share are not only fascinating but also credible. Trust in our commitment to quality and authenticity as you explore and learn with us.
Share this Fact:
- Phone: +90 (212) 875 19 08
- E-Mail: [email protected]
- Company Profile
- Company Policy
- Mission and Vision
- Certificates
- Aluminium Windows
Aluminium Doors
- Aluminium Sliding Elements
- Aluminium Curtain Walls
- Aluminium Skylight Elements
- Aluminium Frames for Safety and Security
- Aluminium Conservatories
- Metal Panel Sheet Claddings
- Aluminium Entrance Frames
- Glass Structures
- Complementary Items
- Lightweight Steel Structures
- Human Resources OPEN
Thermally Broken Doors
Non-thermally broken doors.
- Popular Professionals
- Design & Planning
- Construction & Renovation
- Finishes & Fixtures
- Landscaping & Outdoor
- Systems & Appliances
- Interior Designers & Decorators
- Architects & Building Designers
- Design-Build Firms
- Kitchen & Bathroom Designers
- General Contractors
- Kitchen & Bathroom Remodelers
- Home Builders
- Roofing & Gutters
- Cabinets & Cabinetry
- Tile & Stone
- Hardwood Flooring Dealers
- Landscape Contractors
- Landscape Architects & Landscape Designers
- Home Stagers
- Swimming Pool Builders
- Lighting Designers and Suppliers
- 3D Rendering
- Sustainable Design
- Basement Design
- Architectural Design
- Universal Design
- Energy-Efficient Homes
- Multigenerational Homes
- House Plans
- Home Remodeling
- Home Additions
- Green Building
- Garage Building
- New Home Construction
- Basement Remodeling
- Stair & Railing Contractors
- Cabinetry & Cabinet Makers
- Roofing & Gutter Contractors
- Window Contractors
- Exterior & Siding Contractors
- Carpet Contractors
- Carpet Installation
- Flooring Contractors
- Wood Floor Refinishing
- Tile Installation
- Custom Countertops
- Quartz Countertops
- Cabinet Refinishing
- Custom Bathroom Vanities
- Finish Carpentry
- Cabinet Repair
- Custom Windows
- Window Treatment Services
- Window Repair
- Fireplace Contractors
- Paint & Wall Covering Dealers
- Door Contractors
- Glass & Shower Door Contractors
- Landscape Construction
- Land Clearing
- Garden & Landscape Supplies
- Deck & Patio Builders
- Deck Repair
- Patio Design
- Stone, Pavers, & Concrete
- Paver Installation
- Driveway & Paving Contractors
- Driveway Repair
- Asphalt Paving
- Garage Door Repair
- Fence Contractors
- Fence Installation
- Gate Repair
- Pergola Construction
- Spa & Pool Maintenance
- Swimming Pool Contractors
- Hot Tub Installation
- HVAC Contractors
- Electricians
- Appliance Services
- Solar Energy Contractors
- Outdoor Lighting Installation
- Landscape Lighting Installation
- Outdoor Lighting & Audio/Visual Specialists
- Home Theater & Home Automation Services
- Handyman Services
- Closet Designers
- Professional Organizers
- Furniture & Accessories Retailers
- Furniture Repair & Upholstery Services
- Specialty Contractors
- Color Consulting
- Wine Cellar Designers & Builders
- Home Inspection
- Custom Artists
- Columbus, OH Painters
- New York City, NY Landscapers
- San Diego, CA Bathroom Remodelers
- Minneapolis, MN Architects
- Portland, OR Tile Installers
- Kansas City, MO Flooring Contractors
- Denver, CO Countertop Installers
- San Francisco, CA New Home Builders
- Rugs & Decor
- Home Improvement
- Kitchen & Tabletop
- Bathroom Vanities
- Bathroom Vanity Lighting
- Bathroom Mirrors
- Bathroom Fixtures
- Nightstands & Bedside Tables
- Kitchen & Dining
- Bar Stools & Counter Stools
- Dining Chairs
- Dining Tables
- Buffets and Sideboards
- Kitchen Fixtures
- Wall Mirrors
- Living Room
- Armchairs & Accent Chairs
- Coffee & Accent Tables
- Sofas & Sectionals
- Media Storage
- Patio & Outdoor Furniture
- Outdoor Lighting
- Ceiling Lighting
- Chandeliers
- Pendant Lighting
- Wall Sconces
- Desks & Hutches
- Office Chairs
- View All Products
- Designer Picks
- Side & End Tables
- Console Tables
- Living Room Sets
- Chaise Lounges
- Ottomans & Poufs
- Bedroom Furniture
- Nightstands
- Bedroom Sets
- Dining Room Sets
- Sideboards & Buffets
- File Cabinets
- Room Dividers
- Furniture Sale
- Trending in Furniture
- View All Furniture
- Bath Vanities
- Single Vanities
- Double Vanities
- Small Vanities
- Transitional Vanities
- Modern Vanities
- Houzz Curated Vanities
- Best Selling Vanities
- Bathroom Vanity Mirrors
- Medicine Cabinets
- Bathroom Faucets
- Bathroom Sinks
- Shower Doors
- Showerheads & Body Sprays
- Bathroom Accessories
- Bathroom Storage
- Trending in Bath
- View All Bath
- Houzz x Jennifer Kizzee
- Houzz x Motivo Home
- How to Choose a Bathroom Vanity

- Patio Furniture
- Outdoor Dining Furniture
- Outdoor Lounge Furniture
- Outdoor Chairs
- Adirondack Chairs
- Outdoor Bar Furniture
- Outdoor Benches
- Wall Lights & Sconces
- Outdoor Flush-Mounts
- Landscape Lighting
- Outdoor Flood & Spot Lights
- Outdoor Decor
- Outdoor Rugs
- Outdoor Cushions & Pillows
- Patio Umbrellas
- Lawn & Garden
- Garden Statues & Yard Art
- Planters & Pots
- Outdoor Sale
- Trending in Outdoor
- View All Outdoor
- 8 x 10 Rugs
- 9 x 12 Rugs
- Hall & Stair Runners
- Home Decor & Accents
- Pillows & Throws
- Decorative Storage
- Faux Florals
- Wall Panels
- Window Treatments
- Curtain Rods
- Blackout Curtains
- Blinds & Shades
- Rugs & Decor Sale
- Trending in Rugs & Decor
- View All Rugs & Decor
- Pendant Lights
- Flush-Mounts
- Ceiling Fans
- Track Lighting
- Wall Lighting
- Swing Arm Wall Lights
- Display Lighting
- Table Lamps
- Floor Lamps
- Lamp Shades
- Lighting Sale
- Trending in Lighting
- View All Lighting
- Bathroom Remodel
- Kitchen Remodel
- Kitchen Faucets
- Kitchen Sinks
- Major Kitchen Appliances
- Cabinet Hardware
- Backsplash Tile
- Mosaic Tile
- Wall & Floor Tile
- Accent, Trim & Border Tile
- Whole House Remodel
- Heating & Cooling
- Building Materials
- Front Doors
- Interior Doors
- Home Improvement Sale
- Trending in Home Improvement
- View All Home Improvement
- Cups & Glassware
- Kitchen & Table Linens
- Kitchen Storage and Org
- Kitchen Islands & Carts
- Food Containers & Canisters
- Pantry & Cabinet Organizers
- Kitchen Appliances
- Gas & Electric Ranges
- Range Hoods & Vents
- Beer & Wine Refrigerators
- Small Kitchen Appliances
- Cookware & Bakeware
- Tools & Gadgets
- Kitchen & Tabletop Sale
- Trending in Kitchen & Tabletop
- View All Kitchen & Tabletop
- Storage & Organization
- Baby & Kids
- Housekeeping & Laundry
- Pet Supplies

- View all photos
- Dining Room
- Breakfast Nook
- Family Room
- Bed & Bath
- Powder Room
- Storage & Closet
- Outdoor Kitchen
- Bar & Wine
- Wine Cellar
- Home Office
- Popular Design Ideas
- Kitchen Backsplash
- Deck Railing
- Privacy Fence
- Small Closet
- Stories and Guides
- Popular Stories
- Renovation Cost Guides
- Fence Installation Cost Guide
- Window Installation Cost Guide
- Discussions
- Design Dilemmas
- Before & After
- Houzz Research
- View all pros
- View all services
- View all products
- View all sales
- Living Room Chairs
- Dining Room Furniture
- Coffee Tables
- Home Office Furniture
- Join as a Pro
- Interior Design Software
- Project Management
- Custom Website
- Lead Generation
- Invoicing & Billing
- Landscape Contractor Software
- General Contractor Software
- Remodeler Software
- Builder Software
- Roofer Software
- Architect Software
- Takeoff Software
- Lumber & Framing Takeoffs
- Steel Takeoffs
- Concrete Takeoffs
- Drywall Takeoffs
- Insulation Takeoffs
- Stories & Guides
- LATEST FROM HOUZZ
- HOUZZ DISCUSSIONS
- SHOP KITCHEN & DINING
- Kitchen & Dining Furniture
- Sinks & Faucets
- Kitchen Cabinets & Storage
- Knobs & Pulls
- Kitchen Knives
- KITCHEN PHOTOS
- FIND KITCHEN PROS
- Bath Accessories
- Bath Linens
- BATH PHOTOS
- FIND BATH PROS
- SHOP BEDROOM
- Beds & Headboards
- Bedroom Decor
- Closet Storage
- Bedroom Vanities
- BEDROOM PHOTOS
- Kids' Room
- FIND DESIGN PROS
- SHOP LIVING
- Fireplaces & Accessories
- LIVING PHOTOS
- SHOP OUTDOOR
- Pool & Spa
- Backyard Play
- OUTDOOR PHOTOS
- FIND LANDSCAPING PROS
- SHOP LIGHTING
- Bathroom & Vanity
- Flush Mounts
- Kitchen & Cabinet
- Outdoor Wall Lights
- Outdoor Hanging Lights
- Kids' Lighting
- Decorative Accents
- Artificial Flowers & Plants
- Decorative Objects
- Screens & Room Dividers
- Wall Shelves
- About Houzz
- Houzz Credit Cards
- Privacy & Notice
- Cookie Policy
- Your Privacy Choices
- Mobile Apps
- Copyright & Trademark
- For Professionals
- Houzz vs. Houzz Pro
- Houzz Pro vs. Ivy
- Houzz Pro Advertising Reviews
- Houzz Pro 3D Floor Planner Reviews
- Trade Program
- Buttons & Badges
- Your Orders
- Shipping & Delivery
- Return Policy
- Houzz Canada
- Review Professionals
- Suggested Professionals
- Accessibility
- Houzz Support
- COUNTRY COUNTRY
Custom Cabinet Makers in Elektrostal'
Location (1).
- Use My Current Location
Popular Locations
- Albuquerque
- Cedar Rapids
- Grand Rapids
- Indianapolis
- Jacksonville
- Kansas City
- Little Rock
- Los Angeles
- Minneapolis
- New Orleans
- Oklahoma City
- Orange County
- Philadelphia
- Portland Maine
- Salt Lake City
- San Francisco
- San Luis Obispo
- Santa Barbara
- Washington D.C.
- Elektrostal', Moscow Oblast, Russia
Professional Category (1)
- Accessory Dwelling Units (ADU)
Featured Reviews for Custom Cabinet Makers in Elektrostal'
- Reach out to the pro(s) you want, then share your vision to get the ball rolling.
- Request and compare quotes, then hire the Cabinets & Cabinetry professional that perfectly fits your project and budget limits.
- Custom Bookcases
- Custom Built-ins
- Custom Cabinets – made to fit your specific kitchen, allowing complete customization. You can choose the materials, finishes, and features. Usually are of a higher quality. For example, for a small kitchen with limited space, custom cabinets can be designed to maximize storage and functionality. Contact a local professional in Elektrostal' to order the best cabinets for your kitchen.
- Semi-Custom Cabinets: – offer some customization options within pre-built standard sizes and styles. You can choose from a range of finishes, door styles, and accessories. For instance, you can select a specific color and add features like pull-out shelves or spice racks.
- Prefab (or Stock) Cabinets – pre-made and readily available in standard sizes, styles, and finishes. They are more affordable and convenient for quick installations. An example would be purchasing pre-assembled cabinets from a home improvement store to update your kitchen without any modifications.
- Higher quality and craftsmanship
- More customization options available
- Allows for a personalized and unique kitchen design
- More expensive than prefab cabinets
- Longer production and installation time required
- More affordable option
- Suitable for budget-conscious or time-sensitive projects
- Limited customization options
- Generally lower overall quality compared to custom cabinets
What does a cabinet maker near me do?
Questions to ask a prospective cabinet maker:.
If you search for Cabinet Maker near me you'll be sure to find a business that knows all about the latest trends and styles for your living room, bedroom, kitchen, or whole house remodel. They specialize in crafting cabinets, which are essential storage solutions in any home.
BUSINESS SERVICES
Connect with us.
COMMENTS
4. Sand & prime (as needed). The best way to get good results when painting RV cabinets is to apply a good bonding primer before painting. You'll also need to sand any solid wood and scuff the surface of wood veneer and laminate surfaces. Be sure to wipe off all the dust before you prime or paint.
STEP 1: Remove all doors and drawers. The first step is to use your screwdriver or drill (with a driver bit) to remove all the cabinet doors, drawers and hardware. As you remove each face, use painter's tape to number the space where it goes (on the inside of the cabinet) and the door itself.
Remove any hardware, drawers, and doors. The first thing you need to do is grab a drill and remove everything from the cabinet base. This includes hardware like handles, drawer stops, and cabinet doors or drawers. You'll also need to remove any outlets or other accessories where you'll be painting.
Adding a new coat of paint to even a small portion of your RV can go a long way. Painting the inside of your RV can make it feel more like home and brighten up the space. While the idea of repainting all of the interior walls of your RV may sound exhausting and terrifying, painting the cabinets might sound a little bit more manageable.
Regardless of the type of cabinet, I thoroughly prep the surface using the same steps and technique. Remove all handles and hinges. Lightly sand all surfaces (over sanding will cause the wood to swell). Wipe all surfaces down with a liquid sander. Not everyone does this step, some people prefer the use of TSP or water.
Step 5: Prime the Cabinets. When painting RV cabinets, select a bonding primer or gripper primer with strong adhesion power. Brush or roll a coat of primer on all of the cabinets. Allow the primer to dry as long as directed on the can. Apply a second coat of primer.
Paint. After waiting at least 24 hours after priming, it's time to paint your RV cabinets. Let your first coat of paint dry for about 24-48 hours, then apply a second coat in the same manner. Again, wait 24-48 hours, and once the second coat is dry, be sure to lightly sand and wipe down between the coats.
Learn how to transform your RV cabinets with minimal prep and easy steps. Watch this video and get inspired by the amazing RV remodel results.
1. BEYOND PAINT All-in-One Refinishing Paint. If your camper cabinets need a new coat of paint, BEYOND PAINT is an excellent choice. It gives your RV a modern look, without having to put in a lot of work. The paint has a thick consistency and is great for first-time painters.
The first step is to remove the hinges by unscrewing the screws from the cabinet frames and the backs of the cabinet doors. Also, take out the drawers. 2. Properly clean cabinet frames and doors. Properly cleaning camper cabinet doors before painting is probably the most important step in painting your RV cabinets.
Gently sand these spots until smooth and flush with the rest of the surface. Tip: Sand with the grain of the wood to reduce scratch marks. For the rest of the cabinets, we used 180 grit sandpaper to give all our cabinets a good once over. This is to degloss the surface and get it ready so it'll take the paint well.
Painting camper cabinets can really make a difference in your RV makeover. Find out the best way to paint your cabinets to ensure long lasting results. ... My 1980 travel trailer is set on a permanent slab. I want to change out the hardware on cabinets. It's the locking style knobs. Can I do that ? Reply. Larissa says. June 7, 2021 at 12:22 pm.
Painting your RV cabinets. If you have your paint ready and are prepared for the road ahead, let's start painting those cabinets! 1. Remove the cabinets, prepare your space, and prepare your cabinets. You'll want to begin by taking out all the cabinets you plan to paint, if possible. This makes getting to those hard-to-reach places much easier.
In general, it's best to use a primer of some sort before using actual paint. When painting RV walls, this primer can be a part of the paint itself. However, when painting the cabinets, you are going to need a bit of extra stick. This is thanks to those slippery surfaces, along with the excessive touching and wiping the doors are likely to ...
The quick and easy way to paint your RV is WITHOUT sanding! Just get some acetone to prep the surface and the CORRECT paint. Watch the video as we go through...
Last month we gave you a tour of our totally renovated Grand Design Solitude 310GK Fifth Wheel. We completely painted the interior, including the RV walls, c...
For $8. That's right, $8 worth of oil-based primer is all I needed to end the shenanigans. This primer is amazing, it is what I used for all the cabinets in the house and it is pretty much bulletproof. If you are painting anything that isn't drywall or bare wood, use this. The downside is that it is oil-based, so it smells terrible and is a ...
Step 4: It's finally time for paint! Now that your RV walls are smooth, cleaned, and primed - you're ready to pick a color, and start those final coats of paint. If you want some help choosing a color, I wrote a White Paint Color Guide that helps you choose the perfect paint color for your unique house or RV.
Using your chosen paint color, apply a thin and even coat of paint to the cabinet frames. Start with a brush to get into the edges and corners and then using a roller paint the larger flat surfaces.
Welcome to the 628DirtRooster website where you can find video links to Randy McCaffrey's (AKA DirtRooster) YouTube videos, community support and other resources for the Hobby Beekeepers and the official 628DirtRooster online store where you can find 628DirtRooster hats and shirts, local Mississippi honey and whole lot more!
Hey everyone! Welcome back to another episode and thanks for watching! This past week we got some paint and tackled the cabinets and walls. We used a forest ...
40 Facts About Elektrostal. Elektrostal is a vibrant city located in the Moscow Oblast region of Russia. With a rich history, stunning architecture, and a thriving community, Elektrostal is a city that has much to offer. Whether you are a history buff, nature enthusiast, or simply curious about different cultures, Elektrostal is sure to ...
Mimsa Alüminyum - İstanbul. Adres: BOSB Mermerciler San. Sitesi 4. Cadde No: 7 34520, Beylikdüzü / İstanbul / TÜRKİYE. Telefon: +90 (212) 875 19 08. Faks: +90 (212) 875 58 17. E-Posta: [email protected]. Fasad Stroy - Moscow. Adres: Gorkogo Street 38, Elektrostal - Moscow Region / RUSSIA.
Local cabinet makers design, construct, refinish and repair banks of conventional cabinets, but they also create custom cabinetry, storage and shelving for home offices, playrooms, bedrooms, media rooms and other spaces. They're in the know about Moscow Oblast design trends and different cabinet styles, as well as the latest in special ...