Safari Snorkels were twice awarded Best After Market Product of the Year by 4X4 Australia Magazine, and are distributed extensively in Australia and around the world.
SAFARI AUTOMOTIVE TECHNOLOGY - ABN 75803294474
ALL IMAGES & CONTENTS SUBJECT TO COPYRIGHT
(SAFARI AUTOMOTIVE PTY LTD 1985-2013)
- Find a Store
- Watch List Expand Watch list Loading... Sign in to see your user information
- My eBay Summary
- Recently Viewed
- Bids/Offers
- Purchase History
- Selling/Sold
- Saved Searches
- Saved Sellers
- My Messages
- Get Exclusive Savings
- Expand cart Loading... Something went wrong. View cart for details.

Picture 1 of 3
Safari snorkel x2 pair stickers white graphics decal sticker offroad 4x4.
- 98.8% positive
- Seller's other items Seller's other items
- Contact seller
- Add to cart
- Add to Watchlist
Oops! Looks like we're having trouble connecting to our server.
Refresh your browser window to try again.
Shop with confidence
Item specifics, item description from the seller, postage and handling, sales tax for an item #364896859910, return policy, payment details, hairyfairygraphics, detailed seller ratings, average for the last 12 months, seller feedback (5,667), more to explore:.
- Motorcycle & Scooter Decals/Stickers ,
- Racing Car & Truck Decals & Stickers ,
- Sports Car & Truck Decals & Stickers ,
- Ford Car and Truck Decals and Stickers ,
- Isuzu Car and Truck Decals and Stickers ,
- Australia Car and Truck Decals and Stickers ,
- Toyota Car and Truck Decals and Stickers ,
- Holden Car and Truck Decals and Stickers ,
- Motorcycle Motorcycle & Scooter Decals/Stickers ,
- Kenworth Car & Truck Decals & Stickers

- Air Compressors
- Air Systems Accessories
- Tire Accessories
- Awning Accessories
- Awning Rooms
- Awning Wind Breaks
- Camping Gear
- Fridge Parts & Accessories
- Fridge Slides
- Fridge Transit Bags
- Roof Rack Accessories
- Rooftop Tent Accessories
- Slide Kitchen
- Air Locker Parts & Accessories
- Air Locker Tools
- Differential Covers
- Front Bumper
- Rear Bumper
- Bumper Accessories
- Recovery Points
- Side Rails & Steps
- Skid Plates
- Floor Liners
- Seat Covers
- Drawer Systems
- Storage Accessories
- Driving Lights
- Auxiliary Lighting
- Lighting Accessories
- Off-Road Recovery Kits
- Recovery Boards
- Recovery Straps
- Trail Jacks
- Winch Accessories
- Suspension Kits
- Coil Springs
- Leaf Spring Bushing
- Panhard Rod Bushing
- Shock Absorber Bushing
- Strut Bushing
- Suspension Stabilizer Bar Bushing
- Greasable Shackles
- Panhard Rod
- Suspension Hardware Kit
- Suspension Stabilizer Bar Spacer
- Control Arms
- Leaf Springs
- Torsion Bars
- Merchandise
- Advance search result
- Catalog Search
Breathe easy and roll through rivers; Safari 4x4 off-road snorkels deliver cold, clean air to your engine.
Showing 32 products on the page

- Create New Wish List
Safari ARMAX Snorkel SS450HP

Safari RSPEC Snorkel SS82R

Safari Snorkel Air Ram Grill 000135600

Safari Snorkel Air Ram Grill 000135500

Safari ARMAX Snorkel SS172HP

Safari ARMAX Snorkel SS171HP

Safari VSPEC Snorkel SS1080HF

Safari Snorkel Pre Cleaner PBH000253

Safari VSPEC Snorkel SS420HF

Safari ARMAX Snorkel SS88HPE

Safari Snorkel Air Entry Hose 315-024-500

Safari VSPEC Snorkel SS1070HF

Safari VSPEC Snorkel SS170HF

Safari ARMAX Snorkel SS88HP

Safari ARMAX Snorkel SS89HP

Safari ARMAX Snorkel SS89HPE

Safari Snorkel Air Entry Hose 320-024-200

Safari Snorkel Air Entry Hose 362-024-000

Safari Snorkel Pre Cleaner PBH024256

Safari Snorkel Upper Mounting Bracket 337-032-000

Safari VSPEC Snorkel SS1000HF

Safari VSPEC Snorkel SS1066HF

Safari VSPEC Snorkel SS1130HF

Safari VSPEC Snorkel SS1135HF

Safari VSPEC Snorkel SS190HF

Safari VSPEC Snorkel SS385HF

Safari VSPEC Snorkel SS440HF

Safari VSPEC Snorkel SS445HF

Safari VSPEC Snorkel SS79HFZ

Safari VSPEC Snorkel SS89HF

Safari VSPEC Snorkel SS983HF

Safari VSPEC Snorkel SS56HF
- Aftermarket Headlights
- Daytime Running Lights
- Indicator Guard Repeaters
- Indicator Lights
- LED DRL Grill Inserts
- RGB Headlight Kits
- Tail Lights
- Tailgate Brake Lights
- Bonnet Trims
- Weather Shields
- Number Plate Protectors
- Window Tint & Sun Protection
- Invisible Protection Film
- Fender Flares
- Flare Rubber Gaskets
- Front Fenders (Left)
- Front Fenders (Right)
- Radiator Supports
- Bonnet Scoops
- Door Handles
- Front Bumper Bars
- Rear Bumper Bars
- Tailgate Handles
- Method Race Wheels
- Tyre Accessories
- Clips & Grommets
- Bumper Bar Flare Extensions
- Overflow Bottles
- Washer Bottles
- Number Plate Accessories
- Vehicle Panel Protection
- Neoprene Front Row Seat Covers
- Neoprene Rear Row Seat Covers
- Canvas Front Row Seat Covers
- Canvas Rear Row Seat Covers
- Electric Window Regulators
- Window Switch Buttons
- Sound Deadening
- Cables & Adapters
- Steering Wheel Kit
- Steering Wheel Adaptor Kit
- Steering Wheel Controls
- Steering Wheel Core
- Tail & Headlight Protection
- Underbody Protection
- Hi-Lift Jack Accessories
- Sill & Fender Protection
- Spare Wheel Carriers
- Winch Plates
- Winch Ropes & Straps
- Brackets, Breathers & Spacers
- Offroad Jacks
- Recovery Kits
- Recovery Ropes & Straps
- Hooks & Accessories
- Hooks, Thimbles & Pulleys
- Portable Jump Starters
- Vehicle Recovery Boards
- BBQ Accessories
- Camp Kitchen Accessories
- Coolers & Ice Box's
- Fridge Slides
- Gas Bottle Accessories
- Camp Chairs
- Soft Shell Tents
- Hard Shell Tents
- Portable Speakers
- Camp Lights & Torches
- Lithium Battery Packs
- Rackless Awning Mounting Systems
- Shower Tents
- First Aid Kits
- Ladder's & Step Accessories
- Roof Rack Accessories
- Roof Rack Kits
- Straps & Ratchets
- Battery Box's
- Cup Holders
- Lockable Storage & Safes
- Storage Box's & Accessories
- Water Tanks & Accessories
- Drawer Systems
- Drawer Mounting Kits & Accessories
- Load Bed Cargo Slides
- Performance FMICs
- Replacement Intercoolers
- Intercooler Pipe Kits
- 4x4 Exhaust Systems
- Turbo-Back Exhausts
- Cat-Back Exhausts
- DPF-Back Exhausts
- DPF Adapter Kits
- DPF Delete Pipes
- HIKEit Performance - Throttle Controllers
- Ultimate9 - EVC Throttle Controllers
- Throttle Grenade – Black Ops Offroad
- Performance Chips
- Front Shocks
- Rear Shocks
- Remote Reservoir Shocks
- Suspension Components
- Coil Springs
- Leaf Springs
- Single Row Light Bars
- Double Row Light Bars
- Driving Lights
- Work Lights
- RGB Rock Lights
- Puddle Lights
- Blackout Covers
- Mounting Brackets
- Solar Panels
- Mobile Phone Accessories
- Spiral Whips
- Party Lights
- RGB Headlight Bulbs
- RGB Spare Parts
- Chassis Protection
- Foam Cannons
- Pressure Washer Adapters
- Hanging Air Fresheners
- X-Tra Strength Hanging Air Fresheners
- Fiber Can Air Fresheners
- Fresh Link Air Fresheners
- Spray Air Fresheners
- Vent Liquid Air Fresheners
- Vent Wrap Air Fresheners
- Spray Deodorisers
- Interior Wipes
- Windscreen Banner
- Banner Backing Strip
- Instagram Sticker
- Diecut Stickers
- Holographic Stickers
- ELGlow® FlexLED With Remote
- Door Sill Protection
- Electric Stickers
- The Victorian High Country
- The Great Ocean Road
- Anglesea - The Otways
- Fraser Island
- Toyota Hilux N70 Guides
- Essential Gear for New 4x4 Off-Roaders
- Ford Ranger Raptors vs. 2024 Hilux GR Sports
Country/region
- Australia (AUD $)
- New Zealand (NZD $)
- United States (USD $)
Your cart is empty

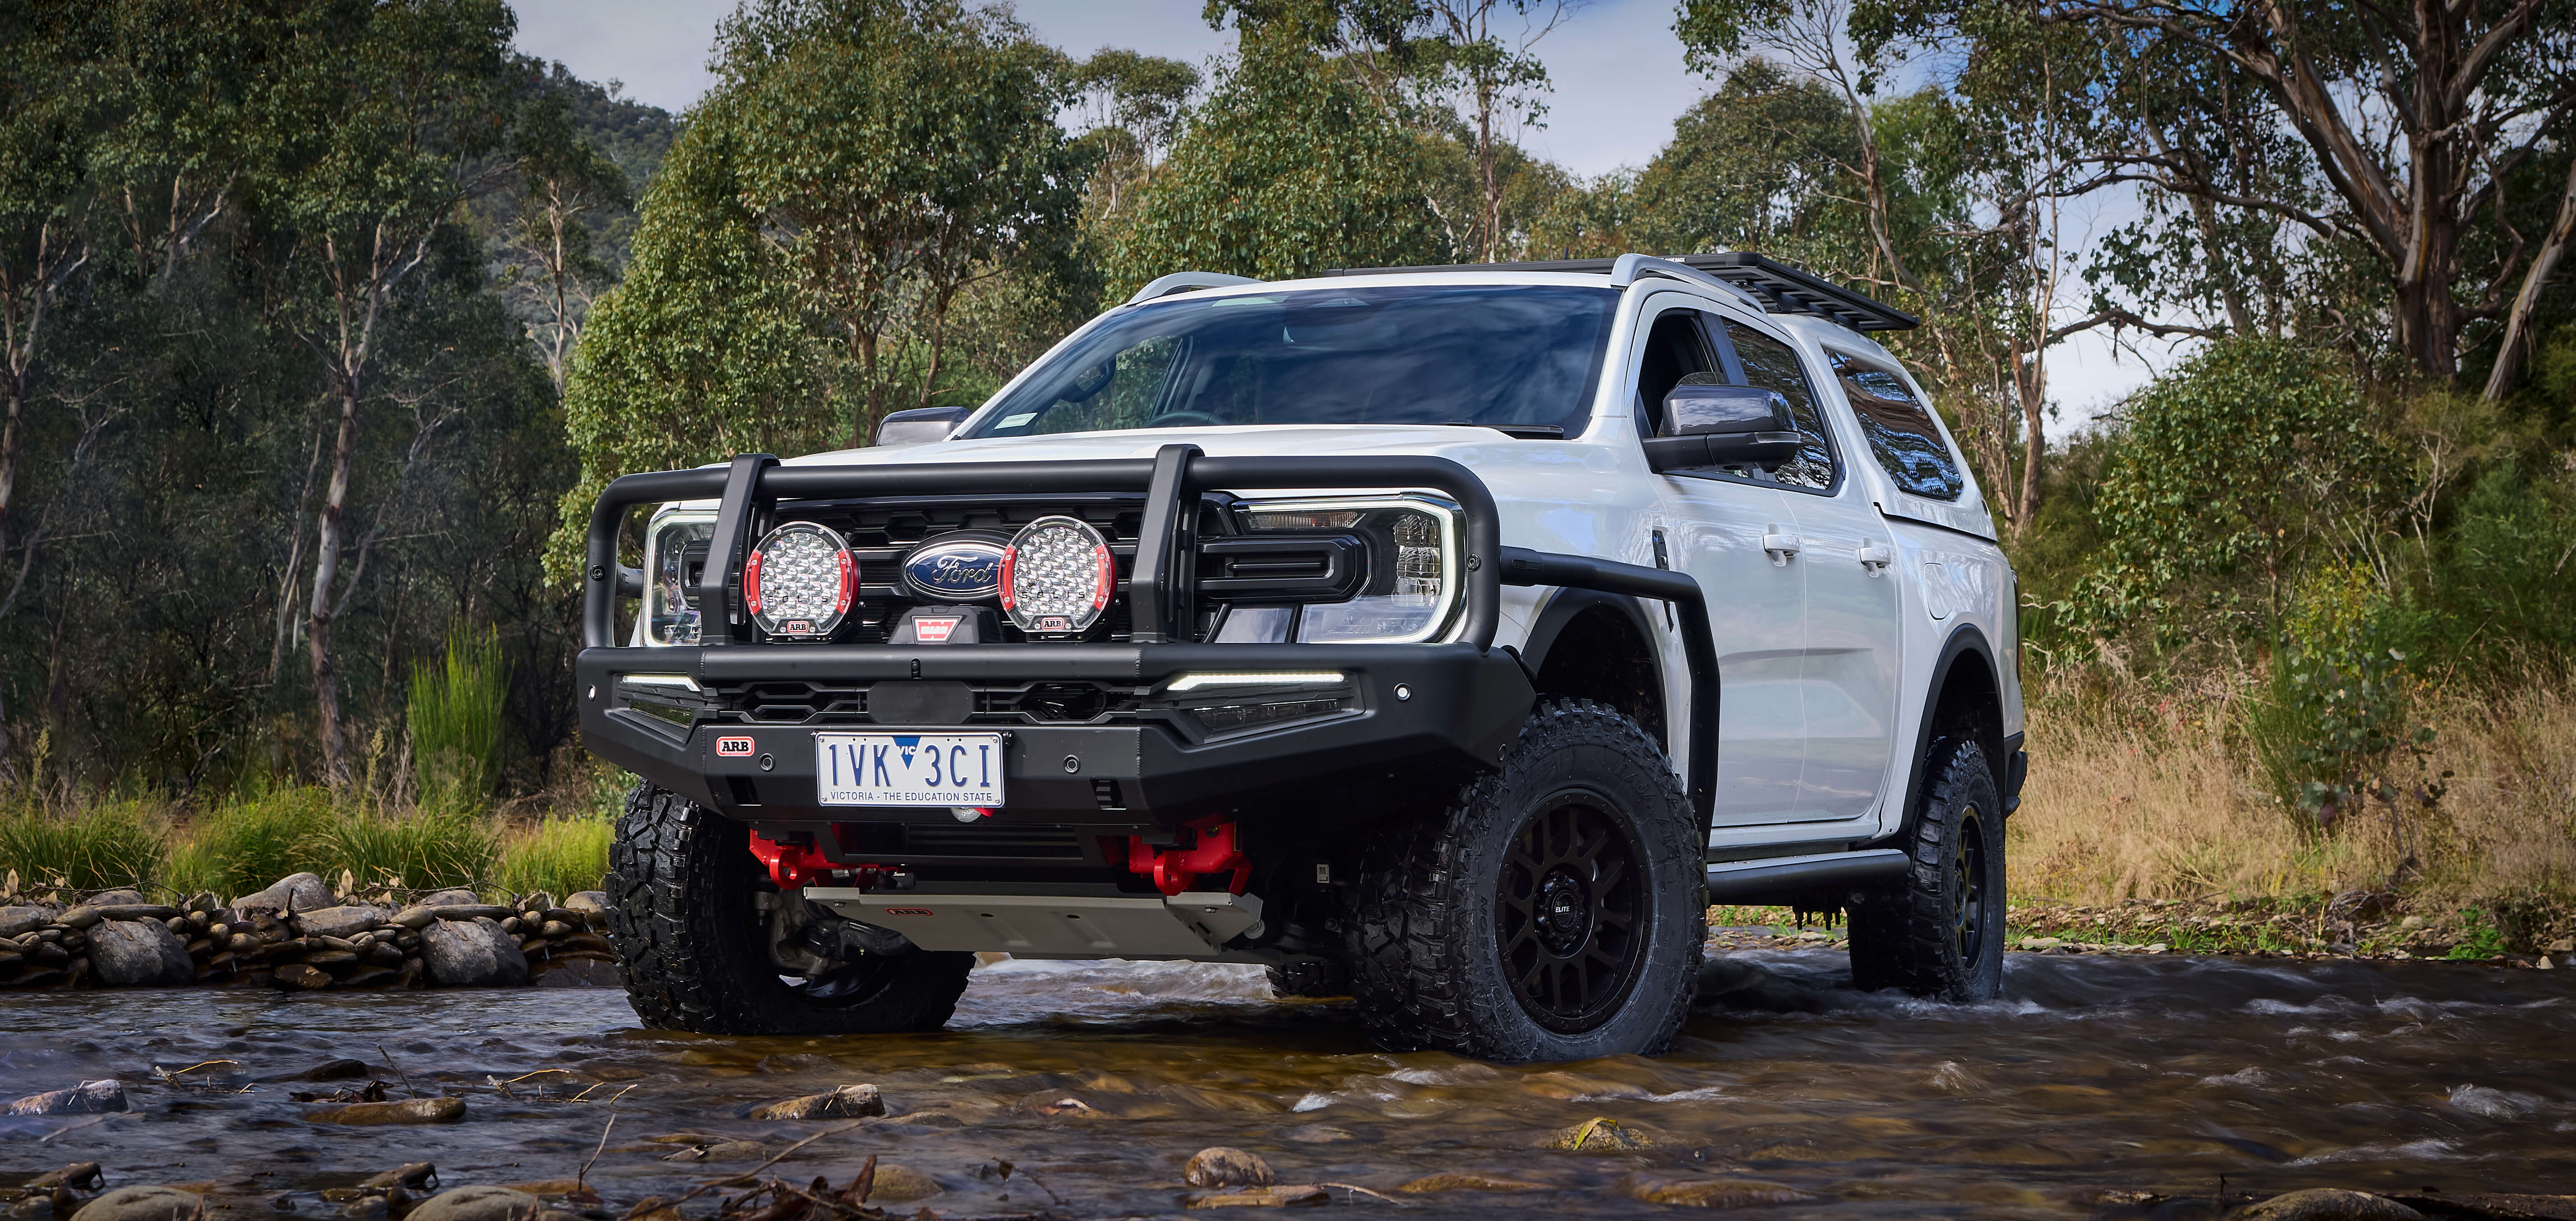
V-Spec Safari Snorkel for Next Gen Ford Ranger & Everest All Engines (06/2022 - on)
Product details.
- Type Snorkel
- SKU SS987HFD
The SS987HFD Safari Snorkel to suit the 2022 Ford Ranger, Raptor & Everest is designed to deliver a huge volume of the coolest and cleanest air possible into the stock air cleaner assembly of the 2.0Ltr Bi-Turbo (YN2S Engine) and 3.0Ltr V6 Diesel. With the huge air flow demands of the 2022 Ford Ranger engines, Safari made the decision to design a snorkel system that raised the air intake to prevent ingesting harmful elements to the vehicle's air cleaner.
Huge air flow is but one aspect of the ultimate in snorkel design. The Safari snorkel air ram is designed to perform two very important roles. The most obvious is to funnel cool clean air into the snorkel body - but just as importantly, the Safari air ram acts as a highly efficient water separator to remove rain water from the incoming air stream - thus ensuring safe engine operation through even the most torrential tropical storms.
Manufactured from Safari's own Industrial Spec UV Stabilised Polyethylene material
Stainless steel mounting hardware EPDM moulded rubber connection hoses to ensure the snorkel lasts the vehicle's lifetime
Water-tight raised air intake for ultimate engine protection against
Water-tight raised air intake for ultimate engine protection against water dust ingress
Australian Made
Lifetime Warranty
Ford Everest (06/2022 - on), Everestii (06/2022 - on)
Ford ranger (06/2022 - on).
- Style: V-SPEC
- Material Type: UV Stabilised Polyethylene
- Fitment Side: Drivers Side
- Fitting Time Approx: 3
- Download Instructions (SS987HFD)
Select your vehicle
- Price List Go Clear Download
- Find Stockist Go Clear View
SAFARI SNORKELS
- Ford Ranger Next-Generation (2022 – Present)
Safari Snorkels
Utilising Safari‘s traditional design concepts and incorporating the very latest in scanning and CAD design software, Safari‘s V-Spec Snorkel for the Next-Generation Ford Ranger/Everest is ready to perform in the most extreme environments, protecting the vehicle’s engine against water, dust, and snow ingress while delivering cool, clean air to the engine.
Fully designed and manufactured in Australia, tested and verified on a custom flow bench to ensure the airflow meets or exceeds the factory inlet design. The Safari Snorkel offers the best air intake protection and performance for today’s 4WD vehicles.
Clever Design

Safari’s Air Ram system is a pivotal and functional attribute of the snorkel; CAD and lab tested, the Air Ram is designed to simultaneously remove the maximum volume of water from the incoming air stream, while delivering the maximum airflow to your vehicle’s engine.
Durable Materials

Safari snorkels utilise a UV stable polyethylene body which ensures a strong and robust fitting to the outside of your 4×4, complemented by high-grade stainless steel and plated hardware for corrosion resistance on all internal and external fittings and fixtures. All Safari connection ducting is custom designed and tooled and is manufactured from EPDM moulded rubber, rated to a continual 130°C operating temperature. There is nothing better!
Vehicle Specific

Nothing fits like Safari. As a result of the intricate design process, working with a combination of CAD modelling and actual vehicles, Safari snorkels are manufactured to integrate seamlessly. Where other products might look similar, none are developed with such attention to detail from the air-box back to the Air Ram to work perfectly with your vehicle.
Safari Snorkel Features

Reduces dust intake in Outback conditions
Safari snorkels are ideal for convoy driving where severe dust can have a detrimental effect on your engine’s performance.

Protects Your Engine From Water
Keep your engine dry and your 4WD moving during water crossings, Safari snorkels reduce the likelihood of engine damage.

Pre Cleaner Compatible
Safari snorkels are fully compatible with optional 7″ or 10″ pre cleaners on some models.

Maintains Fresh Air For Your Engine
High flow air ducting and body ensures air supply is in excess of engine requirements.

Uncover the gear as well as some tips you'll need for your next adventure off grid!

Discover ARB's all-new Slide Kitchen and more

View online or pick up in store
Your Preferred Store ARB Store Search Find Your Nearest Store View Details Australia International --> Find Closest Search or --> or located km away View Details View all Stockists

Subscribe to ARB to receive your regular 4x4 CULTURE magazine, exclusive ARB promotional news and new product release information.
- first_name *
- last_name *
- Country * Afghanistan Albania Algeria American Samoa Andorra Angola Anguilla Antarctica Antigua and Barbuda Argentina Armenia Aruba Australia Austria Azerbaijan Bahamas Bahrain Bangladesh Barbados Belarus Belgium Belize Benin Bermuda Bhutan Bolivia Bonaire, Sint Eustatius and Saba Bosnia and Herzegovina Botswana Bouvet Island Brazil British Indian Ocean Territory Brunei Darussalam Bulgaria Burkina Faso Burundi Cambodia Cameroon Canada Cape Verde Cayman Islands Central African Republic Chad Chile China Christmas Island Cocos Islands Colombia Comoros Congo, Democratic Republic of the Congo, Republic of the Cook Islands Costa Rica Croatia Cuba Curaçao Cyprus Czech Republic Côte d'Ivoire Denmark Djibouti Dominica Dominican Republic Ecuador Egypt El Salvador Equatorial Guinea Eritrea Estonia Eswatini (Swaziland) Ethiopia Falkland Islands Faroe Islands Fiji Finland France French Guiana French Polynesia French Southern Territories Gabon Gambia Georgia Germany Ghana Gibraltar Greece Greenland Grenada Guadeloupe Guam Guatemala Guernsey Guinea Guinea-Bissau Guyana Haiti Heard and McDonald Islands Holy See Honduras Hong Kong Hungary Iceland India Indonesia Iran Iraq Ireland Isle of Man Israel Italy Jamaica Japan Jersey Jordan Kazakhstan Kenya Kiribati Kuwait Kyrgyzstan Lao People's Democratic Republic Latvia Lebanon Lesotho Liberia Libya Liechtenstein Lithuania Luxembourg Macau Macedonia Madagascar Malawi Malaysia Maldives Mali Malta Marshall Islands Martinique Mauritania Mauritius Mayotte Mexico Micronesia Moldova Monaco Mongolia Montenegro Montserrat Morocco Mozambique Myanmar Namibia Nauru Nepal Netherlands New Caledonia New Zealand Nicaragua Niger Nigeria Niue Norfolk Island North Korea Northern Mariana Islands Norway Oman Pakistan Palau Palestine, State of Panama Papua New Guinea Paraguay Peru Philippines Pitcairn Poland Portugal Puerto Rico Qatar Romania Russia Rwanda Réunion Saint Barthélemy Saint Helena Saint Kitts and Nevis Saint Lucia Saint Martin Saint Pierre and Miquelon Saint Vincent and the Grenadines Samoa San Marino Sao Tome and Principe Saudi Arabia Senegal Serbia Seychelles Sierra Leone Singapore Sint Maarten Slovakia Slovenia Solomon Islands Somalia South Africa South Georgia South Korea South Sudan Spain Sri Lanka Sudan Suriname Svalbard and Jan Mayen Islands Sweden Switzerland Syria Taiwan Tajikistan Tanzania Thailand Timor-Leste Togo Tokelau Tonga Trinidad and Tobago Tunisia Turkey Turkmenistan Turks and Caicos Islands Tuvalu US Minor Outlying Islands Uganda Ukraine United Arab Emirates United Kingdom United States Uruguay Uzbekistan Vanuatu Venezuela Vietnam Virgin Islands, British Virgin Islands, U.S. Wallis and Futuna Western Sahara Yemen Zambia Zimbabwe Åland Islands
Subscribe to ARB
- Bull Bars & Protection Equipment
- Drawers & Cargo Solutions
- Ute Lids & Tub Accessories
- Portable Fridge Freezers
- Air Lockers
- Air Compressors & Tyre Accessories
- Rooftop Tents
- General Accessories
- Fuel Tanks and Storage
- Driving Lights
- Dual Battery and Solar Systems
- Recovery Equipment
- The Low Down
- Destinations
- Reader Writes
- Travel Tips
- 4wding Abroad
- 4×4 Fit Outs
- At ARB, We Get It
- Vehicle Weights
- Kids Corner
- 4X4 For Beginners
- Service and Parts Manual
- Store Locator
- Join our Mailing List
- ARB Catalogue
- ‘Just Gotta Ask’
- Merchandise
- Sponsorship Requests
- ARB Off Road Racing Series
- News And Releases
- Calendar of Events
- Investor Relations
- New Zealand
- Latin America
- Old Man Emu
- Dealer Portal
Share this page

Log in or Sign up

- Search titles only
Separate names with a comma.
- 1523993512" id="search_bar_group_pages_after" class="AutoChecker" data-uncheck="#search_bar_nodes" /> After page 1
- Display results as threads
Useful Searches
- Recent Posts
You are using an out of date browser. It may not display this or other websites correctly. You should upgrade or use an alternative browser .
Welcome to Tacoma World!
- Participate in all Tacoma discussion topics
- Communicate privately with other Tacoma owners from around the world
- Post your own photos in our Members Gallery
- Access all special features of the site

3rd Gen Safari Snorkel Install - How To Article
Discussion in ' 3rd Gen. Tacomas (2016-2023) ' started by Hodakaguy , Apr 8, 2018 .

#1 Hodakaguy [OP] Well-Known Member
SAFARI SNORKEL INSTALL GUIDE This is a step-by-step guide on installing a Safari Snorkel on a 3rd Gen Tacoma. The installation is pretty straight forward for the most part, if your handy with tools you shouldn't have any issues installing this unit. Tools and supplies needed: *10mm socket *12mm socket *Flat Blade Screwdriver *Medium Strength Loctite - Available here: CLICK HERE *13mm wrench (Ratcheting Preferred) *10mm wrench *Drill *Drill Bits - Pilot bit/final bits. *Half Round and Rat Tail (Round) file s *Jig Saw with thin metal blade *Painters tape *Metal Primer and Paint *Side Cutters Optional supplies: *7 new OEM inner fender screw grommets for the inner fender. Makes the job easier and faster. (These are available at the dealer or aftermarket below) Toyota part number: 9018906236 You can also get aftermarket units that are cheaper than OEM: CLICK HERE *3M Acrylic Plus Trim Tape 06384 (Modified Upper Snorkel Bracket Install) *Body fastener removal tool - Available here: CLICK HERE Removing the air box: Start by opening the clip that holds the wiring for the mass air flow sensor. Insert a small screwdriver in the back edge of the clip and pry downwards to release. Now remove the connector to the mass air flow sensor, squeeze the connector at the top and pull upwards to release. Take the wiring and loop it back to the firewall, you can hook the connector on the wiring bundle to keep it out of the way. Loosen the hose clamp holding the air box assy to the intake tube. Remove the upper portion of the air box and air filter, set them to the side. Now remove the three bolts holding the lower air box to the fender. Remove the lower air box assembly from the truck and set it to the side. Using tape close up the intake tube to the engine to keep any dirt or debris out while the work is being performed. This is the hole in the fender that the new Safari air boot will pass through. Removing The Inner Fender Liner. This part of the job is the biggest pain, it's not that hard just tedious getting all the clips out. The inner liner is held in place with a combination of retaining clips, screws and fasteners. I will be leaving the fender flares in place during this process to eliminate the risk of breaking the retaining tabs on the flares during removal. You can remove the flares if you choose for your install. Remove all the retaining bolts with 10mm heads (10 Total). Three of them are hidden up under the lower lip of the fender flare, you can easily see them by looking up under the lip of the flare. The front lower retaining bolt is longer, take note of this and re-install it in the same location. The rear lower bolt has a wider backing face on it than the others, make sure this gets re-installed in the same location as well. This fastener is on the front edge of the fender flare, you turn it 90 degrees with a screwdriver and pull to remove it. Now to remove the inner fender screw grommets. There are 13 of these total. These can be a little tricky to remove, the grommets are square and there are two tabs that need to be compressed to get the fastener to release. You can use a couple screwdrivers, a special tool for these style clips or just use a set of side cutters and cut the fasteners off then replace with new units when re-installing. I'll be doing a combination of removal with tool and cutting to make the process easier. The tool I'll be using to remove the clips. Here's a pic of a removed grommet. Seeing this will give you a better idea on how to go about removing it. The two retaining tabs (Red Arrows) need to be compressed while you pull the grommet outwards. The two tabs are on opposite corners meaning the other two corners have no areas to be compressed. When using the tool or screwdrivers make sure you are working on the corners that have the tabs. This picture shows how the tool engages the grommet and compresses the tabs. Two more fasteners need to be removed. The left one (Red Arrow) holds the splash shield onto the frame. Just pry under this fastener with a screwdriver and it will pop right out. The other fastener (Blue Arrow) releases by prying the center button up then pulling the whole fastener out of the frame. You can do this will a screwdriver or a special tool. There are 7 grommets hidden under the lip of the fender flare (Red Arrows show a couple of them). These are harder to remove with the fender flare in place, as mentioned above I will be leaving the flares on for this install so I will cut these 7 grommets with side cutters and install new grommets when re-installing. Gently pull the edge of the flare back, insert the side cutters and cut the head off the grommet. With all the fasteners removed you can remove the inner fender liner from the truck. Start at the front of the truck by pulling down on the back edge of the liner and work your way to the rear. Once the back side is released push the whole liner towards the engine and out from behind the fender flare. Set the liner to the side. Looking up into the fender well with the liner removed. Drilling and Cutting The Holes: Time to lay out the areas to be drilled and cut. Pop the center piece out of the provided template. Line up the upper edge of the template with the top edge of the fender and the rear edge of the template with the rear edge of the fender. Using painters tape attach the template into position. Using a fine tip marker mark the hole locations onto the fender. Once marked remove the template from the fender. Here I'm using a spring loaded center punch to mark the center of the holes. Next drill a pilot hole at each hole location. Now drill the holes to final size. I drilled them to 11/32 (slightly over size) as it gives you a little room to get the snorkel on and off the truck without the threads grabbing while doing fit up work. The tape in the picture keeps metal shavings from getting down between the flare and the fender. I also drilled a hole close to the line on the center cut out location, this hole will give you a place to start using the saw. Apply painters tape around the marked center hole to keep the fender from being scraped up during the cutting process. I'll be cutting the center hole with an air powered saw, you can use a jig saw as well. Using the saw cut out the center hole. Use a half round file and a Rat tail file to clean up all the freshly cut edges, file them smooth and eliminate any sharp edges, burrs etc. I like to use a De-Burring tool to clean up the smaller holes, a rat tail file will also work fine. De-Burring tool. Edges cleaned up and ready for test fitting. Preparing The Snorkel: Installing the mounting studs on the snorkel. I like to use Loctite 243 for my go to medium strength locking compound. 243 will set even when surfaces aren't perfectly clean unlike 242 that requires very clean surfaces. Place a bit of Loctite on the studs and thread them into the back of the snorkel assy, snug them up tightly by hand. Test Fitting: At this point you will want to test fit the snorkel into place on the truck. Some holes may need to be slightly filed (oval shaped a bit) for clearance with a rat tail file (The template is very close but isn't perfect). You might find that it's easier to over size one or two holes slightly if they are hanging up on a stud by drilling them to the next size . CAUTION: The snorkel should go on easily without much effort, if it's tight don't pound the snorkel onto the truck or the threads on the studs will grab the fender when you try to pull the snorkel back off and make removal very difficult. Prepping The Edges: Once the test fitting has been completed it's time to seal the bare edges of the holes with primer and paint. I let the paint dry over night in the garage and finished the install the next morning. You could get away with installing the snorkel faster if needed. Primer and Paint applied. Modifying The Air Box: While the primer and paint is drying it's a great time to get the air box modified to accept the snorkel's rubber boot. You will need to remove the factory intake tip on the lower air box. The tip can be removed by prying with a screwdriver at the retaining clip point on each side of the tip (Red Arrow). Set the tip to the side as you won't be re-using it. Next you will need to remove the three index ridges and the two clips on the side of the air box piping (Red Arrows). This area needs to be smooth so the Snorkel's rubber intake boot will slide onto the air box and seal tightly. Use the side cutters to clip the index ridges as low as possible. Now use a file to finish smoothing off the ridges and side clips. The intake piping should be smooth all the way around now. Installing The Snorkel Rubber Air Boot: Here is the supplied snorkel rubber air boot. The red arrow is pointing to the indent where the boot passes through the factory hole in the fender. Install the boot from up under the fender, fold the tip of the boot to get it to squeeze through the hole in the fender. At this point place the two silver hose clamps on each end of the rubber boot, don't tighten them at this point . Re-install the lower portion of the factory air box and install it into the rubber air boot. Tighten the three air box bolts down but don't tighten the hose clamp on the boot at this point . Installing The Snorkel: Place a very thin layer of lubricant on the edge of the snorkel to air boot connection. Install the snorkel onto the truck making sure that the air boot slides into the snorkel during assembly. Reach up under the fender and install the supplied washers and lock nuts. Leave these a tad loose at this point . Installing the vertical snorkel support bracket - MODIFIED INSTRUCTIONS The Safari instructions tell you to mark out the bracket on the A pillar and drill three holes, the supplied plastic retaining nuts snap into the holes then the provided screws will attach the bracket to the A pillar. I don't mind drilling/cutting holes in the fender but don't want to drill any holes in the body/A-Pillar. If you would like to utilize the factory hardware follow the Safari instructions at this point. Modified A-Pillar Bracket Install Instructions : Instead of drilling into the A-Pillar I will use 3M tape to attach the support bracket to the A-Pillar. This tape is VERY strong and holds extremely well, I've used it in the past with great results. Best thing is this is fully reversible (can be removed by sawing through the tape with a piece of fishing line) and creates no leak points into the cab. 3M Tape being used. Tape applied to the back side of the support bracket and trimmed to shape with a razor blade. With the snorkel bolts still loose under the fender there is a little flex in the snorkel assembly. Pull the snorkel forward a bit, slip the support bracket into position on the snorkel (with the backing removed on the tape), snug the bracket up on the snorkel and press the snorkel against the A-pillar. At this point to snorkel is locked onto the A-Pillar. Now go back up under the fender and tighten the 6 mounting nuts. A 13mm ratcheting wrench works perfectly in this space, especially on the front two nuts as there is limited space available for tools. Tighten the two silver air boot hose clamps at the snorkel and air box connections. Finishing Up: Re-install the air filter and upper air box lid. Re-connect the mass air flow sensor connector at this point as well. I like to apply a thin layer of grease on the air filter seal, this ensures no fine dust can make it's way around the seal and into the engine. Re-install the inner fender liner. Do the reverse of the removal process, get the lip under the fender flare started first and work your way from rear to front. Install new clips at this point if you decided to cut any of them during the removal process. Re-install the hardware and retaining clips removed during the removal process. Using the supplied black hose clamp install the intake onto the snorkel. And the job is all finished The fit and finish of the Safari unit is top notch! Feel free to ask any questions that might come up during the install. Hodakaguy

#2 Bascoma I smell dog poop.....
Wow. Awesome write up!
#3 Taco16LB Well-Known Member
Very nice write up .
#4 Hodakaguy [OP] Well-Known Member
Bascoma said: ↑ Wow. Awesome write up! Click to expand...

#5 valley_taco Well-Known Member
Awesome write-up!

#6 2016trdtacoma Well-Known Member
GREAT write up! Thanks for the detail in the instructions! Sticky game for sure IMHO.

#7 Bertw192 Well-Known Member
I have no intent to install a snorkel... ever. I just don't have a need for one... but that write up was awesome and I enjoyed the read. Like watching one of those garage TV shows, but more info and complete. Well done!

#8 Lost In The Woods 4 out of the 5 voices in my head say go for it!

Nice wright up! Subbing for future reference.

#9 Black taco. Well-Known Member
I can’t believe you had the balls to cut a hole in that beautiful Tacoma.
#10 Black taco. Well-Known Member
Also very well done.
#11 Hodakaguy [OP] Well-Known Member
Black taco. said: ↑ I can’t believe you had the balls to cut a hole in that beautiful Tacoma. Click to expand...
#12 remgu2000 Keepin' on keepin' on.
Hodakaguy [OP] said: ↑ No Fear! Worst case if you decided you didn't like it down the road you could just have a body shop install a new fender....bam, back to stock Hodakaguy Click to expand...

#13 tacofort Well-Known Member
How long do you think it would take to do the mod with all the parts, pieces and paint at hand and ready to go?
#14 tacofort Well-Known Member
tacofort said: ↑ Snorkel went on Last night Click to expand...

#15 Joe23 Canuckistikian
Bookmarked. Need to do this when it warms up a bit more

#16 SocalTaco15 Well-Known Member

Bad ass write up. Nice work OP.

#17 Garyji Well-Known Member

Not something I would ever need to do, but a really awesome write-up. G.

#18 MGMTaco17 Well-Known Member
Great write up wow

#19 brentw59 Well-Known Member
Hey did you use factory grommets to replace the ones you cut or did you use something else?
#20 Hodakaguy [OP] Well-Known Member
brentw59 said: ↑ Hey did you use factory grommets to replace the ones you cut or did you use something else? Click to expand...
Products Discussed in Entire Site Forum: 3rd Gen. Tacomas (2016-2023)

- No, create an account now.
- Yes, my password is:
- Forgot your password?
- Get Started
- Accessories
- Acc Lighting
- Front Bumpers
- Rear Bumpers
- Rock Sliders
- Skid Plates
- Trail Tested
- Maintenance
3rd Gen , Accessories , Install , Off-Road , Overland , Review
Arb safari snorkel 3rd gen tacoma review.

Alright, here we go… a mod that I probably waited too long to do. The snorkel.
Before my Tacoma, I had a 4th Gen 4Runner. That truck ran a snorkel for two, call it main reasons.
- 1. It sealed up my exposed air box (missing fender liners) and lifted the air intake to the roof line.
- 2. It looked super rad (in my opinion).
However, that snorkel was a cheap Amazon find. It was for an 80 series (I think). It worked ok. Got the job done. Didn’t sit well or really have any instructions or anything. It also needed a ton of modification. For example, I had to cut into the body to make room for the new tubing – there was no way it was going to fit any other way. The point is.. it worked, but not in a very calculated fashion.
This time, I knew what I wanted (needed). A tried and true, tested system with EVERYTHING I needed, right off the bat. And the ARB warranty and support – which has always been good to me.
Enter the ARB Safari Snorkel. Let’s run through a quick installation guide (ARB also provides one) and review.
ARB is currently sold only through retailers. I got this one from Mudify. These guys stock a ton of ARB products for fast shipping, and also have good customer service.
Find It Online
- ARB Safari Snorkel (3rd Gen Tacoma): Check Price
Table Of Contents
Why should you add a snorkel.

What Is A Snorkel?
A snorkel is a series of tubing, connections, and airways that takes the point of air intake from a lower point on the vehicle (passenger wheel well, under fender liner) and moves it closer to the roof line. The result is a sealed system that allows temporary exposure to water that may have otherwise been taken into the intake, and immediately into the motor. This would cause catastrophic failure in the form of hydro-lock. Yes, that means a new motor. Not cheap.
Think of it as cheap insurance – especially if you wheel your truck. Exposing your intake to water, especially as a newer driver, is easier than you might think. And freak accidents can happen. Investing in one is a great preventative measure.
Why Would You Want One?
I’m not going to go into anything crazy complicated here. There are a few main reasons to add a snorkel, and a few secondary reasons that I’m sure are up for debate.
First, and most obviously, as described, is moving the air intake out of harm’s way from potential water intrusion. This can protect your vehicle and decrease the likelihood of water getting into your motor. It can also allow you to risk doing deeper water crossings. This can be expanded to include dust, since the fenders are typically more exposed to dust off-road than the roof. So you are avoiding unnecessary dust intake. This can further be improved upon with a pre-cleaner.
Many would argue that a snorkel is a sort of “cold air intake” where air in the fender can potentially be warmer than the ambient air outside. I would guess this applies more to slower driving, as the air movement as you drive 50, 60, 70+ mph on the highway may negate that. However, I still think there is somewhat of a valid point here.
A different line of thinking could also suggest that since the new intake head on the snorkel is bigger than the factory opening, and that it usually faces the rushing air as you drive, that is allows the motor to “breathe” easier. Don’t quote me. I’m not saying you’re getting any true forced induction. But another idea I’ve seen discussed.
Key takeaway – snorkels have value relative to their cost to the decreased risk involved with off-road and overland travel. With some secondary effects. Pretty simple.
This is all reinforced the harder you wheel, and the more water/dust you see. One is especially useful if you lose your fender liners like I did, when I trimmed my fenders/flare for tire clearance.
Installation

Install is not as bad at you might think. The right tools are important. You should have a good understanding of hand tools. But there is some room for error when it comes to cutting and drilling. Just move carefully, and really make sure everything lines up. Check it ten times if you have too. Worst case – you can buy a new fender. But we don’t want to do that. So use this guide and take your time.
ARB also gives you detailed instructions.
Required Tools
- Mechanic’s toolset
- Drill + bits
- Cutting tool (jig saw, or similar)
- Dremel (or some kind of smaller saw/cutting tool)
- Screwdrivers
- Utility knife
- Painter’s tape
- Double-sided exterior automotive molding tape (optional)
Step 1. Remove Air Box

To start, I’ve seen people get really into removing extra components. Wiring, separating the top of the airbox from the intake, etc.
While you can do that for peace of mind, there is plenty of slack to work with, and you should be able to save some time.
Unclip and open the airbox. Pull out your filter. Check to see if it needs replacing.

Next, take out the bottom portion of the airbox. There are three screws total. Two are pictured here. One is to the left of the box.
Step 2. Remove Air Inlet & Trim Air Box

Once you have the airbox out, remove the inlet, seen in the picture above on the bottom. You can dispose of this.

You will need to trim the mounting tabs for the inlet you just removed. I used a Dremel. Simple and easy. Final cuts seen above.
Step 3. Apply Template & Mark Holes

Now apply the provided template to your passenger’s side fender. Make sure that all the lines are evenly matched to the ends of the fender.
Carefully tape it into place. Second set of hands here is nice.
Take a marker and mark all the holes.
Step 4. Drill & Cut Holes

Now drill the holes. Use a step bit, or step up your drill bit size for a clean hole. I used two drill bits to make the smaller holes.
I also make a hole in the larger circle with enough room to get my jigsaw into. Then I made the entire cut. This helps to make it look cleaner.
You don’t have to use a handheld jigsaw, but it is quick and easy.
DO NOT use a hole saw here. It’s a terrible mistake and you will do damage.

Clean up any burrs. I also used a Q-tip dipped in a small cup of some black spray paint to protect the bare metal on all my cuts. I would not skip this step.
Step 5. Install & Secure Flexible Tube

It’s important to note, if you don’t have an aftermarket bumper or cut fenders/flares like I do, you will need to remove your liner beforehand. There are several clips and a few screws to pop the liner out.
Once the liner is removed, take the large rubber connector tube and insert it through the factory intake inlet hole. There is a notch on the tubing so you understand its orientation. A good reference photo is seen above.

A shot from the inside of the engine bay. Make sure to put the hose clamp on before you reinstall the airbox.

Attach the airbox to the new intake tubing. This can be tedious. Install the tube before you secure the airbox again.
The hose clamp might give you a hard time. Make sure it is sitting in the groove on the tube all the way around. You will have to feel around to make sure. This is crucial because you need a good seal here.
Once that is done, you can reattach the airbox, and reassemble the filter, cover, etc.
Step 7. Prepare Body

Prepare the snorkel body with blue thread locker and the threaded studs.

This is another key step. Above you can see the bracket that ARB wants you to bolt to the snorkel, and rivet to the A-pillar.
I chose to use double sided exterior 3M automotive tape. I found it at my local auto parts store. Added a piece along the bracket, and trimmed to fit.
Not necessarily recommended, and not that I am afraid to drill into my truck, I did not want to this time and wanted to test this alternative.
Note: This fitment works okay. I could have done a better job lining it all up with the truck, but there is some movement above 30-40 mpg and at highway speeds. I’m not currently bothered, but know that this is a risk. You can always go back and add rivets. You can’t undo drilling the holes and placing rivets as easily. I do think I could get it a little tighter though, and get less movement – the tape could have better contact.
Step 8. Attach Body To Fender

Take your snorkel body and align with the holes. Depending on how well you did, it may slide right in. It may not. You might need to drill out some of the smaller holes. This did happen to me, but no big deal. Only a small delay.
Eventually, with a little physical persuasion (lol), we got it all to line up nicely. Don’t panic if it doesn’t work the first time. Again, some margin for error here.
Obviously be mindful that you also need to get the plastic intake end to meet the new tube. Another set of hands will help here.

Take all the washers and nuts and tighten the snorkel down to the fender.

Add the other hose clamp to the connection between the new tubing and snorkel body.

Bam! Almost there.
Step 9. Mount Head

Finally, take the snorkel head and the black clamp, and attach it appropriately to the body. That’s it! Not so bad.
Finished Product

I love it! I’ve done this before, and become more comfortable with cutting trucks. But even with documentation, this was pretty straightforward and we were able to move along.

A quick close up shot of the 3M tape and bracket. It attaches relatively well, but again, the contact could be better. I could easily redo the tape though. We will see.

The real question…? Have I crossed any super deep water? The answer… Not yet! However, I don’t need to submerge the truck under a huge amount of water to note that this system fits great, seals really well, and will do the job when expected to.
I’ve used a snorkel before, and I can tell you that I certainly felt better on the occasions where we were wheeling along, many states from home, and unexpectedly dropped into a deeper than anticipated river. The same goes for nights where we saw flooding and I accidentally hit massive pools of water late at night, that could have ended badly.
The fit and finish is awesome. ARB stands behind their products. And to top it off, I absolutely love how it looks. How could you go wrong?
Final Thoughts

Bottom line? Protect your engines. Invest in a snorkel if you plan on wheeling and adventuring hard to remote places.
I’m stoked with how this turned out – no complaints whatsoever. Let me know if you have any questions!

Konrad Chojnowski
Nothing like a day on the trails and a night under the stars! I'll drive just about anywhere to disconnect and have a rad experience.

Self tapping stainless screws and RTV on the pillar. Honestly will you ever remove your snorkel? If you do you have to replace your fender and filling two small holes and blending in your fender to match the door and pillar you would paint anyway is not a big deal. Best to have a secure fitment so nothing vibrates loose or rubs paint away leading to rust. Last note, deburr all the holes. Installing a cyclone greatly improves dust performance otherwise you are literally scooping it up. Sure, the intake is higher and helps but it’s really not effective without. … Read more »
You’re not wrong about mounting the snorkel directly. And as I mentioned, I’m not opposed to drilling into my truck. I was in part experimenting with this alternative, since I know many people have had the same idea. I agree with what you are saying in general. I did mention under the photo about painting the holes to remove all burrs. A pre-cleaner surely helps to eliminate the majority of dust exposure. But the idea of getting less dust is considering that there is much more dust at wheel/fender level than there is at the roof line. I can say … Read more »

It might be worth noting that snorkels aren’t as useful for fording water in the Tacoma as many think without additional and extensive modifications in the engine bay. The Tacoma (and most Toyota trucks) have a critical [and incurable] design flaw for water fording, which is the location of the alternator below/at the level of the top of the tire. Adding a snorkel to the Tacoma to put your intake at six feet high (or thereabout) without extensive waterproofing to the engine, and carrying a spare alternator for the almost certain contamination of bearings and destruction of most of the … Read more »
Man. A lot to unpackage here, haha. To start, while I understand the textbook logic behind this answer, the real-world application is a bit different and may relay the wrong message to someone reading it. You absolutely can ford water in a Tacoma, relatively safely (albeit there is always risk) despite the concerns you mentioned. I’ll explain why. While the alternator (and other components) may be exposed, the only time that this will be a concern is if the vehicle (unfortunately) gets stuck in the water and there is no motion. With the proper technical approach, even if the water … Read more »
Right! And I don’t disagree with what you say here. To be clear, I’m not saying that crossing water deeper than your alternator will damage it immediately and in the moment; I’m saying: (a) that could happen, and (b) the damage will be there and will more likely manifest over the longer-term. As in, you submerge a bunch of unprotected electrical connections and your spinning alternator, it will diminish the life of your alternator and other components in ways most users will not understand is connected to a prior decision to float their Tacoma/Toyota truck. Notice how many caveats there … Read more »
Totally. I think we are on the same page. We certainly want to present as much information as possible. Only so much that I can put into a quick install and review without losing the user in the technicalities. Ultimately, we should cover this to every length possible under – “everything you need to know” – like everyone else, I invite you to write a post for us. I think you would be a good fit for this post and other technical ones. Shoot me an email! We pay for this kind of stuff. [email protected] The only thing I want … Read more »

Now you have me thinking a snorkel would have been a good investment for my last build. I was on the fence about weather to snorkel or not. This article has opened my eyes to things never considered before. With the amount of snow runoff this year a snorkel would almost be an essential element for river crossings. I’m not sure if the new build would benefit from one though. Going a different direction this time. Thanks again for expanding my knowledge of useful Tacoma products. Great site, really enjoy it
I would say that anyone who spends any time near dust or water could benefit. Ultimately, it’s for peace of mind and insurance in case something happens. I’d be lying if I didn’t account for the looks too, haha. Thanks for commenting and being involved!
GET 20% OFF
Take up to 20% off at the 4runner store.
Your cart is currently empty!

Safari Snorkel for Toyota FJ Cruiser Snorkel 2010-2016
- Suits Toyota FJ Cruiser 2010-2016
- Safari V-Spec Snorkel
- Relocates Your Engine’s Air Intake Point to a Higher Location
- Crosslinked Polyethylene Construction
- Built to Perform in Extreme Weather Conditions
- Comes With Stainless Steel and Plated Hardware
- Bolt-On Installation; Drilling Is Required
- Supported by a 2-Year Warranty
- Fully Designed and Manufactured in Australia
- Designed and manufactured in Australia
- Requires cutting and drilling of the fender and A-pillar. Full instructions and template provided.
$ 546.00
Description
Additional information.
- Reviews (20)
SS420HF – ARB Safari Snorkel – (2010-2016 Toyota FJ Cruiser)
UPC . 9343801006040
Protect your Toyota FJ Cruiser against dust and water ingestion with the tough, stylish Safari Snorkel specifically designed to deliver a huge volume of cold, clean air.
Avoiding dust, water and snow ingestion is essential for keeping your 4×4 moving down the trail. Safari Snorkels relocate an engine’s air intake from a low, vulnerable position to a high, safe location where a constant supply of cold, clean air is available.
Relocates Engine’s Air Intake Point. If you want a better engine performance, then add this ARB Safari V-Spec Snorkel to your truck’s arsenal. With this snorkel, you’ll be able to relocate your engine’s air intake point to a higher location. Once installed, your air intake will be able to have a steady supply of cool and clean air, resulting in a powerful engine action.
Crosslinked Polyethylene Construction. Built for long-term use, this ARB Safari V-Spec Snorkel is crafted using a crosslinked polyethylene material. This makes the snorkel extremely durable and capable of performing in extreme weather conditions. Furthermore, this snorkel is designed to resist UV rays, dust, water, and other weather elements.
Bolt-On Installation. Installing this snorkel requires a bolt-on process and some drilling. To ensure proper installation, you need to possess a moderate to a high level of mechanical skills.
Supported by a 2-Year Warranty. To cover any factory flaws, this snorkel is supported by ARB’s 2-year warranty. To avail the warranty service, you must be the original purchaser of the product and be able to present your official receipt. Other terms and conditions may apply.
Application. The ARB Safari V-Spec SS420HF Snorkel is created to fit 2010-2016 Toyota FJ Cruiser models.
SS420HF FEATURES:
- Created to Fit 2010-2016 Toyota FJ Cruiser Models
For a video about the Safari Snorkel product range, click here: https://youtu.be/Ow3Thzrm5oo
To see all Snorkels that Exit Offroad offers, click here: https://exitoffroad.com/product-category/accessories/snorkel/
Vehicle Fitment:
2010 Toyota FJ Cruiser 2011 Toyota FJ Cruiser 2012 Toyota FJ Cruiser 2013 Toyota FJ Cruiser 2014 Toyota FJ Cruiser 2015 Toyota FJ Cruiser 2016 Toyota FJ Cruiser
20 reviews for Safari Snorkel for Toyota FJ Cruiser Snorkel 2010-2016

Jonathan (verified owner) – November 15, 2021
Great description on the page, easy to understand what I was buying.
Brian (verified owner) – November 25, 2021
Exit Offroad really does know what they’re talking about, they have the best product pages.
Brian (verified owner) – November 26, 2021
Would definitely buy from this site again.
Michael (verified owner) – December 27, 2021
Very good customer service, super friendly.
Ryan (verified owner) – January 6, 2022
Good quality, really nice.
Christopher (verified owner) – January 11, 2022
Daniel (verified owner) – January 16, 2022
Kevin (verified owner) – April 6, 2022
Adam (verified owner) – May 27, 2022
Matthew (verified owner) – June 15, 2022
I received it really fast.
Daniel (verified owner) – July 13, 2022
Ryan (verified owner) – April 29, 2023
Value for money, super satisfied.
Sean (verified owner) – April 29, 2023
Matthew (verified owner) – May 25, 2023
Bryan (verified owner) – June 27, 2023
Robert (verified owner) – July 9, 2023
Shawn (verified owner) – September 5, 2023
Chad (verified owner) – March 19, 2024
Jeremy (verified owner) – June 9, 2024
Spoke with Mike, he got me headed in the right direction for what I need.
Nathan (verified owner) – July 21, 2024
Just what I needed.
You must be logged in to post a review.
Related products

Dobinsons MRA59-A575 3-Way Adjustable MRA Long Travel Rear Shocks Pair
- Suits 2003-2024 4Runner (4th and 5th Gen), All FJ Cruisers, Lexus GX470 & GX460 without KDSS, Toyota Prado 120 & 150, suitable for 2 – 3.5″ of lift
- CANNOT BE USED WITH KDSS
- 3-way adjustable valving – adjust high and low speed compression and rebound
- MRA59-A575 – Specifications. 730mm extended, 443mm compressed
- Massive 56mm (2.2″) Outer body with 50mm (1.97″) Bore and Piston
- 22mm / 7/8″ shaft diameter
- 3-way Adjustable shocks provide maximum adjustability to provide the perfect ride quality for you.
- 10 Stage High Speed Compression – For aggressive, high speed off roading through ruts and holes.
- 20 Stage Low Speed Compression – For creepy crawling and cornering
- 15 Stage Rebound – Control your coils, prevent bucking
- 50mm CNC Machined High Flow Billet Aluminum Race Piston
- 3mm Thick Heavy Duty DOM Seamless 56mm O.D. shock Body Precision Honed to +/- 0.04mm
- Upgraded 3 Stage FKM‐HNBR Sealing System
- TSUGAMI™ CNC machined components for precise tolerances
- Parker™ Braided High Pressure Hoses
- 5140 HV900 Hard Chrome Plated, Heat treated 18mm Micro-Polished high strength Shock Shaft with a minimum tensile strength exceeding 700MPA
- T6 6061 Height Adjustable Spring Seat
- Carbon-Fibre/PTFE/Disulphide composite wear band for the ultimate in low-friction, low‐wear performance
- 60mm Full 6063 aluminum remote reservoir
- Lightweight CNC Machined Low Friction floating piston
- High Quality O.E.M. Grade Natural Rubber Bushings
- Single Piece Lower Leg
- EDP Surface Protection
- Direct Bolt-On Shock Design
- CNC TIG Precision Welded Body End Mounts
- Fully Rebuildable Design
- SOLD IN PAIRS
- Includes Universal Reservoir Bracket and Hardware, Sticker Pack, and Adjuster Wrench
- Can Use with Timbren Rear Bump Stop Kit
- Replacement Brake Lines are required: Extended Brake Lines
- Bump stops extensions or longer bump stops are required!!
- Full 2 year limited warranty, no set rebuild time period
- Now comes with a longer hose and different mounting instructions

Dobinsons Adjustable Rear Sway Bar End Link Kit | 4Runner FJ Cruiser GX470 GX460
- Suits 4th and 5th Gen 4Runner 2003-2024, FJ Cruiser (all years), GX470, GX460 (without KDSS)
- Order 1 for 1 vehicle
- Heavy Duty, zinc plated, with high quality ball joint ends for long life
- Kit includes 2 sway bar links, everything as shown in the photo, enough for 1 vehicle
- Will also suit stock non-lifted vehicles simply looking to replace their worn out rear links
- Adjustable to suit lift heights of 2″ to 4″
- Watch a video here to see more about these: https://youtu.be/lZACSaE2PHI
- Note: Product was updated to bigger/thicker stud of the ball joint in 2020, no longer needing the small sleeve shown in the product video. Some vehicles’ sway bar is too thick to use the thick supplied washer, so reuse the stock washer if necessary

Dobinsons Rear Adjustable 4Runner Panhard Rod | 4Runner FJ Cruiser GX470 GX460
- Suits 2003-2009 4Runner, 2010-2024 4Runner, FJ Cruiser (all years), Lexus GX470 and GX460
- Replaces OE Rear Panhard Rod, adjustable to suit lift height
- Re-centers the rear axle after lifting
- Zinc plated steel and E-coated with high quality rubber bushes installed
- Off-car adjustable, cannot be set while fully installed
- For 45mm (1.75″) of lift or more
- Rubber Bushes offer greater flexibility than polyurethane, providing maximum articulation

Dobinsons MRA59-A700 3-Way Adjustable MRA Front Struts Pair
- Suits 2010-2024 4Runner, 2010+ FJ Cruiser, Lexus GX460, Toyota Prado 150, and 2015+ Toyota Hilux Revo, suitable for 0 – 3″ of lift
- Direct Bolt-On Design
- MRA59-A700 – 560mm extended, 420mm compressed
- Does not include coil springs or top mounts – sold separately
- Instructions on setting coil seat height
- Resi installation instructions
- Mods 1 – Getting Started
- Mods 2 – Tire Size Guide
- Mods 3 – Tire Buying Guide
- Mods 4 – Performance
- Mods 5 – Lift & Level Kits
- Mods 6 – Grille Kits
- Mods 7 – Headlights
- Mods 8 – Fog Lights
- Mods 9 – Rock Sliders
- Mods 10 – Roof Racks
- Mods 11 – Front Bumpers
- Mods 12 – Rear Bumpers
- Mods 13 – Skid Plates
- Mods 14 – Wheels
- Switch Systems
- Rooftop Tents
- Acc Lighting
- Tail Lights
- Rock Sliders
- Skid Plates
- Front Bumpers
- Rear Bumpers
- Accessories
- Recovery Gear
- Refrigerators
- Trail Tested
- Maintenance
5th Gen Mods , Accessories , DIY , Expeditions , Install , Off-Road , Overland , Performance , Reviews , Trail Tested
Arb safari snorkel install & review – 5th gen 4runner.

ARB Safari Snorkel Step-By-Step Install On The 5th Gen 4Runner: Full Review & Product Overview
While the majority of 4Runners sold here in North America will sadly spend most of their miles on pavement, there are some that will see a lot of time off-road, either out of necessity or for recreation.
For those on dirt, there are certain modifications that are smart to consider to extend the life and comfort of your 4Runner. Suspension upgrades, tougher tires, bolt-on armor, etc… While all of these upgrades are valid, what upgrades are being made to protect the motor while on the trail? The motor only has a few points of entry or exit that will cause damage or wear over time: the intake and the exhaust. The exhaust side of the equation is less of a concern because it’s pushing gasses away from the motor, so let’s focus on the intake side as its job is to feed the engine with clean air.
ARB Safari Snorkel for 5th Gen 4Runner
Benefits of a snorkel.

The stock air intake on the 4Runner pulls air from the space between the inner and outer front fender on the passenger side. With the plastic fender liner installed, a good amount of dust and water will be averted from the open intake hole. But take a long trip through the dust, or ford a river and you risk a clogged air filter or worse—water in your intake box.
If you have aftermarket front fenders and no longer have the factory fender liner, you can take that risk and increase it. How do you minimize or eliminate the risk? Like many great answers to overland questions — ask the Aussies! There’s no coincidence that one thing you’ll see on many Australian vehicles who spend time off-grid is a raised intake or snorkel. Drawing clean air from a windshield height intake will help prolong your engine life, reduce filter replacement, and eliminate water intake problems. Many vehicle manufacturers offer raised intakes from the factory for overseas applications, but unfortunately, Toyota hasn’t made an option for the 4Runner, but we’re not lost.
ARB Safari Snorkel

Safari Snorkel has been one of the leaders in the snorkel aftermarket for decades and has an extensive product offering that includes our 5th Gen 4Runners. They use a UV-stable polyethylene material that has been CAD-designed for optimal fitment and airflow specific to the 4Runner. Paired with their signature Air Ram head, the snorkel is designed to work in the harshest conditions keeping dirt, debris, rain, and rivers out of your vehicle’s intake.
Find it online:
- Safari Snorkel Kit (Part #SS450HP) 5th Gen 4Runner: Check Price
Install Overview

- Safari Snorkel SS450HP
- Air Ram head
- Adapter boot
- Hole/cutting template
- Upper mounting plate
- Miscellaneous hardware
Tools and Materials
- Painter’s tape
- Permanent marker
- Marking punch
- #5 step drill bit
- Miscellaneous drill bits up to 5/16”
- Right angle drill (optional)
- Body saw (air reciprocating saw)
- 80-grit sandpaper
- Deburring tool
- Loctite Blue 242
- Rustoleum black paint
- Silicone sealant
- Rubber mallet
- Body clip tool
Step 1. Prep Surface

To start, go ahead and prep the area you’ll be working on by washing the front passenger side of the 4Runner. This will remove any contaminants and make sure you have a nice “seal” between the snorkel and the body panel when you’re all finished.
Step 2. Remove Airbox

Remove the upper half of the factory airbox loosening the 10mm clamp on the intake hose closest to the airbox, and removing the factory MAF harness from the intake. You can leave the intake hose attached to the throttle body, but put a nitrile glove over the hose to prevent any contaminants from entering the intake while you’re working.
Remove the three 12mm bolts attaching the airbox to the fender, and roll the airbox towards the firewall to gain access to the bottom of the intake wiring harness. There is one clip to undo here. Remove the lower section of the airbox.
Step 3. Remove Factory Intake Duct

While you have the airbox handy, remove the factory intake duct using a small pry tool. This is where the new adapter hose will attach later on. After removing the inlet, give the whole lower section a thorough cleaning from debris that might have been in the airbox from before. This will also allow you to have a benchmark for how well the snorkel is performing after you’ve installed it.
Step 4. Seal Factory Drain Holes

The factory airbox has two drain holes in it, one on the side that faces the front of the vehicle and one on the bottom. It’s optional, but I would recommend using silicone caulking to fill these holes to seal up the intake. This will keep your intake sealed during water crossings, but will also keep any water that goes into the snorkel (unlikely) in the intake. So if you do seal the intake, make sure you check it occasionally if you’re operating in heavy rain or snow to make sure it’s dry. Once the silicone is applied, set it aside and let it dry while you work.
Step 4. Mask Off Work Area

Next, use the painter’s tape to tape off the area of the fender that you’ll be working on. Use the template as a guide, going all the way down to the fender flare. Make sure you add some tape over the seam between the fender and flare so metal shavings don’t pile up in them when you drill. Taping the whole work area will help keep your fender from being accidentally scratched while working. It’s not a required step, but it’s a smart step to take to protect your 4Runner.
Step 5. Put Layout Over Tape

Take the template out of the box and line it up on the back of the snorkel to make sure all of the holes match up. This preventive step helps to ensure you’re not drilling the wrong holes if you were supplied the wrong template! Attach the template to the fender using painter’s tape, aligning the left edge with the door jam and the top with the top of the fender. Make sure you thoroughly tape the edges so everything lines up properly and matches the contours of the fender.
Step 6. Outline Layout

With the template installed, mark the holes with a permanent marker. Once marked, remove the template and set it aside.
Step 7. Install Studs into Snorkel

Before getting into the drilling portion of the install, grab the six 8mm studs from the hardware bag. Apply some Loctite 242 to one half of the thread on the stud, and install them into the snorkel. Doing this ahead of time will allow the Loctite to set a bit before you add the nyloc nuts during install.
Step 8. Remove Inner Fender

Remove the plastic inner fender liner from the front to the back starting with the body screws under the factory bumper working through the plastic clips and screws towards the firewall. Use a body clip tool to pry the factory clips without breaking the heads off. You’ll only need to pull the fender liner a little more than halfway down. Just far enough to be able to reach back to the rear-most mounting bolt.
Step 9. Drill Holes into Fender

Back to the outer fender… With the holes now marked take a marking punch and punch a mark in the center of each pen mark. This will help keep the drill bit centered when you begin to drill. With the center punched, take your step drill and drill the six mounting holes in the fender. Make sure you are wearing safety glasses for this task as metal in your eye will ruin your weekend install. Take your time and once the appropriate diameter has been reached, spin the bit lightly a couple more revolutions to clean up the hole edge. You’ll want to drill to 16mm, or 5/8” for the mounting holes. No turning back now!
When drilling the hole closest to the passenger door, make sure you have enough clearance behind the fender so you don’t hit the inner fender. Have someone you trust poke their head in the fender to watch while you drill. Make sure they’re wearing safety glasses as well.
Step 10. Drill Cut Start Point

With the mounting holes drilled, mark your hole for the starting point for the inlet hole. You’ll need to choose a size that’s large enough to accommodate your saw blade of choice. Make sure when you mark your hole, mark it on the INSIDE of the area to be cut and far enough from the cut line to make sure you’re not drilling into the portion of the fender you’re keeping.
Step 11. Cut Out Big Hole

After drilling the starter hole, it’s time for the main event. I would recommend taking this moment to enjoy some liquid courage as you’re about to cut a big hole in your 4Runner. Beverage consumed (and then some time to re-group), grab your body saw. I used a pneumatic reciprocating air saw for this task because it’s a precision saw that leaves a thin kerf and a very smooth finish. Use good lighting for this job to make the line more visible. Take your time, adjusting your position to get the best stability during the cut. You can use a magnet across a cut section of the hole to hold the inner piece in place when you finish your cut so it won’t fall through. Breathe easy, the hardest part is over!
Step 12. Clean Cut Holes

Use the deburring tool to remove any metal burrs from the holes you just cut/drilled. Lightly use your finger to feel the inside of the holes for burrs. On the larger intake hole, use 80-grit sandpaper to smooth off the edge of the hole, if needed. Remove the painter’s tape when you’ve finished cleaning the holes.
Step 13. Test Fit Snorkel

Take your snorkel with the studs pre-installed and line it up with the fender to check the fit with the new holes. With any luck, you’ll have a perfect fit with no adjustments needed. If your holes are off, use a die-grinder to adjust them.
Step 14. Mark Drill Holes on A-Pillar

Use this time to mark your A-pillar mounting plate. Mockup the snorkel, and look at where you’ll need to apply painter’s tape. Remove the snorkel, and apply the tape with a few inches on each side. Then reapply the snorkel with the upper plate installed to mark where the plate will be attached to the A-pillar. Use your permanent marker to mark the top, bottom, and windshield edge of the plate. Remove the snorkel and the plate from it. You’ll come back to this in a bit.
Step 15. Paint Drill Holes

With the holes cleaned up, use a Q-tip to apply a layer of paint on all bare edges of metal. This will help prevent any rust from eating away your fender underneath the snorkel. Let the paint dry while you move on to the next step.
Step 16. Drill Pilot Holes into A-Pillar

Take the upper mounting plate and realign it with the marks you made earlier. Then using your permanent marker, mark the three holes you’ll need to drill in the A-pillar. With the holes marked, use the marking punch to set the center of the holes to drill. Starting with a small drill bit (1/16”) drill a pilot hole with your right angle drill. You can use a standard drill for this, but the right angle drill will allow for more depth control when drilling. You’ll want to just break the surface with these holes, but you won’t need to worry about any airbags in the A-pillar.
Step 17. Drill Final Holes into A-Pillar

After drilling your pilot holes, you can get ready to drill the holes for the plastic clips supplied in the snorkel kit. My final hole size was 5/16” to where the clips fit snugly with a hammer tap to set them. I would recommend drilling a 9/32” hole first, checking for snugness with the clip, then widening to 5/16” if needed. You want these to be as snug as possible to help hold them in place. Remove the painter’s tape.
Step 18. De-Burr Drill Holes

With your three holes drilled, use the deburring tool to clean up your holes and paint them as you did with the holes on the fender. Let them sit for a good 10-30 minutes, depending on how warm your workspace is. I used a heat gun to help cure the paint a little quicker.
Step 19. Silicone Clips into Holes

Paint cured, grab the silicone that you used for the airbox and apply a bead around the bottom of the clip. Line it up with the hole, and use a rubber mallet to tap it into place. Gently rotate the clip once it’s seated to even out the silicone at the interface. Repeat this for the other two clips. You can remove any silicone residue by lightly wiping it off with a paper towel damp with Acetone.
Step 20. Install A-Pillar Bracket

Install the upper plate with the supplied stainless steel screws by hand. Be sure to not spin too fast or the clip will start spinning. If it does, take a thin pair of pliers to lightly grip the edges of the clip while you screw in from above. Snug up all 3 screws evenly.
Step 21. Remove Stock Airbox Tabs

You’ll need to modify the stock airbox by removing the retaining and alignment tabs where the factory inlet used to be. I used a die grinder to remove the tabs as described in the instructions and smoothed them with some sandpaper to ensure a clean fit. This is where the snorkel adapter will slide onto the airbox.
Step 22. Install Intake Adapter

Set the intake adapter into the fender with the round end through the inner fender. Slide the smaller of the two hose clamps over the end sticking through the hole with the tensioning screw facing up on the forward side of the adapter. Take the lower half of the intake box and set it into place, sliding the round end of the adapter over the intake on the box. Use a little dish soap on the inside of the rubber adapter as a lubricant if needed. Reinstall the lower airbox, along with the wiring harness clips you removed at the beginning. Wait to tighten the hose clamp until after the snorkel is installed.
Step 23. Install Hose Clamps on Adapter

Take the larger of the two hose clamps and install it on the oval end of the adapter in the fender. Snug it up just enough so it doesn’t rotate on the adapter. You’ll want the tensioning screw facing down on the rearward side of the adapter. Take a small amount of dish soap and spread it on the inside of the adapter as a lubricant.
Have one of the upper bracket bolts at the ready. Bring in the snorkel and line it up with the fender, setting it into place. Reach in from underneath to massage the adapter onto the snorkel making sure it seats evenly. Then, grab your bolt and lightly thread it into one of the upper bracket holes to keep the snorkel in place while you get ready to secure it from inside the fender.
Step 24. Install Nuts and Washers

With your six washers and nyloc nuts handy, thread one of each onto the six studs inside the fender. Tighten them evenly with a ratcheting wrench, eventually getting them all snug on the fender. Once the snorkel is secured from inside the fender, add the upper mount bolts on the A-pillar and tighten them until they’re snug.
Step 25. Tighten Hose Clamps

With the snorkel fully secured, tighten the hose clamps with a 7mm socket on both the snorkel and the intake side of the adapter.
Step 26. Install Airbox

Make sure your airbox is cleaned out using a vacuum and rag, then reinstall the filter and upper half of the air box. Tighten the hose clamp (10mm) and reinstall the harness clips/plug before securing the upper airbox.
Reinstall the inner fender liner after you have cleaned out any metal shavings from the drilling using a vacuum. Use the driver’s side if you can’t remember which clips/screws go where.
Step 27. Install Air Ram

Finally, attach the Air Ram head to the top of the snorkel using the provided black hose clamp with the tensioning bolt facing back. That’s it! You’re done!
Trail Impressions

With the snorkel installed, it isn’t really noticeable from the driver’s seat. You’ll only know it’s there from the grief you get from your significant other when you pick them up from work…ask me how I know.
Aesthetically, the Safari Snorkel will change the exterior appearance of your 4Runner and may look a little out of balance if you have a mostly stock 4Runner. That being said, this is a functional upgrade, first and foremost. If the Safari Snorkel gives you what you need when you need it, who cares what it looks like. On a mild to wild build, this snorkel looks right at home with its black textured finish.
Road Impressions

On the road, there is surprisingly no increase in sound from the snorkel either from wind or intake noise. You do get some increased intake noise if you rev the engine while parked, a benefit for overland parking lot meetups…joking.
Final Thoughts

Functionally, the snorkel has been working well on the 4Runner. I’ve taken it through a number of good water holes that have been covering the trails here in Central Oregon with no water to show in the airbox. I have also driven through heavy rain and snow with the snorkel with no accumulation in the intake, which is promising. The major factor I haven’t been able to test yet is dust, which was my main reason for installing the snorkel. With winter set in here and plenty of moisture in the dirt, I won’t get a good idea for dust until later this year.
I have high hopes for this Safari Snorkel to keep my airbox clean and dry through all of the conditions that I intend to put my 4Runner through in the years to come. It’s big, burly, and built to take a beating — much like the 4Runner itself.

Max Sheehan
Freshly rooted in Central Oregon, I have always had an eye for the outdoors and the vehicles that get you there. As a gateway to the wild, I have spent weekends exploring the best that the west coast has to offer in my expedition style 4Runner.

Thank you for the great write up! I just installed my snorkel following it.
One thing that I figured out that helped was to tape over the washers holes with painters tape (the ones that go on the inside of the fender). Then poke a little starter hole in the middle of the tape to use to press the washer onto the studs. This way the washers have a little bit of friction from the tape to hold them on when pushing them onto the studs giving you all the time you need to get the nut ready.
I only needed this trick for the upper 2 left studs that are very hard to reach with large hands.
I’d welcome thoughts for the nuts. I lost 2 in the process somewhere in the fender and had to buy more. I thought about hot gluing the nut to the washer so they go on as one unit, but that was after I already lost 2 so I never tried it.

Will this install be different for the 2020? There are SRS airbags in each of the A-pillars; what’s the possibility of activating/damaging the airbag system when drilling into the passenger side pillar?

No . Air bags are behind the a piller trim on inside. There is a Chanel in between on the outside. When you drill in its does not go through to inside of vehicle

Look at Snorkel Upgrade for a pre filter.
It’s almost like you know what article is dropping soon! 😉 I’ve been very happy with the one I installed on this ARB snorkel.
- Get Free Parts & Get Paid! Apply to Write

- Search forums
Follow along with the video below to see how to install our site as a web app on your home screen.
Note: This feature may not be available in some browsers.
- Vehicle Tech Forums
- 40- / 55-Series Tech
safari snorkel
- Thread starter fj40yota
- Start date Jun 30, 2011
This site may earn a commission from merchant affiliate links, including eBay, Amazon, Skimlinks, and others.
More options
- Jun 30, 2011
I was thinking about getting a snorkel setup.. and kinda wanted to know the goods and bads on it.. web site says it helps with cooler air and better air flow, but someone told me it can cause my fj40 to over heat during highway speeds? would like to have some opinions on this.. p.s thanks to orangefj and help wanted I now have all the parts i need for a front disk brake swap.. and it will be done next friday.. thank god!

I've been thinking about installing a snorkel too....my main issue is I want a right hand one.

wongtsenhin
fj40yota said: I was thinking about getting a snorkel setup.. and kinda wanted to know the goods and bads on it.. web site says it helps with cooler air and better air flow, but someone told me it can cause my fj40 to over heat during highway speeds? would like to have some opinions on this.. p.s thanks to orangefj and help wanted I now have all the parts i need for a front disk brake swap.. and it will be done next friday.. thank god! Click to expand...

PhrogsPhorever
Whip it good.

fzr400guy said: I've been thinking about installing a snorkel too....my main issue is I want a right hand one. Click to expand...

From what I've heard about snorkels is that they DO restrict airflow. However, as was already stated in this thread, they do pull cooler air but there are better, less restrictive ways to get cool air to the intake. A major plus of having a snorkel is not only to allow the vehicle to ford deep water but if your following another rig through the trails it keeps your incoming airflow ABOVE the trail dust the vehicle in front of you is creating. Plus they just look cool, restrictive or not. One thing to keep in mind though, in whichever kit you choose, pay attention to where the upper snorkel tube mounts to the body. Most of the kits I've seen were designed by idiots. They have the upper tube bolted to the upper side of the windshield hinge. The snorkel is off to the side of the windshield and had they made their bracket mount to the lower part of the hinge (cowl side) the user would still be able to fold the windshield down. As it is, (mounted to upper part of hinge) the windshield can't be folded without folding the snorkel in half. I haven't looked into it enough to see if someone actually makes a PRACTICAL snorkel kit or not but the ones I've seen are not practical.....unless you NEVER plan on folding the windshield down. Just something to keep in mind. "throughout the history of 4x4s only a few earned the right to be called lengendary. The original FJ40 Toyota Land Cruiser is one of the few" - TLC Icon
- Thread starter
Safari is a big name in snorkels. I didn't understand the over heating issue either because the wind is forceing air to the intake pretty much. But I'm defiantly not a expert on this but they do look cool but ill sacrifice looks for reliability

who was selling the Banderante snorkels, those looked good, with the flex tubing out of the body. . .

mustardfj40
Ok thanks I'm gonna get one worst case senerio ill take it off or something

twoturtlesracing
Slowwly but surely....
BRET on this board has made himself some cool looking snorkels using 3" pipe ordered from summit racing. If you are wanting to save some money and like projects, this is neat way to go. You might check into that as well as AWL_TEQ's snorkles . <--- linky....

I bought a safari snorkel and when I held it up to my shorty I couldn't do it I thought it was butt ugly. so I made my own out of 3" muffler tube. Sorry about the old pics since I rebuilt my truck the tube sits 3/8" above the fender. As to over heating I don't think it has anything to do with warm air or cold air I think it has to do with too much air = too lean = a hot engine. I have suffered none of this. View attachment 534648 View attachment 534649 View attachment 534650 Also mounted the bracket on the lower hinge I was about 1/8 off when I made this so I have to slacken the two screws to fold the screen down but atleast I know those two screws move now
twoturtlesracing said: BRET on this board has made himself some cool looking snorkels using 3" pipe ordered from summit racing. If you are wanting to save some money and like projects, this is neat way to go. You might check into that as well as AWL_TEQ's snorkles . <--- linky.... Click to expand...

fj40yota said: Safari is a big name in snorkels. I didn't understand the over heating issue either because the wind is forceing air to the intake pretty much. But I'm defiantly not a expert on this but they do look cool but ill sacrifice looks for reliability Click to expand...
thinking of going with the safari I do a lot of trail riding nothing really deep or mud seriously not a fan of getting muddy, but the trails i do ride on has a trail ending in this creek and coming out the other side and me and my brother him in a rubicon both scratching our head trying to talk each other into it.. killing me to find out where it leads...

camcruiser13
- Jul 1, 2011
I guess they look cool. For the 99% who never go into deep water and therefore use it like chrome

Eshu Elegua
Similar threads
- Mar 31, 2024
- Jun 1, 2024
- Mar 6, 2024
Users who are viewing this thread
- Stay logged in
Share this page
- Saved Custom Products
- Payment Methods
- Address Book
- Start Selling Seller Dashboard
Back to College Savings! | Save 30% Sitewide | Price as marked. Savings based on Comp. Value. Some exclusions apply.*

Shop for Moscow Stickers in thousands of beautiful designs and sizes. You can stick them on almost anything from laptops and phones to notebooks and guitar cases.
- Personalized
- All Categories
- Comfort Colors®
- Long Sleeve
- Crewneck Sweatshirts
- Zip Up Hoodies
- Short Sleeve Pajama Sets
- Long Sleeve Pajama Sets
- Boxer Shorts
- Plus Size V-Neck
- Nightshirts
- Kids Aprons
- Kids Backpacks
- Kids Lunch Boxes
- Football Baby Bodysuits
- Classic Baby Bodysuits
- Long Sleeve Baby Bodysuits
- Short Sleeve Baby T-Shirts
- Long Sleeve Baby T-Shirts
- Toddler T-Shirts
- Baby Blankets
- Standard Mugs
- Travel Coffee Mugs
- Insulated Mugs
- Drinking Glasses
- 1 Liter Stainless Steel Water Bottles
- Insulated Water Bottles
- 30 oz Stainless Steel Water Bottles
- Straw Tumblers
- Wine Tumblers
- Shot Glasses
- Beer Steins
- Canvas Tote Bags
- Zipper Tote Bags
- All Over Print Tote Bags
- Reusable Grocery Bags
- Canvas Lunch Bags
- Zipper Pouches
- Drawstring Bags
- Weekender Tote
- Makeup Bags
- Mini Buttons
- Standard Buttons
- Large Buttons
- Baseball Hats
- Black Baseball Caps
- Trucker Hats
- Luggage Tags
- Beach Towels
- Pillowcases
- Pillow Sham
- Shower Curtains
- Bath Towels
- Duvet Covers
- Plush Fleece Blankets
- Sherpa Fleece Blankets
- Woven Blankets
- Garden Flags
- Hand Towels
- Pot Holders
- Wood Cutting Boards
- Laundry Bags
- Rectangle Magnets
- Round Magnets
- Bell Acrylic Ornaments
- Gift Tag Ornaments
- Heart Ornaments
- Heart Acrylic Ornaments
- Mitten Ornaments
- Oval Ornaments
- Oval Year Ornaments
- Rectangle Ornaments
- Round Ornaments
- Rustic Wood Ornaments
- Scroll Ornaments
- Sled Ornaments
- Snowflake Ornaments
- Sparkle Light Ornaments
- Square Ornaments
- Picture Frames
- Throw Pillows
- Throw Pillow with Zipper
- Rectangular Pillows
- Outdoor Pillows
- Tree Skirts
- Votive Candles
- Wall Clocks
- 8x8 Canvas Prints
- 8x10 Canvas Prints
- 11x14 Canvas Prints
- 12x12 Canvas Prints
- 16x20 Canvas Prints
- 20x24 Canvas Prints
- 20x30 Canvas Prints
- Photo Wall Tiles
- Mini Posters
- Small Posters
- Large Posters
- 20x12 Wall Decals
- 20x6 Wall Decals
- 35x21 Wall Decals
- 36x11 Wall Decals
- 20x12 Oval Wall Decals
- 35x21 Oval Wall Decals
- Bumper Stickers
- Car Bumper Magnets
- Car Door Magnets
- Oval Car Magnets
- Rectangle Car Magnets
- Round Car Magnets
- Square Car Magnets
- Heart Keychains
- Rectangle Keychains
- Circle Keychains
- License Plates
- Aluminum License Plate Frame
- Chrome License Plate Frame
- Die Cut Stickers
- Oval Stickers
- Rectangle Stickers
- Square Stickers
- Double-Sided Yard Signs
- Greeting Cards
- 5x7 Flat Cards, (Set of 10)
- 5x7 Flat Cards, (Set of 20)
- 4x8 Flat Cards, (Set of 10)
- 4x8 Flat Cards, (Set of 20)
- Spiral Notebooks
- 3x3 Post-it® Notes
- 4x3 Post-it® Notes
- Apple Watch Bands
- 15 Pro Max Cases
- 14 Pro Max Cases
- PopGrips®
- Wireless Charger
- Keepsake Boxes
- Square Jewelry Boxes
- Heart Jewelry Boxes
- Circle Necklaces
- Heart Necklaces
- Outdoor Blankets
- Pet Apparel
- Playing Cards
- Women's Racerback Tank Tops
- Maternity Tank Tops
- Long Sleeve Maternity T-Shirts
- Plus Size Long Sleeve T-Shirts
- Plus Size Scoop Neck T-Shirts
- Plus Size Football T-Shirts
- Tutu Baby Bodysuits
- Baby Pajamas
- Toddler Pink Pajamas
- Kids Football T-Shirts
- Girls Classic T-Shirts
- Women's Zip Up Hoodies
- Women's Hoodies
- Baby Pink Pajamas
Track Order
Member login, become a member.
- - Minimum 8 characters
- - At least 3 of the following: uppercase, lowercase, numbers, special characters

- Forum Listing
- Marketplace
- Advanced Search
- Jeep Wrangler Forums
- TJ Wrangler Technical Forum
removing a snorkel
- Add to quote

2k*TJ said: I am thinking about removing my safari snorkel from a 2000 tj sport. I have more lift now and am no longer the 'smallest' jeep in the group etc.. plus it is a bit of a pain to losen the 3 screws on the window frame to take the doors off etc.. Anyway.. my question is how much work will it be to repair the hole in the front fender etc Can it be filled and painted?? Is the hole too big and I would need a new fender?? also.. how much work would it be to switch fenders with someone else if I could find a buyer with a black tj Any help is appreciated.. thx Click to expand...

Why do you have to remove three screws to take off the door?? I'd leave the snorkel...it adds character and you never know when it might come in handy. Not to mention a 3 inch hole in the side of your fender kinda sucks.
Short of welding in a new piece of steel,filling it or getting a new fender then no. Sometimes better to go by the phrase "If it ain't broke then don't mess with it"

leave it - too much trouble to fix it IMO...
Save the Snorkel! :thumbsup:

That's gonna be more or a pain to fix than it's worth in my opinion. I'd run it by a body shop and have 'em give you an estimate. Sorry to hear your wanting to get rid of it though, I simply love mine and I don't have any problems removing the doors (although I do have to do it at an angle to miss the snorkel). Wish I could have been more help - actually - if we have any body shop guy's/girls on the board they can look at my Jeep link and I've got a couple pics of the hole I cut in mine. Maybe they can give you some ideas or an approximate cost by just looking at the pics.
thx for the help.. I will run it by a local shop on Monday... I figure if selling the snorkel I can close to cover the cost of fixing the hole then I will be happy... if not I will keep it...
My buddy might be interested in the snorkel.. redneckjeepr..
To cover the hole, buy some sheet metal from a hardware store like lowes/home depot. Cut it unto a square panel to cover the hole. Paint it in the desired color and place it inside the engine compartment. Drill 4 holes and use small screws/nuts to hang the panel. It'll look clean, and it'll remind people of what was there. It'll also leave you the option to reinstall the snorkel. :thumbsup:
When adding the snorkel, don't you have to cut a hole in your airbox too?
Yes – for the Safari snorkel set up you rivet a blocking plate over the existing intake hole and cut a new hole for the snorkels plate.
- ?
- 18.6M posts
- 739.1K members
Top Contributors this Month

IMAGES
COMMENTS
(Holds your decal or sticker together until it is applied). Middle layer is your actual decal or sticker. (protects the adhesive until the decal is ready to be applied). Before applying decal make sure there is no wax or oily products on the surface.
Safari 4x4 Engineering's purpose built 1200cfm in-house air-flow bench ensures that every snorkel model is designed to supply the optimum amount of air to your 4x4's engine. In the case of ARMAX snorkels, this is used to ensure that we provide the maximum possible amount of airflow to your engine to compliment other engine modifications.
Safari Snorkel Systems are manufactured to the highest standards in durable, UV stable, cross linked polyethylene material and deliver a continuous and cooler supply of air for maximum engine performance. Each system includes quality fixtures and fittings that deliver superior sealing, OEM levels of presentation and long-term durability.
(Holds your decal or sticker together until it is applied). Middle layer is your actual decal or sticker. (protects the adhesive until the decal is ready to be applied). ... SAFARI SNORKEL X2 PAIR STICKERS WHITE GRAPHICS DECAL STICKER OFFROAD 4X4. Condition: Brand New Brand New. Quantity: 10 available / 54 sold. Price: GBP 3.49. Approximately ...
Sticker is supplied on application tape ready to be applied. Also available in RED BLUE GREEN ORANGE PINK YELLOW WHITE BLACK AND MATTE BLACK. SAFARI SNORKEL X2 PAIR STICKERS WHITE GRAPHICS DECAL STICKER OFFROAD 4X4 | eBay
A safari snorkel system relocates your engines air intake point from the relatively low and vulnerable position under the hood to a much higher and safer location where a constant source of cool, clean, dry air is available. Manufactured from premium quality polyethylene, safari snorkels are incredibly resilient and UV stable. Install one before your next trip and breathe easier knowing that ...
SS445HF Safari Snorkel Air Intake kit V-SPEC Compatible For Toyota 4Runner 2003-2009, Ideal for protecting your engine from dust, water while traveling along extreme conditions. 3. $62200. FREE delivery Mon, Aug 19. Only 3 left in stock - order soon.
Breathe easy and roll through rivers; Safari 4x4 off-road snorkels deliver cold, clean air to the engine of your Jeep, Truck, SUV or other offroad vehicle.
The SS987HFD Safari Snorkel to suit the 2022 Ford Ranger, Raptor & Everest is designed to deliver a huge volume of the coolest and cleanest air possible into the stock air cleaner assembly of the 2.0Ltr Bi-Turbo (YN2S Engine) and 3.0Ltr V6 Diesel. With the huge air flow demands of the 2022 Ford Ranger engines, Safari made the decision to design ...
Safari Snorkels Utilising Safari's traditional design concepts and incorporating the very latest in scanning and CAD design software, Safari's V-Spec Snorkel for the Next-Generation Ford Ranger/Everest is ready to perform in the most extreme environments, protecting the vehicle's engine against water, dust, and snow ingress while delivering cool, clean air to the engine.
SAFARI SNORKEL INSTALL GUIDE This is a step-by-step guide on installing a Safari Snorkel on a 3rd Gen Tacoma. The installation is pretty straight...
Find ARB Safari Snorkels and get Free Shipping on Orders Over $109 at Summit Racing! Snorkels are for more than just deep water crossings where they keep water from making its way through your air box and into your engine. ARB Safari snorkel systems relocate your engine's air intake point from the relatively low and vulnerable position under the hood to a much higher and safer location where a ...
FREE SHIPPING! Constant Cool, Clean Air. Install this ARB Safari Air Snorkel System to your Tacoma and you can forget about dust, snow, or water ingestion. This
ARB Safari Snorkel For 3rd Gen (2016-2023) Tacoma: Detailed Step-By-Step Install Guide, Review - Protect Your Intake From Dust & Water!
SS420HF - ARB Safari Snorkel - (2010-2016 Toyota FJ Cruiser) UPC. 9343801006040. Protect your Toyota FJ Cruiser against dust and water ingestion with the tough, stylish Safari Snorkel specifically designed to deliver a huge volume of cold, clean air. Avoiding dust, water and snow ingestion is essential for keeping your 4×4 moving down the ...
FJ40 - 80/80/81 AC/PS SOLD FJ62 - 89, H55f, lift, 33s, sons rig 252k FJ62 - 90, round eye conversion, on locked 40th FZJ chassis 169k LX450 - 97, 147k locked N built (sold)
ARB Safari Snorkel Step-By-Step Install On The 5th Gen 4Runner: Full Review & Product Overview While the majority of 4Runners sold here in North America will sadly spend most of their miles on pavement, there are some that will see a lot of time off-road, either out of necessity or for recreation.
Agreed to that Safari is very branded when comes to snorkel, if the overheating is the issue, they will have to rectify way back. By the way, Safari snorkel for 40 series is only available on the LHS.
Shop Moscow Stickers from CafePress. Find great designs on durable stickers or create your own custom stickers to express yourself. You'll find the perfect stickers at CafePress. Free Returns High Quality Printing Fast Shipping
Direct link to purchase Recreation Permits online. Stickers will be mailed to you, and your email receipt is your temporary permit. If you have previously purchased online, find your account here. If you need help, please call 1-888-922-6743.
Yes - for the Safari snorkel set up you rivet a blocking plate over the existing intake hole and cut a new hole for the snorkels plate. "It is foolish and wrong to mourn the men who died.
Safari Pearl, Moscow, ID. 2,539 likes · 32 talking about this. Safari Pearl has everything you need to bring out the super-hero, pirate, or monster inside you!
Idaho Parks and Recreation handle boat registration and invasive species stickers. You can either: Purchase stickers online. Purchase at a local vendor. Here's a map of vendors to get the sticker. Check out the Idaho Parks and Recreation boatinginformation page for more details!