Long read: The beauty and drama of video games and their clouds
"It's a little bit hard to work out without knowing the altitude of that dragon..."

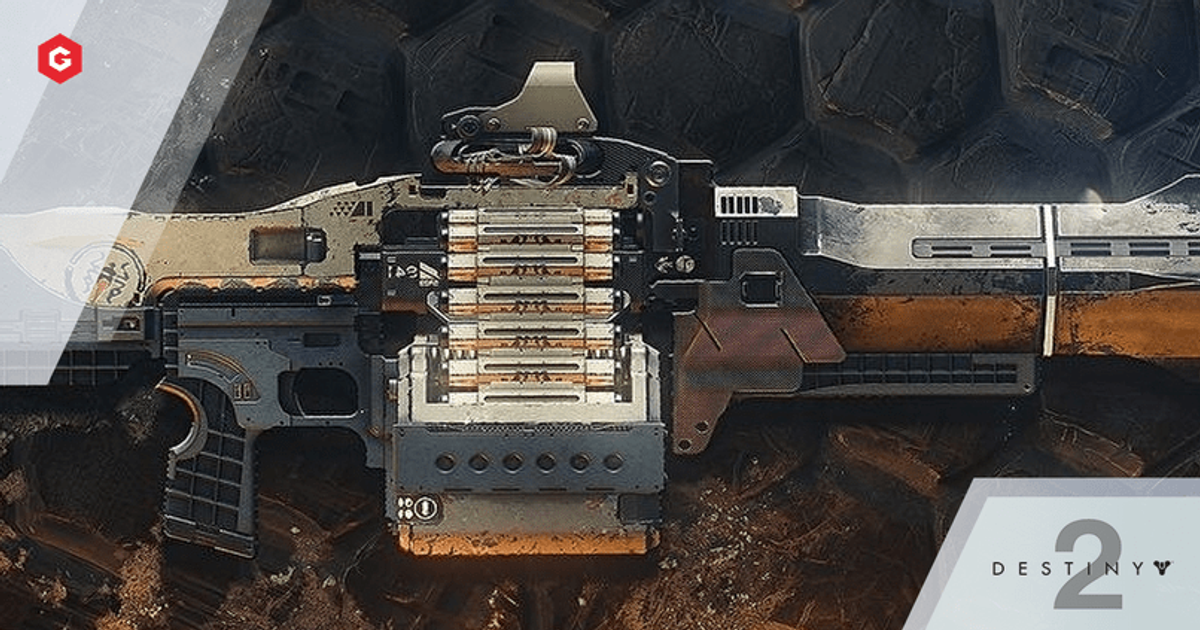
Destiny 2 Xenophage quest: How to complete The Journey and Pathfinder puzzle steps
How to get the Shadowkeep exotic machine gun.
Destiny 2's Xenophage is an Exotic quest for those who have purchased Year 3 expansion Shadowkeep.
Released on weekly reset on October 29th, 2019 alongside Festival of the Lost, starting this machine gun works a little differently to most quests - so you might need a pointer of where to look.
However, like the recent Season of the Undying exclusive Leviathan's Breath , earning the Xenophage is shorter than most Exotic quests, and the bulk of it can be completed solo before having to delve into the Moon's Pit of Heresy dungeon.
On this page:
How to get Xenophage in Destiny 2 in brief
How to get start the xenophage quest in destiny 2, how to complete the journey's emergence step in destiny 2, how to solve pathfinder's four path fragment puzzles, where to find the descent 'path uncovered' and 'path's end' step in the xenophage quest, how to defeat volar, the tempted to finish the xenophage quest.

Here's a quick rundown of the steps needed to obtain Xenophage :
- Interact with the statues near the Pyramid to start the quest
- Light the six plates in Anchor of Light
- Complete the four puzzles at the end of the K1 Lost Sectors on the Moon
- Find the hidden switch within the Pit of Heresy dungeon
- Find the hidden orb later in the Pit of Heresy dungeon to open a secret room
- Defeat the secret boss, Volmar, the Tempted
- Return to Eris
Once the above steps have been completed, Xenophage is all yours.

To begin the Xenophage quest, head to Shadowkeep's Moon destination. You'll want to head to the area next to the Pyramid, except the portal by Eris isn't around to take you there - so you have to get there on foot.
To do this, head to the Sorrow's Harbour area, then go north through the gates of the keep.

There is a path on the left at the end of this area - take it.

Continue along it until you reach the Enduring Abyss area.

Now go just a little further down the corridor, until you see a lantern of sorts on the ground.

Just beyond it, and up and right in the wall, is a path you can take. Leap up and take it.

Continue going and you'll reach the area the portal would take you to.

Now, to start the Xenophage quest, locate the four statues to the sides - two on the left and two on the right.

You can now interact with them with the 'Emerge from the Dark' prompt, lighting it up. The aim is to light all four.

Though it could be random, we interacted with them in an anti-clockwise fashion, the closest one right first, then furthest right, then round furthest left then closest left.
Whether it works for you or not, continue interacting with them until all four light up. Doing so will see a message saying 'You have emerged from the dark - claim your path!' appear on screen, and cause a chest to spawn.

Open the chest to receive the start of the Xenophage quest The Journey, the first step of which is named Emergence.

Head to the Anchor of Light on the Moon, then head to the north-west where you'll find some yellow buildings, including one with a large radio tower:

Directly south of that is a smaller one with a doorway facing it:

Inside, you'll find the following orb location:

You need to dunk this in six locations in the surrounding area, one after another. You have one minute between each dunk before the orb disappears. We recommend scoping out the locations before hand, so you know exactly where to go. You should have plenty of time if you know where you're going first!
The locations are as follows:
1. In the same room as you pick up the orb:

2. Leave this building and head north, following the path round to the more open area, where there's the orange building in the distance. On the hill directly to the left, you'll a large fallen radio tower leaning against the hill. Underneath where it leans is the next orb deposit point.

3. Look south so you are facing the large saucer-like building in the middle of the area. Opposite that on the ground is a small yellow building. The next location is inside.

4. Head back to the north-west part of Anchor of Light to where the large radio tower is. You need to climb up the tower (approach from the south / facing the building where you found the orb) and when you go one level up, it's on the north side, on the outer edge.

5. Look north to see more yellow buildings on the ground. There's a ramp leading up to the one on the right. At the top of that is the next location.

6. Head back to the other area where the giant saucer building is, and the location is right on top.

Now to finish, you need to head back one final time towards the radio tower. There will be a waypoint on your screen at the edge of a raised path when you get close.

Activating this will then give you the Pathfinder quest step.

Next, you have to visit all four Moon K1 Lost Sectors and solve a puzzle. These appear at the end, so complete the Lost Sector as usual, then find the puzzle as you take the route leading out.

To solve it, shooting a panel will change those around it, and you have to keep going until they all match the standalone icon above the grid.
There are multiple ways to do these, but these should work for you (thanks Sipder on reddit for helping with some of the following solutions):
K1 Communion (Anchor of Light)
- Bottom left
- Bottom right

K1 Logistics (Archer's Line)
- Centre right
Swapping the last two round (Centre then Centre right) also works.

K1 Revelation (Sorrow's Harbour)
- Centre left
- Centre bottom

K1 Crew Quarters (Hellmouth)

If you get any wrong as you input, you can try and work out the solution yourself from where you left off. That said, these are tough puzzles, so it might be easier to re-run the Lost Sector to reset the puzzle and try again.

Complete each one - giving you a Path Fragment each time - so you then receive the Descent quest, with the 'Path Uncovered' step.
Once that's done, it's time to take a trip to the Year 3 dungeon Pit of Heresy. If you haven't already, you need to unlock it first before you can start exploring.
First, you need to find a hidden switch. Complete the first encounter to come to an area with a wall of doors on either side of a path. You have to travel to an upper left door that's different to the others, where you'll find the switch inside.
Here is Fuzzy Bearbarian on YouTube showing the 'Path Uncovered' location:

Once you have done the 'Path Uncovered' step, continue Pit of Heresy until you reach the second encounter, then travel down the left side to come to a giant cavern on your left, glowing green with a giant rib cage below.
Continue along the edge of this path, down the lower path, to find a plate. Activating it reveals platforms to the side, with an orb you can collect it.
Take it back the way you came until you find a route on your right. There is a door here, which you can dunk the orb in. This will lead you to a hidden room with a secret boss.
Here is WoW Quests on YouTube to show where you need to go:

The Season of the Deep is here alongside the Into the Depths quest. You can know go fishing too! Don't forget to keep an eye on the Lost Sector and King's Fall challenge rotation schedule!
To defeat Volmar, The Tempted, you have to grab orbs and dunk them in locations related to the buff you have been given.
It's worth scoping out the room first to find their locations, but it's easy to work out where each goes, as there's an elemental effect relating to the buff - Thunderous is Arc, Abyss is Void, Fiery is Solar and Neutral is Kinetic (which is the only dunking spot with no real effect).
Once you have done that, you can then damage the boss. The buff you have also relates to the damage you can then dish out at this point.
Repeat this until the boss is done for. Here is Esoterickk with how the boss goes down (performed as a solo encounter):

Once the boss is complete, visit Eris to receive the Xenophage Exotic. You don't need to complete Pit of Heresy, so if you get stuck from here, the good news is at least you have done everything needed for this quest!
Read this next
- Destiny 3 discussion swirls, following accurate expansion leak
- Destiny 2: The Final Shape's Prismatic subclass and Dread faction detailed
- PlayStation releases digital Jim Ryan bobblehead as nod to his career
Past Wordle answers and all previously used Wordle words
Today's Strands hints and answers for Wednesday 17th April
Today's Connections hint and answer on Wednesday 17th April for 311
Today's Wordle hint and answer on Wednesday 17th April for 1033
Blox Fruits codes
Xbox Game Pass games list for April 2024
Manor Lords system requirements
Manor Lords release date and time
- Ethics Policy
- Ownership Policy
- Corrections Policy

Destiny 2 – The Journey – How To Emerge From The Dark – Lectern Lighting Order
The Journey quest in Destiny 2 can be a bit confusing, so in this guide, we will show you how to emerge from the dark for the Emergence step.
As part of the Xenophage quest, you will need to figure out how to emerge from the dark as part of The Journey exotic quest. The first step, Emergence, talks a lot about Crota, but this is a bit of a red herring. You need to head to the Anchor of Light, to light some Lecterns.
Head for the Anchor of Light, then go the point shown on the map above. This is where you will begin this part of the quest. You need to grab the Light from the strange relic in the small building shown in the header image above. The exact location can be found on the map. Once you have it, you need to light six lecterns, in the correct order.
There was a lot of trial and error done by the community for this one, but eventually, the good folks over at Raid Secrets on Reddit got it all worked out. My hat is off to them, and their amazing ability to expose Destiny 2’s secrets. The easiest way to show you the correct order to light them in is via a video. As such, I have recorded where to go, where the Light is, and what order you need to light the lecterns in. Just check the embedded video above.
Once you have them all, you need to go to an area that will be marked on the map, and interact with an item there. This will move you on to the next part of the quest, called Pathfinder! We are also working on a full guide for The Journey quest here if you need help with other steps.

The Journey
From Destinypedia, the Destiny wiki
The Journey is an exotic quest in Destiny 2 that was introduced in the Shadowkeep expansion, which rewards players with the Xenophage Machine Gun . [1] To obtain this quest, players must complete a puzzle in the Enduring Abyss on the Moon . Right before Eris Morn 's station overlooking the Lunar Pyramid there are four Hive statues, which players have to interact with them to make all of them light up. Solving it spawns a chest with the first quest step.
- 1.1.1 Notes
- 1.2.1 Notes
- 1.3.1 Notes
- 1.4.1 Notes
- 1.5.1 Notes
- 1.6.1 Notes
- 1.6.2 Transcript
- 2 List of appearances
- 3 References
Steps [ edit ]
Step 1: Emergence [ edit ]
Around you... darkness. If you are to discover your path, you must anchor yourself to light.
- Emerged from the dark
Notes [ edit ]
To complete this step, the player has to travel to the Anchor of Light and locate an orb of captive Solar Light in one of the buildings. They have a limited amount of time to light seven saucers scattered around the area with this orb.
Step 2: Pathfinder [ edit ]
A light shines on your path. But you have yet to bring it into focus. Until then, your path remains among the lost.
- Archer's Line Path Fragment found
- Sorrow's Harbor Path Fragment found
- Hellmouth Path Fragment found
- Anchor of Light Path Fragment found
This quest step is completed by solving a puzzle at the end of each Lost Sector on the Moon. There is a grid with Hive symbols on a wall, and a symbol above it. The player has to change all of the symbols on the grid into the symbol above by shooting them. Shooting a symbol changes all symbols on the vertical and horizontal lines where it is located. Once a wall is solved, it spawns a chest with the path fragment.
Step 3: Descent [ edit ]
Your path brightens, shining through the barrier of emerald, beneath a harbor built from sorrow.
- Path uncovered
This quest step is completed in the Pit of Heresy dungeon . The player has to proceed past the Necropolis encounter to the walls with many doors and interact with a hidden switch in one of them. The correct doorway is the only one without a chained symbol on it.
Step 4: Discovery [ edit ]
The Pariahs stand guard over far more than just despair, for within these tunnels lie many secrets.
- Path's end located
This quest step is completed by opening the doorway to the hidden boss in the Pit of Heresy during the Tunnels of Despair encounter. At the leftmost area upon interacting with a prompt on the cliff underside, the player has to cross several floating platforms above the pit to obtain a shiny orb of Solar Light, and light the two saucers by the doorway in the opposite section of the encounter.
Step 5: Slay Volmâr, the Tempted [ edit ]
The end of your path is in sight. Defeat those who would keep you from it.
- Volmâr, the Tempted slain
- This quest step is completed by defeating the hidden boss in the Pit of Heresy. When in Volmâr's room, the player receives a " Dread " buff, which determines what element of damage they will be able to deal to the boss. Each corner of the entrance room contains an orb with a Hive rune above it, the color of the orb corresponds with a certain damage type. There are four saucers with Hive runes above them, and a shiny orb in the middle of the room. The player has to memorize the rune for the orb which matches their Dread in the entrance room, then carry the shiny orb and light the saucer with this rune in the main room. Doing so changes their buff to its " Vengeance " version, which lasts 30 seconds and allows them to damage Volmâr with the buff's element.
- The Dread and Vengeance buffs refer to the elements as Neutral ( Kinetic ), Thunderous ( Arc ), Fiery ( Solar ), and Abyssal ( Void ).
Step 6: Finality [ edit ]
Return to Eris Morn with the Hive bug.
- Talk to Eris Morn
Visit Eris Morn with the now-transformed Omar Agah . She will insert Omar’s Hive bug form into his prized machine gun Xenophage , which is then given as your reward.
Transcript [ edit ]
"This… communes with me. And I know it… I know him. This is what remains of dear Omar. Tortured by the Hive. I knew not that he would be transformed by Crota's twisted experiments…"
"I am sorry I couldn't save you, friend. In life, you may have been unable to escape their grasp. But you will have your vengeance yet."
Eris has kept in her possession one of Omar's greatest assets: his beloved Machine Gun. Eris empowers it with the spirit of Omar, and grants it to you.
List of appearances [ edit ]
- Destiny 2 : Shadowkeep
References [ edit ]
- ^ Bungie (2019/10/1) , Destiny 2 : Shadowkeep , Playstation 4
- Articles with verbatim transcripts of official documents
Destiny 2: how to get the Xenophage exotic machine gun
How to get the Xenophage in Destiny 2—our complete quest guide.

With the launch of the Festival of the Lost, Bungie has also released its latest exotic weapon quest: The Journey.
Through completing The Journey, players will be able to unlock the new exotic machine gun, Xenophage.
As Destiny 2’s second exotic machine gun, Xenophage offers a unique and powerful set of perks. Its slow rate of fire makes it feel more like a single-shot anti-artillery weapon, but holding the trigger proves it is an automatic.
Each shot fired from this 13 round magazine provides a devastating punch with a small explosive radius that can tear through waves of enemies. In total the weapon can hold two magazines of ammo and its inability to deal crit damage seems a little odd, but it was able to tear through Nightmares with ease so it’s definitely worth getting.
Here’s how to pick up Xenophage.
Step 1: Embrace the Light
To start this quest you’ll need to go to the Moon and enter the portal next to Eris (you can also get here through Sorrow’s Harbor). While in the room where Eris usually sits after completing a memory you will see four statues. Each statue can be interacted with and will light one of the other four statues around the room.
To successfully light all four at once, interact with the statues in the following order (taken from the perspective of entering the room): front right, back left, front left. Upon lighting the final statue, a chest will appear and reward you with The Journey.
PC Gamer Newsletter
Sign up to get the best content of the week, and great gaming deals, as picked by the editors.
Step 2: Lighting the way
After acquiring The Journey you will be given some very cryptic steps that allude to the Anchor of Light on the Moon. Head to the Anchor of Light and move towards the large tower on the left side. Within the small building under the tower to the left when you enter there will be a fire. Interacting with this fire will give you a buff.
When in possession of the buff you will need to run around the Anchor of Light and activate six lecterns in a specific order. If you fail to interact with these lecterns in the right order, you will lose your buff and will need to start over. You can see the correct path below, with help from our pals at GamesRadar+ .
Step 3: Solve the Lost Sector puzzles
After lighting the fires in the previous step you’ll be treated to another series of rather ambiguous clues. What these clues really mean is that you need to venture into the Lost Sectors on the Moon, all four of them, and complete a puzzle that can be found on the wall at the end of each past the final chest.
These puzzles are all based on rotating tiles. Shooting a tile will alter the 3x3 grid in different ways. Your goal is to rotate all the objects in the correct order until the entire puzzle matches the symbol placed above it. To save you the heartache of completing several mini Rubik’s Cubes, here are the solutions to each puzzle from their starting position below. The notation below matches up with a standard computer number pad.

K1 Communion: 1, 3 ,8, 8
K1 Revelation: 6, 4, 5, 5, 4, 8, 2, 5
K1 Logistics: 7, 1, 6, 5
K1 Crew: 9, 4, 5, 2, 3, 3, 2
After completing all four of the puzzles and obtain four map fragments, you will unlock the next step in unlocking Xenophage.
Step 4: Journey to the Depths
Now that you’ve got a full map you will need to complete the first phase of the Pit of Heresy. Directly after you complete this section and unlock the chest you will be faced with a wall of doors. Look for the door that does not have a rune hanging over its awning and jump inside. While you are inside you will want to interact with another rune and proceed to the next encounter.
Step 5: Light more torches
Within the second encounter, while the invulnerable ogres are chasing you, there will be a series of Hive runes on the floor at a cliff at the far side from where you dropped down. As you interact with the runes, a series of platforms will appear in the chasm in front of you.
Jump over these platforms and acquire the fire. With the fire in hand, continue back the way you came from and stick to the right-hand side. This might prove tricky due to the ogres, but your end goal is to locate a door with two lecterns outside and light them (similar to those you lit in step 2.) When you light them, the doors will open and you can progress to the final step in the quest.
Step 6: Defeat the Hive Witch

As the doors open you will enter a room with four different runes in each corner. Each of these runes corresponds to an energy type indicated by the glowing orb below it. Blue represents arc, red represents solar, purple represents void, and white/colourless represents neutral. In the next room there will be a boss roaming the area, an object that contains a glowing orb of light, and four different places to deposit this light.
To damage the boss you will first need to look at the debuff you are currently affected by at the bottom left of your screen (void, solar, arc, or neutral), match it with a rune in the first room, and then find the matching rune within the second room where you should then deposit the light you’ve picked up. After depositing the light you will receive a buff for 30 seconds that will allow you to damage the boss using attacks of that specific energy type and only that specific energy type. So make sure you have a varied loadout.
Continue to follow the process of matching your debuff with the correct rune and following up with the correct damage until the boss is defeated. As the boss slowly falls you’ll be awarded with one final item that should be returned to Eris, and in exchange for this item you will receive the Xenophage.
Now it’s time to rip through some enemies like cheap toilet paper. Have a look at the Xenophage in action below:
Rise of the Triad: Ludicrous Edition update adds cross-platform multiplayer, another cut character, and more
Deep Rock Galactic is rolling out a feature to let you play old seasons
If you're excited to dive back into Fallout after the TV show, maybe hold off on Fallout 3 for now
Most Popular
- 2 Best wireless gaming keyboard in 2024
- 3 Best gaming laptops in 2024: I've had my pick of portable powerhouses and these are the best
- 4 Best gaming chairs in 2024: the seats I'd suggest for any gamer
- 5 Best graphics cards in 2024: the GPUs I recommend for every budget
- 2 Alienware 32 AW3225QF review
- 3 Glorious Model D 2 Pro 4K/8KHz Edition review
- 4 Nextorage X Series (NN5PRO) 2TB review
- 5 Scuf Envision Pro review
New to Shacknews? Signup for a Free Account
Already have an account? Login Now
- Subscribe
- Latest Pets
- Forum: Posts today 1320
Xenophage Exotic Machine Gun - Destiny 2
Unlock Xenophage in Destiny 2 by completing The Journey steps on the Moon for Eris Morn.

Xenophage is one of Destiny 2’s most powerful Exotic Machine Guns. What it lacks in ammo capacity and speed it makes up for in raw, overwhelming power. To unlock Xenophage, players will need to complete a quest called The Journey for Eris Morn, which starts on the Moon.
Xenophage, Exotic Machine Gun

The Xenophage Exotic Machine Gun is a Solar Power weapon that uses Heavy ammo – which surprises no one. The gun was originally introduced during Season 8 , Shadowkeep and Season of the Undying, and has seen continual use since then.
Players that unlock Xenophage will be treated to one of the slowest firing Machine Guns in Destiny 2, featuring a 120 PRM. But, more on its perks and stats below.
The Journey Exotic quest
Unlocking Xenophage will require a bit of footwork, some puzzle solving, and venturing into the Pit of Heresy dungeon . Here are the steps to unlock Xenophage:
- Go to the Enduring Abyss below the Moon
- Use a ball of light in the Anchor of Light to light up six locations
- Solve puzzles in the Moon Lost Sectors
- Enter the Pit of Heresy and find the hidden item after the first encounter
- Collect a charge during the Pariah Ogre section and use it to light two brazier to open a door
- Slay Volmar, the Tempted
Step 1: Go to the Enduring Abyss
To get The Journey quest for Xenophage, you will need to reach the Enduring Abyss area beneath the Moon. Begin by loading in at the Sanctuary fast-travel point on the Moon. Head through the portal near Eris (if it's there) and follow to the point where you can see the pyramid. If the portal is not there, you'll have to take the long way. Use the embedded video below to help you find the Enduring Abyss location.
When you reach Enduring Abyss you'll find four statues, two on either side from where you look out towards the pyramid. Do not touch any statues until you're ready to begin. They should not be lit at all.
You will need to light them in the correct order. To do this, approach the statues in a clockwise direction and press the interact button when the message “Emerge from the Dark” appears. When all four are lit, a chest will spawn which contains The Journey, the Exotic quest for the Xenophage Exotic Machine Gun in Destiny 2.
Step 2: Emergence
The actual first step of The Journey will take Guardians to the Anchor of Light region on the Moon. Once there, an orb (ball of light, if you will) can be picked up. This light can then be taken to six nearby locations. At each one, Guardians will have to hold the interact button to Light Your Path. The six locations must be hit in the correct order, which is why we have a video of this step embedded below.
Step 3: Pathfinder - Lost Sector puzzles

The Pathfinder section of The Journey tasks players with solving puzzles in Lost Sectors. These are flip puzzles, where shooting a symbol flips all the symbols on its cardinal plane to the next icon. The puzzles are all found at the very end of the Lost Sector, after defeating the boss and going through a locked door.
You will need to complete all four puzzles in each of the Moon’s Lost Sectors to find the path fragments. Credit to the Raid Secrets community for the solution to some of these puzzles.
K1 Revelation

- Left middle
- Bottom middle
- Right middle
K1 Logisitcs

- Bottom left
K1 Communion

- Left bottom
- Right bottom
K1 Crew Quarters

- Middle bottom
Step 4: Descent

The next step to unlock Xenophage is to dive into the Pit of Heresy dungeon. Depending on your experience level, you can either do this solo or as a fireteam of three.
Clear the first encounter, collect your reward from the chest, and then press onwards. When you reach the wall covered in doors, look up to the left to spot one without a chain hanging over it. Use the wall to climb up to this door. Inside you will find a stone you can interact with that reads "Reveal Path's End". Interact with the stone and move on to the next step.
Step 5: Discovery

The next step also takes place in the Pit of Heresy dungeon, in the second encounter with the invincible Pariah Ogres. Along the left-hand side of the area is an abyss, but there's a ledge just over the edge. Drop down to it and stand on the plate while holding the appropriate button to "reveal a path". Jump across the floating platforms and collect the charge.

Take it back the way you came, sticking to the right-hand wall. You will need to use the charge to light two plates near a small door. This causes the door to open, granting you access to a hidden boss and the last step. This whole step is best attempted when the ogres disappear after clearing the encounter.
Step 6: Slay Volmar, the Tempted

The final step in unlocking Xenophage is to defeat a hidden boss in the Pit of Heresy dungeon, Volmar, the Tempted. This boss fight requires you to use specific elemental damage against Volmar.
When you enter the first room, look at the bottom left of your screen to see what elemental charge you have. Find this element type in the corners of the first room. You will need to memorize the symbol as you must now find that symbol in the boss room. Go into the boss room and search for the symbol. When you find it, activate it. This will give you a short timer allowing you to deal damage of that specific element type. When the time is up, you will need to repeat the process of finding the matching symbol.
Repeat this until Volmar, the Tempted dies. At this point, you can return to Eris Morn to unlock the Xenophage Exotic Machine Gun.
Xenophage perks

The majority of Xenophage’s perks are rather average and even unassuming. However, they work together to make this thing hit like a truck.
- Full Bore – Barrel optimized for distance. Greatly increases range, decreases stability, and slightly decreases handling speed.
- High-Caliber Rounds – Shots from this weapon knock the target back farther. Slightly increases range.
- Rangefinder – Aiming this weapon increases its effective range and zoom magnification. Increased projectile velocity while aiming Rocket Launchers and Grenade Launchers.
- Composite Stock – This weapon has a versatile dual-purpose stock. Slightly increases stability and handling speed.
Xenophage’s Exotic perk is Pyrotoxin Rounds. This is what makes it so powerful.
- Pyrotoxin Rounds – Fires high-powered explosive ammunition.
This unassuming perk ensures that Xenophage deals ludicrous damage. In fact, if you’re not using Anarchy, you’re likely going to want to use Xenophage as your boss damage tool. It’s even great at knocking down Champions and Wyverns.
Xenophage lore

This might sting a little.
There was only darkness… until there was Light. Again. A third time. I knew it. Knew I'd be back one day—only this time, I was something else. Something… not Human. Not by choice, of course. Those damn Hive. They weren't just tryin' to kill me. They were using me to get to my Light. To drain it from my soul. For their sick experiments. But the idiots screwed up. They didn't just drain my Light. They took the whole lot. The entire thing. Soul and all. I'm still me. I'm just not the me I knew. The one with two arms and two legs. I'm something smaller now. But honestly, it's no bother. The fire inside me… it came too. And it rages now more than ever before. The fools have no clue what they've done. No idea the price they'll pay. I'll have my vengeance. In this life, not the next. —Omar Agah
Unlocking Xenophage in Destiny 2 is a lengthy process that requires fighting through the Pit of Heresy dungeon as part of the quest, The Journey. As with all dungeon runs, it's best to take a fireteam with you. Check out our Shacknews Destiny 2 complete strategy guide for more Exotic weapon walkthroughs.
Bill and Sam are the two Shacknews writers who handle the bulk of the Destiny 2 content. As a Hunter and Warlock main respectively, they can cover a great deal of ground with whatever is happening in Destiny 2 today. What they don't know they can find out thanks to their all-star lineup of Destiny 2 friends.
- Destiny 2: Shadowkeep
- Destiny 2: Season of the Undying
Bill Lavoy and Sam Chandler posted a new article, Get the Xenophage Exotic Machine Gun in Destiny 2
The fragments are in each of the four lost sectors on the Moon, the will have hive puzzles at the end of the lost sectors you are to solve.

- Call of Duty
- Apex Legends
- Dead By Daylight
- Attachments
- Field Upgrades
- Killstreaks
- Action and Adventure Games
- Battle Royale
- Gangs of Sherwood
- Indie Games
- Like a Dragon Gaiden: The Man Who Erased His Name
- Only Mobile Gaming
- Role Playing Games
- Shooter Games
- Sports Games
- Strategy and Simulation Games
- The Day Before
- shooter games
Destiny 2 Xenophage Exotic Guide: The Journey Quest and Volar The Tempted Guide
Going through a 'phage.
Published: 08 Jan 2021 10:41 AM +00:00 Updated: 22 Mar 2021 9:32 AM +00:00
Shadowkeep may have landed over a year ago, but collectors will want to get their hands on Xenophage.
Obtaining it will require heading into the Pit of Heresy dungeon, as well as defeating a hidden boss.
Here's what it does, and how to get it.
- Xenophage Guide
Start The Quest
Deposit orbs in anchor of light, k1 revelation, k1 crew quarters, k1 logistics, k1 communion, pit of heresy path uncovered, pit of heresy path's end and secret boss.
Read More: Destiny 2 Penguin Souvenir Locations: ALL Europa Penguin Toys Found In D2 Beyond Light
Destiny 2 Xenophage Guide
Xenophage is an exotic machine gun that uses heavy ammo.
It deals Solar Damage, and its intrinsic perk is "Pyrotoxin Rounds" – allowing it to fire high-powered explosive ammunition.
That makes it ideal for ripping through mobs or bosses.
Destiny 2 Xenophage Quest
Up first – obtaining the quest.
For this, you'll want to head to the Moon, specifically Sorrow's Harbor.
Head through the path to the North of the area, through the Enduring Abyss. Push through to the Pyramid, and look for four very creepy statues on the left and right.
Interact with all four to cause a chest to spawn containing The Journey – the Xenophage quest.
Head to Anchor of Light and look for a building with an Orb inside that you can interact with and pick up.
There are six locations where the orb needs to be deposited nearby:
- in the same room
- Next to a radio tower against a slope
- Small yellow building
- Atop the radio tower in Anchor of Light
- On top of a ramp to the North
- Atop the raised circular building
Head back to where this step started to receive a waypoint that'll kick off the next phase.
Pathfinder Puzzle Solutions
You'll now need to solve a puzzle in each of the Moon's four lost sectors.
You'll need a bunch of symbols on the wall to match the ones above, which is done by shooting specific icons.
Here are the solutions:
- Centre right
- Centre left
- Centre bottom
- Bottom right
- Bottom left
Head to the Pit of Heresy dungeon and complete the first encounter.
Afterwards, you'll find a series of doors on either side of the pathway ahead, with one looking different.
Get through that one, and you'll find a switch to start the next phase.
When you reach the dungeon's second encounter, head to your left into a glowing cavern.
Push on until you find a plate. Activate it by standing on it, grab the orb that appears and head back the way you came – keeping an eye to your right.
Go through the path on the right, dunk the orb, and you'll be tasked with fighting Volmar, The Tempted Slain.
You'll need to grab orbs and dunk them based on the corresponding buff:
- Arc Orb - Thunderous
- Kinetic - Neutral
- Solar Orb - Fiery
- Void Orb - Abyss
After each dunk, damage the boss as much as you can. Once he's dead, you can return to Eris to claim Xenophage!
Explore new topics and discover content that's right for you!
- Privacy Policy
- Corrections Policy
- Ethics Policy
- Fact-checking Policy
- Ownership Policy
- Looking for Eguides?

How to Complete The Journey Quest in Destiny 2
If you have the Shadowkeep Expansion, you might find yourself in possession of the coveted quest, The Journey . If you find yourself in possession of this quest and you don’t have Shadowkeep, be aware that you’ll need that expansion to finish this quest!! So, let’s get into it. Here’s how to complete The Journey quest in Destiny 2.
How to Complete the Journey Quest in Destiny 2
If you don’t have the quest yet, head first to the Moon, then to Sorrow’s Harbor. From here, you’ll want to head towards the Scarlet Keep. Once you enter it, take the first left door, and descend and keep left until you reach the Enduring Abyss . Once you hit the lantern, stop and look up to the right. There will be a lighted corridor you can jump up to.

Do so, then follow this path until you see a Pyramid. You’ll be in a small balcony area with four statues, two on the left, two on the right. By interacting with them, one or more will light up. Our goal is to light all four. This puzzle is random, so experiment by interacting with the statues until all four are lit. I found that working from the bottom left in a counter-clockwise fashion worked perfectly.
Related: How to Complete the Memory Alembic Quest in Destiny 2
Once the statues are lit, you’ll get a notification, and a chest will spawn. Open it, and you’ll get the quest, The Journey. Now, to the entrée:
Step 1: Emerged from the dark.
“Around you… darkness. If you are to discover your path, you much anchor yourself to light.”
It’d be easy to be stumped by this quest description. But it’s actually given us precisely where we need to go: the Anchor of Light . Head there from Sanctuary, then keep left until you see the bright yellow radio tower.

But we don’t want this large tower – we want the small room attached to it. Head inside, and you’ll find behind an ancient server a strange, Hive-like structure with a glowing orb within. Approach it, and it will prompt you to “Pick Up Light”. Do so, and you’ll find there’s a counter on the left side of your screen called “Torch Bearer”. You’ll have one minute to deposit the ball of light into six different locations.
This light has to be deposited in a precise order, so I really recommend finding each of the six locations and their scarlet plates beforehand. Once you have an idea of where to go, you’ll be able to complete this easily.
I’ve provided a short video of my run below (and as you can see, you can make a hiccup here or there and be perfectly fine on time). But here’s how to find each one:
Location 1 : Same Room
In the corner of the same room, you found the ball of light will be a scarlet plate. Interact with it, and your path will burn brighter.
Location 2: Within the chasm
Leave the room and keep heading straight until you see an orange wall in the distance with some Fallen graffiti. Head towards that wall and you’ll reach a stone bridge that goes over a green chasm. Turn left while on this bridge and you’ll see some broken scaffolding. Within this scaffolding is the second plate.

Location 3: Another small room
From your perch on the scaffolding, turn around until you see the saucer building. Head a little to the right of this saucer building and you’ll see a small yellow building with only one room. Behind the console in the center of this room will be another plate.

Location 4: Second floor of the radio tower
Return to the radio tower, but this time we’ll be ascending to the second floor. Once you’re on the second floor, you’ll see some crates covered with purple tarp. Jump on top of them, then look up. If you peer carefully, you’ll be able to see the dark, round shape of another plate on a girder above you. Jump up to it.

Location 5 : Cement ramp
Heading directly north of where the plate on the girder is, we’ll see another set of buildings, connected with a variety of cement ramps. Climb the highest ramp on the right side, and there will be a bowl on top.

Location 6: Saucer/Round Building
From the top of the cement ramp, head forward until you see the UFO/Saucer shaped building that was our landmark for Location 2. We want to climb on top of that. Do so, and you’ll find the plate on top.

Once you find all 6, you’ll be directed towards a steel tower. There’s no time limit for this one, and you’ll get a clear map marker for it to boot.
Step 2: Pathfinder
Okay! We have quite a few more steps to go. We’ll need to find the following fragments:
- Archer’s Line Path Fragment
- Sorrow’s Harbor Path Fragment
- Hellmouth Path Fragment
- Anchor of Light Path Fragment
For this step, we’ll need to visit all the K1 Lost Sectors. Naturally, the easiest one to go to is Anchor of Light’s Lost Sector, K1 Communion, which is North East of the UFO building.
Fragment 1: Anchor of Light, K1 Communion
Complete the Lost Sector like usual, then claim the Lost Sector chest. Jump up towards the Lost Sector exit, and you’ll find a Hive puzzle on the wall. Your goal is to make all the symbols match the symbol at the very top (which I call the ice cream cone). You do this, of course, by shooting a tile which then flips over a series of others. Here’s the easy way to do it:
- Shoot bottom left
- Shoot bottom right
- Shoot top middle
Do that, and you’ll get a grid full of ice cream cones and a hive treasure chest will spawn. Open it, and you’ll get a Path Fragment. Now, to the next lost sector.

Fragment 2: Archer’s Line, K1 Logistics
This Lost Sector is always a pain to find. Head into Archer’s Line from Sanctuary, then keeping heading straight until you reach the large building at the end of the path. Enter the building but try to keep left until you find a room full of spooky scarlet ghosts. Follow the ghosties until you descend into the Lost Sector.
Related: Destiny’s Latest Teaser Reveals New Details about the Strand Subclass
Once you’re in K1 Logistics, continue as normal and grab the Lost Sector chest. Enter the corridor after the chest to find the next puzzle. Like K1 Communion, we’re going to want to shoot some tiles and get it to match the triangle on top.
The easy solution:
- Shoot top left
- Shoot middle right
- Shoot middle center

Claim your path fragment!
Next up: Sorrow’s Harbor.
Fragment 3: Sorrow’s Harbor, K1 Revelation
Another annoying Lost Sector to track down! Use your map to get practically on top of it. Once you are, look around. The Lost Sector is inside a cave that winds beneath your feet. And if you find that the final door won’t open once you complete the Lost Sector, it’s probably because you 1) Missed an acolyte somewhere or 2) You finished the final boss too quickly and you need to leave the area slightly then come back to trigger the next few waves of grunts.
Go through the final doors and you’ll see a new puzzle. To complete it, hit the following tiles:
- Shoot middle left
- Shoot bottom middle

Yeah… that’s a lot of middle. Now, let’s head into the Hellmouth.
Fragment 4: Sorrow’s Harbor, K1 Revelation
Get into the Hellmouth whichever way you prefer, heading towards the crew community at the bottom of this section of the map. There’s nothing tricky about this Lost Sector, except you might miss the puzzle. It’s just past the Lost Sector cache on a rock balcony. Jump over to it then hit the following tiles:
- Shoot top right
- Shoot bottom middle
That’s a lot of bottoms.

… Moving right along. We finally have our last fragment, and we’re onto our next step.
Step 3: Path Uncovered
Again, we get a bit of a location-based hint. We’ll need to head to Sorrow’s Harbor and begin the Pit of Heresy , a Dungeon you can see on your map. To access this dungeon, you’ll need the Shadowkeep Expansion. If you can’t access the Pit of Heresy and you do have the Shadowkeep Expansion, check to see if you’ve completed Eris’ “The Deepening Wake Quest”.
Now that you’re in the Pit, complete the first encounter. Head forward until you hit the wall puzzle with dozens of doors.

There are two rows of lit doors. Look left. Your goal is to get to the second door from the end on the top row. Climb up there and enter the room, and you’ll find a ruin on the ground. It will have the interaction prompt “Reveal Path’s End”. Interact with it, and you’ll get a new step.
Step 4: Discovery
Welp! We’ll need to find the Pariahs, and they’re luckily right in the Pits of Heresy with us. Continue through the Dungeon as normal, heading into the terrible awful maze portion where you’ll need to avoid the Ogres. It’s important to note that you MUST NOT get to the Chamber of Suffering checkpoint, as it will lock you out of backtracking!!
Is that enough exclamation points? !!!! Here are a few extra. I’m giving these to you because I know how tedious it was to get to this point, and it’d be awful to have to complete the Dungeon or wait for reset just to finish this step.
This area is meant to trip you up, but the next set of hidden runes are hidden on a path on a ledge. Search every edge you come across, and if you see a massive set of ribs and a few scarlet ghosts, you’ll know you’re in the right place. There will be a path that will lead downward, terminating at a set of runes on the ground. And, yes, it’s beside an ogre patrol point.

Once you interact with the runes on the ground, a set of platforms will spawn. Jump across them, and you’ll see something familiar: a hive bone structure with a ball of light in the middle. But don’t worry: this time the torch buff won’t run out.
Take this ball of light all the way back where you first entered this section. There, you’ll find two scarlet plates next to a door. Light both, and the door will open. Oh, and be careful of the Ogres. They still want to kill you.
Step 5: Slay Volmar, the Tempted
The door you deposited the light into will now open. Enter and breathe a sigh of relief because the Ogres can’t follow you here. Work your way through the spiderweb-choked corridors. There, at the very end will be a Hive Wizard gold bar – Volmar the Tempted.
I’m very sorry to say that killing Volmar isn’t as easy as chucking a Nova Bomb at his head. This boss can be difficult to solo and there’s a puzzle attached. Around Volmar’s arena are a variety of Hive Ruins, each of which are connected to an element: Void, Netural, Arc, and Solar.
Related: How to Get Riptide in Destiny 2
It’s best to try and memorize where each of these Runes are. In Volmar’s room, there is a ball at the center that he guards. You’ll be given a debuff with an element associated with it. Fiery Dread for Solar, Abyssal Dread for Void, Neutral Dread for kinetic, Thunderous Dread for Arc.
You’ll need to steal the ball he’s guarding then dunk it next to the Rune that represents the element you’re being affected by. Once you’ve dunked the ball, return to Volmar to try to get in as much damage as possible.
If you’re struggling and need to recover, try to hide near the kinetic altar. If you can’t get the ball, exit the room, and get the entrance ball. And once the wizard goes down? You’ll get the next step.
Step 6: Finality
What a journey. I guess that’s why they named this quest what they did. They could have also named it “suffering” and that would have worked, too.
Now, all you need to do is return to Eris Morn in Sanctuary, and she’ll hand you the Exotic Machine Gun, Xenophage! Congratulations, Guardian.

- Privacy Policy

Destiny 2: How to Get the Xenophage Exotic Machine Gun
Xenophage is a top-tier Exotic Heavy Machine Gun and has been since its introduction in the Shadowkeep expansion. Though there are more optimal DPS choices in Destiny 2 , you’ll want to know how to get this weapon. That’s because Xenophage has high burst potential and relatively good ammo economy. Here’s how to complete The Journey Exotic quest.
How to Get the Xenophage Exotic Machine Gun in Destiny 2
To get Xenophage, you’ll need to complete an Exotic quest called The Journey . Even starting the quest is a bit complicated. We’ll go over all the steps below.
How to Start The Journey Quest in Destiny 2
To start The Journey Exotic quest, be sure that you own the Shadowkeep expansion, then head to Sorrow’s Harbor on the Moon .
Travel to the northern edge of the area and enter the Scarlet Keep, taking the leftmost doorway. Travel until you reach a light greenlit hallway, and keep an eye out for another passageway in the upper-right wall.

Jump into the passage, and follow it until you reach the chamber, where you can see the Lunar Pyramid and two Hive statues on either side.

To complete the first step of The Journey quest, activate the statues in the proper order . Approaching them will show the message, “Emerge from the Dark.”
The correct order is below. These positions assume “back” is the side closest to the Pyramid . Once correctly activated, a hidden chest will appear. Open it to start the Journey quest in earnest.
- Front right
How to Complete Emergence: The Journey Step 1
The first step of The Journey Xenophage Exotic quest is called Emergence. Head to the Anchor of Light area on the right side of the Moon . Go to the northwest portion beneath the large, multi-story Fallen structure. There’s a small room there with a fiery altar.
You’ll be lighting a total of 6 Braziers in this step. Pick up the light to activate a 60-second timer. Each Brazier you light resets the timer to 60 seconds.
Brazier Location #1

Go to the small unlit brazier on the floor nearby, and light it to refresh your timer.
Brazier Location #2

From the small room, head out and hang a left. When you see the other orange Fallen building, keep to the left. On a platform above a blue tarp-covered box is the second brazier.
Brazier Location #3

From the second brazier, turn around to the small room across from the large circular structure. The brazier is tucked into a dark corner.
Brazier Location #4

Head out the opposite opening from where you entered and go toward the multi-story Fallen building. Clamber into the support beams to find the next brazier at a vertex on the edge of the structure. You can also light this brazier from below if you’re having trouble reaching the beams themselves.
Brazier Location #5

From the Fallen building, head directly across the area to a small structure with two large generators. The next brazier is to their left.
Brazier Location #6

For the final brazier, jump on top of the large circular building. It’s at the center of the roof.
Once you’ve lit all the braziers, you have one more place to go but an infinite amount of time to get there.

From the circular building, head back toward the first and fourth brazier locations at the multi-story Fallen building. Instead of going all the way there, stop near the cliffside next to a Hive altar jutting out of the ground. Deposit the light.
How to Complete Pathfinder: The Journey Step 2

The second step of The Journey quest for the Xenophage is a bit more straightforward than the first. Your task during Pathfinder is twofold:
- Complete all four Lost Sectors on the Moon
- Solve a brief rune puzzle after the final loot chest
Complete each Lost Sector and loot the last chest to unlock the ability to complete the puzzle safely . The puzzle solutions are below, presented as positions and as numbers as you’d see on a phone. You simply shoot the runes in the following orders:
K1 Communion in Anchor of Light Rune Puzzle Solution
- 7 or Bottom left
- 9 or Bottom right
- 2 or Top middle
K1 Logistics in Archer’s Line Rune Puzzle Solution
- 1 or Top left
- 5 or Middle
- 6 or Middle right
K1 Revelation in Sorrow’s Harbor Rune Puzzle Solution
- 4 or Middle left
- 6 or Middle left
- 2 or Middle top
- 8 or Middle bottom
K1 Crew Quarters in the Hellmouth Rune Puzzle Solution
- 3 or Top right
- 8 or Bottom middle
How to Complete Descent: The Journey Step 3
Steps three, four, and five — Descent, Discovery, and Volmar, the Tempted — all take place inside the Pit of Heresy Dungeon . You’ll only need to complete one of the four main encounters in the Dungeon. We’ve covered everything you need to know about Pit of Heresy in our full walkthrough .
For step three of the Journey, Descent, complete the first encounter and proceed until you reach the wall of doors. Instead of heading down and to your right to the Ogre maze, look up and to your left.
Look for the one door without a rune above it . If you’re using the door directly in front of you as the starting point, the door you want is one level up and two columns to the left.

Platform your way to the door and head inside. There will be a Hive runestone within that you can interact with, giving you the next step in the quest, Discovery.
How to Complete Discovery: The Journey Step 4

For Discovery, head into the Ogre maze. Rather than ducking into the middle caves, keep left until you reach the cliff. Jump down onto the lower platform until you reach a plate in the ground covered in Hive runes.
Activate the plate to raise three floating platforms from the chasm, with another light ball on the final platform. Grab the light ball, head back to the main area, and go right.
Take the tunnels to the right until you begin seeing red-lit doorways flanked by braziers like the ones you lit at the beginning of The Journey quest. You’ll be able to interact with the second door; don’t worry if the prompt doesn’t populate properly. Interact with both braziers to proceed to the next step.
How to Beat Volmar, the Tempted: The Journey Step 5

Make your way through the small maze until you reach a starting area with four Hive runes in each corner . These are the four elemental Dread buffs you’ll be using in the boss fight coming up shortly.
As soon as you enter the next room, Volmar, the Tempted, will appear, a boss-level Hive Wizard that’s completely invincible at first.
You and each member of your fireteam will receive a Dread buff based on one of the four damage elements available during Shadowkeep:
- Kinetic (Neutral Dread)
- Void (Abyssal Dread)
- Arc (Thunderous Dread)
- Solar (Fiery Dread)
To damage the boss, you’ll need to collect the light ball in the center of the arena and then interact with the proper rune to activate it and be able to do damage.
- Abyssal Dread : Top left on the upper platform
- Thunderous Dread : Bottom left on the lower floor
- Fiery Dread : Top right on the lower floor
- Neutral Dread : Bottom right on the upper platform
Once you dunk the light, you can damage the boss, but only with the element noted in your Dread buff. All other elements will register as immune. Repeat this process as often as it takes to kill Volmar — and don’t die. A full team wipe (or a single death if solo) will send you back to the start of the fight .
Once Volmar dies and you progress the quest, you can leave the Pit of Heresy Dungeon. Nothing else here matters to get Xenophage.
How to Complete Finality: The Journey Step 6

All step six entails is visiting Eris Morn and picking up your reward: the Xenophage Exotic Heavy Machine Gun.
The Xenophage Machine Gun you receive won’t be a Pinnacle or Powerful drop. It will be awarded at your current Power level . You don’t have to claim it immediately unless you want to, saving it to fill in a Power gap if you’re optimizing your leveling. However, you can also always infuse it later and get the most out of the weapon as you play.
And that’s how to complete The Journey quest and get the Xenophage Exotic Machine Gun. If you’re looking for additional help with Destiny 2 ’s collection of Exotics, check out our Gjallarhorn , Unfinished Business , and Winterbite Exotic weapons guides. Our D2 guides hub has much more.
Featured image via the Destiny wiki

How to Complete Xenophage Quest in Destiny 2 2023
Use this guide to help you obtain the Xenophage in Destiny 2 2023

A relic of its time, the Xenophage quest is a long and convoluted multistep quest that unlocks the Xenophage Exotic Machinegun. The weapon is a very powerful machine gun and is the bane of many a player in Gambit.
This Destiny 2 Exotic guide will tell you all the steps necessary to unlock the elusive machine gun. But before we proceed with the guide, you should know that to have access to the Xenophage, you first need to have access to the Shadowkeep DLC and the Pit of Heresy Dungeon. We don’t believe that you start the Exotic quest without the DLC.
As an alternative, if one of your friends has access to the Pit of Heresy Dungeon, you will have to tag along in order to complete steps 3 and onward.
Oddly enough, you can’t get the quest from the quest kiosk. It’s just odd considering you can get the Wish Ender quest from one of those kiosks. Buckle up everyone, this is going to be a long quest.
How to Start Xenophage Quest in Destiny 2
In order to get the quest, you first need to go back to the Scarlet Keep, preferably after completing the Shadowkeep campaign. Then you’ll need to summon a chest that holds the Xenophage quest.

Go through the left door and keep going down the tunnel until you see a glowing lantern on the ground. Above it, you’ll find a side passage that leads to an open-air chamber. You will find four statues around the chamber. You need to activate the statues in this order to make the chest that holds the quest appear.

The reference point is where you entered the chamber. The front side is closer to the entrance and the back one is the one beside it.
- Front right

The Journey Quest Steps
There are 6 steps to this Destiny 2 Exotic quest. They will take you all over the Moon and several of the steps will take you through the depths of the Pit of Heresy Dungeon.
The Journey Step 1
Around you… darkness. If you are to discover your path, you much anchor yourself to light.

For this first step in the Xenophage quest, there will be six braziers that you will need to light ignite using your Light. Start by going to this location on the West side of Anchor of Light . (Refer to the image above.)
All six braziers are located all around the immediate area. Even so, the braziers are located in some pretty obscure places. It may take a few tries until you get it right since you have to do it in this specific order .
1st Brazier

The first brazier is located beside the receptacle . Once you light it up, you’ll receive the Torch Bearer buff and now you have 60 seconds to get to the next brazier. Quickly exit the area and head for the main road.

The second brazier can be found on the slopes along the main road. (Look for that orange building if you lose your bearings). It is located on top of some platforms. Light it up and head back in the direction you came from.
3rd Brazier

Once you light the brazier, turn around and make your way back to the initial building. You can find the third Brazier in the corner of this buried yellow building a little ways away. (Refer to the left picture above.)
4th Brazier

Exit East and go to the multi-floor building to get to the fourth brazier . (See the picture above.) This one is located on the very top. Enter the top floors on the right side and go along steel beams to find the brazier in the back.
5th Brazier

Turn back and immediately look to your left. The fifth brazier is located on top of this yellow building .
6th brazier

The sixth and final brazier is located on top of the cylindrical building along the main road of the area.
Once you’ve lit up all 6 braziers, you no longer have a countdown timer. At the same time, a new waypoint will appear. You will need to go there to progress the quest.

Insert the Light into the receptacle to start Step 2 of the quest.
The Journey Step 2
A light shines on your path. But you have yet to bring it into focus. Until then, your path remains among the lost.
- Archer’s Line Path Fragment found
- Sorrow’s Harbor Path Fragment found
- Hellmouth Path Fragment found
- Anchor of Light Path Fragment found
For this second step, you’ll be asked to go to the end of Lost Sectors and decode a series of glyphs in order to progress the quest. Decoding the sequence requires you to shoot them so we don’t recommend any weapon that uses Ricochet Rounds or Explosive Rounds.
Anchor of Light Path Fragment Location

The Anchor of Light Path Fragment is located at the end of the K1 Communion Lost Sector . You’ll need to open the chest to get to the puzzle’s location. From there, you’ll need to shoot the following glyphs in this exact order.
- Bottom left
- Bottom right
if you do everything correctly, a chest will spawn containing the Fragment.
For the rest of the fragments, you’ll only tell which Lost Sector to go and the order in which the glyphs need to be shot. This should all work out as it did the first time around.
Archer’s Line Path Fragment Location

The Archer’s Line Path Fragment is located at the end of the K1 Logistics Lost Sector .
- Middle right
Sorrow’s Harbor Path Fragment Location

The Sorrow’s Harbor Path Fragment is located at the end of the K1 Revelation Lost Sector .
- Middle left
- Middle bottom
Hellmouth Path Fragment Location

The Hellmouth Path Fragment is located at the end of the K1 Crew Quarters Lost Sector . This one’s a bit different. To the left of the chest, you’ll a ledge with the puzzle on it. Jump onto the ledge to get a view of the puzzle.
- Bottom middle
The Journey Step 3
Your path brightens, shining through the barrier of emerald, beneath a harbor built from sorrow.
The third step in this Xenophage quest takes us all the way past the first encounter and into the first jumping section of the Pit of Heresy Dungeon.

Once you reach this section, reach this exact door, as shown above. You can use the ledges to get up there the conventional way or you can do what the cool kids do and Strand your way to the location.
Look above the doorways for a hint about the right door. If you see a doorway without a glowing green chain then you’re looking at the correct one.

Interact with the glyph on the other side of the door to get to the next step. After revealing the Path’s End, you are then going to go to the next part of the Dungeon.
The Journey Step 4
The Pariahs stand guard over far more than just despair, for within these tunnels lie many secrets.
The fourth step takes place in the maze section of the Dungeon. There are three long passageways guarded by invulnerable Ogres. Usually, you’ll need to pick up orbs and transport them to the door of the next encounter, but not this time.

To progress the Exotic quest, you’ll need to go to the left passageway and go along the area above the glowing above below. If the ogre is going you trouble, just drop down to the ledge below. You are to look for glowing markings on the floor. Interact with them to cause a series of platforms to rise from the Abyss. Go to the third platform and pick up the orb.
The ogre might not like what you’re doing so chill for a bit behind the receptacle before proceeding onward.

Orb in hand, bunny hop your way to the far side of the right passageway where you will find a doorway. As seen above, if you see these glyphs then you’re in the right place. There are two discs on either side that you will need to light . Do so while avoiding the ogre’s eye beams. (Feel free to hide in the nearby side passage.)
Enter the doorway and the next step in the quest will begin.
The Journey Step 5
The end of your path is in sight. Defeat those who would keep you from it.
The fifth step requires you to defeat Volmar, the Tempted slain. You are so very close to the end, so take this fight with the utmost caution.
If you look on the left side of your screen, you will see an elemental buff has been activated. This is the mechanic of the fight. In the next room, Volmar will be hanging around the central platform. On the platform is an orb of Light. You are to pick up this orb and deposit it into one of the receptacles located in the corners of the arena matching the damage type. This will initiate the damage phase.

The images above match a symbol to an element. Use them as a guide in case you’re not sure which is which. You can also look around the prep room while in game. Destiny 2 is quite forgiving in that regard.
- Solar and Arc receptacles are located in the lower half of the arena.
- While the Void and Kinetic ones are located in the upper half.
You have just around 30 seconds to deal damage that corresponds to the active buff . So make sure you go into the instance with a weapon for each element. Or bring a weapon that changes elemental affinity. Also, ads will continuously appear throughout the fight. It’s a good idea to thin their numbers before depositing the orb.
It’s worth noting that Volmar is quite tanky and might require more than a few resets before the Hive Wizard goes down. The game won’t give up Xenophage that easily. But seeing as we are above 1800 in this year of Destiny 2. It shouldn’t take us more than 3-4 resets to clear the encounter.
Once Volmar dies, you’ll get a new quest item. You are now one step away from getting Xenophage.
The Journey Step 6
Return to Eris Morn with the Hive bug.

The last step in the Xenophage quest is to report back to Eris Morn back in Sanctuary. Once you’ve given her the bug, she’ll give you Xenophage in return.
Congratulations! You have just completed one of the longest active quests in Destiny 2. Pat yourself on the back and enjoy your new destructive weapon.
And that’s all the steps for getting the Xenophage machine gun in Destiny 2. It’s a bit of a long one but if you’re already familiar with the Pit of Heresy Dungeon, there’s no reason why you can’t do everything within a couple of hours. But hey, it’s all worth it for this beast of a gun. Good luck and have fun out there, Guardians.
Check out this lengthy Xenophage guide showing you step-by-step the things you need to do to get the Exotic machine gun courtesy of YouTuber TriGs .
Home > Game Guides
- Game Guides
Destiny 2: Shadowkeep The Journey Guide
by enricofairme · Published October 29, 2019 5:50 PM · Updated October 29, 2019 7:44 PM
In Destiny 2 there is an Exotic Quest called The Journey. This Exotic Quest takes you around the Moon as you attempt to find the Exotic weapon. To help you complete this quest, use our The Journey Guide.
Note : Guide is still updating.
Reaching Enduring Abyss
To start you want to make your way to the area you meet Eris Morn overlooking the Pyramid. This area is in Enduring Abyss which can be accessed through a Memory portal, or by travelling through Sorrow’s Harbor to the Scarlet Keep. The portal way is rather straightforward, but requires having a Memory quest to turn in.
If you don’t have a Memory quest to turn in, fast travel to Sorrow’s Harbor and make your way inside the Scarlet Keep (located in the north). Inside the keep head forward until you see some glowing green rocks. Take a left here and head forward through the hallway.
As you walk through the hallway you will reach a new area called Enduring Abyss. After the text for this area walk forward until you need to drop down. Don’t drop down. Instead look along the right wall for a hole. Jump to the hole then walk through the corridor to reach the area overlooking the Pyramid.
Interact With the Four Statues to Get Quest
In the area overlooking the Pyramid you will find four statues. Go up to each statue and interact with it (“emerge from the dark”). Once you’ve done this with all four statues a chest will appear. Interact with the chest to receive the quest step Emergence, which is part of The Journey Exotic Quest.
Emergence: Anchor of Light
Once you have the Quest make your way to the Anchor of Light area. I found the the video from YouTuber Spider above to be useful in guiding you where you need to go. To complete this portion of the Exotic Quest you need to pick up a light source then light torches in a specific sequence. Once you’ve lit all the torches you will earn the Pathfinder mission step.
Pathfinder: Find the Path Fragments
The Pathfinder mission step is split into four objectives. You need to find Path Fragments in Anchor of Light, Sorrow’s Harbor, Hellmouth, and Archer’s Line. All of the Path Fragments can be found in the exits of each areas Lost Sector so you will need to complete each one. To help you find the exact locations, consult the the more indepth locations below.
Anchor of Light Path Fragment
Go to the Lost Sector in Anchor of Light. Make your way through the Lost Sector and exit via the door next to the Chest (elevated above the chest ledge). Go up the stairs and you will see some symbols on the wall in front of you. To solve this puzzle complete match all nine symbols to the one show on top of the puzzle. You can change the symbol by shooting. Once you match the symbols a chest appears with the Path Fragment inside it.
Solution (Puzzle Spawn) : Bottom Left, Bottom Right, 2x Top Middle.
Sorrow’s Harbor Path Fragment
Go to the Lost Sector in Sorrow’s Harbor. Make your way through the Lost Sector and exit via the door next to the Chest (on the catwalk by the Chest). Go up the stairs and you will see some symbols on the wall to the right of you. To solve this puzzle complete match all nine symbols to the one show on top of the puzzle. You can change the symbol by shooting. Once you match the symbols a chest appears with the Path Fragment inside it.
Solution (Puzzle Spawn) : Right Middle, Left Middle, 2x Middle, Left Middle, Top Middle, Bottom Middle, Middle.
Hellmouth Path Fragment
Go to the Lost Sector in Hellmouth. Make your way through the Lost Sector and exit using the stone platform near the Chest. On this stone platform is the puzzle. To solve this puzzle complete match all nine symbols to the one show on top of the puzzle. You can change the symbol by shooting. Once you match the symbols a chest appears with the Path Fragment inside it.
Solution (Puzzle Spawn) : Top Right, Left Middle, Middle, Bottom Middle, 2x Right Bottom, 2x Bottom Middle.
Archer’s Landing Path Fragment
Go to the Lost Sector in Archer’s Landing. Make your way through the Lost Sector and exit using the building behind the chest that opens when you defeat the boss. On your way out of this building you will see the puzzle on the wall to your right. To solve this puzzle complete match all nine symbols to the one show on top of the puzzle. You can change the symbol by shooting. Once you match the symbols a chest appears with the Path Fragment inside it.
Solution (Puzzle Spawn) : Top Left, Bottom Left, Middle, Middle Right.
Once you’ve collected all the Path Fragments from the puzzles above you will unlock the Descent objective. This objective takes you to into the Dungeon on the Moon.
Path Uncovered: Pit of Heresy
For this next portion of the quest make your way into the Pit of Heresy Dungeon. In this Dungeon you want to complete the first encounter. You then need to find a hidden pathway. Use the video by WoW Quests above to find the exact location. You will probably need a second or even third to get this far in the Dungeon. Once you reveal Path’s End you unlock the Discovery quest step.
Thoughts on our The Journey Guide? Drop a comment in The Pit below.
Tags: Destiny 2 Destiny 2: Shadowkeep
enricofairme
A lifelong gamer who has devoted the last six years to the creation and development of "Hold To Reset," a website tailored by gamers for gamers. Yell your hot takes at him on X .
- Next story Luigi’s Mansion 3 Prologue Guide
- Previous story Destiny 2: Shadowkeep How to Start Xenophage Exotic Quest
You may also like...
Destiny 2: shadowkeep memory of sai mota guide.
October 2, 2019 8:44 PM
by enricofairme · Published October 2, 2019 8:44 PM · Last modified November 29, 2019 1:33 PM
Destiny 2: Recovering the Past Guide – How to get the Perfect Paradox
December 17, 2019 5:41 PM
by enricofairme · Published December 17, 2019 5:41 PM
Destiny 2: Vex Scanner Locations in Nexus
November 30, 2020 9:32 AM
by enricofairme · Published November 30, 2020 9:32 AM · Last modified October 6, 2023 2:27 PM
3 responses
- Pingbacks 0
Had to leave the quest at step 4. Quest card shows i am on step 4. How do i get back in to start at 4 and not do all of pit of heresy again? This is the exotic quest the journey.
How do you reset the puzzle? I started the puzzle before I saw the walkthrough.
easy just reset the hidden sector and you’ll reset the puzzle
Leave a Reply Cancel reply
Your email address will not be published. Required fields are marked *
Save my name, email, and website in this browser for the next time I comment.
- How to Get Hype Eggs in Pet Simulator 99
- NBA 2K24 2KTV Episode 32 Answers Guide
- How to Unlock Double or Nothing in Buckshot Roulette
- Buckshot Roulette Items and What They Do
- Onepiecedle Answers Today: Classic, Devil Fruit, Wanted, and Laugh
GameSpot may receive revenue from affiliate and advertising partnerships for sharing this content and from purchases through links.
Destiny 2: How To Start The Exotic Xenophage Weapon Quest
Add another Exotic to your Guardian's collection.
By Phil Hornshaw on November 7, 2019 at 10:11PM PST
Destiny 2: Shadowkeep will reward you with plenty of Exotics if you're working through the weekly events. Season of the Undying has seen the launch of three new Exotic weapon quest since the start of Destiny 2 's newest expansion, and more are sure to follow. The latest is the Xenophage Exotic machine gun , which came to the game at the same time as the Festival of the Lost, Destiny 2's annual Halloween event, and the new moon dungeon, Pit of Heresy. Like recent quests to earn Divinity , Deathbringer , and Leviathan's Breath , getting Xenophage is a lengthy journey that requires quite a bit of work and puzzle-solving know-how.
To start the Xenophage quest, you'll need to head to the moon. From there, things get a bit confusing. You'll need to make your way into a special section of the Shadowkeep area that you usually only see when you complete Eris's weekly memory quests. Once you find it, there's a lot more to do.
You need a javascript enabled browser to watch videos.
Mortal Kombat 1 – Official Invasions Season 5 Gameplay Trailer
The Outlast Trials | Toxic Shock Limited-Time Event and Update Trailer
Life Eater - Official Launch Trailer
Devil May Cry: Peak Of Combat | Vergil: Count Thunder Returns Gameplay Trailer
Honkai: Star Rail - Official Aventurine Trailer | "The Golden Touch"
The Complete FALLOUT Timeline Explained!
It's Time To Remake Fallout 1 & 2
Warhammer 40k: Darktide - Path of Redemption | Update Trailer
SAND LAND - Official Darude Sandstorm Trailer
No Rest for the Wicked - Official Steam Early Access Launch Trailer
Battlefield 2042 | Frontlines Mode Returns - Time-Limited Event Trailer
Is Fallout 76 Good in 2024?
Want us to remember this setting for all your devices?
Sign up or Sign in now!
Please enter your date of birth to view this video
By clicking 'enter', you agree to GameSpot's Terms of Use and Privacy Policy
Now Playing: Destiny 2 - How To Start Xenophage Exotic Quest
Here's everything you need to know to get started on the Xenophage quest, including where to go and how to solve the puzzle involving the statues you'll find there.
Where To Start The Xenophage Exotic Quest
The entire Xenophage quest takes place on the moon, so head there first. You'll want to drop by the Sanctuary and talk to Eris Morn to get yourself started on the quest to unlock the Pit of Heresy, the Shadowkeep expansion's new dungeon. Once you've got the necessary quest steps, you're ready to find the start of the Xenophage quest.
To kick off your journey to get the Exotic machine gun, you'll need to go to Eris's spot overlooking the pyramid. If you've done any of the quests to cleanse Eris's memories, you'll have seen this spot--but to get to it, you usually take the portal next to Eris in the Sanctuary. So you have two options: Either complete the weekly memory to open the portal and get to the spot, or take the long way around and walk to that location. If you have to walk, here's how to get there.
How To Get To Eris's Overlook In The Enduring Abyss
Start by spawning in at Sorrow's Harbor. Ride your Sparrow north to the entrance where you'd normally begin the Scarlet Keep Strike, and the beginning of the path you took to enter the pyramid in the campaign.
As you enter the Scarlet Keep, you'll have paths open to the left and right with a green summoning crystal in the center of the room, like in the Savathun's Song Strike. Take the left door--this is the one that guides you toward the pyramid and the path you take during the story.

Keep walking through the tunnel until you see a big green glowing chandelier lying in the middle of the path, against a rock. When you hit this spot, look up and to your right; you should see an opening you can jump up to that's not immediately apparent. If you enter the dark area with the white rocky walls (where you first found Nightmare Thralls during the story campaign), you've gone too far. You also should not emerge outside either.
When you climb up, you'll enter the area near Eris's overlook. Bear left on the path and you should find your way there with no problem. The pyramid will be in front of you, and you'll have four Hive statues spread out on either side of the room. These are what you're looking for.
How To Activate The Statues

If you approach the Hive statues, you'll see a prompt to interact with them that says "Emerge from Darkness." You need to activate all four statues in the proper order to kick off the Xenophage quest. Standing in the doorway facing toward the pyramid, you'll have four statues around you--front and back right, and front and back left.
Activate the statues in this order:
- Front right
If you do it right, you'll receive The Journey, the Xenophage Exotic quest. Your next step takes you to Anchor of Light.
Got a news tip or want to contact us directly? Email [email protected]
- Leave Blank
Join the conversation
Use your keyboard!
Log in to comment
How to Earn the BRAVE Title
Like most Destiny 2 seasons, events, and expansions, Into the Light has a Title associated with it for any Guardian who goes to great lengths to accomplish everything associated with it. Titles are earned by completing all content, including some of the most challenging tasks in the game.
The BRAVE title is the same name given to the BRAVE Arsenal that Shaxx has unvaulted for the Guardian during desperate times. You can view all of the associated Triumphs in the Journey menu by selecting the BRAVE crest. But we've also
BRAVE Triumphs

BRAVE Collector
- Complete all BRAVE weapon quests.
In the Hall of Champions, Arcite 99-40 will offer a total of 12 weapon quests for the 12 BRAVE weapons. The first six rolled out with the launch of Into the Light on April 9 and the rest are planned for rollout in the weeks that follow. Each quest involves using the same kind of weapon, and all players will have to first do the Into the Light intro quest with Shaxx called Feats of Bravery to get Elsie's Rifle and unlock access to these quests.
Grimoire Gatherer VIII
- "We eat the mountains. We drink the seas." ————— The former emperor, Calus, lived for joy, rejecting his empire's long military tradition. His sole heir, and a member of the coup that overthrew him, the Empress Caiatl makes for a different leader ...
- Collect the Grimoire Card
As of this writing, it's unclear exactly how to unlock this Grimoire Card related to Caiatl, but we'll update this page once we know more.
Lord of Reputation

- Reach maximum reputation with Lord Shaxx.
This reputation is related to Lord Shaxx's status as a vendor in the Hall of Champions. Like all vendors, the max reputation occurs at Rank 17. The best way to achieve this is to complete his daily bounties and weekly quests, but merely completing the Onslaught activity will also grant progress.
So Many Waves
- Complete waves in Onslaught.
Based on our estimation, it looks like players have to complete a total of 200 waves in Onslaught.
Breaking the Charge
- Fieldrazer Tormentor defeated
- Siegehook Ogre defeated
- Fallen Warpriest defeated
Each of these three bosses appears in rotation for an entire week with Siegehook Ogre up first during Into the Light launch week. After you complete 50 waves in the non-Playlist version of the activity, they'll be the final boss. Defeat all three during Into the Light to complete this Triumph.
Trying to Budget
- Purchase Defenses in Onslaught.
Based on our estimation, it looks like you have to purchase at least 80 defenses in Onslaught, so you essentially need to play a lot of the activity and be sure to spend your Scrap as often as possible.
Not on Your Watch
- Complete the 5th wave set in Onslaught on Normal difficulty.
Each "wave set" consists of 10 rounds, so this essentially means that you need to complete 50 waves and defeat the boss at the end of a single run in the non-Playlist version of the activity.
BRAVE Weaponsmaster

- Defeat opponents with BRAVE weapons. Defeating Guardians grants more progress. (900)
BRAVE weapons drop as part of Onslaught but also Arcite 99-40's weekly weapon quests. Acquire one or more of the 12 and then simply defeat enemies anywhere in the system. Defeating Guardians in either the Crucible or Gambit will count for more.
Triumphant Whisper
- Complete the Exotic mission "The Whisper."
The Whisper is the Exotic mission that launched as part of Into the Light that reintroduced the Whisper of the Worm Exotic sniper rifle to the game. Complete it to earn this triumph.
Triumphant Outbreak
- Complete the Exotic mission "Zero Hour."
Zero Hour is a revamped version of the Exotic mission that rewards you with the
Up Next: The Final Shape
Top guide sections.
- Destiny Content Vault
- The Witch Queen
- Beyond Light
Was this guide helpful?
In this guide.

This Week In Destiny - 04/11/2024
Apr 11, 2024 - destiny 2 community team.
This Week in Destiny, we’ve been busy! Not only did we launch Destiny 2: Into the Light, but we also gave you all a sneak peek of what's coming with The Final Shape. So, let's talk a bit about it, shall we?
- Prismatic summary.
- Destiny 2: Into The Light is live!
- Pantheon starts April 30.
- Heads-up-display changes coming with The Final Shape.
- Weapon drops rotating soon.
- Kilts for Kids returns.
- The weekly Player Support Report.
- And the Artist and Movie of the Week winners.
A New Subclass is Coming
Prismatic is a new subclass arriving with The Final Shape that will allow Guardians to mix and match some of the most popular Arc, Solar, Void, Stasis, and Strand abilities—combining them to unlock new potential in power and customization.
When using Light and Darkness powers, Guardians will be able to break their limits and achieve Transcendence, a new empowerment state only possible though Prismatic. Our latest Dev Insight article focuses on the crazy potential unlocked when mixing Light and Darkness powers. Go read it if you haven't already!
Go play Destiny 2: Into the Light!

On Tuesday, we also shipped Destiny 2: Into the Light, our two-months-long content update that’s open to all players. Hooray! Everyone at Bungie is incredibly proud and happy that you all can finally play it.
No matter if you’re seeking some beloved weapon drops, want to show Shaxx you can protect the whole Last City all by yourself, or are looking to have some fun with friends, there's something here for everyone! We've gathered all you need to know about Destiny 2: Into the Light in one article so you know what's coming and when.
We also added this awesome opening video that ponders the question, “What is a Guardian?” We know you are all busy answering that as you push back against the forces of the Witness. We pulled a few screenshots that should make good wallpaper material.

Ready to Challenge Gods?

We have already shared some details about Pantheon, the new PvE challenge that will start on April 30. It involves not only a gauntlet of raid boss encounters currently available in the game, but also a few twists on how to approach them. We are keeping some details close to the chest, including the list of enemies that you will face, but since you are all eager to know more about it...
The goal of Pantheon is to relive those incredible and heroic moments that raids always deliver, while also changing what you expect from some of the encounters many of you already know so well. Prepare to be nimble, adapt your strategies (or throw them out of the window), and your fireteam will find success.
Pantheon will increase in scale and difficulty each week, starting with four bosses in the first one and growing up to eight in a row on May 21. Each time a new boss is added, the active modifiers will rotate, and the Power cap will change, starting with players at 5 Power below all the way up to contest mode equivalent of 20 Power below.
As difficulty goes up, so does the pool of available rewards. You can get Adept raid weapons, Deepsight versions of raid weapons, and even Exotic weapons. Some rewards are weekly and others are linked to pursuits or Triumphs (like the four new emblems), but many will also depend on your performance. We challenge you to complete each encounter before the bonus timer expires to get a Platinum score and the greatest rewards.
When April 30 arrives, we hope you have trained and prepared yourselves, Guardians. Shaxx will have the quest you'll need to start your journey to become a Godslayer. Yeah, that's the title waiting for the champions that conquer Pantheon.
Updating the HUD
Today we also have some news to share about the HUD update coming with The Final Shape. To that end, we leave you in the capable hands of our UI and UX team.
Destiny 2 has over 2,000 player-facing buffs and debuffs in the game that can appear on the HUD. These include things like subclass verbs, Armor Charge, Pervading Darkness, or text to help you triangulate a signal on Neomuna.
Prior to The Final Shape, only four buffs could be displayed at once, meaning important buffs were continually being pushed off the screen. With this system, we were asking players to constantly juggle a lot of information in their head. In the worst cases, this limitation would cause players to miss feedback about important activity mechanics that lead to teams being wiped. (Unstable Light, anyone?)
That's why, as part of the many quality-of-life improvements coming with The Final Shape, we set out with two goals to improve the HUD experience:
- Visually prioritize important buffs. We promote buffs that matter in the moment and add new locations where they can be spotted more easily.
- Increase the number of buffs that can be shown. New locations for buffs to appear means more buffs on screen, while not being overly intrusive.
New Buff Channels
In The Final Shape, we've created two new areas on the HUD where modifiers can appear:
- Critical info channel (top center)
- Weapon channel (above the Super meter)
Here’s a visual of how these are organized on screen, in addition to the existing channel where all other buffs get shown on the left:

Let's take a deeper dive into what appears on each of these channels.
Critical Info
The modifiers that appear here are important for successfully completing the current activity. This includes things like wipe mechanics, roles (e.g., Deep Stone Crypt's Operator role), or other special mechanics in the activity that are beneficial for you to notice.

You'll see this channel appear in prime real estate underneath your health and shields. Since we want players to focus on only the most important modifiers here, this channel will not display more than two modifiers at a time.
You'll find weapon-related modifiers showing up in the space above the Super meter, conveniently close to where weapon information appears. Given the high up-time on a lot of these buffs, we wanted to split them out from competing for space with everything else.

The space here is restricted, so only the two most important weapon modifiers will show up here.
Prioritization
As part of these changes, we've made a prioritization pass to help the most relevant buffs and debuffs in the moment stay visible on screen, even when there is a lot going on. Higher-priority buffs will push lower-priority buffs out of the HUD display. Previously, it was very unpredictable which buffs would get knocked out of your HUD display as more buffs would get added.
You’ll find buffs generally prioritized within all channels as follows:
- Note that dangerous or otherwise critical activity information will always be shown in the critical info channel.
- Second-to-second gameplay choices – These are buffs that are required to play your build effectively (such as Armor Charge) or ability cooldowns (like Tangle Cooldown).
- Short- to –medium-term gameplay choices – Subclass verbs (like Amplified), weapon damage buffs, or temporary ability bonuses such as those from Aspects and Fragments are prioritized this way.
- Passive buffs useful for learning or confirming intuition – Includes ability regeneration buffs and temporary stat boosting buffs.
Updates to Buff Appearance
In addition to setting up two new channels on the HUD, the team also took a pass at the readability of our buffs and debuffs.

All of our green buffs and red debuffs now have a thick line weight on the top or bottom respectively to make them easier for colorblind players to read. Subclass-related buffs and debuffs maintain their diamond shape, but they more clearly indicate whether they are a buff or debuff in nature.

Also, timers now display on the left side of the buff icon. Previously, it was displayed after the buff name. This should make it easier to know when a buff or debuff will expire, no matter how long its description might be.
Future Considerations
As many of you noticed, some footage shown on our April 9 The Final Shape Developer Gameplay Preview showed an in-development HUD channel that was on the right side of the screen. During development, we got a lot of feedback that this was pulling players' eyes to unfamiliar parts of the screen and that it was too much of a change all at once.
That's why we refocused the display in The Final Shape and will evaluate adding another channel in upcoming releases, after we have learned more about how players react to the changes announced today. What do you think? What would you want to see on that channel, or moved into it? As always, your feedback is invaluable to us, and we want to hear it all.
Weapons Rotating on June 4

As with every new content release in Destiny 2, we’re swapping some of the weapons that drop. We already shared some details about the loot pool for The Final Shape , but we don't want you to miss the opportunity of getting some rolls before that time, so here's the list of weapons leaving the loot pool on June 4:
Trials of Osiris
- Unexpected Resurgence Glaive – Out of rotation.
- Cataphract GL3 Heavy Drum Grenade Launcher – Last week April 23.
- The Messenger Pulse Rifle – Last week May 14.
- Igneous Hammer Hand Cannon – Last week May 21.
- Braytech Osprey Rocket Launcher – Last week April 9.
- Loaded Question Fusion Rifle – Last week April 23.
Iron Banner
- Jorum's Claw Pulse Rifle – Last week April 30.
- Bite of the Fox Sniper Rifle – Last week April 30.
- Pressurized Precision Fusion Rifle – Last week April 30.
- Swarm of the Raven Heavy Grenade Launcher – Last week April 30.
Even if the weapons are not dropping any longer, you can always focus them on their respective vendors, but remember that the Adept variants of Trials of Osiris and Nightfall weapons can't be obtained or focused unless featured. And regarding what weapons are coming to take the place of these, we'll share more info about that in the future.
Kilts for Kids Fundraiser Returns
And now, a message from the Bungie Foundation.
Guardians! Join us for the 13th Annual Kilts for Kids event to help raise critical funds for Ronald McDonald House Charities of Western Washington & Alaska! Your dedicated kilted crew is back—Christine, Mark, and Forrest never shy away from donning a kilt and getting in front of a camera to help encourage you all to join the cause.
Thank you to all of you who’ve kept this tradition alive, helping us raise over $850,000 to date. That equates to nearly 28,500 nights for families from all over the world to stay at the Ronald McDonald House completely free of charge while they receive medical treatment from Seattle Children’s Hospital. Amazing!

Between now and Friday, April 19, help us achieve our $77,777 goal by heading to the RMHC Donation Page and casting your votes for Team Bungie. Each vote is $10, and every $30 donated will pay for a family to stay at the Ronald McDonald House for one night.
In addition to helping kids and families facing illness, we have a great lineup of rewards* for you!
- $10 Donation: Receive the new Kilted Out shader .[insert graphic]
- $30 Donation: The Kilted Out shader plus the new Heart of a Highlander emblem.
- $50 Donation: All prizes above, plus this year’s annual Kilts for Kids postcard, designed by Bungie artist, Amanda, and digitally signed by Christine, Mark, and Forrest. It will be shipped to you after the event ends.
- $100 Donation: All prizes above, plus a digital copy of this year’s new and unique piece of artwork, crafted by Mark Flieg himself.
- $250: All prizes above, plus a physical print of Mark’s exclusive art, shipped to you.
Heart of the Highlander emblem

*Note: All rewards will be provided by the Bungie Foundation, not RMHC. Rewards will not be automatically redeemed, as we must receive donor data from RMHC before reward distribution. Expect any rewards you’ve earned to be sent to your email on or before April 30. Only one code for each digital item will be provided per unique individual donor email. Multiple codes of the same item cannot be granted to a donor, regardless of total amount donated.
Thank you for providing a safe, welcoming, and supportive home away from home for kids and families in need through this fun annual tradition. You are a light in our community.
The Bungie Foundation ❤
Player Support Report
Superblack shader heist planning ongoing, inquire at Drifter.
Known Issues List | Help Forums | Bungie Help Twitter
Beginning with the launch of 7.3.6, in-game text chat has been updated to auto-join players into chat channels by default. Additionally, players will default to automatically joining voice chat when in a fireteam or fireteam lobby. Players can view and update their settings in-game by navigating to Settings and selecting the Social tab.
To learn more about the language filters used for in-game text chat, click here.
Some players may still see chat turned off by default. This is intentional for our younger players. To learn more, please see our Date of Birth requirements for Destiny 2 and Bungie Services Guide.
KNOWN ISSUES
While we continue investigating various known issues , here is a list of the latest issues that were reported to us in our :
- Onslaught bonus objective UI may overlap player buffs on the side of the screen.
- In Onslaught, certain enemies may teleport and appear behind the ADU on Vostok.
- Some previous Season Pass items available in Eververse display incorrect Seasonal icons.
- In Onslaught, players who spend too long within the Pyramid Ship can miss the portal to return to the ADU, resulting in them missing the next purchase phase.
- Players who have text chat disabled will have text chat UI disappear entirely instead of displaying a disabled message.
For a full list of emergent issues in Destiny 2, review our Known Issues article . If you observe other issues, please report them to our #Help forum .
Pew Pew Pew
Do you ever feel a blistering burst of energy in your stomach to the point you must create a weapon hotter than the surface of the Sun to relieve it? Yeah, we also know that feeling.
Guardian Hideo, by OrangeCoco. Via X/Twitter

Dance, Warlock, Dance
Motion capture is magical. Sometimes we wish we had moves as amazing as our Guardians... or otherwise, in this case.
And there you have it, folks. We are going to cut this outro short ‘cause we have some BRAVE weapons god rolls to farm. Just remember not to touch anything in the warehouse outside of the Hall of Champions. It might look like chaos, but Eva Levante says she has a system.
Now, let's play some Onslaught!
Destiny 2 Community Team
IMAGES
VIDEO
COMMENTS
Here's a quick rundown of the steps needed to obtain Xenophage : Interact with the statues near the Pyramid to start the quest. Light the six plates in Anchor of Light. Complete the four puzzles ...
First up, head to the part of the Moon where Eris Morn dwells and walk over to the portal that sits to her right. You will have been through this portal a few times so you should recognise it ...
Destiny 2 will add yet another Exotic quest to the mix next week, allowing players the chance to nab the Xenophage Exotic Machine Gun.. Step 1: Begin The Journey. You'll need to head to Eris' little hideout inside Sorrow's Harbour to start this quest. To get there, spawn at Sorrow's Harbour and head up towards the large set of stairs, taking the door on the left.
Destiny 2 The Journey Exotic Quest Full Guide - Xenophage Exotic Machine Gun - Step by Step GuideThis guide shows you the Journey exotic quest in Destiny 2. ...
Exotic / Quest Step. Your path brightens, shining through the barrier of emerald, beneath a harbor built from sorrow. "The worst part about what the Hive did to us wasn't the killing. It was the separation. Splitting us up made us weak. They dragged me deep below the lunar surface, through a wall of endless doors. Strung me up.
As part of the Xenophage quest, you will need to figure out how to emerge from the dark as part of The Journey exotic quest. The first step, Emergence, talks a lot about Crota, but this is a bit ...
The Journey is an exotic quest in Destiny 2 that was introduced in the Shadowkeep expansion, which rewards players with the Xenophage Machine Gun. To obtain this quest, players must complete a puzzle in the Enduring Abyss on the Moon.Right before Eris Morn's station overlooking the Lunar Pyramid there are four Hive statues, which players have to interact with them to make all of them light up.
Step 1: Embrace the Light. To start this quest you'll need to go to the Moon and enter the portal next to Eris (you can also get here through Sorrow's Harbor). While in the room where Eris ...
Unlocking Xenophage in Destiny 2 is a lengthy process that requires fighting through the Pit of Heresy dungeon as part of the quest, The Journey. As with all dungeon runs, it's best to take a ...
Start The Quest. Up first - obtaining the quest. For this, you'll want to head to the Moon, specifically Sorrow's Harbor. Head through the path to the North of the area, through the Enduring Abyss. Push through to the Pyramid, and look for four very creepy statues on the left and right. Interact with all four to cause a chest to spawn ...
Open the chest and you'll get The Journey exotic quest. Xenophage Exotic Quest Destiny 2 Emergence. For this part, go to Anchor of Light to complete this puzzle. There are 6 red colored flower ...
The quest for Destiny 2's "bug gun" exotic machine gun is finally here, and it's a bit of a doozy. The Destiny 2 Xenophage quest has a hidden first step and will take you all around the ...
Related: How to Complete the Memory Alembic Quest in Destiny 2. Step 1: Emerged from the dark. the Anchor of Light. one minute to deposit the ball of light into six different locations. Location 1 Same Room. Location 2: Within the chasm. Location 3: Another small room. Location 4: Second floor of the radio tower. Location 5 Cement ramp.
Head to the Moon and land at Sorrow's Harbor. Head towards the Scarlet Keep and you will interact with 4 Statues. This will spawn a Chest with the Xenophage ...
Destiny 2 Path uncovered / Paths end located The Journey Final Exotic Quest Steps Guide (Xenophage)All gameplay recorded with - http://e.lga.to/360gametvThis...
Xenophage is a top-tier Exotic Heavy Machine Gun Shadowkeep Destiny 2. Recommended Videos. complete an Exotic quest called The Journey. Shadowkeep head to Sorrow's Harbor on the Moon. Screenshot by GameSkinny. Screenshot by GameSkinny. activate the statues in the proper order. "back" is the side closest to the Pyramid. Front right.
The Journey Quest Steps. There are 6 steps to this Destiny 2 Exotic quest. They will take you all over the Moon and several of the steps will take you through the depths of the Pit of Heresy Dungeon. The Journey Step 1. Around you… darkness. If you are to discover your path, you much anchor yourself to light.
In Destiny 2 there is an Exotic Quest called The Journey. This Exotic Quest takes you around the Moon as you attempt to find the Exotic weapon. To help you complete this quest, use our The Journey Guide. Note: Guide is still updating. Reaching Enduring Abyss. To start you want to make your way to the area you meet Eris Morn overlooking the Pyramid.
In this video, I will show you the correct order to light the lecterns near The Anchor of Light, as part of The Journey Exotic quest for the Xenophage.
Standing in the doorway facing toward the pyramid, you'll have four statues around you--front and back right, and front and back left. Activate the statues in this order: Back right. Back left ...
advertisement. Defeat opponents with BRAVE weapons. Defeating Guardians grants more progress. (900) BRAVE weapons drop as part of Onslaught but also Arcite 99-40's weekly weapon quests. Acquire ...
#destiny2 #TimeSausages #thewitchqueen #seasonoftherhaunted #xenophage #xenophagequestThe Xenophage Exotic is one of the best Weapons in Destiny 2. As it has...
When April 30 arrives, we hope you have trained and prepared yourselves, Guardians. Shaxx will have the quest you'll need to start your journey to become a Godslayer. Yeah, that's the title waiting for the champions that conquer Pantheon. Updating the HUD. Today we also have some news to share about the HUD update coming with The Final Shape.
Here's is the location of "The Journey - Descent" quest step "Path Uncovered". To get to it, you must complete the first encounter of the "Pit of Heresy" as ...
This video shows Path's end located The Journey Destiny 2 quest objective. How to do Path's end located The Journey Destiny 2 quest. You can complete Destiny...