
21 TRAVEL PHOTOGRAPHY TIPS (Easy Ways to Improve Today)

- Last Updated: February 8, 2024
Here are our best travel photography tips for beginners and intermediates, based on our experience of going from complete beginners to professional travel photographers, and now working in the industry for 8 years.
Picture this.
You finally book a trip to your ultimate bucket list destination.
Antarctica, Iceland, Namibia, Bali, seeing the Aurora Borealis – wherever it is, you’ve waited your whole life to finally visit.
Naturally you are going to want to capture the best travel photos possible of this once-in-a-lifetime adventure to share with your portrfriends and family members, on social media, and maybe even print on the wall at home.
Moments in time or a travel experience that you always want to cherish.
So you’ve splashed out on a new camera based on expert recommendations , and you’re keen to hit the road.
But here’s the problem – you don’t have the faintest idea how to get the same kinds of images you see in postcards or on the internet.
The kinds of travel photos that just pop, stand out from the rest, inspire you to book a flight immediately.
Luckily that’s where we come in.
We’ve been fortunate enough to work as professional travel photographers for almost a decade now, being paid to fly around the world, running photography workshops, take pictures for the tourism industry and tell stories.
And now we want to share our knowledge, secrets and insights from our travel photography journey with you so you can take better travel photos.
In this post you’ll find many of our favourite travel photography tips you need to know to come home with shots you will be proud to show off.
Today is the time to learn. Let’s begin.

Table of Contents
1) Know Your Camera
2) focus on the golden and blue hours, 3) plan your shots, 4) learn about composition, 5) framing, framing and more framing, 6) move your feet, make them feel comfortable, 8) use a tripod, 9) find the right travel photography gear, 10) be unique, 11) find your voice as a photographer, 13) aperture, 15) shutter speed, 17) bonus – general ideas for camera equipment settings, 18) use manual mode, 19) shoot in raw (if available), 20) learn about post processing, save this pin for later, general travel photography tips for beginners.
To start with let me talk about the general travel photography tips that I feel are not only the most important, but also the most difficult to master.
Developing an eye for photography takes time. Years in fact. It’s a never-ending learning process, but I promise you with practice you will get much better.
And once you start to get the skills for framing and composing a shot, the rest is easy.
Whether you shoot on a dSLR, mirrorless, smartphone or an old film unit, the first travel photography tip is to get to know your camera equipment.
Whatever you have in your camera bag , take the time to read the instructions, play around with all the buttons and camera settings, and spend hours with it in your hand so that it becomes a part of you.
Study the menu so that if you need to change camera settings in the field you’re not spending minutes scrolling through it when timing is critical.
Also don’t forget to learn your camera’s limitations.
Does it perform well in low-light or does the image fall apart? Is it sharp wide open, or do you need to stop down to get the best clarity? Does it have inbuilt image stabilisation?
Ultimately when you pick up your camera you want to feel comfortable and know exactly how it works. Then getting better pictures will come faster and easier.

Light is everything when it comes to travel photography images, and there’s a good chance you’ve already heard about the golden and blue hours.
The Golden Hour is that time when the sun is low in the sky and it throws a magical, warm glow across the scene.
Think the first hour after the sun peaks in the morning, and the last hour or two before the sun drops over the horizon in the afternoon.
The Blue Hour is when the sun is below the horizon and the sky gives off a beautiful blue hue.
If you really want better travel photos, one of the best travel photography tips we can give is to get used to waking up early and stay out late to make the most of these two times of day.
If you’re not a morning person, get used to setting an alarm. Many of the great travel photos of the Taj Mahal and other tourist sites with no one in them for example were taken by people who got there early.
Taking photos in the middle of the day can still result in great shots, but in general you’ll find the blue sky too blown out unless there are some interesting clouds, and on a sunny day you’ll find the lighting conditions can be a bit harsh.
Instead use the middle of the day to get street photography, or scout out photo locations and a vantage point for your sunrise and sunset photos to come back later.
Bonus Tip – Even if it looks like the sunrise or sunset might not be so beautiful, wait around. You never know when the clouds might break or the sky randomly lights up in brilliant colours.

Before you arrive in your tourist destinations, spend a few hours planning out your shot list of images you want to photograph.
You can get inspiration from Instagram, Google Maps, travel guides, magazines and more.
Make a note of these pictures, and then plan your day around the optimum time to shoot (sunrise or sunset for example).
Doing this will help you nail the shots you want to go, and give you more purpose and direction.
You need to know that all of the best photographers use tools like Google Maps or social media to form a shot list, and you should get used to it too.

You’ve probably heard about how important it is to compose a shot properly, and I bet if you’ve ever read a photography manual you would have come across the ‘ rule of thirds ‘.
Good composition can be the difference between an average shot and award-winning travel photos.
There’s all kinds of ‘rules’ that theoretically make a photo look nicer, such as not putting your subject in the middle of the shot, don’t cut elements out of the frame, etc.
But right now let’s go a bit into the Rule of Thirds.
This concept is where you divide your image into 9 even squares (many cameras actually have this grid line feature built into their display options).
Then what you do is you place the subjects and points of interest such as a human element along those lines and squares.
Here’s an example of how this looks:

The idea of the rule of thirds is that this is a mathematical idea of what our eyes naturally find pleasing. So it’s good practice to incorporate this method into your shots.
Another thing to look for is leading lines that naturally draw your eye around the photo, as well as different angles and shapes.
Have a river flowing from the side of the shot up to a waterfall on the top left for example, or the foreground bending around, leading the eye towards a church at the top of the photo.
This is a skill that you’ll learn with more practice.
An important thing to remember is that rules are meant to be broken .
Get used to analysing your shots with the rule of thirds, but please don’t use it as gospel if you think a different composition would work.
Adding a human element also brings a lot of interest to a good shot, so place people in your frame.

When you look through the viewfinder or LCD screen, don’t just focus on the subject.
Make sure you run your eyes around the entire frame to make sure you’re not accidentally cutting off something important.
Double-check that the top of a mountain is fully inside the frame, or that your friend’s whole body is in the shot as an example.
This isn’t gospel, because sometimes having something cut off from the frame can be good for composition, but you’ll have to be the judge of that.
Also check to see if you can use something natural in the scene to create a frame inside your picture.
Think of looking out a window at a building, or a bent-over tree surrounding a pretty lake.
These can all help make better travel photos.

This is one of the most important travel photography tips I can give – Move your feet.
Don’t just arrive to a scene and take a shot from the place you’re standing.
Instead take a few minutes to walk around and see if there is a better frame or composition.
Go closer, move back, step to the side, consider your lens’ focal length, etc.
Imagine trying to take that iconic Taj Mahal photo, only to find out later that you were 2m to the left of centre, throwing off that perfect symmetry.
Or maybe if you walk to the river’s edge you’ll be able to incorporate some interesting rocks into the scene instead of just water.
Better yet, take multiple travel photos and fill up those memory cards from the same photo locations so you have lots of options when you get home to see which is your favourite.

7) Ask People for Permission
Travel photography isn’t all about capturing the most beautiful sunsets and gorgeous architecture around the world.
Travel photography is also about the people you meet. But if you’re a bit shy like me, how do you get those amazing portrait photos without feeling rude?
Simple – just ask for permission.
Asking someone for permission to take their photo is polite and respectful.
If you have had a great encounter with someone, or you just see a great opportunity and want to capture a wonderful portrait, give them a big smile and ask if it’s ok to take their photo.
You’ll find many people are more than happy to pose for a photo if you just ask (just make sure you respect them if they say no).

But what if you want to get a candid shot, with the subject looking natural?
There’s always another way to get these without annoying the person.
Don’t make it obvious that you are taking their photo. Act natural and take lots of photos of the environment around them.
You can also keep your camera down by your side and point the lens in their direction.
If you have a zoom lens, use it. This was you can be on the other side of the street or market and still photograph the person.
Interested in learning more? Join one of our exclusive photography workshops in Antarctica, Kyrgyzstan, Tajikistan or Mongolia !
Another one of my favourite travel photography tips for portraits is to bring in another element to the shot.
Some people will feel uncomfortable posing for a stranger, but if you can make it about something else they will feel much more at ease.
As an example, maybe ask if they can pose with something in their store like a rug, or ask them to show you their wedding ring.
This way they’ll realise there is more to your photo than just them. This will also add a lot more interesting elements to the shot!

A tripod is one of the best camera accessories you can have in your camera bag, and really essential for travel photography.
This will allow you to get excellent shots in low light, as well as get creative with your images (like taking long exposures).
These days you don’t always need a massive tripod to travel around with, especially if you want to travel light and are a hobbyist photographer. Look at some of the Joby Gorillapods .
Another good thing about using a tripod is that it will force you to slow down with your photography and put more thought into each shot.
Rather than just pointing and shooting, you will think carefully about where you want to set up your tripod and how you want to compose your shot.
Honestly if you want to become a better travel photographer, you’ll need to invest in at least a small tripod.

You don’t need to go out and spend tens of thousands of dollars on new travel photography gear to get the best shots.
In fact chances are you already have a perfectly adequate camera right next to you (your phone).
Instead just get what you an afford, and as you grow with your photography style, post production, etc, you’ll learn what camera gear you need as well.
Things like filters, tripods, flashes, prime lenses, zoom lenses, etc will come in time.
For now, all you really need is a camera, memory card and enthusiasm!
Check out our recommendations for the best travel tripods .
There’s nothing wrong with getting those iconic shots of the Eiffel Tower or Machu Picchu to share on social media.
They’re beautiful and are often amazing camera angles of famous places that everyone wants to visit.
But don’t forget to be unique as well! Find a different perspective that hasn’t been photographed a million times.
In fact make it your goal to get a few unique shots that you can be proud of.
Over-expose, under-expose, incorporate motion blue – the only limitation is your imagination!

Just like a writer or musician finds a particular style they like, as a photographer you need to discover your ‘voice’.
Travel photography is such a broad term that can cover just about anything.
Really just taking any travel photos will fit the description, whether it is landscape photography, wildlife photography, architecture, portraits, food or whatever.
Just find a style you love most, and focus on getting better at it.
If you really like black and white photography, then start shooting in black and white! Love taking images of crazy street markets? Then get out there and find them!
Experiment, learn, discover and nurture!

Technical Travel Photography Tips
While the technical side of using a camera is usually the most overwhelming thing for a new photographer to think about, it’s actually one of the easiest things to master. All it takes is a bit of study and practice.
If you’ve never looked into getting out of ‘Auto mode’ on your camera, then terms like ISO, aperture, white balance and shutter speed will seem completely foreign.
READ MORE: Check out our great article and blog posts featuring our best landscape photography tips !
12) Exposure Triangle of Photography
The Exposure Triangle is a metaphor to explain the 3 elements that allow light onto a sensor.
A camera captures light, and the right amount is needed so that your image isn’t too bright or too dark.
The 3 parts of the Exposure Triangle are aperture, ISO and shutter.
Each one affects how light reaches the sensor in different ways, and getting this combination right is essential to capturing a beautiful image.

If you want more information, I’ve put together this comprehensive guide to understanding the exposure triangle which you should really check out.
For now though I’ll explain these three things briefly, and how they relate to taking better travel photographs.
Aperture is how wide, or small, the blades in your lens are and how much light goes through the lens.
The aperture size is measured in ‘F Stops’, and displayed as numbers. f5.6, f8, f11, f16, etc
A wide aperture (small number – f1.8) lets in more light than a low aperture (big number – f22).
A wide aperture also has a shallowed depth of field than a low aperture. I know it can be a little confusing, but you’ll pick it up the more you play around with it.
If you want the background blurry in your photo, you’ll want a wide aperture. If you want everything in focus, you’ll want a low aperture.

ISO is how sensitive your camera sensor is to light. A small number, such as 100, means it’s not very sensitive and therefore needs more light to leave an impression.
A high number, like 6400, means it’s very sensitive and needs only a little bit of light to show up on the sensor.
The higher the ISO, the more noise shows up in a photo. Noise lowers the quality of your image, so in a perfect world you’ll want to keep this as low as possible (unless you’re going to stay out late doing astro and night photography ).
It’s also necessary to raise your ISO if you’re shooting moving subjects (or handheld) indoors.

Shutter speed is pretty straight forward – how long it takes for your shutter to open and close. This allows you to freeze a frame, or introduce motion blur.
Want to capture a bird in flight? You’ll want to have a fast shutter (1/4000th of a second for example).
Want to make a waterfall look silky smooth, like you see in so much Iceland photography? Go for slow shutter speeds (3 seconds for example), and check out our guide to waterfall photography tips while you’re at it!
Keep in mind that if you are holding your camera equipment rather than using a tripod, you’ll need to have a fast enough shutter to eliminate your own hand movement.
As a general rule 1/60 of a second is the slowest you should go so your picture doesn’t pick up hand movement. Any slower than that and you’ll probably need a tripod.

16) Combining All Three for Perfect Exposure
There is no ‘perfect setting’ for aperture, ISO and shutter. It all depends on what you are trying to photograph and the style you’re going for.
Luckily most decent digital cameras have two little tools that will let you play around figure out how all three work together – manual mode and histograms.
Manual gives you complete control over your camera’s ISO, aperture and shutter.
If you change one, nothing else will change, unlike in ‘aperture priority’ mode or ‘shutter priority’ mode.
The histogram is a visual display of light. When the bars are all the way to the left, the image is darker. When they are all the way to the right, the image is lighter.
When most of the bars are in the centre, this is perfectly exposed.

The best way to figure out what combinations work best when you’re a complete amateur is to put your camera on “manual” mode, activate the histogram, and play around with the settings.
Pick an aperture (f/8 for example) and point it at the scene. Now look at the histogram.
If the image is too dark, then you’ll need to let more light in. Let’s make the speed slower. See a change?
Now put the shutter back to where it was and instead change the ISO. Make the ISO higher. Is the image getting lighter?
Spend an hour or two playing around with different apertures, ISO and shutter so you get an idea of how each one affects the light hitting the display.
Take note at how drastically things can change if a cloud goes in front of the sun, or you take the camera inside.
This just comes with practice of course, and knowing what settings you want for a particular scene will become second nature
Keep in mind that not all travel photos needs to be perfectly exposed. Sometimes having a darker image looks much better than having one that is nice and bright. You can use your judgement for this.

This is very, very basic and by no means should be read as gospel. There are a million different things that can affect why you would want a faster shutter, or wider aperture. But if you are confused about what to pick for what here’s a quick idea.
- Landscapes – You’ll want your aperture around f8-f11. You’ll also want your ISO as low as possible. Slow down the shutter accordingly.
- Portraits – You’ll probably want to photograph your subject to be sharp, but the background blurry to bring focus on the person. Have a wider aperture (say f2.8 for example), and a faster shutter (around 1/160 at the absolute slowest) to freeze the subject. Adjust ISO accordingly.
- Indoors – Because it is darker inside than outside, you’ll need to let a lot more light into the sensor. Unless you’re using a tripod, keep the speed at around 1/60 as the slowest, and the aperture around f5.6 to start with. Adjust ISO and aperture accordingly.
Of course there’s a bunch of other styles of travel photography that would use different settings, such as astrophotography, architecture, street scenes photography, wildlife photography, etc.
In time you’ll learn what settings work best for each scene.
The best way to get to know your camera and how light works is to have complete control over what settings you choose.
The only way to do this is to shoot in manual mode (shown by the letter M on most cameras).
It will take months of practice, but I promise you that in time you’ll be able to look at a scene and instantly know what aperture, ISO and shutter to use to get the exact style of image you’re looking for.
You can also use aperture priority mode (the letter A on your camera) if you don’t want to make the big leap to manual just yet.
This way you can lock in the aperture you want (f8 for landscape photography, f2.8 for portraits, etc) and the camera will automatically adjust the ISO (although you can control this part too) and shutter to get perfect exposure.
I highly recommend focusing on learning manual settings though until you have it perfected.

When you take a photo on your digital camera, the computer chip inside it takes what you captured on the sensor and converts it into a format that can be easily read. For most cameras, these two formats are RAW and JPEG.
JPEG is a compressed format that the camera creates to save on space. In doing so it ‘locks in’ all the data that it picked up such as the colour and white balance.
RAW files actually saves all the data of what you took and doesn’t compress it.
Most decent digital cameras will give you the menu option of shooting in RAW, and I recommend you use it if you ever plan on editing your photos.
Keep in mind that the file sizes will be a lot bigger (for example on one of our cameras a RAW is 42, while a JPEG is just 20), so you’ll need to have extra memory cards and external hard drive storage.
If you have no plans on editing your photos then shoot in JPEG.

Some people think that editing your photo is ‘cheating’. But the truth is photographers have been editing their photos ever since photography was invented.
Yes, even your favourite photos in National Geographic have been manipulated in some way.
99% of photos you see in your favourite travel magazines have been edited. Every professional photographer edits their photos to some degree.
The reason is that not all cameras are great at capturing exactly what the eye saw in terms of colour and light.
If you really want to get the most out of your professional travel photography business, you should start playing around with post processing.
Many people have heard of Adobe Photoshop , but it’s a pretty advanced tool that most people wouldn’t ever need to use (until you get more experience).
To start with look at the free apps that you can get on your phone, such as Snapseed, or free editing programs on your computer, like iPhoto or GIMP.
Once you get serious about travel photography and you want to start editing all of your photos that are filling up your memory cards and external hard drive, we recommend purchasing Adobe Lightroom.
If you’re ready to make the jump to using Lightroom and Photoshop, Adobe have a great ‘Creative Cloud’ package, which is what we use for only $10 a month. You can buy it here with a 7-day free trial

21) Practice, Practice, Practice
Just like anything, becoming a great travel photographer takes time, and a lot of practice. The only way you can get better is by getting out there taking travel photos!
You don’t even have to travel the world to tourist destinations or have the most travel camera available to be a great photographer.
Borrow some family members to take their portraits, get a friend who is also interested in photography and push each other, or grab your smartphone and go shoot sunset.
Buy whatever you can afford, go for a walk around your city and snap away.
We hope that this general guide on travel photography tips for beginners has been helpful.
Please feel free to reach out to us if you have any other questions. We have a lot of experience working with tourism boards, and would be happy to help you too.
Good luck on your photographic journey, and maybe we’ll see you in National Geographic one day!
DISCLAIMER: Some of the links in this article are affiliate links, which means if you book accommodation, tours or buy a product, we will receive a small commission at no extra cost to you. These commissions help us keep creating more free travel content to help people plan their holidays and adventures. We only recommend the best accommodations, tours and products that ourselves or our fantastic editorial team have personally experienced, and regularly review these. Thanks for your support, kind friend!

Alesha and Jarryd
Hi, We’re Alesha and Jarryd!

We’ve been traveling the world together since 2008, searching for the planet’s best destinations and adventures.
Love Travel?
Sign up for our free weekly newsletter for the best travel tips, ideas and deals!
We respect your privacy. Unsubscribe at any time.
READ MORE...
GoPro HERO 12 Review – Is it Worth Buying in 2024?
Peak Design Everyday Messenger Review – My Honest Experience
GoPro HERO 11 Review – Is it Worth Upgrading in 2024?
Related Posts
A photo journey along the silk road, your guide to the top vivid sydney photography tips and locations, our honest manfrotto d1 aviator drone backpack review, 31 photos that will put kyrgyzstan on your bucket list, 73 thoughts on “21 travel photography tips (easy ways to improve today)”.
I indeed agree in Know your camera and Plan your shots. These tips would make a good start in achieving your socmed worthy travel shots. And ofcourse, the other tips will surely be useful too. Great post!
Good article but I need to say something about using Manual – it’s not that great. Manual is just a different mode of settings for exposure, little different from either shutter or aperture priority, except these two give you a leg up, to where you’re going anyway. At the end of the day whatever exposure setting you choose will be just a combination of the 3 on the ‘exposure triangle’. Instead of using manual try these other two in conjunction with exposure compensation, which overrides the exposure meter reading. You still need the meter for any exposure anyway, just not necessarily using the value it recommends. It amounts to the same thing, only easier, quicker, and still constraining one of the triangle sides that you want. I use manual for specific unusual objects, such as sun, moon, stars, but during general daytime subjects it’ll be very unusual to hamper yourself by not using the aid provided when there is no advantage.
Your blog has become my go-to source for insightful content.
Thank you so much. So glad to hear. 🙂
Before you go, research your destination and its culture. This will help you better understand the people, customs, and landscapes you’ll be photographing.
I benefited a lot from your post. Thank you
So glad you did. Thank you for stopping by. 🙂
Thanks for sharing all this amazing tips & information. Fabulous post !
You are welcome. We are happy to help. Happy photographing
nice summary of basic photo tips that will improve my shots, thanx!
You are rocking..keep it up your work
Thank you so much. We really appreciate it.
Great article with great tips and i also like the pictures
Thank you so much Alesha and Jarryd for these amazing photography tips! I look forward to putting into practice some of your wonderful ideas and tips! I do so appreciate any tips that I can get to improve my photography. :)) Cheers, Marilyn
I absolutely loved this article! Like you I received my first ‘proper’ camera at 14 and since then have been hooked. I recently purchased a Nikon D750 and am absolutely loving it. Although at the moment I only have two lenses for it I am hoping to be able to afford more soon. What are your favourite lenses?
In my photography I love capturing candid portraits of people I encounter during my travels. I always struggle with the dilemma of getting the perfect candid shot and feeling compelled to ask permission before taking the shot. As a very shy person directing people in images is daunting, but it is something I am striving to work on. It’s nice to read that you are also shy yet manage to capture such incredible images of people.
As I am mostly self-taught, I always love to read technical tips to improve my images. I found the technical side of your post incredibly helpful and wanted to say thank you for taking the time to write such a detailed post. I believe it really helps and inspires amateur photographers like myself.
Glad you liked the article. Thank you for your comment. Keep photographying Caitlyn 🙂
Great tips and awesome photos! I always tell people if they aren’t comfortable with their settings, the #1 way to make sure their images aren’t blurry is to shoot in TV/S (shutter) priority. That way you can prioritize having no hand shake.
Thank you so much. Great advice. Thanks for your comment. 🙂
Awesome tips for everyone and specially to me who loves capturing photos everytime i travel.This one also help me and give me more knowledge on how to make awesome photos and its good because you don’t need to buy expensive camera to have a good quality photos, just your iPhone or smartphone you can make a great photos.
Hi, you are so right. You can take great photos with your phone. Glad the article could help you.
Great article! Do you even bother carrying your camera with you during the day in broad sunlight? I find it’s not worth the hassle for such poor shooting conditions.
Hi Scott, It all depends what we are doing. If we are on a job, we always carry our cameras with us. The midday sun is harsh but you get used to working with it. Especially indoors with the sun coming through the cracks, it can work out really lovely sometimes. When we are travelling on our own time, we don’t usually carry the camera. Happy travels
I really enjoyed reading this post, as I am a beginner in photography as well and it’s always interesting to see what gear other people are using!
I have the Canon Rebel as well, and also love the 50mm lens. It’s just great and is so versatile!
Thanks for sharing.
Glad we could help. Thank you for your comment. Happy photographing,
Great tips guys! Photography is an art so it must be learned properly. A good guide can teach art in a great way. This article is similar to a guide because it is an eye-opener for blooming photographers and travel lovers.
Thank you so much!
Thank you for your comment Glorias. Glad the article could help.
Hello Alesha and Jarryd, not sure to whom I adresse the message to, but I’m guessing Jarryd took the pictures and Alesha wrote about it :p
Anyway, do you guys use any customized Firmware on your DSLR? like the CHDK or Magic Lantern. That’s one question, the other one will be: can’t find any Mobile Phone photography on your blog? can you please refer me to any article that provide valuable info around Mobile phone photography?
Hi Ayoub, The photos and words in the article are a combination of both of us. Usually Alesha is the photographer and Jarryd is the writer.
We use use no customise firmware at all. We haven’t ventured this way as it voids our warranty.
As for phone photography, maybe this is an article we should write. With our phone photos, we do use Snapseed to edit them. But do not take any photos through any apps. All the best
Thank you for the tip regarding phone photography, I mostly use the customized firmware to do timelaps and edit directly on the camera, keep me posted after publishing the new article. (Already subscribed to the weekly newsletter)
Definitely will do. Thank you so much. Happy photographing. 🙂
you are doing a great job
Thank you so much. 🙂
This was really an amazing list of tips, I am a hobbyist photographer and this would really helps me a lot
Glad we could help. Keep up the photographing. 🙂
Great tips Alesha and Jarred. I really liked your golden and blue hours tip. Will try it soon and hope get amazing pics 🙂
Glad we could help. Practise will get you on the right track and before you know it you will be taking amazing shots. We are still learning about photography everyday. We love that you can never stop learning. Thanks Linda.
Some of the best tips I have read so far. Amazing post and captures so much detail. Worth the read for every travel photographer. 🙂 Keep it up.
Thank you so much,. We really appreciate it. 🙂
Priceless tips for amateurs like me. Thanks for sharing. For a long while, I’ve tried to follow the rule of thirds, but the best shots came out when I finally dared to break it. You’re absolutely right about the rules are meant to be broken. Regarding the camera, I agree it doesn’t have to be the most expensive. But sometimes I have a feeling my shots would have been better had I owned a proper camera. What device is the best balance between price and quality?
HI Robin, you’re welcome. We are so happy we could help. Sometimes breaking the rules works out to be better. 🙂 We definitely know what you mean. You do not need to buy the most experience camera. A camera that you can use manual settings, is great as you can start using and playing with aperture, shutter speed and ISO. We started off with a Sony RX100ii and it was great. Compact and a great camera to learn. Here is some articles that may help. https://www.nomadasaurus.com/best-camera-for-travel-ultimate-photography-series/ https://www.nomadasaurus.com/best-camera-accessories-ultimate-photography-series/
Thanks a lot for the great advise! I especially like your explanations about the exposure triangle. I was a bit aware of it before, but never played around with it unless I wanted to change the depth of field (and even then, I did this very rarely). But thanks to focusing more on it, I am starting to get the hang of it. I have taken some very good hummingbird pictures, for example, which never would have been possible if I hadn’t raised the ISO so I can keep the shutter speed fast. Those birds zip around like crazy!
Also, I think one of the most important pieces of advise, and the one I’m struggling with most, is to always look at the whole frame. I am guilty of looking at the main subject and later finding out that I cut off important things on the side or that something weird is in the photo that shouldn’t have been there.
Hi Ilona, so happy the article could help you. That’s amazing you experiment with your hummingbird shots. They are fast birds. By practising photography, you will get better and better. No matter how experienced you are, there are always things to learn. When you come to a scene you want to photograph, stop for a minute look around, walk around and think about what shots you want to take. Obviously this is hard when the subject is moving but great for landscape and street photography. All the best and keep up the awesome work. 🙂
Hi, I took around 500 shots on a trip to Kyrgyzstan recently, some I think are pretty good, but now after reading your tips, I think I will make another trip to that part of the world again soon!
what a great tips especially the lighting part – i also agree that getting up earlier and shooting in the natural sunlight is so great for your photos. talking to the locals and knowing your camera, You guys covered it all
Thank you so much for reading Shama. Glad you liked our article. Natural lighting is the best. Even though sometimes that early morning is hard it is worth it. 🙂
u are absolutely right u don’t need an expensive camera or go to Bali ( although it’s a good idea) to get great photos. it’s just simple common sense and a good eye and you can master photography
Well said. Thank you for your comment and reading Shama. Have a great week.
Thanks a lot for the helpful tips on holiday photos. My partner and I are in Easter Island, irresistible place for photo opportunity. My Nikon D7000 will keep on taking photos on auto mode for the time being until I have had enough practice following your guidelines and the who knows what photos I might produce! Thanks.
Glad we could help Balu. Definitely when you have time, go out and take some photos on manual. Play with the different settings. Before you know it, you’ll only be on manual. At the beginning when I was still learning, I would take a shot on the manual settings I thought and then a shot of the same view on auto in case I messed up. Better safe than sorry. Have a great time in Easter Island. There is so much to do there and learning about the history is amazing. Take care. Alesha
Guys your advice are completely helped me. I was stressed before, i want to travelling at the moment but i hope i can take a good picture cause you know how annoying it will be when we take a picture and then when we are home they are completely bad. So then you have to comeback at the same place again just to take a picture. But this one is helpfull
Hi Fabio, Don’t stress. You are going to bring back amazing photos from your travels. It is all overwhelming at the beginning but it gets easy. When you are shooting, put some time aside and concentrate on what you have learned. It doesn’t matter if it takes you 20 minutes to an hour to get your shot. If their are other photographers around, most of the time that are happy to give you some advice. Let them know you are new. Maybe they will let you know their settings for ISO, aperture and shutter. When it comes to editing, take your time as well. There are many You Tube videos that can help you for free. Have a great time on your trip. Happy travels
Hey Guys, very useful tips especially the Bonus tips.
Keep Sharing!!!
Glad we could help. Thanks for reading.
P(Program) you set either the aperture or shutter and the camera adjusts the other one accordingly to maintain the right exposure. Thanks
Thanks Rezan
I love traveling around the world. I wish to capture some of the beautiful places that I enjoyed. The above tips helped me to improve my travel photography skills. It also helped me to click some of the memorable moments of my travel with my friends and relatives.
Hi Vivek, Glad we could help. It is all about practise. We love having a day to ourselves and just getting out and shooting anything – landscape, cityscape, people or animals. We try to give ourselves a challenge sometimes. It makes it interesting and we are enjoying ourselves. 🙂
Great tips to help out beginners like me. I need to work on to ask people for permission as I get shy sometimes. I love the quote “rules are meant to be broken”!
Thank you Mao. Don’t worry, “asking” will come. Alesha was so shy and I used to take all the people shots. Now she is more confident and really enjoys shooting people. All the best.
THANK YOU . Your very easy to read starter guide to photography was AMAZEBALLS I learnt so much .cheers LIZY
Thank you. Glad we could help. Happy shooting and get creative. 🙂
Hey guys, this is an amazing guide, thanks for writing this up in such detail. As an amateur, I always look for good travel photography tips from other travellers. I left my tripod behind in Thailand and I think this was a huge mistake, I need to get a new one, urgently 🙂
By the way, really enjoy your photos on your blog and Instagram, they are amazing! 🙂
Glad we could help guys. We never used to use a tripod in our early years until we discovered how amazing the shots can be with one in low light and now we have 3. You can rest your camera on something to get a shot but you are limited to positions. Thanks for reading guys. 🙂
thanks for the tips. i’d make one edit: instead of ‘move your feet’ i’d say “don’t be lazy”…move left or right. move forward or back. climb up on something or get down on your knees.
Love it Aaron. You are so right. A little to the left might be the perfect shot or a little to the right and crouching might be the perfect shot. thanks for the input. Have a good one.
I love this post. It is incredibly helpful to all beginner travel photographers like myself! I have only been shooting in manual mode for the past 5 months and have already seen a huge increase in the quality of my photos! But I am always looking to improve. Will definitely be sharing your post
It is crazy how you improve when you start shooting manual. I know Alesha did also. You learn so much about the camera and what it can do, it is incredible. Thank you for reading and all the best with your photography Hayley. 🙂
this guide is amazing, thank you so much for explaining everything in a way an amateur can understand 🙂
Bookmarking the post for future reference!
Cheers, Naddya
Thank you guys. We are glad it is useful for you. 🙂
Wow! Amazing Tips. These tips will help a lot to click great pictures with your camera. Love the point of Shutter Speed. and about RAW.
Thanks for Sharing Helpful Post.
Thank you so much Nitin. Glad we can help. Thank you for reading.
Yeah I agree with you buddy.
Thank you 🙂
Leave a comment Cancel reply
Save my name, email, and website in this browser for the next time I comment.
21 EASY Travel Photography Tips (Make Better Pictures with Little Effort)
By Author Jurga
Posted on Last updated: December 8, 2022

Are you looking for simple travel photography tips to help you take better pictures? You came to the right place! In this guide, we share some easy, actionable tips and tricks that will help to improve your travel photos with very little effort. No photography course or fancy equipment needed – find out!
Travel photography has become an essential part of any trip and any vacation. We all want to capture those special moments of our travels, keep them for later, and share them with our family and friends…
But how often do you find yourself in a situation where you feel that your travel pictures just don’t do justice to all the amazing things you saw and experienced?
With ever-improving technology, it’s now easier to take good travel photos without much effort than ever before. However, by preparing well and applying a few simple tricks, you can easily transform your travel photography from good to great! And no, you don’t need a professional camera or any special knowledge for that.
So if you looking for travel photography tips to improve your vacation pictures, this guide should help you do just that. In this article, we share some simple photography tips, but also some important travel tricks.
These tips will not only take your travel photography to the next level but will also help you have a more unique travel experience. Find out!

How this article is structured. First, you’ll find general tips for travel photography, followed by simple photography tips that will help you take better pictures without much effort. Further, you’ll find some useful practical tips and things to consider when preparing for your trip (with photography in mind).
Take a look!
These are our best travel photography tips:
1. Get to Know Your Camera
First, let me make one thing clear. You do not necessarily need expensive camera gear in order to take really nice pictures. Smartphones and entry-level point-and-shoot digital cameras like this one offer excellent quality. Quality that’s more than good enough for a family album, social media stories, or a print to hang on the wall.
However, no matter what kind of camera or smartphone you use for travel photography, it’s always useful to take some time and familiarize yourself with it. After all, you don’t want to miss some unique photo opportunities because of the time it takes you to set up your camera.
Each device has somewhat different settings and a big range of possibilities. Even if you use just a few of those settings once in a while, you’ll improve your photography skills and get better pictures.
Here you can find our hand-picked selection of some really good cameras for travel for all budgets sold on Amazon .

2. Do Some Research for Trip-Specific Photography Tips
Now that I told you that you don’t need any special gear, I also have to add that some types of travel photography might indeed require some special equipment or knowledge.
For example, if you are visiting Nordic countries in winter, you’ll probably want to learn the basics of the Northern Lights photography . You may want to research if there are any special aurora photography apps for your phone. However – if you want some decent pictures – you’ll definitely need a good tripod and a somewhat better camera with manual settings for this type of travel photography.
This is also the case for a trip where you are planning to take pictures of wildlife. Often, your smartphone and cheaper cameras will just not be sufficient for really good pictures. So if you are planning a safari in Africa, you may want to research what kind of cameras and lenses you need for wildlife photography .

3. Experiment with Camera Settings
Don’t be afraid to exit the ‘auto’ mode of your camera and experiment with the settings. Even something as simple as switching off or forcing the flash, can make a huge difference already.
If you are using a smartphone, you probably just use the standard photo and video settings. But if you look a bit deeper, you’ll see that there are other options as well.
Most smartphones also have panorama mode (great for wide panoramas in the mountains or cityscapes), selective focus mode (nice for portraits), or even one for food or night photography. Usually, there’s also a ‘pro’ mode where you can play with different white balance settings, etc.
If you have a DSLR camera , you may want to learn just a little bit about white balance, ISO, aperture, and shutter speed. Change the white balance and your pictures taken on a grey rainy day will become warmer. Change the shutter speed and you have a silky waterfall. Change the ISO sensitivity and you’ll be able to take pictures in low light without the flash…

4. Look for Different Angles
Standing in front of a landmark you visit, you suddenly realize everyone around you is holding cameras and smartphones, taking the exact same pictures… Sounds familiar?
Do you want your travel pictures to be different? It’s easier than you think! All you have to do is simply use your legs.
Sit down, kneel down, even lie down if necessary. Or try to climb somewhat higher. Get closer to your subject or move further away. Go left, go right, go behind… You get the picture. Literally – you get a better, more unique picture just by changing the angle.

5. Try Different Compositions
One of the easiest ways to improve your photography skills is by learning how to make a good composition. Sometimes by simply recomposing your shot just a bit differently, you get a picture that tells a more powerful story.
Most people take pictures with the subject right in the middle. And while sometimes it can result in a beautiful shot, more often you get an ordinary image. Often, you can really bring your pictures to life by simply moving your subject away from the center.
You may have heard of the famous rule of thirds . Divide your picture frame into 3 imaginary lines and 3 columns and place the subject at the intersection of those lines. Take a look at the sleeping koala picture to see what I mean.

Shooting landscapes? Put your horizon at either top or bottom third of the photo. Also, use natural lines, such as a forest path or a twist in the road to help guide the viewer through your photograph.
Taking pictures of people or animals? Try to also place your subject in such a way that they are looking towards your picture and not away from it.

6. Explore Deeper
Some of the best travel pictures are not those that are taken right in front of famous landmarks. For more authentic travel photography, try to get just a bit off the beaten path.
If you are walking around the city, don’t stick to a plan or try to follow the map exactly. If you see an interesting side street or an alley, turn in and check it out. If you are road-tripping and stumble upon some interesting roadside attractions or local events, stop and check it out…
Also, ask locals or other tourists for some cool spots and hidden gems. You’ll be surprised at how many incredible locations are not mentioned in any travel guides. Don’t be afraid to talk to people and ask for some tips.
We have had some amazing travel experiences just because we talked to people. And even if it doesn’t always lead to the best photo spots, you might find delicious local food, quirky shops, or some interesting street art.

7. Include People or Objects
Another easy way to improve your travel photography is by including people or objects in your pictures. Not only do you get better and more unique photos, but they also tell a story.
Look around for something or someone you can include in your picture to give it a different feeling or perspective .
Think of people (locals, kids, really old people – don’t forget to ask for permission!), animals, flowers, tree branches, road signs… For a more personal perspective, try including your own arms or legs, etc.
Even just including a few wildflowers in your composition can make your landscape pictures stand out. You can also frame your images using tree branches and leaves. You can show the size of a building or a tree by including people or cars in that same image.
There are so many ways to be creative; often you only have to look around with different eyes!

8. Look for Colors
When traveling, always keep an eye out for bold, vivid colors . Pictures with strong colors are often more powerful and bring the place back to life in your photos.
It can be anything from colorful buildings (focus on details like walls, doors), to cars, buses, bikes, or scooters. But also local markets and traditional clothing often give you a chance to take some unique colorful travel pictures.
TIP: If you are traveling to a place that isn’t really known for being colorful, wear some bright clothing yourself. A bright jacket can make all your gloomy vacation pictures so much more special.

9. Look for Details
For more interesting travel pictures, try to look for some interesting details everywhere you travel. It can be something local, something unique to that place, or maybe a special detail in the architecture of a building.
Also, get close, really close to your subject. Very often, details tell a stronger story than the whole!
Sometimes you get frustrated because you can’t fit the whole building into a picture. Or you are at a colorful lively market, but your pictures don’t portray any of that special atmosphere… Remember that often less is more and concentrate on a few details rather than trying to capture everything.

10. Have Your Camera Ready
Some of our best travel pictures are often taken unexpectedly, without any planning. It’s especially so with trips that involve wildlife . You just never know when you’ll get to see animals or what they’ll do, so you should always have your camera at hand and ready to take a picture.
Of course, pictures that you take unexpectedly will often not be perfect in composition, or maybe even a bit blurry. You can often solve it with some post-editing afterwards. But at least you got the shot!
Another example of the importance of having your camera ready is when you’re taking a picture of something that you only do once and it moves fast (like in our picture on the fun zip-line experience in Switzerland – see below). You have to be ready to take a picture and it helps if you put your camera in continuous shooting mode. That way, you can take lots of pictures in just a few seconds, and afterwards keep the best ones.

11. Do Something Fun
It’s impossible to get spontaneous pictures of the whole family if you don’t have a photographer following you around the whole day. So if you want to take some fun vacation pictures, the best way to go about it is to actually do something fun.
If you are taking pictures of your kids or your travel companions, simply ask them to do something and actually pose for a picture.
We all want candid shots, but they hardly ever happen, especially when you want to get several people in the same picture. But if you make an effort, you can easily take some really nice vacation pictures of you and your family.

12. Be Patient & Take Your Time
Travel photography is what you make of it. You can just take a picture and move on, but for the best pictures, you need to take your time and be patient.
Often, you don’t have much time when we travel, and you find yourself running from one place to the other. But even if you slow down just a little bit, even if you wait just a few moments, you might be able to take a much better picture.
It might mean waiting for the perfect light or for another person to move away from your composition, but it usually pays off.

13. Just Take That Picture!
Sometimes, you see a beautiful place, but you have no time to stop for a picture, or the light is not perfect, or the weather isn’t ideal, or there are too many clouds… So you swear to do it later or on your way back.
But then the weather changes for even worse, the mist comes up, or something else happens, and you never get a second chance.
This happened several times to us. So now we always take a picture when we see an interesting opportunity. Even if it’s not perfect, at least you got the shot. And if you do come back and the conditions are better indeed, you can always take another picture.
And sometimes, you get some really interesting pictures that way.

14. Travel Light
It’s always so tempting to pack the perfect camera or lens for all the possible situations you might encounter on your trip. But that also means that you’re always carrying so much unnecessary gear. Not only is it expensive to buy and heavy to carry around, but it also limits your flexibility. Not even to mention that expensive camera gear can put you at risk in certain places you visit.
Often, having more photography gear to deal with might actually lead to you missing the best photo opportunities. You may find that you are constantly switching lenses trying to get that perfect shot while your travel companions are simply enjoying the scenery.
So pack wisely, considering what kind of pictures you think you’ll be taking. My personal rule is to never pack more than two lenses for my DSLR camera. If we visit cities, I usually just go with one lens. For nature and wildlife, I pack a good telelens as well. Sometimes, it’s a tough choice which lenses to pack, but you also learn to be more creative that way.
TIP: If you are not a professional or a semi-professional photographer and don’t absolutely need a DSLR camera for your travel photography, simply get a really good point-and-shoot camera with a good optical zoom (something like this ). That way you always have the right ‘lens’ with you. There are so many versatile cameras nowadays that offer great quality. So don’t make your trip more stressful than necessary.

15. Pack a Tripod
Now that I told you to travel light, I also have to say that – for some trips – you really should consider packing a good tripod . It can be bulky and heavy to carry around, but it is also unmissable for certain types of photography.
If you are planning to take pictures early in the morning or late in the evening, if you are photographing waterfalls or Northern Lights, a tripod is a must. But even if you simply want to have the whole family in one picture, it’s often useful to have a tripod. And yes, you can also ask other people to take a picture, but we all know how those pictures usually turn out to be…
There are many different kinds of tripods and you should get one that can steadily hold your camera. For the smallest cameras or smartphones, you can use something like a GorillaPod . For heavier DSLR cameras, we recommend Manfrotto tripods – they are available in many different sizes and models.
My experience shows that for travel photography, the more compact and lighter the tripod is, the more you’ll use it. Just make sure that it can hold the camera and the lens that you have.

16. Pack Enough Memory Cards & Extra Batteries
Always, always pack more memory cards than you think you’d need. They are really not that expensive anymore and as the camera quality gets better and the picture size larger, you may run out of space on your memory card. So always have a few extra cards.
Also, get memory cards that are fast so that you don’t need to wait for the camera to save a picture before you can take a new one. If you are traveling to places with extremely hot or cold weather, make sure that you have quality memory cards that can work in any conditions.
We use and recommend Sandisk SD Extreme and Sandisk SD Extreme Pro cards. They offer an excellent price-quality ratio.
Always pack at least one backup battery set (and make sure that it’s charged) and carry it with you. There’s no use in having a set of extra batteries in your hotel room or in the car; they should always be at hand.
If you are using your smartphone for photography, take a power bank and a cable so that you can easily recharge your phone during the day. In any case, a good light and compact power bank is a must for any trip these days!

17. Be Respectful & Be Careful
One of the most important things any traveler should remember is to be respectful. Respect other people, nature, and local rules and regulations. Also, just use common sense and don’t do things that you wouldn’t want others to do to you.
Don’t go trampling wildflowers even if there are no signs asking not to do that. And definitely don’t go past the signs asking you not to – there’s always a reason for that, even if it might not look obvious to you. Don’t go on private property and try to always ask people before taking a picture of them. When in doubt, don’t take the shot.
Also, don’t go jumping at the edge of a cliff just because it looks cool or you saw someone else post crazy pictures like that on Instagram. Too many accidents happen every year because people are trying to get some perfect angle for their picture and misstep too far… No picture is worth it!
Having said that, we also have quite some pictures taken at places that look quite dangerous. But in our case, it’s more about finding the right angle to make it look more special. We are always extremely careful and we do our best to always stay on paths and never cross the line or a sign asking not to do it.

18. Get up Early & Stay Late
Photography is all about the light, and it’s not a secret that the best times for pictures are at dawn and at dusk. Photographers call this the Golden Hour . So one of the best travel photography tips I can give you is to make an extra effort and get out of bed early in the morning and stay up late.
Not only will you get better pictures this way, but you will also experience some incredible sunsets and sunrises that will make your trip more special!
Another advantage of getting up early is that you can explore even the most popular travel destinations without the crowds. Most tourists never get to their destination before 9-10 AM, so those few hours in the morning will not only help you get better travel pictures but will also make your travel experience so much more unique.
Unfortunately, this is not really the case at sunset at most destinations, because many people love to stay up for sunset. However, you’ll still have more beautiful light and more special colors for your pictures. Also, some destinations that are popular with day-trippers, are very quiet in the evening. So if you can, book accommodation very close-by and stay longer! This brings me to the next two points.

19. Book Your Accommodation Wisely
This might look like a strange tip for travel photography, but the location of your accommodation can have a huge influence on your trip and on the pictures you’ll be able to take.
Spending a night at a popular day trip destination will allow you to explore the place without the crowds of day-trippers. Staying close to a specific landmark might give you unique opportunities to photograph it in a different light and at different times during the day.
Staying inside a national park might mean that you’ll be able to explore it from dawn to dark and even at night. You might be able to photograph incredible skies at night or get to see wildlife just at your doorstep at dawn. Even just booking a room with a nice view can give you chances to take pictures you’d never be able to get otherwise.
So keep this in mind when choosing your accommodation. Some of the most special travel experiences we had during our trips wouldn’t have been possible if we had chosen another accommodation.
Some of those include watching whales from our hotel in Ilulissat, Greenland , or exploring the fairytale castles of San Marino at sunset with hardly anyone else around, or watching wildlife at dusk and in the dark in Etosha National Park in Namibia … And these are just a few examples.

20. Research the Best Photography Spots and Locations
If you want to take some really nice pictures while traveling, it’s helpful to do some research in advance. Once you are on a trip, you hardly ever have the time to scout the best photography locations. It’s very easy to overlook some nice places or special angles when you’re visiting somewhere for the first time.
One of the best ways to research the best locations is by checking images of your destination online. Just type in your destination name on Google Image search, and you’ll see what kind of images come up. You can then try to find their exact location and potentially even mark it in your Google Maps account.
Another good way to find some of the nicest photo spots is by looking on Instagram. However, this also often leads to ‘Instagram tourism’ and everyone taking the exact same pictures of the same ‘instagrammable’ places…
For some places, it might be important to research when the light is best for photography. This usually highly depends on the direction of the sun. Which brings us to the last tip…

21. Don’t Forget Why You Travel & Enjoy Your Trip
If you are on vacation, it will be impossible to always be in the right place at the best possible time. Also, the weather will play a role and some unforeseen circumstances. So no matter how much research you do or which camera gear you have, often, you simply won’t be able to get the best pictures.
Remember that those perfect images that you see in the travel brochures were usually taken by professional photographers. Usually, they stay at the same location for at least a few days, scout out the best times and angles, and go back to the same place a few times in order to capture that perfect light and composition.
So unless photography is the main goal of your trip, don’t stress about it. Remember why you travel in the first place and enjoy your vacation instead of trying to get that one perfect shot!

So, these are some of the basic travel photography tips that I wanted to share with you. As you can see, most of them have nothing to do with the camera you have or the settings you use. It’s more about being creative, looking for different angles, doing something fun, or catching the perfect light. It’s also a matter of practice. The more you do it, the better you’ll get at it.
I truly hope that our tips will help you get better travel pictures. But I also hope that these tips will help you have more special trips and create better memories.
Explore, take your time to look for little details, get off the beaten path, and once in a while splurge for some well-located accommodation. Trust me, it will be worth it!
READ ALSO: Our Favorite Destinations Worldwide
If you found this post helpful, don’t forget to bookmark it and share it with your friends. Are you on Pinterest? Pin these images!

This site uses Akismet to reduce spam. Learn how your comment data is processed .
Wednesday 13th of April 2022
Do you have any tips on how to present the photos and videos that you take on your travels? For instance do you create photobooks or videos that include video clips and photos?
Tuesday 19th of April 2022
@Jurga, Awesome, thank you very much. :)
Thursday 14th of April 2022
Hi Vanessa, yes, we sometimes make a photo book with our pictures and my husband also makes a nice video of each bigger trip too. It's all more meant as a nice memory for the kids and they loved watching older photos/videos of themselves :). We don't usually mix the two though - so pictures and videos are separate.
Michael Anthony Cicchi
Tuesday 6th of July 2021
You make gorgeous photos 🙂
Wednesday 21st of July 2021
Thank you, Michael!
Saturday 26th of December 2020
Great general tipps & some beautiful shots there! keep it up :)
Monday 28th of December 2020
Thank you, Lisa!
Michael Cicchi
Sunday 13th of December 2020
A very nice article, Jurga! Great tips.
Thank you, Michael! Always such a loyal reader!
- Student Successes
- My Learning
How to Take Travel Photos: A Complete Guide
You can also select your interests for free access to our premium training:
Travel photography is one of the most exciting types of photography you can pursue. Combining two of life’s great pleasures—exploring new lands and taking photographs—is a thrill any photographer would enjoy.
While travel photography is open to anyone with the drive to get up and hit the road, there are a few things you need to learn. That’s why we’ve compiled this in-depth article containing everything you need to know about travel photography. We cover everything from camera settings to the best travel gear, so keep reading to find out more.

What Is Travel Photography
Travel photography is simply taking pictures of different places around the world. But good travel photos are not mere holiday snaps. Travel images should show a location in a new light so they’re interesting even for people who have already been there.
Travel photography involves many different styles and techniques. You can incorporate landscapes and portraits into your travel photography. You can even use more advanced techniques like time-lapse and long exposures.
A travel photographer needs to show more than the obvious. They need to explore each location at a deeper level and look for elements that make that place unique and interesting. It isn’t enough to take pictures of the famous landmarks. A travel photographer needs to look deeper and go beyond.
Far-flung exotic locations often hold the most romance for travelers, but you don’t have to go far to practice travel photography. Venturing to new locations is always exciting, but you can also photograph places you’re familiar with. Using your familiarity to your advantage, you can give viewers a deeper view of these locations.
Anyone can shoot travel photography. The first thing you need is a desire to explore the world, which is something you probably already have. But continue reading for everything else you need to know about travel photography, from techniques to gear.
Mastering Travel Photography
While travel photography is open to anyone with an adventurous spirit, mastering the art does require practice, knowledge, and skill.
Firstly, you need to understand your camera and its settings. You might be tempted to take the easy road and shoot in Auto mode. But you’ll get far better results and more interesting and unique images when shooting with semi or fully manual settings.
You should also experiment with composition, and you can try both color and black-and-white photography. These are stylistic choices that’ll give your travel photography a personal touch. You also have to consider specific types of travel photography so you’re ready for anything when you’re on the move.
The following sections cover mastering the art of travel photography. Click the links in the text for more information on each topic.
Camera Settings
When it comes to camera settings for travel photography, there are a few key things to keep in mind. First, make sure your camera is set to the right aperture and shutter speed for the type of photo you want to take. You’ll also need to adjust your white balance and ISO as you move through different locations.
To learn more about camera settings for travel photography, check out camera settings for travel photography .

A travel photography shot list helps you plan and capture the best photos on your trip. Research the location thoroughly, including famous sights, experiences, geography, and lighting conditions. Look at existing travel photos for inspiration, but aim to create something unique.
Use a spreadsheet to organize your shots by day and time, considering factors like sunrise, sunset, and harsh midday light. Include a mix of portraits, environmental portraits, cityscapes, daily life moments, religious sites, festivals, food, transportation, landscapes, close-ups, architecture, night scenes, and wildlife.
Remember to be adaptable and respectful of local customs. With careful planning and a detailed shot list, you’ll be well-prepared to capture stunning travel photos that transport viewers to your destination. To learn more about creating a travel photography shot list , check out this in-depth guide.

Composition
Good travel photography composition captures the beauty and essence of a destination. Use the rule of thirds by placing important parts of your photo on the intersecting points of the grid. Or take advantage of symmetry by centering the axis of symmetry in one direction.
Direct attention with leading lines, using elements like paths or fences to guide the viewer’s eye to your subject. Frame spectacular views with windows or arches to provide context. You can also use bold colors to lead the eyes or balance the composition.
Change your perspective by moving around, kneeling, or shooting from a rooftop. Get close to fill the frame with your subject or step back to include surrounding context. Play with scale by including familiar elements like people to convey the impressive size of large spaces.
To learn more about travel photography composition , check out this in-depth guide.

Black & White
Black-and-white travel photography can be a powerful way to capture the essence of a place. By removing color, you can focus on the light, shapes, and textures that make a scene unique.
Pay attention to contrast and tone in your black-and-white photos. Look for strong shadows and highlights that create depth and drama. Texture is also important in black-and-white photography, so seek out interesting surfaces like rough stone or smooth water.
Most importantly, use black-and-white photography to connect with your subject and tell a story. Whether it’s a portrait of a local person or a landscape that captures the mood of a place, aim to convey emotion in your images.
By developing your own style and vision, you can create compelling black-and-white travel photos that stand out. To learn more about black-and-white travel photography , check out this in-depth guide.

Unique Perspectives
Taking unique photos of famous places can be challenging, but with some creativity and planning, you can capture stunning images. Start by researching the location and scouting out potential spots for your shots. Arrive early to avoid crowds and take advantage of the soft, golden light.
Look for elevated views or unusual angles to create a different perspective. Use composition techniques like the rule of thirds to emphasize the landmark in an interesting way. Including people in your shots can add a sense of atmosphere and tell a story.
Don’t be afraid to experiment with different techniques like light trails or time-lapse photography . If you encounter photography restrictions, think outside the box and find creative solutions. To learn more about capturing unique photos of famous places , check out this in-depth guide.

Documentary Photography
Documentary photography captures real-life events as they happen. It’s a form of visual storytelling that depicts the world around us. Documentary photographers often work on long-term projects to tell new stories through their images.
You don’t need to travel far to find good documentary photography ideas. Look for interesting subjects in your family or community. Focus on the people involved to help viewers connect with the story. You can also tackle big topics by photographing small, local stories related to them.
Visit and scout your locations before the shoot. Get comfortable with the basics of photography, like camera settings and composition. Keep your story personal and critique your work as you go.
If you want to learn more about documentary photography ideas , we have a detailed guide to help you get started.

Train Photography
Train photography offers a diverse range of subjects, from historic steam engines to modern bullet trains. To capture excellent locomotive photos, research train routes and schedules to find the best locations and times. Use natural light to your advantage, with side or backlighting to highlight steam and texture.
Longer focal lengths can compress the scene and show the train in its surroundings. At stations, photograph details like wheels and logos to create atmosphere. Adjust shutter speed for sharp images or creative motion blur, and slightly overexpose for more detail.
For more insights on capturing stunning train photography , check out our full-length article.

Backing Up Photos
It is important to back up photos while traveling, and an external hard drive is a great option. They are compact, durable, and have large storage capacities.
Smartphones and tablets can also be used to manage photos on the go. With the right accessories, they can connect to external storage devices. This allows you to back up and edit your photos without a laptop.
For the best results, use multiple backup methods. This could include an external hard drive, a USB thumb drive, and cloud storage. By having multiple copies of your photos, you reduce the risk of losing them. If you want to learn how to back up photos , check out our in-depth article.

Making Money from Travel Photography
Becoming a travel photographer takes hard work and dedication. You need to learn a wide range of photography skills for shooting everything from landscapes to portraits. Building a strong portfolio of your best travel images is key to attracting clients.
To get your name out there, create a travel website or blog to showcase your work. You can also sell your images on digital platforms like stock photography websites. Selling physical prints of your photos is another great option.
As you travel, look for photography work with local businesses, such as hostels or tourism boards. Capture great travel content and consider offering tours or workshops for extra income.
To learn more about how to become a travel photographer , check out this in-depth guide.
Travel Photography Jobs
Travel photography jobs can be an exciting and rewarding career path for those with a passion for photography and adventure. However, it’s important to understand the challenges that come with the job. You’ll need to have exceptional photography skills, business savvy, and the ability to handle tough physical conditions.
To succeed, you’ll need a strong online presence, including a professional website and active social media accounts. You’ll also need reliable gear that can withstand the demands of travel.
There are many ways to make money as a travel photographer, such as selling prints, licensing stock photos, writing for publications, and teaching. The key is diversifying your income streams and constantly looking for new opportunities. With hard work and creativity, finding paid travel photography jobs can be both fulfilling and profitable.

Get Paid to Travel
Getting paid to travel and take photos is a dream for many photographers. There are several ways to make this a reality. Selling prints of your travel photos through print-on-demand websites is one option. You can also upload your best images to stock photography agencies and earn passive income from sales.
Entering travel photography competitions is another way to earn money and gain prestige. Winning contests can help you promote your work and attract potential clients.
Building relationships with travel magazine editors can lead to regular paid assignments. Learn what they want and deliver high-quality photos to make their jobs easier. To further your success, get paid to travel and take photos by marketing your photography services to people who have the budget to hire you.

Sell Travel Photos
Selling your travel photos can be a great way to make money with your photography. To get started, ensure you have high-quality, well-lit, and properly composed images. They should also be free of technical errors like chromatic aberration and noise.
There are many ways to sell your travel photos. You can sell them through stock photography agencies, directly to clients, or as prints. Each option has its own requirements and markets, so consider your goals before deciding which path to take.
Actively promoting your work is key to maximizing sales. Use social media, email lists, and other marketing strategies to reach potential buyers. If you’re working with a stock agency, ask them what types of images are in demand so you can plan your shoots accordingly.
Learning how to sell travel photos takes time and effort, but with persistence and a willingness to adapt, you can turn your passion into a profitable venture.

Gear for Travel Photography
When packing for a travel photography trip, it’s important to bring the right gear. A lightweight and compact camera body is essential, along with one or two versatile lenses like a wide-angle and a medium telephoto lens.
Don’t forget a sturdy tripod that fits in your luggage for sharp shots in low light. Filters like a circular polarizer and strong ND filter are small but open up creative options when traveling.
Cleaning supplies, extra batteries, memory cards, and rain protection round out the must-haves. With the right travel photography gear , you’ll be ready to capture amazing images anywhere your adventures take you.
Traveling with Camera Gear
Traveling with camera gear can be challenging, but there are ways to make it easier and safer. Use padded cases to protect your equipment from bumps and knocks. A shoulder bag is a good option for keeping your camera close and secure while walking through busy areas.
Always carry your gear in your hand luggage when flying. Most airlines understand the importance of this and are lenient about the weight of your carry-on bag. To deter thieves, hide or remove any camera branding using black duct tape.
Insuring your gear is crucial in case of theft or damage. Take down all the serial numbers and make sure your equipment is fully covered. By following these tips for traveling with camera gear , you can have peace of mind and focus on capturing great photos during your travels.

External Hard Drives
An external hard drive is an essential accessory for travel photographers. Memory cards fill up fast when you’re traveling, and you don’t want to carry a bunch of them around with you. It’s best to take an external hard drive to keep all your photo files in one place.
You’ll need something durable yet compact, which is why we recommend the LaCie Rugged Mini for travelers. It’s an easy fit for any travel camera bag. You have storage options up to 5 TB, and it’s the most durable external hard drive on the market.
See more of the best external hard drives in our full-length article.

If you buy a product through one of our referral links we will earn a commission (without costing you anything). Prices last updated on .
As an Amazon Associate, I earn from qualifying purchases. Product prices and availability are accurate as of the date/time indicated and are subject to change. Any price and availability information displayed on Amazon at the time of purchase will apply to the purchase of this product.
Cameras for Travel Photography
The Canon EOS RP is a great mirrorless camera for travel photography. It’s lightweight, easy to handle, and has a 26 MP full-frame sensor that captures high-quality images in any situation.
The camera’s autofocus system is fast and accurate, even in low light. It also offers eye-detection AF for portraits. The EOS RP can shoot 4K video and has convenient Wi-Fi and Bluetooth connectivity.
This camera is ideal for most travel photography needs. If you want to learn more about the best travel cameras , check out our detailed guide.
Mirrorless Cameras
The best mirrorless cameras for travel are compact and lightweight, but still capture stunning photos and videos. Our top pick is the Nikon Z50 . It has a compact body that fits easily in any camera bag. The 20.9 MP sensor produces bright, vibrant images with excellent low-light performance.
The Z50 is also great for travel vlogging. It records 4K video at 30 fps and has an articulating screen for easy self-recording. Built-in Wi-Fi and Bluetooth make it simple to share your adventures with friends and family back home.
If you want to learn more about the best mirrorless cameras for travel , check out our in-depth guide. We cover a range of cameras for every type of traveler, from beginners to professionals.

Compact Cameras
The Sony ZV-1 II is a pocket-sized camera packed with features for modern travelers. It has a high-resolution 20 MP sensor and a versatile 18-50mm zoom lens. The f/1.8-4 aperture provides solid low-light performance.
Vloggers love the ZV-1 II’s 4K video at 30 fps and the special Cinematic Vlog Setting. A built-in mic and wind muffler make capturing audio easy. Real-time AF with face and eye detection keeps subjects sharp.
The Sony ZV-1 II is the ideal compact camera for travel vlogging. It’s a worthwhile investment for creating exciting content abroad. But we have more options in the link above.

Lenses for Travel Photography
The best travel lenses give you a wide focal range in a compact size. Zoom lenses like the Nikon AF-S DX 18-105mm f/3.5-5.6 are very popular. It has vibration reduction to reduce camera shake and improve low-light performance.
Prime lenses are another good option. They are usually smaller and lighter than zooms. The Canon EF-S 24mm f/2.8 STM is a great example. This pancake lens is ultra-compact but still gives you a versatile focal length.
When choosing the best travel lens , think about the size, weight, and focal length. You want a lens that is easy to carry but still gives you plenty of options. The lenses on this list are all fantastic choices for your next adventure.
Canon Lenses
The best Canon lenses for travel photography are lightweight, versatile, and capture stunning images. Our top picks are the Canon RF 50mm f/1.8 STM and Canon EF 50mm f/1.8 STM . These nifty-fifty lenses are compact, affordable, and great in low light.
Other top choices include the Canon RF 24-105mm f/4-7.1 IS STM for its wide zoom range and the Canon RF 16mm f/2.8 STM for landscapes. The Canon EF 24-105mm f/4L IS USM is a popular all-in-one zoom for DSLR users. It has a constant f/4 aperture and weather sealing.
No matter your camera type, there’s a perfect travel lens for you. Look for a lens that’s light, has a useful focal range, and fits your budget. Canon lenses for travel photography help you capture amazing images around the world.

Nikon Lenses
The Nikon Z 50mm f/1.8 S and Nikon AF-S 50mm f/1.8G are the best Nikon lenses for travel photography. The Z 50mm f/1.8 S offers sharp images and a durable build. It’s great for low light with its f/1.8 aperture.
The AF-S 50mm f/1.8G is compact and lightweight. It also performs well in low light. The 50mm focal length is perfect for street scenes and portraits.
Both lenses are very popular with travel photographers. If you want to learn more about Nikon lenses for travel photography , we have a detailed guide that covers the best options for Nikon mirrorless and DSLR cameras.

Sony Lenses
When choosing the best Sony lenses for travel photography, consider weight, versatility, and image quality. Our top pick is the Sony E 18-105mm f/4 G OSS PZ , offering a wide zoom range, constant f/4 aperture, and effective optical stabilization in a compact design.
For APS-C cameras, the Sony E 35mm f/1.8 OSS is a great low-light prime lens. Its wide f/1.8 aperture and built-in stabilization help capture sharp images in dim settings. The Sony FE 50mm f/1.8 is an affordable and versatile prime for full-frame cameras, ideal for portraits and everyday shots.
Other notable lenses include the Sony FE 24-105mm f/4 G OSS for its all-in-one zoom capabilities and the Sigma 18-50mm f/2.8 DC DN | C for its fast aperture and compact size. To learn more about the best Sony lenses for travel photography , check out our in-depth guide.

Travel Tripods
A travel tripod is a must-have for any photographer on the go. The best travel tripods are lightweight, compact, and easy to set up. They also need to be sturdy enough to support your camera gear.
Our top pick is the K&F Concept Lightweight Travel Tripod . It weighs only 2.4 lb but can hold up to 17.6 lb of gear. The aluminum ball head gives you great flexibility for positioning your camera. And the included carry case makes it easy to take with you anywhere.
If you want to learn more about choosing the right travel tripod , check out our detailed guide. It covers everything from key features to look for to our top recommendations in different price ranges.

Travel Camera Backpacks
When choosing a camera backpack for travel, protection and comfort are key. The best bags are well-designed, roomy, and easy to carry.
Our top pick is the Manfrotto PRO Light Multiloader Backpack. It’s sturdy, spacious, and very adaptable. You can use it as a backpack, duffel, or sling. It has access from the front and both sides.
The Wandrd Duo Daypack is another great option. It’s made from quality materials that protect your gear from the weather. It has ample storage and the main zipper allows quick access to your camera.
If you want to learn more about the best camera backpack for travel , check out our detailed reviews. We’ll help you find the perfect bag for your next adventure.

Manfrotto PRO Light Multiloader
The Manfrotto PRO Light Multiloader Camera Backpack is a top choice for photographers. It has a sturdy design and plenty of space for your gear.
The backpack is comfortable to wear, even when fully loaded. You can easily adjust it to fit your body.
This bag is perfect for any photography adventure. It’s a worthwhile investment for serious photographers looking for a reliable way to carry their equipment. To learn more about the manfrotto pro light multiloader, check out the full review .

Think Tank Airport Essentials
The Think Tank Airport Essentials is a camera backpack made for air travel. It has a smart design, useful features, and fits as carry-on luggage.
This backpack offers secure storage with an efficient use of space and a special lock. The lifetime warranty makes it a one-time investment for years of use.
While it lacks some versatility, the Airport Essentials excels at storage capacity, protection, and style. Photographers who want a Think Tank Airport Essentials for their travels will find this bag a great choice.

Weatherproof Backpacks
Protecting your camera gear from the elements is essential. Weatherproof camera bags offer peace of mind when shooting in unpredictable conditions. They feature robust materials and coatings that keep water out, even in sudden downpours.
Our top picks, the Wandrd Prvke , Wandrd Duo , and Lowepro Freeline , have impressive exterior materials that don’t need a separate rain cover. The Prvke’s roll-top design is commonly used in waterproof bags, while the Duo and Freeline include waterproof zippers to secure even the weakest points.
When choosing a weatherproof camera bag , consider not only its water-resistant abilities but also its functionality for your photography style. Look for features like easy access points, ample storage, and comfortable carrying options that suit your needs.

A camera hard case is the best way to protect your photography gear while traveling. The Pelican Air 1525 is our top choice, with its tough exterior and foam-padded interior that keeps your equipment safe and secure. It’s spacious enough for your camera and accessories without being too bulky.
The Vanguard Supreme 46F is another excellent option, especially for adventure travel. It’s waterproof down to 16.5 ft (5 m) and can withstand temperatures as low as -40°C. The customizable Pick ‘n’ Pluck foam interior ensures a snug fit for each item.
For convenience, the Nanuk 935 is hard to beat. Its retractable handle and wheels make transportation a breeze, while the padded dividers keep your gear organized and protected. If you’re looking for a camera hard case that combines durability and ease of use, the Nanuk 935 is a great choice.

Travel Apps
Travel apps can make your photography adventures easier and more enjoyable. Snapseed is a powerful photo editor with a wide range of tools, from basic adjustments to creative effects. It’s free and available on both iOS and Android.
VSCO is another popular editing app that offers a simple, streamlined experience. Its presets are based on real film stocks, giving your photos an authentic vintage look. You can also use sliders to fine-tune the exposure and add fade or grain effects.
When you’re ready to share your travel photos, consider using Spot. This app helps you find picturesque locations and share your own discoveries with other photographers. With detailed maps and tips, it’s a great way to explore new travel photography destinations .
Editing Travel Photos
Editing your travel photos can take them to the next level. There are many techniques you can use to improve your images, from simple adjustments to more advanced processes.
Cropping is a quick way to remove unwanted elements or zoom in on important parts of the photo. Sharpening will make details pop, while noise reduction can clean up high ISO shots. Straightening the horizon line is also important for a polished look.
Other useful techniques include adding a vignette to draw the eye, adjusting saturation and contrast, balancing highlights and shadows, and using digital blending for challenging lighting. For an extra level of refinement, you can even remove unwanted objects.
With practice, you’ll learn which editing steps work best for your travel images. If you’d like to dive deeper into editing travel photos , there are many great resources available.
Location Guides
Whenever you’re heading off somewhere new, it’s always best to do some research before you go. Your preparations will be more thorough and more specialized when you have a better idea of what to expect. That means you can hit the ground running when you arrive, and you’ll get better results.
We have a collection of location guides for some travel photography hot spots. These posts give you a head start when taking pictures in these locations, helping you get unique shots in popular places.
Let’s drop in on a few of the hottest locations in Europe, Asia, and the US.
European Cities
Europe is a photographer’s dream, with its stunning architecture, charming villages, and beautiful countryside. From the centuries-old buildings to the cobblestone streets, there’s no shortage of photo opportunities.
Some of the best European cities for photography include Amalfi, Italy, with its medieval stories and dainty houses; Venice, Italy, known for its canals and seafood; and Dubrovnik, Croatia, a seaside location with picturesque houses and Game of Thrones filming locations.
Other notable cities include Prague, Czech Republic, with its historic buildings and Gothic churches; Oia, Greece, with its stunning white buildings and sunsets; and Amsterdam, Netherlands, full of incredible art and historical monuments.
Whether you’re interested in architecture, landscapes, or street photography, these European cities offer endless inspiration. To learn more about the European cities for photography , check out this in-depth guide.

Paris is a photographer’s dream, offering countless opportunities to capture stunning images. From the iconic Eiffel Tower to the charming streets of Montmartre, there’s no shortage of beautiful subjects to photograph.
One of the best spots for photography in Paris is the Trocadero, which offers a perfect view of the Eiffel Tower. The Champs Elysee and Arc de Triomphe are also must-see locations, with the latter providing a great vantage point for capturing the city’s skyline.
Other notable photo locations include the Louvre, with its striking glass pyramid, and Notre-Dame Cathedral, which offers both interior and exterior photo opportunities. It’s still striking even after the fire damage.
For a taste of modern Paris, head to La Defense, the city’s business district filled with skyscrapers and unique architecture.
To learn more about Paris photography , check out this in-depth guide that covers the best locations, tips, and techniques for capturing the city’s beauty.

London offers plenty of photography opportunities, from cityscapes to street photography and architecture. Some of the best locations include the Palace of Westminster, where you can capture iconic photos from Westminster Bridge or the south bank of the Thames. Tower Bridge is another well-known site, offering great angles for traffic light trails and sunrise photos.
The London Eye is a newer addition to the skyline, perfect for creative shots like zoom bursts or portraits inside the capsules. Don’t miss the photogenic wrought iron roof at Borough Market, or the beautiful exterior of St Paul’s Cathedral.
For stunning views, head to The Shard, the highest skyscraper in the European Union. Buckingham Palace is a must-see, especially during the Changing of the Guard ceremony. If you’re interested in photography in London , these locations are sure to inspire you.

Rome is a photographer’s dream, with stunning architecture, rich history, and vibrant culture around every corner. From the iconic Colosseum to the beautiful Trevi Fountain, there are countless opportunities to capture breathtaking images.
Don’t miss the Vatican Museum, where you can photograph the famous spiral staircase. The Pantheon’s exterior and interior are equally impressive, especially during the blue hour. St. Peter’s Basilica offers great views of the city and a chance to capture the Pope if you’re lucky.
The Tiber River provides picturesque views, particularly from Ponte Sant’Angelo towards St. Peter’s Basilica. Piazza Navona and Piazza del Popolo are perfect for street photography and capturing traditional Roman scenes. To learn more about the best spots for Rome photography , check out this in-depth guide.

Venice is a photographer’s dream, offering endless opportunities to capture its unique beauty. The best time to avoid crowds and oppressive heat is during the low season or early morning. Sunrise at Academia Bridge provides a stunning view of the Grand Canal, while Piazza San Marco is best photographed before tourists arrive.
Don’t miss the iconic gondolas along the waterfront near Piazza San Marco, especially during sunset and blue hour. For a different perspective, head to San Giorgio Maggiore island to photograph the church and Venice’s skyline at golden hour.
Explore the backstreets of San Polo and Dorsoduro districts for charming piazzas, decaying architecture, and canal scenes. Murano and Burano islands offer colorful buildings and glassmaking demonstrations perfect for photography. To learn more about Venice photography , check out this in-depth guide.

Budapest is another fantastic city for photographers, offering endless opportunities to capture stunning images. From the grand architecture of the Hungarian Parliament Building to the thermal baths of Széchenyi, there’s no shortage of photogenic spots in this beautiful city.
One of the best places to start is the Fisherman’s Bastion, a neo-Gothic terrace with breathtaking views of the Danube River and the Pest side of the city. Nearby, you’ll find Matthias Church, a stunning example of Neo-Gothic architecture that’s perfect for capturing intricate details and beautiful stained glass windows.
For panoramic views of the city, head to Gellért Hill, where you can capture the entire skyline from the Citadella fortress. And don’t miss the iconic Chain Bridge, which looks particularly stunning at night when it’s lit up against the dark sky. To learn more about the best spots for Budapest photography , check out this in-depth guide.

Japan is a brilliant destination for a photography trip. From stunning landscapes to interesting architecture and fascinating culture, there’s no shortage of inspiration for your travel photography.
Capture the vibrant cityscape of Minato, one of Tokyo’s special wards. Improve your food photography skills at Japan’s many cafés and restaurants, where every dish looks like a work of art. Take adorable photos of tame deer in Nara Park or sharpen your landscape photography in Hakone, with its hot springs, views of Mount Fuji, and gorgeous lake.
Don’t miss the breathtaking cherry blossoms in Japan’s parks during sakura season, usually from January to April. Visit the magical Blue Pond in Biei, go on an adventure in Kyoto’s Bamboo Grove, or document the commercial side of Japan in Shinjuku. For more inspiration on Japan photography , check out our in-depth guide.

Tokyo is one of the world’s most vibrant locations, offering a diverse range of subjects to capture. From the bustling streets of Shinjuku and Shibuya to the traditional temples of Asakusa, there’s no shortage of incredible hot spots to explore.
For those seeking modern architecture and vibrant city life, the Tokyo Skytree and Roppongi Hills Mori Tower provide stunning views of the skyline. Harajuku, the heart of Tokyo’s youth culture, is perfect for street photography and capturing unique fashion trends.
If you’re interested in learning more about Tokyo photography , there are many resources available to help you plan your trip and find the best spots to shoot. With its mix of old and new, Tokyo is a city that will inspire and challenge you as a photographer.

Etiquette in Japan
When taking photos in Japan, it’s important to be respectful and follow proper etiquette. Always ask for permission before taking someone’s photo, especially if you plan to share it publicly. If you can’t get permission, blur the person’s face to protect their privacy.
Be prepared to show your photos to the police if asked, and avoid using selfie sticks in crowded areas to prevent injuries. In cafés and restaurants, ask the staff for permission before taking photos of your meal.
At night, skip the flash and use a higher ISO and tripod to capture vibrant neon lights. Avoid taking photos in no-photo areas, of children without parental consent, geishas, people on public transport, and those in the middle of prayer. For more tips on photography in Japan , check out this in-depth guide.

Los Angeles
Los Angeles is a street photographer’s paradise. From the colorful Venice Beach boardwalk to the iconic Griffith Observatory, there are endless opportunities to capture the city’s unique character.
The Santa Monica Pier is a must-visit spot, especially in the evening when the lights come on. Echo Park offers stunning views of the skyline, particularly at sunrise or sunset.
Downtown LA is full of hidden gems like the Bradbury Building with its intricate architecture and the bustling Grand Central Market. For a taste of old Hollywood glamour, head to Union Station or the Hollywood Bowl Overlook. Places for street photography in Los Angeles are as diverse as the city itself, so grab your camera and start exploring.

New York City remains one of the most popular locations for photographers, with countless iconic locations to capture. Central Park offers a variety of scenes, from the Bethesda Terrace and Fountain to the Alice in Wonderland statue. The Brooklyn Bridge is another must-see, with its stunning suspension cables and brick towers.
Grand Central Station and the Chelsea Market are great for street photography and architectural details. The Rockefeller Center provides both street-level interest and panoramic views from its observation deck.
Of course, no trip to New York would be complete without photographing the Empire State Building and the Statue of Liberty. For breathtaking cityscapes, head to Brooklyn Bridge Park or find a unique vantage point to capture the Manhattan skyline. Don’t miss the Flatiron Building and the vibrant energy of Times Square.
To learn more about the best spots for New York photography , check out our in-depth guide.

Photography Road Trip
Planning a road trip for photography involves choosing the right vehicle, deciding on accommodation, and mapping out your route. Your vehicle should be safe, comfortable, and suitable for the terrain you’ll encounter. Living out of your vehicle, like an RV or camper van, allows you to stay closer to photo locations and immerse yourself in nature.
When planning your route, prioritize the locations you want to photograph. Research potential spots using apps and websites like Pinterest, 500px, Flickr, and Google’s My Maps. Plot your route, campgrounds, points of interest, and photo locations to make the most of your trip.
Electricity is essential for photographers on the road. Ensure you have reliable power sources, such as a dual battery system, solar panels, or a 12v inverter. Always carry a power bank as a backup. To stay connected, use local sim cards with data or take advantage of Wi-Fi at cafes and fast food outlets.
By planning your shots in advance and considering factors like lighting, crowds, and unique perspectives, you can capture stunning images that tell the story of your road trip photography adventure.

Inspiration from the Best Travel Photographers
Travel photography captures the adventures and locations you visit during your journeys. It involves many genres like landscape, architecture, street, and environmental photography. Travel photographers often tell stories through their images, focusing on special moments and atmospheres.
There are many approaches to travel photography. You can focus on people, take self-portraits, emphasize landscapes, or try aerial photography. Mixing these approaches can result in a unique style and help you gain recognition as a travel photographer.
If you’d like to learn more about travel photographers , we have an article that goes into greater depth on the topic.
Travel Blogs
Travel photography blogs are a great source of inspiration for your next adventure. They feature stunning images from around the world and provide useful tips for capturing your own travel photos.
Some of the best travel photography blogs cover a wide range of topics, from destination guides to photography tutorials. They showcase the work of talented photographers who have explored every corner of the globe.
Whether you’re planning your next trip or simply looking for some armchair travel, these blogs are sure to inspire you. To discover some of the best travel photography blogs to follow in 2024, check out this list of top picks.

30 Travel Photography Tips: Take Better Travel Photos (and Look Good in Them Too!)
Whether you are a traveler extraordinaire who hopes to take better travel photos , you want to explore the world of posting on social media, you are a mom who snaps pictures of her family wherever you go , OR you want to UP your adventure photography game, learning a few of basic tips will help to improve your photography skills AND the quality of your photographs.
Let’s get started.
Table of Contents
30 Simple Tips to Take Better Travel Photos
As an affiliate, I earn from qualifying purchases. This page may contain affiliate links. I would love your support through clicking on the links. Read the full disclosure here.

Here are a few simple tips to follow as you are traveling and learning how to take aesthetic photos —especially when you visit sites that are popular and everyone else wants to visit at the same time as you!
Aesthetic definition : (adj) concerned with beauty or the appreciation of beauty. Examples of beautiful objects are: landscapes, sunsets, humans and works of art .
1. Avoid Visiting Popular Sites at Popular Times
Maybe this isn’t the “popular” answer, but it is the obvious one.
To avoid visiting popular attractions at the busiest times, this tip might mean waking up early in the morning before crowds gather or visiting a popular site in the early evening when crowds begin to thin.
Not a morning person? Sometimes sacrifices have to be made to capture the best pic and take better travel photos!
Other busy times you may wish to avoid visiting popular sites:
- During holidays
- In the high season
- On a local holiday
- Around noon
- On the weekend
That being said, sometimes you just have to go with the flow and recognize that your shots might be full of 500 of your “new” best friends!
2. Avoid Crowds and Tour Groups if Possible
One of my golden rules for dining while traveling is to wander about five blocks away from the main tourist area and crowded dining options to find out-of-the-way restaurants where the locals might pop in for lunch or dinner.
The same can be said for learning how to take aesthetic photos. If you find that the main tourist areas are completely overrun with tourists AND with tour groups following a guide holding a brightly colored selfie stick, wander away from the crowds and discover the photos that show local life, Friday morning markets, and beautiful architecture.
You will be amazed at your ability to take better travel photos when you can slow down and enjoy the scene in front of you.
3. Be Patient
Have you ever looked at a photo on Instagram and wondered, “ How did they manage to take a picture without any tourists in it ? When I was there it was so crowded I could hardly keep track of my family!”
Patience, my friend. Patience.
…And having your camera ready to go the moment the last tourist walks out of your frame. That’s another idea for learning to take better travel photos.
Again, patience may not reward you with a tourist-free shot. Sometimes you just have to be okay with that.
>> Related : Romantic Instagram Quotes for Couples Who Love to Travel
4. Have Your Camera Settings Dialed In and Act Fast
Having patience leads to this tip: As you are waiting for a photo opportunity, make sure that you have ALL of your camera settings ready to go. Take a few test pictures while the crowds are milling if needed so you know that your shot will be perfect. Adjust for light, change angles, or zoom in.
Act fast once your frame clears.
This spot in front of of the General Sherman tree in the Sequoia National Park in California is often besieged with tourists wanting a memento in front of the giant sequoia tree and the sign.

To capture a “tourist-free” photo of the tree, be ready for the break in the crowd and then snap away. You may only have 2 seconds. Again, have your settings ready to go so that you know the shot will turn out the way you want.
>> Related: 20 Epic Outdoor Adventures in Yosemite National Park
5. Have Your Smartphone Ready as a Backup
This may take a little fancy handwork, but have your camera open on your phone and easy to reach if you are switching between a DSLR. If you find you just can’t get the lighting right or need to shoot from a higher angle to take better travel photos, use your phone’s camera.
Don’t be afraid to use your phone for pictures.
Cameras on newer phones offer sophisticated and advanced technology for all of your travel and adventure photography.
6. Edit Your Photos Later
Edit, edit, edit.
There are free apps for your phone or even desktop options such as Adobe Photoshop or Lightroom where you can crop and remove people from your photo. A little bit of magic to help you take better travel photos.
If you have never used the Adobe products, there is a learning curve associated with those programs.
My tip : Straighten your photos. This is especially apparent if you are taking photos of the ocean. Be sure to straighten the horizon before posting online.
7. Stand So People in the Background are Hidden from View
Sometimes it will be simply impossible to wait for all of the people to clear from your shot to take an amazing travel photo .
If you can, place your subject (you, a family member, friend, or travel partner ) strategically in front of people in the distance.
Voila! It looks as though the street is empty AND that you have mad photography skills!
8. Take Day Trips to Less Popular Destinations to Take Better Travel Photos
The touristy experiences in the bigger cities, such as Rome and Venice and Paris, are great so you can say, “I’ve been there!”, but sometimes getting outside of the city and away from the crowds is awesome.
Day trips to smaller, out-of-the-way towns and villages, such as Orvieto in Italy or Riquewihr in France, can be just as magical and picturesque.
>> Related: 7 Instagram Worthy Villages in the Cotswolds
9. Simply Ask People to Move
You will find that most people will move when they see you waiting with a camera in hand to take a picture.
Sometimes you’ll just have to ask people to move and they are happy to do it. Other times, there’s no rushing some people and they are going to stand in that spot for as long as they want. Dang it! (If this is the case, you can go back to the “ be patient ” point, you can change your angle, you can try again later, or you can just move along.)
10. Use the Crowd in Your Shot to Take Better Travel Photos

Recognize that sometimes you just aren’t going to get the “tourist-free” shot of your dreams when you are planning how to take aesthetic photos of a destination.
For example, the Piazzale degli Uffizi in Florence outside of the Uffizi Museum is often overcrowded with tourists. You may wish to have all of the tourists move out of the way for you to capture the amazing architecture in the foreground and the buildings in the background, but sometimes wishes don’t come true.
Take the picture anyway.
>> Related: Best Things To Do In Florence, Italy
Tips for Looking Awesome and Taking Pictures of YOU!
11. wear colors that pop.

Do you know what colors look best on you?
Choose bright colors that enhance your skin AND make your photos POP with color when you travel.
It may be as simple as wearing a brightly colored scarf.
Consider your destination and make color choices based on it. For example, if you’re at the beach, wear something besides blue so that you stand out from the color of the ocean.
>> Related: 27 Instagram Worthy, Insanely Colorful Destinations Around the World
12. Learn How to Pose to Show Your Best Side
- Move to good lighting
- Slightly push your butt out behind you to show a slimmer torso
- Bend your arm to create space between your arm and your body
- Turn your body 45 degrees toward the camera
- Turn your face so one ear is closer to the camera and slightly tilt your chin down
- Lean forward from the waist just a touch
- Stand tall, don’t slouch. Watch your posture. Sit up to elongate and slim your waist
- Put one foot forward—put most of your weight on the foot in the back
- Show movement—walk, twirl, look away from camera, grab your sunglasses, tuck your hair behind your ear
- Be confident
- Take candid shots
- Use props and have some fun

13. Use a Tripod
While not one of your essential photography gadgets, you may find that a tripod for your camera or your iPhone comes in handy for family photos, still shots, selfies and travel and adventure photography.

The GorillaPod might be a great inbetween tripod if your camera and lens fit the 6.6 pound weight specification.

14. Use a Selfie Stick to Take Better Travel Photos of You!
In a world with camera phones, it is a simple task to ask your travel partners or even a stranger to take your picture.
If you go on vacation and return home without a single photo of you, hand over your camera next time or consider investing in a selfie stick.
How to Take Aesthetic Photos: Follow the Rules of Composition
If you are a new photographer and are feeling a little overwhelmed as you learn to master your camera and take better travel photos, take heart. It takes a lot of practice. The amazing thing about digital cameras is that you can take as many photos as you like , delete as many photos as you don’t like, and continue learning each time you venture out with your camera to take better travel photos.
Following a few rules of composition will enhance your photos.
15. Consider the Light
Use natural light as much as possible in your photographs. Natural light generally refers to any light created by the sun (or the moon).
While it would be nice to say, “Avoid the sun at midday,” sometimes you just can’t as you are traveling. What can you do in such a situation?
- Use a lens hood
- Try to find shade
- Make a point to come back to the spot in early morning or early evening
- Have your subject turn their back to the camera
- Take advantage of the shadows cast by your subject and be creative
- Shoot from a different angle
Good lighting is essential to your photographs when you are trying to take better travel photos.
Quick Tip * Do you ever wonder where the ideal position is to have your subject stand in relation to the sun? Have them stand so that when you as the photographer are facing them, you see their shadow between you and them.
16. Use the Rule of Thirds To Take Better Travel Photos
Imagine that your screen (view finder) is divided into a grid of 9 equal sections when you frame your shot. For the most dynamic and natural photos, move your subject away from the center of the photo and place them along one of those vertical lines or where the points intersect.

You can turn ON the “GRID” option in your camera app or camera settings to visually see the grid as you take pictures. After practice, you will naturally begin to use the Rule of Thirds in your photos and take better travel photos.

Now, this is not to say NEVER CENTER YOUR PHOTOS! There is a time for centering your subject when you wish to create symmetry. But to generally achieve a more natural-looking photo, learn to use the Rule of Thirds.
17. Try Not to Have Objects Sprouting Out Of Your Subject’s Head

Photography skills 101: If you look at the composition of your photo and notice that there is a flagpole or a sign or an architectural feature that extends smack above your subject’s head, have them move a little to the left or the right.
18. Use Natural Frames

Framing is a compositional technique in photography that draws the viewer’s eye to the most important feature in your photo and creates a frame around the subject. Using frames adds more dimension to your photo.
You can achieve this framing technique using windows and doors, an arched entryway, trees and bushes, a tunnel…even an umbrella.
Once you start finding objects that can create a framing effect, you’ll begin to see them everywhere.
19. Find Leading Lines as You Compose Your Photo

Using leading lines to take better travel photos is where you basically use lines from a feature in your photo to direct the viewer’s eye toward the main story, subject, or intent within the photo. Leading lines moves the attention from one element to another.
Examples of leading lines:
- Railroad tracks
- An aisle in a church
- Architectural feature
>> Related: 15 Breathtaking Hikes in Colorado
20. Shoot from a Creative Angle

The effort to take better travel photos may simply mean taking a picture from a different perspective. This may involve shooting up from a lower angle or looking down from a higher vantage point.
Move away from always trying to see your subject eye to eye. Crouch down to a child’s level, stand on your tiptoes, or hold your phone above the crowd to capture a new perspective.
If your children are playing at a play park, try standing under them as they climb the structure or above them as they as play below.
21. Try to Capture a Reflection
Some of the coolest photos come from capturing a reflection of your desired subject.
Did you know that some photographers travel with a water bottle for this very purpose? They create a puddle on the ground in front of an architectural tourist site and take a shot of the reflection in the water.
You can also look for reflections after a rain shower, in a river or body of water, or even in a pair of reflective sunglasses.

22. Focus on the Eyes
Think back to the Rule of Thirds compositional tip. An important point when photographing people is to make sure that the subject’s eye that is closest to you is on one of those points. That is where you camera focus should be as well.
Focusing on the eyes ensures that the viewer engages with the eyes, after all “the eyes are the window to the soul.”
23. Make Sure Your Focus is Spot On
How many times have you taken a picture only to find later that it is out of focus or focusing on the wrong thing? Practice. Practice. Practice.

24. Look for Contrasting Colors

If you are visiting the beach, wear a color that pops against the color of the ocean. If you are in the mountains, zoom back a little to capture some of the bright blue sky to add extra dimensions. Even fall color pops more with the contrast of a little blue in the sky.
Adventure Photography Skills to Take Better Travel Photos
25. learn the basics of your camera.
If your goal is to improve your adventure photography skills AND take better travel photos, find a course that teaches the basic principles of photography. Find someone that teaches in a style that resonates with you.
Understanding ISO, Aperture, and Shutter Speed and how they all work together sometimes takes effort to wrap your head around.
Many professional photographers encourage you to get away from shooting in Auto Mode and “focus” on shooting in Manual Mode. That’s where understanding ISO, Aperture, and Shutter Speed is essential.
If you are traveling and moving from one scene to another, one tip is to shoot in Aperture Mode and let your camera figure out the Shutter Speed. This helps when you are on the go and want to be able to compose a shot quickly.
You can still achieve some nicely composed and focused shots.
Beginner’s Bootcamp Photography Course
26. Practice
There’s nothing like good old fashioned practice to improve your skills over time. Practice on your family. Practice on your friends. Practice on inanimate objects in your garden. Practice with each trip you go on to take better travel photos and improve your photography skills.
Study photos that professionals have taken to discover the angles they shoot from, where they focus and how they use light to their advantage.
27. Take a Course to Learn the Features of Your Camera

If you are looking for a comprehensive course that starts at the beginning, Audrey Ann from Live Snap Love has some amazing photography courses to take.
PS. She offers some FREE cheat sheets too!
- Free Manual Mode Cheat Sheet
- Free Lightroom Starter Kit
- Free Aperture Cheat Sheet
- Free 90-Day Starter Kit
- Launch into Lightroom Course
- Auto to Awesome Course
Want to learn more about these courses? Discover the 5 Best Travel Photography Courses for Beginners .
28. Study Other Photographers

One of the best ways to improve your photography skills is to study other photographers.
Follow some of your favorite photographers on Instagram and discover the Instagrammable places they shoot around the world. If you know you will be traveling to the dreamy villages outside of Florence , see what others take pictures of.
- What time of day did they take the picture?
- Did they stand from above or below?
- Did they include people in their photograph?
- What creative angle did they use?
29. Research Instagrammable Places in Advance

If you spend time on social media or Pinterest, begin to take note of particular destinations and the Instagrammable places where people take pictures. Search for “ Instagrammable places of… ”
Captions for Travel Photos
Once you have captured the best travel photos, you may wish to post them on Instagram. Here are a variety of posts showcasing the best captions for travel photos:
- 75 Romantic Instagram Quotes for Couples Who Love to Travel
- 70 Inspiring Instagram Captions for Travel
- 65 Awesome Travel Quotes for Instagram
- 300+ Instagram Content and Travel Caption Ideas for Bloggers
10 Captions for Travel Photos that Combine Photography and Travel:
- “You can always take a great photo—no matter what the conditions.” – Steve Davey
- “The whole point of taking pictures is so you don’t have to explain things in words.” – Elliott Erwitt
- “Travel photography is really a way of life: a way of traveling.” – Steve Davey
- “Having a camera around your neck gives you a good excuse to be nosy.” – Martin Parr
- “The most valuable things in life are a man’s memories. And they are priceless.” – Andre Kertesz
- “Take only pictures, leave only footprints.”
- “I think of myself as an explorer who has spent his life on a long voyage of discovery.” – Paul Strand
- “Never stop looking, no matter where you are, everywhere there are good photographs.” – Art Wolf
- “If you want to be a better photographer, stand in front of more interesting stuff.” – Jim Richardson
- “The real voyage of discovery consists not in seeking new landscapes, but in having new eyes.” – Marcel Proust
30. Book a Photography Tour
There are plenty of walking tours around the world, and many have options for photography tours as well.
My Favorite Camera Equipment
If you spend any time on social media, you may encounter people who are passionate about their brand of camera. There has long been a debate about which camera brand is the best—Sony, Canon, Nikon, etc.
The answer? Whatever camera you have with you !!!
Point and Shoot Camera

Underwater Camera

Mid-range DSLR

Just remember, you don’t have to travel with ALL of your photography equipment. Pack lightly. Take only the essentials. That may mean your camera body and one possibly two versatile lenses and a few accessories. Here are a few ideas for you to consider.
A go-to lens for the Canon T8i is the Canon EF-S 18-135 mm f/3.5-5.6 with image stabilization. It is perfect for all of your domestic AND international adventures. The Canon T8i (in the Canon Rebel Line) is a perfect beginner’s camera.

If your skills have improved and you are looking to upgrade from a T-series camera to a Canon 6D Mark II or similar DSLR, note that you will also need to upgrade your lenses from the EF-S line to the EF lenses such as this lens: Canon EF 24-105mm f/4 L IS USM Lens

Upgrading is an important consideration, as the photography hobby comes with some expensive photography gadgets and equipment!
The good news, the relatively inexpensive Canon “ nifty fifty ” lens—an EF lens—works with both camera bodies. (Be sure to pick the nifty fifty lens suited to your brand of camera).

Nowadays, with the advances in smartphone camera technology, the best camera might just be in your back pocket!

There are tripods that are small and flexible for travel, but if you are traveling solo (or even with a group), you may wish to have the added benefit of the Fugetek selfie stick in your travel gear .
The selfie stick a handy gadget complete with an iPhone and Android compatible camera stand. The stick can extend in height with an easy click-in lock and comes with a removable remote for easy one-step operation. The tripod features non-skid feet for your selfie stick to become a stand alone device.
The Canon Wireless Remote Control is a handy photography gadget that is lightweight and small. It allows you to take “selfies” with your DSLR!

Or, if your hands are full holding reflectors or if you are using a tripod, you can easily set up your camera on the remote setting and enable the remote control.
There is a specific camera setting !
Don’t forget to change the setting on your camera!
There is a debate in the photography community as to the need or value of Lens Filters. For certain types of photography, filters are essential in achieving a specific look and feel to your photos.

A UV Protected Lens Filter can be a protection to your more expensive lenses.
Be sure to purchase the correct size of filter for your lens.
While you often hear about the “golden hours” in photography, it isn’t always practical to only shoot at the first light of the morning or in the waning hours of the evening for the best light.

As you travel, you are shooting and sightseeing all day long and need to account for the sun as best you can. A Lens Hood can help you to take better travel photos during the daytime hours.
The lens hood blocks the direct sunlight from hitting the lens and allows you to take better travel photos in the bright light of the day.
Again, be sure to purchase the correct size for your lens.
Extra Memory Card
Be sure to have sufficient memory in your SD Cards . If your travel extends for an extended length of time, invest in a card with enough space for all of your vacation photos.

Having a backup card isn’t a bad idea either.
Camera Battery & Charger

Not only should you have a back up SD card as part of your photography gadgets, but having a back up Camera Battery along with your Battery Charger is a good idea.

An improvised backpack rain cover fashioned from plastic bags may work to cover your backpack and keep your camera and photography gadgets dry in a pinch. Invest in a Waterproof Backpack Covers for future rainy days.

Frequently Asked Questions
What makes a great travel photo.
Anyone can take a nice picture of the Eiffel tower. To elevate your photography skills and take great travel photos, you will need great light and excellent composition. Learn those skills to give your photography skills an edge.
What is a good quote of traveling and photography?
“Sometimes I arrive just when God’s ready to have someone click the shutter. ” ~ Ansel Adams
Is a smartphone good for travel and adventure photography?
Yes. Your iPhone may just be your best travel camera. “While the image resolution and quality might be higher on a DSLR or other high-end camera, the iPhone wins hands-down on portability and convenience.” iPhonephotographyschool.com
Love this Post? Pin it!

Final Thoughts on 30 Travel Photography Tips to Take Better Travel Photos and Look Good in Them Too!
This is a brief overview of how to take better travel photos. The key, really, is to practice, practice, practice .
There is so much more to learn if you wish to master the features of your camera, and especially to move away from shooting in Auto .
All in the hopes that you will be able to take better travel photos.
And when you arrive home from your excursions, find creative ways to display the amazing photos you took on vacation.
Related Articles
- Travel Photos: 12 Creative Ways to Share and Display Them
- 15 Popular Photography Gadgets
- 11 Instagram Worthy Beautiful Lakes Around the World
- How to Best Journal Your Travels and Your Life
- 10 Great Reasons to Visit Paris
Share on Social Media

I’m a Colorado-based travel blogger with a passion for exploring the world, enjoying family time, and taking fantastic photographs. I am also a book writing, creative thinking, detail loving, frequent flying, comfort loving mom of three girls and wife to an amazing guy.
Similar Posts

Andaz Costa Rica: An Amazing 5 Star Costa Rica Resort

15 Reasons Why Outdoorsy People Love Boulder, CO in the Summer

40 Cool Things to Bring on a Cruise to Hot Tropical Places

11 Best Things to Do for One Day in Milan

Need Vitamin Sea? 10 Best Reasons for a Couple’s Beachside Getaway

20 Super Travel Resolutions You Can Make for 2024
48 comments.
Thanks for sharing, I really needed this article. These are some great tips. I already know about using the grid but for some reason, I still end up having photos in the center! It’s such a hard habit to break.
Great tips! I definitely try to avoid popular spots at popular times, because I am definitely not an expert at editing people out of my photos. I also really would like to start taking photos with a camera and not just a smart phone, I think that’s a great way to step up my photography game!
This is a super helpful guide! I try to use a lot of these techniques when I take photos too, but you also taught me something new with the use of the grid on your phone camera – great idea! I also swear by my selfie stick/tripod; it really comes in handy for those couple shots. Xx Sara
This is such a useful guide! I definitely need to work on my patience more as I’m not an expert at removing people from shots with software. Even using a grid, I always end up with focal points in the centre, but I guess that takes practice to break that habit. Also, love the tip on the lighting shadow direction!
Great tips Jolayne! I agree with all of these – and above all, be patient haha! Avoiding group tours is another big one for me, where possible! I’m a huge fan of Adobe Lightroom for editing. Thanks for sharing!
Patience is a virtue, especially when traveling.
Interesting idea to use the grid to take photos! Patience is definitely key when you’re trying to get photos in busy spots. We always get at least one person walking into the photo who doesn’t seem to notice we’re taking photos.
This is a fantastic post! I think so many of us are looking to up our photography game and guides like this definitely help 🙂
Thanks so much. I know I can always use helpful tips.
These are some great tips! I’m always looking to take better travel photos so I’ll be sure to test out your suggestions! And it is a good reminder that I need to spend some time getting to know my new camera too! So far it is stuck on manual mode! Thanks for the great guide!
Love all these tips! I use the Grid on iPhone camera all the time – it really helps!
It is pretty handy even if it is just a reminder.
I wished I could just ask people to move aside sometimes, but I’m so socially awkward I almost always NEVER say anything hahahah.. I like the tip about just working them into your composition though! Definitely a creative alternative way to just make the situation work for you and I’m gonna keep that positive attitude with me the next time I’m out there!
These are some great tips! I always try to get to touristy spots during off-times exactly for this purpose. I’m not a professional photographer but I can at least try to not have a bunch of people in my pictures haha
So many great photo travel tips! I especially like the ones for take better photos of yourself!
So sorry for your loss. Keep practicing on the photography and editing and you will find improvement.
A really comprehensive post, very useful. I’ve definitely suffered from photo frustration, where my mind- and even my eye- can see the capture I want but I can’t master my camera/ timing/ settings to quite get it. Practice for progress, I suppose!
On a different note, I’m glad to see the humble selfie stick getting a mention. I think they got a bad reputation at one point but used with consideration- a great tool.
WOW! This is a very comprehensive list with tons of great advice. Would be useful for everyone regardless of their skill level.
These are some great tips! I especially like the ideas for posing and wearing colors that pop.
We all want to look fantastic in our pics right?
Great tips! I am a big fan of avoiding crowds and shooting early in the morning when possible. I also love the idea of wearing items that pop – it’s great to think about contrast when shooting.
Haha i love the bit about be patient, but also simply ask people to move. So true!
Patience is a virtue as a photographer.
This guide was SO helpful! Thank you! I really appreciated the tip about shadows.
Thanks. I always love to learn more about photography.
Wait, you mean people DON’T like to see things coming out of their heads in photos?! Just kidding, but truly, that was a tip that I used to never think about, LOL! Great ideas, and beautiful photos.
Wow! Some great tips here. Thank you for sharing.
Great tips – I omitted a lot of these on my own photography tips blog so really appreciated the depth of information you put together 🙂
Thanks so much.
I love your photos! I have to start using my selfie stick!
Thanks. I am photography junkie. Just can’t help myself.
Love this post! I love taking photos and slowly but surely getting better at doing so over the years has been so rewarding. Great read <3
I like the rule of thirds– I have started using this recently and the composition is so much better!
It is where you eye tends to focus
Thanks for these helpful tips, Jolayne! Will have to try putting some of them into practice ?
Lots of great advice. I love taking photos when I’m traveling, I just need to practice with not making them on auto. We had the general Sherman tree without others since we visited at the end of April. There was another couple and we took pictures of them and they of us.
Very useful guide as I have a trip coming up! I was especially interested in the lens you recommended. Thanks!
Very helpful tips. Thanks for sharing your favorite camera equipment. That’s very helpful!
You certainly demonstrate a deep understanding and expertise. The images are mesmerizing and simply awe-inspiring. The autumn shades of the trees, in particular, capture my heart. It’s as if the leaves are giving a standing ovation to the changing seasons!
Great tips. We are constantly taking blurry pictures while running. Advice for being patient is definitely key.
Great Post! I bought myself a camera as a Christmas present a few years ago and I’m scared to death of it. So many settings to navigate through. I definitely need to take a class to get some of the basics down. Lots of great information here. Thank you!
Really some great and some easy-to-implement tips in this post! Thank you for putting this together.
Great post. Mastering photography is on my to-do list.
So many great tips here! And I definitely need to start practicing how to take better photos of myself, LOL!
Great and detailed post. This will definitely help our followers!
Great post! Definitely will give this a closer read later. I consider myself a decent amateur photographer, so really appreciate all the info and great tips!
You have some lovely photos on this post. I find these tips very useful and will try to remember them the next I am out and about. Thanks for sharing!
Awesome post!! Needed this reminder as a content creator
Leave a Reply Cancel reply
Your email address will not be published. Required fields are marked *
Save my name, email, and website in this browser for the next time I comment.
This site uses Akismet to reduce spam. Learn how your comment data is processed .

Improve Your Travel Photography (15 Tips for Better Pictures)
Prepare to take better travel photos before you leave.
We’ve all grown impatient and expect to be able to figure out equipment just by using it. But I think that’s a mistake. If you want to improve your travel photography, you have to be familiar with the features of your camera and phone. Some are buried in menus, not at all obvious at first glance.
When did you last read the manual or watch videos about the functionality of your camera or smartphone? How many of the features are you missing out on?
Knowing how to use all the important features of your camera is the first step to improving your travel photography. So, now is a good time to read the manual.

Did You Just Get a New Camera?
Sometimes people buy a new camera right before a trip.
If that’s you, read the manual, take your new camera out and shoot for a while, to get the feel for the features. Don’t miss great travel shots because you didn’t know your camera.
Make Sure You Have Enough Memory Cards, Batteries, and a Charger
If you’re shooting with a DSLR or mirrorless, carry at least one spare battery. It’s surprising how fast they can drain, especially if you’re in a cold environment.
Remember to bring your battery charger and a few extra memory cards. It’s up to you whether you bring your laptop to transfer your files or keep them on the memory cards until you get back home. (I bring my laptop plus a backup drive to clear off my cards every night.)

Take a Camera or Just Your Phone?
A few years ago, this wasn’t a serious question. But now, you can get incredible photographs and videos using just a smartphone.
Today’s phones have far more amazing technology built-in than the newest cameras. The camera companies need to wake up or they’ll soon lose their business.
Smartphones give you:
- Detailed low-light images with less noise
- Sharp hand-held long exposures due to image stabilization technology
- Audio that zooms in with video
- Built-in software for editing photos and video
So, the choice is yours. Travel light with just your phone, or take you DSLR or mirrorless camera.

Get Into Manual and Out of Auto Mode
Yes, all cameras have Auto mode where the camera tries to do the work for you. Sometimes the results are fine, but mostly, they could be better.
Ideally you should be shooting in full Manual or Aperture Priority mode to gain much more control.
Although it’s confusing and intimidating at first, with a bit of practice, shooting Manual will become second nature to you.
If you’re looking for help, I’d recommend John Greengo’s course, Fundamentals of Photography as the perfect place to start. This is the course I bought years ago, (it’s been updated since then) and I still refer to it from time to time. I’ve bought other courses, but find this one the most useful. Here’s what’s included:
- 107 Video lessons in HD
- Over 24 hours of class content
- Lifetime access, anywhere, anytime
- Streaming and offline access on desktop and mobile
What I really like about this course, is that it’s broken down into the separate lessons which are clearly titled. So, when you want to learn about a specific topic or just refresh your memory, you go to that video and the associated documents.

Learn How to Use a Photo Editing Program
If you’re wondering why other people’s photos look so much better than yours, one of the reasons is that they have been edited in programs such as Adobe Photoshop or Lightroom .
If you’ve been using JPEGs right out of your camera or phone, learning how to edit will be a big step up.
There are many choices for photo editing software: free or paid, mobile or desktop or online service.
The most comprehensive image editing app with the steepest learning curve is Adobe Photoshop. It’s what the pros use. If you want to learn, here’s a great and inexpensive Photoshop for Beginners course from CreativeLive .
The most popular professional photo editing software is Adobe Lightroom, which can be used together with Photoshop. You can get access to both for about USD $10 a month. There are some things Lightroom can’t do, but if you want to start editing at a professional level, it’s a good choice. It’s available for desktop and mobile.
The most popular photo editing software for smartphones is Snapseed, available on Google Play and the Apple App Store . Although not regarded as professional level, it is loaded with features that make it worthy competition to Lightroom.
Just think of your original image as the raw material. Your edit is the rest.
There are of course many other editing programs, but I think that if you’re going to learn how to edit, you may as well start at the top. You’ll eventually want to move up to one of them anyway.

If You’re Editing Travel Photos, Learn to Shoot in RAW Format
DSLR and mirrorless cameras give you the option of shooting in RAW format. On the most recent generations of smartphones, there are setting for the native apps to shoot in RAW, and there is a wide variety of third-party apps.
A RAW image file is a big file that contains minimally processed data – it’s meant to be edited. On its own, it’s flat, unexciting. But it contains a wealth of information, and most importantly any editing you do on a RAW file is non-destructive. That means you can always re-edit to try different styles.
When you’re finished editing a RAW file, you’ll then save a smaller JPEG version (or a number of versions in various sizes if you like) that you can upload to social media or your website.
Keep in mind that RAW files are quite large and can fill up your memory quickly. So, you may want to transfer the files to the cloud, your desktop or an external drive.
By comparison, a JPEG file is already edited and compressed by the software in your camera or phone. You can further edit it in any program, but you have less information to work with, and any changes you make are permanent. So for example, if you crop an image, you’ll have lost the original, unless you made a copy before you started.
So, my recommendation is to learn how to edit RAW files. Sharper cleaner images, total editing flexibility, better printing quality. You’ll never go back.

Editing on Your Phone, Tablet or Desktop
Today, you can get all the leading editing apps for all platforms. That means, it’s really a matter of personal preference.
For me, I want as much screen real estate as possible, so I edit on a desktop. But others are very comfortable on a tablet.
I don’t know anyone who edits on their mobile, but that’s just me. I’m sure lots of people do, and you can’t beat it for convenience if you’re actually shooting on a phone. When I shoot on a phone, I transfer the shots to my desktop to edit.
Get Better Travel Photographs When You’re Alone
If travel photography is part of your vacation, and you’re with your partner or family, you need to negotiate a little time by yourself to take your photography up a notch.
You want time to find shots, try different angles, and maybe wait until the light is just right.
You can’t expect others to stand around while you’re lining up the perfect shot.
Perhaps you can get out before sunrise while they’re sleeping in or having breakfast. Or, just plan for a few hours of separate activities. You’ll get much better shots.
The best option is to go on a trip alone or with someone who wants to do what you do – take pictures day and night.
After our first trip to Venice, I went back a second time alone , just to shoot. It was great to wander the city with no agenda but to take photographs.

It’s Time to Shoot – Slow Down
Here, I’m talking to myself. I have to keep reminding myself to slow down, look for those “keeper” shots, rather than pointing my lens at everything. One good shot is worth a hundred that you’ll never look at again.
Slow down to really look at what you’re shooting. You may have to wait for people to get out of your scene, for traffic to change or for the light to improve.
A hidden benefit of shooting in Manual mode is that it forces you to slow down a bit. You’ll want to make adjustments to get your settings just right.
The Best Light is Just Before Sunrise or Just After Sunset
For big landscapes – say mountains or by the sea – you’ll want to be on location before sunrise or just after sunset. Colours are richer, the sky is more interesting and if you’re lucky, the clouds will add some drama.
However, this doesn’t mean you can’t shoot at other times. If you’re shooting in a city with tall buildings, you may need the sun high in the sky to provide light, and create interesting shadows. In some places, high noon is the perfect time to shoot.
In low-light situations, you’ll likely want a tripod, although some of the newer cameras give you incredible hand-held shots when it’s virtually dark. The most recent generation of smartphones have wonderful low-light capabilities.

Photographing People – Common Questions Answered
Many photographers like shooting people as part of their travel stories. But there are questions about legality, morality, common sense, whether to ask or not etc. (The following are my answers. I’m not a lawyer, and your answers may be different.)
First, in a public space, it’s my understanding that it’s legal to photograph anyone whether you ask or not. But perhaps the bigger questions are about morality and common sense.
I don’t photograph children if they are identifiable. From the back, maybe, but usually because they’re part of a scene, not the focus.
I don’t photograph people who indicate that they don’t want their picture taken. This may be for personal or religious reasons, it doesn’t matter. If I’ve already taken a shot, I’ll delete it. I don’t want to upset people, nor get into altercations.
I don’t photograph people who are in anguish, or having a hard time. That’s why I don’t shoot people living on the street. But that’s my call, I know others see it differently.
Sometimes I ask people to pose for me if I want them to look into the lens. Other times, usually with a longer lens, I’ll shoot without asking. If I ask, and they say no, I won’t shoot. That’s just respect.

Carrying a Tripod or Not?
For the ultimate control of your image, especially in low light, you’ll want a tripod. With a tripod, you can shoot long exposures of many seconds or minutes to get effects like smooth water, silky waterfalls and more dramatic skies.
Travel Photo Composition Tips
There are many books on composition, and for good reason. When all is said and done, it’s the composition of your photo that matters most.
Here are a few techniques to keep in mind for your compositions:
Leading Lines – Photography is a two-dimensional representation of a three-dimensional world. An image with natural lines that lead the eye into the image, say a road, railway line or row of buildings, is generally more interesting to look at because the 3D effect is more obvious. Study images that really appeal to you – many will have obvious leading lines that take you into the picture. Look for leading lines when you’re hunting for compositions.

Rule of Thirds – Many cameras let you see a grid of nine rectangles in your viewfinder, in other words 3 X 3. When you’re shooting, placing the focus of your image near one of the intersections is often more pleasing than dead center. It gives the eye somewhere to go, rather than being stuck in the middle.
Symmetry – In seeming contrast to the rule of thirds, an image that is obviously symmetrical, can be very appealing, because subconsciously, we’re comparing the sections to each other. That keeps us involved in the image.
Balance – While the rule of thirds suggest that the focus of your image is off to one side rather than center, if it’s too one-sided with no counter-weight on the other side, it will feel off balance. This can sometimes be fixed by changing the cropping of the image.
Scale – We’re fascinated by scale especially at extremes. Having people in your pictures can help with the scale of the other objects in your shot such as a building, bridge or tree. You know approximately how tall a person is, which helps you appreciate the size of everything else. See the earlier shot of the boulders in Monsanto.
Negative Space – Sometimes “nothing” can be very meaningful. Negative space is often tied to scale, for example, a person walking down a beach with a huge stormy sky taking up most of the shot.

Framing – Shooting through an archway, a window or door provides a natural frame for the subject. It’s especially useful if the frame itself helps tell the story.
Point of View – Most photography is shot at head height. Try shots with either the camera close to the ground, or from above for a different perspective.

Give Yourself an Assignment With Restrictions
When you shoot travel images, it’s tempting to try to cover everything. I am very guilty of that. To slow myself down and really look, I’ll often try one of two things.
In the first case, rather than carry a camera bag with a few lenses, I’ll pick a lens I don’t usually shoot with, and take only that one. For example, I have a 35 mm lens. It’s not the lens I use most often. It’s a prime, so no zooming. With that lens, when I see something I want to shoot, I have to find the best composition while dealing with the restriction of the lens. I’ll miss some shots because I can’t zoom in, but that’s ok. I’ll get others that I would never have thought of otherwise.
Or, I might give myself the assignment to shoot just one thing – be it a building, bridge, beach, market, whatever. I am going to find many ways to cover that subject – from afar, from a high vantage point if possible, close-up details, with people and without, in different lighting conditions, vertical and horizontal orientation, whatever it takes to really work a location.
Three Last Suggestions – Crop, Straighten Horizons, Clean Up Edges on Your Travel Photos
There are a few purists out there who claim you shouldn’t crop a picture – what you took, is what you get. To which I say, nonsense. It’s your picture. If cropping it makes It better, do so.
But crop or not, the one thing you always want to look for is a straight horizon. When you’re shooting handheld, it’s easy to have a horizon that’s not 100% straight. That’s where editing comes in – straighten out that horizon.
When you’re shooting, look around the edges of your frame. Ideally, you don’t want things like the odd tree branch or light fixture sticking into your shot. If you can eliminate it in-camera, do so. Otherwise, get rid of it in editing, either by cropping or retouching it out. Before you press the shutter, run your eye around the edges.
Parting Words – Always Carry a Camera
Whether it’s your every-day camera, a point-and-shoot or your phone, you never know when a scene will appear that you want to capture. Even if it’s just for reference for you to go back to later, it’s worth having a camera with you.
Get the Convenience of “WiFi Everywhere” to Upload Your Travel Photos
There’s nothing like having WiFi wherever you go. We rented a Teppy portable WiFi and carried it with us everywhere. It’s small so that it fits in your pocket or bag. With a Teppy, you can connect your phones, tablets, laptops and gaming consoles just like you connect to WiFi at home.
Use the apps on your phone including your favorite GPS apps without paying expensive cellular service fees.
It’s also perfect for uploading pictures, sending emails or just web browsing. We also used it for online work on the road including web updates and social media.
Teppy portable WiFi works around the world. Try it on your next trip.
Get $25 off Your Hotel Accommodation
For hotel accommodation, we like Booking.com. Photographs show off the properties, and real reviews help you choose the hotel that’s best for you. You’ll find a great selection, current prices and pages that make booking easy.
Remember, the most popular destinations fill up quickly, so book early to get the best selection and price. Click here, and you’ll get $25 off your next reservation on Booking.com .
Thinking of Airbnb? Get $50 off Your First Booking
We’ve rented Airbnb on many of our trips. We wrote an article about renting Airbnb, 12 Tips for a Great Renting Experience to help you make the right decision. If it’s your first time renting Airbnb, click here to get the equivalent of $50 CDN off your first booking .
Choosing a Guide Book? Get 10% Off Lonely Planet Books Here
Along with the websites and other travel planning tools, we still like to have a guide book handy. We’ve tried them all, and these days we prefer Lonely Planet books.
Note: Some of the links on this page are affiliate links. If you click on them and buy something or book accommodation, we receive a small commission at absolutely no cost to you. This helps with the cost of operating this site.
Subscribe to the Earth Trippers list Get travel tips and stories right to your inbox
Sign up to our mailing list today!
Thank you for subscribing.
Something went wrong.
We respect your privacy and take protecting it seriously
Share this:
- Click to share on Twitter (Opens in new window)
- Click to share on Facebook (Opens in new window)
Norway Van Gogh Self-Portrait is Authenticated
Indian vedic astrology nakshatra star temple tour, 27 comments.

Great information, we have started adopting these tips. Really useful. Thank you.

I’ve def been caught out in the field with 4 dead batteries so make sure you bring a TON! Also, great advice about always bringing your camera. I don’t know how many times I’ve been out and about and kicked myself for not bringing it along. Thanks for sharing.

I am not that much of the photographer myself but yeah love to take pics and really try to take as professionally as I can, thanks for tips I am definitely applying in my next trip 🙂

A quick way to improve your travel photography is to think about how you want to compose an image and then try some alternate perspectives. Move around, look up, look down, get on the ground, scout framing options, anything to find another way of capturing the scene.

Love the shots and tips. I’ve been a freelance photographer for months now especially in the field of a wedding. Tips from this article can also be applied. Anyway, a great read and looking forward to more of your work, It’s awesome!

I am new to this hobby and I really appreciate this guide to improve my skills. Thank you so much for sharing this. A lot will really learn from this post.

Travel photography is my favorite hobby. Thank you for your great tips. Next time, I will read your post before I go on the trip So that I don’t forget to take my elements.

Hello there! Great tips. Thank you for sharing your knowledge with us!

What the best article it is. I really enjoy your post. please keep it on.

15 Tips for Travel Photography is really awesome and creative experience sharing site. Thanks for sharing your prominent speech.

Travel photography is my favorite hobby. Thank you for your great tips. Photography is one of the best hobbies a person can adopt, Loved every bit of your article. so there are great information tips for us.

Thank you for your kind words. In regards to lenses, there are many choices, depending on your subject matter. The lens I usually shoot with is a Nikon 18–105 mm. That covers a broad range from wide-angle to zoom. Good luck with your shooting.

Fantastic think about Improve Your Travel Photography. You all are sharing some great tips! I appreciate for RAW format. Also lightroom photo editing software for photo retouching and photo masking. Thank you so much Love it 🙂

Amazing, you are really doing good job.

waw, very helpful article. I would love to share this. thanks for sharing these awesome tips.

Great tips here! Thank you for sharing!

This article is really helping me improve my travel photography skills! Thank you so much for sharing these wonderful tips.

Very informative! Thank you for sharing..

Wow! Love this post! Happy I found such a nice post. Thanks for sharing!
Leave a Comment Cancel Reply
Save my name, email, and website in this browser for the next time I comment.
Notify me of follow-up comments by email.
Notify me of new posts by email.

This site uses Akismet to reduce spam. Learn how your comment data is processed .

- Anniversaries
- Baby Showers
- Cards and Stationery
- Father's Day
Photo Books
Wedding invitations, 21 travel photography tips and checklist for your next trip.
Written by Shutterfly Community Last Updated: Aug 12, 2019
Planning your next vacation? Document your trip (big or small) with photos that will allow you to remember and share your experiences long after you return home. Whether you want to capture picture-perfect spots in NYC or head west to embrace scenic spots in San Francisco , you don’t need to be an expert to get genuinely beautiful shots.
Shop Trending Categories

Graduation Announcements

Canvas Prints
Whether you decide to use a nice camera or a smartphone, there are plenty of photography tips and tricks that will help you know how to take the perfect photo . Make sure the equipment you use is familiar to you. You don’t want to spend the whole trip reading your camera manual.
Once you decide on what camera you’re bringing, the photos will come naturally. In case you hit a photo block and aren’t sure what to photograph, we’ve created a travel photography checklist that includes what to bring on your trip and photo ideas. Simply read through the travel photography tips, print the checklist and you’ll be ready to go!
Quickly jump to a section:
- Travel Photography Tips
Travel Photography Checklist
22 travel photography tips and tricks.

1. Do your research
While planning your trip, make a note of destinations that are beautiful. Find out if they are easy to get to and what sort of transportation you’ll need. Will you need a permit for the area? Figure out the logistics ahead of time so you don’t run into problems after you’re already there.
2. Get inspiration from others
The best way to learn is through others. Look at other photographer’s blogs and social media to see if they’ve been to the location you’re visiting. As you look at photos, create a bucket list of places you’d like to photograph while exploring. And make note of the composition and angles to capture.
3. Practice at home
You don’t need to travel far to practice your travel photography skills. Look up local attractions and go visit them with your camera. Learn how the light works in natural settings compared to more industrial ones.

4. Travel light
You don’t need to (and shouldn’t) bring every camera accessory you have with you on your journey. Not only will they be heavy to lug around, but there’s a danger of losing or forgetting pieces behind. Bring only the key items such as the camera, a charger and memory cards.
5. Charge Your Equipment The Night Before
Make sure everything is charged and ready to go before you set out for the day. Bring along 2-3 extra charged batteries for your camera and external flash.

6. Learn a few words in the native language
If you’re going to a foreign country where the language is not your own, try learning a few phrases. Things like “hello”, “thank you” and “Can I take your photo?” will go a long way and might lead to a better photograph.
7. Listen to the Locals
Ask the locals where the best places to shoot are. Ask about their favorite photo spot and they’ll likely be excited to share the wonders of their home. Be sure to be respectful of their space and leave them alone if they’re not interested in talking with you.
8. Follow Basic Photo Rules
If you’re a beginner photographer, take some time to learn the basics. When taking photos, keep in mind guidelines like the rule of thirds and your depth of field. Learning photography terms will help you take better quality photos.

9. Get Candid Shots
Not all your shots should be posed and planned out. Try a variety of angles, capturing candids. Take photos of everything, the one you least expect may be the one that ends up the best.
10. Give Yourself Time
When shooting, make sure you give yourself plenty of time at the location. A time crunch will lead to blurry and rushed photos. Leave yourself enough time to set up, learn what setting your camera should be on and find the right light. This may mean starting your days earlier than normal.
11. Embrace Golden Hour
Lighting is everything. Make sure you know the different sunrise and sunset times of the location you’re at. Even places only a few hours away can differ. It may also be helpful to know what direction the landmark is facing that you’re trying to photograph so you can plan to be there when it’s in full light.

12. Get a New Angle
If you’re visiting a place that’s been photographed thousands of times, try a new angle. Find hidden details that aren’t always noticed like paintings on the ceiling. Shoot through an alleyway that frames the photo or move around and try to find a new vision.
13. Stay in the Moment
Don’t overthink the shot. Stay in the moment and go with the flow. Don’t be afraid to switch around your schedule to get a good photo.
14. Take Notes
Bring a small notebook with you as you travel and when you take photos to make sure you’re noting the place and your camera settings. This will help you later on as you go back to see what worked and what didn’t.

15. Be Wary of the Weather
Look at the weather forecast if you’re shooting outdoors. Remember, just because it’s raining or snowing doesn’t mean you shouldn’t go. Sometimes a foggy backdrop can reflect the light and make for an even better photo.
16. Bring Secure Bags with Locks
You’ve probably invested a lot in your camera and accessories, so make sure they are kept safe. Bring a camera bag with you that has a lot of padding and can be locked.
17. Backup Your Photos
Every time you return to home base, whether that be a hotel or friend’s home, make sure you backup your photos . This will free up space on your camera and will keep your images safe.

18. Always Bring a Camera When You Can
Bring your camera with you wherever you go. The perfect shot could be where you least expect it. This will also let you document your whole trip, not just parts.
19. Be Respectful of Your Environment
You may be visiting this place but to others, it’s home. Be respectful of the people and animals you meet along your journey.
20. Get Lost
Get out of your comfort zone and a venture off the beaten path. Try finding something unique to photograph. Get a little lost.

21. Share Your Work
Once you’ve returned from your trip, make sure your photos don’t just sit on the memory card or computer. Share them by creating a photo board on your wall or styling a travel photo book .
22. Print Everything Ahead of Time.
Before you start your travels, don’t forget to print your boarding passes, itinerary and other documents just in case your phone isn’t working properly. By printing everything ahead of time, you do not have to wait in any lines, worry about the digital kiosks in the airport or lack of wifi connection

Click To Download Travel Photography Checklist PDF
Travel photography is a fun way to document your trips. It allows you to take your stories home and share them with friends and family. Try creating a collage with a photo collage app and sharing your experiences on social media.
Explore Categories

Graduation Invitations

Custom Photo Blankets

Save the Dates

Coffee Table Books

Written by Shutterfly Community | View all posts
★ Lifestyle Expert
Shutterfly Community is here to help capture and share life's most important moments. Discover thoughtful gifts, creative ideas and endless inspiration to create meaningful memories with family and friends.
Visit their Website . You can follow on Instagram and Pinterest .
Nomadic Matt's Travel Site
Travel Better, Cheaper, Longer
How to Take Professional Travel Photos

Travel photography is not something I’ve very good at. I take all my pictures on an iPhone, and if they aren’t used on the blog, they mostly just sit on my hard drive. I’ve never taken the time to really improve my skills. Like learning a language, improving your photography takes time.
Luckily, just like learning a language, anyone can do it!
Travel photographs are memories. You look at a picture, and it conjures up thoughts, feelings, and smells that take you back to a long-forgotten place. I think it’s important we all spend a little time improving our photography.
Today, professional photographer Laurence Norah of Finding the Universe begins a five-part series on how to take better travel photos and become a better photographer in general. He’s going to share his top tips to help you improve your skills and take awesome photos.
Enter Laurence…
In 2009, I gave up my job in IT and set off to travel the world. My first destination was Australia , a stunning country where I desperately wanted to capture my adventures. I’d been taking photos since I was 13, but it was only on this trip that I started to focus on learning the art of photography and realized that this was something I could be truly passionate about.
I quickly learned the reality that photography is a skill that takes time, effort, and practice to master.
It’s also not a question of gear — great travel photography is very much about the photographer.
In this post, I’ll give you the eight simple travel photography tips you need to take better pictures right away. If you follow these rules, you won’t go wrong!
Table of Contents
- Composition
- The Rule of Thirds
- Leading Lines
- Foreground, Midground, and Background
- Focal Points
- Use of Color
- Storytelling
1. Composition: Taking Pictures People REALLY Want
Patterns — the human brain is a sucker for them. We’re always looking for patterns, be they shapes in the clouds, symmetry in buildings, or colors that compliment each other. There’s just something about a pattern that our brains love.
Understanding these patterns and what pleases the human brain is a nifty shortcut to taking better photos. And that’s what composition in photography is all about. Learn and apply the rules below, and you’ll start taking more photos that people will enjoy.
Before launching into them, though, some important basics. First, ensure that your camera is level. You don’t want wonky horizons. Your brain generally doesn’t like them; they’re the visual equivalent of nails on a chalkboard.
Next — stop moving. You want to be as still as possible when shooting to avoid blurry images. Hold your camera with both hands and be steady, or use a tripod.
2. The Rule of Thirds
One of the most important rules of composition is known as the rule of thirds.
I learned recently that this is based on how babies learn to identify their mothers’ faces, which can be split up into three parts: the eyes, nose, and mouth.
The rule of thirds requires you to break an image into three equal parts either vertically, horizontally, or both. The goal is to place key compositional elements into those thirds.
On your device, find the setting to enable a grid over the preview screen. Four lines will appear, two vertical and two horizontal.

Take a look at my shot above of a surreal sculpture park deep in the Australian outback , over which I have overlaid a grid to demonstrate the horizontal and vertical thirds.
With the grid, you can see how I have composed the image: one-third land and two-thirds sky, while the plane on the left is on the left-hand grid line, close to the intersection of two lines.
Placing subjects on the intersecting points will naturally draw the viewer’s eye to them, as these points are usually where we focus first in an image, and doing so is a great starting point for a good composition.
Another of my favorite subjects to shoot is a sunset. I love how they are always different and how wonderful the light is at that time of day.
To get a great sunset shot, you can easily apply the rule of thirds — composing the shot with two-thirds sky, and one-third land or sea. You want to avoid splitting the image half and half, as it won’t look as good. The shot below of a sunset in Santa Cruz illustrates this and also has an interesting subject in the left third of the image.

3. Leading Lines
When composing a photograph, you want to make it as easy as possible for the person looking at it to figure out the subject and focus of the image.
One way to do this is with leading lines — the use of natural geography or other features that the viewer will naturally look at first and that will lead their eyes to the main subject.
Roads are excellent as leading lines, particularly in big landscape shots. When I was traveling in New Zealand , I wanted to create a photographic story of the hike up Mount Taranaki, one of my favorite New Zealand hikes . Near the start, the walking trail itself gave me a perfect leading line to illustrate the journey ahead, drawing the viewer’s eye into the frame and up to the mountain.

Another good illustration of a leading line is this shot of me walking on railway tracks in Italy. (Obviously, it’s only advisable on either disused or somewhat infrequently used tracks!)

The goal for this image was a self-portrait that evoked my life of travel. The parallel tracks, which appear to converge, were perfect for leading the viewer’s eye to the subject — me. I felt I captured the image of wanderlust that I was looking for by using them.
4. Foreground, Midground, and Background
Have you ever taken a picture of a mountain or city skyline and then looked at it later and wondered why it doesn’t manage to convey the majesty of what you were looking at?
This is likely because your photograph is a two-dimensional image, and you have lost the sense of scale that is apparent when you are present and in the moment.
When composing a shot — and this is particularly true for landscape photography — think about the different elements in the foreground, midground, and background of the shot.
For example, here’s an example of a sunset in Glencoe, Scotland , easily the most stunning place I’ve photographed in 2015.

I used the rock in this frozen lake to provide something interesting in the foreground, helping to provide scale and balance to the overall image. The viewer’s eye is drawn to the rock, and then likely to the mountain and sunset, before heading into the distance of the valley.
When you are out and about in the world, think about everything around you. If you see a far-off mountain you want to shoot, look around and see if you can find something interesting in the foreground or midground to incorporate into the shot. If you’re near a river, maybe that could be a canoe. Elsewhere it could be a house. Or a group of sheep. Or a car starting to scale a winding road.
If you’re shooting a city scene, look at what is happening all around you. Street vendors, different modes of transport, and signs and storefronts can all be incorporated as foreground to provide context and scale for your city skyline or that interestingly shaped building.
If you can’t find something, be creative. Find someone to stand in your shot to provide that scale. If you’re traveling with a tripod, do what I did in that railway shot and use yourself as the subject.
Thinking beyond the big background parts of the image and focusing on the smaller elements will help you create more balanced, pleasing images.
Just remember not to confuse your viewer too much with too many compositional elements, and keep it clear what the photo is of.

Here’s another shot from Glencoe. Here the house provides that midground scale, while the river works both as an interesting foreground subject and as a leading line to draw you into the photograph.
This compositional technique isn’t about hanging a picture in a frame; it’s about using what’s around you to “frame” the subject you are trying to capture, illustrating to the viewer what the shot is of and drawing their eyes into the scene.

In this shot of the bridge into the medieval town of Besalú in Spain , I used the old bridge and its reflection as a natural frame for the newer bridge.
When you have found your subject, look around to see if there’s a way you can frame it creatively. Some good options for framing include vegetation, like tree branches and trees, as well as doors and windows.
Take a look at this shot of a temple in Ayutthaya, Thailand , to see what I mean. I wanted to capture the beauty of this temple scene while drawing the viewer into the wat in the center.

The frame in this case is much larger than the subject, but it is never unclear what the shot is of. This is a really easy photography technique, but it might require you to scout around, or step back from your subject, to find a good way to frame it. Don’t be afraid to stand further away and use the zoom on your lens to get the frame you want.
As another example, using trees to frame a waterfall, here’s a shot of Lower Yosemite Falls in Yosemite National Park.

I felt that the trees added much more to the shot with the waterfall between them. There was a pleasing symmetry to the shot, given the two parallel trees.
There are many more options for framing. Experiment and see what works!
6. Focal Points
One way to be sure that people look at the part of the image you want them to look at is to have only that part sharp and in focus and the rest blurry.
This is particularly effective for isolating people or animals in shots — take a look at wedding or sports photos of people, and you’ll see how often the subject of the shot is the only thing in focus.
I love shooting events with friends and family, and I find that this technique works really well at isolating the subject from a crowd and making it obvious who the photo is of.

To start with, you can achieve this effect with the “portrait” or “people” mode on your camera.
7. Use of Color
Color is really important in photography, particularly how different colors work well together. For example, blue works well with yellow (sunflowers in a field), and red works well with green (Christmas!).
To figure out which colors work well together, take a look at this color wheel .
Generally, colors opposite each other on the wheel will complement each other. These colors don’t need to be evenly balanced in a shot — often images work best with a small percentage of one and a greater percentage of another.

Take a look at the shot above, from the gorgeous Nyhavn Harbor in Copenhagen . You can see all sorts of colors, but in particular, the blue of the sky and water is the predominant color, with the houses’ reds and yellows (yellow is opposite blue on the color wheel) offering a counterpoint.
When you are on your travels, keep an eye out for contrasting and complementary colors that you can incorporate into your shots. Spice markets, old European cities , rural meadows, and old colorful barns in green fields are a great place to start.
8. Storytelling
Remember that when you are taking a picture, you have all the background and surrounding knowledge of your trip in your mind. When you look at the image later, all of that will come back to you.
No one else has that advantage. To them, that shot of a waterfall is just that — a shot of a waterfall. The story of the five-hour hike there through a leech-infested jungle? Lost. The feeling of how refreshing it was on your skin when you took the plunge to cool off? Also gone. It’s just a two-dimensional image on a screen, likely quickly flicked by to be replaced by the next image in the stream.
It’s your job to bring all that lost context to life.
We’re often told that a photograph is worth a thousand words. As a photographer, it’s your job to convey those words. Figure out how to tell that story with your image. Get the shots that pull your viewers into your stories. Use emotion, find and freeze moments, and incorporate the human element so your shots resonate with your viewers.
Take this monkey in Rio de Janeiro . These guys were being really cheeky with tourists, trying to get food from them and generally playing around as much as possible. I wanted to try and capture some of that, and I managed to get this monkey sticking its tongue out at me.

I’d advise spending time thinking about the shot you are trying to create, the moment you are trying to capture, and the story you are trying to tell your viewer. Put yourself into their shoes, imagine you are going to be looking at the shot with no other context, and try to build the shot from there.
This is probably one of the harder parts of photography, and — like the shot of the monkeys above — will likely require some time, patience, and luck. You will make errors. But with research and practice, you will be able to master it!
Practice makes perfect – and travel photography is no different in this regard! The more photos you take, the more you will learn how to compose and capture great shots. While reading some travel photography tips will definitely help, the key is to actually go out in the world and practice them. The more you practice, the faster this will all become second nature. It won’t happen overnight, but over time your skills will improve — I promise!
So what are you waiting for? Get out there and start taking some photos!
Laurence started his journey in June 2009 after quitting the corporate life and looking for a change of scenery. His blog, Finding the Universe , catalogs his experiences and is a wonderful resource for photography advice! You can also find him on Facebook , Instagram , and Twitter .
Travel Photography: Continue the Series
For more helpful travel photography tips, be sure to check out the rest of Laurence’s series:
- Part 1 – How to Take Professional Travel Photos
- Part 2 – How to Shoot the Perfect Travel Photograph
- Part 3 – The Best Camera Gear to Get
- Part 4 – How to Take the Perfect Photo: Advanced Techniques
- Part 5 – 7 Editing Tips to Improve Your Travel Photographs
Book Your Trip: Logistical Tips and Tricks
Book Your Flight Find a cheap flight by using Skyscanner . It’s my favorite search engine because it searches websites and airlines around the globe so you always know no stone is being left unturned.
Book Your Accommodation You can book your hostel with Hostelworld . If you want to stay somewhere other than a hostel, use Booking.com as it consistently returns the cheapest rates for guesthouses and hotels.
Don’t Forget Travel Insurance Travel insurance will protect you against illness, injury, theft, and cancellations. It’s comprehensive protection in case anything goes wrong. I never go on a trip without it as I’ve had to use it many times in the past. My favorite companies that offer the best service and value are:
- SafetyWing (best for everyone)
- Insure My Trip (for those 70 and over)
- Medjet (for additional evacuation coverage)
Want to Travel for Free? Travel credit cards allow you to earn points that can be redeemed for free flights and accommodation — all without any extra spending. Check out my guide to picking the right card and my current favorites to get started and see the latest best deals.
Need Help Finding Activities for Your Trip? Get Your Guide is a huge online marketplace where you can find cool walking tours, fun excursions, skip-the-line tickets, private guides, and more.
Ready to Book Your Trip? Check out my resource page for the best companies to use when you travel. I list all the ones I use when I travel. They are the best in class and you can’t go wrong using them on your trip.
Got a comment on this article? Join the conversation on Facebook , Instagram , or Twitter and share your thoughts!
Disclosure: Please note that some of the links above may be affiliate links, and at no additional cost to you, I earn a commission if you make a purchase. I recommend only products and companies I use and the income goes to keeping the site community supported and ad free.
Related Posts

Get my best stuff sent straight to you!
Pin it on pinterest.
Protect Your Trip »
10 travel photography tips for getting better photos.
These tips can help you snap stunning and creative images without a fancy camera – or any experience.

(Getty Images) |
Use this guide to start taking top-notch vacation pictures.

(Courtesy of OrangeandPark.com) |
Wait for golden hour

Install the right mobile apps

Hit iconic spots in the morning

Scout shots on Instagram first

Dress for success

Remember the rule of thirds

Let spontaneity be your guide

Get to know your phone's features

Experiment with angles and lighting

Hire a professional
If you make a purchase from our site, we may earn a commission. This does not affect the quality or independence of our editorial content.
You May Also Like
The best carry-on luggage.
Erin Evans , Rachael Hood , Catriona Kendall , Amanda Norcross and Leilani Osmundson April 17, 2024

The Best Hard-sided Luggage Picks

The Best Luggage Brands
Rachael Hood April 17, 2024

The Best Yellowstone National Park Tours
John Rodwan April 17, 2024

The Best Rome Colosseum Tours
Laura Itzkowitz April 17, 2024

Best Alaska Tours
Lyn Mettler April 16, 2024

The Best Fredericksburg Wine Tours

The Best Personal Item Bags
Rachael Hood April 16, 2024

The 17 Best Costa Rica Tours
Lyn Mettler April 12, 2024

Hard vs. Soft Luggage
Rachael Hood April 12, 2024

10 Tips for Taking Great Travel Photos
A photo can truly speak a thousand words, and capturing the perfect image can feel rewarding and bring back exact memories of unforgettable adventures. But how do we make sure every shot counts? We've partnered with Bob's Books , who have been publishing incredible photo books since 2006, to how to take amazing travel photos you'll want to keep forever. Plus, find out how you can save on your next photo book below!
Looking to capture stunning travel photos that can be transformed into professionally-printed photo books and shared with family and friends or a wider audience?
Travel photography is a bit like storytelling. It’s bringing people along on your journey by introducing them to the places you’ve been and the people you met along the way.
Whether you prefer to use your camera phone or own a dedicated mirrorless camera or DSLR, you can use the following tips to take your travel photography to the next level.

1. Research your destination
Taking some time to research your destination before you leave home is important for a few reasons. Firstly, it’s a chance to learn about the views, landmarks, wildlife, and other hidden gems you’d like to photograph, as well as what to expect in terms of weather and lighting conditions so you can capture the best photographs possible. Learning about local customs, traditions and etiquette will also enable you to respect your destination’s culture and follow any legal requirements when it comes to choosing your subjects and photographing people and places.
.jpeg)
2. Stabilise your camera
Although you won’t always have time to set up a tripod, it’s good to have the option of stabilising your camera if you want to capture sharp photographs of landscapes and architecture as well as birds and wildlife. It’s also essential when you’re photographing anything in low light such as indoors or at night.
Tripods come in many varieties, but if travel photography is your goal, look for one that’s lightweight and portable. If you don’t have a tripod or time to set one up, you can still minimise the risk of blurry photos by holding your camera with both hands and resting your elbows on a stable surface while shooting.
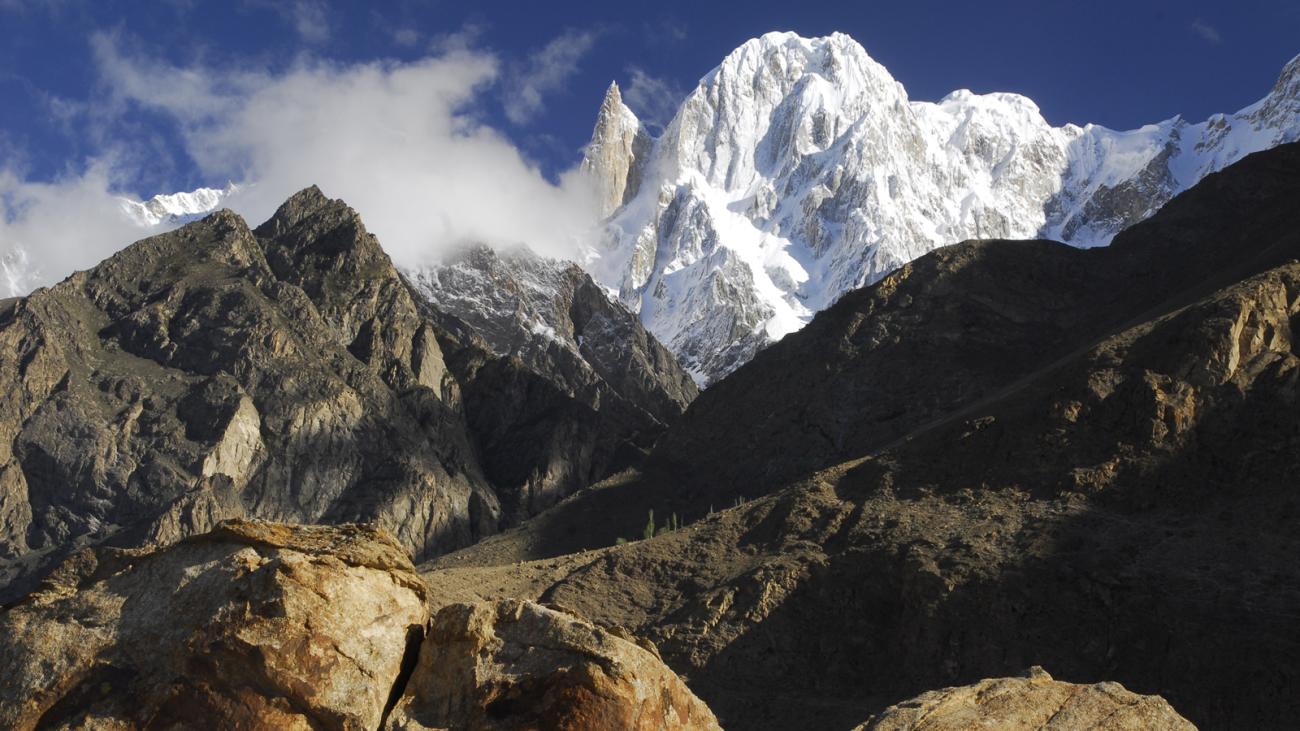
3. Get on eye level with your subject
Whether you’re photographing people or wildlife, try to get down to eye level with your subject whenever possible, as this will help you to establish a connection between the viewer and your subject. It’s generally also the most flattering angle from which to create natural-looking portraits, as shooting from above or below can elongate certain facial features or cause other unwanted distortion.
.jpeg)
4. Try different angles and perspectives
The exact same scene can look very different when it’s photographed from above or below, so think about the angle and perspective you’re shooting from and how you might mix it up. Changing your angle or perspective can also help you include more details in your photograph, whether it’s an interesting reflection or the street vendors and tourists milling about near a well-known landmark.
.jpeg)
5. Think about composition
There are many compositional techniques you can use to create more aesthetically pleasing photographs and draw attention to your subject. For example, ‘framing’ involves using elements of a scene you’re photographing to frame your subject, such as a window, doorway or the branches of a tree or shrub. You can also use ‘leading lines’ to draw the viewer’s eyes through your photograph and create a sense of depth, such as a road, staircase or fence. Other examples of compositional techniques include the rule of thirds, negative space and symmetry.
.jpeg)
6. Get closer if you can
Photographing your subject from close range is a great way to eliminate distracting backgrounds and create more impactful photographs. If you have a camera with a zoom lens, this is easy to do by simply zooming in. On the other hand, if you’re photographing a scene with your phone camera, the image quality may suffer if you use the zoom function, and you may be better off moving physically closer to your subject. Of course, if you’re photographing people or wildlife, it’s important to be mindful and respectful of their personal space.
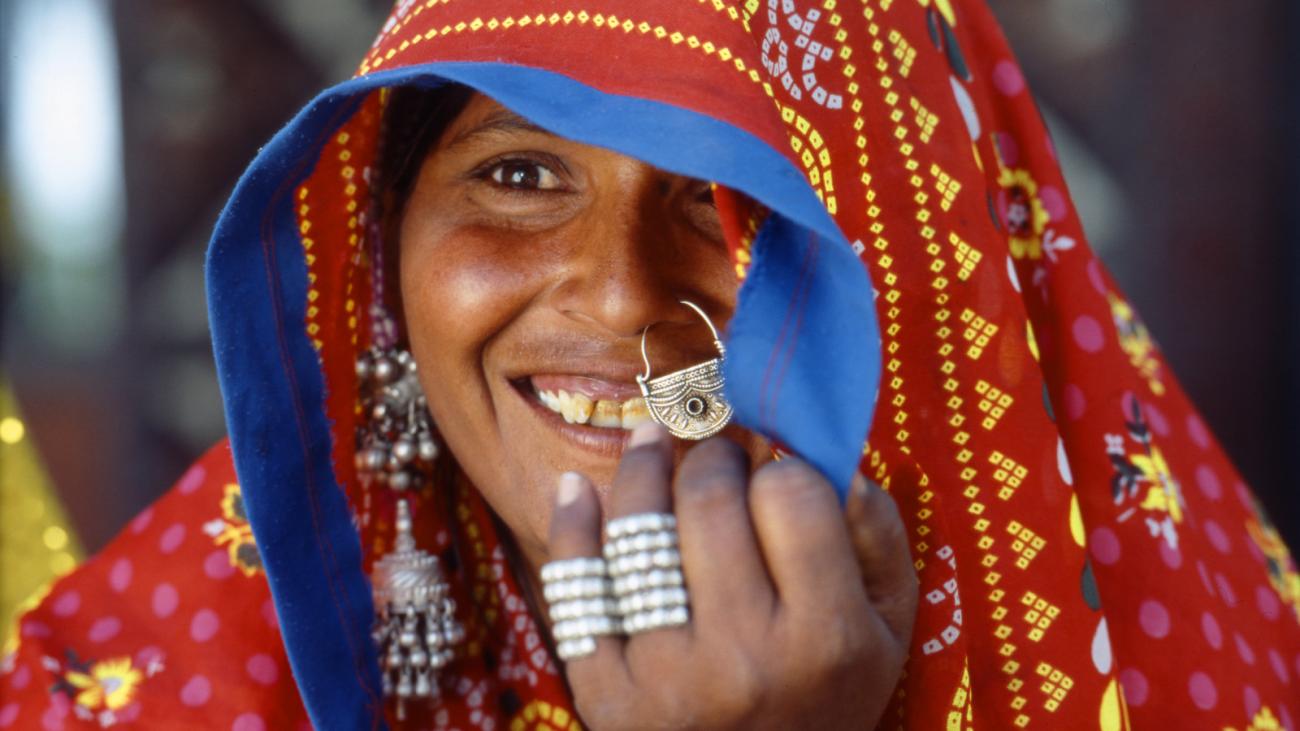
7. Check where the light is coming from
Shooting against the light can at times produce interesting effects, like silhouettes and sun flares. Most of the time, however, you’ll get better photos if you shoot with the light coming from behind or from the side of you. Shooting at midday in bright sunlight can also lead to harsh shadows or blown out highlights, so it’s worth looking for a shaded spot where the lighting will be more even. If your camera has a flash, you can use this to throw some light on a subject that’s close to you in order to reduce harsh shadows.
.jpeg)
8. Capture candid moments
Posed photos can be a lot of fun, but oftentimes, it’s the candid shots showing authentic moments and genuine emotions that will paint the best picture of what your journey was like. Try to keep your camera to hand so you’ll be ready to capture candid moments as they occur, whether it’s your tour group laughing and chatting animatedly, an animal or bird that appears suddenly or spontaneous interactions between locals going about their daily life.
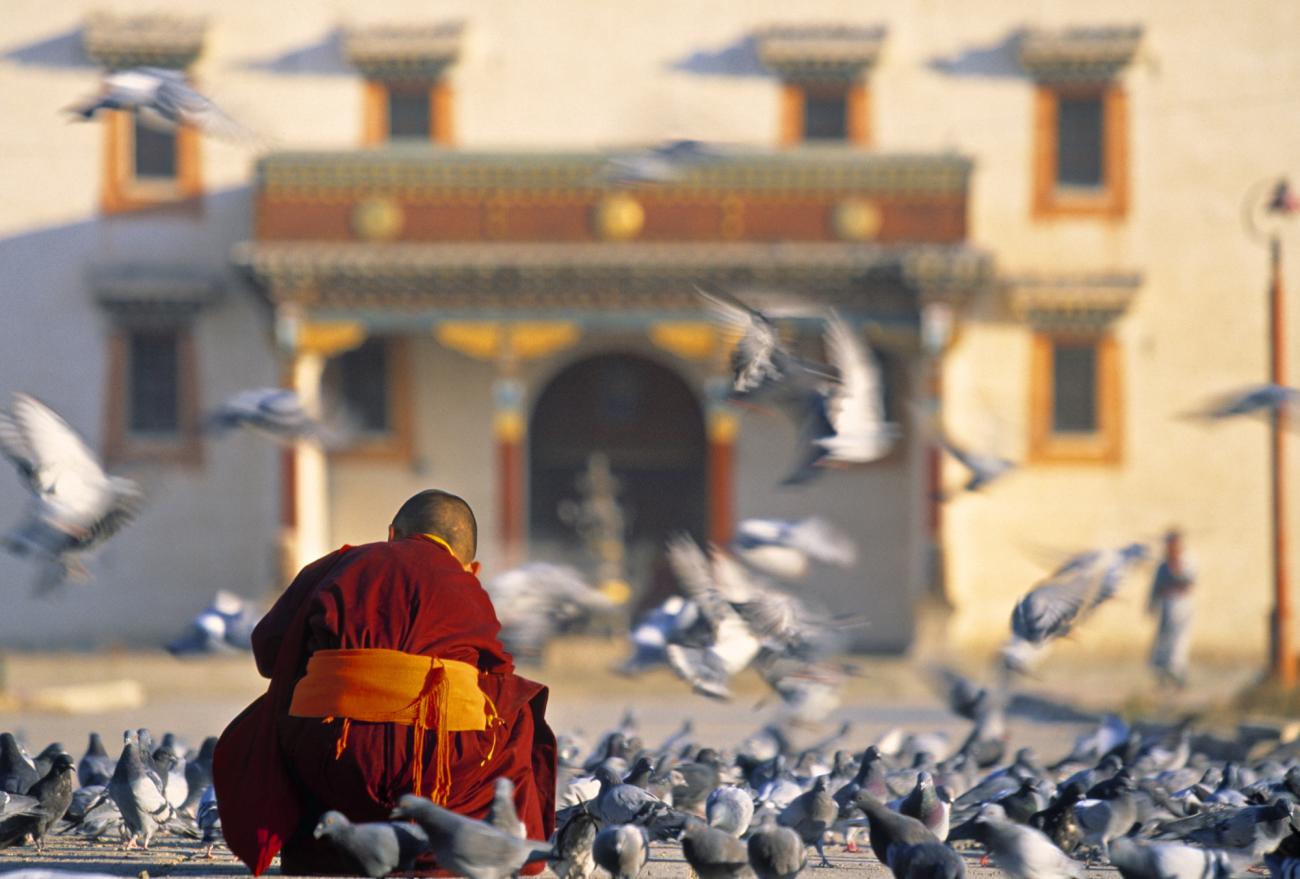
9. Interact with local people
Interacting with your subjects, whether before or after taking their photo, is a great way to put them at ease and capture their personality. It can also add more depth to your photographs by helping you understand the context behind the scenes you’re photographing. Even if you don’t speak the local language, a smile and simple greeting, or even showing them the photograph you’ve taken of them, can go a long way towards making them feel comfortable with the photographic process.
 (1).jpeg)
10. Patience is key
Finally, remember that while you can get lucky at times and capture a beautiful travel photograph in an instant, most of the time, it helps to slow things down and spend some time taking in your surroundings before you start taking pictures. For example, you might need to find a less crowded place to shoot from, look for a better angle, or simply wait for the right light, for wildlife to appear or for interesting interactions to take place.
.jpeg)
Once you’ve returned from your travels and have a collection of stunning photographs to share, you may want to get them organised by creating your very own travel photo book. Bob Books is the UK’s best-loved photo book company and is offering Wild Frontiers members an exclusive 20% off on travel photo books. You can find tips and inspiration for creating a stunning travel photo book on the Bob Books blog .
Related tours

What are you looking for?
23 travel photography tips: how to take better travel photos.
Thanks to popular apps like Instagram and Pinterest , we are constantly bombarded with amazing travel pictures every day!
Have you ever looked at other people’s travel pictures and thought
“Wow, I wish I could take pictures like that!”
I have, and honestly it’s not always as hard as it looks!
Sure, I’m not exactly a pro, but our photos are definitely miles better now than when we first started full time travelling as a couple back in 2016.
Naturally, these things take time and practice, and we’ve learned a lot of what NOT to do along the way.
We’ve also picked up a tonne of useful travel photography tips you can follow that will help you take better pictures on the road.
I’ve followed these tips more and more since we started travelling and my pictures have gotten A LOT better.
As I said, I’m no expert, but I’m constantly learning every day.
Throughout this post I’ve included some examples of editing and how I’ve put my tips into practice, which will hopefully help to visually show you how these tips work!

Travellerspoint
Common photography terms
Before we begin, I’m going to list a few common photography terms.
These should help with understanding some of the more technical tips below, and I’ve put the explanations for these terms in basic form…
ISO: This is a setting that will allow you to darken or brighten your photo depending on the lighting conditions in place. So, if you increase your ISO then your photos will grow brighter. This can help when shooting in dark environments, such as when trying to capture the Northern Lights . In these conditions you need a super high ISO to capture the lights and stars.
Aperture: Aperture is the size of the opening in the lens. A smaller aperture lets in less light, whereas a wide open aperture will let more light into the image for a brighter photo. It will also affect how much of the image is in focus.
Shutter Speed: The shutter speed is the part of the camera that opens and closes to let light in, so you can take a picture. The speed of the shutter is how long it stays open. So the longer it’s open, the more light that’s allowed in. However, if something moves when the shutter is open then it will become blurry. This is when a tripod is great. Again it’s applicable to the Northern Lights where you need the shutter speed to be super slow!
Golden Hours : These are two specific hours of the day when lighting is best for travel photography. It’s the hour after sunrise and the hour before sunset.
Exposure: Exposure is how light or dark an image is and it’s controlled through ISO, aperture, and shutter speed.
Noise : Noise in a photo basically makes it look grainy. For example, images that have a high ISO typically have lots of noise, so it’s always best to use the lowest ISO possible for the amount of light you have for the photo. You can reduce noise in post editing and I’ll show you an example below.
Reducing Noise in a photo example
In the first photo you can see the original photo that was shot in RAW. It’s dark, it’s just not the right setting. So, I’m going to try and “save” this photo…

You can see that in the second photo, once I add a preset, it adds colour and brightness to the shot; however this image is still very grainy, and it’s because it was shot in the wrong setting.

But in this third photo, I’ve reduced the noise in Lightroom and it “smooths” out the image to make it look better.

This image isn’t perfect, but it does show what you can fix in post editing!
Keen to learn more about post editing? Stay tuned for tip 7.
Okay, now it’s time to get into the travel photography tips …
1. Visit during off-peak months

This is a great tip for travel planning in general; but if you want to take better travel photos, then visiting locations during the off-peak season is definitely a great way to do so.
Travelling during the off-peak months typically means that there are fewer people, so there are less people competing for the perfect shot.
In some cases, you’ll be able to get the perfect shot anytime of the year, but in those super touristy places travelling in the off-season will allow you to take better photos, and honestly, have a better overall experience.
Sometimes the “off-peak” months are rainy and difficult to travel in, but shoulder seasons tend to give you the best of both worlds: low crowds and great weather!
We rarely travel to anywhere in peak season, the shoulder season is our sweet spot.
2. Get up early

As they say … the early bird gets the worm!
I actually hate getting up early, honestly it drives me crazy.
(p.s. It’s not because I’m lazy, I do have a chronic illness after all).
But if I’m chasing the perfect picture, then yes, I will force myself to get up early.
It’s always been worth it!
There are a couple of great reasons why getting up early will help you take better travel photos.
Firstly, there will be less crowds since most people will still be asleep, or certainly not out sightseeing yet.
And secondly, you’ll catch the first Golden Hour of the day: which is the hour just around sunrise, when the light for photography is at perfection.
Before I started appreciating golden hour and it’s light, I never really understood why it mattered so much.
But trust me, if you take shots at a location during this period, then return another time and take shots mid-day, you’ll see a massive difference when it comes to your editing process!
Plus, it’s awesome having a tourist site all to yourself for a while.
If you’re using a drone for photography, then getting up early is key to not having any people stuck in your drone shots.
Of course you can edit them all out, but that’s just extra work and requires learning more skills!
3. Stay out late

Naturally, my next travel photography tip is the opposite of getting up early: stay out late.
This is something I certainly don’t mind doing!
When I say “staying out late”, I don’t mean until it’s gone pitch black (with one exception I’ll discuss below).
Basically, you want to catch sunset and the hour before sunset, which is the second Golden Hour in photography.
This is when the daylight is redder and softer so makes for a perfect time to take travel pictures.
Plus, everyone loves a sunset, and across Asia and Central America, you’ll be in for a treat with some truly epic sunset shots.
We don’t do night photography, so I can’t give you specific tips for that; however when in Northern Norway , we did photograph the Northern Lights, which requires you to stay out very late into the night.
To see the Northern Lights , you’ll need a couple of things in your favour, but a big one is complete darkness.
So wrap up warm, get your tripod ready and wait it out!
4. Upgrade your gear

You don’t NEED to fill your camera backpack with the most expensive equipment, just to up your travel photography game. But it does help if you’ve got a decent travel camera or even a high quality camera on your phone.
Most of the latest smartphones have very high quality cameras, like the iPhone & Samsung Galaxy, and you’ll be able to take great photos by using the settings to their full potential.
But, if your budget allows it, then I do suggest you invest in a standalone camera.
We use a Sony a7iii which we couple with a video lens, making for a top quality vlogging & photography setup all in one.
So this is a great option if you want to take awesome pictures AND make really cool travel videos!
Prior to this we had the Canon G7X Mark ii , which is more affordable, and I used ours for a good few years before trading in and upgrading.
If you want to do landscape photography, then you’ll need to purchase a DSLR (Digital Single Lens Reflex).
When it comes to DSLR cameras, it’s all about the lens, which you’ll need to purchase separately.
The DSLR we use is super old now, it’s a Nikon D300 (the old version of the Nikon D780 ), but because I bought a newer lens for it (for the purposes of landscape photography), it works absolutely perfectly.
There’s no need for me to buy another camera when my camera works fine, I can just upgrade or change my lens for what I need.
Cameras have become much more affordable in recent years, so I don’t think you’ll have a problem finding a good quality camera for a great price, and second hand cameras aren’t a bad idea either.
Of course, if you want to be a hardcore photographer, then quality equipment is important, but this post is for the purpose of creating awesome travel pictures, not building a career as a photographer.
The best travel cameras and lenses
We actually put together a long in-depth post on the best cameras that other bloggers use. I recommend checking it out as it includes testimonials from fellow travel bloggers and what cameras they use.
Here it is --> The Best Cameras For Blogging
We also put together some in-depth guides on the different lenses for different types of cameras. These are super in-depth and will allow you to choose the best types of lenses to suit both your camera, as well as the sort of photography you hope to take.
These guides currently include:
- Best Sony a6000 lenses
- Best Sony a6300 lenses
- Best Sony a6400 lenses
- Best Sony a6500 lenses
- Best Sony a6600 lenses
- Best Sony a7ii lenses
- Best Sony a7iii lenses
- Best Sony a7riii lenses
- Best Canon 80D lenses
- Best Canon 90D lenses
- Best Canon M50 lenses
- Best Canon 6D Mark ii lenses
- Best Nikon D3100 lenses
- Best Nikon D3200 lenses
- Best Nikon D3300 lenses
- Best Nikon D3400 lenses
- Best Nikon D3500 lenses
- Best Nikon Z6 lenses
- Best Nikon D750 lenses
- Best Nikon D850 lenses
- Best Nikon D5600 lenses
- Best Panasonic GH5 lenses
And our accessory guides:
- Best Canon M50 Accessories
5. Use the Rule Of Thirds

The Rule Of Thirds is the oldest rule in the photography book, and honestly, it was something I ignored for a long time.
But once you realise the simplicity and purpose of it, you’ll see just how much of a difference it can make to your travel photos.
The rule of thirds is the idea that you divide your image into 9 even squares.
You’ll actually find that most cameras have these features automatically built into the display options.
Next, you then place your subject, or points of interest along the square and lines.
For example, if you’re taking a picture of a horizon, you don’t place it in the centre of the image (unless your purpose is to take a reflection shot).
The idea behind the theory is based on what our eyes naturally find pleasing, and it takes a while to get it right.
But it’s also important to note, that the rule of thirds isn’t scientific and it doesn't apply to EVERY shot.
So don’t rely on it, especially if you think a photo looks better another way.
It’s just a great place to start if you’ve never taken photos before.
Here’s an example …
6. Take a course

We live in a world where there is so much opportunity to learn.
And what better way to learn how to take better travel photos than with an online course.
I’ve learnt a lot from online photography courses , particularly via Udemy who offer a lot of choice for a very cheap price; such as:
- Photography Masterclass: A Complete Guide
- Digital Photography for Beginners with DSLR cameras
- Adobe Lightroom CC Photo Editing Masterclass (I use this guys course for video editing & he’s really good!)
You’ll find courses everywhere, and even if you don’t want to pay for one, then just try one from Youtube!
- 7 Simple Photography Tips
- How to edit like a pro on Lightroom
- Beginner Travel Photography Tips
It’s a fantastic way to pick up new tips, and don’t forget that when it comes to photography, practice makes perfect.
It’s all well and good knowing the theory of something, but if you don’t put it into practice, you’ll never really learn.
7. Use Lightroom & Photoshop

There seems to be this misconception that if you edit a photo...it’s cheating.
Well I’m sorry to tell you that 99% professional photos have work done to them, and this has been happening since people started taking photos.
It’s not about misconception, but actually it’s a lot to do with the camera we are using and the fact that a picture sometimes can’t represent what we’re actually seeing with our eyes.
The ability to edit or enhance a photo allows us to bring a photo to life.
The point is, photos are edited and you can help enhance your photos by using Lightroom or Photoshop .
Photoshop is much more advanced, and you’ll only need it if you plan on doing more serious photography or you simply want to advance your skills further.
But I actually suggest you take a course on using Photoshop, because there is a lot to learn!
But for the rest of us, we can use Lightroom!
Lightroom is an easy application that allows you to quickly edit your photos.
It’s free and can even be downloaded as an app on your phone ( Android / Apple ), or you can pay for it for desktop editing .
If you don’t know where to start when it comes to editing, then you can always use presets!
Presets are like photo filters that automatically apply to your photos and enhance them instantly.
Hundreds of people on Instagram now offer presets and you can download free presets if you don’t want to pay.
When you use presets, you’ll often find that they don’t make a photo look exactly the way you want all the time, and that’s when you can make small adjustments and learn what works!
Eventually, you start creating your own style and you start forming your own presets.
They’re a great way to quickly edit and help you learn tweaks and adjustments to a photograph.
Editing photos has become one of my favourite ways to kill time on long flights .
The effects of presets: This is how quickly a preset can enhance your photo.
The first photo is the original base photo, without any edits. It still looks beautiful, but the lighting doesn’t reflect the reality!

The second photo is with a preset and it adds a little extra oomph to the photo.

8. Travel more (i.e. practice more!)

Practice makes perfect!
There’s no point reading all this, and other articles online about travel photography tips, if you don’t actually try them.
The only way you’ll get better is to take more pictures!
Consequently, this means you need to travel more….but why would you complain about that! :P
You don’t need to travel internationally to practice either.
There is often a lot of undiscovered beauty in our home towns and home countries.
For example, though I’ve lived there my whole life, it took me years before I really saw Ireland .
In fact, when I road tripped the entire country , I was truly blown away by how beautiful it was!
It’s also a good idea to practice in different areas.
For example, shooting at a beach will be different than shooting with a mountain range.
And, shooting a landscape is different than shooting a person in a photo.
So practice different scenes and scenarios to develop and enhance your skills.
9. Use an array of different cameras

I have this really annoying habit now, which is that when I’m travelling with 2 or 3 different cameras, I HAVE to take the photo on all 3….
Sometimes it’s not viable if I’m under a time constraint or there’s lots of crowds around me, but when I can, I try to capture the same shot on two or 3 different devices.
Firstly, different cameras can produce different results, and I like to see those results and decide what’s best.
And sometimes it’s just nice to create something new.
For example, we’ve recently started shooting pictures with the GoPro Hero 8 and it’s crazy high quality and brings a unique frame to some picture locations. It's even better if you use a GoPro gimbal to help steady all your shots.
Also, when you shoot with different cameras, you’ll soon learn what works best for what.
For example, I use my DSLR (and wide angle lens) for landscape shots of lakes, mountain ranges etc.
And for Instagram based shots, where one of us is the focus, I use my Canon G7X Mark ii .
Oh, and we’ve discovered the GoPro is often the best for selfies, so when we do take one, we try and use the GoPro.
If you don't want to splash a lot of money on a new action camera, then check out my list of the best GoPro alternatives . Many of these have the same quality but cost a fraction of the price.
10. Study others

You can learn so much from others, and the only reason I can take better photos and edit better today is because of other people.
I’ve had lots of inspiration on Instagram and other fellow travel bloggers.
And whilst I don’t try to copy them, I do try and take inspiration from their work and apply that to my own.
Some of my favourite presets that I’ve used, and have proved to be a great starting point, are from …
- Salt In Our Hair
- Marie & Jake
- The Blonde Abroad
To get better with presets, you can watch tutorials on Instagram, Youtube and just keep surrounding yourself with new ideas and other people’s great content that will allow you to learn.
These are my favourite travel photography accounts on Instagram
- https://www.instagram.com/followmeaway/ This is my favourite photography account ever. Their shots are unbelievable and if I could get to this level one day it would take a lot of training and practice!
- https://www.instagram.com/destinationchaser/ Andi takes amazing photos, and her photography skills are crazy! Plus, she does a lot of her photography solo, and it’s crazy what she can create! She often shows you how she creates her photos too.
11. Bookmark locations to photo

Before I visit a location, I’ve usually already searched for it on Instagram and I’ve saved location or picture ideas that I really like!
This came in particularly useful when planning where to stop on our visit to The Lofoten Islands .
This is a pretty large region, and we only had two days to visit.
By researching ahead of time and bookmarking great locations I’d seen featured in other blog posts and on Instagram, it allowed us to maximise our time there and get the best possible photos.
Bottom line...
When you bookmark your locations, you can organise your time SO MUCH BETTER.
If some locations require a sunrise light with no one around, then visit those first, and save your spots that provide epic sunsets to the end of the day!
You can also download Locationscout which is one of the best travel apps out there for photographers. Once you've typed in a destination or city, it will show you all the popular photo spots and give you tips on the location, lighting, and the best time to visit.
12. Go scouting the day before

When you arrive at your chosen destination, it’s a good idea to scout out that location before you photograph it.
This allows you to get an idea of the exact shot you want to create and to make sure it actually exists (sometimes people tag locations wrong on Instagram).
If you are arriving in a new place without any plans of exactly where to shoot, then simply take a drive around and scout out your own locations.
This is how you discover great new places.
Then, bookmark them on your phone and, when you’re ready to head out early the next day, you can shoot the awesome locations you’ve discovered.
This is easier in some locations than others, and it’s far easier if you’ve got your own form of transport, such as a moped or car.
It’s always better to be organised when it comes to travel photography, or you could end up missing out on the shot of a lifetime!
13. Capture a memory

Travel is all about creating memories that will last a lifetime.
So don’t get too caught up in the moment of taking “the perfect picture”, because honestly, there is no such thing.
The perfect picture is subjective to the person looking at it!
So create a memorable experience, take photos and have fun with it.
As long as you love your photo, then that’s all that matters!
If you’re travelling as a couple , then you could get creative with your photos all whilst having fun. For example, doing lifts (I would NOT look graceful doing this), kissing (if you’re comfortable in public - and it’s allowed!!), jumping around, holding hands, whatever!
Just do what comes natural and you’ll create a really great photo memory.
14. Use a tripod

If you were to look back at our photos over time, you would see a massive difference in our photos from when we didn’t have a tripod, to actually having a tripod.
When we first bought a tripod, I actually bought a tiny, flimsy one that would tip over in the wind...so don’t buy that kind!
But when I finally invested in a decent tripod, ( like this one here ) it made all the difference to our photos!
Having a tripod will allow you to take portrait and landscape photos when you’re solo travelling, or if you’re a couple or group of friends wanting to take cool pictures.
Also, a tripod is a really practical and important tool for taking landscape shots, or shots where you are dropping the shutter speed down super low.
You can’t create those same shots with just your hands, a tripod is key to taking your travel photos to the next level!
A tripod will also help you frame a photo better.
If you plan on recording videos while traveling, I highly recommend getting a DSLR camera gimbal , allowing you to get stable shots even whilst moving.
15. Get a remote camera shutter release
When you take a photo on your camera, and pop it on timer, you need to run into the shot within the time limit (ours is 30 seconds).
However, if you have a remote or button that’s hooked up to your camera, then just get ready and click the button and your photo will be taken!
This means you won’t need to run back and forth between shots.
Different remotes/buttons will be compatible with different cameras, so just have a look on Amazon to find one to suit your chosen device!
It just makes life a lot easier when taking travel pictures.
If you can’t, then just set your camera to the highest duration on your timer and you’ll hopefully have enough time to get in the shot.
Some cameras can actually link up to an app on your phone that you can take photos via.
16. Shoot in burst mode

Burst mode is KEY to getting natural, high quality travel photos.
When you shoot in bursts your camera takes around 10-30 shots in one click (depending on your camera) and it means that you capture the “in between moments”.
This is particularly good if you’re awkward in front of the camera.
I can see what type of picture I want in a shot, but when it comes to me doing it, I can become an awkward turtle.
By shooting in bursts, I can walk around, spin and it will capture me doing something natural.
Burst is perfect if you want travel shots where you’re laughing, smiling and expressing other emotions.
Those in between moments are where the true awesome travel pictures are created.
Obviously, shooting in burst takes up more memory, so once you’ve chosen the photos you like in the editing process, delete the rest.
17. Shoot in the right mode

It’s easy to rely on “auto mode” because it’s quicker and modern cameras have good capabilities of adjusting to the scene.
However, auto mode doesn’t work in all conditions.
For example, when shooting at night when there’s low light and you need a super high IOS.
I shoot with my auto mode around 50% of the time, and my photos still turn out great because I can work with them post edit.
But, if you want to take your travel photography to the next level, then it’s time to switch to manual mode.
If you’ve never used a camera before, then you might not recognise the terms ISO, aperture, shutter speed.
For a quick explanation, head back to the top of this post where I provide definitions.
Simply put, if you want to take a great picture then having the ability to adjust these to the required settings will really help.
I’ll admit I’m still currently learning this, and it takes some time, practice and reading up on what settings work for different situations.
You can find lots of guides and information on manual mode online, and actually that is another thing a course is really good for.
18. Shoot in RAW

When we take photos on our camera, they’re typically set to be taken in JPEG form, and that’s a term you probably recognise.
But when I shoot any travel pictures, I always shoot in RAW and I encourage you to do so too. RAW files save all the data from the picture you took and don't compress them.
This means that when it comes to editing the photo, you can really change and switch up certain elements of the shot without damaging it.
A JPEG removes some of the quality and details of the shot, which will limit your editing capabilities.
Most cameras have the ability to shoot in RAW, even phones like the iPhone and Samsung Galaxy let you shoot in RAW.
Just pop onto your settings and you’ll find the details.
But be aware, a RAW file is larger than a JPEG since it’s not compressed, so be wary of that if you’re short on memory.
19. Be aware of colour schemes

If you want to create really cool, unique travel photos, then you need to be mindful of the colours in your shot and the colours that you're wearing.
For example, if you’re shooting in a jungle that’s surrounded by green, and you wear green, then you’re really just going to blend in with the shot.
But, if you wear a contrasting colour, such as red, then you will pop amongst the background!
It took me a while to learn the beauty of this tip, but now I always follow it.
So, if I know I’m going somewhere that has a green or blue backdrop, I can dress accordingly (and tell Brad what colour he should wear that day as well).
I’ve popped some photos below so you can see what I mean, but in general I love wearing red and red tends to be a great colour that “pops” so it’s my go-to!
Of course, if you rock up to a great spot and you’re wearing a colour that matches the background, which I have done in the photo below at the Botanical Gardens in Kandy , you can change the colour of your clothing to a slightly different shade, so that it still brings a little contrast to the photo…

Pro Tip: Use a colour wheel to get inspiration on colours for your next photo.
20. Develop your own shooting style

After you’ve been taking photos for a while, you’ll soon realise there is a type of photo that you like...and you’ll naturally start gravitating towards that.
And that’s great because it means you’re creating your own style!
For example, I love a shot that’s “natural”...
It usually involves me walking away from, or towards, the camera in a particular scene, which you can see below…
Or, if I’m shooting just Brad and I, I tend to like us facing away from the camera, towards the view, and sometimes holding hands, which you can see in these photos…
Sometimes, I go crazy and try to create something different, but a lot of the time it looks uncomfortable because it's not my style of photography, and that’s okay too!
For example, you’ll never see a picture of Bradley and I casually dancing...because, well, we’re just not that natural!
It’s all about learning what you’re comfortable with, and shaping your photos into your own creative format.
21. Be unique

No one wants the same shot from the same location a thousand times over.
Just because you’ve seen someone else take a shot in a certain location, it doesn't mean you need to recreate that EXACT shot.
Now, I’ll be honest and say I’m totally guilty of this at times, but I’ve tried to get a little more creative over the years and use other shots as an inspiration for a starting point in my shot.
Then, I’ll take it from a different angle, a different pose, a different colour scheme, or time of day etc...I won’t try to create the exact same shot.
In some places this is more difficult than others.
For example, with the Taj Mahal in India, everyone wants that iconic shot of you standing in front of the Taj.
So, in this case, it’s okay to try and get that exact shot, because...well … that’s the shot you came for!
But in general, don’t try to copy everything so that you’re identical, it also means that you put too much pressure on yourself to create something and if it doesn't turn out the exact same, you’ll feel disappointed.
Just BE YOURSELF! Photography and taking travel photos is all about getting your unique personality into those photos and to create those unique memories that are special to you.
Framing & Cropping: This is how framing your photo then cropping well can create the illusion that no one is around you ;)
The first photo is the original photo of me in front of the Taj Mahal, I knew there were people around, and despite my attempts at asking them to move, they wouldn’t. So I tried to centre myself in the photo of the Taj Mahal and take it landscape so that I could crop it after.
This is the second photo with the crop and my edits. It looks like I’ve got a shot with no one else in it...which is what I wanted because I’m going to frame this photo on my wall!

22. Use the right memory card

I have no idea if there is a science behind this, but I’ve personally noticed a difference.
When I first started taking photos I would buy the cheapest quality memory card I could find, but as my money pot has grown, I’ve started investing in “higher quality” memory cards
In reality, they aren't even that expensive and I’ve noticed that my travel videos and pictures definitely save at a higher quality…
So, for drone photography and videos, if I’m trying to shoot in 4K then a memory capable of holding that quality is needed.
For example, the SanDisk Extreme Pro is our go-to for massive file size shots; then the next one down for higher quality photos is the SanDisk Extreme .
For anything else, like memory cards for my phone's photos, I use the SanDisk Ultra .
It’s worth noting that when we had a GoPro Fusion , which is a 360 Degree camera, 2 super high quality cards were needed, otherwise the images would not show up on another memory card.
Basically, because images are becoming higher quality, we need higher quality hardware and software to cope with that.
23. Try unique angles

You know when you see people lying on the ground or hanging from something to get the shot? They might look crazy, but they’re probably creating a really cool and unique shot!
Below, I’ve got one of my favourite travel pictures from Sri Lanka, and it involved Bradley swinging on a random swing on the beach in Unawatuna … he had a lot of fun and it made for a really cool, unique shot!
There are lots of ways to get unique angles nowadays, and one of my favourites is the use of a dome, for half underwater/half overwater shots!
I’ve not actually got a dome yet, but I plan on bringing one to my next water based location to get some of these epic shots!
Final thoughts
I hope you’ve found these travel photography tips useful!
Please be aware that I am not a photographer, and I have A LOT to learn, but I like to learn!
I’ve seen shots online that I still don’t know how to create, but that gives me a goal and a challenge to create something new.
Do you have anything else to add?
If so, drop a comment below, I'd love to hear your personal travel photography tips!
Also, be sure to check out:
- 90 Travel Tips To Save You Time, Money & Stress
- Monzo vs Revolut: Which Is The Better Travel Card?
- How To Save Money For Travel

Leave a comment
Let us know what you think.

5 million people can't be wrong
17 Travel Photography Tips for Awesome Photos of Your Trip
Our article takes you through some basic travel photography tips to take your best travel photos. If the travel bug bites you, and you want to capture your adventures with photography, this is the guide to bookmark.
We’ll cover planning, camera equipment , shooting techniques , taking portraits , and more. So whether you’re a beginner or an experienced photographer, there’s something for everyone here. So, let’s get started!

17 Travel Photography Tips for Awesome Photos
So many of us enjoy traveling and taking countless travel photos on our trips. That’s because travel photography is a means of preserving our travel memories.
Travel photos also have the potential to connect us to our beautiful world. Good travel photos evoke emotions, transporting viewers to the heart of our journey. They can be vibrant street scenes, breathtaking landscapes, intimate portraits, or cultural details.
Images of places, events, art, and even food can transport us back to a magical place we once explored and experienced. Nothing is better than reliving a magical sunset, a mountain summit, or beautiful architecture months or years later!
With that in mind, these 20 travel photography tips will help you bring your photos to the next level!
1. Choose the Best Travel Photography Equipment
Most photographers have moved on from DSLRs to mirrorless versions. The smaller size and lesser weight are the obvious appeal here. There are many lightweight travel cameras if you’re looking for one.
An ultra-wide angle focal length like the Canon RF 15-35mm f/4 IS USM works well for travel photography. Or zooms like the Sigma 24-70mm f/2.8 Art lens and a 70-200mm works well.
A fast lens is ideal. But I don’t usually photograph at an aperture lower than f/4 or f/5.6, especially when photographing landscapes.
More often than not, I have more than one subject in the scene. And I usually want to capture some of the background to provide context to the shot.
I was in Rome for three days this past summer. But I couldn’t capture the famous Spanish Steps without people, no matter what time of day I tried.
So, instead, I chose to embrace the crowds and showcase this famous monument as the tourist attraction it is. I used a wide-angle lens to showcase the people and the structure to tell the story of the popularity of a famous travel landmark.

People are usually astonished at how little I carry with me each day. My basic equipment on any trip involves a couple of lenses ( 24-70mm and 70-200mm ). A spare mirrorless camera and some filters ( polarizing filter, ND, and graduated ND filters ).
I only bring a tripod when I know I’ll use it, a flash, and a load of memory cards and batteries. If I need other specific equipment (a macro lens, for example), I will add that to the things I take. But this is all I take with me for most of my shoots.
2. Pack Light and Avoid Carrying Too Much Camera Gear
Packing for any travel is an art in itself, especially if you are going away for an extended period. Travel photography requires a different mindset than wildlife or portrait photography with gear.
Travel photography often involves being out and about all day. And you spend a lot of time walking. That means carrying your gear around the whole day.
On any day, while on a travel photoshoot, I walk anywhere between 15 to 30 km. So, weight is an issue when it comes to travel photography.
Aim to carry only two lenses. It’s also great to have a lightweight backpack and light travel tripod . The last thing any travel photographer wants to do is carry around 44 lb (20 kg) of equipment, especially when you won’t use any of it at all.

Carrying equipment you don’t need saps your energy, making you less inclined to push yourself when tired. Who would want to walk up that long flight of stairs with a pack that weighs 55 lb (25 kg)?
Do you carry everything with you all day? No. Decide the specific photos you will take that day, then choose the necessary equipment.
Maybe you’ll be visiting several places in a short period. If so, you probably don’t want to carry all your lenses and cameras because of the weight and time restrictions. Leave unnecessary equipment at your accommodation.
Always aim to head out with as little as you need. Avoid carrying equipment for the sake of it!
3. Know Your Camera Settings and Photography Gear
This is one of the basics of photography, no matter your genre. You should know your camera inside out. When you are traveling and have strangers pose for you, that is not the time to try out different settings and fidget with your gear.
People begin to lose patience and often get suspicious of you and your ability to take a good picture. They are likelier to walk away rather than waste their time with a stranger who does not know how to operate their camera.
Along the same lines, don’t take that new lens out for a spin when you are on the travel experience of a lifetime. It’s best to test it beforehand to know how to use it best.

Good travel photos impact viewers because they capture fleeting moments tourists might miss. But these moments don’t last longer than a few seconds.
Unless you know your camera completely and can switch settings instantly, you might miss them. This is one of the biggest beginner photography mistakes and one of the easiest to remedy.
The only way to get to a point where the camera becomes an extension of your arm is to practice. The more you take pictures, the better and quicker you will evaluate the scenario and change settings.
It’s best to get efficient enough to subconsciously change and tweak settings in seconds. Only then will you capture those fleeting moments.
4. Research Travel Destinations Like a Photographer
Take the time to research the locations, customs, and photography norms of the place you will visit. Find out as much as you can about your travel destination.
And don’t just rely on travel books, like Lonely Planet , and websites. Having a real conversation with someone from the area when you get there is much more helpful than any book out there.
Remember, customs vary not only by country but by region and religion. Understand and appreciate the diverse cultural context and respect these differences.
A little research before your journey goes a long way. It helps avoid disappointment or despair if photo restrictions exist at your destination.
Good trip planning allows your photography to flow. Failure to do this will mean wasting time organizing things on the ground.
- Book Ahead: Get used to travel websites and apps like AirBnb, Booking.com, and Rome2rio. This eases any worries you may have about accommodation and travel.
- Research Stories : What would make a good story from your destination? One key difference between a photographer and a travel photographer is the travel photographer has a keen eye for a story. Are there any famous foods? Is there a big festival? How about famous local produce? Any of these can make a good story when a sequence of photos on that subject is put together.
- Contact Fixers: Reach out to people already at your travel destination. This massively helps with your trip research. It also means you have people you can meet when you arrive. A tour guide could even organize a photoshoot with locals you’d otherwise not be able to work with.
- Plan Around Weather : Although we encourage practicing photographing in all weather conditions, you want to aim for the best conditions. Arriving in the middle of monsoon season is not the best idea. Look at yearly forecasts and monthly average conditions to plan the best time to visit.

5. Make a Travel Photography Shot List
Travel photography research aims to put together a detailed shot list. This will be your checklist to work through to ensure you return with a good variety of photos.
Your shot list will vary depending on where you’re going and any potential brief you must follow. For example, maybe you’re photographing the Venice carnival. Your shot list for this will differ if you photograph Venice without the carnival.
How you set out your shot list will depend on how active you want to be. But it’s also about what you’re photographing and where.
It’s best to allow more time to travel to different locations in a big city. And ensure you also factor in tourist sights’ opening and closing times.
One of the best ways to set your shot list out is to break the day down into four different time segments:
- Morning : Sunrise to around 11:00 am
- Lunchtime : 11:00 am to 2:00 pm
- Afternoon : 2:00 pm to sunset
- Evening : After sunset
The hours might change depending on your destination and time of year. But breaking down the day can help you be more efficient with your time.
Also, break down your shot list by location. Plan to cover places that are geographically close during each time segment. This means you won’t waste your time traveling rather than taking photos. A final shot list should show exactly where you will be and when.

6. Practice Different Types of Travel Photography Before a Trip
After some planning, you’ll need to hone your craft. Does that mean jumping in at the deep end and booking your flight to a far-flung destination? In a word, no.
There are sensible steps you can take before you hit the road. Think of it as the equivalent of a professional sports player practicing before going out to perform in a big match.
The best advice is to start local and build up. The area where you live will almost certainly have photography opportunities, so start there. Day trips, particularly weekend trips, will also help prepare you.
The photographic techniques you need for travel photography are the same for getting good photos in your local area. The following are the types of photography you should be practicing in your neighborhood:
- The Magazine Spread : Imagine you’re going to photograph a story for a travel magazine. Call it 48 hours in your town. Make a photo list of places people would visit, the food they’d eat, and where they’d stay. Then, take photos of each of these things.
- A Wide-Angle Landscape : This photo shows a huge, panoramic scene. It could well be your double-page spread. This photo takes some effort. With an emphasis on “big,” you need to get a good vantage point.
- Festivals or Events : Festivals are a staple of travel photography. They are brief, so you need to nail down your photos. Practice getting varying photos from these events, such as the scene setter, some portraits, and some detailed photos.
- Food Photography : Practice taking photos at a restaurant… without upsetting your dining partner, of course! Think about natural light, arranging the table to get a clean photo, and try using an off-camera flash.
- Street Photography: Always practice your street photography. When you travel, people will bring your photos to life.

7. Learn How to Travel Smart
Travel photography can quickly become expensive. If you aim to pursue travel photography as a career, as mentioned, practicing in your local area is the first step.
Beyond that, you must learn to live on a modest budget but still use enough money to pay for that big-ticket photo.
After you’ve photographed your town a few times, up the ante with some day and weekend trips. Short trips get you familiar with the process of learning about a new place. You have to learn about places quickly to get good photos of them.
You’ll also be doing a lot of walking as a travel photographer. Use local transport as much as possible, and avoid staying in a five-star hotel bubble to stay on budget. These also offer a better glimpse into the local culture and lifestyle.
8. Set Realistic Travel Photography Goals
A famous quote is, “We travel not to escape life, but so that life does not escape us.” This hits the nail on the head for me. Be real about why you travel and what you want to gain out of each travel experience.
If you travel to a marketplace and want a sense of local lifestyles and customs, look for naturally occurring scenes. Don’t look for people you can pose or stage to get your shot. Those travel images are not true to your experiences.
The photo below is by no means a perfect shot. But I love that it shows how rustic transportation choices can be in smaller villages and towns in some countries. It makes for an interesting travel photo to share with friends and family.

9. Be Observant of Your Surroundings
Life is happening all around you all the time. People interact with each other. People interact with nature. Nature puts on a grand show during sunrise, sunset, or thunderstorms.
But don’t wait for a preconceived notion of the perfect moment to take your camera out and shoot travel photos.
At the same time, don’t see the world simply through your viewfinder. Observe the scene, anticipate the shot that you want to get, and be ready. Don’t fire away at every situation only to get home and realize you missed the moment.
While traveling in India, I once found myself in the middle of a village festival ritual. I had no idea what was happening, but I knew I had to document it.
Luckily, a female photographer was somewhat of a rarity in this village. And I was given a special seat in the middle of all the action. It was fascinating to see and experience and, of course, take photos of.
10. Be Present in the Moment
Being present in every moment of every day is a life lesson we all can benefit from. It doesn’t just apply to travel photos. Great moments happen every day around us that are worth documenting, not just for our clients but also for ourselves.
Training your mind to live in the moment and not worry about all the other distractions will also help you really “see” what is around you.
More often than not, you likely travel with a very tight agenda and timeline. No sooner than you get to your destination, you are already mentally prepared to move on to the next stop.
Instead, try to plan a single excursion for a day and focus on learning and experiencing that place or activity before moving on. That way, you can take travel images that accurately reflect your experience.

11. Don’t be Shy, Be Personable and Communicate
Self-confidence, an open attitude, and a genuine smile are important wherever you travel. People around you will generally respond to you with the same attitude you show them.
One of the biggest reasons beginner travel photographers don’t capture great travel images is shyness. It could be shyness in approaching and photographing people, places, or even objects.
Watching people take out their smartphones and snap away without a care in the world is always fascinating. Give some of those people a digital camera, and they suddenly develop a fear that people will challenge them about taking their photos.
Most people will be flattered that you want to take their photographs. But even if they don’t want you to take their photo, what is the worst thing that could happen?

If you ask them, they may refuse. If you don’t ask, they might turn away or put a hand up in front of their face. Does that seem that bad?
You should not have any issues as long as you use common sense. For example, it isn’t advisable to photograph military personnel without asking. Or you shouldn’t take photos in places where photography is not allowed, like museums.
In some cultures, some people may not want to be photographed because of religious beliefs. But in all my years of working as a travel photographer, I have never encountered any problems.
To capture great travel images, you need to overcome any shyness. You must be willing to approach and photograph anyone or any situation that will enhance your collection of that destination.
12. Get Permission Before Photographing People
Be open and honest about your need to photograph something or someone. More often than not, people will respond positively to you.
I have found that most people love to have their picture taken. If you are uncomfortable or nervous about something or someone, it’s best to leave the camera in your bag.
Almost everyone knows what a camera is and what it can do. Simple hand gestures and pointing to the camera are enough, even if you don’t know the language.
Not understanding the language should never be an excuse to photograph an unwilling person. As a photographer, asking for permission before you click the shutter rests solely on you.
If you have time, learn some simple phrases related to photography in the language of your destination country. This lets you communicate more directly with your subject, explaining why you want to take a photograph. It also shows your interest in the local culture.

Sometimes, you can use your camera as an ice-breaker. Take pictures of people and show them your photos of them. You will find that photography instantly becomes more fun and less intimidating. More than anything, respect that “no” really means “ no .”
Yes, I understand that there is another school of thought on whether asking for permission will ruin the composition of an image. A lot of photographers will argue one way or the other.
But if you are taking a picture of a person, you should try to ask permission before or after.
I remember one instance when I was traveling in India with my kids. We were visiting a temple in Southern India, and for some reason, many teenagers started taking pictures of my five-year-old son. They would come up to us and take selfies with my son.
Initially, it seemed innocent enough, and my son posed with them. Soon, it was getting to the point of being creepy, and I had to refuse. As a parent, I was extremely uncomfortable with having strangers take pictures of my kids.
This experience taught me a very valuable lesson. Respect people’s personal space and personal preferences.
13. To Pay or Not to Pay for Travel Photos?
Perhaps one of the most controversial moments while traveling is whether to give money to people you photograph. Sometimes, uneducated, desperate tourists give money to get what they think is an award-winning travel photo.
Soon enough, it becomes a lucrative business in the local community. This can become uncomfortable and unsafe for other photographers who travel through the same places.
I prefer engaging people openly, sharing my story, and showing my need for a picture. In most cases, people are more than happy to share their stories and to be heard. I, too, walk away more culturally and emotionally enriched with the experience.
But if someone expects money for a photograph, the decision becomes less of whether to pay and more of whether to take the photo. That is a judgment call each of us needs to make on a case-by-case basis.
And remember to be mindful of the example we are setting for future travelers and photographers.

14. Learn to Photograph in Any Weather
It’s a luxury to photograph in the best weather conditions, one not always enjoyed by travel photographers. So, learning to make the most of any weather is important to get meaningful photos.
Once again, you can practice this at home. How do you get great landscape photos on cloudy days or sunny days? Going to your local viewpoint and practicing for both scenarios will greatly help.
Plenty of photo opportunities when it rains can give you beautiful photos. Try your hand at some reflection photography once the rain stops.
15. Be Confident in Your Photography Skills
Travel photography can be quite fast-paced. You are trying to capture a scene as it plays out before you. You don’t have the time or the opportunity to re-compose the shot and click the shutter.
But this does not mean you must fire away at your camera’s maximum frame rate and pick the best of the lot in post-processing.
Instead, use your technical and artistic skills to read the scene. Analyze the light, assess the right camera settings, imagine the outcome, anticipate the shot, and take the picture.
Not only will you improve your observation skills over time, but You will also improve your photography.

16. Keep Good Travel Notes
This will help you with your travel photography in the long run. Most people love to create travel photo books of their travel experiences. Having a good log or journal of your adventures will help you add detail and context to the images at a later stage.
If you are an aspiring travel blogger or want to submit your travel photos to a publication, these notes will be a lifesaver. Most magazines want as much detail as you can provide about a place, your travel experience, and your travel photos.
If a pen and paper are not readily available, you can even use the voice memo app on your phone to record an audio narrative of your experience.
17. Travel Without Taking Pictures
As a travel photographer, this is one of my favorite tips to share… Take time to travel without obsessing over capturing every minute of every day with your camera.
Spend time to explore your surroundings without a camera. Your body and mind will thank you for it. Even if you are on assignment, add some downtime to your schedule.
Not only does it help you relax. But it also recharges those creative batteries when you return to your travel photography.

What’s Next?
I hope these 17 travel photography tips were insightful and will help you achieve better photos on your next adventure. Like everything, becoming a great travel photographer takes time and practice. You must always improve your skills technically and creatively.
You have to work hard while on a trip, get by on little sleep, and overcome any shyness that you may have. Needless to say, a love for traveling and exploring new places is also a must.
Planning and patience will help you make the most of your travel photography. And you’ll come back with some incredible travel photos that document your incredible journey.
On the hunt for more great tips before your trip? We have great posts on safari photography , taking photos in fog , or cropping photos to check out next!
Related Articles

6 Safari Photography Tips (for African Wildlife Photos!)

African wildlife photography is what I do. As a wildlife photographer, I’ve taken photos in 26 countries on every continent. But I keep going back to Africa. That’s because nowhere else has the same rich variety of game… and the sheer number of exciting, life-and-death moments that come with it! If you want to find […]

99 Awesome Photography Captions for Instagram (Elevate Your Posts!)

Calling all Instagram photographers! These photography captions for Instagram might be just what you need to elevate your posts and get your work noticed. Don’t let your shots fade into the background of endless scrolling! Pair them with powerful Instagram photography quotes and watch as they captivate and inspire. Read on and find the perfect […]

Cropping in Photography (Tips and Techniques for Beginners)

Cropping in photography is a powerful technique. A good crop can transform a good image into a visually compelling masterpiece. As you embark on your creative journey, understanding the basics of cropping becomes a crucial skill set. It’s not merely about trimming excess edges. It’s about refining your composition. You want to emphasize focal points […]

11 Best Budget Travel Cameras (Top Picks for Travel 2024!)

Finding the perfect camera for travel can be hard, especially if you are on a budget. Today, we will look through various options for travel photography. We’ll show you the best budget travel camera suitable for beginners all the way up to professionals. There are many different factors when considering the best budget travel camera. […]

9 Best Times to Take Pictures Outside (Pro Photographer Tips!)

I’m a wildlife photographer, and one of the best sightings I ever had happened during the middle of the day in bright sunshine. On a game drive in the Serengeti National Park, I saw four male lions taking down a Cape buffalo! The only problem was that the sunlight was so harsh. So there were […]

10 Best Places to Sell Used Camera Gear (+ Seller Tips!)

Do you have photography equipment you no longer need (or never should’ve bought in the first place!)? Read on to find out the best place to sell used camera gear. My hall cupboard is where my photography equipment goes to die. They all sit in the dark, just waiting to be sold off! There’s the […]

- Czech Republic
- Falkland Islands
- Latin America
- New Zealand
- North America
- South Georgia
- Kilimanjaro
- Adventure Travel
- Archaeology
- City Guides
- Itineraries
- Portrait Photography
- Tips and Advice
- Travel Photography
- Travel Stories
- Unhelpful Guides
- Wildlife Photography
- Work With Me
25 Brilliant Tips For Travel Photography
Let me guess: you love travel, but while you want to enjoy your holidays and make the most of the beautiful destination , you’re also a keen photographer and want to capture stunning images that you can look back on and share with your family and friends.
Contents (click to view)
That’s why you’re looking for tips for travel photography. But travel photography is hard! What gear should you take? How do you know where to go and when to go there? What about the weather? Photographing strangers is scary! Places are often crowded! There are so many questions and challenges that it can be quite intimidating to even start.
But as they say, a journey of 1000 miles starts with a single step. And you’ve taken that first step by coming here to read my easy travel photography tips for beginners. Hopefully all this advice will help inspire you to get your camera out and start improving your travel photography so you can create beautiful images of your holidays to enjoy for years to come.

Tips for Travel Photography: Planning
1/ do your research.
The best travel photography starts before you even leave home. To make the most of every destination , you first need to do your research. Look up the places you’re going to on Pinterest, Instagram, or your favourite travel blogs, find out where are the best places to go and the best time of day to go there, and get helpful advice on what gear to take. You can also search for images that inspire you and make a list of the sorts of themes and angles you’d like to get. That way, when you’re at the location, you won’t be wasting your precious holiday time searching for the right spot.

2/ Know your camera
Another thing you need to make sure you do before leaving home is getting to know your camera. I rarely read instruction manuals, but when I buy a new camera, reading the manual is the first thing I do. Modern cameras are packed with amazing functions to help you take stunning images, so if you just stick yours on auto and hope for the best, you’re missing a great opportunity to get the most out of it.
If you’re a beginner travel photographer you don’t necessarily need to start learning all the manual settings, but even taking advantage of some of the different modes your camera offers – such as sports, nighttime or portrait – will really help take your travel photography to the next level.

Read more: The Rewards Of Visiting Uganda’s Batwa Tribe
3/ Travel as light as you possibly can
Don’t weigh yourself down with endless lenses, bodies, tripods and other paraphernalia. Yes it’s great to have lots of gear to choose from, but especially when you’re a beginner the key to great travel photography is freedom and flexibility. If you’re lugging a heavy backpack full of stuff, chances are most of it will end up staying in the bag, or by the time you’ve rummaged through it to find the thing you want the moment will have been lost.
This image was taken on Day 5 of climbing Kilimanjaro with a little Fuji X100T compact I bought specifically so I wouldn’t have to lug a DSLR up the mountain. I’m sure I got more and better shots with this because I could have it in my hand so it was ready to go every time I saw something interesting.

Read more: Climbing The 8 Days Lemosho Route On Kilimanjaro
4/ Bring the camera you have, and always have it with you
The old tip, ‘the best camera is the one you have with you’ is absolutely true. There’s no point splurging on a fancy camera if it’s so heavy you end up leaving it in the hotel. I love my Canon 5D Mark IV , but I have to admit it’s very bulky and heavy and there are lots of occasions when it’s not sensible or appropriate to bring it.
I can’t count the number of times I’ve ended up just using my phone because it’s quick and convenient – and you can take great travel photos with a smartphone! As a beginner, the number one best way you can improve your travel photography is by always having your camera close to hand so that when you spot that perfect moment, you’re ready to grab it.

Read more: An Unhelpful Guide To… Aztec Ruins In Mexico
Travel Photography Tips for Beginners: On Location
5/ prioritise your photography.
You may get lucky and spot a golden opportunity for the perfect photo, but if you’re really keen on taking the best travel images you can, you’re going to need to carve out time in your trip for photography. That’s what’s going to make the difference between a nice holiday snap and a professional-quality travel photograph.
When I’m travelling, I often plan mornings or afternoons just to explore a place with my camera; for me it’s a great way to really get to the heart of an area and spot things I’d never normally notice if I was just walking round as a tourist.

Read more: Stunning Photography on the Streets of Cuba
6/ Get up early and stay out late
The best times to prioritise for travel photography are around sunrise and sunset. Not only will you get the nicest light – the hours just before and just after dawn and dusk (known as blue hour and golden hour) will give you the prettiest light and the most interesting skies, but you’ll also avoid the crowds and be more likely to get those gloriously empty images of your destination that you see on all the travel websites. Yes, it can be tough to drag yourself out of bed that early, but I promise you it’s worth it!
I took this image of our campsite in the Sahara Desert, Morocco , at blue hour, just after sunset, while the rest of my tour group were drinking wine round the campfire. I don’t regret it for a second, and of course I joined them as soon as I was done!

7/ React to the moment
While it’s great to have a plan, sometimes it’s even better to just chuck that plan out of the window and go with the flow. So you’ve arrived somewhere and it’s really crowded? The weather is bad? That famous landmark you came to see is covered with scaffolding? Then you’ll need to adapt.
Travel photography is all about seeing what’s in front of you and capturing the spirit of the place, and if that spirit isn’t what you were expecting, just roll with it. When I was in India I found everywhere was really crowded, so instead of trying to take photos of landmarks (arguably quite boring anyway), I decided to capture the other people taking selfies and came back with some much more characterful travel images as a result.

Read more: India: a Nation of Selfie-Lovers
8/ Set yourself a challenge
It can be all too easy to wander aimlessly with your camera, taking pot shots at random things and not really getting anything good. At times like these I find it’s really helpful to set myself a project. It might be to get ten really great photos of traders in a market, or to focus on doors, street dogs, or graffiti.
You could force yourself to shoot everything without using your zoom or set yourself a travel photography scavenger hunt with a list of 10 or 20 different things you want to capture that sum up the destination for you. Doing this will really force you to think about your photography and help you bring back much better images than if you just fire off your shutter at whatever happens to be in front of you.
In Trinidad, Cuba I spent about three hours wandering around just taking photos of people in doorways; this is one of my favourites.

9/ Abandon your tour group…
If you’re taking a tour or travelling with a group, travel photography can be extra challenging. Getting stunning images takes time and patience, and if you’re always being told to keep up, or you’re worried about getting lost, that can really limit what you can achieve.
So wherever possible, I find the best solution to this is to ditch the group and do my own thing. If you plan to do this, make sure you tell the guide so they’re not looking for you, get their number in case you do get lost, agree a time and place to meet later, and if you can, grab a friend for company and safety. I also always try to be one of the last back on the bus – not late, of course, so I’m delaying everyone, but not early either, so I’m not sitting in a half empty bus when I could still be out exploring.
In Chefchaouen, Morocco , I left the group and wandered off by myself to find interesting corners like this one.

10/ … but mine your guide for information
Taking a tour – even if it’s just a day trip or a guided visit to a site – does offer up one huge advantage for travel photography: local knowledge! Your guide should know all the best places to go, the key things to photograph, and the best times to go there. I always let the guide know that travel photography is my passion, and they will often give great advice and sometimes even adjust the itinerary to make sure I get extra opportunities to take amazing photos of the destination.
In Inle Lake, Myanmar we had a free day, and by chatting with the guide I learned it was possible to hire a private boat and go out on the lake before sunrise, which is how I got images like this one.

Read more: The Beautiful Leg-Rowing Inle Lake Fishermen, Myanmar
11/ Get lost on purpose
Sometimes the best images I’ve taken have been the unexpected ones, when you wander down a side street and discover a slice of local life that the guidebooks would never know about. If you stick to the beaten paths and follow the usual tourist trails, mostly what you will see is other tourists and the country’s polished public face.
It’s only when you dip a little behind the scenes that you find the really interesting stuff, the bits that haven’t already been photographed a million times. So be bold. Wander curiously and see where it takes you – and when you’ve had enough just ask for directions or let Google maps guide you back.

Tips for Travel Photography: Composition
12 / use the rule of thirds.
If you’re a beginner travel photographer you may already be familiar with this concept. The rule of thirds states that if you imagine your image divided up into thirds horizontally and vertically, the most visually-pleasing composition is one where the subject of the image sits on one of the third lines. This draws the eye in and makes for a much more satisfying image than if you put the subject dead centre or too far off to one edge. It really works and it’s one of the easiest ways to make a huge difference to your photography in a single step.
In the image below, you can see the horizon sits nicely on the bottom third line, and the church tower and window are on the left third line.
Of course the rule of thirds is really a guideline more than a rule. Feel free to break it if you want to! If you scroll through the images in this post you’ll notice that the majority of them do follow the rule – but not all of them!

13/ Include people
While you probably want to avoid massive crowds of tourists, it’s a really great idea to try to capture individuals in your travel photos. Including a person can add a sense of scale to a beautiful landscape or give a focal point to wide shot of a landmark.
A street with a few traditionally-dressed locals walking through will always capture the essence of a destination more completely than an empty road, while a charming portrait of a local character always makes for an engaging image. So rather than waiting for people to walk OUT of your shots, why not think about waiting for them to walk IN?
Read more: 25 Spectacular Places To Visit For Travel Photography

14/ Be patient
The best travel photographs rarely happen in an instant. Yes, it only takes a fraction of a second to click the shutter, but to get to that point you need not only planning, but also patience. Quite often I find I can see the potential shot, but the reality is not quite right. The sun needs to come out from behind a cloud, or I need the right sort of person to walk through the shot, or I want the market trader to hand over the money or the tourist to get out of the way.
Often I can be waiting for ages for the thing to happen; sometimes I lose patience and give up, but other times the farmer I’ve got my camera trained on looks up and laughs and it’s totally worth the wait.

Read more: Taking Portraits in Myanmar (Burma)
15/ Think about what’s in the background
A common mistake that many beginner travel photographers make is that they’re so focussed on the subject of their image that they fail to notice what’s going on in the background. Is there a tree growing out of your subject’s head? Did a tourist just wander into the back of the shot? Is there a parked car or pile of rubbish spoiling the view?
When composing your image, ask yourself, ‘what is this photo actually OF?’ and then try to exclude anything that distracts from that, either by reframing, moving your position, moving the subject (if you can!) or waiting until the annoying person in the back of shot has moved away.
In this image of the Falkland Islands I chose to include the people as I wanted to show the juxtaposition of the group and the albatross colony, but if I’d wanted this to just be a photo of the colony I’d have needed to move or zoom in.

16/ Move your feet
Most modern cameras have huge zooms which allow you to get a variety of different shot sizes from a single standing point. But if you stay stuck in one place, you may be missing out on a better view of your subject just to one side. So don’t get too attached to one spot: get closer, get further away, find a vantage point… you might just stumble across something unexpected. And as an added bonus: photography is great for your daily step count!
While the rest of my group were all standing together over to the left, I explored a bit further round to the side and was able to get a much better angle on this chimpanzee.

Read more: Chimpanzee Trekking In Uganda: A Breathtaking Wildlife Adventure
17/ Don’t copy Instagram
While it’s great to use Instagram for background research, once you’ve seen what’s out there try to think outside the box and do your own thing. No travel photographer ever won an award by taking the exact same picture as everyone else, and no one wants to look at hundreds of identical photos of the same place.
How many photos have you seen of a girl in a big hat with her back to the camera looking at a view? It’s so unoriginal! See what everyone else is doing, sure, but then use it as inspiration and move forward.

18/ Take the obvious shot, then take a better one
Each time you take a picture, instead of just taking one, take two. First, the standard one from the conventional viewpoint, and then do something different. Zoom in, crouch down, move closer, walk round the side, wait for someone to walk into the frame, look for a different vantage point, find some way to make your image a little bit less ordinary. This will set you apart from the masses and give you unique, more eye-catching images.
This first photo of the Duomo in Orvieto, Italy , is perfectly nice, but don’t you think the second one is far more interesting?

Read more: 30 Beautiful Pictures Of Guatemala And The Stories Behind Them
Traveller Photography: Best Practice
19/ be culturally aware.
There are many places in the world where photography is frowned upon. Some sites ban it, in other places local people just don’t like being constantly papped by passing tourists. Sadly with the rise of social media this is becoming more and more common, and it’s certainly something I’ve found frustrating in the past, but as a responsible traveller it’s your job to respect the locals and their customs.
So if you find yourself in a place where it’s not permitted or appropriate to take photos, don’t do it. Simply enjoy being in the moment and focus on making memories instead.
Read more: Ethical Travel Photography: How To Capture With A Conscience

20/ Ask permission
It’s not necessary (and it would be impossible) to ask permission from every man or woman in the street before you take a photo, but if you want to take a close up of an individual it’s a good idea to get their consent first. Doing this shows respect and gives that person the chance to decide whether they want to be photographed or not. Don’t worry if you don’t speak the language, a simple smile and a gesture towards your camera is universally understood.
Sometimes, however, you may not want to interrupt the moment as this can often cause the person to stop what they were doing and ruin the shot. In this case you’ll need to make a decision. If you’re far enough away and can quickly take the photo without offending them, do that. If you want to get closer, the best strategy is to ask permission, take one or two photos, walk away a little and wait for them to forget about you and go back to what they were doing, then come back and get the shot you originally wanted.

21/ Be safe
Of course it should go without saying that while following all of these tips, it’s important to be sensible. Don’t go off alone if you’re not sure you’ll be able to find your way back. Don’t wander into a dodgy part of town with a big expensive camera hanging round your neck.
Make sure your money is secure and your backpack pockets are properly zipped and your passport is in the safe in your hotel so that someone can’t pickpocket you while you’re busy focussing on other things.
Watch where you’re putting your feet so you don’t fall off a cliff or step in front of a car. If possible, have someone with you so you can keep an eye on each other. Photography is enormous fun, but that fun will come to a swift end if you get robbed or worse, and no image is worth putting yourself in danger for.

Travel Photography Tips for Beginners: Technicalities
22/ bring enough memory and batteries.
You’ve spent all that money to go all that way, so the last thing you want is to miss out on bringing home some fantastic images just because you didn’t bring enough memory! Make sure you’ve got your charger, at least one spare battery and a big enough memory card or two. Imagine how annoyed you’d be if you spotted something astonishing and then couldn’t capture it because your card was full or your battery died!

23/ Backup backup
Whether you can do this depends on where you’re going and how light you plan to travel, but I never go away for more than a few days without taking a laptop and hard drives with me. At the end of every day I download the photos and back them up on two drives which I store separately, so that if ever my camera or a drive gets lost or broken, I won’t lose all my images.
This image of a penguin colony in Antarctica was just one of several thousand that I took. Losing them all would have been a disaster so I backed up my photos every day.

24/ Learn some basic photo editing
If you really want to take your travel photography to the next level, you need to learn a little photo editing . No professional travel photograph you will ever see has come straight out of the camera; they have all been tweaked at least a bit.
I’m not talking about hours of colour correcting and photoshopping here, and if you’re a beginner I’m not suggesting you pay for pro editing software (at least for now, though you may want to later on), but there are plenty of free tools out there (including the one that probably came with your camera) that will allow you to make a few simple improvements. Things like cropping, levelling a wonky horizon, or adjusting white balance or exposure, are just small corrections that can really help to make each image just that little bit better.

25/ Practise at home
And finally – yes, it’s all about practice. No one ever got good at anything overnight, but if you’re passionate and you want to learn, you WILL get better! Why not try taking your camera out round your local area, for example? Practice street photography in your own town or shoot landscapes in your nearest bit of countryside. That way when you’ve splurged your savings on that trip of a lifetime, you won’t mess it up!

Further travel photography reading
Looking for more tips for travel photography? Why not try some of these:
- 19 Wildlife Photography Tips for Beginners
- 13 Top Tips For Photographing Markets
- How To Take Great Photos Of The Northern Lights
70+ Stunning South Georgia Photography Tips
- Photography on the streets of Cuba
Liked this travel photography tips post?
Why not Pin It for later? Thank you for supporting my blog!

Bella is a multi-award-winning travel writer, wildlife photographer and science and history documentary director from London. Among many awards and nominations she won Blogger of the Year at the British Guild of Travel Writers’ Awards 2023 and Best Photography at the Travel Media Awards 2020. Her work has been published by National Geographic, Wanderlust, and BBC Travel among others. Her films have been shown around the world including on the BBC, Discovery and PBS.
Further Reading...

Inside The Luxury Rocky Mountaineer Train: A Complete Review

My Camera Equipment List: What’s In My Gear Bag?

Beautiful Frescoes, Graffiti and Street Art in Naples, Italy
An antarctica clothing list: what to pack.
Some of the links on this site are affiliate links. This means that if you click through and make a purchase, I will earn a small commission at no additional cost to you. Passport & Pixels is a participant in the Amazon Services LLC Associates Program. As an Amazon Associate I earn from qualifying purchases.
Travel Photography: 8 Tips For Taking The Best Pictures
Documenting the beauty of your travels is a great way to remember the experiences. In today’s age of social media, posting pictures and sharing memories with your friends and family is important. You don’t need to be a professional photographer to get excellent shots.
We wanted to share with you our tips on how to get the best travel photos. Following these tips will start improving your photography game to best capture special moments.

Content and photographs provided by Yana Kogan and Timon .
Disclaimer: This post may contain affiliate links. If you make a purchase or booking through one of our links we may earn a small commission (don’t worry, it’s at no extra cost to you).
8 Tips For Getting The Best Travel Photos
1. choose photogenic destinations.

One of the most important things for getting amazing travel photos while traveling is picking photogenic destinations. While popular destinations like Thailand , Mexico, and Hawaii have ample places to get some insane shots, finding up-and-coming destinations also come with fewer crowds.
These intriguing locations are less photographed and less overdone. Namibia is hands down one of the best places to photograph in the world.
2. Get Good Gear

With the quality of cameras in the new iPhones and Android phones, you don’t need a DSLR camera to get great shots. However, having a DSLR camera has some incredible advantages. Having the ability to manipulate travel photos with different settings is imperative to any aspiring photographer.
Image sharpness, focus points, bokeh, long exposure, and so many other components come into play with DSLR cameras. It makes it easier to get a beautiful shot. Camera equipment is not cheap these days. We suggest starting out with second-hand equipment. We have done it for years and saved thousands of dollars on high-end gear.
Curious about my gear? I use a Canon 5D MIV camera and depending on the setting, switch between these lenses: Canon 16-35mm F/2.8 , Canon 24-70mm F/2.8 , and Canon 70-200mm F/2.8 . For aerial photography, I use a Mavic Pro drone. However, keep in mind no matter how much your gear costs it doesn’t always mean better photos.
3. Experiment With New Techniques

There’s no harm in being experimental with your photography. In fact, most professional photographers use trial and error to get new and innovative shots. So, how do you do that? A great way to learn is to go to a location near your home and find ways to get creative in capturing ordinary objects and scenery.
For example, trees, flowers, rocks, windows, cars, or people can all be used as subjects. Instead of taking regular pictures try to think outside the box. Take pictures fully zoomed in, find ways to create geometric shapes, or consider taking long exposure shots. This will enable you to think differently when taking a photo.
Get creative and don’t stop experimenting.
4. Shoot in RAW Format

Shooting in RAW format allows for manipulation of the photo in extraordinary ways. The difference between taking photos in JPEG format and RAW, is in JPEG the camera will snap a picture in RAW, and then process and compress the image automatically for you.
While in RAW mode, the camera stores all the information about the picture, allowing you to take control during post-processing (i.e. Lightroom/Photoshop). This allows more ability to correct the picture, whether is for overexposed shots or to edit out hoards of people from the photo.
Even if you don’t currently use software to post-process photos today, one day you might want to, so it is still worth holding on to RAW formatted travel photos. Also, technology is always changing and it will be possible to re-edit old photos to create better images.
5. Capture Unique Moments

While traveling, it is great to take unique and interesting pictures. Immerse yourself in a place to get shots of local people and cultures. Be sure to talk to them and ask if you can take a photo, in many instances, people are more than willing to pose for a shot. You might even be pleasantly surprised with an invitation to drink local wine or eat a home-cooked meal.
In many places, we have visited the people who help tell a country’s story. Wildlife photography can also capture impressive raw moments. Whether it is bird watching, your best friend’s dog chasing a ball, underwater photography of marine life, or cheetah killing prey in the Etosha National Park , each moment cannot be replicated and can make your photography stand out.
6. Spend The Time

When we first started traveling, we would create excel spreadsheets with dozens of places to visit while on holiday. Ten days in Italy would be packed with stops at Rome, the Amalfi Coast, Florence, Venice, and Tuscany. Sure, it’s possible to pack it all in and visit as many places as possible, but I can guarantee you that your photos will suffer.
Photography takes time. Recently, we visited Tukad Cepung waterfall in Bali, Indonesia . This is one of our favorite waterfalls in Bali . It also is a tight space and with a group of only 10 people, it could feel crowded. Getting the right shot takes time. Most people show up, spend 15 minutes and leave for their next destination. We were there for nearly two hours. Waiting for people to not be in the shot, the right lighting, and playing with different angles takes time.
Sure, you might have to cut out places to visit on your holiday, but your picture game will get stronger!
7. Photograph in Manual Mode

If there is one thing you take home from this article it would be this. Learning how to shoot in manual gives full control over the camera. There are times when the lighting is perfect, and auto mode might get it right, but most of the time, that is not the case.
To properly adjust for lighting, especially in unideal situations, understanding how to shoot in manual can be the difference from getting no shot to getting THE shot. It is virtually impossible to get good shots of astrophotography without using manual settings. Also, some of my favorite shots have been while using long exposure settings to create a dreamy look.
8. Wake Up Early

This is no secret for photographers. The best travel photos usually are captured at sunrise or just after the first light. With perfect soft lighting, sometimes you will have famous places all to yourself. Traveling with tours can be difficult to get this done, but for independent travelers, this is one of the best ways to immediately boost your photography.
Visiting bucket list destinations , such as exotic islands in the Philippines are getting more and more popular with tourists. Showing up before all the crowds arrive allows you to capture intimate moments with the best lighting of the day.
It’s time to go out and practice. The more time you spend focusing on these details and learning how to take better travel photos, the better the outcome will be. If there are other suggestions you think worked for you, we would love to hear about them. Let us know in the comments below!
That’s it – The secret to how we take beautiful photos!
Check out our favorite photography books for even more inspiration!

SHARE THIS ON PINTEREST

About the Author:

Yana & Timon met at college in Boston, Massachusetts. After graduating, they started their professional careers. They moved to San Francisco in 2010, a city they loved living in for nearly six years. After working and saving up money for several years, they quit their jobs and set off on an adventure of a lifetime. They started living a nomadic lifestyle in December 2015 and have not looked back since.
View all posts
Related Posts

The 15 Best Places to Visit in the US in August (2024)

The 12 Best Hotels in Fuerteventura, Spain

The 12 Best Hotels in Tromsø, Norway
2 thoughts on “travel photography: 8 tips for taking the best pictures”.

These are 8 fantastic tips! I love taking photographs whilst on my travels. It’s so important to document these experiences for the future! I’ll be sure to refer back here before heading out on my next adventure with my camera!

I am so glad you shared this information. It is very helpful for me.
Leave a Comment Cancel Reply
Your email address will not be published. Required fields are marked *
Winter is here! Check out the winter wonderlands at these 5 amazing winter destinations in Montana
- Travel Tips
20 Travel Photography Tips For Taking Amazing Photos
Published: October 11, 2023
Modified: December 28, 2023
by Isadora Brashear
- Tech & Gear
- Travel Guide
Are you an avid traveller who loves to capture stunning photographs of your adventures? If so, you’re in luck! In this article, we will be sharing 20 valuable travel photography tips to help you take truly amazing photos.
Travel photography is not just about capturing beautiful landscapes or famous landmarks. It’s about telling a story, capturing emotions, and showcasing the essence of a place through your lens. Whether you’re exploring bustling cities, serene beaches, or remote villages, these tips will elevate your photography skills and help you create memorable images.
From composition techniques to equipment recommendations, post-processing tips, and the importance of getting off the beaten path, we will cover it all. So, grab your camera, pack your curiosity, and get ready to capture breathtaking images that will transport you back to those incredible moments.
TIP 1: Use Natural Light to Enhance Your Subjects
When capturing travel photos, make the most of natural light to bring out the beauty of your subjects. Avoid harsh overhead sunlight by shooting during the golden hour – the hour after sunrise or before sunset when the lighting is soft and warm. Position your subjects in the direction of the light source for a stunning effect.
TIP 2: Experiment with Different Angles
Don’t be afraid to get creative and try shooting from unique angles. Get down low for an interesting perspective or find a higher vantage point to capture a bird’s eye view. Exploring different angles can add depth and variety to your travel photos.
TIP 3: Capture Candid Moments
Avoid stiff and posed shots by capturing candid moments of people immersed in their surroundings. Candid photography can evoke a sense of authenticity and help you tell a more compelling story through your images.
TIP 4: Pay Attention to Composition
Compose your photos using the rule of thirds, leading lines, and framing techniques. By carefully arranging the elements within your frame, you can create visually appealing and well-balanced compositions.
TIP 5: Include Foreground Elements
Add depth and interest to your photos by incorporating foreground elements. This could be a tree branch, a person, or any object that helps create a sense of depth and leads the viewer’s eye into the scene.
TIP 6: Experiment with Different Shutter Speeds
Try using different shutter speeds to capture motion in your travel photos. Use faster shutter speeds to freeze action, or slow shutter speeds to create a sense of motion and capture light trails.
TIP 7: Utilize the Rule of Thirds
The rule of thirds is a fundamental principle of photography. Imagine breaking an image into thirds both horizontally and vertically, so you have nine equal parts. Place key elements of your photo along these lines or at their intersections for a more balanced and visually appealing composition.
TIP 8: Include Local Culture and People
Don’t just focus on landscapes and landmarks; include photos that showcase the local culture and people. This will help you capture the essence of your destination and add a personal touch to your travel photography.
TIP 9: Use a Polarizing Filter
A polarizing filter can help reduce reflections and enhance colors in your photos. It can make the sky appear bluer, the clouds more defined, and foliage richer. Experiment with a polarizing filter to achieve more vibrant and captivating travel shots.
TIP 10: Take Multiple Shots
Take multiple shots of the same subject to increase your chances of capturing the perfect moment. Experiment with different settings, angles, and compositions to find the one that best represents your vision.
TIP 11: Tell a Story Through Your Photos
Every photo has a story to tell. Consider the narrative you want to convey with your travel photography. Whether it’s the bustling streets of a vibrant city or the tranquility of a secluded beach, let your images speak for themselves.
TIP 12: Use Leading Lines
Leading lines can guide the viewer’s eye through the image and create a sense of depth. Look for natural or man-made lines such as roads, pathways, or bridges to add a dynamic element to your travel photos.
TIP 13: Experiment with Reflections
Seek out reflective surfaces like water, glass, or shiny buildings to capture captivating reflections. Reflections can add visual interest and create unique compositions in your travel photography.
TIP 14: Travel Light
When on the move, it’s important to travel light. Choose a versatile camera and a few essential lenses to minimize weight and maximize flexibility. This will allow you to capture great photos without being weighed down by excessive equipment.
TIP 15: Capture Local Cuisine
Food is an integral part of travel. Don’t forget to capture the delicious local cuisine during your adventures. Take close-up shots, showcase the vibrant colors, and document the unique culinary experiences you encounter along the way.
TIP 16: Experiment with Different Perspectives
Don’t limit yourself to eye-level shots. Try shooting from different perspectives to add a sense of drama and interest to your travel photos. Get down on the ground or shoot from above to create compelling and unique compositions.
TIP 17: Incorporate Symmetry
Symmetry can create visually pleasing and balanced compositions. Look for symmetrical elements in your surroundings, such as buildings, bridges, or natural formations, and use them to create striking travel photos.
TIP 18: Pay Attention to Details
Don’t overlook the small details that make a place unique. Capture close-up shots of intricate architecture, colorful street signs, or traditional handicrafts. These details can add depth and personality to your travel photography.
TIP 19: Embrace Natural Weather Conditions
Don’t let bad weather discourage you from taking photos. Embrace the unique atmosphere created by rain, fog, or snow, and use it to your advantage. These weather conditions can add a sense of mood and drama to your travel images.
TIP 20: Edit Your Photos
Post-processing is an essential part of travel photography. Use editing software to enhance colors, adjust exposure, and crop your photos. However, remember to maintain a natural and realistic look, avoiding excessive manipulation.
1. What kind of camera gear should I bring for travel photography?
When it comes to camera gear for travel photography, it’s best to pack light. Consider bringing a versatile DSLR or mirrorless camera, a wide-angle lens for landscapes, a zoom lens for capturing distant subjects, a tripod for stability, extra batteries and memory cards, and a travel-friendly camera bag.
2. How can I improve my composition skills?
Composition is key in travel photography. To improve your skills, pay attention to your framing, rule of thirds, leading lines, and the use of foreground and background elements. Experiment with different perspectives and don’t be afraid to break the rules to create compelling compositions.
3. How do I capture motion in my travel photos?
To capture motion, use a slow shutter speed and a tripod to create long exposures. This technique works well for capturing flowing waterfalls, bustling city streets, or even stars in the night sky. Practice different shutter speeds to achieve the desired effect.
4. How can I make my travel photos stand out on social media?
To make your travel photos stand out, focus on creating unique and eye-catching visuals. Play with colors, utilize interesting perspectives, tell a story through your captions, and engage with your audience. Experiment with different editing styles to develop a consistent visual identity.
5. What are some tips for capturing portraits while traveling?
When capturing portraits while traveling, make an effort to connect with the locals and create a comfortable environment. Use natural light whenever possible and experiment with different angles and poses. Candid shots often result in the most authentic and memorable portraits.
6. How can I protect my camera while traveling?
To protect your camera while traveling, invest in a durable camera bag or case. Use lens filters to protect the front element of your lens, and consider purchasing insurance for your gear. Be mindful of your surroundings and avoid risky situations that could result in damage or theft.
- Privacy Overview
- Strictly Necessary Cookies
This website uses cookies so that we can provide you with the best user experience possible. Cookie information is stored in your browser and performs functions such as recognising you when you return to our website and helping our team to understand which sections of the website you find most interesting and useful.
Strictly Necessary Cookie should be enabled at all times so that we can save your preferences for cookie settings.
If you disable this cookie, we will not be able to save your preferences. This means that every time you visit this website you will need to enable or disable cookies again.
- Skip to primary navigation
- Skip to main content
- Skip to primary sidebar
- Skip to footer
Indigo Sahara
Travel Reviews, Guides, Tips & Travel Hacking
25 Easy Poses For Travel Photos (With Examples)
By: Indigo Sahara, M.A. | Published: April 5, 2023 | Updated: April 5, 2023
Posing for photos is surprisingly difficult. Honestly, posing correctly for location, outfit and body type does not come naturally to anyone. In order to help you advance in your photo-posing skills quicker than I did, I’m giving you access to over 25 easy poses for travel photos that anyone can do.

Disclaimer: This post contains Amazon affiliate links. If a product is purchased using one of the following links, I may earn a small commission from the brand at no cost to you.
But first, I want to let you know about a couple other blog posts I have that you’re going to want to check out next:
- Cheap Travel Camera Gear For Better Travel Photos
- 15 Easy Beginner Tips To Elevate Your Travel Photography
- 115 Travel Instagram Captions You Need In 2023
Now, let’s dive into the best poses for travel photos .
Table of Contents
Posing Basics: How should I pose for pictures while traveling?
It is important to know a few of the basics when it comes to posing. Here are five pro posing tips to remember as we go through the specific poses for travel photos .
1. Pose To Evoke Emotion
A good photo evokes strong emotion. Try to evoke the exact emotion you feel at the time of taking the photo .
Perhaps you feel a sense of awe, happiness, curiosity or seriousness. Show the viewers how you feel. This can be done through facials, lighting, editing and, of course, posing.
2. Keep Your Hands Busy
Keep your hands busy if possible. Touch your cheek, put your hand on your hip, run your fingers through your hair and use props whenever you can.
Of course, there will be times when you have nothing to do with your hand(s). So, when that’s the case, loosen up and let them hang naturally.
3. Point Your Toes
Whenever you’re sitting or have a foot off the ground in a photo, your toes should be pointed . This will elongate your legs and look a lot less awkward.
If you can’t point your toes in the shoes you’re wearing, such as hiking boots, flex your feet. Basically, just don’t leave them dangling.
4. Avoid Touristy Poses
Touristy poses (like jumping, peace signs, or awkwardly standing and smiling) are fun and location-appropriate sometimes.
But, if you want to look like your favorite travel influencer, avoid these poses the majority of the time.
5. Combine These Posing Tips Together
As you browse through the following travel photo poses , you will notice that I often combine two or more of these posing basics together. Once you practice and get the hang of it, combing the tips will become second nature.
Poses For Travel Photos
1. make triangles with your arms..

This may sound a little peculiar at first, but making triangles with your arms is an industry trick-of-the-trade in the world of photography.
Making triangles brings definition to your muscles, elongates your torso and, overall, brings more life to every photo. It will also help you feel less stiff and more natural, which is the goal.
2. Make a triangle with one of your legs.

The same rule applies with your legs.
Make a triangle with your legs by bending or popping one of them.
3. Hold on to the back of your hat.

I always bring hats on my trips. As you can see, hats make fantastic travel photo props . Plus, they give you something to do with your hands.
Often times, the wind is actually so strong where you are taking travel photos that you have know choice but to hold on to your hat.
Other times, holding the back of your hat can make the viewers imagine that there is wind, and this helps the viewers imagine that they themselves are at the location.
4. Lean against a wall or other nearby object.

This pose is pretty self-explanatory; just be careful not to slouch too much while you lean.
Leaning straight-up gives an element of calm-and-collected to the photo, which looks particularly fitting in luxury travel and beach photos.

5. Run away from the camera.

Again, one of the key ways to producing a high-quality travel photo is to evoke emotion and desire.
Running away from the camera toward an object in the photo will make the viewer want to run toward the view with you, and it creates an exciting feeling of FOMO (fear of missing out).
6. Run toward the camera.

The previous rule applies here, too.
Running happily toward the camera leaves a cheerful and frolick-y impression on the viewer, which is exactly what us travelers feel when we’re at a new destination.
7. Face away at an angle and look back at the camera.

This is, hands down, one of the most flattering travel photo poses .
Plus, this is an excellent pose to use when there is nothing in the photo to sit or lean on.
Take this travel photo pose to the next level by holding a prop with your back arm, such as a hat, purse or beverage.
8. Face away and pop one leg.

Facing the view with your back to the camera and one leg popped is another extremely flattering pose.
It simultaneously brings attention to both you and the view, without taking away from the view.
9. Look up and tilt your head back slightly.

As previously mentioned, the goal with any travel photography is to evoke emotion.
Looking up and tilting your head back will evoke a sense of freedom, which many people feel — or desire to feel — while traveling. You can smile or keep a more serious facial expression here.
10. Focus on the background

This “pose” is more of a camera trick than a physical pose, but I add it to the list, nonetheless.
Focusing on the view rather than the subject shows the viewer exactly what they would see if they were with you. If the viewer was at the location with you, and if you were standing slightly in front of them, you would be out of focus as they look directly at the view.
To get the most blur, you will need a camera lens with a low f-stop. I suggest getting one with an f-stop under 2.0, like the Sigma 28-35mm F1.8 that I used in the above photos.
11. Block the sun with your hand. (Poses For Travel Photos)

Kind of like the wind-and-hat situation, sometimes you actually need to block the sun out of your face .
Not only can this pose cast a unique shadow across your face for an extra element of pattern, but it also makes a seemingly perfect photo location look a bit more realistic.
12. Play the main character.

Indulge in a main character moment while you’re traveling.
Have fun and act sassy if it fits the style of the location.
13. Look up in awe. (Poses For Travel Photos)

You know those moments when you go somewhere incredible and all you can do is look up and mutter, “Wow”? Try to reenact that feeling in your travel photos.
I especially love to use this travel photo pose in busy locations where I don’t want to look like a complete “influencer in the wild.” By looking up at the view like you would naturally anyway, you can sneak photos without bystanders even noticing that you’re posing.
14. Sit with your knees stacked.

Posing while sitting can be tricky.
The best way to pose while sitting is to sit with your knees stacked on top of one another . This pose elongates your legs, forces you to sit up straight and prevents a potentially awkward crotch shot.
15. Rock back and forth for a fake walking shot. (Poses For Travel Photos)

Would you ever guess that I wasn’t actually walking in the above photos? No? Exactly. I was just rocking back and forth!
Just like added emotion to a photo, adding motion is equally important for producing professional quality travel photos .
This posing hack comes in handy particularly when you want to stand in a specific spot of the photo frame but still want to add motion. Nobody will ever know you weren’t genuinely taking a stroll.
16. Face away and look down at an angle.

This simple pose for travel photos allows the view to speak for itself.
Its simplicity is physically flattering, and you can easily incorporate the triangle rule by popping one leg.
17. Throw your hands up. (Poses For Travel Photos)

Throwing one hand (or both hands) up in the air will inspire the viewer to travel and feel as free as you did in that moment.
P.S. if you’re a peace sign addict, this is one pose where you can throw up a peace sign appropriately without looking like a tacky tourist.
18. Throw a jacket or purse over your shoulder.

In you haven’t noticed, props are amazing when it comes to adding a little spice to your travel photos. Props can be as simple as your jacket, coat, sweatshirt, purse or scarf.
If you want an alternative way to hold your prop, throw it behind you over your shoulder.
19. Hold an object in front of you to add foreground. (Poses For Travel Photos)

A basic photography rule is to always have a defined foreground, middle ground and background whenever possible.
An obvious foreground, such as a foreground that is created when you hold an object slightly in front of you, can bring a lot of dimension to the photo, which is very pleasing to the eye.
20. Act like a drama queen.

Embrace your inner influencer, act like a drama queen and just have fun with it.
Even though you may feel silly in the moment, especially if you’re in public, remember that the awkwardness lasts 30 seconds but the amazing travel photos you create will last your entire life .
Who cares what strangers think!
21. Hold food or a drink in your hand. (Poses For Travel Photos)

Food and drinks are super simple yet impactful props in travel photos. Why? Because cultural foods are a huge part of traveling to a new place. Demonstrate this part of traveling by incorporating the foods you eat (and drinks you drink) into your photos .
And, chances are, you’ll already be eating out on your trip anyway.
Bonus tip: food and drinks act as props that give you something to do with your hands .
22. Stand tall and proud.

You don’t always need fancy camera equipment or stellar pose ideas to make a great photo.
This photo from the Bonneville Salt Flats was taken on an iPhone. All I did was stand tall and proud .
23. Hold or adjust your sunglasses. (Poses For Travel Photos)

Like hats and jackets, sunglasses make great props in travel photos as well. Adjust your sunnies to add a little attitude and pizzaz.
This pose also naturally adds a triangle shape with your arm(s), which, as you know by now, is one of the best ways to elevate any pose for travel pictures .
24. Get a bird’s eye view.

Disclaimer: yes, these are drone shots. But, you don’t always need a drone to catch a bird’s eye view.
Lay down on the ground and have a friend take a photo from above. A chair, ladder or ledge of some sort will get the job done and provide your viewers with a new visual perspective.
25. Grab your jacket collar or opening. (Poses For Travel Photos)

Lastly, acting like you’re going to button your jacket (or pop your collar) keeps your otherwise limp hands busy. Not to mention, it brings more life to the photo.
And that wraps up our 25 easy poses for travel photos . Which travel photo pose are you going to try? Be sure to follow me on Instagram and tag me in your posed photo for a chance to be featured on my Story .
More Tips For Travel Photos
15 Easy Beginner Tips To Elevate Your Travel Photography Beach Picture Ideas For Instagram You Need Now Cheap Travel Camera Gear For Better Photos 115 Travel Instagram Captions You Need To Copy

Save These Poses For Travel Photos
Save these poses for travel photos for easy access later by sharing to your socials.
- Share on Twitter Share on Twitter
- Share on Facebook Share on Facebook
- Share on Pinterest Share on Pinterest
- Share via Email Share via Email

About Indigo Sahara, M.A.
Indigo Sahara, M.A., is the founder and CEO of the Indigo Sahara travel blog. Since earning her master's degree in global leadership, she has traveled to more than 20 countries. Now, her goal is to make travel accessible to all by teaching others how to travel on a budget. She writes world travel guides and travel hacking tips weekly.
you’ll also love

Get exclusive content.
Stay up-to-date & receive the latest travel guides and tips right to your inbox.
Reader Interactions

January 29, 2023 at 5:00 pm
Love these tips! Thanks for sharing!

January 31, 2023 at 4:39 pm
So glad you like them, Brianna!
[…] Learn a couple of poses for your travel photos. (Here are 25 easy poses for travel photos with examples!) […]
[…] I have an entire guide to the best Amalfi Coast Instagram spots, as well as travel photo tips for posing, beginner travel photography and the best budget travel camera […]
[…] In addition, if you need some pro tips on taking the best travel photos, I have an entire travel photography beginner guide, as well as guides on how to choose the best camera gear for travel, the best camera lenses for travel and even how to pose in travel photos. […]
[…] extra Chicago photo inspiration, I have an entire guide full of travel photo tips for posing, beginner travel photography and the best budget travel camera gear. Plus, […]
[…] Fall is, hands-down, one of the most beautiful times of year to take photos. There is no doubt that the changing colors and morning haze make perfectly photogenic landscapes. But, sometimes, it can be hard to come up with photo concepts and poses. […]
[…] you need some extra flying photography inspiration, I have numerous travel photo tip guides for posing, beginner travel photography and the best budget travel camera […]
[…] some extra Animal Kingdom photo inspiration, I have several guides with travel photo tips for posing, beginner travel photography and the best budget travel camera […]
[…] if you really want to elevate your Maui Instagram photos, check out my ultimate guide to posing for travel photos here as well as my beginner’s guide to travel photography […]
[…] if you need some couple photography inspiration, I have numerous travel photo tip guides for posing, beginner travel photography and the best budget travel camera […]
[…] if you need some extra travel photography inspiration, I have numerous travel photo tips for posing, beginner travel photography and the best budget travel camera […]
Leave a Reply Cancel reply
Your email address will not be published. Required fields are marked *
Save my name, email, and website in this browser for the next time I comment.

New York Song Captions For The Perfect Post
Follow on instagram.
@indigosahara

- Destinations
- Travel Tips
- Travel Essentials
- Travel Photography
- Camera Gear
- Work With Me
- Privacy Policy
- Refund And Returns Policy
stay in the know
Copyright Indigo Sahara © 2024 · Theme by 17th Avenue

How to Take Better Travel Photos – Beginner Tips, Perfect for Smartphone Photography

Do you want to learn some simple tricks to take good travel photos , either with a camera or just with your phone?
How often have you spent a vacation snapping photo after photo, only to find that many of them really didn’t turn out that great?
At the end of the day, there are so many factors that can affect your photos – and odds are that circumstances are rarely going to be ‘ideal’ when you’re on vacation.
The good news is that just because conditions aren’t perfect, that doesn’t mean that you can’t start to capture better photos.
In fact, with the right technique, you can overcome most of the challenges that you may face, and should see a dramatic improvement in your photos.
5 Simple Tips to Take Better Travel Photos
1. try to take photos when the light is just right.

In most cases, light that is ‘just right’ is when there is plenty of soft light that is diffused and evenly distributed over your subject .
Ideally, there should be no hard shadows or excessively bright highlights.
As you can guess that means you should avoid taking photos in the midday sun if it is very bright.
Similarly taking a photo before dawn or after dusk won’t be that great either as there won’t be enough light.
One of the best times to take photos is actually just before dusk or just after dawn, during what is known as the ‘golden hour’ .
2. Keep the Camera as Steady as Possible

While you’re taking a photo you should make sure the camera is as steady as possible and does not move at all.
That may be tricky, but a good place to start is by holding the camera with both hands and keeping your elbows near your sides.
If you want you can explore other ways to hold cameras as well, especially if you want to get into different positions when capturing photos.
Another option that you may want to consider is making sure you have a travel tripod with you at all times.
Find one that is portable, and can be set up quickly so that you don’t have to spend too long before you snap your photo.
3. Start Using the Rule of Thirds

The rule of thirds is arguably the easiest composition technique to apply and a very simple tip to take better travel photos.
What is the rule of thirds in photography?
To start using the rule of thirds you should just turn on the grid feature that is present in most cameras and on many phones. Then position the subject and other elements using the gridlines and intersection points.
Think about what elements of the photo are most important, and try to position them at or near the lines and intersections of the grid.
They don’t have to be perfectly lined up as long as they’re close.
When you are positioning elements using the three by three grid the subject will be slightly off-center which will make it look more compelling .
All the other important elements should be spaced out as well, allowing the composition to be more balanced.
Keep in mind that although the rule of thirds is a very useful guideline to take good travel photos – it is far from set in stone.
If you feel you could take a better photo by ignoring it, don’t let it stand in your way.
4. Find Unique Perspectives

Most beginners take photos from a single perspective – head-on and at eye level.
If you want your vacation photos to stand out, you should mix it up a little and find unique perspectives that show the subject or scenery in a different way.
A good place to start is to position your camera near ground level or take ‘overhead’ shots.
Aside from that however you should constantly experiment with different angles, and take a few shots from each angle.
5. Try to Photograph People in Candid Situations

Posed photos are all very well and good, but they practically scream, “Tourist!”.
If you want your travel photos to look more unique , you should try to photograph people during candid moments.
Unlike posed photos, candid photos have the potential to carry a lot more emotional weight – and tell a story. That gives them the ability to be far more compelling than posed photos ever could be.
Make no mistake, taking candid photos of people requires patience, a good eye, and quick reactions .
Keeping your camera on a strap around your neck is a good policy, as you’ll be able to grab it and capture a candid moment much more quickly.
Conclusion: Taking Better Travel Photos Isn’t Difficult

These tips to take good travel photos may sound basic, but they really can help improve your photography skills.
If you implement all of the tips listed above consistently, you should be able to capture some really amazing photos the next time you’re on vacation.
You’ll end up with photos that you feel proud of when you publish them on social media or share them with friends and family.
As you can see it isn’t that difficult to start taking better travel photos if you know what to do.
Still, the more practice you get the better you’ll be .
Taking good travel photos takes time, but I hope these simple tips will help you improve your photography skills!
And although these tips can really help, if you want to learn more about taking better travel photos I highly recommend taking a (short) photography course . Udemy is my go-to platform for inexpensive online courses, and they offer a wide range of photography courses.
“Photography is a way of feeling, of touching, of loving. What you have caught on film is captured forever… It remembers little things, long after you have forgotten everything.” — Aaron Siskind
- In Pictures – Where You Should Travel to Next
- Cutting a Video – Tips to Help You Create a Great Travel Video
- 10 Reasons to Travel
Like this article with tips to take better travel photos? Pin it!

This article with travel photography tips for beginners contains an affiliate link. I may receive a commission for purchases made through this link, at no additional cost to you.
Leave a Comment Cancel reply
Contact: [email protected]
Created by Mar y San Design

10 Quick Tips and Tricks for Editing Your Travel Photos Before Posting Them on Social Media
Last Updated on July 6, 2023
Capturing your travel experiences via photos is exciting, but showcasing them in the best possible light on social media requires a touch of photo editing magic. And whether you’re a holiday snapper or a passionate wanderlust-filled adventurer, having a solid understanding of some quick tips and tricks can help you navigate this creative process with ease.
10 Tips and Tricks for Editing Travel Photos for Social Media
This guide will walk you through editing your travel photos before posting them online, shedding light on some of the best tips. Dive in to elevate your social media photo editing game!
1. Choose Your Best Shots
Once you’re back from your trip, it’s natural to have collected thousands of pictures that document every moment. However, not every picture is worth sharing on social media. Be selective in picking out the best photos that showcase your adventure in the best light possible.
Focus on identifying images with excellent composition, interesting perspectives, or ones that encapsulate unique moments. Make sure these images are high-quality and easy to edit.
2. Embrace Cropping
Cropping isn’t just about sizing an image to fit a particular dimension; it’s a creative tool that enhances a photo by removing unnecessary objects from the scene. Through thoughtful cropping, you can emphasize specific elements and direct your audience’s attention.
It also provides an opportunity to play around with the composition of your photo, potentially changing its entire feel. Don’t shy away from this simple yet powerful tool; embrace it instead!
3. Utilize Color Correction
Sometimes, your travel photos might look a little dull or off-color straight out of the camera. This is where color correction comes in. By tweaking the saturation, vibrancy, or temperature sliders in an editing app, you can alter the mood of your image, making it appear warmer or cooler.
It also lets you correct unnatural colors that may be present due to bad lighting. Prepare for a bit of experimentation, as you’ll need to tamper with sliders to get the most out of your shots.
4. Remove Image Backgrounds
In the process of editing your travel photos for social media, you might encounter images with distracting or undesired backgrounds. But don’t throw away the photo just yet! You can easily remove image backdrops online using a variety of AI-powered tools, including Picsart.
All it takes is a few clicks, and you end up with a clean cutout of your subject that can be overlaid on solid colors, other picaresque scenes, or used alone for a more dramatic effect.
5. Enhance Lighting
Lighting plays a crucial role in the outcome of your photos, dictating mood and atmosphere. However, it’s not always possible to capture perfect lighting while you’re traveling. Fortunately, you can enhance the brightness or the shadow details in any photo using editing software.
Even an image taken in less-than-optimal light conditions can come alive by correctly altering blown-out or darkened photos, as it reveals hidden depths and details obscured by poor lighting!
6. Reveal Details with HDR
High Dynamic Range (HDR) editing is a fantastic tool to capitalize on when fine-tuning your travel photos. This technique works to balance the light levels in your images, drawing out details hidden within the highlights and shadows that often get lost in photo processing.
HDR combines multiple shots at different exposures to create an end result packed with detail and depth, representing a more accurate visual experience without relying on editing programs.
7. Don’t Rely on Filters
Whether you’re going on a trip to Asia or Africa, you’ll likely want to bring out the best photos that highlight your travel experience. But if you go all-out with filters, it’ll be difficult for your followers to know what’s going on. For this reason, you should try to keep your shots candid.
Some editing is a good thing. In fact, we recommend it! However, if the filter makes your images look distracting or gaudy, that’s a problem. Use filters sparingly or consider not using them at all.
8. Straighten Your Horizons
Straightening your horizons ought to be one of your top priorities while editing travel photos for social media. Have you noticed how, despite your best efforts, those scenic beach or panoramic skyline images don’t look right? More often than not, it’s because the horizon line is slightly bent.
Thankfully, most photo editing platforms offer straightening tools that let you tweak and align your image until the horizon is perfectly leveled, making your image look more professional.
9. Retouching Portraits
Retouching portraits is a significant part of photo editing, particularly when your travel photos include a wealth of people-focused shots. Facial features often require a different approach in editing since they hold fine details and textures that we naturally focus on in selfies.
Features like skin tone can be softened using retouching tools for a more polished look, or you can use tools to enhance the eyes in close-up photographs to draw attention.
10. Consistent Editing Style
As you prepare your travel photos for posting, consider the kind of aesthetic you want to build. Are you leaning towards warm, sun-kissed hues or prefer more minimalist, monochrome shots? This consistency comes from applying similar tones, contrasts, and filters across your images.
Keep in mind that your photos don’t have to look identical, but they should carry similar cohesive elements. It’s this uniformity that makes your posts immediately recognizable to users!
In Conclusion…
With these quick tips and tricks in your photography toolkit, you’re well-equipped to turn your travel photo collection into a mesmerizing gallery for social media! Remember, every edit you make should strive to enhance the natural elements of your shot rather than overshadow them.
Related posts:
- 6 Fun and Creative Ways to Use Your Travel Photos
- Five Ways to Improve your iPhone Travel Photos
- 10 Best Travel Photography Tips for Beginners
- Top Ten Nepal Travel Tips

- Search Please fill out this field.
- Manage Your Subscription
- Give a Gift Subscription
- Sweepstakes
- Travel Tips
How to Write for 'Travel + Leisure'
Since 1971, Travel + Leisure editors have followed one mission: to inform, inspire, and guide travelers to have deeper, more meaningful experiences. T+L's editors have traveled to countries all over the world, having flown, sailed, road tripped, and taken the train countless miles. They've visited small towns and big cities, hidden gems and popular destinations, beaches and mountains, and everything in between. With a breadth of knowledge about destinations around the globe, air travel, cruises, hotels, food and drinks, outdoor adventure, and more, they are able to take their real-world experience and provide readers with tried-and-tested trip ideas, in-depth intel, and inspiration at every point of a journey.
We tell stories from around the world: stories that are big or small, visually driven or essayistic, first-person or as-told-to or service-oriented.
Our audience is made up of active and passionate travelers — travelers who book an average of seven trips per year, big and small. They're up for anything: adventure, active travel, history, solo trips, luxury, the arts, spa vacations, multi-generational travel, food, wine, RVs, private jets. (Well, some of them take private jets.) Our readers want to learn about people and places around the world, even if they'll never visit those places themselves — to gain a deeper understanding of what's relevant there, and to challenge their own assumptions.
If you want to pitch a story to us, make sure your idea adds something to the conversation. We don't want to have seen that story elsewhere. We love stories about a place that is misunderstood or changing, stories about seeing the world in a new way, and especially stories by writers or photographers who bring a new voice to the conversation about a place or topic.
What We Want From a Pitch
A paragraph encompassing:
- The topic and angle
- The scope of the story
- Why we should cover it
- Why you are the writer for the job
- Whether you've traveled yet
- If not, what kind of editorial support you'd need for travel expenses
If we've never worked with you before, a pitch is your shot at giving us a sense of what your (unedited) writing is like — feel free to show us your voice.
For stories about a particular destination: maybe you have never been to the place before; maybe you went there all the time when you were growing up; maybe you live there now. That part doesn't matter so much as why you are the right person to tell this story, and what particular angle you will bring to the table. For longer, first-person stories, we prefer to have the writer travel on assignment, or write based on a recent trip. If your story will require additional travel, let us know. If you just got back from a trip, or are already planning your own trip, let us know.
If you have never worked with us before, please also include some relevant clips and/or a link to your portfolio. Clips for digital publications are perfectly fine, but if you're pitching print it's also helpful to see what work you've done that's similar in length, style, and scope to what Travel + Leisure does in print.
What We Don't Want From a Pitch
- A list of places you're going.
- A forwarded press release, or a copy-and-pasted press release.
- A couple sentences with no real angle.
- A pitch that will justify you going on a press trip (even if you don't tell us about the trip, we can usually tell).
- A story you've already written for someone else.
- A story that's already appeared recently in Travel + Leisure or on our website , or a competing magazine/website, or even a not-really-competing magazine/website.
Please do not send a pitch to everyone on the team; instead, use the guidelines below to decide who might be the best target for your idea. If an editor says no, it is best practice to not send the same idea to another editor. And if an editor says yes, it's often advisable to try to keep working with them in the future; if they're not the right person for a particular story, they can point you to a colleague. These types of writer-editor relationships are essential and help streamline the pitching process for everyone.
Another thing: we often get asked "what we're looking for" or "what we're currently working on." We totally get it, but we will almost never be able to give you a clear response. The answers to these questions change by the minute, and it's rare that we have a "hole" that we need to fill or a story idea that needs a writer. The best way to start working with us is showing you have unique story ideas that we wouldn't find anywhere else.
What to Expect When You Pitch
Many of us have been on the other side of this conversation (i.e. we've freelanced ourselves, and pitched many other faceless editors) and we know it's often frustrating. Feel free to follow up. If you don't hear back, follow up again! We will never be offended by "if I don't hear back by X date, I'll assume you're not interested and pitch this elsewhere."
Press/FAM Trips and Conflicts of Interest
We are aware that press trips are often a necessity for writers to familiarize themselves with new places, make industry connections, and develop their voice in the travel space. We won't fault anyone for taking press trips, and we don't mind if you pitch something to us based on independent reporting from a past press trip. What's important to us is editorial integrity and fresh storytelling. If you went on the trip for another publication, or have written about it elsewhere, your pitch should be distinctly different from your previous work on the topic. If it was a group trip, your pitch should hinge on your own fresh reporting and angle, not the same itinerary attended by a dozen other writers.
Writers must disclose any and all affiliations with travel companies, tourism boards, or government entities that could present a conflict of interest in their reporting. This includes previously contracted work such as copywriting, social strategy, consulting, or acting as a brand ambassador. If in doubt, point it out! Those who fail to do so will not be considered for future assignments.
It is very, very rare that we actively send writers on press trips for print stories. If your pitch is tied to your attendance on an upcoming press trip — and we can usually tell — we will most likely say no, though we always welcome you to report back afterwards if you find anything interesting.
How to Pitch Us: Digital
Travel never sleeps and neither do we (well, we do sometimes). At travelandleisure.com we write inspirational and instructional stories for passionate travelers. Digital editorial is a mix of short-lead and long-lead story creation. We are looking for all types of travel stories: From practical travel tips and expert advice to inspirational first-person stories and features about a destination or experience. We cover small towns and big cities, beaches, lakes, and rivers (basically if it's a body of water, you'll find us there), mountains and valleys, outdoor adventures and exploring hidden gems, fine dining and speakeasies, and everything in between all over the world.
The Writing and Editing Process: Digital
We commission short-lead and long-lead stories daily. We generally work with regular contributors on our daily stories. Word count varies…a lot. We aren't constrained by page count or, quite, frankly, pages at all — our pages can scroll forever. That said, our news stories are generally 300-500 words. Our general travel stories, first-person storytelling, or listicles can be anywhere from 500 - 2,000+ words.
As you can imagine, we are pitched a lot and don't always have time to respond to every single email (please don't be offended!), so in order to make yours stand out, here's what we suggest:
- We are looking for unique stories we don't already have on our site. Please do your research first and make sure the story you're pitching wasn't recently published on travelandleisure.com.
- Your story can be a listicle or an in-depth look at a particular activity in a destination so long as there is an inspiration and service element. For example, if you're pitching a story on bird watching in Colombia, please be sure to include in your story the binoculars you used, places that offer the best watching opportunities, and any hotels that may offer this as an experience.
- Please don't send a pre-written story — we don't generally accept them. We do however want to read a short blurb about your idea (4-5 sentences) along with a grabby headline. If we are interested, we will reach back out to get more details. But, don't leave out the important bits of your story in the pitch! Remember: How you write your pitch gives us insight into the quality and style of your writing.
We do not pay by word count. We have a flat rate that we pay by type of story. Your editor will share our rate sheet with you. That said, we pay upon receipt of the story and your story must be filed with an invoice. Along with your story, you must also provide press contacts and press releases.
Our daily news writers have a minimum number of stories they write for us each day. If you're interested in becoming a daily news writer, please email [email protected] along with recent news clips, why you're interested in becoming a daily news writer, and your expertise in the travel news space.
For everything else, here's who you'll want to pitch:
- Nina Ruggiero , editorial director, overseeing site, sold campaign content, and social. [email protected]
- Alisha Prakash , associate editorial director, personal essays and first-person narratives, reported features, profiles, evergreen and seasonal SEO stories and roundups, travel tips and trends, and under-the-radar destination spotlights that offer a fresh perspective on a place. [email protected]
- Christine Burroni , senior news editor, travel news, explainers and first-person experiences that expand upon how timely news is affecting travelers, service pieces, wellness trends and tips for travelers, and celebrity interviews with a travel angle. [email protected]
- Maya Kachroo-Levine , digital senior editor; reported features on hotels, destinations, cruising, aviation, food-and-beverage experiences, art, and architecture, ideally pitched with a timely hook; longer-form profiles and articles on often overlooked communities within the travel realm. [email protected]
- Sam Lauriello , social editor, all social requests and platforms. [email protected]
- Elizabeth Rhodes , special projects editor, all-things Disney, cruising, trip ideas, and over-the-top suites. [email protected]
While we're at it, meet the rest of the Travel + Leisure digital team:
Annie Archer, assistant social editor
Mariah Tyler, visuals editor
Alessandra Amodio, photo editor
Courtney Dennis, producer
Madeline Diamond, ecommerce editor
How to Pitch Us: Print
Travel + Leisure is the only monthly print travel publication in the United States, with a circulation of nearly one million.
Print editors are usually thinking at least three months ahead, and sometimes up to a year or more. Breaking, same-day, or otherwise time-sensitive pitches will not be considered; the T+L digital team is the best point of contact for pitching travel news stories, and social takeovers.
We are also constrained in our assigning by the simple fact of page counts. Pitching for print, by nature, involves a lot of rejections. Maybe we've done a similar story recently, maybe we have something similar in the works, maybe that particular editor just doesn't love the pitch as much as others they've gotten, maybe it's just not right for our audience at the moment but two years from now it would be. It happens all the time, even for those of us on staff, and it's not a referendum on you as a person or the quality of your ideas and reporting.
Another thing: If you are used to digital timelines, please manage your expectations for print. Our internal pitching process is rigorous. If the editor you pitched likes your idea, it still has to get past a number of other people. Sometimes those people will say no. You may be grumpy about this, and understandably so! Your editor is probably grumpy, too.
Most positive responses look like: "This is such a cool idea! I'd love to run it past our executive editor to see what she thinks." or "Hey, I love this idea and I think it could be a good fit for our Discoveries section. I'll bring it up with the section editor, and if she likes it too, she will propose it to our editor-in-chief at their next meeting." At that point, we hope that you won't pitch the story around while you're waiting for next steps. Sometimes we'll be able to get an answer for you after a few days; sometimes, depending on the story, it could be a month or longer. Feel free to follow up if you're curious about where we're at, and if you're getting antsy and considering pulling the piece, let your editor know!
The Writing and Editing Process: Print
Travel + Leisure is the only monthly print travel publication in the United States, with a circulation of nearly one million. We tell stories from around the world: stories that are big or small, visually driven or essayistic, first-person or as-told-to or service-oriented.
Our audience is made up of active and passionate travelers—travelers who book an average of seven trips per year, big and small. They're up for anything: adventure, active travel, history, solo trips, luxury, the arts, spa vacations, multi-generational travel, food, wine, RVs, private jets. (Well, some of them take private jets.) Our readers want to learn about people and places around the world, even if they'll never visit those places themselves—to gain a deeper understanding of what's relevant there, and to challenge their own assumptions.
Print editors are usually thinking at least three months ahead, and sometimes up to a year or more. Breaking, same-day, or otherwise time-sensitive pitches will not be considered; the T+L digital team is the best point of contact for pitching travel news stories and social takeovers.
The Sections of the Magazine
While you don't need to have a section in mind when pitching a print story, we encourage you to familiarize yourself with them. It's a cliche for a reason: The best way to have success with a pitch is to get to know the magazine well. If you can't see a story idea fitting into any of these, it's probably not right for us. All editors on our team can slot their stories into any of these sections, but each has one or more dedicated editors who oversee the general mix of stories.
Discoveries
A globetrotter's guide to the latest in travel.
Our front-of-book opener section, made up of stories that are often bitsy and news-driven. A great place to break into the magazine.
Story Formats: Short news-driven write-throughs, roundups, Q&As, step-by-step itineraries, neighborhood guide maps, short blurbs with a collection of beautiful pictures, etc.
Story Length: 100-500 words, though the shortest pieces are usually staff written.
Experiences
Travelers' tales, from near and far.
First-person travel narratives, often with a literary bent, as well as the occasional photo essay. Where appropriate, we try to incorporate relevant travel news (e.g. new hotels, restaurants, shops, galleries, etc.) or a "why now" element.
Story Formats: Essays and written-through travelogues, occasionally broken out into itinerary form, almost always first-person.
Story Lengths: ~700-1,500 words
Intelligent Traveler
Tips and tricks to help you travel smarter.
Travel hacks and insider info on the logistics and process of travel: innovations in the industry, trends in how we're traveling, tips to help you plan ahead and save money while doing it, cool gear you should have on your radar, and news about planes, trains, and automobiles.
Story Formats: A mix of written-through pieces and broken out roundups; they are generally not first-person or based deeply in a personal experience, but rather synthesize trends or give directions. (It's okay to use a first-person experience as a jumping-off point to discuss something larger in the industry.)
Story Lengths: Under 600 words.
The longest stories in the magazine, which live in the "well"—no ads, just beautiful images and thoughtful writing. Most of these are place-based stories—usually a city or a route around a particular state, island, or country—with a literary approach and with plenty of historical and social context. These types of features always include a fairly comprehensive "how to do it" sidebar for readers who want to replicate the journey. Sometimes, we will run travel essays or commentary that aren't about a particular trip, or we'll want to showcase an outstanding photo portfolio and will commission an essay to accompany it.
Story Lengths: typically 2,500–4,000 words
A Note About Feature Assignments: It's tricky to break into T+L with a feature—they're costly to produce, we run fewer of them each year than other kinds of stories, and rarely assign them to new-to-us writers unless there's significant evidence (generally in the form of multiple feature-length bylines and/or a book) that said writer can tackle something of that scope. That's not to say it never happens, just that you may get more traction with your T+L pitches in another section of the magazine, at least until we get to know you and your work.
"Your Best Shot." On this page, we spotlight an outstanding photo from one of our readers, accompanied by a short interview about their experience getting the shot. This is not a paid opportunity, but rather a prize for our Photo of the Day contest. If you're interested, you can submit your best shots HERE for the chance to be featured on this page in a future issue.
Who to Pitch on Print
Every print editor works on all sorts of things and can direct you to the right person if it's not them. But we each focus on certain sections, themes, and geographical areas, and for new writers, those will help you decide to whom to direct your ideas.
Here's the breakdown:
- Paul Brady, news director, edits the Intelligent Traveler section and is our point person for trend pieces about the travel industry. He leads our cruise coverage and often handles stories about aviation, loyalty programs, ski/winter sports, and the polar regions. He also follows Central America, Southeast Asia. [email protected]
- Liz Cantrell, senior editor, edits the Discoveries section and commissions other stories with a focus on outdoor and adventure travel, as well as Canada, Northern Europe, and the Southern U.S., including Texas. [email protected]
- Samantha Falewée , senior editor, works on many sections with a focus on South America; Fiji and French Polynesia; Arizona and New Mexico; and the Midwestern U.S. She is also interested in cultural and Indigenous travel. [email protected]
- Denny Lee , articles editor, focuses on Mediterranean Europe (France, Italy, Greece, Portugal & Spain); East Asia (China, Japan & Korea); Eastern Europe; Western U.S. (Colorado, Montana, Utah, Nevada, Idaho, Wyoming),. He also handles our ski and winter sports coverage, and food coverage. [email protected]
- Danielle Pointdujour , senior editor, leads our hotel coverage and the brand's annual It List. She also covers destinations including the Caribbean, Central America, the Middle East, Turkey, North Africa, Florida, and Texas. [email protected]
- Flora Stubbs, executive editor, has a hand in everything, but focuses mainly on South Asia and East, West, and Southern Africa. [email protected]
- Peter Terzian, features editor, oversees our features well and curates our coverage of East Asia; the U.K. & Ireland; Scandinavia; and the Northeastern U.S. [email protected]
- Jessica Vadillo, editorial assistant, often works on packages and front-of-book items. [email protected]
- Scott Hall, photo director, and Skye Senterfeit, deputy photo editor, are the best points of contact for photographers interested in contributing or those pitching photo essays. [email protected] ; [email protected]
- Fryda Lidor, creative director, is the best point of contact for illustrators and artists interested in contributing. [email protected]
Meet the rest of the Travel + Leisure print team :
Jacqueline Gifford, editor in chief
Erin Agostinelli, managing editor
Ray Isle, wine and spirits editor
Griffin Plonchak, production manager
Kathy Roberson, copy and research chief
Lisa Greissinger, research editor
How to Pitch Us: Social
Travel + Leisure has over 15M followers across its social channels. On Instagram, we share awe-inspiring destination images, first-person travel experiences, and educational articles. On TikTok, we post travel vlogs, hotel suite tours, destination roundups, and more. Overall, we use compelling photos and videos to inspire our audience to explore the world.
We want pitches for:
- Instagram takeovers highlighting a recent travel experience
- Personality-driven TikTok vlogs recapping a trip
- TikTok series that aim to either educate or entertain (bonus points if you can do both)
What pitches should include:
- For TikToks, why it has viral potential
- Whether you've traveled yet (or whether the trip is already booked)
- A timeframe for when you could have the assets ready to go live
- 1-2 examples of your past social media work (takeovers, TikToks, photography, videography, etc.)
Please send social pitches to [email protected] .
4 travel tips to put your mind at ease during your next trip

The season of summer holiday travel is just around the corner.
You might find yourself heading to one of the U.S.’s many national parks, exploring a historic European city or jetting off somewhere tropical, like the Maldives.
That all sounds like fun, but unfortunately, travel mishaps may also happen. Luggage gets lost, passports get misplaced and phones may not work at international destinations when they aren't connected to Wi-Fi.
To avoid the headaches and prepare for whatever may come your way (or what accidentally gets left behind), follow these simple tips.
Watch this video to see the four things you should do before your next trip.
Learn more: Best credit cards of 2023
Pre-Travel Tips
All you need to get travel-ready is your smartphone.
- Take pictures.
Take pictures and screenshots of the important items and documents before you leave for your trip.
This would include:
- Your luggage
- The photo page of your passport
- Your ID cards
- Any travel-related confirmations
- Location and contact details for the places you’re staying
Creating an album on your phone or marking the images as favorites will make it easier to find them should you need them.
It couldn’t hurt to also share these pictures with a trusted loved one, like a significant other or close friend.
- Turn on Notify When Left Behind
Turn on Notify When Left Behind if you use Apple products.
The feature, available on some iPhones, iPads, Macs, and AirPods, will notify you if you are separated from your items, like if you forget your AirPods in your hotel room.
To turn Notify When Left Behind on or off, open the “Find My” app, select the device and then toggle the setting on or off.
- Tell your credit card company about your plans
Have you ever had your card payment declined when paying for something on a trip? That’s probably because your credit card company is picking up unusual activity and flagging it as suspicious.
Prevent that from happening by informing your credit card company of any upcoming domestic or international travel by setting a travel notification.
Many credit card companies allow you to set the notification online or via the app, though some companies may not require one at all.
- Check international phone plans
If you want to use your phone when you're not connected to Wi-Fi while traveling, see what international phone plans your mobile carrier offers that fit your budget. An international plan will allow you to do things like make and receive phone calls, access social media and find directions as long as you have cell service. Without a plan, those functions will only be available when the device is connected to Wi-Fi.
Bonus tip, you can download maps to use offline and easily navigate a new place!
Reviewed-approved travel recommendations
Purchases you make through our links may earn us and our publishing partners a commission.
Reviewed helps you find the best stuff and get the most out of what you already own. Our team of experts test everything from sleep masks and travel pillows to luggage and packing cubes to help you shop for the best of the best.
- Tracking game-changer: Apple AirTags
- Our favorite sleep mask: Mzoo Sleep Eye Mask
- A top wireless charger: Yootech Wireless Charger
- Must-have luggage: Travelpro Platinum Elite Softside Expandable Luggage
- Organization hack: Amazon Basics 4-Piece Packing Cubes Set
- The best portable battery pack: Mophie Powerstation Plus
- Our favorite travel pillow: Cabeau Evolution Classic Travel Neck Pillow
- Top-rated adult coloring book: Cindy Elsharouni Stress Relieving Adult Coloring Book
13 useful things to know before you visit Dublin
Apr 15, 2024 • 10 min read

These local tips on packing, transport and etiquette can help you plan the perfect visit to Dublin © maydays / Getty Images
As a born and bred Dubliner, I’ve spent most of my life trying to make sense of my hometown.
In one way it’s a cinch to figure out: you’ll get your bearings pretty quickly and realize that you can explore most of it on foot. But it’s not just its size that makes it such a great walking city. It’s the nature of life here that makes it the ideal flaneur destination, where you amble and devote yourself to the art of observing life around you.
Spend a few days in Dublin and you’ll soon appreciate that there is much going on in this busy little town, and that to really understand the place you’ll have to move here and spend the rest of your days figuring out its wonderful idiosyncrasies and multilayered sense of humour.
In the meantime, though, here are a few local tips that will smooth your introduction to a city that has the power to grab your imagination and not let it go.
1. Plan on having at least three days in Dublin
Dublin might be a small capital city, but it’ll demand as much time from you as you’re willing to give. You’ll need at least three days to even make a dent in the place: one day to explore even just a couple of the main sights, such as Trinity College and the Guinness Storehouse . You’ll need another day to visit some of the city’s other brilliant attractions, like the Little Museum of Dublin , the Chester Beatty and just one branch of the National Museum of Ireland . And a third day to sample some whiskey and visit either of the city’s iconic cathedrals .
A couple of days more will give you a chance to stretch your legs and explore more of the city – such as the historic General Post Office and 14 Henrietta St on the northside. But you’ll have to build in some leisure time – after all there are 800 pubs in the city , a fine selection of music venues and a handful of great theatres. And what about going further afield, on a day trip to Howth , for instance, or beyond?
Planning on some beers while you're in Dublin? Here's our guide to the locals' favorite traditional pubs

2. Dublin is a casual kind of place so pack accordingly
You can wear pretty much whatever you want in Dublin, and smart casual is the most you’ll need for fancy dinners, the theater or the concert hall. Even most work places like to keep it casual as there’s a general perception in the city that dressing up is only for that special occasion, which work rarely is.
Irish summers are warm but rarely hot, so you'll want an extra layer for when the temperatures cool, especially in the evening when the disappearing sun can make that day’s warmth feel like a distant memory.
Ultimately, the ever-changeable weather will determine your outfits, but a light waterproof jacket (preferably with a hood, unless you’re carrying an umbrella) and waterproof shoes should never be beyond reach, for the almost inevitable rain.
Plan your packing with our seasonal guide to Dublin through the year
3. Take advantage of discount cards
There is a range of discount cards that will save you money on attractions and transport. The GoCity All-Inclusive Pass (1–5 days, €79–164) gives you free entry to a bunch of top attractions, including the Guinness Storehouse, EPIC The Heritage Museum, the Jameson Distillery Bow Street, and the Big Bus Hop On, Hop Off tour. For 25% off six of those attractions, there’s the DoDublin Days Out Card (€55).
As well as the Leap Card (see below), there are good discounts to be had with the DoDublin Freedom Ticket (€48), a 72-hour travel pass that covers all public transport as well as a hop on, hop off tour.
4. Get a Leap card for use on public transport
If you’re planning on using public transport in Dublin, be sure to get a Leap Card first, as it’s cheaper and more convenient than paying for fares directly. This green plastic card is available from most newsagents and can be used on all forms of transport in the city, including buses, DART, the Luas light rail system and commuter trains throughout the county. The Leap Visitor Card (1/3/7 days, €8/€16/€32) provides unlimited travel on public transport. It can be purchased in the city and at Dublin Airport, or ordered online and delivered to your home in advance of your trip.
To use the card, just tap your card on the machine as you get on: for Luas, rail and DART services you will also need to tap off when you get off (but not for buses).
You top up the card with any amount you want (there’s a minimum of €5) at newsagents, any Luas, DART and commuter rail machines, or by downloading the Leap Top-Up App onto any NFC-enabled iPhone or Android phone: hold the card to the back of the phone and you can top up, collect pre-paid tickets and check your balance.
If you’re using a regular Leap card, rather than the Visitor Card, the TFI 90 Minute Fare applies to journeys made by Dublin Bus, Luas and most Dart trains. Any journey less than 90 minutes (including transfer times) costs €2.
Here's more useful transportation information for Dublin
5. Uber is not the best taxi option in Dublin
There are plenty of taxis in Dublin, but they can be tough to find late at night, especially at weekends when thousands of Dubliners are looking to head home to the suburbs after a night out in the city. Uber does exist in Dublin, but it’s oddly expensive; by far the most popular taxi hailing app is Freenow , which most of the city’s taxis are connected to. There are taxi ranks in the city center, but hailing them through the app is the preferred (and most convenient) option for most.

6. Get to grips with Dublin’s dining habits
Dubliners rarely eat breakfast out, so you might struggle to find a decent spot for breakfast that opens before 9am or 9:30am. The good news is that a decent cup of coffee is a non-negotiable, so there are plenty of places open by 8am to cater for caffeinated employees.
Discounted lunch specials are common, especially in the busy city center. Book tables at popular restaurants at least a few days in advance if you want to avoid disappointment or dodge the 5:30pm seating nobody else wants. For the really fancy spots including those with Michelin stars, you’ll have to plan well in advance. Some (like Restaurant Patrick Guilbaud ) will accommodate reservations no more than a month in advance, but a place like Chapter One opens its reservations list three months in advance, and then only for blocks of two months. Most tables are nabbed up pretty quickly, but if you miss out you can join the online waitlist.
7. Many of the city’s museums are free to visit
Most of the city’s larger cultural institutions are free to visit, including the three branches of the National Museum of Ireland, the National Gallery , the Chester Beatty and the Dublin City Gallery-the Hugh Lane – although there is a charge for some of the exhibitions. There are free tickets for the tours of Áras an Uachtharáin , the official residence of the Irish president in Phoenix Park and there is no charge to visit the Irish Museum of Modern Art in Kilmainham.
Smaller, privately owned museums charge a fee, but it’s rarely more than €10, and you won’t need to book your ticket in advance.
Traveling to Dublin on a budget? Here are some other free experiences to consider
8. Bottled water is a needless extravagance
In most restaurants in Dublin you’ll be offered the choice of water – still or sparkling. Unless you have a particular fondness for a specific brand of bottled water, you should always opt for tap as the city’s supply is perfectly safe, free and generally excellent. Some restaurants operate their own in-house filtration system, so for a minimal cost (usually €1–2) you have your choice of still or sparkling tap water. Same goes for filling your water bottle: tap water is fine and you don’t need to buy pricey and environmentally unfriendly plastic bottles to replenish your supply.
9. In the pub, it’s all about the rounds system
Dubliners, like the rest of the Irish, put great store in conviviality and a generous spirit. And both of these qualities are embodied in the rounds system, whereby if someone buys you a drink, you are obliged to buy them one in return. Getting sucked into the rounds system is a great way of getting to know Dubliners: strike up a conversation and, at the appropriate moment (ie when they’re just about to finish their drink), ask what they’re "having" – and before you know it you’re multiple drinks and conversations deep into a blossoming friendship.
Needless to say, you don’t have to take part in buying rounds, but if you want to understand the social glue that binds people together in Dublin, there aren't many better ways than having a few drinks with them.

10. Dublin's nightlife is expensive
Dubliners love a good night out, but the city is a pretty expensive place to party in. The capital is notorious for the price of the pint of beer, which is higher than anywhere else in Ireland. As a result, many Dubliners will do pre-drinks at home before heading out, usually between 9 and 10pm.
Happy hour promotions are illegal in Ireland; expect to pay anything from €7–10 for a pint in the city center, but keep an eye out on pubs that sneakily raise the price of a pint later in the night, presumably when punters are too drunk to notice. It’s illegal to charge a price other than what is indicated; if it happens, your best reaction is to complain and leave.
Licensing laws are stricter in Dublin than almost any other European capital. Pubs can serve alcohol until 11:30pm Monday to Thursday, to 12:30am Friday and Saturday, and to 11pm on Sunday. Many premises apply for special exemption orders, which allows them to serve until 2:30am – usually from Thursday to Saturday nights. Nightclubs usually go until 3am, but in a lot of venues there’s barely a distinction between a huge pub that turns up the music really loudly and a dedicated club for dancing.
11. Learn to take a "slagging" among friends
Dubliners are, for the most part, an informal and easy-going lot who don't stand on excessive ceremony and generally prefer not to make too much fuss. That doesn't mean that they don't abide by certain rules, or that there isn't a preferred way of doing things in the city, though. But the transgressions of the unknowing are both forgiven and often enjoyed – the accidental faux pas is a great source of entertainment in a city that has made "slagging", or teasing, a veritable art form.
Indeed, slagging is a far more reliable indicator of the strength of friendship than virtually any kind of compliment: a fast, self-deprecating wit and an ability to take a joke in good spirits will win you plenty of friends. Mind you, even slagging has its hidden codes, and is only acceptable among friends: it wouldn't do at all to follow an introduction to someone by making fun of them!
12. LGBTIQ+ travelers are welcome in Dublin
Dublin has a pretty vibrant LGBTIQ+ scene, with some well-established bars and club nights as well as activities including hiking and sea swimming. The best-known gay bar in town is the George on South Great George’s St, followed by Pantibar , which is owned by renowned activist and drag queen Rory O’Neill, aka Panti Bliss. June’s Pride Festival is the second-biggest celebration in the city after St Patrick’s Day, a raucous festival of color and fun that runs over five days. August sees GAZE International LGBTQIA Film Festival , Ireland’s only dedicated film festival, while the International Gay Theatre Festival usually takes place in May.
13. Dublin is generally a safe city with good health care
Health and safety should not be an issue during a visit to Dublin. Pharmacies selling basic medication are easy to come by, and crime is not a major concern. Taking normal precautions (eg keeping an eye on belongings in crowds) should be sufficient. O'Connell St and the streets immediately around it can get a little shady after dark, so keep your wits about you.
Explore related stories

Tips & Advice
Apr 17, 2024 • 6 min read
From Portland to Crater Lake, the state's only national park, here are the unmissable places to visit in Oregon.

Apr 17, 2024 • 5 min read

Apr 17, 2024 • 8 min read

Apr 17, 2024 • 4 min read

Apr 16, 2024 • 12 min read

Apr 16, 2024 • 8 min read

Apr 16, 2024 • 6 min read

- Mattress Toppers
- Sheets & Bedding
- Sleep Products
- Cleaning & Laundry
- Heating & Cooling
- Home Office
- Kitchen & Dining
- Storage & Organization
- Wine & Bar
- Accessories
- Handbags & Purses
- Lingerie & Sleepwear
- Outdoor & Fitness Apparel
- Kids Clothes & Accessories
- Pregnancy & Postpartum
- Toys & Books
- Apparel & Accessories
- Camping & Hiking
- Fishing & Hunting
- Tennis & Racket Sports
- Tools & Tech
- Training & Recovery
- Water Sports
- Winter Sports
- Personal Products
- Wellness & Self Care
- Computers, Tablets & Accessories
- Online Tools
- Smart Home Devices
- Smartphones, Smartwatches & Accessories
- Hotels & Lodging
- Travel Products
- Father's Day
- Mother's Day
- Valentine's Day
- Amazon Prime Day
- Beauty & Grooming
- Tech & Electronics
- Travel Deals
- Mattress & Sleep
The Best Compression Socks For Travel, According To A Podiatrist
- Share to Facebook
- Share to Twitter
- Share to Linkedin
The best travel compression socks, also known as flight socks, decrease swelling in your feet and legs to help improve your circulation—and comfort—most effectively during long trips. After analyzing the different options and speaking with New York podiatrist Dr. Nelya Lobkova , DPM, we selected Trtl Compression Socks as the best compression socks for travel overall. For wide calves, we like LevSox Wide Calf Compression Socks and for an affordable pair you can stock up on (and buy on Amazon), Charmking Compression Socks are your best bet.
The best travel compression socks decrease swelling in your feet and legs to help improve your ... [+] comfort during long trips.
Air travel does bring to mind certain health concerns. The changes in pressure create “a higher risk of developing a blood clot in the deep veins of the legs, called a DVT—deep venous thrombosis,” says Lobkova. “Wearing compression socks helps compress the veins and decreases the chance of clot occurring during flight travel.” Ahead, you’ll find our top picks, all approved by Lobkova and broken out with important specs (quick tip: compression socks are measured in mmHg, the same unit as blood pressure) plus buying advice and answers to frequently asked questions at the end.
- Best Overall Compression Socks For Travel: Trtl Compression Socks
- Best Budget Compression Socks For Travel: Charmking Compression Socks
- Best Wide-Calf Compression Socks For Travel: LevSox Wide Calf Compression Socks
- Best Bamboo Compression Socks For Travel: Ostrichpillow Bamboo Compression Socks
- Best Antimicrobial Compression Socks For Travel: Copper Compression Powerknit Knee High Sock
- Best Compression Slipper-Socks For Travel: Comrad Cozygrip Compression Slipper Socks
- Best Stylish Compression Socks For Travel: Sockwell Moderate Graduated Compression Socks
- Best Ankle-Length Compression Socks For Travel: Paplus Ankle Compression Sock
- Best Open-Toe Compression Socks For Travel: Doc Miller Open Toe Compression Socks
- Best Travel Compression Socks Bundle: Comrad 3-Pack Knee High Compression Socks With Packing Cube
Best Overall Compression Socks For Travel
Fun prints with added cushioning, trtl compression socks.
Sizes: S to L | Materials: Coolmax, lycra | Compression level: 15 to 21 mmHg
With an ideal-for-travel compression level, according to Lobkova, a breathable Coolmax knit fabric to eliminate sweaty feet and a cushioned sole for added comfort, these Trtl travel socks scored the highest points in our review. Lycra adds stretchiness and bounce-back shape retention, and this pair comes in a selection of prints—from chevron to colorful stripes—all while preventing swelling. Buying tip: These socks come in three sizes; to ensure a proper fit, measure your ankle and calf circumferences and follow Trtl’s online sizing guide.
Best Budget Compression Socks For Travel
An 8-pack at an unbeatable price, charmking compression socks.
Sizes: S/M to L/XL | Materials: 85% nylon, 15% spandex | Compression level: 15 to 20 mmHg
Available in 8-packs of neutrals, brights or bold patterns, Charmking’s compression socks have the most important features you need while also being wallet-friendly. Targeted compression zones provide support while a reinforced heel and toe add comfort and blister protection. The brand recently updated their fabric composition to enhance breathability and help regulate your temperature and improved their performance stretch, which makes this pair a little easier to pull on than other compression socks.
Best Wide Calf Compression Socks For Travel
For that perfect fit, levsox wide calf compression socks.
Sizes: M to XL | Materials: 77% nylon, 23% spandex | Compression level: 15 to 20 mmHg
With a 360-degree woven construction, LevSox’s compression socks are designed to fit wide calves specifically with targeted support, graduated compression and long-lasting comfort, whether you slip them on for a long flight or if you’re standing all day at museums. The nylon blend is lightweight, durable and breathable, and the sizing is specifically designed to prevent that dreaded “too-tight” feeling at the top of the sock. Just be sure to reference their size chart for the best fit.
Best Bamboo Compression Socks For Travel
Soft fabric with naturally breathable comfort.
Ostrichpillow
Ostrichpillow Bamboo Compression Socks
Sizes: S to L | Materials: 50% bamboo, 25% recycled polyester, 10% recycled nylon, 15% spandex Oeko-Tex | Compression level: 8 to 15 mmHg
Ostrichpillow, best known for its inventive travel pillows , stands out from the pack with these light support, bamboo-blend compression socks. With a fabric that naturally encourages air flow—not to mention has antibacterial and odor-resistant qualities—these socks are designed to relieve muscle soreness, improve blood flow and reduce leg and ankle swelling during travel. They have a lighter compression that’s suitable for everyday wear, and with its extra cushioned sole and reinforced heel and toe, you might end up wearing them even when you’re not on a trip.
Best Antimicrobial Compression Socks For Travel
Copper-infused fabric for ultimate protection.
Copper Compression
Copper Compression Powerknit Knee High Socks
Sizes: S to L | Materials: 85% copper-infused nylon, 15% spandex | Compression level: 15 to 20 mmHg
Copper Compression embraces the natural antimicrobial and antibacterial benefits of copper, infusing it into nylon threads, for toe-to-knee protection. These knee-high socks have the ideal compression level for flying, but are also comfortable enough for high-performance activities like running or hiking, without the sweaty feet feeling that can come with strenuous activity. Expect reduced inflammation, extra arch and ankle support (the brand has other arch support products for foot pain and plantar-fasciitis-sufferers, too) and lower lactic acid in your muscles, reducing the chance of stiffness during travel and beyond.
Best Compression Slipper-Socks For Travel
Cozy to wear for long periods and move around in, comrad cozygrip compression slipper socks.
Sizes: S to L | Materials: 82% polyester, 16% nylon, 2% spandex 81% | Compression level: 10 to 15 mmHg
These slipper-socks from Comrad combine a light compression with cozy comfort. The dual-layer design is ideal for times when you want to take your shoes off on the plane or for relaxing in your hotel room after a long day. They provide light support up the leg while silicone grips on the soles protect against sliding on smooth surfaces or slippery floors. This pair is on the lower end of the compression scale, so they might not deliver the same health benefits as some of the higher compression level picks on our list, especially if you have circulation issues.
Best Stylish Compression Socks For Travel
Sleek pair that's effective and good-looking, sockwell moderate graduated compression sock.
Sizes: S/M to M/L | Materials: 32% merino wool, 31% rayon, 32% stretch nylon, 5% spandex | Compression level: 15 to 20 mmHg
Sockwell’s lifestyle compression socks, available in both men’s and women’s sizing, are a far cry from the bland compression stockings of the past. This pair has four strategic zones of graduated compression to minimize swelling during travel and other prolonged sitting activities and a sleek design that comes in beautiful shades. The high-performance merino wool-blend is naturally moisture-wicking, thermoregulating and odor-resistant, too.
Best Ankle Length Compression Socks For Travel
Gentle compression with added foot support, paplus ankle compression socks.
Sizes: S/M to L/XL | Materials: Nylon, spandex | Compression level: 15 to 20 mmHg
For times when full-length compression socks feel too restrictive, a shorter height compression style still offers extra support focused in the ankle and foot area (some reviewers say it even helps with their plantar fasciitis symptoms). Expect a moderate improvement of circulation, reduced swelling and a breathable, moisture-wicking feel, even after a long day of travel. Fit note: Some say these socks run large, especially for those who wear up to a women’s size 7.
Best Open Toe Compression Sock For Travel
No more overheating toes, doc miller open toe compression socks.
Sizes: S to 3XLT | Materials: Nylon, spandex | Compression level: 15 to 20 mmHg
If you like compression socks but don’t enjoy the feeling of constricted toes, consider an open-toe style. Doc Miller’s have graduated compression that extends up to the knee, a smoothing, stretchy nylon-blend fabric that’s thin and easy to pull on, plus an exposed toe for breathable comfort. The inclusive range fits a variety of calf measurements and their tall sizes add an impressive two inches to the length to the standard fit, ensuring a proper fit for just about everyone. If your toes feel cold or you want protection while wearing shoes, simply slip on regular cotton ankle socks for a soft layer that won’t change the compression benefits.
Best Travel Compression Socks Bundle
For bringing multiple pairs on your trip, comrad 3-pack knee high compression socks with packing cube.
Sizes: S to XL, includes wide sizes | Materials: 91% nylon, 9% spandex | Compression level: 15 to 20 mmHg
Comrad created this kit with travelers in mind. It features three pairs of easy-on-off compression socks—with fun ombré designs—and a handy packing cube that fits into your luggage or carry-on. Your feet and legs will feel energizing relief during a flight, and since you can pack multiple pairs, you can still have compression socks left over for sight-seeing and exploring without having to do laundry. FYI: the ripstop nylon packing cube expands to hold up to 10 pairs of compression socks or other undergarments and accessories, as a convenient bonus.
The 9 Best Eyebrow Pencils, According To Makeup Artists
The 15 best travel safety devices, tested by a frequent solo traveler, why trust forbes vetted.
The Forbes Vetted team is a group of experienced editors, writers and researchers across many categories, including travel and the products that go along with it. From the best carry-on backpacks to travel safety devices to hardside luggage , we have reviewed and tested many travel essentials, with focus on quality, durability, comfort and value. We spend hours evaluating the best products to help you make informed shopping decisions for your needs—or whenever you have a big trip planned.
How We Choose Best Compression Socks For Travel
When researching the best compression socks for travel, we considered both large and small brands that specialize in compression products and travel gear. We read through hundreds of real customer reviews, tested some products ourselves and tapped the expertise of board-certified podiatrist Dr. Nelya Lobkova, DPM of Step Up Footcare in New York City about health benefits, sizing and the do’s and don’ts of wearing compression socks for travel. Most of the socks featured here have a compression level of 15 to 20 mmHg, which is the recommended grade for travel.
What To Consider When Shopping For Best Compression Socks For Travel
Not all travel compression socks are alike. There are different styles, levels of compression and sizes. Here’s what to consider as you shop:
- Fit: The key to compression socks working correctly is a proper fit. If they’re too tight,”they can cause a constriction in circulation to the feet and toes,” says Dr. Lobkova. “This will cause the toes or feet to feel numb and you’ll have the urge to remove them.” Likewise, if your socks are too loose, they won’t provide ideal compression benefits. Pay attention to sizing guides—some socks have gendered sizing or a shoe size equivalency—and calf width. Dr. Lobkova recommends trying on socks or measuring your calf at the end of the day, when swelling is at its highest point. If you have diabetes or peripheral artery disease, your calf circumference can actually vary throughout the day, so Dr. Lobkova suggests “measuring [your calf] when the swelling is the highest, usually with the leg suspended or while standing” to ensure the most accurate measurement for your compression socks.
- Compression Level: Most compression socks for travel have graduated compression, meaning they’re tighter in the foot, gradually easing up at the top of the sock. Average wearers without any vein issues should aim for a low level of compression for travel, usually in the 15 to 20 mmHg range. “For those with venous insufficiency, a high level of compression—30 to 40 mmHg—is advised,” says Dr. Lobkova.
- Height: Most compression socks for travel are knee-highs, but there are also quarter- and ankle-length styles available. Shorter socks have focused compression in the foot and ankle areas while the longer styles’ graduated compression extends to right below the knee. Both lengths are designed to help improve circulation during travel, but different wearers might have different preferences for comfort and ease of use. It might be helpful to test a few styles to find the most comfortable and effective height.
Are Flight Socks The Same As Compression Socks?
Yes, flight socks are simply another term for compression socks that are worn during a plane trip. According to Dr. Lobkova, flight socks usually have an average grade of compression in the 15 to 20 mmHg range.
What’s The Best Level Of Compression Socks For Travel?
Experts recommend wearing socks with a compression level of 15 to 20 mmHg during a flight if you don’t have venous insufficiency or varicose veins. For travelers who suffer from those issues, Dr. Lobkova says 30 to 40 mmHg is recommended “in order to deliver effective compression.”
How Long Can You Wear Compression Socks During A Flight?
Compression socks can be worn during any flight, regardless if it’s an intercontinental long-haul or just a couple hours long. It might be easiest to put on your compression socks at the airport gate, before you board the plane, as wrangling into a pair of tight-fitting socks in the cabin could prove to be difficult and disruptive to your neighbors. If your seat has a lay-flat option, however, take off your compression socks before your power nap. “Lying down can constrict blood flow going to the feet and toes,” says Dr. Lobkoba. The goal of wearing compression socks for travel is to improve circulation in your feet and legs, and laying down can have an adverse constriction effect.
More Travel Product Stories To Shop
- The Best Packing Cubes, Reviewed By Frequent Travelers
- The 8 Best TSA-Approved Luggage Locks To Prevent Theft And Tampering
- The Best Travel Accessories, Reviewed By Our Editors

- Editorial Standards
- Reprints & Permissions
IMAGES
VIDEO
COMMENTS
Table of Contents. General Travel Photography Tips for Beginners. 1) Know Your Camera. 2) Focus on the Golden and Blue Hours. 3) Plan Your Shots. 4) Learn About Composition. 5) Framing, Framing and More Framing. 6) Move Your Feet. 7) Ask People for Permission.
But for tack sharp landscapes, low-light photography, self-portraits, flowing water shots, and sunsets/sunrises, a travel tripod makes a huge difference. 7. Experiment With Composition. Get Low for a Different Perspective. You can almost always come up with a better photo composition after some experimentation.
Take a look! These are our best travel photography tips: 1. Get to Know Your Camera. First, let me make one thing clear. You do not necessarily need expensive camera gear in order to take really nice pictures. Smartphones and entry-level point-and-shoot digital cameras like this one offer excellent quality.
Renan Ozturk: Chase the light. "My biggest travel photography tip is something really simple, which is just to shoot in the good light," Ozturk said, explaining that good light can be found during ...
Here are several tips to help you take stunning travel photography with every camera click. 1. Find the right light. Finding the right light is essential for taking amazing photos for a few reasons. It's simply the best travel photography tip that anyone will tell you. Lighting is everything to capture the perfect shot.
Research the location thoroughly, including famous sights, experiences, geography, and lighting conditions. Look at existing travel photos for inspiration, but aim to create something unique. Use a spreadsheet to organize your shots by day and time, considering factors like sunrise, sunset, and harsh midday light.
Practice on your friends. Practice on inanimate objects in your garden. Practice with each trip you go on to take better travel photos and improve your photography skills. Study photos that professionals have taken to discover the angles they shoot from, where they focus and how they use light to their advantage. 27.
General travel photography tips for beginners. Here are some travel photography tips that will help you take your photos to the next level. 1. Composition is everything. If you want your travel photos to stand out, try playing around with the composition. Be sure to take photos at different heights, angles, and distances away from a subject.
20 Best Travel Photography Tips. 1. Know Your Camera. Knowing the in's and out's of your camera and how to properly use it is incredibly important in taking great travel photos. If you have a new camera, I recommend watching some online videos about it, understanding the settings, and doing some low-stakes photoshoots at home before taking ...
Pack the essential photo equipment. Don't forget to pack the charger for your camera, and an extra battery! Also, you'll probably need an adapter if you're traveling abroad, so don't forget that, either. It's also a good idea to always bring extra memory cards.
Reply. Hasibur Joy August 14, 2020 - 8:16 am. A quick way to improve your travel photography is to think about how you want to compose an image and then try some alternate perspectives. Move around, look up, look down, get on the ground, scout framing options, anything to find another way of capturing the scene. Reply.
13. Stay in the Moment. Don't overthink the shot. Stay in the moment and go with the flow. Don't be afraid to switch around your schedule to get a good photo. 14. Take Notes. Bring a small notebook with you as you travel and when you take photos to make sure you're noting the place and your camera settings.
7. Use of Color. Color is really important in photography, particularly how different colors work well together. For example, blue works well with yellow (sunflowers in a field), and red works well with green (Christmas!). To figure out which colors work well together, take a look at this color wheel.
Harms says that, when in doubt, you should use a pop of color to instantly add intrigue to your photos. " My go-to is red, pink or yellow," she says. "Whether it's a red dress or yellow leaves ...
We're about to spill the beans on the best tips and tricks to take your travel pics from blah to brilliant. We've gathered all the best advice from our seasoned globetrotting photography experts, whether you're a casual snapper or an at-home expert. From capturing that once-in-a-lifetime wildlife shot, spontaneous street shenanigans and ...
9. Interact with local people. Interacting with your subjects, whether before or after taking their photo, is a great way to put them at ease and capture their personality. It can also add more depth to your photographs by helping you understand the context behind the scenes you're photographing.
Stay tuned for tip 7. Okay, now it's time to get into the travel photography tips …. 1. Visit during off-peak months. This is a great tip for travel planning in general; but if you want to take better travel photos, then visiting locations during the off-peak season is definitely a great way to do so.
With that in mind, these 20 travel photography tips will help you bring your photos to the next level! 1. Choose the Best Travel Photography Equipment. Most photographers have moved on from DSLRs to mirrorless versions. The smaller size and lesser weight are the obvious appeal here.
Tips for Travel Photography: Planning 1/ Do your research. The best travel photography starts before you even leave home. To make the most of every destination, you first need to do your research.Look up the places you're going to on Pinterest, Instagram, or your favourite travel blogs, find out where are the best places to go and the best time of day to go there, and get helpful advice on ...
8 Tips For Getting The Best Travel Photos. 1. Choose Photogenic Destinations. Yana standing atop a sand dune in Dorob National Park, Namibia. Settings: ISO-100, f/13, 1/125 sec. One of the most important things for getting amazing travel photos while traveling is picking photogenic destinations.
TIP 9: Use a Polarizing Filter. A polarizing filter can help reduce reflections and enhance colors in your photos. It can make the sky appear bluer, the clouds more defined, and foliage richer. Experiment with a polarizing filter to achieve more vibrant and captivating travel shots.
Travel Photography Tips for Families and Solo Travelers Tip #1. Choosing the Right Camera and Gear. The first step to taking great travel photos is choosing the best camera and gear for your trip. There are many options available, from smartphones and compact cameras to DSLRs and mirrorless cameras to drones and action cameras.
Poses For Travel Photos. 1. Make triangles with your arms. This may sound a little peculiar at first, but making triangles with your arms is an industry trick-of-the-trade in the world of photography. Making triangles brings definition to your muscles, elongates your torso and, overall, brings more life to every photo.
5 Simple Tips to Take Better Travel Photos. 1. Try to Take Photos When the Light is Just Right. In most cases, light that is 'just right' is when there is plenty of soft light that is diffused and evenly distributed over your subject. Ideally, there should be no hard shadows or excessively bright highlights.
10 Tips and Tricks for Editing Travel Photos for Social Media. ... Some editing is a good thing. In fact, we recommend it! However, if the filter makes your images look distracting or gaudy, that ...
Here are five reasons you should consider taking more vacation photos, no matter your destination. 1. Preserve Treasured Memories. Vacations can feel fleeting, but memories last a lifetime. Photos allow you to relive the joy of your trip long after it's over, from the place you saw to the food you tried. They tell the story of your journey ...
Since 1971, Travel + Leisure editors have followed one mission: to inform, inspire, and guide travelers to have deeper, more meaningful experiences. T+L's editors have traveled to countries all ...
Take pictures. Take pictures and screenshots of the important items and documents before you leave for your trip. This would include: Your luggage. The photo page of your passport. Your ID cards ...
13. Dublin is generally a safe city with good health care. Health and safety should not be an issue during a visit to Dublin. Pharmacies selling basic medication are easy to come by, and crime is not a major concern. Taking normal precautions (eg keeping an eye on belongings in crowds) should be sufficient.
Air travel does bring to mind certain health concerns. The changes in pressure create "a higher risk of developing a blood clot in the deep veins of the legs, called a DVT—deep venous ...