

The Very Best Video Editors for Travelers
You’re going to be a movie star roam’s list of favorite video editing apps includes a variety of options – beginner and expert, free and low cost, apple and android, desktop and mobile – so you can create movies and slideshows of your favorite vacation adventures., by liliia decos.
You head out on a fabulous trip. You take hundreds – even thousands! – of photos and videos of your experiences. You come home and never see them again.
Sound familiar? It does to me!
Most of the time, I take too many pictures and don’t know exactly what to do with them. Out of the hundreds of great shots my husband and I take, maybe 20 will find their way to Instagram or Facebook – but others are doomed to be buried in the “photo graveyard” of memory cards and cloud storage.
Well we have a cure for this ailment – and it’s not hydrochloroquine 😉 What if instead of burying your precious moments, you could compile the best pictures and videos from your trips into memorable and fun slide show videos?
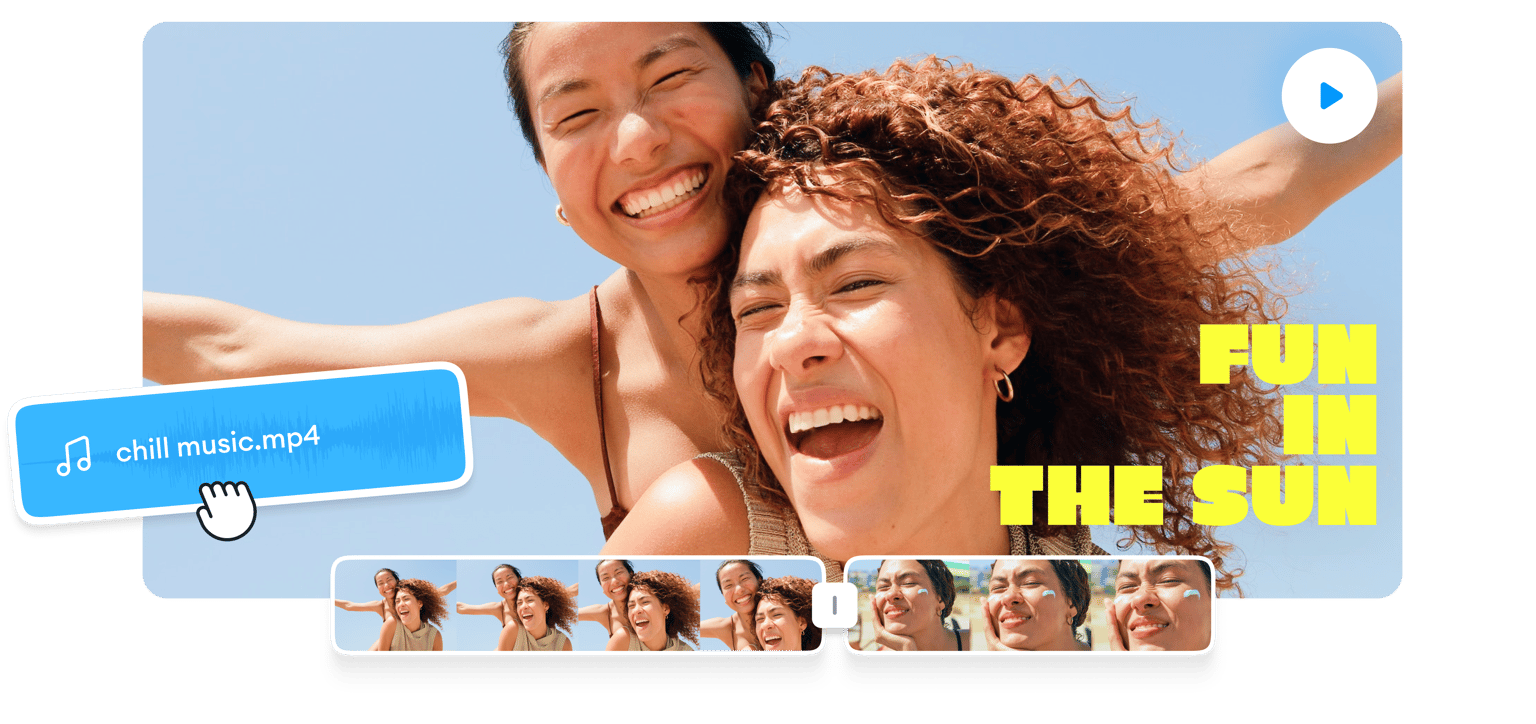
Well you can! And we bet you have some extra time on your hands to get that done. Even better? You don’t have the skills of a professional video editor or a pile of money to spend on software. I created the video below on Quik for free in just minutes!
I’ve compiled a list of 15 video editing apps for ROAM readers to check out. I’ve tried them all and include a bit of info with each one that’ll hopefully let you know which app is right for your situation.
For example, I broke out the list by desktop versions and mobile apps because personally, I work on my laptop when I create longer videos and when I use footage from our DSLR camera. I tend to use mobile apps to be sure I don’t “waste” amazing shots I snapped on my phone.
Keep in mind that there are dozens of video applications on the market, for both mobile and desktop users. It is a matter of trying and figuring out what works best for you. I hope this list will get you started and help your family relive your family adventures! (But if video ain’t your thing, check out our other ideas for preserving your vacation memories .)
And if you come up with a masterpiece, email us at [email protected] so we can share it with our readers!

Best Desktop Video Editors
Price: Free with an option to upgrade to paid Premium version
Available: Windows, Mac, Linux
Pros: Very powerful video editor with an extensive library of video tutorials for beginners
Cons: 4K video is supported only in the premium version. Can be too advanced for beginners
Lightworks is one of the most powerful video editors on this list. It has a huge variety of useful features such as high precision video trimming, multicam support, export 720 for YouTube, and a wide video range of video formats. The free version should be more than enough for most users but for those who are looking for even wider array of features, there is an option to upgrade to the Premium version.
VSDC on Windows
Price: Free with option to upgrade to a Pro version
Available: Windows
Pros: Non-linear video editor with a vast array of powerful features and more than 200 free tutorial videos
Cons: Windows only and technical support is not free
VSDC is one of the best free video editors for Windows. Note that this video editor is “non-linear,” meaning it allows you to combine video files and pictures in any sequence. You’ll be able to create layers, place several objects into a scene, overlap them, blend fragments and even make them half-transparent if your vision requires that 😉 The non-linear editing also allows picture-in-picture, side-by-side and split-screen shots, double exposure and green-screen removal. If these tricks don’t impress your friends, nothing will!
iMovie on Mac
Price: Free
Available: MacOS
Pros: Easy to learn
Cons: Advanced users may find it very limited
If you are a Mac user and you have never edited a video, go no further than this native Mac application. I used iMovie for many years before I started to consider moving up to something more advanced. iMovie is very intuitive and super easy to learn. Also, for basic videos, it has plenty of features such as pre-made transitions, video trimming, audio editing, split screen, 4K resolution and more.
Cons: Might be too basic for some intermediate users
VideoPad is a great editing software for beginners. It is perfect for anyone who just wants to start playing with video editing, as it is simple to use. It offers basic features such as a library of pre-made transitions, the ability to export movies in multiple resolutions, 3D video editing, an option to reduce camera shaking, and a sound effects library. VideoPad allows you directly export to YouTube and other social platforms, as well.
Movie Maker Online
Available: Browser-based app
Pros: Free app with a solid array of features, an extensive library of royalty-free soundtracks and photos, and the ability to export videos without any watermarks.
Cons: Lots of ads and it takes some time to get used to the interface.
Movie Maker Online is an free online video editor. This means that if you don’t have a powerful computer you still can create great videos from your trips! Online video editors are usually very simple but Movie Maker Online is an exception. Unlike other browser-based tools, it offers proper timeline-based editing with titles and effects, plus a huge library of royalty free music and stock images. In exchange, users must view advertisements – it is a trade off you may or may not be willing to make.
Best Mobile Video Editing Apps
Available: iPhone, iPad and Android
Pros: Built-in slow motion editor, ability to add multiple music files to the video and other fun features
Cons: 5 minute video limit, watermark on your video, and many ads unless you pay for the premium version
Download: Google Play
VivaVideo is a fun and very intuitive application that allows you to create a short video on your smartphone within minutes. Importing your own photos and videos from the gallery, you can trim and merge the slides very easily. The app has several free built-in themes, a vast library of songs (on top of your own play list!) and other fun features like stickers, filters, effects and texts to caption your video
I usually use this app to capture best moments of a fun and eventful day. For example, sightseeing in Barcelona for a whole day will result in hundreds of pictures on my phone. Creating a short, two-minute video is a great way to “remember” one day in particular and to share it with friends and family on YouTube or other social media channels. See example below.
Available: iOS and Android
Pros: Free with no watermarks on videos, a super intuitive interface, and great autoediting features to create short fun videos
Cons: Some users may want more editing control
If you have a GoPro camera but for some reason don’t like the GoPro editing app, consider Quik, probably one of the easiest editors to create short videos from both GoPro and smartphone footage. You can zoom, trim, rotate photos and videos from your gallery, albums, Google Photos, Dropbox or GoPro Plus. There are 23 themes and a bunch of filters, transitions and graphics. An AI editor analyzes your videos to select great moments. It detects faces and colors to frame each photo perfectly and also syncs footage to the beat of your soundtrack – and there’s a great selection of songs to pair with your video. Another plus? Every week Quik creates ready-to-watch videos made from photos and video on your phone. That’s really awesome! See example below.
LumaFusion
Price: $29.99
Available: iOS
Pros: The most professional video-editing app for iOS that delivering anything a filmmaker needs
Cons : Not free; doesn’t sync between devices; only for iOS
Download: App Store
LumaFusion is aimed at more of an expert, mobile video editor user and really delivers everything an almost-professional developer could want. You can start as a novice and build up to expert-level videos in a single app. Only downside is that you’ll pay $29.99 for this privilege – not a lot but if you’re just starting out editing video, you might want to mess around with a few free options before jumping up to LumaFusion. The good thing is that it will be waiting for you when you’re ready 😉
Price: Free version available; Pro Edition is $4.99 monthly or $39.99 annually
Available: Android
Pros: Feature-reach editor, supports 4K, exports directly to YouTube, intuitive interface
Cons: Free version adds watermarks
Android users shouldn’t get upset because they can’t get LumaFusion – they’ve got FREE access to Kinemaster, a full-featured video editor. I have been using this app for several years and I simply love it! Despite the fact that the app has all the features a professional editor would ever need, the interface is quite intuitive and easy to use.You can even time audio clips to certain frames which is not a common feature on free mobile editors. See example below.
Pros: Free, simple AND powerful, many soundtracks and editing features, and the ability to produce 1080p videos without watermarks
Cons: Only available for iOS users currently
Another amazing application for editing short videos on you phone from the GoPro company. If Quik is considered to be the fastest and easiest way to edit videos, then Splice promises to deliver desktop editing software power to your phone or tablet. On Splice you can edit your GoPro videos as well as you video and photos from your phone. You can trim clips, add filters, chose from several transitions and add customizable text overlays and titles slides. Splice has an extensive library of royalty-free soundtracks and sound effects, and enables voice-over as well. The only downside is that you must have an iPhone to use it.
Adobe Premiere Rush
Price: Free for three video exports and 2GB of cloud storage, then you can subscribe to Premiere Rush CC plan ($9.99/ month)
Available: iOS, Android, Windows, MacOS
Pros: Cross-platform integration, support for 4K videos, and a multi-track editor
Cons: Free version only lasts for a limited amount of videos and it doesn’t seem as powerful as professional software
Download: Adobe
Adobe Premiere Rush is the next step towards professional editing software. While with Adobe Premiere Pro there is a considerable learning curve (frankly, it can be quite intimidating at the beginning), Adobe Premiere Rush is designed for people who want to be more in control when editing their videos but don’t want to spend hours and hours on how-to tutorials. Think of the difference between Adobe Premiere Pro and Adobe Premiere Rush like the difference between Photoshop and Lightroom – its got all the best tools in a much more user-friendly package. The app offers four video and three audio tracks for editing. You can add music from your own library or use one of the free soundtracks. It delivers a quite intuitive and friendly interface considering that it is a midrange professional video editing software.
PowerDirector
Price: Free with in-app updates
Available: Android, iOS, Windows
Pros: Vertical video editing, slow motion editing, chroma key editable green and blue screen backgrounds.
Cons: Free version has a watermark and doesn’t allow 4K export.
Download: App Store or Google Play
PowerDirector is another great video editing application that is available for both Android and iOS. The easy and intuitive interface lets you create professional looking video in a matter of minutes. The app offers a good selection of effects, the ability to choose background music and voiceovers, as well as all the usual transitions and cropping tools. You can export your videos straight to Youtube, Instagram or Facebook for free in 720p or if you purchase an in-app upgrade, you can export in Full HD 1080 or 4K.
Price: Free with ability to upgrade
Available: Android, iOS
Pros: Fast, easy and fun. Also you can share your content in the app (similar to Instagram)
Cons: You have to pay to download your video. Sharing to Facebook and Instagram is free but you can share only as a post, not as a story (as of April 2020) Limited control over the editing process.
Download: Google Play or App Store
If you are the type of person who shares a lot of content on social media, have a look at this app. Magisto uses AI to select the best part of the footage, so the app pretty much does the editing job for you. You select the content from you library, select the theme and music, and voila! The video is made and is ready to be shared. It is a cool app to use for fun short videos at the end of an eventful day.
Price: Free with an opportunity to subscribe to GoPro Plus
Pros: Multi-track editor, exports directly to YouTube, 20+themes to chose from
Cons: Older app so only on older GoPros; Minimal control and cannot edit templates
If you have an older model GoPro, this is.the app that comes with the phone. The good news is that it is easy to use! GoPro helps you automatically import your footage and create great videos within seconds. There are 20+themes, time lapse sequences and the possibility to go frame-by-frame to find the ideal high-quality still make it possible to take care of your videos quick and easy. What I love the most about this app is that GoPro allows me to view photos and videos right on my phone before I offload them.
Available: Google Play and App Store
This is not a typical video editing application but I still decided to include it on our list. The app tracks all your activities such as hikes, runs, bikes or any adventure outside and then it creates a really cool 3D activities stories that you can share with your friends. As an avid hiker, this app has become one of my favorites!

Liliia deCos – April 2020
Roam contributing editor .

Originally from Ukraine and now based in Spain, Liliia has traveled literally across the world with her husband Jose and their two young daughters. Follow their intrepid walkabouts at bring_baby_abroad and see Liliia’s amazing photos on Instagram at bring_baby_abroad or on ROAM where she won Best Family Photo of 2019 .
© ROAM Family Travel 2020 – All rights reserved
Roam with us read the latest real family adventures.

Beware of Giant Trolls Near Seattle
Some beasts are delightful.

A Nantucket Bucket List for Families
Best food. Best beaches. Best getaway.

Costa Rica’s Osa Peninsula is Calling
Wildlife lovers listen up.

The Ultimate New Orleans Itinerary
A week - or weekend - of family fun

Adventuring in Puerto Rico
Rainforest, beaches & culture - without leaving the US

In Mexico’s Surrealist Secret Garden
See secret gardens & endless waterfalls

Thailand during Covid
The easiest family beach vacation in Southeast Asia

Dog Days in the SoCal Desert
Poolside Palm Springs & Joshua Tree & more!

Insider’s Guide to the Best of Andalucia, Spain
Granada, Seville, and Córdoba—and much more

Family Adventures Across Israel
Hiking, surfing, and exploring from Eilat to Tzfat

The Road to “Eureka!”
From sea glass beaches to redwood forests

8 Reasons Why You Should Rent a Pool NOW

Building Mom-Daughter Bonds in Peru
Bring home far more than snapshots

Coastal Paradise in North Carolina
Pass the Outer Banks for the “Wright” Beach

A Perfect Day in San Francisco’s SOMA District
Art! Architecture! Parks! Garlic fries!

Family Favorites on the Oregon Coast
Fun in Florence, Newport & Cannon Beach

Hut-to-Hut Hiking the Tour du Mont Blanc
A day-by-day recap of one family's Alpine trek

Beyond Airbnb: 7 More Ways to ‘Borrow’ Fun on Vacation
How to get RVs, resort pools, chef dinners, and more

Still in the Saddle
Life at a High Sierra pack station

France with Kids: Vaucluse by Van
Get a taste of the REAL Provence
Related Articles

Ditch the (Toxic, Chemical) Sunscreen
Roam with us., privacy overview.
Travel Video Editor
Create beautiful travel videos online, in minutes!
Create amazing videos of your trips and vacations
Your vacation doesn’t have to end when it ends. Create and edit your travel videos on VEED so you can make them look even more amazing to share with your friends and family. Add elements to the footages of your travel clips such as text, images, transitions, and more. You can also add music and sound effects. Share your video on Facebook, Instagram, and other social media sites!
How to Edit a Travel Video:
1 upload your video.
Upload your video to VEED. You can drag and drop your files into the editor. Or you can select from our video templates and replace the placeholder video.
2 Personalize
Edit and personalize your video by adding text, music, images, and more. You can also choose from our stock audio and video library.
Click Export. Download your video and share!

‘Travel Video Editor’ Tutorial

Create compilations of your trip
Edit your travel video to make it look like a compilation of the places you went to on your trip. With VEED, it only takes a few clicks to create a compilation of video clips. Simply upload your videos into the editor and you can split, trim, cut them, and put the clips together to create one video compilation. Make amazing vacation compilation videos in minutes!
Make your videos look professional
Use our video editing software’s wide array of tools to make your videos professional-looking. Choose from our camera filters and video effects, add text, images, background music, and more. It only takes a few clicks. You don’t need any experience in video editing to create professional-looking videos! Share your awesome videos on different social media platforms.
Transition effects
Add transition effects to your video clips to make them look stunning. Add them in between video clips—all you have to do is drag and drop the transition effect into the Timeline. This is perfect for creating and editing the perfect travel video that you can share with your loved ones!
Frequently Asked Questions
- Upload your video to VEED; just drag and drop it into the editor.
- Personalize your video—add music, sound effects, images, and more.
- Download and share!
With VEED, you can create stunning vacation videos online—straight from your browser. No need to download an app!
The best way to edit videos is to use VEED’s free video editing software. You can rotate, crop, and trim your videos. Add text, images, music, and so much more!
While there are many other free video maker apps out there, VEED stands out because of its ease of use and its incredibly clean interface. Create stunning videos in minutes!
Discover more:
- Anniversary Video Maker
- Commentary Video
- Customized Video
- Event Video
- Fancam Maker
- Hype Video Maker
- Reaction Video Maker
- Romantic Video Online
- Snack Video Online Free
- Sponsor Video
- Teacher’s Day Video
What they say about VEED
Veed is a great piece of browser software with the best team I've ever seen. Veed allows for subtitling, editing, effect/text encoding, and many more advanced features that other editors just can't compete with. The free version is wonderful, but the Pro version is beyond perfect. Keep in mind that this a browser editor we're talking about and the level of quality that Veed allows is stunning and a complete game changer at worst.
I love using VEED as the speech to subtitles transcription is the most accurate I've seen on the market. It has enabled me to edit my videos in just a few minutes and bring my video content to the next level
Laura Haleydt - Brand Marketing Manager, Carlsberg Importers
The Best & Most Easy to Use Simple Video Editing Software! I had tried tons of other online editors on the market and been disappointed. With VEED I haven't experienced any issues with the videos I create on there. It has everything I need in one place such as the progress bar for my 1-minute clips, auto transcriptions for all my video content, and custom fonts for consistency in my visual branding.
Diana B - Social Media Strategist, Self Employed
More than a travel video editor
VEED is so much more than just an online travel video editor. With VEED, you can create videos both for personal and professional use. Create stunning professional-looking videos for your business, advertising videos, social media marketing videos, or presentation videos. You can also create videos for your friends and family—like holiday videos, birthday greeting videos, and so much more! Get started for free today.

19 insanely useful apps for editing photos & videos while traveling (Free & Paid options)

Looking for the best apps to edit your travel photos or make videos and vlogs on the road? Want to know the best free photography apps, or the ones which are worth paying a little more for to improve your shots? Which ones are easiest to use while traveling to create beautiful memories of your trips?
We asked other travel photographers their favourite apps to use on the road- and here are their answers!
We work hard to make this the best travel photography and experience website possible. Shoot Experience is supported by our readers and if you make a purchase through a link on this site, we may earn a small commission at no extra cost to you. We are proud of our editorial integrity and only recommend cameras, gear and accessories we find truly useful. We hope you find the information in this post helpful.
Jump Ahead to...
Best Apps for Photo Editing for professional results
Whether you’re a complete beginner (here are some travel photography tips for beginners ), or you’ve been around the block (ha- excuse the rubbish pun) , there are still plenty of things to learn and improve when it comes to editing travel photos.
To start, let’s look at some of the best and most popular photo editing apps for travelers. Most of these apps are available on both iOS and Android and they come with a huge range of uses and features. Because these are the ‘creme de la creme’, most of them need to be purchased or subscribed to for a monthly or annual fee.
If you’re looking for FREE or very cheap photo editing apps, keep scrolling to the next section.
Enlight Pixaloop
Photos app on iphone, ipad and mac, photo pills- be in the right place at the right time, adobe photoshop express.
Recommended by Erki from Genem Photography
Name of App: Photoshop Express Photo Editor
Available platforms: iOS and Android
Cost of app: Paid (free 30-day trial)
Adobe is one of the most well-known companies when it comes to photo editing. There are a great variety of different programs under Adobe and it’s perfect for more advanced photographers or travelers who want to take their photos to the next level.
Adobe offers different packages, depending on what you need. If you plan to do a lot of photo editing, you can get a Photography Package, which is around 11.99€ per month. The package includes three programs: Adobe Photoshop, Lightroom (mobile based, works on all platforms), and Lightroom Classic (desktop only). Adobe offers a 30-day free trial to see if it’s a good fit for you.
Photoshop has many features to tune up your travel photos. You can start small, with simple editing like adjusting exposure, color grading, and vignetting. But you can also make bigger changes to your captured photo, such as changing overexposed sky or brightening just one area.
You can also remove unwanted people or items- which is especially useful for travelers visiting popular locations like the Leaning Tower of Pisa in Italy or the Taj Mahal in India. The expectation is to get a perfect picture of the landmark with no distractions, but the reality is that these places are often overcrowded. The magic happens in Photoshop, where you can eliminate unwanted subjects and have a perfect photo for Instagram.
Adobe Photoshop is a very advanced photo editing software and takes some time to get to know all the bits and pieces. However, there are several learning videos by Adobe to learn the basics throughout the program.
Lightroom- one of the best photography editing apps
Recommended by Vicki from VickiViaja
Name of App: Lightroom
Cost of app: Paid (free trial)
Why this photo editing app might be best for you: Lightroom is considered one of the best and most professional image editing software on the market. It’s important to realise that there are TWO versions- a computer/ laptop software and then a phone app. If you don’t want to pay for the expensive Computer program from Adobe, you can simply download the free Lightroom app.
The app has a large number of editing functions, similar to what you would find in the computer program. It also has the capability to create and use presets. A preset is basically a set of pre-defined editing filters that you can use to enhance your pictures with just one click. There are numerous tutorials and blog posts on the internet explain how to create your own presets to edit your images in a flash, or you can purchase and use other peoples.
Reasons Vicki loves this app to edit her travel photos: “Some of the pictures I take in my hometown Barcelona can look a bit boring (since the Gothic quarter consists mostly of stone). I created my own preset in Lightroom that precisely fit the tones and colors of my Barcelona pictures. Now I can edit my images quickly and easily without having to start from scratch every time.”

A Color Story
Recommended by Jade from Traveling Transylvania
Name of App: A Color Story
Cost of app: Paid (even free version needs packs to purchase)
A Color Story is a great photo editing app with a wide variety of filters and lens effects. With the ‘free’ version, you can choose individual filter packs to purchase (ranging from 2-6$ USD). If you upgrade to the paid version (ACS+- costs around $32.99/ yr), you automatically get all new filter and effect packs. Depending on how much you use the filters, it may or may not make sense for you to get the paid subscription.
You can apply multiple filters to a photo at different levels of intensity, and save your editing process, which makes it easy to apply the same edits to a large number of photos which is pretty cool. You can do this with the free or the paid subscription.
Why Jade chose to pay for ACS+: “The main reason I opted for the main subscription was for the Color+ feature. Do you ever adjust the saturation on your photos only to find that one color group is taking over? The reds become too red or peoples’ skin becomes too orange? Enter Color+. With Color+, you can adjust the hue, saturation, and luminance of each color family. This is a game changer and makes editing photos so much easier!”
Lens Distortions
Recommended by Isabella from Issy’s Escapades
Name of App: Lens Distortions
What is it best for? Making your photos look ‘wow’!
Price of app: free for certain limited features, upgrade to all features for $23.99 per year.
As your photography advances and you become more involved in the nuances of post-production and the impact this can have on a shot, you may find that some other photo apps are lacking in that extra something that makes you look at a photo and say “wow”.
Lens Distortions is an extremely useful tool for the more experienced photographer to have in their arsenal. It allows you to introduce cinematic tones and effects like light leaks, fog, rain etc to create some extra drama and create atmosphere in a shot. It works on a ‘layer’ basis, allowing you to add features gradually and to layer on top of each. You can easily combine a range of layers and add and remove as you see fit.
The app allows you to use a certain amount of features for free on a limited basis, across a range of the various colour, light and weather layers, but you need to upgrade and pay in order to access all features. Once you start using the app, you’ll discover that this is highly worth it as you’ll always find something that you need to make your image that extra bit special.
As someone based in Ireland that takes lots of landscape images and shots taken in nature, I find the app invaluable for its post production features. I particularly love using it for woodland scenes to introduce light leaks through trees, or also for rugged mountain shots, where I like to introduce effects like fog to make the scene moody and dramatic.
Isabelle’s top tips for using this app: Remember that less is more and bear in mind that the app was created to allow photographers to create subtle effects into their imagery! Also, use the eraser tool so that your effect is applied to certain parts of the image – like around a subject, but not including the subject, as an example.

VSCO Photo editing app
Recommended by Victoria from GuideYourTravel.com
Name of App: VSCO
What is it best for? Touching up photos
Cost of app: Free and Paid- Free trial for 7 days
VSCO is a popular photo editing app that is perfect for editing images for Instagram or other purposes. If you like editing photos on your phone VSCO is definitely a must-have app. It is loved for its filters that are highly adjustable and work more like presets. They have a modern look and will transform your travel photos completely.
The free version gets you a fantastic selection of filters although there are more available if you get a pro membership. This costs from $19.99 per year which is fairly reasonable and definitely worth it if you want to get the most out of the VSCO app. If you’re not quite sure yet whether this is a good option for you why not try the 7-day free trial? You can cancel any time so no risk involved.
VSCO also has some social media functionalities as users can share their photos on a feed. This is a great way to collect all your photos in one place and look at other people’s content while you are on the app. The app also automatically saves any photos you edit so you can easily access them when needed.
Recommended by Mikhaela from YouthSoloArtsy.com
Name of App: Enlight Pixaloop
What is it best for? Touching up and animating photos
Cost of app: Paid- Free trial for 7 days
- 1 month: from 5.99/mo;
- 12 months: from 17.99/mo
- One-Time Purchase: from 54.99
Why this photo editing app might be best for you: Enlight Pixaloop is great for touching up and animating photos. Aside from that, it is easy to use, even for beginners who want to try out advanced photo editing and improve their photography. You can also use this for creating video clips, gifs, and social media posts on Facebook, Instagram, Youtube, and many more. Super easy and convenient to use for creative individuals out there.
In the Pro version, there are a lot of extra functions to try out, and you can remove the watermark which is present in the free version.
TIPS TO USE ENLIGHT PIXALOOP
Here are some ideas to get the most from this photo editing app.
- TO ANIMATE: Click the animate button, click patch, click the area you want to animate, or add motion in your photo.
- If the whole photo is moving, you could click the freeze button to select a specific object, person, or area you want to remove the animation.
- Choose the camera fx to add more actionable and live-motion acts in the photo.
- Choose filters, overlay effects, and add other graphics to make your photo more interesting.
FREE (or very cheap) photography editing apps
If you’re just starting out with travel photography, investing in one of the ‘big boys’ can be expensive- and possibly unnecessary. Until you know what sort of photos you enjoy taking, it’s hard to know exactly what you’ll need.
Instead, we recommend using some of these free photo editing apps to help you get started.
Snapseed- one of the best FREE photo editing apps
Recommended by Utkarsh from journeysfromheart.com
Name of App: Snapseed
Cost of app: Free
Snapseed is a free photo editing tool available both on android and iOS. It was initially developed for Apple’s iPad in 2011 and has gained huge popularity since then.
It has a range of inbuilt presets, a whole lot of filters, color tools and much more. There is a very easy to use interface and a quick learning curve, especially for beginners. It is a free tool and gives access to many of the advanced features like selective adjustments of photos for free, which are usually is paid in similar tools.
Reasons Utkarsh recommends this photo editing app: “I really like using it for my Instagram pages and love the quick-to-use editing features. Travelers can quickly tweak, edit and upload images on the go. It can handle both jpeg and RAW file formats.
There are some special features like Healing,text shadow effects, perspective which make this app an all time favourite for me. I use healing a lot as it helps removes stains, undesirable marks and lets you ‘clean’ the picture.”
Snapseed is a perfect fit for all travel photographers who are looking for a free solution and want to quickly edit and share their photos.
Touch ReTouch- the best photo editing app to remove unwanted items from your images
Recommended by Haley of Haley Blackall Travel
Name of App: Touch Retouch
Cost of app: Paid – $1.99
TouchRetouch from Adva Soft is one of the best apps on the market for eliminating unwanted objects from your photos. At an economical $1.99USD purchase price, the app can be downloaded on Apple and Android products alike.
The TouchRetouch app features object removal, line removal, and a cloning function, all of which can easily be used to edit your travel photos. There are no complicated features here, as most objects and lines can be removed in two simple steps. This app is what most travel bloggers or influencers use for creating crystal clear images that showcase stunning architecture or landscapes.
The object removal function itself includes a brush, lasso, and eraser function, giving you options for how you edit. TouchRetouch has stepped up its game over the last year to include an innovative line removal feature. It allows you to flick over a section of a line, and the app’s smart technology will remove the rest for you without you having to fiddle or spend too much time. If all you want to do is eliminate a blemish or two, there is an option for that, as well.
The cloning stamp is more advanced and can allow you to simply remove objects, or you can spice up your editing game and use it to duplicate or mirror parts of your image to create an interesting effect.
TouchRetouch has a higher precision when it comes to eliminating unwanted objects from your photo. It can be tricky to try to establish boundaries in apps like Lightroom, and TouchRetouch is a more innovative application with a single purpose to create clear, precise edits to your valuable travel photos.
Lensa- is this the best FREE selfie editing app?
Recommended by Parimita from Mumbai Gloss
Name of the app: Lensa: Photo Editor for Perfect Pictures
What is it used for: You can use this app to edit selfies, close-ups, portraits, full lengths, etc. Anything where the face is clearly visible in your photos. This is a wonderful app for photo retouching and creating vibrant, studio level, natural looking images for faces and individuals. You can upload images from your phone folders or open the app in the camera mode.
Play Store Review score: 4.7
Cost of app: You can download the app for free and get 5 photo credits to try it out. You can edit 5 photos for free every week. After that you need to pay (although there is an option to share a link with family and friends to get more credits.)
The paid version includes unlimited photo edits using it’s advanced one touch features like changing photo backgrounds, one touch magic correction, foreground, and background adjustments, etc. Lensa provides Premium Subscriptions on Apple store which are currently $7.99/month and $29.99/year. The plans auto renew till cancelled.
You can upgrade to the paid version if you like but if you are not a heavy photo editor, the free version should be sufficient for creating impeccable selfies for your social media accounts or blogs for a week. Moreover, you can use almost all the features of the app in the free version including one touch background change, one touch magic correction, foreground and background adjustments, various filters, etc.
Why Parimita loves this app for photo editing:
This app enhances your best features without any unnatural looking filters. You can deepen the colour of your eyebrows, remove eyebags and under eye circles, smoothen the skin on your neck, make your lips look plump and even change the colour of your hair without making it look artificial. It is remarkably simple to use, with a very interactive user interface.
TOP TIP to use it better: Combine with other photo editing apps like PicsArt (see below) to change eye colour, to make your selfies pop.
Recommended by Jackie from JouJouTravels.com
Name of App: PicsArt
Cost of app: Free and paid versions($4.99/mo)
PicsArt is a free mobile editing app available on iOS & Android. The app is very simple to use bringing the fun back into editing as even beginners can use it with more ease than Photoshop. There’s a large variety of filters, stickers, and artistic text that you can apply to your image and make a boring picture stand out with more creative flair.
If you want to upgrade to the paid version, you will pay £4.99/mo and get access to more features including more fonts, templates, stickers, and premium photo & video editing tools. This app is much loved because the creative opportunities are endless and it’s so simple to use. There are many templates within the apps to get you started if you’re new to it.
If you want to combine an image with another you can easily do that and erase part of the second image to blend the two images nicely. This is perfect if you like how the subject looks in one photo but the background is more suitable in another. You can also easily remove the background and change the color or pattern with one of the many filters you can choose.
Jackie’s tip: “Another fun option is adding glitter or texture to parts of the photo or even a rainbow to brighten up a sky like this one in Alberobello, Italy !”

Recommended by Mal from rawmalroams.com
Name of App: Facetune 2
Cost of app: Free and paid
Why this might be the best photo editing app for you: Face Tune 2 is an excellent app to easily remove imperfections, fine-tune your photos, and add some extra fun elements.
The app costs £33 for the full version for a year, but there is also a free version with more limited features. The main reason why you would want to upgrade is that the full version saves photos in full quality, which may be important to you if you’re going to share your travel photos on social media and want to preserve the full resolution.
Facetune 2 is particularly good to improve selfies and portrait photos. It works super well with removing skin imperfections and blemishes. You can smooth the subject’s skin with one touch, and this function is also included in the free version. Other functions include coloring, which can be handy if, for example, your lips came out unnaturally pale. You can also resize or reshape the body. Reshaping can be a controversial topic, but if you want some slight adjustment, such as posture, this app is a true hero.
Finally, the app has also some fun features such as defocusing the background, which works particularly well with portrait photos, adding elements to your background or clothes and some cool light effects, which you can use before saving or sending to your portable photo printer .
Lightleap (formerly Quickshot)
Recommended by Corina from Packed Again
Name of App: Lightleap (used to be known as Quickshot)
What is it used for?: Editing photos quickly while traveling, quickly and efficiently.
Cost of app: Free and Paid
Lightleap is an image editing program/app for use on the go when it needs to be done quickly and you don’t have time to use Lightroom or Photoshop. As simple as 10 seconds and you can have a photo edited.
The app can be used for free but you can upgrade. The paid version has many cool effects if you need this for your photo editing. Another great feature of the Lightleap App is the “repair. Quickly remove unwanted people, background stains and simply retouch your picture within minutes and it is ready to upload.
What Corina loves about this photo editing app: ” My favorite feature and the one I use the most are “The Sky under control”. Although moody grey skies can be great, but sometimes I just need a bit of blue and clouds to bring the photo back to live and Lightleap App can do that. You can choose from several different skies from the sunny blue sky all the way to the stargazing night sky. Add it to the photo and most of the times it looks perfect.”
TOP TIP for using this app to edit photos: If you know you will need the App to replace a sky for example, make sure there are NO trees within the skies so that it works better.
Recommended by Jyoti from Story at Every Corner
Name of App: Photos
What is it used for?: Photo editing, organizing, searching, and sharing.
Available platforms: iOS only
Cost of app: Free- comes on your phone
Sometimes the simplest solution is the best. If you have an iPhone, iPad or Mac, you’ll already have the Photos app installed on your device. The app ties in with your Apple ID and can sync images across your Apple devices using iCloud. If you need more storage, you can purchase a subscription for extra iCloud storage. With the additional iCloud storage, you can store all your apps in the cloud and access it from all your devices. You can also share it in Shared Albums on iCloud.
I love the Photos app because it’s extremely easy to use. It’s on all my devices. The app provides quick and easy photo editing seamlessly. The photos are automatically stored on iCloud and available on all devices for uploads on social media and blogs. You can also use air drop to share them with others.
TOP TIP to use the app better: The app is so simple that you really can not go wrong when editing photos. However, very few users know about all the advanced features you can use to take your photos to the next level. Luckily Apple stores and third providers have classes to master photography and editing with native and free apps on our iPhones, iPads or Macs. Apple classes and YouTube videos for taking your photos to the next level are free of charge.
Reasons Jyoti loves the Photos App when traveling: “Typically we carry our large Nikon SLR camera for photography and use Photoshop for photo editing on my Mac. But as the iPhone camera is getting better and better, there are times we leave the photography equipment at home in favor of traveling light. This works extremely well when we’re shooting in good lighting. The quality is remarkable and we can get more candid shots because phone is a lot less intimidating for the subject. All our Barcelona photos such those in the Park Güell photo gallery were taken on our iPhone and edited using the Photos app on the iPhone.
Other awesome photography apps to try
Recommended by Ilse from Digital Travel Couple
Name of App: Photo Pills
Cost of app: Paid- around $13.50
The Photo Pills app is less of an editing app and more of a planner- but it’s still a great tool to plan your travel photography adventures. With this app you will always be in the right place at the right time. You can buy it in the app store for $13,50 and it’s absolutely worth the investment. Once you start using the app you will see all the options it has.
The different tools, known as pills, all serve a different purpose. Some of the pills help you to research and plan your photos in advance. Others help you to execute your photos when you’re on location and there are even pills that help you to choose the best lens for the shot you want to create!
You can use the planner to find a good date and time if you already know where you want to shoot. At the top panel you can select various elements on the map. These include the position of the sun, moon, milky way and shadows. Thanks to the Augmented Reality you can see the path of the sun and moon, as well as the directions of the sunrise and sunset and the moonrise and moonset.
Reasons why Ilse loves using the Photo Pills app: “Personally I am a huge fan of the PhotoPills app as it helped me many times to get the right framing and timing for a shoot. A few months ago I went on a spontaneous Full Moonrise mission to capture the Big Moon above a mountain peak with a person in the moonlight. It was a huge success thanks to PhotoPills that showed exactly the place where the moon would rise behind the mountains. Below you can see the result:

Best apps for Video Editing while traveling
There are lots of programs which will edit video footage, but not many apps worth a mention. Here are some of the best available.
Name of App: iMovie
App Store Rating: 4*/5
iMovie makes video editing easier. Seriously, I’ve run a Youtube channel for our motorhome blog for years. I’ve tried Final Cut Pro and countless others- and I always come back to iMovie. It’s simple to use, even if you’re a complete beginner, and it’s easy to import your videos, select the clips you want and export or share your finished masterpiece. Unless you’re planning on doing professional video editing, or you’re overly concerned about color grading, personally I see little reason to use anything else.
Final Cut Pro
Recommended by Pubali from Paradise Catchers
Name of App: Final Cut Pro
Rating on the App store: 4.2/5 ( see it here )
Cost of app: Paid
Final Cut Pro is Apple’s native video editing software for Mac and great for both enthusiasts and professionals. You get a 90 days free trial for this paid software with a price tag of 299 USD. However, the good news is that it is a one time purchase that includes any future update.
Being part of Apple’s arsenal, the hardware-software combo makes FCP fast, particularly noticeable while rendering large 4K videos. We realized the difference after we struggled combining travel clips from our phone, camera, Xiaomi Fimi X8 SE drone and GoPro, in some other editing software. It was a beach holiday where we had several clips ranging from drone shots of the coastline to snorkeling shots. We decided to try FCP and it worked seamlessly.
Final Cut Pro has bit of a learning curve if you are used to other editing software. However, it has a great user community and you can easily access tons of tutorials that can get you up to speed in no time. The project managing interface is easy to use and the features are comparable to other professional level software.
If you are regularly shooting in 4K, looking for a video editing option in the Mac world and ready to move beyond free software, give FCP a try for 90 days and buy if you like it, without worrying about recurring payments or future updates.
Recommended by Rachita from MeanderWander.com
Name of App: Inshot
Why this video editing app might be right for you: Perfect for editing short-form video content such as reels, stories, etc. With the free version, you get access to a lot of features such as video editing, adding filters and effects to the videos, adding music, stickers, etc. to video, and a lot more.
The paid version currently costs $14.99 per year. With this subscription, users get access to more features and editing options to make the videos even better than before. Most importantly, you can get rid of the watermark and the advertisements.
Why Rachita loves this app for editing videos: “Personally, what I love about this app is that it is extremely easy to use and is great for making reels and short videos on the go. Whether I am on a flight or a boat, I can utilize my time by making videos to share across my Instagram or blogs. Plus, it is so easy to use and saves a lot of time with all the options that are already available for editing the videos.
One of my favourite things about Inshot is that it allows you to export the video in your desired resolution so that you can maintain the quality of the video. Installing this app on my mobile phone has made video editing so much easier and quicker for me.”
Recommended by Ruma from The Holiday Story
Available platforms: iPhone only and Android
Rating on App Store: 4.6/5
What does the app do? Filmora is one of the best applications to create and edit travel videos on the go.
It allows you to merge multiple videos, trim clips, add royalty free music, do a voiceover, add text, effects, transitions and stickers and share your finished creation with the world.
You can use it to create travel videos, reels, vlogs, GIFs, stories and even TikToks.
Features : – The Filmora app has many features like adding external music, simple roll, transition, Fisheye Roll, Zoom, Orb, Motion. It also has a few free pieces of music for editing. You can get only three filters free, and with the pro version, you can get 12 filters. Also, You can make a video with your photos. This app’s unique feature is you can merge more than two videos. Those are also available in the basic version.
With the pro version, you can get access to 5500+ stickers and Templates, 1080P HD video export option, and the most important thing in this pro version is you can remove the watermark of this app. The pro version also has 1000+ stock music tracks and 150+ effects for photo and video editing. The 150+ effects are unique and attractive.
Tips: – Filmora video editing app is very easy to use. It has tutorials for first-time users and you do not need to be an expert to create great travel videos and vlogs with it. If you create a lot of videos, you’ll get use out of the pro plan- each month you get new stickers and effects to use to make the videos unique.
Recommended by Jiayi from the Diary of a Nomad
Name of App: Splice
What does the app do? Video editing- free and easy
Splice is a popular go-to app for editing travel videos. It is free, easy to use, and allows you to do a wide variety of actions to create the most engaging videos.
On Splice, you can easily trim videos, stitch them together, and choose a transition effect. You can also add a lot of other things such as a title, music, special effects, and text/captions in a variety of fonts, colors, and styles. The special effects range from Chroma to Vintage, and they’re perfect for those who enjoy playing with creative aesthetics.
The best thing about Splice is that it’s super user-friendly. It’s laid out in a way that makes everything very intuitive, so even if you’ve never used the app before, you’ll quickly learn how to trim, crop, and stitch your videos together to create a beautiful, cohesive final video.
TOP TIP to use this video editing app: To make the most of Splice, be sure to explore the many sound effects it offers, including cars, claps, footsteps, and instruments. You can really get creative with them!
Why Jiayi chose Splice: One of my favorite videos created on Splice was a compilation of short videos I’ve taken on many hikes around the world. After stitching them together with a cross-fade transition, I added some inspirational hiking quotes to each video using the text overlay feature of the app. I then added some music in the app, and it turned out to be a great ode to some of my most cherished hiking adventures.
Best apps for Go Pro users
Got a Go Pro? Here are some of the best apps for you to use and edit your photos and videos. If you’re new to action cameras, you might enjoy these easy Go Pro tips for beginners.
Quik App by Go Pro
Recommended by Martin from TravelExplorator.com
Name of App: Quik App from Go Pro
Cost of app: Free to download, but needs 49.99 yearly Go Pro subscription or 9.99 just for the app.
Why this might be the right app for you: If you use a GoPro to take photos or videos on your travels, this app is a must use. The user interface is straightforward and isn’t cluttered with confusing options.
Even if you’re a complete Go Pro beginner and it’s your first time using apps to edit a video or image, this app is a great choice. Photos and videos are automatically uploaded from your Go Pro, so you don’t have to worry about uploading large files to an app. It’s called “Quik” because it was designed for the user to be upload and edit footage quickly and easily.
It’s perfect for editing pictures and videos taken with your action camera, but you can also use it to edit other footage no matter what camera or drone you took them with.
The extra features you get with the premium versions are :
- access to their royalty-free tracks you can add to your videos.
- access to all unlocked video editing features like Quik-exclusive filters and video themes.
- unlimited cloud backup of the original photos and videos you import to the app.

Enjoy this? Your friends might too...
You might also be interested in

Travel Photography Tips for beginners- 10 quick and easy ways to improve

Essential Travel Photography equipment for beginners- what you REALLY need

9 easy Go Pro tips for beginners – tricks to get the most from your action camera
Leave a comment cancel reply.
Your email address will not be published. Required fields are marked *
Save my name, email, and website in this browser for the next time I comment.
Create travel videos that inspire wanderlust.
Learn how to plan and execute a video of your globetrotting expeditions. Get pro tips and advice to make stunning travel stories out of your adventures.
Not sure which apps are best for you?
Take a minute. We'll help you figure it out.
Immortalize your travels with a video.
Travel videos are a great way to document your trip, tell a specific story for a client, or just share the sights and sounds you experienced with the world. Whether you’re exploring the pyramids of Egypt, the skyscrapers of New York City, or the tropical waters of Thailand, learn how to make a video of your trip that you’ll want to watch over and over again.
Prepare for your trip.
When it comes to making travel videos, any time spent planning is time well spent. The preparation phase might not be as fun as filming or traveling, but it will help you make the most of your time, and it’ll give you the best chance to come away with the footage you need to make the best travel video you can.
Gather inspiration.
The first step is to research your travel destination and find inspiration. If you’re going on an expedition to Antarctica, this could mean finding out how to dress for the weather. If you’re going to Barcelona in Spain this might include looking up architectural points of interest. Logistics, location scouting, and getting familiar with the local culture will all help you plan your trip and your video.
“I find travel inspiration on social media,” says photographer and videographer Tiffany Nguyen. “So whether it’s Instagram, Pinterest, or a blog I saw, I usually have things bookmarked into a folder on my phone.” Next, Nguyen pins the different locations she wants to visit on Google Maps and color codes them in order of priority. “That way I can plan out a route, and I am not wasting my time jumping from point A to point B,” she says.

Map your story.
After you’ve done your scouting, start to visualize the narrative arc of your video. This process is also known as storyboarding . Your storyboard could be as simple as loose sketches, or it could describe the sequence of your video shot by shot. “Video is very time consuming and the window when you have good light is very small, so it’s important to have a good game plan,” says Nguyen.
One advantage of going through the storyboarding process is that you realize what shots you’ll need for your video. Now you can write a shot list to help you keep tabs on what footage you have and what you still need.
“If you have a strong storyboard and shot list, it’ll be a lot easier for you to put the timeline together and create the sequence for the video,” says Nguyen. “The most important part is being able to tell a story. You may have a bunch of epic clips, but if you don’t know how to tell a story and put it all together, it falls apart.”
Working with a client.
If you’re working with a client, the pre-production process is almost identical, except that you’ll likely be given creative direction or a certain script to follow.
“It all starts with research. I have a client meeting, and then I sit down with my producer and we figure out how we’re going to execute this project. Then I write the script,” explains videographer Bevan Waite.
“The script dictates the next series of preparation documents, which would be the shot list, the call sheet, and any travel logistics that need to be organized. All of these organizational documents reference the script and ensure there’s an allotted time and location for every aspect of the script to be executed,” says Waite.
Find the focus of your film.
From the moment you start planning to the final edit you make, the most important thing to do is keep the big picture in mind; let it drive all your decisions as a filmmaker.
Another way to think about this is to ask yourself what your goal is, what the purpose of your video is. Are you making a travel guide for the Amalfi coast, a documentary of your road trip through Scotland, or a sponsored travel adventure through the Amazon rainforest? Or do you simply want to make an epic travel video as a keepsake of your trip?
Once you have your overarching purpose figured out, the rest of the planning, filming, and editing process will fall into place much more easily. Whether you’re a vlogger who wants to show their subscribers a day in Bali or a blogger who wants to add a video component to your post about the best way to see the Grand Canyon, there’s no limit to what you can do with the video format and a desire to explore.
“Some trips I totally fly by the seat of my pants. And that’s okay; sometimes you can schedule time to not know what the next thing is,” says Waite. “But it’s always a good idea to have that larger vision in the back of your mind, so you know what you’re trying to accomplish.”

Pack your camera bag.
Now that you’ve got your vision, it’s time to pack your bags. The best strategy in the gear department is to keep your kit as minimal as possible. “Especially on travel shoots, where you’re going to four or five different locations a day, you want a really compact, organized camera bag. That’ll allow you to move more easily,” says Waite.
Mirrorless cameras are your best bet for cutting the bulk without sacrificing image quality, but you can use whatever camera you have that can film video. If you’re making a video for a client, it’s a good idea to bring two camera bodies so you have a backup in case one breaks, gets stolen, or gets lost.
“You don’t want to have a huge camera, because that draws attention to you and makes it hard to capture candid moments,” says Nguyen. GoPros and other action cameras are always a good idea to bring, since you can mount them anywhere and they take up virtually no space.
Finally, consider bringing a drone for those stunning aerial shots. “I love having aerial footage in the intro of my videos,” says Nguyen. “An aerial clip grabs your attention right away.” If you do decide to bring a drone, make sure you’re licensed and can legally fly in your chosen location.
“I almost always carry multiple lenses,” says Nguyen. “I have a wider lens, like a 16–35mm, and I also have a couple prime lenses.” While prime lenses are less versatile in focal length , they are more compact and their image quality is often superior to zoom lenses. To round out her kit, Nguyen brings a telephoto zoom lens, which allows you to capture subjects you can’t get close to. These lenses also create a beautiful compression effect for your scene.
But if you want to go minimal, a solid midrange zoom lens such as a 24–70mm can make a great all-in-one kit.

Stabilizers
Nguyen also recommends using a gimbal or other stabilization system. “This is how you’re going to get those smooth cinematic shots,” she says. “When you capture videos with the gimbal you have more usable footage versus a handheld shot, since a lot of those shots can be really shaky and unusable.”
How much does gear matter?
Don’t let gear get in the way of what really matters: the journey itself. Most cameras with video capability can film exceptionally high-quality footage, even an iPhone. The difference is in the story you tell and how you choose to tell it. Your audience isn’t going to be dialed in to pixel differences, but they will care about craftsmanship and how well the story captures their attention.

Tips for filming your video.
Pay attention to light..
Light is one element you should always look out for, since the quality of your light will determine the look and feel of your video. Golden hour is a favorite time for most photographers and videographers, as the soft, warm, directional light close to sunset is flattering for subjects.
“If you have outdoor locations you want to visit, go there at the beginning or end of the day, and then go to your indoor locations in the middle of the day,” advises Waite. “That way you’re still getting a good quality of light inside the buildings, but you’re not getting that harsh daylight outside.”
Vary your shot types.
Consider the variety of shot types you’re collecting as you travel. Just like a favorite food, it may be delicious, but if it was the only food you could eat you’d soon grow tired of it. In the same way, “if you just have static shots or all gimbal shots, the video won’t be as enticing to viewers,” says Nguyen. Wide shots, detail shots, candid moments, lively action shots contrasted with still tripod shots, and time lapses are all shot types you can use to keep your video interesting.
Embrace the unexpected.
When traveling, things are bound to go sideways or veer from your plan at one point or another. Try not to get discouraged when you can’t eliminate all unknowns during your trip. Part of the beauty of travel is your encounter with the unexpected. As long as your camera is ready to roll, you’ve got the opportunity to capture one-of-a-kind footage as the scene unfolds.
“Being able to think on your feet is a very essential skill to have as a filmmaker,” says Waite. “No matter how much prep you do before a shoot, you’re always kind of making it up as you go.”
Get consent from the people you film.
If you’re doing commercial work, you’ll want to make sure you’re squared away legally when it comes to showing people’s faces. The last thing you want is to run into any legal issues down the road, so make sure you get consent or a model release right after you’ve filmed them.
“That’s something you want to be upfront about,” says Nguyen. “Most of the time, if you let them know what you’re doing, I find that people are open to it and think it’s really cool.”
More travel vlog tips here .
Edit with the story in mind.
Back it up asap..
The first thing you want to do after a day of filming is back up your footage onto a hard drive. If you can, have at least two backups of the footage, because you never know what could happen.
Once your footage is safely stored and organized, go through it and start to pick your favorite shots. Pull those clips into the video editor of your choice. Nguyen uses Adobe Premiere Pro.

Make your cuts cohesive.
Now that you’re ready to put it all together, pull out your storyboard again. This is going to be the difference between a clip montage and a story. While it may not be a feature-length documentary, every travel video has a story arc, even if it’s just a chronological retelling of your steps.
“It’s always good to have a bigger picture of what you’re doing in the editing room, rather than just putting a nice video clip next to another nice video clip,” says Waite. “Even if it isn’t clear to other people, as long as you know there’s an inherent structure to the way you’re doing things, I think that’s good enough.”
Waite likes to group similar shots together to create mini-scenes. “If the establishing shot is a drone shot of the ocean at sunrise, the next two to five shots should be of that same scene, shot in different ways,” Waite explains. No matter how you sequence your film, always do it with intention. Think about how your clips connect to each other and work together to move the viewer through the story.
How long should my video be?
That depends on what type of video you are making. “For regular Instagram posts, I find that 45 seconds is the sweet spot,” says Nguyen. “It’s really hard to create a video in just 30 seconds because usually I have so much footage. And I find that one minute is a bit too long, because usually the travel videos you see on Instagram are fast paced.”
Other platforms like a YouTube channel or IGTV are better suited for longer stories, but longer doesn’t necessarily mean better. As long as the story supports the length, you should be good. Just keep in mind that the longer your video gets, the more likely your audience will lose focus, so if you want a long video make sure you’ve got a compelling story to back it up.
Don’t forget sound.
Between voice-overs, interviews, and ambient music that complements your video, audio is one element that can really elevate your video. Collect sound bites from some of your filming locations to use alongside their respective video clips. Whether it's rainforest sounds in Brazil, water lapping at the beach in the Philippines, or even Los Angeles traffic, sound activates another sense and helps immerse the viewer into the scene.
Balance client expectations.
When you work for a client, Waite’s advice is to “put your own creative spin on it as an editor. But go with the direction you’ve been supplied.” It can be tricky at first to strike this balance, but the chances are your client hired you because they like your unique style or personality, and it’s okay to let that show in your editing.
Begin your journey as a travel filmmaker.
There’s a lot to keep in mind as you start to make a travel film, but the most important thing to remember is to relax and enjoy the journey. Don’t worry about being technically perfect so much that you don’t immerse yourself in your location and culture. Your passion and perspective will be much more noticeable than which gear you used or how big your budget was.
“Be shameless and just go for it,” advises Waite. “It’s all about self-confidence. When it comes down to it, it’s really just organization, vision, execution, and editing. None of those steps is rocket science. People can make careers out of just one of those steps.”
From Turkey to Tuscany, Peru to Prague, or New Zealand to Norway, wherever you may find yourself, you’ve got all you need to get out and film your own epic travel video.
Contributors
Tiffany Nguyen
Share this article
Do more with Adobe Premiere Pro.
You may also like
Language Navigation

How to Make a Travel Video in 3 Easy Steps with Ideas & Pro Tips
- how to make a travel video

There are very few categories that offer as much possibility for rich and engaging storytelling as that of travel. Beautiful locales, thrilling adventures, and gripping anecdotes provide a whole lot of content fodder for travel creators and brands!
But that doesn’t mean that making travel videos is a piece of cake. Far from it. In addition to having the technical know-how and an eye for detail, you also need to know how to weave a story around the content you shoot – and for this, you need to constantly ideate and execute. So if you’ve been wanting to make it in the travel space and are wondering how to make a travel video, this article is just what you need.
In the following sections, we will be taking you through everything you need to know about creating travel videos in addition to sharing some of the best ideas you can get started with. If you already have something in mind and would like to get started right away, you can sign up for a free account on InVideo and start bringing your travel videos to life.
Create cinematic travel videos
Without spending hours on editing

Here’s what we will cover:
1. The basics of how to make a travel video 2. Top 7 travel video ideas 3. Pro tips to create travel videos
Let’s dive in.
1. Basics of making travel videos:
While making any video you need to go through the steps of ideating, planning, and executing. But when you’re carrying these steps out in the travel video space, you need to hone several other skills in addition to that of filmmaking, such as time management, thinking on your feet, and acting quickly. So to help you get better at making travel videos let’s take a look at what you need to do.
A. Planning and pre-production
A lot of people believe that planning is an optional step when it comes to creating travel videos because the activity of traveling in itself is so unpredictable. But if you’re looking to create travel videos that leave an impact, planning and pre-production are absolutely indispensable to the process.
Planning for a travel video includes everything from ideation and scripting to location scouting and storyboarding. But all of these processes look very different from how you would do these for regular videos – for the sole reason that there is a huge amount of uncertainty that comes with the process of travel. Filmmaker Aidin Robbins explains the process of planning very well in this video:
Here’s a short outline of how you can go about it:
(1) Ideation
Ideating for a travel video begins with deciding upon a location and then figuring out in what light do you want to present that location. Do you want to create an educational video on the place or showcase its culture or is there a particularly interesting story about the place that you want to bring to light? Your answers to these questions form the basis of your idea.
(2) Research
Once your idea is ready, you want to go ahead and gather as much information as you can about the place – through blogs, youtube videos, personal anecdotes, and even interviews. You want to look up images and videos to get an understanding of what the place looks and feels like. This is super important in helping you plan out your shots later.
(3) Outlining
Once you have the idea and your basic research in place, you want to create a rough outline of the flow of your video. This is where the storytelling aspect kicks in. Mind you this is not a full-fledged script because that isn’t really possible at this stage. With the outline, you want to ask questions such as how do you want to start your video? What is the hook? How will the story flow and how will it end? Here is also where you want to cite any references for creative inputs and ideas.
(4) Plan your shots
Now this is not something that you have complete control over. However, having a basic understanding of how your story flows as well as the shots and angles that will complement the scenes in your story is super important. This will allow you to be mindful of the kind of shots you take. You can create a shot list of the basics that you want to cover so that even if unprecedented events happen, you can still get decent shots from your trip. You can also create a storyboard to help with this process but that is not mandatory.
(5) Figure out your equipment
Depending on the location you’re traveling to, how long you plan on being there, what your living situation is going to be like and other important factors, you will have to decide on your equipment. You will require a professional camera with a few different lenses, a gimbal to take moving shots, a good on-camera microphone to record audio, and also preferably a drone to get cinematic aerial footage. Check out this blog for a complete list of the kind of equipment you will need.
B. Shooting your travel videos
When shooting travel videos you want to think about what that place represents and what emotion it evokes. That is what you want to capture in your shots. The best travel videos are ones that make the viewers feel like they’re traveling with the creator – and generating that emotion is only possible if you know what elements of the place you want to capture in your footage. This holds true even for vlogs – scout the place before you begin filming to get the best shots.
Keep your list of shots from the planning stage handy to ensure you get everything you need. And ensure you capture shots from the journey and not just the place itself b because unless you’re taking your viewers on a journey, it doesn’t evoke the kind of emotion you want it to.
Another thing you want to ensure is simply shooting a lot! In most cases, less than 1% of your footage will make it to the final cut. But for that to happen, you want to ensure you have enough footage, to begin with. The worst feeling is to come back after the trip to edit your video only to realize you missed out on getting good shots. For a more in-depth understanding of how to shoot your travel videos, check out this guide by Parker Walbeck
Of course, a lot of your travel video story is also refined during the editing process , which is what we will be looking at in the next section.
C. Editing your travel videos
If you’ve planned right and shot according to the tips we shared above, your editing process will be all smooth sailing. But as we’ve already discussed, creating travel videos is different from creating other types of videos, which is why you need to pay special attention to different elements.
When you’re editing a travel video, in addition to having great clips, you also have to pay close attention to your choice of music , the sequence of your shots in the final edit, the pacing of the video, as well as the transitions and text you use. An editor like InVideo makes this easier because it already has most of these features inbuilt – allowing you to access and use them at the click of a button.
Travel videos appeal to people’s wanderlust, which means you want to focus on recreating that emotion while editing. Again, you need to go back to your script and storyboard here to first get an understanding of the kind of emotion you want to convey – are you making a fun holiday video or are you showcasing the culture of a place? In each connotation, the editing style is going to be vastly different. For a fun, festival video, you will have upbeat music, fast transitions, and creative text whereas, for a documentary-style video of a destination, you will probably prefer more acoustic music with mellow tunes, simple transitions, and minimalistic text.
Here’s a video by popular travel creator Lost LeBlanc explaining his process of editing a travel video:
Now your editing process will depend heavily on the kind of software you choose to edit on. If you already have some video editing experience and have a robust enough system, you might want to choose professional software like Adobe Premiere Pro or Final Cut Pro.
But if you’re just starting out, you want to use an editing tool that will let you create stunning edits with ease. This is where InVideo comes in. With an extensive library of over 5000+ templates along with ready-made assets like animated text boxes, stickers, call to action, music and sound effects, stock footage, transitions, and more, InVideo makes it super easy for you to edit your travel videos.
2. 7 ideas you can use to create your travel videos:
Now that you have a fair idea of how to go about creating travel videos, let’s take a look at some top-performing travel video ideas to kick your travel video creation into high gear.
Idea #1 - Start your own travel vlog
Travel vlogs are a great way to start your travel video journey. As a travel vlogger, you can start recording your trips, talking to the camera and your viewers, sharing your feelings about your trip, your first impressions, your expressions as you try various food items in real-time, and more. The best part is that travel vlogs don’t even need to be professionally edited. They can be shared even live in real-time, as viewers expect travel vlogs to be raw and real in many cases.
For example, Mina, an American travel vlogger, shares her vlogs from various places she visits across the world. Check out this video of her experience at the Zen capsule hotel in Japan.
Travel vlogs allow you to build your brand, find a niche as well as work towards earning opportunities.
Idea #2 - Create helpful how-to travel guides
You don't have to strictly do videos about your trips. You can create video guides for travel enthusiasts or creators as well. You can share tips, ideas, and knowledge with your tribe through beautifully crafted videos.
For example, check out travel YouTuber Sorelle Amore’s videos. She helps viewers create content like her through travel guides. She also inspires you with stories on how to live free and abundant as she does. Check out this video where she shares tips to travel on a budget.
If you want to create travel videos with a message, you’ll get lots of inspiration on Sorelle’s YouTube channel . Meanwhile, you can create your own travel tips and tricks video using this fully customizable template from InVideo :
Use This Template
Idea #3 - Share unique or strange travel experiences through your videos
Your travel videos can become a medium for you to share your personal, unique, or strange stories. You might have experienced unique events across your trips. You might be into tasting local, but strange food, trying out local dresses, and more. All of this can be a part of your travel videos.
For example, YouTuber Mike Corey’s mission is to conquer his fear of the unknown by traveling to strange and unique places and experiencing uncomfortable events. Check out this video on Mike’s camping experience at a place called Satan’s Castle in Turkey.
These videos are a glimpse into Mike’s methods of overcoming fear and insecurity. Whether you too want to overcome a personal fear, or you’re looking to create unique travel videos, you too can share strange stories, experiences, and events you met on your journey in your videos. Not only will this make your videos more interesting, but you’ll also get attention for doing something different.
Edit and create your own quirky video about strange travel facts with this World’s Deadliest Snakes template.
Use This Template
Idea #4 - Share food stories and reviews in your travel videos
If you are a foodie and love tasting new delicacies while on the go, you can make travel videos about food and culture. Your videos can provide viewers with a peek at different food cultures, cooking methods, and flavors across the globe.
For instance, YouTuber Mikey Chen travels to various countries and eats all the local food he can get his hands on. You too can similarly marry your two interests - travel and food. Check out this video where Mikey shares updates on his quarantine meals during his latest visit to South Korea.
Mikey’s videos are not just about his interests and passions. He has also successfully created merchandise around his content and sponsors various brands and products through his various YouTube channels. If you love to sample different food items, you too can create videos like Mikey, focusing on the food during your trips.
Customize this video to create your own exploration of food and culture across the globe!
Idea #5 - Spread your message of positivity and love in your travel videos
You can create travel videos about love, friendship, and positivity you come across on your trips. Share stories of how people across the globe are all linked by a common thread of compassion and good can be found everywhere.
For example, Phil, a black dude traveling all over Europe creates videos to promote positivity, love, and break barriers, in association with the Matador network. His videos show him going to various countries and cities and connecting with people, smashing stereotypes in the process. Check out this video on a Black traveler’s guide to Milan.
His videos offer a unique perspective, showing us how a black guy approaches and mixes with the European people. Just like Phil, you can take your viewers through the various places you visit, taking in the sights, eating the local food, and doing fun things across the city. You too can create your travel videos sharing your unique perspective, message, or narrative. All you need is a different way of looking at the world!
Idea #6 - Create 1-minute videos highlighting a city (or any place)
Create one-minute videos of a city or a place your visited and loved. You can feature time lapses, unique shots, and more to make these videos look relatable. These videos can be really helpful to viewers who actually want to travel to these cities and countries as they give a glimpse of the destinations and their highlights. They can also be fun to watch, keeping in mind the short attention spans of most people today.
For example, Cailin from YouTube channel Travel Yourself is known for is her “City in a minute” video series. Cailin shares the highlights of the city (or any place), the culture, the food, and any other relevant information, all in a minute. Check out this video by Cailin featuring Israel in a minute.
Show off your impressive travel highlights in your own 1-minute (or longer) video with this themed slideshow template.
Idea #7 - Share video tour reviews, advice, and answer questions
If you are wondering how to make travel videos and are looking for inspiration to start, you can begin by doing reviews of local services, food reviews, restaurant or homestay reviews, and more. Share updates on the key points of a trip, give information on how to reach your destination, what does the trip involves, what is your itinerary, the cost, and more. Your videos can also answer the most frequently asked questions about a place or a trip.
For example, travel YouTuber Christianne started vlogging her journey as a response to commonly asked questions about her trips across the globe. Now she shares everything from life updates to travel itineraries and experiences in the form of travel videos. Check out this video by Christianne featuring Medsailors (a cruise trip) in Croatia.
Edit and customize this template to create your own travel advice video, including details of the trip for prospective travelers.
3. BONUS: Pro tips while making travel videos
If you want to create stunning travel videos, that make people stop scrolling, you’ll need to do your homework in terms of planning your trip and other aspects. In the section below, we share some super actionable tips that make it possible for you to make your travel videos more impressive and engaging.
Tip #1 - Understand your gear
Before you set out to capture beautiful locales and happening adventures, you will need to know how to capture them. Understanding your equipment is essential to getting the best output. Know and practice using your camera and mic in various different settings to know what kind of output it yields.
Study your equipment ’s manual to know how to use different controls. You don’t want to miss capturing a beautiful moment because you were fumbling with the controls on your camera.
Tip #2 - Refine your gear
When you’re starting out it is easy to get swept up by cool gadgets and the latest camera, but the truth is you don’t need a whole bunch of equipment to film good videos. As you hone your craft, refine your gear simultaneously. Your aim should be to be able to travel as light as possible while getting the best quality of the footage.
You can do this by first understanding your style of filmmaking and then sticking to gear that helps you achieve that the best. For instance, if you’re someone who primarily uses wide-angle shots in your travel videos, you might not need to carry multiple macro or telephoto lenses.
The thing to note here is that this kind of refinement comes with practice and experience. So don’t beat yourself up about not getting it right on the first go.
Tip #3 - Capture as much of the journey as the destination
As we’ve mentioned before, travel videos are about showcasing the journey. Even if you’re making a tips and tricks video, if you can make people feel like they’re part of the process – your videos will do much better. This means capturing shots that depict the journey – hiking to the top of the hill, taking a cab to the temple, walking to the restaurant, and others like it.
Tip #4 - Film the people of the place
Yes drone shots of the ocean and close-ups of the forest leaves are beautiful, but the real essence of a place lies in its people. A lot of travel creators don’t realize how crucial this element is. Capturing life and emotions and depicting that in your story is one of the best ways to evoke feelings of belongingness in your viewers and this is not something you want to miss out on.
For instance, check out this video on one of the oldest cities in the world, Varanasi, India, by YouTuber Ben Mikha, depicting the local people and everyday life. It makes the viewer feel like they are a part of the chaotic and vibrant landscape as well.
Tip #5 - Shoot more than you think is necessary
As we had mentioned above, roughly 1% of all your footage is likely to make it to the final edit . This means you need more than enough legroom to play around and experiment with. Even if you feel something is unnecessary at the moment, capture it because you will not truly know if something is unnecessary unless you bring it to the edit table.
Tip #6 - Organize your footage on the go
Unless you’re on a weekend trip, not organizing your footage on the daily is a huge mistake. Since you will be shooting a lot, if you fail to organize on a daily basis, it will become a mammoth task to have to sift through the entire media from your trip at the end.
Tip #7 - Carry enough storage and battery
This means memory cards, hard drives, and battery backup. The worst thing to happen while filming is having your memory cards or battery run out preventing you from filming what you need to. Keep multiple memory cards, hard drives, and power banks to ensure your filming goes as smoothly as possible.
Create inspiring travel videos easily
With 8 million+ stock assets

Wrapping Up
So the next trip you decide to go to, make sure to carry all the necessary equipment and plan your itinerary before you set out. With a little effort towards finding the best locations and angles to shoot from, you can create stunning travel videos that draw viewers in. If you are planning to create a travel video channel or brand, you definitely want to check out this ready reckoner of top video ideas that you can create in the travel space. Use these video ideas to craft engaging travel videos in 2022.
If you have any questions or want to continue the conversation, hop over to the InVideo community and learn from 25K other marketers and video creators just like you! Or check out InVideo’s YouTube channel to learn more video editing hacks and tricks!
And, if you’re looking to create thumb-stopping videos in minutes (even if you’re not a PRO)- sign-up for a free account on InVideo.io today.
This post was written by Upasna and edited by Adete from Team InVideo
Let’s create superb videos
A blog to help you travel and adventure around the 🌏 | Currently: The Netherlands 🇳🇱
The best services, applications, and software for creating travel vlogs
If you are out there exploring the world and thinking, “Why not turn my adventures into a cool travel vlog?”, you must continue reading this post. Travel vlogging is not just a hobby; it could be your ticket to a well-paid gig! 😉 From travel guides to sharing insider tips on hidden gems, the possibilities are endless. But here’s the catch – creating an engaging video that’s a joy to watch can be a bit of a head-scratcher. It’s important to remember that the plot and script are not the only things that need to be perfectly thought out. The editing progress is important too. Below you can find tips for creating awesome travel vlogs and I share the best services, applications, and software with you.

Creating travel vlogs
The success of your travel vlog largely depends on how you bring your video material to perfection. If you post raw and unprocessed videos, then your clip will pale in comparison to the rest of the vibrant and diverse content in terms of editing. An experienced vlogger knows that in addition to a great camera and a travel bag, you need to arm yourself with the best apps for video editing. This is not only a classic video editor where you can crop motion pictures, and apply stunning effects or background music, but also other useful features like a video stabilizer if you forget your tripod and much more. These days you have a huge variety of available services, applications, and software.
Some beginner tips
Below you can find some useful tips for creating travel vlogs. Remember, the key is to enjoy the process and let your unique perspective shine through in your travel vlogs.
- Plan Ahead: Outline your travel itinerary and decide on the key moments you want to capture. Planning ahead ensures you don’t miss exciting opportunities and helps structure your content.
- Storytelling is Key: Craft a narrative for your travel vlog. Share your personal experiences, emotions, and the cultural nuances of the places you visit.
- Keep it Concise: Attention spans can be short, so aim for a balance between informative and entertaining content. Edit out unnecessary footage.
- Capture B-Roll Footage: In addition to main shots, gather plenty of B-roll footage to enhance your storytelling.
- Quality Audio Matters: Invest in a good microphone to ensure clear and crisp audio.
- Experiment with Camera Angles: Spice up your vlog by trying different camera angles and perspectives.
- Use Music Thoughtfully: Choose background music that complements the mood of your vlog.
- Master Basic Editing Skills: Learn to edit your videos effectively. Pay attention to pacing, transitions, and color grading. Experiment with cuts and overlays to keep the audience engaged.
- Create a Compelling Thumbnail and Title: The first impression matters. Craft an eye-catching thumbnail and a compelling title that sparks curiosity and encourages viewers to click on your vlog.
- Engage with Your Audience: Respond to comments and engage with your viewers. Build a community around your travel vlog.

The best mobile applications
Below you can find an overview with (free) mobile applications for editing vlogs.
– Quik
Some people are traveling for extreme sensations. Those are people who are not going to enjoy just a calm trip. It’s all about new experiences offering an adrenalin rush. If you are one of them, then you do not just film on your DVR or smartphone camera, you take GoPro for sure. Editing such video material is easy if you use the GoPro videos editor.
This app offers over 20 pre-made templates for beginners. In addition, you can customize the graphics and make exciting transitions from one clip to another. Editing your videos with this app is easy as you only need to do a couple of simple steps. Upload a video from the gallery, use simple and clear tools, and then you can upload your clip to social networks.
Available for Android and iOS owners.

– Magisto Video Editor
Last year, this application was chosen as the best video editing application. This is well deserved because using it you will be able to create and edit travel videos easily and naturally. The biggest benefit is for beginners who may be new to the editing process. It uses artificial intelligence to help automate some of your work.
All you have to do is add the images and videos you want to use in your clip. The next step is to choose a smart editing style. After that, you just have to choose a song or music to set the mood and in a few minutes, your video will be ready.
Available for Android and iOS owners.

– Splice
In addition to other mobile travel apps to help with your easy travel, don’t forget to install Splice, which stands out from all the others in that you can create a video sequence that will be synchronized to the beat of your chosen music. A wide variety of editing tools, the ability to select multiple transitions and adjust their speed, as well as the ability to slow down the video, allow you to quickly achieve the desired result.
Another distinctive feature is that the finished clip will be saved in high resolution and you can quickly share it with your friends and followers on social networks.
Available for iOS owners.

The best desktop software
Below you can find an overview with (free) desktop software for editing vlogs.
– Adobe Express
Adobe Express is great free online platform for beginners and more more experienced creators. The platform provides a range of video editing tools like trimming, cutting, and arranging your video clips. Additionally, the program offers a variety of built-in templates, filters, and effects. For the latest features and updates, it’s recommended to check Adobe’s official website.
Available on Windows and macOS.

– VideoProc
The biggest disappointment of a vlogger can be that you can shoot a lot of good content in a whole day, and when you arrive at the hotel, you can find that the videos are shaky. It seems that such motion pictures can be left only for personal viewing, and not for publication on the Internet. This problem can be easily and quickly fixed if you have a video stabilizer .
It allows you to easily deal with the problem of shaking even if your video is 4K. You can upload clips shot with your smartphone or action camera. In addition, a variety of tools for editing, changing the format, and recording the screen are available for each user.

– CyberLink PowerDirector
Beginning vloggers tend to start using professional software right away. However, after downloading it, many find that it is quite difficult to use it. However, if you’re serious about making travel videos, then you need something between a professional tool and a feature-limited but easy-to-understand program for beginners.
This software is the right choice, offering a rich set of features and tools, yet easy to use. Everything you need, from impressive effects to adding subtitles, can be found here. All you have to do is think of a captivating plot, write a script and start filming. The finishing touches can be done in the final step using this advanced tool.

– Movavi Video Converter
Besides the process of perfecting a clip, one of the most problematic issues for many vloggers is the conversion of video files. Most often, video materials are in the MOV format, and to publish them on various social and video platforms, you need to use the MP4 format. That is why one of the best tools that you need to use is MOV to MP4 converter , which allows you to convert even large clips in just a few minutes.
This software offers not only a conversion function but also basic editing, resizing, and adding captions, which is essential if you want to create travel video guides.
Available on Windows and macOS.

Conclusion
Now, you can whip up your edits, whether you’re on your laptop or tapping away on your smartphone, thanks to some seriously slick mobile apps and software. So, go ahead, weave your video magic, and let the world see your travel tales. Happy editing!
Author: Daphne
Pin this post for later!

Like it? Share it!

- Share on Tumblr

Reykjanes: a roadtrip along the Icelandic peninsula

Driving scooter in Indonesia, rules & tips
Let me know your thoughts or questions. cancel reply.
This site uses Akismet to reduce spam. Learn how your comment data is processed .
Discover more from Girlswanderlust
Subscribe now to keep reading and get access to the full archive.
Type your email…
Continue reading
- Travel Resources
- Destination Inspiration
- Tips & Advice
- Did You Know?
- Conservation

4 Best Video Editing Tools to Create Travel Videos From Your Photos
- August 24, 2022
Nowadays, everyone takes different photos or videos from their vacations to preserve the memories from a holiday. Imagine that after ten years, you would be able to rewatch videos and photos from one of your best holidays. Moreover, if you have kids, you should know that they grow up quickly. You can show your children the videos you made of them while on vacation as they get older.
Multiple video editing tools can help you create unique and creative videos. A decent video editing program and an experience in video editing are key to preserving your memories of holidays. This post will provide you with a list of useful video editing tools to create travel videos from your photos.
According to Statista , the mobile application market continues to expand yearly. inShot is a mobile video editing program that allows users to edit without having to use a computer, which is incredibly convenient for the majority of users. While it is one of the most popular apps for iPhone and Android users, it allows consumers to create videos, trim and merge clips, cut or delete video parts, and adjust audio and video speed. Furthermore, it offers a vast number of functions that allow you to create great Instagram videos.
The application also allows you to add music, voice-over, and text. Furthermore, numerous filters might be ideal for people who want to upload their videos to various social media platforms.
Movavi Clips Edit Video Editor
Movavi is an easy-to-use application for mobile video editing that includes all necessary functions for creating travel videos. Moreover, it is great for Instagram since it has templates suitable for square videos and stories.
You can use any images or videos from your phone’s gallery to create your travel videos with the app. Additionally, you can upload your downloaded music or insert music directly from the application’s available audio list.
Movavi Clips Edit Video Editor includes a multitude of useful features. It’s an excellent video flipper online that can also rotate, crop files, and add different transitions and effects. It can also modify the duration of each clip and add text and stickers. In addition, the application allows users to add their logo to a video after it has been created. You can also record voice-overs for various video clips and adjust the audio volume.
The application is a perfect solution for all types of users because it is easy to use and has many features that allow people to create excellent travel videos. You might create high-quality videos with this app using your mobile device!
Movavi Clips Edit Video Editor offers both a premium and a free plan. However, if you purchase a free plan, you should be aware that there will be a watermark.
According to Statista , the YouTube platform has around 2,240.03 million users. As a result, if you want to upload your travel video to YouTube, iMovie might be a great solution. iMovie is an application created by Apple. It is user-friendly and allows users to create Hollywood-style video trailers using 14 trailer templates. Moreover, you can make an entire movie using iMovie’s unique themes with numerous titles and studio logos.
The application’s most significant feature is that it supports 4K video resolution. Furthermore, created videos can be transferred between different Apple devices such as the iPhone, iPad, or iPod via AirDrop and iCloud Drive. You can also share your travel videos on any social media platform.
iMovie can fix shaky footage, add text, insert and adjust audio, and apply built-in effects. It also contains unique features like automatic video editing and stabilization, which make editing more accessible. Unfortunately, you cannot insert your downloaded audio into the application. If you need to insert audio, you should buy it from AppleMusic or use the free audio provided by iMovie.
InVideo app is the easiest, quickest, and most convenient method to create travel videos. If you have no experience with video editing, InVideo is the ideal option. You can use the program to cut and edit videos, as well as add text and background audio. You can also improve your video by including animation and voice-over. Color can also be edited using the InVideo application.
With the application, you might achieve the desired result with minimal effort. Furthermore, it offers an easy-to-use interface.
To make a fantastic travel video, you don’t have to be a professional video editor. Moreover, you also don’t need to have a computer! With the advancement of technology, people can now create a variety of videos just by using their mobile devices. Thus, the article should have assisted you in finding the best application for creating unique travel videos from your photos.
Try watching a few Instagram travel bloggers get a sense of how the videos are made. Creating an excellent video using a decent editing application won’t be difficult.
Related Topics
- best tools for editing travel videos
- tips on editing travel videos
- travel films
- travel videos
- travel vlogging
- you tube travel channels

What is the best country for digital nomads?

Lust for life: 4 locations for trainspotters to retire to
You may also like.

Travel Medicine: 5 Things Parents Should Know About Concussions
- April 30, 2024

Staying safe when traveling: Cutting-Edge Innovations in Motorcycle Safety

From Tourist to Local: Mastering Cultural Immersion on Your Travels
- April 29, 2024

5 Tips for Staying in Touch While Journeying Overseas

5 Most Important Lessons Learned from Visiting 35 Nations

Israel is Introducing e-Visas for Tourists and Business Travellers

- Planes, Trains & Automobiles: Tips & Advice
Tips for Traveling with Criminal Charges

What to Do if You’re Arrested Out of State
Input your search keywords and press Enter.
How to Make a Travel Video: 15 Tips to Help PERFECTLY Capture Your Adventure
We’re teaching you how to make a travel video, including capturing quality footage, developing a comprehensive story, and creating an interesting edit.

Making a great travel video is so much more involved than turning on your camera or iPhone and pushing record. Whether you are starting a YouTube channel or you are just making a memorial of your family vacation, you want the absolute best quality video footage to remember your trip by. In this guide, we are going to dive into how to make a travel video or vlog for beginners. We’ll focus on basic tips to create quality video footage, a comprehensive story, and an interesting edit.
Stop for Scavenger Hunts During Your Travels
Let’s Roam creates app-guided adventures for explorers in hundreds of cities around the world . These scavenger hunts , art walks, pub crawls , or ghost hunts combine competitive spirit with interesting trivia and photo ops. Each one offers a fantastic and unique experience! Find one in a nearby city , or download an Explorer Pass and try them all.
How to Make a Travel Video
1. pick your destination.
If you are making a travel video for personal memories, you likely already have a destination in mind. If you are making a professional video for YouTube, you may need to do some keyword research first and find a location that ranks highly in the SEO world. Using something like Google’s Keyword Planner can be very helpful for ideas.
2. Decide What Kind Of Video You Want To Make
There are several different types of travel videos that might interest you. The best way to figure out what type of video you want to make is to watch a lot of travel videos. Hop on Youtube or Vimeo and get to watching. Don’t just watch for entertainment value though, pay attention to things you like and don’t like. Do you like the videos with live narration or do you like voiceovers? Do you like YouTube videos with music and beautiful b-roll footage, or do you really like videos focused on information? There is no right or wrong answer, just preference.
Types of Videos to Consider
· Travel Vlogs – Vlogs or video blogging is a form of videography that is very personal. Generally, they are informal, based on reality, and require limited editing. They are often filmed in selfie-mode and have a friendly vibe. They rely on the audience trusting the vlogger and experiencing the destination through their eyes.
· Travel Guides – Travel guide videos focus more on what to do in a destination, for instance, “Top 10 Things To Do In Chicago.” They are focused on delivering information on the place, instead of personal information. These videos generally take more planning, require you to shoot much more footage, and take longer to edit. They can be highly SEO-driven though and produce a high number of views.
· Niche Videos – If you are making a family memoir, then this doesn’t apply so much to you, but if you are getting into professional video making, you need to find your niche. Do you want to focus on food, culture, or adventure? Think about your target audience and your passion! If you make videos about what you love, it will translate to your audience. They will feel your excitement and connect to your channel.
3. Write A Story
It is important to have a story in mind. You may film your whole trip and have great footage, but it can be really hard to put it together into something that makes sense. It is actually much easier to take some time before filming and figure out what your storyline is. This will help you decide what to film, what order to film in, and how to organize your video clips. If you are planning on posting your video professionally, keeping viewers’ attention is huge! You may have beautiful footage, but if people are bored with you, and your story is all over the place, you will lose them. Pulling people into an organized and interesting plot, keeps them hooked and coming back to see where you will take them next!
4. Decide What You Want To Film
Once you have a story in mind, begin to line out what exactly you want to film. This will naturally go along with your travel planning. What do you want to see? What are your interests in your target destination? Start with a general list of sights. Organize them into an itinerary that makes sense travel-wise. Then, begin to think about how you want to film them.
Again, go back to what others have done. While you don’t want to copy anyone else’s work (it’s always best to be creative and original), you can get great ideas from those who have gone before you. Think about angles, specific shots, pans, and what information you would like to present. Do you want to just have great footage and do a voiceover later? Do you want to present the information in vlog style, taking the viewer along as you go? Perhaps, you want each family member to have a part? Do you just want it to be natural and let what happens happen? Again, there is no wrong answer, only preferences.
We recommend making a list of exactly what video clips you want to get. It doesn’t have to be technical or use formal, filmmaking language, as long as you know what you mean. It can be scratched on a napkin or kept in a formal Google Spreadsheet, whatever fits your style! For instance, if you are filming the Eiffel Tower, you may make a list something like this:
- Slow pan up from bottom to top.
- Slow pan down from top to bottom
- Still view floating by from river cruise
- Panoramic pan from the top
- Long view from Champ-de-Mars
- Distant view The Trocadéro
- Zoom in from a distance
- Close-up still footage of twinkling lights at night
- Time-lapse at sunset as lights come on.
- Zoom out focusing on lights
5. Gather Your Equipment
The best equipment to use is the equipment you have! If you are making a family memoir or just starting out on YouTube, don’t worry too much about getting professional equipment to make travel videos. Actually, the learning curve is quite steep on some professional camera equipment, and you will find that your video quality is not as good as it is on your iPhone, GoPro, or point-and-shoot camera. So, don’t feel like you need to go spend a fortune on equipment. If you would like to snag a starter camera, the Canon PowerShot G7X Mark III is a great one. It has an articulating screen so you can keep an eye on what’s in your frame, a lightweight structure, and it takes great footage.
6. Use Multiple Cameras And Angles
One of the most important aspects of making a good travel video is making it visually stimulating. The same pan from left to right, the same eye level shots over and over, the same focal length throughout, makes for a visually boring video. Spice it up. Cinematic videos use footage from all different angles, above, below, the side, from the bottom up, etc! Get creative, if you don’t like it, you don’t have to use it! If you are planning on using the film for social media, then you need to consider what apps you will be using and film the scene in the correct orientation. For instance, you need a horizontal orientation for YouTube, but you are going to need a vertical orientation for your marketing on Instagram.
If you are traveling with family members or a partner, each of you carry a camera. This allows for multiple views, of the same subject, that you can splice together in editing software to create an interesting clip. Also, two creative brains are better than one. Your partner may see something in a different way than you do, and catching as many viewpoints as you can will help you create a video that many different kinds of people will enjoy watching.
Some cameras are better for specific footage. For instance, a DSLR camera is great for still footage, they are difficult to stabilize when moving heavily. GoPros are better for stabilization in active situations. Obviously, for aerial views, you need a drone. It may be easier to catch an unexpected moment on your phone. Use it all!
7. Keep It Steady
Video stabilization and sound are nemeses of travel videographers. They are the hardest two things to control. While most cameras and expensive lenses have internal stabilization, you will find that large cameras are still very hard to stabilize. If you are considering making YouTube your career, consider a gimbal for your camera. This will allow you to move and walk and talk, without shaky footage. Use a tripod or set up your camera on a steady surface when you want to do a monologue. Use a GoPro with stabilization when doing something active. When doing a pan, something as simple as holding your breath can make a huge difference. Most of all, when you turn on the camera, think about what you are shooting. Don’t just turn it on and slap record. Think about the composition. Think about your body stance. Get set, and then shoot.
8. Over Film Everything
You can never have too much footage. Film it, then film it again. You may think you got good footage, and then you get to editing and realize that it is overexposed, the sun is blocking out everything, or you didn’t allow it to focus well. You may find that you thought you were recording and you weren’t. All these things happen. So, we recommend filming the scene, rewatching it on your screen or phone, adjusting for mistakes, and then refilming it. You may have to film a certain thing multiple times. This isn’t always possible, but when it is, take the time to film it a few times. There is no such thing as too much footage.
9. The Camera Is Not As Fast As The Eye
Remember your camera is a machine. Depending on the quality of your camera, it can take time to focus. When you begin a vlog or monologue, give it 5-6 seconds to focus before your begin talking. When you are panning a landscape, go incredibly slow, as the camera is having to refocus multiple times on the way through to keep sharp. You can speed up the footage in your video editor. Make sure you give it time to focus.
10. Follow The Light
Lighting is of utmost importance in filmmaking. Before you begin filming, do a test. If you are vlogging, make sure your face isn’t under a shadow. Shooting into the sun will often produce starbursts in your footage. Low light footage often looks noisy. Sometimes just turning around the other direction, or turning on a lamp, will completely change your video quality.
If shooting in the middle of the day, your camera will tend to overexpose the footage. Remember that it is much easier to brighten something in post than it is to correct overexposure. Err on the underexposed side. You may need to manually adjust this on your DSLR or mirrorless camera when filming in direct sunlight.
11. Offer Some Information
We find that the best videos give us a behind-the-scenes take on your travel experiences. People want to know what they are looking at. Why is it important? Don’t overdo it. You don’t want to bore people but bring in some historical, cultural, or experiential information to keep the audience interested. If you are making a video for your own memoirs, this is how you are going to remember your trip, so include funny things that happen, how you feel in the moment, and what is going on behind the scenes. These are your memories, make them personal, and include the information that will help you remember the best parts of your trip.
12. Organize Your Footage
When shooting on several cameras, organization is key. You need a single place to bring together all your footage. We recommend investing in a good hard drive. Solid-state drives are more expensive, however, they are more sturdy for being thrown in and out of your travel backpack. We also recommend backing up your footage in multiple places.
Once you get all your footage in one place, begin to watch and label it. If you have 5 pan-ups of Mount Rushmore, label which one you think is the best. If you want to use a number system to grade the quality, that’s great too. Label your videos with descriptive names, letting you know what they are for future use. For instance, do not label your footage, “hot air balloons in Cappadocia.” Label it, “best left to right slow pan of blue balloon,” and put it in the “Cappadocia Hot Air Balloon Ride” folder. The more descriptive the better.
If filming an entire vacation or work trip, you will have footage from several different locations and sights. Break down your footage into appropriate folders. You want to be able to find it quickly! If you know what videos you are going to make for YouTube, separate the footage by video title, keeping all the footage for each video together. This may mean you have footage from several places in one folder.
If you are making a montage for personal use or you aren’t sure exactly what travel videos you are going to make yet, then separate them by location. We find that setting up multiple layers of folders and being as precise as possible takes a lot of time at the front end, but saves you time in the long run. Whatever system you decide to use, use it consistently.
13. The Magic Is In The Post
While getting good footage is obviously important, so is putting it together in a way that makes sense, flows smoothly, and provides visual and audio interest. There is no way we can cover all the ins and outs of editing in the scope of this article, but here are a few general concepts to think about.
14. What Editor Should You Use?
What video editor you use depends on a lot of things, like what equipment did you film on? If you filmed on your phone, and you only have your phone, then you are going to use a video editing app like InShot . If you are filming primarily on an iPhone, then you may want to use iMovie.
Using multiple cameras to produce a full-length travel video or vlog for YouTube or Vimeo, requires true video editing software. Which one you choose, depends on your equipment and your editing style. Many PC users like Adobe Premiere Pro. Those who really want control over every detail of sound and color grading may like Davinci Resolve . Adobe is quite expensive, prone to crashing and freezing, and export issues. We wouldn’t recommend it or any expensive software for beginners.
Adobe does make a web-based video editor called Premiere Rush that is free and has a medium level of control, allowing you to splice video, color grade, and improve the sound. It has premade graphics and allows for adding text and video transitions. It’s a great editor for beginners! Davinci is not as user-friendly, but it does offer incredible control and is free. Mac users tend to use Final Cut , which again might be too expensive if you are just starting out or making videos for fun.
· Add Music
Music can make or break your video. Take some time to find music that fits the emotion of your footage. Find something upbeat for your intro. Make sure that music used when speaking is turned down and doesn’t have too many lyrics or crazy beats that make it hard to understand your words. You want your music to add emotion and interest to your video, not distract the viewer. It should be present, but not overpowering.
If you are posting your video anywhere on social media, you must make sure that you use only royalty-free music. There are paid platforms like Epidemic Sound , Bensounds , or Soundstripe that most YouTube professionals use. Good royalty-free music is generally not free to use. However, most of these subscriptions do have a free trial period.
· Go Easy On The Transitions
Creative video transitions can add to the visual interest of your video. However, you are not making a Powerpoint presentation, so use transitions, especially premade ones, sparingly. Instead, think about transitions when you are filming and use a camera drop, hand to the camera, or spin to transition from one clip to another. Be creative and think it out beforehand.
· Pay Attention To Consistency
When making a travel video, remember that the goal is to create a story. As much as possible, the viewer should not be able to tell when you switch cameras. Part of great editing is to adjust your color and sound to be consistent throughout the video. It takes some practice and a lot of time. So, be patient with it. It’s good advice to take it slow. When necessary, step away for a while and come back and look at it with fresh eyes. Your software will likely need to catch up anyway.
15. Be True To You
If we can offer one piece of advice, especially for those entering the YouTube world, it would be to stay true to yourself. Not only will it make you more successful, as you will attract true fans that want to engage and invest in your channel, but you will be happier with your content. There is nothing worse than watching a video you made 6 months ago and being embarrassed about how fake it feels. You should identify with your own creations. Make it beautiful. Tell a good story, but above all, make sure it is true to who you are!
Closing Thoughts
While this guide is nowhere near comprehensive, we hope it gives you a good foundation to start. Video making is an art, and it takes time to learn. Just like any art form, you need to practice. It will take trial and error. It will involve experimenting and failures, but that is half the fun!
What are your favorite videography tips? Let us know in the comments!
Want to get ahead of the game on filming new destinations? Check out our list of “ Emerging Travel Destinations”, and get there first!
Does your new adventure include traveling with a partner? Check out our guide on “ How to Travel As A Couple: Tips For An Amazing Adventure. “
Frequently Asked Questions
Making a great travel video starts with capturing fantastic footage. Composition, lighting, and stabilization are things to think about. Include info like travel tips and historical facts to add interest!
These 15 tips for producing travel videos will help you ensure that you capture your adventure in a fun and professional way
Picking what to shoot is an important part of making a travel video . Consider doing a tour or a city scavenger hunt of your destination. This will allow you to get a glimpse of the local attractions.
Featured Products & Activities
15 June 2021
Tips for how to make a travel video that stands out.

Dreaming about how to make a great travel video and not sure how to start? Travel videos are excellent ways to breathe life into your holiday photos and memories. And, let's face it: videos attract a lot more engagement on social media than photos these days. You only have to check out social media trends for 2021 to see that everyone, from friends and families to brands and their marketing arms, is creating videos to share with and entertain their audiences.
Videos can make us dream of our next holiday, they can inspire new plans, or they can just help your followers get to know you better. Whether you're into adventure videos, interviews, photomontages, or a first-person, pared-down production, here are some easy steps to create your own amazing travel video.
Learn from other travel videos
Remember the saying "imitation is the sincerest form of flattery"? If you have some social channels you already love to follow for their footage, especially travel videos, now is the time to get inspired. Watch the videos that do really well, either getting lots of likes or thumbs up, or engagement from viewers. Get an idea of what all these have in common and what features you'd like to use in your own videos.
You can also watch some reputable creative travel videos like the documentaries produced by National Geographic to get ideas of stories and angles you can take with your own productions (at a much lower scale, of course!)
Have a story
The single most important trick to making a shareable and memorable travel video is to link it to a story. Whether it's a quick account of your first-person impressions of where you are, or a bird's eye view of a flyover over a mountain forest, ask yourself: what's the story and what will my viewers take away from this video?
Research travel video ideas upfront
This is a tip that will not only help your video do well on social media, but will also make you more efficient. Before you head to the place you're planning to film, do your research about the area, what other good travel videos were done there, what angles you'd like to capture, and so on. Consider your itinerary for the day: will you stay in one place or move around? And how will you shoot that?
Move from the travel video ideas to the execution by sketching out how you'll make each frame stand out. You might use more than one camera or just your phone. Knowing all this in advance will save you lots of time and will give you awesome footage.
Plan a shooting schedule
Following on from the tip above, once you have your story and your travel video ideas are fleshed out on paper, make yourself super-efficient by drafting a schedule. It doesn't have to be a professional, Hollywood-style shooting timetable, it can literally be a 2-line sketch! But having it on paper will focus you on getting the best shots for your film.
Pick the best songs for travel videos
Having a musical background makes your video more fun and engaging and it can sometimes alter the mood completely. Think about your favorite movie soundtracks for travel scenes, or nature sounds you can overlay onto your video with a good video editing app. In a pinch, just search for "songs for travel videos" online and refer back to your inspiration channels as well. You can also use your video editing app to get additional ideas for background music.
Make a creative travel video with color and depth
To really make your travel video stand out, add some extra focus points that take it from just an overview of a place to a more vibrant and engaging piece of filming. For example, if you're traveling through an Italian village with an open-air market, go beyond filming a wide-angle shot of the stalls and zoom in on the colorful vegetables and fruit.
You can make your video more unique with close-up shots, details, and one-of-a-kind angles focusing on stand-out elements of your trips.
Make it funny
Another way for your travel video to stand out is to make people laugh. We're not suggesting you become a comedian, but the best funny travel videos manage to capture interesting - and comical! - moments in their destinations. This will mean you have to be spontaneous and capture funny moments as they happen, then share them with your followers. So, keep your eyes open for shots that will generate some laughs!
Have a mix of content
For your social media channel, diversity is key to keeping your audience engaged. Whether you're posting your travel videos to YouTube or TikTok, avoid always shooting the same style of video. Mix landscape views with close-ups, scenes with you talking to the camera with interviews, and make use of music and transitions to keep your viewers entertained.
Enhance your travel video with clever editing
This is where a good video editing app can help you make amazing travel videos even from your phone. To make your video even better, add some effects and writing to convey additional information you may not think is coming out clearly. You may also want to use some of these travel video transition ideas: chapters or headings, music intros, cut effects, etc. There's so much you can do post-filming, so make the most of it!
Be consistent / have a theme
You might think this clashes with the idea of having a mix of content - it doesn't! Being consistent is all about defining your "why" : what's your channel about and what are you sharing your videos for? Do you want to offer a new perspective on classic destinations? Are you looking for the quirkiest food venues? Do you want to become a world-class one-minute interviewer?
Whatever theme sounds good to you, weave it into your videos to develop your unique brand.
Play with durations for different social media platforms
You don't need us to tell you that you can't expect the same results with a 10-minute YouTube video as with an Instagram story. But then again, if you focus on providing short snippets of life in a new destination, one-minute travel videos are ideal and you should post them to TikTok or Instagram. Adapting for different platforms will allow you to either focus on one type of content only, or diversify as much as you'd like. Play around with durations until you find what suits you the best.
Remember your audience
When shooting a travel video, think of who it's for: are they interested in the experience, the scenery, the people? Depending on the audience, you may alter the style and look of your travel footage. You could also repurpose your content and use a video editing app to cut parts of your footage into new travel videos dedicated to specific audiences.
For example, assume you've shot lots of footage from a city break in Paris and you realize you could make a one-minute travel video with the "best of" scenes as well as an in-depth video about the cathedrals or restaurants or the music scene... All of a sudden, you have different videos from the same footage, addressing different audiences, and widening your reach.
Whether just starting out or looking for fresh ideas about how to make a travel video, this guide should give you some inspiration for creating new and engaging content you can be proud of . And, remember: start sharing, see what works, and adapt as you go along!
Enjoyed our writing? Share it!

The Best Budget Green Screen Kit & DIY Green Screen
How to find the best budget green screen kit and creating a DIY green screen at home...

How AR and VR Are Shaping the Future of Marketing
Augmented reality in social media enhances messaging and benefits to brands. Explore the benefits and future of AR and virtual reality in social media.

How To Do Color Grading & What Color Grading Is
Learn how to do color grading, color correction vs color grading, and how to make your films stand out with cinematic color grading!
Ready to start editing with Splice?
Join more than 70 million delighted Splicers. Download Splice video editor now, and share stunning videos on social media within minutes!
Copyright © AI Creativity S.r.l. | Via Nino Bonnet 10, 20154 Milan, Italy | VAT, tax code, and number of registration with the Milan Monza Brianza Lodi Company Register 13250480962 | REA number MI 2711925 | Contributed capital €10.000,00 | Sole shareholder company subject to the management and coordination of Bending Spoons S.p.A.
- How to Make a Travel Video
Use Movavi Video Editor!
- Edit and enhance videos easily
- Add stylish transitions, titles, and filters
- Stabilize and reverse video, equalize sound, and more
By clicking the download button, you're downloading a free version of the program.*
- Help Center
Make it epic: Travel vlog tips and tricks

Been on an exotic beach holiday, amazing mountain hike, or exhilarating skydiving adventure? A travel video is the best way to share your experiences with others – in person and on social media. People love to experience natural beauty, crazy stunts, awesome shows, and engaging stories – so why not tell them yours?
That said, simply filming your surroundings whenever you feel like it rarely makes good travel video material. In this article, we’ll explain how to make a travelogue video and share some useful travel vlog tips on equipment, planning, and making the travel video itself. A little time spent on preparation will go a long way to helping you create a great travel journal or holiday video for everyone to enjoy.
Read on to find out how to make a travel video that will inspire others and engage your audience from start to finish.
Inspiration first! Here’s a sample travelogue we’ve put together using the Movavi’s travel video editor to get your creative juices flowing.
Here are the travel video tips what we’ll cover:
Choose a theme and stick with it
Prepare equipment: cameras, drones, and other gear
Shoot great footage: 4 important things to remember
Edit your travel movie with Movavi Video Editor
Even if your two-week trip to Thailand included such wildly different activities as snorkeling, shopping for souvenirs, elephant riding, and temple sightseeing, cramming all of your experiences into one video will overload your viewers. If you want to create an engaging story instead of a boring video diary, pick one topic and stick to it. Here are some ideas to try out:
Clubbing and parties
Concerts and perfomances
Beach vacation
Hiking and camping
Extreme sports
Local culture
Family holidays
Wildlife and safaris
Food and shopping
Prepare equipment: Cameras, drones, and other gear
Easy-to-use
Always on hand
Good for spontaneous shooting
Use an external microphone or replace the audio later
Shoot horizontally
Shoot in 1080p HD at 60fps for a really clear picture
GoPro or other action camera
Ideal for scuba diving, skiing, and other extreme sports
Compact and light
Has a time lapse feature
Choose a reliable mount for your shooting scenario
Get a waterproof housing case
DSLR Camera
Excellent video quality
Versatile settings
Lots of compatible equipment
Big cameras intimidate people; use a discreet camera for intimate footage
Set up auto-focus when you don’t have much time
Use a tripod controlled panning and video stabilization
Great for epic aerial footage and stills
Lets you film at unusual angles
Get an ND filter to avoid overexposure
Use a drone with a gimbal stabilizer to reduce camera shake
Fly safely and responsibly
Miscellaneous
Making a travel video doesn’t really need much gear, but some things are essential for a good travel or documentary video. Here’s our checklist:
Camera chargers and spare batteries
Extra memory cards and/or an external hard drive
A tripod or a monopod
Secure cases and bags for transporting your equipment
An external microphone with a wind screen
Shoot great footage: 4 Important things to remember
Film at chest level
Instinctively, we tend to hold the camera at eye level, because that’s the way we normally see things. But lowering the camera angle makes everything seem larger and more impressive. However, if you’re shooting action sports video using a GoPro, an eye-level footage will be more captivating.
Select highlights
People want to be amazed – show them the best moments of your adventure: breathtaking vistas, stylish cocktails, wild parties, exotic animals, romantic old streets and canals. No-one wants to see a boring documentary with your standard hotel rooms or drive from the airport.
Give context
Everyone loves stories: let your audience know where you are and what’s going on to really engage them in your video. Look for opportunities to establish context while filming. In videography, there are the three main ways to add context:
Voice commentary. Tell your viewers what’s happening and how you feel about it
Visual narrative. Create continuity through editing by arranging scenes into a meaningful sequence
Text. Create an opening title sequence or add captions to the video
Focus on the people you’re with
Stories work best when they have different characters in them. Capture your travel companions or locals in the places you’re filming, so your viewers will have someone to identify with. Recording the emotions and reactions of other people also makes great movie material.
Step 1. Install the Movavi’s travel video editing software
Download this handy video maker for Windows or Mac, depending on your operating system. Run the downloaded file and follow the on-screen instructions to install the program. Once Movavi Video Editor has been installed, launch it and choose New Project on the welcome screen. Now, to learn how to create a travel video with Movavi Video Editor, proceed to the following steps.
Step 2. Import your footage
Click Add Media Files to import the music files and video footage you want to use in your travel diary video. All files will be automatically added to the Timeline in the lower half of the program window. Drag your clips along the Video track to move and rearrange them.
Step 3. Improve the quality of the video
Most common problems of the travel video footage come from its spontaneity: you don’t have much time to set up your equipment properly or plan your shots. You can fix over- and underexposure, stabilize shaky cam and crop your frame if needed. Select the clip you want to fix and click Clip properties . In the Tools menu that opens, you’ll find options for Stabilization as well as Color Adjustments . Use the Crop and Rotate tool to fix framing issues if needed.
If you were filming at multiple locations under various light conditions, your movie will look much more professional if you do color grading. Color grading means making sure that color values look good and are consistent in your video. In the Color Adjustments tab, switch to Manual Adjustments and work with temperature, saturation, hue and other color parameters of your clips. Also, check out the Filters tab and try out Color filters to give your visuals an extra punch.
Step 4. Cut footage and add transitions
Travel videos shouldn’t be long unless you’re filming a semi-professional documentary. Select the juiciest and most exciting parts of your trip and arrange them in a meaningful way that will show how you felt and what you experienced on the trip. Use the Split button to cut your footage into scenes. If there are parts you want to delete, select the unwanted footage and click Delete on your keyboard.
For travel video, regular jump cuts are usually enough, but if you want to spice up transitions between scenes, go to the Transitions tab and try out animated transition styles like Crossfade or Zoom, as well as various Blur-ins and Wipes.
Step 5. Add music
Whether you’re planning to use original sound from your video footage or not, additional music is essential to engage your viewers and cause emotional response. You can discard original sound altogether and make a dynamic music video out of your travel video footage. Choose music to taste and sync action in your video to the music drops and rhythm changes – that will attract and keep your viewers’ attention.
Go back to the Import tab and click Add Media Files to choose a tune. If you can’t think of one, there’s a whole collection of built-in music tracks in the video editor: click Music and drag the track you like onto the Timeline .
Step 6. Add titles
Remember the talk about giving context to engage viewers? Use titles and captions to tell everyone about your traveling experience. The Movavi’s travel video maker has over 40 animated title styles: animated title screens, credits, lower thirds, and captions. To add text to your video, go to the Titles tab, select the style you like and drag it onto the timeline. Double click the added title clip to open its properties, then double click the text field(s) to edit the text. In the Clip Properties , set duration and speed of the text animation. Hit Apply to save changes.
How to Make the Best Travel Instagram Reels, According to Social Media Influencers
By Jishnu Bandyopadhyay

All products featured on Condé Nast Traveler are independently selected by our editors. However, when you buy something through our retail links, we may earn an affiliate commission.
No matter where you're traveling in the world, you'll want to take some of those memories back with you. And if you love capturing them on Instagram , you're in luck. Condé Nast Traveller India spoke to some of the best travel creators in South Asia—including Larissa D’sa , Wander with Sky’s Aakash Malhotra , Savi and Vid of Bruised Passports, Siddhartha Joshi , and Revati and Charles Victor of Different Doors—for their tips on creating travel Reels for Instagram and putting your best foot forward on the Explore page. Here is your ultimate guide to making the next viral travel Reel.
All products featured on Condé Nast Traveler are independently selected by our editors. If you buy something through our retail links, we may earn an affiliate commission.
How do you start making a travel Reel for Instagram?
Malhotra begins with a clear-cut plan when making a Reel. “When crafting a compelling travel Reel, there are five key principles to bear in mind,” he says. “Prioritize high-quality footage and unique perspectives. Weave a narrative: Keep it personal and authentic. Emotions over beauty: Capture the essence of the locale. Audio is king: Choose complementary soundtracks. And lastly, timing matters: Share high-resolution content within the optimal timeframe.”
Savi and Vid stress that the video needs to be representative of the experience you are having or want viewers to have: “Be it a place you’re traveling to or somewhere you’re dining ! It needs to be impactful. If you can capture the audience within the first half, then that’s a sure-shot winner. Trending music is a no-brainer.”
For D’sa, it needs to feel authentic and real. “I have to keep it authentic, else it's not me,” she says. “Going viral should never be the reason to make a Reel. When you are truly enjoying yourself in a video, it shows. And that joy is infectious. Even though the quality of the video is of utmost importance, having fun and looking beyond trends is the key.”
Revati and Charles suggest being clear on what you are trying to communicate. “Some useful information ? A beautiful view? It’s then easier to make decisions while shooting, rather than ending up with a lot of footage that you don’t really like or can use.” They also recommend being the face of your Reel. “Don’t be afraid or shy to get in front of the camera! And talk. People love listening to people and seeing their faces to be able to put a face to the voice.”
Instagram content
This content can also be viewed on the site it originates from.
What equipment do you use to make a travel Reel?
“When it comes to crafting cinematic Reels, my go-to gear includes the iPhone 14 Pro,” says Malhotra. However, he also relies on a versatile array of equipment to elevate his content. “I use the Sony Alpha ZV-E1 for vlogs, accompanied by a selection of lenses tailored to specific needs. The DJI Mavic 3 takes care of breathtaking aerial shots, while the DJI Avata provides wide-angle drone shots. In addition, my trusty GoPro HERO 12 swoops in to capture all the action.”
D’sa says, “95% of my Reels are shot on camera. But an iPhone camera is good enough to start.” While Savi and Vid use a full-frame camera, their phones, and a tripod to make their Reels with a multi-camera setup. Joshi also uses his iPhone camera to film most videos.
For Revati and Charles, it depends on the situation at hand. “Our trusted Sony a7R III camera is for when we need stellar footage." An iPhone camera works for easy shots; a Hollyland Lark Wireless Microphone for clear voice-overs, and to talk over distances.
Malhotra says, “If you're embarking on your journey as a travel Reel creator on Instagram, you'll be pleased to know that an iPhone is your all-in-one solution. In fact, it's the only equipment I believe you truly need.” Revati and Charles add, “The best camera is the one you already have and know how to use ! It’s simple, shoots some great footage and doesn’t have a steep learning curve. There are people who’ve shot such fabulous films with just their phones!”
Savi and Vid suggest you add a portable ring light to your kit to make closeup shots look instantly better.
Which apps or software do you use to edit videos?
“To fine-tune my masterpieces, I turn to a variety of editing tools. On my laptop, I rely on Final Cut Pro for comprehensive edits. When on the move, VN Video Editor is my choice for mobile editing, and I also harness the native Instagram Reels tab for those final touches,” says Malhotra.
Joshi also suggests the VN Video Editor app for edits on the go: “For those just starting out, simplicity is the key to success. You can accomplish most of your edits using the Instagram app itself. Remember, consistency is the linchpin of growth. Begin there, and venture into more advanced editing techniques as you go.”

Harrison Pierce

Alex Erdekian

Charlie Hobbs

For Savi and Vid, Adobe Premiere Pro takes the cake. “I enjoy playing around with fonts, grading, and colors. There are countless phone-friendly apps like InShot and Filmm that are great for beginners or for established creators to edit on the go.” D’sa uses Premiere Pro on her laptop too, but she prefers InShot for on-phone editing. “Though it might sound time-consuming, I would always recommend learning desktop-based software before one on a phone. That truly makes learning the process on the phone quicker. I personally started with Adobe Premiere on my laptop, but there is DaVinci Resolve , which is arguably the best and has a free version too.”
Revati and Charles use a MacBook Pro to edit. “It helps to have an SSD drive and a large-capacity Drobo to archive can save and access all the footage for later use. Of course, sometimes it’s as simple as shooting with your phone and editing on it, either with templates or with editing apps like VLLO . The edit must roughly be in your head before you shoot. Our 35-odd years of collective experience in shooting commercial films have etched that in our minds. Take people through a journey or discovery. Every piece of content is a story, even just info-dispensing ones! As a process, do a rough lineup, without worrying about the exact points you want to cut. If it makes sense, then begin cutting precisely. Walk away from it for a bit, and you will often return with great ideas. If you have a voice-over, having that in place with your rough cut will tell you whether you need fewer or more words. The superimposed text should be limited to just the few things you want to emphasize.”
What’s the key to a catchy caption on Instagram?
“Try to be unique with your words, and don’t be afraid to make it emotional. That’s when you will be able to create an interesting caption that connects with your audience,” says D’sa. While Joshi says, “Treat each reel differently. Ideally, keep it short, but in some cases, you might need to add more information in the description that wasn't in the reel, or cue to a bigger story.”
Savi and Vid aren’t afraid to keep their captions bulky: “We’ve always been storytellers, so we love writing long and meaningful captions. I would say one should go with their instinct while penning captions. If you enjoy short and impactful captions, go the one-line route! But if words give you joy or you have valuable information to share, write a lengthy descriptive one.”
“Don’t forget to provide any context or background info that you couldn’t add in the reel,” say Revati and Charles. “Ask a question—it’s great to get more engagement and comments. Write in your own voice, and make sure you don’t use phrases that you’d never utter. Use hashtags and keywords for added discoverability, and put relevant information in (cost, location, timings, etc). Lastly, since it’s happened to us, please don’t copy someone else’s caption!”
Malhotra adds, “Crafting an engaging caption is an art in itself. Here's the secret: Keep it concise and relatable. Always remember, that your caption serves as the second point of engagement. This means that if someone enjoys what they see in your reel, they'll be inclined to delve deeper into your caption. So, make your caption an extension of the story your video tells.”
What shouldn't you do when making travel videos?
“Make sure your content isn’t being uploaded in low-resolution. Remember that timing is everything. Don't post when your potential audience is catching the z's and try avoiding non-trending audios,” says Malhotra.
Savi and Vid suggest that you do not “overdo the filters and colors, as overly processed reels tend not to do well. Avoid too much text [on the video itself]. It gets tough to read and people love watching and listening more than reading. And don’t just copy trends mindlessly. If it’s you, then go for it.”
Joshi says, “Copying someone else’s style might work for a while, but you need to develop your own aesthetic. We personally feel there are no strict no's, except reels promoting irresponsible behavior that can cause societal harm, such as littering in public places, ignoring driving rules to film sensational content, or reinforcing sexist stereotypes,” say Savi and Vid.
Revati and Charles add, “Just post. Don’t wait to gold-plate it. The more you do it, the better you’ll get. Don’t worry so much about what people are going to think or how you look. You’re forgotten at the start of the next reel!”
A version of this article originally appeared in Condé Nast Traveller India .
By signing up you agree to our User Agreement (including the class action waiver and arbitration provisions ), our Privacy Policy & Cookie Statement and to receive marketing and account-related emails from Traveller. You can unsubscribe at any time. This site is protected by reCAPTCHA and the Google Privacy Policy and Terms of Service apply.
Make Your Travel Memories Come Alive With Video Using AI
Create a stunning video montage of your travel memories with Steve.AI travel video maker. Relive your journeys like never before with unforgettable travel videos. Start creating today.

Travel-related content on YouTube increases by 118% year over year (YoY) in terms of views
Don't just take our word for it. Trusted by leading brands across the world

Steve.AI Travel Video Maker: Easy to Use, Even for Beginners

Explore Our Amazing Travel Video Templates
Create travel videos using AI at ease.

Create content for your travel influencer brand.

Collage of family travel Vlog

Give packing advice for travelers.

Provide tips on budget-friendly travel.

Share tips and advice for solo travelers.

Improve your travel blog with a video content.

The best 5 must-see countries of Africa

Instagram reels video of your amazing travel moments
Create Travel Videos in Minutes with AI

Unique Travel Video Ideas That Stand Out
Share your daily travel experiences and adventures with the world. With Steve.AI, you can edit your video and make it more engaging.
Showcase the beauty of nature with stunning footage of mountains, beaches, and other natural attractions.
You can highlight the pros and cons of each destination and give your personal opinion on which one you prefer or recommend.
You can create a collage of your travel footage. With Steve.AI, you can add music and effects to make your travel video more memorable.

Frequently Asked Questions

All products are independently selected by our editors. If you buy something, we may earn an affiliate commission.
8 of the best travel apps that travel editors can't live without
By Charlotte Davey

The best travel apps, when used to your advantage, can be the most indispensable companion for a trip. Not only can they save you time and money, but they can also reduce any journey-induced stress. Need to work out costs on a group trip , translate a menu, or get from A to B when you don’t speak the language? There’s an App for that. But just as you don’t need a suitcase laden with unworn clothing, no one needs a phone clogged with gimmicky or useless apps. We asked our jet-setting editors to share the apps they genuinely use while travelling and the lesser-known gems that have saved a holiday. So while the BA App, Rome2Rio, or Monzo might be stalwarts of the frequent flyer’s home screen, here are the clever, hardworking Apps our travel insiders swear by.
Cost: Free to use (Wanderlog Pro includes additional features and costs around £40 per year)
USP: One of the best travel apps for planning every kind of trip, including road trips and group travel: create a trip itinerary, budget costs, organise flights and hotel reservations, and collaborate with friends. After your trip, share a travel guide to inspire other travellers.
Wanderlog brings everything you need to plan your trips into one seamless app experience. Its user-friendly, web-scanning database contains a huge wealth of information about sights, attractions and places to eat and drink. Not only can you find recommended hotspots through the app and add these to a map view, but you can also import reservation and flight details from your emails. Wanderlog is especially ideal for group trips. Your customised itineraries and lists can be edited by multiple people in real time, and users can leave notes for fellow travellers – such as a reminder of the must-have dish or dress code at a restaurant. Smart AI functionality means that the app can offer (editable) auto-generated itineraries as well. And if that isn’t enough, you can track expenses and cost-splitting too, indispensable for larger groups and squabble-prone families. Toyo Odetunde

Cost: Free to download.
USP: Request a chauffeur-driven, class-leading car on-demand or in advance for yourself or on behalf of others.
Wheely is a seriously plush chauffeur service within an easy-to-use app, currently operating in London, Paris , Dubai, and Moscow. What makes this ideal for the frequent flyer is that you can add in your flight details when booking an airport pick-up, so the driver knows exactly what time you’ll be landing (so no risk of them driving off if you’ve been delayed), and they’ll be ready and waiting for you (with your name on a sign) at arrivals. For any other queries, you can live chat with a real person (no bot responses here) – for example, if they can provide a baby seat (which they happily did for a recent family holiday ). Cars come with water and chargers as standard, and drivers are friendly, professional and knowledgeable. Peace of mind at the click of a button. Charlotte Davey
Hong Kong Taxi Cards
Cost: £1.99
USP: With over 9,000 Hong Kong addresses translated into written Chinese and Cantonese, equipped with a function to request additional addresses and get feedback quickly, this is not an ordinary dictionary-type translator app.
This is indispensable for travelling around Hong Kong if you’re not fluent in Cantonese. The App has pretty much every address ready in Chinese and Cantonese, so you can show your taxi driver where you want to go without getting lost in translation. It also has a speaking option which delivers the address fluently, which is really helpful if you have zero grasp of the language. Another handy feature is that the App will show you the journey time and estimate fare – something to remember is that not all taxis have card machines so you’ll need to make sure you have enough cash on you before you hail a cab. Matt Buck

Cost: Free to download (Splitwise Pro costs £2.79)

Paul Richardson

Amy Abrahams

CNT Editors

USP: Splitwise is the easiest way to share expenses with friends and family and stop stressing about “who owes who”.
This is a game changer for working out costs on group trips. Everyone in the party signs up, and then you simply enter your expenses as you go – with a description of what it was (flights, accommodation, food, etc) and who it needs to be split between (i.e. the whole group or just those who were in the taxi, for example). It’s a great way to stay on top of costs, from larger expenses to smaller spending, like a round at the bar. At the end of the trip, click ‘simplify debts’, and you should be left with just one transaction each to ensure everyone has paid the same amount. You can label each trip and see who has settled up, and if someone doesn’t pay the App will send them helpful reminders (saving pennies and friendships). Charlotte Davey
How to Make a Great Travel Video
Driving traffic is critical to the success of any affiliate marketing campaign. In the travel niche, one of the best solutions is to create travel videos. Videos are a highly engaging, easy-to-share form of content that will boost the engagement on your page and help you grow brand awareness. This post explains how to make a travel video step-by-step to capture your audience’s attention and encourage them to click your affiliate links.

The truth is that you don’t need years of experience or a filmmaking background to start making great travel videos. Over time, through trial and error, you will find a workflow that perfectly works for you and will be able to create engaging content in no time. If you are just starting out, you can follow the tips that we share to create your first travel video. While videos come in different forms (from “walk and talk” vlogs to more advanced films), the video-making process essentially includes four steps:
- Creating a story that will connect the shots
- Making enough footage
- Editing it into a single story
- Publishing your travel video
Below, you will find a detailed description of each step and tips on how to make an engaging travel video.
Step 1. Creating a Story
The process of making a travel video starts prior to actual filming. You need to have a story in mind before you hit record. This is because human brains love stories and are fascinated to see them until the end. Such videos trigger emotions and allow viewers to feel as if they have also seen those sceneries with their own eyes. For that reason, creating a story behind your video is the most important part of the whole process.
What kind of story can you narrate? It can be about your trip or about a place itself, like about local food, people, traditions, etc. Try to think of a common thread in your footage that can be weaved into a whole story. It can start with sunrise and end with sunset, or happen in reverse chronological order.
1. Hone Your Skills by Watching Travel Videos
You can find travel video ideas by watching content from other creators. Pay attention to their video format, style, transitions between clips, light, and experiment from there. Vimeo Travel is a great platform to start with, as it offers thousands of inspiring travel videos from the world’s best creators.

2. Find the Purpose of Your Video
The second step is to find the purpose behind your video. What do you want it to convey and through which format can that be achieved most efficiently? Who is your video for and what do you want your viewers to feel in the end? From the moment you start planning your shots to publishing the video, the key thing is to remember the end goal and make decisions accordingly. Also, think about why you’re making travel videos in general and how you want this channel to evolve.
For example, you might want to inspire people to go to a particular country by showing beautiful scenery and communicating the vibe of the place. Or create a highly informative video that will show people how they can plan their trip step-by-step. Understanding the purpose will help you stay focused and work efficiently.
3. Plan Your Shots
Now that you have a purpose in mind, it’s time to plan your shots. Create a list of all the things you want to film: what sights, sounds, and experiences will represent your idea best? Consider different angles to shoot from, types of shots, etc. You’ll also need a common thread connecting all shots and smooth transitions between them. For example, it can be the same location, angle, sound, object, etc.
A common mistake is to film random shots without proper planning. Then, travel video editing becomes quite challenging, as one has to create a story out of that pile of footage. To avoid it, try to find travel video ideas and plan beforehand. You can even create a Pinterest board to visualize ideas and map your story beforehand. Then, you’ll know what to film when on site.

Step 2. Filming Your Video
Now it’s time to put that plan of yours into action and take the necessary shots. Follow our best practices to shoot smartly.

1. Find Which Gear and Settings Work Best for You
You can still make a vacation video without expensive equipment, even a phone can be enough. For example, Mark from Migrationology started out with a point-and-shoot camera, which was about 4.3 megapixels. Kiersten from The Blonde Abroad used to make shots on her iPhone. Depending on your camera, having multiple lenses might come in handy. For example, photographer and videographer Tiffany Nguyen often carries prime and wider lenses in her kit to take different shots.
You also might need a tripod, headphones, a good microphone to record audio, and maybe an external lighting system. GoPros are also a good idea because they take up little space and can be used anywhere. To take breathtaking shots from a bird’s eye view, consider buying a drone. Such clips draw attention right away, but make sure to get a license to fly in select locations.

2. Use Support for Your Camera
To make steady shots, consider using a tripod, a gimbal stabilizer, or a shoulder mount rig. It might be hard to hold your camera and keep it from shaking with every breath. Special gear such as tripods can stabilize your camera so you can focus on the footage content.
3. Choose the Best Light
Light can define the look and the feel of your video, so it’s very important to consider the time of day when planning your shots. Dawn and dusk are the best time to film outside, as the light is soft and not as intense as during the day. It’s also the best moment to make a timelapse of the sun rising or setting. And you can shoot indoors in the daytime, as there will be a good amount of light inside buildings.
4. Diversify Your Shot Types
Just as an unvaried diet quickly becomes boring, having the same type of shots won’t excite your viewers in the long run. Using different types of shots will help keep your viewers engaged, and engagement is key to travel videography. Here are a few ideas for travel video shots :
- Close-up shots
- Action shots
- Point-of-view shots
- Still tripod shots
- Time lapses
- Panning left, right, up, down
- Shooting from bird’s eye view
- Slowly spinning shots, etc.
Last but not least is to show up on camera so that the audience can see your face and get to know your personality. It will help them connect much faster.
5. Create Movement
To make a travel video even more engaging, try to add motion. Apart from filming moving objects like birds flying or people dancing, you can create your own motion through simple camera movements such as panning, or liven up a static landscape with a timelapse, etc.
6. Get Consent From Everyone You Shoot
If you wish to get people on camera, make sure to get their consent. While some may be eager to get filmed, others might object. So, to avoid any legal trouble, discuss this with your models before releasing your footage.
7. Be Smart When Filming
One of the most important travel video tips is to shoot smart. On the one hand, when you start editing, you may wish there would be more material. On the other hand, watching hours of video to find the best clips and make a three-minute compilation can also be challenging. So, you need to shoot smartly. Here are a few tips:
- Shoot when the light is at its best, which is usually at dawn and dusk. Thus, you’ll have time to explore the place during the day.
- Make sure your camera is steady. It’s better to film shorter yet steady clips in contrast to longer but shaky footage.
- Videos are about movement, so if you need to film something still, try to add motion by moving the camera and so on.
- Take various shots, such as panning up and down, left and right, zooming in and out, etc.
- Film from different angles: for example, from eye level, from close to the ground, from a tree, etc.

Make sure to check your footage regularly. If something is wrong, it’s better to find out while you’re still on site so you can fix it.
8. Back It Up
After filming is over, it’s important to back up the footage into a hard drive, or onto two different places just in case. Better safe and sorry. Once the footage is backed up, you can move on to the next step and start picking the best shots.
Step 3. Editing Your Video
Travel video editing is no less important than filming. At this stage, you can choose your favorite clips and put them together into a captivating story. It might be a time-consuming process unless you handle it wisely. Here are a few tips on how to make a vacation video that inspires wanderlust:
1. Use Editing Apps
Travel video editing apps will save your time and help create smooth transitions. Start with easy tools to learn the ropes and then move on to more advanced solutions.
- iMovie . This program is great for those who have little grasp on editing, for example, you can use it to combine clips with meaningful transitions. iMovie is for Mac only.
- Movavi is an alternative tool, available for Windows. You can change the background, add special effects, and more.
- Quick . This is a special app by GoPro, which automatically edits clips to a beat point, for example, your favorite song. It also allows you to collect your best clips, provides unlimited backup, various light and color options, etc.
- Filmora . This tool guides you through the whole editing process and tells what type of footage you need and when. It offers a library of video styles and video LUTs (presets for videos), as well as music, transitions, and more. Here is a detailed guide on editing with Filmora .
More advanced users can take advantage of tools like:
- Adobe Premiere Pro is a professional editing tool that allows you to import and edit videos, add effects, and export footage. It features pro templates and allows for advanced customization.
- After Effects is another great tool by Adobe to make cinematic movie titles, intros and transitions. You can remove an object from your clip, add animation or 3D design, and more.
- Final Cut Pro is available for Mac and features incredible editing functions based on machine learning.
You can always start with a free trial and then decide which program will be most helpful, and worth its money, in your case.
2. Make Meaningful Connections
If you look for travel video ideas on the internet, you’ll notice smooth transitions between clips. When editing your video, try to find meaningful connections between clips. Naturally, it can be a chronological retelling of your journey if you look at a bigger picture. But you can also work with smaller details and connect your clips through:
- The motion of an object
- The camera moving in the same direction
- Dominant color
Using such methods will allow you to create a single flow throughout your travel video and make it cohesive and therefore engaging. It may be unclear to viewers at first, but as long as your footage has inherent structure and is edited with intention, it’s good enough. So, you can start watching all the clips until you find two that can be meaningfully connected and edit from there.
3. Add Stock Videos if Necessary
If you lack certain clips to create a cohesive video, look for relevant stock videos. There is a lot of high-quality free and paid footage that may be a perfect match and save you the necessity to go back to the location and shoot again. Here are some platforms:
- Storyblocks offers royalty-free stock images, audio and video. Unlimited access to video starts from €20 per month, to access to all content – from €30 per month.
- WeVideo provides a collection of over a million licensed stock media files. Access to the Essentials library is possible with paid subscription only, starting from $4.99 per month.
- Videvo shares over half a million video clips, motion graphics, video templates, music tracks, etc. Premium subscription starts from $4.99 monthly.
4. Find Good Music
Good music is essential in making a travel video, as sound helps create a comprehensive experience for viewers. If you find relevant tracks before sequencing your film, you can follow the beats and add connections accordingly. If not, you can look for music that will suit your edited clip. The goal is the same — to make what users hear and see go well together. Some websites offer royalty-free music that you can easily use in your videos:
- Artist provides royalty-free music, sound effects, and footage starting at $9.99 per month. You can search music by mood, genre, instrument, etc. The platform offers licenses covering social media such as Facebook, Instagram, TikTok, and more.
- Thematic offers copyright-free music matching your YouTube videos. You can filter songs by aesthetic, vibe, keywords, and other filters. Remember to credit the author when publishing your video!
- MusicVine features over 6,000 tracks from the world’s famous composers and songwriters. You can access the music starting from €17.99 per month depending on your project type.
5. Add Real-Life Sounds
Using real-life sounds for your video will help create a comprehensive experience for your viewers. Smells, tastes, and sounds heighten our senses when traveling, so you can increase the emotional response from your audience and help them feel connected to the place with this technique. For example, you can collect sound bites with a microphone on site when filming or recourse to stock platforms offering real-life sounds such as Freesound . You can also find sound effects in the YouTube Audio Library .
6. Find the Perfect Length
It’s important to make your video engaging yet not boring or tiring. The ideal length will depend on the platform. For Instagram, it should be about 45 seconds , while YouTube and IGTV are good for longer footage. Depending on what your video is about, a good length can be three to ten minutes and comprise the following parts:
- Introduction. This should take about ten seconds. Make it as engaging as possible to capture the viewers’ attention and entice them to watch it until the end.
- Promotion. Promote your brand for about five seconds. It can be just a logo with music, or more.
- Body. This should last three to eight minutes. Depending on what you want to share, the main part of the video can vary in length.
- Call to action. The final scene and call to action should last about 10 seconds. Many bloggers use this part to ask the audience to like the video and subscribe. Also, you can add an end card directing viewers to other videos on your channel or page.
Step 4. Publishing and Promoting Your Video
While it may seem that publishing a video is a piece of cake and your work is done, there are some best practices to drive more traffic.
1. Export in a High Quality
For your viewers to have a better experience, it’s important to ensure that it has the highest quality possible when exported. For example, the Bucketlistly Blog advises using the ProRes 422 format to have high quality without the huge file size. You can then upload this file to the Adobe Premiere Pro and compress the video while retaining its quality.
2. Drive Traffic in the First 24 Hours
If you publish your video on YouTube, driving as much traffic as possible within the first 24 hours after publishing is a decisive factor for your video’s success. You’ll show the algorithm that your video is particularly relevant and good, and deserves to be shown to more people. So, the objective is to get as many views, likes, and comments as possible during the first day. If you count on SEO in terms of traffic, your strategy will likely be different, because it takes time for Google to rank and start sending you traffic.
3. Optimize Video With Keywords
Adding keywords to the video title, description and meta tags will help drive more traffic. You can start with the Google Keyword Planner to find keywords with high search volume. Here is where to add keywords to optimize your video for YouTube:
- File name. Before uploading the video, name it using a keyword.
- Title. Add keywords at the beginning of the video title but ensure that it makes sense.
- Description. On YouTube, you can add a description below the video. It’s common to include keywords once every 100 words to not be spammy. Description length varies a lot among vloggers, some write about 300-500 words.
- Tags. Use keywords as tags. Remember about synonyms and related keywords.
- Thumbnail image. Enticing thumbnails can boost your clicks and what you can achieve through attractive images and relevant keywords.
- Subtitles. While creating subtitles takes time, they can greatly improve user experience and widen your audience through inclusivity.
4. Send Your Video to Your Email List
If you have a newsletter, you can share a new video with the subscribers. Thus, you’ll ensure more traffic and stay in touch with your followers.
5. Share Your Video on Social Networks
Another way to promote a video is to share it on social media. Some vloggers take advantage of Instagram and Facebook lives as they find it useful to drive more engagement. You can share the full video or make a teaser and encourage the audience to click the link and keep watching.
6. Create Memes or Infographics
An advanced promotion strategy is to create funny memes and infographics to drum up interest. Such content works great on its own, and together with a quality video, it can make a slash in your traffic! Make sure to add a CTA to see the full-length video. The goal here is to boost interest and get as many shares as possible.
If you like traveling, making travel videos is one of the best ways to share your adventures with your audience and encourage them to explore the world. Make sure to create videos that share your travel tips and tricks and help your audience plan for their own travels.
A travel vlog will not only help you grow a loyal community, it will also connect you to other travel enthusiasts and boost your affiliate marketing conversions.

Android Police
What is youtube create.
Spruce up clips on the go with YouTube’s video editing app
Apps like TikTok, YouTube, and Instagram have popularized short-form content. They made it available to the masses, inspiring many to create videos from their phones. You'll find video editing apps for every need, irrespective of whether you use a phone or tablet . YouTube recently joined the fray by releasing an app for creators called YouTube Create. Here’s everything you need to know about YouTube’s editing app.
What is YouTube Create, and how it works
While TikTok features a few effects to spice up videos, prolific creators prefer using ByteDance's CapCut for editing. YouTube appears to be following in the footsteps of the TikTok creator with YouTube Create.
The company released YouTube Create in beta mode in September 2023. It is a mobile app for video editing that offers creators free tools for making YouTube Shorts and long-form videos. YouTube designed and developed the standalone app based on feedback from around 3,000 creators.
YouTube not working? Here are easy fixes to get you back to streaming
Who can use youtube create.
The YouTube Create app is still in beta and is currently available only on Android. The company will bring the editing tool to more creators and add new features over time.
Users in the following countries can download and access YouTube Create:
- New Zealand
- South Korea
- United Kingdom
- United States
YouTube Create is free to download from the Google Play Store. You can access it on phones with Android 8.0 or newer. You'll also need at least 4GB of RAM.
Has YouTube Create replaced YouTube Studio?
No, YouTube Create and YouTube Studio are separate entities. The former is a standalone app for video editing. Meanwhile, the latter is a platform that helps creators analyze engagement, interact with the audience, and track revenue.
How to access YouTube Create
Here’s how to get started with the app.
1. Launch the Google Play Store app on your phone and search for YouTube Create .
2. Tap Install . You’ll see the option if it’s available in your region.
3. Launch the app and tap Sign in . It's worth noting that you’ll need a Google account to log in.
4. Tap the + button and allow YouTube Create to access photos and videos on your device.
5. Choose any video from your phone and select Import .
6. Use the editing tools to add effects and trim your video clip.
Navigating YouTube Create’s video-editing tools
YouTube Create lets you make precise edits, add a voiceover, and trim videos from your phone. The app can automatically add captions to your content. It also provides access to YouTube’s library containing filters, transitions, and royalty-free music.
The video editing app’s intuitive interface makes it easy for beginners to edit videos and add fun effects. Here’s a quick overview of all the features.
YouTube Create editing toolbar
After importing your video, you’ll see the clip at the center of the screen, and the project timeline appears below it. Click it to access the editing toolbar that includes the following options — Split, Filters, Effects, Adjust, Speed, Volume, Audio Cleanup, Rotate, Replace, Rearrange, Delete, and Duplicate.
YouTube Create transitions
Add transitions by tapping the Transition icon (which looks like an hourglass laid horizontally) on either end of your video. You’ll see options including Dissolve, Fade to black, and Fade to white. Select from more than 40 transitions to seamlessly blend your clips. You can add a new video to your project by tapping the + button to the right of your timeline.
YouTube Create video-editing options
Below the video are all the editing options.
- Overlay: Add photos or videos on top of your clip.
- Text: Include plain text or text effects.
- Sticker: Choose from a range of stickers, GIFs, and emoji.
- Sound: YouTube Create lets you select royalty-free music and sound effects from its library.
- Voiceover: Record a voiceover by holding the red button.
- Captions: Automatically add subtitles to your videos.
- Aspect ratio: Choose from three aspect ratios — landscape for regular videos (16 x 9), portrait for YouTube Shorts (9 x 16), and square (1 x 1).
How to listen to YouTube with the screen off
Exporting a video on youtube create.
To export your project, tap the three-dot menu at the top of the screen. Select Export and choose the video resolution. The app will save the video to your device and prompt you to upload it to YouTube or share it on social media.
YouTube states that failed exports are a known issue, and the company is working on fixing the problem. It suggests removing multiple video layers, stickers, effects, and transitions as a workaround. If you’re exporting a 1080p video, try reducing the quality to 720p.
You'll lose all your existing projects if you delete the YouTube Create app or move to a new phone. Export your videos to the photo gallery before doing so.
Unleash your creativity and make your own YouTube videos
If content creation interests you, make your own YouTube channel and verify your account to unlock access to extra features. YouTube Create’s user-friendly interface makes it easy for beginners to edit and upload videos. Step up your game and try the best YouTube hidden tips and tricks .
3 travel apps you need before your next flight to keep you out of long TSA lines

Travel can be stressful, especially when airports are involved.
Flights get delayed, or, worse still, canceled.
Ever-growing security lines sometimes snake through the airport, putting you in jeopardy of missing your flight.
Last-minute changes can happen and derail months of planning, potentially starting off your trip on a bad note.
Programs like TSA PreCheck and Global Entry can help travelers, but there are also ways that tech can help you prepare for your journey and stay aware of the curveballs that might come your way.
Learn more: Best travel insurance
Here are three apps to download before your next trip.
Watch the video above to learn which three apps you need before your next trip.
Airline app
Download your airline’s app!
It keeps all of your travel information in one, easy-to-access place.
Turn on notifications to get immediate alerts when it's time to check in so you'll know if there are any delays or gate changes.
Once you have a boarding pass, save even more time by adding it to the digital wallet on your smartphone.
The lines at airport security can be very unpredictable. Sometimes there is no wait, other times, the line extends into the check-in area.
The Transportation Security Agency’s (TSA) app, MyTSA, tries to make the wait a little more predictable and helps you determine what to expect, especially if you’re traveling from one of the busiest airports in the US.
The app provides a real-time look at your selected airport's wait time, any FAA delays, and which TSA PreCheck lanes are open.
The app also uses historical data to help you plan ahead. So, even if your flight is three days away, the app can show you what you’re likely to encounter that day based on previous experiences.
It’s also a useful resource if you’re unsure about what you can or can’t pack in your carry-on and checked luggage.
Mobile Passport Control
If you’re traveling abroad, the Mobile Passport Control app makes your return through U.S. customs much faster.
The app is a digital version of the Customs and Border Patrol Declaration Form that anyone entering the U.S. is required to fill out.
You can save up to 12 profiles in the app, and only one form is needed per family, per residence.
The app doesn't work at every airport, so check the CBP website to see where you can use it.
Reviewed-approved iPhone accessories
Purchases you make through our links may earn us and our publishing partners a commission.
Reviewed helps you find the best stuff and get the most out of what you already own. Our team of tech experts test everything from Apple AirPods and screen protectors to iPhone tripods and car mounts so you can shop for the best of the best.
- The best rugged iPhone case: Spigen Slim Armor
- A top wireless charger: Yootech Wireless Charger
- Our favorite screen protector: Ailun Glass Screen Protector
- The best portable battery pack: Mophie Powerstation Plus
- Durable phone car holders: Beam Electronics Phone Holder
- An iPhone tripod we love: Aureday Phone Tripod
- The best lightning cable: Anker 6 ft Premium Double-Braided Nylon Lightning Cable
More problems, solved
- Pre-travel checklist: 4 things you need to do before your next trip
- Plan your trip: 3 tips to plan your next trip using social media
- Easily get around: 4 tech tips to easily explore a new city
- Stream offline: How to watch TV shows, movies offline
- Communicate in any language: 5 ways to use Google Translate on your phone
- Photograph your food: 4 tips to capture delicious photos of your food
- Snap the perfect pic: 4 iPhone camera tricks you need to know

10 Apps That Will Make The Most Of Your Vacation In 2024
I f you've ever spent time at a networking event, made small talk at your kids' soccer games, or scrolled through a dating app, you'll know that "travel" is something almost everyone will tell you they enjoy. Couple that with an attachment to our smartphones that borders on co-dependent, and it's no surprise to learn that travel apps are a hot commodity. Some of the best innovations in travel come in the form of apps. Staying in touch with people at home, travel planning, staying organized on the road, or connecting with other travelers? Not only is there an app for that, there are many apps for that.
To help you sort through the plethora of what's out there, here are some travel-ready apps to make your vacation a blast. We've sourced suggestions from people who travel for a living and those who leave their local area only rarely, so no matter how often you jet-set, there is an app for you.
Read more: 12 Smart Gadgets You Didn't Know Existed
If your cell plan doesn't include international roaming, you can get slammed with steep fees for using mobile data outside your own country.
There are a few ways to get around roaming charges, including buying a local SIM card for the country you are traveling in, using a Wi-Fi stick , or investing in a dual SIM phone, like those from Samsung, Apple, or Google. One of the easiest and cheapest options though, is an eSIM app like Airalo . Airalo was one of the first in the eSIM game and continues to be popular with travelers. Fans of the app point to how easy it is to download and get started quickly, and how much it saves in fees. On the other hand, some users have noticed a discrepancy in how well it works in different countries. One reviewer on TrustPilot states "We do NOT recommend this plan given the extremely poor performance in Vietnam" despite noting excellent service in Hong Kong.
Airalo is a paid service, available on the App Store and on Google Play.
Google Maps is often the default app travelers reach for when navigating new territory. It's a trusted resource for a lot of reasons, including the ease of finding reviews and info for even very small businesses. But it's not the only map app out there, nor is it the best in every situation. The main advantage of Maps.me over Google Maps is that it is based on user-generated information. Particularly for folks who are getting around on foot, this "boots on the ground" approach is excellent and more direct than reporting problems to Google Maps . It also means that if you find a cool place on your travels and want to make sure other travelers can find it, you can add it to a map.
Like Google Maps and other useful way-finding apps, you can download maps and bookmark points of interest for offline use, although the background information on locations is not as robust as on Google Maps. Maps.me also allows you to access various modes of transportation while offline, which Google doesn't.
Maps.me is free to download and available from the App Store and from Google Play.
Cash's position as king is increasingly precarious. On your travels, you'll find cashless options in places you might not expect. The mass availability of mobile payment platforms like Square means you may be able to whip out your phone or card at Swiss coffee carts or Mexican street vendors. Wise (formerly Transferwise) lets you move between currencies seamlessly. Wise lets you operate in 40 currencies, which is particularly handy if you are traveling to several different countries. They advertise charges that are less than the major banks. However, some users have complained about complications with money transfers, so be forewarned if you intend to use this app for sending money.
Of note to travelers is the option to get an actual bank card that can function as an international debit card with a nominal conversion fee (not all bank cards can pay by debit in countries other than your home base.) Or, save a step and scan your phone to pay from your Wise account.
Wise is available on the App Store and from Google Play. There is no charge to download the app, but fees are charged for some banking activities.
If you are going to be traveling from place to place on your vacation, you will want the Rome2Rio app on your phone. Enter your destination and departure location, and the app spits out the options and approximate costs for each leg of your journey. For instance, if you are in Edmonton, Canada, and want to get to the Thai island of Ko Yao Yai, the app will suggest six options, labeling the best, cheapest, and fastest combination of flight, minibus, and ferry. You can't purchase tickets through the app, although there are links to book accommodation that take you to Booking.com. Being able to purchase travel fares through the app would make things easier, especially if they were offered in a package, but the absence of that feature means you can investigate and compare prices from different booking operators , so we are putting it in the win column.
Rome2Rio is free to download and available from the App Store and from Google Play.
Rick Steves Audio Europe
Rick Steves is recognized as a top voice in travel guides. His down-to-earth approach to travel has endeared multitudes of followers to him, spawning an industry of books, television shows, and a sprawling web presence that features how-to guides, articles, and an active travelers' forum. On top of all that, he has a free app for self-guided walking tours through many of Europe's top sights called Rick Steves Audio Europe . Reviewers of the app give it a high rating (4.7 on Google Play and 4.3 on the App Store) using superlatives like "This app is GOLD," and comparing the quality of the tours to paid audio tours. On the downside, it is difficult to sync the app on multiple devices, so if you are in a group you may all be at slightly different parts of the tour, which can be mildly annoying. There are a bunch of tour sites, with more added periodically.
The audio tours and accompanying maps are downloadable, so you don't need to worry about burning through mobile data or needing to rely on Wi-Fi. Rick Steve Audio Europe is free to download and available from the App Store and from Google Play.
How many trips come vividly back to life in your mind just by thinking about that one excellent bowl of Cacio e Pepe pasta or sun-drenched sip of a Paloma? Exploring a place through its flavors and discovering new spots to eat is a beloved part of travel. In Europe, TheFork (the French version is called LaForchette) is the go-to app for crowd-sourced restaurant reviews. Previously, the app also covered Australia, but at the start of 2024, it was announced they will be pulling out of Oz.
You can find Michelin-starred restaurants with months-long wait lists or little hole-in-the-wall spots by searching the name of the eating establishment, the city or neighborhood you want to eat in, or the kind of cuisine you are craving.
The app is worthy of its space on your phone just for the restaurant listings and reviews, but if you want to explore more of the capabilities, there are ways to expand its usefulness. You can make reservations, register to collect points, access discounts and specials at select spots, and pay through the app. TheFork is free to download and available from the App Store and from Google Play.
Looking for a little love on the road? The Fairytrail app might be the ticket to romance (or ROAMance) you are looking for. Aimed at digital nomads and van life devotees, the app is a nice addition to the dating lives of travelers of all stripes. Members are evaluated and assigned a fairytale character similar to enneagram-slash-Myers-Briggs personality types, which is a new and novel approach compared with other iPhone dating apps or Android dating apps .
Because the app is focused on people with nomadic lifestyles, matches are location-independent. The idea is that users of the app will be willing to travel to each other to meet and date. There is a setting that allows an extra layer of matching: dream places to visit. If you so choose, before chatting with a match you need to have an overlapping "bucket-list" destination. Previously, this was an unavoidable step but became an optional setting after it was changed in response to frustration expressed by reviewers. The app is being redesigned in 2024 and soliciting feedback from users. Stay tuned, it seems more happy endings are in store! Fairytrails is free to download with in-app purchases and is available from the App Store and from Google Play.
Price Scanner And Converter
A very unpleasant aspect of vacationing in another country is coming home to a shocking credit card bill. Part of the problem is the tendency of holidaymakers to spend like money isn't real, but the other problem is how difficult it is to calculate prices into your own currency. Sure, you can come up with shortcuts to do quick math, but that gives you an estimate rather than an exact cost. To help, there are many different currency converter apps out there, with features like real-time rate calculation and offline capability. The somewhat clunky-named Price Scanner and Converter takes it one step further by using your phone's camera to scan prices and display them automatically in your preferred currency (out of 150 global currencies.) New iPhone cameras also have a similar capability, but it isn't as seamless a process as using this app.
This price scanning app isn't presently available on Google Play, although there are similar apps to be found. The reviews are pretty overwhelmingly mediocre, so if you are on team Android, your best bet may be to download a regular currency converter and enter in prices the old-fashioned way.
Downloading the Price Scanner and Converter is free from the App Store.
Searching through your emails for confirmations and itineraries isn't an efficient way to access your travel information. And good luck if you have used your work email for some of your planning and your personal email for others. What if you are offline when you need to find your tour details? Nightmare fuel. Tripit has created a simple user experience, allowing you to forward all those endless travel planning emails to be arranged into an easily accessible itinerary in a single spot, which you can access from any of your devices.
Other features of this include the ability to load PDFs, QR codes, and other travel documents to your Tripit travel folder. There are helpful navigation tools, like airport maps, neighborhood safety ratings, and nearby places. You can share your travel plans and sync them to your calendar. For $49 a year (or a free 30-day trial) you can upgrade to Tripit Pro for enhanced travel aid, including notifications to help keep you on track and on time.
Tripit is free to download from the App Store and from Google Play, and you can upgrade to the premium Tripit Pro on the Tripit website or in the app.
Mobile Passport Control
The latest app from U.S. Customs and Border Patrol goes by the wildly creative name, " Mobile Passport Control ." It's a no-nonsense app with a no-nonsense name that allows users to streamline the customs experience. Rather than filling out declarations forms, users enter their information into the app and send it to border officials so they can access it as soon as they get to customs. You can do this immediately upon arrival, say as your plane is taxiing to the gate.
The app is for United States citizens and Canadians with a B-1 or B-2 visitor visa who are entering the USA at one of 33 American airports, 11 preclearance sites, and four seaports. It works in tandem with your passport, but it doesn't replace it.
As a bonus, some sites allow those with the Mobile Passport Control app to use their own (almost always shorter!) line or expedited Global Entry lines at passport control. You can enter family members on the same app and there is no approval process, just download and go.
A previous iteration of the app had a premium, paid version, but this is no longer the case. The app is free on the App Store and Google Play.
Read the original article on SlashGear .

Watch CBS News
2 NYC beaches make Travel + Leisure's "25 Best in the USA"
9 Best Photo Book Websites
Don't let your favorite photos go to waste — use these top-tested online services and turn them into keepsake albums.

We've been independently researching and testing products for over 120 years. If you buy through our links, we may earn a commission. Learn more about our review process.

Best Overall
Shutterfly photo books.

Walmart Photo Custom Photo Books

Most Aesthetic
Artifact uprising photo books.

Best for Themes
Mixbook photo books.

Best for Beginners
Printique photo books.

Best for Amazon Prime Members
Amazon prints.

Best for Young Kids
Pinhole press photo books.

Best for Google Photo Users
Google photo books.

Best for Families
Chatbooks custom photo books & albums.
Photo albums create a tangible and lasting archive of memories — ultimately proving to be more durable and accessible than the mess of digital files on your phone and computer. Plus, a custom photo book can be a thoughtful and unique gift for birthdays, holidays, anniversaries, or other special events.
Online photo book services make it easy and quick to choose a theme or layout, upload photos and ship the book straight to the recipient. Best of all, some photo book makers even have apps so you can upload photos directly from your smartphone.
Shutterfly offers basic photo books at an affordable price. You can choose from a wide selection of themes, like birthday, travel or wedding, or neutral styles , such as modern or rustic. You can also create your own book and choose the book size, cover style and page style, then embellish it with Shutterfly's extensive library of stickers and ribbons to make your book extra special. We appreciate how easily users can edit within their chosen template and the brand's high-quality photo book paper, making Shutterfly a top pick.
You can also opt for one of its 6" x 6" Instant Books , which let you add photos from your phone, tablet or computer in minutes. These mini photo books have only 20 pages, but they're a great place to store goofy candids or Instagram posts you never want to forget. The possibilities are essentially limitless, though the vast array of options could be overwhelming for those getting started.
If you don't want the pressure of deciding on a layout, the brand offers a convenient Make My Book option, in which Shutterfly's professional designers curate your photos and design the book for free. Plus, you'll still have the opportunity to put finishing touches on it before it gets printed. Whether you opt for 50 or 800 photos (the maximum), you'll receive an email notification within 24 hours that your book is complete.
Crunched for time? Design your photo book online and pick up select styles at a Walmart store near you in as little as one hour. Photo books picked up in one hour can have 15 single-sided pages and a linen cover, while same-day pickups (ready in a few hours) can have up to 20 double-sided pages and the option of a hardcover.
On top of the speedy turnaround, Walmart has a great selection of styles : You can choose everything from the photo size and layout to the type of cover, including hardcover glossy or matte, linen, leather and lay-flat glossy or matte. If you need help narrowing down the choices, there's also the option to shop by occasion, whether you're looking for a one-year anniversary or 15th-year anniversary gift .
Despite the fast shipping and variety, our tester noted that the quality was not as high as the options offered by other photo book makers on this list — but that may be expected considering the bargain price tag. Regardless, these photo books still make a superb present that can cost under $10 without compromising on sentimentality.
No matter the occasion, you can't go wrong with one of Artifact Uprising's high-quality photo books. There are numerous design options, including preset books to celebrate the birth of a new baby or commemorating a marriage.
You can choose from lay-flat albums, books with photo strips and even softcover Instagram Friendly Books for the influencer in your life. The company even has an iPhone app that lets you create a photo book right from your smartphone. However, Rothman found the app to be glitchy at times and noted there's room for improvement with the software. Still, the books come out on top for elegance and simplicity .
One online reviewer wrote, "The fabric cover is beautiful. The photos are amazing quality and look amazing even though the photos were taken on film and therefore are a bit grainy." The overall 4.6-star rating (out of 5) backs up that review. Quality and elevated designs come with a higher price tag, but there are options for $20 or less if you're shopping on a budget.
If you have a special project and a little more money to spend, Artifact Uprising offers Design Services , which allow you to work one-on-one with an expert to bring your special moments to life. Just note that the design fee is rather steep at $119 and requires an additional $100 album deposit.
When Mixbook says it has "custom photo books for every occasion," it really means it. There are 374 different themed templates to choose from, including everything f rom travel and sports to weddings and recipes.
But that doesn't mean you have to give up creative control. You can still customize the look to your liking, from fun backgrounds to stickers to text using the Editor tool. Plus, there are plenty of paper varieties, from semigloss to ultra-thick matte.
Our testers appreciated the nice balance between good photo editing and price, but one did experience issues with the lay-flat option, in which the photos bled into the crease. You can also use the iPhone app to organize your photos with a tool that the brand calls "Automagic": Simply choose the images you want and select a theme. The goal of Automagic is to help arrange your camera roll so your photos are in order when it comes time to add them to your photo book.
If you're not sure where to start, our pros love Printique because it's super easy to use. You can select one of the many predesigned layouts or create an entire photo book from scratch.
Choose among portrait, landscape and square orientations, as well as hardcover and softcover options. You can even store your memories in a genuine leather or vegan leather book or pick from five different fabric colors. Although you can't choose the color for a hard- or softcover photo book, you can still customize the shape, size and paper type.
Looking for something more advanced? There'sa tool for professional photographers to design and create their own photo books. But if you want to keep things simple, consider starting with one of Printique's 4" x 4" Mini Softcover photo books , which have a maximum of 40 pages and come in three sizes.
Is Amazon Photos already your preferred destination for uploading photos? Then creating a photo book through its interface is an easy solution.
Similar to other photo book makers, you can create by occasion and size, or choose its 8" x 8" Premium Photo Book for a versatile option that has a laminated cover and lay-flat binding. There's also an option with standard binding at a lower cost, and all Amazon Prime members get free shipping . (Everyone else is eligible for free shipping with a minimum order of $15.)
In addition to photo books, you can shop large prints, calendars, cards and metal tabletops. There are fewer size and style options than most services when it comes to photo books, but the other photo product choices make up for the lack of available styles. After all, sometimes it's easier and quicker to have fewer options to choose from if you need to pull something together last-minute.
RELATED: 37 Best Personalized Gifts You Can Find on Amazon
With Pinhole Press, you can choose from various photo book styles ranging from board pages to softcovers to accordion-style setups. Upload your photos and let the system do the work, or manually place the photos into the layout yourself.
One of our testers says her kids love the Custom Board Books , which have themes such as " Count With Me ," " Healthy Habits " and " I Can Be Anything ." These photo books aren't just visually stimulating, but they can also educate and entertain kids for years to come .
"I got my daughter the ' My First Photo Book ' as a toddler and made it all about her — like pictures with family, doing things she likes, her favorite toys, at the playground and beach, etc. — and she still is obsessed with it," says GH Institute Executive Director Lexie Sachs .
We think he custom Photo Puzzle is a fun option for kids, and the Itty Bitty Books are easy to tote around in a work bag for on-hand entertainment. There's less variety in some categories, including Itty Bitty and hardcover books, but with so many additional photo categories other companies lack, there are still plenty of great options for kids.
RELATED: 12 Best Personalized Books for Kids
If you store your snaps in Google Photos, then Google's very own photo book maker might be the most convenient option for you. Even though there are no fancy designs, the process is seamless.
Choose from two options: a 7" x 7" softcover photo book or a 9" x 9" hardcover photo book. You can include between 20 and 140 pages, and you have the option to add a spine title if you hit more than 48 pages for a softcover or any number of pages for a hardcover.
Another hallmark of Google Photos is that you can make one photo book and order multiple copies to give to family members and friends who are also pictured in the photos. Since they come at an affordable price point, you could give everyone on your gift list a copy, whether you decide to create a collection of candid photos for your closest friends or a tangible memento of a fun family trip. Though there may not be as many designs and styles to choose from, that can make the customization process less daunting.
Chatbooks Custom Photo Books & Albums
"Set and forget it," one of our testers said about the ease of using Chatbooks, which markets itself as "ridiculously easy." You can upload images from Instagram, Flickr, Dropbox, Facebook or your computer and edit them on your desktop or via the app .
The service's Custom Photo Books & Albums option is great for families looking to personalize a family vacation , as you can choose colors, layouts, cover styles, collages, captions and more. Peruse its vast collection of more than 300 unique book covers, or shop the premium lay-flat and special occasion photo books.
You can also have fun with the Instagram and Facebook series — a 6" x 6" or 8" x 8" book with 60 pages — that lets you store your favorite social media posts in a tangible place to look back on for years to come.
Unique to Chatbooks is its subscription service, which allows you to receive a softcover, hardcover or mini photo book each month. If you and your family love taking photographs of walks in the park, weekend road trips or vacations, this service is ideal for getting your photos in your hands ASAP. One thing to note about the subscription option is that there are only two sizes available (5" x 7" and the monthly mini).
How we chose the best photo book makers

At the Good Housekeeping Institute , our pros in the Media & Tech Lab have been testing photo book makers for more than a decade . For this article, we referenced a robust test of photo book makers we completed in 2009 and ordered a round of new products to test in 2023. We also researched the latest updates and offerings to a variety of apps and services.
When choosing the best photo book makers, our Lab experts consider ease of use, performance and appearance . That means our pros take an in-depth look at a wide range of features, such as how easy it is to navigate the interface and add photos and text to the book; upload and delivery time; the number of styles, covers and templates offered; and the photo, paper and binding quality.
What to look for when shopping for the best custom photo book maker
Keep the following features in mind when choosing the right photo book maker website for your needs:
✔️ Size: Whether you're looking for a small photo book for kids or a much larger album to house snapshots from a long family vacation, there are regular, large and miniature photo book sizes available. It's best to think about how many photos you want to include and where you plan to store the album (i.e., will the book be too tall for your bookshelf or just right on top of your coffee table?).
✔️ Shape: Most photo books are rectangular or square in shape, but some companies also offer photo puzzles, calendars and tabletops to choose from too. The shape is really about aesthetic preference and the orientation you prefer for your photos.
✔️ Page count: Are you compiling 20 photos from your daughter's first-birthday party? Or are you putting together an anniversary album of pictures of you and your partner throughout the years? The number of pages determines the number of photos you can include in an album, so you have enough space to include everything.
✔️ Paper quality: This is probably a no-brainer, as the quality of material your photos are printed on is as important as the quality of the photos themselves. Although companies with higher-quality paper, like Artifact Uprising , may have a higher price tag, the extra money goes toward paper that won't lead to photos bleeding into the crease. But there are still services that are affordable and offer good-quality products, like our best value pick, Walmart Photo .
✔️ Binding quality: Some companies, like Google Photo , will add a binding to your photo album. This feature is especially important when considering the durability and longevity of your photo album. Whether it's a softcover, hardcover or lay-flat book, make sure the binding can withstand accidental drops and the wear and tear of passing the family album around at holiday parties.
✔️ Templates: If your photo album will have a certain theme or be centered around a specific occasion — or it's your first time using a photo book maker — choosing a service that has a variety of templates to choose from will let your creativity flow and also help you warm up to the design process.
✔️ Editing capabilities: When looking at beginner-level or more advanced designer tools, consider how robust or simple they are to use. Having lots of control over the interface is fun, but if you're looking for a more straightforward experience, opt for a service that does the majority of the decision-making for you or offers designer help, like Shutterfly .
What is the easiest way to make a custom photo book?

It really depends upon the service and your preference .
Although some online custom photo book makers also have an app, it can have limited functionality, be buggy or not as easy to use as the desktop equivalent. Often, an app makes it super simple to upload pictures from your phone (a major plus!) but doesn't allow as much flexibility for product assortment or editing once you've selected. That said, designing a photo book on your smartphone or tablet versus a desktop may come down to how many edits you intend to make .
If you plan to do a lot of editing, the non-app version on a larger screen would likely be your best choice. If you want to quickly make a book with limited changes, an app on your mobile device may be the way to go.
Why trust Good Housekeeping?
Elizabeth Berry is an updates editor at the Good Housekeeping Institute , where she ensures product reviews reflect accurate information. To update this guide, Elizabeth gathered notes from previous tests and researched the latest updates to our favorite services.
A previous version of this guide was written by Amina Lake Abdelrahman , a product review writer and editor who worked as an editorial assistant at the Good Housekeeping Institute from 2018 to 2020.
Elizabeth Berry is the editorial assistant for WomansDay.com, where she writes and edits lifestyle content. When she isn’t assisting with day-to-day editorial needs, Elizabeth is baking dairy-free cakes, reading books, or strolling through nature.

@media(max-width: 64rem){.css-o9j0dn:before{margin-bottom:0.5rem;margin-right:0.625rem;color:#ffffff;width:1.25rem;bottom:-0.2rem;height:1.25rem;content:'_';display:inline-block;position:relative;line-height:1;background-repeat:no-repeat;}.loaded .css-o9j0dn:before{background-image:url(/_assets/design-tokens/goodhousekeeping/static/images/Clover.5c7a1a0.svg);}}@media(min-width: 48rem){.loaded .css-o9j0dn:before{background-image:url(/_assets/design-tokens/goodhousekeeping/static/images/Clover.5c7a1a0.svg);}} Product Reviews

The Best Men's Walking Shoes

The Best Sous Vide Machines

The Best Patio Furniture

The Best Camping Chairs

The 12 Best Hyaluronic Acid Serums of 2024

The 6 Best Portable Charcoal Grills

The Best Cleaning Products

The Best Car Upholstery Cleaners

The Best Gifts for 4-Year-Old Girls

The Best Lumbar Support Pillows

The Best Walmart Fire Pits
IMAGES
VIDEO
COMMENTS
VSDC on Windows. Price: Free with option to upgrade to a Pro version. Available: Windows. Pros: Non-linear video editor with a vast array of powerful features and more than 200 free tutorial videos. Cons: Windows only and technical support is not free. VSDC is one of the best free video editors for Windows.
Create and edit your travel videos on VEED so you can make them look even more amazing to share with your friends and family. Add elements to the footages of your travel clips such as text, images, transitions, and more. You can also add music and sound effects. Share your video on Facebook, Instagram, and other social media sites!
4. KineMaster - frame-by-frame edits. If you're a perfectionist looking to leave your legacy in every frame, KineMaster is the app for you to be extra precise with your edits. This app allows you to trim videos, and add transitions and effects frame-by-frame. So that means you've got supreme control over your edits.
Ideal for those who are new to video editing, it provides an intuitive platform for crafting travel videos with ease. Key features include AI tools for visual and audio editing, extensive filters, transitions, and simple yet effective tools for adding text and music. iMovie. iMovie, Apple's own video editing app, is a go-to for many Mac users.
If you already have an Adobe Profile, your creation will also automatically back up to the Adobe Cloud. Magisto. This app will create a video for you in only three easy steps! After choosing one of four editing styles: traveler, fashion, country, or clean, you then upload your footage, and select a music track, leaving Magisto to do the rest!
FlexClip is a simple yet powerful video maker and editor for everyone. We help users easily create compelling video content for personal or business purposes without any learning curve. Easily make fascinating travel videos to document those wonderful journeys using FlexClip's free video maker. Check beautiful travel video ideas and make yours.
A Color Story is a great photo editing app with a wide variety of filters and lens effects. With the 'free' version, you can choose individual filter packs to purchase (ranging from 2-6$ USD). If you upgrade to the paid version (ACS+- costs around $32.99/ yr), you automatically get all new filter and effect packs.
When it comes to making travel videos, any time spent planning is time well spent. The preparation phase might not be as fun as filming or traveling, but it will help you make the most of your time, and it'll give you the best chance to come away with the footage you need to make the best travel video you can.
Idea #4 - Share food stories and reviews in your travel videos. If you are a foodie and love tasting new delicacies while on the go, you can make travel videos about food and culture. Your videos can provide viewers with a peek at different food cultures, cooking methods, and flavors across the globe.
24/7 customer support. Our customer support team is available to help 24/7. Enterprise members also receive dedicated account managers and a guaranteed uptime SLA. Vimeo's free travel video creator and editor makes it easy to do custom, stunning traveling video content. Browse all templates and effects.
737 templates. Create a blank Travel Video. Sunset Beach Waves Purple Ocean Video Intro. Video by chuanfun-design. Yellow Simple Travel Vlog YouTube Intro. Video by Goodware Std. Purple & White Minimalist Simple Floral Feminine YouTube Intro. Video by insangle. Blue Collage Nature Nature Sea Summer Travel Video.
Editing such video material is easy if you use the GoPro videos editor. This app offers over 20 pre-made templates for beginners. In addition, you can customize the graphics and make exciting transitions from one clip to another. Editing your videos with this app is easy as you only need to do a couple of simple steps.
InVideo. InVideo app is the easiest, quickest, and most convenient method to create travel videos. If you have no experience with video editing, InVideo is the ideal option. You can use the program to cut and edit videos, as well as add text and background audio. You can also improve your video by including animation and voice-over.
6. Use Multiple Cameras And Angles. One of the most important aspects of making a good travel video is making it visually stimulating. The same pan from left to right, the same eye level shots over and over, the same focal length throughout, makes for a visually boring video.
Plan a shooting schedule. Following on from the tip above, once you have your story and your travel video ideas are fleshed out on paper, make yourself super-efficient by drafting a schedule. It doesn't have to be a professional, Hollywood-style shooting timetable, it can literally be a 2-line sketch! But having it on paper will focus you on ...
Edit your travel movie with Movavi Video Editor. Step 1. Install the Movavi's travel video editing software. Download this handy video maker for Windows or Mac, depending on your operating system. Run the downloaded file and follow the on-screen instructions to install the program.
Joshi also suggests the VN Video Editor app for edits on the go: "For those just starting out, simplicity is the key to success. You can accomplish most of your edits using the Instagram app itself.
See It. TripCase is a free app that helps you organize your trip by making an itinerary for you. The itinerary can include flights, accommodations, rental cars, restaurant reservations, and more ...
Cue a new generation of video-editing apps that use AI to produce a polished compilation in seconds that is perfect for uploading to Instagram, Facebook, YouTube, WeChat and Weibo.
Create Travel Videos in Minutes with AI. Step 1. Log in to Steve. Choose 'Create New Project' and choose the video type. Step 2. Generate automated script with the help of AI or write your own script. Step 3. Choose a template from our customized library that suits your travel video. Step 4.
Cost: Free to use (Wanderlog Pro includes additional features and costs around £40 per year) USP: One of the best travel apps for planning every kind of trip, including road trips and group travel: create a trip itinerary, budget costs, organise flights and hotel reservations, and collaborate with friends. After your trip, share a travel guide ...
7. Be Smart When Filming. One of the most important travel video tips is to shoot smart. On the one hand, when you start editing, you may wish there would be more material. On the other hand, watching hours of video to find the best clips and make a three-minute compilation can also be challenging.
TravelAnimator - The best of the lot. TravelAnimator gets your job of creating fun animated travel maps pretty easily. It is a highly-rated app on the Play Store and App Store. It allows you to ...
3. Launch the app and tap Sign in. It's worth noting that you'll need a Google account to log in. 4. Tap the + button and allow YouTube Create to access photos and videos on your device. 5 ...
Mobile Passport Control. If you're traveling abroad, the Mobile Passport Control app makes your return through U.S. customs much faster. The app is a digital version of the Customs and Border ...
Airalo. Airalo was one of the first in the eSIM game and continues to be popular with travelers. Fans of the app point to how easy it is to download and get started quickly, and how much it saves ...
2 NYC beaches make Travel + Leisure's "25 Best in the USA". Rockaway Beach and Coney Island are sharing the prestigious space with other sun, sand and surf spots in places like Hawaii, California ...
You can find more details about how the airlines were scored here. Alaska Airlines was ranked "Best Airline Overall" with a score of 68.07 out of 100, followed by SkyWest (65.69) and Spirit ...
Californians won't have to travel far to experience some of America's "best" beaches as the summer season approaches. Four California beaches were named among the 25 "best" nationwide ...
The goal of Automagic is to help arrange your camera roll so your photos are in order when it comes time to add them to your photo book. Shipping time. 3-5 business days. Book sizes. 11" x 8.5 ...