How-To Geek
How to set a default zoom level in safari for mac.
Ease the strain on your eyes and browse Safari more easily. Quickly set custom zoom levels for content and text on different websites.

Quick Links
How to set a default zoom level for all websites, how to set a default zoom level for a single website.
Safari , the default web browser on Mac, gives you the ability to shrink or enlarge both the content and the text on all websites or just specific ones. Ease the strain on your eyes and browse better by setting a default zoom level in the browser.
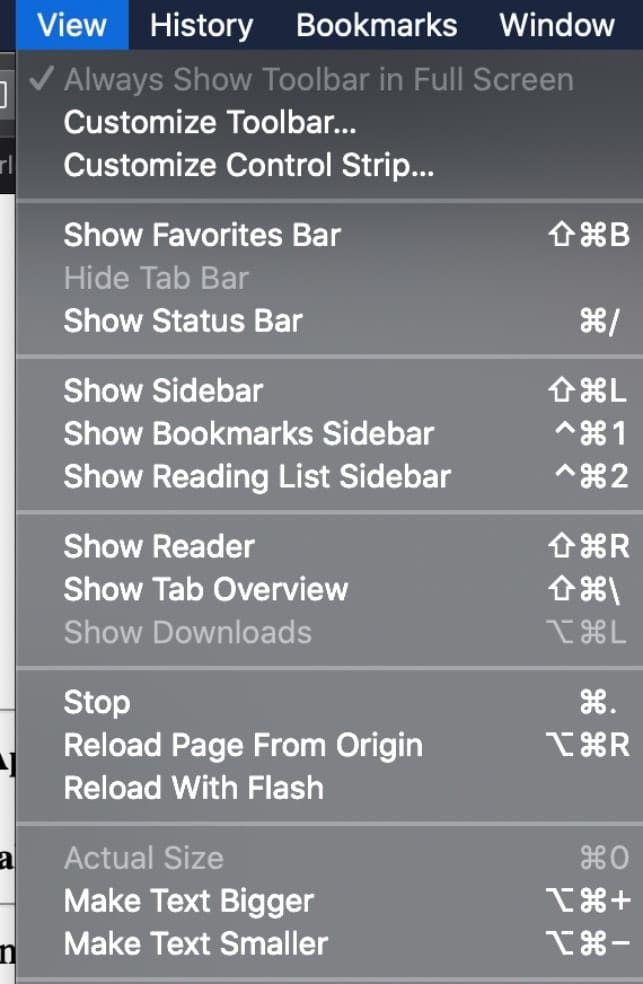
Start by opening the "Preferences" menu. Find it by clicking Safari > Preferences in the top menu bar.
From the window that opens, click Websites > Page Zoom. You can now open the "When Visiting Other Websites" drop-down menu to select your desired zoom level for all websites.
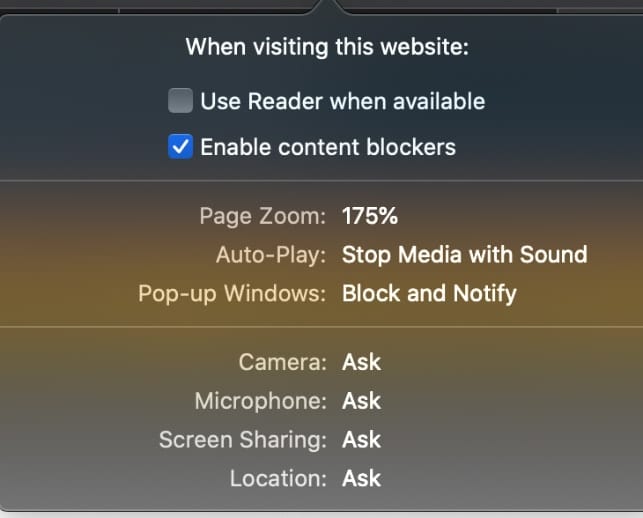
Setting the individual page zoom level for specific websites takes just four clicks. In the top menu bar, click Safari > Settings for This Website.
Select the current zoom setting next to "Page Zoom" and click your desired setting.
To reset the zoom level to 100 percent on any website, press Command + 0. Hold Command and press the Minus (-) or Plus (+) key to shrink or enlarge the website, respectively.
You can also hold Option + Command and press the Minus (-) or Plus (+) key to shrink or enlarge just the text of the website.
To set a default zoom level for just the text of one website, hold down the Option key and click "View." While still holding Option, click either "Make Text Bigger" or "Make Text Smaller."
These settings should make using Safari less straining and give you an overall more pleasant browsing experience.
Newsletters
- Our sponsors
- Watch Store
- Hot topics:
- Apple rumors
- Apple deals
- Editor’s picks
- Buying guides
Enable automatic Page Zoom for easier reading in Safari [Pro tip]
By Killian Bell • 1:00 pm, January 13, 2021
- Top stories

iOS, iPadOS, and macOS allow you to increase font sizes system-wide so that everything you do is easier to see. You can do a similar thing to make your favorite websites easier to read inside Safari.
We’ll show you how to use Page Zoom in this Safari pro tip.
If your vision isn’t too spectacular, increasing font sizes on your Apple devices can make a huge difference to usability. And when you choose a larger font in your settings, that change extends to many of your apps.
However, a larger system font won’t automatically make webpages easier to read in Safari. There’s another setting for that, and we’ll show you how to take advantage of it.
Enable automatic Page Zoom in Safari
Simply follow these steps on iPhone and iPad:
- Open the Settings app.
- Tap Safari .
- Tap Page Zoom .
- Select the Page Zoom preference you would like to use. This will become the default and will apply to all websites.
And follow these steps on Mac:
- Open Safari .
- Click Safari in the menu bar, then click Preferences…
- Under the Websites tab, click Page Zoom .
- You’ll see a list of the sites you currently have open, and you can specify a zoom preference for each if you wish. To set a zoom setting for all sites, look for the drop-down box alongside When visiting other websites .
There are a long list of Page Zoom options, from 50% to 300%, with 100% selected by default. We recommend selecting 115% initially, then visiting a site you find difficult to read, and increasing the zoom again if necessary.
Page Zoom can have inadvertent affects on some websites, and the higher your zoom setting, the more likely you are to run into issues. That’s why it’s best to increase zoom incrementally to find what works best for you.
Change Page Zoom on the fly
You might find a Page Zoom setting that works for you but still run into some websites that are too difficult to read. When this happens, you can change Page Zoom for this particular site on the fly.
On iPhone and iPad, simply tap the Aa button in Safari’s address bar, then use the buttons at the top of the menu to adjust zoom. On macOS, tap View in the menu bar when Safari is open, then click Zoom In .
Daily round-ups or a weekly refresher, straight from Cult of Mac to your inbox.

Cult of Mac Today
Our daily roundup of Apple news, reviews and how-tos. Plus the best Apple tweets, fun polls and inspiring Steve Jobs bons mots. Our readers say: "Love what you do" -- Christi Cardenas. "Absolutely love the content!" -- Harshita Arora. "Genuinely one of the highlights of my inbox" -- Lee Barnett.

The Weekender
The week's best Apple news, reviews and how-tos from Cult of Mac, every Saturday morning. Our readers say: "Thank you guys for always posting cool stuff" -- Vaughn Nevins. "Very informative" -- Kenly Xavier.
Popular This Week
Apple watch series x concept will make you want it now, slow horses author brings new thriller to apple tv+, 5 reasons your mac might be running slow, big curved dell 4k display serves macbook duo [setups], why you should expect a new m-series mac chip every year, make music like a pro with the best audio interfaces for mac, apple tv+ brings huge hollywood scam to the screen, silo star drops major hints about sci-fi hit’s future on apple tv+, delta all-in-one retro game emulator now out for iphone, apple could finally fix iphone’s longstanding camera flare problem.
iPhone User Guide
- iPhone models compatible with iOS 17
- R ' class='toc-item' data-ss-analytics-link-url='https://support.apple.com/guide/iphone/iphone-xr-iph017302841/ios' data-ajax-endpoint='https://support.apple.com/guide/iphone/iphone-xr-iph017302841/ios' data-ss-analytics-event="acs.link_click" href='https://support.apple.com/guide/iphone/iphone-xr-iph017302841/ios' id='toc-item-IPH017302841' data-tocid='IPH017302841' > iPhone X R
- S ' class='toc-item' data-ss-analytics-link-url='https://support.apple.com/guide/iphone/iphone-xs-iphc00446242/ios' data-ajax-endpoint='https://support.apple.com/guide/iphone/iphone-xs-iphc00446242/ios' data-ss-analytics-event="acs.link_click" href='https://support.apple.com/guide/iphone/iphone-xs-iphc00446242/ios' id='toc-item-IPHC00446242' data-tocid='IPHC00446242' > iPhone X S
- S Max' class='toc-item' data-ss-analytics-link-url='https://support.apple.com/guide/iphone/iphone-xs-max-iphcd2066870/ios' data-ajax-endpoint='https://support.apple.com/guide/iphone/iphone-xs-max-iphcd2066870/ios' data-ss-analytics-event="acs.link_click" href='https://support.apple.com/guide/iphone/iphone-xs-max-iphcd2066870/ios' id='toc-item-IPHCD2066870' data-tocid='IPHCD2066870' > iPhone X S Max
- iPhone 11 Pro
- iPhone 11 Pro Max
- iPhone SE (2nd generation)
- iPhone 12 mini
- iPhone 12 Pro
- iPhone 12 Pro Max
- iPhone 13 mini
- iPhone 13 Pro
- iPhone 13 Pro Max
- iPhone SE (3rd generation)
- iPhone 14 Plus
- iPhone 14 Pro
- iPhone 14 Pro Max
- iPhone 15 Plus
- iPhone 15 Pro
- iPhone 15 Pro Max
- Setup basics
- Make your iPhone your own
- Take great photos and videos
- Keep in touch with friends and family
- Share features with your family
- Use iPhone for your daily routines
- Expert advice from Apple Support
- What’s new in iOS 17
- Turn on and set up iPhone
- Wake and unlock
- Set up cellular service
- Use Dual SIM
- Connect to the internet
- Sign in with Apple ID
- Subscribe to iCloud+
- Find settings
- Set up mail, contacts, and calendar accounts
- Learn the meaning of the status icons
- Charge the battery
- Charge with cleaner energy sources
- Show the battery percentage
- Check battery health and usage
- Use Low Power Mode
- Read and bookmark the user guide
- Learn basic gestures
- Learn gestures for iPhone models with Face ID
- Adjust the volume
- Find your apps in App Library
- Switch between open apps
- Quit and reopen an app
- Multitask with Picture in Picture
- Access features from the Lock Screen
- View Live Activities in the Dynamic Island
- Perform quick actions
- Search on iPhone
- Get information about your iPhone
- View or change cellular data settings
- Travel with iPhone
- Change sounds and vibrations
- Use the Action button on iPhone 15 Pro and iPhone 15 Pro Max
- Create a custom Lock Screen
- Change the wallpaper
- Adjust the screen brightness and color balance
- Keep the iPhone display on longer
- Use StandBy
- Customize the text size and zoom setting
- Change the name of your iPhone
- Change the date and time
- Change the language and region
- Organize your apps in folders
- Add, edit, and remove widgets
- Move apps and widgets on the Home Screen
- Remove apps
- Use and customize Control Center
- Change or lock the screen orientation
- View and respond to notifications
- Change notification settings
- Set up a Focus
- Allow or silence notifications for a Focus
- Turn a Focus on or off
- Stay focused while driving
- Customize sharing options
- Type with the onscreen keyboard
- Dictate text
- Select and edit text
- Use predictive text
- Use text replacements
- Add or change keyboards
- Add emoji and stickers
- Take a screenshot
- Take a screen recording
- Draw in documents
- Add text, shapes, signatures, and more
- Fill out forms and sign documents
- Use Live Text to interact with content in a photo or video
- Use Visual Look Up to identify objects in your photos and videos
- Lift a subject from the photo background
- Subscribe to Apple Arcade
- Play with friends in Game Center
- Connect a game controller
- Use App Clips
- Update apps
- View or cancel subscriptions
- Manage purchases, settings, and restrictions
- Install and manage fonts
- Buy books and audiobooks
- Annotate books
- Access books on other Apple devices
- Listen to audiobooks
- Set reading goals
- Organize books
- Create and edit events in Calendar
- Send invitations
- Reply to invitations
- Change how you view events
- Search for events
- Change calendar and event settings
- Schedule or display events in a different time zone
- Keep track of events
- Use multiple calendars
- Use the Holidays calendar
- Share iCloud calendars
- Camera basics
- Set up your shot
- Apply Photographic Styles
- Take Live Photos
- Take Burst mode shots
- Take a selfie
- Take panoramic photos
- Take macro photos and videos
- Take portraits
- Take Night mode photos
- Take Apple ProRAW photos
- Adjust the shutter volume
- Adjust HDR camera settings
- Record videos
- Record spatial videos for Apple Vision Pro
- Record ProRes videos
- Record videos in Cinematic mode
- Change video recording settings
- Save camera settings
- Customize the Main camera lens
- Change advanced camera settings
- View, share, and print photos
- Use Live Text
- Scan a QR code
- See the world clock
- Set an alarm
- Change the next wake up alarm
- Use the stopwatch
- Use multiple timers
- Add and use contact information
- Edit contacts
- Add your contact info
- Use NameDrop on iPhone to share your contact info
- Use other contact accounts
- Use Contacts from the Phone app
- Merge or hide duplicate contacts
- Export contacts
- Get started with FaceTime
- Make FaceTime calls
- Receive FaceTime calls
- Create a FaceTime link
- Take a Live Photo
- Turn on Live Captions in a FaceTime call
- Use other apps during a call
- Make a Group FaceTime call
- View participants in a grid
- Use SharePlay to watch, listen, and play together
- Share your screen in a FaceTime call
- Collaborate on a document in FaceTime
- Use video conferencing features
- Hand off a FaceTime call to another Apple device
- Change the FaceTime video settings
- Change the FaceTime audio settings
- Change your appearance
- Leave a call or switch to Messages
- Block unwanted callers
- Report a call as spam
- Connect external devices or servers
- Modify files, folders, and downloads
- Search for files and folders
- Organize files and folders
- Set up iCloud Drive
- Share files and folders in iCloud Drive
- Share your location
- Meet up with a friend
- Send your location via satellite
- Add or remove a friend
- Locate a friend
- Get notified when friends change their location
- Notify a friend when your location changes
- Add your iPhone
- Add your iPhone Wallet with MagSafe
- Get notified if you leave a device behind
- Locate a device
- Mark a device as lost
- Erase a device
- Remove a device
- Add an AirTag
- Share an AirTag or other item in Find My on iPhone
- Add a third-party item
- Get notified if you leave an item behind
- Locate an item
- Mark an item as lost
- Remove an item
- Adjust map settings
- Get started with Fitness
- Track daily activity and change your move goal
- See your activity summary
- Sync a third-party workout app
- Change fitness notifications
- Share your activity
- Subscribe to Apple Fitness+
- Find Apple Fitness+ workouts and meditations
- Start an Apple Fitness+ workout or meditation
- Create a Custom Plan in Apple Fitness+
- Work out together using SharePlay
- Change what’s on the screen during an Apple Fitness+ workout or meditation
- Download an Apple Fitness+ workout or meditation
- Get started with Freeform
- Create a Freeform board
- Draw or handwrite
- Apply consistent styles
- Position items on a board
- Search Freeform boards
- Share and collaborate
- Delete and recover boards
- Get started with Health
- Fill out your Health Details
- Intro to Health data
- View your health data
- Share your health data
- View health data shared by others
- Download health records
- View health records
- Monitor your walking steadiness
- Log menstrual cycle information
- View menstrual cycle predictions and history
- Track your medications
- Learn more about your medications
- Log your state of mind
- Take a mental health assessment
- Set up a schedule for a Sleep Focus
- Turn off alarms and delete sleep schedules
- Add or change sleep schedules
- Turn Sleep Focus on or off
- Change your wind down period, sleep goal, and more
- View your sleep history
- Check your headphone levels
- Use audiogram data
- Register as an organ donor
- Back up your Health data
- Intro to Home
- Upgrade to the new Home architecture
- Set up accessories
- Control accessories
- Control your home using Siri
- Use Grid Forecast to plan your energy usage
- Set up HomePod
- Control your home remotely
- Create and use scenes
- Use automations
- Set up security cameras
- Use Face Recognition
- Unlock your door with a home key
- Configure a router
- Invite others to control accessories
- Add more homes
- Get music, movies, and TV shows
- Get ringtones
- Manage purchases and settings
- Get started with Journal
- Write in your journal
- Review your past journal entries
- Change Journal settings
- Magnify nearby objects
- Change settings
- Detect people around you
- Detect doors around you
- Receive image descriptions of your surroundings
- Read aloud text and labels around you
- Set up shortcuts for Detection Mode
- Add and remove email accounts
- Set up a custom email domain
- Check your email
- Unsend email with Undo Send
- Reply to and forward emails
- Save an email draft
- Add email attachments
- Download email attachments
- Annotate email attachments
- Set email notifications
- Search for email
- Organize email in mailboxes
- Flag or block emails
- Filter emails
- Use Hide My Email
- Use Mail Privacy Protection
- Change email settings
- Delete and recover emails
- Add a Mail widget to your Home Screen
- Print emails
- Get travel directions
- Select other route options
- Find stops along your route
- View a route overview or a list of turns
- Change settings for spoken directions
- Get driving directions
- Get directions to your parked car
- Set up electric vehicle routing
- Report traffic incidents
- Get cycling directions
- Get walking directions
- Get transit directions
- Delete recent directions
- Get traffic and weather info
- Estimate travel time and ETA
- Download offline maps
- Search for places
- Find nearby attractions, restaurants, and services
- Get information about places
- Mark places
- Share places
- Rate places
- Save favorite places
- Explore new places with Guides
- Organize places in My Guides
- Delete significant locations
- Look around places
- Take Flyover tours
- Find your Maps settings
- Measure dimensions
- View and save measurements
- Measure a person’s height
- Use the level
- Set up Messages
- About iMessage
- Send and reply to messages
- Unsend and edit messages
- Keep track of messages
- Forward and share messages
- Group conversations
- Watch, listen, or play together using SharePlay
- Collaborate on projects
- Use iMessage apps
- Take and edit photos or videos
- Share photos, links, and more
- Send stickers
- Request, send, and receive payments
- Send and receive audio messages
- Animate messages
- Change notifications
- Block, filter, and report messages
- Delete messages and attachments
- Recover deleted messages
- View albums, playlists, and more
- Show song credits and lyrics
- Queue up your music
- Listen to broadcast radio
- Subscribe to Apple Music
- Play music together in the car with iPhone
- Listen to lossless music
- Listen to Dolby Atmos music
- Apple Music Sing
- Find new music
- Add music and listen offline
- Get personalized recommendations
- Listen to radio
- Search for music
- Create playlists
- See what your friends are listening to
- Use Siri to play music
- Change the way music sounds
- Get started with News
- Use News widgets
- See news stories chosen just for you
- Read stories
- Follow your favorite teams with My Sports
- Listen to Apple News Today
- Subscribe to Apple News+
- Browse and read Apple News+ stories and issues
- Download Apple News+ issues
- Listen to audio stories
- Solve crossword puzzles
- Search for news stories
- Save stories in News for later
- Subscribe to individual news channels
- Get started with Notes
- Add or remove accounts
- Create and format notes
- Draw or write
- Add photos, videos, and more
- Scan text and documents
- Work with PDFs
- Create Quick Notes
- Search notes
- Organize in folders
- Organize with tags
- Use Smart Folders
- Export or print notes
- Change Notes settings
- Make a call
- Answer or decline incoming calls
- While on a call
- Set up voicemail
- Check voicemail
- Change voicemail greeting and settings
- Select ringtones and vibrations
- Make calls using Wi-Fi
- Set up call forwarding and call waiting
- Avoid unwanted calls
- View photos and videos
- Play videos and slideshows
- Delete or hide photos and videos
- Edit photos and videos
- Trim video length and adjust slow motion
- Edit Cinematic mode videos
- Edit Live Photos
- Edit portraits
- Use photo albums
- Edit, share, and organize albums
- Filter and sort photos and videos in albums
- Make stickers from your photos
- Duplicate and copy photos and videos
- Merge duplicate photos and videos
- Search for photos
- Identify people and pets
- Browse photos by location
- Share photos and videos
- Share long videos
- View photos and videos shared with you
- Watch memories
- Personalize your memories
- Manage memories and featured photos
- Use iCloud Photos
- Create shared albums
- Add and remove people in a shared album
- Add and delete photos and videos in a shared album
- Set up or join an iCloud Shared Photo Library
- Add content to an iCloud Shared Photo Library
- Use iCloud Shared Photo Library
- Import and export photos and videos
- Print photos
- Find podcasts
- Listen to podcasts
- Follow your favorite podcasts
- Use the Podcasts widget
- Organize your podcast library
- Download, save, or share podcasts
- Subscribe to podcasts
- Listen to subscriber-only content
- Change download settings
- Make a grocery list
- Add items to a list
- Edit and manage a list
- Search and organize lists
- Work with templates
- Use Smart Lists
- Print reminders
- Use the Reminders widget
- Change Reminders settings
- Browse the web
- Search for websites
- Customize your Safari settings
- Change the layout
- Use Safari profiles
- Open and close tabs
- Organize your tabs
- View your Safari tabs from another Apple device
- Share Tab Groups
- Use Siri to listen to a webpage
- Bookmark favorite webpages
- Save pages to a Reading List
- Find links shared with you
- Annotate and save a webpage as a PDF
- Automatically fill in forms
- Get extensions
- Hide ads and distractions
- Clear your cache
- Browse the web privately
- Use passkeys in Safari
- Check stocks
- Manage multiple watchlists
- Read business news
- Add earnings reports to your calendar
- Use a Stocks widget
- Translate text, voice, and conversations
- Translate text in apps
- Translate with the camera view
- Subscribe to Apple TV+, MLS Season Pass, or an Apple TV channel
- Add your TV provider
- Get shows, movies, and more
- Watch sports
- Watch Major League Soccer with MLS Season Pass
- Control playback
- Manage your library
- Change the settings
- Make a recording
- Play it back
- Edit or delete a recording
- Keep recordings up to date
- Organize recordings
- Search for or rename a recording
- Share a recording
- Duplicate a recording
- Keep cards and passes in Wallet
- Set up Apple Pay
- Use Apple Pay for contactless payments
- Use Apple Pay in apps and on the web
- Track your orders
- Use Apple Cash
- Use Apple Card
- Use Savings
- Pay for transit
- Access your home, hotel room, and vehicle
- Add identity cards
- Use COVID-19 vaccination cards
- Check your Apple Account balance
- Use Express Mode
- Organize your Wallet
- Remove cards or passes
- Check the weather
- Check the weather in other locations
- View weather maps
- Manage weather notifications
- Use Weather widgets
- Learn the weather icons
- Find out what Siri can do
- Tell Siri about yourself
- Have Siri announce calls and notifications
- Add Siri Shortcuts
- About Siri Suggestions
- Use Siri in your car
- Change Siri settings
- Contact emergency services
- Use Emergency SOS via satellite
- Request Roadside Assistance via satellite
- Set up and view your Medical ID
- Use Check In
- Manage Crash Detection
- Reset privacy and security settings in an emergency
- Set up Family Sharing
- Add Family Sharing members
- Remove Family Sharing members
- Share subscriptions
- Share purchases
- Share locations with family and locate lost devices
- Set up Apple Cash Family and Apple Card Family
- Set up parental controls
- Set up a child’s device
- Get started with Screen Time
- Protect your vision health with Screen Distance
- Set up Screen Time
- Set communication and safety limits and block inappropriate content
- Charging cable
- Power adapters
- MagSafe chargers and battery packs
- MagSafe cases and sleeves
- Qi-certified wireless chargers
- Use AirPods
- Use EarPods
- Apple Watch
- Wirelessly stream videos and photos to Apple TV or a smart TV
- Connect to a display with a cable
- HomePod and other wireless speakers
- Pair Magic Keyboard
- Enter characters with diacritical marks
- Switch between keyboards
- Use shortcuts
- Choose an alternative keyboard layout
- Change typing assistance options
- External storage devices
- Bluetooth accessories
- Share your internet connection
- Allow phone calls on your iPad and Mac
- Use iPhone as a webcam
- Hand off tasks between devices
- Cut, copy, and paste between iPhone and other devices
- Stream video or mirror the screen of your iPhone
- Start SharePlay instantly
- Use AirDrop to send items
- Connect iPhone and your computer with a cable
- Transfer files between devices
- Transfer files with email, messages, or AirDrop
- Transfer files or sync content with the Finder or iTunes
- Automatically keep files up to date with iCloud
- Use an external storage device, a file server, or a cloud storage service
- Intro to CarPlay
- Connect to CarPlay
- Use your vehicle’s built-in controls
- Get turn-by-turn directions
- Change the map view
- Make phone calls
- View your calendar
- Send and receive text messages
- Announce incoming text messages
- Play podcasts
- Play audiobooks
- Listen to news stories
- Control your home
- Use other apps with CarPlay
- Rearrange icons on CarPlay Home
- Change settings in CarPlay
- Get started with accessibility features
- Turn on accessibility features for setup
- Change Siri accessibility settings
- Open features with Accessibility Shortcut
- Change color and brightness
- Make text easier to read
- Reduce onscreen motion
- Customize per-app visual settings
- Hear what’s on the screen or typed
- Hear audio descriptions
- Turn on and practice VoiceOver
- Change your VoiceOver settings
- Use VoiceOver gestures
- Operate iPhone when VoiceOver is on
- Control VoiceOver using the rotor
- Use the onscreen keyboard
- Write with your finger
- Use VoiceOver with an Apple external keyboard
- Use a braille display
- Type braille on the screen
- Customize gestures and keyboard shortcuts
- Use VoiceOver with a pointer device
- Use VoiceOver for images and videos
- Use VoiceOver in apps
- Use AssistiveTouch
- Adjust how iPhone responds to your touch
- Use Reachability
- Auto-answer calls
- Turn off vibration
- Change Face ID and attention settings
- Use Voice Control
- Adjust the side or Home button
- Use Apple TV Remote buttons
- Adjust pointer settings
- Adjust keyboard settings
- Adjust AirPods settings
- Turn on Apple Watch Mirroring
- Control a nearby Apple device
- Intro to Switch Control
- Set up and turn on Switch Control
- Select items, perform actions, and more
- Control several devices with one switch
- Use hearing devices
- Use Live Listen
- Use sound recognition
- Set up and use RTT and TTY
- Flash the LED for alerts
- Adjust audio settings
- Play background sounds
- Display subtitles and captions
- Show transcriptions for Intercom messages
- Get Live Captions (beta)
- Type to speak
- Record a Personal Voice
- Use Guided Access
- Use built-in privacy and security protections
- Set a passcode
- Set up Face ID
- Set up Touch ID
- Control access to information on the Lock Screen
- Keep your Apple ID secure
- Use passkeys to sign in to apps and websites
- Sign in with Apple
- Share passwords
- Automatically fill in strong passwords
- Change weak or compromised passwords
- View your passwords and related information
- Share passkeys and passwords securely with AirDrop
- Make your passkeys and passwords available on all your devices
- Automatically fill in verification codes
- Automatically fill in SMS passcodes
- Sign in with fewer CAPTCHA challenges
- Use two-factor authentication
- Use security keys
- Manage information sharing with Safety Check
- Control app tracking permissions
- Control the location information you share
- Control access to information in apps
- Control how Apple delivers advertising to you
- Control access to hardware features
- Create and manage Hide My Email addresses
- Protect your web browsing with iCloud Private Relay
- Use a private network address
- Use Advanced Data Protection
- Use Lockdown Mode
- Use Stolen Device Protection
- Receive warnings about sensitive content
- Use Contact Key Verification
- Turn iPhone on or off
- Force restart iPhone
- Back up iPhone
- Return iPhone settings to their defaults
- Restore all content from a backup
- Restore purchased and deleted items
- Sell, give away, or trade in your iPhone
- Erase iPhone
- Install or remove configuration profiles
- Important safety information
- Important handling information
- Find more resources for software and service
- FCC compliance statement
- ISED Canada compliance statement
- Ultra Wideband information
- Class 1 Laser information
- Apple and the environment
- Disposal and recycling information
- Unauthorized modification of iOS
Customize your Safari settings on iPhone
Customize your start page
When you open a new tab, you begin on your start page. You can customize your start page with new background images and options.

Scroll to the bottom of the page, then tap Edit.
Choose the options you want to appear on your start page:
Favorites: Display shortcuts to your favorite bookmarked websites. See Bookmark a favorite website .
Frequently Visited: Go straight to the websites you visit most.
Shared with You: See links shared with you in Messages, Mail, and more. See Find links shared with you .
Privacy Report: Stay updated on how many trackers and websites Safari blocked from tracking you. See View the Privacy Report .
Siri Suggestions: As you search, allow websites shared in Calendar and other apps to appear.
Reading List: Show webpages currently in your Reading List. See Add the current webpage to your Reading List .
Recently Closed Tabs: Go back to tabs you previously closed.
iCloud Tabs: Show open tabs from other Apple devices where you’re signed in with the same Apple ID and Safari is turned on in iCloud settings or preferences. See Organize your tabs with Tab Groups .
Note: Your custom start page settings are updated on all your Apple devices where you have Use Start Page on All Devices turned on, and you’re signed in with the same Apple ID using two-factor authentication .
Change the text size for a website on Safari
Use the Page Settings button to increase or decrease the text size.
Tap the large A to increase the font size or the small A to decrease it.
Change the display controls for a website on Safari
You can hide the search field, switch to Reader, and more.
Hide the search field: Tap Hide Toolbar (tap the bottom of the screen to get it back).
See a streamlined view of the webpage: Tap Show Reader (if available).
To return to the normal view, tap Hide Reader.
See what the webpage looks like on a desktop computer: Tap Request Desktop Website (if available).
You can also adjust Safari settings in Accessibility settings. Go to Settings > Accessibility > Per-App Settings. Tap Add App, choose Safari, then tap Safari to adjust the settings.
Choose where to save downloads
When you download a file in Safari, you can choose whether to save it to iCloud or on your iPhone.
iCloud Drive: Select this option to save downloads to the Downloads folder in iCloud Drive. This allows you to access the downloaded file on any iPhone, iPad, or Mac where you’re signed in with the same Apple ID .
On My iPhone: Select this option to save downloads to the Downloads folder on your iPhone.
Share website passwords with a group
You can create a group of trusted contacts and share a set of passwords. Passwords stay up to date for everyone in the group, and you can remove someone at any time.
See Create shared password groups .
Adjust privacy settings for Safari
You can choose what privacy settings you want across Safari, and create individual exceptions for websites. See Browse privately .
How to Zoom In and Out in Safari on Your Mac
On your Mac, you may want to zoom in or out to make things on your screen easier to see while browsing the web in Safari. If you zoom in, this will enlarge the text, images, videos, and other objects on a website. You can also zoom out to see more content. By default, Safari sets the zoom level to 100%, but you can change this. This article will help you adjust the size of website content to make a webpage easier to read. More specifically, this article will teach you these:
- How you can zoom in to magnify any web content that you have on your Mac.
- How you can zoom out if you think the website text and images are too small.
- How you can set a default zoom level for all websites.
- How you can customize zoom settings for individual websites.
This article is especially important as users with low vision may prefer to have Safari (and other browsers) zoom into page content.
To quickly zoom in and out
You can zoom the active website you are currently viewing. If you want to quickly zoom in, out, and reset the zooming setting, you can use these keyboard shortcuts. This will temporarily set the zoom level:
- Zoom in: Command and +
- Zoom out: Command and –
- Actual size: Command and 0 (this will restore the zoom to 100%).
Alternatively, in the Safari app, you can click the View menu and select a different zoom level: Actual Size, Zoom In, or Zoom Out.

Increasing or decreasing the Text Size
You can zoom website text. This will only change the text size. The website’s other elements (e.g., images, etc) will not be changed. Here is how:
- While you are viewing the website, press and hold down the Option key and from the View menu, select Make Text Bigger or Make Text Smaller.

Or, alternatively, you can use these shortcuts:
- Make text bigger: Option, Command and +
- Make text smaller: Option, Command and –
- Reset to the default text size: Command and 0
Permanently set the zoom level for all pages opened with Safari
As stated above, Safari’s default zoom setting is 100%. Here is how you can change this setting:
- Open Safari and in Safari, go to Safari > Preferences > Websites > Page Zoom (sidebar).
- Select all websites (you can press the Command key and click the websites).
- Then click the “When visiting other websites” menu and choose a larger or smaller percentage.

Set the zoom level for a specific website
If a particular website content looks too small or too big for you, then you may want to customize its zoom setting. Here is how:
- If you are currently viewing the website, then you can click the Safari menu and Settings for This Website. Choose the Page Zoom option and change the level. You can increase or decrease. The 100% option will return the website to the default magnification level.

- If you are not currently viewing the site, then you can choose Safari > Preferences > Websites. Select Page Zoom (sidebar) and then change the zoom level.

Set a minimum font size
This is another zoom setting. You may want to use it. So, if you are thinking that the font sizes on the web appear too small (for example, you may have vision impairment), you can set a minimum text size. In Safari, click Safari > Preferences > Advanced. Check the “Never use font sizes smaller than” box and choose a font size.

- How To Turn Off Zoom (Magnifier) On Your iPhone
- How to Change the Text Size in macOS
- How To Change macOS Cursor Size
Dr. Serhat Kurt worked as a Senior Technology Director specializing in Apple solutions for small and medium-sized educational institutions. He holds a doctoral degree (or doctorate) from the University of Illinois at Urbana / Champaign and a master’s degree from Purdue University. He is a former faculty member. Here is his LinkedIn profile and Google Scholar profile . Email Serhat Kurt .
Similar Posts
Terminal says operation not permitted on mac, fix.
Several users have reported that they are unable to use Terminal to execute commands because they see an error message saying “Operation not permitted”. This article explains how you can fix this problem….
How to Know if a Mac is Refurbished or New
Sometimes, especially buying a second-hand Mac, you might wonder about its history. You may want to know if the Mac you want to buy was purchased as a brand new or refurbished device….

What to Do If You Clicked a Phishing or Scam Link
Scammers target people with email or text messages and phone calls to deceive them into revealing personal or financial information like passwords, social security numbers or credit card details. Scams and phishing attempts…
How to Find Receipts for Apple Purchases
In this article, I explain how you can view and download your receipts for Apple products that you have directly bought from Apple. Apple makes its products available for sale online and in-store….
What Does Emergency Override Mean?
When you attempt to charge your iPhone, your device may show a warning message saying “Charging Not Available” or “Liquid Detected in Lightning Connector” if your iPhone detects moisture or liquid in the…
iPod Touch 5th Generation Won’t Turn On? Fix
You press the power button and nothing happens? Does your device not respond? Does your iPod just display a black screen? Do not worry. This can be easily fixed in a few seconds. Here is how…
Leave a Reply Cancel reply
Your email address will not be published. Required fields are marked *
Categories:
Download Free
How to Zoom In on Safari
It's free and super easy to set up
Safari is a popular web browser that is widely used across various devices. However, sometimes it can be difficult to read text or view a webpage without zooming in. Fortunately, Safari provides multiple ways to zoom in on a page. In this article, we'll explore the different options available for zooming in on Safari and guide you through how to use them.
Understanding Zoom Options in Safari
Before diving into ways to zoom in on Safari, it's essential to understand the various zoom options available. Safari offers two types of zoom options: Page Zoom and Text Zoom.
Page Zoom vs. Text Zoom
Page Zoom enlarges the entire webpage, including text, images, and other elements. This option is beneficial for users who want to view the webpage in its entirety without having to scroll excessively. However, it can also make the page appear cluttered and difficult to read.
Text Zoom, on the other hand, only enlarges the text, not other elements on a page. This option is useful for users who want to focus on the text and make it easier to read without affecting the layout of the page. However, it can also make images and other elements appear small in comparison.
Both options have their benefits and drawbacks, depending on the user's preference and the specific webpage. Some users may prefer to use Page Zoom for websites with lots of images, while others may prefer Text Zoom for websites with a lot of text.
Setting Default Zoom Levels
If you prefer to always view webpages at a specific zoom level, you can set a default zoom level in Safari Preferences. To do this, open Safari Preferences, go to the "Advanced" tab, and choose "Page Zoom" or "Text Zoom" from the dropdown menu. Set the zoom level you prefer, and every subsequent page you visit in Safari will automatically zoom to that level.
It's important to note that setting a default zoom level may not work for every webpage, as some websites have their own zoom settings that override the browser's default settings. Additionally, changing the zoom level on a webpage may affect the webpage's layout, making it appear distorted or difficult to navigate.
Overall, understanding the different zoom options available in Safari can help improve your browsing experience and make it easier to read and navigate webpages. Whether you prefer Page Zoom or Text Zoom, or like to change the zoom level on a per-page basis, Safari offers a variety of options to suit your needs.
Zooming In Using Keyboard Shortcuts
Safari offers several keyboard shortcuts that allow you to zoom in and out of a page. Zooming in on a page can be particularly useful when reading small text or viewing images in detail. Here are the most commonly used keyboard commands:
Zooming In and Out with Keyboard Commands
To zoom in on a page, press the "Command" and "+" keys simultaneously. This will increase the size of the text and images on the page, allowing you to view them more clearly. If you want to zoom out, press "Command" and "-" keys simultaneously. This will decrease the size of the text and images on the page, allowing you to see more of the page at once.
Using keyboard shortcuts to zoom in and out can be a great time saver, as it allows you to quickly adjust the size of the content on the page without having to navigate through menus or use your mouse.
Resetting Zoom to Default with Keyboard Shortcuts
If you accidentally zoom too far in or out while browsing a webpage, you can easily reset the zoom level to default with the "Command" and "0" keys. This will return the page to its original size and make it easier to navigate and read.
Overall, keyboard shortcuts are a great way to improve your browsing experience and make it more efficient. By using these shortcuts, you can quickly and easily adjust the size of the content on the page and navigate through websites with ease.
Zooming In Using Safari Menu Options
Another way to zoom in on a page is through the Safari menu options. While using the zoom feature can be helpful for those with visual impairments or for those who want to get a closer look at a particular part of a web page, it can also be useful for those who want to read small text or view images more clearly.
Accessing Zoom Options in the View Menu
To access the Zoom options in the View menu, go to "View" in the Safari menu bar and select "Zoom In" or "Zoom Out." This will allow you to increase or decrease the size of the text and images on the page. Alternatively, you can use the keyboard shortcuts "Command" and "+" or "-" keys simultaneously. This is a quick and easy way to adjust the zoom level without having to navigate through the menu options.
Customizing Zoom Levels in Safari Preferences
You can also customize the default zoom levels by going to 'Preferences' in the Safari menu. From there, choose 'Page Zoom' or 'Text Zoom' from the dropdown menu, and set the percentage that you prefer. This is a great option for those who frequently use the zoom feature and want to have a more personalized experience while browsing the web.
Additionally, it's worth noting that some websites may have their own zoom features that override the default settings in Safari. For example, some websites may have a "Zoom" button that allows you to quickly adjust the zoom level without having to navigate through the Safari menu options.
In conclusion, the zoom feature in Safari can be a useful tool for a variety of purposes, from making small text easier to read to getting a closer look at images on a webpage. Whether you prefer to use the menu options or customize the default settings, Safari makes it easy to adjust the zoom level to fit your needs.
Zooming In Using Safari's Touch Gestures
If you are using a touchpad or magic mouse, Safari also supports various touch gestures to zoom in on a page.
Pinch-to-Zoom on Trackpad and Magic Mouse
To zoom in with a trackpad or magic mouse, you can use the pinch-to-zoom gesture by placing two fingers on the trackpad or holding down the control key and scrolling up or down with the mouse wheel.
Double-Tap Zoom on Trackpad and Magic Mouse
You can double-tap with two fingers on the trackpad or double-click using a magic mouse to zoom in on the area you're focusing on.
Using Safari Extensions for Enhanced Zoom Control
If you are looking for additional control over your zoom experience, you can explore a variety of Safari extensions that can cater to your specific needs.
Popular Safari Zoom Extensions
Some of the popular Safari Zoom extensions include ZoomPage, Zoom Hub, and PerfectZoom. These extensions provide advanced options for zooming in and out of webpages in Safari.
Installing and Managing Safari Extensions
You can install extensions using the Safari Extension Gallery or third-party websites. To manage and remove extensions, open the "Safari" menu and select "Preferences." Choose the Extensions tab, and you can disable, remove, or customize the extension's settings.
Zooming in on a Safari browser couldn't be easier with the many options provided by the browser. Use the tips and tricks shared in this article to enhance your browsing experience and enjoy zooming in on webpages without hassle.
Let's set you up !
Working on the web!
Student Tips
Startup Tools
Browser Glossary
Browser Tips
How to use Safari zoom to automatically make websites larger on Mac
Have you ever visited a website where the content was so small you had trouble reading it? Or maybe you’ve seen a webpage where the content was completely oversized? Safari has a handy zoom feature that you can adjust not just for the current site you’re visiting but for specific sites or all sites automatically.
Here’s how to use Safari zoom to automatically make websites larger on Mac.

Zoom in on specific websites
Since Safari is smart enough to remember, you can adjust the zoom level for the current site you’re on, and the next time you visit, that zoom level will be applied. You have a couple of ways to do this.
- Click View > Zoom In from your menu bar.
- Click Safari > Settings for [Website name] and adjust the Page Zoom in the pop-up box.

You can also use the pinch open gesture on your trackpad to increase the zoom level. However, Safari will not remember the zoom level if you use this option.
If you want to just make the text bigger rather than zoom in on the entire page, you can do this as well.
Click View from your menu bar and hold down the Option key. You’ll see the Zoom In and Zoom Out features change to Make Text Bigger and Make Text Smaller .

Zoom in on all sites automatically
If you would like all sites you visit in Safari to be zoomed in at a certain level, it’s easy to set up.
1) Open Safari and click Safari > Settings or Preferences from the menu bar.
2) Click the Websites tab.
3) Select Page Zoom from the left.
Now on the right side, you’ll see all of those sites that Safari remembers the zoom level for, as well as pages you have open currently. Here, you can adjust them individually if you like.

4) Click the drop-down box next to When visiting other websites at the bottom and select the zoom level you want. Keep in mind that this will not apply to those in your Configured Websites list, only to other pages you open.

If you want all pages to open at a certain zoom level and don’t want individually configured sites, remove the sites listed under Configured Websites .
You can select one at a time and click Remove or click the first one, hold your Shift key, and click the last one to select them all. Then click Remove .

Once you remove sites from the Configured Websites list, all webpages that you visit will open at the zoom level you choose under When visiting other websites .
With websites all over the internet in different sizes, it’s nice to have a way to zoom in or out so that you can enjoy them better. This is also convenient for those with a visual impairment who need them at a certain size.
What are your thoughts on the Safari zoom feature? Is this something you have found you needed?
Other Safari tips:
- 12 Safari keyboard shortcuts you should know
- How to view recent Safari history on your Mac
- How to change your Safari Homepage on Mac, iPhone and iPad
How To Zoom Out In Safari

- How-To Guides
- Software Tutorials

Introduction
Welcome to our guide on how to zoom out in Safari! Safari is a popular web browser with a sleek interface and advanced features. However, sometimes webpages may appear too large, making it difficult to view or navigate through the content. In such cases, zooming out can be a useful solution to adjust the size of the page and improve readability.
In this article, we will explore various methods to zoom out in Safari , catering to different preferences and situations. Whether you prefer using keyboard shortcuts, accessing the zoom option through the view menu, utilizing the pinch-to-zoom gesture on a trackpad or magic mouse, or customizing the zoom settings in the Safari preferences , we’ve got you covered.
By the end of this guide, you’ll have a clear understanding of how to zoom out in Safari and be able to easily adjust the zoom level to suit your needs. So, let’s dive into the methods and start zooming out in Safari !
Method 1: Using Keyboard Shortcuts
One of the quickest and most convenient ways to zoom out in Safari is by using keyboard shortcuts. These shortcuts allow you to adjust the zoom level without having to navigate through menus or settings. Here are the steps to zoom out using keyboard shortcuts:
- To zoom out in Safari, press and hold the “Command” key (⌘) on your keyboard.
- While holding the “Command” key, press the “-” (minus) key.
- Each time you press the “-” key, Safari will zoom out by a preset amount.
- Continue pressing the “-” key until the page is zoomed out to your desired level.
The keyboard shortcut “Command” + “-” is a handy way to quickly decrease the zoom level in Safari. It is especially useful when you want to shrink the page to view more content at once or if the webpage appears too large for your screen.
Keep in mind that using keyboard shortcuts to zoom out in Safari will decrease the overall size of the webpage, including text, images, and other elements. If you find that the page becomes too small to read comfortably, you can use the keyboard shortcut “Command” + “+” (plus) to zoom back in and increase the size.
Now that you know how to use keyboard shortcuts to zoom out in Safari, you can easily adjust the zoom level with a few simple key combinations. Let’s move on to the next method and explore another option for zooming out in Safari.
Method 2: Using the Zoom Option in the View Menu
If you prefer a more visual approach to zooming out in Safari, you can utilize the built-in zoom option available in the view menu. This method provides a user-friendly way to adjust the zoom level and is particularly useful if you’re not familiar with keyboard shortcuts. Here’s how you can zoom out using the view menu:
- Open Safari and navigate to the webpage you want to zoom out.
- Click on the “View” option in the Safari menu bar at the top of the screen.
- In the drop-down menu, hover your cursor over the “Zoom Out” option.
- Click on “Zoom Out” to reduce the zoom level of the webpage.
- You can click on “Zoom Out” multiple times to further decrease the zoom level.
The zoom out option in the view menu allows you to easily adjust the size of the webpage with just a few clicks. By reducing the zoom level, you can fit more content on the screen and improve readability.
In addition to the zoom out option, you’ll also find other useful zoom-related options in the view menu, such as “Zoom In,” “Actual Size,” and “Zoom Text Only.” These options provide additional flexibility to customize your browsing experience according to your preferences and needs.
Using the zoom option in the view menu is a straightforward method to zoom out in Safari. Whether you’re new to Safari or simply prefer a visual approach, this method allows you to easily adjust the zoom level and optimize your browsing experience.
Now that you’ve learned about using the zoom option in the view menu, let’s explore another method that utilizes the pinch-to-zoom gesture on a trackpad or magic mouse.
Method 3: Using the Pinch-to-Zoom Gesture on Trackpad or Magic Mouse
If you’re using a trackpad or a Magic Mouse with your Mac, you can take advantage of the pinch-to-zoom gesture to easily zoom out in Safari. This method provides a seamless and intuitive way to adjust the zoom level with just a simple gesture. Here’s how you can use the pinch-to-zoom gesture:
- Place two fingers on the trackpad or Magic Mouse.
- Pinch your fingers together, moving them closer towards each other.
- As you pinch, Safari will zoom out, reducing the zoom level of the webpage.
- You can continue pinching your fingers together to further decrease the zoom level.
The pinch-to-zoom gesture offers a natural and intuitive way to control the zoom level in Safari. By using your fingers to pinch or expand, you can easily adjust the size of the webpage to your liking. This method is especially convenient for those who prefer tactile interactions and want a more hands-on approach to zooming out.
It’s worth noting that the availability of the pinch-to-zoom gesture depends on your device’s compatibility. Most Mac laptops and trackpads , as well as Magic Mouse, support this gesture. If you’re using a different type of mouse or trackpad, this gesture may not be available. In such cases, you can try using the keyboard shortcuts or other zooming methods mentioned in this guide.
The pinch-to-zoom gesture not only allows you to adjust the zoom level in Safari but also gives you precise control over the size of the webpage. Whether you want to shrink the page to fit more content or make it smaller for comfortable reading, this gesture provides a convenient and efficient solution.
Now that you’ve learned about using the pinch-to-zoom gesture on a trackpad or Magic Mouse, let’s explore another method by customizing the zoom settings in the Safari preferences.
Method 4: Using the Zoom Options in the Safari Preferences
If you prefer a more permanent solution for adjusting the zoom level in Safari, you can customize the zoom options in the Safari preferences. This method allows you to set a default zoom level or enable text-only zoom for a consistent browsing experience. Here’s how you can use the zoom options in the Safari preferences:
- Open Safari and click on “Safari” in the menu bar.
- In the drop-down menu, select “Preferences” to open the Safari preferences.
- Click on the “Advanced” tab in the preferences window.
- Check the box next to “Never use font sizes smaller than” to enable text-only zoom.
- Use the slider or input a specific percentage in the “Page Zoom” section to set the default zoom level.
By customizing the zoom options in the Safari preferences, you can have more control over how webpages are displayed. Enabling text-only zoom ensures that only the text size adjusts when zooming in or out, preserving the layout and preventing images from becoming distorted.
The ability to set a default zoom level allows you to always have your preferred view when loading webpages. Whether you prefer a larger zoom for easier reading or a slightly smaller zoom for a compact layout, you can tailor the default zoom level to your preferences.
Keep in mind that customizing the zoom options in the Safari preferences will apply to all webpages you visit using Safari. This can be particularly useful if you frequently visit websites with similar designs or if you prefer a consistent browsing experience across various sites.
Now that you know how to customize the zoom options in the Safari preferences, you have a more permanent solution for adjusting the zoom level to your liking. Let’s wrap up this guide with a quick summary of what we’ve covered.
Zooming out in Safari is a useful feature that allows you to adjust the size of webpages for improved readability and convenience. In this guide, we explored four different methods to zoom out in Safari:
- Using keyboard shortcuts: By pressing “Command” + “-” (minus), you can quickly decrease the zoom level.
- Using the zoom option in the view menu: Navigating through the “View” menu, you can easily access the zoom options and adjust the zoom level.
- Using the pinch-to-zoom gesture on trackpad or Magic Mouse: By pinching your fingers together on the trackpad or Magic Mouse, you can intuitively decrease the zoom level.
- Customizing the zoom options in the Safari preferences: By adjusting the settings in the Safari preferences, you can set a default zoom level or enable text-only zoom.
Each method offers a unique approach to zooming out in Safari, catering to different preferences and situations. Whether you prefer keyboard shortcuts for quick adjustments, visual options in the view menu, tactile interactions with pinch-to-zoom gestures, or customized settings in the preferences, you can find a method that suits your needs.
Remember that zooming out in Safari can be helpful when webpages appear too large or when you want to fit more content on the screen. It’s important to find a balance between zooming out for better visibility and ensuring that the page remains legible and easy to navigate.
We hope this guide has been informative and helpful in assisting you with zooming out in Safari. Now, you can confidently adjust the zoom level and enhance your browsing experience. Happy zooming!
Leave a Reply Cancel reply
Your email address will not be published. Required fields are marked *
Save my name, email, and website in this browser for the next time I comment.
- Crowdfunding
- Cryptocurrency
- Digital Banking
- Digital Payments
- Investments
- Console Gaming
- Mobile Gaming
- VR/AR Gaming
- Gadget Usage
- Gaming Tips
- Online Safety
- Tech Setup & Troubleshooting
- Buyer’s Guides
- Comparative Analysis
- Gadget Reviews
- Service Reviews
- Software Reviews
- Mobile Devices
- PCs & Laptops
- Smart Home Gadgets
- Content Creation Tools
- Digital Photography
- Video & Music Streaming
- Online Security
- Online Services
- Web Hosting
- WiFi & Ethernet
- Browsers & Extensions
- Communication Platforms
- Operating Systems
- Productivity Tools
- AI & Machine Learning
- Cybersecurity
- Emerging Tech
- IoT & Smart Devices
- Virtual & Augmented Reality
- Latest News
- AI Developments
- Fintech Updates
- Gaming News
- New Product Launches
- AI Writing How Its Changing the Way We Create Content
- How to Find the Best Midjourney Alternative in 2024 A Guide to AI Anime Generators
Related Post
Ai writing: how it’s changing the way we create content, unleashing young geniuses: how lingokids makes learning a blast, 10 best ai math solvers for instant homework solutions, 10 best ai homework helper tools to get instant homework help, 10 best ai humanizers to humanize ai text with ease, sla network: benefits, advantages, satisfaction of both parties to the contract, related posts.

How To Go Full Screen On IPhone Safari

Why Is My Safari So Zoomed Out On IPhone

How To Zoom Out Of Safari On IPhone

Why Is My Safari Zoomed In

How Do I Zoom Out On Safari

How To Make Safari Bigger On IPhone

How To Make Safari Screen Smaller On Mac

How To Zoom Out On Safari Mac
Recent stories.

How to Find the Best Midjourney Alternative in 2024: A Guide to AI Anime Generators

How to Know When it’s the Right Time to Buy Bitcoin

How to Sell Counter-Strike 2 Skins Instantly? A Comprehensive Guide

10 Proven Ways For Online Gamers To Avoid Cyber Attacks And Scams

- Privacy Overview
- Strictly Necessary Cookies
This website uses cookies so that we can provide you with the best user experience possible. Cookie information is stored in your browser and performs functions such as recognising you when you return to our website and helping our team to understand which sections of the website you find most interesting and useful.
Strictly Necessary Cookie should be enabled at all times so that we can save your preferences for cookie settings.
If you disable this cookie, we will not be able to save your preferences. This means that every time you visit this website you will need to enable or disable cookies again.
How to Zoom in Safari: A Comprehensive Guide
Zooming in on webpages can greatly enhance your browsing experience, especially when dealing with small text or images. Safari, the popular web browser developed by Apple, offers a convenient Zoom feature that allows users to magnify content effortlessly. In this article, we will delve into the ins and outs of zooming in Safari, providing you with easy-to-follow instructions and expert tips to make the most out of this functionality.
Accessing the Zoom Feature in Safari
To begin zooming in Safari, you first need to access the Zoom feature. Fortunately, Safari makes it a breeze to find and activate this option. Follow these simple steps:
- Launch Safari on your device.
- Navigate to the top menu and click on the “Safari” tab.
- From the dropdown menu, select “Preferences.”
- In the preferences window, click on the “Advanced” tab.
- Check the box next to “Accessibility.”
- Now, Safari's Zoom feature is enabled, and you can proceed to adjust the settings according to your preference.
Zooming In on Safari Webpages
Once you have enabled the Zoom feature, it's time to dive into the process of zooming in on Safari webpages. Here's how you can do it:
- Press “Command” and “+” simultaneously to zoom in.
- Press “Command” and “-” together to zoom out.
- Press “Command” and “0” (zero) to reset the zoom level to the default.
- Look at the top-right corner of the Safari window to find the toolbar.
- Click on the “Zoom In” icon (magnifying glass with a plus sign) to zoom in.
- Click on the “Zoom Out” icon (magnifying glass with a minus sign) to zoom out.
- You can also click on the “Zoom Text Only” icon to zoom in on text exclusively.
- Simply place two fingers on the trackpad.
- Spread them apart to zoom in.
- Pinch them together to zoom out.
By following these methods, you can easily adjust the zoom level to your liking, making web content more accessible and readable.
Adjusting Zoom Settings in Safari
Safari provides several options to customize the Zoom feature according to your specific needs. Let's explore how you can adjust Zoom settings:
- Return to the “Preferences” window by following the steps mentioned earlier.
- Under the “Accessibility” tab, locate the “Zoom” section.
- Use the slider to set your desired default zoom level.
- Safari will remember this setting for future browsing sessions.
- Smart Zoom is a convenient feature that allows you to double-tap on a webpage to automatically zoom in and out.
- To enable Smart Zoom, go to the “Preferences” window and click on the “Trackpad” tab.
- Check the box next to “Smart zoom” to activate this functionality.
- Safari offers different styles for the Zoom feature, allowing you to choose the one that suits your preferences.
- In the “Accessibility” tab of the “Preferences” window, click on the “Display” dropdown menu.
- Select your preferred style from the available options.
By customizing these settings, you can optimize the Zoom feature to enhance your browsing experience.
Troubleshooting Zoom Issues in Safari
While Safari's Zoom feature is generally reliable, you may encounter some issues along the way. Here are a few common problems and their corresponding solutions:
- Sometimes, zooming in Safari can cause webpages to appear distorted or misaligned.
- To rectify this issue, hold down the “Option” key while zooming to maintain the webpage's original layout.
- If zoomed-in content appears blurry or pixelated, try using the “Zoom Text Only” option from the toolbar.
- This will optimize the readability of text while keeping other elements at their default size.
- In some cases, Safari may not remember your preferred zoom level after closing the browser.
- To resolve this issue, ensure that “Never use font sizes smaller than” is unchecked in the “Preferences” window under the “Advanced” tab.
By applying these troubleshooting tips, you can overcome common issues and enjoy a seamless zooming experience in Safar
In conclusion, knowing how to zoom in Safari is a valuable skill that can greatly enhance your browsing experience. With Safari's easy-to-access Zoom feature and customizable settings, you can effortlessly magnify web content to suit your needs. Whether you're reading small text or examining intricate details in images, Safari's Zoom feature ensures you never miss a thing.
So, why strain your eyes when you can zoom in Safari with just a few clicks? Take advantage of this powerful functionality and enjoy a more comfortable browsing experience today!
Tabletmonkeys is a tablet computer media company focusing solely on tablet computers. iPad & tablet news, tablet leaks, November tablet deals, tablet sales, tablet prices, tablet launches, tablet apps, tablet comparison, 2-in-1 tablets, and tablet accessories, is otherwise the focus of Tabletmonkeys.com.

- Press Releases
- Industry News
- Product Spotlight
- Fresh from Apple
- Video Production
- Installation Videos
- Explainer Videos
- Testing Lab
- Networking & Security
- Special OWC Deals
- The Other World
- Powered by OWC
- Space & Beyond
- Random Thoughts & Topics
- OWC Unplugged
- Article Archives
- Make a Suggestion
Send us a Topic or Tip
Have a suggestion for the blog? Perhaps a topic you'd like us to write about? If so, we'd love to hear from you! Fancy yourself a writer and have a tech tip, handy computer trick, or "how to" to share? Let us know what you'd like to contribute!
How to Increase or Decrease the Zoom Level in macOS Safari

Sometimes when I’m viewing an article (usually involving patent images) in Safari, it’s hard to view an entire image. However, you can increase or decrease the zoom level of images (and text) when viewing web pages in the macOS web browser.
When viewing a picture or text, press Command and the + (plus) or – (minus) keys. Alternately, you can click on View in Safari’s menu bar and select Zoom In or Zoom Out.
You can even add zoom buttons to Safari’s toolbar. To do so, right-click (or Control-click) on a space in the Safari toolbar and click Customize Toolbar. Click and drag the Zoom buttons in the dropdown to the are you clicked on the toolbar. Click Done to finish.
Also cool: if you wish to keep images at the same size and only adjust web page font size on the fly, press Option-Command and the + or – keys. You can also hold down the Option key and click on View in the Safari menu bar. This changes the Zoom options to “Make Text Bigger” and “Make Text Smaller.”
The web browser will “remember” your zoom wishes and preferred font size settings until you clear your History. If you want to do that, open Safari, select Clear History, and click the Clear History button.
But, wait!, we’re not done. You can also set the zoom level for a website of your choosing. Once you’ve set up the zoom level for a specific webpage, Safari applies it automatically whenever you view it. Here’s how to set this up:
Go to the site.
Under the Safari menu, click Settings for This Website. You’ll be presented with a variety of options from which to choose, including setting the page zoom percentage.
Other Topics You Might Like:

Leave a Reply Cancel reply
Save my name, email, and website in this browser for the next time I comment.
Notify me of follow-up comments by email.
Notify me of new posts by email.
You Might Also Like
The ultimate mac buyer’s guide, part 5: cpu cores speed up workflow — sometimes.

How to Brighten Up Your Video Calls With Studio Light and Continuity Camera in macOS Sonoma

How to Enable Two-Factor Authentication for Your Apple ID in macOS Sonoma

The Ultimate Mac Buyer’s Guide, Part 4: How Much Memory Does Your Workflow Require?
Email Address
- Brand Assets
8 Galaxy Way Woodstock, IL 60098 1-800-275-4576 +1-815-338-8685 (Int)
All Rights Reserved, Copyright 2020, OWC – Since 1988 | Terms of Use | Privacy Policy
We use cookies to provide you with a full shopping experience, including personalized content, and to help us improve your experience. To learn more, click here .
By continuing to use our site, you accept our use of Cookies, Privacy Policy and Terms of Use .
- PRO Courses Guides New Tech Help Pro Expert Videos About wikiHow Pro Upgrade Sign In
- EDIT Edit this Article
- EXPLORE Tech Help Pro About Us Random Article Quizzes Request a New Article Community Dashboard This Or That Game Popular Categories Arts and Entertainment Artwork Books Movies Computers and Electronics Computers Phone Skills Technology Hacks Health Men's Health Mental Health Women's Health Relationships Dating Love Relationship Issues Hobbies and Crafts Crafts Drawing Games Education & Communication Communication Skills Personal Development Studying Personal Care and Style Fashion Hair Care Personal Hygiene Youth Personal Care School Stuff Dating All Categories Arts and Entertainment Finance and Business Home and Garden Relationship Quizzes Cars & Other Vehicles Food and Entertaining Personal Care and Style Sports and Fitness Computers and Electronics Health Pets and Animals Travel Education & Communication Hobbies and Crafts Philosophy and Religion Work World Family Life Holidays and Traditions Relationships Youth
- Browse Articles
- Learn Something New
- Quizzes Hot
- This Or That Game New
- Train Your Brain
- Explore More
- Support wikiHow
- About wikiHow
- Log in / Sign up
- Computers and Electronics
- Internet Browsers
- Safari Browser
How to Change Safari Settings on iPhone or iPad
Last Updated: November 4, 2019 Tested
This article was co-authored by wikiHow staff writer, Nicole Levine, MFA . Nicole Levine is a Technology Writer and Editor for wikiHow. She has more than 20 years of experience creating technical documentation and leading support teams at major web hosting and software companies. Nicole also holds an MFA in Creative Writing from Portland State University and teaches composition, fiction-writing, and zine-making at various institutions. The wikiHow Tech Team also followed the article's instructions and verified that they work. This article has been viewed 35,770 times. Learn more...
This wikiHow teaches you how to customize the behavior of the Safari web browser on your iPhone or iPad. If you're using iOS 13 or later, you now have the option to choose display options for individual websites in addition to making global changes.
Changing Web Preferences by Website

- Changes you make with this method will only affect the currently-open website. If you want your preferences to affect all websites rather than just for those you customize, see the Changing Web Preferences for All Websites section instead.

- Select Ask on a feature if you'd like to be asked each time the site tries to access the feature (default).
- Select Deny if you never want the site to access the feature.
- Select Allow to always allow the site to access the feature.

Changing Web Preferences for All Websites

- It is also possible to customize these settings on a per-website basis. See this method to learn how.
- Changing your web preferences using this method will not affect sites you've customized individually.

- Select Ask on a feature if you'd like to be asked each time any site tries to access the feature (default).
- Select Deny if you never want websites to access the feature.
- Select Allow to always allow websites to access the feature.
Changing General Safari Settings

- Use the sliders in the "IN SAFARI" section at the top to choose whether Siri has access to Safari.
- Use the sliders in the "IN SEARCH" section to customize whether Safari options show when searching your iPhone/iPad or using the Shortcuts app.
- Tap the back button when you're finished.

- Tap AutoFill to adjust which information appears automatically in form fields, such as your name, address, phone number, email, and credit card info.
- Pop-up ads are blocked in Safari by default. If you'd like to see pop-up ads on websites, slide the "Block Pop-ups" switch to the Off (gray) position.
- Tap Downloads to choose where to save files and media you download from websites. You'll have the option to choose a cloud storage service or your iPhone/iPad.

- To allow sites and services to track your browsing anywhere on the web, slide the "Prevent Cross-Site Tracking" switch to the Off (gray) position. To retain your privacy, you can leave this switch in the On (green) position.
- Cookies are used by websites to keep track of your visits, preferences, and login information (for sites that require username/password access). [2] X Research source The "Block All Cookies" switch is Off (gray) by default, but you can enable it by toggling it to the On (green) position.
- Safari will display a warning message if a website you visit is deemed fraudulent in some way. If you don't want to see these messages, you can toggle the "Fraudulent Website Warning" switch to the Off (gray) position.
- Adjust the "Check for Apple Pay" switch to reflect your desired Apple Pay behavior on all websites.

Expert Q&A
You might also like.

- ↑ https://www.cultofmac.com/636450/how-to-use-safaris-amazing-new-settings-in-ios-13/
- ↑ https://us.norton.com/internetsecurity-privacy-what-are-cookies.html
About This Article

1. Go to a website in Safari. 2. Tap the Aa button. 3. Tap Website Settings . 4. Make your changes. 5. Tap Done . Did this summary help you? Yes No
- Send fan mail to authors
Is this article up to date?

Featured Articles

Trending Articles

Watch Articles

- Terms of Use
- Privacy Policy
- Do Not Sell or Share My Info
- Not Selling Info
wikiHow Tech Help Pro:
Level up your tech skills and stay ahead of the curve
How to Zoom Out on Safari for iPhone

Zooming out on Safari on an iPhone allows users to get a better overview of a webpage they are browsing. It is a simple feature that can greatly improve the browsing experience by fitting more content on the screen. The process to zoom out involves user gestures as well as settings tweaks within the iPhone’s system preferences.
Users who prefer gesture-based controls can perform a pinch-to-zoom-out gesture directly on their screens. If a more permanent solution is needed, the ‘Settings’ app provides options under ‘Accessibility’ and ‘Page Zoom’ to adjust default zoom levels in Safari. For those needing frequent zoom adjustments, understanding these methods is essential for navigating web content effectively.
Making Things Smaller: Zooming Out in Safari
Zooming out on websites in Safari for iPhone gives you a wider view and makes things easier to see at a glance. Here are the best ways to do this:
Pinch to Zoom
The quickest and most intuitive way to zoom out is by using the classic “pinch” gesture:
- Open the website: Navigate to the website you want to zoom out on.
- Finger Placement: Place your thumb and index finger on the screen, fairly close together.
- The Pinch: Move your fingers apart in a spreading motion. The website will zoom out as you do this.
Zoom Settings
For more permanent zooming, adjust your Safari settings:
- Go to Settings: Open the Settings app on your iPhone.
- Find Safari: Scroll down the list of apps and tap on “Safari.”
- Adjust Zoom: Under “Settings for Websites,” tap on “Page Zoom.”
- Choose Your Zoom: Select the desired zoom percentage for websites. This will be the new default zoom level for Safari.
Website-Specific Settings
Sometimes, you might want to adjust the zoom level on a single website without changing your global Safari settings. Many websites have a built-in zoom function:
- Accessibility Settings: Look for a menu symbol (often three lines or dots) near the top of the website, which might offer zoom controls or an accessibility menu.
- Keyboard Shortcut: Press “Command” and “-” (minus) keys at the same time to zoom out incrementally.
Summary Table of Methods
Choose the method that best suits your needs and enjoy the comfort of a zoomed-out view on your iPhone!
Key Takeaways
- Adjust Safari’s zoom level to fit more content on the screen for a better overview.
- Use the pinch gesture on the screen or change settings in the ‘Settings’ app for default zoom levels.
- Learn how to manage zoom to navigate web content with ease on an iPhone.
Optimizing Zoom Level on Safari iPhone
Adjusting the zoom on Safari for iPhone helps you see small text and details on webpages better. Here are ways to set your default zoom level and make manual adjustments.
Adjusting Default Zoom in Safari Settings
Go to the iPhone ‘Settings’ app and tap ‘Safari’. Scroll down to the ‘Page Zoom’ setting under ‘Settings for Websites’. Here you can set the zoom level that Safari will use by default. This makes content bigger or smaller when you open pages.
Utilizing Manual Zoom Methods
Besides setting a default, you can zoom in and out on any webpage. Do this by putting two fingers on the screen and moving them apart to zoom in, or pinching them together to zoom out. Double-tap the screen with one finger to quickly zoom in and out on a specific section.
Accessibility Features for Visual Impairments
For those with visual impairments, Safari provides full screen and window zoom features. Find these in the ‘Accessibility’ settings of your iPhone. They can magnify the entire screen or just parts of it, making content easier to read.
Navigating Web Content Effectively
Getting around web content with ease often involves zooming out to see more on your screen. This section provides clear instructions on how to view webpages effectively using various methods in Safari on iPhone.
Expanding Content View on Webpages
Expanding your view of a webpage allows you to see more content at once. To reduce the magnification and fit more on your iPhone screen, try a pinch gesture. Place two fingers close together on the screen and slide them apart. This gesture makes everything smaller so you can view more.
Mastering Safari Browsing Gestures
Safari supports a range of touch gestures to help you move through content quickly . Swipe left or right to switch between open tabs or use a light double-tap with one finger to zoom out. These actions give you smooth control over navigation and let you manage what you see and how you see it.
Using Keyboard Shortcuts for Efficiency
While iPhone Safari doesn’t support keyboard shortcuts natively, adding an external keyboard opens up new methods for fast browsing. You can quickly switch tabs or enter full-screen mode. An example is pressing Command + Shift + \ to show all open tabs, letting you pick the one you want with ease.
Frequently Asked Questions
Zooming out in Safari on an iPhone can be simple. Here are answers to some common questions about managing the zoom level in Safari.
What steps are required to zoom out in Safari on an iPhone?
To zoom out , place two fingers on the screen and move them together. This gesture is the standard way to zoom out on any webpage in Safari.
How can I reset Safari view to normal size on my iPhone?
Double-tap the screen with three fingers. This should reset the zoom level to the default size.
Is there a way to disable the zoom feature in Safari on my iPhone?
Yes, go to Settings, tap Accessibility, select Zoom, and toggle it off. This will disable zoom across all apps.
Why is my iPhone Safari view stuck zoomed in, and how can I fix it?
Often, triple-tapping the screen with three fingers will unstick the zoom. If that does not work, restarting Safari or your iPhone may resolve the issue.
How can I zoom out on a webpage in Safari when my iPhone is locked?
When an iPhone is locked, the screen content should not be able to zoom in or out. Unlock the phone to adjust the zoom in Safari.
What is the method to zoom out in Safari on an iPad?
The method is the same as on an iPhone. Use two fingers to pinch the screen together to zoom out on a webpage in Safari.
Similar Posts
How To Turn SafeSearch Off: Quick Guide to Disabling Content Filters
SafeSearch is a handy tool integrated into various search engines, including Google, that helps to filter out…

Turning Off Incognito Mode: A Simple Guide to Restore Regular Browsing
To manage online privacy, many people use incognito mode, which is a feature in web browsers such…

Safari Cannot Open The Page Because The Address Is Invalid: Troubleshooting Guide
When Safari displays the message “Cannot Open the Page Because the Address Is Invalid,” it means there’s…
Can’t Clear My History on Safari: Steps to Troubleshoot and Resolve
When using Safari, the browser developed by Apple, maintaining privacy is vital, and clearing browser history is…

How to Clear Your Browser Cache and Cookies: A Step-by-Step Guide
Clearing the cache and cookies from a web browser is a regular maintenance task that can help…
How To Use Safari’s Listen To Page Feature: Enhancing Your Browsing Experience
Safari‘s Listen to Page feature in iOS 17 is an innovative tool that enhances the way users…
How to Change Page Zoom in Safari on iPhone 14
If you want to adjust the zoom level in the iPhone 14 Safari browser, then you need to go to Settings > Safari > Page Zoom > and then choose the desired option.
Our guide continues below with additional information about zooming in Safari, including pictures of these steps.
You can also check out our video about how to change page zoom in Safari on iPhone 14 for more on this topic.
How to Adjust the iPhone Safari Zoom Level (Guide with Pictures)
The steps in this article were performed on an iPhone 14 Plus in the IOS 16.6 operating system.
These steps also work on many other iOS versions, as well as many other iPhone models, including the following:
- iPhone 14 Pro
- iPhone 14 Pro Max
Step 1: Locate the Settings icon on your Home screen and tap it to open the menu.

Step 2: Scroll down and choose the Safari option.

Step 3: Scroll down again and select the Page Zoom option.

Step 4: Tap the desired zoom level you wish to use for the Web pages you view on your iPhone.

Now that you know how to change page zoom for Safari on iPhone 14, you will be able to adjust this setting as needed until you find the level that makes Web browsing most comfortable.
Note that this won’t affect the zoom level in other Web browsers like Google Chrome or Mozilla Firefox. You will need to change the zoom level for those browsers as well.
Additionally, this won’t affect the appearance of any other apps or menus on the device. You can, however, change the zoom level for the entire phone by going to Settings > Display & Brightness > choosing Display Zoom and then selecting the Larger Text or Default option there.
Video About Safari Zoom
Summary – Zooming in Or Out in Safari on an iPhone 14
- Open Settings .
- Select Safari .
- Choose Page Zoom .
- Select an option.
Related: How to Pin a Safari Tab on an iPhone 14
The iPhone 14 screen has a high resolution, and depending on the phone model that you own, it can also be a pretty large screen.
This allows you to see a lot of information on the screen at one time, such as when you are looking at a Web page.
But you might feel that the information on the screen is either too large or too small and that you would like to change that.
One way that you can accomplish this is by adjusting an option called “Page Zoom” for Safari.
Hopefully, our article above about how to change page zoom in Safari on iPhone 14 has provided you with the information that you need in order to switch the Safari display to something that is more comfortable for you.
All Content is the sole property of Matthew Burleigh and Solve Your Tech. If you are reading this blog on another site, it has been reposted without the author’s permission and is in violation of the DMCA. © Solve Your Tech.

Matthew Burleigh has been writing tech tutorials since 2008. His writing has appeared on dozens of different websites and been read over 50 million times.
After receiving his Bachelor’s and Master’s degrees in Computer Science he spent several years working in IT management for small businesses. However, he now works full time writing content online and creating websites.
His main writing topics include iPhones, Microsoft Office, Google Apps, Android, and Photoshop, but he has also written about many other tech topics as well.
Read his full bio here.
Share this:
Join our free newsletter.
Featured guides and deals
You may opt out at any time. Read our Privacy Policy
Related posts:
- How to Unzoom Apple Watch
- 15 Ways to Fix Safari Not Working on iPhone in 2023
- Safari History iPhone: How to See It [2023 Guide]
- How to Change the Maximum Zoom Level iPhone Setting
- How to Zoom Out on Safari iPhone Web Browsers
- How to Get Safari Back on iPhone 13
- 15 iPhone Settings You Might Want to Change
- 3 iPhone Safari Tips You Might Not Know
- How to Make All Columns the Same Width in Excel 2013
- How to Rotate Screen on iPhone 7
- How to Bookmark on iPhone (2023 Guide)
- How to Make Google Your Homepage in Safari on a Mac
- How Do I Change Pop Up Blocker iPhone Settings in Chrome?
- How to Remove Frequently Visited on iPhone
- How to Disable a Safari Extension on an iPhone 13
- How to Remove the Page Number from the First Page in Word 2013
- Why Can’t I Create a Private Browsing Tab in Safari on My iPhone?
- How to Change the Zoom Level in Google Docs
- How to Shut Off iPhone 6 Zoom
- How to Enable or Disable Portrait Orientation Lock Button on iPhone

Contribute to the Microsoft Edge forum! Click here to learn more 💡
April 9, 2024
Contribute to the Microsoft Edge forum!
Click here to learn more 💡
- Search the community and support articles
- Microsoft Edge
- Website issues
- Search Community member
Ask a new question
Per-site zooming with Edge on iOS.
On iOS both Safari and Chrome are able to zoom the page on a per-site basis. This zoom level is retained between visits. This is an essential accessibility feature for those of us with poor eyesight. Can this feature not be added to Edge on iOS?
Without it I simply cannot use Edge on iOS.
Report abuse
Replies (3) .
- Independent Advisor
2 people found this reply helpful
Was this reply helpful? Yes No
Sorry this didn't help.
Great! Thanks for your feedback.
How satisfied are you with this reply?
Thanks for your feedback, it helps us improve the site.
Thanks for your feedback.
OK - I have sent feedback.
Question Info
- Norsk Bokmål
- Ελληνικά
- Русский
- עברית
- العربية
- ไทย
- 한국어
- 中文(简体)
- 中文(繁體)
- 日本語
IMAGES
VIDEO
COMMENTS
Setting the individual page zoom level for specific websites takes just four clicks. In the top menu bar, click Safari > Settings for This Website. Select the current zoom setting next to "Page Zoom" and click your desired setting. To reset the zoom level to 100 percent on any website, press Command + 0. Hold Command and press the Minus (-) or ...
According to this post from Apple's Safari Support discussion forum: 1) Create a file named defaultzoom.css (or any name you like, just make sure it has a css extension .) 2) Copy and paste in the following: body {. zoom: 130%; change 130 to whatever number suits you. >100 means zoom in, <100 means zoom out. Don't forget the % percent sign!
You can increase or decrease just the font size of pages that you view in Safari on macOS Sierra. Safari will remember your settings until you clear your History. To increase the font size, press Option-Command-Plus sign (+) To decrease the font size, press Option-Command-Minus sign (-) Or you can go to the View menu and hold down the Option ...
In the Safari app on your Mac, do one of the following:. Make all content larger: Choose Safari > Settings for This Website and choose an option from the Page Zoom pop-up menu, or choose View > Zoom In. You can also pinch open on a trackpad that supports gestures. Safari remembers the zoom level when you return to the website (unless you pinch open to zoom).
For all websites. Open Safari and click Safari > Settings from the top menu bar. Go to the Websites tab. Select Page Zoom from the left sidebar. Here, you will see your configured websites and currently open websites where you're using page zoom. You can change their zoom level or remove them.
Websites. tab, click. Page Zoom. . You'll see a list of the sites you currently have open, and you can specify a zoom preference for each if you wish. To set a zoom setting for all sites, look ...
Customize your start page. When you open a new tab, you begin on your start page. You can customize your start page with new background images and options. Open the Safari app on your iPhone. Tap , then tap . Scroll to the bottom of the page, then tap Edit. Favorites: Display shortcuts to your favorite bookmarked websites.
Permanently set the zoom level for all pages opened with Safari. As stated above, Safari's default zoom setting is 100%. Here is how you can change this setting: Open Safari and in Safari, go to Safari > Preferences > Websites > Page Zoom (sidebar). Select all websites (you can press the Command key and click the websites).
Accessing Zoom Options in the View Menu. To access the Zoom options in the View menu, go to "View" in the Safari menu bar and select "Zoom In" or "Zoom Out." This will allow you to increase or decrease the size of the text and images on the page. Alternatively, you can use the keyboard shortcuts "Command" and "+" or "-" keys simultaneously.
Zoom in on all sites automatically. If you would like all sites you visit in Safari to be zoomed in at a certain level, it's easy to set up. 1) Open Safari and click Safari > Settings or Preferences from the menu bar. 2) Click the Websites tab. 3) Select Page Zoom from the left. Now on the right side, you'll see all of those sites that Safari remembers the zoom level for, as well as pages ...
One of the key customization options in Safari is the ability to set a default zoom level for all web pages. By accessing the Safari preferences and navigating to the "Advanced" tab, you can specify a default zoom level that will be applied to all web content. This feature is particularly useful for users who consistently prefer a specific ...
Open Safari and navigate to the webpage you want to zoom out. Click on the "View" option in the Safari menu bar at the top of the screen. In the drop-down menu, hover your cursor over the "Zoom Out" option. Click on "Zoom Out" to reduce the zoom level of the webpage. You can click on "Zoom Out" multiple times to further decrease ...
How to Zoom in Safari: A Comprehensive Guide. By Jim Miller January 14, 2024 8:39 PM Jim Miller January 14, 2024 8:39 PM
To do so, right-click (or Control-click) on a space in the Safari toolbar and click Customize Toolbar. Click and drag the Zoom buttons in the dropdown to the are you clicked on the toolbar. Click Done to finish. Also cool: if you wish to keep images at the same size and only adjust web page font size on the fly, press Option-Command and the ...
3. Adjust the font size. The default zoom amount (100%) appears at the top of the menu. Tap the smaller A on the left to decrease the default font size, or the larger A on the right to increase it. Continue taping until you're satisfied with the new size, then tap anywhere on the page to close the window. [1] 4.
Adjusting the zoom on Safari for iPhone helps you see small text and details on webpages better. Here are ways to set your default zoom level and make manual adjustments. Adjusting Default Zoom in Safari Settings. Go to the iPhone 'Settings' app and tap 'Safari'. Scroll down to the 'Page Zoom' setting under 'Settings for Websites'.
If you are looking for a video about how to set default zoom on safari, here it is! In this video I will show you how to zoom in safari iphone. Be sure to wa...
Summary - Zooming in Or Out in Safari on an iPhone 14. Open Settings.; Select Safari.; Choose Page Zoom.; Select an option. Related: How to Pin a Safari Tab on an iPhone 14 Conclusion. The iPhone 14 screen has a high resolution, and depending on the phone model that you own, it can also be a pretty large screen.
2. Many applications I use, like Vim, Safari, and Chrome, support "Zoom In" and "Zoom Out" to magnify the size of the screen, or return it to standard size. Every time I start some applications, I zoom them "in" a bunch of times, and would like to set a default zoom level for them, so I don't have to do this all the time.
1. In Mac OS X 10.14, Safari defaults to "zoom to fit" when opening a PDF. There used to be a WebKitPDFScaleFactor item in the safari.plist but I don't think it exists anymore. How do I change the default to just "100%" so that I don't need to press command+0 every time I open a PDF?
Learn how you can manually change the Safari page zoom to a larger or smaller size.Gears I use:Velbon Sherpa 200 R/F Tripod With 3 Way Panhead https://amzn.t...
Per-site zooming with Edge on iOS. On iOS both Safari and Chrome are able to zoom the page on a per-site basis. This zoom level is retained between visits. This is an essential accessibility feature for those of us with poor eyesight. Can this feature not be added to Edge on iOS?