

DIY RV Slide Out Storage Trays – 7 Easy Plans
DIY RV slide out storage trays for your rig can be a great way to save money and easily access everything you’ve put in your RV storage compartment quickly and easily. They’ll save you plenty of money compared to the sliding storage trays offered at the dealer or by other manufacturers, and the best part is that you can customize them to your exact needs or specifications.
There are many ways to make your own RV slide out storage trays which we’ll cover in today’s guide.
Why DIY RV Slide Out Storage Trays Are Worth It
There are plenty of benefits to having RV storage slide out trays, which we’ll cover here first.

A RV Sliding Storage Tray Provides Easier Access To Your Stuff
Adding RV pass through pull out drawers allows you to bring everything you stored into the open, without the need to reach far into the small storage space or bring things out one at a time to reach something that’s at the back.
Just open the drawer and it’s all there – grab what you need, and push the RV sliding tray back in and you’re done!
Making Your Own RV Cargo Slide Is Affordable
While some aftermarket pre-built RV cargo slide units can cost up to $1000, making your own RV cargo slides will be a fraction of that cost.
The RV life isn’t cheap, so it’s important to save money where you can, and building your own RV sliding storage tray solution is a great way to do that.
Your DIY RV Storage Slide Out Trays Will Fit Your Rig Perfectly
Although there are a few premade RV slide out tray makers that offer a custom fit, many offer preconfigured sizes that may not make the best use of your space or fit your exact gear set up.
By designing and building your own RV storage drawers you can maximize the footprint to get as much storage as possible, plus you also get to customize them with compartments or extra features that don’t come on premade options.
Making a diy RV generator slide tray is a great example of this.
DIY RV Slide Out Storage Trays – 6 Plans
Easy diy rv storage slide out trays.
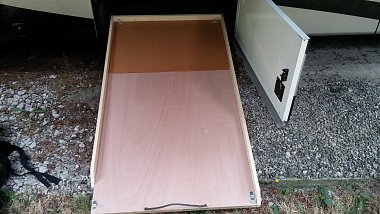
If you’re handy with a saw and power tools, you can make these great-looking RV sliding trays.
You’ll need 36” drawer slides (ideally rated at 500lbs or higher depending on the weight of your gear), a sheet of ⅝” plywood, and some 1” pine lumber.
The total cost of this project is around $400, which is less than what a single premade RV sliding storage tray would cost from a retailer.
These trays are 32” wide by 44” deep and are fastened to the RV storage floor with angle brackets.
Finish them off with ¾” sheet metal screws on the trays into the flooring so they are held into the plywood in your RV’s basement storage.
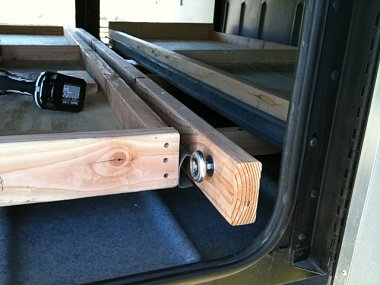
DIY Pass Through RV Sliding Tray System
This solution is a bit cheaper because and easier to attempt because you’re swapping out the drawer slides in favor of caster wheels mounted upside down.
You’ll still be building the RV cargo slide frames and drawers out of plywood, then mounting the caster brackets upside down and screwing everything into your RV’s plywood to keep it secure.
The drawers “slide” on top of the caster wheels to allow you to easily access everything.
All in all, this is a simple option for RV pass through pull out drawers that almost anyone can attempt.
Try Your Hand At These DIY RV Basement Storage Slides
One clever camper used garage door rollers on his RV basement storage slides.
This is a bit more heavy duty than we’d normally opt for, but would work well if you’ve got some heavy gear to store or if you happen to have some extra material that fits this application.
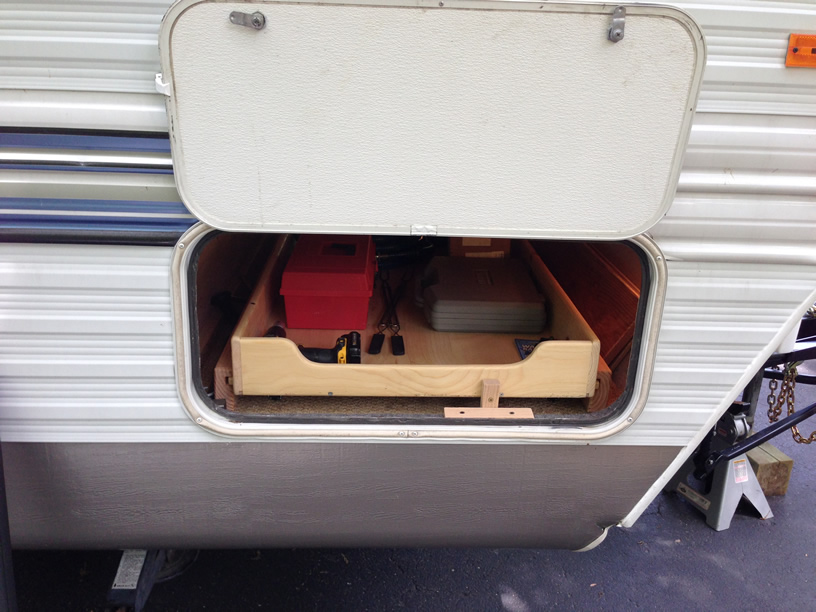
Build A RV Generator Slide Tray
This DIY RV generator slide tray allows you to easily access and service your generator, along with whatever other things you need to get to in the compartment.
Note the user also made a separate RV sliding drawer for their batteries, which is a nice touch.
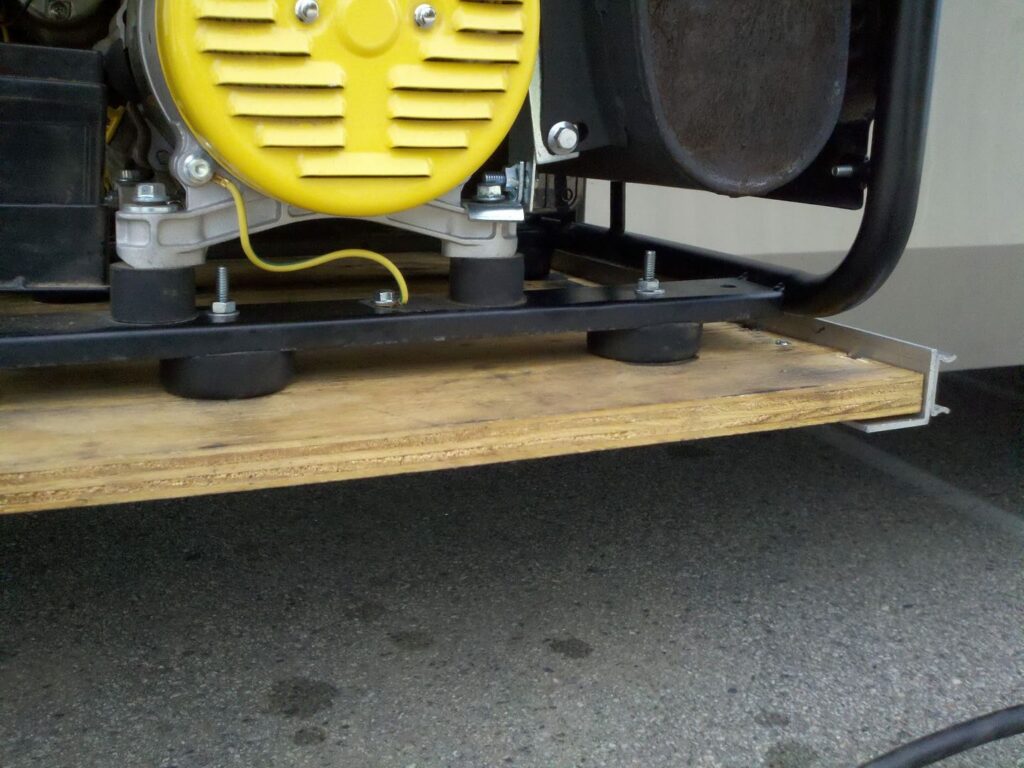
The unit was made with plywood and heavy-duty drawer slides and mounted into the RV basement storage floor to support the generator when the RV drawer is slid out.
Try Making An RV Pull Out Storage Tray With Casters On The Bottom
This clever DIY RV basement storage slide uses pegboard or Luan door material, plywood side boards, mounted caster wheels on the bottom to help it roll, and even has a rope handle to help it get over the RV storage cubby lip and a fold-out leg to keep it level on the ground.
There are 4 tie-down anchors so you can secure your gear (a bike in this case) with bungee cords, which is genius.
Make RV Storage Drawers Without Rollers
Some RVers have gotten pretty clever with some super cheap and low-tech solutions.
We saw one camper online who used a runner rug (you can also use a strip of carpet remnant) trimmed to the length of their RV pass through storage space and used plastic storage bins.
Using this method, you can simply pull the rug out to access your bins, and pull everything back through from the other side.
It’s cheap, easy, gets the job done, and requires no construction.
Other campers have attached furniture moving pads on the bottom of their own DIY slide out RV storage drawers or on store-bought flat bottom storage tubs so they can easily slide the tubs in and out of the RV storage space.
How To Make Your Own DIY RV Slide Out Storage Trays
Making your own RV cargo slide or RV sliding tray is easy and requires just a little bit of measuring and use of power tools.
Here’s what you’ll need to get started:
- A Sheet Of Plywood (⅜” to ½” should be fine)
- Measuring Tape
- Circular Saw
- Orbital Sander Or Sandpaper (optional)
- Hardware (Drawer Slides, Casting Wheels, or Whatever Else You Decide To Use)
- Finishing Materials (If Desired): Paint, wood stain, drawer lining material, etc.
Once you’ve got your supplies gathered, it’s time to get to building your RV storage drawers:
- Step 1 : Measure your RV storage compartment length and width for the base and sides of your RV basement storage slides.
- Step 2 : If using drawer slides, account for the width of both the drawer slides and the frame for the drawer when cutting your plywood. Same goes for height considerations if using casters on the bottom, as they’ll raise the height of your RV sliding storage tray.
- Step 3 : Measure and mark your cut lines on your sheet of plywood.
- Step 4 : Cut your plywood with a circular saw. Always use eye and ear protection.
- Step 5 : Sand all pieces if desired (this is recommended!).
- Step 6 : Use wood glue and screws to attach the sides of your RV pull out storage tray to the base.
- Step 7 (Optional) : Cut and attach divider pieces in the RV slide out tray if you prefer.
- Step 8 : If using drawer slides, make the frame, using your previous measurements and adjusting for width of both the additional plywood and drawer slide mechanisms using Steps 3-6.
- Step 9 : If using drawer slides, attach them to both the RV sliding tray drawer and frame now.
- Step 10 : If using paint or stain, apply them to the RV storage drawer and frame at this time
- Step 11 (if needed) : Attach the RV slide out storage tray frame to the floor of your RV’s storage compartment using screws. We recommend using shorter screws that will only go into the plywood subfloor in your RV’s storage compartment rather than long screws that could damage something beneath that plywood layer
- Step 12 : Attach any handle(s) or drawer lining to your DIY cargo RV slide and mount the drawer into the frame.
Here’s a good video showing the construction and installation process of wood-only DIY RV slide out storage trays:
Wrapping Up Our Guide To DIY RV Storage Slide Out Trays
We hope this guide helped you to get some ideas on how to make your own RV pull out storage tray system and helped your project go smoother.
What option did you decide to go with, and how did your RV cargo slide turn out?
Let us and your fellow campers know in the comments below.
If you’re into DIY RV projects, be sure to take a look at our guides to the best RV outdoor kitchen mods and how to install an RV bike rack over propane tanks .
While you’re here, check out our other helpful RV repair guides as well:
- What to do if your RV water pump keeps running
- Everything there is to know about your RV low point drain valve
- How to perform RV toilet foot pedal repair
- Tackle problems filling fresh water tank on RV
- Our guide to RV roof reseal cost
- What to do if your RV heater is blowing cold air
- How to fix an RV microwave not working
- Our guide to motorhome fuel pump replacement
- How to replace RV window glazing bead
- How to fix an RV toilet not holding water
- How to fix a sagging RV slide out
- Preparing for an RV one night freeze
Leave a Comment Cancel reply
Save my name, email, and website in this browser for the next time I comment.
Terms and Conditions

How to Store an RV Outside: The Complete Guide
This post contains affiliate links.
Whether you already have an RV or are thinking of getting one, you have probably already considered where and how to store your RV. Most RV owners store their RV outside since indoor storage options are few and far between. However, improper RV storage could lead to major damage to your vehicle that could potentially cost you thousands of dollars. This is especially true if you live in a state with intense winters and summers.
So, how do you store an RV outside? These are the basic steps needed to safely store your RV outside
- Choose the right location
- Wash the exterior
- Clean the inside
- Maintain proper ventilation and humidity
- Shut off propane tanks
- Add fuel stabilizer
- Rodent, pest, and critter proofing
- Take care of tires
- Consider your batteries
- Drain the fluids in your RV
Read on to get the full details on each step and make sure you are all set to store your RV outside.

Table of Contents
Storing Your RV Outside
RV storage is very climate-specific. In other words, outdoor winter storage and summer storage require different and sometimes overlapping methods of care. Also, the climate you live in will affect how you store your RV too. This article will focus on important points that are useful for both seasons and all environments.
When it comes to leaving your RV outside, there are a few essentials you need to take into consideration before you get into the nitty-gritty. Read below to find out all the preparations for storing your RV outside.
Choose the Right Location
Step 0 is deciding where you will store your RV. It’s best to figure this out early on since there can be limitations of how long you can park it for at your house or if you have an HOA if you are even allowed to. You don’t want to be all set up to leave your RV for the winter only to find out you can’t park it there. When it comes to storing your RV outside, you can either park it near your home or at a designated outdoor storage area.
If you’re going to park your RV near your home consider the following:
- Trees drop sap, twigs, and leaves. You already know this from camping trips. So imagine that over several months. It’s a real pain in the neck to get rid of tree sap off your RV cover so avoid parking under trees despite the shade they provide.
- Nesting birds will get your RV dirty. Avoid areas where birds could easily create nests. You’ll thank me later.
- Keep it accessible. Park your RV where you can still have access to it so that you can make sure it is okay and even take it out for a drive from time to time.
- Take advantage of overhangs. If you have an extended cover on your front lawn or garage, then store your vehicle under that. It will provide extra shielding from the sun.
- Avoid parking your RV on grass, sand, or dirt. Even if you jack-up your vehicle, which you definitely should, you are still at risk of sliding when it rains or gets a little damp. The RV could also sink into the ground, so stick to asphalt and concrete.
- Choose smooth, dry blocks to store your RV on . Blocks will help protect your tires and keep your RV off the ground.
Pro Tip: Unfortunately, just because it’s your property doesn’t necessarily mean your RV can hang around in storage mode forever. There may be local laws or regulations that determine how long an RV can remain on your property.
If you can’t store it on your own property, whether it’s due to lack of space or HOA rules, ask your friends if they would be willing to let you store it on their property. This is the next best thing to having it at your house. Don’t forget to show your buddy your appreciation for parking your rig at his house with a gift card or dinner out.

Outside Storage Area
Storing your RV outside doesn’t just mean storing it in front of your house or garage, you could also park it in a large outdoor RV storage facility.
If you do decide to go down that route out of choice or necessity keep a few things in mind.
- These places aren’t always the most secure. Ideally, you will get a nice storage zone with security, fences, and cameras but that’s not always the case.
- Even if you don’t have anything inside, thieves don’t know that. Your fixtures or anything that can be sold for scrap metal is valuable.
- You also need to consider the fact that, if your vehicle is far away, you may not have the time or capability to plug in the battery, start it up every now and then, and check the cover for any rips or holes.
So storing your RV off site should be left as a last resort. Instead, keep your precious vehicle where you have access to it all the time.
Start With a Wash
Before putting your RV into storage for the season, you should give it a thorough washing. This will prevent damage caused by dirty and grime build up and also keep your RV looking good.
The basics of washing an RV:
- Start from the top and move down as you go with a quick prewash. Make sure your vents and windows are all sealed, so you don’t leak into your RV.
- Scrub the roof down with a non-abrasive cleaner; otherwise, you risk chipping the paint. Use a soft-bristled brush and go in circles with both hands giving a bit of pressure. Don’t miss any spots, and get rid of all the dirt and grime.
- Hose down and then use a carwash cleaner or soap safe for automotive use. If you have a foam gun, go for it!
- Use Windex for the windows and clean both the inside and outside of your windshield. Use a microfiber towel for windows and to dry off all areas after you hose down the RV and let it dry a bit.
- Use a soft-bristled brush for any corners that could hold rust or grime.
- Finally, use a spray tire cleaner for your tires and a high-gloss polish for your rims but don’t overdo it.
Make sure the RV is completely dry before you store it. It also won’t hurt to wax the exterior of the vehicle to protect the paint from chipping and cracking under the heat of the sun, essentially aging your RV. A clean RV is the first line of defense against corrosive sand and dirt, and waxing the vehicle is the last step to seal everything before you cover it.

Consult with your dealer to see what sort of washing material is optimal for your specific brand and model. Also, don’t skimp on the wax, seriously… go with something high quality or you are going to regret it when its time to drive again.
Finally, you should wash the cover or any tent material you intend to cover your RV with and make sure it’s dry before you shield the vehicle.
Clean the Inside
It’s kind of a no brainer. I mean, if you have to clean the exterior, you can’t really leave the interior dirty.
This is where it gets a bit tricky. Sure, you have a lot of seams and windows to take care of on the outside but there are so many little details to clean, dust, and wash on the interior of your RV.
Not to sugar-coat it or anything, this is going to take some time and elbow grease.
Get rid of everything! By the time you’re ready to store your RV outside, there should be no food, valuables, or other perishable items in the vehicle.
- Start by removing all food items, and yes, that includes things in cans and packages you haven’t opened. Check your refrigerators, freezers, and cupboards.
- While you’re at it, remove all valuables. Stored RVs, even if they are on your property, are prime targets for thieves, so take your expensive items with you. Anything from pictures to tools should be taken out.
- Defrost your fridge and freezer and leave some small baking soda containers behind to prevent any smells from accumulating in your RV. You’ll also want to keep the fridge and freezer ajar while stored.
- Dust off everything from top to bottom and pay particular attention to cupboards, shelves, and ventilation. You are going to want to leave your rooftop vents slightly open, so dust is going to accumulate no matter what. It’s good to get in there every month or so to do a quick check and dust around a bit.
- Wipe down hard surfaces with soap and water, or disinfecting wipes. Pay particular attention to tables and counters. If you or your kids have spilled drinks in the past especially sugary drinks like juice or alcohol that can leave a stain or a sticky spot, you need to wipe these off.
- Clean your window sills on both sides using a brush and detergent like dish soap. If you didn’t clean the inside of your windows earlier grab the Windex or a vinegar and water mixture and use a lint-free cloth or newsprint to clean them.
- Bleach or disinfect the cupboards and corners inside your RV especially areas prone to moisture like the bathroom and under the sink. This will prevent mold and fungus from forming, which we will go over more in the humidity and ventilation section below. Use Clorox wipes if you are allergic to bleach.
- Finally, vacuum and mop away! Don’t leave any traces of dust, crumbs, or any sand or dirt. By the time you are done, the RV should look like it did when you first got it… that is unless you bought it off a friend or someone you found online.
Before you leave and lock up, take one final look for any valuables. Also, this one is obvious, but like food, you shouldn’t leave anything that could perish or freeze like shampoo, deodorant, toothpaste, or medicine.

Ventilation and Humidity
This is where weather conditions play a huge role. Where you live and store your RV is the number one thing you need to consider when you store your vehicle outside. Depending on where you live, humidity can work in your favor or completely destroy the RV.
People in humid states like Florida and Alabama should decrease humidity in their vehicles to prevent the formation of mold, fungus, and bacteria. Ventilation plays a huge role when it comes to maintaining the proper amount of humidity in your RV. Leaving your rooftop vents completely open could make the RV too humid, and shutting them off completely could make it too dry.
Tips for Reducing Humidity in Your RV
- Besides the fact that you should clean the interior of your vehicle, you can also place charcoal throughout the interior to absorb moisture from the air. You can pick up charcoal bags from Amazon that will help reduce moisture and smell in a neat little package.
- Open all cabinets and closed off shelves to prevent air from accumulating in one place and promoting molding.
- Only slightly leave your vents open to provide some air-flow. It’s a good idea to have vent covers as well to protect your interior for water. As long as you have charcoal in place and a proper RV cover, you should be safe from fungus and bacteria.
On the other hand, if you are in a dry state like Arizona, your main concern might be wood chipping and cracking.
Tips for Increasing Humidity in Your RV
- To increase humidity, you can place a few large buckets of water in the RV.
- Again open all cabinets and shelves.
- If you are in a dry state, you should almost entirely shut off your ventilation, leaving just enough of an opening to allow for some airflow to help circulate moisture and keep your RV from cracking.
Airflow is paramount, but like humidity, it’s a double-edged sword. Too much ventilation leaves the interior highly exposed to leakage caused by rain or melting snow. Not enough ventilation doesn’t allow for proper airflow. Slightly open the ventilation sliders on the top of your RV, not too much but just enough. As I mentioned, having covers on your vents will help keep the weather out.
Disconnect Propane Tank
To start off, you should shut off your propane tank. This is a great way to prevent certain odors that are especially attractive to rodents and insects, and more importantly, shutting off your propane tanks is an important safety practice that should be at the top of your outdoor RV storage checklist.
If your propane tank is not built in you can remove your tank altogether to be extra safe. If you do so, make sure to cap off the propane lines to keep insects and sand out. You can pick some caps up at your nearest hardware store. If you remove the tanks, store them in a dry and well-ventilated spot to prevent damages or rust.
Add Fuel Stabilizer
Now, if you have a motorized RV, you should change the oil and oil filter before storing it since acid accumulation can take place, which will corrode your engine. It is also very important that you add a fuel stabilizer to prevent deposits from forming throughout the fuel tank.
To add stabilizer simply:
- Add the stabilize, be sure to pick one that is correct for your vehicles fuel type
- Fill the fuel tank
- Take your RV for a drive to ensure the stabilizers makes its way through the entire tank and fuel lines. If your generator runs off the same fuel tank as your engine you should run it for a little bit too.
Pro Tip: When you store your RV, try to run the generator at least once every month for 15-30 minutes to keep everything in tip-top shape.
Rodent, Pest, and Critter Proofing
Think about it, if you were a small creature, where would you rather be during the cold winter? In the snow or inside a nice safe, and secluded vehicle. Yeah, I’m picking the latter as well.

Here are some tips for keeping your RV pest free:
- Check for cracks . When cleaning the interior, make sure there are no cracks, crevices, or holes in the corners, bottom, or on the walls of the vehicle, no matter how small! You can do this by looking for any places where you see daylight creeping through.
- Seal the cracks. Seal off these imperfections with expanding foam or silicon. Don’t just place tape it off. This is not an effective way to prevent pests from getting into your RV.
- Consider a repellant. As a final precaution, you may consider getting a deterrent or repellent. Unfortunately, some of the heavy-duty stuff isn’t necessarily organic or natural, but it gets the job done. So figure out for yourself if cleaning and covering is enough for you then don’t get deterrents.
Otherwise, here is a list of some great repellants for every specific problem.
- For mice and other rodents: Fresh Cab lasts up to 90 days
- For roaches: Combat Max 12 Month Roach Killing Bait
- For most insects: bugs hate peppermint. You could get a highly condensed extract and place a few drops on curtains and beds inside the RV.
- For ant: Diatomaceous Earth , sprinkle around the wheels of the RV, kills ants and other insects but safe for humans and pets.
- Also for insects and other pests: Ultrasonic pest repellers
Pro Tip: Leave some baking soda in specific places like cupboards, in corners, and in the fridge. This will prevent funky odors from accumulating and inviting nasty pests.
Take Care of Your Tires
RV’s are heavy, and you don’t need me to tell you that. So having a large load resting on the same spot for months on end is extremely damaging to the tires.
Flat spots and other complications can occur from improper tire care, including low tire pressure and expansion. In winter months the asphalt could get frozen and cause the RV to skid. Whereas in hot weather, your tires could expand, and they are at the full mercy of the sun.
Take proper care of your tires with the following tips:
- Jack up your RV. A slab of wood is ideal for separation between the hot or frozen asphalt or concrete. Make sure it’s wide enough so that there are no parts of the tire hanging off the sides.
- Get tire covers and protectors because the sun’s rays can be very deteriorating, especially for black surfaces. Learn more about Why You Should Cover Your RV Tires in my article
- You should also drive your RV every month or so, which will release pressure off the tires. However, just keep an eye on the weather and pick a fair weather day for your little jaunt.
If your tires get damaged you will need to replace them, which is costly, so take that extra step and make sure you’re all set for the winter or whenever you decide to store your vehicle outside.
Pro Tip: Make sure to check your tire pressure and inflate as necessary before getting back on the road.

Consider Your Batteries
This part is especially important for the cold winter months, but RV owners in warm climates should also take note. In instances where you will not have your vehicle attached to an independent power source, remove your RV battery before storing it outside . This is especially true for RVs that have much larger and more expensive batteries
If you don’t want to remove your battery, then you need to keep it fully charged while in storage outside. Ideally, you should have electricity available so you can keep your batteries constantly charged.
A trickle charger is the best way to keep your batteries constantly charged. We have a solar panel on the roof of our RV that trickle charges our batteries even when our battery switch is shut off. If you do this and you cover your RV, make sure your solar panel still has access to the sun. Learn more in our article How to Store an RV Battery for Winter.
Pro Tip: This isn’t the battery we talked about above, but while we are on the subject of batteries, make sure you remove dry cell batteries from your smoke alarm, clocks, and other devices when you store your vehicle, so they don’t corrode. Do NOT drive or use your RV without the batteries placed back in the smoke alarms.

Drain the Water from Your Water System
This one may seem obvious, but a lot of people miss it. You need to drain all of the water tanks, holding systems, and plug your sinks and shower drain.
In colder climates, water is obviously going to freeze, causing damage to your pipes, fittings, and lines. This kind of destruction is going to be extremely costly to repair and not to mention time-consuming.
In warmer climates, you will find that freshwater that is standing still for days, weeks, and often months is an ideal breeding ground for all sorts of bacteria, algae, fungus, and mold. These gross things will set off a chain of events from bad odor to decay and rot to an all-out infestation.
Warmer climates will also damage your pumps, tubes, and tanks because they will essentially heat up the water inside, causing expansion and moisture accumulation, which will not only reek but could destroy your RV in the long run.
How to Drain Your Holding Tanks
You’ll need to drain down all of your tanks, which means the black, gray and freshwater tanks.
To drain your gray and black water tanks follow your normal process but be sure to rinse your tanks. You should have a spot to hook up a hose (DO NOT use your drinking water hose) that will give your tanks a nice rinse. If you are still new to the process follow the steps below.
- Put on gloves and go to your nearest RV dumping site.
- Start with the black tank first. Attach the dumping hose that should come with your RV to the dumping hole in the ground first! Do NOT attach it to the RV first.
- Once you have clamped to the dumping site, attach the other end of the hose to your drain outlet by removing the lid and clamping tight. Make sure all elements click before draining.
- Pull open the black holding tank valve FIRST and attach a hose with clean water to the rinse system to allow for everything to fully clear out of the RV.
- Then empty the grey tank. You could repeat this process a few times to be safe.
- Make sure you don’t hear any more water draining out before you disconnect from the RV first then holding the hose up high detach from the dumpsite.
- Rinse your hose, pack it up, throw those gloves away, washup, and you’re all set!
But you still aren’t done yet, the freshwater tank is the most important one to drain! It’ll take ages to empty your freshwater tank if you just let the pump run plus you will never get all the fluid out of the system.
Your RV should have a drain on the freshwater tank. Simply unplug the drain or open the valve and let the water out. Just make sure there is somewhere for all that water to drain into, you don’t want it pooling next to your house or under your RV.
Make sure your water pump is turned off, you don’t want to run it dry! After all the water is out, open all the faucets inside and flush the toilet to help let out any leftover water pressure.
Don’t forget about your hotwater tank! This is a commonly overlooked part of your water system that would be a pain to replace. There should be a drain plug on your hot water tank. Open that up and let all the water out.
At this point, you still have to get the rest of the residual water out of the system or you end up with a burst pipe. Two common methods are using Anti-Freeze or compressed air to flush your system.
Pro Tip: Water draining is something you can do yourself even if you have never done it before but if you want to be extra cautious and have the budget there are many trained professionals that would be happy to help.
Anti-Freeze for Your Water System
After you have drained all the water out, it’s recommended that you pump some RV antifreeze throughout the water system. Many RV will have a specific port for this, check your owners manual on how to do this. Make sure you get something that is non-toxic because you will pump the antifreeze throughout your freshwater supply tank as well as the tubes that feed into your faucets.
So unless you want to end up in the emergency room, consult your RV dealer for the best non-toxic antifreeze. Your vehicle manual should have a storage checklist, which will likely highlight the water draining steps you need to take before storing it for the winter.
Compressed Air to Blow Out Your Water System
This is our preferred method of winterizing our RV’s water system. We use a small compressor and a little adapter found at your local hardware store. Follow these simple steps to blow the residual water out of your system.
- Disconnect the water line between the pump and the rest of the RV, i.e. the pump outlet
- Open all faucets and taps in the RV, if you don’t water will spew back out at you from the open line in front of your face.
- Put the compressor adapter in the waterline and apply air pressure
- Continue until no water sprays out of the taps. Have a buddy hold open the toilet valve as well, you should be able to only partially depress it so you are letting water in but not opening black water valve.
At this point, there should be no water left in the system and your RV should be safe no matter how cold it gets.
Cover Up Your RV
Arguably the single most important accessory, that should ideally come with your RV, is the cover! You need to cover up your RV for a number of reasons especially if you are going to store it outside.
No matter how well you follow all the steps above, clean the inside and outside of your vehicle, apply wax, and hoist your RV up, nothing can prepare it for the environment it’s in except a nice quality cover.

Why You Need an RV Cover
There are many positives to owning an RV cover and protecting your rig:
- Extreme weather conditions like snow, hail, and blazing heat from the sun will slowly but surely damage your vehicle.
- You can expect anything from paint chipping and cracking, to tires losing pressure, your dashboard changing color, and overall decay.
- During the winter months, a lot of snow is likely going to accumulate on the roof of your RV. With a cover on it will be easy to clean.
- They are great against damage from wind, bird droppings which can corrode into the paint and stay there forever, and tree sap which is another nightmare altogether.
- Covers are excellent ways to shield your RV from UV rays and water from seeping through. Especially since you should keep your roof ventilation slightly open to allow for air-flow, you need a heavy-duty waterproof and UV reflecting or at least blocking cover.
There are a few downside to RV covers though too:
- Can be awkward and difficult to put in place
- A poorly fitting cover can scratch up your RV
How to Maintain Your RV Cover
Your cover and your covered RV will require some maintenance throughout the off season.
- Like you would shovel snow off the front of your garage, you should also jump up on top of that vehicle you love so much and get shoveling! Of course, make sure you are safe up there. High quality covers will be less likely to freeze and cause a slippery situation.
- If the temperature doesn’t go below freezing, you can hose down your cover while it’s still strapped on the vehicle to get rid of any droppings and sand.
- Remember to wash and dry your cover before placing it on your RV and before storing it when not in use.
What if You Don’t Have a Cover?
Unfortunately, most RV’s do not come with a cover. You can find them easily enough at Camping World or Amazon but they do get expensive. But it is a good investment to protect your big investment in an RV.
Avoid using standard tents or tarps. These are ineffective and will often do more bad than good. Plastic tarps will trap moisture in-between your RV and the cover, causing leakage and decay.
If you don’t have a cover and you live in a dry, warm area, then the least you can do is cover your tires after you hoist the RV up and get special windshield covers to protect your dashboard. As I mentioned above I have an article dedicated to Why You Should Cover Your RV Tires .
Pro Tip: When shopping for covers, look for something with tight straps that will keep your RV in place and something that is breathable.
I hope this guide has helped you navigate the best practices for storing your RV outside. Each step in the process is crucial to maintaining your vehicle in good shape. So, avoid costly repairs, clean up jobs, and easily avoidable maintenance jobs by creating a storage checklist and following it to a T.
Diane is a lover of all things travel. She and her young family wanted to explore North America from the comfort of their own home so they bought an RV. After fully rehabbing a 1994 Safari Trek, they set out to explore both Canada and the USA.
Recent Posts
Why You Need to Disconnect Your RV Battery When Not In Use
It's always fun to get the RV ready for another adventure after it's been in storage but what isn't fun is finding out your house batteries are dead. Without your house batteries, most of the...
Best Campgrounds in Yellowstone National Park for RVs
Yellowstone National Park is one of those places that should be on your bucket list. And one of the best ways to get there and enjoy the park is in your RV. Whether you are looking for a full...

- Books & Merch
- Gear We Use
- National & State Parks
- Best RV Campgrounds in New Hampshire
- Best RV Campgrounds in NC Mountains
- Best Florida Beach RV Campgrounds
- South Dakota
- The Great Lakes
- Campers Swear By This Portable Device That Keeps Dogs Safe -The Best Portable Dog Fence for Camping (2024)
- Mosquitos and bugs
- Camping Clothes
- Camping Gifts
- Camping Internet
- 5 Best RV Backup Cameras for RV & Trailer
- 7 Best Screen Tents for Camping (2024)
- Best RV Campgrounds in California
- 5 Best Key West RV Parks
- 9 Best RV Campgrounds in New Jersey
- Camping Reservations
- Campground Comparisons
- Cheap or FREE RV Camping Sites
- Best RV Campground Memberships & Clubs
- Boondocking 101
- Boondocking Adventures
- RV Internet
- What Do Flamingos and Upside Down Pineapples Mean?
- Where to Find FREE or Cheap RV Sites Camping
- RV Winter Camping
- RV Show List for 2024
- 17 Best Camper Vans 2024 (New Class B RVs Available!)
Organizing your RV Exterior Storage
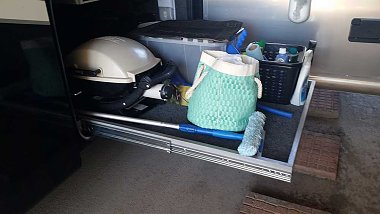
Roadtreks are blessed with lots of storage, but unless you keep it organized there will never be enough space. The older Roadtreks have one or more compartments with a fiberglass door and a rubber hinge. By the way – keep an eye on that hinge. They will eventually fail, and it is best to have a spare on hand. They are pop-riveted in place so you may want to have a body shop install it, but if you have the hinge already it will make life easier. They are very expensive to order through dealers, but you can buy it for less from Moore Industrial Hardware. (click for link).

Your RV exterior storage compartment(s) may be different, but if you can organize them well, you will be able to set and break camp efficiently and will not have trouble finding what you need when it is cold or raining.
Published on 2013-12-26
Mike Wendland is a multiple Emmy-award-winning Journalist, Podcaster, YouTuber, and Blogger, who has traveled with his wife, Jennifer, all over North America in an RV, sharing adventures and reviewing RV, Camping, Outdoor, Travel and Tech Gear for the past 12 years. They are leading industry experts in RV living and have written 18 travel books.
7 Responses to “Organizing your RV Exterior Storage”
September 26, 2014at1:07 am , Betty Travis Thomas said:
What would an RVer do without plastic bins and milk carton bins!!??
September 25, 2014at11:54 am , Jennifer Sexton said:
Jason Sexton
July 13, 2014at9:37 am , Mary Snook said:
I bought those bags he mentioned and love them. I found one that has two zippers. We have our jumper cable on one side and the other has elastic to hold tools.
July 13, 2014at7:05 am , Susan Watt said:
This looks great. Love the ideas! Where do you store your dump hose and your tools?
July 14, 2014at12:25 pm , Lynn said:
Susan – On a pre-macerator Roadtrek the dump hose is stored in a tube, you just pull it out. It is already connected at the far end. It makes dumping very easy and there is no separate hose to store. We store the tools in a inside compartment just inside the rear door. We have a few commonly used tools in a small Eagle Creek bag that fits on the shelf above the driver’s door. We have multiple of these bags that store everything from electronics stuff to batteries to first aid items. And they all have labels.
January 26, 2014at10:41 pm , Paul Konowalchuk Pogorzelski said:
We had a Coleman pop-up with a slide out dining area and a huge, deep stowage trunk in the front. Accessible from outside & inside too. One could fit a couple Canadians in there LOL
January 26, 2014at2:47 pm , Robert Brooks said:
Popup camper has a 10″ x 14″ storage accessible from inside/outside. Otherwise storage must be attached to rear or tongue and that is very little.
Comments are closed.
Related Posts

7 Simple Tips To Keep Mosquitoes Away From Your Camp

Starlink Internet for RVers: My Install

Are YOU a NERVOUS RVer? Drive with Confidence: 7 RV Driving Tips
15 Best Camping Storage Boxes & Bins for Organizing Your Gear
Bring some order to the chaos of backseats and closets stuffed with camping and outdoor gear with these rugged, utilitarian storage bins

Photo courtesy Gregory

Field Mag may receive a minor commission from purchases made via affiliate links.
Staying practiced in a spectrum of outdoor pursuits requires two things: time and the gear to get it done. As urban dwellers with finite storage space, keeping track of all our crap gear investments can be quite a task. (Yes, I'm guilty of storing endless tote bags and backpacks in empty duffels, next to my climbing shoes and hiking boots .) It can be a real challenge to remember where that one piece of gear is hiding without a very dialed system. Good news is, camping storage bins is a fast growing category for a surprising number of outdoor goods manufacturers.
More organized outdoor people have long relied on bulky, plastic, clear storage bins to haul their gear from the basement or closet to the trailhead and campsite. Now, brands from the outdoor industry have worked up no shortage of impressive storage options designed explicitly for storing camp/climb/ski/etc gear at home, hauling equipment in your car camping vehicle of choice, AND to the campsite or crag. Whether you live in the exurbs, the city, or a van, these camping storage boxes, bins, and containers will help make your life easier in more ways than you might imagine. And yes, I have personally replaced a few overloaded Ikea totes with some bins from this list, so consider the following editor tested and approved.
Below I'll breakdown the ins and outs of what we look for when qualifying the "best bins". Read on, take some notes, then embrace a more organized life (perhaps give your gear closet a proper KonMari while you're at it).
What to Look for in a Gear Storage Container?
It might seem like an obvious overstatement, but size is probably the first thing to consider. For example, a huge 100+ liter bin might sound nice but think about lugging that thing up and down from a second-story walkup. Or even off a high storage shelf. Instead, two individual 50-liter containers would allow for easier quick access and extended backseat Tetris-ing, with the added benefit of keeping your camp kitchen and cookware separate from grosser outdoor gear.
Construction & Material
Some of these gear storage containers use flexible materials (Cordura, nylon) mated to a frame, which is collapsible when empty to save space. The more bombproof gear containers mold themselves in hard plastic, tested to handle significant, repeated drops through a lifetime of service. Which is the best if of course a question of preference (personally, I dig the flexible options.)
Weatherproofing
Similar to the material selection, it's obvious that heavy-duty, rigid containers for outdoor gear are made to keep the weather out as long as their closures are well-considered. But don’t overlook the soft-sided bins that use welded seams and waterproof materials to keep your gear bone dry, too. Last thing you want is a soggy sleeping bag!
Top Picks for the Best Gear Bins:
Yeti loadout gobox 60 gear case, rux 70l clear, gregory alpaca gear box 45, snow peak stacking shelf container 50, front runner wolf pack pro, roam 86l rugged case, the north face base camp gear box, yakima mod homebase, dometic go hard storage 50l, plano 108 qt sportsman trunk, radius outfitters gear box 3000, pelican case sm trunk.
- Sidio SidioCrate Full Size
REI Co-op Trailgate Gear Bin
Rubbermaid action packer 48 gallon, the 15 best camping & outdoor gear storage containers of 2024.

Pros: Rugged and submersible, ideal for watercraft use Cons: Pros come at the cost of some bulkiness Volume: 60 liters Weight: 17.2 pounds Price: $300
It makes all too much sense that Yeti would offer an uninsulated version of their popular hard cooler to use as a camping storage box. And while many brands choose to sell a host of accessories separately, Yeti kindly includes an inner lid organizer, drop-in trunk organizer, and vertical divider. The GoBox lacks the bear-proof honor of its coolers but happily keeps out dust and weather. Just don’t get it mixed up with your actual cooler, or you’ll be sipping warm beer all weekend. Available in a 15 liter, 30 liter, and 60 liter sizes for your various needs, plus a pleasing limited edition Camp Green color.
SHOP FROM YETI

Pros: Clear exterior, high volume and low weight Cons: Expensive, single-size option
Volume: 70 liters Weight: 5.3 pounds Price: $298
The Rux 70L gear hauler pairs a strong, flexible TPU-coated nylon with a composite nylon frame, making it both lightweight, waterproof, and capable of being packed flat when empty. Campers can easily access items from inside with the lid removed or by flipping up one of the foldable portions; we really love this new clear version of the Rux bag for its ease of gear-rummaging. An ecosystem of components makes this container one of the most modular systems we’ve seen yet.
SHOP FROM RUX

Pros: Affordable and clean design, accepts add-on organizers Cons: Thin plastic latches may be less-durable, but they’re backed by a lifetime warranty Volume: 45 liters Weight: 6.1 pounds Price: $60
Backpacking innovators brought some innovative designs to help hikers carry their gear into the backcountry, and now they’re helping us keep things clean and tidy at home or in the car trunk. The impact-resistant polycarbonate body supports up to 50 pounds of weight while a clear lid gives you a quick look at its contents. Unlatch the lid from either side of the box and slide in a few optional Gear Pods for further compartmentalization of camera gear or your coffee kit .
Shop from Gregory

Pros: Great design, doubles as home decor Cons: Heavy, open-top design does not secure gear Volume: 50 liters Weight: 12.1 pounds Price: $170
We’ll typically gravitate towards a closed-top storage bin, but sometimes the ability to overload a lid-free bin is useful for items like firewood or stacks of camp blankets. This stainless steel bin from the high-design-minded folks at Snow Peak stacks neatly in its normal configuration and also when the hinged points are flexed open wide. For an at-home outdoor aesthetic, stack together a couple of the 25 liter models in your mudroom or utility space.
SHOP FROM SNOW PEAK

Pros: Stackable with very secure closure design Cons: Internal dividers sold separately beginning at $45 Volume: 30 liters Weight: 8.1 pounds Price: $80
Front Runner specializes in gear for to outfit the overlanding adventurer with everything from rooftop tents and car awnings to these sturdy plastic storage bins in its catalog. Saving valuable interior space, the Wolf Pack Pro boxes are intended to live on roof racks , secured by heavy-duty latches while highly resistant to dust and water. Save yourself a little cash by ordering them in pairs or quads and fully organize your gear with compartmentalized perfection.
SHOP FROM FRONTRUNNER

Pros: Lightweight and packs flat when empty Cons: Soft exterior means it's more suitable for soft gear Volume: 86 liters Weight: 5.5 pounds Price: $175
The mountain gear geniuses at The North Face put forth a design that combines heavy-duty fabric with an internal frame, providing substantial storage volumes at a fraction of the weight other hard body cases often come with. The small tote style box might not be the best choice for scenarios where a heavy-duty submersible box is king, but the stackable medium and large gear box and will suffice for organizing car camping trips.
SHOP FROM BACKCOUNTRY

Pros: Rugged and modular system that accepts a number of add-ons Cons: Pricey, maybe only accessible to the more affluent carcampers and vanlifers Volume: 99 liters Weight: 55 pounds Price: $949
Auto cargo specialists Yakima have dreamed up a high-end trunk organizer befitting of a fresh-off-the-lot AWD adventuremobile. Once affixed to your cargo area via integrated lash straps, the heavy-duty base’s slide-out drawer provides easy access to gear once optional rigid Topper bins, semi-rigid GearCrates, or open GearTotes are added on. A bit overkill for the average car camper, but certainly the dream kit for a hyper-organized owner of a rig like a Wilderness Edition Subaru. Available in small, medium, and large base sizes.
Shop from Yakima

Pros: Very rugged, nice color options Cons: Heavyweight design may be overdoing it for many users Volume: 86 liters Weight: 21 pounds Price: $309
The overland accessory brand ROAM Adventure Co offers several sizes of their Rugged Cases, starting at 55 liters and up to a ginormous 160-liter gear trunk. Each of the six volumes of LDPE (low-density polyethylene) containers comes in four colors to choose from, with interlocking contours that inhibit stackability between all sizes. With the higher price tag also comes a complete list of features: rope and rubber handles, dustproof and weathertight gaskets, and locking steel latches. For further organization, add a MOLLE panel or a lid organizer to the inside of the case’s lid.
SHOP FROM ROAM

Pros: Clean design, compatible with useful bins Cons: Heavy carry weight in smaller volume sizes Volume: 50 liters Weight: 13 pounds Price: $150
Travel refrigeration turned general camp equipment brand Dometic now makes camping gear storage bins that give serious toaster vibes (in a good way) with clean, brushed aluminum sides. The midsize locker sports a hinged lid that accesses the dustproof and waterproof interior, capable of nesting smaller 10-liter and 20liter Soft Storage bins ($109-149). High-impact-resistant polymer tops and bottoms protect your stuff with interlocking stackability should you end up with a few of these in your trunk or pick up bed with some tie down straps.
SHOP FROM DOMETIC

Pros: Super affordable, straight-forward design Cons: Flimsier than others, may not survive hard use Volume: 102 liters Weight: 7.7 pounds Price: $45
This high-impact plastic storage trunk takes the cake on the biggest bang for your buck, offering the highest volume-to-dollar ratio out of our entire list. Given the low weight of the high-volume trunk, it’s probably safe to assume it lacks the long-term durability that other options provide. If throw-it-off-a-cliff ruggedness isn’t your top concern, then this budget bin still offers several attractive features: a pair of integrated rolling wheels, molded grooves for stacking, port for a padlock, and a removable lid.
SHOP FROM AMAZON

Pros: High quality materials, flat-pack design Cons: High dollar-to-liter ratio Volume: 30 liters Weight: 9 pounds Price: $239
Specializing in accessory gear for all types of overland vehicles and vanlife-type-rigs, this box from California-based brand Radius Outfitters spares no expense to deliver a rugged gear box that disassembles for flat-pack storage when it’s not needed. Padded panels keeps camera and other small, expensive pieces of gear from bumping around too heavily when the fireroad gives way to washboard gravel. Also available in larger 3500 and 5500 sizes and with additional internal dividers. For the dedicated remote working-from-van folks, Radius even has a Starlink Storage Case designed with custom foam inserts for this sci-fi hardware.
Shop From Radius Outfitters

Pros: Robust design will withstand hard use Cons: A pricier option that will be of less value to many Volume: 80 liters Weight: 19.3 pounds Price: $320
Trusted by photographers , videograpers, and travelers of all sorts with very expensive gear; Pelican cases are the very definition of bomber. The storage experts’ lineup now includes a full suite of cargo cases and boxes explicitly designed for rugged terrain and harsh weather while fastened to the roof racks and truck beds of macho overland vehicles. From steel latches to the mounting hardware, every inch of the roto-molded case has been designed to go far without restraint.

Pros: Lightweight and impact-resistant Cons: Design is less visually appealing than other options Volume: 181.7 liters Weight: 20.7 pounds Price: $150
It’s not your regular Rubbermaid bin; it’s the Rubbermaid bin you grab when you need to pack for action: car camping trips, kayak outings, and all that good stuff we’re all about. The durable plastic storage bin features a removable, lockable lid for easy gear access. For dry food storage or organizing groups, camp essentials , its smaller 8-gallon storage organizer counterpart.
SHOP from Amazon

Pros: Simple and flat-packing design Cons: Light structure less ideal for heavier items Volume: 140 liters Weight: 3.7 pounds Price: $139
The OG outdoor recreation outfitters storage solution takes the concept of a packing cube and ups the scale to 100-liter ($109) and 140-liter ($139) storage bins for camping gear. The featherlight bins use strong 300 and 1,680-denier polyester (super heavy duty) with a water-resistant DWR treatment and foam panels to give it some structure. When unloaded, the large-format bins fold for easy storage in the back of your closet.
SHOP From REI

Sidio SidioCrate 2.0
Pros: Simple and modular design, made in USA Cons: Minimal functionality without add-ons, only two sizes Volume: 33.3 liters Weight: 5.5 pounds Price: $34
Milk crates are the storage bins of the people, and storage brand Sidio took on the task of reinventing them from the ground up as a hyper-modular storage system for anyone and everyone. Available in Full ($34) and Half ($24) sizes, the made-in-USA crates fit an entire array of add ons: handles, lids, dividers, and even casters to push around a neat, colorful stack of the camping storage containers. Instead of using virgin polypropylene, Sidio uses 100% recycled post-consumer plastic to mold its crates and add-ons.
Wondering what to put in these bins? Check out our rundown of car camping essentials .
Published 08-24-2022
Updated 05-01-2024

Ultrarunner Kílian Jornet's latest pursuit is to upend the footwear world by making super-durable trail running shoes
A quick and dirty guide to keeping you and the environment clean with 9 biodegradable soaps, tested and approved
A footwear collab woven by an unlikely pair of brands held dear to Field Mag’s dual outdoorsy and urban hearts

Tested and approved, these environmentally friendly sunscreens will protect your skin and the environment, all year long

From Central Park classics to Brooklyn climbing gyms (and the Gunks), we break down all you need to know about climbing in America’s largest city

Hands-on with the all-new St. Elias hiking boot, a sleek modern update with a nod to the heritage hikers the Minnesota-brand built its reputation upon
- You are here:
- Home »
- Blog »
- » RV Pass-Through Storage Organization Ideas (DIY Tray + Tips)
")
RV Pass-Through Storage Organization Ideas (DIY Tray + Tips)
- March 12, 2022 /
- RVing 101 /
- By James V.
Thinking outside the box. This is a standard term used to describe driving creativity. When it comes to your pass-through storage area you may have to think outside the box to maximize the available but limited space. There are many ideas to adapt or use when you think about it.
One option you can try is to use tote boxes. Those plastic boxes are easy to open and very easy to label. You can use the lids to store lawn chairs, hoses, and cables if you want. Plus, you can construct some PVC piping for added storage items that won’t fit in those totes.
To learn more about this clever use of the pass-through storage space, just continue to read our article. It has some great ideas on how you can utilize this space and carry more things with you. Take a few minutes to see which of these ideas will help you out the best.
What is RV Pass-Through Storage?

This is found underneath your RV and it is that storage bin that goes from one side of the trailer or vehicle to the other side unhindered. There are no walls or other obstructions in the way and your items can be shifted with relative ease.
There are some benefits to this storage spot and maximizing its usefulness. Here are just a few of those benefits:
1. A clear area to store things that are not needed but need easy access to when they are needed. You have room to maneuver those totes or other items you create to hold your things without worrying about banging something. like your arm.
2. Capable of storing longer items. With no walls in the way, you can store those 6 to 8 foot long poles or other devices that won’t fit anywhere else. For example, your oars for your kayak or canoe can be stored in this area.
3. Consistent access to your things. When you are in a tight spot at least one side of the storage compartment should open wide enough to let you inside and get your things out. You may have to dig through some things but it is better than starting the RV and pulling out a few feet then having to back the vehicle back in again.
What Can Be Stored in These Pass-Through Storage Areas

There are a lot of odd-shaped items that you can place in this handy little spot. We mentioned oars earlier but you can also place tiki lamps, fishing rods, long ice chests. short ladders, step stools, long barbecues, and many more items you may have on hand.
There are lots of creative ideas, coming up, that will help you organize the space so you can get more things in and not make it difficult to get them out again. The key is to use some common sense as a 10-foot ladder will not fit in an 8-foot space.
You do not want to cram things inside as that will make it a little risky when you need to retrieve an item or you may break the item if it is not stored correctly. When you look at the space, you will see that you have a lot of volume to use.
There will be length times width times height so make use of that space and make life a little easier for yourself and your spouse. When it comes to RVs and trailers, you do not have a lot of storage space. It is best to be creative and design your storage areas so that they work for you and your things.
How To Organize RV Pass-Through Storage
There are some people who are just not organized. You have seen their office desks, their rooms, or home and everything is just piled wherever there was a spot. This should not be the way you treat your pass-through storage space. If you do you won’t get much inside.
Here are some ways to organize your limited area and make it work for you:
1. Totes with wheels- these are made of plastic, are strong, and can hold a lot of items. They also come in different sizes so you can pack specific things in large or small totes or bins.
The wheels just make it easier to get the bin from its spot to where you need it to go so you can look through it. Label the bins or totes with the contents making it easier and quicker to find what you are looking for.
Place the labels where they can be read easily. Also, make sure those labels do not come off unless you take them off.
2. Use coat hooks- these little items will help you make use of the wall space inside this storage area. They are good for hanging up clothing you do not need or you can place them at intervals and use them to hold longer items.
Plus, you can use these coat hooks to hold ropes or cables or even bungee cords when you need your items to remain still when you are traveling.
3. Drawer organizers will work- they help you partition little areas so you can store little items inside that storage area. Keeping everything organized is the best way to use the limited space and make sure every item inside is safe.
These drawer organizers will work inside the RV or trailer as well making full use of the limited storage space you have in that part of your RV, etc.
4. Wire shelving can come in handy- these can be attached to the walls of the storage area and make use of the upper portion of that pass-through storage space. Making full use of all the space you have is very smart RVing.
These shelves can hold the drawer organizers as well making sure your smaller items are protected from bumps and heavier objects.
5. Try curtain rods- they may not go lengthwise but you can use a series of them width-wise to hold clothing, blankets, and other softer objects. There are unique design ideas where you may be able to make these rods movable so you can get better access to those clothing items inside the storage area.
Travel Trailer Pass-Through Storage Ideas

There are different ideas you can consider when you are contemplating using this space in the best way possible. Here are some ideas to help your creativity and get you thinking outside the box:
1. Peg board- this is a very good idea when you want to utilize your wall space and the upper portions of the area. Attach the peg board next to the wall and place hooks in them to hold different items like fishing rods, oars, skis, and so on.
There are many different methods to use to place the peg boards inside this area and you can even place them on wheels to have them slide out for better access.
2. Net organizers- this is a handy option when you have owners manuals, and other light items that need to be found easily but also need to be kept out of the way.
They attach to the roof of your storage area via sticky tape and stay out of your way. You are not losing much headroom unless you pack a lot of items inside the netting.
These net organizers should come in different sizes so you can store larger light items and keep them out of the way of the heavier objects down below.
3. Hollow pipes- these can attach to the sides or even the roof of your pass-through storage area. They can hold items like sewer pipes, water hoses, and other needed equipment that are too big for other storage bins.
They can be attached by screws or tape depending on your preference and they also utilize upper space or they can go behind beg board frames to use that area as well.
4 . Wood dowels- like the curtain rod idea, you can use these to go across the width of your storage space and give you more room. The good thing about these wood dowels is that they come in different thicknesses and can be cut to size.
The drawback to this idea would that you would have to cut wood holders to place these dowels in. But you can paint or stain them to make the pass-through storage area look better. Steel rings can go over the dowels or the curtain rods to help hold individual items.
5. Shoe holders- when you and your family own lots of shoes, you can attach longer shoe holders to the walls of this space and place those extra unused shoes out of the way until they are needed.
These are cheap and easy to attach plus you can get a lot of shoes out of your upstairs closets, giving you more storage space in your living area.
6. Hanging baskets- another good idea that can use the space above those plastic totes. You just need to securely attach a nice metal rod against the wall or walls of your storage area and then hang the metal baskets on those rods.
This will give you an area to use those drawer organizers and elevate items you do not want to be broken. Then for smaller items like screws, thread, needles, etc., you can buy plastic organizers and place them inside those shelves.
These ideas should get you started on how to design your pass-through storage area and make sure your things are well organized and safe.
How do You Keep Things From Falling in An RV?

When you use the rod and basket idea, the key to keep items inside from falling is to not over pack them. Keep everything beneath the rim of the fence so that nothing can fall out accidentally.
With totes, you can place the wheels in such a position that they will not move until you move them. A little piece of wood on each side of the storage space will do the trick. This lip should prevent the wheels from turning and keep those totes in place.
As for the peg board and rods, the hooks will do that task for you but you can also use a mesh fence to hold them in place. Just string it up from end to end and make it tight so nothing moves.
Cargo bars will also help you secure your items. You won't lose too much storage space but at least your items will not move. And when you couple them with a cargo net, you have a very secure system in place.
DIY RV Pass Through Storage Tray

This is also a very good idea. These slide out storage trays do come in different sizes so you can design that pass-through area the way you want it to be and make the trays light enough to pull out.
While these trays can cost over $1000 for the commercially sold models, you can make your own at a fraction of the cost and design it with compartments for better storage facilities.
It just takes a little handyman skill, the right tools, and the right materials. Plus, you can make it fit exactly the dimensions your pass-through storage area contains. You can be creative too as you can use peg board and these slide outs at the same time.
Some Final Words
To maximize this storage area, all it takes is a little ingenuity, a little creativity and a little thinking outside the box. With the right help, you can create a great storage area that will hold all your odd-shaped items.
The key is to make sure you pick the storage idea that fits the items you want to place inside that area.
Related Posts
Does CarMax Buy RVs? (CarMax RV Trade-In Guide)
300 Lbs Over Payload: What Happens If I Exceed My Payload?
Thor Vegas Problems (Windshield, Battery, Fridge, Swivel Chair)
Leave a Comment:
- Search Please fill out this field.
- Manage Your Subscription
- Give a Gift Subscription
- Newsletters
- Sweepstakes
We independently evaluate all recommended products and services. If you click on links we provide, we may receive compensation. Learn more .
- Travel Products
- Activity + Adventure
- Camping + Hiking
The Best Camping Gear Storage for Your Next Outdoor Adventure
Keep your camping essentials organized and secure — at home and in the wild — with these storage essentials.
:max_bytes(150000):strip_icc():format(webp)/Kevin-Brouillard-Bio-Photo-e1e6e2d6ae6b4bdfa33d8b1b82bd2921.jpeg "travel trailer outside storage bins")
In This Article
- Our Top Picks
- Tips for Buying
Frequently Asked Questions
- Why Trust T+L
Travel + Leisure / Alli Waataja
Whether spending time with family and friends, unplugging from technology, or exploring new terrain, camping creates many rich experiences and lasting memories. With this quality time and adventure comes the logistics of packing gear, setting up camping, and unpacking at home. While these steps may not be the highlight of a trip into the great outdoors, they can make a huge difference in keeping campers happy.
Fortunately, there’s plenty of storage options to accommodate different types of camping gear and equipment, as well as space limitations, camping styles, and budgets. Besides organization, first-rate storage also keeps camping provisions and gear safe from critters and the elements.
Best Overall
Yeti loadout gobox 60 gear case.
This burly, stackable gear box includes thoughtful interior organization and a durable closure system.
The weatherproof protection and security comes at the cost of a heavier design that doesn’t compress or pack down.
The Yeti LoadOut GoBox 60 Gear Case is our top pick for keeping gear protected and organized on a camping adventure . Well-known for its highly insulated coolers, Yeti brings quality construction and intuitive design to the GoBox series, too. The exterior is dustproof and fully submersible, as evidenced by IP65 and IP67 ratings, so there’s no concern about leaving it outside during heavy rain or traveling with it by canoe or boat. The interior has 60 liters of storage space, which can be configured with up to three Yeti caddy trays (two come included) and two dividers (also included). Alternatively, these can all be removed to fit larger items and take advantage of the expansive interior. The closure system consists of Yeti’s NeverFail hinge system, LipGrip handles, lockdown latches, and AnchorPoint tie-down slots. It’s built to be stackable with other Yeti gear boxes, helping save storage space at home. It can hold either three LoadOut GoBox 15s or one GoBox 15 and one GoBox 30 .
The Details: 17.2 pounds| 30 x 14.8 x 13.4 inches | 60 liters | TPO/PP/EPDM, rubber/aluminum
Best Lightweight
The north face base camp gear box.
The North Face
It combines the portability of a duffel bag with the organization and durability of a gear box.
The shoulder strap could have more padding for carrying comfort.
In the world of gear boxes and cases, the North Face Base Camp Gear Box clocks in much lighter than the bulk of the competition. Weighing 4.1 pounds, it delivers a solid capacity of 65 liters and includes a folding metal frame, plentiful pockets, a carry strap, and duffel handles. The exterior is made with TPU-coated recycled polyester that’s water repellent and tough enough for rocky and rugged terrain. The spacious main compartment of the Base Camp Gear Box can accommodate larger gear, like camp stoves . Meanwhile, there are four internal mesh pockets and a zip pocket on the lid for safely storing valuables and smaller items. A series of daisy chains provide attachment points for additional gear. After unpacking, simply lift the internal metal kickstands to store the gear box flat.
The Details: 4.1 pounds | 16 x 22.2 x 12 inches | 65 liters | 300D recycled polyester with TPU coating
Best Organization
Radius outfitters gear box 3500.
This portable and stylish gear box is packed with pockets and adjustable dividers for a customizable storage solution.
Its capacity is intended for organizing smaller gear and camping provisions.
The Radius Outfitters Gear Box 3500 empowers campers to devise a storage system that best suits their needs. It comes with six moveable, velcro dividers, allowing the 35-liter gear box to be set up in numerous configurations. Using all the dividers can come in handy for storing smaller items like batteries and headlamps, or it may make sense to pull some out for larger equipment. There are also expandable pockets on the side of the box for stashing items you’ll frequently use like, multitools and lighters. Velcro strips are also used on the bottom of the Gear Box 3500 to stop it from sliding on the floor of the car. The removable lid is equipped with both velcro and a magnetic latch for quick and easy access. Leather handles enhance the rugged outdoor aesthetic while providing a comfortable grip for carrying. When not in use, the gear box can be quickly disassembled and packed flat.
The Details: 10 pounds | 25.3 x 16.8 x 7.4 inches | 35 liters | 1680-denier Cordura (main body), leather, nylon, and polyester
Most Durable
Pelican bx80 cargo case.
The steel latches and tough exterior keep gear secure and protected from the elements.
It’s not the lightest gear box and there’s no wheels for smoother transport.
The Pelican BX80 Cargo Case is designed for rugged overland adventures. The outside’s roto-molded construction and gasketed lid shield gear from moisture, UV rays, and winds up to 70 miles per hour. It’s equipped with mounting hardware and tie-down plates to fasten it to a truck bed or roof rack. The BX80 Cargo Case is secured shut via two steel latches, which are both padlock compatible. Though hefty, the 80-liter case has military-grade handles that lock out at 90 degrees for a firm grip while lifting from car to campsite.
The Details: 19.3 pounds | 25 x 16 x 17.3 inches | 80 liters | Roto-molded synthetic
Best Budget
Kelty car-go-box.
Backcountry
This lightweight and durable storage box offers intuitive, color-coded organization at a value.
It’s primarily designed for car camping, unless transferring the storage pods into a backpack.
With the Kelty Car-Go-Box, long gone are the days of haphazardly loading the trunk with camp gear and hoping for the best. The storage box comes with three color-coded pods of equal size, making it easy to separate kitchenware from clothing, snacks from toiletries, or any combination of things. Once packed, adjustable straps can be assembled to hold the pods in place or function as carry straps. The outer case of the Car-Go-Box is made with rugged 600D polyester that’ll last for years of adventures. All three storage pods and the case are collapsible, helping save space when tucked away in the trunk, garage, or closet between uses.
The Details: 5.1 pounds | 12 x 12 x 19.5 inches | 46.5 liters | 600D polyester
Omnicore Designs 110L Poly Mesh Storage Sack
It helps extend the life of your sleeping bag.
It doesn’t provide sufficient compression for packing gear on a trip.
While compression sacks save precious space on the road or trail, they’re not always the best solution for storing gear at home. The Omnicore Designs Poly Mesh Storage Sack strikes the ideal balance of keeping a sleeping bag contained while allowing it to breathe and unfurl. Keeping down sleeping bags in a compression sack for an extended period reduces their loft, which refers to the volume of the down. This is a problem because the more compact the down, the less able it is to trap air and insulate. With 110 liters of capacity, the Mesh Storage Sack has plenty of room and ventilation for stowing sleeping bags between trips. The drawcord closure is a breeze to use and the reinforced bottom helps keep dust and debris out.
The Details: 1.6 ounces | 32 x 16.5 inches | 110 liters | Polyester
Cotopaxi Allpa 60L Gear Hauler Tote
This durable, eco-friendly bag offers organization and convenience with its handy pockets and versatile carry options.
Its water-resistant construction can withstand some moisture, but it’s not waterproof.
The Cotopaxi Allpa 60L Gear Hauler Tote stands out from the competition for its ease of use and unique, vibrant color scheme. The bag has two sets of straps and grab handles, giving campers the choice of carrying over the shoulder or by hand. Its spacious main compartment is ideal for stowing larger gear and apparel, while the exterior zip and interior mesh pockets help separate valuables and essential items. All this adds up to 60 liters of storage capacity — a lot given the bag’s weight of just 1.5 pounds. The Allpa Gear Hauler also features sustainable materials: the nylon shell and polyester liner are both made with 100 percent recycled fabrics sourced from pre-consumer waste.
The Details: 1.5 pounds | 20 x 14 x 14 inches | 60 liters | 100 percent repurposed nylon and polyester
Best Label Maker
Brother p-touch cube.
It’s a compact, easy-to-use device for staying on top of your gear and equipment organization.
The minimalist design doesn’t include an automatic tape cutter.
The Brother P-touch Cube takes the hassle out of tracking camping gear across multiple storage bins and cases. The space-conscious label maker connects via Bluetooth to your smartphone or tablet to print long-lasting labels for your camping essentials. It uses the free Design&Print 2 app, which includes a wide selection of pre-designed templates, fonts, and frames for personalizing labels. The P-touch Cube can be powered by AA batteries or AC adapter cord, which comes included.
The Details: 12.8 ounces | 4.6 x 2.5 x 4.6 inches
Best Collapsible
This all-in-one storage system offers versatile carry options and a collapsible design.
The sophistication and weatherproofing may not be worth the cost for RV and car campers.
The RUX 70L Gear System can be adapted to suit almost any camping adventure. It’s equipped with grab handles, a shoulder strap, and backpack straps for easy and convenient transport to wherever you’re setting up camp . There are multiple lash points to attach other gear and a set of integrated utility rails to anchor the RUX 70L to your vehicle. Packing and unpacking is a breeze thanks to the wide opening, spacious interior, and rigid sides. When it’s free of gear, the RUX 70L collapses down with the help of compression straps to neatly fit in your tent, garage, or closet. It also delivers reliable protection from abrasion and the elements. The waterproof fabric and bungee lid trap out moisture while the reinforced floor adds puncture resistance.
The Details: 5.3 pounds | 19.5 x 15.7 x 13.8 inches | 70 liters | TPU-coated 840-denier nylon
Best Compression
Sea to summit evac compression dry bag.
The straps and closure system make it easy to pack down gear, plus it delivers waterproof protection.
There’s a handle for carrying, but it’s not ideal for transporting long distances.
The Sea to Summit eVac Compression Dry Bag is a user-friendly option for compact gear storage. It’s equipped with four straps comprising two ladder lock and two side-release buckles to secure a snug and even compression. The roll-top closure is ideal for easy packing and unpacking, as well as sealing out moisture. For additional protection, the Dry Bag is coated with waterproof polyurethane and its seams are double-stitched and tape-sealed. Sea to Summit’s eVent fabric allows air to flow out of the bag during compression without the use of the valve or letting water enter through. It’s fitted with a sturdy nylon for easy handling from the car to canoe or campsite. Outdoor enthusiasts will appreciate that the nylon used is bluesign-approved, meaning the manufacturing meets strict environmental and safety requirements.
The Details: .4 pounds | 22 x 12.6 x 11.5 inches | 35 liters | Nylon
Best Lockable
Plano sportsman's trunk large.
It’s tough, spacious, and includes padlock-compatible latches.
The utilitarian case doesn’t include interior organization.
The Plano Sportsman Trunk delivers a durable and budget-friendly solution for stashing gear and equipment. The exterior employs high-impact plastic and a reinforced lid that’s sufficiently sturdy for sitting on or stacking other gear and equipment. The interior offers an impressive capacity of 102 liters, all of which is completely open, making it a good choice for larger gear like camp stoves or tents. The trunk lid closes via two hatches that can be padlocked for added security. Though sizable, the trunk has integrated wheels and recessed handles to help transport, even when fully loaded.
The Details: 6 pounds | 30 x 14.3 x 12.8 inches | 102 liters | Plastic
Best Dry Bag
Sea to summit dry bag.
It delivers reliable protection from the elements and a lightweight, portable design.
There are multiple places to attach a carry strap, but one doesn’t come included.
The Sea to Summit Big River Dry Bag provides peace of mind that your gear will weather the storm, so to speak. Together, the roll-top closure, 420-denier nylon, and taped seams supply compressible, watertight storage. There are several lash loops along the side of the bag, providing versatile options for securing it to a boat or backpack. It’s possible to add a shoulder strap for hands-free carrying, but this must be purchased separately. Sea to Summit designed the Big River Dry Bag with a white interior lining to enhance visibility when sorting through gear, helping overcome a common challenge in dry bag functionality.
The Details: .5 pounds | 28 x 13 x 8 inches | 35 liters | 420-denier nylon
Tips for Buying Camping Gear Storage
Choose hardy materials.
Preparing for the unexpected, whether it be a sudden downpour or capsized canoe, can help make or break a camping trip. Choosing hardy materials that have waterproof and dustproof ratings is key when comparing storage options. “First and foremost, I look for durability,” says Jacey West, a content creator who promotes accessibility in the outdoors. For rigid gear cases, look for molded plastics and aluminum. With soft-sided and collapsible storage, keep an eye out for ripstop nylon and weather-proof coatings. Storage that’s designed to be stackable is another indicator that it’ll stand up to weight and handle wear and tear.
More durable storage may involve a higher upfront cost, but the investment provides greater assurance that your gear and equipment will last for years to come. “My tried-and-true storage bins have lasted 13 years so far,” notes West.
Check your gear's individual storage needs
Sheltering gear from the elements and critters is usually top of mind when camping and exploring the outdoors. But it’s also important to use storage bins, cases, or boxes to protect gear from light, moisture, and pesky rodents at home.
Some equipment and gear require greater care, namely sleeping bags and pads. Both items benefit from having air flow and more space than what’s allowed in a compression sack. For sleeping bags, a loose mesh bag is an ideal storage solution. Air mattresses can be hung in a closet, though it’s important to avoid repeating the same crease lines when packing and hanging. For self-inflating pads, leave the pad semi-inflated with the valve open to allow circulation.
Maximize your space
Besides keeping things organized and protected, storage equipment can help save space at home and in the car. Collapsible storage containers are optimal for those who are space-constrained or prefer a more minimalist setup. Some storage is designed to be stacked to save floor space. But any type of storage can be tucked out of the way with some planning and creativity. For example, the walls and ceiling of a garage can be rigged for holding camping gear storage. Apartment dwellers might take advantage of space underneath the bed for gear boxes or cases.
Selecting storage that can be used at home and in the outdoors can also optimize your use of space. “I keep my gear in the storage bins that I bring camping,” says West. “Storing all my cooking gear in one place also ensures I don’t leave anything important behind,” she adds.
To extend the life of your gear, store it in a location at home that’s protected from moisture and direct sunlight. The optimal location depends in part on your living situation and space constraints. Storing the bulk of your equipment together — save for sleeping bags and sleeping pads that need more room and ventilation — helps stay organized when you’re ready to depart on your next camping trip.
Cleaning camping gear before packing it away helps maintain its performance and structural integrity for years to come. While it’s okay to get a little dirty while camping, it’s important to remove dirt and debris from items like tents before packing them away. For deeper cleaning, it’s best practice to read and follow the manufacturer’s recommendations, as common household cleaners could damage gear and equipment.
From stackable gear boxes to collapsible bins and compressible stuff sacks, options abound for organizing and storing gear. Adding labels or using a color-coding system can further enhance organization and make it easier to track down specific gear and equipment. Either approach also helps streamline the packing and unpacking process.
Why Trust Travel + Leisure
Kevin Brouillard is a contributing writer at T+L, specializing in outdoor gear and apparel. His work has been published in TripSavvy, Jetsetter, and Oyster, and he served in the Peace Corps in Cambodia for two years. He spoke to, Jacey West , a content creator who’s passionate about making the outdoors more accessible. Kevin also researched dozens of camping gear storage options to curate this list.
Love a great deal? Sign up for our T+L Recommends newsletter and we’ll send you our favorite travel products each week.
:max_bytes(150000):strip_icc():format(webp)/IMG_1354-4feec82d9a8d49a59c438d1cb9238bd2.jpg "travel trailer outside storage bins")
Related Articles
- Destinations
- Russian Visa
- Travel Services
- What is Russia
- Practicalities
- Way to Russia
- >>
- Ask a Question
- All categories
- Russian Visa (406)
- Transport (60)
- About Russia (61)
- Moscow (18)
- St. Petersburg (12)
- Trans-Siberian (18)
Get Our Book:
Our 780-page PDF e-book includes all the essential info you need while you're in Russia. Take it with you on your phone, computer or USB stick. • Moscow & St. Petersburg guides • Off-the-beaten track locations • Getting a Russian visa with no ties • Traveling Trans-Siberian on the budget • Russian alphabet and phrasebook • 200 pages on Russian culture and customs
Baggage storage at Moscow train stations
Please log in or register to add a comment., please log in or register to answer this question., related questions.
- trans-siberian
- st-petersburg
- start2study
- russian-visa-invitation
- self-employed
Image Unavailable

- To view this video download Flash Player

magFlags XL Flag Elektrostal Moscow oblast | landscape flag | 2.16m² | 23sqft | 120x180cm | 4x6ft - 100% Made in Germany - long lasting outdoor flag
Purchase options and add-ons, about this item.
- 100% Made in Germany » ... because the first impression last, quality flag for representative purposes *****
- State-of-the-art High-Tech Outdoor Fabric » One air-permeable 110 GSM Polyester to keep wind forces low and lifetime high
- Mirrored Back » Image printed on the front, mirrored image 100% visible on the rear side
- Landscape flag | 2.16m² | 23sqft | 120x180cm | 4x6ft
- Show your pride for your hometown with the Elektrostal flag! Made with quality materials and vibrant colors, this flag is the perfect way to display your patriotism and love for your city. Fly it proudly at home, at events, or even in your car. Get yours today and show your Elektrostal pride!
- The flag of Elektrostal, Moscow Oblast, is a striking combination of Old Glory red, representing strength and courage at 81%, complemented by a subtle touch of light grey at 5% for balance and harmony. The bold black stripe at 3% adds a touch of sophistication, while the shimmering gold stripes at 3% each symbolize prosperity and success. The flag is completed with a touch of very dark grey at 1%, representing the city s resilience and
- Elektrostal Moscow oblast

Product information
Warranty & support, looking for specific info, product description.
Flag: Elektrostal Moscow oblast landscape flag | 2.16m² | 23sqft | 120x180cm | 4x6ft Elektrostal Moscow oblast Elektrostal obwód moskiewski , flaga ???????????? ?????????? ??????? Since we know how important your external presentation is, we print our Elektrostal Moscow oblast flag for your representative appearance using the most modern machines in Germany. To ensure your maximum flexibility, we have equipped the flags with quality metal eyelets, to let you simply attach these flags to any flagpole. To let you use the flags for a long time, we have strengthened the flag using double safety seams and a tear proof strap at the side of the pole. Due to the quality of this business flag, you show a particular degree of the closeness to Elektrostal Moscow oblast. Details about this flag This landscape Elektrostal Moscow oblast flag is a quality product Made in Germany made of 110g/m² gloss polyester. This Elektrostal Moscow oblast flag is wind- and weather-resistant and highly durable. The flag colors are intensive and UV-resistant. This flag is specially made for outer space. This Elektrostal Moscow oblast flag will be delivered with a double safety-seam as well as with 2 metal eyelets to hoist at the flag pole. The metal eyelets give you great flexibility for placing this flag on any flagstaff. The mast side is reinforced with a white hem. The quality flag material and the metal eyelets will take care of a long endurance of this Elektrostal Moscow oblast flag. If required, the flag can be washed at 60 degrees Celsius. Recommended height of flag pole Elektrostal Moscow oblast flags of 2.16m² | 23sqft | 120x180cm | 4x6ft look best with flagpoles of around 6m | 18ft height. Need a bigger size or an other configuration? We can provide bigger sizes, other configurations, exclusive indoor ...
Customer reviews
Customer Reviews, including Product Star Ratings help customers to learn more about the product and decide whether it is the right product for them.
To calculate the overall star rating and percentage breakdown by star, we don’t use a simple average. Instead, our system considers things like how recent a review is and if the reviewer bought the item on Amazon. It also analyzed reviews to verify trustworthiness.
No customer reviews
- Amazon Newsletter
- About Amazon
- Accessibility
- Sustainability
- Press Center
- Investor Relations
- Amazon Devices
- Amazon Science
- Sell on Amazon
- Sell apps on Amazon
- Supply to Amazon
- Protect & Build Your Brand
- Become an Affiliate
- Become a Delivery Driver
- Start a Package Delivery Business
- Advertise Your Products
- Self-Publish with Us
- Become an Amazon Hub Partner
- › See More Ways to Make Money
- Amazon Visa
- Amazon Store Card
- Amazon Secured Card
- Amazon Business Card
- Shop with Points
- Credit Card Marketplace
- Reload Your Balance
- Amazon Currency Converter
- Your Account
- Your Orders
- Shipping Rates & Policies
- Amazon Prime
- Returns & Replacements
- Manage Your Content and Devices
- Recalls and Product Safety Alerts
- Conditions of Use
- Privacy Notice
- Consumer Health Data Privacy Disclosure
- Your Ads Privacy Choices
IMAGES
VIDEO
COMMENTS
3 Reviews. $153.99. Add To Cart. Online Exclusive. Swiss Link Aluminum Storage Box, Medium. 6 Reviews. $172.99. Add To Cart. Greenmade 12-Gallon Flip-Top Box.
Let's start off this list strong by looking at one of the best overall portable storage bins. The Plano Sportsman's Tote is available online and costs about $50. This might seem like a lot of money for a single tote, but this product was built to last under any conditions. Each tote is 37.19 inches long, 14 inches wide, and 18 inches deep.
Step 4: Cut your plywood with a circular saw. Always use eye and ear protection. Step 5: Sand all pieces if desired (this is recommended!). Step 6: Use wood glue and screws to attach the sides of your RV pull out storage tray to the base. Step 7 (Optional): Cut and attach divider pieces in the RV slide out tray if you prefer.
Storing Your RV Outside. RV storage is very climate-specific. In other words, outdoor winter storage and summer storage require different and sometimes overlapping methods of care. Also, the climate you live in will affect how you store your RV too. This article will focus on important points that are useful for both seasons and all environments.
By Mike Wendland | Updated Dec 26, 2013. Roadtreks are blessed with lots of storage, but unless you keep it organized there will never be enough space. The older Roadtreks have one or more compartments with a fiberglass door and a rubber hinge. By the way - keep an eye on that hinge. They will eventually fail, and it is best to have a spare ...
OPTIMAL SPACE- Underchassis storage bins help you free up space in your RV and tow vehicle. EASY ACCESS - Designed with a spring-loaded latch system that slides the bin in and out with ease. BUILT TOUGH - Each bin can hold up to 100 lbs. of gear and made with a rust-inhibitive coating on steel parts.
Rubbermaid ActionPacker️ 48 Gal Lockable Plastic Storage Bin, Industrial, Rugged Large Container with Lid (Black,gray) ... 16 Inch Aluminum Truck Bed Tool Box Truck Car Outdoor Trailer Pickup Underbody Toolbox,RV Storage OrganizerTrailer Storage W/Side Handle&Lock,5 Bar Tread,Black(16"X7.5"X10") ... RV Trailers | Diamond Plated Storage ...
MORryde Sliding Storage And Cargo Tray - 36" x 90". CTG60-3690W. In Stock. Price: $834.74. 4 in stock!
Utopia Home - Fridge Organizer Bins - Set of 8 Refrigerator Organizing Bins - Pantry Organizers and Storage - Stackable Clear Storage Bins For Home & Kitchen Pantry Organization and Storage. 30,374. 10K+ bought in past month. $1999. List: $30.99. FREE delivery Thu, Jan 25 on $35 of items shipped by Amazon. +3 colors/patterns.
Consider hanging a large pegboard that can hold utensils, pots and pans, and baskets for small items and produce. A hanging pocket organizer is great for holding papers, and baskets hanging on the walls can hold all kinds of things, saving you cabinet and counter space and keeping things organized. 6. Make use of the undersides of cabinets.
Each Airstream travel trailer model features its own unique kitchen style, but upper and lower storage for dishes, pots, pans, silverware, and pantry items is always included. In larger travel trailers, pull-out pantry storage makes it easy to see what you have and grab what you need. In the Globetrotter, overhead cabinets feature custom curved ...
REI Co-op Pack-Away Bin. The OG outdoor recreation outfitters storage solution takes the concept of a packing cube and ups the scale to 100-liter ($109) and 140-liter ($139) storage bins for camping gear. The featherlight bins use strong 300 and 1,680-denier polyester (super heavy duty) with a water-resistant DWR treatment and foam panels to ...
Thinking outside the box. This is a standard term used to describe driving creativity. When it comes to your pass-through storage area you may have to think outside the box to maximize the available but limited space. There are many ideas to adapt or use when you think about it. One option you can try is to use tote boxes.
RV Cargo Carrier. Cargo Bins. Chassis Mount. 99-1/2 Inch Long. Lippert. Stow supplies, tools, and a spare tire with this storage unit that mounts beneath your RV or trailer chassis. Two 27-7/8" long x 17" wide x 8" tall, slide-out bins with lids hold up to 100 lbs each. Bolts onto your trailer's frame. More Information >.
Locking Floor Mounted Storage Box for Enclosed Trailers - 19" x 29" x 7-1/4". Our Price: $350.07. (5) Add to Cart. Locking storage box mounts in the floor of your enclosed trailer and gives you space to store your hauling essentials without losing floor space. Galvanized steel box with black powder coat lid ...
Using a spring-loaded latch system, these bins are easy to slide in and out so you can access all of your gear hassle-free. The standard underchassis RV cargo bins come complete with two detachable molded storage boxes with lids. Bins measure 27-7/8"L x 17"W x 8"H. Mounting hardware is included.
View Details. Madison Accessories Camping Chair Storage Rack 22105 Steel. For Sale. $20.37. View Details. Camco "Life Is Better" Collapsible Bin. Out of Stock. $26.63. Space Bag Jumbo 36 inch x 52 inch.
The outer case of the Car-Go-Box is made with rugged 600D polyester that'll last for years of adventures. All three storage pods and the case are collapsible, helping save space when tucked away ...
Looking to get a hitch installed on your car, truck or SUV? Find trailer hitch installation locations in Moscow, TX 75960.
IRIS USA 11 Gallon Loackable Storage Totes with Lids, 2 Pack - Orange Lid, Heavy-Duty Durable Stackable Containers, Large Garage Organizing Bins Moving Tubs, Rugged Sturdy Equipment Utility Tool Box. Options: 4 sizes. 270. 400+ bought in past month. Limited time deal. $5129 ($25.65/Count)
306K subscribers in the TankPorn community. TankPorn is for all things Battle Tanks, Armored Fighting Vehicles, Armored Cars, Self-Propelled Guns and…
Best answer. In fact, all Moscow train stations have baggage storage areas and most of them are automatic. The one at Leningradsky station is located in the basement floor, follow the signs for "камера хранения" ("camera khraneniya"). The previous answer described well how it may look like - so if you don't see any automatic ones ...
Amazon.com : magFlags XL Flag Elektrostal Moscow oblast | landscape flag | 2.16m² | 23sqft | 120x180cm | 4x6ft - 100% Made in Germany - long lasting outdoor flag : Outdoor Flags : Patio, Lawn & Garden