- Google Plus


How to Create the Perfect Travel Photo Gallery Wall

Sharing is caring!
A Travel Photo Gallery Wall is the perfect way to help your vacations keep on giving you inspiration and fond memories. Let your love of that dream destination continue to grow with a travel picture wall, well after the plane has touched down.
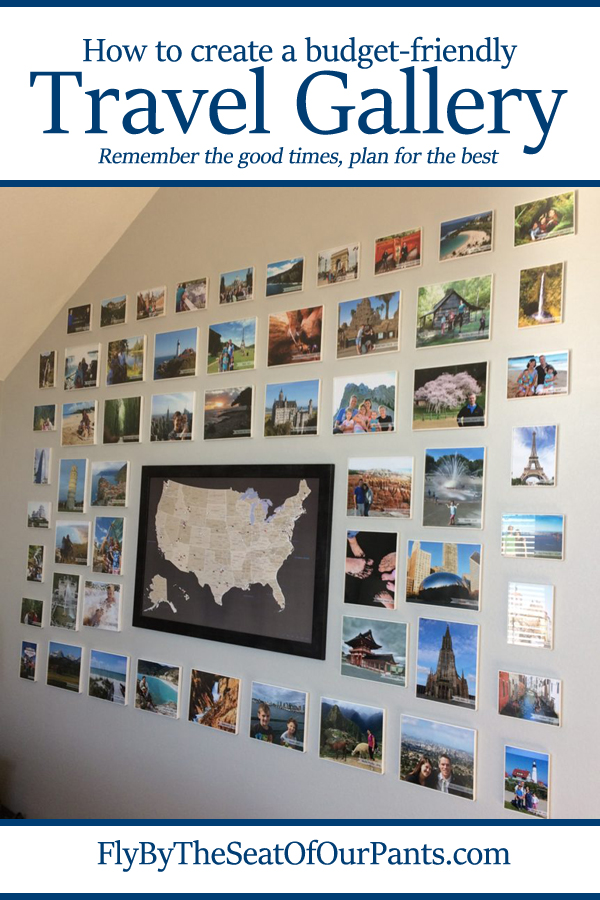
One of the best parts about traveling is being able to re-live the sights seen and memories created. A fun way our family does this is by having a travel gallery on our wall with a map .
Where to put a Travel Photo Gallery Wall?
When we started traveling a lot as a family, we wanted something to strengthen our good memories of trips together and inspire future travel. We looked at lots of travel wall ideas.
We considered collecting travel wall decor from different destinations. Ultimately, but we decided our own memories from the lens of our own cameras and our viewpoint would be the best way to make our travels last forever.
We chose to create our wall of travel photos on a spacious and open wall in our master bedroom right next to our bed. Travel is a priority in our family, so it’s our private travel wall gallery. We aren’t showing off to our friends and family all our travel experiences, but rather keeping them close to our hearts and minds in our private room.
My husband and I cuddle up together and reminisce about our trips on the walls. We love seeing how little our kids were on past trips. Then when we get home from a trip, we enjoy going through our travel pictures and picking the best one to represent our feelings of the destination and our trip there.
We all use the travel photo gallery wall and push pin map to create future trip ideas and plans together.
Adding photos of our most recent adventures sometimes means we have to take out an old photo, but we keep a file of all our travel photos used in the past. Changing the travel photos on the wall make it look ‘new and different’ which sometimes is hard to do in a home.
Don’t let the memories fade when the trip ends! Get your travel pictures on the wall!

Benefits of a Travel Photo Gallery Wall
I love having a travel wall of photos. Here are all the reasons this is worth your time, resources and a full wall in your home (or more!)
- Remember stunning scenes, majestic vistas, and beautiful cities. Photos never do it justice, but it will bring back my memory of the place
- Create stronger bonds of love for your family
- Feel nostalgic for good memories from journies around the world
- To encourage and motivate future trips and adventures to add to the collection (and get another pin in our travel map!)
- Have travel on your mind as you can see so much of the world left to explore.
- Motivation to save for your next trip
- Find destinations that are interesting and new right from the pushpin map. Easily see the spots you haven’t been to and be curious about what there might be to do or see there.
Travel Wall of Photos | Before and After
Our previous wall was a collection of random frames and different sizes of travel photos. We added the travel photos on our wall as we took new trips – with whatever frame we could find. We added new frames and photos as we went so it was a bit chaotic.
Not to mention the ugly yellow and red wall! we were due for an update!

When we recently repainted our master bedroom, we wanted to be more intentional in creating our travel gallery. In the past, we would find a random new frame for a new trip photo and cram it into space on the wall.
My goals for the new gallery wall with a map included:
- Display many of our favorite travel photos
- Professional Push pin map to help us track our trips and plan future trips
- Look Clean and Organized

How to Create a Travel Picture Wall
1. push pin map.
A travel Gallery photo wall needs to include a push pin map! I love the maps ready complete with the foam backing to easily stick pins in our vacation spots. A travel map helps you envision the world and be curious about a variety of places to see.
Push Pin maps are high quality and look gorgeous. There are so many options to choose from, you are sure to find exactly what works for your style and travel type.
Here are some travel wall ideas to consider as your pick your map.
- USA or World map?
- Artistic Map or Accurate Map?
- Busy Map or Simple Design?
- Colorful or muted tones?

After looking for many, many options, we decided that even though the artistic maps were more aesthetically pleasing, a map with accurate cities and roads would meet our needs better.
However, with our new room colors and simple design, we wanted a map that had muted tones and was easy to look at from a distance. We found a simple earth-toned map with major cities and roads listed. It is perfect!
These Push Pin Travel Maps have 8 frame options and over 20 different maps to choose from. They come with a foam board already installed so it is ready to start adding your pins. And you will even receive map pins in your order, so you can start pinning your travels immediately.
We received our Push Pin map within a week of ordering it. It is durable in quality and was shipped to protect the frame. The map arrived exactly as shown on the website.
You’ll find many different options for world maps and US maps and even keepsake boxes and other travel decor and treasures from Push pin Maps.

Now comes the fun part of finding your very favorite photos from your trips.
- How many photos?
- Landscape only or with people in the photos?
- Label photos with date or location?
- Artistic prints or random assortment
Keep in mind that most of your best travel photographs will be landscape not vertical. You’ll need more wide frames than long frames. There will be the occasional tall photos (like the Eiffel Tower, Tower of Pisa or Gateway Arch ). so don’t limit to only landscape. We opted for a design that gave us minimal vertical photo spaces and plentiful landscape options.
Do you want only artistic photos or some with your family in them? We opted for some of both. We love seeing how little our kids were on certain trips and talking about their changing looks and personality through the years. But we also enjoy using our photography skills to capture the perfect perspective at our destination.
Do you want to label your photos with locations or years? We put a small tag on each photo with the location and year. Even though we thought we would remember every trip forever, after 6 years of traveling, we realized we were wrong. When we would look at our wall we were forgetting when and where we experienced things.
If you print all your photos at the same time, it is much cheaper to get 8x10s here for only $.70 each. There is a $9 shipping fee, so this is only cost effective if you are buying a large number of photos. We received 60 8 x 10s in a couple of days for half the cost of printing locally.
Do you want larger, decorative frames with mats or simple frames ?
On our previous travel wall, the variety of frames and mats were distracting and chaotic. We just wanted to see our photos without the distraction of the frames. We purchased inexpensive, uniform frames . We ordered all the same frames in bulk and saved money.
If your budget allows, you may consider making canvas prints of your favorite photos.
4.Other Decor
Many travel galleries have beautiful pieces of decor mixed in. Arrows, Quotes, Wooden plaques, or globes or travel souvenirs on a shelf might be a perfect addition to your travel display. Look around for a favorite travel decoration to add to your travel photo gallery wall.
Our wall was just a little full, so we put travel decor in other locations in our home.
Total Cost of our Travel Photo Gallery Wall
- 60 8×10 prints= $35
- 36 5×7 prints =$28
- Push Pin Travel Map = $120 ( includes the frame and pins)
- 60 8×10 frames and 36 5×7 frames = $88
Total for a new travel wall = $271
Do you have a travel photo wall idea?
Please share it with me at [email protected] or on Instagram.com/flybytheseatofourpants
I would love to find inspiration in your travels!
Fly by the Seat of our Pants contains affiliate links. When you buy through the links it helps keep this website running, at no extra cost to you.
If you liked this, you may like these posts, too!

Long Layover At DFW Airport? Take TEXRail Direct To Grapevine

Unique Valentine’s Day Gift Ideas for Couples
Related posts.

Don’t miss this Hidden Gem for a Fantastic Family Vacation near DFW

How to Teach Your Child to Read | Best Gift you can Give your Kids

Best Things to do in Amarillo, Texas with Kids
24 comments.

Love this and plan on doing something similar in my basement. Can you tell me how you put the info on each of the photos? What program you used? Love the idea of that. Thanks!

I used adobe photoshop. Im sure there are many photo editing software that can do it. Canva is a free program…

Great tips and ideas! Thank you. Another DIY project to add to the list.

Great information, I have never thought of doing this. I really like the idea. I just need to figure out where I could put this in my house somehow. I have always wanted away to put our fun adventures on a wall.
Its a great way to bring your trip home with you! You could even do a small corner of just a few photos you rotate through…

I love this idea. I’ve always wanted to create a travel wall and this has given me the inspiration to do it! I love how you added the map as the center point and built the rest around it. Its a very organized way to display many photos in one area and tell a story with it.
Thank you! I really like how it turned out! Show me yours when you finish it!

This is an awesome idea! I have one but it is in the process of being made. =) Planning more vacation trips with my little ones.
share with me what you come up with! Hope your travels go smoothly with the littles!

Awesome idea! This will be the same thing that me and my wife are planning to do by the time we move to our new home. Thanks for sharing it!

Thank you so much for this post! I have actually been working on our travel gallery and have had a hard time deciding which direction to take. I think my original thought would have been to chaotic. You inspired me to go with a more simple approach. I’m excited to work on it now!
oh good! I know my first few ideas would’ve been really chaotic because of the number of trips we take! Most wall only have a few photos with more decor, but I wanted to streamline mine!

I absolutely LOVE this idea! Now I just have to find a wall 🙂
Yep that can be challenging! Is there a wall you really dislike that you can redo?

I think this is awesome and something I will definitely do. I just had my first child in September of 2017 and we’ve already traveled to North Carolina from Alaska together. About to fly again to Oregon and then England for the summer. This is also a great way for me to FINALLY decorate my bedroom!
Wow! You are going places! Yep, we love it in our bedroom too!

Love this idea! I was actually just looking for ideas on how to do the same sort of things. I love how clean and organized yours looks. I have a large world map that I want to do it with.
Finding the map was the hardest part for me! So if you already have yours you are ready to go!

I love this and want to do it! Plus the low cost makes me super happy!
Right? I thought it would cost a lot more to re do the entire thing to my liking!

I love this! My fiancé and I were recently talking about printing our trip photos and starting a photo gallery.
Perfect time to start just as you are starting out your marriage! Leave lots of blanks for the future!!

Love this idea! The muted map tones really help the pictures stand out. Definitely going to do something similar! (I wonder how we could include both a world map and a U.S. map… hmm….)
Oh, good idea. I was think I would just convert over to a world map, but it would be better to have both! Our kids just got passports and we are starting to travel the world more. Let me know what you come up with!
Write A Comment Cancel Reply
- International
- National Parks
- Budget Tips
- Support this Website | Contribute to Blogger Jamie Harper
- Disclosure & Privacy
- Work with Me
Customized gallery walls delivered in 2 weeks - free shipping on all orders!
Use Code WELCOME10 for 10% off your first purchase!
- Shop Shop by Collection Art Gallery Walls - Now Live! Classic Gallery Walls Multitasking Gallery Walls Staircase Gallery Walls White Space Gallery Walls Corner Gallery Walls Small Gallery Walls Cell Phone Friendly Gallery Walls Grid Gallery Walls Quad Gallery Walls Wedding Gift Collection Travel Photo Gallery Walls Oversized Picture Frames Shop by Size Under 4FT Wide 4-6 FT Wide 6-8 FT Wide Over 8 FT Wide
- Frame Styles Metal Picture Frames Ashton Hansen Wood Picture Frames Graysen Darby Jensen
- About us FAQ Contact Us Store Policies Shipping Policy Refund, Return & Cancellation Policy Content Policy All Policies

- Shop by Collection
- Art Gallery Walls - Now Live!
- Classic Gallery Walls
- Multitasking Gallery Walls
- Staircase Gallery Walls
- White Space Gallery Walls
- Corner Gallery Walls
- Small Gallery Walls
- Cell Phone Friendly Gallery Walls
- Grid Gallery Walls
- Quad Gallery Walls
- Wedding Gift Collection
Travel Photo Gallery Walls
- Oversized Picture Frames
- Shop by Size
- Under 4FT Wide
- 4-6 FT Wide
- 6-8 FT Wide
- Over 8 FT Wide
- Frame Styles
- Metal Picture Frames
- Wood Picture Frames
- Store Policies
- Shipping Policy
- Refund, Return & Cancellation Policy
- Content Policy
- All Policies

- Best selling
- Alphabetically, A-Z
- Alphabetically, Z-A
- Price, low to high
- Price, high to low
- Date, old to new
- Date, new to old
Gallery Walls Ideal For Travel Photos
Stories are meant to be shared! Frame your fondest memories & adventures with a travel gallery wall to keep them alive.

Join our VIP list for inspiration, new arrivals & more!
Join our mailing list for exclusive offers, tips & inspiration.
Let customers speak for us
Thank you for the quality of materials, the expedient response and the guidance of how to hang. All went well - again thanks
The Girl Who Goes
independent, intentional travel
Last Updated on September 1, 2023
How I Created My Travel Gallery Wall

Hi, it’s me, your travel blogger friend who left her glamorous, frivolous life in Spain to settle back into the typical patterns of everyday American society for the past 10 months. (Thanks, COVID.) While our next adventures seem to be creeping closer, little by little, I’ve had some time to work on other projects that I’ve enjoyed. And one of them was decorating my very own office!
When our roommates moved out at the end of January, Matt and I finally got to move into our own home offices. I’ve never had an office before! I spent way too long planning out how I wanted it to look, browsing Etsy and Facebook Marketplace for things that would make it feel cozy and also remind me of my former life. And thus, I decided on a travel-themed Gallery Wall.
I thought it would be fun to share the process with everyone, in case you’re interested in trying something similar! (And if you’re looking for some inspiration for your wall, check out these travel quotes .)
Art Curation
I’ve never attempted something like this before, so I did quite a lot of research first on how to create a good gallery wall. One of the things I consistently read: You shouldn’t just go out and buy a bunch of art for the sake of the gallery. Some online sites even sell pre-made gallery art sets. But the best gallery walls have a lot of character specific to the person who designs them. Each piece tells a story.
Luckily, I already had a lot of travel-themed posters, maps, and art in other mediums that had been sitting in a box in the closet since I got home from Spain. I did search Etsy for other travel prints that felt special to me to make my gallery a little more well-rounded. Plus, it’s important to have a good variety of size, as well as vertical or horizontal orientation. That gives it more visual interest. But apart from that, the majority of my art was already mine — things I’d been collecting for years.
Here are a few of those pieces and their stories:
London/Notting Hill Poster

When I moved into my apartment in Spain, there was a single, empty poster frame hanging above my bed. As I gradually furnished my bedroom, I kept an eye out for something I could put in it — something that would help tie the room together and make it feel like home. I found this poster of Notting Hill in London (another place that’s very special to me), and it fit the poster frame almost perfectly. I knew it had to be part of my gallery wall!
German Map of Spain

I came across this old map of Spain at a market in Berlin when I visited in 2019. It’s from 1906, and it only cost €8! I had to buy it. The hardest part was trying to protect it from the rain and ensure it didn’t get all bent up in my backpack I was carrying, because it’s really fragile.
Homemade “Wanderlust” Canvas

In 2017 when my Italian sister Gaia was with us for Christmas, she made me this as a gift. We both love to travel, and that’s something that really connects us. This came to Spain with me, and I love it!
Madrid Arrow Sign

I bought a few of these signs at the Rastro market in Madrid for my family and for Matt. But I also bought myself one, because unfortunately I figured there would eventually come a day when I was away from Madrid. (Though I didn’t know it would be so soon. ☹)
A few of my art pieces are postcards from places I’ve been, and some were downloaded from Etsy. For those, it was as easy as taking the file to FedEx and having them print it for me on nicer, sturdier paper. It was cheap, too!
And three of my art pieces aren’t made of paper, but I knew I wanted them to be part of the gallery wall as well because they fit the theme. Plus, it gives the whole thing more visual interest/variety.
Most gallery walls have art in frames. As my gallery ended up with 18 pieces of art — 15 of which needed frames — that’s a lot of frames to buy!
A nice frame at Target will set you back around $13… and that’s for a relatively small one! It can really add up quickly. So I bought all of my frames (except one) at the thrift stores near me. I found most of them at Savers and Goodwill. Most of the small/medium frames were less than $3. Some of the larger ones were around $4-$8, but I didn’t need too many of those. In total, I probably spent about $50 on frames.
You can decide whether you want to have all your frames the same color or colors, or whether you want to mix it up. I decided I wanted a more eclectic mix, so I have frames of almost every color and style.
Before going to the thrift store, it helps if you have a general idea of how large you need your frames to be. I took measurements of all of my art pieces, so I knew I needed two 11×14 frames, three 5×7 frames, etc.
For some of the pieces that have more unique sizes, I measured them with the goal of finding frames that matched their proportions. The cheap 20×28″ poster frame I got from Joann was a decent fit for my 18×25″ poster of London, with a 2-3 inch border around the sides. I bought some large pieces of white cardstock/poster board to use as a background for several of my pieces. I trimmed it to the right size for the frame, taped my art to it, and then framed the whole thing — which now has a clean, even white border.
At the thrift store, a lot of the larger frames are in the “wall art” section rather than with picture frames. As these are meant to be purchased and hung as-is, it’s hard to know how big they are because they don’t list their frame size. So, I recommend bringing a tape measure with you! If I saw a somewhat-promising frame, I would whip out the tape measure and find out whether it was good fit for one of my pieces. The people at the store might have thought I was weird, but it all worked out in the end for me. 🙂
It took me about three or four trips to gather all the frames I needed, and it took varying levels of work in order to “open” the frames and replace the art. I don’t recommend doing this all in one night because it can be frustrating. Definitely be sure you have some tools on hand (needle-nose pliers were the real MVP) to help remove any metal that holds the back of the frame together.
Making a Template
It might be very tempting to skip this step. Because it’s also a lot of work, and it’s time consuming. BUT, I attribute this step to the overall success of my gallery wall’s design.
Get a roll of white paper — or you can use newspaper. Whatever kind of paper that is big enough for your largest pieces of art is fine. But, once all your art is framed, lay it over your big pieces of paper, trace it, and cut it out. Then, label it with something that will help you know what piece of art it is. “Denali Moose,” for example. After you’ve done it for all your frames, you should have a bunch of pieces of paper that are the same size as your frames.
Now, you can use painter’s tape to tape your these template pieces on the wall and play around with your layout. I started by measuring to find the midpoint of my wall. Then, I placed a piece of painter’s tape vertically to mark it. I started by taping my largest template piece on one side of it. Then, I kept building with additional template pieces around it, trying to keep it even on both sides.
Making a template on the actual wall is so much easier than using the real frames on the floor and trying to translate that to the wall. You don’t have to worry about making a mistake when it comes to hanging, either, because the templates are also useful in that regard!

Hanging the Art
While you could do this with nails, many of the frames I used didn’t have sawtooth hangers or any hangers whatsoever. Plus, I didn’t want to put nearly 20 holes in the wall. Especially because I still wasn’t sure how/if this was going to turn out. Instead, I bought a ton of large Command Strips from Target (probably about $40 total, but I didn’t use all of them on this project).
Bonus: the pack of command strips I bought came with a mini level , which was way easier than trying to use the heavy 3-foot level we have in our basement. I also used this level to help me when I was putting up my template pieces to make sure they were relatively straight.
So, now it’s time to hang your art! Instead of taking the template pieces down, leave them up and replace only one piece at a time with your real art. Again, I started with my biggest piece. When I took down that template piece, it was obvious to me where my poster needed to go. I put the command strips on the back of the frame and removed the sticky backing. And put the poster up where the template piece had been, using my mini level.
And I just did this one by one until all the frames were up and all the paper templates were on the ground. (Even though I was still missing a few pieces of art, I went ahead and put all the frames up.)
I would step back every once in a while to see how it was looking. I think I only needed to make one adjustment based on one of the pieces looking a little crooked, but the level helped and the template obviously did, too! Everything went up without a hitch.
In the end, I’m really happy with how it turned out! While stumbling into my office each morning with my coffee and sitting down for work isn’t as exciting as my two years in Spain… it sure beats when I was in lockdown in my apartment bedroom during the first few months of the pandemic last spring. Turns out, sitting on your bed with a small lap desk from IKEA isn’t the most comfortable workspace… but I try to leave that in the past 😉
Have you ever tried something like a gallery wall? Or, how do you bring travel into your living spaces? Let me know in the comments!
–Cathy

Originally Published on April 24, 2021.
Leave a Reply Cancel reply
Your email address will not be published. Required fields are marked *
Notify me of follow-up comments by email.
Notify me of new posts by email.
- Skip to primary navigation
- Skip to main content
- Skip to primary sidebar
- Skip to footer
Decor Adventures
A Home Decor and DIY Blog.
You Might Like These Projects Too

Before I begin showing you my forever-in-waiting gallery wall in my home office, I…
I absolutely love living in an old house. The character in our home is so…

The last two weeks around here have been a holiday decorating frenzy, with lots of…
Travel Photos Gallery Wall
I see London, I see France. Too bad there’s no underpants in this post, this is not that kind of blog! But it is the kind where I get to show you my newest favorite project, a gallery wall I put up in the dining room all of our travel photos. And I’m going to show you exactly how I printed, framed, planned and hung them all up.
If you are coming over here from Capturing Joy with Kristen, welcome. Today I’m showcasing a project in our dining room makeover, the last project that is – before I show you a whole room reveal, which has been forever in the making, but worth it I promise 🙂
If you’ve been on a bunch of trips like we have, then you know how fun it is to get those picture off your memory card and onto your walls. I decided to create a travel photo gallery wall in our dining room, come see.
In four easy steps you can complete this project. Here are the supplies you need:
- Digital photos – Or maybe you have some already printed you’d like framed
- Picture frames – I picked up frames from thrift stores for about $3 each
- Photo mats – I buy mat board and cut it myself. See how to cut photo mats here .
- Glass cleaner and paper towels – To clean the frames
- Software to plan a layout or grid paper to plan it
- Hanging hardware – I used monkey hooks {more on those below}, command strips, screws and anchors or you can use nails if you are hanging in drywall {these walls are plaster}
- Tools – Level, pencil, drill and drill bits, post its
Printing Pictures
When you have hundreds of pictures from a trip or a few trips, sometimes it’s hard to pick your favorites. I decided to print our photos in black and white and was specifically looking for some artistic architectural shots and some of us. We traveled to nine cities in total, so I selected some pictures to included three in one frame, two in others, and others to be printed larger.
I love printing my photos at Walgreens. This isn’t a sponsored post for them, but I find their online photo site to be easy to use and there’s always a discount code to use.
See look, London, France, plus Ireland in there too.
Framing the Photos
The frames I used for these were all the same type. I go out thrifting a lot and started to see the same frames, so I picked them up here and there for no more than $4 each. They were all shades of silver metal and were exactly the modern look I was going for.
First I took apart each frame, cleaned the glass and figured out how I was going to cut the mats for each. You can always buy already cut photo mats, which would make framing a lot quicker, but all of my frames were different sizes so cutting my own was going to be easier for me. See how to cut your own photo mats here . All you need is a simple cutter and tool they sell at craft stores. We cut all our own photo mats, it saves a ton of money in the long run.
Since I wanted a modern look for the matting, I placed the pictures off center height-wise. This was from my trip to England and Wales 10 years ago and was in Conwy, Wales where I saw my first castle.
But I also matted them off center because I had a fun little addition to the project I wanted to use. Bookplates! Since the pictures were of all over, I thought it would be fun to add a little label onto the glass. I saw this idea at A Thoughtful Place . Perfect and pretty Courtney! They sell this kind that is adhesive, so it worked great on the outside of the glass.
It takes me a while to cut the mats, because you need to be exact, but soon enough I had three {out of nine} done. That’s my trip to Ireland with my friend Cathleen in the middle {and more castles} and the Tower Bridge in London on the left. One of my favorite places!
Planning a Gallery Wall
Now here is where you have to do a little thinking. To plan out this wall, first measure the space in which you’ll hang up the pics. We hung these in in our dining room and had 43.5″x 112″ of wall space. Now I know not everyone has a built in graphic designer {my husband} with fancy software to plan out a gallery wall like we did. But you can easily do this with grid paper and paper shapes to represent your frames.
It’s actually very fun, like putting together a puzzle. The ones without labels we still have to select photos for and we left space for future trips. Be creative and select a pattern you love. There’s tons of options if you look them up online.
We measured out where each of the top left corners of the frames would be and put post its on the wall where the frames would go. Then we measured where the hook would go and started hanging.
Hanging the Frames
Usually when we hang up items in our old plaster walls I use this method , but you can probably just use regular old nails. Consider yourself lucky. Our anchor and drill-in-a-screw technique leaves large holes in the wall so I wanted to see if we could do something different. I did use command strips on the smaller, lighter ones, which I love.
My new idea for the wall were monkey hooks. They are funny sounding but work great. All you have to do is drill in a tiny hole and work the hook into the wall. They are made for drywall, which is not what we have in the dining room, so I was really happy they worked in plaster and lath walls. Success for old houses!
Dan got up on the ladder and I was the assistant. He said “scalpel” and I handed him the drill or the level or whatever. We always have a little fun doing projects together. We started hanging them from the center out so in case we had to adjust or our measurements were off, we’d have room to correct things.
By the way, Dan wants me to tell you he is wearing a hat for these photos so you don’t have to be subjected to his “weekend hair” 🙂
The hanging was actually the quickest part, so now I’ll stop chatting and let you see the results!
You can see we didn’t yet hang all of the pictures we had planned on and framed actually. One of them needed some hanging hardware and others we still need to pick out pictures for. So our gallery wall will grow over time.
See that beer in my hand below? It’s a Guinness in Ireland, it really does taste better from the source! We did visit the factory on that trip, that was amazing.
The paint color is Driftwood Gray by Martha Stewart paint. See the rest of our house’s paint colors here and about the grass cloth wallpaper that’s on the lower walls.
These walls have been empty since we moved in three years ago, so I’m loving that there is some life on them now.
Thanks for reading this super long post! I hope it helps you for when you decide to bring some of your memories off the camera and into your home!
See all of my projects here and see you later gators! And don’t forget to head back over to Capturing Joy to enter today’s giveaway and visit for the rest of the month for more decorating with pictures ideas and giveaways.
Get our free home decor and DIY printables
Get access to our free DIY and home decor resource library of printables today.
Reader Interactions
Leave a reply cancel reply.
Your email address will not be published. Required fields are marked *
This site uses Akismet to reduce spam. Learn how your comment data is processed .

February 12, 2014 at 10:26 am
I need someone to do this for me! When I hang pictures, no matter how carefully I measure, things always seem to be a little off and then I obsess over the errors. Weirdly, if other people do it, mistakes don’t bother me (as long as they are small).
Love the idea of the bookplates listing the place and date!

February 12, 2014 at 11:16 am
Hi Lori, It’s actually really quick to do once you pick out the pictures! I know what you mean by the spacing though. We measured three times, then drilled the holes 🙂
Thanks for leaving a note! – Jessica

February 12, 2014 at 11:36 am
I love the bookplates idea. It looks so sleek and modern! Great job!

February 12, 2014 at 12:03 pm
Love the idea of adding the labels. It looks fantastic, and what a great way to keep the memories alive!
February 12, 2014 at 12:26 pm
Thanks Shauna. I’m really happy to get these up. What’s the use in having all the fun if you don’t get to be reminded of it!

February 13, 2014 at 1:05 am
Visiting from Kristen Duke- I LOVE this idea! The bookplate really makes the frame, I had no idea they had adhesive ones! I currently live in Germany. We have traveled all over the world and would love to frame some of the photos I’ve taken- I’m totally doing this when we get back to the states!
February 13, 2014 at 11:05 am
This would be a great project for you then! The bookplates are in the Martha Stewart line at Staples. We had to go out of town to get them, but see if you can order them online. Hope that helps and thanks for visiting my blog!

February 13, 2014 at 9:21 am
I’m visiting from Capturing Joy. I love the look of your gallery wall and I appreciate how you broke down the process. I, too, like to use Walgreens for printing my photos. I find that their color is better than other retail places (Target or Walmart, for example). The bookplates add just the right touch, too!
February 13, 2014 at 11:03 am
Thanks so much, glad you like them. And that’s great to know about the color at Walgreens. I find it to be very convenient.
Thanks for commenting!

February 14, 2014 at 4:49 am
Beautiful wall decorations using travel photos. It is looking very vibrant and awesome I would say. I think these photos are of Paris ? right ?
February 14, 2014 at 10:58 am
They are photos of all of the places we have traveled including Paris.

February 16, 2014 at 11:01 am
That looks great Jessica!! Love the bookplates on them, what a fabulous idea!!

February 16, 2014 at 12:36 pm
Jessica I LOVE this idea! We have SO many travel photos and I got chills looking at this because the Hubs and I were at Bunratty Castle in Ireland {and Durty Nellie’s too} in 2000. What are the odds?? Pinned!
February 16, 2014 at 12:40 pm
*Nelly’s, rather. I just showed my Husband too. He reminded me that is the pic I have that I photoshopped silly Irish hats on our head one year. That will be going up on the blog soon. lol

February 17, 2014 at 9:58 pm
It looks fantastic! I love all of the special photos. So happy you were able to use the bookplate idea! Awesome, job. Thanks for letting me know!

February 19, 2014 at 9:52 pm
Love gallery walls… what a great one with your travels.

February 19, 2014 at 11:41 pm
What a great way to display your travels. I love the labels and detail to hang the gallery wall. Thanks for the inspiration. Pinned 🙂

February 20, 2014 at 6:26 pm
Wow! I love that you make your own mats, and I LOVE the labels. They take the gallery wall to a whole other level.
Amazon Affiliate Disclosure
DecorAdventures.com is a participant in the Amazon Services LLC Associates Program, an affiliate advertising program designed to provide a means for sites to earn advertising fees by advertising and linking to amazon.com. Read this site’s full disclosure here .
- Upload photo

- Bestsellers
- Luxe collection
- BIG frames & prints
- For the table
- For the wall

- Shop by price Gifts under $50 Gifts under $100 Gifts under $250 Baller gifts
- Shop by occasion Wedding picture frames Instagram frames iPhone photo frames Stocking stuffers
- Shop by recipient For moms For dads For that special someone For your bestie

- < Products

- < New & featured

- Shop by price
- Gifts under $50
- Gifts under $100
- Gifts under $250
- Baller gifts
- Shop by occasion
- Wedding picture frames
- Instagram frames
- iPhone photo frames
- Stocking stuffers
- Shop by recipient
- For that special someone
- For your bestie
How To Create A Travel Gallery Wall

Creating a travel gallery wall is a great way to transport you back to some of your favorite moments. And it’s easy to do!
To begin, consider where you want to feature your gallery. It works well in central locations, so a blank wall in your living area could be a good choice. Entryways are also an excellent place to create a feature that you’ll pass by every day.
Start with a theme
If you’re an avid traveler, you’ve probably got thousands of photos. To help you choose, consider picking a region or country that holds special memories for you. Also, working with one geographical area will help narrow down your choices and keep the theme consistent. Other options that could work include-- your favorite outdoor adventures, beaches from around the world, or major cities.
Choosing your photos
When selecting photos for your travel wall, it’s important to consider a few things so you end up with a gallery that you’ll love.
- Choose memorable images. For example, a photo of you visiting the Grand Canyon is probably a dramatic image and will evoke great memories.
- Ensure your photos are of high quality and that the lighting is good.
- Consider using filters. For example, black and white works well on outdoor landscapes. It will also ensure that your gallery wall is cohesive.
Consider your layout
It’s essential to consider the layout of your gallery to match the style of your home. For example, a symmetrical gallery works well with modern and sleek finishes. On the other hand, if you’re after a more eclectic look, you can put your frames up at different heights and levels.
Sketching your ideas is a good way to work out your design. Another option is to cut out different shapes and sizes of paper to act as frames and plot them out on the wall.
Picking a frame
If you have a large wall, you can select different sized frames, but if you’re working with a more intimate space, it’s best to use small ones.
Here are some things to consider:
- If you’re matching your frames and evenly spacing them along your wall, you’ll want to purchase the same frames for all your images. However, consider selecting different colors, for example, a mix of silver and gold.
- An unstructured look allows you to select different sized frames and styles for your gallery wall. If you already own frames, this can be an excellent option. Many people purchase frames while on holidays that add to the story of their travel gallery.
- When choosing colors for your frames, consider the color of your walls. For example, bright-colored frames are a good option if you’ve got plain walls, but if you have detailed walls, such as striped wallpaper, choose something simpler.
Ready to order?
Once you’ve selected your theme, photos, frames, and layout, you’re ready to order! Discover how easy it is to create a travel gallery wall with Frameology.
- Share Share on Facebook
- Tweet Tweet on Twitter
- Pin it Pin on Pinterest
- Add a second item for 10% off entire order
- You got 10%! Add a third item for 15% off entire order
- Congrats! You've got 15% off entire order
Your cart is empty
- Framed pictures
- HD metal prints
- Acrylic prints
- Gallery walls
Gift note added Is this a gift?
Add gift note
We will send your message to the recipient via email or SMS as soon as your gift is delivered by our shipping provider.

- Choosing a selection results in a full page refresh.
- Press the space key then arrow keys to make a selection.
9 Creative Ways To Display Your Travel Photos
Searching for unique and creative ideas to display your travel photos? Traveling is an amazing experience that allows you to explore new cultures, meet new people, and create unforgettable memories. So why not relive those moments by displaying your travel photos? These creative travel photo display ideas add a personal touch to your home decor and also serve as a daily reminder of your incredible adventures. Here are the best unique and inspiring ideas for displaying your favorite travel memories.
Creative Ways to Display Holiday Photos
1) make a travel gallery wall .

Create a fun travel gallery wall display highlighting your best travel photos. Mix and match different sizes and mediums to create a unique space with your top travel images. Select a theme like beaches, your favorite dive spots, or scenic sunset views from all around the world. .
2) Design a Calendar

Why buy a generic calendar when you can make a beautiful travel wall calendar with your travel photos? It’s also a good reminder to plan a trip soon!
3) Create a Coffee Table Photo Book
Share your favorite memories in a photo book that will last forever. You can add custom details to make it your own or use a template.
4) Make a Scrapbook

Save your airplane tickets and anything that reminds you of your trip and add it to a fun scrapbook to remember your best holidays. Write down the top things to do and where to eat so you can remember it for next time.
5) Use Reclaimed Materials To Display Photos
Get creative and find unique things to use to hang your photos like mini clothespins . Make a beautiful frame by gluing small pieces of driftwood to a frame you already have. You can also use twine or rustic string to wrap around a rod or piece of driftwood and create a photo display to hang travel photos.
6) Design a Unique Gift
Whether you’re looking for a gift for Mother’s Day , Father’s Day , a birthday or a celebration, give them a unique gift with a travel photo on it. Design a cute tote, mugs, magnets, puzzles, and ornaments for the holidays.
7) Make a Custom Map

Design a custom map with photos of your top adventures. This is a great gift idea and one of our favorite creative travel photo display ideas.
8) Save your Travel Photos in a Journal

Whenever you get the travel bug, reach for your travel journal or keepsake box to remind you of your fondest travel memories. For some extra encouragement, add testimonials and kind words to your journal that you can look at when you need an extra confidence boost.
9) Make Save the Dates or Holiday Cards
Create one-of-a-kind greeting cards, stationery or holiday cards with your travel photos.
Conclusion: How to Display Travel Photos at Home
We hope these travel photo display ideas inspire you to create something beautiful with your vacation photos. Whether you create a wall gallery or use a digital photo frame , there are so many great ways to display your top travel moments.
What are favorite travel photo display ideas?
You may also like:
THE BEST TRAVEL PHOTO APPS TO EDIT ON YOUR PHONE
- WORK WITH US
Photo Presets
The Mandagies

How To Make A Travel Gallery Wall
Post Summary: How To Make A Travel Gallery Wall
Last weekend, Berty and I were sitting in our apartment and staring at a blank wall.
It’s been two months since we moved into our Seattle apartment and our walls are STILL BARE. Life came at full speed and the last thing on our mind was decorating.
One day though, we were sitting on the couch….I don’t know what happened, but it seemed like the very next second we were getting out the measuring tape, hammer, and nails. We marched across the street to the frame shop to get advice and went into full-blown style mode. We were finally putting together our travel gallery wall!
Stick around, because we’re giving a tour of our travel gallery wall, and tips for making your own!

A while ago, we received a cool piece of advice as we embarked on our adventures. It was to collect a piece of art at every destination . We wanted our new married life together to reflect the stories and experiences we shared together. Since then, we’ve kept true to our tradition and have collected art from all over the globe!
Displayed, we have art from Glacier National Park , Machu Picchu + Lima, Peru ; Bali + Surabaya , Indonesia, Chiang Mai, Thailand, some original art, and a Cascadia flag. We are excited to see this wall evolve and grow as we explore more of the world!

How To Make Your Own Travel Gallery Wall
Collect art everywhere you go.
Your destinations don’t have to be exotic, they just have to mean something to you! This takes time – your walls can evolve and change just like you, so start with what you’ve got!
Be Inspired By Different Mediums (Photos, Paintings, Canvas, 3D Art)
Some pictures we have are painted on canvas, some printed, and others hand-drawn. All of them are beautiful in their own way! Mixed mediums prevent your wall from looking too matchy-matchy.
Let Your Art Speak For Itself
Each piece contains meaningful stories. We were inspired by our Bali Aunt Polyn who collected artifacts and beautiful tapestries from all over the world. It was fun to ask about a piece on the wall while we were eating breakfast. Our hope in creating our gallery wall would be that it inspires conversation too!
Celebrate Your Artistic Friends
Our friend Colin is an architect/designer and he created the painted outline of the world. He presented it to us during our wedding rehearsal. We couldn’t be more thankful for him! Displaying art from your friends shows your support, and will guarantee your wall is one-of-a-kind!
Instagram Grid Pictures
These prints from Artifact Uprising are a total game-changer! Each set of 25 is for $22. We used 24 in our frame. I absolutely love the idea of using them on mini clothespins or stringing across wire too. We decided to buy a wooden frame, back it with white poster board, and arrange them in a grid. These photos are from our trip to Peru in 2015 – back when we got engaged! It’s my favorite piece on our wall because it reminds me of all the fun memories Berty and I made together during that week.

Thanks Berty Mandagie for editing these photos. Love you babe. 🙂
— PIN THESE! —

Thanks for reading!

How To Make A Removable Photo Wall (Perfect For Travel Photos)
Posted on Published: December 25, 2018 - Last updated: February 17, 2024
Categories Travel , Travel Tips
My removable photo wall is an inexpensive and adaptable way to display your favourite travel photos.
This is the ultimate gallery photo wall to showcase a large number of photos at a relatively low cost . You can also continuously add photos, expanding the photo wall, as you travel to new places.
Psst! This blog post contains affiliate links in it which sends me a bit of extra money if you use them… at no extra cost to you!

Why You Need A Removable Photo Wall?
I’m the person that goes on vacation and snaps at least 500 pictures… in one day alone…
The only problem with taking so many photos on vacation? There’s no way to display that many photos all at once, especially without breaking the bank.
I could blow up, print, and frame my absolute favourite ones. But you can only do that to so many photos. You’ll run out of wall space pretty quickly this way, not to mention the high cost of buying that many picture frames.
I also enjoy making photo books to recap the trip ( I like Shutterfly ). But, how often do you take those out to look at?
I wanted something that I could walk by every day , look at, and bring me back to the best moments on vacation. So I needed to find a better solution.
( p.s. see more ways to display your travel photos in my post here !).
So I had to come up with my own solution…

You might also be interested in reading…
- How To Take Group Travel Photos By Yourself: My Secret Hack

Making A Removable Gallery Photo Wall
The removable gallery photo wall was born with inspiration from your Instagram wall… I really like the clean and uniform look of an Instagram profile (p.s. follow me on mine !). It’s also similar to the removable photo tiles for walls… but those are really expensive.
The only costs for my removable gallery photo wall was a few materials and the prints themselves.
The key to making it removable is using double sided removable tape ( see it on Amazon here ).
This way, you can add photos until you run out of wall space or even easily swap photos.

DIY Photo Wall Ideas: Which Photos To Choose
Choosing the photos to display is the best part about a photo wall. You can choose all your favourite travel photos , there’s no having to choose your top 3 out of 50.
For the gallery wall to look aesthetically pleasing, I tried to mix up the contents and perspectives of each photo. For example, I printed some closeups, landscape, and others with us in them!

Never forget a favourite travel memory
Keep track of your travels every day with my digital and printable travel journal . Use it on the go on your phone or tablet, or print it out!
Editing & Cropping The Photos
For you gallery wall, you will have to edit your photos before printing them.
You’ll want to crop all your photos into a square aspect ratio (I went with 5×5 and loved the look). But see what size your printing studio offers.
I also added a white border to my prints, which added a nice separation between each photo. This way, the gallery wall doesn’t become too overwhelming.
*Depending on where you’re printing your photos, they might have an option to add a white border automatically to your prints. And you can sometimes crop your photo directly on the printing page as well.

Printing The Photo Tiles For Wall
There are a few places that print photos in a square aspect ratio. I used Costco, but they’ve since closed their photo studio moving it to Shutterfly.
Shutterfly offers square prints in 4×4, 8×8, and 12×12 sizes. You can also crop your photo directly on their website and add a white border. Visit Shutterfly here .
Another important choice you have to make when printing is whether you want a glossy or matte finish .
I printed the photos with a glossy finish, because that’s my default choice for printing photos… but I regret it. When photos are on display on the wall, the glossy finish adds a lot of glare. If I were printing them again, I’d choose a matte finish to avoid this problem.

What You’ll Need For Removable Wall Stickers Photos
There are a few basic items you’ll need to make your removable photo wall. Most of these should be easy to find at your local store or even on Amazon .
Double Sided Removable Tape
This is what makes your travel photo wall expandable and removable!
It’s important that you buy double sided removable tape and not just tape that’s double sided or removable. It’s also called poster tape, see it on Amazon here .
With poster tape, you don’t have to fold over the tape or worry about ripping off paint when you take them down… possibly ruining the print itself.
I’ve moved my photo wall three times now with the same tape! Sometimes I’ll have to add a bit more to certain photos, but not that much!
Find Poster Tape on Amazon

- This clear double stick tape securely mounts posters and lightweight objects to wall, Doors, Tile, glass, refrigerators, vinyl wallpaper, etc.
- It can be removed without damage
- Scotch mounting products have adhesive on both sides and allow the mounting of pictures, photographs, decorations, etc.
- Use Scotch wall mounting products on most surfaces including ceramic tile, wood surfaces, and non-flat painted walls.

A Level To Make Sure Your Photo Wall Is Straight
A level might just be the most important item you need because you’ll want to make sure the prints are straight on your wall.
The worst feeling is putting up 50 prints, stepping back to admire your work, and then realizing it’s not straight at all.
So order yourself a level on Amazon here .
Find A Level on Amazon

- High accuracy 9-inch spirit level for easy leveling
- Torpedo level with 3 separate vials for easy leveling: horizontal, vertical, and 45 degrees (1.0mm/m accuracy)
- 3 easy-to-read vials made of durable supremely transparent acrylic glass with smooth inner contours and bright fluorescent liquid inside; Integrated ruler provides measuring marks in both metric and imperial scale
- Magnetic edge for convenient, hands-free use — great when working with steel materials
- Lightweight yet durable ABS and aluminum frame; TPR coating for added strength; hole for convenient hanging and carrying

Putting Together Your Removable Photo Wall
This is probably the easiest DIY you’ll ever do.
With your level, draw the outline of your removable photo wall. You really only need to draw 2 connecting lines but you can level out all four sides if you want. This is a good idea to get a visual of the space and how big your photo wall will be (mine is 7 x 12).
To place the photos, you can either decide to wing it, or plan out where each photo will go (by setting it up on the floor first).
My strategy was to not place two to similar photos right next to each other. For example, I alternated between closeups, landscapes, and photos with people in them.
To stick the photos to the wall, rip off a piece of double-sided tape that’s about 4 inches long (a bit shorter than the length of the print). Place 4 strips along each edges of the print. Align the print to the corner and stick it on when it’s straight.
Repeat this step for all your prints. And Voila! Your photo wall is complete!

Upgrade Your Photo Wall
If you want to make your prints last longer and give your wall a more ‘ finished’ look , you can order a large custom frame for all your prints.
The photos inside the frame would still be removable, but it does complicate things as you have to take down the frame and open it each time. But I’ll admit, I love the look of an epic large frame! It’s just so grandiose.
But getting a frame this size will cost you as it will also have to be a custom size!
What You Need For Removable Wall Photos
Related posts.
- 7 Creative (& Affordable) Ways To Display Travel Photos
- How To Plan Your Vacation In 9 Simple Steps
Click Image To Share Or Save Post For Later

Last update on 2024-04-11 / Affiliate links / Images from Amazon Product Advertising API
Thursday 27th of October 2022
Thanks for this! I've been wanting to do this for a while but reading how simple your process was is inspiring me to get on with it!
Hi Crissey!
YES YOU WILL NOT REGRET THIS!!! I cannot tell you how much I love seeing my photo wall everyday and growing it after every trip! So glad I could help inspire you to start this project :D
My Secret to Taking the Best Group Travel Photos | Afternoon Tea Reads
Friday 7th of August 2020
[…] Or here’s a great way to showcase all your new picture perfect travel photos! Make your own expandable and removable travel photo wall! […]
How to Display your Travel Photos

To support this website, at no extra cost to you, we may earn revenue on links within this post. As an Amazon associate, I earn from qualifying purchases.
When we’re not traveling, we’re dreaming of travel. One of the ways we love to dream about travel is to look through our travel pictures. This means, of course, that we have to get our travel pictures off our mobile devices, hard drives, phones, and camera sd cards and on to display them for all to see. What do you do with your travel photos, or how do you display your travel photos?
Have you ever been at a loss as to what to do with travel pictures? I’ve included some DIY and some done-for-you options, so if you don’t feel extra crafty, don’t sweat it! Learn how to display your travel photos with these traditional, fun, or innovative ideas.
Table of Contents
Sources for Printing Your Travel Photos
If we’re going to talk about how to display your travel photos, we need to start with printing. We’ll cover some other ways without printing below, but for now, assume we need to get those digital photos off your phone or your camera.
Printing Services
Traditionally, one of the easier ways to get physical copies of your photos is by using printing services at places such as Walgreens or CVS Photo . I like that for most prints, you have a same-day option. So if we’re feeling super motivated, waiting on delivery won’t stop us!
Snapfish and Shutterfly have also been around for a long time and often have great deals. It’s worth comparing prices for prints across a few of these, and then pick one and stick with it. The last thing you want to do is try to remember who you uploaded your photos with. While these sites are usually popular to create photo books and photo albums, you can opt for full-size photos for displays.
Another good idea, and best if you want to print single photos on a whim, is to invest in a decent photo printer. I like working with Hp Printers because of their HP instant ink program . Enroll for a small monthly charge, based on how many pages you print, and always have ink on hand. It’s cheaper than buying ink. The HP Envy works well with Bluetooth and your phone. Reviews seem pretty great about printing photos as well.
The HP Sprocket Select Photo Printer is possibly the best thing I’ve seen to bring with you on the go. Full-color photos and Bluetooth allow you to print images on the go. It’s only 3.5 by 5 inches long, so it’s perfect to keep in your purse or camera bag. I like the idea of using this printer to use as thank you cards when you’re traveling as well.
Do you have old photos sitting in photo storage boxes? Or what about negatives or slides? An easy way to share those with your family members is to invest in a negative scanner.
The Kodak Slide n Scan is super easy to use and can scan 35mm, 126, 110 film negatives and slides to 22mp resolution digital images. It’s a great option to save old prints and family photos to digital storage, an external hard drive, flash drives, or even Google drive. From there, you can print your favorite family vacation memories.
If your photo collection isn’t in negative form, but you have lots of photos from days gone by, a photo scanner might be the best option. The Plustek Photo scanner scans photos in seconds. I like this over a traditional printer flatbed scanner as you can continue to feed photos into it. That way if you have a large amount of precious memories to save, you’re not constantly stopping to replace what is on the flatbed.
Have you seen Mixtiles yet? These are easy 8×8 “tiles” that you select from their app, and at $13 each, turn into wall art. You can do borderless, black or white frames. I think these will lend well with gallery wall ideas below.
Chatbooks is another one that has easy peel & stick gallery wall tiles. If you want slightly bigger than Mixtiles, Chatbooks wall tiles are 10×10.
Travel Pictures Gallery Wall Ideas
Now that you have your photos printed, how do you display them? Gallery walls are perhaps the most popular of the choices.
Below you can see some of the ideas for collages and gallery walls. Pinterest is a great source for gallery wall ideas if you need further inspiration.
Personally, I like the clean frame look to better show off your travel photos. I would recommend a simple white or black frame with a white mat. You can choose to mix up sizes or keep them all the same size. I do think this is where Mixtiles or Chatbooks appeal to me more. However, I have friends that do amazing gallery walls. in their homes, it’s just not as easy for me.
These are a couple that I love.

Canvas Prints
If you do or don’t do a gallery wall, canvas prints might be the way to do it. Snapfish has a host of canvas wall art options.
Pallet Sign Wood Photo
If you have a rustic look, go for this pallet sign to immortalize your favorite travel photo.

Personalized Photo Mug
You’ve seen those photo mugs where you can put pictures of your kids. They always look a little, well, basic, to me. However I did find this photo mug, that would be great in your kitchen or on the go. I like that it looks a little more artistic.

Personalized Travel Blanket
A photo blanket is another great way to show off your favorite travels. Imagine a cushy plush blanket draped over your sofa or one of your chairs in your living room, filled with stunning photos of your favorite trips. I don’t know about you, but this would definitely get me dreaming of my favorite places as I doze off under the blanket. And if it’s a vacation in Maine , this doubles as a cozy reminder of that trip.

One of the ways I love how to display your travel photos is to incorporate them with a map.
I’ve seen this done in a variety of ways. It can be with postcards or Polaroid-style images glued near a map.
Get a 50 States photo map collage . What I like about this particular one is that it has inner borders that help contain all the state cutouts and make it easier to cut and place your state photos. Plus, it even comes with a map maker tool that you can print the photos just as you need them!

I also like these individual state prints from Minted that include either an outline of the state or your photos within the whole state.

Wall Calendar
Do you have a wall calendar in your home? I know in the age of digital, we may not need a wall calendar, but I always like the at a glance option of looking month to month. Of course, you can fully personalize a calendar to include your travel photos or feature places you’ll travel that month.
See personalized calendars at Shutterfly.
Digital Frame
You could go for a digital frame to display your photos, but I want something as simple as possible. That’s why I would choose a Google Nest Hub or a Google Nest Hub Max . I use Google Photos to back up my photos on my phone (even though it’s an iPhone, more bang for the buck.) So it’s easy to get those photos to display on a Google Nest Hub. Plus you get all the smart home features with a Google Nest hub. Go for the Google Nest Hub Max to use to make video calls. Buy at Staples and get Free Shipping or Free Pick up.
Vision Board
Use your travel pictures for a vision board. If you have a favorite place you’ve traveled, again and again, put these photos in your vision board. Having a vision board inspires the whole family that we will travel again. Set aside some time this weekend to put your travel pictures in your travel vision board .
Paint Your Photos
If you’re feeling extra crafty you can take one of your favorite photos and attempt to recreate it in a watercolor form. Of course, again, someone on Etsy can do it for you .

Ceramic Tiles
Make a big statement with ceramic tiles. This one is 12″ x 12″ but they come in all sizes. Check them out at Image Snap .

Do you have a favorite way to display your travel photos? Let me know in the comments.
Save this for later.

Tonya Denmark of Detail Oriented Traveler's Favorite Resources
✈️ my favorite way to check flights.
Skyscanner is a great way to check all flights and create watch lists for a change in flight prices.
🏩 My choice to check hotel prices
Booking.com has the most extensive list of hotels.
🏠 My go to for the Best Home Rental site
VRBO has better support for home rentals. I recommend using them.
👨👩👧👦 My absolute Best Tour Booking Site
Viator allows you to book now and pay later, plus has free cancellation.
🎠 My Go to for the Best Attractions Pass
Go City all inclusive passes provide extraordinary value
Read my review of Go City Here.
Best Travel Insurance
Travel Insurance Master gives you quotes from a variety of insurance policies so you can pick the best one for you.
Best way to store your luggage
Luggage Hero is the perfect way to find storage options when you are touring a place for the day.
What's the best way to check rental car prices?
Discover Cars is my choice for trusted ratings and no hidden costs.
Best Travel Planning Guide
I have a comprehensive travel planning guide that you can buy here. Use code: WELCOME for 25% off.
About The Author

Tonya Denmark
Comments are closed.
52 Eye-Catching Gallery Wall Ideas That Will Breathe Life Into Any Room
Ashley Knierim is a home decor expert and product reviewer of home products for The Spruce. Her design education began at a young age. She has over 10 years of writing and editing experience, formerly holding editorial positions at Time and AOL.
:max_bytes(150000):strip_icc():format(webp)/AshleyKnierim-2fd66218631a4dbf91f7a1f8359bdab2.jpg "travel photo gallery wall")
The Spruce / Marty Baldwin
A gallery wall is a fun way to create a focal point and a conversation starter in any room. You can build a gallery wall using an existing collection by gathering all of your favorite prints, paintings, and photos in one area rather than scattering them around the room. Or you can start from scratch and build a gallery wall with everything from family photos to thrift store art.
Adapt your gallery wall to complement your space, from a minimalist photography wall featuring black-and-white photos in identical black frames to a maximalist gallery wall that incorporates a mix of frame colors and artwork. Or assemble an eclectic gallery wall that includes a variety of framed artwork interspersed with decor objects, mirrors, or natural elements.
Check out some of the best gallery wall ideas in a range of styles and settings for inspiration.
An Antique Gallery Wall
@culdesac_cottage / Instagram
If you like mixing vintage and modern , you'll love this gallery wall. When putting together a gallery wall, try to make it a cohesive look. While there's always space to mix and match materials and colors, a common theme is the best way to ensure your arrangement doesn't look cluttered.
Gallery Wall Above a Couch
@westlake.house / Instagram
If you're struggling to decorate that wide-open wall behind a couch, and a gallery wall is a great way to fill that space. This living room proves just how beautiful a well-planned gallery wall can be above a sofa.
Once you choose your gallery wall pictures, it's a good idea to lay out your design on the floor before you hang pictures on the wall. This allows you to visualize how everything will look together before you commit to putting it on your wall.
A Basket Gallery Wall
@icasasucasahome / Instagram
This fun idea puts a unique spin on the gallery wall look. While a gallery wall is usually thought of as an array of artwork and photos, you can recreate the look with nearly any wall decor. This idea uses various woven baskets to decorate a bright green wall. If your gallery wall lacks color, a bold accent wall can act as the perfect canvas for the display.
Mixed Media Gallery Wall
@hareandbull / Instagram
Another fun way to break up a gallery wall is to sprinkle in various objects and pieces of decor among the prints. This rustic look uses different items such as a washboard, a vintage cake pan, and lanterns to create a multifaceted design that gives the nook a lot of dimension and style.
A Cozy Gallery Wall
@chloeelizabethart / Instagram
Whether you have endless blank space or just a few little nooks here and there, you can find room to create a gallery wall anywhere in your home. This lovely design proves that an empty hallway wall is a perfect backdrop of a few art prints.
When working with less space, focus on a mix of small and medium-sized framed pieces to break up the display and maintain that gallery wall look.
A Home Office Gallery Wall
@thevintagetraderuk / Instagram
One of the best elements of this cute little gallery wall is that some of the pieces are framed kids' artwork. Not only is this idea adorable, but it's a great way to make your children feel like they are an intentional part of your home design.
Craft Room Gallery Wall
@weetman_house / Instagram
If you have a little craft room in your home, a gallery wall is a great idea to spruce up your space and show off some of your work at the same time. The weavings in this gallery wall break up the artwork and add pops of texture and color to the space.
A Very Colorful Gallery Wall
soozidanson / Instagram
Patterns are fundamental building blocks of decor, and just because you have a gallery wall doesn't mean you can't weave in some bold, bright patterns at the same time. This eye-catching gallery wall is not for the shy home decorator, but the animal print and neon colors in this room look excellent.
While this pattern was painted on the wall, you can replicate the look with a wallpaper or stencil design as the canvas for your gallery wall.
Gallery Wall Series
@daniellegutelli / Instagram
This gallery wall is a great way to fill a large space even if you don't have a large assortment of prints and photos. These three large photographs create a wonderful series that is playful and artsy at the same time.
Another way to recreate his look is to break up a single print into three separate images and blow them up in size at your local copy store.
Staircase Gallery Wall
@girlandgrey / Instagram
Another major pro when it comes to gallery walls? You can pretty much put one in every room in your house. Whether you have a stunning open staircase like this one to decorate with a gallery wall or a cozy nook, this look works no matter how much space you have.
Empty Frame Gallery Wall
@miriamemiliedesign / Instagram
Who says your picture frames need to display art in your gallery wall? This rustic idea plays with empty white picture frames and shutters to create a gallery wall that's neutral enough to play well with the rest of the room's decor.
If you want to recreate this look, you can find vintage picture frames at your local thrift store and paint them. Either stick to a single shade or pick a color palette that plays off other accessories in your room.
Floor-to-Ceiling Gallery Wall
@flawsomehome / Instagram
There's just something about a floor-to-ceiling gallery wall like this one that instantly brightens our mood. While this look may be too ambitious for some of us, it is a wonderful way to fill a lot of empty space and add endless visual interest to any room. Plus, you'll never get tired of your gallery wall when there's always something new to look at.
Bathroom Gallery Wall
Brexton Cole Interiors
A matte black background will make modern artwork stand out. Brexton Cole Interiors added interest to a spacious bathroom with a gallery wall filled with a mix of small drawings and photos in a mix of black, white, red, and gold frames.
Pink Gallery Wall
Design by William Hunter Collective / Styling by Emily Henderson Design / Photo by Sara Ligorria-Tramp
Arrange an assortment of colorful paintings on blush pink walls to bring your bedroom or guest room to life. This gallery wall above a daybed from William Hunter Collective for Emily Henderson Design has a mix of portrait and landscape paintings in white, black, wood, and unframed canvases for an effortless feel that looks collected over time.
Breakfast Nook Gallery Wall
Becca Interiors
Add interest and color to a neutral breakfast nook with a gallery of vintage landscape paintings. Becca Interiors chose a coastal theme for this surfing village home decorated with vintage furniture and a decorative surfboard. The largest and most colorful of the paintings is hung dead center to set the tone.
Source inexpensive framed art at thrift stores, flea markets, or estate sales to create a budget-friendly gallery wall.
Royal Blue Gallery Wall
Tyler Karu Design + Interiors / Photo by Erin Little
In an older home decorated with antiques, set off a collection of oil paintings in gilded frames with bold jewel-toned walls. Tyler Karu Design + Interiors highlighted a collection of portraits and landscape paintings with royal blue paint on the walls to create a timeless feel with a sense of history.
Black-and-White Drawings
Studio Peake
Create a sense of cohesion by choosing a single style of art. This gallery wall over the desk in a London bedroom by Studio Peake contrasts blue-gray walls with rows of black-and-white drawings in a slightly staggered grid pattern to add interest to the uniform display.
Full Height Gallery Wall
House 9 Interiors
Fill the space between the top of the sofa and the high ceilings of your living room to create a full-height gallery wall that will make an impact, like this space from House 9 Interiors . Beige walls soften the look.
Traditional Gallery Wall
A quiet gallery wall of small framed pieces can replace a large painting over the sofa in a traditional living room. Becca Interiors hung three rows of black-framed artworks in a diamond-shaped pattern over the sofa in this airy neutral space.
Colorful Patterned Frames
Hang a gallery wall with variations on a theme for a bold and intentional look. Studio Peake layered a series of colorful prints over patterned wallpaper. The prints are variations on a theme, while the frames have the same geometric pattern in two color iterations. The even number of prints and neat grid layout keeps the arrangement from looking chaotic.
Music Room Gallery Wall
Forbes + Masters
Dark chocolate walls create a warm backdrop for a striking gallery wall. This music room from Forbes + Masters has a music-themed gallery wall lit by wall sconces that reinforces the theme, while a guitar displayed in an acrylic frame is hung on the other side of the door.
Grasscloth Gallery Wall
Hang pictures on colored grasscloth walls to add texture to your gallery wall, like this London sitting room from Studio Peake . The gray wall covering is an excellent foil for colorful art and decor.
Family Photo Gallery Wall
Brophy Interiors
If you are a fan of displaying family photos, fill an empty wall in your TV room with black-and-white images in matching frames. Brophy Interiors decorated a white shiplap accent wall with two neat rows of family photos.
Yellow Matboard Gallery Wall
A simple swap like choosing colored matboard can add visual interest to a gallery wall of similar artwork in similar frames. Studio Peake matched white frames with pale yellow matboard to add contrast with light blue walls in this London bedroom.
Neutral Gallery Wall
Jessica Nelson Design / Carina Skrobecki Photography
While you can use a gallery wall to display personal items and quirky pieces, you can also display a coordinated selection of pieces for a polished feel that will add visual interest to a neutral room, like this space from Jessica Nelson Design .
The gallery wall is located on a side wall in the living room to complete the space rather than acting as a main focal point.
Bright Gallery Wall
Combine bright wallpaper with bold and colorful artwork for a striking look. This midcentury modern-inspired living room from Dazey Den makes a statement with orange patterned wallpaper and pops of neon yellow on the kitschy canvases of this lively gallery wall.
Nursery Gallery Wall
Alvin Wayne
Add color and sophistication to a nursery with a colorful off-center gallery wall, like this cool space from interior designer Alvin Wayne that doesn't pander to the usual ideas of what a baby room should look like.
Black-and-White Gallery Wall
Gray Space Interiors
Use similar black frames of different sizes and widths to create a sense of cohesion while displaying black-and-white photos of friends, family, travels, like this hallway gallery wall from Gray Space Interiors .
Shiplap Gallery Wall
Ashley Montgomery Design
Hang vintage paintings in a selection of frames on a vertical shiplap wall to make your eat-in kitchen feel cozy and warm, like this space from Ashley Montgomery Design .
Mismatched Frame Colors
K Shan Design
Mix different frame styles and colors for a kids's room gallery wall, like this space from K Shan Design .
Vertical Gallery Wall
In a small foyer with double-height ceilings, take advantage of vertical space to create an extra-tall gallery wall that will make what could feel like an empty and soulless pass-through area into a feature, like this space from House 9 Interiors .
Kitchen Gallery Wall
Brady Tolbert for Emily Henderson Design / Photo by Tessa Neustadt
Choose a black-and-white theme to decorate your kitchen that will allow you to get creative with image formats, sizes, and mediums.
This kitchen gallery wall from Brady Tolbert for Emily Henderson Design is centered around a large-scale black-and-white photo, and includes everything from framed sketches to a letter board sign.
Double Gallery Wall
Design by Kate Marker Interiors / Photo by Margaret Rajic
Decorate the corner of your living room by hanging a double gallery wall of framed photos and artwork. Kate Marker Interiors created cohesion by using the same mix of frames and colors while varying the artwork. The same sconces were hung on both walls to create cohesion.
Minimalist Gallery Wall
Define a reading corner in an airy space with a small minimalist gallery wall of framed art surrounded by plenty of bare wall, like this space from Brady Tolbert for Emily Henderson Design .
Sports-Themed Gallery Wall
Brexton Cole Interiors
Mix in vintage sports equipment and banners with small framed art to create a lively kids' room gallery wall above the bed. Brexton Cole Interiors chose navy paint and white wainscoting to create a winning backdrop for this fun gallery wall.
Moss Green Gallery Wall
Design and Photo by Sara Ligorria-Tramp for Emily Henderson Design
Pair dark wood and gilded vintage frames of varying shapes and sizes with vibrant moss green walls, like this bedroom gallery wall from Sara Ligorria-Tramp for Emily Henderson Design .
Travel Photo Gallery Wall
Desiree Burns Interiors
Hang a gallery wall in a formal dining room that makes the space feel decorated even when it's not in use.
Desiree Burns Interiors hung a gallery of travel photos in matching white frames whose pastel colors are complemented with luminous blue-gray walls for a minimal feel.
Vintage Gallery Wall
Ryann Miller for Emily Henderson Design / Photo by Sara Ligorria-Tramp
Mix vintage posters, photos, and portraits in frames of various styles to create a nostalgic gallery wall in a cozy dining room like this space from Ryann Miller for Emily Henderson Design .
Mirror Wall Gallery
Mix in some small round decorative mirrors of different styles and finishes to reflect light and make a staircase display more varied, like this space from Brexton Cole Interiors .
If you love collecting vintage and antique mirrors, line your staircase with a mix of old and modern mirrors of varying shapes and sizes that will fill the space while reflecting light and views .
Hallway Gallery Wall
Caitlin Higgins for Emily Henderson Design / Photo by Sara Ligorria-Tramp
Turn the untapped wall space of a hallway into a gallery wall that will make a pass-through space feel cozier, like this space from Caitlin Higgins for Emily Henderson Design .
All-White Gallery Wall
Design by Calimia Home / Photo by Jeanne Canto
Use white frames and mats against white walls for a seamless look that will highlight imagery.
In this home office from Calimia Home , a gallery wall of white-framed photos is complemented with an adjacent wall of frameless inspiration images tacked up with tape that can be rotated in and out at will.
Paint by Numbers Gallery
Emily Henderson Design / Photo by Sara Ligorria-Tramp
Grouping like items will create an impact. Create a budget-friendly gallery wall with a group of similar imagery sourced online or at your favorite flea market. In this white and wood dining room from Emily Henderson Design , framed paint-by-numbers ocean-themed paintings in various shapes and sizes create a cohesive look.
Dark Shiplap Gallery Wall
Urbanology Designs / Matti Gresham Photography
Dark shiplap creates a dramatic backdrop for a modern home office gallery wall. Urbanology Designs mixed framed art and textiles with a wall sconce and tiny shelf displaying decor objects for an eclectic look.
Built-In Gallery Wall
Turn built-in bookcases into a gallery wall by lining the shelves with an eclectic assortment of framed art in a mix of sizes and frame styles.
Hang some of the pieces on the front of the shelves for a three-dimensional look, like this space from Urbanology Designs .
Reading Nook Gallery Wall
Make a reading nook feel cozy and inviting with a gallery wall that includes framed prints, a wall sconce, and decor pieces like a mini ladder.
This space from Emily Henderson Design is outfitted with a chaise longue in a dark floral patterned fabric that adds a vintage note.
Home Office Gallery Wall
Add interest to a neutral home office with a small gallery wall behind your outward-facing desk that will make the room feel finished.
Urbanology Designs mixed art, photography, and decor in this small and simple gallery wall, leaving plenty of white space all around it to retain a minimal and uncluttered feel.
Cafe Style Gallery Wall
Velinda Hellen for Emily Henderson Design / Photo by Sara Ligorria-Tramp
Evoke the spirit of a European cafe with a large gallery wall filled with vintage French travel posters, photos, and art, like this bright space from Velinda Hellen for Emily Henderson Design .
Abstract Gallery Wall
Design by Devon Grace Interiors / Photo by Dustin Halleck
For a more coordinated look, choose a theme and a color scheme for your gallery. Devon Grace Interiors added interest to the wall above a sideboard with a mix of abstract art in shades of black and blue, with matching thin black frames for cohesion.
Floor-to-Ceiling Gallery
Jess Bunge for Emily Henderson Design / Photo by Sara Ligorria-Tramp
Start with a framed canvas leaning on the floor against the base of your gallery wall to create a truly floor-to-ceiling gallery wall in a spacious entry like this one from Jess Bunge for Emily Henderson Design .
Couch Wall Gallery
Design by Maestri Studio / Nathan Schroder Photography
Mix colorful artwork with vintage mirrors for a warm and eclectic feel. This gallery wall from Maestri Studio features pink flamingoes and gilded mirrors for a lively mix.
Color and Black-and-White
Mix color and black-and-white family photos to add interest to a gallery wall. This gallery wall from Devon Grace Interiors follows the line of the staircase, adding warmth to bare white walls.
Smoky Blue Gallery Wall
Design by Arlyn Hernandez for Emily Henderson Design / Photo by Sara Ligorria
Dark smoky blue wall paint creates the perfect backdrop for modern art and photos, like this dining room from Arlyn Hernandez for Emily Henderson Design that mixes vintage and modern decor.
Tips for Creating a Gallery Wall
- Before you hang anything, do a trial run by laying everything out on the floor or a large table depending on the size of your artwork and your wall space. Or use painter’s tape to map out your gallery wall arrangement. This will help to prevent mistakes when it’s time to hang things up.
- Start hanging artwork and decor from the center of your gallery wall at eye level to create a focal point. This works if you have all of your wall decor picked out or if you plan to hang a gallery wall that will grow with time.
- If your gallery consists of various size frames, use larger pieces as the focal point and arrange smaller pieces around it, filling in gaps as you go with more art or small mirrors or decor such as baskets, vintage finds, or architectural salvage pieces.
- Be sure to pay attention to placement by leaving equal spacing between pieces to create a cohesive look, whether you are lining up images in a grid or have chosen a more free-form arrangement.
More from The Spruce
- 32 Bedroom Wall Decor Ideas to Style Your Space
- 64 Wallpaper Ideas to Revitalize Every Room in the House
- 41 Ideas for Decorating Around a TV That Will Help It Blend In When It's Not On
- 78 Dining Room Decor Ideas For a Stylish Entertaining Space
- 92 Home Decor Ideas That Will Suit Any and Every Room in the House
- 52 Dynamic Black and White Bathroom Ideas
- 51 Fireplace Mantel Decor Ideas and Expert Tips
- 67 Teenage Girl Bedroom Ideas for Every Style
- 27 Modern Dining Room Ideas and Designs
- 40 Baby Room Ideas for Decorating a Charming and Functional Nursery
- 55 Kitchen Decor Ideas in a Range of Styles to Personalize Your Space
- 53 Modern Bathroom Ideas to Upgrade Your Space
- 40 Ways to Decorate With Plates on the Wall for a Charming, Unique Look
- 41 Apartment Decorating Ideas That Will Make Your Compact Space Feel Like Home
- 24 Basement Wall Ideas to Replicate for a Refined Space
- 47 Stunning Blue Room Ideas for Every Style
Home & Jet
An award-winning home, travel and lifestyle magazine featured in…

Get Inspired

Dec 15 Create a Gallery Wall With Your Travel Photos
There is always that question about what we can do with the countless photographs we often take with our cameras and smartphones. If you enjoy taking pictures while traveling, you always want to keep these experiences and memories alive. Immortalize your memories by printing them, framing them, and incorporating them into your interior for a beautiful and sentimental outlook.
What is a Gallery Wall?
A gallery wall is a collection of framed and unframed wall art, wall designs, and other decorative pieces in a grouping. Gallery walls are becoming popular in the contemporary world of interior decoration . This minimalistic and stylish approach to achieving the perfect interior is the best way to bring color and light into any space.
Nothing beats the captivating power of a beautiful arrangement of photo prints. You can astound your guests with an attractive and stunning display of your favorite travel photos. How you display your photographs is entirely up to the structure and size of your home. Several areas in the home are perfect for a gallery wall display, but nothing beats displaying one in your living room. Evaluate your space and decide the best way to incorporate a gallery wall into your interior.
Your Available Wall Space
If you want to create the perfect gallery wall, this is perhaps the first thing to consider. Once you are sure of the available wall space, it becomes easier to select adequate frame sizes. For a professional and genuine display, your prints should occupy about seventy-five percent of your open wall space. A simple technique will be to measure the height and width of your wall and then multiply what you have by 0.6 and 0.75, respectively.
Framing Your Prints
Framing your prints tends to give them a processed and traditional look. Elevate your interior's style and visual outlook by creating a gallery wall with your framed travel photographs. It is safe to assume your travel photographs will come in different shades of color. Incorporate a white or neutral-based frame to avoid a disappointing clash of color. There is no better way to bring consistency and balance to the pop of color than using a neutral frame. Embrace the spirit of the seasons and use an excellent gallery wall of framed prints highlighting different places you have visited. Create a stunning and straightforward gallery wall by maintaining symmetry and consistency with the sizes and arrangement of the frames. You can order framed canvases and immortalize your travel and adventurous memories. Check out our travel guides for incredible adventure ideas if you need new memories!
Display Your Prints
As mentioned earlier, there are several techniques to displaying your favorite travel prints; go through our expert ideas on some of the best ways to showcase your favorite prints. The dining room is the perfect place for statement piece.
A Combination of Artworks
Integrate other forms of wall art into your gallery wall for a genuine, bright, and gorgeous display. Try to maintain consistency with the theme, and ensure the different forms of wall art in use are travel Inspired pieces.
Utilize Mirrors
Bring character and style to your interior by incorporating reflective mirror elements for a pop of color. It’s a traditional but chic approach to decorating your living area. Serenading your gallery wall with other forms of wall designs isn’t a bad way to style up your living area.
Floating Shelves
Create a stunning display of travel prints by hanging them on a floating shelf. You can get creative by using two or more shelves for a proper gallery wall display.
Display Your Gallery Wall Above A Mantel
An arrangement of framed prints above a fireplace is perhaps a more contemporary approach to displaying your favorite travel photographs. Celebrate this season by creating a gallery wall above your fireplace, and ensure to add other decorative pieces such as an accent chair for a truly homey and festive outlook.
Other posts we think you might like…

Dec 24 Tips for Seniors Traveling With a Wheelchair

Dec 13 6 Best Destinations to Visit in India in 2022
50+ Creative Ideas for Hanging Travel Photos and Making Your Home Feel Like a Work of Art
By: Author Valerie Forgeard
Posted on Published: January 10, 2023 - Last updated: July 1, 2023
Categories Travel
Are you looking for some creative ways to hang your travel photos? Whether you’re an avid traveler or want to add a touch of adventure and wanderlust to your home decor, hanging pictures of your travels can be a great way to do it.
From wall artwork displays featuring multiple images to hanging individual prints in unique ways, plenty of ideas will help you turn those memories into beautiful wall decor.
In this article, we will explore some inspiring ideas for hanging travel photos so that every time you look at them, they remind you of the places you’ve been and the unique experiences.
50 Ideas to Transform Your Travel Photos Into Artwork
- Create a gallery wall with a selection of your favorite travel photos.
- Hang a single large travel photo as an eye-catcher.
- Create a collage of small travel photos.
- Use floating shelves to showcase travel photos.
- Try a series of travel photos in matching frames.
- Create a mosaic of travel photos.
- Use clothespins or clips to hang travel photos from string or wire.
- Hang travel photos on a corkboard or bulletin board.
- Hang travel photos on a world map with push pins.
- Hang travel photos on a pegboard for a modern and functional display.
- Use a hanging photo stand with pockets or sleeves.
- Hang travel photos in a stairwell for a unique presentation.
- Hang travel photos in matching frames in a stairwell.
- Use a hanging rod and clips to showcase travel photos.
- Hang travel photos on a wall in a grid pattern.
- Use a photo ladder to hang travel photos.
- Hang travel photos in a circle or other geometric shape.
- Use a wire system to hang travel photos.
- Hang travel photos on the wall with washi tape or clips.
- Use a hanging photo tree to showcase travel photos.
- Hang travel photos in a group on a wall.
- Use a photo shelf to hang travel photos.
- Hang travel photos on a wall with clipboards.
- Use a hanging photo stand with clips or magnets.
- Hang travel photos on a wall with a hanging display with hooks.
- Use a hanging display with wire or string.
- Hang travel photos in a row on a wall with matching frames.
- Use a hanging display with wooden clips.
- Hang travel photos on the wall with a photo display with rope.
- Use a hanging photo display with clothespins or dowels.
- Hang travel photos on the wall with a photo display with chains.
- Use a photo display to hang with wire loops.
- Hang travel photos on the wall with a photo display with strings.
- Use a hanging photo display with wire baskets.
- Hang travel photos on the wall with a photo display with wooden slats.
- Use a hanging photo display with staples and wire.
- Hang travel photos on the wall in a photo display with clear plastic sleeves.
- Use a hanging photo display with metal staples.
- Hang travel photos on the wall in a photo display with metal rods.
- Use a hanging photo display with wireframes.
- Hang travel photos on the wall in a photo display with metal chains.
- Use a hanging photo display with wooden or metal rods and brackets.
- Hang travel photos on the wall using a photo display with rubber bands.
- Use a hanging photo display with strings or ribbons.
- Hang travel photos on the wall with a photo display with metal rings.
- Use a hanging photo display with wooden dowels and string.
- Hang travel photos on the wall with a photo display with metal hooks.
- Use a hanging photo display with metal clips and wire.
- Hang travel photos on the wall with a photo display with metal baskets.
- Use a hanging photo display with metal rods and clips.
Where to Hang Your Travel Photos
Hanging travel photos in your home is not only a great way to remember your best moments, but they also make a beautiful addition. Travel photos add a touch of wonder and color to gray walls. They are also a great source of inspiration. Looking at them makes you want to go on your next travel adventure!
- Corridor . This is a great way to showcase some of your favorite travel photos and a great way to engage guests in conversation.
- In the kitchen . If you have a large kitchen window with natural light, you can hang some of your favorite travel photos there (as long as they do not block the view). This will create a welcoming atmosphere for your guests and make them feel comfortable when they come over for dinner or other occasions.
- On the mantel or other central point . The mantel is one of the areas that most people look at when they are in your home, so it makes sense to display some of your best travel photos there. You can also try hanging them near the fireplace or another natural focal point in your home, such as an open window or a large plant.
- On a gallery wall in the living or dining room . A gallery wall is an area covered with multiple frames that together act as one cohesive artwork (think Warhol). It’s a great way to display multiple paintings in a room without them having to compete for attention.
- In an office or workspace . If you have an office space where you work on the computer, hang some travel photos there! It will remind you why you went on vacation in the first place – and who knows? Maybe they’ll inspire you for your next vacation, too!
- In the bedroom . Use your favorite travel photos as desktop wallpaper or screensavers on your phone and tablet computer so they are always in view when you need inspiration for planning future adventures.
The Best Way to Hang Your Travel Photos
The best way to hang your travel photos is in a photo frame with an adhesive hook on the back. This is a great way to showcase your photos, as you can move them around and change the position they’re hung.
Here are some things to consider when hanging travel photos:
- Hang them high enough to be seen from anywhere in the room. You want your guests to see the photos from every seat. So hang them high enough so that everyone can see them.
- Make sure you have enough space on either side of your photos so they don’t look crowded together. You want people to see all the details in each photo. So ensure there is enough space around each photo so people don’t miss anything when they look at it up close.
- Don’t put too many picture frames close together because then the wall decor will look messy and chaotic instead of nicely organized as you want. It’s always a good idea to keep some white space between your art pieces and various hanging frames, such as travel photos and family pictures, rather than overloading the entire wall with your decorating ideas.
Inspirations for Creating a Cohesive Theme or Story With Your Travel Photos
When you travel, you’re going to take a lot of photos. And if you’re anything like me, there’s a good chance that many photos aren’t terrific.
By that, I don’t mean that every photo has to be perfect. I think that many of the best travel photos are the ones that don’t look like they were taken by a professional. But when it comes to telling a cohesive story with your travel photos, it can be helpful to have some inspiration to tell your story visually.
Here are a few ideas on how you can do that:
- Use a consistent image detail . This could be as simple as using the same lens or focal length for each shot (if you’re using an interchangeable lens camera). Or it could mean keeping your subject in the center of the frame throughout the images.
- Use the same lighting conditions for each shot . For example, if you take one photo at dusk and another at dawn, try to match both shots to have similar lighting conditions.
- Orient your subject in different ways during the series . If your subject is standing on a beach, try shooting it from above, below, or even behind so that its silhouette stands out against the sunset sky in each photo (make sure it’s not too close to the edge).
What to Do With the Travel Photos That You Can’t Hang Anywhere
You have just returned from a trip and brought back many photos. You start looking through them, going through your favorites, and trying to decide which 2 or 3 dozen photos should be enlarged and hung on your wall. It’s not as easy as you might think. Here are some ideas on what to do with the extra photos in your collection that don’t make it onto your wall display or into your living room.
Digital Archive
If you’re not a professional photographer and don’t need to keep thousands of photos, store them on your computer or an external drive. That way, you’ll always have them on hand when you need them. You can also create a folder for each year and sort your photos by location or theme if you want to create a photo album later.
Photo Prints for Friends and Family
I like to print out smaller versions of my favorite photos so I can hang them as art prints in my home or give them as gifts – especially if they show something special that happened during our travels together (a baby’s first snowfall, etc.). You can even print larger versions for the walls if the quality is good enough!
Create Your Gallery Show Online Using Sites Like PicMonkey or Canva
This is an excellent option if you want to share your travel photos but don’t have the budget or skills to create a proper photo book (see below).
Print Out Your Travel Photos and Stick Them in a Scrapbook or Photo Journal
Scrapbooking is a great way to preserve your travel memories, and it’s fun too! If you don’t like scrapbooking, you can still use your travel photos to make a photo journal. You can even make it interactive by adding stickers, crayons, or paints.
Create a Travel Photo Calendar for the Coming Year
You can easily create your calendar with Vistaprint or Snapfish.
Here are the steps to create a travel photo calendar:
- Select the photos you want to include in your calendar. You can choose photos from a single trip or combine photos from different trips.
- Open a calendar template or software, and choose the layout and design for your calendar. You can usually customize the different sizes, orientations, and number of months in your calendar.
- Add your travel photos to the calendar template by placing one photo each month. You can add text or other design elements, such as patterns or graphics, to the calendar template.
- Preview and proofread your calendar to make sure everything looks correct.
- Print your calendar using a high-quality printer or send it to an online printing service so it can be printed and shipped to you.
- Once you’ve finished your travel photo calendar, you can hang it on the wall or place it on your desk to enjoy throughout the year. You can also give it to friends or family members who love to travel.
Use Your Travel Photos to Create Custom Wallpapers or Screensavers for Your Phone or Computer
Use your photos to create custom wallpapers or screensavers for your phone or computer. You can create a slideshow with your favorite travel family pictures or use a photo as a background for your lock screen or desktop wallpaper.
- Skip to primary navigation
- Skip to main content
- Skip to primary sidebar
Pages of Travel
Travel Blog
- WORK WITH US
- DESTINATIONS
- THE BEST TRAVEL GEAR
- PACKING FOR YOUR TRIP
- PHOTOGRAPHY TIPS
- search Search
A Fun Guide to Decorating With Travel Souvenirs and Photos
Created On: January 8, 2017 | Updated: September 21, 2023 | 42 Comments
Disclaimer: This post contains affiliate links from which we may make commission from. As always, we only recommend places and products we love! In addition, we try our best to keep our articles up-to-date with current prices, locations, and hours of operation however we always recommend double-checking when planning a trip as these items can change frequently.
Decorating With Travel Souvenirs and Photos
One of my favorite things to ask people is what they typically pick up for souvenirs when traveling! I used to collect Starbucks coffee mugs from cities but after my first trip to Japan when I bought five to bring home from various cities I visited, I decided that I might want to slow down on the breakable items. Although, I will admit I still get a little piece of pottery ever now and then.
A few of my other favorite travel souvenirs I’ve picked up on my travels are my yukata, knives, chopsticks, tea, and incense from Japan. Jams, wine, olive oil, and honey from France. Balsamic vinegar, and parmesan from Italy. Spices from Hungary. And of course, the miscellaneous clothing items, candies, and snacks. But I also enjoy picking up postcards, saving ticket stubs, and brochures, and of course, taking photos on my trips.
So now that you went on an amazing trip, took hundreds of gorgeous photos, and picked up a few travel souvenirs along the way what do you do with them now? Decorating with travel souvenirs in your home doesn’t have to be difficult or even cost very much! Here are some of the ways we have displayed our travel souvenirs and memorabilia from our trips.

I’ve always been a fan of shadow boxes because you have the ability to create such a unique collage of items and travel souvenirs. Plus you can change out the items as you collect more. Some of our favorite items to put in shadow boxes are ticket stubs, stickers, keychains, photos, or really any other items you want.
What you’ll need to create a shadow box:
- A shadow box frame (any size) $15-25
- Ticket stubs, stickers, trinkets, stamps, postcards, photos, or any other items you want to include FREE or minimal cost
- Straight Pins (any colors) $4
- Picture Hanging Nail Kit $8
Total cost: Around $25-30 if you already have nails and a hammer.
Polaroid Photography

I love my Fujifilm Instax because it captures a unique perspective. Rather than placing all of my Polaroids in a book, I have turned them into fridge art! All you have to do is take your camera with you when traveling, snap some mementos, and tape them to your fridge (or wherever else you want) with washi tape! This one is a little more expensive than other ideas for decorating with travel souvenirs but after the initial cost of the camera, it’s not too much.
What you’ll need for polaroid photography:
- Fujifilm Instax or another Polaroid camera $50+
- Fujifilm Instant Film $15 for 20 sheets
- Ultra-Thin Sharpie (if you want to caption your photos) $4.50 set of 5
- Washi Tape $3.50 for 5 styles
Total cost: Around $80, however after the initial cost of the camera it’s relatively inexpensive to decorate with polaroids!
Gallery Wall

Creating a gallery wall is an easy way to fill up wall space with photos with travel souvenirs and events in life! You can do this in a number of ways including framing printed photos, fabrics, postcards, and posters. You can mix and match frames if you’d like or you can use the same style of frame to create a more cohesive look.
What you’ll need to create a gallery wall:
- Picture frames
- Prints, photos, postcards, etc. Price varies depending on the cost of your photo prints. We prefer Mpix because they’re inexpensive and have beautiful quality prints.
- Nail(s), hammer
Total cost: $35-40+
Display Cabinet

A lot of our travel memorabilia came to us as family heritage pieces. Timeless and priceless artifacts such as our sake set, geisha doll, and vase that Logan’s grandmother brought with her when emigrating from Japan will always be a few of our favorites. We store these items and a few others we’ve collected while traveling, safely in a display cabinet.
What you’ll need for a display cabinet:
- A display cabinet or curio cabinet with glass doors for viewing or bookshelves. Our suggestion? Search garage sales, flea markets, and antique shops for one that you can restore yourself!
- Artifacts to put inside – we used a lot of family heirlooms for this including vases, nesting dolls, trinkets, sake set, and tea set but you can put any items you want inside.
Total cost: $150+ depending on the cost of the cabinet.
Framed Postcards

One cheap souvenir to purchase while traveling is postcards. Usually, they are under $2 and have quality photos, artwork, or designs. Another perk? They’re also extremely lightweight so you don’t have to worry about lugging around something heavy when traveling (like when Logan carried 5 mugs for me all over Japan LOL).
What you’ll need to frame postcards:
- 8 X 10 picture frame or larger
- Postcards: $6-8 (if each postcard is $1)
Total cost: Around $20 or less
Postcard Bunting

If you save ticket stubs, photos, postcards, and other small paper goods, creating a bunting is one of the easiest DIY projects for decorating with travel souvenirs! Another huge perk is you can change out the items as much as you’d like.
What you’ll need to create a postcard bunting:
- Photos, postcards, or other small paper items.
- Twine $5
- Mini or regular clothespins $2.50
- Tape (or nails and hammer if tying the twine around nail)
Total cost: Around $10-15

We have two large old maps and three smaller ones and they are my favorite pieces inside our home. They have so much history and character plus fill up our walls nicely.
My parents found our maps for us at a flea market and I’ve seen them at other flea markets since then! You can also search for them on eBay or Etsy .
What You’ll Need:
- Nail(s) and hammer
Total cost: Around $5-$200
What are some ways that you decorate your home with the travel souvenirs you brought back from trips? What are some of our favorite travel souvenirs you purchase or save while traveling?
Reader Interactions
Leave a reply cancel reply, comments & reviews.
January 8, 2017
I’m a textile addict and usually bring back a few handmade ones from my travels. Pillow covers are light and easy to pack in any luggage including a backpack. 🙂
kallsypage says
January 9, 2017
Pillow covers are such an excellent idea! I will have to look for some of these on our next trip. 🙂
I’ve been compiling a list of ways to display all of our travel memorabilia! I know I want to do a scrapbook, even though it’s cliche, but I love them. I can look through old scrapbooks for hours with a cup of coffee. I’m also going to do a gallery wall with travel photos, I think it’s the thing I’m most excited about! I also love your idea of a fireplace; I wish I could do it, but I’m pretty sure the apartment we’re moving into doesn’t have one. There are so many ways to incorporate your souvenirs into your home, I can’t wait to get started in a few weeks! Thanks for sharing 🙂
I love scrapbooks Suz! We have a few from our travels and completely forgot to include those in the post. The gallery wall is such a simple way to fill wall space with items from travels. Please let me know when you decorate with your memorabilia! I’d love to see it 🙂
Adrianna says
That is awesome! I dont have polaroid camera but I found place where I can print my regular photos in polaroid style. And they now on my wall in my living room ( almost filled up the whole side) . Such a perfect idea to display them
That’s so cool! Where can you do that? I would love to do that with some of our other photos. 🙂
I love the idea with the box
Thanks Wendy! It’s a simple way to put odds and ends together.
Louiela says
Memories are what we have after traveling and we always want to keep them… Glad you have these suggested this memorabilias.. I love the shadow box as I tend to collect and keep any papers pertaining to my travels including receipts?
I completely agree with you. The shadow box is a favorite of ours as well because you can put so many different items in it. 🙂
Victoria says
Oh my word!!! The insta camera wall is my fave!
Our fridge is getting so full from the photos! 🙂
Such cute ideas! I’m totally going to do a shadowbox wall!
Thanks Erin! I’d love to see your shadowbox after you complete it. 🙂
Thank you so much! We have a lot of fun searching for old maps at flea markets and collecting items to use for gallery walls. Those old maps sure feel like they have stories to tell! 🙂
That would be a great way to display some of your souvenirs! 🙂
Kelly Hogan says
January 10, 2017
Love love LOVE these ideas! We have a massive National Geographic map hanging where we pin the places we’ve been, but haven’t found a way to show off our other travels yet. I’m one of those people that keeps EVERYTHING – ticket stubs, brochures, etc., plus the billions of photos we take. I’ve had a gallery wall in mind for awhile now but just haven’t gotten around to it. I absolutely love the polaroid idea, though…might have to do that in the interim!
Thank you so much Kelly! We have been looking for a world map for awhile now to do the same! I keep a lot of small papers as well (as you can probably tell). The polaroid is a new favorite of ours – such a unique way to document travels! 🙂
dentjuli says
I haven’t seen the polaroids on the fridge before! I’ll have to try that!
One day I realized that our fridge was cluttered with papers and receipts so I decided to tape a few up there and thus began a trend! 🙂
August 13, 2020
I got polaroid pictures of my kids from a princess theme birthday party. I put them on my fridge until they were in high school. I didn’t use tape, I used a magnet strip retrieved from either old business magnet or from NFL schedule magnets and stick it to the back of pictures. Then it is easy to move around. I also have started some magnets souvenir collection now on my fridge. Keep thinking to use the map, travel stub and tickets, but haven’t got to that yet. Your ideas are great.
Kallsy Page says
August 14, 2020
I love your idea to reuse magnet strips on the back of your polaroids! I have some magnets from doctors, pizza places, etc that I don’t need anymore so I may have to give that a try. 🙂
Thank you for reading! Let me know if you end up doing something with your travel stubs or tickets.
You’re so creative, these are beautiful – I make a scrapbook for every trip but now I’m thinking shadow boxes could be fun too. Thanks for the ideas!!
Thank you so much Staci! I need to get back into travel scrapbooks. 🙂
Robert says
Some great ideas, I’ve pretty much got my office walls and shelves full of travel memorabilia! Excellent idea with the Shadow Box!
Thank you Robert! The memorabilia seems to just grow and grow doesn’t it!? 🙂
Prerna_Malhan says
This made me remember the time when i was in college – i used to make scrapbooks and albums to preserve all memories. I am definitely going to do this for my travel souvenirs. Thanks for inspiring.
Some of my most cherished memories are in scrapbooks! I need work on some of these again. Thanks for reading! 🙂
Collette Stohler says
You’re so creative! I may need to hire you to decorate for us 🙂
Thank you Collette! You’re too sweet. Happy to come help. 😉
Thank you! I have a lot of fun with it. 🙂
January 11, 2017
I love the fridge Polaroid idea! Goodness knows I look at my fridge MANY times during the day – how lovely to be reminded of fun adventures in different cities and countries!
January 15, 2017
That’s exactly why we did this! 🙂 We visit our fridge a little too often 😉
Lena Ameri says
January 12, 2017
These are such great ideas! We are always wondering what to do with our travel memorabilia. We started adding shells from beach vacations to a lantern that’s filled with sand from Costa Rica. Bassam is also obsessed with getting a shot glass from everywhere we go. Needless to say, our collection is getting out of hand. Your ideas seem to be much more organized and streamlined than that. Great post!
Love the idea with the shells Lena. We have a bunch of shells that sit in a bowl but have always wondered what to do with them. I love that Bassam likes collecting shot glasses, those are so funny! Some of the best I’ve seen were in Australia! 🙂
bruceschinkel19 says
January 14, 2017
Some really great ideas here! I’ve done the shadow boxes (even given them as gifts), and they turned out great. We also have a bit of a gallery wall with a mix of pictures and fun souvenirs like a boomerang, maracas, and ukulele 🙂
What a great idea to give a shadow box as a gift! I will have to do that in the future. You’ve also inspired me to hang the boomerang that I bought in Australia! 🙂
I completely understand your woes. We’ve got to stop collecting so many things! That’s why we’ve started switching to papers and photographs. 🙂
Turpin says
January 25, 2017
Beautiful ideas for displaying holiday memories!
wahamiltron says
March 11, 2017
Some really cool ideas! I recently started working on a gallery wall at home, but maybe I’ll try one of your other suggestions after my next trip 🙂
Paula Morgan says
I have been meaning to do a shadow box for ages!
Plan Your Next Trip
Traveling the world can be overwhelming, we get it! That’s why we’re here to help you get started on your own journey.

- Shop Our Favorites
- Work With Us
- How to Plan For A Trip
- The Best Travel Apps
- DIY Travel First Aid
- Travel Credit Cards
- TSA Precheck & Global Entry Info
Destinations
- Japan Travel Guides
- United States
- South America
Travel Tips
- Airplane Travel
- Budget Travel
- Packing Tips
- Photography
- Travel Gear
Get More Travel Inspiration + Tips
When you subscribe to the newsletter!

30 Gorgeous Gallery Wall Ideas To Fill Any Space With Art
D o you have a blank wall in your home that you have always wanted to make a canvas for your favorite art ideas? If you answered yes, we have some excellent news for you. A gallery wall is a perfect way to express your artistic personality. When asked about it by Veranda, Annica Wallin, an Executive Creative Director for Desenio, beautifully put it: “Choose art that you love that speaks to you. Curating an eclectic mix of different styles creates an intriguing and personal collection.”
Image credits: desenio
Whether you want to make an eclectic statement, add some color, or showcase your personal memories, a gallery wall can do it all. With our curated list of 30 stunning gallery wall ideas, you can turn any space into a home gallery—from lounge to hallway.
Read on to find valuable tips for arranging your art, choosing the right frames, and creating a centerpiece in your space. Trust us, the possibilities with these wall art ideas are endless! Don’t forget to vote for your favorites!
Are Gallery Walls Still on Trend?
Can a gallery of sentimental photos, prints, or art ever go out of fashion? Possibly, just not so quick. As one of the home decor trends of 2023, gallery walls will continue to be popular the following year. On the other hand, gallery walls can be timeless as long as you change the art occasionally.
Some trends might, in fact, be going out of fashion. According to Google Trends, interest in world wall art has dropped drastically since its peak in August 2023. Studio production and interior designer Adrian Palacios confirmed to Living Spaces that “World wall art is going out and being replaced by a movement toward less obvious and more nuanced art. These are complicated times we’re living in, and our walls don’t need to add to our information overload.”
How to Design a Gallery Wall?
There is no right or wrong way to arrange a gallery wall, so you can follow your intuition and experiment with different options. However, if you don’t know where to start or how to arrange the pieces, here are some useful tips for you to begin with.
The first thing you need to consider is the placement of your gallery wall. Choose an empty wall in your home that you want to decorate, such as above the sofa in the living room, behind the bed in the bedroom, or in a hallway.
Pick a Spacious Wall
Image credits: cottonbro studio
Ensure your wall has enough space to accommodate the art without making it look crowded or sparse. You can measure the area and mark it with painter’s tape.
Consider the Room’s Function
Image credits: Max Rahubovskiy
Design your gallery wall facing the seating area in the living room so you can sit down and admire your art.
Consider the Lighting
Image credits: Maria Orlova
Choose a wall with good lighting, natural or artificial, to enhance the visibility of your art or photographs.
What is the best way to arrange a gallery wall? You can use different layouts, such as a grid, a symmetrical, or an organic placement, to create various effects and styles for your gallery wall. Just remember to measure your art against the wall.
Grid Layout
Image credits: wuttichai1983
Follow a horizontal and vertical alignment to arrange your art in a neat and orderly fashion. It creates a uniform look, perfect for minimalist and modern-style spaces.
Symmetrical Layout
Arrange the art pieces following a central axis or a focal point. It creates an elegantly balanced look for classic and formal interiors.
Organic Layout
Hang your art following a curved shape. This method is perfect when you have pieces in different sizes and shapes. It creates an eclectic look and works well with bohemian and rustic-style interiors.
When creating a gallery wall, it’s important to consider the frames you’ll be using. Frames come in a variety of styles and can have different effects on both your gallery wall and interior. You can choose matching or mismatching frames or even opt for frameless options. To add some interesting contrast, you can mix frames of different colors, materials, and thicknesses.
Matching and Mismatching Frames
Image credits: wallstreetdubai
Matching frames create a uniform and consistent look to perfectly suit a grid or a symmetrical layout. However, if you want to go for a diverse and eclectic look, try using mismatched frames. This works exceptionally well if you have an organic layout. Finally, choose no frames to create a modern, minimalist look.
Choosing a Color
Image credits: baliol.house
Pick frames that suit your color scheme or theme to create a balanced interior. You can seamlessly blend similar colors to match your art or choose bold contrast to make it a statement in your space. If you want to push it even further and create a striking maximalist decor in your home, try using different frames for each piece.
Accessories
Image credits: rebeccadiy
Have fun with frames by adding shelves, wall hangings, baskets, or other items to make your gallery wall not only artistic but functional.
Artsy Living Room Gallery Wall Ideas
Whether you are an art lover or want to bring some creativity to your living space, our collection of living room gallery wall ideas will give you plenty of inspiration. You can choose from a range of styles, from a mix of vintage pieces to a modern display of contemporary art, and create a unique look that truly reflects your personality.
#1 Natural Wood
To design a bright and cozy hallway, consider framing vivid prints in natural wood frames.
Image credits: amazon.com
#2 Illuminated Gallery Wall
The gallery wall looks great during the day but can be dim at night. Illuminate your photographs with lights to add a magical and romantic touch to the wall, brightening up the space.
#3 Layout Variations
Consider featuring a gallery wall with an arrangement of photos in different layouts. For a space such as a staircase, a diagonal layout would be perfect. If you want to create a repetition, it’s best to opt for the same style of frames. The layout of the gallery wall can be either horizontal or vertical, depending on the placement.
#4 From Small To Large
Photography begins to look dynamic and exciting when framed in different size frames.
#5 Old-School Collage
Create a focal point using an old-but-gold collage technique. Combine photographs in a symmetrical or asymmetrical grid with your own photos, or use a collage kit.
#6 Pink Photographs
Adding your favorite pinkish photographs, such as nature or travel, will instantly warm up the colors of the room.
#7 Colorful Photographs
Colorful, bright photographs are perfect for balanced monochromatic interiors. If you choose to go with this look use black-and-white frames.
#8 Round Frames
One unconventional way to design a gallery wall is by using circular frames. This approach creates a modern look with a touch of avant-garde.
#9 Photographs And Letterboard
Feature your family photos with a letterboard to make your gallery wall more authentic. You can write anything from family member’s initials to their full names or simply put a phrase that describes them.
#10 Polaroids
Display your Polaroid photos and create a retro, nostalgic look, reminding you of all the precious moments in your life.
Hallway Gallery Wall Ideas
A hallway is often an overlooked space at home, but it can be transformed into a stunning gallery with minimal effort. Whether you want to make a statement, add color, or showcase your taste, we’ll share some of the most inspiring gallery wall ideas you could try in your home.
#11 Black And White Photographs
Looking for a classic and elegant photo gallery wall idea? Feature black-and-white family photos in stylish black frames to add a striking contrast to the wall. This idea is easily adaptable to any space or color palette.
#12 Black And White Linear Art
Looking for modern minimalist gallery wall ideas? Play with black and white linear prints to create a monochrome feature in bright interiors.
#13 Inspiring Quotes
Receive a dose of motivation every time you step into your home. Positive, inspirational art is perfect for designing a hallway gallery wall.
#14 Add Zones To Your Hallway
Anyone with a long hallway will confirm how difficult it is to organize. One way to solve this is by adding zones to your hallway. Combine a mirror, table, and shelves to create a focal point first. This area will help separate the space and provide functionality as you can display prints, vases and keep your goods. Next, make use of an empty wall along the hallway by hanging a few pictures.
#15 Cover Odd Areas
A gallery wall is an ideal way to fill unused areas. Choose abstract wall decor in colors complementing your interior.
#16 Vintage Paintings
Feature a mix of portraits or botanical pieces with antique frames to create a vibrant and eclectic art display. If you want to make a statement feature in your living room, try expanding your gallery wall over the two walls.
#17 Letterboards
Letterboards are perfect for making a special hallway announcement or keeping home’s internet passwords. You can hang a letterboard or put it on the chest of drawers next to some sculptures.
#18 Neutral Prints
Improve your empty hallway walls by decorating them with two double-sided neutral paintings—a final touch to a mid-century hallway.
#19 Golden Frames
Consider hanging impressionist paintings in golden frames to make your hallway feel more luxurious.
#20 Functional Shelves For Unused Corners
Have an empty corner in the hallway? Install a shelving unit to display books, plants, candles, and other miscellaneous art. You can still use it to hold your keys, making it a functional and stylish piece of your interior.
Photo Gallery Wall Ideas
A photo gallery wall is a charming way to share cherished memories and add a personal touch to any room. Whether it’s a collection of family photos or an eclectic mix of artistic photo prints, a gallery wall expresses genuine emotion.
With thoughtful placement and a keen eye for design, the following photo gallery wall ideas will transform a blank wall into a captivating visual display.
#21 Vintage Gallery
Design a gallery wall with a collection of retro French art for an authentic countryside-style look in your hallway.
#22 Old-Fashioned Posters
Mix and match posters of different sizes, colors, and patterns to create a charming collage that reflects your unique taste.
#23 A Plate Gallery
The perfect way to add an attractive detail to your interior is by creating a display of plates on your wall. Choose plates of different shapes and sizes, whether plain or with patterns. Hang them using plate hangers.
#24 World Maps
Create a travel-themed and adventurous look by adding miscellaneous maps to your wall. You can also hang some frames with pictures from your travels, making the gallery wall more sentimental.
#25 Gallery Wall With A Clock
Feature an extraordinary clock with paintings, sculptures, and other collectibles on your gallery wall. The clock will add a nostalgic vintage touch.
#26 Gallery Of Shelves
Using shelves to display objects will create a gallery wall that is both functional and stylish. The shelves allow for more variety, as they can hold frames, books, plants, candles, sculptural pieces, etc.
#27 The Magic Of Mirrors
Add dimension and light by incorporating unframed mirrors into a staircase gallery wall. The mirrors will reflect other details of the room, such as plants and furniture, expanding the space further.
#28 Mismatching Frames
Embrace the charm of mismatching frames to create a fun and creative atmosphere. Experiment with different sizes, shapes, colors, and styles to see what works together.
#29 Basket Gallery Wall
Use various woven baskets to decorate bright white walls. The texture of the baskets adds contrast and creates a unique vibe for your bedroom. They are also easy to hang and move around, making this idea highly versatile.
#30 Above A Couch
How do you fill the blank space behind a sofa? The answer is simple—with a well-planned gallery wall! Simply arrange the prints symmetrically to complement the living room’s colors and style.
Answers to Popular Questions About Gallery Walls
Before you go ahead with designing your own gallery wall, let’s answer some of the most popular questions to help you along.
What Is the Rule for Gallery Walls?
While there are no strict rules in place for making a gallery wall, a common practice is to keep the space between the frames consistent, at or around 3 inches apart . This can help your gallery look less crowded and chaotic.
What is Replacing Gallery Walls?
Some believe that gallery walls have become outdated and too cluttered for a modern, minimalist approach to decorating. If you’re looking for something more sophisticated and subtle, try hanging a tapestry, a single large-scale print, or a group of no more than three art pieces, on your wall. Alternatively, you could create an accent wall with plants. Vertical gardens are currently one of the trendiest options out there.
Where Not to Put a Gallery Wall?
A gallery wall is a great way to display your favorite art and photos, but there are some places where you might want to avoid putting one.
- Busy or cluttered areas. A gallery wall can make a space look crowded and chaotic if too many elements compete for attention.
- In sunny or humid places. Sunlight and humidity can damage your art and photos. Avoid placing gallery walls near windows, bathrooms, or kitchens to prevent fading, warping, or mold growth.
Inaccessible spots. A gallery wall should be placed in a location that is easy to maintain and appreciate.

2024 eclipse one of many reasons flat Earth claims are nonsense | Fact check roundup

Tens of millions of Americans will watch as the moon passes between the sun and the Earth on April 8, completely blocking out daylight for minutes for those in the path of totality . The celestial show has launched a frenzy of paper glasses purchases and hotel reservations , and it serves as a perfect case-in-point for how scientists know the Earth, moon and sun move through space.
But it hasn't stopped some skeptics from continuing to believe the Earth is flat, a conspiracy theory experts say dangerously feeds into paranoia and spurs an unhealthy skepticism of all science and credible authorities.
The USA TODAY Fact-Check Team has debunked an array of flat Earth-related claims, including that Antarctica is really an ice wall around a flat Earth and the related conspiracy theory that space – and space travel – isn't real.
More: Surreal April 2024 total solar eclipse renews debunked flat Earth conspiracy theories
More : The 2024 total solar eclipse is in less than a week: How to get glasses; cloud forecast
The claim: NASA admits the Earth is flat and non-rotating
Our rating: False
NASA has consistently said the Earth is a round, rotating globe, and the documents referenced don't prove otherwise. The "flat, non-rotating earth" model is a common technique used to generalize mathematic equations, experts said. Read more
More from the Fact-Check Team: How we pick and research claims | Email newsletter | Facebook page
The claim: Antarctica is an ice wall that surrounds the flat Earth
Antarctica is a continent in the Southern Hemisphere. Satellite data from NASA and independent companies shows the land mass as an island with a definitive end. Read more
The claim: Pictures show the Earth is flat, and sea levels haven’t changed
Scientists have ample evidence the Earth is curved, including images of the planet taken from outer space. And long-term tide gauge data shows that sea levels have risen in Sydney Harbor over the past century and continue to rise. Read more
The claim: Moon visible in the daytime proves Earth is flat
The Earth is not flat, it's spherical, as proven by photos from space and an array of observations and calculations that can be done from Earth. Planetary scientists say the visibility of the moon and sun during the daytime doesn't prove a flat Earth – it is in fact a reflection of the motion of the sun, moon and Earth in space, along with the Earth's rotation. The moon also does not emit its own light. Read more
The claim: Radar technology wouldn’t work if the Earth was a globe
Scientists say that radar technologies account for the Earth’s curvature. Furthermore, the curvature of the Earth plays into some of the limitations of radar technology. An abundance of evidence demonstrates the Earth is spherical in shape – including images of the planet taken from outer space. Read more
The claim: Celestial navigation would be impossible if Earth is globe-shaped and orbits the sun
Celestial navigation is a technique still used to determine location based on the positions of celestial objects. Because the Earth and other celestial bodies are in motion, the apparent position of stars, planets and the sun in the sky changes. These changes must be taken into account for successful celestial navigation. Read more
The claim: Operation Highjump was a mission to find out what was beyond the 'ice wall' of Antarctica
Historical records show Operation Highjump was a naval operation conducted to establish a base in Antarctica. There is no evidence it was sent to investigate an "ice wall." There’s overwhelming evidence that Antarctica is a continent, not an ice wall. Read more
The claim: Post implies moon missions impossible because of Earth's atmospheric temperatures
Our rating: Missing context
The implied claim is wrong. Thermospheric temperatures do not melt spacecraft. While this layer of the atmosphere does technically reach the temperatures stated in the post, there are not enough air molecules in the thermosphere to transfer significant amounts of this heat to an object, according to researchers. Read more
The claim: Post implies Apollo missions didn't happen because lunar module can't travel between Earth and the moon
The implied claim is wrong. The Apollo 11 lunar module traveled through space after being propelled toward the moon by a powerful rocket. Astronauts made the journey in a different, attached module − called the command module. Astronauts only used the lunar module for transport between the moon and the orbiting command module. Read more
The claim: Post implies NASA space shuttle can't travel faster than jet due to its design
The implied claim is wrong. The NASA space shuttle travels much faster at top speeds than the SR-71. The space shuttle is launched with the aid of huge rocket boosters not shown in the photo and only reaches top speeds at elevations where there is virtually no air resistance. The SR-71 jet moves more slowly because it must reach its top speeds under its own power and against the friction of Earth's atmosphere. Read more
Thank you for supporting our journalism. You can subscribe to our print edition, ad-free app or e-newspaper here .
USA TODAY is a verified signatory of the International Fact-Checking Network, which requires a demonstrated commitment to nonpartisanship, fairness and transparency. Our fact-check work is supported in part by a grant from Meta .
IMAGES
COMMENTS
Create a centerpiece: Frame a map of the region, country or even the world to act as an anchor for the rest of the photos. Some travel galleries even feature themed wall decals or hanging metal wall art from which you can create lines with string or cords to "point" to the corresponding photos. Add lettering: Make a statement (literally ...
3. Follow a Grid Layout: Easy as 1,2,3. The simplest, most straight-forward design is a grid layout. The easiest and most versatile layout for your travel photo collage wall is a grid. A well-structured grid layout displaying your travel memorabilia instills a sense of order and sophistication.
1. Push Pin Map. A travel Gallery photo wall needs to include a push pin map! I love the maps ready complete with the foam backing to easily stick pins in our vacation spots. A travel map helps you envision the world and be curious about a variety of places to see. Push Pin maps are high quality and look gorgeous.
4. Make A Gallery Wall Or Photo Grid With Travel Photos. For a more traditional way to display your travel photos on your wall, you can also frame them. For a fun look, create a travel gallery wall with different sized prints and frames. It's easy to add new photos, and they don't have to be measured perfectly, or even match!
Check out our travel gallery wall selection for the very best in unique or custom, handmade pieces from our digital prints shops. ... Paris Travel Gallery, Paris City Photo Set, Paris Printable Souvenirs, Digital download (710) Sale Price $20.52 $ 20.52 $ 27.36 Original Price $27.36 ...
Date, new to old. Gallery Walls Ideal For Travel Photos. Stories are meant to be shared! Frame your fondest memories & adventures with a travel gallery wall to keep them alive. Filter. 12 products. SortSortFeaturedBest sellingAlphabetically, A-ZAlphabetically, Z-APrice, low to highPrice, high to lowDate, old to newDate, new to old. Large.
Set of 3 Travel Prints, Spain Wall Art Prints, Spanish Village Photo Spain Prints Set, Travel Gallery Wall Art, Spain Photography Terracotta (140) $ 58.25. FREE shipping Add to Favorites Milwaukee City Black and White Art Prints Set of 6, Milwaukee Photo Gallery Wall, Milwaukee Map Poster, City Skyline Wall Art, Wisconsin, WI ...
BUT, I attribute this step to the overall success of my gallery wall's design. Get a roll of white paper — or you can use newspaper. Whatever kind of paper that is big enough for your largest pieces of art is fine. But, once all your art is framed, lay it over your big pieces of paper, trace it, and cut it out.
I decided to create a travel photo gallery wall in our dining room, come see. In four easy steps you can complete this project. Here are the supplies you need: Digital photos - Or maybe you have some already printed you'd like framed; Picture frames - I picked up frames from thrift stores for about $3 each
When selecting photos for your travel wall, it's important to consider a few things so you end up with a gallery that you'll love. Choose memorable images. For example, a photo of you visiting the Grand Canyon is probably a dramatic image and will evoke great memories. Ensure your photos are of high quality and that the lighting is good.
1) Make a Travel Gallery Wall. Create a fun travel gallery wall display highlighting your best travel photos. Mix and match different sizes and mediums to create a unique space with your top travel images. Select a theme like beaches, your favorite dive spots, or scenic sunset views from all around the world. . View gallery walls on Amazon.
Instagram Grid Pictures. These prints from Artifact Uprising are a total game-changer! Each set of 25 is for $22. We used 24 in our frame. I absolutely love the idea of using them on mini clothespins or stringing across wire too. We decided to buy a wooden frame, back it with white poster board, and arrange them in a grid.
Travel Gallery Wall Art, Travel Wall Art, Travel Posters, Black White Print, Travel Quote, Wanderlust Print, World Map Line Art, Camera Art ... Paris Travel Gallery, Paris City Photo Set, Paris Printable Souvenirs, Digital download (721) Sale Price $15.26 $ 15.26 $ 20.34 Original Price $20.34 ...
DIY Photo Wall Ideas: Which Photos To Choose. Choosing the photos to display is the best part about a photo wall. You can choose all your favourite travel photos, there's no having to choose your top 3 out of 50.. For the gallery wall to look aesthetically pleasing, I tried to mix up the contents and perspectives of each photo. For example, I printed some closeups, landscape, and others with ...
Chatbooks is another one that has easy peel & stick gallery wall tiles. If you want slightly bigger than Mixtiles, Chatbooks wall tiles are 10×10. Travel Pictures Gallery Wall Ideas. Now that you have your photos printed, how do you display them? Gallery walls are perhaps the most popular of the choices.
Decorate the corner of your living room by hanging a double gallery wall of framed photos and artwork. Kate Marker Interiors created cohesion by using the same mix of frames and colors while varying the artwork. The same sconces were hung on both walls to create cohesion. Continue to 34 of 52 below. 34 of 52.
A simple technique will be to measure the height and width of your wall and then multiply what you have by 0.6 and 0.75, respectively. Framing Your Prints. Framing your prints tends to give them a processed and traditional look. Elevate your interior's style and visual outlook by creating a gallery wall with your framed travel photographs.
50 Ideas to Transform Your Travel Photos Into Artwork. Create a gallery wall with a selection of your favorite travel photos. Hang a single large travel photo as an eye-catcher. ... Hang travel photos on a wall with a hanging display with hooks. Use a hanging display with wire or string.
Travel Gallery Wall Art, Travel Wall Art, Travel Posters, Black White Print, Travel Quote, Wanderlust Print, World Map Line Art, Camera Art (366) Sale Price $10.40 $ 10.40
Travel Posters Aesthetic Preppy Posters for Bedroom Decor-Preppy Room Decor Aesthetic-Destination Poster-Trendy Y2K Travel Wall Art-Maximalist Pictures-Funky Vintage City Posters- PRINT 8x10 (Rome 2) 1. $1295. FREE delivery Sat, Oct 7 on $35 of items shipped by Amazon. Or fastest delivery Wed, Oct 4.
A shadow box frame (any size) $15-25. Ticket stubs, stickers, trinkets, stamps, postcards, photos, or any other items you want to include FREE or minimal cost. Straight Pins (any colors) $4. Picture Hanging Nail Kit $8. Hammer $10. Total cost: Around $25-30 if you already have nails and a hammer.
Consider the Room's Function. Max Rahubovskiy. Design your gallery wall facing the seating area in the living room so you can sit down and admire your art. Consider the Lighting. Maria Orlova ...
A roundup of flat-Earth Fact Checks: Skeptics wrongly believe Antarctica is an ice wall that surrounds a flat Earth and space travel isn't real. 20 years till the next one Dream Chaser details ...
Travel Gallery Wall Set, Travel Prints, Wanderlust Wall Art, Airplane Line Drawing, Black and White, Travel Art, World Map Art, Travel Quote ... Gift Photo, Printed Picture Wall Art, Travel Poster Prints (61) Sale Price $53.74 $ 53.74 $ 61.07 Original Price $61.07 (12% off ...
Mumbai India Black and White Photo 8 Piece Wall Art - India Set of 8 Prints - Mumbai Travel Digital Download Gallery Posters - India Decor. (216) $11.74. $29.35 (60% off) Digital Download.