We may earn a commission from your purchase on Amazon.com

How Do I Pair My Plantronics Voyager Legend To The Plantronics USB Dongle?
Updated by Kamika Royal on Apr 19, 2024
Disclaimer : We do not carry the Plantronics Voyager Legend so our knowledge is limited to the content of this article. You can also find it here on Amazon!
If you don't see lights on the USB dongle while it’s plugged into your computer, the Plantronics Bluetooth headset is not paired to it. Let's get them synced!

Plantronics Voyager Bluetooth Pairing
- Turn the headset on
- Press and hold the call control button (the silver button indicated by the arrow) for about 4 seconds until the headset flashes red/blue
- Unplug the USB dongle and plug it back in. The dongle will pair to the headset and turn blue

What is Headset Answers?
This is the internal support database for Headsets.com . We manufacture and sell office headsets in North America. With over 25 years' experience in the business, we know headsets.
Please use our support database for free headset support, whether you’re a Customer of ours (or not). If you have problems, suggestions, or unanswered questions, please email us at [email protected] (compliments also welcomed 😀)
Looking for office headsets in the UK? Check out Headsets.co.uk .
Ready for a better headset?
Questions/comments?
- Request Quote
- FREE Buyers Guide
- Headset Compatibility Guides
- Headsets 101 Guide
- Frequently Asked Questions
1-800-914-7996
$100 Minimum Order - No Returns
- Multi Connectivity
- Office Phones
- Computers & Phones w/ USB ports
- Microsoft Teams Certified
- Cell Phone Bluetooth Headsets
- Office Phones using QD
- Cables & Amplifiers
- Poly Headsets (Plantronics)
- Jabra Headsets
- Yealink Headsets
- Logitech Headsets
- EPOS Headsets
- Poly (Polycom) IP Phones
- Yealink IP Phones
- Teams Desk Phones
- Zoom Desk Phones
- Office & Contact Center
- 911 Center | Dispatch
- Conferencing
- Speakerphones for Conference Calls
- Cameras | Webcams
- EHS Cables/Lifters
- Wired Headset Cables & Amplifiers
- Wireless Headset Accessories
- Wired Headset Accessories
- Computer Headset Accessories
- Cell Phone Headset Accessories
- A/V Accessories
How to Pair the Plantronics Voyager Legend Bluetooth Headset
First time pairing for the voyager legend headset:.
1) Turn the headset on. Slide the power switch to the ‘on’ position showing green. The headsets LEDs will begin flashing red/blue. The Voyager Legend headset is now in pairing mode. If you don’t see the red/blue flashing LED, turn the headset off and repeat step 1. If for a second time your Voyager Legend LED doesn’t flash red/blue, your headset may have already been paired. Skip to the below section labeled: To Pair Voyager Legend to a Different Phone or Re-Pair to the Same Phone
2) Turn on your phone’s Bluetooth feature. While the Voyager Legends LEDs are flashing red/blue, activate Bluetooth on your phone and set it to search for new devices. • iPhone Settings > General > Bluetooth > On • Android™ Smartphones Settings > Wireless & Networks > Bluetooth: On > Scan for devices
NOTE: Menus may vary by device
3) Select Voyager Legend. Select “PLT_Legend” on your phone as a found device. If your phone asks, enter four zeros (0000) for the passcode or simply accept the connection.
4) Complete pairing process. Once your Plantronics Bluetooth pairing is complete, LEDs on the Voyager Legend will stop flashing red/blue and you will hear “pairing successful.” from the headset.
NOTE: To enable caller name announcement, allow access to your contacts if your phone prompts you.
Your phone should now be paired with the Plantronics Voyager Legend headset . Customers often ask us how to connect Plantronics Bluetooth headsets and with these instructions, you will be able to use your old headset with your new phone.

To Pair Voyager Legend to a Different Phone or Re-Pair to the Same Phone:
1) Turn the headset on. Slide the power switch to the ‘on’ position showing green.
2) Using voice commands. Tap the Voice button on your Voyager Legend and say “Pair mode,” or Press and hold the Call button on your Voyager Legend until you hear “Pairing”
3) Turn on your phone’s Bluetooth feature. While the Voyager Legends LEDs are flashing red/blue, activate Bluetooth on your phone and set it to search for new devices. • iPhone Settings > General > Bluetooth > On • Android™ Smartphones Settings > Wireless & Networks > Bluetooth: On > Scan for devices
4) Select Voyager Legend. Select “PLT_Legend” on your phone as a found device. If your phone asks, enter four zeros (0000) for the passcode or simply accept the connection.
5) Complete pairing process. Once your Plantronics Bluetooth pairing is complete, LEDs on the Voyager Legend will stop flashing red/blue and you will hear “pairing successful.” from the headset.
NOTE To enable caller name announcement, allow access to your contacts if your phone prompts you.
Your phone should now be paired with the Plantronics Voyager Legend headset and ready for use. Customers often ask us how to connect Plantronics Bluetooth headsets and with this guide, you will be up and going in a matter of minutes.
Popular Audio/Video Solutions:

Make sure to update your headset firmware.
Visit Poly Lens for the latest updates.
- Support Home
- Printer Support
- Computer Support
- Poly Collaboration Devices
- Ink & Toner Cartridges
- Software and Drivers
- Printer Diagonostic Tools
- Computer Diagnostic Tools
- Windows Support
- Print and Scan Doctor
- HP PC Hardware Diagnostics
- Create a new case
- Find an existing case
- Manage contracts and warranties
- Register an account
- MyHPSupport Help
- Security Bulletins
- Support Dashboard
- HP Account benefits
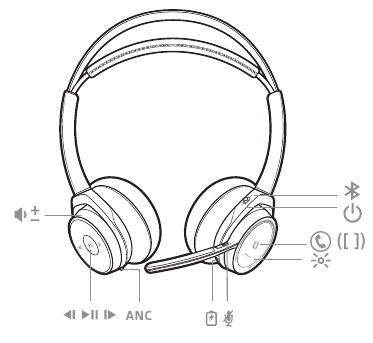
Voyager Focus UC: How to pair and use with the BT600 adapter
The following procedure details how to pair and use your Voyager Focus UC headset with the BT600 mini USB adapter.
Pairing to the USB Adapter
First time Pairing
Your Bluetooth USB adapter comes pre-paired to your headset.
Insert the Bluetooth USB adapter into your laptop or PC.
Pairing is successful when you hear “pairing successful” and the USB adapter LED is solid blue.
Some softphones require the installation of Plantronics Hub for Windows and Mac (click here to download) to enable headset control (answer/end and mute) functionality.
Plantronics Hub software also allows you to customize your headset's behavior through advanced settings and options.
Second-time Pairing
Insert the high-fidelity Bluetooth USB adapter into your laptop or computer and wait for your computer to recognize it.
Put your headphones in pair mode.
Put your Bluetooth USB adapter into pair mode by gently pressing and holding the pair button with a pen or paperclip until the Bluetooth USB adapter flashes red and blue.
Pairing is successful when you hear "pairing successful" and the Bluetooth USB adapter LED is solid blue.
Configuring the USB Adapter
Your high-fidelity Bluetooth USB adapter comes ready to take calls. If you want to listen to music, you will need to configure your Bluetooth USB adapter.
To configure your Bluetooth USB adapter to play music, go to Start menu > Control Panel > Sound > Playback tab. Select Poly BT600, set it as the Default Device and click OK.
To pause music when you place or receive calls, go to Start menu > Control Panel > Sound > Communications tab and select the desired parameter.
To configure the Bluetooth USB adapter, go to Apple menu > System Preferences > Sound.
On both the Input and Output tabs, select Poly BT600.
Additional support options
Enter a topic to search our knowledge library

- Plantronics Manuals
- Voyager Focus UC
- User manual
Plantronics Poly Voyager Focus UC - Bluetooth Stereo Headset Manual
- User manual (16 pages)
- Quick start manual (5 pages)
- User manual (15 pages)
Advertisement
Charge stand
Usb bluetooth adapter, connect to pc, configure usb adapter, pair to mobile device, pair usb adapter again, wear on the right or left, charge your headset, check headset battery status, load software, make/take/end calls, mute/unmute, mute on reminder, play or pause music, track selection, use sensors, deepsleep mode, answer calls from a second device, change language, update firmware, accessories, troubleshoot.
- Download manual
- 1.1 Headset
- 1.2 Charge stand
- 1.3 USB Bluetooth adapter
- 2.1 Connect to PC
- 2.2 Configure USB adapter
- 2.3 Pair to mobile device
- 2.4 Pair USB adapter again
- 3.1 Wear on the right or left
- 3.2 Charge your headset
- 3.3 Check headset battery status
- 4 Load software
- 5.1 Make/Take/End Calls
- 5.2 Mute/unmute
- 5.3 Mute on reminder
- 5.4 OpenMic
- 5.6 Play or pause music
- 5.7 Track selection
- 5.8 Use sensors
- 6.1 DeepSleep Mode
- 6.2 Answer calls from a second device
- 6.3 Change language
- 6.4 Update firmware
- 7.1 Accessories
- 8 Troubleshoot
- 10.1 References
- 10.2 Download manual
NOTE *Functionality varies by application. Does not function with web-based apps.

Connect and pair
Your Bluetooth USB adapter comes pre-paired to your headset.

- Pairing is successful when you hear "pairing successful" and the USB adapter LED is solid blue.
- OPTIONAL : Headset call control Some softphones require the installation of Plantronics Hub for Windows and Mac (plantronics.com/software) to enable headset control (answer/end and mute) functionality. NOTE Plantronics Hub software also allows you to customize your headset's behavior through advanced settings and options.
Your high-fidelity Bluetooth USB adapter comes ready to take calls. If you want to listen to music, you will need to configure your Bluetooth USB adapter. Windows
- To configure your Bluetooth USB adapter to play music, go to Start menu > Control Panel > Sound > Playback tab. Select Plantronics BT600, set it as the Default Device and click OK.
- To pause music when you place or receive calls, go to Start menu > Control Panel > Sound > Communications tab and select the desired parameter.
- To configure the Bluetooth USB adapter, go to Apple menu > System Preferences > Sound. On both the Input and Output tabs, select Plantronics BT600.

- iPhone Settings > Bluetooth > On*
- Android Settings > Bluetooth: On > Scan for devices* NOTE *Menus may vary by device.
- Select "PLT Focus." If necessary, enter four zeros (0000) for the passcode or accept the connection. Once successfully paired, you hear "pairing successful" and the headset LEDs stop flashing. NOTE Your headset can pair with up to 8 devices but only maintain 2 connections simultaneously; this includes the Bluetooth USB adapter.
- Insert the high-fidelity Bluetooth USB adapter into your laptop or computer and wait for your computer to recognize it.
- Put your headphones in pair mode.

Fit and charge

There are several ways to check your headset battery status.
- Wearing the headset, tap the Call button and listen to the voice alert (smartphone only).
- When not wearing the headset, tap any button except the Call button and observe the headset LEDs.
- Place the headset in the charge cradle and observe the headset LEDs.
Some softphones require the installation of Plantronics Hub for Windows and Mac to enable headset control (answer/end and mute) functionality.
- Install Plantronics Hub for Windows and Mac onto your computer by visiting plantronics.com/ software .
- Manage your headset settings with your computer or mobile device with Plantronics Hub for Windows and Mac or Plantronics Hub for iOS and Android, respectively ( plantronics.com/ software ) .
While on an active call, choose:
- Tap the red Mute button
- Take off/put on your headset while on an active call (requires active smart sensors)
* Plantronics Hub for Windows and Mac required (plantronics.com/software) If you have muted an active call and you start to speak, then a desktop notification reminds you that you are on mute. You can add a voice prompt notification by managing your mute features with Plantronics Hub for Windows and Mac.
While not on a call, tap the red Mute button to activate OpenMic and hear your surroundings. Control the level of ambient noise you hear by adjusting the volume wheel.
Rotate the volume wheel
- Put on/take off the headset (requires active smart sensors)
- Tap the Play/pause button
NOTE Functionality varies by application. Does not function with web-based apps.

More Features
If you leave your headphones powered on but out of range of your paired phone or USB adapter for more than 7 days, your headset conserves its battery power by entering into DeepSleep mode. Once back in range with your phone or USB adapter, press the Call control button to exit DeepSleep mode.
It's easy to answer calls from two devices (including softphone). When on a call, you hear a ringtone notification of the incoming call from the second paired device. To answer a second call from the other device, first tap the Call button to end the current call and tap the Call button again to answer the new call. If you choose to not answer the second call, it will go to voicemail.
You can change the voice prompts language of your headset (for example "mute on").
- Download Plantronics Hub for Windows/Mac at plantronics.com/software.
- Dock your headset in the charge stand and plug it directly into your computer.
- Disconnect your headset from other devices; this includes unplugging your USB adapter from the computer.
- Open Plantronics Hub for Windows/Mac and go to Settings > Language to view language choices for voice prompts.
Firmware updates are designed to keep your headset current with the latest technology. Update your firmware to:
- Change voice alert/command languages
- Improve performance
- Add new features to your device
- To update your headset firmware, dock your headset in the charge stand and plug it directly into your computer. Disconnect your headset from other devices; this includes unplugging your USB adapter from the computer.
- Do not answer or place a call during the update
What's in the box

For warranty details, go to plantronics.com/warranty.
NEED MORE HELP? plantronics.com/support
Plantronics, Inc. 345 Encinal Street Santa Cruz, CA 95060 United States Plantronics BV South Point Building C Scorpius 140 2132 LR Hoofddorp, Netherlands
© 2019 Plantronics, Inc. Plantronics, Voyager, DeepSleep and Simply Smarter Communications are trademarks of Plantronics, Inc. registered in the US and other countries. Bluetooth is a registered trademark owned by Bluetooth SIG, Inc. and any use by Plantronics, Inc. is under license. All other trademarks are the property of their respective owners.

Documents / Resources
Download manual Here you can download full pdf version of manual, it may contain additional safety instructions, warranty information, FCC rules, etc. Download Plantronics Poly Voyager Focus UC - Bluetooth Stereo Headset Manual
Need assistance.
Do you have a question about the Voyager Focus UC that isn't answered in the manual? Leave your question here.
Thank you! Your question has been received!
Related Manuals for Plantronics Voyager Focus UC

Table of Contents
Delete from my manuals.
Click the green button to print the entire article. To print the original version of the document - click the blue one.
Upload manual
Plantronics Bluetooth Pairing Mode: A Step-by-Step Guide
Putting your Plantronics Bluetooth into pairing mode is a breeze! All you need is your Bluetooth device, and in a few simple steps, you’ll be ready to connect it to your phone, tablet, or computer. Just make sure your device is charged, and you’re good to go!
Step by Step Tutorial: Putting Your Plantronics Bluetooth in Pairing Mode
Before we dive into the steps, let’s quickly discuss what we’re about to do. Pairing mode is what allows your Bluetooth device to be discoverable by other devices. This is essential for establishing a connection.
Step 1: Turn on your Plantronics Bluetooth
Press and hold the power button until the light indicator turns on.
When you turn on your Plantronics Bluetooth, you might notice a light indicator. For most models, this light will flash blue and red when your device is in pairing mode. If it doesn’t, don’t worry! We’ll get there in the next step.
Step 2: Activate Pairing Mode
Hold the power button down for 5-6 seconds until the light indicator starts flashing blue and red.
After you’ve turned on your device, keep holding down the power button. You’ll know you’re in pairing mode when the light flashes blue and red. This is your device’s way of saying, “Hey, I’m ready to pair with something!”
Step 3: Keep the Device in Pairing Mode
Wait for your other device to discover your Plantronics Bluetooth.
Once your Bluetooth is in pairing mode, grab the device you want to pair it with. It could be your phone, laptop, or tablet. Go to the Bluetooth settings on that device, and it should find your Plantronics Bluetooth listed there.
After you’ve completed these steps, your Plantronics Bluetooth will pair with your device, and you’ll be ready for hands-free calling, listening to music, or whatever else you need your Bluetooth for!
Tips: Enhancing Your Pairing Experience
- Make sure your Plantronics Bluetooth is charged before you try to pair it.
- Keep the Bluetooth and the device you’re pairing it with close to each other.
- If your Bluetooth doesn’t go into pairing mode, try resetting it according to the user manual.
- Make sure your other device’s Bluetooth is on and in discovery mode.
- If you’ve previously paired your Plantronics Bluetooth with another device, it might connect to that device automatically. Be sure to disconnect from the other device if you want to pair with something new.
Frequently Asked Questions
How do i know if my plantronics bluetooth is in pairing mode.
Your Plantronics Bluetooth will have a light indicator that flashes blue and red when in pairing mode.
What do I do if my device doesn’t recognize my Plantronics Bluetooth?
Make sure your Bluetooth is in pairing mode and your other device’s Bluetooth is on and set to discoverable. Sometimes, turning off the Bluetooth on your device and then turning it back on can help.
Can I pair my Plantronics Bluetooth with multiple devices?
Yes, most Plantronics Bluetooth devices can remember multiple devices, but they can only be connected to one device at a time.
What should I do if my Plantronics Bluetooth won’t go into pairing mode?
Try resetting your Bluetooth device. The instruction manual that came with your device should have specific steps on how to do this.
How far away can my device be from my Plantronics Bluetooth and still maintain a connection?
Typically, Bluetooth devices work within a 10-meter (33-foot) range, but walls and other obstacles can affect this.
- Turn on your Plantronics Bluetooth
- Activate Pairing Mode
- Keep the Device in Pairing Mode
Pairing your Plantronics Bluetooth with your device shouldn’t be a headache. With these simple steps, you’ll have your Bluetooth device ready to go in no time. Whether you’re setting it up for the first time or reconnecting to a new device, the process is straightforward.
Remember to keep both devices close together for the best connection, make sure your Bluetooth is charged, and if you run into trouble, don’t hesitate to consult the user manual or get in touch with Plantronics support. Happy pairing, and enjoy the freedom of wireless connectivity with your Plantronics Bluetooth!

Matthew Burleigh has been writing tech tutorials since 2008. His writing has appeared on dozens of different websites and been read over 50 million times.
After receiving his Bachelor’s and Master’s degrees in Computer Science he spent several years working in IT management for small businesses. However, he now works full time writing content online and creating websites.
His main writing topics include iPhones, Microsoft Office, Google Apps, Android, and Photoshop, but he has also written about many other tech topics as well.
Read his full bio here.
Share this:
Join our free newsletter.
Featured guides and deals
You may opt out at any time. Read our Privacy Policy
Related posts:
- How to Connect Sony Headphones to iPhone
- How to Change Bluetooth Name on iPhone (2024 Guide)
- How to Pair a Jabra Bluetooth Headset with an iPhone 14: Step-by-Step Guide
- How to Forget a Bluetooth Device on the iPhone 5
- How to Pair an iPhone With Another Phone: A Step-by-Step Guide
- Can I Have Two Bluetooth Devices Connected to an iPhone at Once?
- How to Set up Bluetooth Headsets With IPhones: A Step-by-Step Guide
- Does the iPad Pair With Bluetooth Headphones? Find Out Here!
- Bluetooth Headset Won’t Connect to My iPad – Troubleshooting Tips
- How to Connect a Computer and an iPad With Bluetooth: A Step-by-Step Guide
- How to Turn off Bluetooth on iPhone 14: A Step-by-Step Guide
- How to Delete a Bluetooth Device on iPhone 15: A Step-by-Step Guide
- What Kind of Bluetooth Headsets Will Work with iPhone 14: A Guide
- How to Print Via Bluetooth From an IPhone to a Printer: A Step-by-Step Guide
- How to Connect Two iPhones to Bluetooth: A Step-by-Step Guide
- iOS 17: How to Change Bluetooth Name on iPhone Easily
- How to Delete a Bluetooth Device on an iPhone 13
- How to Connect a Bluetooth iPhone to a Mac: A Step-by-Step Guide
- How to Connect Airpods to Chromebook: A Step-by-Step Guide
- How to Disconnect Bluetooth Device – Windows 10

No products in the cart.
- Refund Policy
FAQ: Plantronics Voyager Legend Bluetooth Headset
Q1: How do I pair my Plantronics Voyager Legend Bluetooth headset with my device? A: Ensure the headset is in pairing mode (LED indicator flashes red and blue). On your device, enable Bluetooth and select “Voyager Legend” from the list of available devices. Follow on-screen prompts to complete the pairing process.
Q2: What is the battery life of the Voyager Legend headset? A: The battery life varies, but on average, it provides up to 7 hours of talk time and 11 days of standby time. Charging time is approximately 90 minutes.
Q3: Can I use the Voyager Legend with multiple devices? A: Yes, the headset supports multipoint technology, allowing you to connect and switch between two devices simultaneously.
Q4: How do I answer or end a call using the Voyager Legend? A: To answer a call, simply tap the call button on the headset. To end a call, tap the call button again. You can also use voice commands such as “Answer” or “Ignore.”
Q5: Is the Voyager Legend compatible with voice assistants like Siri or Google Assistant? A: Yes, the headset is compatible with voice assistants. To activate, tap the voice command button and speak your command.
Q6: Can I customize the settings on the Voyager Legend? A: Yes, you can customize settings using the Plantronics Hub app. The app allows you to update firmware, adjust headset settings, and find misplaced headsets using the “Find MyHeadset” feature.
Q7: How do I reset my Voyager Legend to factory settings? A: Turn off the headset, press and hold the call button, and turn on the headset. Release the call button when the LED indicator flashes red and blue. The headset is now reset.
Q8: Does the Voyager Legend support HD audio? A: Yes, the headset features wideband audio for enhanced call clarity and supports A2DP for streaming music and multimedia.
Q9: Is the Voyager Legend water-resistant? A: While not fully waterproof, the headset has moisture protection, making it resistant to light rain and sweat.
Q10: How do I charge my Voyager Legend headset? A: Connect the included micro USB charging cable to the headset and a power source. The LED indicator will show the charging status, and it takes approximately 90 minutes for a full charge.
For more detailed information and troubleshooting, refer to the user manual provided with your Plantronics Voyager Legend Bluetooth headset.
- Wireless Headsets
- EARN COMMISSIONS
- (800)683-5715
Login to my account
Enter your e-mail and password:
New customer? Create your account
Lost password? Recover password
Recover password
Enter your email:
Remembered your password? Back to login
New Poly Voyager 5200 UC With BT700 Adapter

One of the most popular Bluetooth headsets just got an update. The Poly Voyager 5200 UC is now, as they say, new and improved.
In this blog, I’ll point out what’s different and new, and at the same time, I’ll cover the points that have helped to make this one of the most popular Bluetooth headsets here in the U.S., and around the world.
Unboxing first impression
The first thing that jumped out at me is the new branding. As you probably know, Plantronics is now going by a new name; Poly. That’s the name that emerged when Plantronics, and Polycom joined forces.
The updated Voyager 5200 now has the Poly name and logo on the headset, and branding can also be seen on the case and USB adapter as well. So what else is new with this highly popular Bluetooth headset? The big change is the USB adapter has been updated. The BT700 USB Adapter is enhanced to give you a better, more stable wireless connection, improved sound quality, and even a bit longer wireless range. So if those are things that are important to you, then you’ll appreciate these new updates.
What’s in the box?
- A portable charging case
- A BT700 USB Adapter
- The Voyager 5200 Bluetooth headset
- A USB A to USB C converter
- A USB to Micro USB cable
- 3 sizes of earbuds; small, medium and large
Connectivity
As with the former version, the Voyager 5200 UC connects to all the usual devices such as:
- Desktop computers
- Mobile phones
Connecting to computers is simple because the USB adapter comes pre-paired. Plug it into the computer USB port, charge the battery, and you’re ready to go. And with the updates to the BT700 adapter, you’ll have a better overall experience with a better connection, sound quality and range.
Connecting to a mobile device is equally easy too. All you need to do is press and hold the call control button on the side of the earpiece to put it into the pairing mode. That makes the Voyager 5200 discoverable, which populates it into your Bluetooth settings display. Select the Voyager 5200 option, and you’re ready to get talking.
The battery on this updated Voyager 5200 remains the same as the former iteration at up to 7 hours. The charge case gives you two additional charges when you’re mobile, making for a total talk time of up to 21 hours. But to get those 21 hours, you do need to pause your use, while the earpiece gets a new charge.
Some might argue that the 7 hours of battery isn’t enough for the Voyager 5200 to be used for business. I disagree with that because there are many DECT headsets that are specifically designed for use in business that have the same amount of talk time. One example would be the Poly CS540 , and there are others. And besides, most of us don’t talk the full 8 hours of our workday.
So whether you work in an office, at home, in a vehicle, or anywhere else, the Voyager 5200 UC will keep you connected.
Sound quality
This is a subject that can splinter into several directions. For example:
- Voice sound quality (how you sound to your callers)
- The sound your callers hear (your voice, and your background noise) 3. Ear speaker sound
- Your voice sound quality, when the microphone is reducing noise.
Overall, the Poly Voyager 5200 does a very good job. It has strong points, but there is one area where it’s lacking a bit.
First, the 5200 gives you very good voice audio quality. This means that your callers will hear you loud and clear, and that’s what you want in a professional headset. For a small, portable headset, the 5200 really sounds good.
The second thing is it does a respectable job at removing background noise. It could be better, but it certainly gets the job done. And when the 5200 microphone is working at reducing noise, it keeps you sounding good in the process. I bring this up because there are some headset microphones that can remove noise pretty well, but when it’s doing that, it compromises voice audio quality. You won’t experience that with the Voyager 5200 UC. You’ll sound professional, even when there’s noise going on around you.
This isn’t a headset that’s going to give you a great audio experience for things like listening to music. It’s really not meant for that, and besides, it has only one ear speaker which makes high fidelity audio not practical. But for what it’s designed for, which is to give you good sound quality for voice calls, it does a very good job. The amount of volume is sufficient, and the clarity is top notch. So don’t expect Bose sound quality when you get this headset, but do expect to hear your callers loud and clear.
The button layout on the new Voyager 5200 UC is the same as the former model. Specifically, you have:
- Call Control
- Volume down
There’s also two ways you can charge the Voyager 5200. First, you can access the micro USB port on the bottom of the headset, and charge it with the included USB cable. Or, you can drop the Voyager 5200 into the portable charge case where you’ll find a recessed charging bay for recharging the earpiece. So whether you want to recharge through your computer USB port, a wall outlet, or on the go through the charge case, you have several convenient options.
The bottom line
The Voyager 5200 is one of the most popular headsets ever. So popular that other headset manufacturers have released their own versions of this same design. As the saying goes; “imitation is the finest form of flattery” Well, Poly should be flattered because the design of the 5200 is one of the best to ever come out.
This is a lightweight (0.7 ounces) headset that can be worn all day. It provides you with enough battery strength to keep you talking all day. And when you need more, even while on the go, you have the ability to recharge the battery wherever you are.
The Voyager 5200 has a microphone that sounds great, and removes noise well, and gives you the option to hear your callers in HD. It connects to all your different devices, and is compatible with all the leading UC platforms such as Microsoft Teams, Zoom, RingCentral, and others. So you can take calls even when you step away from your desk, thanks to the remote call answer feature.
This is an all-in-one kind of product that’s professional grade, affordable and comfortable. And when it comes to headsets, you don’t have to look that far to find other headsets that don’t compare to the high standards found in this headset.

Sound like a pro on every call, even if your dog is barking in the background
Eliminate background noises for your microphone with Neep's AI-powered noise cancellation.
Try neep Free
Need help finding the best headset for your situation?
Contact us today and one of our friendly Advisors will match you with the right headsets.
CONTACT US TODAY

Should IT Teams Really Deal With Office Headset Support Tickets?

What Is the Best Plantronics Wireless Headset?

What Is a UC Headset?

Which is the Best Headset for Business Calls on a Busy Sales Team?

Yealink EHS36 Setup Guide For Discover D904 Wireless Office Headset
8 most frequently asked questions about office headsets.

5 Benefits Of Renting Your Office Headsets

The Complete Guide for Comfortable Office Headsets
What is the best wireless headset for office phones, shop our best selling headsets.

- Opens in a new window.

Moscow Sky Lights Up With Strange Glow After Explosion at Electrical Substation: Reports
N ew footage has emerged showing bright flashes lighting up the night sky in southern Moscow during the early morning hours of November 22.
Knewz.com has learned that there was an explosion at an electrical substation on the outskirts of Russia's capital city followed by an alleged power outage in "several" homes.
Video snippets, shared on Russian news channels like ASTRA , captured a series of flashes that caused the sky to change color. Smoke could also be seen rising from a building.
Corroborating the video, several Russian Telegram accounts reported an explosion near the south of Moscow and a subsequent fire at the Lyublino electrical substation, southeast of central Moscow, per Newsweek .
The local authorities from the area have since confirmed that an explosion occurred in the village of Molokovo, but they reassured the public that all vital facilities were operating as normal.
Russian outlet MSK1.ru reported the blaze at the substation and noted “several” power outages.
The town of Lytkarino, located to the southeast of Moscow, was one of the affected areas, as reported by the independent outlet, Meduza .
Additional power failures were reported in the southern Domodedovo section of the city. However, electricity was later restored to these areas.
One local resident speculated that a drone may have been responsible for the explosion, but additional sources are yet to support this theory.
Newsweek reported that messages on the ASTRA Telegram account run by independent Russian journalists showed residents near the substation panicking. One concerned Russian called it a "nightmare."
The incident follows an attack by Russia on a power station in southwestern Ukraine that left 2,000 people without electricity .
Knewz.com reported previously:
“ Russian forces launched a total of 38 Iranian-made Shahed-136/131 drones during the later hours of November 17 and 18.
The Ukrainian Air Force Command reported that 29 of these drones were shot down [...].
One civilian was injured as a result of the attack that targeted energy infrastructure in the southwestern Odesa Oblast.”
The assault came after repeated warnings by Ukraine’s President Volodymyr Zelensky that Russia would try to cripple its power grid as winter approaches.
Ukraine's leader warned that if Russia resorted to attacking its power utilities, it would respond in kind.
Ukraine has conducted numerous long-range aerial drone strikes on Moscow since May 2023.
Most recently on November 20, it was reported that one such incursion was intercepted close to the city, per Kyiv Post .
Moscow’s Mayor Sergei Sobyanin confirmed this and elaborated that the region's air defense systems intercepted the unmanned craft over the city of Elektrostal to the east of Moscow, as well as another over the Bogorodsky district, northeast of central Moscow.
The details of the recently surfaced video footage have yet to be independently verified.

IMAGES
VIDEO
COMMENTS
Find out how to pair your Plantronics Voyager 5200 to USB Dongle.🟣Featured Product🟣🟪 Plantronics Voyager 5200: ️https://headsetadvisor.com/search?type=pr...
Step 2) Click & hold the call control button for 3 to 5 seconds. While wearing the headset, press and hold the black call control button, located at the end of the microphone boom arm, for three to five seconds. If successful, your headset will verbally say "pairing," and that is how you will know if your Plantronics Voyager 5200 is active.
Plantronics Poly Voyager 5200 Series User Manual View and Read online. Charge your headset. Pair your phone. Pair to mobile device. Est. reading time 10 minutes. Poly Voyager 5200 Series Headsets manuals and instructions online. Download Plantronics Poly Voyager 5200 Series PDF manual. ... this includes the Bluetooth USB adapter. NFC pairing.
Plantronics Voyager Bluetooth Pairing. Turn the headset on. Press and hold the call control button (the silver button indicated by the arrow) for about 4 seconds until the headset flashes red/blue. Unplug the USB dongle and plug it back in. The dongle will pair to the headset and turn blue.
Keep it pressed for about 3-5 seconds until you see the LED light flash red/blue 8. Allow the pairing process to complete, lights will normalize, and you can begin using the Voyager 5200 UC. Pairing to a computer using the USB Adapter - option 2 Another way to pair up your Poly Voyager 5200 UC is by downloading the Poly Hub Software.
This video shows you how to pair your Plantronics Voyager 5200 UC headset to the BT600 USB Bluetooth dongle when using the MDA 220 adapter. If you have addit...
To Pair Voyager Legend to a Different Phone or Re-Pair to the Same Phone: 1) Turn the headset on. Slide the power switch to the 'on' position showing green. 2) Using voice commands. Tap the Voice button on your Voyager Legend and say "Pair mode," or Press and hold the Call button on your Voyager Legend until you hear "Pairing". 3) Turn on your phone's Bluetooth feature.
Step 1. With the BT600 USB Adapter plugged into your laptop or computer, press and hold the button on the side of the BT600 for 3-5 seconds. The BT600 will start flashing red and blue, indicating that it's in pairing mode. Note* The button is quite small, so we recommend using something like a paperclip or pen tip to hold down the button!
pairing will not work if there are two devices connected already. 1. Ensure NFC is on and your phone's display is unlocked. (Phones may vary.) 2. With the headset turned on, lay the headset on the back of the phone near the NFC tag on the phone as shown until NFC pairing is completed. If necessary, accept the connection. Pair to Another Device 1.
Windows. To configure your Bluetooth USB adapter to play music, go to Start menu > Control Panel > Sound > Playback tab. Select Poly BT600, set it as the Default Device and click OK. To pause music when you place or receive calls, go to Start menu > Control Panel > Sound > Communications tab and select the desired parameter. Mac.
Insert the high-fidelity Bluetooth USB adapter into your laptop or computer and wait for your computer to recognize it. 2. Put your Poly audio device in pair mode. 3. Put your Bluetooth USB adapter into pair mode by pressing and holding the recessed pair button with a pen or paperclip until the Bluetooth USB adapter flashes red and blue.
When prompted for the passkey, enter 0000. When pairing is successful, the indicator on your headset turns off. Your headset is now connected and ready to use. Plantronics Voyager 815... Page 8: Custom Fit CuSTOm FiT The Plantronics Voyager 815 headset comes with three sizes of noise- isolating ear buds.
Plantronics Voyager Focus UC User Manual View and Read online. Est. reading time 10 minutes. Voyager Focus UC Headsets manuals and instructions online. ... Put your Bluetooth USB adapter into pair mode by gently pressing and holding the pair button with a pen or paperclip until the Bluetooth USB adapter flashes red and blue.
PAGE 1. Voyager 8200 UC User Guide. PAGE 2. Contents Headset overview Be safe 3 3 Connect and pair 4 Connect to PC 4 Configure for media 4 Pair to mobile device 4 Pair mode 5 USB Bluetooth adapter 5 Pair USB adapter again 5 NFC pairing 5 Load software 6 The Basics 7 Power on/off 7 Fit 7 Volume 7 Make/Take/End Calls 7 Mute/unmute 8 Play/pause music 8 Track selection 8 Voice control 8 Charge 8 ...
Step 1: Turn on your Plantronics Bluetooth. Press and hold the power button until the light indicator turns on. When you turn on your Plantronics Bluetooth, you might notice a light indicator. For most models, this light will flash blue and red when your device is in pairing mode. If it doesn't, don't worry!
Dave demonstrates how to pair the Plantronics Voyager 8200 UC to your laptop/computer with the included BT600 USB Adapter and the Plantronics Hub Application...
FAQ: Plantronics Voyager Legend Bluetooth Headset Q1: How do I pair my Plantronics Voyager Legend Bluetooth headset with my device? A: Ensure the headset is in pairing mode (LED indicator flashes red and blue). On your device, enable Bluetooth and select "Voyager Legend" from the list of available devices. Follow on-screen prompts to complete the pairing process. Q2: What is the battery ...
Posts: 4,694. Plug adapters in Moscow hotels :) I just arrived in Moscow yesterday only to find to my acute embarassment that I had forgotten my universal plug adapter. I had a new bag for my chargers and cords and simply left it out. Frankly I had no idea where one could be bought in central Moscow, so I asked the Sheraton Palace hotel ...
This video shows you how to pair the Voyager Legend headset to the BT300 USB Adatper
307K subscribers in the TankPorn community. TankPorn is for all things Battle Tanks, Armored Fighting Vehicles, Armored Cars, Self-Propelled Guns and…
As with the former version, the Voyager 5200 UC connects to all the usual devices such as: Desktop computers. Laptops. Mobile phones. Tablets. Connecting to computers is simple because the USB adapter comes pre-paired. Plug it into the computer USB port, charge the battery, and you're ready to go.
Peach vodka is what primarily gives this Peach Moscow Mule its peach flavor. However, if you don't want to buy peach vodka or simply want a stronger peach flavor, you could one of two things: Muddle 1/3 cup chopped peaches or 1/2 of a peach at the bottom of the mug as the first step, OR. Puree 1/3 cup chopped peaches or 1/2 of a peach in a blender.
New footage has emerged showing bright flashes lighting up the night sky in southern Moscow during the early morning hours of November 22. Knewz.com has learned that there was an explosion at an ...