Spend $125 more and get free shipping!
Your cart is empty
Free standard shipping on US Orders of $125 or more.

Jana Lam Hawaii
Travel tissue pouch • surprise print • rainbow collection.
Continuing in our tradition of covering up unsightly utilitarian products (e.g. the Clorox Wipes Cover, Rectangle Tissue Box Cover, and Square Tissue Box Covers), this sweet little thing is the perfect pop of rainbow to pull out of your bag when you need a nostril wipe. It’s so much nicer to pull out a pretty pouch instead of a ghastly plastic thing right?
The Details: 5" x 3.5" with a slit opening down the middle
Made in Hawai‘i, USA
You may also like
Recently viewed.

How to make a fabric pocket tissue holder – a timely craft idea
I recently met with my wonderful friend Helen, who you may know from the beautiful home and garden Instagram account @home_to_roost . We enjoyed a delicious lunch and a good old natter. “Before I forget” she started “I wondered if you could use these.” Knowing me well, Helen offered several beautiful scraps from her fabric collection. And indeed, I knew I could use them well. Here in my weekly blog, I aim for a little escapism for us all and rarely do I enter into much controversy or discuss what’s in the news. However, the all too familiar Coronavirus headlines cannot have escaped any of us in recent days and government and health officials continue to urge us all, to up our hygiene game and bin those tissues once used. Join me today as I offer up a pretty and functional solution for carrying those disposable tissues around in our pockets and handbags. This week I have a surprisingly simple tutorial for you as I show how to sew a fabric pocket tissue holder…
Begin by selecting two pieces of complimentary fabric for your fabric tissue holder: One piece will be the liner, the other is the outer fabric. I tried a couple of sizes and settled on, nineteen by sixteen centimetres and twenty-three by sixteen centimetres. Your tissue holder may be whatever size you like or whatever size best suits your disposable tissue pack. Here is a Pinterest search where you will find a great many ideas on how to make a travel tissue holder and in the interest of transparency, here are a few tutorials on my page which I found useful.

With the right sides of the fabrics facing, stitch approximately a half centimetre seam allowance along both short edges. Once joined, it will appear you have way too much lining fabric. Don’t worry, once both edges are stitched turn the fabric inside out, so the right sides of each fabric are showing and press flat with your iron. This will give you approximately one centimetre of lining fabric now showing on each short side. These edges will eventually form the opening for your tissue holder.

Then stitch approximately half a centimetre in, on the right side of the top fabric of both edges like this….

Keeping the outer fabric upturned on your work table as in the last photo above, loosely fold both short edges into the middle and if you’d like your tissue opening to overlap (when finished) lay one ‘edge’ on top of the other as shown below. Alternatively, for no overlap, simply fold the short edges to meet in the centre. Remember to take your initial measurements into consideration when deciding this step. Then stitch together each short side allowing approximately a one-centimetre seam allowance as shown in the second photo below.

That’s it. Turn the fabric through the opening, poke the four corners neatly through and press flat with your iron et voila…

So how many friends and family do you know who’d appreciate a fabric pocket tissue holder? Or what about children and grandchildren for their school bags, dog walker friends for their coat pockets and even one or two for yourself? I know you to have more than one handbag. Not surprisingly, neither Mr nor Master M were hugely impressed when I suggested they might like one each in my blue fabric.

You could even team up your pretty tissue holder with a matching teeny drawstring bag to hold safe that elusive hand sanitiser if you so desired. Wouldn’t they make a wonderful and useful pair to gift? I shall certainly include a tissue holder in my giveaway over on Instagram , details of which, I shall be offering in next week’s story. So for now, that’s me organised. I’m off to enjoy a delicious coffee and my latest new book, do share if you make your own fabric pocket tissue holder. Until next week…

And if you are looking for more craft projects, you may like to look here , here and here for inspiration!
Share this:

Is there no end to your talents. X
Aah thank you! This really is so easy and would make a lovely birthday gift don’t you think… would you like one?!x
They’re soooo pretty!!!
And sooooo easy to make! I’m so glad you like them, thank you for joining in and I hope you are well Wendy x
YES!!! Fight the virus the WW&L way! Absolutely love this – especially as there’s no mini packets of tissues left in the shops no one wants them floating around in their bags and pockets!! This is FANTASTIC mum as always xxxxx
Ha ha I’m so happy you like them Little Miss. I might use your “Fight the virus….” as a new tag line, what do you think?x
As I anticipated on your Instagram account another great creative make for my must do list although this may have to be squeezed in at the top. It’s cute, useful and much nicer to pull out of your bag than a plastic wrapper. Another inspiring project Helen 😊
I am so pleased you like the make this week Elizabeth. It really is so quick to make too and as you say, so much nicer than the plastic. Not sure there will be too many more tissues left on the shelf the way our shops are at the moment though!x
Aww Thankyou for the mention Helen. I knew you’d find a use for it. I think I shall be making one for each handbag now. Such a simple but useful idea and I love the idea of the bag for the hand sanitizer too ( that’s if you can find any on the shelves). Xx
And thank you for the lovely fabric! They are quite addictive to make… I have three now! And you’re quite right, not a sanitiser to be seen, nor loo roll or paracetamol or pasta, rice, beans… crazy times for us. Have a lovely week my friend x
Comments are closed.

A Fabric Collage – another beautiful craft for Suffolk Puffs

A Simple Bumble Bee Embroidery – a delightful spring craft

Rubber stamps – how to say a crafty thank you

How to make little Peg Snowmen – two perfect craft days

How to make a Fabric Mushroom – in a magical woodland setting

Homemade Fabric Apples – and a delightful Autumn Craft Day

An Easy Fabric Mouse – more ways to recycle scrap fabric

Playing with Loose Watercolours – a day creating unique art
And there is always news of belle our beautiful shepherds hut on the blog…do subscribe so you don’t miss a single post ….

Grab a copy of our FREE Handbag eBook!

F REE HANDBAG EBOOK! Get your copy! >
Make a Pocket Tissue Holder

I actually never thought I would need a pocket tissue holder. But as I have gotten older my allergies have gotten worse and I use more tissue than I used to so I started carrying around pocket tissues in my purse. I didn’t realize that the package would fall apart within a week of it rattling around in there. So here I am actually making a pocket tissue holder. Since I was making one for myself I figured that I would show you the process step-by-step so that you could make one for yourself. This is a super simple process that only requires scrap fabric and basic sewing skills to complete. In fact, there are only four seams in this entire project. The rest is using an iron. Believe me anyone can make this project. So lets get started.
If you would like a video tutorial of this easy to make project head over to YouTube and check out my video on this project. While you are there subscribe to my free YouTube Channel.

What you will Need:
- 6 1/2″ x 5 1/2″ piece of outer fabric
- 7 1/2″ x 5 1/2″ piece of lining fabric
- Standard sewing supplies

Step 1: Make a Pocket Tissue Holder
Cut your fabrics to the designated sizes. I used some scrap fabrics that I had on hand. In my example the red and white fabric is the outer fabric and the solid red is the lining fabric. You will notice that the lining fabric is larger than the outer fabric. This is done on purpose.
Step 2: Make a Pocket Tissue Holder
With right sides together sew the lining piece to the outer piece at the short ends using a 1/4″ seam allowance. You will notice that there will be a difference in lengths of the long sides. Don’t worry. This will make sense when you press the fabric.

Step 3: Make a Pocket Tissue Holder
Turn the piece right sides out and press flat so that there is 1/4″ of the lining showing on each side of the outer fabric. There is a lot of pressing in this project and in all sewing projects. In fact a good iron is on my list of sewing room must haves. I purchased this iron about a year ago and I absolutely love it. I use it everyday for the posts here at Sew very Crafty and for my personal sewing as well. It is cordless which makes it perfect for me and works like a gem. I purchased it from one of my affiliates, Sewing Machines Plus, for a really good price and free shipping so if you are in the market for a new iron please check this one out here . It is perfect for the beginner and advanced sewist.

Step 4: Make a Pocket Tissue Holder
Fold the long edges so that the meet in the center of the piece and press. You should only be seeing the lining fabric at this point.

Step 5: Make a Pocket Tissue Holder
Stitch along the short ends. I used an overlock stitch on my regular sewing machine for this to protect the raw edges but you can use a straight stitch and follow it up with a zig zag or just keep it raw. It is totally up to you.

Step 6: Make a Pocket Tissue Holder
Turn the piece right sides out and put in your tissues and you have completed your pocket tissue holder.

If you enjoyed this project sign up for our newsletter and receive your free list of sewing room must haves.

How to Make a Pocket Tissue Holder
The perfect holder for your pocket tissues. Keep the package and the tissues clean using this fabric holder.
- 6 1/2" x 5 1/2" Outer Fabric
- 7 1/2" x 5 1/2" Lining Fabric
- Sewing Machine
Instructions
- Cut fabrics
- Sew the short sides together using a 1/4" seam allowance. Press flat.
- Fold the long sides to the center and press.
- Stitch along the the short ends using a 1/4" seam allowance.
- Turn right sides out.
- Insert tissues.
These perfect pocket tissue holders make great stocking stuffers.

SIGN UP TO RECEIVE THE LATEST FROM SEW VERY CRAFTY !
We don’t spam! Read our privacy policy for more info.
Check your inbox or spam folder to confirm your subscription.
Share this:
- Click to share on Facebook (Opens in new window)
- Click to share on Pinterest (Opens in new window)
- Click to share on Twitter (Opens in new window)
- Click to email a link to a friend (Opens in new window)
- Click to print (Opens in new window)

Hi, Welcome to Sew Very Crafty a place for beginner and intermediate sewists and crafters to learn and create. Here at SVC we create simple and fun projects that anyone with basic to intermediate skills can create and grow with. My name is Diana and I am a lifelong learner, sewing enthusiast, parent, spouse, lawyer, and die hard St. Louis Cardinals fan. I live in California with my husband. I love God and my country but am proud of my Irish heritage. I enjoy sharing my creativity and the things that I love with others.
Similar Posts

How to Make Windowed Fabric Coasters

How to Make an Open Wide Tote Bag

How to Sew a Bow Clutch

True Meaning of Christmas

DIY Halloween Costumes

How to Make a Beginner Baby Bonnet
Thank you. What a great gift idea. My corners did not turn out very well…too much bulk from multiple layers.
You’re welcome. Sorry about your corners. I am surprised that there was too much bulk.
Looking Forward to Reading your Thoughts on this Project Cancel reply
This site uses Akismet to reduce spam. Learn how your comment data is processed .
Privacy Overview
The Cottage Mama
sewing • cooking • crafting • all things domestic
Subscribe to my Newsletter
Subscribers receive FREE exclusive patterns & discounts
- Lessons with Lindsay Videos
- Sewing Basics
- The Cottage Mama’s Creations
- ALL CRAFTING
- Main Course
- Slow Cooker
- ALL RECIPES
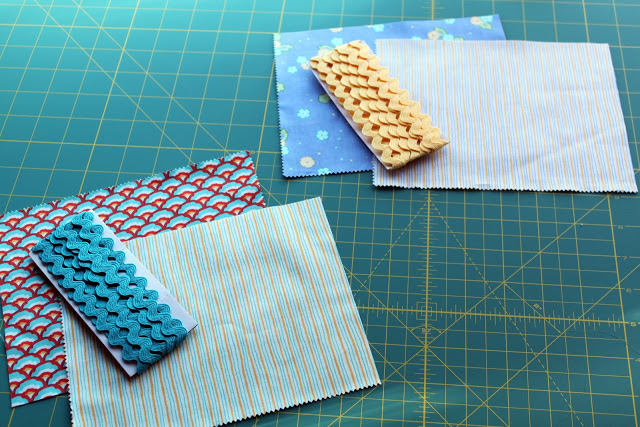
Rick Rack Travel Tissue Holder ~ Tutorial

These last couple weeks we have been sick with some pretty nasty colds around here ~ tis the season, I guess. It is the worst feeling to be caught out and about without a tissue in sight. I mean, what is a girl to do? I’ve been meaning to make some travel tissue holders for the last year and I finally sat down and sewed some of these little cuties.
As most of you know, I’ve got a thing for rick rack, so I decided to incorporate one of my favorite trims into the design. This project is a really great way to use up scraps as it only takes two small squares of fabric. If you are in a ‘scrap busting’ kind of mode, this is going to be a great project to put those scraps to good use.
Also, if you are just starting out sewing, this is a perfect beginner project and if you are a seasoned pro, these fun travel tissue holders will take you minutes to sew together. Let’s get started…….
You may also like these:
Like this post? Want even more? Sign up below and receive all my tutorials, recipes and updates directly in your email inbox.
28 Comments
Those are the cutest tissue holders, the rick rack is the perfect added touch!
Very cute, love it with the rick rack!
I too love the addition of the rick rack, makes it look so special. I definitely want to try that Wonder Tape!
I made 10 of these one year for my son’s teachers, therapists and aides as part of their appreciation gifts. They go together fast and are a great stashbuster. These are great for using up those small pieces of ribbon and trim that are too small for anything else but you just hate to throw away.
I make these for gifts as well, but the rick rack trim is a really cool idea. I’ll have to try it. Thanks for the tutorial.
Muito lindo, I like this Thanks Beijos no coração
very cute:) A friend actually gave me one of these she had made last year for Christmas. I need to get it refilled:)
Hi Lindsay, I love your tutorials and I just wanted to let you know that I recognized some of them here: http://theberry.com/2012/01/30/mystery-misc-30-photos-2/ . They aren’t attributed to you, and I’m not sure if you care or not, but if you do, I thought you should know! Thanks -Hannah
Thank you SO much for bringing that to my attention. I asked the author to remove the picture and she did. It’s really a bummer when others don’t credit the creator of a tutorial. Thanks again for letting me know!
Too much for me to do, dear Lindsay! Especially since I don’t sew and do not have a sewing machine, and am too lazy to sew by hand. 😉 But I always love seeing your posts, you are gifted. A project like this probably takes someone like you five minutes. I also enjoyed your post of the girls’ toys! I’d like to babysit them to be able to play with all that stuff with them. 🙂 Best, Gloria P.S. A ‘kiss’ for your boy (and, of course, my little girlfriend ‘models’ too!)
Cute project! And I love the look of your blog!! Just found you via Blogstar… look forward to seeing more!
Hello, I came across your blog last week and liked it so much that it is down in my favourites already. This is a very nice and easy tutorial, I can hardly wait to be in my new flat with my sewing-machine set up in order to give it a go. They are going to make perfect small presents! I agree with what others have said already: rick rack trim looks great. I would maybe give a go to white or black lace (depending on the fabric I choose).
Best wishes, Fred http://frederiqueandfriends.blogspot.com/
Very cute idea!!
Cute project. The rick rack adds a fun touch!
Nice project, it is so cute. The rick rack is veruy lovely.
This comment has been removed by the author.
Thanks a lot for this nice and easy tutorial! I quickly made several of them.
These are so sweet. Pinning immediately!
<3 Christina @ I Gotta Create! Wildly Original link party is open.
I have made these tissue holders but I like your idea of the added rick rack. Thanks for the pattern and the rick rack
I chuckled to myself when reading the tutorial. I made this when I was in Jr. High for all my teachers for end of school gifts. That was in the late 60’s. They are just as handy now as they were back then.
Love this pattern & all the other tutorials you post, but….would it be possible if a print version could be included? so tired of wasting paper & ink when printing your tutorials that will print the entire blog, plus all the comments…..thank you!
Thanks so much! No, there is no way to have it just print out the instructions for this pattern. But you can select what pages you want to print and just choose not to print the pages with the comments. Hope that helps! Have a great day, Lindsay.
do you pin the rick rack to the 6″ side or the 7.5″?
thank you so much for the tissue holder. I am just,now, teaching my 8 year old great grand daughter how to sew. This is a perfect project.
[…] Rick Rack Travel Tissue HolderToy Storage Labels‘I Spy’ Fabric Matching GameHappy Day Big Bow Dress TutorialOrange Themed Birthday PartyWill It Go Round in Circles? Free Quilt Pattern / TutorialTulip Petal Sun Hat Free PatternEmbellished Ruffle Hoodie TutorialWoodland Cottage Pincushion – Free Pattern / TutorialCharm Pack Baby QuiltFabric Covered BoxSummer Picnic Dress – Free Pattern / TutorialDIY Ribbon HolderEmbellished Onesie Dress TutorialJelly Roll Quilt TutorialThe Lolly Dolly Pillow TutorialDouble Layer Twirl Skirt – Free PatternFat Quarter Tote TutorialMason Jar Soap DispenserJewelry TutorialBeaded Fabric NecklaceRuffle Headband TutorialChristmas Tablecloth TutorialChristmas PillowcasesThank you, from the bottom of my heart, for visiting my little corner of the internet world at The Cottage Home. It has been a pleasure getting to know all of you and I am looking forward to a great 2013! Happy New Year!Love It? Share It!0000 […]
[…] used the Rick Rack Tissue Paper Holder Tutorial to make these gifts. I added in a cotton fabric for the lining and used pink rick rack as an […]
[…] Source: Rick Rack Travel Tissue Holder ~ Tutorial – The Cottage Mama […]

Read more about Lindsay

Popular Posts

Mary Jane Baby Shoes Pattern

Before and After Kitchen Makeover

15-Minute Pillowcase {with French Seams} ~ Tutorial

Purple Potluck Bowl Covers

Tile Coaster Tutorial

Embellished Hooded Towel Tutorial

Change Up Bag Lunches with Tortilla Roll-ups

Ruffle Bonnet Tutorial

Purchase My Book

Stay Connected
All Content Copyright © The Cottage Mama 2024 · Privacy Policy · Disclosure · Site design by Emily White Designs
- Search for:
- Learn to Quilt
- Mystery Block of the Month
- Small Quilting Projects
- Quilts to Make
- Donation Quilts
- Learn to Sew
- Small Sewing Projects
- Pattern Library
- Party Planning
Uncategorized , Learn to Sew , Sewing , Small Sewing Projects
How to sew a pocket tissue holder.

Pocket Tissue Holders are simple yet fun to make, and even better they make great little gifts! In the past, I have made these as teachers’ gifts and I even made a basket full of them for my vow renewal as a handmade keepsake.
I always keep one in my handbag for those moments when you get caught out in the restrooms with no toilet paper! Was that too much information?
TO MAKE A POCKET TISSUE HOLDERYOU WILL NEED:
- Two pieces of fabric 6″ x 7½” they can be the same fabric or contrasting
- Paper, pencil, regular scissors, and a ruler (to make our template)
- Tape measure
- Sewing scissors
- Sewing machine
- A pack of tissues ( I used these ones )

In this tutorial we make a template, which is basically a little pattern, this is a great technique to know how to do for future projects. It also means you will always have it on hand if you want to make another Pocket Tissue Holder in the future.
Please watch my video for full instructions on how to make a Pocket Tissue Holder.
INSTRUCTIONS TO MAKE A POCKET TISSUE HOLDER HOLDER
Make a template from paper that measures 6″ x 7½”
Take two pieces of fabric bigger than your template, place the right sides of the fabric facing each other.
Pin your template to your fabrics and cut around the template carefully.
Unpin your fabric from the template.
Making sure your edges and corners line up, pin both of the 6″ sides.
At stitch length 2.5 sew along the pinned edge with a ⅜” seam allowance. Backstitch at the beginning and end.
Turn your fabric right side out.
Press, making sure you roll out the seams so they are sitting nice and flat.
With the fabric you want to be on the outside of your Pocket Tissue Holder facing you, fold the bottom edge up at 1½”, measuring both sides with a tape measure.
Turn it around. Fold the bottom edge up so the Pocket Tissue Holder measures 3″.
Pin both sides.
Sew along the pinned edge with a ⅜” seam allowance.
Trim loose threads.
Trim the corners.
Turn right side out.
Push the corners out with a point turner, or a blunt object you have on hand.
OUR NEXT PROJECT
Now let’s make a Scrunchie , but first I will show you how to cut fabric with a rotary cutter here .
If you would like the full supplies list for my eight-week course, as well as weekly emails with all the information you need each week please sign up for my emails over here .
Thanks so much for joining me! Please leave a comment and let me know how you go, or if you have any questions.
4 thoughts on “ How to Sew a Pocket Tissue Holder ”

Loved the little project on making a pocket tissue holder. You always do such a great job on giving directions so clearly so that beginning sewers find it easy to follow. I did try your sewing machine dust cover and emailed for a copy of the written form for calculating measurements but have not received it yet. Looking forward to viewing more of your video tutorials.

Thanks so much Marie for your awesome feedback. Just wondering if you received the sewing machine cover pattern? Thanks, Stacey

I can hardly wait to make quite a few of these.
Awesome, I am glad you like it, Marilyn!
Leave a Reply Cancel reply
Your email address will not be published. Required fields are marked *
Save my name, email, and website in this browser for the next time I comment.
Elf on the shelf flags and tags
Where can we send your free files to?
Username or email address *
Password *
Remember me Log in
Lost your password?
IMAGES
COMMENTS
Check out our pretty tissue holder selection for the very best in unique or custom, handmade pieces from our toiletry storage kits & travel cases shops.
This item: ThingIs - Pocket Tissue Holder for Purse, Travel Tissue Holder, Pocket Tissue Cover, Travel Tissue Holder, Portable Tissue Case, Tissue Pouch, Black $9.99 $ 9 . 99 Get it Dec 21 - Jan 5
Make a pretty DIY tissue holder for travel tissues and pocket tissues with this easy tutorial. Read my blog article at https://blog.treasurie.com/tissue-cove...
Travel tissue pouches are so super useful and make the best little gifts for pretty much anyone! Bonus — they're extremely fast to make and inexpensive to boot. Learn how to sew up these easy travel tissue holders and whip up a bunch for some fun last minute gifts with my latest tutorial! Catch the video tutorialbelow, and/or grab the ...
Funwares White Facial Travel Tissue Packs, Chlorine-Free, 8 Packs, 72 Tissues, 3-Ply Sheets, 9 Sheets Per Pack, Car, Travel, School, Work. 4.5 out of 5 stars. 828. ... Car Tissues Holder with Facial Tissues - 4 PK - Travel Tissue Tubes Box Container Perfect Fit for Car Cup Holder Car Tissues Cylinder (Pink) 4.4 out of 5 stars.
Made in Hawai'i, USA. Continuing in our tradition of covering up unsightly utilitarian products (e.g. the Clorox Wipes Cover, Rectangle Tissue Box Cover, and Square Tissue Box Covers), this sweet little thing is the perfect pop of rainbow to pull out of your bag when you need a nostril wipe. It's so much nicer to pull out a pretty pouch in.
This will give you approximately one centimetre of lining fabric now showing on each short side. These edges will eventually form the opening for your tissue holder. Then stitch approximately half a centimetre in, on the right side of the top fabric of both edges like this…. Keeping the outer fabric upturned on your work table as in the last ...
Have you made these cute tissue holders? Use my No Slip Templates for the quickest, easiest & most consistent way to cut & sew them. These days - whether the...
Learn how to sew fabric tissue holders for travel size tissues. It is a quick and easy sewing craft that even a beginner can make. Keep some on hand for last...
Portable Camping Toilet with Detachable Inner Bucket and Removable Toilet Paper Holder for Travel, Boating and Trips, Grey. 4.5 out of 5 stars. 3. $29.99 $ 29. 99. $19.99 delivery Mar 28 - Apr 1 . Add to cart-Remove. TreeLen Chrome Toilet Paper Holder Stand Tissue Holder for Bathroom with Shelf Storage Holds 4 Mega Rolls Phone and Wipes.
Step 3: Make a Pocket Tissue Holder. Turn the piece right sides out and press flat so that there is 1/4″ of the lining showing on each side of the outer fabric. There is a lot of pressing in this project and in all sewing projects. In fact a good iron is on my list of sewing room must haves. I purchased this iron about a year ago and I ...
Instructions: Cut your fabric. You will need two pieces for each tissue holder. One for the exterior and one for the lining. Also, pick out a coordinating color of rick rack trim. Pin rick rack to both sides of the exterior piece of fabric. Line the rick rack up with the edge of the fabric. Another option is to use Wonder Tape to temporarily ...
4. Lay the back of the tissue holder on your workspace, right side up. Place a 2" x 6" folded fabric rectangle on top with the folded edge toward the center. Working counter-clockwise, place a 4" x 2 1/4" folded fabric rectangle on the left side, with the folded edge toward the center. Pin the fabrics together in the top left corner.
Check out our pretty tissue box selection for the very best in unique or custom, handmade pieces from our tissue box covers shops. ... Mini Tissue Pouch, Travel Tissue Holder, Pocket Tissue Cover, Tissue Case (1.1k) $ 12.00. Add to Favorites Knitting Instructions for Cable Tissue Box Cover Boutique Cozy Box Sweater Advanced Beginner With Photos ...
With the fabric you want to be on the outside of your Pocket Tissue Holder facing you, fold the bottom edge up at 1½", measuring both sides with a tape measure. Turn it around. Fold the bottom edge up so the Pocket Tissue Holder measures 3″. Pin both sides. Sew along the pinned edge with a ⅜" seam allowance. Trim loose threads. Trim ...
This is a step-by-step tutorial demonstrating how to make a Traveling Size Tissue Case. It was designed to hold a travel size package of Kleenex tissues. T...
Pretty Delft Blue and White Floral Flowers Purse Tissue Holder, Pocket Tissue Case, Travel Case Cover Pouch, with Kleenex Pack (1.2k) Sale Price $5.59 $ 5.59
Check out our pretty tissue box cover selection for the very best in unique or custom, handmade pieces from our tissue box covers shops. ... Mini Tissue Pouch, Travel Tissue Holder, Pocket Tissue Cover, Tissue Case (1.1k) $ 12.00. Add to Favorites Monogrammed blue heron linen square tissue box cover embroidered | Egret linen tissue box Cover (2 ...