CDL Pre-Trip Inspection Checklist
Studying this Class-A CDL pre-trip inspection checklist is an important part of truck driver training. Before getting your Class-A CDL and finding an entry level truck driving job , most states will require students to pass a DOT (department of transportation) pre-trip inspection test and a general knowledge test .
Each company’s pre-trip inspection varies slightly. Most likely you will have to do the coupling system, light check and in-cab inspections plus one of the remaining three sections.

Pre Trip Inspection Checklist
Download free and print it! Printable Pre Trip Inspection Checklist (PDF)
There are many sections to learn but the test is not as difficult as it may seem. Studying our simplified Class-A pre-trip inspection checklist and taking classes at your local CDL training school will get you prepared.
Engine Compartment
Driver door fuel area, coupling area, light check, in-cab inspection and brake tests, belt driven alternator, belt driven water pump, brake chamber, brake lining, caste nuts and cotter pins, coolant reservoir, gear box and hoses, gear driven air compressor, gear driven power steering pump.
- General Hoses
Leaf Springs
Power steering fluid reservoir, shock absorber, slack adjuster and push rod, spring hanger, steering column, what to check for:.
When checking the engine compartment, you will always want to make sure the following components are properly mounted and secured. You should also make sure they are not cracked, bent or broken. The items you will need to check for include:
- Make sure all of the wires are connected. The belt should not be cracked or frayed and the free play on the belt should be between ½ to ¾ of an inch.
- The free play on the belt should be between ½ to ¾ of an inch. Also check all the hoses running to and from the water pump to make sure nothing is leaking.
- The brake chamber should not be leaking air.
- The brake drum should be properly mounted and secure.
- The brake hose is rubber, so it is important to make sure it is not leaking air.
- Check for oil or debris on the lining. There should be at least ¼ of an inch of friction material.
- Make sure all three caste nuts and cotter pins are present.
- The reservoir should not leaking and must be filled to the manufacturer’s specifications.
- Make sure the drag link is properly mounted and secure, and not cracked, bent or broken.
- The gear box and hoses should have no abrasions, bulges or cuts, and should not be leaking.
- Although the air compressor is hard to see, you must make sure it is properly mounted and does not leak.
- The steering pump is located in the same place as the air compressor and is also gear driven. Ensure the steering pump is not leaking.
General Hoses (Passenger and Driver’s Side)
- The hoses should be secure at both ends. There should be no abrasions, bulges or cuts. Fluids run through these hoses, so it is important to make sure they are not leaking.
- The hub seal (or axle seal) should not be leaking and should be filled to the manufacturer’s specifications.
- Make sure none of the leaf springs have shifted.
- Check for leaks under the truck.
- There should be no lug nuts missing. Look for rust trails, powder residue and cracks around the bolt holes.
- The oil level should be filled to the manufacturer’s specifications.
- Make sure the pitman arm is properly mounted and secure. It should be not cracked, bent or broken.
- Make sure this reservoir is not leaking and filled to the manufacturer’s specifications.
- The rim cannot have any unauthorized welds.
- Make sure the shock absorber is not leaking. If it is leaking, the leak will be at the point where the top and bottom portion of the shock meet.
- With the brakes released and pulled by hand, the push rod should never move more than one inch.
- The spring hanger should be properly mounted and secure.
- Make sure the steering column is properly mounted and secure. It should not be cracked, bent or broken.
- Look for abrasions, bulges or cuts on the tread or sidewalls. Tread depth should have a depth no less than 4/32 of an inch. Tires must be properly filled to the manufacturer’s specifications. This can be checked with an air gauge.
- Make sure the tie rod is properly mounted and secure, not cracked, bent or broken.
- Make sure all are accounted for.
Back to top of Engine Compartment
Catwalk and Steps
Door and hinges, drive shaft, exhaust system, frame and cross members, spring mount.
Again it is important to make sure these items are properly mounted and secure. Look for cracks, bends, and breaks.
- The actual airbag is rubber, so it is important to check for abrasions, bulges, cuts and leaks, in addition to any missing mounting bolts.
- The axle seal should not be leaking and should be filled to the manufacturer’s specifications.
- Make sure to mention the brake chamber is not leaking air.
- Make sure the brake drum is secured properly. Also look for cracks, bends and breaks.
- Check the brake hose at both ends to make sure it is not leaking air.
- There should be no oil or debris on the brake lining. There should be at least ¼ of an inch of friction material.
- The cat walk and steps should be clear of any loose objects.
- Physically demonstrate that the doors open, close and latch properly. Door seals should not be worn, torn or rotten.
- The drive shaft should not be twisted and the u-joints should be free of any debris.
- The tread and sidewalls should have no abrasions, bulges or cuts. The tread depth should be no less than 2/32 of an inch. Tires should be properly filled to the manufacturer’s specifications. This can be checked with an air gauge.
- The exhaust system should show no signs of leaks.
- There should be no unauthorized holes or welds. Bundle up the cross members to ensure none are missing.
- Fuel should not be leaking from the tank and the cap should always be on tight.
- Rust trails could indicate loose bolts, while powder residue and racks around the bolts could mean the bolts have been over-tightened.
- Mirrors should be clean for best visibility.
- Make sure the mud flap is secured properly. Also look for cracks, bends and breaks.
- Make sure to mention there should be never be any unauthorized welds.
- The shock absorber should be secure at both ends and not leaking. If it does leak, it will leak in the middle.
- With the brakes released and pulled by hand, the push rod should not move more than one inch.
- If you are equipped with duals, check to see there is proper spacing between the tires and there is nothing stuck.
- The spring arm should be secure at both ends.
- The spring mount should be secure at both ends.
- Make sure the torque arm is secured properly. Also look for cracks, bends and breaks.
- Make sure to check and mention that no U-bolts are missing.
Back to top of Driver Door Fuel Area
Electric Line
Locking jaws, mounting bolts, release arm, sliding fifth wheel locking pin.
- Air lines should be secure at both ends with no abrasions, bulges or cuts. They should not be leaking, dragging or tangled.
- Make sure the apron is properly mounted and secure. Look for cracks, bends and breaks.
- Make sure there is enough space between the tractor mudflap and the trailer landing gear so that they don’t hit each other when making a turn.
- The electric line should be secure at both ends. There should be no abrasions, bulges, cuts or exposed wires.
- The gap is not an actual item, however there should be no space between the apron and the skid plate.
- The seals should be in good condition with no cracks, signs of rotting, or leaking air.
- Make sure the king pin is properly mounted and secure. Look for cracks, bends and breaks.
- You must physically check that the locking jaws is fully locked around the king pin.
- No mounting bolts should be missing.
- Make sure the platform is properly mounted and secure. Look for cracks, bends and breaks.
- The release arm should be in the fully locked position.
- The skid plate needs to be properly lubed.
- The pin must be in the fully locked position.
Back to top of Coupling Area
Header Board
Landing gear, rear door and hinges.
- Shock Absorbers
Tandem Frame and Release
Trailer tire.
- Again make sure the airbag has no abrasions, bulges, cuts or leakings. The airbag should not be missing any mounting bolts.
- The brake chamber should be properly mounted so that is does not leak air.
- The brake hose should be secure at both ends with no abrasions, bulges, cuts or leaks.
- Check for oil or debris on the brake lining. There should be at least ¼ of an inch of friction material.
- There cannot be any missing cross members.
- The header board cannot have any holes or missing rivets.
- The landing gear must be fully raised and the cradle handle secure.
- Rust trails indicate loose bolts. Powder residue and cracks around the bolt holes could be an indication of over-tightened bolts.
- The rims cannot have any unauthorized welds.
- The rear door should open, close and latch properly. Door seals should not be worn, torn or dry rotten.
- The shock absorber should be checked at both ends for leaks.
- When the brakes are released and pulled by hand, the push rod should not move more than one inch.
- Release handle and locking pins should be in the fully locked position.
There should be no abrasions, bulges or cuts to the tread or sidewalls. Tread depth should be no less than 2/32 of an inch. The tire should be properly filled to manufacturer’s specifications and checked with an air gauge.
- Front of the truck
- Both sides of the truck
- Rear of the truck
- Both sides of the trailer
- Rear of the trailer
Back to top of Trailer
The five functions are:
- Left turn signal
- Right turn signal
- Four way flashers
- High/low beams
- Brake lights
Back to top of Light Check
- Airbrake Test
Air Pressure Gauges
Emergency equipment, heater and defroster, lighting indicators, oil pressure gauge, parking brake, service brake check, water temperature gauge, windshield and mirrors, windshield wipers and washers.
The last section is In-Cab Inspection and Brake Tests. For the In-Cab Inspection you will once again want to make sure all of the following components are properly mounted and secure. As well as the following:
Air Brake Test
There are three stages to an air brake test:
- Applied Pressure Test – When doing the Applied Pressure Test, you will want to build the air pressure to governor cut out. Put the truck in the lowest gear, turn the engine off and immediately turn it back on. Push in the tractor and trailer valves which will then release the parking brakes. Push and hold the brake pedal, allowing the gauges to stabilize. When the gauges have stabilized, announce the Primary and Secondary PSI. Listen for air leaks while doing this.
- Warning Light and Buzzer – Pump down on the brake pedal until the warning light and buzzer comes on. This is typically at or before 60 PSI.
- Tractor/Trailer Protection Valve Pop Out – Pump down on the brake pedal until the tractor and trailer protection valves pop out, this will be between 20 and 40 PSI.
- The air pressure gauges should build to governor cut out.
- Your truck should have a fire extinguisher, three red reflective triangles and spare electrical fuses.
- Demonstrate both the heater and defroster are working properly.
Horns (Air Horn and City Horn)
- Blow both horns to make sure they are working.
- Check the left turn, right turn, four way flashers and high beams; also point these out on the dashboard.
- Make sure transmission is in neutral and then fully depress the clutch. Turn the key on, check the ABS light, announce when it comes on and off, and start the engine.
- The seat belt should not be ripped or frayed and should adjust and latch properly.
- The engine oil pressure gauge should rise to normal operating range.
- Trailer Parking Brakes – Set the trailer brake, release the tractor brake, then tug lightly on the trailer.
- Tractor Parking Brakes – Set the tractor brake, release the trailer brake and tug lightly on the trailer.
- Release both the tractor and trailer brakes. Drive at idle speed. Apply the service brake to make sure you come to a complete stop and that it doesn’t pull to the left or right when applying the brakes.
- The voltmeter should be charging between 13 and 14 volts.
- The water temperature gauge should also rise to normal operating range.
- The windshield and mirrors must be clean, with no obstructions and in proper adjustment.
- Demonstrate the wipers and washers are working properly by spraying the windshield.
Back to top of In-Cab Inspection and Brake Tests
During a CDL pre-trip inspection, truckers inspect many aspects of their commercial vehicle, including the overall safety of the vehicle; major hoses, fluid levels, and vehicle belts; the clutch or gear shift; and emergency equipment. The driver demonstrates their knowledge by walking around the vehicle, checking various safety components and explaining why each part should be checked for safety.
Reference and practice tests:
- Printable Pre Trip Inspection Checklist (PDF)
- CDL General Knowledge Practice Test
- Pre Trip Inspection Practice Test
- CDL HAZMAT Endorsement Practice Test
Edited for 2024 on 12/5/23
CDL Pre-Trip Inspection Test and How To Memorize It
The pre-trip is one of the things that students fear the most and fail the most. Let’s face it, the pre-trip is intimidating because there is so much stuff to memorize. The key to learning the pre-trip inspection is preparation, memorization, and repetition. Don’t go away, in this article I have exactly what you need to make sure you pass it the first time.
It is going to take time for you to memorize everything and the only way to do this is by repeating it over and over.
Hopefully, the school where you are being trained is giving you enough time to practice it everyday you are there.
I can’t stress that enough, regardless of which method you use below you need to repeat it daily and practice on your own.
Don’t expect that your run through once a day with your instructor is enough, it isn’t.
In this article I’m going to give you 8 tips that will help you memorize the pre-trip so you are able to pass it your first time and move on with your driving career.
1. REPETITION!
The only way to memorize the pre-trip is to repeat it over and over. Start with the engine area and work your way around the truck and finally inside the cab.
There is no way around consistent repetition. The more you do it the more you will memorize it. It’s just that simple.
Now that we have established how important repetition is I want you go through the rest of this list and figure out which method (or methods) works best for you and then repeat it over and over.
2. Record Someone Else
You can use YouTube to find a video of someone doing a pretrip and for the most part they work pretty well (more about YouTube later).
Take it a step further though. Ask someone (like and instructor or friend) to do a pre-trip and video record them.
While they are doing it try to use the zoom function on your camera so that you know what the parts look like and what is being checked.
Students that I come across have said that this method works really well because you have quality video and audio. Just watch your recording over and over and this stuff will be engraved in your brain.
Just make sure you are absolutely sure that the person you record knows what they are doing and are showing you everything. You don’t want to watch a video that skips anything that will be on the test.
3. Smaller Chunks
Break down the pre-trip into smaller chunks so that it is not overwhelming. If you think about memorizing everything at once it will be a daunting task.
My suggestion is you learn your air brakes first, then the inside of the cab, the engine compartment, and then the rest of the truck. You can chose any order that you want to as long as it helps you out.
Memorize each part and then tie it all together. You will find that learning the pre-trip is much easier if you do it this way.
4. Use Your Imagination
Do this while in bed before you fall asleep. Warning: the pre-trip is going to consume a lot of your attention during training, even while you sleep!
When you wake up go through a video you found on YouTube or the one you recorded (see #2) and correct any errors you made.
5. Find A Truck
It really helps if you have access to a truck. Pictures alone are not enough. Most of you are probably getting your training through a private school, company sponsored training , or community college.
All of these will give you access to an actual truck and should be taking time each day to practice the pre-trip.
Take advantage of this time with the truck to practice your pre-trip as much as possible. When class ends try to stick around to get in some extra practice, this could be the difference between passing and failing.
6. Watch A Pre-Trip Video On YouTube (not straight through)
There are a lot of videos on YouTube that you can choose from. Let me save you some time, these two (below) is the best because it has good audio and video quality, is accurate, and is easy to follow.
Don’t watch the video straight through over and over. Like I mentioned earlier you should chunk it into smaller sections.
Watch a section, pause it, and list off the names of the parts and things to look for. Play it again to see if you are getting them correct. When you finish one section go on to another section until you finish it.
Don’t move on to a new section until you have memorized the section you started. When you complete all the sections you should be able to watch the whole pre-trip and repeat everything on it from start to finish.
If you want to challenge yourself a little try mixing up the sections so that the sections that was last is now first. This will let you know if you are really memorizing everything.
7. Use A Checklist
Probably the most popular ways to memorize the pre-trip is to use a checklist. No doubt that wherever you are getting your training at is already giving you a checklist to use.
Use it. A lot.
Not all checklists are done in the same order but they should all cover the same stuff. I like this one here (printable PDF document) by the people at Trucking Truth , it’s easy to follow and is accurate.
Every possible thing that you will need to identify during the pre-trip is on this checklist.
8. Use Pictures/Diagrams
There are a ton of picture resources out there that will help you memorize the test. Just do a search for “cdl pre-trip inspection pictures” and you will find a ton of stuff.
The picture I like most are these (link to PDF) by Driver Solutions. The pictures are easy to see and distinct arrows are used to point to each part. Along with pictures is an explanation of what to look for and what to say for each individual part.
What Is The Pre-Trip Inspection?
The pre-trip inspection is an inspection of the commercial vehicle including the cab, engine compartment, and exterior.
A driver of a commercial vehicle is required, by federal law, to complete one every day before driving the vehicle and at least once in a 24 hour period. Every single time you begin driving your truck you will have to complete a pre-trip.
The purpose of it is to make sure that the vehicle is safe to drive.
This gives you a chance to get whatever is wrong fixed. If you miss something and are inspected it could result in citations by the DOT.
A lot of drivers find it to be a pain in the rear but you really need to do it every single time you drive your truck. Don’t listen to the irresponsible driver at the truck stop that tells you it’s okay to skip it. It’s not okay.
How Long Does An Inspection Take?
A pre-trip usually takes about 15-45 minutes to complete. It really depends on the type of truck you are inspecting and your experience.
After several years of driving it’s inevitable that your pre-trip is going to be quicker because you are better at doing it and you know what to look for.
As a new driver you should take your time and make sure you do it right. Make it a habit to always conduct a thorough inspection so that you run into less problems while on the road.
What To Say During The Pre-Trip Test
Knowing what to say is important during the test. There are some specific language the person testing you is going to be listening for. More than likely you already heard these phrases but here is an easy way to remember what to say:
PMS— Properly Mounted, Secure ABC— Abrasions, Bulges, Cuts CBB— Cracked, Bent, Broken
There are some tricks that you can use to make sure you say the right thing, here they are: 1 . If its mounted (almost everything is) use the words, “Properly Mounted, Secure” (PMS) 2. If its rubber use the words, “Abrasions, Bulges, Cuts” (ABC) 3. If it’s metal or another hard surface use the words, “Cracked, Bent, Broken” (CBB) 4. If it has fluid or air going through it or in it remember to say, “Not Leaking”
This language shouldn’t be new to you, hopefully the school that is training you has already taught you this stuff.
What Should You Cover During The Pre-Trip?
The areas that you should cover include the coupling system, light check, in-cab inspection, engine compartment, trailer, and drivers door fuel area. Make sure that you are prepared for all of these.
Also, keep in mind that CDL schools/classes may cover the pre-trip in different orders. It’s okay though, they all cover the same stuff. The order that you practice is probably going to be different from someones in a different school/class.
There is no correct order as long as you memorize everything.
What Will Be Tested On The Actual State Pre-trip Inspection Test?
You will be required to perform a pre-trip for the light check, the in-cab inspection, and the coupling system. These 3 areas you have to complete.
After completing those 3 areas your examiner will have you perform one of the following: the engine compartment, trailer, drivers door fuel door, or the entire vehicle.
You will not know ahead of time which one the examiner will choose. This is why it is crucial that you know all the areas.
What Else You Can Do To Prepare?
Aside from the ways listed above to help you memorize the pre-trip there are some other things you can do.
One thing you can do is try answering some practice tests like these here from Trucking Truth. There are 5 free practice tests you can take.
I really find that these practice tests reinforce what you need to know for the real test. It’s worth your time try them out just to see how you do.
What If You Fail The Pre-Trip?
If you do fail the pre-trip you are able to retake it. Make sure you know why you failed the test, ask the inspector if he/she can specifically tell you what you did wrong.
This is usually never a problem because the inspectors want you to know what you missed so that you can pass the test the next time.
One more thing, don’t be embarrassed because you didn’t pass it on your first try! This happens to a lot of people! You are not the only person that will fail the pre-trip and you won’t be the last.
Study what it is that you missed/did wrong and pass it on your second attempt.
Extra Tips For Passing The Pre-Trip Test
Probably the most common reason people fail the pre-trip is because they are nervous.
The two things that will help you out the most is to always remember that the pre-trip is a verbal contact test.
As you start walking towards the vehicle you should already be looking for any leaks under it, broken marker lights, loose mirror brakes and anything else that seems out of place.
BE VERBAL! Your number one priority is to make sure the examiner knows that you know what you are talking about. The more you talk the greater your chances are to pass the test.
Even if it might seem you are going overboard just keep going. Examiners tend to like when testers are verbal.
http://www.truthabouttrucking.com/fls/Pre_Trip_Inspection.pd
CONTACT! The second most important thing you can do is make contact with the item you are describing. For example, as you are explaining the radiator brace you need to make sure you point to or put your hand on the brace as well.
Your examiner wants to make sure that you actually know what the item is that you are explaining.
Make sure you are pointing the the correct item though! Don’t describe the radiator brace while pointing to the turbo!
Again, make sure you are VERBAL and CONTACT every single item (correctly) that you are describing.
Now go pass that test! Good luck driver!
Privacy Policy
COPYRIGHT © 2019 CDL TRAINING SPOT
- All Companies
- Driver Training
- All Freight Types
- Lease/Purchase
- Message Board
- Truck Driver Salary
- How to Become A Truck Driver
- Will I Be Successful?
- Truck Driving Schools
- CDL Practice Tests
- Get Your CDL
- Get Your First Truck Driving Job
- Your First 100,000 Miles
- Advanced Tips
- Sign Up Here
Select Location x
Please tell us your location.
Location not set
The Complete Pre-Trip Inspection Checklist

Due to heavy memorization, the pre-trip inspection is one of the hardest aspects of the CDL test. Also called the “Vehicle Inspection Test,” the pre-trip is one of the tests that trucking students fail the most.
With this pre-trip inspection checklist, we tell you everything you need to know and what you need to check for.
Engine Compartment – What to Check For:
When checking the engine compartment, you always want to make sure the following components are properly mounted and secured. You should also make sure they are not cracked, bent, or broken. The items you need to check for include:
Belt-Driven Alternator
All of the wires are connected. The belt is not cracked or frayed, and the free play on the belt is between ½ to ¾ of an inch.
Belt-Driven Water Pump
The free play on the belt is between ½ to ¾ of an inch, and all the hoses running to and from the water pump are tightly clamped. Ensure nothing is leaking.
Brake Chamber
The brake chamber is not leaking air.
The brake drum is properly mounted and secure.
The brake hose is rubber; it is not cracked and is not leaking air.
Brake Lining
Check for oil or debris on the lining. There should be at least ¼ of an inch of friction material.
Caste Nuts and Cotter Pins
All three caste nuts and cotter pins are present.
Coolant Reservoir

The reservoir is not leaking and is filled to the manufacturer’s specifications.
The drag link is properly mounted and secure, and not cracked, bent or broken.
Gear Box and Hoses
The gear box and hoses have no abrasions, bulges or cuts, and are not leaking.
Gear-Driven Air Compressor
The air compressor is properly mounted and does not leak.
Gear-Driven Power Steering Pump
The steering pump is properly mounted and not leaking.
General Hoses (Passenger and Driver’s Side)
The hoses are secure at both ends and are not leaking. There are no abrasions, bulges, or cuts.
The hub seal (or axle seal) is leaking and is filled to the manufacturer’s specifications.
Leaf Springs
None of the leaf springs have shifted or are bent or broken.
There are no signs of leaks under the truck.
There are no lug nuts missing. There are no rust trails, powder residue, or cracks around the bolt holes.
The oil level is filled to the manufacturer’s specifications.
The pitman arm is properly mounted and secure. It is not cracked, bent, or broken.
Power Steering Fluid Reservoir
The power steering reservoir is not leaking and is filled to the manufacturer’s specifications.
The rim does not have any unauthorized welds.
Shock Absorber
The shock absorber is not leaking. If it is leaking, the leak will be at the point where the top and bottom portion of the shock meet.
Slack Adjuster and Push Rod
With the brakes released and pulled by hand, the push rod does not move more than one inch.
Spring Hanger
The spring hanger is properly mounted and secure.
Steering Column
The steering column is properly mounted and secure. It is not cracked, bent, or broken.
There are no abrasions, bulges, or cuts on the tread or sidewalls. Tread depth should have a depth no less than 4/32 of an inch. Tires are properly filled to the manufacturer’s specifications. This can be checked with an air gauge.
The tie rod is properly mounted and secure, not cracked, bent, or broken.
Make sure all are accounted for.
Driver Door Fuel Area-What to Check For:
Remember – during the pre-trip inspection, you want to make sure these items are properly mounted and secure. Look for cracks, bends, and breaks.
The actual airbag has no abrasions, bulges, cuts, or leaks. The airbag is not missing mounting bolts.

The axle seal is not leaking and is filled to the manufacturer’s specifications.
The brake drum is secured properly and has no cracks, bends or breaks.
Check the brake hose at both ends to make sure it is not leaking air.
There is no oil or debris on the brake lining. There is at least ¼ of an inch of friction material.
Catwalk and Steps
The cat walk and steps are clear of any loose objects.
Door and Hinges
The doors open, close, and latch properly. Door seals should not be worn, torn, or rotten.
Drive Shaft
The drive shaft is not twisted, and the u-joints are free of any debris.
The tread and sidewalls have no abrasions, bulges, or cuts. The tread depth is no less than 2/32 of an inch. Tires are properly filled to the manufacturer’s specifications. This can be checked with an air gauge.
Exhaust System
The exhaust system shows no signs of leaks.
Frame and Cross Members
There are no unauthorized holes or welds. Bundle up the cross members to ensure none are missing.
Fuel is not leaking from the tank, and the cap is on tight.
There are no rust trails, loose bolts, powder residue, or cracks around the bolts.
Mirrors are clean, with no cracks or chips.
The mud flap is secured properly, with no cracks, bends and breaks.
There are no unauthorized welds.
The shock absorber is secure at both ends and not leaking. If it does leak, it is preferable to leak in the middle.
There is proper spacing between the tires and there is nothing stuck.
The spring arm is secure at both ends.
Spring Mount
The spring mount is secure at both ends.
The torque arm is secured properly, with no cracks, bends or breaks.
No u-bolts are missing.
Coupling Area-What to Check For:
Air lines should be secure at both ends with no abrasions, bulges, or cuts. They should not be leaking, dragging, or tangled.
Make sure the apron is properly mounted and secure. Look for cracks, bends, and breaks.
Make sure there is enough space between the tractor mud flap and the trailer landing gear, so that they don’t hit each other when making a turn.
Electric Line
The electric lines are secure at both ends. There are no abrasions, bulges, cuts, or exposed wires.
There is no space between the apron and the skid plate.
The seals are in good condition with no cracks, signs of rotting, or leaking air.
The king pin is properly mounted and secure, without cracks, bends and breaks.
Locking Jaws
Physically check that the locking jaws are fully locked around the king pin.
Mounting Bolts
No mounting bolts are missing.
The platform is properly mounted and secure, without cracks, bends and breaks.
Release Arm
The release arm is in the fully locked position.
The skid plate is properly lubed.
Sliding Fifth Wheel Locking Pin
The pin is in the fully locked position.
Trailer- What to Check For :
The airbag has no abrasions, bulges, cuts or leaks, not missing any mounting bolts.
The brake chamber is properly mounted and does not leak air.
The brake hose is secure at both ends with no abrasions, bulges, cuts, or leaks.
No oil or debris on the brake lining and at least ¼ of an inch of friction material.
No missing cross members.
Header Board
The header board does not have any holes or missing rivets.
Landing Gear
The landing gear is fully raised and the cradle handle secure.
No rust trails, powder residue, or cracks around the bolt holes.
The rims do not have any unauthorized welds.
Rear Door and Hinges
The rear door opens, closes, and latches properly. Door seals are not worn, torn, or dry rotten.
The shock absorber is secure at both ends with no leaks.
When the brakes are released and pulled by hand, the push rod does not move more than one inch.
Tandem Frame and Release
Release handle and locking pins are in the fully locked position.

Trailer Tire
There are no abrasions, bulges, or cuts to the tread or sidewalls. Tread depth is no less than 2/32 of an inch. The tire is properly filled to manufacturer’s specifications and checked with an air gauge.
Light Check
There are five locations where you must check your lights. These include:
- Front of the truck
- Both sides of the truck
- Rear of the truck
- Both sides of the trailer
- Rear of the trailer
The five functions are:
- Left turn signal
- Right turn signal
- Four way flashers
- High/low beams
- Brake lights
Inspection and Brake Tests-What to Check For: In-Cab
The last section is In-Cab Inspection and Brake Tests. For the In-Cab Inspection you once again want to make sure all of the following components are properly mounted and secure. As well as the following:
Air Brake Test
There are three stages to an air brake test:
- Applied Pressure Test – When doing the Applied Pressure Test, you want to build the air pressure to governor cut out. Put the truck in the lowest gear, turn the engine off and immediately turn it back on. Push in the tractor and trailer valves which then release the parking brakes. Push and hold the brake pedal, allowing the gauges to stabilize. When the gauges have stabilized, announce the Primary and Secondary PSI. Listen for air leaks while doing this.
- Warning Light and Buzzer – Pump down on the brake pedal until the warning light and buzzer comes on. This is typically at or before 60 PSI.
- Tractor/Trailer Protection Valve Pop Out – Pump down on the brake pedal until the tractor and trailer protection valves pop out, this will be between 20 and 40 PSI.
Air Pressure Gauges
The air pressure gauges build to governor cut out.
Emergency Equipment
Truck has a fire extinguisher, three red reflective triangles, and spare electrical fuses.
Heater and Defroster
Demonstrate both the heater and defroster are working properly.
Horns (Air Horn and City Horn)
Blow both horns to make sure they are working.
Lighting Indicators
Check the left turn, right turn, four way flashers and high beams; also point these out on the dashboard.
With the transmission in neutral, fully depress the clutch. Turn the key on, check the ABS light, announce when it comes on and off, and start the engine.
The seat belt is not ripped or frayed and adjusts and latches properly.
Oil Pressure Gauge
The engine oil pressure gauge should rise to normal operating range.
Parking Brake
- Trailer Parking Brakes – Set the trailer brake, release the tractor brake, and tug lightly on the trailer.
- Tractor Parking Brakes – Set the tractor brake, release the trailer brake, and tug lightly on the trailer.
Service Brake Check
Release both the tractor and trailer brakes. Drive at idle speed. Apply the service brake to make sure you come to a complete stop and that it doesn’t pull to the left or right when applying the brakes.
The voltmeter is charging between 13 and 14 volts.
Water Temperature Gauge
The water temperature gauge rises to normal operating range.
Windshield and Mirrors
The windshield and mirrors are clean, with no obstructions and in proper adjustment.
Windshield Wipers and Washers
Demonstrate the wipers and washers are working properly by spraying the windshield.

This is a really nice complete list, very useful.
Comments are closed.
Contact ClassADrivers.com
Please use the form below to contact our customer service or sales team.
You can also reach us at (888) 830-2326. Our normal business hours are Monday-Friday 8 a.m. to 5 p.m. (Pacific Time).
Our business address is: Attn: Class A Drivers MH Sub I, LLC dba Internet Brands 909 N Pacific Coast Highway, 11th Floor El Segundo, CA 90245
By clicking the ["Send"] button, you agree to our Terms of Use and Privacy Policy , and to the use of cookies described therein, and you also consent to the collection, storage, and processing of your data in the United States where the level of data protection may be different from that in your country.
Complete pre-trip inspection checklist for truck drivers

By The Schneider Guy
Estimated reading time: 4 minutes
As a truck driver, performing a CDL pre-trip inspection is one of the most common and repeated tasks you will complete. Pre-trip inspections help truck drivers ensure their tractor and trailer are safe to operat e before hitting the road.
Keep reading to learn what a p re -trip inspection is and what should be on a p re -trip inspection checklist .
What is a pre-trip inspection?
A pre-trip inspection includes checking over the tractor and trailer a truck driver will be operating . A pre-trip should be completed before the operation of a vehicle :
- At the beginning of a driver’s shift.
- Any time a new trailer is picked up.
- After a 10-hour break.
A thorough inspection usually takes anywhere from 30 minutes to one hour and should be logged as on-duty, not driving (line 4) .
How to complete a CDL pre-trip inspection
CDL pre-trip inspection checklist
1. passenger-side engine: .
- Air filter housing: Secure mounting, cover in place.
- Windshield washer fluid reservoir: No leaks, proper fluid level.
- Turbocharger: No oil or exhaust leaks.
- Engine air ductwork: No cuts, clamps secured.
- Alternator: Mounting secured, no broken or loose wire.
- Accessory drive belt: Not cracked or frayed.
- Air conditioner compressor: Secure m ounting .
2. Front brakes (covers all five brake components):
- Brake drum: No cracks.
- Brake lining: No cracks or damage.
- Slack adjuster: Proper angle to the brake chamber, clevis and cotter pin intact.
- Brake air line: No bulges or cuts, fitting tight .
- Brake chamber: Mounting bolts secured, band clamp secured.
3. Front wheel:
- Tire: ABCs (abrasions, bulges, cuts), pressure = 120 PSI, tread depth = 4/32 min ( DOT ) .
- Wheel: Not cracked or bent.
- Hub oil: Not leaking, at proper level – if it’s a sealed unit, can’t check level.
- Oil seal (outer): Not leaking.
- Valve cap: Not missing.
- Lug nuts: None missing, no streaks or shiny areas, none loose.
4. Driver side of engine:
- Radiator brace: No cracks or missing bolts.
- Radiator: Not leaking, secure mounting.
- Water pump: No cracks, not loose or leaking.
- Fuel water separator/filter: Not leaking, secure mounting.
- Pitman arm/drag link: Not cracked, castle nut secured with cotter pin.
- Steering gear box: Secure to frame, not leaking.
- Power steering reservoir: Secure mounting , no leaks, proper level.
- Dipstick: Right level, secured after check.
- Steering shaft: Secure, not loose or damaged.
- Fuel pump: No cracks, not loose or damaged.
- Oil filler cap: Secure, no cracks.
- Engine coolant reservoir: No leaks, proper fluid level.
5. Steer axle suspension:
- U-bolts: No cracks, no loose or missing nuts.
- Leak spring: No cracks, not loose or shifting.
- Tie rod: Secured with castle nuts and cotter pins.
- Shock absorber: Secure mounting, not leaking oil.
- Axle: Not cracked.
6. Rear suspension:
- Spring mount: No cracks, secure mounting.
- Tire: ABCs (abrasions, bulges, cuts), pressure = 110 PSI, tread depth = 2/32 min ( DOT ) .
- Airbag (bellows): Fully inflated, secure mounting, not ruptured.
7. Side of cab:
- Mirrors: Secure m ounting , no broken glass.
- Doors: No damage, glass not broken, hinges secured, opens and closes well.
- Lights and turn signals: Working, not cracked.
- Steps: Mounted, secured to skirting.
- Battery box: Secure m ounting , cover latched.
- DEF cap: Cap secured.
- Fuel cap/tank: Gasket in place, vent in place, chain secures the cap to the tank.
- Side skirting: No damage, panels secure.
- Side box: Secured, safety triangles present.
- Side of sleeper berth: No body damage.
- Sleeper berth window: No cracks.
8. Rear of cab:
- Electrical cord: No bare wire, no corrosion, check the plug at the end of the cord.
- Air line: Not tangled or worn, rubber grommets not worn, fittings tight.
- Cab shock absorber: Secure mounting, not leaking oil.
- Cab airbag (bellows): Not ruptured, securely mounted.
9. Driveshaft/rear frame:
- Driveshaft: Not cracked.
- Universal joint: Not cracked, not missing bolts, no shiny areas.
- Differential: Not leaking oil.
- Frame: Straight, no non-factory welds.
10. Fifth wheel area:
- Pivot pin: Keeper pin and cotter key intact.
- Slider lock pins: Fully engaged.
- Release arm: Not bent.
- Slider rail: No broken welds or missing bolts.
- Slider stop blocks: Welds not broken, not missing bolts.
- 5th wheel platform: Well-greased, tilted down.
11. Front of trailer:
- Top rail: No cracks or collision damage.
- Clearance lights: Not broken, working properly.
- Registration: Not missing, readable.
- Document box: Not missing or loose.
- Air line /glad hands: No bulges or cuts in air lines, rubber grommets not damaged on glad hands.
- Electric hook up: No broken pins, cover intact.
- PM sticker: Current, legible.
- Height sticker: Legible, legal for route.
- Placard holder: Not broken or missing rivets.
- Tracking device: No cracks or collision damage.
12. Side of trailer:
- Top rail: Not cracked, no collision damage.
- Clearance light: Not broken, operational.
- Bottom light: Not cracked, no collision damage, no missing bolts.
- Landing gear: Legs straight, no broken welds in bracing, sand pads secured and clean handle in cradle.
- Reflector tape: Clean.
- Side panels: No holes or cuts, no missing rivets.
13. Rear of trailer:
- Latches: Secured, not damaged.
- Lights: Not broken or missing, operational.
- Splash guard: Brackets and guard secured.
- License plate: Secure and clean, light is working.
- Bumper: Not damaged, no broken welds.
- Door hooks: Not loose, no missing bolts.
- Hinges: Not cracked, no missing bolts on both sides.
- Door seals: No separation, no rubber tubing sticking out.
14. Trailer suspension:
- Air line: No bulges or cuts, fittings are tight and not rubbing.
- Axle: Not bent or broken.
- Clevis pin/cotter key: Not missing.
- Slack adjuster: Proper angle, clevis pin and cotter pin intact.
- Brake linings: Minimum of ¼ inch thick, not cracked.
- Brake drum: Not cracked.
- Tire: (ABCs), tread depth = 2/32 , air pressure = 110 PSI.
- Spring: Not broken, not shifted.
- Spring mount: No broken welds.
- U bolts: Not loose, not cracked.
- Torque rod: Secure mounting, bushings intact.
- Spring brake chamber: Secure m ounting , band clamp secure.
15. Gauges/inside the truck:
- Fuel: Matches visual when looking in the tank.
- Def level: Maintain a minimum of one light bar.
- Oil pressure: 25-50 PSI.
- Speedometer: 0-60 MPH.
- Air pressure: 90-120 PSI.
Please note that the list above is just an example. It is important to remember the type of driver you are, the company you work for and the type of truck you drive can impact your CDL pre-trip inspection . Be sure to consult your company guidelines or speak with your leader for more information on your post-trip inspection requirements.
Get more great driving tips and guides.
Schneider Guy loves the "Big Orange." He's passionate about the trucking industry and connecting people to rewarding careers within it. He's been the eyes and ears of our company since our founding in 1935, and he's excited to interact with prospective and current Schneider associates through "A Slice of Orange."
Related posts

8 CDL Road Test tips to help you pass

How hard is it to get a CDL?

How to get your CDL – 7 simple steps for new truck drivers

Join 100,000+ Drivers
- Sponsorship
- Thinking of Becoming a Truck Driver?
- Getting a CDL License
- Trucking Driving Jobs Guide
- Trucking Company Guide
- Trucker Life
- Paid CDL Training
- CDL Schools
- Professional Driving Skills + Knowledge
- Owner Operator
- Latest Articles
- Truck Driver Skills
The Pre-Trip Inspection: A Practical Guide For the Truck Driver
Updated February 24th, 2022

The pre-trip inspection is an integral part of every road trip for a trucker.
It’s probably the most disliked and most often overlooked part of the job of the professional truck driver in the trucking industry.
This inspection is meant to be a thorough check of the truck, trailer and load.
The check is to ensure that everything is in correct working order, prior to the truck and driver, departing on a trip.
Any damage or issues found during the pre-trip inspection which needs attention, must be addressed before departure.
CDL Test Pre-Trip Inspection
If you just came through the process of getting your CDL, you can breathe a sigh of relief.
You don’t have to check all 500 or so items that you had to memorize for the test every single day.
Out on the road, a thorough pre trip shouldn’t take more than 10 to 15 minutes.
DVIRs – Daily Vehicle Inspection Report
According to federal law ( FMCSR Section 396.11 ), every day, a driver must submit a Daily Vehicle Inspection Report (DVIR) for each power unit he operates. Multiple trailers can go in one report.
DVIRs are either paper or electronic.
Not every trucking company (ahem) enforces this policy, so some truck drivers can go months or years without submitting a DVIR.
Minimum DOT Pre-Trip Inspection Requirements
- Service brakes including trailer brake connections
- Parking brake
- Steering mechanism
- Lighting devices and reflectors
- Windshield wipers
- Rear vision mirrors
- Coupling devices
- Wheels and rims
- Emergency equipment
Your trucking company’s DVIR might be more thorough.
This is a thorough Q&A on DVIRs which you can refer to.

Inspecting a New Truck
When you are assigned a new truck (either daily or just once), there are a few additional things you need to check for on the pre-trip inspection.
Truck Compliance
- Cab card and book – This is a book containing the registration, inspection, permits, cab cards, IFTA paperwork, and any other important papers for the truck. Make sure it is in the truck and all the paperwork is up to date.
- Inspection sticker – This is outside the truck. Find it and make sure the truck is not overdue.
- IFTA stickers – These are the fuel tax compliance stickers. They are on both sides of the truck. Make sure the current year is displayed.
- Elog device – Most trucks are required to have a working elog device.
- Required permits – These are in the cab card book. The most common permits are Heavy Motor Vehicle Trip Permit (Oregon) and the Weight Distance Tax Permit (New Mexico).
- New York HUT sticker – This is usually on the front of your truck. It’s a type of permit.
- License plate – Make sure the license plates on the front and back of the truck match.
- FMCSA Safety Regulations and Hazardous Materials book – These will be given to you by your company. They must stay in your truck within arms reach from the driver’s seat.
- Paper logbook – If your e-log stops working, you must log your hours in a paper logbook, which must be kept in your truck.
- Medical card – You must keep your current medical card in your truck. Always have your CDL on you as well.
- Orange triangles – You must have 3 triangles for when you break down.
- Fire extinguisher – Must be charged and secured to the truck. No rolling around on the floor.
- Extra fuses – If your truck doesn’t use circuit breakers, you must have spare fuses.
- Load bars and/or straps
- Extra oil, coolant, and windshield washer fluid
- Line antifreeze and diesel anti-gel
- Chains and bungees
- Gladhand seals
- Hammer, wrench, wire cutters, cable cutters, knife with glass-breaker
The Class A Pre-Trip Inspection Process
Unless I have to bobtail to pick up my trailer, I inspect my truck and trailer together.
The best way to memorize a thorough pre trip is to do it the same way each time.
Your process will look different from mine, but as long as you are consistent, you will be less likely to miss anything.
I do the inspection first thing each morning as well as every time I swap trailers.
Paperwork and Trailer
- Check the paperwork. It should be the first thing checked when you get to your truck.
- Match the trailer number to your paperwork. If your trailer has a seal, make sure it matches too.
- Unsealed trailer. If your trailer does not have a seal, open it and confirm the product matches the bills. If you are picking up an empty trailer, open it and make sure it’s actually empty.
- Confirm your destination. Ensure the destination is the same as on your trip sheet or load assignment. If there is a discrepancy, call your dispatcher.

I personally like to start with checking under the hood of the rig. Not everyone does, but I do.
Under the Hood of the Truck
I walk around the front of the truck, making sure all the lights work. Then I open the hood.

- Fluid levels – Check all fluids: coolant, oil, power steering fluid, and windshield washer fluid. Make sure caps are tight for the rad, oil filler, power steering fluid and the dip-stick is seated properly.
- Alternator, water pump, power steering pump –Make sure these are in good working order, and the belts are not worn or have too much slack.
- Observe at the engine block. Check for leaks, fluid running down the side of the engine. Check for wear, cracking or fraying. Inspect fan belts for proper tension and signs of wear.
- Hoses – Check all hoses for leaks, cracks, and tears.
- Wiring – Check wiring for wear.
- Steering linkage – Check linkage for worn or missing parts.
- Tires – Tires should be properly inflated and have decent tread. If there are flat spots on the tire, it needs to be replaced.
- Hub seal – Make sure it’s not leaking and wiped with oil if transparent.
- Brakes – Brake chambers should not be out of round and should be free of grease. Shoes should not be worn down too much.
- Slack adjusters – Pull slack adjuster. If it travels more than an inch, it needs to be adjusted.
- Suspension – Shocks should be in good condition, and not covered in grease or oil.
Back of the Truck
Next, I check the back of my truck because it’s easier to check this before hooking to a trailer.
- Tires – Tires should be properly inflated and have decent tread. If the tires have flat spots, the tire needs to be replaced.
- Suspension – Shocks and airbags should be in good condition, and not covered in grease or oil.
- Drive shaft – Driveshaft should be undamaged and free of grease. Make sure there is no debris in the u-joints.
- Frame – The frame should not have any welds and not cracked or significantly rusted.
- Fifth wheel – The fifth wheel should be properly greased and not broken.
- Fuel tanks – Fuel tanks should not be leaking.
- Stairs and catwalk – Stairs and catwalk should be free of debris and not broken.

Tires should be checked with a tire gauge.
Tip . This is especially if you are slip seating. Tire thumpers aren’t very accurate. If you use a tire thumper, still check with a tire gauge from time to time.
Drives and tandems should be inflated to 100-110 psi and have a minimum tread or 2/32in. Steer tires should be inflated to 110-120 psi and have a minimum tread of 4/32in.
Tires under 50 psi should be replaced, as they can’t retain enough air pressure.
Flat spots can occur from dragging tandems in the winter or when trying to slide the tandems. Tires with flat spots should be replaced.
Check tires for damage, nails, and punctures.

Next, I jump in my cab and start my truck.
- Gauges – Make sure air, oil, and water temperature gauges rise to normal levels.
- Mirrors – Adjust mirrors before moving your truck.
- Windshield wipers – Make sure they work and sit flat against the windshield.
- Horn – Make sure the city and air horns both work.
- Heat and A/C – Check to see if heat and/or air conditioning is working.
- Seat belt – Seat belt should not be frayed and should move freely.
Coupling and Air Lines
This is what could happen if you don’t do the tug test.
The pre-trip inspection is a pretty important thing to do.
Learn your pre-trip procedure and do it when required.
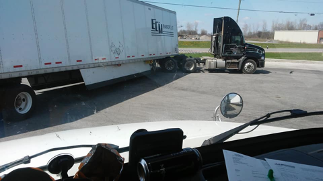
This is why you should always do a tug test when picking up a trailer. The passenger side of the front of the trailer is resting on the frame of the truck and NOT hooked up to the 5th wheel.

The front left corner of the trailer is supported by retracted landing gear only. (Not good!)
The truck driver in this photo (hopefully) learned how critical a pre-trip is. Don’t end up in a pickle like this guy.
Next, I hook up to my trailer.
- Tug test – I back under my trailer until I hear a click, and then immediately do a tug test.
A tug test tests both your coupling and your brakes. If you pull away from your trailer, you aren’t hooked properly.
If you pull your trailer with you, your trailer brakes are out of adjustment. Be absolutely sure to write it up and have it corrected before departure.
- 4 Ways + Headlights. I also turn on my four-way flashers and headlights.
- Airlines and pigtails – Next, hook up airlines and pigtails (electrical connection). Inspect to make sure they aren’t leaking or ripped.
- Visual check of Fifth wheel – Look at the fifth wheel arm under the trailer to make sure it is coupled. The arm should be in.
- Landing gear – Raise the landing gear and check for damage.

Next, I check the bulkhead (front of the trailer).
- Wall – Make sure the wall is not damaged.
- Inspection sticker – Check the DOT inspection sticker to make sure it’s not out of date.
- Registration paperwork – Check the front trailer box to make sure the registration is good.
- Reefer unit – If you are pulling a reefer, select the pre trip function on the unit and run it. It should be completed by the time you are finished your pre trip inspection.
Next step for the pre-trip inspection is to check the side of the trailer and the tandems.
- Lights – Lights should be on and flashing.
- Suspension – springs or airbags should be in good condition, and not covered in oil or grease.
- Tandem pins – Tandem pins should be locked in position, and slider arm should be in its cradle.
- Cables – Make sure the tandem cables aren’t dragging on the ground.
- Underbelly – Make sure there are no damaged beams under the trailer. Check the entire length.
- Mudflaps – Mud flaps should not be torn and hanging.
Back of Trailer
Next, I check the back of the trailer.
- Doors – Doors and hinges should not be damaged.
- Door latches – Doors should be closed and secured.
- Seal – Seal should be intact and match paperwork.
- DOT bumper – DOT bumper should not be damaged
- License plate – Check for the license plate. They tend to wear out and fall off.
Passenger Side
Next, I check the passenger side.
- Brakes – Brake chambers should not be out of round and should be free of grease.
- Suspension – Springs or airbags should be in good condition, and not covered in grease or oil.
- Mudflaps – Mud flaps should not be torn.
Ready to Roll

Finally, I jump in my truck and double check my paperwork and destination.
I release my air brakes, roll forward, and push the service brake.
If everything is good, I’m ready to roll.
Post-Trip Inspection
When I’m done for the day, and every time I swap trailers, I do a post-trip inspection. If I am swapping trailers, I do a pre-trip on the new trailer as well.
A post-trip includes:
- lowering the landing gear
- removing the airlines
- uncoupling, and walking around the trailer checking tires, lights, seal, and mudflaps
Then I finish my paperwork and go home.
Slip Seating
If you slip seat (meaning you are in a different truck each shift), your pre- trip check should be more thorough than if you are permanently assigned a truck.
This also applies to the first inspection after being assigned a truck.
Please be courteous and write up any problems or issues found, so the next driver of the vehicle doesn’t have to deal with it.
Side Note: Clean out your truck and throw away any trash. Common courtesy goes a long way in trucking, between drivers.
Pre-Trip Inspection F.A.Q.
Most breakdowns can be avoided with proper preventative measures, such as daily inspections.
Thorough inspections should be done at the start of each shift. Inspections of trailers should be done every time you swap trailers.
Each driver should do a thorough pre-trip every time they swap drivers.
It should take about 10-15 minutes to perform a pre trip inspection.
The DOT. Make sure you stay in compliance so you don’t end up with hefty fines and an out of service.
The best way to memorize your pre trip inspection routine, is to do it the same way every time. That way you’re less likely to miss something. If you have questions, ask your safety team at your company.
Fluids in the engine, engine hoses and wires, brakes and suspension, mudflaps, trailer registration and inspection paperwork, and license plates.
A Few Trip Planning Tips

- Buy and learn to read a trucker’s atlas. It’s useful to plan routes and avoid restricted roads. I find this road atlas a necessity as a professional truck driver.
- Buy a decent trucking GPS , but don’t rely on it 100%. Use common sense.
- Don’t use the GPS in your elog device. It will put you in a lake.
Please note that minimum requirements for the inspection are established by the FMCSA.
But these may vary by state, trucking company, truck type, and trailer type.
It is your duty as a professional truck driver to perform a thorough pre-trip inspection before each trip and before you drive.
You’ll save yourself from headaches, fines and unnecessary accidents.

More Articles You May Like
- Trucking Terms – A Guide to Our Industry’s Lingo
- The 18 Wheeler – A Comprehensive Guide to Big Rigs
CDL Truck Driver Skills – Tips, Tricks + Knowledge to Kick Your CDL Skills Up a Notch!
- The D.O.T. Physical- A Guide For the Truck Driver

Everything You’ll Want To Know About Paid CDL Training

Custom Big Truck Sleepers Photo Gallery Collection

The Best Trucking Companies to Work For 2024 USA

5 Best GPS For Truckers – A Professional Driver’s Guide
Twice a month we email you the best tips and new articles to help you better navigate the trucking industry..

10 Truck Driving Safety Tips Every Professional Driver Should Follow
A veteran 40+ years truck driver shares 10 of the all time, tried and true truck driving safety tips ALL professional truckers should know AND follow! If every driver of EVERY vehicle on the road followed these safety tips, our roads would be SO much safer.

Trucker Tips Master Guide: Expert Advice From Experienced Truck Drivers
A collection of trucker tips from million milers and experienced drivers. These are gold nuggets for the new truck drivers!

Instruction, clear advice, videos and photos for truck driver skills, maneuvers and information for all professional truck drivers.
A practical guide to paid CDL training programs. Recommended Company Sponsored Schools, Requirements, pros + cons, what to expect from company-sponsored cdl training programs.
Is a Career As a Department of Defense Truck Driver For You?
As a Department of Defense (D.O.D.) truck driver, your role is integral to the logistics and supply chain operations of […]
Navigating Fair Truck Driver Pay: Are You Earning Enough?
Ready to take control of your truck driver pay? Discover key factors impacting your earnings and ensure you’re compensated appropriately […]
The Best Tanker Trucking Companies to Work, U.S., 2024
Top Tanker Trucking Companies in the US To Work For Tanker work typically falls to the ‘better carriers’. Tanker carriers […]
Best Flatbed Trucking Companies, US, 2024: Our Top Picks
There are over 1 million truck drivers working for flatbed trucking companies in the U.S. trucking industry. However, not all […]
Best Trucking Companies For New Drivers in the U.S., 2024
For new drivers entering the trucking industry, diving into the right pool can make all the difference. The foundation of […]
Follow Smart Trucking
Prime’s Guide to Pre-Trip Inspections
Tractor-trailers can weigh up to 80,000 lb . if you count the semi, trailer and cargo. Operating a heavy tractor-trailer can be dangerous, so drivers undergo extensive training to earn their CDLs and start their careers.
Whether studying for your CDL test or heading to your next customer, pre-trip inspections help you catch problems with your vehicle or trailer. Unchecked issues can lead to accidents or extensive repairs.
Do you know how to perform a pre-trip inspection? Need a quick refresher? Follow our guide to pre-trip inspections to learn the basics. Reach out to our Safety Department for more in-depth information.
Use these quick links to jump to sections of the article:
- The Engine Inspection
- Driver Door Area & Tires
- Trailer Pre-Trip Inspection
Lights & Reflectors
In-cab pre-trip inspection , large truck crash statistics .
Knowing how to operate a semi-truck safely in various conditions is imperative for drivers. In 2019, there were 510,000 large truck crashes, according to FMCSA’s 2021 Pocket Guide to Large Truck and Bus Statistics .
Of these crashes, 4,479 were fatal, and 114,000 were injury crashes involving large trucks. Most fatal large truck crashes involved those weighing more than 33,000 lb.
Accidents happen. Drivers can mitigate their risk of an accident by being responsible behind the wheel , following federal regulations and performing pre- and post-trip inspections.
Your Pre-Trip Inspection Checklist
Drivers must provide a vehicle inspection report at the end of each day. Vehicle inspection reports list any issues that could affect the vehicle’s operation and safety. Inspecting vehicles before and after each trip helps catch problems and keep drivers safe.
At a minimum, each report covers the following parts of a vehicle :
- Coupling devices
- Emergency equipment
- Lights and reflectors
- Parking brakes
- Service brakes
- Steering mechanism
- Tires and rims
- Windshield wipers
Pre-trip inspections take around 15 to 20 minutes. You’ll examine your truck and trailer to ensure it’s ready for the trip.
Before every haul, you should check that you have your license, registration, medical card, updated inspection sticker and FMCSA Safety Regulation manual. If you’re picking up a trailer, always make sure the trailer number matches the number listed on your assignment.
Follow these steps to inspect your tractor-trailer, and watch our video on Prime’s pre-trip inspections . Chock your tires before you begin, so the vehicle doesn’t roll or slip.
Under the Hood: Examining the Engine
Start your pre-trip inspection by looking at the engine. Lower the gear guard so you can open the hood. Remove pins and unlatch the hood to do so. Once the hood is open, step back and look underneath the truck to see if there are any leaks.
Passenger Side
On the passenger side, make sure that your general hoses and alternator are free of cuts, abrasions or cracks. Hoses should be sufficiently secured, exhibiting no signs of leaks.
Driver’s Side
Walk around to the driver’s side and conduct a similar examination. Look at the parts listed below for signs of wear, abrasions and leaks. Your coolant and oil levels should be filled to the manufacturer’s specifications. Keep an eye out for fraying belts, improperly secured parts, and missing castle nuts and bolts.
- Air compressor
- Belt-driven water pump
- Coolant reservoir
- Gearbox and hoses
- General hoses
- Power steering fluid
- Power steering pump
- Shock absorber
- Spring hangers and arm
- Steering linkage
Check Your Brake System
Drivers must check the brake hose, brake chamber and slack adjuster. When pulled by hand, the push rod should not move more than 1” with the brakes released.
Your brake line should be free of debris and oil, and the hose material shouldn’t be worn too thin.
Outside Driver Door Area & Tires
If the engine looks good, inspect the outside of the truck.
- Check your mirror on the driver’s side to ensure it is clean and firmly mounted to the vehicle.
- Open the driver’s door, and examine the door’s seals and hinges for cracks or dry rot.
- The fuel cap should be on tight, and the fuel seal should not leak.
- Ensure that the catwalk and steps at the back are clear of any objects or debris.
In addition to the steps above, drivers should look at the following parts for damage, wear or debris buildup:
- Brake hose, chamber, lining and drum
- Drive shaft
- Frame and cross members
- U-joints and bolts
Check Your Tires (All of Them!)
The tires on your tractor-trailer should have a tread depth of no less than 0.125” and be aired according to the manufacturer’s standards. You can check the air pressure with a gauge and adjust it based on your load and the temperature .
The rims shouldn’t be bent or broken, and there shouldn’t be cracks around the bolt holes. Behind the tire, the mud flap should not be tattered or loosely attached to the vehicle. There should be space between the mud flap and the tire.
Trailer Pre-Trip Inspection
Is the truck good to go? Check! Now it’s time to inspect the trailer. Walk around the trailer and examine it for cracks, abrasions or broken parts.
- Brake hose, lining and chamber
- Frame and cross members
- Shock absorbers
You’ll also want to check that:
- The landing gear is fully-raised with the crank handle secure in its cradle. The landing gear and mud flap should be a proper distance apart.
- The tandem relief’s handle and locking pins are in the fully-locked position.
- The slack adjuster and push rod don’t move more than 1” when pulled by hand.
The back doors of the trailer should latch properly. The trailer’s lock rods and hinges must be intact and not bent. Your trailer should also have door chains for safety when loading and unloading.
Coupling: Back of Tractor, Front of Trailer
A driver’s next step is to examine where the tractor and trailer connect.
- Electric line — Ensure there are no exposed wires. The line should be secure.
- Air line — Your air line should be secured at both ends and not leaking.
- Gladhands — Check for worn or rotted seals on gladhand couplings. Make sure there are no leaks in the gladhands connected to the trailer’s air brakes.
- Trailer apron — No gap should exist between the apron and the skid plate. The skid plate should be lubed.
You should also check the kingpins, mounting bolts, and the sliding fifth wheel and locking pin.
Refrigerated Trailer Inspections
When you inspect one of Prime’s refrigerated trailers , you start by selecting the “pre-trip” option on the trailer’s display. It will take the reefer 10 to 15 minutes to complete a self-inspection and notify you of anything in need of adjustment or repair.
While the reefer’s self-test runs, you should look for any signs of damage on the bottom rail, top rail and sides of the trailer. Reefers are insulated. Drivers need to examine the trailer for cracks and exposed insulation.
You don’t want to drive off without working lights. The lights on your truck and trailer should be securely in place, not cracked and amber in color.
- Clearance lights
- Marker lights
- Headlights
- Tail lights
- Reflective tape on trailer and mud flaps
Once you’ve checked that the lights and reflectors are intact, you should test your lights and turn signals. Climb into your cab and turn the following lights and signals on:
- Left turn signal
- Right turn signal
- Four-way flashers
- Brake lights
Inside your cab, you’ll check that your seat belt latches and is not too worn. Next, check that you have a fire extinguisher that’s charged. Ensure your cab has three reflective triangles under the bunk area and electrical fuses in the glove box.
Once you’ve reviewed your safety gear, adjust your mirrors, start the engine and check the dashboard’s instrument panel:
- Oil pressure — It should be rising as the engine runs.
- Voltmeter — It should show the alternator charging between 13 and 14 volts.
- Air pressure — It should be around 120 to 125 psi.
While you’re here, test the heat and air conditioning, city horn and air horn.
Air Brake Test
With your tires chocked, you can perform an air brakes test. To do so, release both brakes and turn the truck off. When you turn the truck back on, you will apply pressure.
- Apply hard pressure to the brake.
- Watch for the gauges to stabilize.
- Hold a hard brake for one minute. You don’t want to lose more than four psi during this minute.
- Pump down on the brakes until the gauges read at or before 60 psi. Your warning light and buzzer should come on.
- Pump down on the brakes until the tractor and trailer valves pop up between 40 to 20 psi.
Parking Brake Test
After testing your air brakes, you can test your parking brake. Allow the truck to rebuild its air pressure before testing the parking brakes.
- Remove wheel chock.
- Release the tractor brakes and apply the trailer brakes.
- Put the truck in “drive.”
- Give your trailer brakes a light tug, ensuring they hold.
- Switch. Release the trailer brakes and apply the tractor brakes.
- Give your tractor brakes a light tug, ensuring they hold.
- Release both brakes.
- Pull forward to 5 mph, then use the brake pedal. The truck shouldn’t pull left or right. It should come to a smooth stop.
What to Do if There’s an Issue During Pre-Trip Inspection
Contact your fleet manager or road assistance immediately if you find an issue with your tractor or trailer. Prime will take corrective action and advise you on what to do next. Repairs must be made before the tractor-trailer can be dispatched again.
Inspection violations affect both the driver’s and carrier’s records. Violations can decrease a carrier’s CSA score . FMCSA keeps records of driver and vehicle violations. These records are updated monthly.
CDL Pre-Trip Inspection Test
Truck drivers must begin each work day with a pre-trip inspection. The Class A CDL test requires new drivers to know how to do a pre-trip inspection. Student drivers must be able to identify truck and trailer parts and understand how they operate.
You’ll walk an examiner through a pre-trip inspection for that portion of the CDL test. The best way to remember what’s on a pre-trip inspection checklist is to perform inspections the same way each time. The more you practice, the more it will become second nature.
Are you ready to become a driver?
Do you need CDL training? Our Driver Training Program prepares you for your CDL exam and offers experience hauling real loads.
Apply online to start our CDL training program, or contact our Recruiting Department at 866-290-1568 for details.
Recent Posts

10 Construction Zone Safety Tips for Truck Drivers

Tips for Truck Driver Parents: Ways to Connect With Your Kids

What’s The Difference Between Dry Van & Reefer Trucking?
Transportation solutions, carrier solutions, drive for prime, work in house, success leasing.
Created by: Campaignium
Privacy Overview
- Company Culture
- Company Programs
- Leadership Team
- Fleet Maintenance
- Refrigerated Division
- Flatbed Division
- Tanker Division
- Intermodal Division
- Load Tracing
- Documentation
- Qualifications & Expectations
- Pay & Benefits
- Driver Training Program
- CDL Holders
- Driver Awards
- Salt Lake City
- Pittston, PA
- Springfield, MO
- Jobs At Prime
- View Available Loads
- Prime Power Fleet
- Lease & Lease Purchase
- Benefits of Leasing
- How to Get Started
- Pedigree Benefits
- Financing Information
- Equipment Inventory
- Omnitracs Logs
- Company Store
- Submit Pics from the Road
- Driver Verification
Pre-Trip Inspection Study Guide
The Class A pre-trip inspection is an essential element of getting your CDL . This handy study guide will give you a head start on training. Follow our tips to make sure you ace your CDL exam with flying colors!
This Pre-Trip Inspection Study Guide includes:
1. What is a Pre-Trip Inspection?
2. What to expect at the Pre-Trip Inspection Test?
3. List of truck parts to be inspected
4. Tips to Pass a Pre-Trip Inspection Test
What is a Pre-Trip Inspection?
A pre-trip inspection is a comprehensive checkup of your truck to ensure that everything is in working order before you get on the road. Utilizing a pre-trip inspection checklist helps ensure the safety of your vehicle and resolve any concerns or possible issues before you hit the road.A standard Class A CDL pre-trip inspection involves checking fluid levels, leaks, tires, fifth wheel, brakes, clutch, shock absorbers, and other components. After you’ve checked your truck, document your findings on a DVIR (Driver Vehicle Inspection Report). Any issues found must be addressed before departing. A thorough vehicle pre-trip is required by law and takes approximately 15 minutes.
The Pre-Trip Vehicle Inspection Test
You need to complete a pre-trip inspection test to pass your CDL exam. The pre-trip is often viewed as one of the most challenging aspects of getting a CDL. However, like anything, practice makes perfect. You will have up to 50 minutes to complete a pre-trip vehicle inspection for the state examiner. During the exam, you should identify each part and tell the examiner what you are looking for or inspecting. Below is an outline of each section of the pre-trip. Within each area, there are multiple parts you must identify. Once in school , you will receive a detailed pre-trip inspection checklist. You’ll have adequate time during training to get familiar with the process. Below is an outline of the different parts of a pre-trip
Parts Included in a Pre-Trip
Your pre-trip begins as you approach the vehicle. You’ll begin inspecting the front of the vehicle from top to bottom. Next, you’ll check the engine, opening the hood from the passenger’s side. Your inspection will continue from front to back of the tractor and trailer, inspecting all parts listed below.
1. Approach (front of the tractor)
2. Engine
3. Steering System
4. Steer Axle Suspension
5. Steer Axle Brakes
6. Steer Axle Wheels & Tires
7. Side of Tractor
8. Drive Axle Suspension
9. Drive Axle Brakes
10. Drive Axle Wheels & Tires
11. Coupling
12. Trailer Side
13. Tandem Axle Suspension
14. Tandem Axle Brakes
15. Tandem Axle Wheels & Tires
16. Trailer Rear
Tips on How to Pass the Pre-Trip Inspection Test
Now that you know what a pre-trip inspection is, it’s time to start practicing. Below are several tips to help you remember.
Four-Step Process
Apply this four-step process for each part inspected.
1. Name the Part
2. Securement
3. Condition
4. Special/specific items for that part (If applicable)
1. Alternator
2. Securely mounted, no missing hardware
3. Not bent, broken, or damaged
4. No exposed wires, belt-driven
Pre-Trip Inspection Phrasing
During a CDL Pre-Trip Inspection test, it is not only what you say but how you say it. Use precise language to identify each part. We’ve outlined the phrasing we recommend and teach to our students.
Metal Items:
Securely mounted
Not missing any hardware
Not cracked, bent, or broken
No illegal welds or drill holes
Properly greased, no foreign debris
No signs of leaks
Glass and Lights:
Not cracked or broken
Clean and clear of dirt of illegal stickers
Proper color (Lights)
Hoses/Air Lines:
Securely mounted on both ends
No abrasions, budges, or cuts
No missing hardware
No signs or leads
Not cut, worn, torn, or frayed, and no exposed wires
No corrosion
Belts/Rubber:
Not cut, cracked, worn, frayed, or dry rotten
(Belts) not more than ¾ inch of play when pushed
Use Acronyms
Acronyms use the first letter of a group of words to form a different word that is easy to remember. This technique is useful when remembering words or items in a specific order. One helpful acronym our students use to remember parts of the in-cab inspection is Honestly We Safely Get Licensed Professional Men Women Hired Every day.
Honestly = Horns
We = Windshield/Windshield Wipers
Safely = Steering Play
Get = Gauges
Licensed = Lights
Professional = Pedals
Men = Mirrors
Women = Windows
Hired = Heater/Defroster
Everyday = Emergency Equipment
Tips for Remembering a Pre-Trip Inspection
There are several apps and videos available to help you practice a pre-trip. However, nothing beats walking around a truck and trailer. You will have plenty of time to practice with equipment during training. The comprehensive checklist provided during CDL training will be your guide. Many students find it helpful to video themselves doing a pre-trip to watch it and identify areas for improvement.
Utilize these tips and plenty of practice to master the pre-trip. Our experienced instructors will be there to help you every step of the way.
Have more questions about CDL Training?
Get all of your questions about being a truck driver and getting your CDL on our blog . If you are ready to get your CDL, please fill out the form below and a career specialist will reach out with more information about CDL training , tuition and job placement .
Class A Pre-Trip Inspection Study App
The CDL Pre-Trip Inspection can be the most daunting portion of the driving test. But, it's easy if you study.
Use this FREE study guide to prepare for your CDL Skills test.
Would you like a video version of the Pre-Trip Inspection? Scroll to the bottom of this page for a free video.
Courtesy of CDL College .
Metal Parts: cannot be broken or cracked and must be securely mounted. Rubber Parts: no abrasions, bulges, or cuts. Parts that hold a Fluid or Air: cannot be leaking. Example: the engine air compressor (a metal part) is securely mounted, not cracked, gear-driven, and has no audible leaks.
• The Pre-Trip Inspection is a verbal test. • Say at least 2 things about every item you inspect. • Point to, or touch, every item that you inspect. • Mention all damaged items to the tester.
01: Engine Compartment + 1 Axle
Stand in front of the truck.
(3 L’s) Lights, Leans, Leaks
Verify that the LIGHTS on the front of the truck are the proper color, securely mounted, not cracked or broken, and clean.
Next, make sure the truck isn’t LEANing to one side, which could indicate a suspension problem or low tire pressure.
Ensure there are no LEAKS underneath the engine compartment.
Check the front of truck for damage. When you find damage on the vehicle, tell the tester that you’ll note it on your Vehicle Inspection Report.
3 Components
Alternator: securely mounted, not cracked; wires are properly fastened and not frayed. Belt or gear driven: If belt-driven, belt has no more than 1/2" to 3/4" of play, and no cuts or splits.
Water Pump: (see box on right) properly mounted and not broken; no visible leaks; belt or gear driven: belt has no more than 1/2" to 3/4" inch of play and no splits or cuts.
Air Compressor: securely mounted to engine, not broken or cracked; no audible leaks; belt or gear driven: belt has no more than 1/2" to 3/4" inch of play and no splits or cuts.
Coolant: verify proper level through sight glass or dipstick; reservoir is properly mounted not cracked; check the hoses for splits or cuts and ensure they are securely mounted at both ends.
Oil: indicate where the dipstick is located and that the oil is at the proper level.

Power Steering: verify proper level through sight glass or dipstick; reservoir is securely mounted and not cracked; check the hoses for splits or cuts and ensure they are securely mounted at both ends.
Belts and Hoses
After properly inspecting the power steering hose and the coolant hose , tell the tester that you would inspect all remaining hoses the same way. After properly inspecting the alternator belt , tell the tester that you will inspect all remaining belts the same way.
Steering Shaft: not bent or broken and securely mounted; no excessive play. Steering Gear Box: properly mounted to frame and not cracked or broken; no visible leaks; HOSE has no visible leaks and is properly mounted at both ends.
Pitman Arm: not cracked and securely mounted, all hardware is present. Castle nuts and cotter pins are present and tight. Drag Link: not broken and properly mounted at both ends. Rubber bushings: not split or cut and properly greased. Upper/Lower Control Arms and Tie Rod: not broken and securely mounted, all hardware present.
Spring Mounts: spring mounts and hardware are not cracked or broken and properly mounted to frame. Leaf Springs: not cracked or broken, not shifted or scissored; properly mounted to spring hangers. U-bolts: not cracked or broken and securely mounted.
Shock Absorber: not bent or broken and mounted securely; no visible leaks; rubber bushings have no dry-rot.
Brake Hose: hose to brake chamber not split or cut, no audible leaks, and securely mounted at both ends. Brake Chamber: not cracked or broken and securely mounted; no audible leaks. Slack Adjuster: no missing hardware and properly mounted; push rod has no more than 1" of play and is at a 90° angle to brake chamber. Brake Drum: securely mounted and not broken, no bluing from excessive heat. Brake Pads: securely mounted and not broken; minimum brake pad thickness is 1/4".
Wheel inside: not broken and securely mounted; no welding repairs. Tire: sidewalls have no cuts or bulges; steer tire tread depth is 4/32" min.; tread is evenly worn; check inflation w/ air gauge (do not kick tires) ; no re-treads on steers. Wheel outside: securely mounted and not cracked, no illegal welds. Valve Stem: properly secured and not broken; no audible leaks, has a metal cap. Lug Nuts: not cracked or broken; all lug nuts are present and tight. Hub Seal: not cracked, broken, or loose; no visible leaks. End this portion of the inspection at the Hub Seal.
02: Side and Back of Truck + 1 Axle
Side and back of truck.
Mirror bracket: properly attached to truck and not broken, all hardware in place. Door: securely mounted and opens and closes; hinges not broken and securely mounted; rubber seal not split or cut and is properly mounted. Steps: hold my weight, not loose, no debris. Fuel tank: not leaking and no loose hardware; cap is tight, seal intact and chain present. Exhaust: not loose, all hardware present, no evidence of leaks (exterior soot). Cat Walk and Steps: properly mounted and not excessively dirty. Frame: not twisted or broken and no illegal welds. Drive Shaft: not cracked or broken, U-joints not broken and have no foreign objects. Rear truck lights: proper color, all lights are present, not cracked or dirty, no moisture inside the lens. Mud Flap: bracket is securely mounted and not cracked, all hardware in place; mud flap not split or cut. DOT tape is securely mounted, not dirty, covers 100% of rear. Space: enough space between rear of truck and landing gear for turns.
Note: axle suspension components can be different from truck to truck. You should determine which suspension components are present and inspect those components. Axles consist of suspension, brakes, wheels, and tires. Spring mounts: spring mounts and hardware are not cracked or broken and properly mounted to frame. Leaf Springs: not cracked or broken, not shifted or scissored; properly mounted to spring hangers. U-bolts: not cracked or broken and securely mounted. Shock Absorber: not bent or broken and mounted securely; no visible leaks; rubber bushings have no dry-rot. Air Bags: not split or cut, no audible leaks; mounts are properly secured and not cracked. Brake Hose: hose to brake chamber not split or cut, no audible leaks, securely mounted at both ends. Brake Chamber: not cracked or broken and securely mounted; no audible leaks. Slack Adjuster: no missing hardware and properly mounted; push rod has no more than 1" of play and is at a 90° angle to brake chamber. Brake Drum: securely mounted and not broken, no bluing from excessive heat. Brake Pads: securely mounted and not broken; minimum brake pad thickness is 1/4". Wheel inside: not broken and securely mounted; no welding repairs. Tires: sidewalls have no cuts or bulges; tread depth on drive tires is 2/32" min.; evenly worn; check inflation w/ air gauge (do not kick tires) ; can be re-treads; Dual Tires: no foreign objects between tires, no gap between wheels. Wheel Outside: not cracked, securely mounted, no welding repairs. Valve Stem: properly secured and not broken; no audible leaks, has a metal cap. Lug Nuts: not cracked or broken; all lug nuts are present and tight. Hub Seal: not cracked, broken, or loose; no visible leaks. End this inspection at the Hub Seal.
03: Connections
Locate the air lines and the electrical line at the rear of the cab.
Air Lines should be securely mounted at BOTH ends. All hardware is present, nothing broken. Lines have no cuts or splits and no audible leaks. Glad hands are locked in place, not broken, and seals are not split or cut.
Electrical line is securely mounted at BOTH ends. All hardware is present and tight. Lines have no cuts or splits. Safety latches are in place. Lines are not tangled or dragging on catwalk.
Fifth Wheel Assembly: Apron: securely mounted, not cracked or broken. No gap between apron and skid plate. Skid Plate: properly greased, securely mounted, not cracked. Pivot pin is securely mounted, not cracked or broken. Platform: is securely mounted to frame and not cracked or broken. Release Handle: securely mounted, not broken and in locked position. Sliding Fifth Wheel? The actuator is not cracked or broken; air line is securely mounted, no audible leaks, no cuts or splits).
Kingpin and Locking Jaws: securely mounted and not worn. Locking jaws are secure around kingpin, both are properly greased.
04: Trailer + 1 Axle
Start at the front of the trailer, then inspect the side and the back. Finish with a trailer axle. Front of Trailer: clearance lights are the proper color, not loose, cracked, or dirty, and clean. Front of trailer has no holes, all rivets present. Side of Trailer: no holes in side of trailer, all rivets in place. DOT tape: properly secured, not dirty, covers at least 50% of the side. Frame: not twisted or broken, all hardware present and tight. Cross members: securely mounted, not loose or broken, none missing. Floor: securely mounted and no holes. Landing gear: is raised, not broken, securely mounted; Handle not broken, securely mounted, and operational. Clearance light: proper color, not loose, cracked or dirty; rubber gasket not split or cut. Air lines: are securely mounted under trailer, no audible leaks, not dragging on the ground. Tandem slide: not bent, properly mounted, pins locked in place. Release arm: securely mounted, not broken, and in locked position. Mud flap: securely mounted, no cuts, and proper distance from tire and ground. ABS light: not cracked or dirty, proper color, no moisture inside
Back of Trailer: clearance lights are the proper color, not cracked or dirty, and clean. Hinges: are securely mounted, bot cracked or broken. Doors: not broken, no holes; door seal intact, no cuts, securely mounted. Door handles and rods: are not bent, are securely mounted, and operational. Lights: proper color, securely mounted, not loose, cracked or dirty. DOT tape: is securely mounted, clean, and covers 100% of rear. Bumper: is properly secured, not cracked or broken.
Trailer Axle
Note: axle suspension components can be different from truck to truck. You should determine which suspension components are present and inspect those components. Axles consist of suspension, brakes, wheels, and tires.
Trailing Arm Mount: securely mounted to frame, not broken or cracked. Spring mounts: spring mounts and hardware are not cracked or broken and properly mounted to frame. Leaf Springs: not cracked or broken, not shifted or scissored; properly mounted to spring hangers. U-bolts: not cracked or broken and securely mounted. Shock Absorber: not bent or broken and mounted securely; no visible leaks; rubber bushings have no dry-rot. Air Bags: not split or cut, no audible leaks; mounts are properly securedand not cracked. Brake Hose: hose to brake chamber not split or cut, no audible leaks, securely mounted at both ends. Brake Chamber: not cracked or broken and securely mounted; no audible leaks. Slack Adjuster: no missing hardware and properly mounted; push rod has no more than 1" of play and is at a 90° angle to brake chamber. Brake Drum: securely mounted and not broken, no bluing from excessive heat. Brake Pads: securely mounted and not broken; minimum brake pad thickness is 1/4". Wheel inside: not broken and securely mounted; no welding repairs. Tires: sidewalls have no cuts or bulges; tread depth on drive tires is 2/32" min.; evenly worn; check inflation w/ air gauge (do not kick tires) ; can be re-treads; Dual Tires: no foreign objects between tires, no gap between wheels. Wheel Outside: not cracked, securely mounted, no welding repairs. Valve Stem: properly secured and not broken; no audible leaks, has a metal cap. Lug Nuts: not cracked or broken; all lug nuts are present and tight. Hub Seal: not cracked, broken, or loose; no visible leaks. End this inspection at the Hub Seal.
05: External Light Check
Follow the flow to avoid missing any lights: 4 sides for the truck, 4 sides for the trailer.
Group similar lights together (headlights and high beams; turn signals and 4-way flashers; brake lights and tail lights).
TRUCK LIGHTS
Front: clearance lights, headlights, high beams, left turn, right turn, 4-way flashers
Left side: clearance light, left turn, 4-way flasher
Rear: tail lights, brake lights, left turn, right turn, 4-way flashers
Right side: clearance light, right turn,4-way flasher
TRAILER LIGHTS
Front: clearance lights
Rear: clearance lights, tail lights, brake lights, left turn, right turn, 4-way flashers
Right side: clearance light, right turn, 4-way flasher
06: In Cab and Brake Test
Memorize this formula: 5, 5, Safe Start, 5, 5 5 safety items 5 in cab items Safe Start 5 gauges 5 -step brake check
5 Safety Items
5 in cab items.
Follow the blue spiral shape below to remember the 5 in cab items. Mirrors: glass not dirty or cracked, no illegal stickers, mirrors properly adjusted. Windshield: securely mounted, not dirty or cracked, no illegal stickers. Windshield wipers: arms properly mounted and not broken; blades have no splits or cuts, wipers and wiper fluid are operational. Heater/defroster: demonstrate both are operational by setting fan to max, and the mix valve to heat/defrost. Dashboard light indicators: turn the lights on and check the indicators for the high beams, right and left turn signals, and 4-way flashers.
Tell the examiner these 3 steps before you perform them: parking brake is set, transmission in neutral, and the clutch is depressed. Start the engine and look for the ABS light on the dash to come on and then go off. With the vehicle started, check the gauges.
Oil gauge: operational, rising to proper operating range, no warning light. Temperature gauge: operational, rising to proper operating range, no warning light. Voltmeter: operational, at the proper operating range, 12-14 volts. Air gauges (2): building air to proper operating range, no warning lights.
5-step Brake Test
Explain each step before performing it. With the first 2 steps, you’re either trying to move the vehicle, or you are moving the vehicle. The engine must be ON for the first 2 steps. 1) Parking Brake: release trailer brake (push RED valve IN); slowly release the clutch, tugging lightly against the parking brake. Push clutch in. (Leave everything in the truck as it is). 2) Service Brake: (brake pedal) release parking brake (BOTH valves should be IN), pull forward to 5 mph, depress clutch and brake while lightly gripping the steering wheel; check if vehicle pulls to the left or right. (Leave everything in the truck as it is).
**Turn the engine OFF, and turn the key ON for the next 2 steps. You’ll need power for your gauges.**
Air Compressor check: perform a Safe Start. Idle up the engine (1200RPM) until the secondary air tank reads 85psi. At 85psi begin counting. The air pressure must rise from 85 to 100psi in 45 seconds or less. Next, fast idle the truck up to 120-140psi, at which point the governor cut-out should occur. Psshhh!
Class A CDL Pre-Trip Inspection Video
Want the youtube version of the Class A Pre-Trip Inspection video? Watch the youtube version.
Would you like our help finding a CDL driving job?
Try our version of a job board- Gary's Job Board. CDL Job Board Receive daily job offers in your email for FREE. Sign up takes 2 minutes. Review Gary’s jobs. Reply to the jobs you like, trash the crappy ones. Gary puts drivers in control.
Visit CDL College for all of your truck driving school needs .
Class A Pre-Trip Inspection Study App Copyright© 2018 CDL College

- Register / Login
- Trucker's Forum
- Paid CDL Training
- Truck Driving Jobs
- CDL Practice Tests
- High Road Training
Pre-Trip Inspection - My Way! A Must See!
Topic 3798 | page 1.
- General Category
- Pre-Trip Inspection - My Way! A must see!

You can now find a PDF printable version of this entire pre-trip inspection and a PDF checklist, both printable, in our Pre-Trip Inspection Study Guide or you can view them directly here:
- PDF: Daniel's Pre-trip Inspection (Main Version)
- PDF: Daniel's Pre-trip Inspection (Printable Version)
- PDF: Daniel's Pre-trip Inspection Checklist (Printable Version)
Hello TT! You're looking at yet another legendary thread done by me!
This is my Pre-Trip Inspection, done my way! This Pre-Trip is done on my truck and trailer. I physically took the pictures and edited them to my liking. These are not pictures taken off of Google. It is a complete Pre-Trip Inspection and features everything you'll need to know. I've been working on this for a long time and my hometime finally gave me the chance to finish it all up.
This is based off of Prime Inc.'s Pre-Trip Inspection procedure. Your companies Pre-Trip might vary slightly.
Here are our sections:
Engine Compartment
Drivers Door Fuel Area
Coupling System
Trailer (Please note in the type of suspension your trailer has)
Light Check
In-Cab Inspection and Brake Tests
You will absolutely have to do the Coupling System, Light Check, and In-Cab Inspection. Then they select for you to also do either the Engine Compartment, Drivers Door Fuel Area, or the Trailer. It could be either one. You will have a total of 4 sections that you must pass on your exam. So study extra-hard on those required sections.
As stated, these are solely based off of how I like to do the Pre-Trip. I give my personal opinions as well as some helpful tips.
Your Instructor's advice may vary. In the end, just do it the way your Instructor wants you to do it.
Pre-trip Inspection:
A pre-trip inspection is a thorough inspection of the truck completed before driving for the first time each day.
Federal and state laws require that drivers inspect their vehicles. Federal and state inspectors also may inspect your vehicles. If they judge a vehicle to be unsafe, they will put it “out of service” until it is repaired.
Commercial Driver's License (CDL)
A CDL is required to drive any of the following vehicles:
- Any combination of vehicles with a gross combined weight rating (GCWR) of 26,001 or more pounds, providing the gross vehicle weight rating (GVWR) of the vehicle being towed is in excess of 10,000 pounds.
- Any single vehicle with a GVWR of 26,001 or more pounds, or any such vehicle towing another not in excess of 10,000 pounds.
- Any vehicle, regardless of size, designed to transport 16 or more persons, including the driver.
- Any vehicle required by federal regulations to be placarded while transporting hazardous materials.
Hours Of Service
Check for leaks under the truck.
Daniel's Tip: This is easy to forget, I suggest you mention it first to get it out of the way.

Properly Mounted and Secure. Not Cracked, Bent, or Broken. All wires connected The belt is not cracked or frayed and the free play on the belt is between 1/2 to 3/4 of an inch.
Daniel's Tip: Remember the Alternator is Belt Driven. Do not forget to mention the belt!

Properly Mounted and Secure at both ends. No Abrasions, Bulges or Cuts and not leaking.
Daniel's Tip: Don't forget to mention "at both ends". Fluids run through these hoses so you must say that they're not leaking.

Daniel's Tip: Same thing - Don't forget to mention "at both ends". Fluids run through these hoses so you must say that they're not leaking.

Properly Mounted and Secure Not Cracked, Bent, or Broken. Not leaking. Not leaking and filled to manufactures specifications.
Daniel's Tip: The Reservoir must be Properly Mounted and Secure, but don't forget about the hoses leading to and from the Reservoir! You must also state that its filled to manufactures specifications and not leaking.

Properly Mounted and Secure Not Cracked, Bent, or Broken. Not leaking The belt is not cracked or frayed and the free play on the belt is between 1/2 to 3/4 of an inch.
Daniel's Tip: The Water Pump is Belt Driven, don't forget that belt! Check all the hoses running to and from the Water Pump, ensure that nothing is leaking.

Filled to manufactures specifications.
Daniel's Tip: You don't need to take out the dipstick. Just point at the dipstick and say its filled to manufactures specifications.

Properly Mounted and Secure Not Cracked, Bent, or Broken. Not leaking and filled to manufactures specifications.
Daniel's Tip: We've got many hoses here. Don't abandon those hoses! Ensure nothing is leaking and filled to manufactures specifications.

Properly Mounted and Secure Not Cracked, Bent, or Broken. Not leaking
Daniel's Tip: The Air Compressor is Gear Driven. It is located behind the Frame and you really cannot see it. As long as you state all the above and point in the general area you'll be fine.

Daniel's Tip: Likewise, the Power Steering Pump is located at the same place as the Air Compressor. This is also Gear Driven. Ensure its not leaking and state the above - point in the general area and you're good.

Properly Mounted and Secure Not Cracked, Bent, or Broken. No Abrasions, Bulges or Cuts and not leaking
Daniel's Tip: Don't forget to mention the hoses and not leaking.

Properly Mounted and Secure Not Cracked, Bent, or Broken.
Daniel's Tip: Combine the Pitman Arm, Drag Link, Tie Rod, Castle Nuts and Cotter Pins and state that you'll be checking all of these the same way. Point at each item and name the part, then state "I check all of these the same way, they're all to be Properly Mounted and Secure and not Cracked, Bent, or Broken. While pointing at the Castle Nuts and Cotter Pins don't forget to state that there are no Missing Castle Nuts or Cotter Pins. All of these items make up your Steering Linkage.

Properly Mounted and Secure. Not Cracked, Bent, or Broken.

Caste Nuts and Cotter Pins-
None missing. Cotter Pin is present.
Daniel's Tip: Lot's of folks like to combine this with the Drag Link. I do not, I like to say this separely at the very end of my Steering Section. As long as you say there are none missing and the Cotter Pin is present you'll be good to go! Don't forget that there are three Castle Nuts and you must point at all three.

Properly Mounted and Secure at both front and rear. Not Cracked, Bent, or Broken.
Daniel's Tip: The difference between a Hanger and a Mount is that Hangers are much, much smaller. I could go technical but don't over complicate this. The Hangers are in the front, Mounts in the back. Be sure to say "at both front and rear".

Properly Mounted and Secure at both ends. Not Cracked, Bent, or Broken. None are shifted.
Daniel's Tip: Leaf Springs will always be in the Engine Compartment, they're not Spring Arms! Don't let any fool tell you that because they would be wrong. These are Leaf Springs because there are multiple Springs - plural. Be sure to say none are shifted.

Properly Mounted and Secure. Not Cracked, Bent, or Broken. None missing.
Daniel's Tip: Very simple item. Just be sure to say none are missing, that line is easily forgettable.

Properly Mounted and Secure at both ends. Not Cracked, Bent, or Broken. Not leaking.
Daniel's Tip: Don't forget to say "at both ends" and "not leaking". If it'll leak, it'll leak at the point where the top and bottom portion of the Shock meet - in the Middle.

Properly Mounted and Secure at both ends. No Abrasions, Bulges or Cuts. Not leaking air.
Daniel's Tip: Again, don't forgot to say "at both ends". The Hose is rubber so give it the ABC and not leaking air. You could combine the line with the Chamber but I prefer not to but its very easy to forget to mention the hose. When you're under pressure, you tend to forget the small things - like a hose.

Properly Mounted and Secure. Not Cracked, Bent, or Broken. Not leaking air.
Daniel's Tip: Easy item to inspect, don't forget to mention that it's not leaking air.

Properly Mounted and Secure. Not Cracked, Bent, or Broken. With the brakes released and pulled by hand, the Push Rod should not move more than 1 inch.
Daniel's Tip: The Slack Adjuster and Push Rod are always combined. Please, be very careful with your words on this one. Say it exactly how I wrote it! Memorize that line.

Brake Drum-
Daniel's Tip: Easy item to inspect. Just a simple PMS and CBB.

Properly Mounted and Secure. Not Cracked, Bent, or Broken. No oil or debris. Friction Material is not worn dangerously thin.
Daniel's Tip: Remember, you're checking for oil or debris and for friction material on the Lining not on the Drum. People often mix this up. You must point exactly at the Brake Lining, like I have it in the picture.

Properly Mounted and Secure. Not Cracked, Bent, or Broken. No unauthorized welds.
Daniel's Tip: Fairly simple item. Be sure to mention that there cannot be any unauthorized welds.

Properly Mounted and Secure. Not Cracked, Bent, or Broken. There are none missing. No rust trails or powder residue. No cracks around the bolt holes.
Daniel's Tip: Rust trails could indicate loose bolts while powder residue and cracks around the bolts holes could be an indication of the bolts being over-tightened. Be sure to let the examiner know you're looking for rust trails or powder residue and no cracks around the bolt holes.

Properly Mounted and Secure. Not Cracked, Bent, or Broken. Not leaking and filled to manufactures specifications.
Daniel's Tip: My method is that the Hub Seal is located on the Steer Axle, Axle Seal belongs on all the other Axles. Though it doesn't matter if you call the Trailer Axle a Hub Seal. You can call these Hub or Axle Seals. Just be sure to say that its filled to manufactures specifications.

No Abrasions, Bulges or Cuts to the tread or sidewalls. Tread depth is no less than 4/32 of an inch. Properly filled to manufactures specifications. Check it with an air gauge.
Daniel's Tip: Tires are a big deal! Be sure to look for Abrasions, Buldges or Cuts to the Tread and Sidewalls. Be sure to say it too. Steer tires cannot be less than 4/32 of an inch depth. You must say "of an inch", simply saying "4/32" is not enough. Properly filled to manufactures specifications and you absolutely must add that you check it with an air gauge! You don't have to physically check it with an air gauge on your exam, just mention that you would.

When a violation by either a driver or company is confirmed, an out-of-service order removes either the driver or the vehicle from the roadway until the violation is corrected.
Properly Mounted and Secure. Not Cracked, Bent, or Broken. and clean.
Daniel's Tip: Be sure to say that it is clean. On your In-Cab you must do the Mirrors all over again the same way, except you'll add that its properly adjusted.

Properly Mounted and Secure. Not Not Cracked, Bent, or Broken. Opens and closes and latches properly. Door seals not worn, torn, or dry rotten.
Daniel's Tip: Physically open the door and point out the Door Seals. Open and close the door several times to demonstrate that the door opens and closes and latches properly.

Properly Mounted and Secure. Not Not Cracked, Bent, or Broken. Not leaking from the tank and cap, cap is on tight.
Daniel's Tip: Be sure to say that it cannot be leaking from the Tank or Cap.

Properly Mounted and Secure. Not Not Cracked, Bent, or Broken. There are no signs of leaks.
Daniel's Tip: Easy to miss because its not always in sight. Be sure to knock this out quickly to get it out of the way. Remember to look for no signs of leaks.

Properly Mounted and Secure. Not Not Cracked, Bent, or Broken. Not twisted, and the U-joints are free of any debris.
Daniel's Tip: I like to knock out the Drive Shaft after the Exhaust just because its right next to it. No reason to skip around. Be sure to state that its not twisted and the U-Joints are free of any debris.

Properly Mounted and Secure. Not Not Cracked, Bent, or Broken. Clear of any loose objects.
Daniel's Tip: Easy item. Don't forget to state that they are clear of any loose objects.

Properly Mounted and Secure. Not Not Cracked, Bent, or Broken. There are no unauthorized holes or welds. No missing Cross Members.
Daniel's Tip: You can't miss that Frame, but the Cross Members can be easily forgotten. Bundle them up and be sure to state there are no missing Cross Members.

Properly Mounted and Secure. Not Not Cracked, Bent, or Broken.
Daniel's Tip: Easy item. Extremely straight forward.

Properly Mounted and Secure at both ends. Not Not Cracked, Bent, or Broken.
Daniel's Tip: Be sure to include "at both ends". Otherwise its a very easy item. Notice the difference between a Spring Hanger and a Spring Mount?

Properly Mounted and Secure at both ends. Not Cracked, Bent, or Broken.
Daniel's Tip: A Spring Arm is only one spring- unlike the Leaf Springs. Don't let anyone tell you otherwise because a lot of people have this confused. Don't forget to include "at both ends."

Properly Mounted and Secure at both ends. Not Not Cracked, Bent, or Broken. Not leaking.

Properly Mounted and Secure at both ends. Not Cracked, Bent, or Broken. No Abrasions, Bulges or Cuts. Not leaking. No missing mounting bolts.
Daniel's Tip: Don't underestimate the Air Bag. Be sure to say its PMS at both ends. The top of the Air Bag is metal so give it a CBB. The actual Air Bag is rubber so give that an ABC. It is not leaking air and no missing mounting bolts. This is the one item that you must do a PMS, CBB, and ABC on!

Brake Chamber-
Properly Mounted and Secure. Not Not Cracked, Bent, or Broken. Not leaking air.

Daniel's Tip: Easy item to inspect. Just a simple PMS (properly mounted, secured) and CBB (cracked, broken, bent).

Properly Mounted and Secure. Not Cracked, Bent, or Broken. Not leaking and filled to manufacturers specifications.
Daniel's Tip: Just be sure to say that its filled to manufacturers specifications.

No Abrasions, Bulges or Cuts to the tread or sidewalls. Tread depth is no less than 2/32 of an inch. Properly filled to manufactures specifications. Check it with an air gauge.
Daniel's Tip: Tires are a big deal! Be sure to look for Abrasions, Buldges or Cuts to the Tread and Sidewalls. Be sure to say it too. Drive tires cannot be less than 2/32 of an inch depth. You must say "of an inch", simply saying "2/32" is not enough. Properly filled to manufactures specifications and you absolutely must add that you check it with an air gauge! You don't have to physically check it with an air gauge on your exam, just mention that you would.

Daniel's Tip: Simple item. Just a sidenote, don't forget the Reflective Tape on your Mudflap when you do your Light Test.

Only if you're truck is equipped with duals! Check to see that there is proper space between the tires. There is nothing stuck between the tires.
Daniel's Tip: This only applies if you don't have Super Singles. Just let the examiner know you would check for proper space between the tires and making sure there's nothing stuck between them.

Super Singles:
A single, wide wheel substituted for a tandem (two wheel) assembly. The main benefit of a super single is a reduction in weight and lower rolling resistance which provide better fuel economy. The disadvantage is the lack of tire redundancy (or a 'backup tire' in case of a blowout) from which tandem wheels benefit. A tire blowout is more dangerous with a super single and can not be driven on.
Coupling Area
Electric Line-
Properly Mounted and Secure at both ends. No Abrasions, Bulges or Cuts. No exposed wires.
Daniel's Tip: Don't forget "at both ends". Its really easy to forget to say "No exposed wires." so really make that line stick so you won't miss it on the exam.

Daniel's Tip: Don't forget to say "At both ends." Be sure to point at both the red and blue air line.

Properly Mounted and Secure. Not Cracked, Bent, or Broken. Seals are in good condition, no cracks or signs of dry rotting. Not leaking air.
Daniel's Tip: Take an air line off during the test so you could show the examiner the seals.

Daniel's Tip: The Apron is the front surface of the Trailer that the Fifth Wheel is beneath. Its the part of the trailer that doesn't have visible cross members and flat with few holes.

Properly Mounted and Secure. Not Cracked, Bent, or Broken. Properly lubed.
Daniel's Tip: The Skid Plate is the top slippery surface of the Fifth Wheel. It must be properly lubed.

Check to make sure that there is no space between the Apron and Skid Plate.
Daniel's Tip: The Gap is not an actual item. Its the space between the Apron and the Skid Plate. There should be no daylight between the Apron and Skid Plate.

Daniel's Tip: Can be easy to miss because you can't see it. But please don't miss something so important as the King Pin. Engrave this into your head.

Properly Mounted and Secure. Not Cracked, Bent, or Broken. Fully locked around the King Pin.
Daniel's Tip: On your exam you must bend down and physically check those Locking Jaws, just like you should be doing every day several times. Be sure to say its fully locked around the King Pin.

Daniel's Tip: The Platform is what the Fifth Wheel rests on. It goes Frame, then Platform, then Fifth Wheel. The Platform is easy to inspect, feel free to combine it with the Mounting Bolts. But again, I choose not to.

Daniel's Tip: Technically, you could combine this with the Platform but I choose not to. Up to you. Be sure to point at the bolts and don't forget to say none missing.

Properly Mounted and Secure. Not Cracked, Bent, or Broken. Is in the fully locked position.
Daniel's Tip: The Release Arm is what allows you to disengage the Locking Jaws. The handle, or Arm, must be in the fully locked position. You must say that!

Daniel's Tip: Remember to point at the Sliding area and the Locking Pin. It must be in the fully locked position. You must say that!

Make sure that there is the proper space between the tractor mudflap and the trailer landing gear. So that they don't hit each other when making a turn.
Daniel's Tip: Clearance is by far the easiest to forget of everything in the entire test! I kid you not. Please engrave this into your head. You want to check the space between your mudflap and landing gear, so they don't hit each other on a turn.

Header Board-
Properly Mounted and Secure. Not Cracked, Bent, or Broken. No holes or missing rivets.
Daniel's Tip: The Header Board is the front wall of the trailer. You must say that it cannot have any holes or missing rivets.

Properly Mounted and Secure. Not Cracked, Bent, or Broken. Is fulled raised and the cradle handle is secure.
Daniel's Tip: The hardest thing about the Landing Gear is that handle. It must be in the cradle and secure. The Lading Gear must be fully raised.

Properly Mounted and Secure. Not Cracked, Bent, or Broken. No missing Cross Members.
Daniel's Tip: The Frame is the bottom portion on the walls of the trailer. Don't get that mixed up. The Cross Members go side-to-side throughout the trailer, there cannot be any missing.

Properly Mounted and Secure. Not Cracked, Bent, or Broken. Release handle and locking pins are in the fully locked position.

Properly Mounted and Secure. Not Cracked, Bent, or Broken. No Abrasions, Bulges or Cuts. Not leaking air. No missing mounting bolts.

Daniel's Tip: The Slack Adjuster and Push Rod are always combined. Please, be very careful with your words on this one. Say it exactly how I wrote it! Memorize that line. The ones in the back look a lot different than the ones on the Steer axle, but that shouldn't impact you on your performance.

Daniel's Tip: Just be sure to say that its filled to manufactures specifications.

Tandem Axles
A set of axles spaced close together, legally defined as more than 40 and less than 96 inches apart by the USDOT. Drivers tend to refer to the tandem axles on their trailer as just "tandems". You might hear a driver say, "I'm 400 pounds overweight on my tandems", referring to his trailer tandems, not his tractor tandems. Tractor tandems are generally just referred to as "drives" which is short for "drive axles".

Daniel's Tip: Tires are a big deal! Be sure to look for Abrasions, Buldges or Cuts to the Tread and Sidewalls. Be sure to say it too. Trailer tires cannot be less than 2/32 of an inch depth. You must say "of an inch", simply saying "2/32" is not enough. Properly filled to manufactures specifications and you absolutely must add that you check it with an air gauge! You don't have to physically check it with an air gauge on your exam, just mention that you would.

Daniel's Tip: Simple item. Just give it a PMS and a CBB.

Properly Mounted and Secure. Not Cracked, Bent, or Broken. Opens and close and latches properly. Door seals are not worn, torn, or dry rotted.
Daniel's Tip: You don't need to open the trailer doors to demonstrate that they open and close and latch properly. So keep that in mind. Just be sure to point out the Hinges and the Door seals and say the above.

Five locations that you must check your lights are:
Front of the Truck
Both sides of the Truck
Rear of the Truck
Both sides of the Trailer
Rear of the Trailer
The Five Functions are:
Left Turn Signal
Right Turn Signal
Four Way Flashers
High Beams/Low Beams
Brake Lights
--------When you start your Light Check, you should tell the examiner
that you will check all your:
Lights, Reflectors, Reflective Tape the same way.
Properly Mounted and Secure
Not Cracked, Bent, Broken
Clean and illuminated
The proper color of amber to the front and sides, and red to the rear.
Turn on your Marker Lights and Headlights.
Now walk around the entire truck and trailer and point out the lights Give the function of the light and the location.
You should then ask your examiner to help you check your Five Functions.
While you're sitting in the drivers seat, the examiner will stand to the front of the truck, then behind the trailer. He will then check your Turn Signals, Four Way Flashers and Brake Lights.
You must do each function at every location.
New! Check out our help videos for a better understanding of our forum features
" data-commandafter="
Click on any of the buttons below to insert a link to that section of TruckingTruth:

This topic has the following tags:

Why Join Trucking Truth?

- The High Road Training Program
- The High Road Article Series
- The Friendliest Trucker's Forum Ever!
- Email Updates When New Articles Are Posted
Apply For Paid CDL Training Through TruckingTruth
Did you know you can fill out one quick form here on TruckingTruth and apply to several companies at once for paid CDL training? Seriously! The application only takes one minute. You will speak with recruiters today. There is no obligation whatsoever. Learn more and apply here:
- Privacy Policy

IMAGES
VIDEO
COMMENTS
Our Pre-Trip Inspection Study Guide has everything you need to prepare for the Class A CDL Pre-Trip Inspection Exam. Our study guide will cover the pre-trip inspection terminology as well as a thorough list of all of the parts you will be inspecting on the vehicle. For each part you will be inspecting there will also be a list of items you will ...
Prepare for your CDL Examination by learning from this video. This is a complete demonstration of performing pre-trip inspection of the entire tractor/traile...
Here's a demonstration of how to perform a proper pre-trip inspection on a Class A tractor-trailer with one trailer. For the CDL Class A road test, the CDL C...
Class A Pre-Trip Inspection Point to, or touch, every item that you are inspecting. Tell the tester how you know that the part you are inspecting is in good, safe working condition. Identify all defects or you may not receive credit. 1 Engine Compartment + 1 Axle 3 L's. Leaks, Leans, and Lights.
TRAILER Inspection: Front of Trailer: clearance lights proper color, securely mounted, not cracked or dirty, no moisture inside lense. Header board not BBC, all hardware present. Side of Trailer: not BBC, no holes, all rivets in place. DOT tape is securely mounted, not dirty, covers at least 50% of the side.
This infographic demonstrates the coupling and uncoupling items that you will need to inspect during the Pre-Trip Inspection portion of your CDL Skills Test. During your CDL skills test you will be asked to explain to the examiner how you know the items associated with the connection of the truck and trailer are in good safe working condition.
Printable Pre Trip Inspection Checklist (PDF) CDL Manual. CDL General Knowledge Practice Test. Pre Trip Inspection Practice Test. CDL HAZMAT Endorsement Practice Test. Edited for 2024 on 12/5/23. Complete CDL pre-trip inspection checklist with online reference and study guide plus a free PDF pre trip inspection checklist to print.
Pre-Trip Inspection walk-aroundFrom the time you approach your truck to right before you start the in- cab, our instructor will demonstrate all of the proper...
1. REPETITION! The only way to memorize the pre-trip is to repeat it over and over. Start with the engine area and work your way around the truck and finally inside the cab. There is no way around consistent repetition. The more you do it the more you will memorize it. It's just that simple.
CHECK TRAILER: (TRAILER COMPONENTS) 1. Trailer: 2. Clearance lights, clean, not broken and working properly, have proper color. 3. Trailer no damage 4. Landing Gear Fully raised, securely mounted, no cracked no bent, 5. Support frame securely mounted, no cracked, no bent, no damage 6. Crank handle: secure 7. DOT stickers properly place 8.
• Uses full-color images, diagrams, and easily digestible ... TRACTOR-TRAILER DRIVER TRAINING MANUAL Published & Printed by. J. J. Keller & Associates, Inc. ... Pre-trip inspection En-route inspection Post-trip inspection Special rigs Summary
A proper pre-trip inspection will include inspecting the brake system both in-cab and externally. Truck drivers should check the brake adjustment with the slack adjuster for proper alignment. Check brake linings for appropriate thickness. Ensure your truck's air lines aren't damaged, don't leak, and are properly sealed.
The pre-trip inspection test requires heavy memorization and is one of the hardest trials to get your CDL. Use this helpful checklist to pass that test! ... Tractor/Trailer Protection Valve Pop Out - Pump down on the brake pedal until the tractor and trailer protection valves pop out, this will be between 20 and 40 PSI.
PRE-TRIP Inspection 7505 Dahlia St. Commerce City, CO 80022 303-227-7841 Engine Compartment + 1 Axle Side and Back of Truck + 1 Axle Connections and Trailer + 1 Axle External Light Check In-Cab with Brake Check Our YouTube videos are very popular. Go to YouTube and search for 'cdl college playlist'
What is a pre-trip inspection? A pre-trip inspection includes checking over the tractor and trailer a truck driver will be operating. A pre-trip should be completed before the operation of a vehicle: At the beginning of a driver's shift. Any time a new trailer is picked up. After a 10-hour break. A thorough inspection usually takes anywhere ...
Daniel the super trucker shows you the proper procedure to do a pre-trip inspection on a tractor trailer before heading out on the road.
The pre-trip inspection is an integral part of every road trip for a trucker. It's probably the most disliked and most often overlooked part of the job of the professional truck driver in the trucking industry. This inspection is meant to be a thorough check of the truck, trailer and load. The check is to ensure that everything is in correct ...
Tractor-trailers can weigh up to 80,000 lb. if you count the semi, trailer and cargo.Operating a heavy tractor-trailer can be dangerous, so drivers undergo extensive training to earn their CDLs and start their careers.. Whether studying for your CDL test or heading to your next customer, pre-trip inspections help you catch problems with your vehicle or trailer.
This is my Pre-Trip Inspection , done my way! This Pre-Trip is done on my truck and trailer. It is a complete Pre-Trip Inspection and features everything you'll need to know. I've been working on this for a long time and my hometime finally gave me the chance to finish it all up. This is based off of Prime Inc.'s Pre-Trip Inspection pro ...
Your pre-trip begins as you approach the vehicle. You'll begin inspecting the front of the vehicle from top to bottom. Next, you'll check the engine, opening the hood from the passenger's side. Your inspection will continue from front to back of the tractor and trailer, inspecting all parts listed below. 1.
Rubber Parts: no abrasions, bulges, or cuts. Parts that hold a Fluid or Air: cannot be leaking. Example: the engine air compressor (a metal part) is securely mounted, not cracked, gear-driven, and has no audible leaks. • The Pre-Trip Inspection is a verbal test. • Say at least 2 things about every item you inspect.
This is based off of Prime Inc.'s Pre-Trip Inspection procedure. Your companies Pre-Trip might vary slightly. Here are our sections: Engine Compartment. Drivers Door Fuel Area. Coupling System. Trailer (Please note in the type of suspension your trailer has) Light Check. In-Cab Inspection and Brake Tests.
This course is designed to help properly prepare property-carrying CMV drivers for conducting pre-trip, on-the-road and post-trip inspections on standard CMVs. After completing this course, learners will be able to: Conduct a thorough pre-trip inspection; Explain when an on-the-road inspection needs to be done, and how to complete one