

Review: Celestron TravelScope 70 Telescope
Author: Luna Gregoria
Updated: Nov 7, 2022
Ad Disclosure Advertiser Disclosure AstronomySource is an independent, advertising-supported astronomy website. We receive compensation for sales made for all telescopes that we recommend, but that doesn't affect our editorial decisions. We have affiliate partnerships with Amazon, HighPointScientific, and Telescope.com
When it comes to the telescopes we review, our editorial board (which is comprised entirely of astronomers) make unbiased judgments. Please keep in mind that our performance rating system on this page is completely unrelated to any kind of monetary gain.
I want to like the Celestron TravelScope 70, I really do. I have had fun with it. But I just can’t recommend it to beginners for astronomy. And though I’m not an expert on daytime spotting scopes, I’d probably advise against getting one for that purpose as well. It is a nice optic ruined by poor mechanical design and accessories, and unless you’re willing to spend more time and money replacing its accessories (or if you have them already lying about, as I do), I can not recommend it.
The advertising on the box describes it as a nature observing telescope which can be used for casual astronomy. This seems to sort of explain (or disclaim) some of the... peculiarities of this instrument.
Total Score
5/10: Downsides outweigh upsides
Score Breakdown (out of 5)
Moon & Planets: 3
Rich Field: 3
Accessories: 3
Ease of use: 2
Portability: 5
Read our scoring methodology here .
- A nice 70mm f/6 achromatic objective.
- Lightweight and portable.
- Sturdy enough.
- Decent eyepieces.
- Stopped down effective aperture.
- Useless optical finderscope.
- Terrible 45-degree erecting prism.
- Useless, extremely wobbly tripod.
The Competition
I picked mine up used for $50, and I think at that price it’s just about right. But at full price? There are better options in most cases.
If you want a telescope that is small, lightweight, and very easy to use, consider the Orion SkyScanner 100 or Zhumell Z100, a 4” tabletop reflector. And at this price point, if you want to scan wide fields of view across the sky searching for bright deep-sky-objects and star fields, consider a pair of binoculars instead. A 10x50mm or 7x50mm pair of binoculars have the same overall light gathering.
Our Verdict
If you’re already a telescope owner, this might be a good portable option for you, for the same reason as the ST80. I find the TravelScope 70 is lightweight enough that it plays much nicer on photo tripods than the ST80 that I own, and despite getting the ST80 specifically as a grab-n-go scope, I found that I would end up taking the TravelScope 70 outside instead, especially if I wanted a peek at something behind the trees, visible from a different part of my yard. It’s a bit like a ShortTube 70 , in overall design and in application, and for an astro-tinkerer you may be able to fix some of its shortcomings.
But for a beginner? There are probably better options. Even Celestron’s TravelScope 80, though it has some similar bad accessories, has the beloved Synta-made ShortTube 80 optics and mechanical design, and it’s only around $20 more expensive. Meade’s AdventureScope 80 is like the TravelScope 80 but with a marginally better diagonal. (And if you’re considering getting a TS80 or AS80, why not go for the fully kitted out ST80-A or ST80-EQ?)
Just be sure, before you buy, that you’re ok with buying a telescope without a tripod or mount, because that’s effectively what you’ll be getting--the tripod must be replaced to do astronomy with it, and should probably be replaced even if you just want a daytime spotting scope. Treat it as an optical tube and eyepieces only.
Celestron Travelscope 70
Rating: 2.5/5
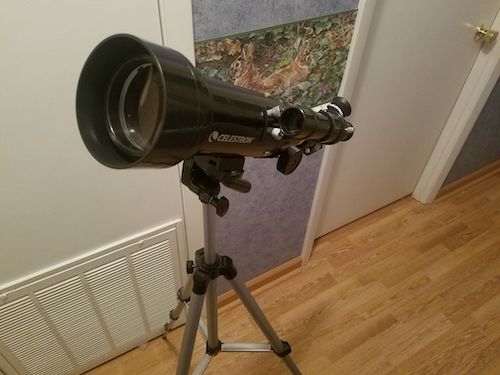
The Tripod of the Celestron TravelScope 70
I have some bad news and some good news.
I normally discuss the optics first, but I’m going to address the tripod first this time, because it is the most important thing to beware of with this telescope. The tripod belongs in the trash . It might work, barely , for a small point-and-shoot toy camera. But a telescope will magnify any small wobble and cause the image to shift and shake tremendously. Even at low magnification, I found that it was almost unusable, but I could just about find focus. At 40x, I couldn’t even find focus–any tap of the focuser knob sent the image into several seconds of shaking. The mount head is soft and plastic, and it feels like it wants to break instead of move where I want it to. It is hopelessly unbalanced in the altitude axis, which means pointing above about 45 degrees is futile. (Of course, for reasons I’ll get into, it’d be futile anyway). It’s also so short that even when fully extended, I had to take a chair out and sit down to reach the eyepiece. It’s too short even for terrestrial use, pointing around the horizon.
That was the bad news. The good news is that the TravelScope 70 is small enough that it can easily be used on any good tripod. So if you already have a nice and sturdy tripod, tall enough for the mount head to get above your face when observing while sitting down (or ideally, when standing as well), then the TravelScope 70 will probably work fine there.

The TravelScope 70 has an achromatic lens objective with an aperture of 70mm and a focal length of 400mm. Its lens elements are nicely coated without bright reflections. My impression is that, for the money, this is a pretty great objective lens. It won’t hold up to any 70mm Apochromat, but you get what you pay for.
There are a few problems with the mechanical design of the TS70. First of all, the (non-collimatable) lens cell, which is similar in design to the ShortTube 80’s and some other cheap achromats I’ve seen, was tightened extremely tight. I put in a lot of elbow grease to loosen the lens cell. The trouble is that this tightened lens cell actually bends the glass, creating “pinched optics.” You might not think glass can bend, but you’re only allowed to bend by 1/1000th the width of saran wrap, so screwing the lens cell down so tight makes the image noticeably fuzzier at high powers. In fact, I’d go so far as to say that the image at first was a mess. After loosening the lens cell just enough that I could hear a slight rattle when shaken (but not too much so that the scope would never be collimated), the image was much cleaner and sharper.
When testing the optics, I did so with and without the 45-degree erecting prism, and I found that without the prism, the image is actually pretty good. It’s got some spherical aberration (in the star test it looks pretty bad, but in actual use, it’s not too noticeable, definitely not at 40x given by the stock 10mm eyepiece) and it is a little rough. It remained out of collimation. It is possible (though tedious) to fix collimation in a lens cell like this, but it wasn’t bad enough to worry about.
The biggest optical problem in the telescope tube is actually part of the mechanical design of the telescope. The focuser used seems to be identical to the one used on a long-focus 70mm achromat, so it’s too long, and it actually protrudes into the light path. For some positions of the focuser, the entire 70mm objective is visible, for others it’s restricted to perhaps only 60mm! Overall, the aperture is probably around 65mm when used with a mirror star diagonal . It’s 60mm or less when the stock prism diagonal is used, since it takes up more focuser travel and vignettes the light path. It may be possible to saw off part of the focuser drawtube to fix this oversight. I haven’t done this for the review. This is a frankly embarrassing error to make since, as far as I can tell, the quality of the objective is easily good enough to justify making full use of all 70mm of it.
The Accessories
The two eyepieces are a 20mm and a 10mm Modified Achromat (a variant of a Kellner eyepiece that has three elements). They have fairly wide fields of view, sharp centers, and passable edges. They’re nothing special, but they’re far better than what many beginner telescopes come with, and they definitely work for this purpose.
The TravelScope 70 comes with a black nylon bag that can hold the tripod and telescope. It’s a nice extra, and it might have come in handy if the tripod that’s meant to go with it was any good. If you get a nice, but small, tripod, you might make use of it.
The two real letdowns among the accessories are the finderscope and the prism diagonal. The finderscope is ridiculous. Galileo’s telescope was probably better. These things barely belong in a McDonald’s happy meal toy, let alone a telescope. It is barely sufficient for sighting through it to find targets, but it isn’t usable on its own as a wide-field finderscope.
The biggest problem with the accessories, other than the tripod, is the 45-degree erecting prism, which goes between the focuser drawtube and the eyepiece. The body is made of plastic, and it feels cheap. It is both an ergonomic and an optical disaster.
Diagonals typically come in 45-degree angles (with erecting prisms) or 90-degree angles (either with a mirror or an erecting prism). This is because, if you imagine pointing a telescope with no diagonal at all high in the sky, you’d have to crane your neck uncomfortably to get your eye to the eyepiece. A 90 degree diagonal is preferred for astronomy since it allows a comfortable viewing angle even when pointed all the way to the zenith (top of the sky). A 45 degree prism can’t go above 45 degrees before you have to start looking up into it. However, 45 degree prisms can be preferred for nature observing if the tripod is tall enough. And for a terrestrial spotting scope, you do want an upright image. Mirror diagonals will show a mirror image, but don’t degrade the image as much. Because the tripod is so short, a 90 degree erecting prism would have been preferred.
The problems don’t stop with ergonomics. Unfortunately, it also degrades the optics of the telescope. The view of the Moon was plenty sharp with a mirror diagonal installed, but going back to the prism, the view became blurry and there was a lot of chromatic aberration (false color fringing). It’s adequate for viewing at low powers, but it causes very noticeable fringing before you even get to 40x. The prism itself is miscollimated–looking into the prism, the view of the objective lens is off-center, and that means you’re getting even less light.
Upgrading the Accessories
Upgrading the eyepieces is a low priority, as they should serve you for a while.
The finderscope should be replaced with a red dot finder. Red dot finders have no magnification at all, they just project a red dot through a small lens/window onto the sky and use some optical trickery to make it look like it’s “at infinity.” (There’s no parallax). When upgrading, be sure to find one with a compatible mounting foot. The mount is done with two screw-stalks that stick up out of the optical tube, the finder mount slips over them, then two thumb-nuts are screwed onto the stalks. This is the same finder mounting system used by other telescopes like the FirstScope/FunScope, Orion SkyScanner, and more.
Finding objects can be done at low power with the telescope itself—it is its own finderscope.
Upgrading the tripod is the most urgently needed fix, but decent tripods are pretty expensive. Don’t buy the scope unless you already have a decent tripod. If you already have the scope and want an upgraded tripod, don’t spend more than $100 on one. For around $100-150, there are better telescope options altogether.
The prism diagonal is the next most urgently needed replacement. Keep it around for comparison or for when you want to do terrestrial observing, but it’s just no good for serious astronomy.
For astronomy, you want an economical mirror star diagonal. Don’t go too expensive, you just need a cheap $30 or so 1.25” diagonal to get the job done. The views of the Moon, planets, and double stars will be sharper and more color free, and you’ll be able to use longer-focus eyepieces with wider fields of view, and you’ll be able to use more of the telescope’s aperture. And to top it all off, it’ll just be more comfortable to use.
General Use
After my first half hour using the telescope, I was exhausted trying to work around its awful mount. However, in that time, I was able to observe the Double Cluster in Perseus, the Orion Nebula, and the Andromeda Galaxy, and I was pleased enough by them to not immediately write off the telescope as a failure.
After a rest indoors, I set the telescope up again with my good tripod, the mirror diagonal off my Orion ST80, and a red dot finder, and I went out and had a lot of fun with it. It isn’t a powerful telescope, but I personally enjoy small telescope observing quite a lot. The wide-field views you can get with small short telescopes make up for the small aperture, so you can fit a lot of stars in the eyepiece.
The Orion Nebula showed its bright core easily, though somewhat softly, and hinted at the tenuous outer layers of gas and dust. Three stars in the trapezium were easily resolved, and the fourth wasn’t too difficult at 40x. At low power, the entire Orion’s Sword stellar association is visible and very pretty, with the nebula showing up as a fuzzy blob in the middle.
I was not able to see any details in the Andromeda Galaxy M31–the satellite galaxy M32 was only suspected, and there was no hint of the fainter M110. All I could see was a ghostly pale core of the galaxy, and this was the one object that was especially disappointing in comparison with what other small scopes of mine had shown.
Some of my favorite small scope targets are the open clusters M35, M37, M36, and M38, which follow a line up from Castor-Twin’s Foot in Gemini up to the middle of Auriga the Chariot. M37 and M36 can be seen together in the same field of view with a wide field 32mm Plossl eyepiece (though not together with the stock 20mm), as well as M36 and M38. The appearance of these clusters is a fuzzy blob that can be resolved into a glittery mess, with varying degrees of sparkle and fuzziness. Each of these are groups of young stars just spreading out into the Milky Way, and they are observed best in winter and spring.
I was able to see the Clown Face Nebula, though it required a higher magnification of 67x to resolve it as a planet-shaped nebula instead of a star, I only suspected it was a nebula at 40x.
I was even able to observe M81 and M82, a pair of galaxies in Ursa Major.
I went out one night to compare my Orion ShortTube 80 (optically identical to the Celestron TravelScope 80’ s objective lens) with the TravelScope 70. By my calculation, the difference between the two shouldn’t have been especially noticeable, but it definitely was. The view of Caldwell 64, the Tau Canis Majoris Cluster, was so much dimmer than the view through the ST80 that it required averted vision to suspect there was more than one star, whereas the ST80 showed it with a sparkly halo easily. The ST80 could just barely do the two bright components in the Leo Triplet, while I couldn’t see them at all in the TravelScope 70. The overall character of the images was the same (to be expected when observing at the same magnification), but the TS70 was dimmer than it should have been, which confirms that the effective aperture was stopped down.
If you go in with the correct expectations (objects will be dim and gray) and look for the right objects (look for objects in guides for small telescopes and binoculars, rather than the famously named nebula you’ve seen in pictures), the telescope can work just fine for deep sky viewing from a suburban or darker sky. In a rural sky, it’d be powerful enough to see every one of the Messier objects. I find that it’s much easier to find and appreciate deep sky objects in a small scope after you’ve gotten familiar with deep sky observing in a larger telescope. But there’s no reason you can’t start small if you set your expectations right.
As I write this, there are no planets worth looking at (Mars is a dot in even the largest telescopes), so the only high-resolution tests I could put the telescope through were of double stars and the Moon.
At high power, the focuser is loose enough to reveal a bit of image shift as you rack the focuser in and out. Without shimming the focuser, this means maintaining good collimation will be difficult. Other than that, the focuser isn’t wobbly or loose, and even at high power, I can find best focus pretty easily.
With the 45-degree prism, the Moon was aesthetically pretty at low powers but a bit of a rainbow mess at 40x and higher. With the mirror diagonal, the moon became much sharper and you could really begin to appreciate its features. I found the 40mm sub-aperture-mask dustcap it comes with wasn’t really needed; it’s plenty sharp enough even at 67x, and there’s no chromatic aberration noticeable until you overpower the scope to about 167x. (Maximum useful power would be around 100-130x) It held its own against a cheap 70mm long-focus achromat and the ShortTube 80.
At one point, while observing, I dropped the telescope about 5 feet onto the floor. There seems to have been no damage. The story might’ve been different on concrete, but I like the scope enough that I don’t want to intentionally drop-test it.
Leave a Comment Cancel reply
Save my name, email, and website in this browser for the next time I comment.
Since 2011, we've published astronomy related content and reviews to help guide the community better.
Our Astronomy Experts
Our Review Process
How We Make Money
© Astronomy Source 2011 - 2024
Privacy Policy
Terms and Conditions
- Skip to content
- Skip to primary sidebar
Telescope Guide
Best telescope reviews, advice, and more. Your one-stop resource for getting started with telescopes & astronomy.
Celestron Travel Scope 70 Review: Skip the Accessories
Written by Richard J. Bartlett Last updated on April 6, 2022 .
There’s nothing quite like camping out under the stars. By returning to nature, we can also return to the world that our ancestors knew. We can even bring some of the conveniences of modern times with us. For example, ancient astronomers didn’t have the luxury of exploring the universe with a telescope. You might think a telescope is too large to pack with your camping gear, but the Celestron Travel Scope 70 aims to prove you wrong. Does it succeed in making itself the essential camping accessory? Or is it excess baggage? Keep reading for our full review.
- Celestron FirstScope Review: The Little Scope That Can
- Celestron SkyMaster 20×80 Review: Bigger and Better
- Gskyer 70mm Telescope Review (How it Compares)
About the Celestron Travel Scope 70
Before we dive into the details, let’s set some realistic expectations. While you can pack a large Dobsonian into the trunk of your car, the chances are you’ll want something a little more practical. This is especially true if you want something you can also use during the day – and a large Dobsonian isn’t the best choice for that.
You’ll need something small, light, portable and easy to set-up and use. This is essentially what the Travel Scope aims to be. Keeping this in mind, let’s review the scope’s key specs:
- Type: Refractor
- Optics: Glass, fully coated
- Aperture: 70mm
- Focal Length: 400mm
- Focal Ratio: 5.7
- Minimum Useful Magnification: 10x
- Maximum Useful Magnification: 168x
- Limiting Stellar Magnitude: 11.7
- Resolution (Dawes): 1.66 arc seconds
- Supplied Eyepieces: 20mm (20x) and 10mm (40x)
- Telescope Weight: 1.5 pounds
- Total Weight: 3.3 pounds
The Travel Scope is available with apertures of 50mm, 60mm, 70mm and 80mm. Besides the aperture of the telescope, the only essential difference between them is in the focal length. The 50mm and 60mm models have a focal length of 360mm while the 70mm and 80mm have focal lengths of 400mm. You can gather more light and have greater magnification with the larger apertures.
The difference in weight is negligible – the total weight of the 50mm aperture is 2.2 pounds, while the 80mm weighs a total of 4.4 pounds. While this is twice as heavy as the 50mm, the total weight is so minimal that it won’t cause anyone any problems.

Check Latest Price at High Point Scientific
Check Latest Price at Amazon.com
What’s Inside the Box
Besides the telescope itself, the kit also includes the following items:
- Altazimuth mount
- 45° erect image diagonal
- 5×24 finderscope
- Two eyepieces: 20mm (20x) and 10mm (40x)
- User manual
- Instructions on downloading the Starry Night Basic Edition software
- Info on the Sky Portal app
The altazimuth mount is pretty standard for small refractors such as these, while the tripod is a regular camera tripod. It’s not the most durable tripod, but you can easily replace it with one of your own choosing – which, as we’ll discover, is probably the best idea.
Whether you intend to use the scope during the day or exclusively at night, you’ll need the 45° erect image diagonal.
In an astronomical telescope, the image is always inverted – horizontally, vertically, or even both – and a diagonal is used to correct that. There’s a slight loss of image quality, but with a scope this size it’s not going to make a lot of difference.
Besides, you’ll find yourself using the diagonal simply because it’s impractical to use the telescope without it. The diagonal works by angling the eyepiece so that you’re looking down into the telescope tube, rather than directly through it. This saves you from having to contort yourself to look up through the telescope when it’s pointed at a high angle toward the sky.
Additional Accessories
This review covers the standard package for the Celestron Travel Scope 70, but there are other options available. For example, for a little more initial outlay, you could buy the package that includes the following additional accessories:
- Smartphone adapter – this allows you to attach almost any smartphone to the telescope and (potentially) capture images and video of targets. In practice, this is only really a viable option for the Moon, brighter deep-sky objects (such as the Orion Nebula) and anything you care to observe during the daytime.
- Lunar filter – an essential accessory for any telescope owner, a lunar filter is attached to an eyepiece and will significantly reduce the brightness of the Moon. Without it, the Moon can be dazzling and will ruin your night vision. It’s also worth knowing that the supplied filter is not the greatest, as it is tinted green and will discolor the Moon as a result. For a more natural-looking Moon, it’s worth investing in a neutral density lunar filter instead.
- 3x Barlow lens – another essential accessory, a Barlow lens will multiply the magnification of any eyepiece attached to it. The supplied 3x Barlow will increase the magnification threefold; as a result, the 20mm eyepiece will produce a magnification of 60x and the 10mm will produce a magnification of 120x. Every astronomer will own a Barlow as it effectively doubles the number of magnifications available to you; even though you might only have two eyepieces, you have access to four magnifications.

What We Liked
- Telescope itself is decent quality
- Very lightweight and portable
- Great for camping and hiking
- Easy to use
- Good for beginners
What We Didn’t Like
- Poor quality tripod
- Lackluster finderscope and eyepieces
- Backpack won’t provide much protection
- No accessory tray
Celestron Travel Scope 70 Review – User Experience
Getting set up.
Assembling the Travel Scope is pretty straightforward, and if you’re used to attaching a camera to a tripod you’ll probably have no trouble with this. For everyone else, the directions are pretty clear and there are ample illustrations and step-by-step instructions to help you along your way. Putting everything together doesn’t take long at all; attaching the scope to the tripod only takes a moment and then it’s just another couple of minutes to attach the finderscope, diagonal and eyepiece.
As mentioned earlier, the telescope is very light, even when attached to the tripod, and it’s very easy to simply pick everything up with just one hand and move it to the desired location.
However, before you turn the telescope toward its first target, you’ll need to align the finderscope. The process itself is simple enough in principle, but unfortunately, this is when you’ll encounter your first frustrations.
Aligning the Finderscope – A Foreshadowing of Things to Come
Attaching the finder itself is simple – you only need to slide it into the mount and then screw the mount onto the tube – and the process of alignment is theoretically easy. It’s best to do this during the day, so once the finder is attached, you should insert your lowest powered eyepiece into the diagonal (the 20mm that’s supplied with the scope will do the trick) and then point the scope towards a terrestrial target.
You’ll need to move the scope around until your target appears in the center of the eyepiece field of view. Here’s where things can get a little tricky, as you’ll need to adjust the finder so that your target appears at the center of the crosshairs too. One thing you’ll immediately notice is that the finderscope view is inverted, which makes targeting the telescope just that little bit more challenging.
You can lock the mount and prevent it from accidentally moving by tightening the appropriate screws and the vertical adjustment handle, but unfortunately, the process of tightening the screws causes the scope to move a little.
(You also have to resist the urge to hold the tripod steady as this will cause the scope to move. The problem, however, is that if you don’t, the entire tripod is likely to also move as it’s too lightweight and flimsy to stand steadily in one place.)
To be fair, many tripod-mounted scopes are prone to this type of issue, but it’s particularly noticeable with the Celestron Travel Scope 70.

The Trouble With Tripods
Once the finder has been set up, you’re pretty much ready to go. Locating objects is straightforward, as the scope moves in a simple horizontal and vertical motion. You can use the tripod’s handle to accomplish this, and once you’ve found your target, you can then tighten it to keep the scope at the proper angle. This causes the telescope tube to sag a little, so you’ll need to allow for this play as you locate your target.
There are a few other things to keep in mind here:
- Don’t over-tighten the handle as you’ll need to move the scope from time to time. This is so you can keep track of your target as it crosses the sky. Also, be careful not to knock the scope as it’s easily moved out of position.
- Using heavier accessories may cause the eyepiece end of the telescope tube to sink toward the ground. You’ll then find your scope pointing up at a steep angle, rather than at your target!
- Observing targets at a high angle above the horizon is problematic. Pointing the telescope tube directly upwards can cause it to come into contact with one of the tripod legs. You can observe targets that are nearly overhead, but you’ll need to make sure the tripod legs aren’t obstructing the tube. (This is a common problem with all tripod-mounted scopes but you should still be aware of it.)
The focusing mechanism feels smooth, with only a little shake at a low magnification. Increase the magnification and the shaking becomes far more problematic. A lot of this is due to the tripod as its thin and flimsy legs aren’t capable of properly supporting the scope. Adjusting the screw on the focuser should make focusing a little easier and smoother.
Possible Solutions for the Tripod Problem
One solution for the lack of tripod stability might be to retract the legs and then place the telescope on a table. I didn’t try this myself, but it might offer some improvement. Otherwise, the best solution is to replace the tripod entirely with something a little sturdier.
The replacement tripod doesn’t have to be anything expensive either. I attached the Celestron Travel Scope 70 to a Victiv 72 inch tripod ( See it on Amazon.com ) and the entire experience was far more trouble-free and enjoyable. The general movement of the scope was smoother, the locking mechanism was more effective and the shakiness all but vanished. In short, replacing the tripod allows the telescope to perform exactly as it should.

Bringing It All Into Focus
We tested the Celestron Travel Scope 70 during both the day and night. During the day the scope produced decent enough views; the 20mm eyepiece (20x) produced views that were up to the task, with little or no chromatic aberration around high contrast objects. The 10mm eyepiece (40x) didn’t fare quite as well, with some aberration around the edge of the field of view. It also had an uncomfortably narrow field of view.
Swapping the supplied eyepieces out for my own pre-purchased SVBONY eyepieces (an inexpensive and decent quality alternative) produced clearer, more comfortable views. This demonstrated that the optical faults lay with the supplied eyepieces, rather than the lenses of the scope itself.
The scope was tested on a moonless night (it was around last quarter) at a suburban location with above-average transparency and seeing. The limiting naked-eye magnitude was around 4.0.
Once you take the telescope out under the stars, you’ll soon notice the limitations of the finder. Despite (or because of?) it having a magnification of 5x and an aperture of 24mm, you’ll find it difficult to see anything but the brightest stars and planets through it. That being the case, you’ll probably need to star-hop to reach your celestial destination.
For example, although the Messier 41 open star cluster is easily visible in 7×35 binoculars, it was nowhere to be seen in the 5×24 finder. Arguably this is due to the reduced magnification and aperture, but it should be noted nonetheless.
Despite these limitations, the stars of the cluster appeared sharp and the telescope provided an attractive view, even at 20x. As you might expect, it was certainly better than the view through 10×50 or 20×50 binoculars.
The Sharpness of the Stars
The shape of the Orion Nebula (M42) was also detectable at 20x, with at least three of the Trapezium stars being seen. Doubling the magnification to 40x barely brought neighboring M43 into view while a hint of green was seen in M42 itself.
The Pleiades looked good, with the stars appearing sharp and blue. The better view comes with the 20mm eyepiece as the lower magnification (20x) produces a more aesthetically pleasing sight. Unfortunately, it’s not the same story with the Hyades, as the cluster is too large to fit within the field of view, but Aldebaran showed a strong coppery color.
Cor Caroli was an easy split at 20x, with the primary showing a nice, creamy peach color and the fainter secondary star appearing white. Mizar was a little more challenging; to me, it wasn’t a clear split at 20x but doubling the magnification to 40x certainly did the trick.
As mentioned earlier, it’s difficult to see anything but the brightest stars through the finder. With that in mind, the Beehive cluster proved to be too elusive. Fainter targets, such as globular clusters and galaxies, are similarly lost, even though I have no doubt the scope is capable of showing them.
Packing It All Away Again
Once you’ve finished for the night, it’s a good idea to pack the scope away in the provided backpack. For one thing, the entire assembly is so light that if it’s left standing it could be easily knocked over. Disassembly is easy enough: the eyepiece and diagonal slide easily out, the finder unscrews from the tube and the tube itself is then unscrewed from the tripod. Lastly, the tripod legs are retracted and folded up.
The backpack is of a pretty average size and weighs next to nothing. It’s a canvas bag with a zipped, shallow pocket on the inside of the cover and two more open pockets on the divider that separates the two main compartments. There’s plenty of room for the scope, tripod and a few vital accessories, but you’ll ultimately find it rather unsatisfactory.
The primary reason for this (besides the open pockets that can easily allow accessories to fall out) is that the two main compartments are too wide for either the scope or the tripod. More specifically, besides a very short divider and a couple of loose velcro straps that are too long to securely wrap around the hardware, there’s nothing to stop either the scope or the tripod from sliding around.
As such, again, it’s worth investing in a replacement backpack that’s better able to protect its contents. Again, like the replacement tripod, inexpensive alternatives are available that are more than up to the task – but be sure to buy one with dividers that can be customized to the scope and tripod.

Final Thoughts on the Celestron Travel Scope 70
The Travel Scope produces very similar views to the FirstScope, but this really shouldn’t come as any surprise. After all, they’re both manufactured by Celestron and they both have a similar aperture and focal length. Unfortunately, they both suffer from the same problem: the scope itself is fine, but the accessories leave something to be desired.
In its favor, the Travel Scope comes supplied with a finder (whereas the FirstScope does not) and while the inverted view is confusing and it’s not the best quality, it will help you locate some of the brighter targets.
The eyepieces that are provided with the Celestron Travel Scope 70 are also a little better, but whereas the FirstScope has a solid Dobsonian mount, the Travel Scope is severely let down by its tripod. Personally, I wouldn’t trust the backpack to safely transport the telescope tube without a fair amount of extra padding.
In short, like the FirstScope, you’ll want to take the telescope tube and leave the accessories. At the very least, you should probably shop around for a good tripod and finder – it’s advisable to get some decent eyepieces too. For example, I’ve bought a number of the afore-mentioned SVBONY eyepieces for my scopes and they’re a good, inexpensive option for anyone just starting out.
Make these relatively minor upgrades and you’ll find yourself with a highly portable scope that’s worth camping out for.
About the Author
Why you can trust our reviews.
Feature Image Credit: Richard Bartlett / TelescopeGuide.org

As an Amazon Associate we earn from qualifying purchases. TelescopeGuide.org is a participant in the Amazon.com Services LLC Associates Program, an affiliate advertising program designed to provide a means for sites to earn advertising fees by advertising and linking to amazon.com, amazon.ca, amazon.co.uk and any other website that may be affiliated with Amazon.com Services LLC Associates Program.
Amazon and the Amazon logo are trademarks of Amazon.com, Inc., or its affiliates. We do not specifically market to children under 13.
About Us | Privacy Policy | Affiliate Disclosure | Cookie Policy | Contact Us
Celestron Travel Scope Review

The Celestron 21035/21038 Travel Scope is another great astronomy and terrestrial telescope from Celestron that has portability and ease of use as the main features. It’s a compact refractor telescope that is available in two models, the 50mm (the 21038 model ) and the 70mm (the 21035 model ). Although there is a price difference between the two models, with the 50mm one being obviously slightly cheaper, we’ve come to the conclusion that the 70mm model is well worth the additional dollars in the price and as the images are much clearer and better overall. In the text that follows we’ll be focusing on the 21035 model. Worth noting that part of this Travel Scope Series are also the following telescopes: the newer DX models Travel Scope 60DX and Travel Scope 70DX and the other popular one the Travel Scope 80. You’ll find a comparison table below.
A.I. Scanned Best Price

Celestron Travel Scope 70 Review Card
- Manufacturer - 9.9/10 9.9/10
- Optics - 9/10 9/10
- Value - 9.5/10 9.5/10
- Portability - 10/10 10/10
- Mount - 9.2/10 9.2/10
This telescope has been a bestseller for Celestron for years now. When talking about a telescope just under the $100 mark it’s easy to understand why it’s a market favorite given the included backpack and smartphone adapter as well as a sturdy enough tripod.
- Crisp images of the moon and planets. Jupiter’s ring and moons are visible.
- Backpack included
- Lightweight which makes it one of the most portable telescopes on the market
- Smartphone adapter for digiscoping inluded
- Versatile with terrestrial viewing capabilities
- Not overly powerful for deep sky objects viewing
Comparison Table for all Travel Scope Models

What’s in the box

- Optical tube
- Mount and tripod (preassembled)
- 20mm and 10mm eyepiece
- 45° erect image diagonal
- 5×24 finderscope
- SkyPortal app
- Celestron’s Starry Night Basic Edition Software
- Backpack to store scope and accessories
The Celestron travel scope comes with a backpack for both it’s models the 50mm and the 70mm one. The backpack is padded and as it’s custom created for this telescope , all the components and accessories along with the tripod and the telescope it’s self fit perfectly.
As we’ve mentioned besides the backpack case the set also includes a full size aluminium photographic tripod which turned out to be very stable (considering the light weight nature of the tripod and telescope which would make it a difficult for the tripod to be as reliable as with other telescopes) and especially useful for taking amazing photos. The other accessories consist of the two eye pieces ( 20mm one for a 20x magnification and a 10mm one for a 40x maginification) and a 45 degree correct image prism . And last but not least, Celestron includes a copy of The Sky X software which was contains a database of over 10,000 objects and printable sky maps (which can be very helpful if your new to astronomy).
Mount & Tripod

The mount for this telescope and in fact for the entire Travel Scope series is the manual alt azimuth mount type. It’s easy to handle and works ok on the tripod. And speaking of the tripod with it’s help you can adjust the height of the telescope anywhere from 22″ to about 46″ .

Correct Image Prism
One additional accessory which I’m happy Celestron included in the package is the erect image prism.
When you look through a refractor telescope without such a prism you see the image upside down. Now, when viewing celestial objects it’s not such a big deal with a few exceptions but when viewing terrestrial objects it becomes a problem. So by having this accessory, this telescope is ready to be used on your next trip for all kinds of terrestrial viewing as well.

Overall I would rate the tripod as a nice thing to add to this beginner package. However I can’t rate it very high in terms of sturdiness. Weighing just 1.8lbs (0.81kg) it’s hard to expect more. It’s again a compromise for maximum portability.
The Celestron Travel Scope strong points:
With the total kit weighing just 3.3 lbs (1.5 kg) the entire set is very portable and you can take it with you anywhere and expect great optics and views. The backpack fits perfectly and gets full marks. The altazimuth mount ensures an easy and smooth movement which is important not only when tracking object but also when you keep following them (in the case of stellar objects).
Then another strong point is the fact that it’s easy to setup and easy to use . Which makes it an ideal gift for a pre-teenager.
The Celestron Travel Scope weak points:
At first there weren’t any obvious weak points for this telescope given it’s dimensions and price range. We feared that the tripod would be just a too light and not sturdy enough as that can be a problem with even higher priced telescopes, but it did act very well. The thing that could have been improved was the finder scope that gives this telescope a nicer look similar to higher priced telescopes, but overall it’s all that useful.
Overall this is a pocket rocket telescope that delivers on it’s promises having great crystal clear optics and score high on the portability scale. As a first budget telescope this is one of the best options available.
Click here for the best price on this telescope
Technical Specifications
The actual numbers for the Travel Scope 70 Model 21035.
About The Author

How To Set Up The Celestron Travel Scope 70 [Step By Step]

Have you just received your new Celestron Travel Scope 70 telescope but feeling a bit overwhelmed about how set it up?
Maybe you can’t find the instruction manual that came with it!
Not to worry.
Setting up this portable telescope for the first time can seem daunting, but there’s no need to fret – this guide has got you covered.
In this easy-to-follow walkthrough, I’ll take you step-by-step through the entire assembly process.
I’ll share helpful set-up tips and tricks I’ve learned from my own experience putting this scope together straight out of the box.
Follow along as I take you through extending the tripod, attaching the optical tube, installing the diagonal, adding the eyepieces, and mounting the finder scope.
I’ll provide clear instructions that align with Celestron’s recommended setup routine.
Before you know it, you’ll have your Travel Scope 70 fully put together and ready to start exploring the cosmos and beholding celestial wonders.
Just a few straightforward steps stand between you and the stars.
Let’s get started!

Table of Contents
How To Set Up The Celestron Travel Scope 70
The Celestron Travel Scope 70 is a portable and versatile beginner telescope. Setting it up properly ensures you get the most out of your stargazing sessions.
Follow these steps to assemble and use your Travel Scope 70.
Unpack and Protect the Equipment
When you first unpack your Celestron Travel Scope 70, it is essential to keep all of the protective packaging materials.
These can be used to store the optics when they are not in use.
Having this extra layer of protection can help extend the life of your telescope.
Set Up the Tripod
The tripod that comes with the Travel Scope 70 is pre-assembled, making setup very straightforward.
First, undo the clips on each of the tripod legs. Extend the legs to your preferred height, with a minimum height of around 16 inches.
Make sure to lock each clip securely to ensure stability.
When fully extended, the tripod has a maximum height of approximately 49 inches.
Attach the Optical Tube
Now it’s time to attach the optical tube to the tripod mount. Locate the part of the tripod that has a large lever and turn it anti-clockwise to release the mount.
Then, tighten it back into place to secure the mount.
At the top of the mount, you’ll find a small screw.
On the bottom of the optical tube, there are two threaded holes – you can use either one.
Align the optical tube with your chosen hole and screw it into the mount, making sure it is tightly secured.
Use the Alt-Azimuth Mount
The Celestron Travel Scope 70 comes with an alt-azimuth mount, allowing for easy point-and-shoot sky observation.
To move the telescope up and down, unscrew the lever on the mount anti-clockwise.
Once you have positioned the telescope where you want it, screw the lever back in to lock it in place.
To swivel the telescope left and right, use the small knob on the mount. When you have found your target, lock both levers to keep the telescope steady.
Install the Diagonal
The diagonal is a crucial accessory for comfortable viewing, as it directs the light at a 90 degree right angle to ensure you see objects the right way up.
Start by removing the protective caps from both the diagonal and the telescope itself. Unscrew the lever on the diagonal.
Insert the diagonal into the telescope’s focus tube, then screw the lever clockwise to securely attach it.
Add Eyepieces
To start observing, you’ll need to insert eyepieces into the diagonal.
Unscrew the eyepiece holder on the diagonal.
Take one of the eyepieces out of its protective case and insert it into the holder, screwing it in clockwise to secure it. Experiment with different eyepieces to achieve varying levels of magnification.
Install the Finder Scope
The finder scope is helpful for easily locating celestial objects.
Start by removing the protective caps from both the finder scope and the telescope. Unscrew the nuts on the optical tube of the telescope.
Place the finder scope on top of the optical tube, with the larger end facing outward. Screw the nuts clockwise to firmly secure the finder scope.
Align the Finder Scope
Properly aligning the finder scope is essential for accurate targeting of objects. Close one eye and look through the finder scope eyepiece.
Find a terrestrial object such as a bird or tree and center it in the crosshairs.
Use the adjustment screws on the finder scope to align the crosshairs directly with the object.
Make sure the object stays in focus when adjusting the focus knob.
Observe and Enjoy the Night Sky
With your Celestron Travel Scope 70 fully assembled and aligned, you’re ready to start exploring the night sky!
Take your time to practice how to navigate, focus, and locate interesting celestial objects.
Astronomy is a very rewarding hobby that becomes even more enjoyable the more you practice your skills.
Disassembly
When you are finished with your stargazing session, disassembling the telescope is straightforward.
Simply remove the accessories such as the finder scope, eyepieces, and diagonal in the reverse order from how you put them on.
Secure the optical tube to the mount and collapse the tripod legs, locking them in place. Carefully store all components in their protective packaging.
Following these steps will have you set up and stargazing in no time with your Celestron Travel Scope 70.
Refer back to this guide whenever you need a refresher. Happy observing!
Is the Celestron Travel Scope 70 easy to set up?
Yes, the Celestron Travel Scope 70 is very easy to set up. It comes pre-assembled, and the process involves extending the tripod legs, attaching the optical tube, adding accessories like eyepieces and diagonal, and aligning the finder scope.
How Long Does The Celestron Travel Scope 70 Take To Set Up?
Setting up the Celestron Travel Scope 70 typically takes around 5-10 minutes. This includes extending the tripod legs, attaching the optical tube, installing accessories, and aligning the finder scope.
Do I need any tools to set up the Celestron Travel Scope 70 ?
No, you do not need any additional tools to set up the Celestron Travel Scope 70. It comes with all the necessary components, and assembly can be done by hand without any tools.
Related Guides:
- Celestron Travel Scope 70 Review [Should You Buy It?]

Hey, my name is Jeremy. I’m a passionate and seasoned astronomer who loves nothing more than observing the night sky. I also love researching, learning, and writing all things Space and the Universe. I created Astronomy Scope to share my knowledge, experience, suggestions, and recommendations of what I have learned along the way while helping anyone to get into and maximize their enjoyment of the hobby.
Love Astronomy and Saving Money?
Sign up to receive sale alerts, news about upcoming celestial events, and telescope tips from our experts!
Please let us know what topics you are interested in.
Text CELESTRON to 833-948-6837 to sign up for observing alerts and offers via text!
Recieved A Free Gift!
Subtotal ( Items) $0.00
Have a promo code? Enter it during checkout!
Orders of $50 or more are eligible for free ground shipping! Contiguous USA only. Product exceptions apply.
- Orders ship from Torrance, California.
- Orders placed after 12:00 PM Pacific Time or over the weekend will be shipped within 1-2 business days.

Check these out
- Top Accessories
- Popular Science by Celestron
- Advanced VX
- AstroMaster
- AstroMaster LT
- CPC Deluxe HD
- ExploraScope
- National Park Foundation
- NexStar Evolution
- NexStar SLT
- PowerSeeker
- StarSense Explorer
- Travel Scope

The most popular accessories for your new telescope!
Buyer's Guide!

Start here to find the perfect telescope for you!

Optical Tubes
- Mounts & Tripods
- Astronomy Binoculars
- Solar Observing
- Cameras & Imaging Accessories
- Dew Prevention
Accessories

Sport Optics
- Top Spotting Scopes
- Top Electronics
- Spotting Scopes
- Outdoor Electronics
- Sport Optics Accessories
NEW: Nature DX ED Binoculars

Celestron’s award-winning Nature DX binocular gets a major upgrade with the addition of ED objective lenses.
NEW: Elements ThermoTank 3

On the trail, at the job site, in the classroom, or simply sitting at home relaxing – the Celestron Elements ThermoTank 3 will keep your hands toasty.
NEW: Elements ThermoTorch 5

This rugged, 3-in-1 device features a true tactical 3-mode flashlight, a hand warmer, and a portable power bank for recharging your personal electronics on the go.

Microscopes
- Top Microscopes
Digital Microscopes
- Biological Microscopes
- Compound Microscopes
Stereo Microscopes
- Celestron Labs
- Microscope Accessories

Observing the microscopic world has never been easier!

Perfect for the serious student, professional scientist and discriminating hobbyist
Kids Microscope Kit

Great for home, classroom, or home-school use, this kit includes all the essential items you’ll need to begin exploring the wonders of the microscopic world.

- Redefining Technology
- News & Guides
Team Celestron
- Public Relations
- Executive Bios

Our Technology

- Technical Support
- How-To Videos
- Manuals & Software
- Knowledge Base & FAQ
- Product Registration
- Spare Parts
- Warranty Information
- Do not sell my personal information
CPWI Software

Take control of your telescope! Download the Celestron PWI Telescope Control Software
SkyPortal App

Celestron’s FREE planetarium app is an astronomy suite that redefines how you experience the night sky.
Using Telescope Eyepieces

Your eyepieces are the first accessories you should learn to use with your telescope. Read our guide!

Tools for Beginners
For Astronomers

For Birders

Travel Scope 70 DX Portable Telescope with Smartphone Adapter
£129.99
Style: Travel Scope 50 Portable Telescope National Park Foundation Travel Scope 60 Telescope Travel Scope 70 Portable Telescope Travel Scope 80 Portable Telescope with Smartphone Adapter Travel Scope 70 DX Portable Telescope with Smartphone Adapter Travel Scope 60 DX Portable Telescope with Smartphone Adapter Popular Science by Celestron Travel Scope 70 Portable Telescope with Smartphone Adapter and Bluetooth Remote
- A portable telescope kit with everything you need to get started: 70mm refractor telescope with fully coated glass optics, full height tripod, travel backpack, plus lots more
- Smartphone Photography Accessories - Capture images and video through your Travel Scope with the included smartphone adapter and Bluetooth shutter release
- More Bonus Accessories – You’ll also receive two eyepieces (20mm and 10mm), an erect image star diagonal, a 2x Barlow lens, a Moon filter, and a finderscope
- Day-to-Night Performance – Use your Travel Scope™ for celestial viewing at night or for observation of birds, nature, and wildlife during the day
- The custom backpack fits your telescope and all its accessories comfortably
- Observe in no time with a quick and easy, no-tool setup
- Pan handle Alt-Az control with clutch for smooth and accurate pointing
OVER 60 YEARS OF INNOVATIVE TECHNOLOGY
In the 1960s, Celestron’s founder, Tom Johnson, created groundbreaking new telescopes never before seen on the consumer market. Today, our world-class team of optical and electronic engineers continues to push the boundaries of technology. From the SkyProdigy, a telescope so smart it can align itself, to our high-performance EdgeHD optical system, we’ve revolutionized the hobby of astronomy for beginners and advanced amateurs alike. Go behind the scenes with Celestron’s product development team and learn more about our award-winning and patented innovations.

At the forefront of a new era in amateur astronomy, the launch of Celestron Origin stands as a beacon, seamlessly intertwining stargazing and astrophotography into a singular, user-friendly experience. This intelligent, all-in-one observatory and astroimaging system emerges as a catalyst, eliminating the complexities traditionally associated with telescopes and, in turn, metamorphosing your backyard into an inviting gateway to the Universe.

Celestron released the patented Rowe-Ackermann Schmidt Astrograph (RASA) 11” optical tube in 2014. Unlike traditional telescopes, the RASA design ingeniously places the imaging sensor at the front of the telescope tube, creating an ultra-fast f/2.2 system with an extraordinarily wide field of view.
Sky recognition technology that has revolutionized the manual telescope by eliminating the confusion common among beginners and enhancing the user experience for even seasoned telescope users.

U nleash the full pointing accuracy of your Celestron computerized telescope with a specialized telescope control software suite. control and Sky Viewer display makes selecting your target easy. CPWI has an extensive object database, employs PointXP mount modeling, and more.
The new Lithium Phosphate (LiFePO4) battery chemistry has significant advantages over other battery chemistries, great for for those Astronomers on the go.
WiFi technology encircles the globe in a web of connectivity, knowledge, and information. Now, Celestron is using that same technology to allow star gazers to connect to the night sky and enhance their experience of the cosmos in fun and unique ways.

Planetarium software package which provides easy-to-understand explanations and impressive visuals of all kinds. Learn more about extra solar planets imagery, 3D Star rendering, observation planning, telescope control, multiple-panel printing, and much more.

Celestron’s aplanatic EdgeHD optics revolutionized astroimaging. This award-winning optical system reduces visual defects like field curvature and coma, creating an ultra-flat field for pinpoint stars all the way to the edge of today’s largest imaging sensors.
Fastar Technology allows imagers the option of drastically increasing the speed and sensitivity of their Celestron optical tube, allowing bright, detailed images with short exposures.

Our patented SkyAlign alignment technology makes setting up a computerized telescope simple, fast, and accurate. Just point the telescope at any three bright objects—stars, bright planets, or even the Moon—and your telescope can orient itself with the night sky.

Celestron’s patented StarSense® Technology makes it easier than ever to locate objects in the night sky, even if you’ve never used a telescope before. Turn it on and push ‘Align.’ In about three minutes, you’re ready to observe!

Get ready for a night of astroimaging with your mount faster than previously thought possible with All-Star Polar Alignment. This innovative software solves the time-consuming problem of trying to pinpoint the North Celestial Pole.

One of the most important factors in a telescope is its transmission—the percentage of light that reaches the focal plane. Our proprietary StarBright XLT optical coatings dramatically increase transmission, up to 97.4% on our Schmidt corrector lenses.

ED stands for "extra-low dispersion," which refers to the composition and optical properties of the glass used for the lenses. ED glass is specially formulated and contains rare-earth compounds that greatly reduce a visual defect called chromatic aberration.

This telescope control software replaces the hand control and allows the user to remotely control their Celestron computerized telescope from their personal PC or laptop.

EclipSmart solar products feature Solar Safe filter technology providing the ultimate protection from harmful solar radiation, including both IR and UV light, and filters 99.999% of visible light. Celestron Solar Safe filter technology is GUARANTEED SAFE for direct solar observation and has been independently tested by SAI Global Assurance Services.
Includes These Celestron Technologies

Customers Also Purchased

Description
Specifications
Support & Downloads
Get a new perspective on nature and the Universe with the ideal day-to-night telescope, Travel Scope 70 DX. This refractor telescope includes a full height tripod and lots of bonus accessories, include a smartphone adapter so you can capture images and video through the eyepiece. It all packs up into a high-quality custom backpack—ready to go wherever your adventures take you.
Whether you take it along on your next camping trip or enjoy an impromptu backyard stargazing session, setting up the telescope is a breeze. Even on your first time out, you can assemble the telescope and its accessories in just a few minutes. The adjustable tripod legs allow you to customize the telescope’s height or place it on raised surfaces like a picnic table.
By night, Travel Scope 70 DX delivers great views of the planets, the Moon, star clusters and brighter deep sky objects like the Orion Nebula and Andromeda Galaxy. During the day, Travel Scope 70 DX doubles as a spotting scope. Enjoy amazing views of birds, wildlife, boats on the water, migrating whales, and so much more.
The entire telescope kit weighs just 3.3 pounds, so you can take it anywhere, hassle-free.
Smartphone adapter and Bluetooth shutter release
Create your own stunning images and video of celestial or terrestrial objects with the smartphone adapter. With its light, rigid frame, this accessory allows you to connect any smartphone to your Travel Scope’s eyepiece. The additional magnification provided by the eyepiece allows your phone to capture great images of the Moon and planets. This smartphone adapter installs easily by clamping over the top of an eyepiece. The smartphone is held in position with the help of tightening knobs that securely lock your phone in place. To capture the best image, Celestron has also provided a Bluetooth shutter release that allows you to trigger the camera’s shutter on any Android or iOS smartphone remotely, without disturbing the placement of your phone and telescope. NOTE: Some large and/or bulky phone cases (including folio style cases) may need to be removed for the phone to fit in the adapter.
Manual Alt-Azimuth telescope
Navigate the sky confidently with Travel Scope 70 DX’s intuitive pan handle. The Alt-Az control with clutch allows for smooth tracking and accurate pointing. Like a photographic tripod, you can move the clutch in an up/down, left/right fashion to follow your object in the eyepiece.
Deluxe Accessories Included
In addition to the smartphone adapter and Bluetooth shutter release, Travel Scope 70 DX includes a full selection of optical accessories, including two eyepieces (20mm and 10mm), an erect image diagonal, a finderscope, a 2x Barlow lens, and a 1.25” Moon filter. The two eyepieces offer different magnifications so you can view your subject at low or high power. The erect image diagonal allows for more comfortable viewing and right-side-up images. The permanently mounted finderscope will help you locate objects and quickly center them in your telescope’s eyepiece. Lastly, the Moon filter reduces glare and increases contrast on the surface of the Moon.
Travel Backpack
Pack up your optical tube, tripod, eyepieces, and accessories safely and securely in the included custom backpack.
Starry Night Software
Download Celestron’s Starry Night Software and learn about the night sky, celestial objects, and how to plan your next observing session. Celestron Starry Night Software is the premier astronomy software package on the market, providing detailed information, plus tips and tricks for viewing our Solar System and beyond.
Downloadable Robert Reeves’ Lunar Landscapes eBook
Familiarize yourself with the Moon, our neighboring world, with Robert Reeves’ Lunar Landscapes eBook . This fascinating guide will take you on a tour of the Moon’s top geographical features, from the crater Tycho to the Sea of Tranquility where Apollo 11 astronauts landed.

£69.99

£249.99

£64.99

£34.99

£74.99
£16.99

£39.99

£89.99

£19.99

£54.99

£399.99

£79.99

£14.99

£44.99

£24.99

£139.99

£109.99

£12.99

£49.99

£119.99

£289.99

£164.99

£179.99

£149.99

Browse the Series

Popular Science by Celestron Travel Scope 70 Portable Telescope with Smartphone Adapter and Bluetooth Remote
There are currently no customer reviews.
Featured Dealers
Online Retailers

Telescope Compatibility
Focus Motor Compatibility
IMAGES
VIDEO
COMMENTS
It's got an achromatic lens with a short focal ratio, which results in false color fringing, and its aperture of 70mm isn't a whole lot. It'll show you the Moon and large DSOs like the Pleiades, Orion Nebula, Andromeda Galaxy, and the Beehive. In theory it can see every Messier object as at least a faint smudge.
The Celestron Travel Scope 70 is perfect for beginning stargazers, travelers, and anyone who wants an easy-to-use grab-and-go telescope, such as young kids. The manual alt-azimuth mount and accessories like the finderscope make pointing and tracking objects straightforward. Total beginners will appreciate how intuitive it is to use.
The TravelScope 70 has an achromatic lens objective with an aperture of 70mm and a focal length of 400mm. Its lens elements are nicely coated without bright reflections. My impression is that, for the money, this is a pretty great objective lens. It won't hold up to any 70mm Apochromat, but you get what you pay for.
Joined: 28 Jul 2009. Posted 30 November 2010 - 07:50 PM. Nice review ED, Sounds like the 70mm Celestron is a versatile little scope and a good bargain, considering its modest cost. With best wishes,
The Celestron 70mm Travel Scope is a reasonably good low cost unit intended for daytime viewing and casual astronomical observation. The package is light and compact, primarily designed for travel. All components can be stored in the backpack, which has enough room for accessories. It serves well as a spotting scope at the rifle or archery ...
Telescope Weight: 1.5 pounds. Total Weight: 3.3 pounds. The Travel Scope is available with apertures of 50mm, 60mm, 70mm and 80mm. Besides the aperture of the telescope, the only essential difference between them is in the focal length. The 50mm and 60mm models have a focal length of 360mm while the 70mm and 80mm have focal lengths of 400mm.
Subscribe to my Channel: https://bit.ly/2ofOP90Thank you for watching my truth about the Celestron Travel Scope 70, where I talk about my years of experience...
Wondering How To Set Up The Celestron 70mm Travel Scope? This step-by-step tutorial walks you through the exact steps you need to take, and can also be used ...
The Travel Scope 70 is a refractor telescope perfect for terrestrial and celestial viewing on the go. The Travel Scope can view the planets, moon, star clusters and brighter deep sky objects like the Orion Nebula and Andromeda Galaxy at night and with the erect image star diagonal makes the optical tube ideal for using as a spotting scope during the day.
9.5/10. Portability - 10/10. 10/10. Mount - 9.2/10. 9.2/10. 9.5/10. Summary. This telescope has been a bestseller for Celestron for years now. When talking about a telescope just under the $100 mark it's easy to understand why it's a market favorite given the included backpack and smartphone adapter as well as a sturdy enough tripod.
Set Up the Tripod. The tripod that comes with the Travel Scope 70 is pre-assembled, making setup very straightforward. First, undo the clips on each of the tripod legs. Extend the legs to your preferred height, with a minimum height of around 16 inches. Make sure to lock each clip securely to ensure stability.
During the day,Travel Scope 70 doubles as a spotting scope. Enjoy amazing views of birds, wildlife, boats on the water, migrating whales, and so much more. The entire telescope kit weighs just 3.3 pounds, so you can take it anywhere, hassle-free. Smartphone adapter and Bluetooth remote shutter release - Create your own stunning images and ...
View community ranking In the Top 5% of largest communities on Reddit Mi-8 Landing at Krasnodar - Center comments sorted by Best Top New Controversial Q&A Add a Comment
I have the opportunity to participate in an intensive Russian language course in Krasnodar in Summer 2022. I have been studying Russian for 4.3 years now, so I think this intensive course will really boost my current skill in the language, which I would say is at the advanced beginner stage.
One of the sights of Krasnodar is Galitsky Park, also known as Krasnodar Park, or Black and Green, which received its last name thanks to the colors of FC Krasnodar, located on the territory of this very park.
Definitely this. Tourism in Russia should definitely be invested by both public and private sectors once the SMO has ended. Even if relations with the West are sour, there's 70% of the rest of the world to market to. With Africa, India and China alone you've already got 4 billion potential tourists to cater to.
During the day, Travel Scope 70 DX doubles as a spotting scope. Enjoy amazing views of birds, wildlife, boats on the water, migrating whales, and so much more. The entire telescope kit weighs just 3.3 pounds, so you can take it anywhere, hassle-free. Smartphone adapter and Bluetooth shutter release. Create your own stunning images and video of ...