

A Step-by-Step Guide To Planning A Perfect Hiking Trip

Hiking is perhaps the most accessible, healing outdoor activity that exists. But if you don't develop a plan, you may find yourself in a sticky situation. Fortunately, planning a hiking trip is an exciting (and critical) activity that will send you on your way to a successful hike.
Are you questioning whether or not you really need that much water? Or if you can just walk out your front door and wander wherever the wind takes you? If so, this guide is for you.
I love a one-mile hike just as much as I love a 15-mile hike. I have run out of water, gotten terrifyingly lost on unfamiliar trails, and suffered sunburns that affected me for weeks. With each learning experience, I have discovered how to form the ultimate hiking plan.
Below, I'll help you learn how to make a hiking trip go as smoothly as possible. From pre-trek research to a guide on hiking essentials, I've got you covered. Let's start planning and hit the trail!
Step One: Plan The Route
Hike planning is essential to executing a worry-free, rewarding hiking trip. Learn ahead of time if you need any permits for parking or hiking. Fortunately, there are no specific requirements for an awesome hike — you can hike for a mile, or you can hike for 20 miles.
As a beginner hiker, you’ll want to start small. Perhaps with one to three miles and not a whole lot of elevation gain. It’s also important to understand both total elevation gain and elevation gain over a specific distance. For example, gaining 1,000 feet of elevation over five miles is significantly less strenuous than gaining the same amount of elevation over one mile.
Learn the trail before you start your trek — at least a couple days before. Know the trail's profile, forks, and the locations of water sources. Nothing feels quite as hardcore as whipping out a paper trail map and a compass, and this is certainly a basic skill you should develop as you become a more experienced hiker.
Nonetheless, you can easily learn and download a trail map on your smartphone using navigation apps . My personal favorite is Alltrails; there are usually reviews and trail condition reports left by other users in the recent past, and it’s incredibly user-friendly.
Choose a hiking trail that starts relatively nearby so you’re not driving a long distance after exhausting yourself. And of course, opt for a trail that offers a rewarding view — a lake, blooming wildflowers, or a distant summit. You want to enjoy your early experiences to encourage future hiking!
Step Two: Estimate Your Trip Time
The average hiker covers between two and two & a half miles per hour. This can serve as a rough estimate for planning your trip time. If you are brand new to hiking, it’s likely that you’ll hike at a slightly slow pace, and that’s a-okay!
This means that if you are hiking three miles at the average hiking pace, you can expect it to take about an hour and a half. If you are on a 6-mile hike, you’re looking at about three hours. These are approximate times. More strenuous or technical trails will increase the time it takes you to complete your hike. Allow extra time for rest and water breaks, unexpected obstacles, and of course, enjoying rad views.
Step Three: Check The Weather Forecast
Check the weather conditions a few days in advance to help you prep for your hike. Check them again the night before and even again right before you leave in case there are last-minute changes. This will help you choose and organize your gear in advance, so the morning of your hike is hassle-free.
Step Four: Plan Your Food & Water
The amount of food you'll need for a day hike is dependent on the duration, intensity, and your personal metabolism. For an all-day adventure of high intensity hiking, you may find yourself requiring 2,500–5,000 calories. You should certainly eat before you go , then bring plenty of snacks and something for lunch.
Foods that are high in protein are perfect for dinner the night before, breakfast the day of, and even a post-hike recovery meal. Eggs, lean meats, and soy are superb protein sources. Include some energy-packed carbs in your breakfast and snacks. Oatmeal, granola, and fruit are excellent choices.
{{article-cta}}
Nut butter or nuts are awesome both before and during a hike as a slow-burning energy source. Steer clear of highly processed foods like candy and cheese.
If you're only spending a couple hours on a relatively flat hiking route, you'll be able to get by with just a snack. Munch on some gorp or a piece of fruit, and drink plenty of water.
How much water you'll need varies with the length of your adventure. A good rule of thumb for hydration is drinking half to one liter of water per hour of hiking. This recommendation can fluctuate, however. Variables include trail intensity, outside temperatures, your sweat rate, and your fitness level. It's always better to err on the side of caution and bring a bit more water than you think you'll need.
If you know that there are water sources along the trail, you can opt to carry less water knowing you'll have the chance to refill. Using your map or navigation app, estimate the time it will take you to reach the drinking water source. Then, only carry the amount of water you'll need to reach the source.
In my personal experience, water straight from an alpine stream is unmatched. It’s delicious and invigorating after miles of hiking. However, indulging in fresh stream water will require a water filter of some sort.
Step Five: Get Your Gear In Order
If you're unfamiliar with the 10 Essentials for first aid and emergency situations, take a moment to read up on this list from the National Park Service.
Once you're set in the emergency department, the fun stuff begins! Keep your pack as light as possible, but don't sacrifice any must-haves. Here are five sub-steps to prep your essential hiking gear for meandering along a stream or bagging a mountain peak.
1. Prepare your layers
Since you've already checked the weather, you know what to expect for temperature. But you should still prepare layers, since the temperature will fluctuate throughout the day. You should have at least a sweat-wicking base layer, a warm mid-layer, and a shell for rain or high winds.
2. Break in your hiking footwear
For weeks in advance , spend time breaking in your hiking boots or shoes . Hiking footwear is designed to be rugged, stable, and protective. As a result, they often feel stiff at the beginning.
If your hiking shoes are new, wear them around your house and on nearby walks. Start small — gradually build up the length of your break-in walks until your boots are broken in. It's also helpful to have a high quality pair of hiking socks to keep your feet happy.
3. Invest in a high-quality water container
My personal preference is a water or hydration bladder because it keeps my hands free, and I can drink on the move. Some packs come with built-in hydration reservoirs, making water access easy-peasy.
A durable water bottle is also a perfectly adequate option. I do advise caution here, however: If you carry a water bottle in your pack, it's less accessible, which may lead you to ignore your hydration needs for longer. Carry your water bottle in your hands to encourage better hydration.
4. Pack your hiking daypack
Any dry food can go in the night before, as well as a jacket in case of unexpected inclement weather. Pack your safety essentials, which should include sunblock, insect repellent, a first aid kit, and a headlamp.
5. Pack a “luxury” item
If you're up for extra weight on your hiking trip, pack a luxury item. To elevate your trek from a trying trudge to an epic hike, bring your camera , a sketch pad, or some binoculars.
Step Six: Implement Safety Measures
- Always provide your hiking itinerary details to a responsible friend or family member, especially if you don't have a hiking partner.
- Hitting the trail with a hiking buddy is almost always a good idea, but sometimes it's tough to find someone who wants to send it as hard or as often as you do. Stay on the trail, and use your navigation tools.
- Learn and share emergency contact numbers, such as the park ranger office and the local sheriff. If you have cell service during your hike, you can call in an emergency. Provide the responsible party with a time they should call emergency services if you have not returned.
- Check online for dangers in the area, such as natural disasters, poisonous plants, and dangerous animals. You can often find these reports on a hiking navigation app or on a state or national park website.
- If you are a frequent hiker (or intend to become one), a personal locator beacon is a must. Especially when hiking alone. This will allow you to send out a signal using a satellite to get help in an emergency.
Now you're all set to get on the trail. Remember the basics:
- Learn your route in advance
- Estimate time for your trip, including extra time for delays
- Check the weather forecast, and bring layers for variation
- Bring food and water — a little extra of each
- Pack your gear early, but keep your pack as light as possible
- Share your itinerary, and stick to it
Just like anything else, successful adventures take practice. Don't expect perfection the first few times, and make notes of ways to improve after each hike. Get out on a trail, and have some fun!

Living and working in the Grand Canyon, Emmi has decades of experience organising and leading hikes around the world.
*The information on this site is based on research and first-hand experience but should not be treated as medical advice. Before beginning any new activity, we recommend consulting with a physician, nutritionist or other relevant professional healthcare provider.

The 13 Different Types of Climbing

Where To Buy Used Mountaineering Gear

Why is Climbing Everest So Deadly? A Data-Driven Report
What Is Trekking? Complete Guide For Beginners
Please share!
Walking itself sounds like a pretty simple and easy activity.
Still, with a little training and effort, you can scale it up to be really challenging! Whether it’s a hidden waterfall deep in a forest, a mountain summit, or some other path less taken, trekking is a pretty advanced sport you can easily fall in love with.
Imagine being out there in the wild environments on your own or with a group of other nature lovers. You’re far away from crowds, city rush, or even some popular paths many hikers tend to take.
Sounds intriguing? Let’s delve deeper into a complete beginner guide and find out the essential thing— what is trekking, and what do you need to know about it?

Table of Contents
What’s the Difference Between Trekking and Hiking?
First of all, let’s solve the trekking vs. hiking dilemma because many believe that they are basically the same thing.
Sure, they both include walking, the natural environment, and many other overlapping elements, but in reality, we’re talking about two different activities.
Hiking is a long, vigorous walk on footpaths or hiking trails that usually lasts for a couple of hours, one day, or perhaps overnight.
Trekking is a long yet energetic hike that lasts multiple days and is mostly in the wild natural environment. In other words, you can do it off hiking trails.
They’re both challenging in their ways. However, trekking takes a bit more time to prepare physically and while dealing with supplies.

So, What Is Trekking?
Trekking is what we’d call long-distance hiking.
It’s walking for longer than a day, sometimes even for a couple of weeks. Throughout the entire journey, you’re partially or entirely self-sufficient.
Of course, everyone has their reasons why they would start such an adventure. One of the main goals is to get away from the city rush and simply enjoy the stunning scenery.
Initially, people practiced trekking primarily in the mountains and often in some hardly accessible spots. Today it’s a sport becoming increasingly popular, which is why the term extends to different types of itineraries and terrains suitable for all levels.
People start their trekking journey with different motives, but in the end, a solid commitment to the goal is the critical element, whichever level they’re on.
Besides that, this sport can be an excellent chance for a social gathering and meeting new friends with similar interests. Imagine hanging out with other nature lovers walking on trails in astonishing regions of relatively unspoiled wilderness.
Important Tips for Trekking
Trekking sure sounds fun and exciting, but there are still certain things you should consider before planning your adventure.
Choose Your Route Carefully

As in every sport, you need to be aware of your limits.
Don’t start off your first trek with a trail that looks the best and the most intriguing. Be realistic and go for ones that are not too difficult for you.
First, start with a simple trek and build your strength gradually. You want to get to the point where you’re not struggling or scampering your way up.
Trekking is supposed to be a fun activity you’ll enjoy, so gather information about the trail you want to take.
While choosing your route, check the terrain’s type and length and the elevation change.
Start building your resistance by taking long walks. Wear a day pack when you’re climbing steep descents or inclines.
Also, it would be great to go through your first trekking expeditions with a group that can help and guide you through the whole process and potential issues.
Buy Good Trekking Equipment

Trekking may be fun, but it’s not easy. Don’t make it even harder for yourself by buying low-quality equipment that can bring you additional troubles on your trip.
When it comes to trekking, good-quality footwear is a MUST.
The sport can get pretty demanding, so you don’t want to bother with blisters and pain in the ankles to save a couple of bucks. Invest in boots you’ll be able to use for a long time.
Trekking boots are specifically designed to endure different types of terrains. They’re also meant to keep you from slipping and hurting yourself.
The best would be to choose a pair that goes up to your ankles since they’ll support them the most.
It’s not just good footwear. A comfortable backpack is one of the essential parts of trekking equipment too. Pay attention to hip straps, proper back straps, and the support structure to keep your back safe and comfortable for long distances.
Pack Enough Water

Food and water are essential parts of your trekking route, so don’t underestimate the amounts you’ll need on your journey.
Remember, it’s better to have some extra water rather than be dehydrated and thirsty, especially when you don’t have any water source within reach. Bring some light snacks, such as energy bars, which will help to keep you going!
Choose Your Own Pace

Don’t compare yourself to others. Some other trekkers may be active in this world way longer than you, so it’s logical they are better prepared and can endure longer than you.
Also, remember that not everyone focuses on the same things while trekking. Some prefer to take things slowly to enjoy the scenery, while others prefer to avoid stopping multiple times and cover longer distances.
Trekking is not a race, so listening to your body and going at your own pace is essential.
Take as many breaks as you need. The journey is supposed to be challenging, true, but it’s also supposed to be an exciting experience you genuinely enjoy.
Whichever pace you set, stretch out your muscles before taking longer routes – that’s something your body will definitely thank you for later!
Don’t Forget to Check the Weather

Imagine you finally scheduled a trekking route, and while you’re enjoying your third day of the journey, you notice a storm approaching.
Just a couple of minutes of researching the weather in a place you want to visit can save you trouble with landslides, rain, or even snowstorms.
This is especially important when you’re planning to cross over rivers or other bodies of water. Trekking is generally a pretty safe activity, but it can be dangerous if you get caught in harsh weather conditions.
If the storm catches you after all, be flexible with your plans and look for shelters that will keep you as safe and dry as possible.

How to Pack for Trekking
The first thing you need to take care of when you’re going to trek is getting a good backpack. It’s the essential thing that will help you keep your supplies organized.
It’s also essential to get a high-quality item to evenly distribute the weight you are carrying so your back doesn’t suffer.
Now, let’s move to the packing itself.
One of the mistakes many newbie trekkers make is filling their backpacks with everything that comes to their mind, including neck pillows, speakers, snacks, and other things they “might need” during the trek.
It’s great to have these things with you, but the last thing you want on your trek is a heavy bag that constantly weighs you down.
Bring lightweight equipment and take food that doesn’t take up too much space. You can even find some lightweight foods made only for trekking.
If you opted for a multi-day trek, bring a cookery set and enough water and food to last throughout that period. One of the good sides of traveling with a group is that you can distribute the weight of the things you carry.
Experienced trekkers and hikers often say it’s better to pack the sleeping bag first. After that, you can top it with heavier items.
Place them closer to your back to evenly distribute the weight and transfer some of it to your hips. Things you’ll be accessing more often, such as a jacket and water, should be on top so you can have them within reach.

The Essentials for Trekking
The supplies you will take on your trek depend on the weather conditions, season, number of days you will stay, and the area you visit.
These are some things you can consider taking, but you’re the one who knows best what things you can’t go without.
Basic Stuff
- Documents (an identity card)
- Powerbank (for your phone or other gadgets)
- First aid kit
- A utility knife
- GPS/Navigational devices
- Light traveling towel
- A couple of plastic bags if your clothes get wet
- Toilet paper
- Personal toilet kit (including toothbrush, toothpaste, etc.)
- Personal medical kit (paracetamol/aspirin for fever, vomistop for travel sickness in hilly parts, pain killers, your regular medications, bandages, plasters, etc.)
- Sunscreen lotion
- Lip balm (SPF 30+)
- Mosquito repellant

- Lightweight T-shirt
- 2 pairs of track pants and quick dry tees (better avoid denim)
- 2-3 pairs of regular socks and 2 pairs of warm socks
- Thermal wear
- Gloves (2 pairs, one waterproof and one woolen)
- Woolen cap that covers your ears
- Poncho, umbrella, or raincoat
If It’s a Multi-day Trek

- Cookery set
- Camping gear
Why Should You Try Trekking
Trekking culture is growing worldwide, especially in some non-touristy areas that are difficult to access.
Sometimes treks can be epic because of the breathtaking scenery. On the other hand, sometimes the thing you’ll remember the most about your journey is the superhuman levels of endurance and effort you’ll need to get to your destination.
Some trekkers are willing to go through whatever it takes because of the feeling they get when they reach the final destinations.
For others, it’s all about the trip and the camaraderie along the trail.
But all the treks have one simple thing in common—a sense of being on a special mission that makes this activity more than just a simple act of walking and turns it into a life-affirming journey.
Even though it doesn’t sound like this initially, trekking is more challenging than hiking. It’s a sport that tests your endurance, ability, and psychological and mental capacity.

Where Can You Go Trekking?
It’s hard to tell which are the best treks in the world because everyone has different preferences and answers.
Some trails are epic because they require strenuous endurance and effort to reach the endpoint. Some, on the other hand, offer astonishing scenery.
For some, it’s all about the journey and those little joyful moments they experience along the trail. Others focus on the destination itself.
The great thing is that all the trekking fans can find something for themselves! What matters is transforming the everyday walking act into an exciting and life-affirming expedition.
Here are some of the fascinating destinations across the world where you can go trekking:
- Kalalau Trail, Hawaii (moderate)
Distance: 11 miles (18 km) in one way
Time: 2 days
- Routeburn Track, New Zealand (moderate )
Distance: 20 miles (32km)
Time: 3-4 days
- Everest Base Camp, Nepal (moderate)

Distance: 80 miles (130km), round trip
Time: 2 weeks
- Inca Trail, Peru (moderate)
Distance: 20 miles (33km) round trip
Time: 4-5 days
- Markha Valley Trek, Ladakh, India (moderate)
Distance: 50 miles (80km)
Time: up to 7 days
- Kilimanjaro, Tanzania (moderate)

Distance: 23–56 miles (37-90km)
Time: up to 9 days
- Camino de Santiago de Compostela, Spain (shorten the route, moderate)
Distance: 62 miles (100km)
Time: 5-6 days
- Camino de Santiago de Compostela, Spain (full route, advanced)
Distance: 500 miles (800km)
Time: 35 days
- GR20, Corsica, France (advanced)
Distance:104 miles (168km) round trip
Time: 15 days
- The Haute Route, France-Switzerland (advanced)
Distance: 125 miles (200km)
- The Torres del Paine Circuit, Patagonia, Chile (advanced)

Distance: 85 miles (136km)
Time: 9 days
Don’t feel discouraged by this list if you’re not in a position to travel far away from the area where you live.
Every country offers its beauty and paths that are yet to be discovered, so don’t hesitate to do your research and let us know about the treks you’ve come upon!
Some Final Words
Trekking is an exciting activity that has grown in popularity over the past couple of years.
Many believe hiking and trekking are basically the same thing. However, the main difference is that hiking mostly takes place on marked routes and lasts for a couple of hours or up to a day.
Trekking lasts multiple days, and it’s mostly about exploring untouched nature and paths less taken.
The spirit of trekking is generally about enjoying the beautiful scenery, taking the time to stargaze, and discovering astonishing landscapes daily. Of course, everyone has their own goals and pace.
Get enough water and food, prepare your body, and don’t hesitate to spend more money on purchasing higher-quality equipment.
Trekking itself can be quite demanding, so you primarily want to avoid struggles that come with bad footwear or a backpack that doesn’t allow you to distribute the weight of your supplies equally.
Don’t forget to check the weather, explore the route you’re taking, and thoroughly list all the things you may need on this special journey. Be careful with the latter, you don’t want to overstuff your backpack and struggle with things you only thought you needed.
It’s a fun sport and an opportunity for you to test your endurance and mental and psychological capacity.
That’s it for now! Now it’s time to go out, explore the wilderness, and fall in love with this amazing long-distance walking activity. See you somewhere out there!
- https://foxtrail.fjallraven.com/articles/trekking-tips-for-beginners-2
- https://www.adventureinyou.com/travel-tips/beginners-guide-to-trekking/
- https://www.euttaranchal.com/tourism/trekking-things-to-carry.php
- https://adventures.com/blog/hiking-vs-trekking/
- https://www.muchbetteradventures.com/magazine/hiking-vs-trekking-whats-the-difference/
- https://stingynomads.com/camino-de-santiago-last-100-km/
- https://www.rei.com/blog/travel/how-to-hike-the-camino-de-santiago
- https://www.lonelyplanet.com/articles/best-treks-in-the-world
- https://www.walksworldwide.com/blog/beginners-guide-to-trekking
APRIL SALE: Book now and get up to 60% off!
Hiking & Trekking Tours & Trips in USA
From the granite cliffs of Yosemite to the twists and turns of the Grand Canyon, the United States is home to some of the most coveted trails in the world. Explore the icy slopes of Alaska or the volcanic peaks of Hawaii , the world is your oyster on a hiking adventure in the Land of the Free.
250+ Hiking & Trekking tour packages in USA with 3,572 reviews

- Hiking & Trekking
Hiking Utah's Mighty 5
Loved this trip, got to meet some awesome people and even got to do some hikes that weren't on the itinerary but were on my bucket list. All in all I couldn't of asked for a better trip

Hiking Sequoia, Kings Canyon, and Yosemite
Great way to travel and meet new people! Changes were made to the itinerary due to road/trail closures but it worked out in the best way. CEO adapted meals for vegetarian travelers in the group. I would book with them again!

Hiking in Yosemite and the Sierra Nevada
The tour plan with its walks, chosen sights ie places to hike & visit, and lodging is excellent. It was a tight schedule without pressure offering A LOT of impressions and beauty. A great o really plan. I would have enjoyed a bit more history & information about the different sights. While many travelers enjoy a more laid back experience of look-see-go, I am the type who enjoys more when I am given something to focus on when I land somewhere new. I prefer a guide who is ready to offer good and intriguing information which was missing for me in my group.

- Walking Adventure
4 day Yellowstone and Tetons in depth tour from Salt Lake City Small Groups Tour
Great tour, Kit did a great job guiding us. I got to see so many great parts of Yellowstone.
- 5% deposit on some dates Some departure dates offer you the chance to book this tour with a lower deposit.

Hiking Utah's National Parks
Great people , Great time. First meal together in los Vegas was awful. It was slimy Thai with NO VEGETABLES. We had to walk across a four lane highway in Los Vegas! I think a great and inexpensive restaurant is Ping Pang Pong.or what ever. Horrible stay in Bluff behind a gas station. No lobby, no restaurant, and no room to move around. Put suitcases on table. Change stay to town of Bland.

Rocky Mountain Immersion: Explore Yellowstone, Grand Teton, and Rocky Mountain National Parks

- Mountain Hikes
7 Day Southwest National Parks Grand Canyon Camping Tour
We thoroughly enjoyed the 7-day tour of the US southwest . We love the destinations included in the tour, every place we visited is on our bucket list. I wanted to pinch myself every day that I visited those iconic and beautiful places as shown in my photos below. We enjoyed all the extra, optional experiences that were suggested by the tour guide. They added more fun to the tour. The Hummer tour in Moab, Utah was one of the optional experiences and it was a blast! Not only it’s fun, you get to see the amazing scenery during the sunset. One previous review mentioned he or she was forced to participate in the Navajo taco dinner in Monument Valley. That comment is not true. You have a choice not to do that and the guide can make a different arrangement for you. The optional Navajo taco dinner is one of the highlights of the tour that we will remember for a long time. It would be a shame not to have this cultural experience when you get to meet Navajo people when you are in the Navajo Nation! Our tour guide, John did a fantastic job. He was full of enthusiasm and energy. He kept the tour well organized and always provided information we needed. We highly recommend the tour.

Yellowstone Base Camp Tour
The Yellowstone Base Camp tour was excellent. We covered a wide variety of Yellowstone sites from the popular attractions to beautiful but less frequented locations. Our guides, Chris Rapich and Ed Cochran, were great. They provided a lot of information about the park and wildlife, made great meals and did everything they could to make this a memorable experience. I'd travel with them anytime.

Best of Lassen Volcanic Basecamp
Great experience. This may have been our guide's (Sassy) first official trip, but she did a great job. We all got along very well and Sassy handled some adversity with aplomb. Parts of the park at Lassen were inaccessible, but we managed to do and see a lot. One of our guests tested positive for Covid but we found creative and safe ways to make it all work. Meals were very good. I have booked another trip with Wildland.

- Christmas & New Year
USA – 5 Days Chasing Slot Canyons in Utah

USA – Montana Glacier National Park Sun Road Llama Trek

National Parks Walk

5 Utah National Parks in 5 Days Lodging Tour

Classic Walks in Vermont

5 Utah National Parks in 5 Days Camping Tour
5 star experience. Definitely recommended!
What people love about Hiking & Trekking Tours in USA
the best way to explore the vastness and glory of the Utah desert is by camping and hiking in small groups. I enjoyed this trip immensely, it was challenging enough but not too much. Our guide was a brave and resourceful powerful woman. I am planning my next trip with you already!
The trip was well coordinated. Our trip had to be re-routed due to the very snowy winter, but our tour guide, Phil, still managed to keep our days full, and our hikes about the same mileage that we would have walked otherwise. The hikes were moderate to steep, nothing that our entire group could not keep up with. I felt that everyone was accommodated to. And we went to our rooms at night exhausted from our days journey. Yosemite is a must-do, if you have never been there. The pictures do it no justice. Having the tour guide from intrepid was great, because he told us all about the history of the National Park- things that I would have walked right by if I were hiking alone. This trip was great! can’t wait until the next one.
Hiking & Trekking Tours
- Attraction-Based Hikes (57)
- Mountain Hikes (32)
- Centre Based Walking Holidays (9)
- Rocky Mountains (158)
- Sierra Nevada Mountains (30)
- Appalachian Mountains (28)
- Mount Denali National Park (10)
- Mount Rainier (6)
Regions in USA
- Western USA (320)
- Southwest USA (206)
- Rocky Mountains (160)
- Sun Belt (136)
- Four Corners (126)
- Pacific Coast USA (68)
- West Coast USA (64)
- California (59)
- Northern California (46)
- Yellowstone National Park (40)
- Grand Canyon (39)
- Yosemite National Park (35)
- Sierra Nevada Mountains (31)
- Central California (30)
- Lake Tahoe (30)
Travel Styles
- 10 Best Hiking & Trekking Companies
- Your Guide to Planning a Private Hike 2024/2025
- Best Hiking Tours in The World 2024/2025
- USA Travel Guide | All You Need to Know
- 10 Best Backpacking Tours & Trips 2024/2025
- Best time to visit East Coast USA (Low & High Season)
- Best Time to Visit the West Coast, USA in 2024/2025 (with California)
- Best USA Vacation Spots for Couples: Parks, Cities and more
- 5 Best Guided Backpacking Trips & Tours
- Best 10 Day USA Itineraries 2024/2025 (with Reviews)
How To Plan For A Trek: The Ultimate Guide
Ever considered going on a trek and don’t know how to plan for a trek?
Trekking, It’s definitely an experience you should try, but like any type of travel, it can be stressful to plan out the details—especially if you’re not familiar with the process. Trekking is an incredible way to spend time in nature, learn more about the local culture, and get in shape while doing it. However, it can also be quite dangerous or uncomfortable if you don’t know what you’re doing beforehand. As such, here are eight things you need to know before going on your first trek!
1) Get fit before you start
This one may seem obvious, but some people (for example, those who’ve never been hiking or trekking before) might not be in tip-top shape. But if you want to experience everything that goes along with trekking (or any type of traveling), you need to be prepared. The first thing you should do is visit your doctor and ask for a clean bill of health—your doctor can check your overall health as well as make sure you don’t have any conditions that could hinder your journey. If there are any minor health concerns, they can also give recommendations on how to deal with them while hiking or trekking so that it doesn’t become anything serious later down the road.
2)Train yourself for walking
Start by walking every day, maybe right after you wake up or before you go to bed. If possible, walk outside. Try not to take your phone with you—leave it at home and give yourself time for reflection. This will help you make sense of what is happening around you, which in turn will make it easier for you when it comes time for your trek. You can start small; instead of trying to cover 10 miles in one day, aim for 5 and work your way up from there as necessary. Start out slow if you have done little or no physical activity—it’s important that you feel good about walking before doing something more challenging like hiking up mountains.
3) Research your trek thoroughly
If you’re new to trekking, research all of your options thoroughly before you choose a trekking company and pay for your trip. This will help ensure that you are well prepared for any emergency situations which might occur during your travels. For example, if you have an emergency contact at home, make sure they have all of your travel details and emergency contacts in case something goes wrong while you’re away. It is also important that they are aware of where and when you are traveling as well as how long it should take for them to get in touch with someone from your trekking company in case something does go wrong.
4) Pack the essentials
Ensure that you always have your passport and other identification cards, as well as credit or debit cards, with you when you travel. Keep a copy of your medical insurance policy in case you need it. And pack medications that you take regularly in their original containers (pack them in your carry-on if they need to be kept cold or out of direct sunlight). Whether you’re traveling by car, train, boat, or plane, pack clothing appropriate for all possible weather conditions. If flights are canceled due to bad weather and temperature extremes common where hiking is most popular, missing even one day can disrupt every aspect of your trip — from airport logistics to hotel reservations. Check our Essential Trekking Gears for Trekking: Ultimate Guide for gears you need for trekking.
5) Choose the right Footwear
It’s very important that you choose proper footwear for trekking, as it can make all of the difference. When looking for good hiking boots , take note of your trekking style and what type of terrain you will be traveling on. For example, hiking in mountainous areas may require special treads and extra ankle support. Take into consideration how much time you plan to spend walking each day—there’s no sense buying a heavy boot if you only plan to walk three miles each day! Additionally, there are different types of socks that are better for specific activities. Wool socks are great for keeping feet warm in cooler climates or when hiking at high altitudes; however, they tend to be heavier than synthetic materials.
6) Carry the right backpack
The best type of backpack is one that fits your needs and your body. If you have broad shoulders, choose a bag with plenty of support straps and padding. Make sure it isn’t too heavy, or you won’t be able to carry it comfortably. Think about how many days you’ll be gone—if you need extra water, sleeping bags, or other supplies, make sure they don’t add too much weight to your pack (you might want to stick them in your daypack). Above all else, remember these two words: a breathable fabric. Don’t buy an old-school canvas bag if you can help it–make sure your bag has stretchy side panels so sweat can escape during those long uphill treks.
7) Get an early start
It’s always better to start early when traveling, but especially when hiking in unfamiliar territory. And while it’s easy enough to find your way down a trail you haven’t hiked before, it can be tougher coming back up — particularly if you set out during peak hours. If you find yourself working against crowds of others trying to get down from a popular peak or mountain, it’s often easier and safer if you can just wait until later in the day. Hiking early will also allow for plenty of time should anything go wrong; hikes tend to take longer than expected, after all! It’s always better for there to be too much time than not enough — such is life!
8) Listen to your body but don’t be afraid of it
As you train for your trek, pay attention to how your body responds. If you’re feeling weak or lightheaded, slow down—you don’t want to collapse during your trip. On days that you exercise, eat more carbohydrates and proteins than usual. The increased calorie intake will give you energy. Do not try any new supplements or drugs unless advised by a doctor first; some may cause unexpected side effects, like stomach pain and nausea.
9) Eat well during your trip
From jet lag and long car rides to roughing it in tents, there are many ways in which a trip can impact your eating schedule. As such, it’s important that you fuel up properly before and during each adventure. Pack healthy snacks like nuts or granola bars in case you find yourself famished on day one of your trip; when hunger hits, reach for something with protein or fiber. If you’re embarking on an overnight trek, be sure to pack high-energy foods like granola bars as well as plenty of protein-packed foods like jerky, nuts, and hard cheese that won’t go bad at higher altitudes.
10) Follow instructions of local guides if you are on a group tour
The most experienced guide will have trekked more times than you can count and has likely taken your trail many times. It is their job to keep you safe and make sure everyone in your group is having fun. If they suggest following a certain path, don’t question it; just do it. Their advice can mean life or death if something goes wrong, so respect that they know what they are doing—for good reason! This goes for any activity where there is risk involved: always follow the instructions of local guides first before setting off on your own. And never forget that wherever you go, even when abroad, people who live there will be experts in what to do in an emergency situation because an emergency situation happens often when doing something dangerous!
The bottom line is that you should make sure you are prepared and know how to plan for a trek before going on a trek. A small amount of preparation can save you from lots of trouble.
Share this:

Trekking Poles for Backcountry Hunting: A Comprehensive Guide

The 3 Best Adventure Treks in the World
5 thoughts on “how to plan for a trek: the ultimate guide”.
Pingback: How to Avoid Altitude Sickness While Trekking in Nepal - HikePackers
Pingback: Essential Trekking Gears for Trekking in Nepal: Ultimate Guide - HikePackers
Pingback: How to plan for a trip to Ladakh: Ultimate Guide - HikePackers
Pingback: The Top 10 Trekking Destinations in the World
Pingback: Trekking as a Hobby (2024): Embracing Adventure and Wellbeing Outdoors | HobbyFAQS
Leave a Comment Cancel Reply
Your email address will not be published. Required fields are marked *
Save my name, email, and website in this browser for the next time I comment.
Notify me of follow-up comments by email.
Notify me of new posts by email.
Sign up for our newsletters
The best of hiking news, in your inbox.
- Trail Reviews
- Field Notes
- Photography
Seven Mega Trekking Packages For 2023 and 2024
July 9th, 2023
Skyblue Overland may earn a small commission from affiliate links in this article.
Trek into the wilderness on some of the world’s most iconic trails. Whether it’s exploring Patagonia, climbing Kilimanjaro, or trekking to base camp in the Himalayas, there’s an unforgettable adventure waiting for you.
evoTrip Trekking Trip Packages
Whether you like to plan your trips ahead of time or you’re not a planner – evoTrip Trekking Trip Packages has you covered. These guided trips can alleviate some of the stress and chaos that comes from planning a fun filled adventure trip. Sometimes the most difficult part of planning a trip is deciding on a destination. Evo is an outdoor brand that not only provides premium quality gear for those who love adventure on land or on water, but their team is passionate about creating a community for those with the adventurous spirit.
Here’s a round-up of seven Hiking and Trekking trip plans curated by the team at evoTrip, including destinations Patagonia, Nepal, Ecuador, Iceland and Peru. These trips are focused on trekking and will provide you with a detailed plan for exploration.
In addition to these challenging adventures, evoTrip has many other trip plans and destinations available!
Ultimate Patagonia Trek
Quick notes: 15 days – $4,850 US
Trip dates available October to December of 2023, and January to March 2024 (please note: multiple trips per month are available)
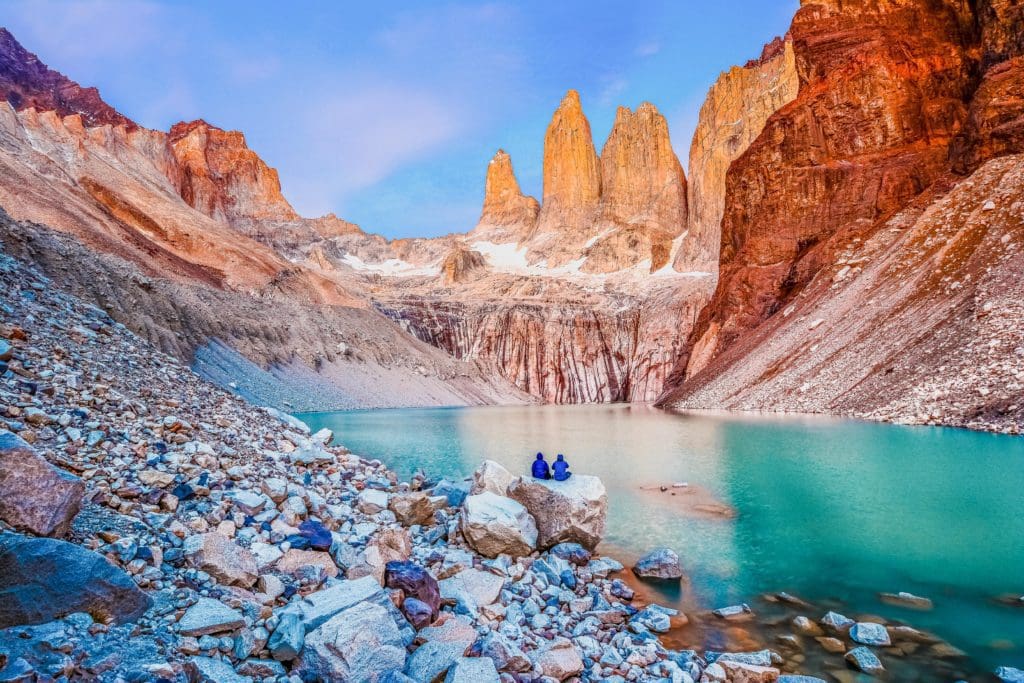
Laguna torres with the towers at sunrise, Torres del Paine National Park, Patagonia, Chile.
Trip Details: This Patagonia trip is not only thoughtfully organized but will give you the outdoor experience of a lifetime. The Patagonia region is arguably one of the most beautiful places to see rock cliffs, glaciers, alpine lakes, and mountain landscapes. With such a vast region, many never end up making the trip because the planning takes so much research, time, and effort. Let evoTrip take the reins and plan everything from all lodging accommodations, meals, flights, trekking permits, and more. The trip itinerary is broken down giving details for each day of your trip and you’ll be with a guide the entirety of the 15 days. This trip package will feature 6 nights camping in Torres del Paine National Park which will give you a full immersive experience of seeing the beautiful park. The itinerary also includes the distance and elevation levels that you’ll be trekking each day. To ensure that your trip is enjoyed to its fullest potential the trip planner includes a very detailed packing list, especially for those who have never traveled to the Patagonia region. Other questions that may arise are answered in the in-depth FAQ section or by chatting with an evoTrip team member.
To learn more about this beautiful trip you can check it out here .
Ecuador Trekking
Quick notes: 8 days – $999US
Trip dates available: August to December 2023 (reserve yours now there are only a few dates available!)
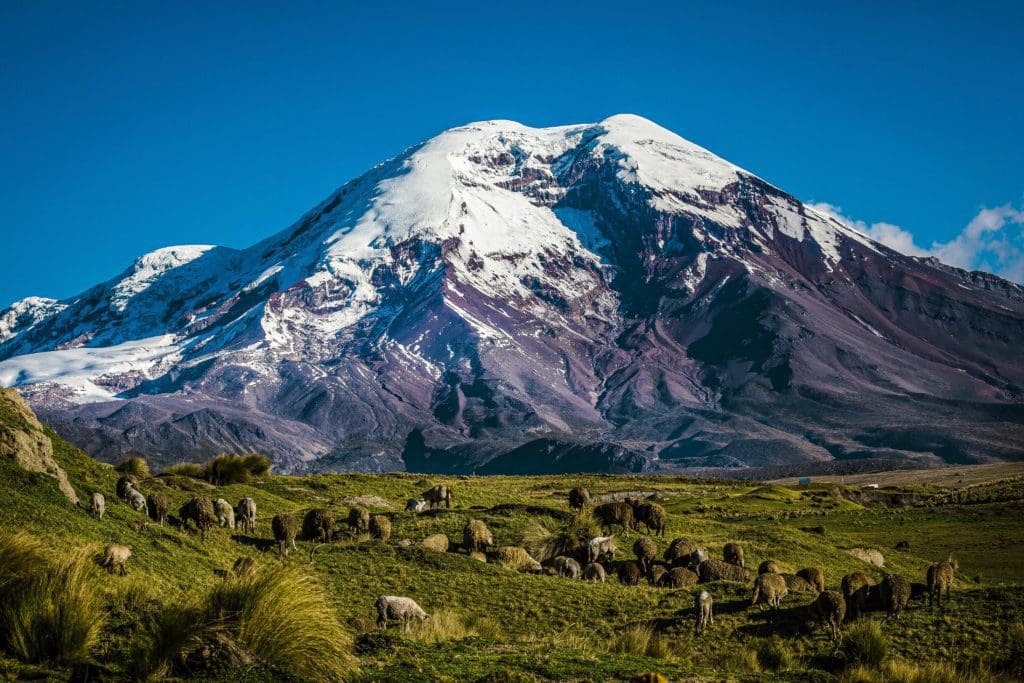
Chimborazo volcano and sheep on the moor, Andes, Ecuador
Trip Details: Take yourself on an immersive hiking trip through Ecuador’s Andes and Amazon River regions. This trip combines the beautiful Andes Mountains, the Amazon Basin region, and the soulful culture of Ecuador’s villages. On the hikes you’ll see crater lakes, volcanoes, wildlife, waterfalls and more! The detailed itinerary includes a day to explore the city of Quito before embarking on the trek to see the Andes Mountains and see impressive mountain landscapes such as Cotopaxi and waterfalls in the Amazon Basin. This Ecuador trekking trip incudes accommodation for 7 nights ranging from hotels, ecolodges, and cozy haciendas. Meals, transportation, and hiking gear is also included. Worried about a language barrier – the trip includes an experienced English-speaking guide. As with all evoTrip plans be sure to check out the detailed packing list and FAQ sections that can help answer any additional questions.
To reserve your trip now visit here.
Torres del Paine, Patagonia
Quick notes: 11 days – $3,350US
Trip dates available: October to December of 2023 and January and February 2024 (please note: there are multiple trips available each month)
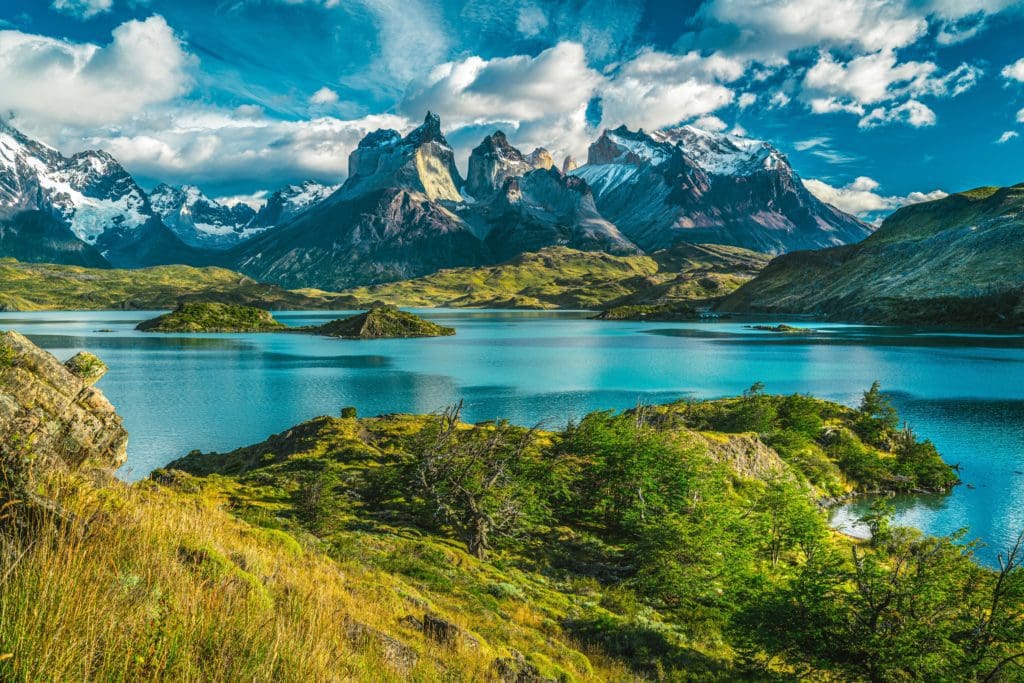
Trek to many of the stunning peaks in Torres del Paine National Park.
Trip details: On this 11-day excursion you will see all the best sights in Torres del Paine and Patagonia. During this trip you’ll trek to many of the stunning peaks in Torres del Paine National Park and end your days staying in mountain top huts. The first day of the trip gives you time to explore Santiago, Chile where you can check out the Metropolitan Park or their National Zoo. This trip includes 5 days of trekking and exploring Torres del Paine and the Patagonia regions some of the daily treks you’ll see Lake Nordenskjold and Mount Alamirante Nieto – both jaw dropping scenery. The daily itinerary includes long hiking trips but also the option to get fully immersed in the mountains by adding on ice hikes or kayaking on the glacier lakes. Complete with a packing list to relieve any stress about what to bring to make sure you get the most out of this incredible adventure!
Mount Kilimanjaro, Tanzania
Quick notes: 8 days – $2,760US
Trip dates available: August to December 2023.
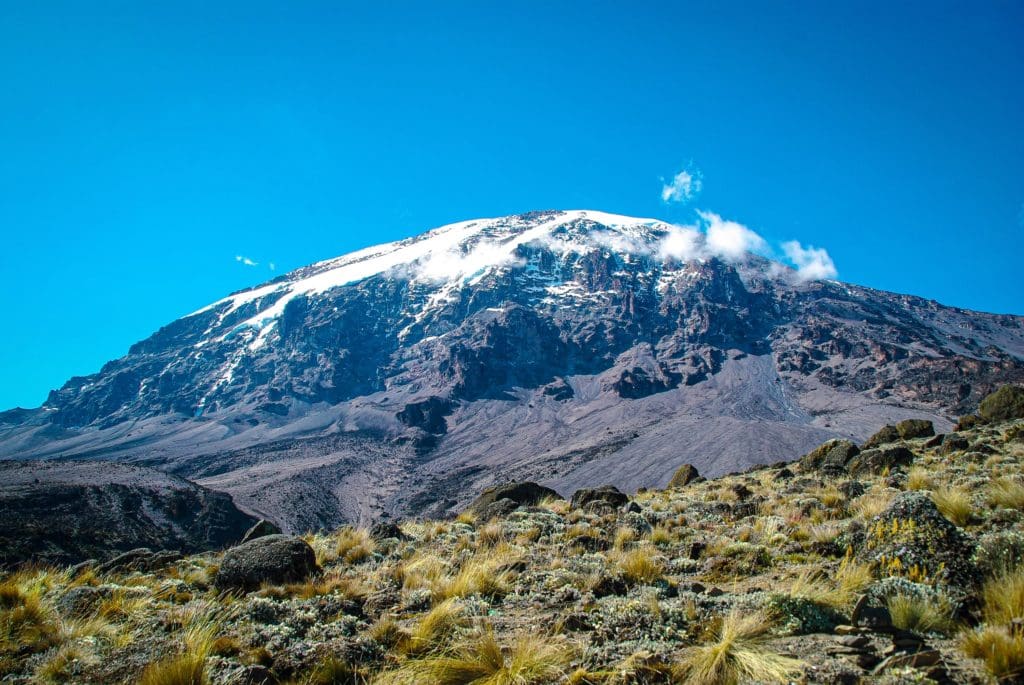
Climb Kilimanjaro, one of the world’s Seven Summits
Trip details: The world’s 7 summits are a daunting bucket list item but one that many outdoor adventure junkies longingly hope to accomplish one day. This evoTrip will help you get started on the 7 summits with this incredible 8-day trip to Mt. Kilimanjaro in Tanzania. Starting in the rainforest lowlands traveling through an alpine desert, along a glacier, and up the Marangu Route you will proudly stand at the top Mt. Kilimanjaro feeling accomplished and fulfilled! During the trek to the summit you’ll stay in huts, enjoy yummy hot meals, beautiful sunsets, and incredible views of the Tanzanian Serengeti. While you are summiting one of the world’s highest peaks, the itinerary is thoughtfully curated for those of any skill level. The hiking distances are manageable each day and the trip planner has days to help acclimate to the elevation and the region. The longest day hike is 13 miles to the summit, but the views are worth the long day! This trip includes hut accommodations, meals, celebratory dinners, guide services, and ground transportation. Due to the range in elevation and climates along the trek to the summit this evoTrip plan includes a very detailed packing list to ensure you have the best experience on your adventure.
Visit evoTrip to learn more!
Everest Base Camp, Nepal
Quick notes: 16 days – $1,650US
Trip dates available: September, October, November of 2023, April, May, September, October and November 2024
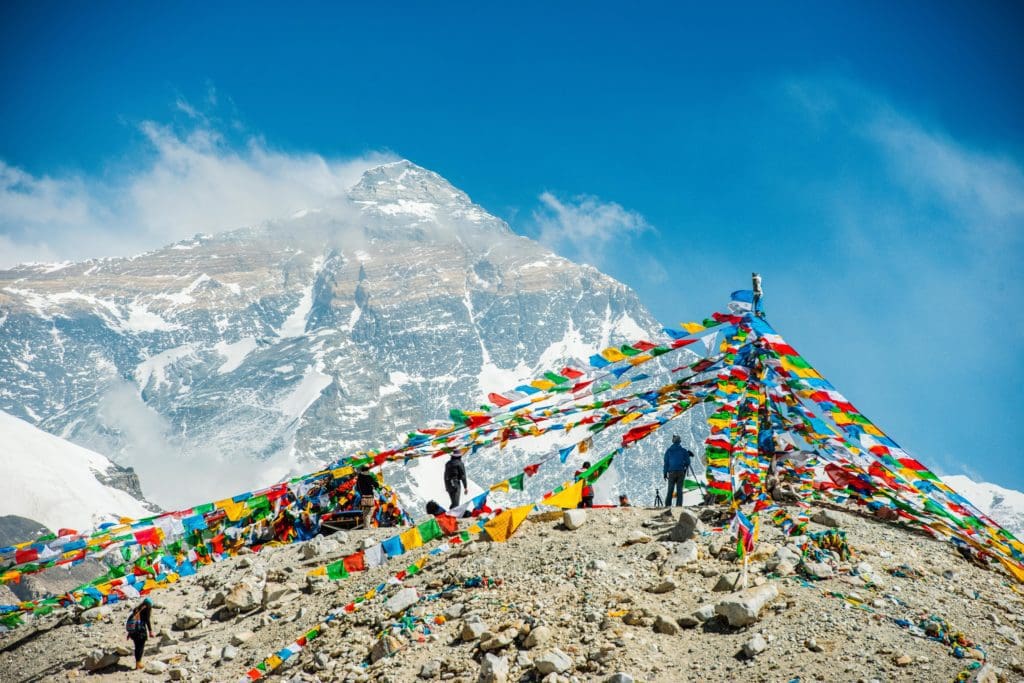
Spectacular mountain scenery at the Mount Everest Base Camp trek through the Himalaya, Nepal.
Trip details: What better way to explore one of the most scenic and daunting mountain vistas in the world than with an impeccably planned 16-day trip. You will have the special experience of trekking and adventuring through the Himalayas, Mount Everest, and Nepalese villages and challenge yourself on the trails up to Everest Base Camp. Mount Everest proudly sitting at 29,029 ft., is surrounded by the Dudh Koshi Valley and Namche Bazaar are the highest points of Everest Base Camp at 18,225 ft. This trip will not only give you once in a lifetime mountain views, a challenge trek, but it will show you the culture of the Sherpa lifestyle in Nepal and the Himalaya regions. Along the challenging yet rewarding hike you will see Buddhist monasteries, sweeping views of Everest, and stay in remote villages. As one would assume, the packing list for a trip to the Everest region can be long and require advanced gear – however, this trip package includes local porters to carry your gear during the trek, expert local mountaineers as guides for the duration of the trek, all meals and lodging is also included. The trip itinerary provides information on the type and duration of hiking that will be done each day to help with your decision to embark on this special trip!
A detailed packing list and additional information about this incredible adventure can be found here.
Machu Picchu, Peru
Quick notes: 7 days – $1,399US
Trip dates available: August September, October, November and December of 2023, then May and June of 2024.
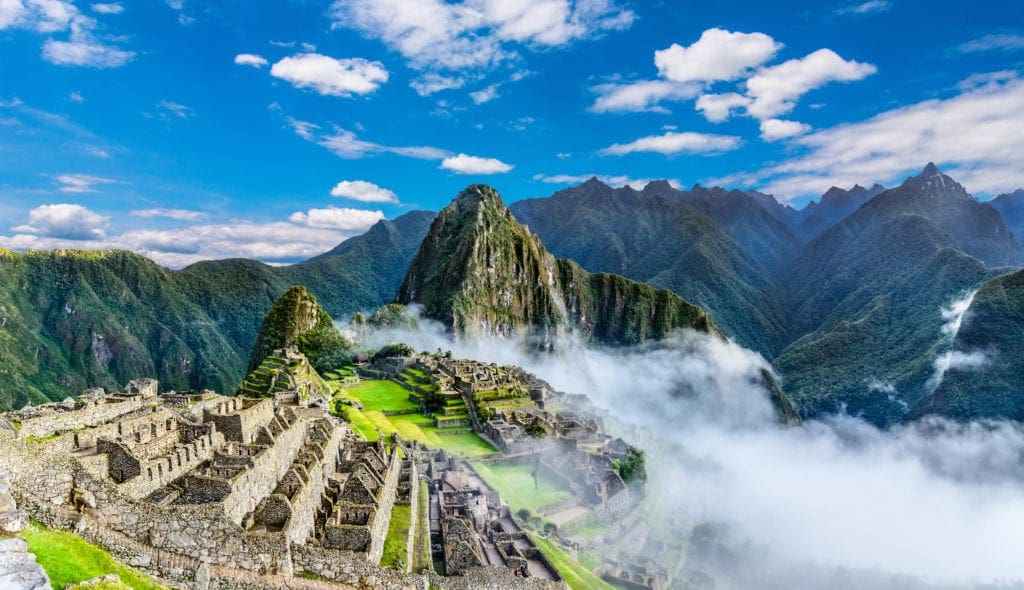
Overview of Machu Picchu, agriculture terraces, Wayna Picchu and surrounding mountains in the background
Trip details: Conquer the Andes Mountains and the iconic Machu Picchu ruins by bike and trekking. Take yourself back to the time of the Incans in Peru with this 7-day adventure in the Andes mountains. This well-balanced trip featuring biking, trekking, and exploring the town Cusco. The second day of the trip will include hiking to Inca fortresses and biking to a mountain town seeing waterfalls, glaciers, mountain peaks, and an indigenous community. The third day will take you to one of the most sacred Incan historical sites in the Andes, this site is not easily accessible to normal tourists, however, your guide will take you to mountain top town of Ollantaytambo. While this is a steep hike its worth it. The fourth day will provide some biking and relaxation at a natural hot spring. On your fifth day you’ll get to see one of the 7 Wonders of the World with Machu Picchu, included in your trip is a special three-hour trek with a guide. The remaining days of the trip will be thrilling and include beautiful sites.
Check out this activity filled Machu Picchu trip on the evoTrip site!
Laugavegur Trail, Iceland
Quick notes: 5 and 6 days trips are available – $2,290US
Trip dates available: June to September 2024
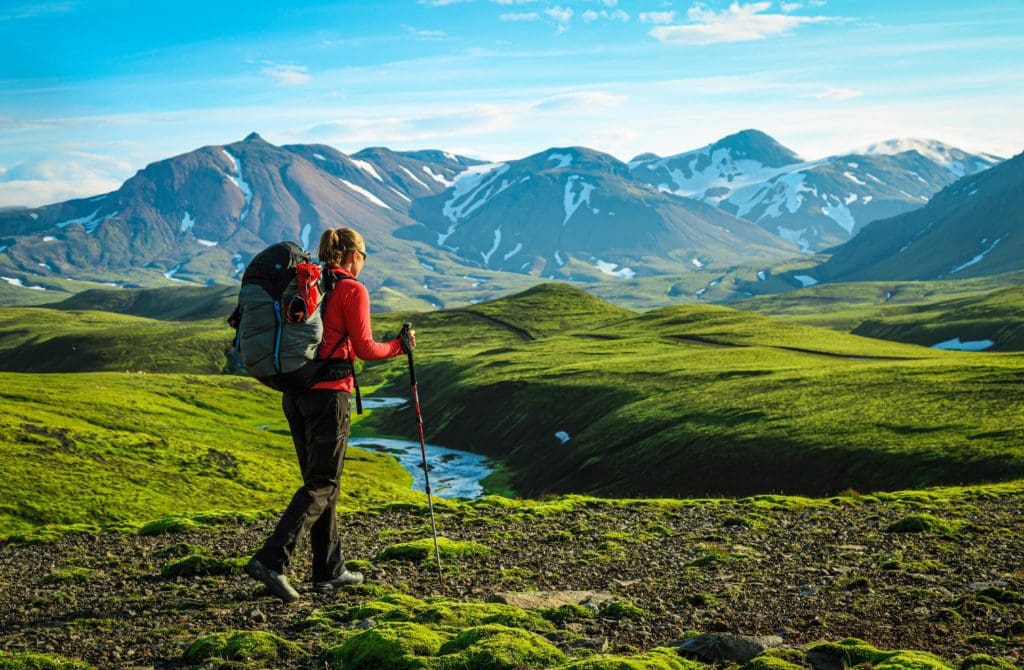
Female hiker on the Laugavegur trail, Iceland.
Trip details: What better way to see some of Iceland’s most beautiful scenery than on a hiking tour! This Icelandic adventure is only available in the summertime because that’s when it’s the most optimal weather, daylight, and opportunity to traverse the Icelandic highlands! This mountain biking trip is fully supported with an experienced guide. The guide will take you along the Laugavegur Trail where you’ll see volcanic fields, hillsides, glaciers, mountain lakes, and natural hot springs. You’ll start the trip with a day to explore Iceland’s capital city of Reykjavik. At the halfway point of the trip, you’ll have extended time to explore the Thorsmork region and see waterfalls, hilly landscapes, and more.
Other information on what’s included in this trip package, a full packing list, and FAQ’s can be found on the trip’s page here .
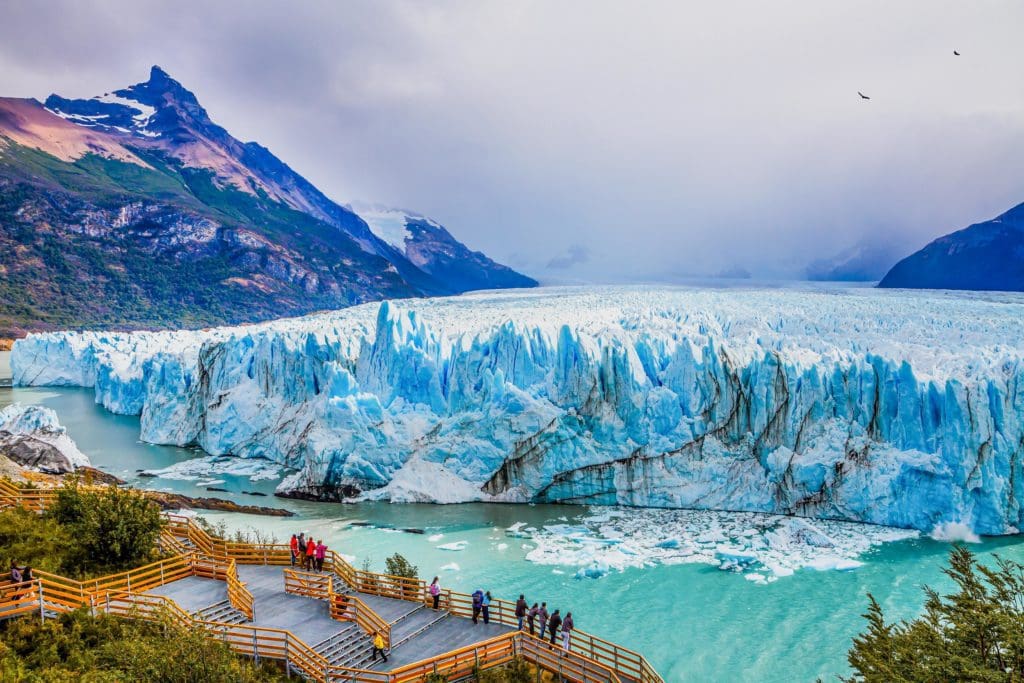
Grandiose Perito Moreno glacier in Argentine part of Patagonia.
Each of these mountainous excursions promise to provide you with an experience of a lifetime! Whether you choose to immerse yourself in the Patagonia and Torres del Paine regions or you want to experience that “top of the world” feeling at Everest Base Camp, the detailed and thoughtful trip itineraries will take any stress away to allow you to fully embrace adventure! Each trip has a daily itinerary, full packing list, FAQ section, and option for additional trip add-ons to further enhance your experience should you wish. The team at evoTrip takes every liberty to make sure these adventures take you to some of the most beautiful places in the world! As you make your adventure plans for 2022 be sure to seriously consider one of these trips we shared!
Global Rescue Membership
Skyblue Overland has been working with Global Rescue to spread awareness of their membership perks. Medical and security emergencies happen. When you find yourself in a tough position and are in need of some serious medical or rescue help, you want someone like Global Rescue to call. If you do not have a membership with someone like Global Rescue, an emergency evacuation could cost up to $100,000. That is why over 1 million members globally trust Global Rescue to get them out of those frightening situations.
Global Rescue personal memberships and enterprise solutions provide rescue and evacuation services when travelers become injured, sick (including COVID-19) or their safety is threatened. They provide 24/7/365 access to award-winning travel intelligence and medical advisory services, TotalCare SM telehealth, as well as emergency action planning, training and itinerary support.
Global Rescue is there whether you’re hiking, kayaking, snowmobiling, fishing or simply enjoying the outdoors and get ill or injured and you’re unable to get to safety on your own. Global Rescue is the red button you push in an emergency. Their team of medical and security experts come through for you when it matters most.
All services, including rescue, transport and evacuation, are included in the cost of membership. There are no deductibles, no co-pay, or claim forms. No kidding.
Enroll With Global Rescue Prior To Embarking On Your Next Adventure

More Adventures
Adventurer’s guide to acadia national park, maine.
Tucked away among the islands of Maine’s coast is a romantic and picturesque escape. Lakes overflowing with large boulders, granite mountains, lush forests, and breathtaking coastal beaches create an atmosphere that encourages countless explorations. Acadia beckons.
Read More →
Adventurer’s Guide To Black Canyon Of The Gunnison…
The Black Canyon, a deep chasm carved with razor-sharp precision, emerges as if from nowhere. It is one of the narrowest and steepest gorges in North America, beckoning to the adventurous.
Moab, Utah Is A True Adventure Destination
Moab is the capital of Utah’s high desert, situated in a valley on the banks of the Colorado River. Stunning red rock canyons and 12,000-foot peaks of the La Sal Mountains provide outdoor activities for all.

Trekking tips for beginners – because there's more to it than just common sense
We've got great tips for beginner trekkers in this post. These are tips around planning, your physical prep, your clothing and gear, actually walking the trail, and also trekking etiquette. It's everything you need to know to become a seasoned trekker!
Trekking in the wilderness – where you're far from the noises of the city and the demands of daily life – is one of the best experiences you'll ever have. Trekking broadens your horizons and challenges you, not only physically but in other ways too, as it often takes you out of your comfort zone.
We highly recommend giving trekking a go, but we also recommend you ease your way into it safely and sensibly. With this in mind, we present you with our top trekking tips for beginners!

At Follow Alice we lead treks in some of the most beautiful spots in the world!
Planning
Planning involves considering things like where and when you'll go trekking. Follow our tips below and you'll discover this isn't really a daunting task at all.
1. Pick an introductory route
What we mean by 'introductory route' is a route that's reasonably easy and not too long.
Your early treks should be about getting familiar with long-distance, multiday hiking (i .e. trekking!) . Focus on building your strength, getting used to your pack, and learning what to pack (and what to leave at home).
Here are a few specific pointers in terms of landing on an introductory trek:
- Choose a route with minimal elevation gain, which is to say one that’s reasonably flat so you don’t freak out your body and mind by tackling something overwhelming.
- Don’t go for a route that takes you into extreme weather – not only will this require possible very expensive equipment that you don’t yet have, but it will also tax you physically and mentally in a way that you should perhaps build towards.
- Don’t go for extreme terrain, like a very rocky path or one with tons of scree. Also consider avoiding snow and ice, which might necessitate bringing crampons. Build up your ankle strength and confidence by tackling a relatively smooth and dry path.

Picking a manageable trek route increases the chances you'll feel like smiling in photos!
2. Choose your season carefully
Trekking often takes you into extreme terrain, such as mountainous territory with frigid nights, or deserts with fierce winds and intense heat, or regions that receive monsoon rains. So you need to do your research before choosing when in the year to go to locations like this.
Often winter isn’t the best time, but it all depends on where in the world you are. In some places, spring means a miserable world of flies, midges and other critters. So yes, research is essential. (Alternatively, check with the tour operator you plan to use on their advice of the best season for the trek.)

Depending on the route, mist can be just mist, or it can become dangerous fog
Firstly, you want to choose a safe season in terms of things like blizzards, thick fogs or possible landslides from water-clogged ground. Not only could such seasonal hazards make your trek unsafe, they could also lead to authorities closing certain paths or parks, which can derail your entire trip.
Check the weather forecast just before heading out.
Trekking often takes you into remote places with little or no cellphone connectivity, few to no people, and few to no services. So if you come across trouble of any sort, help isn’t nearby. This means you need to be sensible – choose a safe season and head out only if the weather forecast is amenable.
Research any water crossings
Some treks involve a river crossing or two. If it’s a tidal river, then you might well need to cross at low tide, or things could get very wet, even rather hairy. So you may well need to set your starting time for the day in accordance with when you need to arrive at the river for the crossing.

It's vital that you research the trail conditions of the season when you'll be trekking
3. Tell someone when and where you’re going
It’s important that someone outside of the trekking party knows exactly when and where you’re trekking.
Often a trekking register is imposed on you whether you like it or not by park authorities, who make you sign the park register. At other times, the onus is on you to ensure you sign the mountain register. Never, ever forget to do this, as this is what’s used by authorities to assess if anyone is missing and send out a search party.
If you’re trekking in unmonitored wilderness, it’s even more vital that you let someone know exactly where you’re going. But we don’t recommend heading into such terrain as a novice. Better that you stick to a well-marked trail in a properly monitored park or reserve.
Linked to this is the necessity of sticking to the stated itinerary and trail. This isn’t your daily jog where a spontaneous detour along that intriguing footpath to the left is a good idea.
Satellite phones for the win
If you head off on a trail with a proper trek guide, then the tour company should know exactly where you will be at any given time. Furthermore, your guide should be equipped with a satellite phone so that help can be obtained even when there's no mobile phone service. Check with your operator that this is the case before heading out together.
4. Try slackpacking before trekking with a rucksack
We recommend your first few treks be slackpacking adventures. This means you carry just a daypack and have someone else transport the bulk of your belongings. This could mean using the services of a porter, or having someone drive and drop off your belongings ahead of you at the next accommodation.
Carrying a heavy rucksack filled with your clothes, food, cooking equipment and camping materials just makes your trek that much harder and more daunting. You want to ease yourself into trekking, not be whacked over the head with the practicalities, rigour and expense of doing it all yourself.
Don't shy away from using the services of a porter
Porters are common along many trekking routes around the world. We highly recommend using a porter if one is available. Porters literally take a load off of you, which as a beginner trekker is a massive help and also can allow you to tackle a more exciting trek route.
In addition to being a physical help, porterage is an important means of employment in many popular trekking regions.
When trekking in Nepal , for instance, porters are standard practice. Sometimes they carry your packs themselves, and sometimes they make use of pack animals like yaks.
When you climb Mt Kilimanjaro , you actually have no choice but to use porters. This is partly because no one person can carry all that they need, given that even drinking water for the week must be carried with you. Another reason is that it’s mandated by the Kilimanjaro National Park Authority.

On Kilimanjaro, porters are an essential service
5. Research national and park permits
Most parks and reserves require you to pay an entry fee of some sort. Some countries also require travellers to pay a fee. The important thing is to do your homework and know what costs to expect. Also find out if these must be paid beforehand or in person, and if you need to pay in cash.

Most large parks require you to obtain a permit or pay an entrance fee
One of the perks of going on a trek with a reputable tour operator is that they deal with such details and admin for you. At Follow Alice, for instance, we work all necessary park and government fees and permits into our tour package price. This way you don’t have to worry about any surprise costs. We also acquire the permits on your behalf to save you the extra admin.
6. Choose your fellow trekkers carefully
Going on a trek with experienced trekkers is a great plus as you can look to them for guidance in both the planning and execution of the trip. Obviously don’t go on a trek with that cousin who thinks everything is a competition. Rather choose people, if possible, who will be encouraging and patient with you.
If you go with a company, research them well. Are they experienced in leading trekking tours? Is the trek guide trained in first aid? A good idea is to read independent reviews of the company before choosing them.

Try to pick companions who'll be supportive of you as a beginner trekker
7. Make a checklist
Every seasoned trekker has a checklist they work through diligently before heading off on a trek.
A good checklist should include a to-do list as well as a packing list. The to-do list includes items like checking on park permits and looking up the weather forecast. Your packing list should include every little item that foes into your toiletries bag.
You’ll add to and improve your checklist with time.
Physical preparation
Naturally, the fitter and stronger you are, the easier any trek will be.
If you’re taking on your first multiday trek, then we highly recommend putting in some focused physical training beforehand. Trekking involves challenges beyond just physical endurance, so the more you can reduce the physical challenge, the better. You’ll then be able to focus your energies on any other challenges that arise, as well as on simply enjoying the experience.
8. Do some preparation hikes
Trekking requires strength and stamina. Naturally, the best physical preparation for trekking is doing exactly what you’ll be doing on the trek itself: hiking. If you can do some preparation hikes in the lead up to your trek, you’ll be doing yourself a world of service.
As much as you can, walk the same sort of terrain in your prep hikes that you’ll cover on the trek itself. Also try to walk the same number of hours that you’re likely to cover on the average trek day.
Ideally, start your preparation hikes at least two months before the trek.
9. Train with your backpack
Your preparation hikes should ideally mimic the trekking conditions as much as possible. This means things like wearing the backpack you’ll be using on the trek.
Even better, fill the backpack with the items you’ll be taking on the trek. In this way you’ll not only get used to the weight of it all, but you’ll also quickly discern if anything is unnecessary, or there’s something you’re missing. Further to this, you’ll be able to determine if your backpack is comfortable and suited to the task.
Look for a rucksack or backpack with wide shoulder straps as these distribute the weight better. You don’t want thin straps digging into your shoulders as you trek.
You also want padded hip belts, especially with a rucksack. These let you carry some of the weight on your hips – an absolute must!
We also recommend using a backpack with multiple compartments besides the main bin. This makes it easier to store and find things. When it comes to the pack's fabric, polyester or very strong nylon works well. You should also look for a pack that has a netted back panel, as this allows your body heat to escape. (Learn more in How to choose a backpack for trekking .)

It's only after many consecutive hours with your backpack that you know if it's truly comfy
10. Train in your hiking boots
Similarly, you want to train in the boots and socks you’ll be wearing on the trek.
Just as with your backpack, this is about checking that everything is comfortable and suitable. For instance, finding out on a low-stakes hike that your sock seam is uncomfortable or that your boots are sponges is far better than discovering the same on the trek when there’s nothing you can do about it.

Train in the shoes you'll wear on the trek to ensure they're comfortable and suitable
If you plan to buy new trekking boots, please do so thoughtfully. For starters, wear your intended hiking socks when trying on the boots. Leaving the laces untied, push your feet as far forward as they’ll go. Then insert an index finger between your heel and the back of the boot. You want your finger to fit in snugly (too much space and the shoe is too big, too little space and the shoe is too small).
Walk around in the shoes a little, or even step onto a treadmill if possible to try them out properly.
About 60% of people have differently sized feet, so always try on both the left and right boots.
You can learn more in The best hiking boots for Kilimanjaro (the info here can be applied to high-altitude trekking anywhere in the world).
11. Hike on back-to-back days
Speaking of mimicking the trek conditions, try to fit in some back-to-back hiking days as part of your physical prep. Consecutive days of trekking can place strain on the body. So you want to build up your body’s strength and stamina in this regard. You also want to teach yourself that you're capable, so that a positive mindset kicks in on the trek when the going gets tough.
Clothing and gear
Let's now discuss the items that need to go on the trek with you ...
12. Wear broken in shoes and socks
Hiking boots are generally better than hiking shoes, as the former offer more ankle support and also have thicker tread and a more durable fabrication.
That said, depending on the terrain you’ll be trekking, hiking shoes might be sufficient.
As to socks, ensure you have ones warm enough for the climate in which you’ll be trekking.
You might also like to consider wearing sock liners or two pairs of socks at once to help reduce the chances of blistering. If you do develop a hotspot, always deal with immediately. Don't wait until it's a full-blown blister before doing something about it!
As discussed in Tip #10, you want to do your trek wearing socks and shoes that you already know to be comfortable on long hikes. A good rule of thumb for breaking in hiking shoes is to traverse 100 km in them before the two of you head off on a big trek.
13. Bring gaiters
A gaiter is a lower leg covering that extends over the top of your shoes and then ends somewhere below your knee. They can be made from various fabrics, though a popular choice is a waterproof gaiter.
Wearing gaiters on a trek has a few benefits, like:
- Keeping dirt and small stones out of your socks and shoes.
- Keeping water and mud at bay (if waterproof).
- Protecting you from cuts and rashes caused by thorns, serrated plants and other nasties.
- Protecting you from snake bites.
If you’re worried about snakes, try to remember this saying: “First one wakes it. Second one annoys it. Third one gets it.” So it’s best to not walk third in line. 😃
14. Pack waterproof gear
We’ve mentioned waterproof gaiters, but of course no trekker should head out of the gate without a few other waterproof essentials, namely a rain jacket, waterproof overpants, and a backpack cover.
A rain jacket that doubles as a windbreaker can be a great asset. Note that you can also buy a waterproof backpack.
Ideally your hiking boots should be waterproof as well. If not, try to ensure they’re at least water-resistant.

You really want waterproof gear to avoid a miserable trek
15. Wear layers
When trekking, you want to layer your clothes. This is partly for warmth and comfort, partly so you can strip or add layers piecemeal. The layers you need are as follows:
- An inner layer (think thermal long-sleeved vest and leggings in cold climates)
- A middle layer (this would be your shirt and shorts or trousers)
- An outer layer (like a fleece jacket, beanie and gloves)
- A waterproof layer
The specifics of your layers depends greatly on the climate where you’ll be trekking. The clothing requirements for a snowy trek in the mountains are, naturally, far different from those of a warm coastal trek and will involve a further layer on both your legs and your top half.
16. Pack light
Whether the bulk of your belongings are to be carried by you or a porter, you want to keep things to a minimum and pack light. Don’t skimp on essentials, but also accept that you won’t be wearing a fresh set of clothing every day.
Certain items, like a fleece jacket, will do hard duty and be smelly at the end of the trek - don’t fret about it, everyone smells on treks. Depending on the location and weather, you might be able to wash a shirt or similar in the shower or a river, then strap it onto the back of your backpack to dry as you walk the next day.
Other essential items might include medications, toiletries and high-energy snacks (unless these can be bought along the trail).

Don't stuff your backpack full or you'll soon feel the burden of the weight
If you're doing a trek with a tour operator, you should be given a full packing list tailored to that trek.
Walking the trail
You might think trekking is just about putting one foot in front of another. What else is there possibly to know?
Well, yes, at its most basic, trekking is just walking. But there’s also a little more to it. Here are a handful of tips that can make the act of trekking that much safer, easier and kinder to your body.
17. Get an early start
It’s best to start your day’s trekking early. It’s decidedly un-fun worrying that you won’t make your destination before darkness falls.
As a beginner trekker, aim to walk for no more than six hours per day. You don’t want to push yourself too hard.
18. Take a 5- to 10-minute break every hour
It’s important to take regular rests. This applies to beginner trekkers just as much as seasoned ones.
Remember that trekking is a marathon, not a race. You’re in it for the overall experience, so take things slowly, and rest often.
Also, trekking is a team effort, so you should endeavour to go at the pace of the slowest person. Don’t be the person who sets off after a rest break the moment the slowest soul catches up!

Regular rest stops are a must – not just for the body, but also for taking in the view!
19. Take long strides on flats, short steps on hills
There will be times on a trek when the going is easy, and you trot along happily, thinking little about what you’re doing. Wonderful! But for those times when the going is tough and fatigue is setting in, you’d do well to employ a little strategy in your steps.
When walking along a flat route, try to extend your stride just a little. It also helps to swing your arms a little more determinedly, elbows bent.
On ascents and descents, shorten your steps a little. This will reduce the impact of the step on the downhill, and reduce your fatigue on the uphill. Also try to use both legs when making bug uphill steps rather than overtaxing one leg in particular.
20. Wear your pack correctly
Don’t risk short- or long-term discomfort (or even injury) by wearing your backpack or rucksack incorrectly. If you have waist straps – which a good pack should have – then ensure they’re sitting on your hips properly to take some of the load off of your shoulders.
You also need to ensure the contents in your pack or rucksack are evenly distributed, so you’re not lopsided. You also don’t want the pack pulling you backwards, so pack heavier items at the bottom.

The guy in the purple hoodie has a backpack that's hanging a bit too low
21. Try using trekking poles
Trekking poles are great at helping you to stabilise yourself on uneven terrain. They also help to cushion the impact on your knees on steep or long descents. (They’re not intended for hooking the backpack in front of you when you’re struggling to get the person’s attention.)
If you already have ski poles, you can use these instead of forking out for trekking poles. That said, one of the nice things about quality trekking poles is that they can be collapsed for easy storage, and can also be lengthened or shortened to suit your frame or the terrain.

Trekking poles offer a few benefits, including taking a little strain off your legs on downhills
If you're thinking of investing in trekking poles, please read How to choose and use trekking poles .
22. Look after your eyes and skin
It’s important to protect your eyes and skin while trekking.
For your eyes, this means wearing sunglasses with UVA and UVB protection. This is especially important when trekking near water (to avoid the glare) or in snow (to avoid snow blindness – a real thing!).
Protect your skin by covering up, wearing a sun hat or cap with a wide brim, and using a sunscreen with a high SPF factor.

It's important to protect your eyes and skin, especially on high-altitude treks
Remember that the higher the elevation, the stronger the solar rays. So even if you’re bundled up against the cold and snow on a high-altitude trek with only your nose and cheeks exposed, that very same nose and cheeks are in danger of being burned.
A spray sunscreen is often the easiest option as it can be reapplied without needing to first clean your hands.
23. Bring your camera
Obviously you want to capture some of the beauty and special moments of the trek. So don’t forget your camera.
Our advice is to consider assigning one person in your trekking group to take pics. There’s no need for five cameras to emerge when you spot a duiker in the clearing – why not let the most skilled photographer among you capture the sight and share it with you later, allowing the rest of you just stay present in the moment? (We offer similar tips in Mindful travel: 14 ways to have a more meaningful trip .)

You might like to consider having just one person in the group takes photo on the trek
24. Stick to the path
It’s important to stick to the marked trail when trekking. Not only should you do this as a safety precaution, but also for the sake of conservation. Stepping off the trail could harm fragile flora and harm a delicate ecosystem. We want to keep our literal human footprints to a minimum! (Learn more in 7 ways to reduce your eco footprint when trekking .)
You also want to stick to the trail from a safety point of view. Firstly, stepping off the trail increases your chances of twisting an ankle or falling, as you might not see clearly where your foot will fall. Grass and vegetation can mask holes, exposed roots and more.
Secondly, and more importantly, wandering off the trail jeopardises your safety. There might be literal and figurative pitfalls just off the pathway. Also, if mist or fog descends, you might struggle to find your way back to the route. Finally, if a rescue team has to be sent out for you, they can’t be guaranteed of finding you if you’ve left the trail.
Exception: Going to the loo
When you’re out in nature and nature calls, you usually have to step off the path to find a quiet, concealed spot. Try to go 50 m or more away from the trail, and be sure to bury any waste. Carrying a small trowel might be a good idea for certain treks. Do your best when navigating your loo run to step on as few plants as possible.

Sticking to the trail has a few benefits, including protecting the ecosystem
25. Don't step on fallen trees, logs or rocks
Whenever possible, you should step over obstacles in your path rather than on them.
Have you seen Happiness for Beginners on Netflix? Here the character Hugh walks along a fallen tree trunk only to have the rotting wood give way and knock him out, while also injuring his leg badly. Don't be a Hugh.
As to logs that clearly aren't rotting, they could still roll underfoot. And if it's not necessary to step on a rock, then that's great, as that rock could also shift underfoot and cause an accident.
That said, you also want (as much as possible) to first look to see where you're putting foot before actually making the step. This is because there may be a snake or other creature that won't take kindly if you tread on them.
26. Stay hydrated
Staying well hydrated means ensuring you’re getting plenty of H₂0 as well as enough electrolytes. You can be chugging endless amounts of water on a strenuous trek and yet still end up emptying the contents of your stomach after strenuous exercise because your electrolytes are too low. Remember that pretty picture as motivation to plan your source of electrolytes for your next trek!
Electrolytes can be found in coconut water, fruit juice, sports drinks, and even tablets.
Note that it's especially important to drink plenty of water on high-altitude treks as it helps to lessen the symptoms of mild altitude sickness.

Drinking water helps to mitigate the symptoms of altitude sickness
Finally, remember that if you’re thirsty, you’re already hydrated. So drink little sips often. A hydration pack with a drinking hose is useful here so that you don’t have to reach for your water bottle every time you want a sip.
Bring water purification tablets
Depending where your trek takes place, water purification tablets might be necessary. They don’t taste great, but diarrhoea isn’t a treat either. Just add an electrolyte sachet to your water source to mask the taste of the purification tablet.
27. Eat nutritious food
Obviously it’s important to eat healthy and nutritious food during treks to provide your body with the fuel it needs to keep going.
What some of you might not know, however, is that nutritious food is doubly important on high-altitude treks to help keep the symptoms of altitude sickness at bay. So while a chocolate bar can be a great pick-me-up when your legs are tiring, the main part of your diet on a trek should be nourishing whole foods.

Do your best to eat nutritious food even if the high altitude has reduced your appetite
Trekking etiquette
Whether doing a short hike or a multiday trek, certain universal rules or etiquettes apply on the trail. These exist to both protect the natural environment and also make the trail enjoyable for everyone. Many are just good common sense stuff!
28. Walk in single file
Generally speaking, you should walk in single file on a trek. Obviously if the path is very wide, walk side by side. But on narrow footpaths, the etiquette is to walk in single file.
29. Give way to uphill climbers
If the path is a narrow one (and arguably all the best ones are!), then you might need to step aside or just off the path when you encounter foot traffic. (Yes, this is another exception to the stick-to-the-path rule.)
Note that uphill climbers should always be given the right of way on trails. If there are mountain bikers and horse riders on the path too, they also have right of way.

Uphill is tough, so we give way to those tackling the incline
30. Don’t speak too loudly
It’s safe to assume that all other trekkers on the trail are there to enjoy the sights and sounds of nature. Trekking is a great time for reflection, for some solitude, and for benefitting from being in the outdoors. So don’t talk loudly. Also, your hilarious anecdote could be scaring off the wildlife.
31. No music except through headphones
If you must bring music on a trek, it should only ever be listened to through earphones. This goes for campsites too.
Again, assume everyone else on the trek wants to hear the sounds of nature.
It’s also better from a safety point of view to be alert to all noises, so no music at all is best. (That said, a little sing-a-long if there’s no other party on the trail can be fun at times.)
32. Never, ever litter
This one doesn’t need explaining, at least we hope!
When trekking in remote parts where there are no bins (trash cans), you should always carry out what you take in, so carry some refuse bags for storing waste. Depending on the nature of the item, you could possibly bury it in the ground inside of a biodegradable bag. But this depends on the area and the ecosystem, and often this won't be allowed.
Be sure to familiarise yourself with the specifics of the country, reserve or park where you’re trekking before heading out on the trail so that you know what actions to take or avoid, and also have the necessary equipment to abide by the rules.
33. Don’t pick wildflowers or feed wild animals
Again, this is pretty basic stuff. No matter how cute the monkeys, rabbits, deers or whatever – don’t mess with their natural habits and digestive systems by feeding them.
Instead, be content to coo over them from a distance, snap a photo (without flash – you don’t want to scare them), and then let them be.
And as pretty as that hibiscus might look tucked in your ponytail, refrain from picking the flora. A trekker should aim to impact the environment as little as possible, thereby preserving it for everyone else as well as for the sake of the ecosystem.

Never feed wild animals, no matter how ridiculously cute they are!
Ready, set … let’s trek!
At Follow Alice we offer a handful of epic trekking adventures.
We have our trekking in Nepal trips, which include the Annapurna Circuit and the Everest Base Camp trek . We also offer a Mount Kilimanjaro climb , our flagship trip! And we also lead treks along the Inca Trail to Machu Picchu in Peru.
All of these treks are high-altitude treks, which means they take place at great elevation. High-altitude treks are particularly challenging because the reduced oxygen levels make breathing and exercise that much harder. But high-altitude treks are also incredibly rewarding, as the scenery and sense of accomplishment tend to be second to none!
We have a wealth of information about trekking these trails to help you learn more about them and the challenges involved. If you’d like to learn more, a good starting point might be one of the following blog posts:
- What is it like to climb Kilimanjaro?
- Annapurna Circuit versus Everest Base Camp
- The Classic Inca Trail – what the route looks like
Or if you’d prefer to chat to someone and have your questions answered, please feel free to give us a shout. We’re more than happy to chat! 😃

How to prepare for your trekking adventure: our 10-step training guide

UPDATED: This blog was originally published on February 18, 2015.
Sure, you can turn up at the foot of Mt Kilimanjaro with nothing but a song in your heart and a pocket full of dreams. But you’re going to be in for a bit of a shock.
Without at least some pre-trip training, or a good basic level of fitness, trekking is hard work. Let’s be real – it’s hard work anyway. The toll for a great trek is paid in sweat. Sore calves and aching quads are badges of honour, with blisters and lost toenails marks of pride.
But in return, you get some of the most untouched, pristine and jaw-dropping scenery on the planet. And you know what? The more you train for your epic hike, the easier it’ll be.

Photo by Kieran Wallace
And you don’t have to be an Iron Woman/Man to climb to Everest Basecamp or reach the top of Mt Toubkal . Far from it. Trekking is available to anyone; you just have to be sensible and work a bit for it. Here are a few of our top prep tips for your upcoming trek:
1. Start walking now (it’s never too early to start training)
This may seem like the most obvious step to start with (pardon the pun), but you’d be surprised how many people don’t do it. The best way to prepare for a really long walk? Do some really long walks. You should start with small-ish distances and work up to the length you’ll be trekking on your trip. When you start your training, leave a day in between each walk to let your body recover. But as your body gets fitter, try to do back-to-back sessions each day – it’ll help build your stamina for the relentless nature of a ten-day trek, where you won’t have the luxury of rest days. Ideally, you want to be able to walk 4-6 hours – comfortably – before you leave.
CHECK OUT OUR RANGE OF SMALL GROUP HIKING ADVENTURES HERE
2. Make leg-based cardio part of your routine…
As well as doing long walks, you should also work some leg-based cardio into your daily routine. Cycling is awesome for building up muscle in your legs, but soccer, football, squash and swimming are all great too. If you’re more into gym workouts, mix up your spin classes or cycling bursts with squats and lunges (the more weight, the better).
3. …and take the stairs every chance you get

Photo by Patrick O’Neill
Stair climbing is also a good one for building up calves and quads, so take the stairs instead of the lift or escalator when you’re at work or the train station.
RELATED: WHAT I WISH I KNEW BEFORE TREKKING EVEREST BASE CAMP
4. Make sure you’re walking properly
You’ve been doing it since you were around one year old, but it’s super important to monitor how you’re walking and if you’re doing it correctly. Make sure you’re hitting the ground with your heel first, then rolling onto your toe, which propels you onto the next step (this will help reduce the risk of shin splints and tendon pulls – ouch). Walk with your head up, eyes forward and shoulders level.
5. Mix up your training terrain…

When you’re on your trek, it’s unlikely you’ll be walking on level footpaths and roads, so avoid training solely on level footpaths and roads. Instead, try to train on surfaces that will be similar to the trails on the trek. If you’re heading to Everest or Kili, aim to train on steep, rocky terrain and loose shale; if it’s Kokoda , try to find muddy paths. It’s really important you prepare your feet, ankles and knees for the stress they’ll experience on the trip.
RELATED: WHAT’S REALLY LIKE TO TREK THE INCA TRAIL
6. …and walk in all types of weather
It’s also unlikely you’ll get ten straight days of perfect weather on your trek, so prepare yourself for all conditions by walking in cold, windy, rainy, warm and humid conditions (where possible, of course!).
7. Try using walking poles

When you’re navigating Kili’s gravel trails or lumbering down Dead Woman’s Pass on the Inca Trail , walking poles will become your two new best friends. They take the pressure off your knees on the downs, and give you extra support on the ups. Incorporate poles into your training sessions so you get used to walking with them.
RELATED: TREKKING TO MACHU PICCHU? HERE’S YOUR ULTIMATE PACKING GUIDE
8. Train with a backpack
On almost all of our trekking trips, you won’t be carrying your main pack, but you will need to carry a small daypack, packed with essentials like your camera, snacks, sunscreen, water and wet-weather gear. So with all your days/weeks/months of training, make sure you’re challenging yourself with a weighted bag. If you really want to push it, pack your bag with a few extras, so it’s a little heavier than what you’re planning to hike with on the trip – it’ll make the eventual trek feel like a walk in the park (chortle).
9. Keep the tank fuelled

Photo by Miguel Gutierrez
It’s SO important you’re stocked with enough water and food during a trek (hydration is key!). Nuts, dried fruit, muesli bars and chocolate are all good, quick sources of energy and protein; keep a selection of these healthy snacks in your daypack. Also, bring along a reusable canteen; alpine streams are usually a great source of fresh water, but our guides provide boiled (and cooled) water daily throughout your trek. While you’re in training-mode, try to eat and drink ‘on the go’ as much as you can, so your body can get used to digesting during strenuous exercise.
RELATED: WE ASK A LEADER WHICH ROUTE TO TAKE UP MT KILIMANJARO
10. Invest in a good pair of shoes

Your feet are your most crucial body part on a trek, and it doesn’t take much to keep them in toe-tappingly tip-top shape. First, invest in a pair of good-quality, water-resistant hiking boots; you want plenty of support and ventilation too. Then, wear them in. How do you do this? Wear ‘em everywhere. On your training runs, on walks to the shops, to work, to formal events (well, maybe not). You get the idea though; by wearing them in as much as possible in the weeks and months leading up to the trek, it’ll help avoid blisters, bunions and lost toenails. Then, stock up on a few pairs of really good hiking socks (preferably a wool/nylon blend), that will wick moisture and keep your feet dry. If you want to get a bit crazy, wear two pairs while walking to minimise your chance of blisters.
Ready and raring to go? Step right this way to pick your next small group trekking adventure with Intrepid.
Feature photo by Miguel Gutierrez.
Feeling inspired?

James Shackell
I was born in 1987 and aged from there. I like the sound of pop-rocks and dislike the sound of styrofoam. The length of my forearm is approximately the same as the length of my shin. My favourite Beatle is Ringo. I believe that junk food tastes so good because it’s bad for you and that your parents did the best job they knew how to do. If Johnny Cash wrote a song about my travels it would be called ‘I’ve been to several places but still have many other destinations on my to-do list, man’. Sometimes I have trouble finishing sen
You might also like
The 7 best places to go on a..., 5 reasons to visit sri lanka in the..., why 2024 is the best year to see..., yellowstone vs yosemite: which national park to visit, 6 unique experiences you can have in el..., from delhi to udaipur, here are the five..., cinque terre vs amalfi coast: which destination to..., love at first bite: 10 famous sandwiches from..., galapagos or madagascar which unique destination should be..., central vs south america: how to plan your..., 4 reasons you should take a road trip....
50+ Awesome Trekking Tips and Tricks
Trekking is more than a simple hike through the woods. It’s a trip that tends to change you. It builds strength, confidence and friendship, with all kinds of interesting people. Preparation is key however, and you’ll be more ready for your adventure with a few fantastic trekking tips and tricks.
I feel like there’s so much time in between my treks that I start anew with each one. But I do keep a list of things to think about when planning, things to bring and things to do or not do along the way.
Top 5 Trekking Tips Break in your hiking boots before the trek. Pack light but carry essentials. Stay hydrated and energized. Leave no trace. Know your route and weather conditions.
Trekking tips and tricks.
Sharing my trekking tips for beginners with you now, because sharing is caring.
Planning ahead
1. choose the right trail.
It’s essential to select a trek that aligns with your fitness level and prior experience. Consider your physical abilities and hiking endurance.
Be honest with yourself, even if it isn’t easy. Opting for a trek that matches your fitness level will make it a more enjoyable and manageable experience.
2. Research
Understand the trail, potential weather conditions, permits, regulations and any necessary equipment before you leave. Conduct thorough research on the chosen trail.
I try to read as many books and blogs about the trek as possible, to know what I’m getting into.
Familiarize yourself with the route, its difficulty level, and any potential challenges you may encounter. Additionally, gather information about the prevailing weather conditions during your planned trekking period. This will help you pack appropriate clothing and gear.
Determine if the trail requires any permits or permissions, and make sure you are well-informed about the necessary documentation. Lastly, identify and gather any equipment or gear essential for the trek.
3. Think local
Learn about local traditions and be respectful towards the communities you encounter during your trek. You’re likely to come across unique cultures and traditions. Take advantage of it!
Take the opportunity to learn about the local customs and traditions of the areas you’ll be passing through. Show respect for the local communities, their beliefs, and their way of life. This is one of the best things about trekking, about life. People.
Follow any guidelines or protocols provided by the local authorities or your guide regarding interacting with the communities.
4. Learn the important phrases in the appropriate language
Hello, good morning, please, thank you, good night, bathroom, water, coffee. That sort of thing.
This seemingly small detail has made a huge difference to me, in the way people perceive me and the way they respond to me.
5. Acclimatize if necessary
If you are trekking in high-altitude areas, it’s vital to plan for proper acclimatization. You simply can’t win against Mother Nature. Altitude sickness can be a potential risk at high altitudes.
To mitigate this, consider incorporating rest days into your trekking itinerary to allow your body to adapt to the higher altitudes gradually. Drink plenty of fluids, avoid strenuous activities during the initial days of the trek, and pay attention to any symptoms of altitude sickness.
6. Choose the right guide
If you’re planning to hire a guide, opting for a guide with good reviews ensures a higher likelihood of receiving a satisfactory and fulfilling experience.
These reviews can shed light on the guide’s expertise, knowledge, professionalism, and overall ability to enhance your journey or activity.
By considering the positive feedback shared by others, you can make a more informed decision and increase the chances of having a memorable and enjoyable time with your chosen guide.
Trekking guide: how to prepare for trekking
One of the biggest differences between hiking and trekking is that you need to prepare significantly more for a trek.
7. Start training as early as possible
Practice walking with a backpack to get used to the weight.
Starting your training early and incorporating backpack walks into your routine not only helps you acclimate to the additional weight but also improves your physical fitness, gear assessment, and overall preparedness for your upcoming adventure.
Train for trekking by hiking, as there are many benefits of hiking .
Remember to start with lighter loads and gradually progress to heavier weights as your fitness level improves. It’s important to listen to your body, pace yourself, and avoid overexertion or strain.
Consulting with a fitness professional or a knowledgeable instructor can also provide valuable guidance in designing a training program tailored to your specific goals and needs.
8. Train for cardio fitness
Training for cardio fitness is crucial when preparing for a trek due to several reasons. First and foremost, cardio exercises improve your overall endurance and stamina, allowing you to sustain physical activity for extended periods without feeling fatigued.
Trekking often involves long hours of walking or hiking, sometimes in challenging terrains, and a well-trained cardiovascular system enables you to handle such demands more efficiently. Improving your cardio is also extremely helpful when you’ll be trekking at higher altitudes.
Cardio is my greatest weakness, so it takes priority in my trek training. Do you know your weakness?
9. Train for strength
Strength training is essential when preparing for a trek because it helps build muscular strength and endurance, which are crucial for carrying heavy backpacks, navigating uneven terrains, and overcoming obstacles.
Second, strength training improves joint stability and flexibility, reducing the risk of injuries during the trek. Additionally, it enhances overall body stability and balance, allowing you to maintain control and stability on challenging trails.
10.Train for endurance
Training for endurance is vital when preparing for a trek because it allows you to sustain physical activity for extended periods. Endurance training improves your cardiovascular fitness, enabling you to walk or hike for long hours without feeling fatigued.
It enhances your body’s ability to utilize oxygen efficiently, crucial for high-altitude treks.
Endurance training also helps build mental resilience, allowing you to push through fatigue and discomfort. By training for endurance, you ensure that you have the stamina and endurance necessary to complete the trek successfully.
11. Incorporate step training as well
Including step training in your trek preparation is important because it helps simulate the demands of uphill and downhill treks, allowing you to build specific leg and cardiovascular strength for those terrains.
It targets and strengthens the muscles used in climbing and descending, such as quadriceps, hamstrings, and calves.
Pro Tip: You will get more of a cardio workout if you do steps without additional weight and more of a leg workout if you do steps with weights.
Step training also improves balance, stability, and coordination, preparing you for uneven and challenging trail conditions.
12. Break in your shoes well before your trek
Breaking in your shoes before a trek is crucial to avoid discomfort, blisters, and potential foot injuries. New shoes often have stiff materials and need time for the soles and upper parts to mold to your feet.
By breaking them in before your trek, you can identify any potential issues or discomfort, giving you the opportunity to address them before embarking on the trek, ensuring a more comfortable and enjoyable experience.
13. Listen to your body and rest when you need to
A little fatigue and a little soreness is natural and expected. But if you’re exhausted, take a rest day. If you’re in significant pain, take a break from training.
If you don’t listen to your body’s signals when it is sending the subdued ones, you will eventually be receiving some loud and clear. And those tend to take longer to recover from.
14. Eat healthy
Eating healthy while training for a trek is essential for optimal physical performance and overall well-being. A balanced and nutritious diet provides the necessary fuel and nutrients to support your training, helping you build endurance, strength, and recover effectively.
Nutrient-dense foods supply vitamins, minerals, and antioxidants that aid in muscle repair, reduce inflammation, and support immune function, crucial for the demands of trekking.
Additionally, a healthy diet helps maintain a healthy weight, promotes good digestion, and provides sustained energy levels, enabling you to tackle long hikes and challenging terrains with greater ease.
15. Taper your training right before your trek
You want to give your body a few days rest before beginning your trek. Doing so will give your body the break it needs to begin your trek in peak condition and with the most energy.
16. Take Diamox before you start, if you plan to at all
Not everyone takes Diamox for altitude sickness. I take it if I’m doing a trek at altitudes above 14,000 feet, like the Everest Base Camp trek, just in case. If you plan to take it, do so before you arrive at your higher altitudes. It works most effectively if taken before you need it.
17. Pack light
Carry only essential items to minimize weight. Distribute the weight evenly in your backpack, and use dry sacks or waterproof bags to protect your gear.
18. Carry Paracord and 4 clips
A simple round of paracord and 4 clips can come in handy for a variety of things, but especially for setting up your laundry to dry if necessary. Be sure to purchase the lightest weight ones possible that are also sturdy enough to not break.
19. Keep your gadgets safe from water
You should keep your gadgets in individual waterproof containers. Keep an extra waterproof sack for wet items that do not have time to dry before getting going again.
20. Pack hand warmers for night time
There are many brands out there but the only one that works reliably in my own experience is Hot Hands.
21. Wrap duct tape around your hiking pole to store it
This saves you the trouble of having to find it later when you need it most.
22. Bring a buff or two
They are conveniently handy for all kinds of things, from keeping your neck warm to hiding your unwashed hair. Two is better than one, because they’ll get dirty as well.
23. Use thin, double lined socks for hiking
I prefer Wright socks for summer hiking.
24. Use thick wool socks for night time wear
I prefer SmartWool to keep my feet warm at night.
25. Drink plenty of water in advance
Hydration plays a vital role in maintaining optimal physical performance, as it helps regulate body temperature, supports cardiovascular function, and aids in nutrient delivery to muscles.
Proper hydration also prevents dehydration, which can lead to fatigue, muscle cramps, and decreased cognitive function. Additionally, being well-hydrated helps improve joint lubrication, reducing the risk of injuries.
By starting the trek well-hydrated, you enhance your endurance, energy levels, and overall well-being, allowing you to tackle the challenges of the trek more effectively.
26. Bulk up
If you’re at all underweight, or like the weight you’re currently at, consider adding a few more pounds before you leave. Depending on the length of your trek, particularly at higher altitudes, you’re going to burn more calories than you consume unless you make a concerted effort otherwise.
27. Bring small treats to look forward to
It can be special energy bars, chocolate or anything that packs well and makes you smile. Dole it out to yourself once a day and appreciate every bite.
28. Bring something for dry throats
Consider bringing throat lozenges for dry air and to reduce any coughs that might come along. I prefer the sugar-free sort myself.
29. Bring chapstick or lip balm
Whatever you use to keep your lips moist. Preferably with sunscreen. Think about bringing more than one, just in case.
Day of, hiking tips
30. wear moisture-wicking and breathable clothing, in layers , 31. bring a fleece layer too, 32.stay updated on the weather conditions.
Know before you go to ensure you pack the right gear, such as rain gear, warm clothing, or sun protection.
33. Bring navigation
A map, compass or GPS device, first aid kit, headlamp, multi-tool, matches or lighter, water purification tablets, and extra food.
34. Make sure your backpack fits properly
You want your backpack to fit properly so it’s easier to carry and so that it doesn’t cause you pain two days into the trek.
35.Drink plenty of water throughout the trek
Carry a reusable water bottle or hydration bladder, and know the locations of water sources on your route.
36. Water purification
If you’re hiking through areas where water safety is questionable, bring a filter or water purification tablets.
37. Pace yourself
To pace yourself on a trek means to regulate your speed and energy expenditure in a way that allows you to maintain a steady and sustainable pace throughout the journey. It involves finding a balance between pushing yourself enough to make progress while avoiding overexertion and fatigue.
To pace yourself effectively, begin the trek at a moderate speed that allows you to maintain a conversation without gasping for breath. Pay attention to your breathing pattern and heart rate. Adjust your pace if you’re consistently out of breath or pushing too hard.
Be mindful of any signs of fatigue, muscle soreness, or discomfort. Adjust your pace accordingly and listen to your body’s needs.
38. Take breaks
Make sure to take regular breaks to rest, hydrate and refuel. Sit down and put your feet up.
39. Stay on the trail
For your sake and the environment, stay on the trail. It keeps you both safe!
40. Pack it out
Pack out all your trash, avoid littering, and be mindful of local wildlife.
41.Share your trekking plans with a reliable person
Provide details about your route, expected return time, and emergency contacts.
42. Acclimatize
If trekking in high-altitude areas, acclimatize properly, ascend slowly, and recognize the symptoms of altitude sickness. Descend if symptoms worsen.
43. Wildlife safety
Observe wildlife from a safe distance. Avoid feeding or approaching animals, as it can be harmful to both you and them.
44. Domestic animals
Walk on the inside of the trail with pack animals. Do not put yourself between an animal and the edge of anything.
45. Community matters
Get to know the people you’re hiking with, the guides and the porters if possible. This is what makes the trek extra special.
46. Wash your hands whenever possible
Use hand sanitizer of you are unable to wash your hands.
47. Use sunscreen on a regular basis
Protect your skin from the sun, even if you can’t see it.
48. Bug safety
Apply insect repellent to prevent bug bites and potential diseases.
49. Take long strides in flat areas
This uses your muscles in a different way and stretches them a bit as well.
50. Take short steps when going uphill
This can help your calves and also lower the demand on your heart.
51. Take zigzags
Zigzag your way up or down to make it easier on your knees if you need to.
52. Use poles
Let your poles absorb some of the burden going up and down.
53. Carry emergency device
Carry a fully charged mobile phone or a satellite communication device for emergencies.
54. Listen to your guide
Be honest with them. They have seen it all already, so don’t let embarrassment prevent you from receiving the help you need.
55. Enjoy the journey
You’re outside, the best place to be. You’re experience new and interesting things every day. Appreciate it while you are able.
Day of, while not walking
56. sleep well.
Make sure you have a comfortable sleeping setup, such as a tent, sleeping bag, and sleeping pad.
57. Buy the local crafts to support the local community
Yes, they’re probably over-priced. Do it anyway.
58. Use the water that has been boiled
You can also use purification tabs or water filters, or a combination of all three.
59. Food safety
Avoid salads and meats if possible unless sure of condition.
60. Keep your phone warm
Put your phone in a sock to keep it warm, or next to your body, as cold electronics lose charge faster.
61. Write in your journal every day
You’ll see new things in every direction you turn. After a while, they tend to blend together. Writing in your journal helps to organize your memories in a way that helps that helps you know what it is you actually did.
62. Eat, even if not hungry
It’s easy to not eat when you’re hiking, when you’re at higher elevations. Energy is crucial however for success and the only way you get that on a long-term basis is by eating.
63. Send postcards home if possible
To yourself or a loved one. You will appreciate it when you get home.
64. Use Nalgene water bottles for heat if necessary
You can pour boiling water into a Nalgene water bottle and it will stay warm for hours. If it is not a Nalgene water bottle, it may melt with the heat.
What should I pack for a trekking trip?
The absolute minimum gear you should be bring is as follows.
- appropriate footwear
- appropriate clothing layering system
- a map and compass or GPS
- a first-aid kit
- a headlamp or flashlight with extra batteries
- sun protection (sunglasses, sunscreen, and a hat)
- sufficient food and water (plus a way to purify water)
- emergency shelter (such as a lightweight tent or bivy sack)
Tailor your packing list to the specific conditions and duration of your trek.
Hygiene while trekking
Use body wipes daily to keep your body clean while trekking and to wash up after relieving yourself .
To wash your hair without running water, you can wash it in a basin by pouring water you’re your head with a cup, before and after using shampoo and conditioners. This method allows you to clean your hair without running water, but it may not provide the same level of cleanliness as using a shower.
Alternatively, if you find a stream or lake, take advantage of it and wash your hair using environmentally friendly soap and shampoo.
In between washings, you can use a bandana, a hat, ponytails or braids to keep your hair under control. But brush it twice daily, whatever else you do with it.
Disconnecting from technology
A huge part of the trekking experience is being disconnected from technology for a significant amount of time. Don’t ruin it by bringing along electronic devices that will distract you from the experience.
Bring a book, write in your journal, play card games with your companions or tell stories to each other.
Collecting memories
While a cell phone is technology, it is also the major tool for photography for most people. You can keep it charged with solar chargers, or multiple power banks if necessary. Use battery-saving mode and switch to airplane mode.
You can bring along external drives to store all of your photos if you do not have access to a cloud service.
How to stay safe while trekking
Take a few steps before you leave to make sure you stay safe while you’re out on your journey.
- always inform someone about your trekking plan
- check the weather forecast and be prepared for changes
- learn basic navigation skills and carry a physical map and compass, even if you have a GPS device
- be aware of your surroundings and potential hazards, such as wildlife, unstable terrain, and weather changes
- stay hydrated and nourished, and take breaks as needed
- familiarize yourself with the signs of altitude sickness if trekking at high elevations and know when to turn back or seek lower ground
Trekking Hacks and FAQs
To get better at trekking, focus on improving your physical fitness through regular exercise, including hiking and endurance training. Invest in proper gear, learn navigation and survival skills, and gradually increase the difficulty and duration of your treks to build experience and confidence.
The #1 etiquette rule while hiking is to “Leave No Trace.” Respect the environment by packing out your trash, staying on designated trails, and minimizing your impact on nature to preserve the beauty and integrity of the trail for future hikers.
The #1 etiquette rule while trekking is to “Respect Local Culture and Customs.” Show appreciation for the local communities, their traditions, and way of life. Follow their guidelines, dress modestly when required, and engage with locals in a respectful and considerate manner.
To get energy for trekking, maintain a balanced diet rich in carbohydrates, proteins, and healthy fats. Stay hydrated by drinking plenty of water. Consume energy-rich snacks and meals before and during the trek, such as fruits, nuts, granola bars, and trail mix.
Final Trekking Tips
With proper preparation, you can navigate effectively and make the most of your trekking experience without feeling overwhelmed or unprepared.
When you have conducted thorough research, packed the right gear, and undergone adequate training, you approach the trek with a sense of preparedness and self-assurance.
This confidence not only enhances your overall trekking experience but also lets you tackle challenges with a positive mindset. Being well-prepared before setting out on a trek can significantly contribute to your safety, comfort, enjoyment, flexibility, and confidence throughout the journey.
Dr. Tammi Kaeberlein is the owner and author of Wander Healthy, a longevity lifestyle blog that helps people incorporate healthier options into their daily lives. She's also a scientist in the biology of aging and has earned certification as a sports nutritionist and personal fitness trainer. When she isn’t writing about health and wellness, she is usually outside somewhere.
Beginner’s Guide for Trekking in the Himalayas: Tips on Planning and Execution
Home » Trekking Tips » Beginner’s Guide for Trekking in the Himalayas: Tips on Planning and Execution
- April 21, 2023 April 22, 2023
- Trek Preparation , Trekking Tips

The majority of you who have searched for this topic are probably planning your first trek in the Himalayas. Otherwise, you may already have booked a trek and are trying to understand what an adventure tour would be like on the mountain.
Yes, you read that right—an adventure tour. Trekking in the Himalayas is indeed an adventure tour, and it will have its share of risk elements as well. But don’t worry; you have a certain amount of risk even when you cross a road or drive a car. Besides this, trekking is not a sport, at the same time does require certain physical strength and endurance, along with mental preparation.
Now let’s carefully go through the major planning parts and till you complete your journey along with our insights and pro tips . Remember that it is almost impossible to write an “ All in One or Complete Guide ” on this topic. In spite of the fact, we put in our due diligence so that we don’t miss any important points for you and even work as your one stop trekking guide. Don’t follow blindly whatever is written or implied, including our website! While most of these are facts, a few are opinions based on professional experience on this topic or a holistic view of mountains in general.
Also, this article is not about recommending the best treks for beginners in XYZ and so on, but rather equipping you with a meticulous understanding of the fundamentals of a trekking vacation in the Himalayas. On top of that, you get a broad understanding of how to choose a trek that suits you the best.
Plan well ahead of the execution:
Planning the right steps from the beginning would surely help you complete your first Himalayan journey, making it safe and memorable. It can be a life-changing experience quite easily for you. However, a trip at an altitude above 3000 m or 10000 ft will have uncertain natural or inclement weather conditions; altitude itself is a barrier, and adjusting to a different daily routine for most of you can be a potential challenge on a trek. Don’t take it too easy or casually, and be prepared. That can easily make life difficult on mountains. Simply think that mountains have their own natural rules, and we just need to abide by them. Rest can be a game changer in your life.
The Planning Phase: From now till you start your journey
Now we will discuss the points, which are essentially your preparation. It’s better to pay attention to details if you have made up your mind in favour of a Himalayan trek. When you get time, do go through the given links for more understanding. Note the headings so that you can do your own re(search) on the points mentioned here.
Choose the right season or time for your trek :
Any trekking route in the Himalayas will have its own specified season(s) that are supposedly the “best time to visit”. During this period, a particular route showcases most of the beauties and features it is known for. Additionally, you get a safer passage to complete your trek as well.
Each such suitable season for a particular trek will have different beauties and offerings, and you don’t get them all together. But trust us, each season will delight you with something or other.
Decide on the trekking grade :
All Himalayan treks are graded according to their difficulty level to complete. Consider starting with an Easy grade trek . You should try a route that will be well within your control as a whole; don’t test any extremes. Most likely first time you are going to a high altitude place and stay above ~ 3000 m/10000 ft.
People with previous hiking experiences in low altitudes who are living an active lifestyle or following a fitness schedule for the time being may consider a Moderate level trek , going up to the highest altitude of ~ 4300 m – 14000 ft while camping or sleeping below 4000 m – 13000 ft of altitude.
Research the trekking route or the region :
Now these treks are located in different states or destinations across the Indian Himalayas . Try to see which ones suit you best, your preferred locations that match your vacation time, and any other preferences. All the destinations are indeed beautiful, but at times it’s a matter of convenience to choose a particular region.
Sometimes you may have heard about or been recommended a particular trek route. Before taking up your trek, research your chosen trekking route thoroughly. Get information on the trail conditions, weather patterns, altitude changes, and any cultural and natural landmarks along the way. This will help you prepare mentally and physically for the trek.
Pro tip : Consider choosing a trek from a shortlist that most matches with the above mentioned three points.
Talk with someone you know:
This is a quite natural thing that you would like to talk to someone you know who has been on treks, preferably in the Himalayas. Or maybe you just heard about trekking from a person, and now you are here as part of your research. First-hand information from people you know matters, as they should have taken many of these steps.
Otherwise, just get in touch with us so that we can talk. Often, it is easier to comprehend or understand when we talk.
Consider bookings through a reputed trekking tour operator/agency for trekking:
As a first-timer, it’s not normal that you can arrange a DIY (a.k.a. independent) trek in the Himalayas on your own. Well, maybe if you have highly experienced friends or family members to make a group. There are many logistical things the team would need to take care of to arrange an independent trekking tour.
Else, simply do your research and choose a professional organisation that takes care of the trekking logistics and helps you with many other things that you require. E.g., almost half of the points we discuss here are automatically taken care of by a reputed trekking company.
As a trekking tour operator, we offer Fixed Departure Treks that you may join as a solo member or with your group. Dates, costs, and services for these treks are fixed. Alternatively, if you already have your own group of people, you may opt for a Customised tour . Here dates, itinerary, level of service, and itinerary are tailor-made as suits your group. Cost depends on primarily the number of persons and level of service you prefer.
Pro tips : You pay for the professinal knowledge and on ground quality support. Do thorough research before choosing your trekking organisation. Consider getting a first-hand reference or recommendation from someone you know. There are many companies that are essentially travel portals or marketplaces, and Trek is one of the many available products and tickets they sell! It all depends on how the on-ground tour operator, who is responsible for managing and running the show, handles things! We suggest you avoid using a “booking agency”, unless highly trusted.
Keep a provision for an extra (buffer) day in your itinerary:
It may be pretty helpful to keep a buffer day or two in your travel itinerary. Keep this reserve day at the end of your trek. Either use it during an unforeseen event on the trek or later you just chill out a day after your trek.
Depending on a trek, sometimes it is convenient to reach the nearest railway station or airport on Day 0. Plan your travel itinerary accordingly.
Flexible flight tickets and reservations can be handy in dealing with such conditions.
Visit a doctor and consider getting a travel cum medical insurance for the trip:
It is always advisable that you visit a doctor well in advance before starting your trek. You must consult your doctor if you are already on medication or have an existing medical condition.
As already mentioned, trekking in the Himalayas involves certain risks, such as bad weather, accidents, and natural disasters. Consider getting comprehensive travel insurance that covers medical emergencies, evacuation, and repatriation. Check with your trekking company to see if they can arrange one for you.
Arrange the necessary permits and documents :
Treks within the Himalayas are in remote locations and require permits from various governing bodies, including the concerned forest department or district administration offices, etc. If you book with a company, they will obtain the necessary permits.
Always carry the original identity card with your address on it. It can be your AADHAR, driving licence, voter ID, passport, or any other government ID card (a PAN card is not a valid ID card as it doesn’t have an address on it). Keep one or two photocopies of the original. In some treks, you need to bring your recent passport photo for permit procedures.
Additionally, you may have to submit a medical fitness certificate from a doctor for some treks where it is applicable. As it’s an adventure activity, usually companies will require an indemnity clause signed by you as well.
Get fit for the trek:
Trekking in the Himalayas can be physically demanding, so it’s essential to be in good physical shape. If you are already on a fitness schedule, you are surely at an advantage. Otherwise, plan to start a fitness programme well in advance, focusing on cardio and a few strength training exercises. Consult a physical trainer or your tour operator before undertaking any such programme. You can also do some practise hikes in your local area to build up your stamina.
Remember that you will enjoy the trail and surroundings more when you are reasonably fit for a given trek.
Here is a starter for the beginners:
Physical Fitness
Check the list of things to carry :
This is a very important aspect so you are safe and comfortable on the mountains.
- Your 3-layers of clothing (a must on the mountains above ~3000 m/10000 ft):
- Sleeping bag (generally, it is included in the package by your tour operator, like we do in our treks)
- Your trekking shoes or boots
- A rucksack or a backpack with a raincover
You may buy, borrow, or rent a few items. On many easy treks, you can reuse the already existing ones that you have for a different purpose. Consult our article on renting vs. buying trekking gear before deciding on a particular item.
Do carry a personal first aid and general medicine kit.
There are other small yet essential things to pack. Check out our detailed list of things to carry on a Himalayan trek below:
List of things to carry on a Himalayan trek
Pack smart and light:
The key to backpacking is to pack all the essentials while keeping your pack light. You don’t want to carry unnecessary items that are heavy on you. We recommend that you invest in buying good quality items so that they serve you safely on the mountain in the long run. At the same time, these items are lighter in weight and known for their wider range of use in different types of situations and conditions.
How you should pack your backpack for trekking?
Budget your expenses:
Now comes the budget. Estimate based on the following major expenses:
- Your tour package cost (which usually takes care of your accommodation, meals, trekking guide and support staff, camping equipment and logistics, permits and levies charged by the governing authorities, etc.)
- Travelling to basecamp and returning home
- Any other accommodation and meals outside the trek but which may be required during your travel
- Purchasing or renting trekking gear
- Any other personal expenses or some buffer expenses
Pro tip : Keep adequate cash on hand for any on the spot expenses and as a buffer. Online transactions can be very difficult in remote areas due to limited network connectivity.
Don’t jump into a trek at the last moment:
As you can see, there is quite a bit of planning ahead for your trek, so just don’t register or book a trek at the last moment. As a beginner, take your time, plan well in advance, and then get things arranged. There is always a next time, no matter how tempting if you could manage to join at the 11th hour. I is very likely that if you are very late to decide, you may remain unprepared and put yourself and your team at risk.
Trek Execution Phase: Follow these when you are actually on the trek
This is an equally important phase and deals with the dos and don’ts on the ground. To adjust yourself on a mountain, you need to focus on two key areas. One area is altitude and how you are coping with it physically following certain rules. Another area is being that how do you interact with the environment as a whole by following certain norms, decorums, or etiquette, whatever you like to call it.
Stay hydrated and enjoy your meals:
It is vital to drink enough water and fluids throughout the day to remain hydrated. Fill your water bottle(s) at a campsite and ask your guide about a possible opportunity to refill while you walk. Drinking water is collected from a stream or from a natural source. Avoid drinking water from unknown sources.
Remember that due to the cool or cold weather, you may not feel like drinking adequate water. This may directly lead to a muscle cramp or create other health problems on the mountain.
Eat sufficient food, which gives you much needed energy and nutrition to continue your trek. Ideally, you should eat at least the same amount you eat back at home. A fractional reduction can be due to the new conditions; however, a moderate loss of appetite is an early indicator of mountain sickness.
Acclimatise properly :
High altitude means less pressure, or thin air, and less oxygen to breathe. Acclimatisation refers to the physiological changes that occur when you arrive at a high altitude and allow the body to function properly in the low oxygen environment. E.g., your ear pops on a plane, which is the adjustment your body does due to the pressure difference.
It is recommended that you sleep inside the tree line for three nights before reaching a higher altitude. Usually tree line ends between 3300 to 3600 m (11,000 and 12,000 ft) depending on a region or particular route. A well thought-out itinerary will consider these factors and help you in the acclimatisation process.
If your body doesn’t acclimatise, you may notice sustained symptoms, which include headache, nausea, shortness of breath, and dizziness. difficulty sleeping, and the inability to exercise or move. These are signs of Acute Mountain Sickness (AMS) , although they are uncommon below 4000 m – 13000 ft. When someone is affeted by AMS, it is a must to bring the person as quickly as possible.
Avoid alcohol and smoking which seriously harm you on the mountain.
Pro tip : Cool down once you reach your campsite for the day. Don’t get inside the tent and rest immediately, even if you are feeling unwell. Rather, put on warm clothes, walk around a bit, chit chat with your fellow trekkers, sip a cup of tea, and enjoy and adjust to the environment.
Inform any irregular or uncomfortable physical condition to your trek guide:
Always inform your trek guide or leader about any discomfort rather than keeping it a secret. This may help to identify any altitude conditions and act accordingly.
Follow the instructions of your trek guide or leader:
This is self explanatory. Be it how you walk or manoeuvre on the trail or maintaining certain rules. They are experienced in these conditions and well aware of the situation. After all, your guide and support team are responsible for your well being on the mountains.
Start early and finish early:
A regular day on the trail can be quite different from your daily routine back home. During a trek, you wake up early to witness the sunrise views, get refreshed, and have your breakfast. Pack everything and be ready to start at the latest by 7:00 – 7:30 am.
If you start early, most likely you will reach your day’s destination on time and have plenty of time to explore the campsite in the afternoon. Similarly, you finish your dinner and call it a day early so that you get enough sleep.
Set your pace:
It is important to find the pace that suits you. Don’t walk too fast or too slowly, as either of these will make you tired. Keep walking at a slow but steady pace. Take short breaks to enjoy nature or to catch your breath.
Follow mountain manners and etiquettes
Mother nature likes good manners. Be modest and humble in the mountains. A smile goes a long way. Your flexibility to cope with and adjust according to the conditions is certainly a great advantage.
Work as a team on mountain:
Just remember the age-old saying, United we stand, divided we fall. Gel well with your team mates. Your team’s bonding plays a role here as well.
Respect local customs and traditions:
The Himalayas are a culturally diverse region, and it is important to respect local customs and traditions. Dress modestly, remove your shoes before entering temples or monasteries, and ask permission before photographing people.
Care for the environment, leave no footprints:
The Himalayas are a fragile ecosystem, and it’s important to respect and take care of the environment while trekking. This is the only way we can do our part to preserve this magnificent gift of nature for our future generations.
Strictly avoid littering, stick to the designated trails, and do not disturb the local flora and fauna. Don’t leave any of your non-biodegradable waste on the mountain; carry these items back and recycle or reuse them whenever possible.
If you have continued till now, most likely it has clarified many queries and doubts that you had as a beginner. If you need some more information or understanding, please feel free to get in touch in one of the following ways:
About Author
Leave a Reply
You must be logged in to post a comment.
Submit this form that we can email you all the necessary details and call you to discuss.
Tour starting date: green boxed dates indicate starting of a scheduled fixed departure tour (day 1 of our tour itinerary). please check the calendar and choose a suitable fixed departure date (green boxed) unless dates are not matching or you are looking for a customised/private trip., i accept the terms & conditions.
Tips for Hiking With Kids
Tips for Hiking With Dogs
Mapping and Navigating Your Route
10 Essential Safety Tips
Tech for Backcountry Communication
Best Hikes in US National Parks
Amazing Mountain Hikes in the US
Best Hiking Trails in Canada
Best Hikes in Europe
Best Hikes in Africa
Best Hikes in South America
Best Hikes in Southeast Asia
World's Best Long-Distance Hikes
Hiking Boots, Shoes, and Sandals: How to Choose
Buying and Breaking in Hiking Boots
Hiking Boots
Lightweight Hiking Shoes
Men's Hiking Boots
Men's Hiking Sandals
Waterproof Hiking Boots
Women's Hiking Boots
Women's Hiking Sandals
List of Essential Gear
Hiking Pants
Hiking Shirts
Hiking Socks
Baby Carriers
Hiking Watches
Trekking Poles
A Complete Packing List
Everything You Should Pack for a Hiking Trip
Rena is a freelance writer and editor specializing in travel, tech, sustainability, gender/sexuality, and intersections thereof whose career has included 10+ publications and whose personal travels have spanned 25+ countries.
:max_bytes(150000):strip_icc():format(webp)/Behar-headshot-74a0c6b3b9df4c8691831484925bc365.png "trekking trip details")
TripSavvy / Linda Strauta
One of the biggest appeals of a good hike is the chance to get away from the city, with all its hustle and bustle. But being temporarily away from society means that you can’t just pop over to a convenience store if you happen to need a snack or a Band-Aid.
“Going on a hike, you are out in the elements, exposed to the beautiful but also ever-changing landscape and weather of nature,” says Cody Meuli, product line coordinator for The North Face. “Nature is wild. It deserves respect. We can respect nature by being prepared.”
There’s no substitute for good preparation for making your hike the best it can be. “Pack for your day,” says Vince Mazzuca, director of marketing at Osprey. “The more you know about your conditions, your trip plan, and your backup plans, the more you can be prepared for the day and be confident in your outing, which all equals having more fun in the outdoors.”
The 10 Essentials to Bring on Every Hike
The “ten essentials” were originally created by conservation and education nonprofit The Mountaineers during their climbing courses in the 1930s. The list still holds up and is frequently referenced by backpackers and other outdoors experts, including the American Hiking Society (AHS), who compiled a list of their own. The essentials you should bring are:
- Appropriate footwear: Your feet are your most important hiking tool. As they go, your whole trip goes. Make sure you’ve chosen the correct shoe for your hiking conditions and don’t forget proper socks .
- Map and compass/GPS: No, your phone doesn’t entirely count. While offline map functionalities and apps like AllTrails can be great, you also need to be prepared for the possibility of a dead battery or lack of reception. That’s where a paper map and compass or satellite GPS can save you.
- Water: Hydration is key, especially when hiking. The most common suggestion is that you should drink roughly 1 liter of water for every two hours on the trail, but you should bring more water than you think you’ll need. If you’re going on a multi-day trek , you’ll probably need more water than you’d like to carry. In those cases, a portable water filter or a purifying solution will allow you to treat water from outdoor sources.
- Food: Don’t let getting hangry ruin your hike. Travel with calorie-dense foods to keep you going, whether that’s some DIY trail mix, energy bars, or apples and jerky. It never hurts to throw in an extra serving or two just in case you’re out longer than expected. Consider using a backpack cooler if you plan on bringing along food you want to keep cold.
- Rain gear and dry-fast layers: Weather forecasting is still an uncertain science. Would you rather have slightly more stuff in your bag and stay dry when the wind changes, or have a slightly lighter bag and an accidental case of hypothermia? (The former is the correct answer.) A versatile, lightweight, and breathable rain jacket is the single most important thing you can pack, in Meuli’s opinion. There are plenty of lightweight options that will keep you warm and dry without weighing you down. Look for words like “shell” and “packable” in the clothing description.
- Safety items: The AHS defines safety items as “light, fire, and a whistle.” A small flashlight will suffice for a day hike, while longer trekkers may want a headlamp or something more substantial. If you’re going to start a fire , be absolutely sure you’re aware of both the legality of doing so and the environmental conditions. Fires are prohibited in many parks for a reason; you’ll have an even bigger problem on your hands if you start a wildfire.
- First aid kit : Accidents happen and you should be prepared when they do. The Red Cross has a list of easy-to-find items to stock your kit, as does the Washington Trail Association . You can always supplement with things that are specific to your needs, whether that’s prescription medication, Pepto Bismol, or just some extra Band-Aids. “Never underestimate the value of chapstick,” says Meuli.
- Knife or multi-tool: You don’t need to go full Crocodile Dundee, but having a good multi-tool , like the 19-tool Leatherman Signal , can help you with a multitude of trail tasks, whether that’s gear repair, first aid, trimming kindling for a fire, or just cutting up your snack apple.
- Sun protection: Any skier or snowboarder who’s fallen victim to goggle tan lines can tell you that sun protection isn’t just important on warm days. Make sure you’re SPF’ed up and equipped with a hat and sunglasses, even when it’s cloudy.
- Shelter: While getting stranded may seem unlikely, you never know what could happen. That doesn’t mean you need to carry an entire tent on a day hike—AHS recommends a space blanket as a good option.
- Bonus: A trash bag: The “leave no trace” adage is a common one in the outdoor community for a good reason. An old plastic grocery bag or Ziploc can help you keep your trash contained and make sure it gets off the trail with you. Even better, you can help leave the trail cleaner than you found it. “You’d be amazed at how much you can help,” says Meuli, who recommends spending at least one day on your favorite trail solely for the purpose of picking up trash.
What to Wear Hiking
There are plenty of options for great hiking gear out there. Ultimately you want to be warm, comfortable, and protected from the elements. When you're picking out your clothes, Meuli recommends that you start by considering the ecosystem of your trail. Is it dry or humid? In the mountains or at sea level? Then, check the weather forecast; while it isn’t always 100 percent accurate, it’s good to have an estimate. Finally, consider the objective of your trip. Are you moving fast and covering a lot of ground, or out for a casual jaunt?
“If I’m hiking a fourteener, I want to pack fast and light with lots of water and energy bites,” says Meuli. “If I’m out with my family and my dog on a Sunday afternoon, I might bring extra food, water, and my camera in order to take time to truly experience the joy of the trail.”
Choosing Layers
The layers you need, naturally, depend on the weather. Meuli suggests working in threes, with a base layer of a T-shirt/tank top or lightweight long-sleeve shirt; mid-layer of a long-sleeve shirt, fleece, or lightweight jacket; and a top breathable wind/rain shell. If it’s going to be colder, upgrade the levels of your layers accordingly by, say, swapping a tank top for a thicker long-sleeve shirt and a light hoodie for a fleece.
Choosing Fabrics
Fabric-wise, most outdoor gear is made from synthetics like polyester or nylon to help wick sweat while still allowing movement and breathability. Unfortunately, synthetic fabrics can also shed microplastics when washed that end up in our water supply. If you want to keep it eco-friendly, opt for merino wool instead. Rather than the scratchy sweaters, you may be thinking of, merino is soft against your skin. It also wicks sweat, minimizes odor, and is fully natural—wins all around. Fleece made from recycled materials can also be a greener choice.
Cotton is one textile you should absolutely avoid. Cotton absorbs and retains water, which means you’ll stay sweaty in warm weather and start getting chills in cold.
Whatever fabric you choose, Meuli recommends gear that’s durable, versatile, and well-fitting. “I don’t want to struggle with my gear at the same time I’m struggling against the elements,” he says.
Tips for Packing Your Gear
So where do you put all of this equipment? Into your handy hiking pack, of course . Just like your clothes and shoes, your pack should comfortably fit your body. “People regularly ignore the importance of fit in a pack and a poorly fitting pack can lead to a pretty uncomfortable experience,” says Mazzuca. “The best pack for you is the pack that fits really well. Then you can spend more time enjoying the day and less time adjusting pack straps.”
There are two things to keep in mind when packing your bag: weight management and access. Heavier items should be centered and close to your back, while the lighter items can fill in space around the heavier ones to keep them in place. “A properly fitting and packed bag will be secure on your back and will not sway under dynamic movement,” says Mazzuca. “This helps you maintain balance over rocky terrain and is just more comfortable.”
Keep the things you’ll want easy access to in places you can reach, rather than buried at the bottom of the bag. Things like water, snacks, sunscreen, extra layers, and your phone should be easy to grab without having to do a full trailside excavation.
“You want to enjoy yourself,” says Meuli. “You don’t want to overpack but you also don’t want to be underprepared. You want to strike a balance between comfort, protection, water, and sustenance to last you the right amount of time while on the trail.”
The 11 Best Waterproofing Sprays of 2024, Tested and Reviewed
The 11 Best Travel Money Belts of 2024
The 14 Best Men’s Travel Pants of 2024
The 10 Best Patagonia Jackets of 2024, Tested and Reviewed
The 9 Best Hardshell Jackets of 2024
The 11 Best Carry-on Backpacks of 2024, Tested and Reviewed
The 14 Best Survival Kits of 2024
The 11 Best Beach Blankets of 2024
The 7 Best Winter Coats for Men of 2022, Tested and Reviewed
Packing List for an Overnight Hike
How to Choose and Prepare for a Hiking Trip
The 7 Best Ski & Snowboard Boot Bags of 2024, Tested and Reviewed
Everything You Should Pack for a Camping Trip
What to Pack for a Short Hike
The Best Daypacks for Hiking of 2024, Tested and Reviewed
What to Wear Hiking: Experts Share the Best Hiking Clothes
A Complete Guide to Hiking for Beginners
Planning your hiking expedition can be a bit overwhelming, especially for beginners. Not to mention the challenges that arise whilst you are actually out there in the wilderness.
Many hikers will find it difficult to live in urban areas, and what about bears? Then there are other concerns such as what to eat, what to pack, how to navigate while hiking and how to deal with the climate.
So, in this comprehensive hiking guide , we are going to break down everything you need to know when preparing for this life-changing adventure.
Just a little preparation and planning will get you going.
What is Hiking?

Hiking is a low-impact activity which involves hikers walking across long trails or paths, in a forest or mountains. This activity can be of moderate to high difficulty, depending on the type of trail.
A hike can be for just one whole day or last for more than 20 days; it really comes down to your choice. You can go for a hike alone or in groups.
Hiking is slightly different from trekking, as trekking is a much longer program.
Altogether, hiking is an amazing activity that helps you explore the history and culture of a country or a specific area. It’s like a cultural adventure, where people meet trails.
What are the different types of hiking?
As for the duration and difficulty of a hike, there are two different types:
- Short hikes: These can last for as long as one whole day or half a day. Or, it can just accompany your short trip.
- Long hikes or treks: Few hiking programs last for more than a week, where hikers cover a considerable amount of kilometers. Such hiking involves spending the nights in camps, mountain huts or tents.
No matter what type of hiking you engage in, it is surely one of the greatest ways to visit local areas and experience the natural wilderness.
How to start hiking as a hobby?

Hiking is just walking right.
So primarily, it requires your willingness to get out there and explore your surroundings.
Once you make up your mind, you just need to arm yourself with the right kind of clothing, gear and safety kit, and you will do just fine.
- Take baby steps; buy stuff that is absolutely necessary for beginner’s hiking such as shoes, wind-breaker, backpack, etc. As you gain experience, you can then buy additional gear and make hiking your hardcore hobby.
- Plan your budget and spend according to the time you’ll invest in hiking. You don’t want to overspend if you hardly hike.
- Hiking is quite an inexpensive hobby, as most of the gear needed for a hike can be generally found around your house.
- Pack all the essential gear and look for state or county parks near you. Most of these parks do not demand an admission fee and have clear, marked trails. Which is why these are a perfect option for your first hiking experience. You will get to see some nice scenery as well.
- Do not go above your skill level. Advanced trails are for people who’ve been hiking for several years. Have patience and as the years pass by, you can click with this hobby.
- Once you’ve been on a few trails, you can search for more difficult or challenging terrains and invest in appropriate hiking gear like good shoes, technical equipment, trekking poles, a hiking backpack and more.
What is the best time to go hiking?
Hiking is suitable all year round, depending on your selected area and its weather conditions. It is better to avoid hiking during winter, as it can get dangerous or harsher. But the mountain areas that host ski sports in winter are ideal for hiking.
Amazing benefits of Hiking
Nothing is more mesmeric than the beautiful landscapes and panoramic sceneries you see whilst hiking. But these aren’t the only pros of hiking, there’s a lot more to it than you think.
Being in the company of nature can reap lots of benefits, mental as well as physical.
Physical Benefits
Whether you are planning to go on a day-long expedition or a short hike, either way it will act as a low-impact cardio workout. Such cardio exercise will help you:
- Reduce risk of heart diseases
- Aid weight loss
- Lower blood pressure levels
- Strengthen core muscles
- Boost bone-density
Hiking has the ability to reverse the effects of arthritis and osteoporosis and tends to boost your bone density. Thus, regular hiking will gradually decrease the loss of calcium in your bones, making them stronger. Not to mention, hiking is also considered as a weight-bearing workout, which helps in strengthening muscles and bones.
Mental Benefits
The most significant hiking benefit is for a person’s mental well-being. As you hit the trail, you will instantly feel more relaxed, your stress levels and anxiety will be reduced and your mood will be uplifted. Regular backpacking tends to prevent people from depression, as your brain engages in more creative and problem-solving situations.
Here’s how hiking impacts your mental health:
- Reducing stress and anxiety: Climbing and walking long distances tends to alleviate the anxiety levels in humans and discard negative thought processes.
- Improvement in memory and mood: Even if you only spend a couple of hours in nature, it will boost your cognitive abilities, increase your memory span and uplift your mood.
- Problem-solving skills and creative thinking: A research revealed that walking results in the formation of creative ideas. Your creative output can rise up to 60% if you go hiking frequently. Moreover, time spent in the wilderness allows your brain to develop great problem-solving skills.
- Bonding: Not just for the body and mind, but hiking works as a great opportunity to bond with your loved ones, escape from the hectic life and meet new people.
What to pack for your hiking?

One of the biggest concerns of newbie hikers is; what gear to pack for the journey.
While packing for hiking , the ground rule is to keep it as light as possible, so to remain comfortable and safe.
Now there are two scenarios here; what to pack for a one-day hiking trip and what to pack for multi-day hiking? Let’s go into detail.
What to pack for a one-day hiking trip?
A backpack is the first and foremost item needed for day hiking. Choose a backpack that can efficiently hold 11 to 20 liters of gear, ideal for short, one-day hikes. here is a guide about Best Osprey Backpack.
Pack your clothing as per the weather conditions of the trail. Make sure you are well prepared for unplanned weather and consider clothing that will protect you from rain, sun or snow.
When it comes to footwear, it really depends on personal choice. Some hikers prefer wearing trail runners, while others would opt for hiking boots . Go for training hikes and see which footwear feels comfortable to you. Many might think that hiking with trail runners is bizarre, but it is actually not. Trail runners are able to survive thousands of miles, even the most rugged terrains out there. As compared to heavy hiking boots, trail runners are much more reliable and comfortable for one-day hikes.
Food and Water
Pack snacks that will suffice you for day hiking and will be easy to carry on the trail.
How much water should you carry on your hike? – That’s a great question.
You can carry about 2 liters of water per person for a one -day hike. A hiker must drink around 1 liter of water every 2 hours, or more if hiking during warm climates. Carry aluminum or stainless steel bottles instead of plastic bottles and fill them up timely at water sources.
You will come across mesmeric terrains while hiking, and you might feel like capturing the beauty to cherish the moments. For that, we recommend that you carry your best point-and-shoot camera that is handy, lightweight and has an excellent zoom. There’s no point in hauling a 10 lbs. camera on the hike.
Toilet Paper, WAG Bag and Trowel (for when there are no toilets)
You will have to take plenty of toilet paper on the trails, as a matter of fact. Store them in a zip lock bag to keep them dry. Whenever you want to go for a #2, dig a cat hole with the help of a trowel. Remember to stay at least 200 feet away from a water source.
There are a few permit sections of trails that require you to carry your doings in a WAG bag. Sounds dreadful, but it actually isn’t. The bag has a deodorizer inside to neutralize the smell. A WAG kit is necessary on a few parts of the trails, as myriads of people visit every day.
Emergency gear
First aid kit.
Hiking expeditions can sometimes be risky, especially in the backcountry. Make sure to carry a first aid kit with you comprising of medicines, painkillers, band-aids, etc. to be safe. You should also carry a medical emergency guide that will help you perform proper first-aid with step-by-step instructions. You can also carry an emergency shelter for uncalled situations.
Always carry matches or a mechanical lighter in your supplies. Select waterproof matches, specially made for hiking purposes and store them in a sealed can. If the situation arises, make sure to pack dry tinder for firestarter purposes.
A small, bright headlamp will come in handy during hiking trips. Always check the batteries before heading out and also carry a lighter backup light source (like a smartphone).
Sun Protection
Proper sun protection is an extremely important factor to consider during any backpacking adventure, even if the weather is cloudy. So, don’t forget to pack your sunglasses, SPF lip balm, sunscreen, hiking hat, etc. Select a sunscreen with a minimum of SPF 30 to protect your skin from UVB and UVA rays. Apply it every 2 hours.
Tools and Repair Equipment
Tenacious tape.
Anything could happen when you’re out in the wilderness, so it’s good to be prepared. Carry tenacious tape, just in case you need to repair a torn tent, popped sleeping pad, backpack, dry bags, jackets, or any other fabric, rubber or vinyl-made gear.
The tape will prevent rips from spreading further. Go for a tape that has a non-gloss finish, as it will look almost invisible and you don’t have to worry about matching colors. You can also bring a small roll of duct tape for heavy-duty blister protection.
Pocket Knife
A small utility knife comes in handy to perform various tasks during backpacking trips. It’s good to have an all-in-one tool (knife, can opener, tweezers, etc.) on the trails.
Make sure to carry a permit wherever necessary and keep it where it will be easily accessible. That’s because you have to show it to respective Park Rangers of the area.
Toiletries and Hygiene Products
Don’t forget to pack small toiletries and hygiene products such as toothpaste, travel toothbrush, hand sanitizer, etc, which are absolute needs.
Don’t forget to carry prescription medicines and menstrual products as well.
Handy Towel
A small towel will come in handy to clean up after a long day’s hike. This will not only help you in maintaining proper hygiene, but also freshen up your mood. Make sure to never wash yourself directly in the lake or other water sources, as it is dangerous for the ecosystem and wildlife. Rather, walk a little further away from the water source, take a water bottle shower and use your small towel as a washcloth.
Journals, Books and Games (Optional)
It’s good to have some kind of entertainment, so you can just relax after a long day of hiking. You can carry journals along with you as well, to pen down your experiences on a trail.
Other Essentials
Apart from all these listings, you can also carry a whistle (to signal for help in emergency situations), a garbage bag (to store garbage that you may create), toilet paper (it also serves as a firestarter), compass, maps, GPS, altimeter watch or other such navigational gear, binoculars, ID, cash, credit card, cellphone, trekking poles, etc.
What to pack for multi-days hiking?
For multi-day hikes, you might need to carry all the gear mentioned above, but what else?
Is there any extra gear needed for more than one day of hiking? The answer is; Yes. Here are a few things you need to add to your pack (along with things listed above):
A tent is one of the heaviest items that you will be carrying on your hike. Which is why it is important to choose a tent that focuses on keeping the weight down.
There are plenty of non-freestanding tents out there, deliberately designed for ultralight backpacking and thru-hikers. Single-wall shelters work exceptionally well in keeping the weight down, whilst being feature-packed and of comfortable size. These might take a little longer to set up, but they are extremely lightweight compared to traditional tents.
Whereas, double-wall freestanding tents are for those who are ready to carry some extra weight, but won’t compromise on convenience.
Here are few guides about best dome tent , best 4-season tent , best cabin tent , best waterproof tent and best tent for camping and hiking .
Sleeping Bag
Many trails are situated at an elevated height, so you might feel cold, even during summer. If you plan to go hiking during late fall or early spring, you are likely to experience below freezing temperatures during the night. That’s when a sleeping bag will keep you warm. Make sure your chosen sleeping bag strikes a perfect balance between being warm and fairly lightweight. here is our guide about best sleeping bag for camping and hiking and best sleeping bag for couples.
Sleeping Pad
During chilly hiking nights, a sleeping pad will make sure your body is insulated from the cold ground. Select an insulated sleeping pad featuring up to 3 or higher R-value.
Camp Pillow
Getting a good night’s sleep is a must and the right kind of camp pillow will make that possible for you on the trails. When it comes to a camp pillow, it really depends on your personal choice. Some hikers prefer inflatable pillows, whereas some like stuffed sack pillows. Stuffed sack pillows are comfy, feather light and come with the softness of a fleece layer. here is our guide for best camping pillow
Water Protection for Backpacks
A wet sleeping bag is a nightmare in itself. So, keeping the gear inside your backpack free from water is necessary on rainy days.
You can carry one or two large sized garbage bags for when the weather gets too harsh and you want to line the inner side of your pack. To make waterproofing easier, go for waterproof stuffed sacks that allow for quick organization.
Kitchen Setup
Keeping weight to a minimum for a hiking trip is a must! And we can’t stress it enough.
Your kitchen setup also comes under the key area where you need to keep it down.
- Stove and Pot: For short hiking trips (2-3 days), you can go for an integrated canister stove system , as it is convenient, fast and fuel efficient. As for strenuous trips (about a week or more), it is better to choose a stove that’s lighter and less bulky.
- Camp Spoon and Cup: If you prefer making your own coffee in the morning or cooking your own meals, then pack a lightweight bowl that will also serve as a cup. You will also want to pack a good-quality foldable spoon.
For a three-day hiking trip, you can take a 230-gram fuel canister with you to make coffee, dinner, soup or oatmeal.
Water Filter
For longer trips, carry a lightweight water purifier or filter that will suffice you from one water source to the next. Select a purifier that works fast and doesn’t include any chemicals, pumping or squeezing mechanisms.
Additionally, you can even take a few Chlorine Dioxide Pills, just in case your purification system loses battery, fails or breaks.
Insect Rrepellant
Mosquitos are bloodthirsty, vicious and quite annoying. While hiking in any of the lake areas, you might come across bugs, mosquitoes, etc., especially in the month of July and August. To avoid this, keep a small container of DEET or other insect repellent lotion with you. Also, spray Permethrin on your clothing, tent, sleeping bag and other gear to protect yourself.
For trips that are longer than a couple of days, you need to take a lightweight, small power bank. Devices that usually run on batteries such as cameras, phones, headlamps, etc., are likely to run out of battery, so it’s better to have a backup.
Bear Canister
To store all scented items (such as trash, toiletries, etc.) and food, you can take an approved bear canister with you or cooler .
Bear canisters are large enough to carry and store all your resupplies, and keep them safe from bears, raccoons and any other creature that is very much attracted to human food. And, these canisters also double as a stool. Avoid placing this canister near cliffs, lakes and rivers. You can strap the canister right on top of your backpack or even carry it inside.
How much should my backpack weigh?
Your backpack is another of the heaviest items you will be carrying for hiking, so it’s important to choose a comfortable and lighter pack. We would recommend you to go for backpacks that weigh around 2 to 3 lbs. Such backpacks have simple frames and can handle up to 25 to 35 lbs. weight.
For short hikes on the terrain, go for up to 15 to 20 liters of daypack that will encompass lightweight clothing, a few snacks and water. For longer days in the wilderness, you will need more clothing, gear, water and food. So, opt for a pack having about 30 liters of capacity.
What to wear while hiking?
Choosing the right kind of apparel and footwear for hiking has to be an extremely essential factor of your planning. Anything you wear on your hike, from top to bottom, will make a huge difference on your entire hiking experience. It can either make it an amazing experience or a bad experience, sometimes even put you in danger.
Over-packing can lead to an uncomfortable hiking trip. So, make sure you pack only that which is necessary, which you can layer easily and avoid taking multiple things that fulfill the same purpose. It is better to take dry synthetic clothing that is washable and dry easily. Depending on your personal choice, you can pack hiking leggings, hiking pants, a long-sleeve shirt, a pair of hiking shorts, 2 to 3 t-shirts, 2 to 3 pairs of socks, 2 to 3 pieces of underwear, a warm hat, a sun hat and a pair of gloves for cold nights.
Shoes and Socks
Before you begin your hike, the footwear you’re wearing is the most important thing to check. Regular running shoes won’t provide the much needed traction on the hikes, making you unstable on rocky and uneven terrains. Ask yourself the following questions:
– What type of hike are you heading to?
– What kind of trail is it?
– Are there any wet or cold conditions?
– Would you need an ample amount of ankle support in footwear?
Here are a few footwear options for you to choose from:
- Hiking Shoes: Hiking shoes offer less support compared to boots, but they are a great option for short hikes and even trails. Hiking shoes are lightweight, so they are ideal to use in summer.
- Hiking Boots: Supportive and rugged, hiking boots offer better ankle support and feature sturdy construction. As they’re heavier and more secure than hiking shoes, these are well-suited for rough terrains and longer hikes.
- Backpacking Boots: Such boots are suitable for most uneven and roughest of trails and multi-day hikes. Backpacking boots are durable enough to withstand bad weather conditions and muddy or wet terrains. Thick outsoles, waterproof materials and good ankle support are a few of the common attributes of such boots. Once you select your ideal backpacking boots, one that suits the type of terrain, you can then add a good set of insoles to them for extra support and comfort.
- Hiking Socks: Opt for a pair of socks made from synthetic or wool material that are fairly water-resistant. If the weather is wet or cold, go for an insulated, mid-weight pair of socks, and if it’s dry weather, you can go for ankle-height, lightweight socks. It all comes down to the type of hiking conditions you’ll be facing.
For hiking in mountain ranges during peak season, make sure you are armed with rain gear to prevent yourself against hypothermia. In such conditions, one must opt for a lighter rain shell with a puffy coat that provides adequate warmth. Such puffy jackets will come in handy even during summer backpacking trips. When the sun goes down, you can just throw on your hoodie.
Fleece Jacket
Lightweight fleece is another excellent option for layering. During wet as well as cold climate, a fleece jacket will provide enough warmth when worn under the rain coat and puffy hoodie. But during summers, you probably won’t need one of these.
Depending upon the weather and temperature, your apparel will change. An effective way to adapt to the changing weather conditions is through layering. Design a system of layers to put on or remove as per the situation needs. Most basic layers are:
- Base layer: For warm weather, go for a t-shirt made from synthetic material and shorts. And for cold weather, you can switch to long underwear and a comfortable shirt.
- Insulating layer: This layer will keep you warm when it’s chilly out there. A woolen sweater or fleece jacket are excellent options for an insulating layer.
- Waterproof layer: Pack a good-quality waterproof jacket, waterproof pants or windbreaker.
- Pants and shorts: For summer hikes at low altitudes, choose a comfortable pair of shorts. For bushy areas, wear a pair of pants to protect your legs. If you’re confused, just put on a good-quality pair of convertible pants (with drying materials like spandex or nylon), they’ll handle any kind of situation.
- Hats: During rainy conditions, a water-resistant, full-brimmed hat will keep the rain out whilst keeping your head warm. As for summer, a wide-brimmed hat will protect your ears and face from the sun/dust.
What not to pack?
Avoid taking cotton clothing for hikes. Often, people assume cotton material to be a more reliable and practical choice. But it is actually not ideal for hiking. Why? Because when cotton material gets wet through rain or sweat, it will trap the cold , which might lead to hypothermia. So, it’s better to ditch your denims and go for silk, nylon or woolen fabrics instead.
Where to go Hiking?
If you are a beginner, we would recommend you to head to a local area for hiking. Choose an area that is familiar and close to home. Research hilly areas and National Parks near to your home by checking National Park websites, travel blogs or tourism board sites.
Once you get enough experience, you can go for areas afar.
How to find trails near you?
Check the elevation, difficulty level and rating of a hike before you go. You also need to determine your fitness level and capabilities. Talk to your physician if you are suffering from any medical condition and carry all your medicines on the hike.
The following tools will come in handy in finding new trails near you:
– Wikiloc.com : This website has detailed information regarding every trail on the list. You can narrow down your choices by filtering length, difficulty level and how you will be travelling to the trail. Trail listings have elevation information, suggestions, tips, comments and other crucial information along with interactive maps. But, information and data for remote areas or smaller towns might be limited.
– mapmyhike.com : On this website you will find various hikers have added notes and logged the hike that they’ve taken. You can search by your postal code and check if anyone has recently taken any trails.
– AllTrails : This is an app which connects to your phone’s GPS. It will track your trail, measure the distance travelled, elevations reached, speed and much more. You can even save the hikes that you loved and share them with others.
– MyTopo : This is a website where you can find maps to download to your mobile or to print which will help you find your next trails.
– Local visitor’s centre : Most of the towns and cities will have a local visitor’s centre where you will find tons of data about the area. You can even get a hard copy of a trail guide for hiking and a couple of maps.
– Check our guides for camping in different States where you can find awesome hiking trails like this guide and this
What to eat while hiking?
Hiking is a strenuous activity, so you’ll need to consume a lot of calories to keep up and retain your energy levels. That does not mean you over-pack your food. For a 2 to 3 week hiking trip, you should take breaks and resupply frequently along the trail.
Make a precise food plan and go for lighter meals such as couscous, mashed potatoes, rice mix, etc. We also recommend taking calorie-rich foods such as nuts, peanut butter, chocolate, etc. to go with your meals. Variety is the key here.
How to Navigate while Hiking?
One question that pops up in every amateur hiker’s mind is;- how to navigate whilst hiking? And the answer to that is simple; through maps, a compass or modern-day equipment such as a GPS and other phone apps.
Before you begin your hike, you need to study the entire area and know about potential landmarks and elevation changes.
How to use a compass and maps?
Trails that run over several miles will demand more than just a standard hiking map. In such a situation, hikers can make use of comprehensive maps offered by National Geographic . Most of these trail maps are compact, waterproof and contain key information regarding campsites, water sources, mileage, resupply locations and more. Getting your hands on a topographical map via US Geologic Service can also work. Apart from this, you can also carry a compass, just in case.
How to navigate with GPS?
There are many GPS resources out there, such as user-updated GPS apps to help you derive on-trail information regarding campsites, water sources, tips, etc. You can also utilize handheld GPS units or GPS hiking watches that encompass mapping capabilities. These gadgets will make your hike more convenient.
here you can find few reviews of top GPS for Hiking: Garmin eTrex 10 , Garmin eTrex 20x , Garmin eTrex 30x .
Now, the real question is; how to navigate using your GPS unit while hiking?
The latest GPS units on the market are flooded with advanced features, so it’s easy to get a bit overwhelmed, especially if you’re an amateur. Here we are going to look at the basic functions of a GPS unit and a few tips and tricks for accuracy and reception.
GPS stands for Global Positioning System. It’s important to remember that a GPS unit cannot really replace a compass or a map, rather it enhances the accuracy of your navigational skills with advanced technology. Hikers always need to carry a comprehensive map and a compass. For better accuracy in altitude and position, the GPS unit must get strong signals from at least 4 to 5 satellites.
The most common features found in every GPS receiver made for hiking are:
– Location: Almost every GPS receiver is accurately able to triangulate your exact position by receiving data transmission signals from multiple satellites. This data is generally displayed in coordinates: latitude and longitude or UTMs.
– Point-to-point navigation: A destination is termed as a “way-point”. With location function, one can determine a starting way-point. If you have established coordinates for the destination you’re headed to (via a website, book, map, mapping software, etc.), the GPS receiver will provide the distance to your destination, a straight-line along with point-to-point bearing. In reality, trails might not follow a straight line, so the bearing might change from time to time.
– Route navigation: Joining multiple way-points on the trail will help you navigate from point-to-point, with the help of distance guides and bearing on the way. As you reach your very first way-point, the GPS unit will direct you towards the next one.
– Track recording : This is one of the most important features to find in a GPS unit. The track recording feature will record a virtual trail of locations you’ve been to, which will help you retrace your steps. In some units, you can even configure your GPS to automatically provide track-points over specific intervals.
Navigation Capabilities
- How to enter way-points: Marking your route by determining way-points is simple. Just press the ‘MARK’ button (some units have an ‘ENTER’ button). If you want to mark a way-point right where you’re standing, just pressing the button once will do the marking. To this way-point, you can add details such as a name (campsite, waterfall, trail-head, etc.), short notes, the elevation and the coordinates. This will make it easier for you to retrace your route.
- Follow way-points: Make use of ‘FIND’ or ‘GOTO’ buttons to find point-to-point targets. If you open the Compass screen, you can see the distance, bearing and time of travel as well.
- How to record a track: Enable the ‘TRACK RECORDING’ feature and the GPS receiver will automatically set up track points on your route, just like laying a breadcrumb line that shows where you’ve been. This feature comes in handy whilst hiking in an unknown terrain. You can easily configure the GPS unit to drop laid track-points over predetermined intervals of distance or time. The shorter the distance between the two track-points, the more accurate your retracing will be.
Good Reception
One of the most common problems hikers face on the go is poor signal strength. Here are a few tips and tricks on how to tackle this situation:
- Satellite lock: You need to do this right at the starting point of your hike, before you even step foot into the wilderness. Once locked, it will pick up signals when you enter the woods.
- GPS placement: Place your GPS unit on the shoulder strap of your backpack, such that it will get a clear view of the sky. For handheld units, make sure you don’t move your arms too much, or it might disorient the unit. GPS wrist watches suffer with low reception and accuracy due to the same reason. So, it’s better to secure the watch where it won’t move much.
- Avoiding obstacles: Accuracy of a GPS unit majorly depends on the strength of signals transmitted from 4 or 5 orbiting satellites. If the overhead view is obstructed, the transmission signals or reception can become reduced or blocked completely, making your GPS unit almost inaccurate. In this case, you need to find some open ground or an elevated area.
- Initializing: If your new GPS unit is not picking up transmission properly, you need to carry out a simple initialization process. This usually happens when your GPS unit has been manufactured in another continent, so when you turn it ‘ON’, it has a memory of their satellite links. The initialization process will orient your unit to its current position and download data from local satellites in the sky. This approach will make it easier to acquire signals quickly next time. Refer to the user’s manual of your GPS receiver to know how to initialize the unit.
- Batteries: Make sure to place fresh batteries in the GPS unit and also carry a few spare batteries, just in case. Turn ‘OFF’ features that are not needed to preserve the battery life.
Whilst planning your hike, make sure you familiarize yourself with your GPS unit, so you don’t get confused in an unknown territory. Practice using the unit in a local park to know how it works. Do thorough research before buying your ideal GPS receiver. Check its features and get the one that meets your requirements as well as fits your budget.
Why you need hiking sticks (trekking poles) and how to use them?
On the trails that have plenty of elevation loss and gain, the trekking poles will aid you in such situations. Trekking poles reduce strain on your knees when there’s a long descent or ascent.
When you are setting up an ultralight tent system, these hiking sticks can also come in handy as your tent poles. Thereby, saving a considerable amount of weight.
Benefits of Trekking Poles:
Trekking poles will prove beneficial during long distance treks and hikes. Often, hikers tend to avoid taking trekking poles, although you’ll see skilled athletes and sky runners carrying trekking poles to climb high alpine terrains.
- Using hiking sticks or trekking poles while ascending will help you get reliable kinetics. They will reduce strain from your legs, as the arms will act as your secondary source of support.
- Not just that, trekking poles work exceptionally well in providing good balance, especially in regions with too many rocks, ice or snow.
- Lastly, trekking poles will surely prove to be a blessing whilst descending. As hiking down from a peak can put a lot of stress on your knees.
Carry trekking poles with you, and your legs will thank you!
Which trekking poles to buy?
Personally, we find collapsible poles more reliable than telescopic ones. That’s because, telescopic poles have small mechanical parts which are prone to getting lost, and, it also requires frequent assembling/disassembling which is time-consuming.
– Go for collapsible poles that will suit your height, instead of the adjustable ones.
– The best trekking poles are those which allow your arms to rest comfortably when placed at a 90-degree angle in front of you. If you feel even a slight strain or discomfort whilst reaching out to the poles, or if your arms form an acute angle when using them, then know that these poles are the wrong size.
– Another factor to consider is weight. Opt for lighter poles, as you don’t want to get fatigued easily. Poles featuring carbon shaft are durable as well as extremely lightweight.
How to use Hiking Sticks?
Using trekking poles is quite simple.
– Make sure to utilize the wrist straps, often provided with the poles. These straps will keep pressure off your palm and wrist and will create the required pressure from your core. And, they also won’t cause the poles to slip from your hand during crucial moments.
– Use the poles with a light touch and tap the ground gently to make precise contact. Don’t lean on the pole entirely.
– The metal tip at the bottom is generally covered with a rubber tip to provide good grip in the rocky terrains and prevent the metal tip from scratches. Remove the rubber tip in ice or snow, as the inside metal tip will provide better grip here.
Hiking Safety
Hiking safety is the most important topic to cover in this hiking guide. Preparation is the first step. Make sure you train well, know where you’re headed to, wear proper apparel and always carry a map and compass, just in case technology fails you.
Indeed, hiking comes with a few risks. It’s your duty to be prepared and take necessary precautions:
- If you ever get lost, it is your responsibility to help people find you. Always inform your friends, relatives or any emergency contact of your hiking itinerary, where you’ll be going, who you will be going with and what vehicle you’ll drive.
- Carry good-quality topo maps and compass, and make sure you know how to use them.
- You can take a personal locator beacon with you, just in case your cell phone has no reception. This device will help you send your exact location or make an emergency call to the required contact.
- Go through this guide and get to know how to help yourself if you ever get lost.
Hiking for beginners can be tough, so it is better to find a partner if it’s your first time.
Here are a few safety tips for beginners
- It is important for you to step aside and give right of way when required. Horses have right of way over backpackers/hikers. Uphill hikers have right of way over those going downhill. Hikers have right of way over people on a bike.
- If you’re hiking with a dog, step to the side whenever necessary, as not everyone is fond of dogs.
- Don’t go off route, stay on the trail.
- Use headphones whenever needed, as some people go hiking to get some peace.
- Allow your dog to lead you. Take plenty of snacks, water and clothing.
- Don’t throw trash around and leave no trace.
- Get proper sleep the night before.
What to do if you see a bear while hiking?
It’s quite natural to get frightened when you spot a bear while hiking. Such situations rarely lead to something serious or aggressive. That’s because, even bears are afraid of humans.
Follow these guidelines while heading to a bear country:
- Avoid: The best way to avoid bears is to not go through a bear habitat alone. Travel in groups, make noise, talk or sing. Pay attention to your surroundings
- Stay calm: If you happen to spot a bear, remain calm and reach up for bear spray or any other deterrent. Stick together as a group to intimidate the bear.
- Distant encounters: If you encounter a bear from a long distance, give it space. Don’t approach it, move away and do not click any photo. If possible, take a detour to give it enough room.
- Close encounters: If the bear is too close to you or your campsite, stay still and evaluate the situation. See whether the bear is calm or aggressive. Back away slowly, don’t run and keep an eye on the bear to see how it reacts. If the black bear approaches you, yell at it by looking directly into its eyes. IF IT’S A GRIZZLY BEAR (BROWN BEAR), NEVER TRY TO MOVE IT.
- Defensive bears: Sometimes a bear might approach you to defend a perceived threat. This generally is the case with a mother bear protecting cubs or a bear protecting food. Such bears might react aggressively and challenge you by popping their jaws. In such a situation, try to appear innocent, non-threatening and remain calm. Back off and speak in a pleasing tone. Leave the area instantly. If the bear still attacks, use your bear spray. Do not play dead at all and don’t get aggressive unnecessarily. Point the spray right above its head, so the liquid gets into its nose, eyes and throat.
- Repelling an aggressive bear: Try to repel the bear with a firm voice at first. If it continues to approach you, get your deterrent ready. A non-defensive bear might get aggressive if it sees no action from you. Act aggressively, look it in the eye and fight it if you get attacked. Shout, stamp your feet and threaten the bear with the spray, pole or stick. If it makes a final attack, fight for your life, punch, kick and hit the bear with whatever you can.
Common Hiking Mistakes Made by Beginners
Not every new hiker makes these common mistakes, but it is always better to be aware.
- Wearing new boots: A new pair of boots are highly likely to cause blistering and soreness, as they are stiff, and this can ruin your entire hiking experience. It is better to use them for a couple of weeks before you hit the trails with them.
- Not checking weather conditions: Hiking during extreme rain, thunder or lightning can be annoying. Look for the weather conditions, especially if you are going on a short hike.
- Not warming up: Stretching exercises right before you head out for a hike can prevent you from having sore muscles.
- Not drinking or eating: It’s a bad idea to go hiking without having proper food or being hydrated. Make sure you drink every half an hour and also snack along the way to retain your stamina levels.
- Go off-trail: Off-trail hiking requires planning and experience. Don’t take any shortcuts, especially if you are not experienced enough or do not have the necessary gear to retrace your track if you get lost.
- Over-packing: Stick with basic essentials and a handful of extra supplies. Evaluate the weight and necessity of every item in your backpack and leave behind whatever isn’t necessary. Do not over-pack, otherwise you might get tired quickly on the hike.
- Feeding the animals: Feeding the wildlife when you are out hiking can prove dangerous, if they change their foraging habits. It might also make them associate hikers with food, which can lead to many risks and consequences. Dispose and store your food carefully to prevent wild animals from stealing it
Where to find more info about hiking?
If you want to know more about hiking, there are myriads of resources out there such as articles on the internet, TV shows, magazines, hiking guides, etc. Read as much information as you can about hiking and get yourself familiar with the hiking terms.
Final Thoughts
If done right, hiking is a mesmeric, life-changing experience, as it exposes you to nature and teaches you to survive in the wilderness. You get to meet new people, find out more about the culture of the area and many more things.
For sure, hiking comes with its own risks and challenges. But if armed with the right kind of information and gear, you are going to be just fine!
Hope this comprehensive hiking guide elucidates everything you need to know about hiking and motivates you to go out there and experience it!
Leave a Comment Cancel reply
Keep in mind that we may receive commissions when you click our links and make purchases. However, this does not impact our reviews or comparisons. We try our best to keep things fair and balanced in order to help you make the best choice for you.
As Amazon Associate, I earn from qualified purchases.
Latest news

Find Your Perfect Backpacking Tent: The 10 Best Picks

How to Select the Correct Size for Your Backpacking Tent: The Perfect Fit

How to Choose The Best Compact Umbrella
© Outdoor With J
Privacy policy
- Expeditions & Peak Climbing
- Trekking in Nepal
- Tours in Nepal
- Tours & Trekking
- Tours & Expeditions
- Happy Clients
- Expeditions & Peak Climbing
- +977 9851024885, +977-01-4527248
- [email protected]
- Expeditions & Tours
- Everest Sherpa Foundation
- Trekking & Tours
- Tailor Made

Mt Everest 2024 Tibet

Mt. Cho-Oyu Expedition 2024

Best Sellers
Explore the most sought after trekking trails and outdoor adventures with us our fantastic range of tours and treks are curated just for you., expeditions.

Mt. Everest 2024 Tibet

Mt. Shishapangma Expedition 2025
Peak climbing.

Mera Peak Climb 2024

Island Peak

Lobuche East

Everest Three Passes Trek

Everest Base Camp Trek

Barun Amphu Laptsa Khumbu Trekking
Travel with climbalaya, 20 years+ experiences, 1000+ people successful expeditions, 5000+ people trekking.
12+ Mountains
Sustainability
Tailormade Trips
How our customers express their opinion.

“It was exhausting but fun!”
“very professionally organized”, “an excellent experience”, tailormade trip.
Trekking In Nepal – A Comprehensive Guide
Some of the links on this page are affiliate links

Nepal is one of the most stunningly beautiful countries on the planet. It’s a place where towering white peaks touch the sky, monks peacefully meditate in ancient mountainside monasteries, and lumbering yaks haul goods to quaint villages largely disconnected from the outside world. To put it simply, Nepal is a backpacker’s dream come true.
For all it’s grandeur and immensity, planning a trek in Nepal isn’t as difficult as you might think. Trekking tourism has been popular in Nepal for decades and Nepalis are excellent hosts. Kathmandu has hundreds of quality guiding companies and “teahouse” lodges bring an entirely new level of comfort to the backcountry. Even for those with little backpacking experience, trekking in Nepal is likely to be accessible, affordable, and absolutely unforgettable.
So if you enjoy stunning views, radiant culture, and epic adventure, chances are you’ll fall in love with Nepal. We hope you find this guide useful for planning your next trip.
Check out our Nepal Trekking Gear Checklist to help you with planning your adventure.

BEST TIME TO TREK
Technically you can hike in Nepal year round, but most trekkers choose between the two peak hiking seasons of fall and spring. If it’s your first time trekking in Nepal, we recommend visiting during one of these peak seasons. The trails will be more crowded, but the benefits tend to be worth it in our opinion.
Fall (October – November) : This is the most popular trekking season in Nepal. During this time you’ll have the best chance for clear mountain views, sunny skies, mild temperatures, and little precipitation. The downside is that you’ll be sharing the trail with throngs of other tourists and teahouses will be bumping, especially along the most popular routes.
Spring (March – April) : Spring is the second most popular time of year to trek in Nepal. As the snowpack melts on high mountain passes, giant rhododendron trees bloom across the hillsides of Nepal. Temperatures are generally mild this time of year and it’s a good time for viewing wildlife too. The two main downsides to spring hiking are busy trails and the possibility of hazy skies, which can obscure mountain views. That said, hazy skies tend to be less of an issue as you climb in elevation.
Off Peak Season : Trekking outside the peak seasons in Nepal can be rewarding as well. Solitude is easier to find, prices are cheaper, and befriending locals is easier too. That said, there are significant downsides to trekking outside the peak seasons in Nepal, so don’t be too cavalier when choosing your travel dates.
Experienced winter travelers ( December – February ) can find sunny days and brilliant mountain views this time of year. That said, temperatures can be bitter cold, daylight hours are shorter, and harsh winter storms can disrupt travel plans with little warning. Also, many popular trails will not be accessible this time of year due to heavy snowfall at high elevations.
Trekking during monsoon months ( May – September ) is not usually advised. Monsoon rains bring landslides and leaches to Nepal. The former makes mountain travel very difficult (if not dangerous) and the latter is just gross and obnoxious. The weather can also be hot and humid this time of year and the mountains are often obscured by clouds.
TEAHOUSE TREKKING
One of the reasons Nepal is such an amazing place to hike is the teahouse trekking culture. “Teahouses” are essentially small mountain lodges frequently spaced along popular trails. On most trails in the Everest, Annapurna, Manaslu, and Langtang regions you’ll pass a teahouse every hour or two. They’re a great place to meet other travelers, eat a home-cooked meal, warm your toes by the fire, and bed down for the night.
On a teahouse trek you’ll sleep in one of these lodges every night and you’ll eat almost all of your meals in teahouses too. Accommodations are usually simple, comfortable, and very affordable. It’s expected that you’ll eat your meals wherever you stay, which is one of the reasons rooms are so cheap. Teahouses also sell snacks, candy, hot showers, beer, and sometimes even halfway decent wifi.
Most teahouses cost around $3-5 per night and can be booked upon arrival. The usual setup is a small room with two twin beds and a shared bathroom down the hall. Some teahouses have rooms with attached bathrooms, but you’ll likely pay a premium for the upgrade. Blankets may be provided, but we recommend hiking with a sleeping bag for warmth, comfort, and cleanliness (learn more: Nepal Equipment Guide ).
For those looking to hike in Nepal’s more remote areas, camping treks can be arranged through most trekking agencies in Kathmandu. This option will add cost and complexity, but could lead to a unique and rewarding trek. That said, camping treks aren’t nearly as popular as teahouse treks and camping won’t be necessary on any teahouse trekking route.

POPULAR TEAHOUSE TREKS
It would be impossible to list all the fantastic and unique trails in Nepal. So instead, we wanted to highlight a few of our favorites and some popular recommendations. These teahouse trekking routes are all exceptional hikes, and they’re a great place to start.
Everest Base Camp
Difficulty: Moderate to Difficult
Best Time: March-April & October-November
This is the most popular trekking route in Nepal, and with good reason. Walk in the footsteps of the world’s most famous climbers and gain a spectacular view of Everest from the peak of nearby Kala Patthar.
Annapurna Circuit
An extremely popular and stunning trek with lots of variety. This route combines spectacular mountain scenery with Tibetan-influenced culture and culminates at one of the highest trekking passes in the world, the Thorong La.
Annapurna Base Camp
Difficulty: Moderate
A fantastic trek for those with limited time still wanting to experience a stunning Himalayan amphitheater of mountains. This is also a lower elevation hike, which may make it better for those worried about altitude or hiking off-peak season.
Everest Three Passes Loop
Difficulty: Difficult
For those with the time and physical ability, this is one of the most spectacular trekking routes on the planet. Hit the highlights of the Everest Base Camp route and the stunning Gokyo Lakes on this epic and increasingly popular loop.
Langtang Valley
Once among the most popular trekking routes in Nepal, this area was hit hard by the 2015 earthquake, but it’s on the rebound. Trekkers looking to avoid crowds on a hike filled with Tibetan culture, natural diversity, and fantastic Himalayan scenery should definitely take a closer look.
Manaslu Circuit
This trek features spectacular mountain scenery coupled with a rich and authentic Tibetan culture. Though Manaslu is gaining in popularity, it still sees a fraction of the travelers drawn to the Everest and Annapurna treks. Also, if you have the time, a side trip up the Tsum Valley should not be missed.
Gokyo Lakes
This is a great trek for those looking to avoid the crowds of hikers headed to Everest Base Camp but still seeking majestic Everest scenery. The views from atop Gokyo Ri may be the finest in all the Himalayas.
Upper Mustang
Best Time: May-October
This heavily Tibetan-influenced district oozes with culture and panoramic Himalaya views. The uniquely arid mountain landscape of this region makes it a good choice when other areas are soaked in monsoon rains. This is a restricted area though and permits are pricy.
Difficulty: Easy to Moderate
This lower altitude trek is a popular option among hikers looking for a shorter taste of Nepal’s trekking culture. The route isn’t nearly as remote as many treks, but the views from Poon Hill are still stunning.
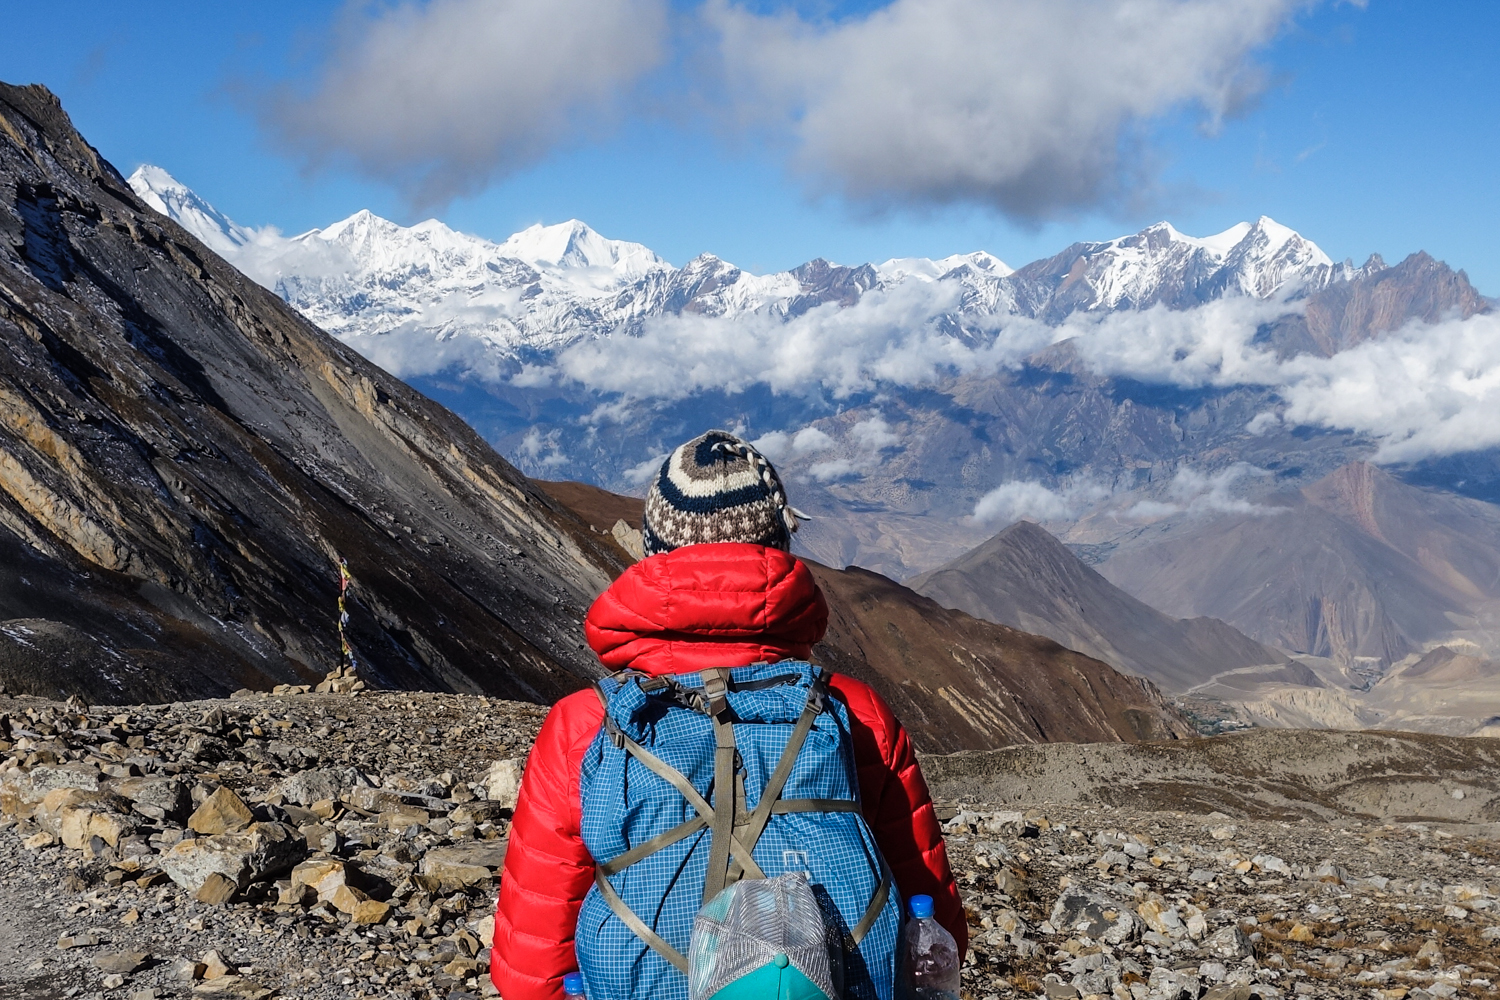
DIFFICULTY RATING
Trekking difficulty will depend on a multitude of factors including your experience, physical fitness, pack weight, and weather conditions. There are many different types of treks to choose from in Nepal with varying degrees of difficulty. Make sure to choose a trek that fits your fitness level and train adequately before your hike.
Trekking trips in Nepal are not technical (no ropes, ice axes, or crampons), but there will still be big ups and downs. There are sure to be long days and sore legs, but treks in Nepal are paced to give a lot of time for rest and acclimatization, so don’t fret. It certainly won’t be easy, but most active hikers fair very well on Nepal’s trails, especially with some training beforehand.
Porters are another consideration for reducing the difficulty of your trek. A porter can be hired to carry heavy gear, so all you have to tote is a small daypack. This option greatly increases accessibility along Nepal’s trails. We were surprised and impressed by the amount of people in their 50’s, 60’s and even 70’s who we met on the trail.
INDEPENDENT OR GUIDED TREKKING
Update: Effective April 1, 2023, new requirements require solo or foreign independent trekkers to use a local guide or porter while trekking in Nepal’s national parks and protected areas.
This is an important question for many trekkers and the choice will likely come down to experience and personal preference. If you’re a highly experienced backpacker traveling along a popular route (Annapurna Circuit, Everest Base Camp, etc.), it’s likely that you’ll get by just fine without a guide. That said, Nepali guides bring more to the table than just logistics management. A good guide can help you learn about local culture and may even become a close friend.
For many popular trekking routes in the Annapurna and Everest regions you won’t be required to hire a guide. These trails are mostly well marked and have lots of travelers. This leaves the door open for experienced trekkers to hike independently, which is a nice benefit for those with the skills and know-how. If you’re unsure of your preparedness or nervous about high altitude safety, we recommend hiring a guide. Also, for trekking trips to any restricted area, you will be required to hire a guide.
If you plan to hike independently, make sure you have a good map, the proper permits, and a good guidebook before you leave Kathmandu (see map & guidebook section below). Also, expect to put in a good amount of planning time to fully prepare for your hike.
Guided Trekking Pros
All pre-trip details handled (permits, fees, etc.)
All transportation arranged (bus, plane, jeep, etc.)
Little worry about any details while hiking (lodging, route, schedule, etc.)
Guidance & safety while trekking at high altitude
Local information on religion, culture, food, etc.
Independent Trekking Pros
Can be much less expensive
Hike on your own schedule
More direct interaction with locals
More choice on where to stay & eat (though guides usually know the best spots)
No group dynamics to deal with, just you and the trail.
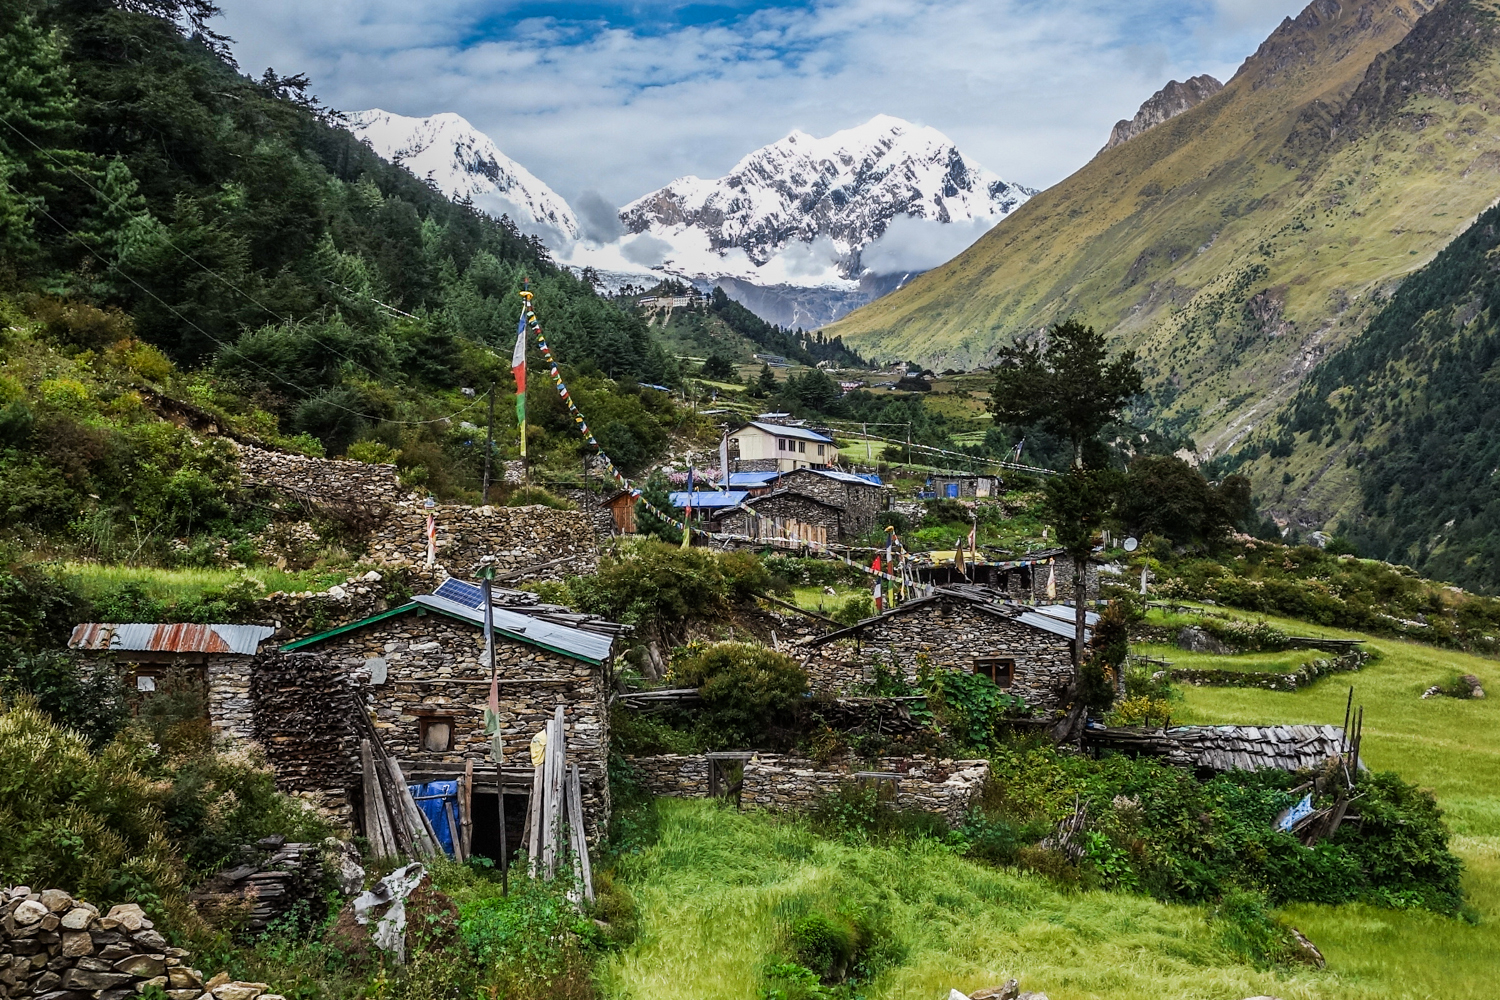
GUIDES AND PORTERS
Guides and porters are very common in Nepal (though not always mandatory) and prices are quite competitive. In general a guide will cost around $25-30 per day and a porter will cost around $10-15 per day. A guide will help with logistics, information, and safety on your trek. A porter will carry heavy gear, so you only have to hike with a small daypack.
If you choose to trek with a guide, make sure they speak fluent English because they’ll be the point person on your hike. They’ll manage transportation, lodging, food, hiking schedule, routes, and safety on the trail. Your guide will also be a good source of information on local culture, customs, festivals, and norms. A good guide can be an extremely useful resource on the trail and they may even become a lifelong friend.
Porters are also useful and very common along trails in Nepal. Porters have the job of carrying heavy gear, so you don’t have to. This is especially beneficial for older trekkers, novice trekkers, or groups with children. Just remember, even if you do decide to trek with a porter, it’s still very important to keep your gear weight to a minimum. Porters have an absolutely backbreaking job, so please don’t make it any harder on them.
Also, make sure to tip your guide and porters well. A good tip is about 15% of the total you paid for their services. Hand the money directly to each person to ensure they get the full payment. Guides and porters have very tough jobs and they often get surprisingly little compensation for their work.
Guide Recommendation
Looking for a guide on your trip to Nepal? I highly recommend reaching out to our friend Ganesh in Kathmandu. Ganesh is truly an exceptional guide and you’ll love trekking with him if he’s not booked up. He’s knowledgeable, friendly, funny, and highly experienced. Here’s his contact info: [email protected] , Ace Vision Treks & Tours or ACE Vision Nepal , and Ganesh on Facebook . Just tell him Dave & Annie sent you.
TREKKING COMPANIES
There are literally hundreds of trekking companies in Kathmandu and many of them are very good. With a little online research (try tripadvisor ) you should be able to find a bunch of highly qualified companies to help you plan a trek. Most companies plan treks advance, but you can also fly into Kathmandu and plan a trek in person surprisingly easily. Planning things in person will require more flexibility, but you’ll likely save a good chunk of change and have the chance to interview guides before your trip.
Trekking Company Recommendation
During our most recent three months in nepal, we worked with Ram at Outdoor Himalayan Treks . Ram was absolutely fantastic and we’d highly recommend contacting him if you have any questions. He gave us tons of useful information and helped us plan transportation, accommodation, and trekking permits on a few of our hikes. Here’s Ram’s contact info: [email protected] or Ram on Facebook . Just tell him Dave & Annie sent you.
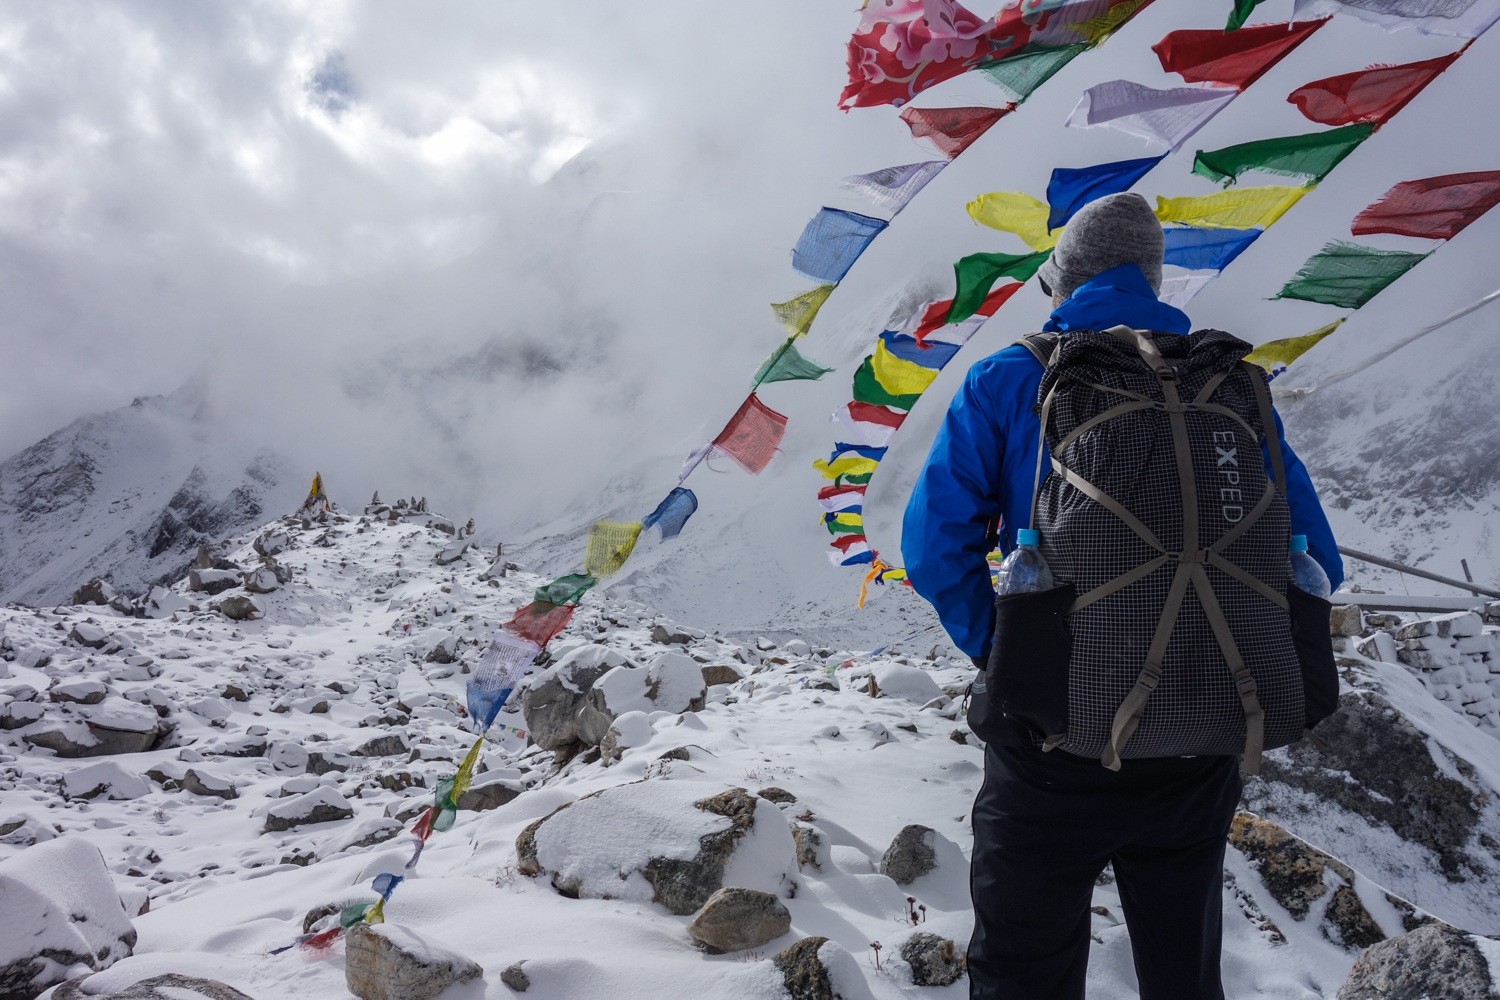
GROUP OR SOLO TREKKING
Some trekking companies offer group packages for popular trails. This can be a good way for solo travelers and couples to link up with other hikers and save a little money in the process. There are downsides to traveling in a large group as well, so make sure you know what you’re getting into before you sign up. Many trekkers (us included) prefer hiking in small groups or with a personal guide. That type of travel will give you more flexibility and less compromise as you trek.
TEAHOUSE TREKKING GEAR
Need to know what to bring? Visit our Nepal Gear Guide & Checklist for personal recommendations on the best trekking equipment. You can also check out the CleverHiker Gear Guide for all our favorite non-Nepal equipment (tents, stoves, sleeping pads, etc.).
NEPAL GEAR GUIDE & CHECKLIST
CLEVERHIKER GEAR GUIDE
GUIDEBOOKS & MAPS
For general trip planning and research, we highly recommend picking up the Trekking in the Nepal Himalaya book. This book covers all the popular trails and some less popular routes too. It has extremely helpful information about trekking, accommodation, food, and general Nepal travel advice. We used this book nearly every day on the trail (we took pictures of pages with our phones to save weight) and found it very useful.
Once you decide on a trek, it should be easy to find specific maps and guidebooks when you reach Kathmandu. Just walk around Thamel (the main tourist hub in Kathmandu) and you’ll find lots of bookstores catering to trekkers with the most updated resources.
Make sure at least one member of your group is carrying a detailed map of your trek. You may not need it much for navigation (most popular routes are well marked), but it will still be useful. Also, a good guidebook with detailed trail descriptions can be helpful as well. It’s nice to know what challenges lie ahead and get excited for upcoming highlights.
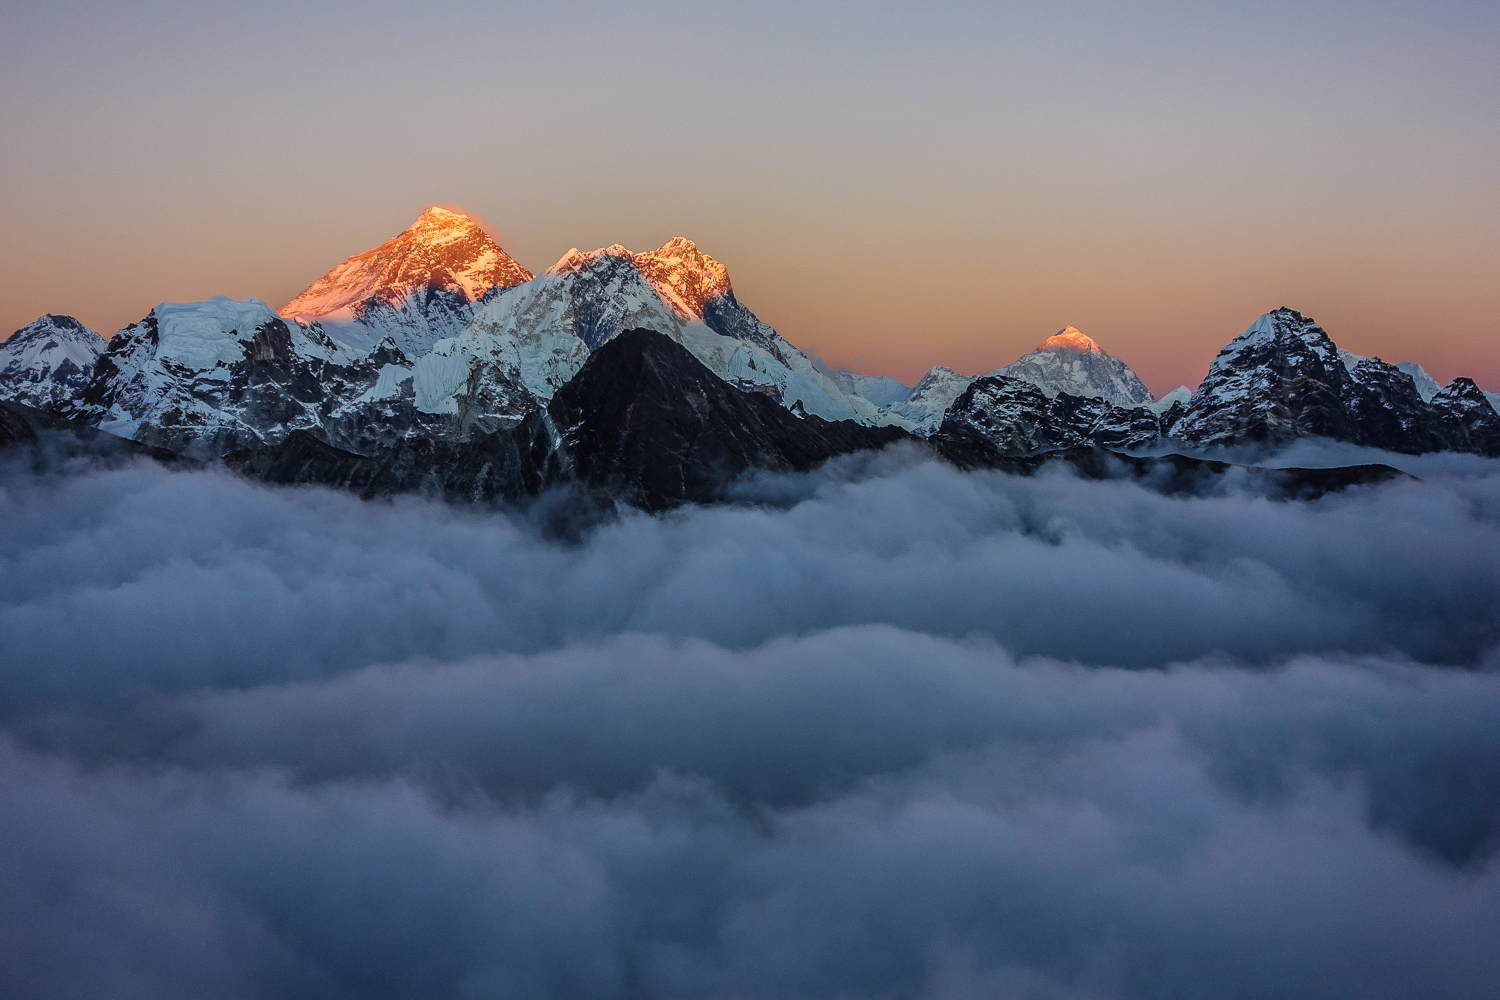
TREKKING SAFETY
When hiking in Nepal, you’ll be heading into remote areas far from reliable hospitals. That’s why it’s important to take every precaution before you set out. Below you’ll find some of our safety tips for trekking in Nepal. Also, check out our emergency first aid skills tutorial video to brush up on your wilderness safety knowledge.
Educate yourself on Acute Mountain Sickness (more info below). Take the prescribed acclimatization days on high-altitude treks, stay hydrated, and listen to your body.
Helicopter evacuations are not uncommon in Nepal, and many of them are preventable. Evacuations like these can be incredibly pricy, so we recommend picking up trekking travel insurance before you trip.
Don’t trek alone. If you’re traveling solo consider hiring a guide or making friends to hike with.
Always pay close attention to weather conditions, especially on long pass days. Storms can develop quickly in the mountains and can be fatal if you’re unprepared.
Always hike with a lightweight first aid kit and the 10 backpacking essentials .
Leave a detailed itinerary with an emergency contact and write important phone numbers on a piece of paper that will be easy to find in an emergency.
When encountering yak or donkey caravans, move to the inside (away from any cliff) and let them pass. These animals can sometimes be clumsy and may bump into you.
Crime is not common in Nepal, but it’s not unheard of either. Keep a close eye on your belongings, especially your backpack filled with valuables.
Always carry enough water on the trail and stay hydrated. Also, bring a water purifier (more info below) to make sure your drinking water is clean.
Keep your eyes on the trail to avoid any missteps that could end your trek.
Be very careful around landslide and avalanche areas. Consult a guide or locals if a crossing looks difficult and don’t take unnecessary risks. Turning around is always an option.
HIGH ALTITUDE SAFETY
If you’re trekking in Nepal, there’s a good chance you’ll be hitting some high elevations, so it’s important to know the basics of high altitude hiking. Acute Mountain Sickness (AMS) is no joke, and if you make reckless decisions or ignore symptoms, it could even kill you. Most hikers take the time to acclimatize properly and experience limited AMS symptoms if any, so there’s no need to freak out. But you do want to understand AMS and take it seriously. Check out our high altitude safety tutorial video for more info.
TRAVEL INSURANCE
We highly recommend purchasing travel insurance if you plan to trek in Nepal. In fact, we wouldn’t trek in Nepal without it. Most trekking locations in Nepal are very remote, so if something goes wrong, you’re likely to need an emergency evacuation, and that can get insanely expensive.
When choosing travel insurance, make sure to buy a plan that will cover high altitude trekking and helicopter evacuations in Nepal. We did a bunch of research and ended up choosing World Nomads . Their rates were reasonable, their coverage was excellent, and communicating with them was easy. We fortunately didn’t need to use our travel insurance, but the peace of mind alone was well worth it.
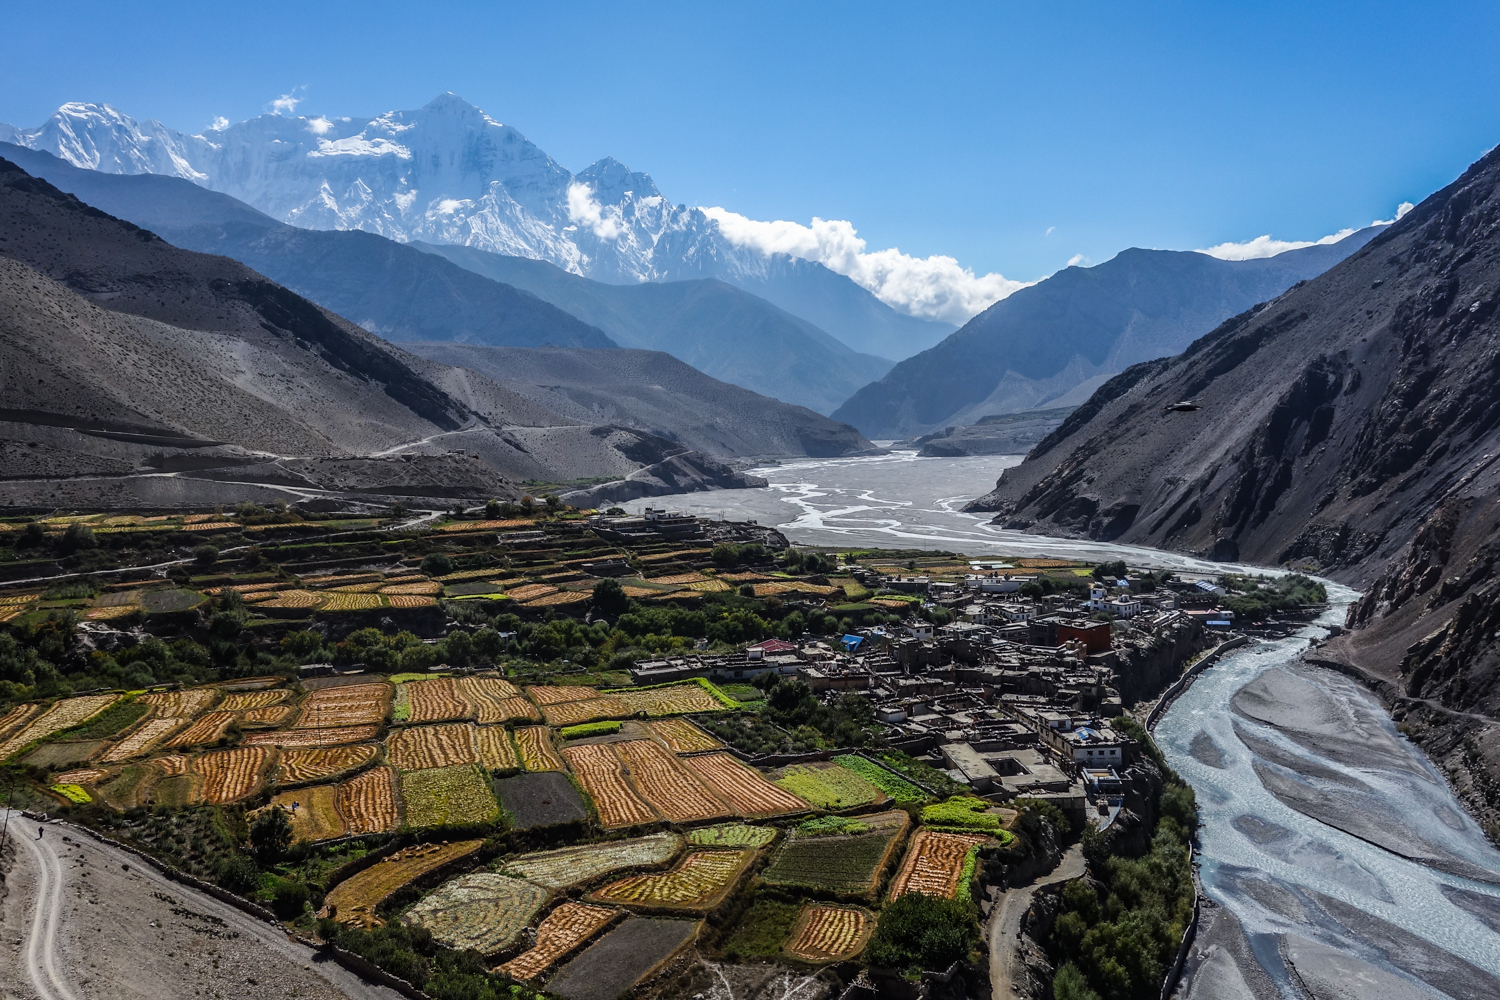
POST EARTHQUAKE CONDITIONS
Nepal was hit by a massive earthquake in April of 2015 . Thousands died in the disaster and widespread damage affected many temples, buildings, roads, and some trekking infrastructure.
We spent 3 months trekking around Nepal in the fall of 2016 and had very few inconveniences due to the earthquake. Some signs of the devastation remain, but most trails have been fully repaired. Accommodations were safe and plentiful, especially along popular routes.
Teahouse food options are generally simple but sufficient. Menus are roughly the same at most teahouses (see example menu below) with the ubiquitous dhal bhat as a hearty and delicious staple. You will also commonly find momos (dumplings), pasta, rice dishes, soups, pizzas, and in some places yak steak and apple pie. A home-cooked warm meal will always be a nice treat at the end of a long day on the trail.
Although teahouse menus are always similar, you’ll notice that prices increase as you move farther away from cities. Most supplies must be carried by yak or donkey to remote locations, which explains the increase in cost. It’s also always a good idea to carry snacks when trekking between villages and on long pass days.
*Note: If you plan to book a trip through a trekking agency, make sure to talk about food costs ahead of time. Most companies will give you two options: 1) you pay an up-front fee that will cover all food costs on your trip or 2) you bring money and pay for meals as you go. The first option is easier because you won’t have to hike with lots of cash and handle money throughout the day. The second option can be much cheaper though, because you’ll only pay for exactly what you order.
Below is an example of a typical teahouse menu. Prices are displayed in Nepalese Rupees (about 100 = 1 USD). For reference, this was one of the most expensive teahouses we visited.

It’s important to have a water treatment plan before you trek in Nepal. Water is usually easily accessible, but you’ll want to purify it first for safety. Water treatment pills, UV sterilizers, and water filters are all popular options. You can also purchase bottled water from teahouses, but that’s an eco-unfriendly strategy that will greatly increase cost and waste on your trip. We used a SteriPEN Ultra on our last Nepal trip and we highly recommend it. It was fast, easy to use, and we didn’t have to ingest any funky tasting chemicals.
While hiking, we recommend carrying at least 1-2 liters of water and filling up often. Staying hydrated is essential while trekking and it becomes increasingly important as you hike higher in elevation. Also, it’s easy to forget about drinking water when it’s chilly outside, but it’s imperative to stay hydrated. Ordering pots of hot tea can be a great way to ensure you’re getting enough fluids on cold days.

Trail towns don’t have ATM machines and teahouses rarely accept credit cards, so you’ll want to make sure you bring plenty of cash for your trek. In the fall of 2016, we budgeted around $30 per person per day for food and accommodation on our treks. In the Annapurna and Manaslu regions that budget covered our daily expenses and then some. We often had extra funds for treats like hot showers, beer, and baked goods. In the Everest region our $30 per day didn’t go quite as far, but we were still able to buy the occasional treat.
In general, it’s always smart to carry more cash on the trail than you might think. Luxury items like chocolate, tea, beer, wifi, and hot showers are all great morale boosters, but the costs add up. You may also want to buy small gifts, replace broken equipment, or hire transportation if your travel plans fall through.
It’s also important to consider the costs of charging your electronic devices. Some teahouses will let you charge batteries for free, but most collect a fee. Usually you’ll be able to get a full battery charge for $2-5, but in remote areas it can cost more.
Most teahouses offer hot showers for a fee, usually around $3-5 per shower. Showers will range in quality from a bucket of hot water to the rare proper shower. We found it often wasn’t worth the cost for a mediocre shower, so we recommend bringing wet wipes for quick cleaning.
*Note: Namche Bazaar in the Everest region does actually have an ATM machine, but it can be inconsistent, so we wouldn’t recommend counting on it.
TRANSPORTATION
Most visitors fly into the Tribhuvan International Airport (KTM) in Kathmandu, the capital city of Nepal. Kathmandu is a great base for sightseeing, planning a trek, or any last minute hiking preparations.
In general, transportation around Nepal is very slow going. Long bus rides, cancelled flights, and unexpected delays are sadly part of the norm. So make sure to give yourself a couple buffer days when planning your trip and embrace the adventure.
Most popular treks depart directly from Kathmandu or Pokhara, the second largest city in Nepal. Some treks are accessible via flight, but many require a long bus or jeep ride to the starting point. Depending on your destination, there will usually be a couple different options to get there. Local transportation tends to be cheaper, but “tourist” options will often be far more comfortable.
If you organize a trip through a trekking company, they will take care of the logistics for you. If you choose to trek independently, you’ll need to get the proper permits and pay any park/conservation fees before your trek.
Every trekker in Nepal needs a TIMS card ( Trekking Information Management System ), which costs around $20. You can get your TIMS card and pay your park fees at the Nepal Tourism Board offices in Kathmandu or Pokhara before your trek.
It’s also likely that you’ll need to pay conservation or national park fees. These can be obtained ahead of time and commonly cost around $20-$30, depending on where you’ll be hiking. You may be able to pay some park fees on the trail, but we found it much easier to take care of everything ahead of time.
UPDATE- JANUARY 13, 2018 – There have been some changes to the TIMS requirements for the Khumbu (Everest) region. It is no longer necessary to obtain a TIMS Card for this area. Instead, they are collecting a Khumbu pass, which costs NRS 2000 or USD 20 per person. It is uncertain how long this change will stay in place as many people in the travel agencies are unhappy with the system. We always recommend checking the most current requirements before beginning your trek.
PERMITS – RESTRICTED AREAS
There are several restricted areas in Nepal that require special trekking permits. If you’re heading to one of these areas you’ll need to obtain permits through a registered trekking agency and travel with a guide. As of March 2017, the following areas require restricted-area permits: Manaslu, Nar-Phu, Tsum Valley, Upper Mustang, Dolpo, Kanchenjunga, and Humla.

PHONES AND WI-FI
For better or worse, it’s becoming increasingly easy to stay connected while trekking in Nepal. Along the most popular routes, some teahouses sell wifi and you may even get a phone signal using a local SIM card. Don’t count on staying connected though, because service is often unreliable at best.
If you buy a local SIM card in Kathmandu, there are two main companies to choose from: Ncell and Nepal Telecom. As of fall 2016, there was minimal (if any) coverage in remote regions, such as Manaslu, Tsum Valley or Dolpo. In the Annapurna region, Nepal Telecom SIM cards seem to work okay, while in the Everest region, NCell was a better bet. We were far from impressed by phone connectivity on the trail, but we expect coverage will get better in the coming years.
Wifi may be available at some teahouses along your trek as well, though speed and functionality will be highly variable. In the Everest region they sell pre-paid wifi cards (around $3 for 100mb) that work well but get used up quickly. In contrast, on the Annapurna Circuit you may pay a one time fee of $3-5 for wi-fi access, but connections can be very slow (if working at all).
VISA INFORMATION
In order to enter Nepal you will need to obtain a tourist visa. Most people get a visa on arrival at the Tribhuvan International Airport in Kathmandu. You can also do this ahead of time at a Nepal Embassy if you are traveling overland from India.
As of March 2017, US travelers had three tourist visa options. You could choose a 15 day visa ($25), a 30 day visa ($40), or a 90 day visa ($100). There are electronic visa machines at the international airport and staff to assist with forms. We applied for a 90 day visa on arrival and found the process to be surprisingly quick and efficient.
Please check current visa guidelines for specific information as these policies can change and this website is not an official source of information on Nepal visas.
RESPONSIBLE TREKKING & CULTURAL CONSIDERATIONS
The number one rule of backpacking conservation is Leave No Trace . Learn it and live it.
Don’t buy bottled water in teahouses. The extra cost and waste are not worth it. Instead, use treatment pills, a water filter, or a UV sterilizer. We used the SteriPEN Ultra and loved it.
Don’t litter. Pack out your trash and keep Nepal beautiful for generations to come. If you really want to be a superstar, pack out trash that you find along the trail.
Deforestation is a real problem in Nepal. Avoid using firewood and stay in lodges that use eco-friendly fuel.
Dress conservatively, especially when sightseeing in towns. For women, this sadly means no shorts or shirts that show shoulders.
Public displays of affection are frowned upon in Nepal, so save it for private time.
Walk to the left of religious monuments such as mani walls, chortens, and prayer wheels. If you spin a prayer wheel, always spin it clockwise.
Follow the rules when visiting temples. Shoes off, no exposed shoulders, cover your legs, and don’t take pictures inside. Also, don’t enter Hindu temples wearing leather products.
Always ask permission before taking a photo of a person. Most people won’t mind, but if they decline, respect their wishes.
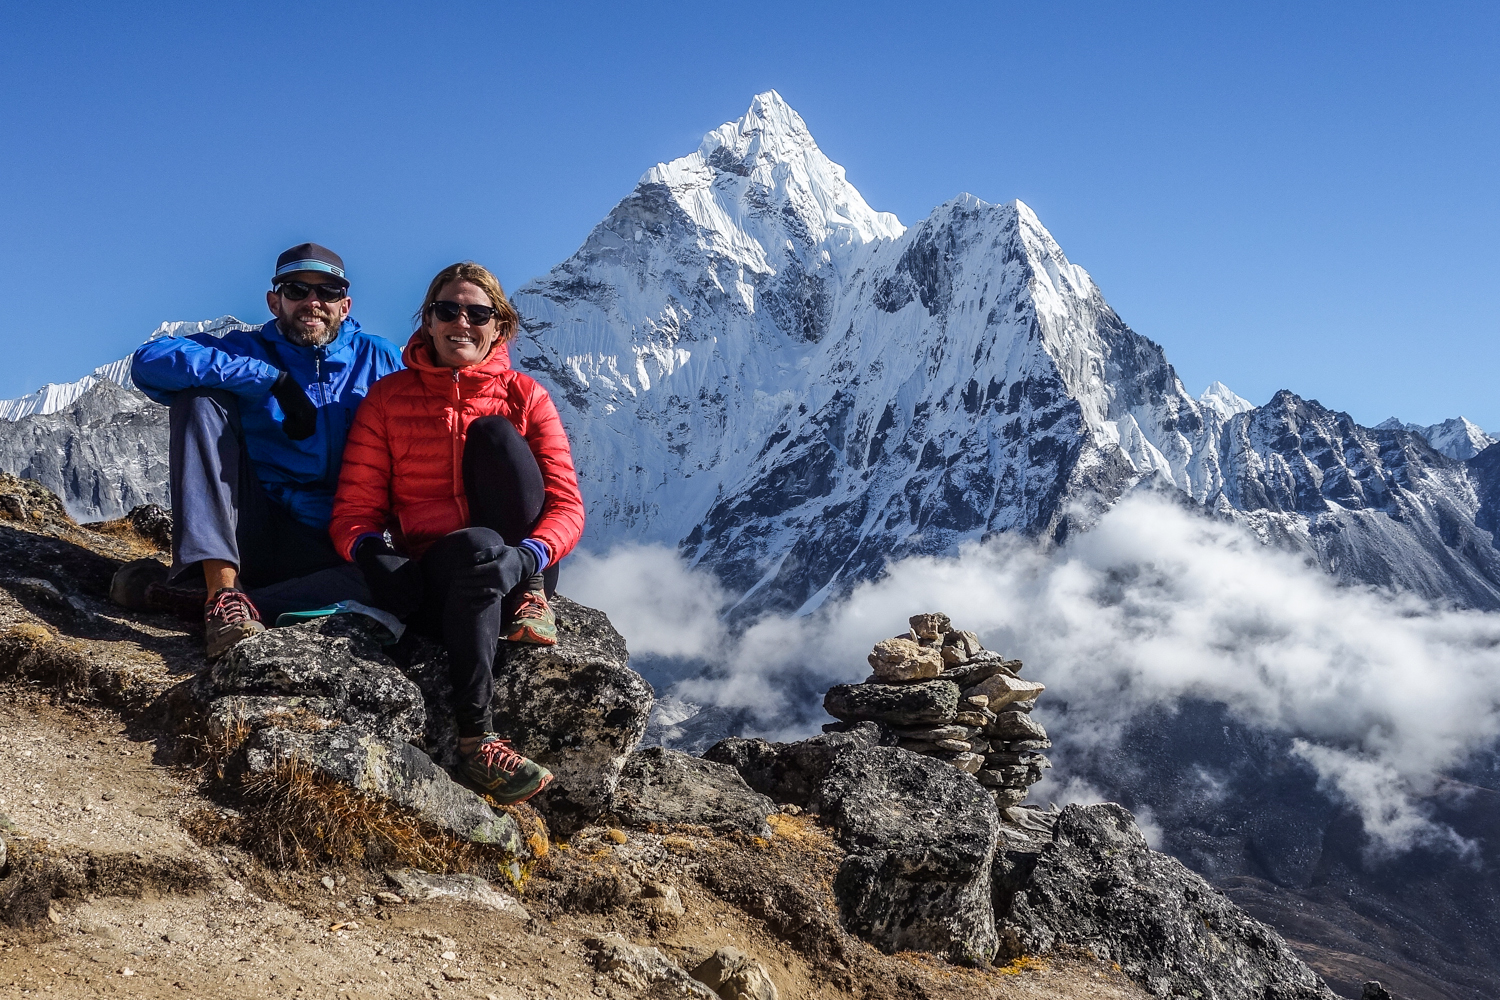
MORE RESOURCES
Hopefully you found this guide helpful for planning your trip to Nepal. We have truly fallen in love with Nepal and we know you will too. For more helpful resources check out the following links:
Nepal Gear Guide & Checklist
Best Backpacking Gear – CleverHiker Gear Guide
CleverHiker Top Gear Awards
Essential Trail Skills Video Series
L ightweight Gear Basics Video Series
And as always, please feel free to leave a comment below if you have any recommendations, questions, or suggestions. Take care and happy hiking!
Disclosure: Some of the links on this page are affiliate links, which means we may receive a small commission if purchases are made through those links. This adds no cost to our readers and helps us keep our site up and running. Our reputation is our most important asset, which is why we only provide completely honest and unbiased recommendations.
10 Best Trekking Itineraries in 2024-2025
Classic inca trail, classic w trek, ultimate patagonia trekking, mt kilimanjaro lemosho climb, alaska backcountry adventure, hiking enchanted china, borneo's peak: mount kinabalu climb, grand national parks: las vegas to la, hiking the canadian rockies, top trekking destinations in the world, trekking destinations, alaska treks, mount kilimanjaro, canada treks, best treks in central and south america in 2024-2025, cordillera blanca trek, trekking chapada diamantina, cotopaxi trekking, cordillera real trekking, inca trail express, torres del paine short w trek, 10 best polar treks for 2024-2025, 10 best treks in asia & africa for 2024-2025, mt kilimanjaro rongai climb, mt kilimanjaro machame climb, mount everest basecamp wellness trek, highlights of nepal, manaslu circuit trek, best of nepal, ebc - everest basecamp trek, abc - annapurna basecamp sanctuary trek, uganda luxury wildlife safari tour, 5 top usa hiking tours for 2024-2025, trekking itinerary travel guide.
- A hiking-focused itinerary: Every day will feature hiking as the main activity. You may have opportunities to explore cities, towns, and archaeological sites that you come across or do any number of side activities, but hiking really is the focus of these trips.
- Camping opportunities: Our trek tours offer a mix of lodges and camps along the way, but we promise that even the camps along the trail are very comfortable.
- Excellent guides: A guide is the core of a trek, and a good guide can make all the difference. That's why we make sure that the guides our tour operators feature are expert hikers, prepared to help with anything that might happen along the way, and also among the most knowledgeable so that you gain knowledge and deeper appreciation of the magical destinations that you're hiking!
- Classic treks: From Machu Picchu in the Inca's Sacred Valley to Africa's untamed Mt. Kilimanjaro to the Great Wall, we have trekking adventure tours in all corners of the world to let you experience the renowned natural and human wonders of the world.
- Lesser-known trails: We've also worked with our operators to offer expeditions that visit the lesser-known routes of popular destinations.
Hiking the Inca Trail
Patagonia lowdown: low elevation south america treks.
- Travel light. It may not feel like anything now, but you’ll feel the weight of every extra gram a few hours into your climb. Bring only the essentials.
- Train. If you’re a beginner, training can be as simple as gentle walks, quick runs, and even easy hikes. Perhaps take the stairs at work? The key is getting the body used to a little exertion.
- Wear the right shoes. Trust us, shoes can make or break the experience of a great trek. Some like hiking boots, while others prefer trekking trainers that are light and quick-drying. Try a couple at the store to see which one’s more comfortable to you. And remember, break it in before your trek!
- Track the weather. Always check the forecast before hitting the trail. In fact, check the weather repeatedly , including a few hours before your trek.
- Pace yourself. This isn’t a race, so resist the temptation to power forward with everything you’ve got, especially in the beginning. Find a slow but steady pace to make sure you have enough energy to make the final ascent.
- Layering: Stay warm and gear up with a base layer (moisture-wicking underwear), a mid-layer (insulation), and an outer layer (shell protection from wind and rain).
- Protect your skin: Make sure every part of your body is covered, including your hands, feet, ears, nose, and cheeks. Goggles can help protect your eyes from the harsh wind and potential rain.
- Hand and toe warmers: Pack warm packets for extra heat in your extremities on trekking adventures.
- Fuel up: You may feel less hungry or thirsty when it’s cold, but eating and drinking are just as important. Pack snacks that don’t freeze easily, like chocolate and nuts.
- Stay alert for cold-weather injuries like frostbite and hypothermia. Know the signs, like coldness, tingling, and pain for frostbite or shivering and mental deterioration for hypothermia.
Peru Travel: Great Alternative Treks to the Classic Inca Trail
A sample menu from our inca trail treks in peru, hiking in chile, hikes at machu picchu: should i hike huayna picchu or machu picchu mountain, trekking faqs, trekking travel videos.
Why Travel With Adventure Life
Recognized by.

Experience Trekking
On the rugged trails, experience mountaineering, on the land of mount everest, experience activity, engage in an array of actions, experience heli tour, observe aerial view of the himalayas, experience filming, on the undisturbed protected areas, experience diversity, of the friendly ethnic people, experience wildlife.

Most Popular Trips in Nepal
Well, the uncertainty that anyone might face before their departure to Nepal is deciding on a suitable trip in Nepal. And to address that question we have selected a few well-known and mostly strolled trekking routes, homestay experiences in mid-hill of Nepal, wildlife experience, and adventurous and challenging sports too!

Everest Base Camp Trek
Globally renowned, Everest Base Camp trek is an adventurous trek that introduces you to the lap of the highest peak and a series of viewpoints to high mountain sceneries, Sherpa Cultures, and beautiful flora and fauna.

Langtang Valley Trek
Far from the city, cutting through the dense forest full of oaks, bamboo beautiful greenery, and Rhododendron (during spring & autumn), Langtang region trekking begins.

Annapurna Circuit Trek
This oldest trekking route will take you to the elevation of 5,416 m while you hike through the most scenic places, tall mountains, and deepest gorge of the world.

Manaslu Circuit Trek
The Manaslu Circuit Trek is renowned as one of Nepal’s excellent treks. This journey takes you around Manaslu, the world’s eighth highest mountain at 8,163m (26,781 ft).

Upper Mustang Tiji Festival Jeep Tour 2024
Experience the thrill of driving in the desolate moonscape of Upper Mustang and Kali Gandaki Valley to explore the Tiji festival

Island Peak Climbing
Island Peak (also known by its local name Imja Tse) the best combo of Everest Base Camp with Island Peak Climbing is a thrilling lifetime experience
Newly Discovered Trips
Remarkably, the newly discovered destination is rich in culture, traditions and can experience the authenticity of the Nation. And hand in hand we work together for searching brand new routes and promote them among domestic tourist as well.
Snow Leopard Tracking Trek in Nepal
An extraordinary and exciting wildlife trek in the Manang district of Annapurna Region of Nepal to track the Snow Leopard trails and spot them in the wild Himalayas.
Pikey Peak Trek
A newly discovered short and easy trekking destination with spectacular panoramic views of eight-thousanders including Everest, and Kanchenjunga.

Mardi Himal Trek
The Mardi Himal trek (4,500 m) is designed for those who want to be there in a short time and lost in nature.

Tamang Heritage Trail
Tamang heritage trek takes you on a cultural adventure with a blend of nature and culture. Enjoy spectacular views of Ganesh Himal, and the Langtang Himalayas.

Tsum Valley Trek
Tsum Valley Trek is a remote and culturally Tibetan valley is reached off the Manaslu Circuit trail and can be done as an add-on to the Manaslu Circuit or as a two-week trek in itself.

The best places to begin exploring the Nepalese Himalayas
Latest from our blog.
Some helpful tips & tricks, travel stories, and other thoughts from our team that help you travel. Browse all stories

Why Everest Base Camp Trek is famous?

Jungle Safari in Nepal

Nepal’s Top 15 by Lonely Planet
– what they say?
travelers’ experience
Successful Science Research Trip to Annapurna Region We chose Nepal for our science research trip, which was organized by Trekkers Paraside and Adventure Pulse. We both appreciated the dedication of the entire team to making our research trip successful. Our research based on Glacier, river, high altitude lake & mountain, flora & fauna through the Science University of Calcutta. We explored the Manaslu Glacier near Bimthang, Himlung Himal glacier of Nar Phu valley trek, Tilicho Lake, and the Kali Gandaki River. Our trip duration of about a month. Because of the heavy snowfall in February 2021, crossing the Throng-la pass was difficult but worth it. The guide Mr. Sange Sherpa is the most important aspect of our research trip’s success. If you are looking for any science-related research in the Himalayas, both guide and company are highly recommended. Arvinda Kumar Singh & Ajay Kalkata, India -->
Life-time experience with Trekkers Paradise This was my significant Himalayan trekking expedition with Trekkers Paradise team in the Annapurna Circuit Trek with Tilicho Lake and Upper Mustang. Trekker’s Paradise group left no stone unturned to ensure safe and complete expedition. The team planning was emaculous with almost daily discussion and excellent arrangements. All your team, guides and porters were enthusiastic, helpful, knowledgeable and sincere. Without any trek preparations I did this trek successfully with the care and guidance of brave and hardworking Sherpas. And one thing I want to add is that trekking is impossible without Sherpas. Overall, it was a fabulous trekking experience in the heavenly Himalayas of the Annapurna Circuit that will set in my mind forever. I was lucky enough that I came and visit this beautiful country Nepal and I will try my best to come each year and trek in Nepal. Dr Vinit Kolhe Pune, India -->
Everest Base Camp Trek with Trekkers Paradise I went to Everest Base Camp with Trekkers Paradise, We were 4 in groups, there was a 100% successful trek. This was a once-in-a-lifetime adventure for us all and we could not have picked a better company than Trekkers Paradise. The guides were very knowledgeable and friendly, he made sure we had enough time to rest and was instructing and encouraging us to drink more water and walk slowly but steadily. The entire trek was very well organized and the weather favored us as well. We got to see all the Himalayas that can be seen from the area. Stephan Hans Axel Stockholm, Sweden -->
One of the best days of my life I was extremely satisfied with Trekkers Paradise. Mr. Ghanshyam, the owner, has proven to be very courteous and helpful from the very beginning, trying to organize the best trek to Everest Base Camp. The guides and porters are very professional and friendly, the accommodations simply superb. I highly recommend it, Mr. Ghanshyam (Trekkers Paradise) will turn your trip into an unforgettable experience! Dr Ganesh Bhoir Pune, India -->
Mesmerizing Tour to Kathmandu, Pokhara & Chitwan In November 2019, I came with my family for a 2-week city tour of Kathmandu, Pokhara, and Chitwan wildlife safari. It was great to see Mr. Ghanshyam after such a long time. In Kathmandu, we visit world heritage sites like Swyambhunath, Boudhanath, Pashupatinath Temple, and Bhaktapur Durbar Square, among others. Pokhra is the best place in Nepal to visit and even one of the most beautiful places in the world. Visit Devi’s Fall, Phewa Lake, the World Peace Pagoda, Sarangkot, and a variety of adventure activities. The chitwan national park 4 days safari was mesmerizing experience ever. Overall, I would recommend Trekkers Paradise for everyone looking for a good value tour with flexible timings and experienced and knowledgeable guides. Thank you for your time and generosity, and I hope to see you again soon. Farook Nikhil Singapore -->
Related Destinations
We also provide and manage trips to the neighboring countries India, Tibet too! If you intend to follow along the path and explore Nepal’s nearby nations then here are a few trips around.

Bhutan is well known for its natural beauty, forts, trekking spots, great culture, heritage, rich biodiversity, and colorful festivals in the world.

The dream of every foreigner because of the boundless travel opportunities it presents, along with its rich heritage and culture, and varied flora and fauna.

Tibet is known for its splendid lakes and unique landscapes, such as the sparkling, sacred Namtso Lake, and the deepest canyon in the world.
every information you need to know
Arriving in nepal, mountaineering, best season, places to see, things to do, more on nepal, we live & breathe the travel experiences.
We do comprehend the limitation of time, choices of treks and trips, one’s endurance to embark on a journey and this is why we communicate and talk about every aspect of your voyage since the beginning.

Grab Our SPECIAL OFFERS
Travel & tours, 22 exciting trips, 58 exciting trips, travel partner, lovely destinations, adrenaline sports, 16 exciting trips, ready to take the next step.
Travelling with us is super easy and awesome. Trekkers’ paradise takes every moment to make your tirp the memory of lifetime. Click the button below and contact us, we are here to help you.
Making the best of your time in Nepal
Have a fixed number of days? Maximize the things to see and do during your visit.

7 Days in Nepal – 7 Unique Itinerary Ideas
The majority of travellers visit Nepal for trekking in the Everest Base Camp, Annapurna Base Camp, Annapurna Circuit Trek, and other popular trekking destinations. There are treks for trekking lovers…

10 Days in Nepal – 7 Unique Itinerary Ideas
10 days in Nepal is plenty of time to enjoy some of the country’s attractions. From breathtaking treks in the high Himalayas to visiting the Buddha’s birthplace at Lumbini, white-water…

Two Weeks in Nepal – 7 Unique Itinerary Ideas
Two weeks in Nepal is enough time for a truly satisfying adventure. Whether you’re interested in doing an epic trek or making your way around the country to learn about…

Hiking & Walking Tours & Travel Packages 2024/2025
Our 2,373 most popular hiking & walking trips. compare tour itineraries from 446 tour companies. 11,477 reviews. 4.7/5 avg rating., popular hiking & walking tours.

Highlights of Albania
- Travel through Albania while discovering its fascinating history and culture
- Discover Butrint, one of the greatest archaeological sites in the Balkans
- Stroll along UNESCO-Listed towns and visit hilltop castles

New Zealand: The South Island
- Prepare to be dazzled by the staggering beauty of the South Island’s glittering lakes, lush forests, fertile farmlands, and alpine peaks.
- Hike up a valley carved by the retreating ice of Franz Josef Glacier.
- Spend a day at a wilderness resort, enjoying kayaking, canoeing, hiking—and perhaps strolling to a colony of glowworms.
- Experience life on a working ranch and savor a home-cooked meal during a visit to a sheep and cattle station.
- Sample local vintages during a wine tasting at a local estate.

Glaciers, Falls & Tango
- Tour both sides of Iguazú Falls’ majestic waterfalls and wander the national park split between Argentina and Brazil.
- Walk alongside Patagonia’s Perito Moreno Glacier, one of Argentina’s cultural staples,in cosmopolitan Buenos Aires.
- Best time to travel: From October to April

Tour du Mont Blanc Hotel Trek
- Stay in a variety of small, friendly hotels and pensions
- Walk in the shadow of Mont Blanc, the highest mountain in western Europe
- Enjoy the spectacular scenery of this world-famous route
- Three rest days to explore the alpine towns of Courmayeur, Les Contamines and Chamonix.

Greece Panorama Adventure
- Cook and have lunch with a local family in the Peloponnese
- Visit the most important archeological sites of Greece
- Experience a speed-boat Private Tour at the sandy beaches of Crete
- Hike the Caldera of Santorini
- End your trip with a cruise witnessing the most famous sunset of Greece

Greek Island Wanderer
- Island hopping between the Cyclades Islands of Syros, Paros, Santorini and Naxos
- Visit gleaming waterfront harbours, rocky coves and sandy beaches
- Explore the historic capital city of Athens with the chance to visit the Acropolis

Walking on the Greek Islands
- Discover the three islands of Naxos, Santorini and Paros
- Gentle walks through idyllic scenery and remote villages
- Enjoy delicious local Greek cuisine

El Chalten to Ushuaia: Hiking in Patagonia
- Sail to see the Perito Moreno Glacier from close.
- Hike near the stunning Mount Fitz Roy and stay in Torres del Paine National Park.
- Travel to Ushuaia, the most southern city of the world and sail the Beagle Channel.
All Hiking & Walking , expedition cruises, self guided adventures and vacation packages. Find the best guided and expert planned vacation and holiday packages. Read more about Hiking & Walking

Small Group Hiking & Walking Tours
Best of Galapagos
- Explore the islands on this in-depth adventure, coming face-to-face with some of the most extraordinary wildlife on earth.
- Get your blood pumping as you scale a volcano on Isabela Island.
- Acquaint yourself with the beautiful churches and graceful boulevards of Quito, Ecuador's capital.
- Get up close and personal with giant tortoises on Santa Cruz Island. These nearly extinct creatures are one of the greatest drawcards to the Galapagos.
- This is a land based Galapagos trip, meaning you'll use locally owned hotels on the islands and have more opportunities to interact with the locals as opposed to staying on a boat.

Malta and Gozo Discovery
- Highlights tour of Malta and Gozo exploring these Mediterranean islands
- Explore Malta's capital of Valetta and its fortifications, churches, Grand Harbour
- Discover the oldest freestanding structures in the world including the temple of Ggantija

Mont Blanc Highlights
- Walk surrounded by dramatic mountain scenery
- Stay in a comfortable alpine chalet
- Enjoy the shops, bars, restaurants and cafes of Chamonix

Jordan Discovery
- You’ll never forget your first glimpse of The Treasury in Petra. Spend a day taking in the majesty and mystery of this unforgettable place on a guided tour then enjoy free time to explore.
- Experience the unique sensation of floating in the super-salty waters of the Dead Sea, then cover yourself in the mineral-rich mud for a spa treatment like no other.
- Be welcomed into a local home in Petra where you’ll chat to your friendly family hosts over a traditional meal and learn what life is like in this popular spot.
- Meet Bedouin locals, learn about their ways, and sleep under the stars in a desert camp in the far-out destination of Wadi Rum.
- Relax in the seaside town of Aqaba on the shores of the Red Sea relax around its untouched reefs and transparent waters – a spectacular spot for snorkelling.
Best Hiking & Walking Tours by Duration
Tours, Cruises & Private Trips
Best Hiking & Walking Tours by Price
Top Hiking & Walking Attractions & Experiences
Top Hiking & Walking Experiences
- Following the Inca Trail to Machu Picchu in Peru
- Hiking the wondrous and expansive Grand Canyon
- Walking through the winding streets and colorful city houses of Cinque Terre in Italy and taking in amazing coastal views
- Heading up Mount Toubkal in Morocco
- Exploring the Atacama Desert
- Trekking through Alice Springs in Central Australia, seeing Uluru and learning about the native culture
Hiking & Walking Tours & Travel Guide
Hiking & Walking Attractions & Landmarks Guide
A hiking tour is one of the most rewarding ways to see a country, both in the physical accomplishment and the fabulous views. Hiking brings you close to the earth, as you wind through natural habitats, feeling the weather and smelling the air. And many options now exist to satisfy even the most cautious traveler.
Why take a hiking tour with a guide?
There are many benefits to taking a hiking tour with a guide, the most obvious being safety. Tour guides and companies are well trained in the routes, natural habitat, and first-aid to make your trip enjoyable and safe.
Another perk to having a tour guide is the ease of navigation and less frequented hidden gem routes and nature spots. Tour guides are experts in the region and can give you historic and cultural information along with directions to the best and safest routes.
Guides can explain alternative routes for various physical levels and can recommend different trails depending on your scenic and adventure preferences.
Popular hiking tour destinations around the world
Stride lists itineraries along some of the most popular hiking trails and destinations in the world. With over 2,000 hiking and walking tours offered, the options are endless. If any of these top hiking destinations are on your bucket list, you are in luck! Stride has a hiking and walking tour ready for your next adventure:
1. Inca Trail - The famous Inca Trail is located in Peru and leads to the mighty Machu Picchu . There are over 150 trips listed on Stride that explore the Inca Trail. There are tours that hike the trail in its entirety, which takes about 4 days, but there are also many options that hike part of the trail at varying physical levels.
2. Appalachian Trail - This scenic trail is located in the eastern United States and is over About 2,200 miles (3,500 km) long. Visited by over 2 million hikers each year, this popular destination stretches from Georgia all the way up to Maine. Some of the most frequented segments of the Appalachian Trail included in tours listed on Stride are the Great Smoky Mountains in Tennessee and North Carolina and the Shenandoah Valley of Virginia.
3. Kilimanjaro hike - Mount Kilimanjaro is the highest mountain in Africa. Stride lists over 100 hiking trip options that tour many of Kilimanjaro’s most popular trail routes. The oldest, most well established is the Marangu route . You can find over 40 tour options that hike along the Marangu route, with the average tour lasting one week. Other routes listed on Stride are the popular Machame, the beautiful Lemosho, and the less demanding Rongai.
4. Trolltunga - A spectacular rock formation located in Hordaland county in Norway , Trolltunga is a very popular Scandinavian hiking destination . This mountain is shaped like a hanging cliff, hovering over Lake Ringedalsvatnet. Stride offers 6 hiking and walking tours that explore this spectacular Norwegian rock formation.
5. Mount Everest - Mount Everest is earth's highest mountain above sea level, located on the Nepal/China border in the Mahalangur Himal sub-range of the Himalayas. Towering at 8,848 m (29,029 ft), this mountain is rarely climbed in entirety. Though hiking Mount Everest can be very dangerous, Stride offers 90 tours that hike and trek the Everest Base Camp and surrounding areas of Tibet, Nepal , and Bhutan.
6. Grand Canyon - This U.S. national park is located in the state of Arizona and is visited by over 5 million travelers each year. With hundreds of trails to choose from, the most popular are the extensive rim-to-rim, the Bright Angel Trail, the Rainbow Rim Trail, and the Hermit Trail. With views of a lifetime, Grand Canyon tours are guaranteed to impress. Hike to the bottom of the Grand Canyon to a campsite, or hike around the outer rim. The options are endless!
7. Yosemite - Yosemite National Park is located in California’s Sierra Nevada Mountains. With breathtaking views of rolling meadows and towering mountains, there is a Yosemite hike or walk for every traveler listed on Stride.
The most popular hiking trails in Yosemite are the Upper Yosemite Falls, Clouds Rest, Nevada Falls, and of course, the iconic Half Dome. This 14-16 mile round trip hike is intense and suited for in-shape avid hikers. It requires ascent by cables for a portion of the steep hike, which are only up in the summer months. It is recommended to plan your trips in advance, as Half Dome is in high demand and requires a permit for entry.
Tips for hiking in high altitude
Walking and hiking in high altitude regions causes a shortness of breath, which is exacerbated by the difficulty of the trail, elevation, and personal physical ability. This is something to research and adequately prepare for prior to any hiking trip.
In some cases, altitude sickness can ensue, creating symptoms of severe headache and/or nausea. If this is the case, retreat to lower elevation, as the only way to relieve altitude sickness is to descend immediately. Some tips in advance of and during high altitude hikes are as follows:
Train for your hike in advance : If you have close access to high altitude locations, it is recommended to take practice hikes or walks to acclimate your body to moving in those high altitude levels.
Run, bike, and swim : These activities can be practiced prior to a high altitude hike to build up your cardiovascular endurance. This will help condition your body for a high altitude hike.
Climb stairs : This helps build up your leg muscles and lungs to prepare for high altitude activity.
Hydrate : Bring adequate water and food for your high altitude hike. Hydration is always key in any hike, especially those in high altitude!
Take breaks : If you are becoming short of breath, pull to the side and soak in some of the beautiful nature and scenic views as you catch your breath.
Know your limits and take it slow : It is not a race to the top! Enjoy the hike, take it all in, and hike at an appropriate pace for the altitude level.
Choosing a Route
It's important to make sure you look at the tour's activity level before picking the trip. If you're already physically fit and are looking for a challenge, feel free to go for a trip with a "hard" physical level ! While no hike is going to be 100% comfortable (this isn't sailing through the British Virgin Islands on a luxurious cruise shi p !) it is possible to find less intense outings.
And not all hikes are up and down. For example, Mt. Cook in New Zealand is a mainly flat hike, though long. A good option for those worried about elevation or wanting to avoid a strenuous hike. If that still sounds like little too much, consider starting out with a walking tour, or having a look at the easy hiking/walking trips that we at Stride have conveniently marked.
Top hiking trails in…
Offering over 2,000 trips from 270+ tour companies, hiking and walking tours are among the most popular listed on Stride. With the wide rage of tour styes, locations, intensity levels, and regions to choose from, every traveler seeking a hiking tour will find their best fit on Stride. The countries with the top hiking trail locations are as follows:
United States - With 58 national parks stretching from the east to the west, The U.S. is a prime hiking spot for travelers. Some of the most famous hiking trails include: Half Dome in Yosemite, Angel’s landing in Zion National Park, Devil’s Garden Trail in Arches National Park, and Root Glacier Trail in Wrangell-St. Elias National Park.
Peru - The world’s longest mountain range, the Andes, runs through Peru. The most famous hike in the Andes is Machu Picchu and the Inca Trail that leads up to the summit. Although Machu Picchu may be the most famous hiking trail in Peru, there are several other top hiking destinations such as the Santa Cruz trek in Peru’s Huascarán National Park in the Cordillera Blanca mountain range and the colorful Rainbow Mountain.
Norway - From the lush fjords to the jagged mountain peaks, Norway has some of the most spectacular hiking trails in the world. Some of the most popular hikes are Pulpit Rock, Kjeragbolten, Trolltunga, and Besseggen Ridge.
Nepal - Most famously known by hikers for the iconic Mount Everest, Nepal is a popular location for hiking and trekking excursions. Top hiking trails in Nepal include Everest Base Camp, Great Himalaya Trail, and the Annapurna Circuit Trek.
Chile - Chile is home to some of the most beautiful and unique hiking locations in the world. With the Aconcagua mountain range, the Torres del Paine National Park of the Patagonia region, and the Andes, Chile is rich in nature, outdoor adventure, and hiking trails.
New Zealand - Known as an outdoor lover’s paradise, New Zealand has an extensive collection of hiking trails, arguably the best in the world. You can find breathtaking hikes on both South and North islands. On the South Island, popular hiking trails include Routeburn Track and Milford Track. On the North Island, top trails include Whanganui Journey, The Tongariro Crossing, and Mount Maunganui Summit.
Canada - Canada’s vast terrain contains some of the most gorgeous trails in the world. From the west to east coast, some of the most popular hiking regions include Whistler Mountain, Banff National Park, Jasper National Park, and Lake Louise.
Hiking & Walking Reviews & Ratings
Excellent trip with a great leader and itinerary.
As always Explore has succeeded in putting together a tour that gives you a good feel for the country you are visiting and its people and culture. There were place...
Susan Postill
Lovely trip, beautiful country, nice people, good food,...
Mixed feelings. Fabulous countryside, mountains & valleys, rivers & greenery. Lovely churches, mosques, museums & old Roman remains. But towns in 1st w...
Trusted Customer
Guide Tedi and driver Tony - brilliant team who were proud to show us their lovely country. Nothing was too much trouble for either of them. Tedi was mature way bey...
See all Hiking & Walking reviews
Related Trips & Tours
Hiking & walking tours faq.
1. Does Travelstride have all the tour operators?
2. How does the Member Savings program save me money?
3. Can I trust the tour operator and trip reviews on Travelstride?
4. What does ‘Stride Preferred’ mean?
You are using an outdated browser. Please upgrade your browser or activate Google Chrome Frame to improve your experience.

- Trip Styles
- Destinations

- Trip Destinations
- Washington Hiking Tours
- Olympic Hiking Tours
Wild Olympic Coast Traverse
Seattle, wa, trip highlights.
- Coastal Thru-Hike
- Amazing Beach Camps
- Marine Wildlife
- Native Rock Art
- Towering Sea Stacks
- Lush Rainforests
Description
This Wild Olympic Coast backpacking trip in Olympic National Park offers an extremely unique opportunity to explore a dramatic coastal backcountry environment. It requires a flexible attitude and adventurous spirit and in return rewards guests with truly remarkable moments in stunning wilderness settings. We explore the edge of the United States on this rugged 4 day expedition through Washington’s coastal wilderness. We’ll hike past dramatic wave-carved rock spires, explore sea life in tidal pools, and traverse headlands at low tide.
This trip starts on the Makah Reservation in the furthest northwest corner of the continental US. We’ll weave our way through coastal forests until we reach the beach, and then traverse southward past ocean-carved arches, abundant sea-life, and rugged bluffs. These aren’t the sandy beaches of tropical dreams–these are the epic beaches of Washington. Driftwood fires will keep us warm at night, and we’ll let the tides dictate our schedule–sometimes we’ll scramble over boulders around the edge of a headland at low tide, other times we’ll take advantage of steep footpaths and ropes to climb up and over ridges in our way.
$1730 Per Person
DIFFICULTY LEVEL 4
Scale of 1-5. 1 is least difficult; 5 is most difficult
Hiking Distances:
Backpack Weight:
Extremely Rugged
Max Daily Elev. ↑↓:
Heights Exposure:
Significant
Please Note: Terrain, Elevation Gain and Heights Exposure ratings reflect the section or day of the trip with the maximum difficulty of each. Much of the trip is at easier levels. See the trip itinerary for more detailed information. Backpack Weight ratings are estimates that account for Wildland-provided gear, guest clothing, personal items and a share of group food. By packing light it’s often possible to stay on the lower end of the weight range. Pack weights also decrease during the trip.
PHYSICAL DEMANDS OF THIS TRIP
- Hiking uphill or downhill with a 35-45 lb backpack for 6-8 hours
- Maintaining balance and footing on extremely rugged terrain
- Ascending steep slopes by hiking up while moving hand over hand up fixed ropes
SOLITUDE LEVEL 3
1 least solitude, 5 most solitude
We rate this Olympic National Park hike a solitude 3. You can expect hours of solitude at a time.
Private Trips

Travel in perfect company by booking a private trip exclusively for your group!
Our sliding scale for private trips is based on the final number of guests in your group. Rates are per person and do not include sales tax, national park fees or guide gratuity. The final rate is based on the actual number of guests on the trip and may adjust based on cancellations or additions.
Please Note: you can also enjoy a private trip at our normal scheduled rates by filling any empty tour to capacity. However, if group members drop from the tour those spots will automatically become available on our website for instant booking. By purchasing a private trip at the rates listed below, your trip will remain exclusive to your group regardless of cancellations.
Private Rates FOr This Trip
- 2 People: Rate x 2.5
- 3 People: Rate x 1.75
- 4 People: Rate x 1.25
- 5+ People: Rate x 1.15
*all rates are per person
Learn About Our Private Trips
- Shuttle to the trailhead: 4.5 hours
- Hiking Mileage: 4 miles
- Elevation Loss: 200 feet
This multi-day Olympic National Park hiking trip begins with pick up at your hotel in Olympia and a scenic drive to the trailhead on the very tip of the Olympic Peninsula. We’ll drive alongside the scenic Hood Canal, and then get views of Vancouver Island across the Strait of Juan de Fuca. After a tasty picnic lunch we’ll put on packs and hike through a coastal forest for two miles before reaching Shi Shi Beach and our first dramatic views of the Pacific Ocean. We’ll hike south along the beach and set up camp with views of sea stacks, cliffs, and pounding waves. We’ll watch the sun set over the ocean, enjoy a hearty backcountry dinner, and then fall asleep to the gentle roar of the ocean.
- Hiking Mileage: 4.5 miles
- Elevation Gain: 1100 feet
- Elevation Loss: 1100 feet
Our second day will give us some of the best scenery – and the best challenges – that Washington’s coast has to offer. We’ll hike south along the beach, stopping to explore caves, sea-stacks, tidal pools, and forests along the way. We’ll ford small creeks, and when the tide is low we’ll traverse quickly along tidal flats around headlands obstructing our path. Sure footing is important—we’ll be crossing wet boulders covered with kelp and barnacles. When the tide is high we’ll scramble up and over steep overland routes, using handlines to assist our climb. After about 4 miles we’ll reach Seafield Creek and camp for the night. It’s a short mileage day, but packed full of challenges We’ll have some time to relax over another wonderful backcountry dinner and peaceful night’s rest.
- Hiking Mileage: 4.3 miles
- Elevation Gain: 500 feet
- Elevation Loss: 500 feet
On day three we’ll continue our coastal traverse with one more big headland, and then ford the Ozette River at low tide. We’ll be getting wet, so make sure to bring water shoes. After crossing the Ozette River we’ll leave our biggest challenges behind and travel south to Cape Alava, the westernmost edge of the contiguous United States. We’ll see Tskawahyah Island to the west of us, while keeping an eye out for sea life, and enjoy one last, dramatic sunset and evening on the beach.
- Hiking Mileage: 6.1 miles
- Elevation Gain: 400 feet
- Elevation Loss: 350 feet
- Shuttle to Olympia: 4.5 hours
On our last day we’ll head south past Wedding Rocks, and search for ancient Petroglyphs left from the Makah habitation of the area. Eventually we’ll reach Sand Point and turn inland. Boardwalks will take us back though coastal forests until we reach Ozette Lake, and our vehicle, where we’ll enjoy one last lunch together before driving back to Olympia.
Please Note : We always do everything in our power to follow the set itinerary, however it can change occasionally based on temporary access restrictions, weather, lodging/campground availability, guest ability/injury, natural events like fires and flooding, and other potential causes. Normal terms and conditions apply to trips with itinerary changes.
Trip Dates & Booking
Trip dates & booking.
Click on a date to register. You can also click here to request new dates or book through customer service.
AVAILABLE TO BOOK
This trip is available and bookable online! Click on the date to register now or contact us online to book through our award-winning customer service team!
This trip has 1 or 2 spots remaining and is bookable online! Click on the date to book now or contact us online to book through customer service.
REQUEST A RESERVATION
This trip is exclusively booked through customer service due to logistics with lodging, permits, staffing, availability, or something else. Please contact us online or call us at 800-715-HIKE (4453) to request a reservation.

Don't see your dates? Call us! We may be able to add new trip dates.
Trip details, what's included.
- Top-of-the-line tent, backcountry sleeping pad and multi-day backpack
- High quality, synthetic sleeping bag (professionally laundered after every use) – or bring your own .
- Use of trekking poles
- All meals are included from breakfast the first day through lunch on the last day
- Trained hiking guide(s) with years of personal wilderness and hiking experience, medical certifications, and a passion for leading people into breathtaking landscapes. See Guide Bios .
- Comprehensive, roundtrip transportation from your hotel in Olympia and back
- All entrance fees, permits and passes
- Emergency equipment including a company-issued first-aid kit and communication device (InReach Explorer or satellite phone)
- Mandatory 3% national park fee that passes through directly to Olympic NP
What's Not Included
- Clothes, raingear, and footwear ( see recommendations )
- Sunscreen, toiletries and personal items
- Water bottles and a headlamp or flashlight
- Guide gratuity (industry recommendation is 10-20% of trip cost)
Click here to see a printable, downloadable trip information packet with more detailed guidance about what to pack.
Meals: What to Expect
All of our hiking and backpacking tours include a diversity of tasty meals packed full of critical carbohydrates, proteins and fats. We carry foods that travel well in the backcountry – rice, pastas, lentils, beans, couscous, packaged meats, nuts, breads, oatmeal, granola, and more.
For optimal taste and energy, we supplement all our meals with spices, herbs, oils, cheeses, butter, sugar, and fruits and vegetables (fresh and dried). In addition, we provide you with with an assortment of trail mix, snacks, and dried fruits to eat at your own discretion.
We regularly accommodate vegan, vegetarian, kosher and non-gluten diets and will make adjustments for food allergies. These and other special dietary requests may require an additional fee.
Gear We Provide
We provide all group gear which includes the following:
- Deuter or Osprey backpacks
- Sierra Designs, Kelty or Big Agnes tents
- Sierra Designs, Kelty, Big Agnes and Mountain Hardware synthetic-fill sleeping bags (or bring your own )
- Thermarest or Big Agnes sleeping pads
- Leki trekking poles
- Cooking stoves and cookware
- Company-issued first-aid kit
- Emergency communication device(s)
Guest Packing List
When you register for this tour you’ll receive access to a printable, downloadable trip information packet with a detailed packing list specific to this trip ( click here to see it now.) All trips require a sturdy pair of hiking shoes or hiking boots, rain gear, a recommended clothing system, a headlamp or flashlight, a hydration system (water bottles and/or bladder) and other items specific to each trip.
Additionally, some guests choose to bring their own sleeping bag. We supply high quality, synthetic fill bags that are professionally laundered after every trip. Synthetic fill is non-allergenic, insulates when damp and stands up well to repeated washings, but is heavier and bulkier than down. If you’re able to bring your own down sleeping bag, there are multiple benefits . If not, we’ve got you covered!
Trip Logistics
How do i register.
Reserve your spot today! In the Trip Dates & Booking section of this page, the green and red dates are bookable online by simply clicking on the date, and blue dates must be booked through our customer service team for a variety of possible reasons. To email our customer service team, you can click here to get the ball rolling. Our adventure consultants will confirm availability, and if you’re ready to register we’ll email you a link to a registration profile. You’ll have 72 hours to complete your profile (and that of any dependents) and pay the deposit.
Feel free to call us for more info – we’re here 7 days a week!
Where Do We Meet?
Your guide will conduct a virtual orientation meeting (via conference call) at 5:00 PM the evening before your trip begins to review the packing list, communicate the first day’s logistics and answer any last minute questions you have. Your guide will give you the phone number for this call during the pre-trip contact approximately 10 days before your trip start date.
Early on the morning of Day 1 your guide will pick you up from your accommodations in Olympia, WA.
Click here to see a printable, downloadable trip information packet with more detailed guidance about flights, shuttles, recommended lodging and more.
Travel to Olympia
The most common way to reach Olympia is by flying into Seattle and renting a vehicle or shuttling to Olympia (approximately 1 hour). SeaTac (Seattle-Tacoma) Airport is one of the most easily accessed destinations in the country. Many major cities in the United States and internationally offer direct flights into Seattle.
The shuttle to Olympia is provided by Premier Airport Shuttle. Go to https://premierairportshuttle.com/olympia/ or call 800-962-3579 to make reservations.
Start/End Times
Your guide will inform you of the first day’s pick-up time at the orientation meeting. Generally, you can expect it to be between 5 and 8 am, although the exact time will depend on current weather and road conditions. We will drop you off at your hotel on the final day normally before 5 PM (this time is not guaranteed, as a variety of circumstances can influence our exact return time).
Safety Precautions
Your safety is our top priority. Our hiking tours are led by professional hiking guides, all of whom are wilderness-certified first responders or EMT’s, each with years of guiding and wilderness experience. Guides adhere to standardized risk management protocols in case of any potential or actual incident, and all tours carry an emergency communication device and comprehensive first-aid kit. Additionally we have a “24/7” system through which guides or guests can reach Wildland support personnel at any time.
If you have any further questions about safety, please contact us at 1-800-715-HIKE (4453) for more information.
Essential Eligibility Criteria
Essential Eligibility Criteria (“EEC”) have been specifically identified to help you understand the skills and abilities necessary to participate on each Wildland trip, and they apply uniformly to all potential trip participants, irrespective of the presence or absence of any disability.
Once you identify a trip in which you may be interested, please carefully review the EEC and itinerary details. If after reviewing the EEC that apply to your desired trip, you determine you need an accommodation in order to meet the EEC, please contact us prior to registering to discuss your requested accommodation.
The EEC exist for your own safety and the safety and enjoyment of all participants. If you are unable to meet the EEC for the trip, with or without an accommodation, you are not eligible for that trip. If you register and arrive for a trip for which you do not meet the EEC, you will be disqualified from participation on the trip and will be dismissed or evacuated from the trip without a refund.
Guide Working Parameters
Guides are required to take 8 hours off each 24-hour period to sleep, recuperate, take personal/down time…etc. In addition, as part of the 8 hours off they must sleep/rest or be in their tents/rooms uninterrupted for a minimum of 5 hours each night. We ask guests to respect these requirements and to not interrupt guides’ off time and sleep time unless there is a true emergency.
Age Restrictions
Age restrictions on this trip are as follows:
- 12 and older to join scheduled tours (mixed groups)
- 5 and older to join private tours, with final approval and specific logistical requirements (such as porter or stock assist) determined on a case by case basis
Weather in Olympic National Park
Olympic National Park covers a dramatic diversity of terrain from seashores to rainforests to alpine peaks and glaciers. The weather will be largely dependent on which trip you sign up for and which ecosystem you will be hiking in. Read below for average high and low temperatures in different parts of Olympic National Park:
- Accommodations

Backcountry Sleeping
Tent camping.
Sleeping on backpacking trips is in premier 1-person, 2-person or 4-person backcountry tents. Solo travelers, and anyone else who requests it, are issued single tents. Top-of-the-line self-inflating sleeping pads and synthetic-fill sleeping bags (professionally laundered after every trip) are also provided.

Backcountry Cuisine
Fresh & delicious.
Meals from breakfast Day 1 through lunch the last day are fully included and prepared by your guide. We never use dehydrated backpacking meals, instead serving freshly prepared, delicious backcountry cuisine made with a variety of common and specialty ingredients that travel well in the wilderness.

Amazing Campsites
In the action.
Of course campsites vary tremendously by destination, trip and even by the individual day of a trip. However, you can expect to camp in beautiful areas that put you right in the action to make the most of your backpacking adventure. We carefully design our itineraries with campsites in mind.
Trip Reviews
Average customer ratings:.
- 5.0 (9 reviews)
- Most recent
Fantastic experience!
Fantastic experience! Office staff helped us select a trip that worked with our travel dates and location. Our guide was well qualified, friendly, competent, caring, and spent time getting to know us. We were very well fed, safe, and warm. All of the equipment we borrowed from Wildland was good quality and looked brand new. The route was challenging but appropriate for us. I would book with Wildland again!
Nothing but positive experiences
This was my third trip with Wildland Trekking. I've had nothing but positive experiences with them. The guides on this trip were Darrek and Kyle, both whom were terrific guides and great cooks. Both were very knowledgeable about local flora and fauna and the history of the region. I would note that while the distances and elevation gains on this trip were not great, the terrain is mostly off trail, and quite rugged at times.
Beyond Excellent!
Highly recommend!
See All Guest Reviews!
Related trips, you might also like....
Olympic Rainforest to Glacier Trek

North Cascades Classic

Valleys and Glaciers of the North Cascades
- Similar Trips
- day by day itinerary
- logistical and travel information
- gear and clothing lists and more
Leave a Reply Cancel reply
Your email address will not be published. Required fields are marked *
First Name & Last Initial *
Save my name and email in this browser for the next time I comment.
wildland Wires
Sign up to receive our exclusive Wildland Wire emails and stay up to date with Wildland Trekking's promotions, discounts, contests, outdoor tips and tricks, trip reports and more!
IMAGES
VIDEO
COMMENTS
Carry your water bottle in your hands to encourage better hydration. 4. Pack your hiking daypack. Any dry food can go in the night before, as well as a jacket in case of unexpected inclement weather. Pack your safety essentials, which should include sunblock, insect repellent, a first aid kit, and a headlamp. 5.
Food: Strenuous, uphill hiking can easily burn upwards of 900 calories an hour. Bring enough food to keep your body powered. Energy-packed foods like those made with honey or protein-packed foods like nuts and jerky will help your body more than heavy carbs or overly processed foods.
Hiking is a long, vigorous walk on footpaths or hiking trails that usually lasts for a couple of hours, one day, or perhaps overnight. Trekking is a long yet energetic hike that lasts multiple days and is mostly in the wild natural environment. In other words, you can do it off hiking trails.
We provide in-depth backpacking guides to some of the most beautiful places on our planet. Each guide includes all the pre-trip details you'll need to plan an awesome backcountry adventure. For more popular CleverHiker resources, we recommend checking out the following: CleverHiker Gear Guide. CleverHiker Skills Tutorials.
Hiking Sequoia, Kings Canyon, and Yosemite. Alicia 17 Jun, 2023. 5. The trip was well coordinated. Our trip had to be re-routed due to the very snowy winter, but our tour guide, Phil, still managed to keep our days full, and our hikes about the same mileage that we would have walked otherwise.
Three words: Pack enough water! Often, you underestimate the amount of water to bring on a trek. Remember its always better to have an excess rather than to find yourself thirsty and dehydrated. Water to Go bottles and other water filtration devices come in handy when doing long treks.
8) Listen to your body but don't be afraid of it. As you train for your trek, pay attention to how your body responds. If you're feeling weak or lightheaded, slow down—you don't want to collapse during your trip. On days that you exercise, eat more carbohydrates and proteins than usual. The increased calorie intake will give you energy.
Ecuador Trekking. Quick notes: 8 days - $999US. Trip dates available: August to December 2023 (reserve yours now there are only a few dates available!) Chimborazo volcano and sheep on the moor, Andes, Ecuador. Trip Details: Take yourself on an immersive hiking trip through Ecuador's Andes and Amazon River regions.
12. Wear broken in shoes and socks. Hiking boots are generally better than hiking shoes, as the former offer more ankle support and also have thicker tread and a more durable fabrication. That said, depending on the terrain you'll be trekking, hiking shoes might be sufficient.
10. Invest in a good pair of shoes. Photo by Kieran Wallace. Your feet are your most crucial body part on a trek, and it doesn't take much to keep them in toe-tappingly tip-top shape. First, invest in a pair of good-quality, water-resistant hiking boots; you want plenty of support and ventilation too. Then, wear them in.
41.Share your trekking plans with a reliable person. Provide details about your route, expected return time, and emergency contacts. 42. Acclimatize. If trekking in high-altitude areas, acclimatize properly, ascend slowly, and recognize the symptoms of altitude sickness. Descend if symptoms worsen. 43. Wildlife safety. Observe wildlife from a ...
All Himalayan treks are graded according to their difficulty level to complete. Consider starting with an Easy grade trek . You should try a route that will be well within your control as a whole; don't test any extremes. Most likely first time you are going to a high altitude place and stay above ~ 3000 m/10000 ft.
The list still holds up and is frequently referenced by backpackers and other outdoors experts, including the American Hiking Society (AHS), who compiled a list of their own. The essentials you should bring are: Appropriate footwear: Your feet are your most important hiking tool. As they go, your whole trip goes.
Description. Our Wild Patagonia Explorer Trek is a dream expedition for any adventurous world traveler. We have combined unique lodging, remote horse-supported trekking, cultural immersion, fantastic hiking and more in one grand adventure. We explore Chile's newly created Patagonia National Park and the mountains surrounding it to create the ...
For a 2 to 3 week hiking trip, you should take breaks and resupply frequently along the trail. Make a precise food plan and go for lighter meals such as couscous, mashed potatoes, rice mix, etc. We also recommend taking calorie-rich foods such as nuts, peanut butter, chocolate, etc. to go with your meals.
Summit Half Dome with Wildland Trekking on a 3-Day Backpacking Trip! Join Our Award Winning Yosemite Guides on the Trip of a Lifetime. 800-715-HIKE (4453) (9-4:30 Every Day) Top Rated On ; ... Trip Details. Trip Details. What's Included. Top-of-the-line tent, backcountry sleeping pad and multi-day backpack;
If you're preparing for an upcoming expedition, trek, tour, or would like to customize your trip, please don't hesitate to contact us by phone or message. +977 9851024885. [email protected]. Enquire Now. We deeply value our Sherpas.
Guided Trekking Pros. All pre-trip details handled (permits, fees, etc.) All transportation arranged (bus, plane, jeep, etc.) Little worry about any details while hiking (lodging, route, schedule, etc.) Guidance & safety while trekking at high altitude. Local information on religion, culture, food, etc. Independent Trekking Pros. Can be much ...
This 5-day trip spends 4 days hiking the Inca Trail then visits Machu Picchu for a full day exploring the ruins. Hike with expert guides and enjoy deluxe camping to assure the best possible experience. Travelers are required to spend a minimum of two nights at high altitude before the trek, usually in Cusco, Sacred Valley, or Lake Titicaca. ...
Compare the best 2,359 Trekking & Expeditions tours, vacations packages, & adventures from 294 local experts and top companies. Covid-19 updates.... Search Search Tours. ... Quick View Trip Details. Mont Blanc Highlights. By Exodus Travels. premier. 4.7 /5. 100+ reviews. Small Group Tour-30 % $3,645. 8 days From $2,550. Highlights.
Everest Base Camp Trek. Globally renowned, Everest Base Camp trek is an adventurous trek that introduces you to the lap of the highest peak and a series of viewpoints to high mountain sceneries, Sherpa Cultures, and beautiful flora and fauna. Trip Details. USD 990. 11 Days.
Quick View Trip Details. Highlights of Albania. By Explore! premier. 4.6 /5. 100+ reviews. Small Group Tour-19 % $1,980. 11 days From $1,610. ... This is something to research and adequately prepare for prior to any hiking trip. In some cases, altitude sickness can ensue, creating symptoms of severe headache and/or nausea. If this is the case ...
Shuttle to the trailhead: 4.5 hours; Hiking Mileage: 4 miles; Elevation Loss: 200 feet; This multi-day Olympic National Park hiking trip begins with pick up at your hotel in Olympia and a scenic drive to the trailhead on the very tip of the Olympic Peninsula. We'll drive alongside the scenic Hood Canal, and then get views of Vancouver Island across the Strait of Juan de Fuca.