

How to Winterize a Travel Trailer in 8 Easy Step-by-Step Guides
Winter can be very challenging for RV owners. As a travel trailer owner, knowing how to winterize a travel trailer is essential, especially if you’re new to the RV lifestyle.
One of the first RVing problems we encountered early was due to lack of winterization. As a newcomer to the RVing world, we weren’t familiarized with the process and the need to winterize our travel trailer .
This mistake cost us a fortune, and as soon as winter was over, our propane tank was gone, and our plumbing system was completely damaged as a result of water freezing in them. We had no choice but to begin repairing and replacing the damaged parts.
Don’t let this happen to you. Winter will soon be upon us. Wintering your rig can be a little time-consuming, but putting in the work always pay off, provided you have the right tools and knowledge.
To continue exploring new destinations and maximizing your outdoor experience, winterizing your travel trailer will secure your leisure and investment.
Steps on How to Winterize an RV or Travel Trailer
Now, let’s quickly dive into how to winterize a travel trailer .
Step 1: Clean and Inspect All Parts
Before winterizing your travel trailer, spend some quality time cleaning and inspecting both the interior and exterior of your trailer.
This step is the first because you want to avoid dirt or other elements that could interfere with the process.
Start by removing food items or debris from the trailer’s interior to prevent mold or mildew growth during winter.
Check thoroughly for any signs of damage – it might be as little as cracks in the walls or floors; see if there are leaks in the roof or possible worn-out tires.
Ensure to properly seal all windows and doors to avoid any drafts or leaks.
Use a mixture of clean water and detergent to remove all accumulated dirt from the exterior of your travel trailer over time.
Remember to inspect the roof, awning, and other exterior parts for any signs of wear and tear.
Spending quality time to inspect and clean your travel trailer will be worth it, as you’ll be able to spot any issues you can’t help but address before winterizing.
This approach will ensure that your trailer stays in good condition throughout the off-season and is ready to use when the camping season returns.
Step 2: Disconnect Batteries and Electrical Appliances
The next step is disconnecting your batteries and electrical appliances to prevent drainage and damage during storage.
Since the storage period can drag on, disconnect the batteries, including the solar panels connected to your trailer.
Disrupt and turn off your batteries, solar panels, and all electrical components, including lights, appliances, and air conditioning.
Store the RV batteries in a cool, dry place, preferably on a battery tender, to maintain their charge.
Disconnect the solar panels by removing the positive and negative cables.
Cover the solar panels with a protective cover to prevent external interference during storage.
Always remember to label all cables for easy reconnection.
Step 3: Drain and Clean Waste Water Tanks
Next, drain your black and grey water tanks and clean them thoroughly to prevent any buildup or odors.
Start by locating the valves for your black and grey water tanks.
Connect your sewer hose to the appropriate tank valve and channel the other end into a nearby portable tank.
Open the black water tank valve first, and allow the water to drain completely. It’s essential to empty the black tank before the grey water tank since the grey water can help flush out any remaining waste.
After draining the black water tank, open the valve for the grey tank to drain. Open the sink and shower faucets to ensure both tanks have no water whatsoever.
Once the tanks are empty, add a cleaning solution following the manufacturer’s guidelines. Typically, you’ll pour a measured quantity of the solution into your toilet bowl and flush it into your black water tank.
Allow the cleaning substance to sit in the tanks for some time. This step is crucial for removing any buildup or odors.
After the substance has had time to work in the tanks, drain the tanks again, ensuring all the cleaning solution is flushed out. You may need to rinse the tanks a few times to ensure they are spotless.
Disconnect your sewer hose and keep it away from your freshwater hose to avoid cross-contamination.
Properly draining and cleaning your waste water tanks will prevent unpleasant odors or buildup from developing during the winter months.
Step 4: Drain Fresh Water Tank and Water Lines
Next, drain your fresh water tank and all water lines. Apply compressed air to blow out any remaining water from the pipes.
Follow the steps below.
Turn off the water pump and release pressure through all faucets and valves.
Locate and connect a hose to the freshwater tank drain valve.
Allow all of the water to drain by opening the drain valve.
Close the drain valve, then remove the hose once the tank is empty.
Next, locate your water lines’ low-point drain valves. There could be more than one, so it would make sense to consult your manual to see how it’s done or let a professional put you through it if you need clarification.
Allow all of the water to drain by opening the low-point drain valves. Though it depends on your type of travel trailer, and in most cases, you will need a wrench to open the valves.
Close the low-point drain valves and disconnect any hoses or attachments used to drain the water once all of the water has completely drained.
Finally, blow out any remaining water from the lines with compressed air. Connect an air compressor to the city water inlet and blow out each line until there is no more water.
Begin at the closest faucet to the water pump and work outward.
Step 5. Bypass the Water Heater
The next thing in this stage is to turn off the water heater. This is required to prevent antifreeze from circulating in the water heater.
First, turn off the water heater and allow it to cool.
Locate your travel trailer’s bypass valve. This valve is typically found near the water heater or in the water lines that lead to and from the water heater.
Set the bypass valve to “bypass” mode. This will redirect water flow around the water heater, preventing antifreeze from passing through it.
Step 6: Drain the Water Heater
Step 7: add antifreeze to the plumbing system.
After bypassing the water heater, now add antifreeze to the piping system. This is done by injecting antifreeze into the plumbing system with a hand pump or a water pump conversion kit. You can check out your manual for the perfect amount for your trailer.
Pour antifreeze into the tank after finding the fresh water fill port on the trailer’s outside.
Turn on the water pump and keep it running until the antifreeze drains from all taps and drain valves. This ensures that the antifreeze has completely replaced the water.
Step 8. Flush the Toilet and Run the Faucets
After applying the antifreeze to the plumbing system, allow it to sit for a while; now, flush the toilet and run the faucets to make the antifreeze reach all system regions.
Turn on all faucets, including the shower, and leave them running until pink antifreeze appears.
Flush the toilet often to ensure antifreeze is present in the bowl and tank.
Run the hot water faucets to confirm that the hot water lines are antifreeze-filled.
Make sure to flush any outdoor showers with antifreeze.
After ensuring that antifreeze has reached all parts of the plumbing system, turn off all taps and close the toilet valve.
Dos and Don’ts of Winterization
Winterizing a travel trailer has its own dos and don’ts, like several other things. These dos and don’ts matter greatly; you should prioritize them to maintain your trailer.
Do follow the manufacturer’s guidelines for winterization.
Do use non-toxic antifreeze.
Do store your travel trailer in a dry, covered location.
Do inspect your travel trailer regularly during the winter months.
Don’ts:
Don’t use automotive antifreeze.
Don’t forget to drain all water.
Don’t forget to disconnect your travel trailer’s batteries and solar panels before the winterization process.
Don’t store your travel trailer without properly cleaning and inspecting the interior and exterior first.
Most Common Mistakes When Winterizing a Travel Trailer
There are several mistakes people make when winterizing a travel trailer. Here are some of the most common winterizing mistakes you want to avoid:
Not draining and cleaning waste water tanks before winterizing.
Using regular automobile antifreeze rather than RV antifreeze.
Failure to properly disconnect batteries and solar panels before winterization.
Allowing water to remain in the plumbing system.
Failure to thoroughly clean and check the interior and exterior of the travel trailer before storing it.
Placing the travel trailer in an unsafe area without covering or adequately securing it.
Winterizing your travel trailer is critical to protecting it from harsh winter weather and avoiding costly damage. If you follow these walk-in, step-by-step guides, you’ll see that your travel trailer is winterized correctly and ready to use again in the spring.
Remember to thoroughly inspect your travel trailer, unplug the batteries and solar panels, drain and clean all water tanks and pipes, and store it appropriately. Following the dos and don’ts and avoiding common errors will help you complete the winterization procedure successfully.
How hard is it to winterize a travel trailer?
Winterizing a travel trailer is not hard; it can be a bit straightforward process; however, it can also be time-consuming and require thorough attention.
What Happens if You Don’t Winterize Your Travel Trailer?
When you fail to winterize your travel trailer, you risk damaging your plumbing system, water heater, propane, electrical system, and other vital components. The havoc starts with water freezing, expanding, and causing damage to every element it’s in contact with.
This often results in costly repairs when fixing the damaged components. Fixing these components is inevitable. Trust me; you want to hit the road with them since they make up the must-have accessories for a travel trailer.
How Much Does It Cost to Winterize a Travel Trailer?
Winterizing a travel trailer costs between $50 and $300. But the final cost can also vary, depending on whether you do the winterization yourself or hire a professional.
If you handle the winterization process independently, procuring the equipment and materials necessary for the task can cost between $50 and $100 or surpass that threshold.
But, if you assign the tasks to a professional, you might spend between $100 and $300, but this also depends significantly on external factors like your RVing location and the size of your travel trailer.
What are the Tools You Need to Winterize Your Travel Trailer?
To winterize your travel trailer, these tools and materials must be available:.
- RV antifreeze
- Water pump
- Compressed air
- Water heater bypass kit
- Water pressure regulator
- Wrenches and pliers
- Screwdriver
- Rubber gloves
How cold can it get before I winterize my travel trailer?
Ideally, you should winterize your travel trailer when the temperature reaches 32°F or 0°C.
How long can a travel trailer stay winterized?
A travel trailer can stay winterized as long as it is adequately prepared for storage without leaving any droplets of water in the lines and tanks.
7 Best Cold Weather Travel Trailers
7 Winter RV Living Tips: How We Stay Warm All Winter in our RV
How long does it take to winterize a travel trailer
The time it takes to winterize a travel trailer is determined by the RV’s complexity and the extent of the winterization process. It might take 30 minutes to several hours to thoroughly winterize a trailer. However, it is critical not to speed up the procedure in order to avoid missing any critical steps.
Can I use regular antifreeze instead of RV antifreeze?
No, regular antifreeze is harmful and should not be used in potable water systems. When winterizing your travel trailer, always apply dedicated RV antifreeze.
Do I need to winterize my travel trailer if I live in a mild climate?
Certainly, even if you live in a temperate region, winterizing your trailer is always a brilliant idea. Freezing temperatures are still possible, and it is always better to be safe than sorry.
How often should I winterize my travel trailer?
It’s important to winterize your travel trailer once a year before the winter months begin.
Can I skip bypassing the water heater during the winterizing process?
No, bypassing the water heater during the winterizing process is critical to prevent antifreeze from circulating the water heater.
Related Posts

How to Clean Pop up Camper Canvas Like a Pro

How to Jack Up Your Travel Trailer

How To Keep Mice Out of Camper

How to De-Winterize Your Travel Trailer (RV Checklist)
Are you ready to take on the camping season? Before hitting the road, it’s important that you de-winterize your travel trailer. To ensure you don’t miss a beat, we’ve created an extensive de-winterize travel trailer checklist:
How to De-winterize Your Travel Trailer:
- Charge and Re-install All Batteries
- Check the Tires. During winter storage, an RV’s tires will lose about two to three psi of air pressure for every month or inactivity. Also, check depth of the tire tread
- Check the Exterior for cracks, broken seals, and exterior lights
- Flush the Freshwater System of All Antifreeze
- Sanitize the Freshwater System
But that’s just a quick glimpse!
So below, we’ll go through all the necessary steps for a safe and successful camping season. From checking propane tanks and water lines to draining plugs and inspecting batteries, our de-winterize travel trailer checklist has got everything covered.
So don’t delay – get started now with these most important steps so you can hit the open road in no time.
Table of Contents:
De-winterizing the exterior of an rv, de-winterizing the propane system of an rv, de-winterizing the freshwater system of an rv, check all rv batteries after winterization, what should i remove from the rv for winter, when should you de-winterize a travel trailer.
- How do you sanitize a camper water system after Dewinterizing?
Do you have to de-winterize an RV?

When de-winterizing your RV for the spring and summer, it’s a good idea to inspect the exterior of your vehicle.
This includes checking for any signs of damage from winter weather or animals that may have nested in the vehicle while not in use. Start by looking over all surfaces of your RV, including windows, walls, roof, and tires.
Check for any cracks or holes that could cause a leak or other issues during travel.
Next, check all tire pressure levels to ensure they are properly inflated and safe to drive on. Tires can deflate during cold temperatures so make sure they are filled with air before hitting the road again.
Inspect each tire individually as well as tread depth – if you notice uneven wear patterns this may indicate an alignment issue which should be addressed prior to driving long distances with your RV.
If you have a spare tire, don’t forget about those also!
Tire covers are a great thing to consider for your RV during the downtime in winter as they can protect your RV’s tires from sun, rain, snow, sleet, and cold. They are surprisingly easy to put on and are fairly inexpensive.
Click that link to read all about them on my site.
To maintain the aesthetic appeal of your RV, use a soft brush such as an old toothbrush and a gentle cleaner like dish soap mixed with warm water to clean off any dirt or debris that has accumulated on its exterior.
Use a gentle cleaner like dish soap mixed with warm water along with a soft brush such as an old toothbrush – avoid using anything abrasive which could scratch paintwork or decals on the side of your trailer. Make sure you rinse off completely after cleaning too so there is no residue left behind.
Gently scrub away any accumulated dirt and debris on the exterior of your RV with a soft brush such as an old toothbrush, taking care not to damage paintwork or decals.
Use a gentle cleaner such as dish soap mixed with warm water along with a soft brush like an old toothbrush – avoid using anything abrasive which could scratch paintwork or decals on the side of your trailer. Make sure to rinse off completely after cleaning so there is no residue left behind.
After thoroughly inspecting the exterior of your RV for any damage or wear and tear, you can now proceed to de-winterize it. Moving on to the propane system of an RV, it is important that all components are properly checked before use.

Propane systems are essential for many RV owners, providing the fuel needed to power appliances and heaters. After a long winter, it’s important to de-winterize your propane system before you hit the road. Here’s what you need to do:
Check Propane Tanks:
Start by inspecting your propane tanks for any signs of damage or leaks. Ensure all valves are firmly shut and the container is still tightly sealed. Inspect the tanks for any flaws, and if found, get them substituted quickly before reuse.
Test Connections:
Once you have checked the tanks themselves, test all of their connections with a soapy water solution or leak detector spray. This will help identify any potential leaks in the lines between your tank and other components such as hoses or regulators. If there is a leak present, make sure it gets fixed immediately before turning on your propane system again.
Replace Components if Necessary:
In some cases, parts may need to be replaced due to age or wear and tear from being exposed to cold temperatures during winter storage periods. Check things like hoses, regulators, and other components for cracks or tears in order to ensure they can safely hold pressure when used again this season.
Check Gas Lines & Valves:
Lastly, inspect gas lines throughout your RV for any signs of corrosion or blockages which could prevent the proper flow of gas through them when turned on later down the line – literally. Make sure that all valves along these lines are functioning correctly too; otherwise, you might find yourself stuck without hot water until they’re repaired.
Essential measures should be undertaken to de-winterize an RV’s propane system in order to guarantee secure and proficient functioning. Next, we will look at how to properly de-winterize the freshwater system of an RV.
Once you’re done checking, test all LP gas appliances by lighting the burners and ensuring everything is working normally. Your refrigerator also likely runs on propane, so also check to make sure the fridge is starting to get cold .

De-winterizing the RV water system is a vital step in preparing for your next camping adventure.
The first step in the de-winterizing process is draining and flushing all non-toxic RV antifreeze from the RV’s fresh water tank, system, and RV water lines, including connections to your hot water heater as well as other fixtures.
If you removed the water filter when winterizing, make sure that gets put back in place.
The step-by-step process is:
- Connect your trailer’s water intake to a garden hose (at your house or campground)
- Turn on the water at the spigot
- Turn on every faucet in the camper including the shower (both hot and cold water in case there is lingering antifreeze in the hot water heater tank)
- Let the water run until totally clear
- Turn off the water at the spigot
- Turn on the water pump
- Repeat the procedure to eliminate any antifreeze in the freshwater tank
This process will fill up your holding tanks, so ideally have that connected at a dump station or campground or have a plan to dump it soon.
If you aren’t able to connect to a water source, this process will still work with a full fresh water tank in conjunction with the water pump.
The last step in de-winterizing is checking all valves associated with the freshwater system to ensure they are opened correctly and do not leak when pressurized.
This can be done by turning each valve handle several times clockwise until tight then back off slightly counterclockwise – if done properly these should remain open without having to constantly adjust them manually every time you want fresh water flowing into your RV.
Lastly, test out all faucets and shower (including an outside shower if you have one) within reach to make sure everything is working properly before hitting those dusty trails once more.
To ensure the freshwater system of your RV is de-winterized properly, be sure to follow all steps in this checklist. Moving on, it’s important to check all batteries after winterization for optimal performance and safety.
It is essential to check all RV batteries after winterization.
Verify that the batteries have been adequately charged to guard against destruction or erosion during storage. Connectors should be cleaned and tightened, while battery fluid levels should also be checked and topped off if necessary with distilled water.
If possible, it’s best to use a battery tester/charger like this one on Amazon when checking the voltage of each battery in order to get an accurate reading. Anything lower than 12 volts indicates that the battery needs charging before being put back into service. If your RV has two or more batteries connected together in parallel, they should both read at least 12 volts when tested individually with a multimeter.
That tester is good for regular as well as deep-cycle batteries, lead-acid batteries, as well as both 6-volt, and 12-volt systems.
You can also test for resistance between terminals using an ohmmeter or continuity tester; anything higher than 0 ohms indicates a good connection between terminals and proper electrical flow through the cables connecting them.
Additionally, you may want to inspect the case of each battery for signs of wear such as cracks or bulges which could indicate internal damage due to overcharging or other issues caused by improper maintenance during winterization procedures.
Frequently Asked Questions
Before winterizing your RV , it is important to remove all food and perishables.
All water tanks should be drained and cleaned with a bleach solution. Remove any batteries from the RV and store them in a warm location. Cover windows, vents, air conditioners, and other openings with plastic or foam insulation to protect against cold temperatures.
Finally, inspect all hoses for cracks or leaks before storing away until springtime. Taking these steps will ensure your RV is properly winterized and ready for the next camping season.
It is important to de-winterize a travel trailer as soon as the weather begins to warm up. In Texas where I live, that would be early March. But if you live in Chicago, that may be too soon.
Here’s a handy chart showing the date of the last freeze regionally around the US:
This will help prevent damage from freezing temperatures and ensure that all systems are functioning properly before taking it out on the road. To de-winterize, start by draining any antifreeze or water left in the system, then flush out fresh water until it runs clear.
Next, inspect all hoses and fittings for cracks or other damage and replace them if necessary. Finally, fill with fresh potable water and check for leaks at each connection point. Taking these steps now can save you time and money later.
How do you sanitize a camper water system after de-winterizing?
To sanitize a camper water system after de-winterizing, it is important to first flush the entire system with fresh water.
Add a quarter cup of bleach for every 15 gallons of tank capacity and fill the tank with fresh water, then proceed to turn on all faucets until chlorine is detectable.
Turn on all faucets until you smell chlorine at each outlet, then let sit for 12 hours before draining and refilling with clean potable water. Lastly, run all faucets again to ensure that any remaining traces of bleach have been flushed out completely. Following these steps will help keep your camper’s drinking water safe and free from contaminants.
Yes, IF you added biodegradable antifreeze to your trailer’s freshwater system, de-winterizing an RV is a necessary step before taking it out for the first time in the season.
Now if you live somewhere mild like Florida, adding antifreeze isn’t likely necessary, in which case you may not need to do much of anything.
But for most of us, this process involves flushing antifreeze from the water lines and draining tanks to ensure that all systems are working properly. Inspecting and replacing any components or accessories that may have been harmed during storage should be carried out, if necessary.
Following these steps will help ensure safe travels throughout your camping adventure.
Today we looked at all the crucial things you must do to get your RV ready after having winterized it during the colder months. From batteries to the fresh water system, to interior and exterior checks, we covered it all.
After following this step-by-step guide, you are now ready to enjoy your RV during the camping season.
Before embarking on your journey, ensure that there are no water leaks or other potential issues present in the RV. Ensure all is in good working order to guarantee a secure and delightful excursion with companions and family.
It’s also a good idea to check and maybe replace batteries in a smoke alarm if your trailer has one.
DSC09424 by Adventures On Wheels and IMG_0081 by JBLM MWR is licensed under CC2.0 and may be cropped, edited, and/or had a text overlay added. Still frame taken from video How to Winterize an RV + What Tools & Supplies You Need | RV DIY by RVLove | Marc & Julie Bennett , also licensed under CC2.0 and may be cropped, edited, and/or had a text overlay added.
Middle Class Dad is a participant in the Amazon Services LLC Associates Program, an affiliate advertising program designed to provide a means for sites to earn advertising fees by advertising and linking to Amazon.com. As an Amazon Associate, I may earn a small commission from qualifying purchases if you click to Amazon from my site and choose to make a purchase. This is no way increases the cost to you.
Jeff Campbell
Jeff Campbell travels on and off with his 3 daughters in a Newmar Baystar Class A Motorhome. He writes extensively on both RVs, campgrounds, parenting on the road tips, remote learning & schooling, and much more! Click Here to learn more about me. Click Here to learn more about my site. Editorial Policies.
Leave a Reply Cancel reply
Your email address will not be published. Required fields are marked *
Save my name and email in this browser for the next time I comment.
Recent Posts
RV vs Regular Toilet Paper: Key Differences
When it comes to choosing the right toilet paper for your recreational vehicle (RV), there are some important considerations to keep in mind. But what's the difference between RV toilet paper and...
Essential Family Camping Gear 2024 Must-Haves
When it comes to family camping, having the right gear can make all the difference in creating lasting memories and enjoying the great outdoors. Whether you're planning a weekend getaway or a longer...
This post may contain affiliate links or mention our own products, please check out our disclosure policy .
How To Winterize An RV in 9 Easy Steps
Published on July 27th, 2018 by Ray & Tammy Roman This post was updated on March 19th, 2024
This guide shows you how to winterize an RV in 9 easy steps. Winterizing your camper is not too difficult if you follow clear and concise, step-by-step instructions. In this beginner guide to winterizing an RV, you’ll find all the steps you need to successfully prepare your RV for winter storage.
This is a comprehensive guide to RV winterizing, so I’ve broken it down into manageable steps. I’ve curated the best videos on the subject to help you along. Let’s get started with nine easy steps to winterize an RV.
What You Will Need To Winterize your Camper
- Non-Toxic RV Anti-Freeze: The amount you will need depends on your RV’s plumbing layout. Plan on needing about 4-6 gallons of antifreeze; give or take a few quarts. I recommend the RecPro RV Non-Toxic Anti-Freeze, available in a 4-gallon (ca. 15 liters) pack on Amazon. DO NOT USE AUTOMOTIVE ANTIFREEZE.
- Water Heater By-Pass Kit: Some, not all RVs, come with a built-in water heater by-pass, but if yours doesn’t, you’ll need a kit to bypass the tank. The Camco Water Heater By-Pass Kit is the one I recommend. Make sure you get the right length for your tank.
- Holding Tank Cleaning Wand: I recommend a cleaning wand to clean sediments from your RV water heater. Camco’s cleaning wand is one of the best and most affordable available.
- Water Pump Converter Kit: This allows you to use the RV water pump to inject anti-freeze into your pipes easily. This Camco Permanent Pump Converter Winterizing Kit is the one you want to use.
- Basic Hand Tools: To remove drain plugs and loosen obstructions that may be in the way, you’ll need some basic tools such as an adjustable wrench, pliers, screwdrivers, etc.
- Owner’s Manual – It helps to have a copy of your owner’s manual to ensure you are doing things properly and are not missing any steps.
9 Steps To Winterize Your Camper
As you can see from the list, winterizing an RV is not overly expensive. It’s important, however, to have these supplies on hand before you get started, as it allows you to get your RV winterized without any delays.
DON’T MISS OUT ON RV LIVING UPDATES
Sign up for the newsletter today.
Please enter a valid email address.
An error occurred. Please try again later.
Thank you for subscribing to the RV Living newsletter, keep your eye on your inbox for updates.
I highly recommend you read your owner’s manual to learn about any winterizing guidelines that may be specific to your camper.
Familiarize yourself with all the steps below before you begin.
Step 1. Disconnect any outside water source
The first thing you’ll want to do is disconnect any outside water source that may be connected to your city water inlet. You will also want to disconnect any inline water filters or bypass them if they have a bypass.

Step 2. Drain Your Fresh Water Tanks t the Low Point Drain Lines
Draining your freshwater tank is simple and shouldn’t take too long. There is usually a single hose coming out from the underbelly of the RV. There is a valve you turn to let the water out. That will easily and quickly drain your fresh water tank.

Step 3. Drain and Flush Gray and Black Holding Tanks
Some RVs have a tank flushing system built-in, so simply engage that to clean the tanks. You’ll need to do it manually if your RV doesn’t have a tank flushing system.
You’ll need to drain your black and gray water tank. Clean your black and gray water tanks using a cleaning wand.
Both your black water tank and gray water tank terminate at a valve. Lubricate the termination valves with WD-40.

Make sure to dispose of the content at a proper dump station.
Step 4. Drain Your Hot Water Heater Tank
Never drain your hot water tank when the water temperature is hot or under pressure.
First, turn off the breaker to your RV water heater as a safety precaution. This will prevent you from accidentally starting the water heating element with no water in the tank.
Let the hot water cool down. When you are sure the water is not hot, go outside your RV and open the panel to access the water tank.
Next, find the tank drain plug typically located near the bottom of the tank. Loosen the drain plug using an adjustable wrench and remove it. Be careful when removing the drain plug as it is usually plastic.
On Suburban brands of hot water heaters, the drain plug is also an anodized rod, remove it, and the water inside the tank will start to run out.
To help the water drain quicker, open the pressure relief valve at the top of the tank.

Step 5. Drain your water system
Open all hot and cold faucets inside and outside your RV. Don’t forget the toilet valve and if you have an outside shower it also needs to be open. Now it’s time to drain your RV water lines.
First, you need to locate the low-point water line drains. They are usually located underneath your RV near the tank. There is a hot water line and a cold water line.
Here is a video showing you the typical location of the low-point water line drain valves, plus an easy tip to modify for future use.
Next, run the water pump for a bit to help force any water out. Turn the water pump off as soon as the water has drained. Be careful not to run the water pump without any water in the system for too long, or you might ruin the pump.
Step 6. By-pass your water heater
In this step, we’re going to bypass your water heater. Doing this prevents you from filling your tank with RV antifreeze, saving you as much as 6 to 10 gallons of antifreeze. Some RVs come pre-equipped with a bypass system, but many do not. If yours does not have a bypass system, you must purchase a water heater bypass kit and install it. I recommend this one by Camco .
Remember to use an air compressor to blow out your water lines. You just have to be careful not to use too much air pressure during the process; 30-35 psi is sufficient.
How To Use Water Heater Bypass Valve (Video)
In this video, you’ll learn how to operate the bypass valve in your RV water heater. It’s very simple and once you understand how to do it, winterizing your RV becomes much easier.
Step 7. Add anti-freeze (Non-Toxic RV Anti-freeze)
Let’s add the antifreeze. There are typically two ways to add antifreeze to your travel trailer. You can use a water pump conversion kit and add the antifreeze from the inside, or you can use a hand pump and add the antifreeze from the outside.
To check your progress, you must open up one faucet at a time. Begin with the kitchen faucet, open the hot water, and keep it open until antifreeze flows through it.
Once the output from the hot water faucet is flowing with pink antifreeze, you will know that antifreeze is in that system, and you can close the faucet.
Do the same with the cold faucet side. Do this with all faucets working from the highest, which is usually the kitchen faucet, to the lowest, typically the bathroom in the shower, and finally flush the toilet until antifreeze flows into the bowl. Make sure pink antifreeze is flowing from your shower head as well.
How To Add Antifreeze to an RV Plumbing System (Video)
Step 8. Pour anti-freeze in the shower and all sinks
At this stage of the process, you will want to pour a cup of antifreeze, or in some cases, two cups of antifreeze, into the shower drains, and kitchen sink drains. Don’t forget the toilet bowl as well. If you have an ice maker, washing machine, or an outside shower, you will want to winterize those. For those accessories, check your owner’s manual on how to winterize them.
Step 9- You now are done winterizing your travel trailer
Once you have completed all the steps above, go through your RV and make sure all faucets are closed.
Additional Tips To Winterize An RV
Here are some additional tips before you place your travel trailer and storage.
- If your RV is equipped with a dishwasher or ice-maker, check the owner’s manual in how to winterize those appliances.
- Clean out your refrigerator, freezer, and pantry, and remove anything that can spoil and will not attract rodents. Leave the door open during storage to prevent mold and mildew buildup in your fridge.
- Perform thorough cleaning on the interior of your travel trailer.
- Perform an exterior inspection and check for areas that might need caulking or repair.
- Your sewer hose will probably need cleaning before you start it.
- Thoroughly wash the exterior of your RV and wax.
- Clean the awning rollout and the awning fabric with an awning cleaner. Let it dry completely before you roll it up.
- Elevate your RV using leveling jacks, so your tires are off the ground. This prevents your tires from developing flat spots while in winter storage.
- Remove and store your propane tanks.
- Cover any roof vents to prevent insects from entering
- If you own a motorized RV, add some fuel stabilizer to the fuel tank.
Below is a video showing the winterization of a typical travel trailer.
How To Winterize and RV Checklist PDF
What better way to winterize your RV than with a handy RV Winterization Checklist in PDF that you can easily print out and use? Below are links to 3 checklists you can print out and use for free.
- Advanced RV Checklist
- RV Winterizing Your RV Checklist
- RV Winterizing Checklist
Final Thoughts
Winterizing a travel trailer or motorhome is not a difficult task. The steps above are very general, and some may or may not apply to your particular travel trailer. I encourage you to check your owner’s manual for the exact steps needed to winterize your travel trailer or hire a professional to do it for you.
The steps to winterize an RV will work for all campers, including off-road campers with a water system.
Don’t own a travel trailer just yet? If you are thinking of buying one in the near future, check out our top-rated travel trailer brands post.
If you enjoyed this post Please Share:
Related posts:.
Top 4 Best RV Antifreeze
About the author:.
The Savvy Campers
When to Winterize a Travel Trailer
If you have ever owned or considered purchasing a travel trailer, you know how costly of an investment it is. Unless you live in a warm climate, you will need to appropriately winterize your travel trailer. If you choose not to winterize your travel trailer, you will likely incur extreme costs in repairs.
When do I winterize a travel trailer? The answer varies depending on the geographic location you live in, as the climate varies by location. The general rule of thumb is to winterize your travel trailer when the temperature is at or below 32 degrees Fahrenheit and will be so for a prolonged period of time.
To ensure the quality and longevity of your investment, winterizing is non-negotiable. Failure to winterize your travel trailer will prove to be a very costly mistake. For a step to step guide on how to winterize, here is our complete guide.
What Happens if I Don’t Winterize my Travel Trailer?
If you choose not to winterize your travel trailer, there are many damages that are likely to occur, such as.
- Broken pipes
- Damaged water pump
- Damaged sink valves and traps
- Damaged toilet valves and traps
- Cracked tanks
- Cracked drain lines
As you can see, there are many things that can go wrong when you fail to winterize your travel trailer properly. All the problems can be repaired, but it will be expensive, and you will lose time with your travel trailer while it’s in the shop. Let me tell you, if you can avoid the RV shop, do so. Typically it takes a month just to get in during camping season and they charge as much as an attorney makes per hour. (just kidding, but almost)
Can I Winterize the Trailer Myself?
Thankfully, winterizing a travel trailer is something that can be done without the assistance of a dealership or trained professional. If you choose to winterize your travel trailer by yourself, it is imperative that you follow the correct steps. We have our complete guide here that anyone can do with a limted tool kit.
The best place to find the protocol for winterizing your travel trailer is going to be in the owner’s manual. In the manual, you will find the necessary steps to take to ensure proper winterization. There are also many travel trailer forums that you can check out for tips and tricks from other travel trailer owners based on your specific model.
How Long Does the Process Take?
The time it takes to winterize your travel trailer is going to depend on several factors; the size of the trailer, your experience and comfort level with the process, the number of people helping, and the availability of resources and tools needed.
If you have the proper tools, the average time it takes to fully winterize a travel trailer is anywhere from 30 minutes to an hour and a half. Like anything, the more times you go through the process, the easier it becomes. Don’t be discouraged if you take well over 2 hours to winterize your travel trailer the first time. Remember there is a learning curve and efficiency will come with experience. The important thing is to complete the job properly and not to forget anything, such as your black water tank flush.
When is the Best Time to Winterize?
As stated earlier, the best time to winterize is when the temperature is at or below freezing. For some locations, this temperature drop will occur in early fall, while other areas won’t see this temperature until closer to winter. To learn more about how long it takes for pipes to freeze, take a peak at our article on the subject here .
To ensure you have your travel trailer winterized before harsh weather strikes, it is a good idea to keep an eye on the weather. When you see the temperatures beginning to dip into the low 40’s it may be time to winterize.
Some people choose to winterize their travel trailer directly after the final use of the year which eliminates the need to track the weather as closely.
Tools / Supplies Needed
When preparing to winterize your travel trailer, you want to make sure you have all the necessary tools on hand. The last thing you want to do is make trips to the store in the middle of the process. Chances are you have a lot of the necessary tools on hand.
- Antifreeze (RV/Travel Trailer Specific)
- Blow Out Adapter
- Air Compressor
- Water Heater Drain Socket
- Wand to Clean Holding Tanks
- Silicone Spray
- Bug Screens
- Dehumidifier
- Storage Cover
This is quite an extensive list and you may not need all the items. Some items such as the bug screens, mothballs and dehumidifier would be considered optional, but will help to keep your travel trailer pest-free during storage.
Steps to Follow When Winterizing your Travel Trailer
These steps are quite general and may not be applicable to all types of travel trailers. Please be sure to read the owner’s manual carefully before beginning the process to ensure you don’t skip anything.
- The first thing you want to do is bypass and remove any water filters that are present. When closing the travel trailer for the winter you want to make sure the water lines are dry. This is where the air compressor will come in to play as you blow the water out of the lines.
- Drain the water from your tanks. Most tanks are black and gray. Neglecting to drain the water can result in nasty cracks to the tank, which will deem them unusable.
- Drain the water heater and blow out the lines. Again, leaving water in the lines can cause them to freeze and crack.
- Once you have drained the water heater and lines, you will want to bypass it as well.
- Add antifreeze to the travel trailer. This will help ensure no freezing occurs.
Why Do I Need to Bypass the Filters and Water Heater?
It may seem like an added step to bypass an area that has been completely dried out but neglecting to bypass these areas can result in anti-freeze leaking into these components. Thankfully most travel trailers will have a bypass built in, but you may need to purchase the correct parts.
If you need to purchase a bypass kit, you can find several options on Amazon. The average cost of this part is low, and it is relatively easy to install. When looking at the parts, if you are uncertain about which part to get, check your owner’s manual and even reach out to a dealership if needed.
Where Can I Get a Cover?
If you are opting to purchase a cover for your travel trailer you have the option of visiting the dealership, manufacturer, or Amazon. In each of these places, you will be able to find a cover that is a perfect fit for your travel trailer. When purchasing a cover, you will need to have the dimensions of your travel trailer as well as the weight of the cover you are looking for.
The cost of the cover will vary depending on the size as well as the weight, but you can expect to pay between $60.00 and $700.00. If you are looking for a customized cover it will likely be more expensive. For more information about if you should cover your trailer, head over to our guide here.
Where Should I Store the Travel Trailer?
If your travel trailer is properly winterized, you can safely store it outside for the winter if you have the space to do so. It is important to keep in mind the appearance of your travel trailer exterior may diminish with prolonged exposure to extreme elements. Because of this many people opt to cover their travel trailer. Here is a guide to storing your RV at home .
If you live in a location with particularly harsh winters, you may opt to store your travel trailer in a facility that offers protection from the elements. Not all covered spaces are climate controlled so you will still need to winterize your travel trailer to prevent internal damages.
How Much Does Storage Cost?
While renting a dedicated storage space for your travel trailer may be ideal, it can be quite costly. The price will ultimately depend upon your geographic location, but a ballpark average provided by storage.com is:
Again, these prices are an average. You will likely find the geographic location has an impact on the prices you are going to be paying for storage. In our area, they are on the high side of this chart. This is simply based on the supply and demand premise. If you are in a location with harsh winters, the demand for indoor storage units will likely be greater than in a more temperate climate.
Final Thoughts
A travel trailer is a great investment for you and your family; however, it is important to remember the investment will only last if you take the time and care to maintain it. If you are ever uncertain about the method to winterize your travel trailer it is best to reach out to an expert for help.
Be the first to be notified about FREE tips, hints, coupon codes, and email-exclusive information. All for FREE!
Related Posts:

Similar Posts

What is the difference between a 30 amp and 50 amp RV?
A 30 and 50 amp system both have the same purpose, to power the RV. However, they are very different and are used in different types of RVs. What is the difference between a 30 amp and 50 amp RV? The difference between 30 amps and 50 amps is how many items you can run…

Can You Take an RV Through a Truck Wash?
Being on the road for such a long time, your RV can get dirty faster than expected. However, finding a spot that allows you to wash an RV is not easy. But if you pass numerous signs indicating truck wash ahead, you may consider taking your RV through a truck wash. You can take an…

The Best Ways To Store Waste When Boondocking
Boondocking is one of the easiest ways to get away from civilization and experience the wilderness’s quiet, peaceful, raw beauty. As a rule, you should take everything you brought into the wilderness away with you when you leave. This poses a challenge for the waste you produce while boondocking. What are the best ways to…

What To Look For When Buying a Used Class C Motorhome: Essential Tips for a Smart Purchase
Class C motorhomes are a budget alternative to the luxurious class A motorhomes. They are smaller and have fewer amenities than class A motorhomes, but are more fuel efficient and cheaper to maintain. The most important things to look for when buying a used Class C Motorhome are the mileage, leaks or water damage, the…

How To Test If Your RV Fridge Is Working On Electric?
Most RV fridges are absorption refrigerators designed to run on 12V direct current or 120V alternating current electricity or propane gas heating. The absorption fridge is designed to be able to switch between any of these three supply settings. If your fridge is not working, no display lights will light up inside the fridge or…

How Long does it take for a RV Fridge to get cold? Plus 4 Quick Tips
Keeping your food, drinks, and items cold while out camping is important to provide you with the best experience and from eating spoiled food. Before you start packing, you will want to cool your refrigerator. How long does it take for a RV Fridge to get cold? It typically takes 24 hours for your refrigerator…
Join our Newsletter to stay up to date on the latest RV topics and receive our FREE RV Inspection Cheat Sheet Today. Use this tool to inspect new or used campers you are looking at purchasing.
No thanks, I’m not interested!
How Do You Winterize (Put into Storage) A Travel Trailer?
Posted on Published: October 4, 2023 - Last updated: October 13, 2023
Categories RV CAMPING
Sharing is caring!
- Pinterest 501
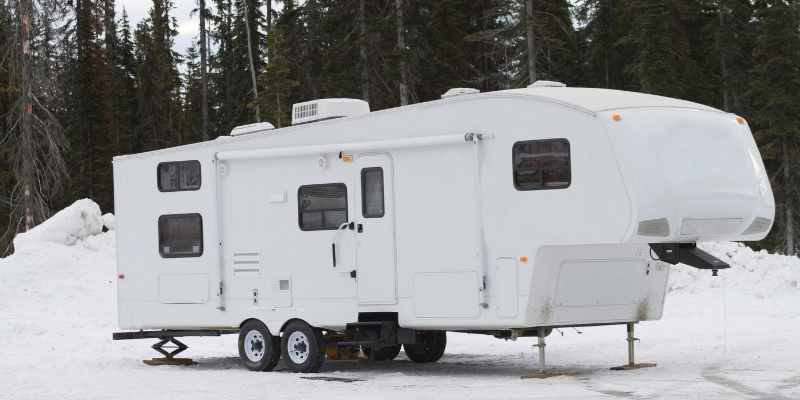
After a great season of RV camping the sad time often comes when you have to put the camper away for the season. It is important to winterize your RV travel trailer to withstand winter temperatures if you store your RV travel trailer in most of the US or Canada during the winter months.
Don’t Forget To Pin It For Later

Failure to properly winterize your travel trailer could result in burst pipes and damage to your travel trailer plumbing system. It is important to winterize your travel trailer anytime the outside temperature is predicted to fall below 32°F.
Repairs needed on your travel trailer due to freezing are not covered under most limited warranties so you will want to protect your investment by properly winterizing your travel trailer. We also recommend you get someone to assist you when you begin to winterize your travel trailer.
These RV checklists are provided for informational purposes only. We ALWAYS recommend you consult your owner’s manual for complete checklists and instructions on the items you need to safely operate and use your RV camper.
WHAT IS INVOLVED IN WINTERIZING YOUR TRAVEL TRAILER?
While it may seem as though there are tons of things to do to get your RV travel trailer ready for winter, there are really TWO major things think about:
- Externally and Internally protecting the RV from harsh weather & pesky visitors
- Protecting your water systems.
Winterizing your travel trailer may seem a bit overwhelming at first, but with a bit of practice and a good RV travel trailer checklist for reference, you will be winterizing your travel trailer like a pro in no time.
EXTERNALLY & INTERNALLY PREPARING YOUR RV TRAVEL TRAILER TO SURVIVE THE WINTER
You may think that winterizing your travel trailer simply means draining the water from your trailer and putting in an RV antifreeze solution to protect the water lines from freezing. Certainly, this is a vital aspect of winterizing your travel trailer before winter storage, but there are a few other important tasks to be completed in order to protect the external and internal components of your RV travel trailer.
RV TRAVEL TRAILER WINTERIZING CHECKLIST
Perhaps the most challenging aspect of winterizing a travel trailer, is understanding all the steps need to winterize your plumbing system. I know each year when it comes to getting my RV travel trailer out of storage and ready for the season, I can get a bit nervous about forgetting something. That is why I create RV checklists. The owner’s manual is invaluable, but having a handy checklist on your phone or printed out helps as you walk through each step.
Winterizing RV Checklists Spreadsheets

Many of these steps are the reverse order of what you will do when taking your travel trailer out of storage , I find it best if I have a checklist for both winterizing and de-winterizing my travel trailer .

Here is a quick rundown on how to winterize your travel trailer .
- Get on the roof of your travel trailer and check for any damage or signs of potential leakage so they can be repaired before you stow away your travel trailer for the season.
- Check all other surfaces and seams for any signs of cracks, leaks, or sealant failures and repair as necessary.
- Close all the windows and roof vents.
- Close the propane cylinder valve(s). If you don’t already have a cover for your propane cylinders, now is the time to purchase one and make sure your regulator is covered.
- Cover all external outlets to prevent mice and other rodents from entering your RV travel trailer.
- Cover your roof air conditioner.
- Disconnect 120-volt AC power to the RV
- Do not use stabilizing jacks during storage.
- Drain All Water Lines [Details Below]
- Drain and flush all holding tanks (Fresh water, gray water, black water, and hot water heater tank(s)) [Details Below]
- Remove all perishable items from the interior.
- Do not leave any liquids or items in your travel trailer that are susceptible to freezing.
- If at all possible, store your RV indoors under a roof. If this is not possible, consider investing in an RV tarp that can “breath”.
- Wash the interior and the exterior of your RV
- Remove all batteries from the RV and store in a place where they won’t freeze.
- Cover your RV tires with a cover that will prevent weather checking and UV damage
- To prevent damage from moisture and mildew, turn your cushions on edge.
- Turn off 12-volt DC/120-volt AC/propane to the refrigerator; defrost, and clean your refrigerator. You can use crumpled up newspapers or baking soda boxes in the refrigerator to prevent odors during storage.
- Install mouse traps throughout the RV travel trailer
- One tip in winterizing your RV travel trailer is to store any linens and clothes in a sealed plastic bin to prevent access to rodents or other creatures.
WINTERIZING YOUR TRAVEL TRAILER PLUMBING SYSTEM
There are a few more steps you need to take in addition to the above checklist before you begin to drain your RV travel trailer fresh water system.
- Before winterizing the FRESH WATER system in your travel trailer, be sure to empty and flush your black and gray water tanks at a certified dumping station.
- Level your RV Travel Trailer
- Turn the water heater and water pump switches located inside your travel trailer to the OFF position.
- As you will be working with the water heater, also ensure your propane tanks are shut off.
- If you have any inline water filters remove and bypass before starting.
- Locate the outside panel access to your water heater. Turn the Water heater switch to the OFF position and turn the Water Heater Bypass Valves. (Consult your owner’s manual for the exact location of these valves)
HOW TO DRAIN THE FRESH WATER SYSTEM IN YOUR TRAVEL TRAILER
Now you are ready to begin the steps to drain the fresh water system. This procedure has to be done whether you choose to winterize your lines with compressed air or an RV antifreeze.
- OPEN all faucets, including the outside shower faucet if so equipped
- OPEN the “exterior fresh tank drain” valve on the permanent fresh water holding tank (if so equipped). This knob turns 45° to open or close.
- OPEN the “low point drains” on your FRESH WATER holding tanks (located underneath your travel trailer) and drain all the water ensuring they are completely empty. Leave the valves set to OPEN.
- Turn ON your Water Pump and run as needed. The process generally takes 15-20 seconds.
- Be sure to operate the toilet flush with the Water Pump on as well until the water stops flowing.
- Relieve the water pressure on your water heater using the pressure & temperature (P&T) relief valve BEFORE you remove the water heater drain plug. Otherwise, if there is any water pressure present the water will spray out of the opening when you remove the drain plug.
HOW DO YOU WINTERIZE YOUR TRAVEL TRAILER WITH COMPRESSED AIR?
While most people will choose to winterize their plumbing system with an RV antifreeze, it is also possible to winterize your plumbing system with an air compressor . This method will utilized an air hose to blow water from your travel trailer water lines.
SIX EASY STEPS TO USING COMPRESSED AIR TO WINTERIZE YOUR TRAVEL TRAILER
- Make sure all the FRESH WATER holding tanks are empty and drain valves are OPEN. (See above on draining the FRESH WATER tanks).
- Run the water pump until it is dry, this will take about 15-20 seconds.
- OPEN all the faucets and drains in your travel trailer. You will also want to operate the toilet flush lever until water stops flowing with the water pump on.
- It is generally best to also bypass your water heater by turning the water heater bypass valves. (Always Consult your specific RV Travel Trailer Owner’s Manual to locate your water heater and it’s bypass valves)
- Now, using an air hose and a blow out plug adapter , blow air through the city water connection. Any remaining water will generally blow out in five to ten minutes. You may wish to also purchase an air pressure regulator to regulate the pressure (around 30-40 psi) and prevent excess pressure from damaging your water lines.
- After you have blown the air from all of your lines, pour 1-2 cups of non-toxic RV antifreeze into all of your drains and your toilet to protect your P-traps from freezing.

Need Resources to De-Winterize Your RV ? Check out the Ultimate RV Departure List Bundle, RV Packing Lists, and other Travel Resources in our Shop.
TRAVEL TRAILER ACCESSORIES NEEDED TO WINTERIZE FRESH WATER SYSTEM WITH COMPRESSED AIR
- Air Compressor
- Blow Out Plug Adapter
- Air Pressure Regulator
- RV Antifreeze
HOW DO YOU WINTERIZE YOUR RV TRAVEL TRAILER WITH RV ANTIFREEZE?
The more commonly used method to winterize your travel trailer is to pump RV antifreeze through your water lines. After completing the previously mentioned steps for preparing your RV travel trailer for storage, dumping your black and gray water tanks, and draining the fresh water systems, follow these steps for winterizing your travel trailer with RV antifreeze* instead of compressed air.
* NOTE: You should never use automobile antifreeze in your travel trailer fresh water system as it is toxic.
- The first step to winterize your RV travel Trailer with antifreeze is to make sure all the FRESH WATER holding tanks are empty and drain valves are OPEN. (See above on draining the FRESH WATER tanks).
- If your travel trailer is equipped with a water filtering system, replace the filter cartridge with a clear plastic bypass hose .
- Turn OFF your water heater 12-volt and 120-volt interior control switches.
- If you haven’t already done so, turn the water heater bypass valves to the BYPASS position now.
- Make sure the “fresh tank drain” and “low point drains” are CLOSED.
- If your travel trailer water pump doesn’t already have a hose built in, Camco makes converter kit that can be used to siphon the RV antifreeze. You can also place a garden hose into a container of RV antifreeze solution. Be sure you purchase enough to completely winterize the travel trailer (usually 2-3 gallons).
- Attach the other end of the hose to the City Water Fill.
- Turn the water pump ON.
- OPEN the hot water line on all the faucets ( kitchen , bathroom , shower, and outside shower) until the RV antifreeze begins to flow continuously (Pink solution will come through the faucets).
- Close the faucet hot water lines and repeat with the cold lines on all the faucets.
- Do not forget to run the RV antifreeze through the toilet as well.
- When you are done adding RV antifreeze, remove the hoses from the container.
- To prevent staining, it is recommended that you rinse the RV antifreeze out of your sinks, shower, tub, and toilet with a soft, dry cloth.
TRAVEL TRAILER ACCESSORIES NEEDED FOR WINTERIZING YOUR TRAVEL TRAILER WITH RV ANTIFREEZE
- RV antifreeze
- Bypass hose for water filter system
If you still don’t feel comfortable getting your RV travel trailer ready for winter storage, you can always hire someone to winterize your RV travel trailer for you, but as you can see, with a good checklist and a bit of practice, it can easily be done.
Don’t Miss These Helpful RV Travel Trailer Resources & Free Printables
- FREE RV Trip Planner
- FREE RV Kitchen Packing Checklist
- RV Checklists to help You get ready for the Camping Season
- Ultimate Interactive RV Departure Lists
- RV Packing List Printables
- RV Must Haves for your new Travel Trailer
- Personalized RV Camping Signs
- PRO Courses Guides New Tech Help Pro Expert Videos About wikiHow Pro Upgrade Sign In
- EDIT Edit this Article
- EXPLORE Tech Help Pro About Us Random Article Quizzes Request a New Article Community Dashboard This Or That Game Popular Categories Arts and Entertainment Artwork Books Movies Computers and Electronics Computers Phone Skills Technology Hacks Health Men's Health Mental Health Women's Health Relationships Dating Love Relationship Issues Hobbies and Crafts Crafts Drawing Games Education & Communication Communication Skills Personal Development Studying Personal Care and Style Fashion Hair Care Personal Hygiene Youth Personal Care School Stuff Dating All Categories Arts and Entertainment Finance and Business Home and Garden Relationship Quizzes Cars & Other Vehicles Food and Entertaining Personal Care and Style Sports and Fitness Computers and Electronics Health Pets and Animals Travel Education & Communication Hobbies and Crafts Philosophy and Religion Work World Family Life Holidays and Traditions Relationships Youth
- Browse Articles
- Learn Something New
- Quizzes Hot
- This Or That Game New
- Train Your Brain
- Explore More
- Support wikiHow
- About wikiHow
- Log in / Sign up
- Home and Garden
- Heating and Cooling
- Winterization
How to Winterize an RV
Last Updated: March 25, 2023 Approved
wikiHow is a “wiki,” similar to Wikipedia, which means that many of our articles are co-written by multiple authors. To create this article, 13 people, some anonymous, worked to edit and improve it over time. There are 9 references cited in this article, which can be found at the bottom of the page. wikiHow marks an article as reader-approved once it receives enough positive feedback. In this case, 94% of readers who voted found the article helpful, earning it our reader-approved status. This article has been viewed 322,521 times. Learn more...
If you enjoy camping but take to an RV rather than a tent, then you know there’s work to be done at the end of the camping season. When you’re done camping for the year, and it’s time to leave your RV dormant for the winter, you need to take the appropriate steps to winterize an RV. You don't want to find burst pipes come spring!
Draining the Water and Drying the Water Lines
- If your RV does not come equipped with a built-in system, you should clean the tanks out with a wand or a product designed to clean both of the tanks.
- Take all the tanks' contents to your local dump station.
- Flush your toilets a few times to make sure all the water's gone!
- Technically, it's attached to the "Water Intake Fitting."
- Pressure should be 30 pounds per square inch (maximum of 50 psi). [4] X Research source
Adding Antifreeze to the Plumbing System
- From the inside using a water pump conversion kit
- From the outside with a hand pump
- We'll be addressing the water pump with a bypass method. The science behind the pumps is the same. However, without a bypass, you just have to add much, much more antifreeze. Regardless of whether or not you have a bypass, do not drain your water heater before adding the antifreeze.
- Turn off the water heater
- Disconnect the water supply (the above step)
- If installing for the first time, disconnect the hot and cold lines going in and out of the water heater
- Connect the bypass, following the instructions on the package
- Close off the same hot and cold lines and open the bypass
- Approximately 2 to 3 gallons (7.6 to 11.4 liters) of antifreeze should be enough to fill the RV’s entire plumbing system, provided a bypass is installed. If you don't have one, you need as much antifreeze as the water heater can hold, usually 6 to 10 gallons. [4] X Research source
- You may need to flush the toilet several times until the RV antifreeze comes out at a steady rate.
Completing the Final Details
- And as for valuable items, why would you leave them in an RV for six months? And the laundry, well, it's just best to leave everything clean so when you come back in the spring, there's a lot less work to do.
- Check the entire RV for places that bugs or animals may be able to get into. Just because you're not using it doesn't mean they should get to!
- You may want to put rags on top of the sharp corners of your RV so that breathable material doesn't rip. For good measure!
Community Q&A
- Most RV parts stores will have the supplies needed to winterize an RV. Thanks Helpful 0 Not Helpful 0
- Your owner’s manual will have information about the preferred method of winterizing your particular model of RV. Thanks Helpful 0 Not Helpful 0

- Never use automotive antifreeze in the lines of an RV, as this can cause damage to the plumbing system. Thanks Helpful 17 Not Helpful 7
- Be sure to open the pressure relief valve when draining the water heater. Allowing the water to drain while it is under pressure, or hot, can lead to injuries. Thanks Helpful 13 Not Helpful 8
Things You'll Need
- Pump (water or hand)
- Bypass kit (optional)
- Antifreeze (minimum 3 gallons)
- Tank-cleaning wand
- Tarp of breathable material
- Air compressor
- Adapter ("blowout plug")
You Might Also Like

- ↑ http://www.gagscamperway.com/rv/winterize.htm
- ↑ https://www.reserveamerica.com/outdoors/how-to-winterize-an-rv.htm
- ↑ 4.0 4.1 http://www.kinstler.com/how_to/winterize_an_rv/how_to_winterize_rv.html
- ↑ https://gorving.com/what-to-do/winterizing-your-rv
- ↑ http://rvservices.koa.com/rvinformation/rvmaintenance/step-by-step-rv-winterizing-checklist.asp
- ↑ https://www.fraserway.com/discover-rving/blogs/winterizing-101-how-not-burst-your-pipes
- ↑ https://www.parkedinparadise.com/winterize-rv-camper/
- ↑ http://www.doityourselfrv.com/rv-winterizing-winter-storage-information/
- ↑ http://rvservices.koa.com/rvinformation/rvmaintenance/you-winterized-your-rv-but-did-you-prepare-it-for-storage.asp
- http://koa.com/familyzone/camping101/articles/rvmaintenance_506.htm
About This Article
To winterize an RV, start by draining the water from the fresh water, black, and gray holding tanks. You should also open any cold and hot water faucets and flush the toilet a few times to make sure all of the water is out. Next, attach a compressed air adaptor to your RV's water lines and blow air through the water lines using an air compressor, which will force out any remaining water. Finally, add antifreeze to your RV's plumbing system to protect it throughout the winter. To learn how to protect your RV from a rodent infestation during the winter, scroll down! Did this summary help you? Yes No
- Send fan mail to authors
Reader Success Stories
Jim Darrough
Nov 9, 2016
Did this article help you?

Oct 20, 2022
Nov 27, 2016
Judy Stephens
Aug 16, 2017
Bill Arthur
Oct 31, 2016

Featured Articles

Trending Articles

Watch Articles

- Terms of Use
- Privacy Policy
- Do Not Sell or Share My Info
- Not Selling Info
Get all the best how-tos!
Sign up for wikiHow's weekly email newsletter
- Toggle Search Form
How to Winterize a Camper Trailer or RV

Wash and Dry the RV

Once the RV is clean, make sure to dry it off thoroughly. Even a small amount of moisture on the surface can cause corrosion over time, so drying it is a crucial step.
Prevent Pests from Coming in
Now that the outside of the vehicle is clean, it’s time to clean the interior. Start by removing all food from the RV so insects and rodents aren’t tempted to come in. Then wipe down counters and seats, followed by sweeping and mopping the floor to ensure no crumbs are left.

Get Rid of the Water
One of the most important steps for winterizing a camper trailer or RV is to make sure there is no water left in it when it’s cold outside. Otherwise, it could freeze and wreak havoc on the RV. This is why it’s critical to remove the water from any tanks in the RV , including the water heater, fresh water tank and the gray and black tanks. Then, pour non-toxic RV camper antifreeze into the plumbing system to prevent the pipes from freezing.
If there’s an ice maker or washing machine in the RV, consulting the manual for those appliances is the best way to find out how to winterize them. And if the water heater uses electricity, turn it off before storing the RV.
Shut Down or Put Away Other RV Components
RVs are made up of numerous parts that need to be turned off for the winter. For example, take down any awnings, and shut gas tank valves. Check the roof for leaks and fix them as needed, and then change the oil before storing the RV.
In addition, remove any batteries from the RV, since they often drain and become unusable after long periods of storage. Don’t store them with the RV. Instead, put them in a spot where the temperatures aren’t extreme. Finally, plug the RV’s tailpipe with steel wool or some rags to keep pests out.
Cover it up for Winter

Following these tips can help prevent any damage to the RV over winter so it’s ready to start driving again when spring gets here!
Leave a Reply Cancel reply
- Automotive Care
- Cool Rides Online®
- Indoor and Outdoor Living
- Powersports and Recreation
- Press Releases
- Revving Up™
- Small Engine Care
Home » Guides » How To Dewinterize A Travel Trailer
How To Dewinterize A Travel Trailer

- Last Updated: Apr 7, 2024
If you’re like most people, the colder weather means it’s time to put your travel trailer away for the winter. But if you neglect to de-winterize your trailer, you could be in for some big problems when you finally try to use it again. In this blog post, we’ll show you how to de-winterize a travel trailer so that it’s ready for use when the warmer weather arrives.

When Should You Dewinterize Your Travel Trailer?
It’s that time of year again! The weather is getting warmer and the days are getting longer, which can only mean one thing: it’s time to start thinking about taking your travel trailer out of storage. But before you hit the open road, there’s one important task you need to take care of first: de-winterizing your travel trailer.
So when is the best time to de-winterize your travel trailer? Generally speaking, it’s best to do it as early as possible in the spring. This gives you plenty of time to check for any damage that may have occurred over the winter months and to make any necessary repairs. It also gives you a chance to give your travel trailer a good cleaning before hitting the road.
Of course, every travel trailer is different, so be sure to consult your owner’s manual for specific instructions on how to de-winterize your particular model. But in general, the process involves draining all the water from the system, then flushing it with fresh water and antifreeze. Once that’s done, you should be good to go for another season of adventure!
Checklist To De-winterize Your Trailer :
To help you get started, here is a checklist of things to do when you are de-winterizing your trailer:
Inspect The Tires And Check The Tread Depth
Before you hit the road this spring, it’s important to make sure your trailer is ready for the journey ahead. One of the most important steps in de-winterizing your trailer is to inspect the tires and check the tread depth. Temperature changes can cause tires to lose air pressure, and low tread depth can make it difficult to maintain control on wet roads.
By taking a few minutes to check your tires, you can help ensure a safe and enjoyable trip. In addition to checking the tires , you should also take a close look at the brakes and suspension. If you notice any problems, it’s best to have them fixed before hitting the road. De-winterizing your trailer may seem like a lot of work, but it’s worth it when you consider the alternative.
Check All Of The Lights And Signal Lamps
One important task is to check all of the lights and signal lamps. These are essential for safety, so you want to be sure they are in good working order before hitting the open road. Checking the lights is a simple process: just turn them on and make sure they are bright and visible from all angles.
If any of the bulbs are burned out, be sure to replace them. Once you’ve checked the lights, it’s also a good idea to test the RV’s horn to ensure it is working properly. With these simple checks, you can help ensure a safe and enjoyable RVing season. After spending months in storage, it’s not uncommon for bulbs to burn out or connections to become corroded.
Taking a few minutes to check these items will ensure that you’re visible to other drivers and avoid any potential accidents. So before you head out on your first trip of the season, be sure to give your lights a quick once-over.

Test The Brakes
Brakes can wear down over time, and they may not work as well in cold weather. That’s why it’s a good idea to test the brakes before you head out on your first trip of the season. Here are a few tips:
- Park your RV or trailer on level ground and set the parking brake.
- Apply pressure to the brake pedal and hold it for a few seconds. If the pedal sinks to the floor, there may be a problem with the brakes.
- With the engine off, pump the brakes a few times to build up pressure. Then start the engine and apply pressure to the brake pedal again. If the pedal sinks, there may be an issue with the brake fluid or other components.
If you have any concerns about your brakes, it’s best to take your RV or trailer to a qualified mechanic for inspection. By taking care of maintenance items like this, you can help ensure that your travels are safe and enjoyable all season long.
Check All Of The Fluid Levels In The Trailer
Checking the fluid levels in your trailer is a crucial part of maintaining it. The brakes and bearings are two areas that need regular maintenance, and both require different types of fluids. The brakes use hydraulic fluid, while the bearings need grease.
You should check the level of each type of fluid regularly, and top them off as needed. If you’re not sure how to do this, consult the owner’s manual for your trailer. By taking the time to keep an eye on the fluid levels, you can help ensure that your trailer remains in good working order.
Lubricate The Moving Parts
Any experienced camper knows that regular maintenance is essential to keeping your trailer in good condition. One important task is to lubricate the moving parts, such as the hitch, jack, and door hinges. This will help to prevent rust and keep the parts moving smoothly. In addition, it’s a good idea to inspect the tires and brakes before each trip.
Once you have completed this checklist, your trailer should be ready for another season of adventures. However, if the parts are already showing signs of wear, it is important to take them to a qualified mechanic for repair or replacement. By taking these simple steps, you can help to prolong the life of your trailer and keep it running smoothly for many years to come.
Winter is coming to an end and it’s time to start thinking about de-winterizing your travel trailer. If you don’t take the necessary precautions, you could find yourself in a world of trouble when it comes time to hit the open road again. This post outlines the steps you need to take to properly de-winterize your travel trailer so that everything is ready for summer adventures.
Other Popular Posts:
What Size Generator For A Travel Trailer
How To Winterize A Travel Trailer (Step by Step Guide)
How To Jack Up A Travel Trailer: The Ultimate Guide

Leave a Comment Cancel reply
Recently published guides.

Buying a Generator for RV Life

RV Refrigerators: How Do They Work?

How to Repair Norcold Fridge Flap
How To De-Winterize A Travel Trailer
With the upcoming warmer weather, you’ll have more time to indulge in a travel trailer experience. As an RVer who loves spending time traveling to your favorite spots, you need to get your travel trailer ready.
Take it out from your storage, get ready to perform its maintenance, and head out for the camping trip during the spring season.
If you don’t know how to de-winterize a travel trailer, consider the factors mentioned in this guide.
Table of Contents
Check Your Tires
When you store the RV for a longer duration, the tires start losing their air pressure to around 2-3 psi during a month. So, if you stored them for six months, you need to refill them.
Apart from that, if you stored the RV in a cold area or an outer area, the tires might be extremely deflated when you check it out for the spring season.
If you take a risk and drive the travel trailer with underinflated tires, you might end up with uneven wear and tear, poor handling, blowout, and ultimately an accident.
Invest in a tire pressure gauge to check air pressure within RV tires plus the spare tire. Reinflate all your tires based on the recommended load. You can check the user manual for correct tire pressure. If your tires are completely worn out, you may purchase RV tires during the start of the season.
Inspect the Exterior
Before you plan to start your trip, you must also check the RV’s exterior, as it helps you find any damages, cracks, or leaks. Identify weather stripping around doors, windows, and others. Plus, replace the peeled or cracked roof sealants . Make sure to check slide-out, roof plus body seams, and then replace them with new seals.
If your RV was stored outdoors, check water damage or roof because snow accumulation can cause structural damage causing cracked seams.
If you own a towable camper, inspect hitch components to identify damage and rust. Then, replace all damaged parts, so you don’t face any bad experiences during the trip.
Charge and Reinstall your Batteries
Batteries are the essential components of RV travel trailers. You can never overlook them. Similar to RV tires, RV batteries also lose their charging because of internal leakage.
Periodic checking of the RV batteries is a must even if you store the RV and take it out during the season. If you keep your batteries charged at times of storage, this expands the RV battery’s lifespan and helps you get ready for the trip.
Before you start up with the trip, make sure to check the battery charging with a voltmeter. The RV should not be connected with any electricity as it might lead to a false reading. Usually, full battery charging shows 12 volts or above. If it’s below 12, you need to charge it before taking it out for a trip.
For charging the RV batteries, make sure to attach the RV battery to the charger while keeping it off. Then turn the battery charger on and let your battery charge completely. Based on the battery size, you need to charge it for a few days and a few hours.
Once the battery is ultimately charged, check its water level, then add the correct amount of distilled water. If you see the water below its plates, add some to reach the point before charging the battery.
When you reinstall the RV battery, make sure to connect it securely. You can also take help from a professional RV maintenance service.
Flush your Water System
When de-winterizing a travel trailer, flushing the water system is a crucial system. When traveling, you believe in using clean water for washing, cleaning, cooking, showering, or drinking.
During winters, you must have added the non-toxic antifreeze RV solution that prevents freezing of water pipes. When going out in spring, you need to flush off the antifreeze from your RV’s plumbing system making your water clean for use.
If you placed the antifreeze within the freshwater holding tank in winters, you need to drain your tank completely. Next, add potable water within the freshwater holding tank and follow these steps for flushing antifreeze.
- Make sure to turn on your water pump.
- Next, open the water faucets like showers or sinks.
- Make sure that the water runs from the entire system for a few minutes.
- When the RV pump runs, flush your toilet for some time.
- Once your water seems clean, you can turn off the pump and close all faucets.
- Make sure to switch the water heater from bypass mode. If you forgot to place your water heater in a bypass mode during winters, you need to drain antifreeze from your water heater tank, collect it for disposal.
- Replace the water filter cartridges which you removed at times of storage.
- Dump the black and gray water holding tanks on the official dumpsite.
Sanitize your Water System
Another essential step at times of de-winterizing the travel trailer, you need to sanitize the water system. Even if you avoided using antifreeze for the plumbing system, sanitize the water lines. This step is essential for getting rid of all molds and bacteria that might grow in water pipes at storage times.
To sanitize the water system, you need to follow these simple measures
- Close the drains and make sure to install durian plugs.
- Make sure to measure a 1/4th cup of bleaching agent for 15 gallons the freshwater tank holds.
- Now pour bleach in a 1-gallon container, next fill it using water.
- Now add this mixture with a freshwater holding tank.
- Fill this tank using potable water.
- Now turn on all the water faucets and pumps.
- Make sure to run the water till the time this smell is gone.
- Make sure that this solution suits for around 12 hours within the waterline and water tank.
- Drain the entire water from your RV’s system.
- Next, refill the entire freshwater tank using potable water.
- Now flush the system after turning the water pump and open all faucets.
- Make sure that the water runs till there is no bleaching smell.
Check the Engine
Now check the RV engine, check the entire engine fluid levels, and ensure the controls and lights are operational. Make sure to check fluid levels, power steering, brake fluid, engine oil, transmission, engine coolant, and windshield washer fluid. If you find any low levels, keep them on point to have an ultimate RV traveling experience.
Once you are done checking engine fluid levels, start your engine. Check readings over gauges and check the headlights, dash lights, windshield wipers, and taillights.
Apart from these steps, check leaky pipes, replace your propane tanks, check the propane appliances, test all 120-volt appliances, RV generator, replace filters, and check all safety devices, windows, and air vents. Apart from mechanical things, stock first aid, emergency supplies with updated insurance and registration.
How do you flush antifreeze out of a camper?
For flushing antifreeze out of a camper, you can turn on the water pump, open all water faucets, and water will run in the entire system. When your RV water pump is running, flush the toilet for a specific time.
Once the water is clean, turn off your pump and close the faucets. You also need to switch the water heater from bypass mode and drain antifreeze. Next, you need to replace the water filter cartridge and dump black and gray water holding tanks.
How much does it cost to winterize an RV?
Winterizing an RV travel trailer is a straightforward process where you can save a lot if you know all measures. The cost for processing varies between $10 or under.
More about winterizing an RV read here .
Can I dump RV antifreeze on the ground?
As the RV antifreeze is flammable, it’s best to avoid dumping this antifreeze in the ground. Ethanol and propylene are non-toxic, but they can result in a bad smell or taste. This can lead to drying out of the rubber plumbing seals leading to leaks. Again, these are flammable, so it’s best to avoid dumping them in the ground.
How much antifreeze do you need to winterize a travel trailer?
The amount of antifreeze varies based on the vehicle size and the waterline length. Usually, you need 2-3 gallons of propylene glycol antifreeze. However, if you don’t plan to bypass the water heater, you need six extra gallons of the antifreeze.
Can you put bleach in RV black water tank?
Bleach kills odor-causing bacteria within black water tanks, but adding extra chlorine can damage RV gaskets and seals. However, using diluted non-chlorine or chlorine bleach like hydrogen peroxide is safe in RV black water tanks.
Besides, you can add safer options for cleaning black water tanks like dishwashing detergents, enzyme formulas, yeast, and baking soda.
Once you are done following the RV travel trailer winterizing tips, you can end up coming to your favorite spot in the upcoming season.
Apart from following these tips, keep the exterior neat, check critters, clean air conditioners and fans, wash screens and windows, change all towels and linens then vacuum.
Have fun at your next travel trailer experience.

I`m a current Law Enforcement Officer working within the Counterterrorism Bureau in New York State. I have been Camping for over 20 years. My styles of camping include tent, car, truck, van, and RV travel trailer. I have a YouTube channel where I teach all types of camping with an entertaining method: https://youtube.com/@TheSmallsRVAdventures
Similar Posts

How Many Gallons Per Minute Does an RV Shower Use: 6 Key Features
Running out of water while taking a shower in your RV is no fun. Not being aware of how many gallons per minute does an RV shower use could lead to not knowing when it’s time to refill the water tank. In this article, we’ll cover the 6 features of our easy-to-use Shower Guide. Find…

RV Microwave Not Working: 14 Possible Reasons and Troubleshooting
Is your RV microwave not working? I am here to help if you are facing similar problems. My RV microwave was not working long ago, and I got so worried. Luckily, I discovered the cause and fixed it without any hardships. In this article, I will highlight 14 possible reasons behind RV microwave not working…

8 Forest River RV Electrical Problems: Easy Solutions Guide
Are you facing any Forest River RV electrical problems? Although these motorhomes are built to last for many years, getting on the road exposes them to elements, causing connections to rust or break. Keeping your electrical systems in perfect working condition will guarantee a trouble-free camping trip without sudden power outages that can ruin your…

Is Flex Seal the Best RV Roof Sealant?
This article was prepared by the Flex Seal Editorial Team. All opinions are their own and not necessarily those of CamperLife or its other contributors. When it comes to protecting your RV roof, a quality sealant is critical. After all, the condition of your RV roof is key to help brave any weather condition that…
![15 Best Pop Up Camper Hacks and Ideas [With Pictures]](https://camperlife.co/wp-content/uploads/2019/04/ceiling-hooks-768x772.jpg "winterizing tracer travel trailer")
15 Best Pop Up Camper Hacks and Ideas [With Pictures]
Camping is an enjoyable and bonding experience. What makes a camping trip even better? Bringing your kids along and introducing them to the animals and camping traditions. However, we’ve compiled 15 pop-up camper hacks that will make any trip a success for you and the whole family. Among them you’ll find tips for organizing your…

Trailer Running Lights Not Working: 2023 Guide with Safety Tips
Are you having trouble with your trailer running lights not working? Don’t worry, this guide is here to assist you. We’ll cover common causes of trailer lights failure, walk you through diagnosing the issue, and provide essential safety tips for your trailer trips. We have everything you need to fix your trailer running lights. Whether…
Your privacy is important to us. This website uses cookies to enhance user experience and to analyze performance and traffic on our website. By using this website, you acknowledge the real-time collection, storage, use, and disclosure of information on your device or provided by you (such as mouse movements and clicks). We may disclose such information about your use of our website with our social media, advertising and analytics partners. Visit our Privacy Policy and California Privacy Disclosure for more information on such sharing.
- Owner Login
- Dealer Login
- Fifth Wheels
- Travel Trailers
Helpful Tools
- Find A Dealer
- RV Definitions
- Component Manuals
- Our Company
- Owners Page
- Forest River Corporate Home
- Privacy Policy
- Terms of Use
- Accessibility
- Forest River Apparel
Explore Tracer
Home > Tracer > Tracer
- Find Your Local Dealer
- Contact Prime Time
- Search Our Videos
- Local Dealers

NO SACRIFICES
For the consumer who is looking for ultra-light weights, but doesn’t want to sacrifice style, amenities, and comfort... we’ve designed the Tracer series travel trailers. The Tracer Ultra-Lite offers spacious layouts, plush residential furniture, and other high end features not typically seen in an ultra-lite trailer that is often thousands of pounds lighter than traditional travel trailers! The Tracer has raised the bar for comfort and luxury in an ultra-lite brand. In your next travel trailer, make NO SACRIFICES!
Light weight. Easy to tow. Loaded with features. No sacrifices!

2024 Tracer Floorplans
Tracer le travel trailers.

You must be logged in, or create an account to use the Forest River wish list.

Tracer Travel Trailers

Dealer Stock Only

Specifications Definitions
GAWR (Gross Axle Weight Rating) – is the maximum permissible weight, including cargo, fluids, optional equipment and accessories that can be safely supported by a combination of all axles.
UVW (Unloaded Vehicle Weight)* - is the typical weight of the unit as manufactured at the factory. It includes all weight at the unit’s axle(s) and tongue or pin and LP Gas. The UVW does not include cargo, fresh potable water, additional optional equipment or dealer installed accessories. *Estimated Average based on standard build optional equipment.
CCC (Cargo Carrying Capacity)** - is the amount of weight available for fresh potable water, cargo, additional optional equipment and accessories. CCC is equal to GVWR minus UVW. Available CCC should accommodate fresh potable water (8.3 lbs per gallon). Before filling the fresh water tank, empty the black and gray tanks to provide for more cargo capacity. **Estimated Average based on standard build optional equipment.
Each Forest River RV is weighed at the manufacturing facility prior to shipping. A label identifying the unloaded vehicle weight of the actual unit and the cargo carrying capacity is applied to every Forest River RV prior to leaving our facilities.
The load capacity of your unit is designated by weight, not by volume, so you cannot necessarily use all available space when loading your unit.
May Show Optional Features. Features and Options Subject to Change Without Notice.

2024 Tracer Features & Options
Tracer le advantage package.
- Eternabond Construction
- Gas/Electric DSI Water Heater
- Spare Tire w/Carrier
- Steel Wheels
- XL Grab Handle
- Steel Entry Steps
- Manual Stabilizer Jacks
- Manual Tongue Jack
- Power Awning w/LED lights
- Back Up Camera Prep
- 2 in 1 Gas Oven and Range
- LED Interior Lighting
- Stainless Steel Galley Sink
- 15k BTU Air Conditioner
Tracer Advantage Package
- ETERNABOND® CONSTRUCTION
- Fiberglass Front Cap
- Fully Enclosed Underbelly
- Spare Tire with Carrier
- Solid Stance Entry Steps
- Universal Docking Station
- Outside Shower
- Battery Disconnect
- Power Awning with LED Lighting
- Slam Latch Baggage Doors
- 60”x80” Queen Bed
- Undermount SS Kitchen Sink
- Low Profile Range Hood
- High Def Soundbar
- Large 2-Door 12V Refrigerator
- 15,000 BTU Ducted A/C
- 6 Gallon Gas/Electric Water Heater
- 18 Gallon /Hour Quick Recovery Mode for Water Heater
- 30,000 BTU Furnace
- 3-Burner Gas Cooktop with Oven
- Range Hood w/Light
- Water Heater Bypass
- High-Capacity Water Pump
Interior Features and Equipment
- LED Lighting Throughout w/Motion Sensor Lights In Key Locations
- Pre-drilled And Screwed Cabinetry
- Solid Wood Core Cabinetry
- Brushed Nickel “J” Spout Kitchen Faucet
- Solid Surface Galley Countertops (Not on LE models)
- EZ Glide Sleeper Sofa (Most Models)
- Extended Height Toilet w/Foot Flush
- Large Medicine Cabinet
- Shower Surround
- Skylight Above Shower (Most Models)
- 12V Exhaust Fan in Bath
- 60"x80" Queen Size Mattress (Not on LE models)
- Ultra Soft Bunk Mats (Where Applicable)
- LED TVs (Not on LE models)
Exterior Features and Equipment
- LED Lit Electric Awning
- Electric Stabilizer Jacks
- Power Tongue Jack
- Huge Pass Thru Storage
- 1” Thick Oversized Baggage Doors with Magnetic Catches and Slam Latches (Thumb latches on LE models)
- Universal Docking Center (Not on LE models)
- Battery Disconnect Switch (Not on LE models)
- Black Tank Flush (Not on LE models)
- Outside Shower with Recoil Hose
- Observation System / Sideview and Rearview
- Cable and Satellite Ready
- Large Fold-Away Grab Handle
- “Solid Step” Fold Down Entry Steps (Not on LE models)
- Spare Tire w/ Carrier
- Omni Directional TV Antenna
- Exterior GFI Outlet
- LP Quick Connect
- LED Lit Marine Grade Exterior Speakers
- Aerodynamic Fiberglass Front Cap (Not on LE models)
- Front Diamond Plate Rock Guard
- “E-Z Lube” Axle Hubs
- “D” Rated Radial Tires
- Extended Drip Spouts
- Exterior Bottle Opener
- Doggy D-Ring-Pet Securement
- Outside Refrigerator (Select Floorplans)
- 30 AMP Detachable Power Cord
- 50 AMP Detachable Power Cord (Select Models)
Tracer Update Alerts
Please sign up below if you would like to receive notifications when we make updates to this brand. Or, if you only want updates on a particular floorplan, you can select to be updated on each one individually.
Get Update Alerts
Get update alerts for tracer, alert sections.
- Specifications
Tracer Brochure

10th Anniversary Package
IMAGES
VIDEO
COMMENTS
Step 3: Drain and Clean Waste Water Tanks. Next, drain your black and grey water tanks and clean them thoroughly to prevent any buildup or odors. Start by locating the valves for your black and grey water tanks. Connect your sewer hose to the appropriate tank valve and channel the other end into a nearby portable tank.
Take the small screen off the city water connection, then using a screwdriver (or anything long and pointy), push against the valves until the antifreeze comes out of it. You may need someone to turn the pump on to flow the antifreeze. Replace the small screen, and your water system will be winterized.
Add a few inches of RV pump antifreeze to winterize your toilet to the bowl. Next, flush the bathroom several times until the antifreeze appears in the bowl. Inline water filters, turn off the bypass valve, and open all of your RV's faucets until the antifreeze comes out. Step # 4: Disconnect And Drain The Battery.
Open all hot and cold faucets, including those outside the coach, if you have them. Open the fresh water drain on your RV's undercarriage. This could be a valve or a just a cap. Turn off all faucets that you opened in Step 3. Find your city water connection (usually next to your fresh water fill access). Connect the compressor and turn it on.
This is a comprehensive step by step video to help you learn how to Winterize your RV or Travel Trailer. We show a few different systems and how they work so...
👇 *Click _"SHOW MORE"_* below to open the full video description! 👇*How to Winterize a Travel Trailer - Are you winterizing your RV properly?* Did you kno...
Here's a quick video for the RV travel trailer owner who wants to winterize their RV in 16 easy steps. Our model trailer is a Visa Ultra Light but the proces...
Fall always brings loads of calls to our Service Department about winterizing. This tutorial is designed as a guide to follow for winterizing a standard trav...
Check the Tires. During winter storage, an RV's tires will lose about two to three psi of air pressure for every month or inactivity. Also, check depth of the tire tread. Check the Exterior for cracks, broken seals, and exterior lights. Flush the Freshwater System of All Antifreeze. Sanitize the Freshwater System.
Be careful not to run the water pump without any water in the system for too long, or you might ruin the pump. Step 6. By-pass your water heater. In this step, we're going to bypass your water heater. Doing this prevents you from filling your tank with RV antifreeze, saving you as much as 6 to 10 gallons of antifreeze.
Step 5: In the spring: drain, flush thoroughly, and fill. When the weather warms up again, you can drain the antifreeze from your freshwater tank. Now make sure your gray water drain valve is open or you have a catch container ready to collect the drain water. Fill your freshwater tank with about a gallon of water and run all fixtures until the ...
Winterize a Camper for Beginners: Clean and inspect interior and exterior. Disconnect batteries, propane, and solar panels. Drain and clean waste water tanks. Drain the fresh water tank and water lines. Drain the water heater. Prevent pipes from freezing (blow out water lines or pump in antifreeze) Store your RV properly.
The answer varies depending on the geographic location you live in, as the climate varies by location. The general rule of thumb is to winterize your travel trailer when the temperature is at or below 32 degrees Fahrenheit and will be so for a prolonged period of time. To ensure the quality and longevity of your investment, winterizing is non ...
This knob turns 45° to open or close. OPEN the "low point drains" on your FRESH WATER holding tanks (located underneath your travel trailer) and drain all the water ensuring they are completely empty. Leave the valves set to OPEN. Turn ON your Water Pump and run as needed. The process generally takes 15-20 seconds.
Download Article. 1. Allow all water to drain from the fresh water holding tank. To drain the water from your RV, you'll need to open what's called the "petcock." Do not be tempted to drain the water heater yet -- that has to be done after you add antifreeze. [1] 2. Drain the black and gray holding tanks.
Cover it up for Winter. The final step to winterizing the RV is to cover it. Make sure it's completely dry first or it could invite rust or corrosion. For the same reason, use a breathable fabric for the cover or a custom RV cover, not just a plastic tarp. Be sure to also cover the tires if the RV will be stored outside, since they need ...
Park your RV or trailer on level ground and set the parking brake. Apply pressure to the brake pedal and hold it for a few seconds. If the pedal sinks to the floor, there may be a problem with the brakes. With the engine off, pump the brakes a few times to build up pressure. Then start the engine and apply pressure to the brake pedal again.
When de-winterizing a travel trailer, flushing the water system is a crucial system. When traveling, you believe in using clean water for washing, cleaning, cooking, showering, or drinking. During winters, you must have added the non-toxic antifreeze RV solution that prevents freezing of water pipes. When going out in spring, you need to flush ...
Freshwater tank and water line sanitization. The next step in dewinterizing an RV is to sanitize the freshwater system. Using a ratio of approximately 1/4 cup bleach for every 15 gallons of water or a water system cleaner, fill the freshwater tank almost full. If possible, hauling your RV is a great way to agitate the mixture.
The Tracer Ultra-Lite offers spacious layouts, plush residential furniture, and other high end features not typically seen in an ultra-lite trailer that is often thousands of pounds lighter than traditional travel trailers! The Tracer has raised the bar for comfort and luxury in an ultra-lite brand. In your next travel trailer, make NO ...
Ira takes you through the basic steps to winterize your Forest River travel trailer.Website: https://www.forestriverinc.com
The 330RSTS is one of the best overall travel trailers for the winter. It's protected by Climate Shield™ technology that protects it against all kinds of weather conditions. The design also includes an enclosed and heated underbelly, a 35,000 BTU furnace, a built-in fireplace, and double layered fiberglass insulation.
Jeff from Johnson's RV shows us how to properly de-winterize a trailer for the upcoming camping season!