Far Cry 6 Cache Money Treasure Hunt and how to get in Bunker 2
The hunt is on
Far Cry 6 Cache Money is one among many treasure hunts you’ll find scattered across Yara, and entering Bunker 2 to find the treasure makes it one of the more difficult ones.
It's worth the trouble, though. Your reward is a special rifle that's perfectly suited to guerilla combat.

Far Cry 6 Cache Money - Where to find Cache Money Treasure Hunt

Cache Money triggers once you arrive at the Aguas Lindas FND base in Yara’s Madrugada region. Search the loot crates in the base, and you’ll find the document that starts the hunt.
The document directs you to Bunker 2. The location is nearby, and and it’s also marked on your map. Since the bunker is still inside the restricted zone, expect heavy opposition.
How to enter Bunker 2 in Far Cry 6
Follow the power lines until you reach the bunker, then climb up to the roof. Your goal is destroying everything inside, but there’s a catch. The only way into the bunker is through the front door, and while there’s a generator powering the roof door, the switch that opens the bunker door gives you a window of opportunity too short to make it inside.

The bunker just so happens to be full of fuel canisters — and some Easter egg contraband — so the easiest way to get inside is opening the door and chucking a grenade in.
Head inside once the flames die down, shoot the lock off the gate, and go inside the fenced area. Grab the key to the officer’s room, then activate the switch under their desk. This finally gives you access to the treasure room.

The cache itself contains a 3-star sniper rifle, the Sobek Special. Like other special weapons, this one has a predetermined loadout that you can’t modify at workbenches.
If you're feeling confident with your new rifle, take on some of Far Cry 6 's other massive bases to find rare materials, including uranium , and scraps for upgrading your camp facilities . Getting the ultimate weapons will take some extra time and grind, though. If you're really determined to hunt down all of Yara's secrets, make sure to find all 15 Criptograma chests as well.
Read this next
- Good news, Steam's just introduced a better way to enjoy dodgy smut and 6/10s with your grandparents
- Xbox Game Pass' December batch includes notorious GOTY Far Cry 6 and Goat Simulator 3 chaos
- Far Cry 6 and three more Ubisoft titles are heading to Steam this spring
Free Monopoly Go Dice Links
Coin Master Free Spins
Manor Lords: How to raise influence
Manor Lords: Best development points
Manor Lords: How to raise settlement level
Manor Lords: What to build first
READY? FIGHT How to watch Evo Japan 2024
Manor Lords beginner's guide: What to know before you start
- Entertainment
- PlayStation
- Elden Ring Guides
- Roblox Codes
- Pokemon Legends Arceus
- Privacy Policy
- Terms of Service

Far Cry 6 Cache Money Guide: How to Get Into Bunker 2
Are you having trouble with the Cache Money Treasure Hunt in Far Cry 6? Far Cry 6 has several Treasure Hunts scattered across Yara that reward players with unique weapons and gear if they manage to solve a puzzle, but Cache Money is one of the trickiest puzzles in the game. This quest requires you to find the confiscated treasure somewhere in Bunker 2, but getting inside the bunker is easier said than done. Here’s how to get inside Bunker 2 in Far Cry 6’s Cache Money Treasure Hunt.
How to Start Cache Money in Far Cry 6
Cache Money is located in an FND base in the Aguas Lindas region of Madgrugada. It’s just west of Esperanza, Yara’s capital city. It’s a dangerous area filled with tough enemies, so make sure you either come prepared or stay out of sight. Once you arrive at the FND base, you can find a note that will start the Treasure Hunt.
How to Access Bunker 2 in the Cache Money Treasure Hunt
According to the note, the soldiers have hidden some confiscated goods in Bunker 2 nearby. If you can get inside, you can retrieve what they’ve stolen. Bunker 2 is on the northern edge of the base. Follow the power lines leading from the bunker onto the roof of the main building. This will lead you to a power switch that opens the bunker door.

Press the switch on the roof to open the door to Bunker 2. The door only opens for a few seconds though, and there’s nowhere near enough time for you to run inside. Thankfully, there are a bunch of explosive canisters just inside the bunker. When the door opens, shoot the barrels inside Bunker 2. This will blow open the hatch on the roof of the bunker, giving you a way in.
Make your way through the hatch and proceed down into the bunker. Open the second hatch inside and climb down the ladder. This will bring you to the main storage area in Bunker 2. Shoot the lock off the gate and grab the key hanging on the wall. Then, use that key to open the nearby locked door and enter the office.

The office seems like a dead end, but there’s a secret room that can be opened with a hidden switch behind the desk. Press the button behind the desk and the treasure room will reveal itself. Inside, you’ll find a weapon cache with a 3-star sniper file in it.

Your reward for this Treasure Hunt is the Sobek Special, a unique sniper rifle. It comes equipped with Blast Rounds and a canted sight, allowing you to swap between a long-range scope and a short-range optic on the fly. Blast Rounds also make this weapon perfect for taking out tanks and helicopters. There are plenty of other Treasure Hunts scattered across Yara, so keep an eye out for them if you want to earn rare gear.
Far Cry 6 is available now on PC, PS4, PS5, Xbox One, Xbox Series X|S, Google Stadia, and Amazon Luna. Check out our review of the game here .

Far Cry 6: Cache Money Treasure Hunt Guide
Far Cry 6 players can find out the steps required to unlock the sealed bunker door found in the Cache Money treasure hunt in this short guide.
As Far Cry 6 players explore the region of Yara, they will encounter a variety of FND bases throughout the region. While the rewards for completing FND bases typically include crafting materials, at one of the largest bases Far Cry 6 players are also able to complete an optional treasure hunt.
On the east coast of the Aguas Lindas region , players will find one of the largest FND bases in the game, containing multiple outposts, launch sites, and bunkers. At one of the outposts, players will find a document in an orange container that will start a nearby treasure hunt called "Cache Money".
RELATED: Far Cry 6: The Mongoose and The Man Treasure Hunt Guide
In the document, an FND commander gives an order to keep Bunker 2 sealed at all times. Players will find the bunker directly behind the nearby building.
How To Open The Bunker Door
Similar to the solution for "The Last One To Leave" treasure hunt , in the Cache Money hunt, players must follow the powerlines. When inspecting the bunker, players will notice a series of powerlines leading from the bunker controls to the roof of the nearby outpost. Proceed to the side of the outpost and climb the ladder to the roof of the building.
On the roof, players will find a large generator with a switch that can be interacted with. When players press the switch, they will find that the bunker doors will briefly open.
Unfortunately, the door will not open long enough for the player to reach the entrance to the bunker. After interacting with the switch, use any ranged weapon and aim towards the opening in the bunker doors.
Through the opening, players will see several gas barrels inside the bunker that they can shoot. After shooting the barrels, the roof hatch of the bunker will blow open, allowing players to access it.
Proceed into the bunker and then down the orange hatch. After following a large hallway, players will eventually reach a fenced storage area containing cultural relics that have been stolen by Anton Castillo's army .
Shoot the lock to the room and pick up the office key that is found on one of the shelves. With the office key, players will be able to access the adjacent officer's room.
Inside the room, players will find a hidden switch underneath the officer's desk. Interact with the switch in order to reveal a secret room containing the final reward chest.
In the chest, players will obtain the Sobek Special 3-star sniper rifle. Like other unique weapons obtained through treasure hunts, this weapon cannot be modified at any of the workbenches.
Far Cry 6 releases October 7 for PC, PS4, PS5, Stadia, Xbox One, and Xbox Series X.
MORE: Far Cry 6: Should You Choose Male or Female Dani?
- Ethics Policy
- Ownership Policy
- Corrections Policy

How to find and enter Bunker 2 in Far Cry 6
Bunker 2 is a location in Far Cry 6. You’ll visit it as part of a treasure hunt called Cache Money which, coincidentally, rewards you with the Sobek Special unique sniper rifle. Here’s our guide to help you find and enter Bunker 2 in Far Cry 6.
Go to the FND Storage Hub in Aguas Lindas, Madrugada
Bunker 2 and the Cache Money treasure hunt are found in Aguas Lindas at the northeastern section of Madrugada (it’s close to the Esperanza border). The area that we’re looking for is called the FND Storage Hub.
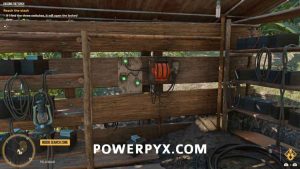
Once you get there, climb the ladder at the side of the building and take out the guards. You can interact with a panel here (seen in the featured image) that opens Bunker 2’s doors. Unfortunately, you won’t have enough time to make a mad dash before the doors close.

Now, if you take a closer look, you’ll realize that there are fuel canisters piled up just behind Bunker 2’s entrance. If you use grenades, machine guns, or rocket launchers, you can cause a massive explosion. This will cause the shaft above Bunker 2 to open up.

Climb down the shaft and the ladder. Continue along the hallway until you see a locked gate. Shoot the lock and pick up the Officer’s Keycard on the shelf.
In the next area, you should find a television set. Examine the desk to find another switch. Interact with it to reveal a hidden room. Inside, you’ll find a Yaran Contraband chest. Open it and get the Sobek Special unique sniper rifle. This also completes the Cache Money treasure hunt in Far Cry 6.

As for the Sobek Special sniper rifle in Far Cry 6, it has the following mods:
- Blast Rounds
- Large Sniper Scope
- Canted Reflex Sight
- Headshot Supremo

Far Cry 6 Cache Money and how to open Bunker 2
How to open Bunker 2 in the Cache Money treasure hunt

The Far Cry 6 Cache Money mission is mainly about how to open Bunker 2. This sealed building is the destination for a treasure hunt in Madrugada and has an oddly tricky solution that could be quite hard, especially if you haven't got your screen brightness whacked up high. It shouldn't actually be that hard but there's some really bad signposting where, while the objective is clear, the solution is definitely not in this Far Cry 6 task. So if you're stuck trying to open the Far Cry 6 Cache Money Bunker 2 door we can help you do just that and get this treasure hunt finished.
Far Cry 6 Cache Money treasure hunt location

You'll find the Far Cry 6 Cache Money treasure hunt by Esperanza west checkpoint, just outside of Esperanza in Madrugada. The treasure hunt icon will appear if you get close but there's also a chance you'll get intel on it from speaking to any guerillas with the black exclam point over their heads. Once you know where you're going, head to this Aguas Lindas building:

You'll need to take a little care getting in if you don't want any trouble, as there's a lot of traffic going through the gate and a sniper tower overlooking everything. Once you're inside, however, things are fairly clear.
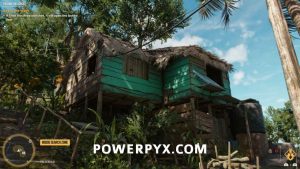
This is the building you're looking for, with the treasure hunt note on the guard booth by the barrier that explains Bunker 2 must remain closed at all times.

How to open Bunker 2 in the Far Cry 6 Cache Money mission

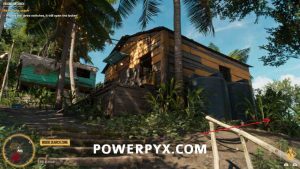
Head past the building and you should see a ladder that will take you up to the roof. There's one guard up there, and another below, at ground level around the back, deal with them as you will and then look for a switch overlooking Bunker 2.
If you press the switch the Bunker 2 door will open. Briefly. There seems to be no way of reaching the open door in time and this is where a lot of people are getting stuck. The reason is the spectacularly bad sign posting here - if you want to get into the Cache Money Bunker 2 you need to press the switch and then shoot through the doors while they're open. It's impossible to see most times of day but there are actually explosive containers in there and blowing them up will blast open a hatch on the roof. That's how you get in.

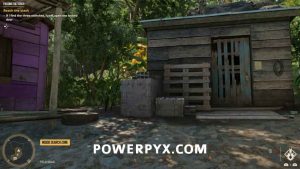
Once inside the bunker head down the corridor to reach an office and storage areas (check the desk for an Assassin's Creed Easter egg note). Shoot the lock to get in the cage for some resources and a key card for the locked door. Inside the office look for a switch behind the desk to open a secret passage and inside there you'll find the Sobek Special sniper rifle, a unique weapon with explosive bullets.
Far Cry 6 tips | Far Cry 6 Amigos | Far Cry 6 secret ending | Far Cry 6 map | Far Cry 6 mysterious key and locked chest | Far Cry 6 wingsuit | Far Cry 6 best Supremo and Resolver weapons | How to unlock Far Cry 6 preorder bonuses and DLC | Far Cry 6 Triada Blessings Relics | Far Cry 6 gunpowder | Far Cry 6 co op | Far Cry 6 length | Far Cry 6 weapon list | Far Cry 6 third person | Far Cry 6 Chorizo | Far Cry 6 Criptograma Chests | Far Cry 6 best gear and builds | Far Cry 6 industrial circuits | Far Cry Seeds of Love | Far Cry 6 update patch notes | Far Cry 6 McKay kill or spare choice | Far Cry 6 Fort Quito key
Sign up to the GamesRadar+ Newsletter
Weekly digests, tales from the communities you love, and more

I'm GamesRadar's Managing Editor for guides, which means I run GamesRadar's guides and tips content . I also write reviews, previews and features, largely about horror, action adventure, FPS and open world games. I previously worked on Kotaku, and the Official PlayStation Magazine and website.
Eric Barone quietly reveals new Stardew Valley update that's a game changer for honey farming: "Life will never 'bee' the same"
My next Metroidvania kick is an ingenious mix of Zelda-like exploration, twin-stick combat, and pitch-perfect controls – with 97% positive Steam user reviews
Wait a minute, Bandai's latest anime game actually looks pretty good: a console and PC action-RPG city builder based on one of the best video gamey anime in years
Most Popular
- 2 Stellar Blade review: "A good action-RPG that I enjoyed a lot despite several issues"
- 3 Manor Lords review: "Brimming with the potential to exceed its already broad horizons"
- 4 Medici board game review: "Friendly competition"
- 5 Arborea review: "Fascinating interplay"
- 2 Boy Kills World review: "A gleefully bonkers blend of The Hunger Games and The Raid"
- 3 Rebel Moon Part Two – The Scargiver review: "Zack Snyder’s sci-fi epic stumbles towards the finish line"
- 4 Abigail review: "A blood-bomb of fun that needs more narrative meat"
- 5 Sometimes I Think About Dying review: "Daisy Ridley demonstrates her star power"
- 2 X-Men ’97 episode 7 review: "Season one has finally hit a lull"
- 3 Knuckles review: "A confident trial run for Sonic 3"
- 4 Alien RPG Building Better Worlds review: "Carrying on the quiet momentum of one of the best TTRPGs out there"
- 5 X-Men '97 episode 6 review: "The heart of the X-Men has triumphantly returned, but at what cost?"
Cache Money Far Cry 6 - Find Confiscated Treasure in Bunker 2
Home » Far Cry 6 » Cache Money Far Cry 6 – Find Confiscated Treasure in Bunker 2
The Cache Money Far Cry 6 treasure hunt mission requires you to find confiscated treasure in Bunker 2 found in one of the many military installations spread across the game’s world. It will take a bit of light puzzle-solving and exploring as you slowly get your bearings and figure out where the confiscated treasure is hidden. Out of the plethora of treasure hunt side missions, this one is definitely one of the tricky ones. You might find yourself stumped. If that’s the case, just keep reading this guide. We’ll show you exactly where to find the confiscated treasure in Bunker 2 in the Cache Money hunt.

How to Get Cache Money Far Cry 6 Treasure Hunt
To get the Cache Money Far Cry 6 treasure hunt and the confiscated treasure in Bunker 2, head to the east of Aguas Lindas and enter the military base through the gate in the southeast of the compound. To the right of the entrance, you’ll find a guardhouse with a note pinned on it. That starts the treasure hunt. Next, head up the ladders to the roof of the building behind the guardhouse.

Once up there, kill the guard and press the button on the low wall next to the generator. The doors to Bunker 2 will start opening, then stop. Shoot at the crates full of explosives through the gap in the door and the hatch on the top of the bunker will blow open, so head up there and drop inside. Find the hatch in the floor and climb down.

Far Cry 6 Cache Money Bunker 2
Once you’ve gone down the ladder in Bunker 2, head all the way down the corridor on the left and into the room full of artifacts. Shoot the padlock on the gate, go into the cage, and pick up the keycard on a purple lanyard. Use it to unlock the door opposite the cage and enter the office. Crouch behind the desk with the TV on it and press the button. This will cause the bookshelf on the left to move and reveal a secret room, inside which is a chest with an alligator on it. Open it to get the Sobek Special unique sniper rifle and complete the Cache Money Far Cry 6 treasure hunt. You can also check out our Youtube video guide if you need additional help.

YOU MAY ALSO READ

Leave a Reply Cancel reply
Your email address will not be published. Required fields are marked *
Save my name, email, and website in this browser for the next time I comment.
You’re missing a very important step that you have to shoot into the room as the doors open to blow up the stuff in there.
Right you are. Fixed it.
Prodigygamers
Game Guide, Walkthough & News
Far Cry 6- Cache Money Treasure Hunt Walkthrough & Find Sobek Special
By Angelz in PC PS4 PS5 Xbox One Xbox Series X 11/10/2021
In Far Cry 6, at Aguas Lindas, Oasis Plains there is a Treasure Hunt near Nogal River i.e. “Cache Money” . The note will indicate at the beginning that a unique weapon is placed in the cache inside bunker 2. We need to add and unlock weapons which is more important than the Exp gained. Therefore in this post, we have mentioned all the steps that you need to perform in order to complete the mission and obtain the FND Cache.
Cache Money Treasure Hunt Walkthrough For Far Cry 6
Instead of standing near Bunker, climb on top of the headquarters roof where all the power cables would be present that you need to trip. Interact with the button that will briefly open the bunker’s door.
During the brief moment, shoot the barrel to blow everything inside. The impact of the explosion will open up the passage. From there everything is simple, just advance forward until you reach the final room where the door will be locked that requires a key. To gain access to the Officer’s Room, you will need the key placed inside the cage. Break the lock and collect the key to use it on the door.
Inside Officer’s Room, there is nothing but a TV placed on a table playing some channel. Under the table, there is a switch that will open up the secret passage where the Tier 3 Sniper Rifle “Sobek Special” is hidden.
For more informative guides on Far Cry 6, click on the link that has been mentioned below the description:
- How To Play Co-Op And Invite Friends
- How To Unlock All Amigo Location
- GDP Oil Platform How To Obtain The Weapon Chest
- All Criptograma Chests And Charts Location To Unlock Special Gears
- Fort Quito Armory Key And Hidden Chest With Signature Weapon “The Autocrat” Pistol Location
- Secret Ending Or Alternate Ending
- The Mongoose And The Man Treasure Hunt Walkthrough
- Ida’s Triada Relic Treasure Hunt Walkthrough
- A Rising Tide Treasure Hunt Walkthrough All Boat Or Name In Sequence
- Best Weapons That You Need To Get
- Car Vehicle Pickup Point Location To Add Car In Your Collection
- Gunpowder Location And How To Find Them
- How To Unlock All Leaders And Recruit
- Aguda Cliffs Checkpoint Key Location To Unlock The Door
- How To Destroy Anti-Aircraft Guns With No Weapons
- Paradise Lost Mission Walkthrough
Leave a Reply Cancel reply
Your email address will not be published. Required fields are marked *
Long read: How TikTok's most intriguing geolocator makes a story out of a game
Where in the world is Josemonkey?
Far Cry 6 The Last One to Leave: How to restore the power and solve The Last One to Leave quest
Goodbye, so long, sayonara.
Far Cry 6's The Last One to Leave is one of the treasure hunts in the game.
This tasks you interact with three switches for the traffic light to open the door. Each one of these are found in an specific spot, and require to follow a certain order of actions beforehand, either by interacting with a short puzzle or looking for a valve to clear the way.
This page explains how to restore the power to unlock the substation in Far Cry 6 and complete The Last One to Leave promptly.
On this page:
Far Cry 6 The Last One to Leave location
How to complete the last one to leave and restore the power explained.

Treasure hunts in Far Cry 6 are optional activities that often involve solving environmental puzzles and putting your grapple to good use with some acrobatics inside caves or military bases. At the end of each you will receive unique rewards, from unique weapons to weapon charms.
Here's where you can start The Last One to Leave treasure hunt:
- The Last One to Leave location: Found in Casas del Lodo Residences, which is south of Roya Jay in Esperanza.

Now, let's jump to the steps to complete the quest.
Looking for more help? If you're just starting, we have pages on male or female Dani Rojas , completing Fuel the Revolution , how to destroy anti-aircraft guns , and where to go first on the map . Elsewhere, we explain where to find Triada Relic locations , Parting Gifts , The Long Drop , Cache Money , Rising Tide , High Supply , And the Beat Goes On , The Last One to Leave , Liquid Courage , The Missing Muse , The Emerald Skull , The Truest Yaran , Chorizo's location , the best Far Cry 6 weapons , and the GDP Oil Platform , Finally, we explain Far Cry 6's secret ending .
You can start The Last One to Leave by grabbing a note in Casa del Lodo Residences, right outside the locked room. The quest is simple: you have to activate three switches (seen by the cables that originate from the traffic light in the roof of the locked shed).

Using the map as reference, we'll be starting by the one that points south. This looks like a regular house, but the switch is hidden somewhere. For this, you'll have to activate three objects in a certain order.

First, interact with the radio standing on a desk next to the window, right on the opposite side of the backdoor.

Then, turn the TV on in the living room.

Lastly, turn the picture that is found right before the corner of the right side of the living room.

The furniture next to the picture will move to the right and allow you to enter the hidden room, where the first switch awaits. Activate it and let's get going.

Now, we're moving to the location that points to the west. Upon your arrival, you will notice a red smoke. To deactivate this, interact with the valve in the yellow tank on the opposite end. You can then enter the house through the front door. When you stumble upon the blocked path, all you have to do is crouch to emerge on the other end of the house. The switch is in that back room, next to a window.

At last, let's head to the remaining switch, which is located north. For this one, you have to climb to the the rooftop of the garage next to it. Then, once on the roof, make a quick sprint towards the blue piece of cloth and grab yourself from the ledge. That's the last switch.

Once done, return to the first shed where you picked up the note, go through the door and open the chest (even if the door's lock appears red, you can head inside without issues).

Your rewards are the Desert Eagle and the Techmaster Pants. That's all for the treasure hunt!
Read this next
- Unannounced Far Cry spin-off game featuring laser deathmatches rated by PEGI
- Far Cry 6 heads up December's first wave of Xbox Games Pass titles
- Far Cry 6's online services will remain online, but don't expect any further updates
Today's Wordle hint and answer on Sunday 28th April for 1044
Today’s Connections hint and answer on Sunday 28th April for 322
Today’s Connections hint and answer on Saturday 27th April for 321
Today's Strands hints and answers for Saturday 27th April
Today's Wordle hint and answer on Saturday 27th April for 1043
Sisyphus Simulator codes
Haze Piece codes
Honkai Star Rail Topaz materials, kit, and Eidolons
GameSpot may receive revenue from affiliate and advertising partnerships for sharing this content and from purchases through links.
Far Cry 6: Treasure Hunt Locations And How To Solve Them
Far Cry 6 has plenty of treasure hunts to take part in, and if you're feeling stumped, here's how to solve them.
By Darryn Bonthuys on October 6, 2021 at 10:12AM PDT
Treasure hunts have long been a fun diversion in Far Cry, offering a change of pace from the action-packed missions of the core game. Essentially small puzzle sandboxes, treasure hunts require you to use all your available skills, powers of observation, and some cerebral heavy-lifting to solve the clues and earn some great gear.
Far Cry 6 has plenty of these treasure hunts to take part in, which can be discovered by stumbling into them while exploring the map, engaging with NPCs, or looking at the various maps below so that you know exactly where to go. Convenient .
The Legend Of La Princesa
The mongoose and the man, ida's triada relic, crocodile tears, high supply, cache money, liquid courage, the missing muse, and the beat goes on, oku's triada relic, the truest yaran, sword-crossed lovers, the long drop, the emerald skull, parting gifts, the last one to leave, passing the torch, a little birdie told me, a rising tide.

- Location: Costa Del Mar, the Blue Hole cave
- Rewards: 150 XP, 1000 Yaran Pesos, Permit meat, Tarpon meat, Bait charm
One of the early treasure hunts that you'll come across is the legend of La Princessa. To start it, head down to the Blue Hole Cave in Costa Del Mar. From the cliffs, dive into the waters by the objective marker and watch out for the jellyfish:

You'll need to move with purpose here, as Dani can only hold their breath for so long, and it's a long swim underwater. Once you're inside the cave, start making your way through it. To reach certain vantage points for your grapple, you'll need to swim through underwater pocket sections in the cave, usually inhabited by jellyfish. Avoid them, keep climbing up, and you'll earn the rewards listed above.

- Location: Costa Del Mar, Aguda Cliffs, Siniestra
- Reward: Lethal Dose sidearm
Over in the village of Siniestra, one resident has been tormented recently by a mongoose that appears to have some sort of vendetta against him. Having caught the relentless beast, the villager has taken off for the night and left behind some loot that's worth grabbing. Go to his home, which is the elevated house in Siniestra, and shoot the lock off his gate:

Open the shed with the red door using the key placed on the steps and prepare for bloodthirsty malice on four legs:

Chase down the dread menace known as La Comadreja, and once you've eliminated it you can grab the key to the house's stash. Go inside to grab some supplies, cash, and the handy Lethal Dose sidearm.

- Location: Lozania, Monjas Valley
- Rewards: Ida's Sigil
It's time to test your climbing skills in this treasure hunt. A fairly straightforward mission, all you'll need to do is follow the markers as you ascend the mountain and use ziplines inside of the cave.

Once you've cleared this challenge, you'll get your hands on the first Triada relic, experience points, and the Ida's Sigil gear.

- Location: Aguas Lindas, Cobre Shores
- Rewards: Surf 'n Turf rifle
One crocodile fanatic's bond with his reptilian friends isn't as deep as he believes it to be, and after falling victim to the scaly love of his life, his best gear is up for grabs. Luis's farm needs to be cleared of all the crocs for you to safely proceed, with his star attraction Beatriz having a tough hide and the key to his stash:

Once she has been dealt with, get out of the zoo by breaking locks, and circle back to the windmill:

From here you can grapple over the ledge to Luis's home, where you'll earn the Surf 'n Turf rifle for all your effort.

- Location: Lozania, Palma Forest
- Rewards: M16 A1 Rifle, experience points, gunpowder, supremo-bond materials
Another climbing mission, you'll be going up, up, and almost over the mountain here. Using your grapple hook, keep working your way to the summit. Eventually, you'll travel through a cave and on the other end, a dead end.

Not exactly! Fire a few rounds into the net holding all those rocks in place, don't think about the landslide you just created, and move on up to the supply drop to claim a new rifle and some materials to help upgrade it.

- Location: Aguas Lindas, Oasis Plains
- Rewards: Sobek Special sniper rifle
There's an FND Storage Hub with some supplies that are worth pilfering. You'll need to gain access to Bunker 2, which appears to be sealed up in an effort to deter any rebels from breaking in. That's not exactly too much of a barrier though, and to bust in you'll want to head to the top of this building:

Once you're on the roof, activate this switch:

For the next part, you'll need to show off your marksmanship skills quickly, as the bunker door will be briefly open. Fire a few rounds into the gap to cause an explosion:

Take the zipline down, enter the bunker through the hatch on top and then open another hatch. Once inside, you can break the lock on the contraband lock-up, grab the keycard and open the door to the officer's quarter:

Press the red button behind the desk:

And there you go, free loot!
- Location: Noventarmas, Del Toro Port
- Rewards: Into Orbit rocket launcher
With Maria Marquessa having taken over a local distillery, the owner of the warehouse has locked himself in his office and drunk himself to death. To find a way in, you're going to need to do some remodeling by opening several valves and increasing the production pressure to an explosively dangerous level. The first valve can be found in the corner to the left of the main rocket vat:

Another valve can be found under the stairs:

A third valve can be found under the ceiling. Climb the stairs, jump onto the pipes and follow them until you can leap across to the other side:

With pressure sufficiently built up, turn the valve on the rocket vat and prepare for the mother of all drinking binges. In Dani's inebriated state, they'll need to look through the busted ceiling and throw their grapple hook into a vantage point:

Climb on up, move through the air ducts, and you can claim one of the best rocket launchers in the game--as well as a nasty hangover.

- Location: Cruz Del Salvador, Cape Santa Maria
- Rewards: Dark Tech head mask, Life Preserver charm
Ambrosio pines for his muse Rosa, and it's up to you to follow his clues to find his beloved boat. Your first lead can be found on the bar balcony, on the table to the right of the prop steering wheel:

Grab the key over here:

And then investigate the lookout point on the dock for another clue:

Take the zipline down to the nearby cliffs, climb them, and you'll discover one final clue:

From here, dive into the water and search beneath the beacon to find the remains of Rosa, as well as some new gear for the revolution.

- Location: Cruz Del Salvador, Arroz Flatlands
- Rewards: USB stick, 1911 sidearm
After an underground club has been flooded, it's up to Dani to claim any useful supplies left behind. Bust through the barricaded door and make your way inside the cave. You'll need to restore some of the power, which can be done by using the grapple point located on the disco ball to climb up:

Swing on over and flip this switch:

Now begins the tricky part. With the power back on, you'll need to climb up to the DJ booth. It appears to be simple, but the catch here is that you must only climb when the power flickers off. When it briefly comes back on, stop what you're doing or you'll fall down and have to start all over. What makes this especially challenging is that you'll need to swing through some sections, so make certain that you get the timing just right.
Once cleared, you can grab a USB stick for your collection, the 1911 sidearm, and some experience points.

- Rewards: Oku's Deliverance leg gear, Doubloon charm
This spooky mission can only be done at night, so make certain that the stars are out when you pay a visit to Fort Oro. Once you're inside, go to the dining room on your left, and try not to be scared by all the mirrors that break spontaneously. You'll notice that one mirror to the right of the entrance hasn't shattered, so finish the job and you'll find a hidden switch:

Press it, and the next room will open. Inside are several televisions and three switches:

Press the middle one first, then the left one, and then finally the right switch. Now head upstairs and pick up the dungeon key on the fireplace mantle after the cupboard automatically moves:

Unlock the dungeon door in the entrance room, go downstairs, and break open the boarded-up door on the right side of the jail. Hit the switch on the pillar past the gunmen replicas:

With the well now open, take the door behind the switch, follow the path, and grapple out of the dungeon. Take the zipline down to the well, descend down it, and follow the markers inside to the treasure chest.
Now that the creepy adventure is over, you'll have new Oku-themed leg gear in your collection and the Doubloon charm to add to your weapons.

- Location: Noventarmas, Cielo Gardens
- Rewards: True Loyalist shotgun
The power station has gone dark, and one of Castillo's fanatics appears to be the cause of the recent outage. At the Gran Finca power station, you'll need to clear some blockages in the pipes before the lights come back on. Go to the grate on the floor, and fire a round into this blocked pipe:

Head down, and on the east side, it's time for a swim. Jump into the water, and look for this pipe:

Give it a bash, and once the water has cleared, head down to the turbine. One more blocked pipe awaits you:

Clear it, and make your way back up to the control room. With power restored, the zealot's shrine to Castillo will open, and inside you can pick up the True Loyalist shotgun as a reward.

- Location: Barrial, Muerte Point
- Rewards: La Petite Mort grenade launcher
It's time for a pirate adventure next, as Dani heads to the coast and enters a cave that definitely does look like a skull:

This is one of the easier treasure hunts, as all you have to do is follow the path, climbing and rappelling along until you reach the partially-submerged shipwreck. Descend down to it, and light the fuse on the cannon:

Once the cannon has cleared all the debris obstructing your path, head back up the path and into the now open gift shop, to grab some booty. And by booty, we mean a portable cannon that works as a grenade launcher.

- Location: La Joya, Catalina Ridge
- Rewards: Excavation Execution shotgun
There's a bridge worker in peril, but by the time that Dani gets to them, it's too late to save the unlucky employee of Castillo's regime from a watery grave. What you can do though is close the sluice gates, grab the storage shed key, and help yourself to some loot. The control room shed may seem locked:

But if you peek through this window, you can spot a lock that you can open with a bullet:

To close the sluice gates, you'll need to operate the machinery in a precise order. First, activate the sluice control by the calendar:

Press the button on the side of the hydraulic monitoring machines:

Turn the pressure valve:

And then go back to the main console to hit this button:

Go back to the broken part of the bridge, rappel down and take the key:

Now go open the storage shed, and grab the Excavation Execution shotgun for yourself.

- Location: Conuco, Concepcion
- Rewards: 1,200 Pesos, Ida's War Dance charm
If you've been eager for an Indiana Jones-inspired Yaran adventure, then you've come to the right place. The Emerald Skull treasure hunt kicks off with a trip to the town of Concepcion, and then moves to a cave that will be marked on your map:

It's a small cave with a few jumps, until you reach a dead soldier clutching a mysterious skull:

Take the skull, and watch out for the booby trap as a live grenade will roll out from the deceased soldier. Dodge it, and then head to the next cave marked on your map. After dealing with a crocodile, place the skull inside of the nearby idol to open a secret entrance:

There are three angry crocodiles in here, so be wary. Next, climb the stairs and swing over to the idol on the left side of the cave. Place the skull in there:

Now go place the skull in the idol on the right side:

A passage to a secret room will open up at the top of the stairs, but you'll need to be quick as it's full of poison gas:

Dash through, make your way to the top, and clear some obstacles. Swing over to the main idol, and your expedition will earn you a hefty sum of Yaran pesos and a new charm.

- Location: Conuco, Sombreado Gorge
Over at the Coco farm, one rebel is keeping Castillo's forces out of his armory by setting everything on fire. To gain entrance to that room, you're going to need to douse the flames. First, go to this part of the search zone:

Next, unplug this connection:

And then this one:

Now for the fun part. Grab the nearby truck, and hitch it up to the disconnected generator:

Drive the generator to the station over here and hook it up:

Now go turn on the water pump:

With the flames out, you can peek through the window of the bunker and spot a lock on the hatch that you can blast off:

Now that the lock is out of the way, enter from the top and grab the keycard. You can now open the bunker properly and score some materials and the MGL-6 grenade launcher.

- Location: Esperanza, West Lado
- Rewards: Desert Eagle sidearm, 1,000 Pesos, and Techmaster pants
A family hoping to escape Yara sadly never made it, and it's time to investigate what they left behind. Over in Esperanza, hop onto this power station roof and survey the area:

You'll need to flip three switches in this treasure hunt, with the first one being in this building:

To activate the secret switch, first turn the radio on, then turn the TV on, and then finally examine this framed photograph:

Next, follow the yellow pipeline from this blue house:

And turn the poison gas off:

Head inside the now safe home, and the switch will be here:

Make your way to this sentry post with the water tank, and turn the switch on over there:

With all three switches flipped, head back to the power block and enter the now unlocked room to claim a Desert Eagle sidearm, 1,000 Pesos, and Techmaster pants.

- Location: Sierra Perdida, Promise Peaks
- Rewards: Supremo-bond materials, Fifteen Wishes wrist gear, Spas-12 shotgun
An abandoned rebel hideout is worth exploring, so head on over to Promise Peaks. Here the challenge is to flip three switches to power on the generator, which will open the vault. The first switch is inside this house:

Go onto the deck, jump onto the makeshift bridge, and walk around to enter the open window. The big orange switch is right there:

The second switch can be found in this yellow house:

Go past the water tanks, and you'll spot this board that you can smash to get inside the house and flip the switch:

The final switch is in this modest shack:

Simply break the flimsy door apart, go inside, and turn the power on. Easy. With all switches now activated, head back down the path and place the primary lever in the on position, and go claim your loot.

- Rewards: AR-C rifle, Trogon charm
Unlike the other treasure hunts in this guide, this particular mission is all about speed, precision, and keeping a pelican well-fed. Head to your camp in Promise Peaks, and on the west side you can find Danilo the pelican.

With a fresh supply of fish, Danilo will first fly off the lookout point and you'll need to follow him with your wingsuit. Just make certain that you don't get too far away or the hunt will be over.
Danilo will fly down to Roxas Farm and demand more treats, after which he'll take off again. To keep up with him, grab the nearby ATV and hit the road.

The next stop on Danilo's tour is Sotomayor Farm, and this time you'll need to jump off the cliff to keep up with him. Danilo will land just past Leyva Farm, and once you've fed him yet again, grab the jet ski and follow him to a nearby island.

With his stomach full, Danilo will hand over the treasure chest key, which you can use to open the box and grab the AR-C rifle and the Trogon charm.

- Location: Sierra Perdida, Robusta Hills
- Rewards: Camo Quinceanera rifle
The Legends of '67 left some gear behind just in case anything unfortunate ever happened, and it's time to collect. Over in Sierra Perdida's small village of Yarabi, there's a vault in an old house that has been locked.

The solution? Check out several boats that hide mathematical clues as to how to open the vault, which can only be accessed by pressing five buttons inside the lodge in a specific order. I couldn't actually figure out how those numbers work, but there is a cheat-sheet beneath the house that tells you the exact order:

Back inside, press the El Tigre button first:

Then Papa Chulo:

El Lucky next:

Then the Clarita switch:

And finally the Roja Victoria button:

With the vault open, head inside to claim the Camo Quinceanera rifle and several supplies.
Got a news tip or want to contact us directly? Email [email protected]
- Leave Blank
Join the conversation
Use your keyboard!
Log in to comment
The Enlightened Mindset
Exploring the World of Knowledge and Understanding
Welcome to the world's first fully AI generated website!
How to Trip the Power in Far Cry 6: Exploring Cheats, Map, Missions, Resources, and Weapons

By Happy Sharer
Introduction
Far Cry 6 is an action-adventure shooter video game developed by Ubisoft Toronto and published by Ubisoft. Set in a fictional Caribbean island nation called Yara, the game follows the story of a guerilla fighter named Dani Rojas who is fighting against the tyrannical rule of President Anton Castillo. One of the main objectives in the game is to trip the power and take control of Yara. In this article, we will explore how to trip the power in Far Cry 6.
Using Cheats and Exploits
Cheats and exploits are tools that allow players to manipulate the game in order to gain an advantage. These tools can be used to trip the power in Far Cry 6 by unlocking new abilities or bypassing certain sections of the game. For example, one cheat can be used to instantly fill up the player’s health bar, while another can be used to unlock all weapons and upgrades.
Exploring the Map
Exploring the map is one of the best ways to trip the power in Far Cry 6. The map contains various locations where you can find resources, complete missions, and even fight enemies. Exploring the map can also help you uncover secrets and shortcuts that can give you an edge over your opponents.
Completing Missions
Completing missions is another great way to trip the power in Far Cry 6. There are a variety of missions available, ranging from simple side quests to more complex main story missions. Completing missions can reward you with resources, experience points, and other items that can help you in your quest for power.
Collecting Resources
Collecting resources is an important part of tripping the power in Far Cry 6. Resources can be found scattered across the map in various forms, such as loot, crafting materials, and money. Collecting resources can provide you with the necessary items to craft powerful weapons, upgrade your gear, and purchase items from vendors.
Utilizing Weapons
Using weapons is essential for tripping the power in Far Cry 6. There is a wide variety of weapons available, ranging from handguns to heavy machine guns. Utilizing different types of weapons can help you gain an advantage in battle, as well as make it easier to complete missions and defeat enemies.
Tripping the power in Far Cry 6 can be achieved by using cheats and exploits, exploring the map, completing missions, collecting resources, and utilizing weapons. All of these activities can help you on your journey to become the ultimate ruler of Yara. With the right strategy, you can take control of Yara and achieve ultimate power.
(Note: Is this article not meeting your expectations? Do you have knowledge or insights to share? Unlock new opportunities and expand your reach by joining our authors team. Click Registration to join us and share your expertise with our readers.)
Hi, I'm Happy Sharer and I love sharing interesting and useful knowledge with others. I have a passion for learning and enjoy explaining complex concepts in a simple way.
Related Post
Exploring japan: a comprehensive guide for your memorable journey, your ultimate guide to packing for a perfect trip to hawaii, the ultimate packing checklist: essentials for a week-long work trip, leave a reply cancel reply.
Your email address will not be published. Required fields are marked *
Expert Guide: Removing Gel Nail Polish at Home Safely
Trading crypto in bull and bear markets: a comprehensive examination of the differences, making croatia travel arrangements, make their day extra special: celebrate with a customized cake.

Far Cry 6 Walkthrough & Guides Wiki
- All Missions
- Treasure Hunts
- Beginner's Guide
- Best Weapons
Tips and Tricks
Outpost Guide: How to Liberate Outposts
First Far Cry game? Start here! ★ Beginner's Guide: Tips and Tricks
Get started with our story and collectible guides! ・ Story Walkthrough and All Quests ・ Yara Map and All Collectibles ・ Best Weapons in the Game ・ Best Armor Sets and Builds ・ All Post-Game Content and How to Get 100%

List of Contents
- How to Liberate Outposts
What are Outposts?
Rewards for liberating outposts, far cry 6 related guides, locate the cameras and alarms.

Defeat all soldiers

Bring in the Arsenal
When taking over outposts, make sure that you have plenty of ammo reserves as there tend to be a higher number of enemies in the area. LMGs, SMGs, and rifles tend to do the trick. But, if needed, bring in weapons that can eliminate vehicles as some outposts do have tanks.
Outposts are crucial areas of business that fuel Anton Castillo's reign over Yara. It can range from research bases, media outlets, or mining sites. Taking over them is crucial as it hampers Anton's control over Yara.
All Outposts (FND Bases) Locations
New Fast Travel Point

Resources and New Shops

Other bigger outposts will not only have vehicle pickup points, some of them will even have shops where you can trade in your tradable goods and Yaran peso.
New Crate and Mission Locations

Liberty Trophy
Completely liberating all FND Bases (outposts) will grant you the Liberty Trophy.

List of Tips and Tricks
Tips and Tricks Guides
We at Game8 thank you for your support.
In order for us to make the best articles possible, share your corrections, opinions, and thoughts about 「Outpost Guide: How to Liberate Outposts | Far Cry 6」 with us!
When reporting a problem, please be as specific as possible in providing details such as what conditions the problem occurred under and what kind of effects it had.
Do you want to send this information?
Walkthrough Menu
- Far Cry 6 Wiki Top
- Story Walkthrough
Yaran Stories
- Crossover Missions
- La Noche De La Muerte
Isla Santuario
- The Lucky One
- Juan of a Kind
- Fire and Fury
- Fuel the Revolution
- Libertad Rises
- The Guerrilla
The Monteros
- Meet The Monteros
- Napoleon El Pequeño
- Clear the Air
- Packing Heat
- Bury the Hatchet
- Death Warrant
- Diesel Daisy
- Justicia Montero
Maximas Matanzas
- Meet Maximas Matanzas
- Balance the Books
- Precious Cargo
- Break the Chains
- Re-Education
- Radio Libertad
- Guerrilla Radio
- Bottle Episode
- Words Like Bullets
- Lost and Found
- Intervention
- Surgical Extraction
- Angel De La Muerte
- Meet The Legends
- Take Your Medicine
- Pics or it Didn't Happen
- The New Revolution
- Bullet Points
- National Treasure
- Knuckleball
- Room Service
- Our Right to Party
- The Lion's Roar
- Tourist Trap
- Weapon of Choice
- Surgical Strike
- The Deported
- Paradise Lost
- Against the Wall
- The Lion's Den
- The Battle of Esperanza
- Who's A Good Boy?
- Fetch Quest
- Spur of the Moment
- Backseat Driver
- Stealing Thunder
- Heavy Metal
- Triada Blessings
- Paint the Town
- Boom or Bust
- Wing and a Prayer
- Tanks for the Likes
- The First Love
- The Seeds of Love
- Stealing Home
- Shock Therapy
- Everything to Lose
- Nothing to Hide
- Undercover Stud
- Tricks of the Trade
- We're (Un)Jammin'
- Turn the Party
- Model Citizen
- Big Papi In Little Yara
Special Yaran Stories
- Dani & Danny Vs Everybody
- The Man and the Mongoose
- The Legend of La Princesa
- Ida's Triada Relic
- Crocodile Tears
- High Supply
- Cache Money
- The Missing Muse
- And The Beat Goes On...
- The Truest Yaran
- Sword-Crossed Lovers
- Liquid Courage
- Oku's Triada Relic
- A Rising Tide
- Mimo Abosi's Triada Relic
- The Long Drop
- Sweet Fifteen
- A Litte Birdie Told Me
- Passing the Torch
- Parting Gifts
- The Emerald Skull
- The Last One to Leave
Other Story Guides
- How to Get the Secret Ending
- How to Open the Locked Door in Fort Quito
- Can You Capture Fort Quito?
- How to Get the Aguda Cliffs Checkpoint Key
- How to Use the Mysterious Key
- GDP Oil Platform Container Puzzle
- Should You Kill or Spare McKay?
- List of Characters
- Anton Castillo
- Diego Castillo
- Clara Garcia
- Juan Cortez
- List of Amigos
Basic Gameplay Guides
- Beginner's Guide: Tips & Tricks
- Character Creation and Customization
- Trophy Guide: How to Get All Trophies
- Male or Female Protagonist? Differences and Which to Choose
- Difficulty Settings: Best Difficulty to Choose
- Bribe Guide: Bribe or Kill?
- Crafting Guide: How to Use the Resolver Workbench
- Best Camp Facilities to Build and Upgrade
- How to Get Pre-Order Bonuses: Libertad Pack
- All Ubisoft Connect Rewards and Challenges
- How to Save the Game: Is Quick Save Available?
- Vehicle Pickup Points: How to Get Vehicles
- How to Get Industrial Circuits
- Fishing Guide: How to Fish
- How to Get Industrial Composite
- Wingsuit Guide: How to Get and Use
- Can You Change Time of Day?
- How to Raise Rank Fast: EXP Farming
- Lola's Black Market Guide
- How to Destroy Anti-Aircraft Cannons
- Alpha Animal Locations
- 100% Clear: Post-Game Content Guide
- All Endings Explained and How to Get
- Dominoes Location and How to Play
- How to Farm Supremo-Bond
- Best Submachine Guns
- What to Sell and Trade in the Shop
- Cockfighting Guide: Best Roosters to Use
- How to Get into Anti-Aircraft Site Psi
- Best Amigos
- Where to Get Ammo
- Which Resort is Paolo in?
- How to Get the Angelito FW Turbo (Flying Car)
- Crypt Gate Key Guide
- Bandido Operations Guide
- How to Fast Travel
- How to Win Gran Premio Races
- How to Liberate Checkpoints
- How to Liberate Airspaces
- Stealth Guide
- How to Disarm Cameras
- How to Check Weaknesses
Item Farming Guides
- How to Farm Pesos
- How to Farm Moneda
- How to Get Depleted Uranium
Best Equipment Guides
- Best Sniper Rifles
- Best Rocket Launchers
- Best Pistols
- Best Rifles
- Best Supremos
- Best Gadget Mods
- Best Shotguns
- Best Armor (Best Gear)
- Best Armor Sets and Builds
Trophy Guides
- Jawson Brody
- Finders Keepers!
- Toxic Influence
- Slip Sliding Away
- Outdated Tech
- Termination Phase Guide
- Hidden Cash Guide
- Death From Above Guide
- Heated Conflict Guide
- Not So Tough
Maps and Locations
- Full Map of Yara
- All Collectibles
- All Rooster Locations
- All USB Stick Locations
- Criptograma Chests and Charts Locations
- How to Get All Bandido Leaders
- All Hidden History Locations
- All Military Targets
- All FND Bases Locations
- All Anti-Aircraft Locations
- All Military Checkpoint Locations
- All Ambush Locations
- All Supply Drop Locations
Animal Maps
- All Hunting Spots
- All Fishing Spots
- List of Weapons
- Unique Weapons
- Sniper Rifles
- Resolver Weapons
- Auto-Pistols
- List of Gear
- List of Supremos
- Exterminador
Camp Facilities
- List of Camp Facilities
- Hideout Network
- Guerrilla Garrison
- Fishing Hut
- Bandidos Barracks
- Hunter's Lodge
Items and Materials
- List of Items and Materials
- Resolver Materials
- Camp Resources
- Miscellaneous
- List of Animals and Wildlife
- List of Vehicles
- Cars and Trucks
- Helicopters
Become The Villain
- Become The Villain DLC
News and Game Info
- Latest News for Far Cry 6
- Updates and Patch Notes
- Multiplayer and Co-op Guide
- Release Date
- Preorder Guide
- List of Voice Actors
- All Trailers
- List of New Features
- Online Features
- All Game Editions and Bonuses
- Is Far Cry 6 a Sequel or Prequel?
- How to Preorder
- System Requirements
- Roadmap and Update Schedule
- List of DLCs
- Preload Guide
- Release Time and Launch Countdown
- Season Pass
- How to Fix Warm Up PSO Cache Error
- All Error Codes and How to Fix
- Third Person Mode: Gameplay, Driving, and Cutscenes
- Server Status: Is The Server Running?
- How to Enable HDR
- How to Download HD Texture Pack
- PS5 and Xbox Series X Upgrade Guide
- Best Settings
- How Many Players in Co-op?
- Secrets and Easter Eggs
- Game Length: How Long to Beat
- Does Far Cry 6 Have a Map Editor?
- Weekly Insurgencies: Release Date and Rewards
- Title Update 2
- Message Boards
- Discussion Board
- Questions Board
- Spoilers/Secrets Board
- Suggestions Board
- 1 1989 FND CPC-2700 Enforcer Locat...
- 2 All Ubisoft Connect Rewards and ...
- 3 1974 Reina Rocinante-M Estaño Lo...
- 4 Meet The Monteros Mission Walkt...
- 5 1952 Knox K8 KFI Location and Ho...
- We could not find the message board you were looking for.
Gaming News

Top 10 Upcoming Mobile Games

Stellar Blade Review

Tekken 8's Master+ Event at EVO Japan is THE Tourney to W...

Manor Lords Review (Early Access)
More Gaming News
Popular Games

Honkai: Star Rail Walkthrough & Guides Wiki

Genshin Impact Walkthrough & Guides Wiki

FF7 Rebirth Walkthrough & Guides Wiki

Pokemon Scarlet and Violet (SV) Walkthrough & Guides Wiki

Palworld Walkthrough & Guides Wiki

Dragon's Dogma 2 (DD2) Walkthrough & Guides Wiki

Persona 3 Reload Walkthrough & Guides Wiki

Monster Hunter Rise: Sunbreak Walkthrough & Guides Wiki

Pokemon UNITE Walkthrough & Guides Wiki

Fire Emblem Heroes (FEH) Walkthrough & Guides Wiki
Recommended Games

Elden Ring Walkthrough & Guides Wiki

Pokemon Legends: Arceus Walkthrough & Guides Wiki

FF7 Remake Walkthrough & Guides Wiki

New Pokemon Snap Walkthrough & Guides Wiki

Hyrule Warriors: Age of Calamity Walkthrough & Guides Wiki

Super Smash Bros. Ultimate Walkthrough & Guides Wiki

The Legend of Zelda: Breath of the Wild Walkthrough & Guides Wiki
All rights reserved
© 2020 Ubisoft Entertainment. All Rights Reserved. Far Cry, Ubisoft and the Ubisoft logo are registered or unregistered trademarks of Ubisoft Entertainment in the U.S. and/or other countries. The copyrights of videos of games used in our content and other intellectual property rights belong to the provider of the game. The contents we provide on this site were created personally by members of the Game8 editorial department. We refuse the right to reuse or repost content taken without our permission such as data or images to other sites.
- Popular Articles

Far Cry 6 Passing the Torch Treasure Hunt Walkthrough
October 4, 2021 by Archavia Leave a Comment
Passing the Torch is a Treasure Hunt in Far Cry 6. This walkthrough will guide you through all objectives of the Passing the Torch treasure hunt quest.
Region: El Este Sub-Region: Sierra Perdida Requirement: Locate the Treasure Hunt starting point in the open world and read the note at its location Reward: 150 Guerrilla XP, 1 Supremo-Bond (Resolver Material), Fifteen Wishes (Wrist Gear), SPAS-12 (Shotgun) Mission Info: These old guerrillas have left the new generation a gift… if I can get to it.
Objectives:
Reach the stash
Starting Location: Passing the Torch
Passing the Torch is a Treasure Hunt available in Felicidad, northeast of the Patriotas Peak camp in Sierra Perdida, El Este. It can be started by reading the note.

To access the building and treasure, you will need to flip three orange switches in the area to direct the power, then flip the final switch in the open hut. These can be located by following the powerlines with lightbulbs on them.
The first switch can be found in the yellow house up the stairs. You can get inside by going around to the right of the building and smashing a wooden panel blocking a hidden entrance.
The second switch can be found in the cyan house further up. To get inside you will need to go behind it and jump across the platforms to reach the window.
The third switch can be found in the small hut next to the purple house. Break the door down to access it.
Once all three have been turned on, return to the open hut at the bottom and flip the switch to open the building with the treasure.
This finishes Passing the Torch Treasure Hunt in Far Cry 6.
For all other Quests, check out the complete Far Cry 6 Walkthrough .
Leave a Reply Cancel reply
Your email address will not be published. Required fields are marked *
- Terms of Service
- Privacy Policy
- Cookie Policy
IMAGES
VIDEO
COMMENTS
From here, we'll be heading to Bunker 2. From where you just picked up the note, keep moving forward and turn around the corner to see the bunker on the other side with the number 2 on top. Upon ...
Hop over the fence, then climb up onto the first roof and use the ladder to head all the way up. Take out any officers up here, then make your way to the far right side. You'll find a metal table ...
Far Cry 6 PS5 - Cache Money | How to Trip the Power and How to Enter the Bunker | Walkthrough | Treasure HuntGameplay is Recorded from PS5 4K HDR 60FPS.Far...
Far Cry 6 - Cache Money Treasure Hunt WalkthroughFAR CRY 6 ALL TREASURE HUNTS:https://www.powerpyx.com/far-cry-6-all-treasure-hunt-locations-solutions/FAR CR...
This gameplay walkthrough of Far Cry 6 will show you the location & solution of the Treasure Hunt "CACHE MONEY". This guide will show you How to Enter Bunker...
Cache Money is a Treasure Hunt in Far Cry 6. This walkthrough will guide you through all objectives of the Cache Money treasure hunt quest. Region: Madrugada Sub-Region: Aguas Lindas Requirement: Locate the Treasure Hunt starting point in the open world and read the note at its location Reward: 150 XP, Sobek Special (Unique Sniper Rifle) Mission Info: I should uncover the […]
Cache Money triggers once you arrive at the Aguas Lindas FND base in Yara's Madrugada region. Search the loot crates in the base, and you'll find the document that starts the hunt. The ...
Far Cry 6 has several Treasure Hunts scattered across Yara that reward players with unique weapons and gear if they manage to solve a puzzle, but Cache Money is one of the trickiest puzzles in the game. This quest requires you to find the confiscated treasure somewhere in Bunker 2, but getting inside the bunker is easier said than done. Here ...
Published Oct 6, 2021. Far Cry 6 players can find out the steps required to unlock the sealed bunker door found in the Cache Money treasure hunt in this short guide. As Far Cry 6 players explore ...
Here's our Far Cry 6 guide to help you enter Bunker 2 for the Cache Money treasure hunt and Sobek Special sniper rifle.
Break the lock outside the storage room and go inside to collect the "Officer's Room Key" hanging inside, as shown below. Use the key to open the locked door. In this room, you will find another switch behind the desk as shown below. Pressing the switch opens a secret room. Go inside the secret room and open the chest to complete the ...
How to open Bunker 2 in the Far Cry 6 Cache Money mission. Head past the building and you should see a ladder that will take you up to the roof. There's one guard up there, and another below, at ...
To get the Cache Money Far Cry 6 treasure hunt and the confiscated treasure in Bunker 2, head to the east of Aguas Lindas and enter the military base through the gate in the southeast of the compound. To the right of the entrance, you'll find a guardhouse with a note pinned on it. That starts the treasure hunt.
SIMPLE, EASY TO FOLLOW GUIDE/SOLUTION! Stuck? I'll show you how to easily break into bunker #2, find the hidden hatch and button to enter the super-secret va...
Cache Money Treasure Hunt Walkthrough For Far Cry 6. Instead of standing near Bunker, climb on top of the headquarters roof where all the power cables would be present that you need to trip. Interact with the button that will briefly open the bunker's door. During the brief moment, shoot the barrel to blow everything inside.
How to complete The Last One to Leave and restore the power explained. You can start The Last One to Leave by grabbing a note in Casa del Lodo Residences, right outside the locked room.
The manager's office is on the left, and the power station's control room is up the stairs on the right. Go up the stairs to the control room, where you will find a main switch and a row of red ...
Fire a few rounds into the gap to cause an explosion: Take the zipline down, enter the bunker through the hatch on top and then open another hatch. Once inside, you can break the lock on the ...
Part of our Guide at: https://www.gosunoob.com/far-cry-6/cache-money-far-cry-6-bunker-2-confiscated-treasure/Far Cry 6 Cache Money Treasure Hunt Location & S...
In this article, we will explore how to trip the power in Far Cry 6. Using Cheats and Exploits. Cheats and exploits are tools that allow players to manipulate the game in order to gain an advantage. These tools can be used to trip the power in Far Cry 6 by unlocking new abilities or bypassing certain sections of the game. For example, one cheat ...
Bring in the Arsenal. When taking over outposts, make sure that you have plenty of ammo reserves as there tend to be a higher number of enemies in the area. LMGs, SMGs, and rifles tend to do the trick. But, if needed, bring in weapons that can eliminate vehicles as some outposts do have tanks. All Weapon Types.
October 4, 2021 by Archavia Leave a Comment. Passing the Torch is a Treasure Hunt in Far Cry 6. This walkthrough will guide you through all objectives of the Passing the Torch treasure hunt quest. Region: El Este. Sub-Region: Sierra Perdida. Requirement: Locate the Treasure Hunt starting point in the open world and read the note at its location.
Part of our Guide at: https://www.gosunoob.com/far-cry-6/truest-yaran-treasure-hunt/Far Cry 6 The Truest Yaran Treasure Hunt Walkthrough - How to Get Inside ...