Table of contents

Ultimate Backpacking Checklist & Gear Essentials
Some of the links on this page are affiliate links
We’ve spent decades honing our backpacking gear to (our) perfect balance of weight and creature comforts. After 20,000 miles and 1,000 nights on trail, we’re pretty dialed in to what we want and need for any adventure, and we love helping people find their perfect kit as well.
We’ve organized the Ultimate Backpacking Checklist into categories to make it easier for you to gather your backpacking gear for your next trip. We also have adownloadable checklist. Print it out and have a hard copy with you as you organize your gear.
Ultimate Backpacking Checklist
DOWNLOAD OUR PRINTABLE CHECKLIST
*We consider items in italics to be optional
- Tent poles or trekking poles
- Groundsheet for tent floor durability
BACKPACK & STORAGE
- Trash compactor bag or waterproof stuff sacks for interior rain protection
- Large Ziploc for garbage
- Shoulder strap camera pocket
- Summit pack
ENTERTAINMENT
- Book or Kindle
- Crossword puzzles
- Cribbage or dice
- Notebook + pen
NAVIGATION EQUIPMENT
Always be prepared and know how to use your map and compass, even if you plan to use a GPS or GPS app.
- Topo map(s)
- Waterproof map bag / Ziploc
- GPS or GPS phone app with maps downloaded for offline use
- Satellite Messenger/PLB for remote locations
- Download driving directions for offline use
- Photos of guidebook pages
- Check current weather before trip
- Call ranger station pre-trip for trail conditions + regulations
- 2 copies of itinerary: 1 left with friend + 1 under car seat
- Backpacking permits
- Band-aids of various sizes
- Antibiotic ointment
- Medical tape
- Latex gloves
- Safety pins
- Antihistamines
- Antidiarrheal
- Check out our Best First Aid Kits list for more suggestions
PERSONAL TOILETRIES
- Sunscreen + lip balm
- Bug repellant
- Toiletries (biodegradable shampoo, etc.)
- Prescription Rx
- OTC meds + vitamins
- Contact lenses + supplies/glasses
- Toilet paper/wipes + sealable bag to pack it out
- Digging trowel
- Menstrual products
- Hand sanitizer
- Toothbrush, paste + floss
- Earplugs + eye mask
- Nail clipper
- Pre-trip: Clip nails, cut hair, shave, etc.
- Provisions – commonly between 2,500-3,500 calories per day
- Extra day’s supply of food for emergencies
- Food bag / Ursack
- 50’ nylon cord + small carabiner for bear bag hanging or bear canister where required
OPTIONAL EQUIPMENT FOR SNOWY & ICY TRIPS
- Ice axe – learn + practice proper self-arrest technique
- Traction devices
SLEEP SYSTEM
- Sleeping bag / backpacking quilt
- Pad attachment straps (optional)
- Sleeping pad
- Pump sack (optional)
TOOLS & ACCESSORIES
- Trekking poles
- Lightweight hammock
- Backpacking chair / sit pad
- Light pocket knife or multitool
- Phone (turn on low power/airplane mode)
- Waterproof phone case
- Bear spray for grizzly country
- Camera + waterproof case/Ziploc
- Extra camera battery
- Headlamp (check batteries pre-trip)
- Extra batteries for long trips
- Power bank + charging cords
- Wall plug for thru-hikes
- Assorted Ziploc bags
- Cash, ID, credit card, insurance card
EMERGENCY KIT
- Duct / Tenacious Tape for repairs
- Sleeping pad patch kit
- Needle + thread
- Small Sharpie
- Stormproof matches + small fire starters
- Small backup lighter
- Backup water treatment pills ( Chlorine Dioxide )
- 2-4 water bottles (ability to carry 2-6 liters depending on climate) or a hydration pack & bladder
- Collapsible water containers for carrying lots of water in dry locations
- Water treatment
- Pre-filter for water treatment, ex: pantyhose
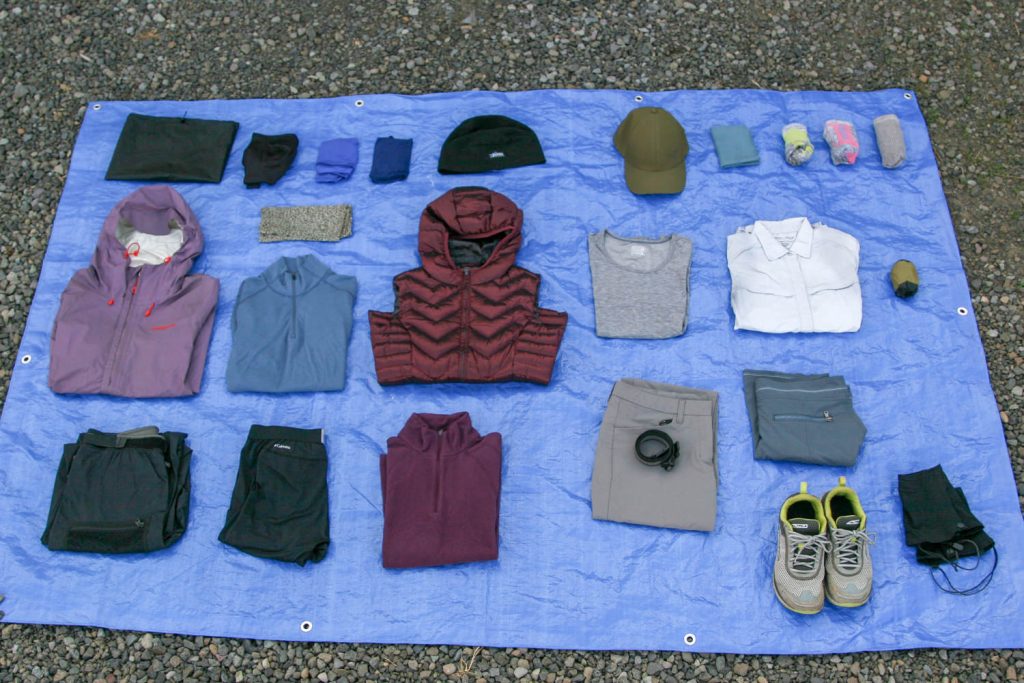
All clothing items should be lightweight, moisture-wicking and quick-drying (synthetic or wool, no cotton).
- Hiking pants ( Men’s / Women’s ) & shorts ( Men’s / Women’s )
- Wicking shirt/tank & long-sleeve sun shirt ( Men’s / Women’s )
- 1-2 pairs quick-dry underwear
- Down jacket and/or fleece jacket
- Rain jacket
- Rain pants for wet trips
- Windbreaker depending on forecast
- Base layers
- 2-4 Pair socks
PACK IN CAR
- Parking pass for car
- Clean clothes + shoes to change into
- Gallon of water for trailhead shower
- Camp towel to dry off
- Water + snacks
Backpacking Tips
LIGHTEN YOUR LOAD – Start by weeding out things you don’t need. Be careful with every choice you make, a few ounces here and there can add a lot of weight in the end. A lightweight backpacking checklist, like the one here, will help you to focus on essential items. Next, focus on lightening your heaviest gear: shelter, backpack, and sleeping bag. Switching your traditional big three out for lightweight options is the best opportunity for weight savings, especially when you’re starting out. If you invest in a lightweight shelter, backpack, and sleeping bag, you can easily cut 10 or more pounds and be well on your way to having an ultralight backpacking setup.
CLOTHING FOR BACKPACKING – The clothing you pack will change slightly depending on the conditions you expect to encounter on specific trips, but the fundamentals remain the same. Clothing made with quick-drying fabrics that wick moisture away from your skin are best to help your body thermoregulate and stay comfortable in both hot and cold environments. Nylon, polyester, wool, bamboo, silk, and synthetic blends are all good options. Avoid cotton – it absorbs moisture and takes a long time to dry, which can cause a variety of problems including blisters and chafing. Choose items that can be worn together in layers. Fleece and goose-down have the best warmth-to-weight ratio and make the best insulation materials for backpackers. Rain gear should be lightweight, breathable, and waterproof.
BACKPACKING FOOD – Good food is really important for any backpacking trip, so it’s well worth the effort to put together a simple meal plan before your trip. Keeping food weight down is a critical backpacking skill that usually takes experience to master. A good place to start is our Guide to Lightweight Backpacking Food . Most seasoned backpackers opt for lightweight, calorically-dense foods that are very easy to prepare. Packaged freeze-dried meals and snack foods can be great, but keep in mind, they tend to be very high in sodium/sugar, which can take their toll, if eaten in excess.
Another approach is to prepare your own backpacking meals , using a food dehydrator to dry meats, fruits, veggies, and sauces. Combining them with spices and quick-cooking or easily rehydrated dried goods such as pasta, couscous, instant potatoes, instant refried beans, and minute rice is a great way to customize your own highly-nutritious meals. This method takes more time and effort, and you must be more willing to carry more weight, but making your meals can be more cost-effective and healthier for long trips. Our approach is usually a mix of both methods. For more specifics about food, check out our Best Lightweight Backpacking Food guide , where we outline our general backpacking food strategy and suggest some of our favorite meals .
CleverHiker Backpacking Video Series
If you’re new to backpacking, or have been hiking with outdated equipment, we highly recommend watching our two professionally-filmed video series (below), where we’ll teach you everything you need to know to start backpacking -the skills and the gear.
- Essential Trail Skills – 20 HD tutorial videos to teach the most critical skills for backpackers of all levels, such as: Leave No Trace, Backpacking Trip Planning, How to Find and Fit the Right Backpack, How to Pack a Lightweight Backpack, and much more.
- Lightweight Backpacking Basics – One of the main reasons to minimize your pack weight is to maximum your freedom on the trail. Backpacking with a lighter pack will reduce stress on your body, give you more free time on the trail, and allow you to hike farther with less effort. In this 10-episode series, you’ll learn all about the gear that will allow you to hike lighter to make the hiking the most enjoyable part of your trip.
Why trust us?
We understand how tough it is to find trustworthy gear advice, and that’s one of the main reasons we built CleverHiker. We live for outdoor adventure, and we take these guides very seriously.
- Our recommendations are completely independent and based on hands-on experience.
- We test outdoor gear for a living – we’ve logged over 20,000 trail miles and 1,000 nights in the wilderness.
- Our team has thru-hiked some of the most iconic long trails, including the Continental Divide Trail, Pacific Crest Trail, Appalachian Trail, Colorado Trail, Long Trail, Oregon Coast Trail, Arizona Trail, Pinhoti Trail, Superior Hiking Trail, as well as extensive peak bagging, and international treks.
- We field test every product we recommend, which is sadly not the norm.
- We travel to industry trade shows to stay up-to-date on product innovations.
- We continuously update our guides throughout the year and when new products launch.
- We treat recommendations to our readers as if they were for our family and friends.
- We’re lifelong learners and we’re always open to feedback. If you think we’ve missed a worthy product or got something wrong, we’d love to know about it.
Need More Backpacking Advice?

How to Lace Hiking Boots & Shoes

How to Clean Hiking Shoes & Boots

La Sportiva Spire GTX Hiking Shoes Review

Zpacks Duplex Zip Tent Review
Durston X-Mid Pro 2 Tent Review
100 Best Gifts For Hikers, Backpackers & Campers 2024

7 Best Trekking Poles of 2024

10 Best Rain Jackets of 2024
ZPacks Arc Blast Backpack Review
Six Moon Designs Lunar Duo Tent Review
SOTO Windmaster Backpacking Stove Review
Strawberry Mountain Wilderness Loop Backpacking Guide
Get the best content from cleverhiker & around the backpacking world.
Social media is great, but our bi-weekly newsletter is a much better way to stay in the know.
Sign up to get our curated emails with the best content from CleverHiker and around the backpacking world. You’ll be turned on to new videos, trip reports, gear reviews, inspiring outdoor stories and much more. So get in the mix!
We’re on the road right now – join in on the fun and follow @thebrokebackpacker on IG!
- Meet the Team
- Work with Us
- Czech Republic
- Netherlands
- Switzerland
- Scandinavia
- Philippines
- South Korea
- New Zealand
- South Africa
- Budget Travel
- Work & Travel
- The Broke Backpacker Manifesto
- Travel Resources
- How to Travel on $10/day
Home » Gear » backpacking packing list
The ULTIMATE Backpacking Packing List: Everything You Need To Travel (2024)
Deciding what to take on a backpacking trip and what to leave behind can be quite the challenge. You have one bag and so much stuff you could bring. How do you decide exactly what are the backpacking essentials, and what is excessive?
One of the most common questions that we consistently get from folks about to hit the road is – what gear should I take backpacking? What are the essential items I need? Well, read on cos we will show you exactly what to pack while backpacking by giving you my top-secret lightweight backpacking checklist.
This is the definitive backpacking checklist. We’ve put together this epic guide filled the backpacking essentials – just the things you do need, and some bold claims about the things you don’t need to take backpacking.

Backpacking Checklist
Choosing what to pack, what to bring backpacking – 10 essential backpacking items, best backpacking clothes checklist, backpacking necessities – technology checklist, backpacking packing list – adventure checklist, backpacking supply list – hiking gear checklist, backpacking packing list – toiletries packing list, backpacking packing list – medical checklist, backpacking packing list – documents checklist, faq about the best backpacking packing list, final thoughts on our definitive backpacking checklist.

Nomatic Travel Bag
- Capacity > 30L
- Price > $299

Nomatic Navigator Carry On
- Capacity > 37L
- Price > $400

GoPro Hero 11
- Resolution > 5k

Arc’teryx Beta AR Jacket
- Price > $600

Insurance From World Nomads
- Price > Click For a Quote
Our Top Tips and Packing Hacks…
Before we get into the details of this, let us start by sharing our absolute tip-top tip for travel packing – pack light.
Whether you are camping or hiking, travelling to Europe or Asia as a baller or on a budget, it doesn’t matter what sort of backpacking trip you’re planning. You need to travel as light as possible. This is why we’ll only be talking about the backpacking necessities .
Note that This is a purposely lightweight backpacking checklist to help you achieve this. We’ve only included things to take backpacking that you really need!

This is the most important backpacking packing tip I can give you. Travel light! And here are some of the reasons why packing light is so damn important;
- By travelling lighter you are saving yourself the strain and the stress of a weighted pack. Heavy bags suck, and more shit = more weight.
- Travelling lighter will enable you to have spare space, meaning you can fit more stuff in your bag if need be. See a nice souvenir for mum? Want to pick up some camping gear? If you pack light, you’ll have the space to add more gear to your pack…
You might be thinking, ‘But there are over 100 items recommended on your backpacking essentials checklist! I’ll need 4 backpacks to fit them all!’
This is true! We make a ton of backpacking travel gear recommendations in this guide, and it would be silly to try and bring all of them along with you on your backpacking trip.
We’ve done our best to break this backpacking checklist down into several sections so you can pick what to take backpacking based on the kind of trip you’re doing. Not everyone is going to need a sleeping bag and hiking boots, some will reserve more room for specialist camera gear and extra batteries. Others will rightly prioritise room for emergency toilet paper!
One thing that everyone should prioritize though is respecting mother nature and not leaving anything behind. The less you pack, the less you can leave behind. Packing eco-friendly products is an extra bonus of course 😉
So keep this in mind as you peruse this list – only pack the gear that best fits your travel style and itinerary. Doing so will turn this epic checklist into your perfectly tailored minimalist backpacking list.
Another great tip is to always pack appropriately for your destination and for the kind of trip you intend to have. For example, keep a firm eye on climate – if you are backpacking Europe in July then you won’t need too much in the way of warm clothes (except a jacket for the UK!). Likewise, if you’re just going to be hitting the beach or exploring cities then hiking shoes are probably not all that essential! And if you aren’t a Digital Nomad or aspiring entrepreneur, then you can probably take that laptop off your backpacking list.
By keeping note of the travel style and itinerary of your backpacking trip, you’ll be able to quickly and easily identify which gear on this backpacking checklist is right for you to bring along on your travels…
Looking for a backpacking clothes list, hold your horse a little because that comes later, first you need to check off these backpacker essentials.
Looking to find your tribe?
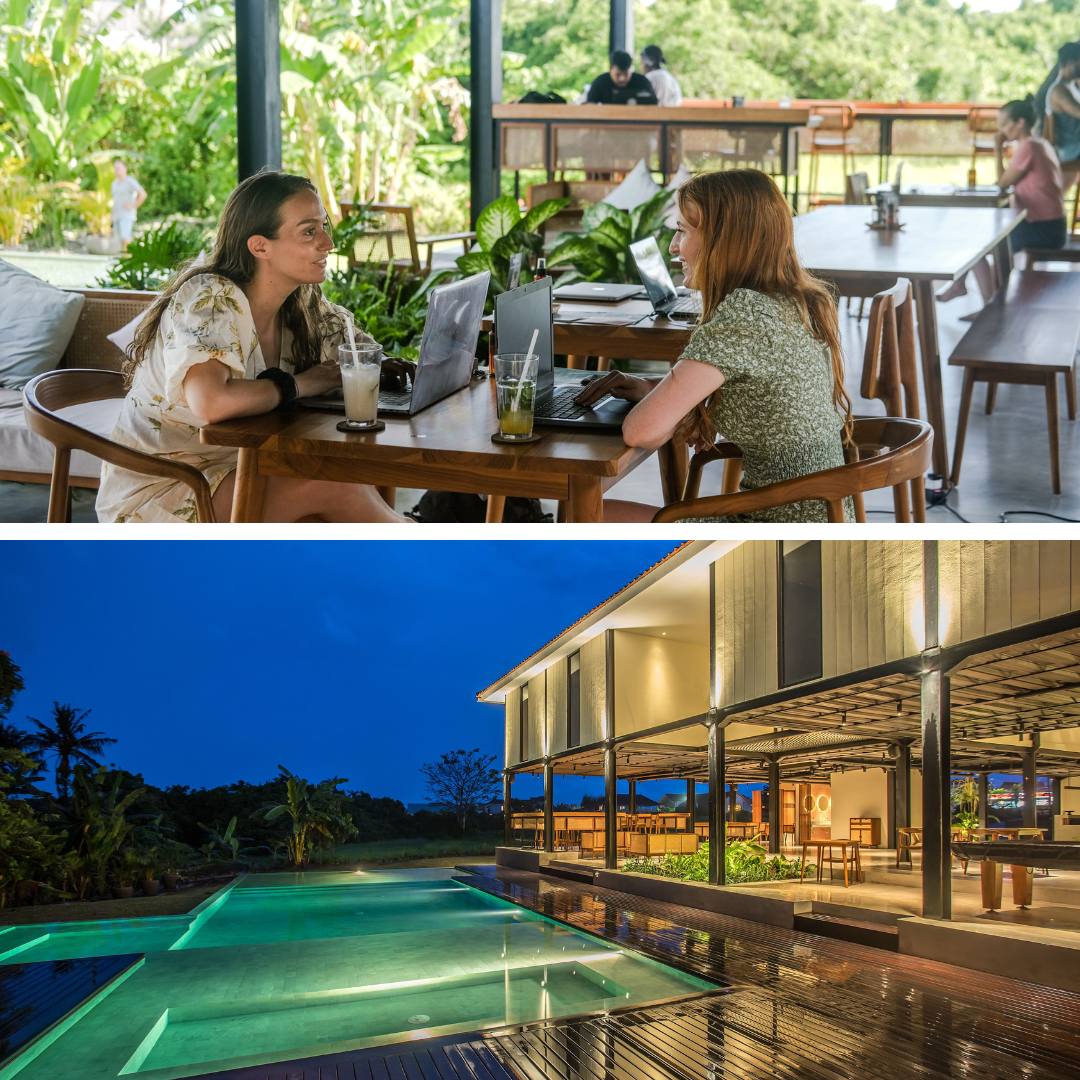
Introducing the best Coworking Hostel in the World – Tribal Bali !
A unique coworking and co-living hostel for those that want to travel the world while working from their laptops. Make use of the massive open-air coworking spaces and sip on delicious coffee. If you need a quick screen break, just take a refreshing dip in the infinity pool or grab a drink at the bar.
Need more work inspiration? Staying at a digital nomad-friendly hostel is a really smart way to get more done whilst still enjoying the social life of travelling… Mingle, share ideas, brainstorm, make connections and find your tribe at Tribal Bali!
Out of all the things you could bring on your backpacking adventure, these are my 10 highest recommendations. This is the backpacking gear that we have been using for over a decade as we travel around the world.
There’s a lot of gear out there that you don’t need but in my opinion, every traveller should have these ten backpacking essentials on their checklist…
#1 Travel Backpack! (Like the Osprey Aether Plus 70 Pack)

The most important item on this backpacking gear list is a good backpacking backpack! After all, you can’t be a backpacker without a backpack and picking the right backpack is key! I mean, it wouldn’t be a backpacking trip packing list without something to pack it all in!
I myself am a big fan of Osprey packs They are really bloody comfortable, well designed, ergonomic, hard wearing and they come with a lifetime warranty. Backpacks come in all kind of shapes and sizes but we suggest picking a backpack in the forty- to the sixty-litre (40l – 60l) range.
Lots of us here at TBB use the Osprey Aether backpack (read the full review here ) but there are lots of great options out there.
Picking the right travel backpack is very important; you are, after all, going to be pretty much living out of your pack.
You can’t compile your ultimate backpacking gear list without the right backpack! Remember to throw in some good packing cubes too so you can keep everything organised, they’re another must have for backpacking.

REI is one of America’s biggest and most-loved outdoor gear retailers.
Now, for just $30, get a lifetime membership that entitles you to 10% OFF on most items, access to their trade-in scheme and discount rentals .
#2 Daypack – (Like the Osprey Daylite Pack)

Most of us here at TBB travel with a big backpack which we use for keeping most of our stuff and traveling and then a smaller pack which we use for day trips and stuff.
We recommend looking at the Osprey Daylite ; it’s super comfy and of great quality. It’s versatile as hell so can be used for beach days, going shopping, day hikes, overnight camping trips or simply for carrying your backpack to the coffee shop.
Want a few more options? Have a look at our guide to the best travel backpacks to see which suits you best.
If you don’t like the look of the Exos then go and check out our detailed post on how to choose the best daypack for travel.
#3 A Proper Travel Towel (Gotta stay dry!)
Towels are essential backpacking gear as a lot of hostels don’t provide them or if they do, they may not really be all that clean. However don’t bring a ‘normal’ towel on your backpacking journeys, they are big and take up loads of room in your pack and they take ages to dry.
Travel pros like use micro-fibre dry towels series that roll up into tiny, space saving proportions AND they dry unbelievably quick. Granted, they are not quite as comforting as a cotton towel but its a trade of that travellers need to make. A good micro-fibre travel towers is essential travel gear on any ultimate backpacking gear list.
The Matador micro-fibre towel range are made by travellers for travellers. They are super light, and most importantly dry very quickly and are perfect for all types of backpacking trips.
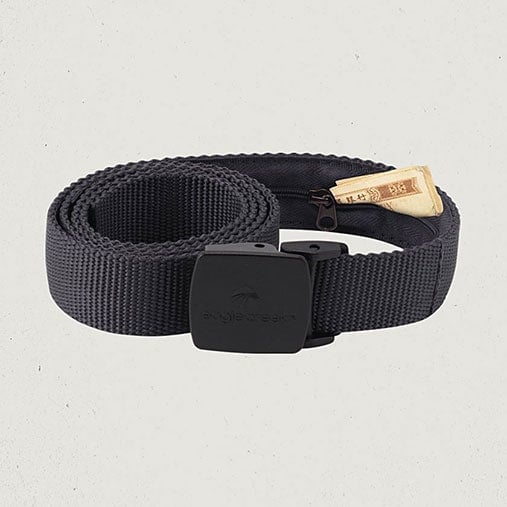
#4 Travel Security Belt (hide your cash!)
I take travel security very seriously, so I never travel without this incredible product.
To keep your money hidden on the road, I strongly recommend picking up one of these beauties – it has a hidden inner pocket in which you can hide up to twenty notes or some marijuana…
I never travel without a security belt and it’s helped me keep my money hidden and on my body whilst travelling through more dodgy countries but it’s useful for all types of backpacking trips. Travelling with a money belt is a small investment that helps keep your money safe.

#5 Combination Padlock (For your backpack and hostel lockers!)
Travel Padlocks are very important for a few reasons.
First, you can lock your bag up when you need to. Connect the lock between the two zippers and BOOM! Your bag is safe from any intruders. This will help keep you at ease when you have to be apart from your bag.
Padlocks are also VERY handy when staying in hostels. Most hostels provide some sort of lockers, but not all of them provide locks for those lockers (or even worse – they charge for them!). However, I don’t always trust hostel padlocks for security reasons and of course, little padlock keys are all too easy to lose.
Always pack a few good quality, combination padlocks. They slot easily into the little pockets and compartments of your backpack and are so very useful. Just remember to remember the combination…

#6 World Travel Adapter (a MUST have)
Travellers all hope for the same thing, that one day the world will unite, and all decide upon a universal size for power adapters…
Well until that happens, you’re going to need a travel adapter and they’re useful for all types of backpacking trips.
There are currently 15 different types of power adapter sizes in use around the world! The best way to ensure your beloved electronics get charged regardless of the country you are in is by using a universal adapter.
It’s worth splashing out a bit here and getting one that can charge a laptop and two USB devices at once.

#7 Wandrd Packing Cubes
In case you have never used them, packing cubes are little compression cubes that allow you to neatly pack clothes in in order to help facilitate better packing. They allow you to pack more stuff, and to keep it all better organised.
For the longest time, I thought that packing cubes were a superfluous indulgence, but boy was I wrong. Now I never travel without a few and they are the perfect way to organise yourself when you’re packing for a backpacking trip.
These ones from WANDRD are great quality and excellent value for money.
#8 A travel-friendly laptop!
We only really recommend bringing a laptop traveling for a few reasons. 1) You make money or need to work online, or 2) you really really love your laptop. Otherwise, backpacking is a great opportunity to unplug and get offline for a while.

For the Digital Nomads and laptop enthusiasts out there, you’ll want a high-quality piece of technology – and we’ve got just the thing for you.
One of the best investments we ever made was our MacBook Pros. It’s got a great UI, it’s very durable, and it helped us take The Broke Backpacker to the next level.
If you looking to start a blog, or make money online, it’s our highest recommendation. Check out this post for a full breakdown of travel-friendly laptops.
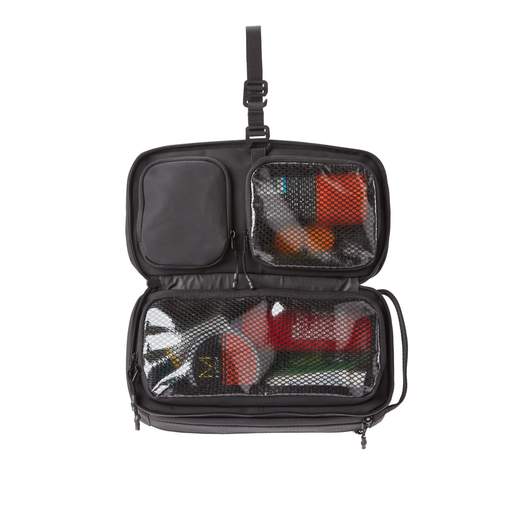
#9 Nomatic Toiletry Bag (Convenience in ways you never thought possible)
Hygiene, haircare and skin care all need to be maintained during a backpacking trip and so you will need to bring along some toiletries.
The best way to do this is to invest a dedicated toiletry bag.
This one by Nomatic is possibly the best toiletry bag on the market. It is made from water resistant, wipe cleanable material that guarantees longevity and it offers excellent organisational capabilities. It is also comes with a hang-up-hook so you can hang it over the shower head or your hostel bed.
We like to say that we’ve never really feel like I’ve moved into a place until we hang up our toiletry bags. Backpacking travel toiletry bags rock!

#10 GoPro Hero9 Black
Every traveller needs a camera, right?
The performance of action cameras has increased significantly, whilst the overall price has come down – making them more affordable. GoPro is the leading action cam brand for a reason: the image quality and stabilization technology of their cameras are unmatched. What’s great is that you get a decent piece of camera gear in such a small package.
Of course, not everybody needs a camera as many of us are quite content to use our smart phones. Still, investing in one of these means you can take some awesome videos and capture those special treasured travel memories.

#11 – eSim by Onesim
The good news about Planet Earth is that there is excellent 4g and 5g Internet coverage, taxi apps and food delivery apps in pretty much all cities and towns (but it does get patchy once you venture out into the wilds and wilderness). The bad news is that your native SIM card will probably not work once your leave your native country and so you will not be able to access any of this online goodness until you rectify that particular situation.
You can waste time hanging around phone shops queuing to get a plastic sim or you can is,ply install a eSim onto your phone before you leave home. You just access the OneSim site, choose the package for whatever country you wish to visit, download it and off you go – you are online the moment you land at the airport.
eSims are easier to set up and better than the environment than plastic sims. The downside is that not all phones are eSim ready.
#12 – GPS Luggage Tracker
You may know this, but right now airlines are losing record amounts of bags and suitcases some of which are never to be seen again. To help to find your bag in the event it does go missing, just pop a GPS luggage tracker inside it and you will be able to identify exactly where on earth it is.
A good, reliable GPS luggage tracker has emerged as an essential piece of travel packing.

Do You Want to Travel FOREVER??
Pop your email in below to get a FREE copy of ‘How to Travel the World on $10 a Day!’.
Whilst we were all born naked, and have some of our best times naked, clothes are nevertheless a part and parcel of life pretty much anywhere on earth. Whilst dressing for day-to-day life at home is presumably second nature to you by now, dressing for travel can be a bit more complicated.

As such picking the right clothes when backpacking is super important. Here are a few tips to get you all started when compiling your backpacking clothes checklist…
- Pack light clothes – Hot or cold weather, pack clothes that fold up small and don’t weigh too much – avoid denim jeans and pack hiking pants instead! Even if you are heading to freezing weather, it’s better to bring clothes that you can layer up with rather than bringing a big heavy jacket. Cotton is light and breathes. Splurge on the more sweat-resistant stuff if you can and always pack some rain gear!
- Dress dark – Unleash your inner goth and dress dark! Darker clothes hide annoying stains and can be worn for longer. This is extra important because you can expect your backpacking clothes to be on a quicker rotation than your normal wardrobe.
- Bring fewer clothes – Clothes can be found for pretty cheap in most parts of the world, so rather than overpack, bring slightly less than what you need and pick up anything else you might need on the road. This is especially true for places like India and Thailand where you can find amazing, local made clothes for amazing prices.
These are my top recommendations for the best clothes to wear while travelling/backpacking. This travel packing list will see you through heaps of different scenarios.
- Underwear (x5) : It can be surprisingly hard to find underwear that fits in Asia… Pack enough before you go backpacking!
- Thin hiking trousers (x1) : Craghoppers for both men and women make the best stuff and their NosiLife range is impregnated with mosquito repellent. I’ve been wearing Columbia hiking pants for years and swear by them – it’s tough, light, good value and keeps mosquitoes at bay.
- Long-sleeved mosquito repellent shirt : A long sleeve sun shirt is a backpacking necessity when travelling to certain areas, mosquito repellent shirts are a lifesaver when trekking or hanging out in tropical climates.

- T-shirts / Tank tops (x4) : Easy to find on the road, don’t stress too much about these.
- Base Layer (x1) : Crucial for keeping warm, I swear by my Helley Hansen . Many can also double as a long sleeve sun shirt.
- Lightweight technical fleece : Essential when you’re on buses or trains that have the AC turned to ‘freezing’.
- Evening wear (x1) While not quite backpacking necessities, it’s nice to have for a night on the town! Again, I tend to stick to Craghoppers; they have some smart shirts which are also tough and practical.

- Sunhat (x1) : If you’re heading to the scorched plains of Backpackistan, you need to keep your head covered. My Barmah bush-hat has accompanied me on many adventures.
- Buff (x1) : One of my favourite travel accessories on this backpacking checklist, I wear one on my wrist at all times; it’s great for keeping the sun off or covering your mouth and nose to keep dust out. I also use it as an eye mask on long haul transport and in dorm rooms.

- Indestructible sunglasses : I have probably destroyed over one hundred pairs of sunglasses… For a backpacking adventure, it’s worth investing in a decent pair of sunnies and I recommend Abaco; these are specifically built for travellers and are pretty much impossible to break.
- Warm Gear : If you’re heading into the mountains this is the most important section of the backpacking gear list. Do yourself a favour and pick up a pair of water-resistant gloves , a hat with ear-flaps , a down jacket, good quality rain gear and some lightweight hiking shoes.
I’ve been using my RAB Neutrino for years and it was a great investment. I never travel without my RAB, I know that if I have to sleep rough I can survive a night as long as I have my trusty down jacket. It weighs just 650grams, folds down super small and will keep you very warm indeed.

- Trekking trainers : Don’t go travelling around the world without decent shoes! I personally swear by North Face Hedgehogs and have been wearing them for nearly a decade. They are a good lighter option to hiking boots.
- Technical sandals : If you’re going to be spending a lot of time trekking in the jungle, hanging out on the beach or sailing then it’s worth bringing a pair of good quality technical sandals; Teva make the best hiking sandals in my opinion. Alternatively, you could pick up some lightweight hiking shoes.
- Flip Flops : Not all backpacking clothes has to be techy. You can make yourself comfy by packing a pair of these along. They’re essential on any backpacking clothing list!

Camera: If you want to take a camera and you’re new to photography I suggest getting something by Lumix , they offer great bang for your buck and is ideal for taking quality travel photos. Check out this incredibly detailed post for a breakdown of the best travel cameras, or best travel tripods if you’re really interested in travel photography.

Laptop : Since I make a living online, I travel with some top-notch tech. Buying a MacBook Pro was the single best investment I ever made. Whilst a laptop might not be on every backpacking trip list, if you’re blogger or photographer then you’ll be needing one.
Check out this incredibly detailed post for a breakdown of the best travel laptops for digital nomads and backpackers.

USB flash drive : Endlessly helpful.
USB card reader : Essential if you’re into your photography.
World Travel Adapter : This could easily top the list of backpacking essentials. It’s worth splashing out a bit here and getting one that can charge a laptop and two USB devices at once.

Smartphone : If you have a good smartphone, you might not need a camera – it totally depends on how much you care about your photos.
Portable battery : Extremely useful for keeping your phone and camera charged whilst adventuring. I travel with two as I’m often trekking and away from power.
If you’re a keen hiker or adventurer, you know that you’ll need to carry more gear… It’s great to pack light but if you’re spending a lot of time camping out or hiking through the mountains, it’s important to be prepared. This camping gear checklist has got you covered on everything you’ll need for your epic hikes and camping delights.

Head-torch : One of the most useful items on this backpacking checklist! Head torches are useful for caving, hiking and bathroom trips when the power’s gone out.
Check out my post on the best headlamps for travel.
Pocket Blanket: Lightweight, waterproof, super compact pocket blanket is a great addition to your backpacking checklist. Doubling up as an emergency poncho, a picnic blanket is worth its weight in gold when chilling, or camping, on the beach. This is a great item to have, even for someone looking for a minimalist backpacking list and if you want to roll around with your significant other, a picnic blanket is well worth packing.
Camping Hammock : Lighter and more portable than a tent. Plus, chicks dig hammocks… I always travel with a parachute hammock. Not an absolutely essential item, but one of my favourite items on this backpacking packing list.
Mosquito Net : Put a box-shaped net on your backpacking list if you’re headed to the Tropics.
Cable ties : Always worth packing a couple, especially if you’re off on a motorbiking adventure.

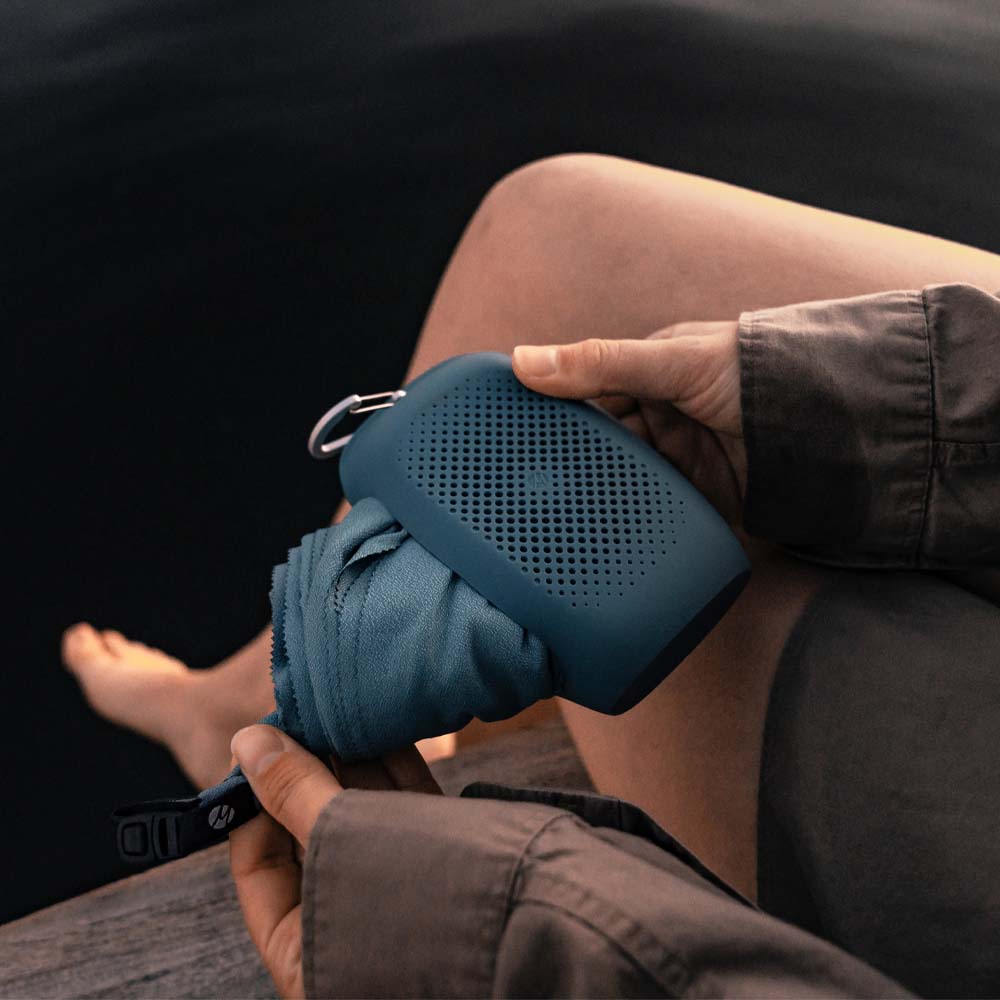
Carabiners : I always pack a couple of these. Simply clip them to your pack and use them when you need to attach stuff to the outside of your pack, fix things, hang up mosquito nets… They’re super useful on any backpacking trip checklist.
Sleeping bag liner : Useful when the sheets are not so clean or you want to sleep under a blanket but it’s damn hot. Check out all our favourite sleeping bag liners . If you’re serious about camping you might also want to look at some lightweight sleeping pads too.
Small sewing kit : Fix your own shit, you’ll save some money. In fact, whether you’re camping or not we reckon this should be on any backpacking packing list.
Pens and notebook : Don’t go travelling without them!
Travel workout equipment: You may want to throw a jump rope, a light yoga mat, and stretching strap to stay on top of your travel fitness game.

You may not need a lot of the gear below, but if you’re planning an epic expedition and will be away from civilization a lot it does make sense to invest in some of this must-have hiking gear. Some of us at TBB always travel with a tent as it has saved a ton of money on accommodation over the years. This is our hiking/camping gear checklist…
Multi-tool : We’ve been using our ultra-lightweight Leatherman Skeletool for years, it’s the perfect companion for any backpacking adventure. Check out our guide to the best multitools here for some more options.
Portable Stove : If you are hiking/camping, then this obviously needs to be on your backpacking equipment list. I have a pocket rocket which serves me well – check out my post on the top backpacking stoves to find out if you really need a stove for your travels.

Tent : If you’re camping, you’ll need a tent… Check out my detailed post on the best tents to take backpacking.
Hammock: Even if you’re not sleeping on the beach, a camping hammock always comes in handy when backpacking and most hammocks take up next to no room in your pack. Check out my article on the best camping hammocks for travelling!
Sleeping pad and sleeping bag : Klymit makes the best value sleeping pads. Check out my post on the best sleeping pads to take backpacking. If you are hiking and camping a lot, this is obviously a must when it comes to your backpacking equipment list – without a sleeping pad, you will get seriously cold. You can also pick up a top-quality travel pillow too if you want to get extra comfy – we suggest one from the good people at TRTL .

Water bottle : Every backpacker should hit the road with a water bottle – it’ll save you money and help reduce your plastic footprint on our amazing planet.
Grayl Geopress: The best option for purifying water. – Once upon a time I lost my original Grayl… and soon after contracted a parasite from some questionable water. Since replacing it with the Geopress, I’ve been able to stay parasite-free at multiple high-altitude campsites and other escapades. It’s revolutionized my travels, and by buying one, you’ll also be helping out the planet by not adding to the plastic problem.
Water purification tabs : A much cheaper option for purifying water.

In our wash bags, my backpacking essentials are…
- Microfiber trav e l towel -super lightweight and fast-drying
- Toothbrush and toothpaste
- Cotton buds
- Pack of tissues
- Decent sunscreen (often expensive to buy abroad)
- Razor with replacement blades
- Shaving gel
- Lau ndry bag
This travel toiletries list has all the essentials. Ladies – pack more as you may need.
It’s always worth packing a small first-aid kit. On our travels, we’ve been hospitalized multiple times between us, been in a couple of motorbike accidents and had more hangovers than you can count. They’re essential on any backpacking packing guide and our first aid kits saved my ass on more than one occasion…
I recommend picking up a pre-assembled first-aid kit and then pimping it out with all of the below.
- Personal medicines such as inhalers
- Paracetamol, ibuprofen, and aspirin
- Disinfectant spray
- Disinfectant wipes
- Mosquito repellent (at least 40% DEET)
- Antihistamines
- Bandages and gauze
- Plasters in various sizes
- Steri-strips
- Throat lozenges
- Ciprofloxacin (the best thing to take for traveller’s diarrhoea. Prescription only in the UK so please take medical advice before taking)
- Malaria pills if applicable
It helps to be organized before you hit the road; we travel with all of the below in a plastic wallet, it may sound nerdy but when you’re at a politically charged border crossing you will get across a lot faster if you are organized.
- Flight, train, and bus tickets
- Travel Security Belt: The best way to keep your money hidden.
- Address of your first hostel (even if it’s fake).
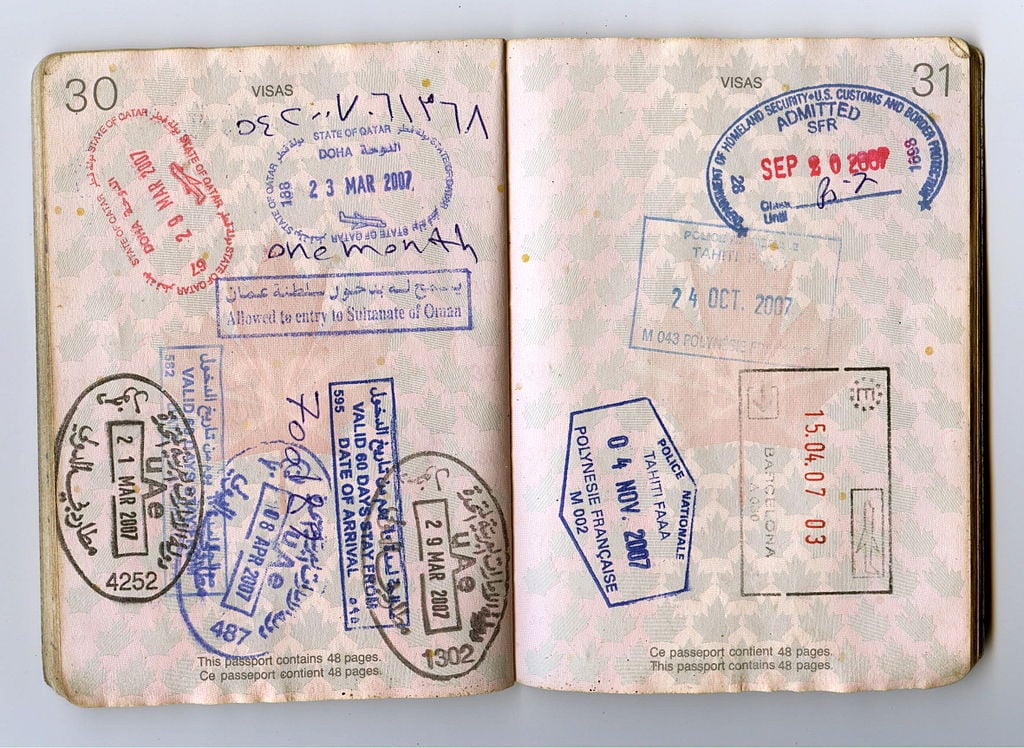
- Valid Passport
- A laminated copy of your passport
- Debit Cards x 2
- Credit Card
- Dollars or Euros
- Some, one-dollar bills for tips
- Driver’s license
- half a dozen passport photos for visas on arrival (you normally need two per visa).
- Insurance information, home contact details, and health information as part of a laminated card.
Backpacking Essentials – Travel Insurance!
Do you need Travel Insurance for your trip? Even if you’re only going for a few days, that’s more than enough time to get smote by wrathful angels. Have fun, but take it from us, overseas medical care and cancelled flights can be seriously expensive – insurance can, therefore, be a life-saver.
Travel mishaps can and do happen and it is well worth thinking about insurance before you leave home. This is a backpacker’s essential item that many either forget about or ignore and we don’t want you to regret that!
We use World Nomads which specialises in covering digital nomads and backpackers. Why not get a quote from them yourself?
Do be sure to read the terms and conditions to make sure that the policy covers your needs.
ALWAYS sort out your backpacker insurance before your trip. There’s plenty to choose from in that department, but a good place to start is Safety Wing .
They offer month-to-month payments, no lock-in contracts, and require absolutely no itineraries: that’s the exact kind of insurance long-term travellers and digital nomads need.

SafetyWing is cheap, easy, and admin-free: just sign up lickety-split so you can get back to it!
Click the button below to learn more about SafetyWing’s setup or read our insider review for the full tasty scoop.
Still, have some questions about our backpacking travel essentials guide? No problem! We’ve listed and answered the most commonly asked questions below. Here’s what people usually want to know:
What are the essential items for backpackers?
Every backpacker needs a good backpack ! After that pick up a good water bottle, some hiking boots and a compass.
What to pack for 3 months of backpacking?
Make sure you have a good travel backpack . Then bring a rain jacket, good shoes, 10 sets of underwear, and always remember a headtorch!
How much weight should you carry in a backpack?
Don’t pack more weight than you can carry and don’t put too much pressure on your backpack. As a general rule, don’t try to carry more than 20% of your own body weight.
What size backpack do I need for 3 months?
It depends on your travel style and what activities you hage planed. However typically we would suggest you bring a size between 50-65L.
We’ve been around the world a handful of times. My backpacking list comes with ten years of travel blood, sweat, and tears so have a proper read over this backpacking checklist and heed my advice, pack light but be sure to pack the things you need for your own travel style…
With the help of these packing lists, you’ll be able to figure out exactly what to pack for your trip so you can gallivant around the world knowing you’ve got everything you need for your adventure…
For more travel gear inspiration, check out my buddy Gianni’s ultralight packing list and for the ladies, this excellent travel packing list for women by Two Scots Abroad.
My friend Gemma has put together this detailed post on how to choose high-quality hiking pants for men.
Have we missed anything off our backpacker checklist? Are there any backpacking must-haves that you swear by that we’ve forgotten? Let us know below.

And for transparency’s sake, please know that some of the links in our content are affiliate links . That means that if you book your accommodation, buy your gear, or sort your insurance through our link, we earn a small commission (at no extra cost to you). That said, we only link to the gear we trust and never recommend services we don’t believe are up to scratch. Again, thank you!

Joe Middlehurst

Share or save this post

71 Comments
Hi all !!! I’ve been going through your website for days now as I am planning my FIRST 6-months solo backpacking trip in southeast Asia (a way to end my student years on a high note ?).
Being a big nature addict, I will be traveling off the beaten paths as much as I can… (ex : planning several five-day-ish hikes in the mountains) BUT I also plan on enjoying some touristy, beach, chill activities + working from my laptop!!!
Therefore, I’ve been wondering how much of all this camping gear I should take with me… For instance, it’s great to have a portable stove when you need one, but is it necessary to carry it around for six months ? Is it realistic to carry a tent+a laptop+all the backpacking necessities+all the camping gear ? In short, how would you recommend combining adventure, working nomad and tourist modes in my backpack ? + Where do you leave your unnecessary stuff (ex: laptop…) when you go camping in the mountains for a week ?
Thanks a lot for taking the time to answer me, and for your amazing website !!!
Generally you can pay to have your stuff stored either at hostels or guesthouses in most SEA countries. If you are really going off grid you will need to be self sufficient and have the items you need with you, including a way to cook.
Some things you will be able to get in SEA but quality camping gear can be harder to come by and expensive. It’s certainly feasible to carrying all the gear you need plus laptop etc and store other things while camping.
Really good post you have there. One thing I would like to add is this Cocoon Grid It Organiser my boyfriend got for his Christmas present. It keeps all your techy electrical things together in one place and they never fall out. We have the one which stores his MacBook air, his kindle, charging cables, adaptor plugs, spare batteries and pens. You can mix and match. You should have a look as you have quite a bit of gadgets there.
great tips for backpackers and checklist. Must give suggestions about hygiene during such adventurous trips.
Long time fan, first time caller. Thanks for this excellent packing guide, and for all the other useful content on the site. I’m off to India & South America so this resource has proved super useful!
My question was, do you have any “best practice” tips on how best to store your passport + other small valuables? I’m guessing keeping them on you is your best bet, but was specifically wondering if there was anything similar to the cash storage wallet that you’d recommend?
Many thanks in advance!
Hey Will! So personally, I always keep emergency cash and a photocopy of my passport rolled up and hidden in a zipper in my security belt – it’s basically a normal looking belt but on the inside there’s a zip and you can hide stuff in there – really helpful! For my passport, personally I hide it as deep in my backpack as possible, it isn’t practical to take it out on nights out or when exploring so it stays, hidden, with my main backpack.
The broke backpacker promoting links to a towel that costs 45-50 quid. You think you might have lost touch with your target audience from getting so much sponsorship you’ve forgotten what it’s like to be an actual broke backpacker?!
Hi Kayleigh,
I think you may have happened upon a listing on amazon.co.uk for one of our Active Roots towels. This is not being sold by us, nor does that company act as a reseller for us.We would not recommend buying from them. We only sell on amazon.com, the towel is around 19.99usd. Hope that helps clarify.
Hi, the link for the Backpacker Bible isn’t working! Is there another link I can try? I’d like to check it out and possibly purchase! Preparing for a huge RTW trip, and this site has been a literal lifesaver!
Hey, the link is now working! It looks like there was a temporary error, but NO FEARS!!! Now you get your free reading material for your adventure! 🙂
I just want to say thanks for this entire site. Everything about it is super useful and you’ve made it easy to read and navigate. I’m very grateful for you! Best wishes in your future travels xx
Thanks as always for visiting! Good luck on your next backpacking adventure!
Such a complete list. I will keep it in my mind and remember this before my next trip. Thanks for the sharing such an informative article.
Glad you found it useful.
thanks for the post
Thanks for the information
Nice list…except for the 70Lts backpack. as much space you have, you always tend to fill it up. I wont go for more than 40Lts
At the last minute, I chucked a small roll of duct tape into my pack. This tape patched a ripped daypack, stopped a cracked glass bottle from leaking, made a makeshift handle for heavy bags after the handles broke, and covered the open ports on my phone/camera when I went to the beach. Genius product which made other travellers extremely jealous 🙂
Antibiotics (ciprofloxacin) should only be used in special cases of traveller’s diarrhoea, and at least not self-diagnosed! You shouldn’t be advising people bringing it on their trip.
Trust me buddy, when you are in the middle of the mountains with no clinic or hospital for several days walk, it’s worth having a well packed medi-kit.
Being a 46 year old backpacker myself this was still extremely informative! I’m heading out next month for what may be my last year solo. Doing All of South America! Would you happen to have this list in a printable format?
Hi! Great tips – great list, thank you.
I have backpacked a lot – and am now dragging my husband and kids around the globe as much as I can. Sadly, I have discovered that I am getting more sqeamish about sleep. Really prefer to avoid other people’s grime and itchy blankets (argh the thoughts of wet, dirty, woolly blankets in a hostel i Nainitaal)… So, am thinking of investing in some ultra-thin sleeping bags for us – or travel sheets. Do you have any thoughts or recommendations? I realise something ultra-thin and backpack friendly won’t be warm, but it is just so we can sleep in our own dirt – dirty, wet woolly blankets can go on top…
Wow, I do sound like an old, prissy lady!
Thanks in advance
– where are you now? we are going to Iran next month 🙂
I traveled with a silk sleeping bag liner for this exact reason – they are really great! 🙂
that’s what i thought, thanks 🙂
there are items on this list that cannot be in a carry on backpack (like the leatherman multitool), how do you solve that issue?
thanks in advance.
Valid point about the leatherman skeletool… normally however I travel overland or with hold luggage as I DO have a fair bit of stuff – camping equipment mostly 😉
Hi Will!!! Big fan of your blog as your writing is captivating and has inspired me to do more with the years left on my clock! and for that my friend I thank you! Now I was really curious how you keep your stuff save from petty theft when camping out with your hammock? Vietnam in particular.
Hey Josh! Personally, most or all of my valuables usually stay in my daypack which never leaves my side unless I’ve been able to lock it up somewhere… petty theft can be a problem for sure, for a longtime though I had nothing worth stealing 😛
Great list. After reading this I realized my packing suit needs to be upgraded. And first of all, I need to replace the heaviest items with lighter ones. And it’s high time that I obtained a dry bag. Have no idea how I could do without it. Thank you for sharing this.
Hi question about the day pack you recommend, the zomake small pack… some of the reviews I ve read say it s not waterproof as advertised. what is your experience with it in the rain? We are traveling to Colombia at the end of their rainy season and I would like a day pack that is waterproof. By the way I love your website, Thank you.
Hey Michelle, it certainly isn’t super waterproof but it can take some rain… just not being dumped in a river! 🙂
Wow what a tremendous checklist. I just love your list. I love travelling. And i have been thinking about my next travelling. Many time i love to pack my backpacking. This time i will must follow your checklist and hope so it will be more comfortable for me. From here i know some new items which is essential for bring with me when i am packing my backpack. If you had more insight i will greatly appreciate it. Thanks for the sharing such a informative also helpful article.
Thank you so much for sharing your tips and experience. I always bring my travel towel and my hammock – it can be a lifesaver.
Awesome checklist, man! I have to say that the most important thing I’ve ever brought with me on my backpacking trips—especially to South Sudan—has been a hammock. Having a hammock is like having a heaven bed and a partner at the same time. I’ve laughed with, cried with, and disclosed my innermost secrets to my hammock, whom I consider to be my best friend and potential marriage partner.
Well, I don’t want to be rushing about from place to place, going everywhere and not really getting to see much if you know what I mean, so SE Asia?
Hi, I really like your list, my boyfriend and I have just started to plan our travels. We are going for a year, I’d love to go for longer but I’m a nurse and the longer I go without working the harder it is to get back into nursing. Is there anywhere in particular you would recommend? So far we are thinking a month of interrailing in Europe then getting the Trans-siberian railway to Beijing and winging it from there so any adivce would be appreciated!
A year of backpacking sounds like an epic trip! As for advise – can you be a bit more specific about what you’re looking for? There’s so many epic places in the world to visit…
So very hard to know what to pack in that small bag, but your guidance and tips certainly help with the selection.
Great work.
Cheers Sharon…
Great article! I love reading about what other travelers bring with them. A few of those I wished I realized before I started my travels (eg first-aid kit and ear plugs). I also love that you included condoms twice…you can never be too careful.
I read one of the comments above that discussed how bringing as many electronics as you suggest makes it “too comfortable.” I disagree, I believe that travel is different for everybody and you should be as comfortable as you want to. I have no plans on going on any vision quests or anything, so making sure I have my laptop and chargers on me is a necessity.
My trip might be a bit less intense than yours (less camping), so if you’re ever curious on what a city-dwelling traveler brings in his bag you can check out my new “what’s in my bag” post:
http://www.citizensofeverywhere.cc/2018/02/09/round-the-world-packing-list/
Look forward to reading the rest of your posts, looks like I have a lot to catch up on!
Adam http://www.citizensofeverywhere.com
Hi Will, Love the packing list and your blog in general! Despite having travelled for years I have just started in the travel blogging world. I’m developing my website at the moment and would love it if you have the time to take a look and give me your feedback. Apologies if you get requests all the time but if you are game then I would appreciate it! Kind Regards Charlie
Great packing list!! Most of the time i over pack my backpack. This will help me a lot. Which size backpack do you prefer for travel?
You have shared a great list. And I must say that a simple and light weight camera is a must. Who would not want to capture the great moments while on a trek
I think this is a great list.Your Article is Wonderful! A lot of Great Tips and Very nicely written. I have learned a lot from your article Thank you for sharing with us.
Great list and images alongside 🙂 Think we need to upgrade some of our gear before our next trip after reading this! Cheers.
After reading your list I tend to leave the laptop at home and just stick with my phone, I try to reduce the whole electronics and leave what I can behind.
But I agree you have to pack for the kind of trip your taking. I tend to find that backpacking is a great way with getting to know yourself more and you do meet a lot of people from all walks of life. The amount of friends I have made over my time backpacking its nice.
But I do try and stick to the essentials when I backpack. 🙂
Great Read and great list 😉
Cheers dude and yeah I totally hear you – there are advantages to leaving the electronics behind; harder when you’re going for years at a time though!
Hi there,Im heading to south east asia for about 5 months end of november, i was just wondering the vaccinations you recommend which I should get done as hospitals try hook you up with things that are not really needed.
Tetnus and the Heps are usually worth getting… 🙂
Will, great list of gear…but how much does your kit generally weigh? Seems like it could be damn heavy!!!
I agree that toiletries is the most important things we should carry with us whenever we plan to travel somewhere. If you’re going on a short trip and you don’t have any check-in baggage, you need to make sure that any toiletries you bring don’t fall foul of the 100 ml/3 oz limit.
This is especially relevant for women (who tend generally to carry more cosmetics type stuff) and first time travellers. The number of newly bought toiletries I have seen confiscated at airport security, by now, would number in the high hundreds of litres. Check it in or keep it under 100ml for hand luggage. I can only imagine where all that product ends up.
Hello Will,It’s a good list for easy living.I have just done a 4 month motorcycle trip around most of S/East Asia and as far as electronics go,all I took was a $15 cell phone.My total pack weight was 18kg and did trip in the wet season.Lots of fun.I feel that too much gear and all the electronics you suggest,makes the trip to easy,(comforts of home)might as well stay home.It is fun getting lost,you do finish up in some cool places,you might never have,discovered.
I love your bio. I from Venezuela
very nice post. thanks for sharing! will definitively check it before I travel next time.
All this goes in one bag that you have on you all the time? it all fits?
Nah, I tailor what I take based on what kind of trip it is…
But i dont get it, what do you do to all the stuff, i mean, you are backpacking, if you have sleeping bags to go hiking and then you go to a city and you dont need it, you throw it away?
sorry my english sucks haha love your blog, i click on every sponsor you have 😉
Epic list Will! I wish we bought a GSP device when we started travelling. I thought it was a bit overkill but it would have saved the day a few times in India!
A valid point!! It’s not often I miss something like that… my hat off to you Sir!
for the more adventurous ones, hammocks and a good tent. travelled 4 months in SEA, and quite possibly spent a month in the tent to reduce accommodation expenses.
A hammock or a tent are a great way to save money but they do weigh you down, you need to work out what kind of trip you want and plan accordingly – whenever I hitchhike, I take camping gear 🙂
Excuse me, when you sleep outside in a tent how do you go to the bathroom?
Dig a hole my friend, dig a hole.
Bandanas (2), shemagh scarf, Paracord, pharaoh rod (metal match). What does your pack weigh? Mine is currently 35lbs. Id prefer 30 but doesn’t seem possible to lose anything.
You can never have enough Bandanas….. Mine is around the 30 mark 🙂
You can do almost anything with a shemaugh and paracord!
Thanks, Serena
I haven’t heard of this but it sounds pretty awesome; going to check it out now! 🙂
Digital copies of your preferred travel guides can be loaded onto your tablet. Save the weight, don’t take the book!
Leave a Reply Cancel reply
Your email address will not be published. Required fields are marked *
Save my name, email, and website in this browser for the next time I comment.
Notify me of followup comments via e-mail.

March 27, 2024
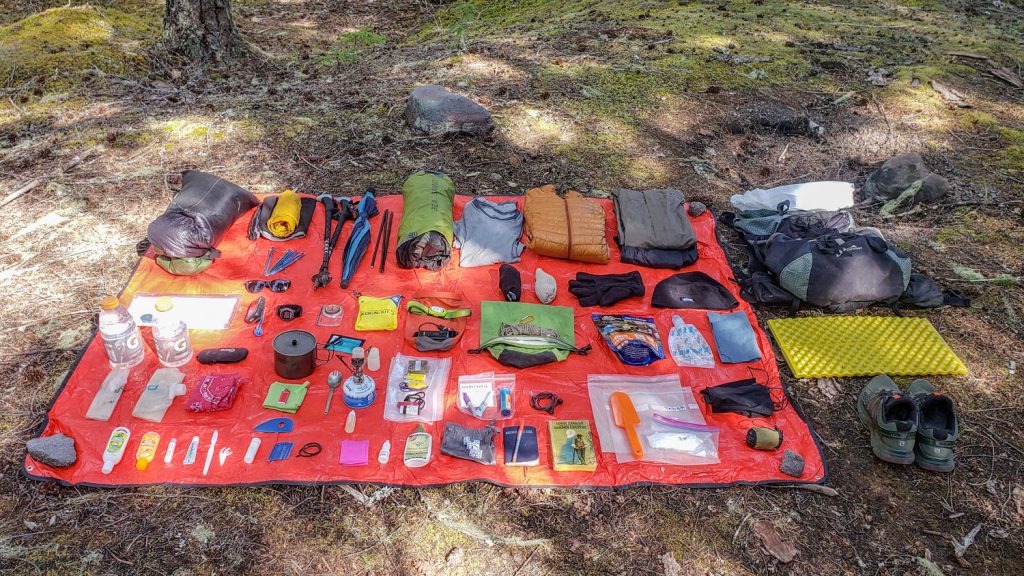
Looking for a no-frills backpacking packing list for 2-5 days? Here is everything you need for a 2-5 day backpacking trip keeping it as light as possible without breaking the bank!

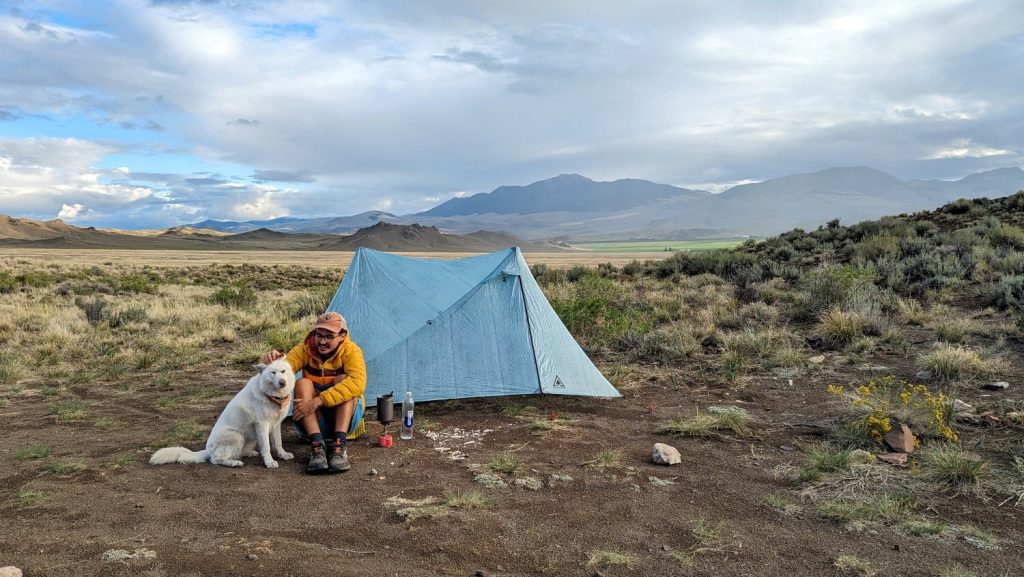
Why this blog? Hi there! My name is Maddy and I’ve been working as an outdoor wilderness guide and writer since 2018! All of this gear is tested and true, and this exact setup has been tested multiple times. This is my recommended semi-ultralight setup that works everywhere from the desert, to cold weather backpacking in Northern Minnesota.
Note: this blog uses affiliate links. That means if you choose to make a purchase, I make a small kickback at no additional cost to you.
Packing List for 2-5 Day Backpacking Trip:
The key with backpacking is to bring everything you need, and nothing you don’t! Weight adds up quickly, and odds are you won’t even use that hairbrush, deodorant, or life-straw. My favorite part of backpacking is really fully realizing exactly how little I need to live & thrive.
Sleep System for 2-5 Days of Backpacking
- Nemo Disco Sleeping Bag (if shoulder season UL Enlightened Equipment 0 degree quilt )
- Nemo Tensor Sleeping Pad (changed over from Big Agnes bc this one is equally comfortable comparably priced and packs down much smaller
- Waterproof Sea to Summit Compression sack for Sleeping Bag
- Big Agnes Fly Creek 2 UL + footprint Tent

Kitchen Gear 1-2 People, 3-5 Day Backpacking Trip:
- MSR camp stove
- Sea to Summit Collapsable Dish-wear
- 2 Smartwater water bottles empty (even a Nalgene can add weight. Definitely leave your metal Stanley at home, that adds lots of weight!)
- Sawyer Squeeze water filter (alt: iodine tablets)
- Spork (long enough to reach bottom of dehydrated meals while keeping your hand clean ideally)
- Tin mug if coffee drinker
- If with a group and making meals from scratch, Nalgene bowl to eat from. If not, straight from the bag
- Urssack for bear proofing (Talk to your ranger if in a park that requires a bear box; sometimes an Urssack is allowed instead.)

Getting enough food as you’re backpacking is really important. DO NOT just pack ramen and oatmeal to eat for days straight. You will be uncomfortable, and it can even be dangerous.
In general, budget one breakfast, one lunch, one snack, one dinner, and one dessert for a day. Personally, depending on the trip, I will either purchase pe-packed meals in advance, or dehydrate my own meals in advance.
If you will be backpacking longer than a few days or long distances (greater than 15 miles a day), I recommend coming up with a nutrition plan. I am not a nutritionist, but here are a few resources that are a good place to start:
- Ultralight Backpacking Meal Plan
- Backpacker’s Nutrition Guide
Personally, I’ve found for me that two oatmeal packets with peanut butter works for breakfast, followed by mid-morning Cliff Bar, followed by a PB&J M&M tortilla wrap for lunch. For dinner, I’ll have a dehydrated camp meal, often lentils and rice, pasta, or beans and rice, wrapped in a tortilla. Usually I’ll have a dessert handy if I’m still hungry! Sometimes I’ll go through a second Cliff Bar at some point in the day.
Pack more food than you think, and pick meals you know you will like . Those dehydrated meals at REI are not a fun thing to mess around with on a backpacking trip. Anything you don’t like and can’t finish you’ll have to pack out, and it will be much heavier now that it’s rehydrated. If you like pasta, just get pasta.
Electronics for 2-5 days of Backpacking
- One external battery pack for phone (I usually bring a pretty beefy battery like this one!)
- Garmin InReach
- Canon Rebel SL3 (the most accident-proof budget-friendly camera out there; I have licensed photos to big magazines and tourism boards from this camera) + SD card + spare battery

Clothes for 2-5 Days of Backpacking, three seasons:
- Down Puffy jacket
- 2-3 pairs of Darn Tough Socks (1 pair worn; 3 pairs total if cold climate hiking, 2 pairs total if warm enough I expect to wear sandals for portion of time)
- 4 pairs of underwear
- 1 pair of quick dry shorts
- One pair of long underwear (or just leggings that already have holes in them), sometimes worn, sometimes packed
- Hiking pants (any of these depending on temperature), worn not packed
- 1 long sleeve wool baselayers top to wear, one to pack. I like Smartwool , it’s consistently had the most longevity of any baselayer I own. Some people just bring one baselayers; I sweat a lot and know that I get cold sitting in my wet baselayer at camp so I’ll usually bring a spare and sleep on top of the sweat wet one to dry it out by morning.
- One fleece pullover, thin (check out local Superior Fleece, MN )
- Hiking Boot (worn). I’ve had my Oboz Bridger Mid’s for three years now and put over 1200 miles on them, still in great shape.
- Hiking Sandals for camp (alt: crocs)
- Thin wool gloves . Almost never regret packing these
- Raincoat & Rain pants
- Raincover for Pack
- Compression Sack for clothes

Backpacking Bag Options for 2-5 day backpacking trips:
- For lightweight trips, I use the Granite Gear Perimeter 35L
- I’ve also used the Osprey Renn 50 and will use the Osprey Aura 65 for trips longer than one week with no resupply options. To be honest though, I really prefer the Granite Gear barebones setup and find it to be more comfortable than all of the features on the Osprey Bags. If you’re new to backpacking and have a lot of luxury items you want to bring (ie, you don’t care what I say, you will be bringing deodorant and a camp chair), go for the Osprey Aura. However if you’re looking to keep it to bare essentials, look into some of the smaller GG packs.
MISC things to pack for 2-5 day backpacking trip:
- First Aid Kit
- Emergency Bivvy (Keep in a pocket accessible without removing your backpack. If you fall and break something and cannot easily move, this will make it easier to last a night. I have only ever used my emergency bivvys when helping strangers, but it has never not been worth bringing on the off chance I can help someone in trouble.
- Signalling Mirror
- Trekking Poles
- UL repair kit (tent split covered in duct tape and noso patch or two)
- Pillow (meh, often I do not bring)
- Hand sani, toothbrush, sunglasses
- Binoculars (if room only)
- Sunscreen (small tube or tin)
First Aid Kit Notes for Backpackers:
You can purchase a first aid kit from REI prepackaged, but I like to build out my own for my own specific backpacking needs. I blister easily, and for me preventative blister care is super important.
This looks like cutting my toenails before trips, duct taping or KT taping over the parts of my feet that blister before I start hiking, and the second I start to feel a hotspot, I take off my hiking boot and use Glacial Gel patches and KT Tape to cover the spot before it becomes a blister.
It is far better to stop hiking and tend to your blisters early than to try and patch up an open wound. For me, I know that on long downhill sections I blister on my pinky toe and the outer edge of my foot, so I slap some duct tape on the usual spots before hiking so it doesn’t rub. On uphills, I blister at my heels, so I do the same.
The most common backpacking injuries tend to be blisters, dehydration, and burns from camp stoves. I come prepared for this by having a burn kit, rehydration packs, and practicing preventative First Aid by staying hydrated, preventing blisters, and being conscious of boiling water and camp stoves (ie, don’t let someone pour freshly boiled water into your coffee cup while you’re holding it!!)

THINGS I DO NOT BRING BACKPACKING:
- Soap ! There is no such thing as truly eco friendly soap. Use the dirt to cut the grease and rinse, you’ll be fine.
- Pillow ! My puffy jacket works just as well as a pillow as most of the lightweight camp pillows
- Pack towel ! I just never use it
- Deodorant . I find caking layers of deodorant on myself while backpacking to actually be way more gross than just doing it once before hitting the trail, then not again until I’m done and showering.
- Extra down blanket . Your sleeping bag can unzip neatly into a blanket! There is no reason to bring both a sleeping bag and a down blanket.
- Hairbrush . A French braid and finger combing got me through 70 days of sea kayak camping. After that, no way am I carrying that weight.
- The containers things came in. I don’t bring the bag my tent came in— I stuff it loose into my pack to save weight. I don’t bring a container for my utensils, or extra packaging, or any extra snitch or stuff sacks beyond the compression sacks listed above. Every single extra thing that you bring adds weight, and every nonessential thing becomes something you’re likely to leave behind.
- A camp chair. There are lovely rocks and logs all around me. It just isn’t worth the extra weight.
THNIGS I SOMETIMES BRING BACKPACKING:
- A small day pack . I brought one of these when backpacking Havasupai and base-camping
- Trekking Poles . The older I get, the more I use these. That said, if I’m flying to get to a backpacking destination, I pretty much never bring them.
- Sleeping Bag Liner . SO! A sleeping bag liner. Personally, I almost never feel like they actually add any warmth, no more than a hot Nalgene would. That said, they can do a lot for the longevity of your sleeping bag, keeping a down bag clean from the oils on your skin. In general, I ditch the liner unless I am bringing a bigger pack.
- Wet wipes. This really depends on my mood. If I’m on my period backpacking, I almost always bring them. Really improves my quality of life.
- Trowel: if where I am backpacking I have access to pit toilets, I usually don’t bring this (a small shovel for digging catholes
- WAG bag: If I’m backpacking somewhere like the desert or high alpine, you pack out all waste including human waste. For this, you poop into a WAG bag and pack it out. I like to use the same container the waste came in (aka those little ziplock dehydrated meal bags). Sound gross? Just pick a different place to backpack.
- Map & Compass: I far prefer to navigate by paper map and compass than by electronic app! That said, realistically many popular backpacking trails do not require a map and compass. Be aware of what you personally need to navigate in the area you’re travelling.
- Permits ! Many backpacking trails require permits! Be sure to check in advance to see if the trail you’re planning on hiking requires a permit.

Tips for packing your backpacking bag:
Everyone has a different way to pack a backpacking way that works for them, and the only “right” way to pack a backpacking bag is the way that works for you!! That said, there are some things to keep in mind when packing your backpacking bag:
- You want things you might need while hiking on top! This means rain gear, snacks, lunch, a layer for if you get cold, first aid, emergency signalling, water, and sunscreen, should all be pretty accessible without having to unpack your entire bag.
- You want most of the weight to sit on your hips, not tug at your shoulders. I like to mess with my pack until it stands almost completely around my hips and my shoulder straps are basically just there to prevent it from sliding out.
- You probably want the bulk of the weight centered around the small of your back. For me, this just means throwing my tent stakes and poles as close to my back as possible, as well as a small pile of cliff bars.
Basically, I pack everything I don’t need until the night at the bottom of my pack, everything I need while hiking at the top, and do my best to fill in as much as possible near my lower back.
Looking for more practical and beginner-friendly outdoor advice!? Check out…
- How to sea kayak camp for beginners !
- A complete guide to Minnesota’s BWCA
- The best backpacking routes in the Midwest
free resources like this one are made possible by paying subscribers of the Hello Stranger Newsletter . Join the newsletter today to connect with thousands of like-minded adventurers and get gritty and honest adventure stories delivered right to your inbox (aka read my diary).
Love reading about how and what to pack for a short backpacking trip share this article on social media.

Complete Backpacking Checklist {Printable Packing List & Best Backpacking Gear}
This post may contain affiliate links.

What gear should you pack for a backpacking trip? We share our complete backpacking checklist with all of our lightweight backpacking essentials!

In the summer of 2007, I decided to go on my first backpacking trip. I bought a backpack in the wrong size for $20 on Craigslist, loaded it up with my camping gear (like, my car camping gear), and hiked up into the San Gabriel mountains near my home. It was a rough hike, to say the least, but I loved it. And, hey, everyone has to start somewhere, right?
Since then, I’ve made some big changes to my backpacking gear list. I hiked the John Muir Trail in 2012, and that required me to think through what I was carrying and make some investments in quality items – many of which I’m still using today!
Save this post!
Enter your email and we'll send this post to your inbox! Plus, you'll receive our newsletter full of great tips for all your outdoor adventures.
Michael and I have been backpacking together for over a decade and even hiked the JMT for our honeymoon in 2019, so we’ve had a lot of time to work out the kinks in our backpacking checklist.
In this post, you’ll find our complete backpacking gear list. This list stays relatively the same whether we’re going on a weekend or multi-week trip, so it can apply to most backpacking trips.
Additionally, we offer suggestions for a mix of gear including budget items, lightweight and ultralight options, as well as the tried and true gear that makes it into our own packs.
Our Backpacking Checklist
Use this backpacking packing list to help you get organized for your next trip. If you want a printable backpacking checklist , sign up for our email list using the form above and we will send you one for free!
Backpacking Packing List
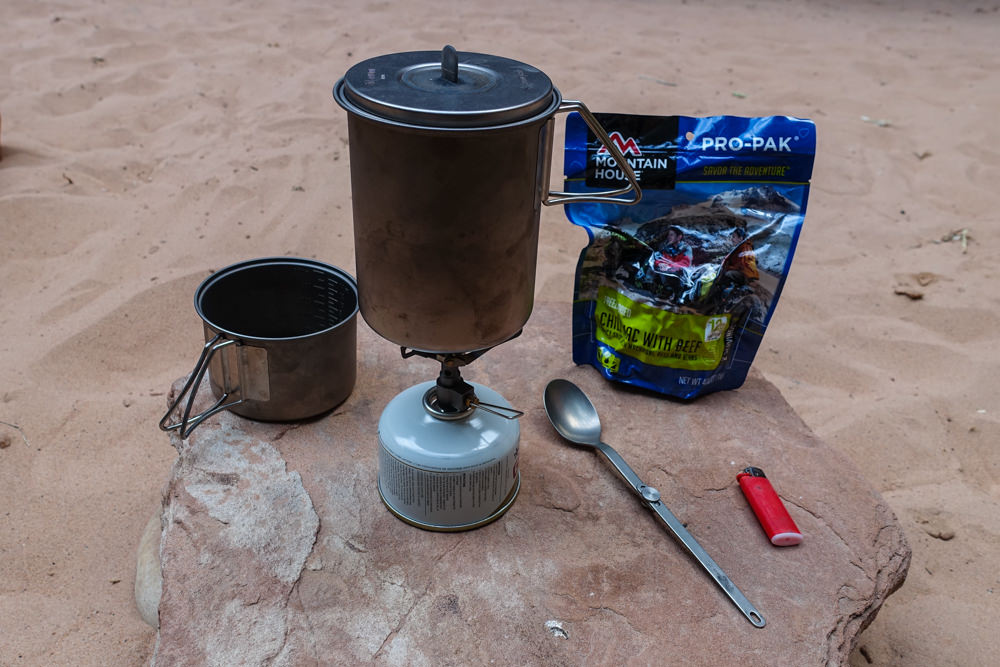
Cooking System Stove Stove fuel Cookset / pot Lighter Eating utensil Mug / cup (optional) Biodegradable soap + small sponge (optional) Water filter Water bottles / reservoir Bear canister / food bag Plenty of food
Clothing Hiking top non-cotton Hiking pants or shorts Underwear / sports bra Hiking socks Hiking boots or shoes Gaiters optional Warm base layer top Warm base layer pants Insulating jacket Rain jacket + pants Windbreaker optional Beanie Gloves Sun hat Sunglasses Bandana or buff optional Camp clothes / shoes optional Extra hair ties optional Mosquito heat net optional
Safety & Navigation Headlamp w/ extra batteries First aid kit Knife / multitool Gear repair kit Signal mirror Whistle Emergency fire starter Backup water treatment Compass / GPS device Printed maps Itinerary left w/ friend or family member
Toiletries Toothbrush + toothpaste Lip balm Hand sanitizer Trowel TP + waste bag Wet wipes Quick dry towel optional Medications
Misc. / Extras Permit if required Photo ID, cash, credit card Hiking poles Cell phone Camera, battery, memory card Battery bank & charger cords Solar panel optional Backpacking pillow optional Ear plugs / eye mask optional Journal + pen / pencil optional Lightweight chair / sit pad optional Extra trash bag & ziptop baggies

Essential Backpacking Gear
This section covers the essential backpacking gear systems: hiking, shelter, and sleeping. These items tend to be the heaviest pieces of gear you’ll carry, so it’s worth considering their weight in addition to other features to keep your total pack weight as low as you can.
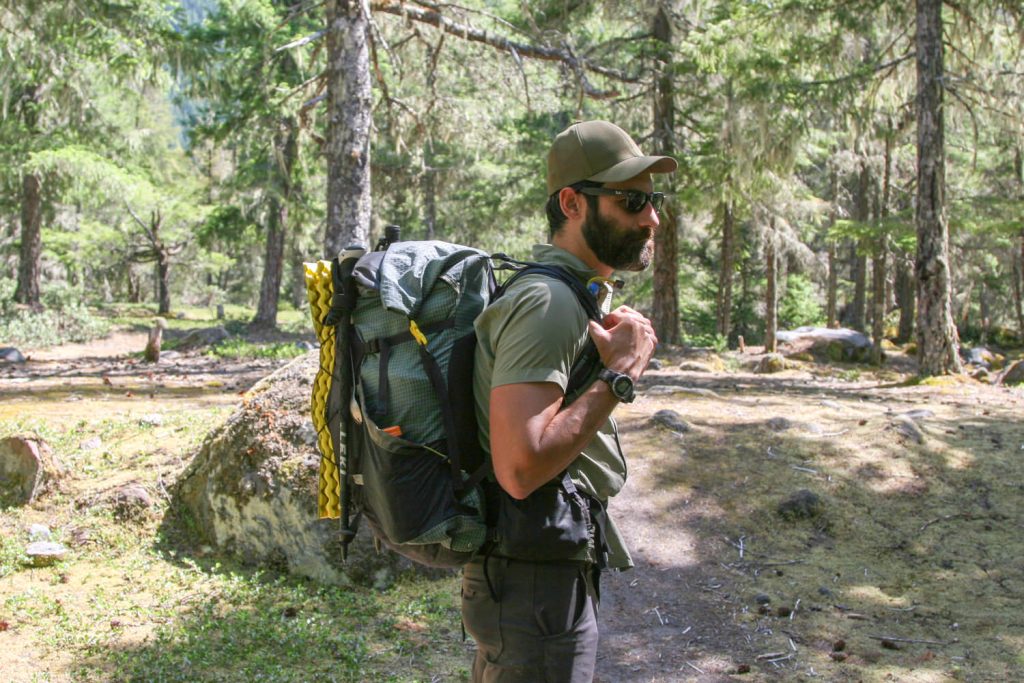
Backpacking Backpack
Every successful backpacking trip starts with finding the right backpack. Most backpackers find a pack in the 40-65L capacity range to be versatile for nearly all trips.
If possible, go to a gear store like REI, have your torso sized properly, and spend time trying on a bunch of different packs to find the right one. When I first started backpacking, I hiked too many miles with packs that were just wrong for me. Finding the right pack made a huge difference!
Here are our top picks based on our experiences:
Ultralight Pick: Zpacks Arc Series — If you’re looking for a framed ultralight pack, I would highly recommend looking into the Zpack Arc Series backpacks . These packs come in several sizes, and all feature the “Arc Frame” system which helps transfer the load onto your hips and also creates an air gap between the pack and your back to help you stay cool, load lifters, adjustable shoulder straps, and will comfortably carry up to 35 lbs of gear. I have the women’s pack and find it to be perfect for my almost-ultralight kit.
Lightweight with high capacity: ULA Circuit or Catalyst — The Circuit (68L/35lb load) and the Catalyst (75L/40lb load) are two of the most popular packs among PCT thru-hikers for good reason: they are super versatile and can carry a lot of gear, despite being lightweight at 36.6oz and 46.7oz, respectively. The Catalyst was the first lightweight pack I owned and I hiked the JMT comfortably with it fully loaded. These packs are a great pick if you’re working on decreasing your load but aren’t yet at an “ultralight” base weight.
Budget pick: REI Flash 55L — For under $200, the REI Flash 55L is a great pack at a budget-friendly price. It’s available in both men’s and women’s styles.
Tried & true traditional backpacking packs: Osprey — Over the years, Osprey’s packs have stood out to us as solid, durable packs with great suspension and load-carrying capabilities, and at a pretty reasonable price point. At the end of the day, these packs are heavier but often they carry heavier loads more comfortably, despite their weight. The AG (Anti-Gravity) packs have been our favorites for their airflow and suspension designs, and the Eja / Exos line has gotten attention in recent years for their lighter-weight design for those with more dialed-in kits.

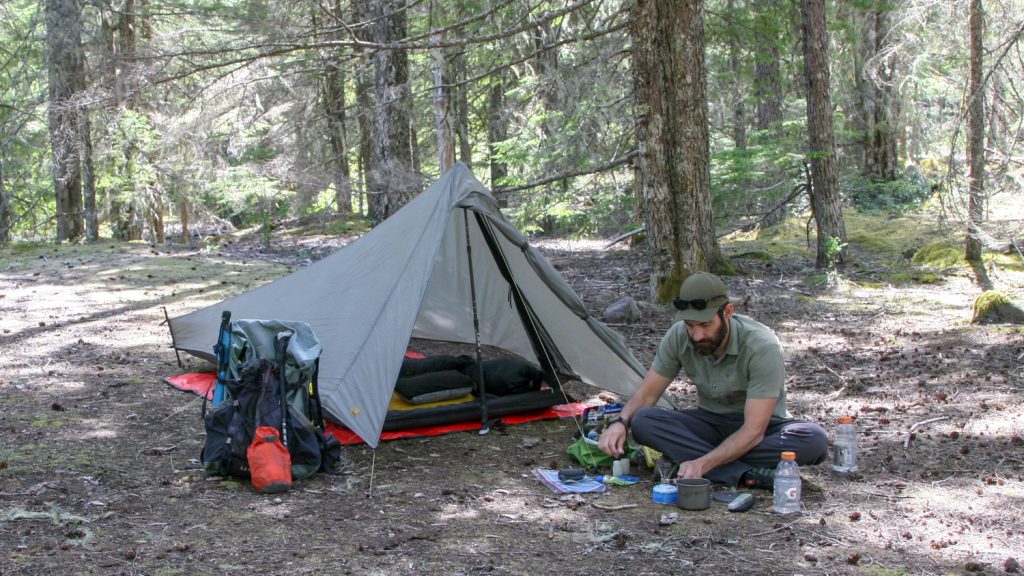
Backpacking Tent
Your tent is your home away from home and there are a number of important things to keep in mind when selecting the right tent. Besides the obvious factors like floor size, weight, and price, consider ease of setup, and “liveability” (I did not fully appreciate the livability of our tent until we spent an entire week backpacking in rainy conditions on our honeymoon!)—this includes things like peak height, interior pockets, ventilation, and room for your gear.
Here are some options to consider:
Ultralight Pick: Zpacks Plex Solo or Duplex — These are two of the lightest tents out there, which is probably why we saw so many of them out on the JMT! Made from Dyneema composite fabric, this ultralight tent weighs only 13.9oz for the solo version and 18.5oz for the two-person . It relies on trekking poles and stakes to set up properly, but that’s how it stays so light! However, we won’t sugarcoat it—this is a pricey tent, but if you’re looking for the best ultralight option, this tent is hard to beat.
Best freestanding: Big Agnes Copper Spur HV UL — The Copper Spur is a freestanding tent with lots of interior space. It’s double-walled and can be set up fly first. Its freestanding nature comes at a bit of a weight cost—the UL1 is just over 2 lbs and the UL2 is 2.7 lbs. Both the 1 and 2-person versions have “awnings” that can be set up using trekking poles to provide some shade or light weather protection for hanging out. The 2 person version has two doors so you don’t have to worry about crawling over your tent mate at night.
In our packs: Big Agnes Tigerwall UL — The Tigerwall is a great option if you want a double-walled tent and don’t mind if it’s semi-freestanding (meaning it does need to be staked out in a few spots). It can be set up fly-first which is helpful in rainy weather. The Tigerwall UL2 is just over 2 lbs, and it’s also $100 cheaper than the Copper Spur UL2.
Budget Pick: REI Passage — At about 4 lbs, the REI Passage isn’t exactly a lightweight tent, but if you’re on a budget, the price can’t be beaten—only $139 for the one-person version! This freestanding tent is easy to set up, is double-walled, comes with a footprint, and has a roomy vestibule and interior pockets for organizing your gear.
Sleeping Bag
At the end of a long hiking day, nothing beats cozying up in a warm, fluffy sleeping bag! When buying a sleeping bag, you’ll be confronted with a lot of different temperature ratings.
The rule of thumb when it comes to temperature ratings is that the listed rating is what you can survive in, but to be comfortable you’ll want to add ~15F , particularly if you’re a colder sleeper.
Another option for those looking to cut weight is a sleeping quilt or hybrid quilt/bag. This design eliminates the down on the bottom of the bag, which gets compressed under your body weight and loses a lot of its insulating property anyway.
Backpacking sleeping bags and quilts to consider :
Lightweight Pick: REI Magma — The REI Magma is a great all-around sleeping bag that comes in two temperature ratings (15F and 30F) in men’s and women’s configurations. The men’s 15F comes in just under 2 lbs and the women’s 15F just over 2 lbs, so they are fairly lightweight for the warmth they provide (the 30F bags are both under 1.5 lbs).
Best Hybrid Quilt/Bag (ultralight): Zpacks Classic — Zpacks’ Classic sleeping bag is actually a bag/quilt hybrid. It has a great warmth-to-weight ratio and comes in 30F , 20F , and 10F temperature ratings. It features 900 fill power water-resistant down and a 3/4 length zipper to save a little weight while also staying snug while you sleep. These are true ultralight bags with weights of .75lb-1.5lb depending on temperature rating and length.
Best Synthetic Bag: Marmot Trestles Elite Eco — The Marmot Trestles Elite Eco is a great synthetic bag that’s not too heavy and is budget-friendly, too! The major downside to synthetic bags is they are not as compressible as down, so these are not ideal for lower-volume packs. But if you’re looking to avoid animal products this bag is a good place to start.
Budget Down Bag: Kelty Cosmic 20 — Down bags can get pricey, but the Kelty Cosmic 20 does a good job balancing price, weight, and warmth. The men’s version is under $200 and the women’s is just over. Both versions use water-resistant down. It’s worth noting that while the women’s version is nearly a pound heavier, it also has a 10F warmer comfort & lower limit tested temperature rating.
In Our Packs: Enlightened Equipment Revelation Quilt — Michael and I both use the Enlightened Equipment Revelation Quilt . It’s light, compressible, and pretty versatile—in warmer weather, it can unzip all the way to allow some of the heat to escape so we don’t overheat. There is no women’s version and the temperature rating is definitely on the “lower limit” end of the spectrum, so I’d advise getting a bag at least 10F warmer than you think you need if you’re a cold sleeper.
Sleeping Pad
Your sleeping pad serves two purposes: it provides cushioning, and it insulates you from the ground. The insulating power of sleeping pads is measured in “R-Value”. Here is a rough estimate of what R-value to look for based on nightly lows:
Down to 50F: R-2 or less Down to 32F: R 2-4 Down to 20F: R 4-5.4 Below 20F: R 5.5+
Backpacking sleeping pads to consider:
In our packs: Nemo Tensor Insulated (R 4.2) — After trying multiple sleeping pads, the Nemo Tensor is the pad we keep coming back to. It’s lightweight at 15oz, super comfortable, easy to inflate, packs down small, and it’s quiet .
Ultralight & warm: Thermarest Neoair XLite NXT (R 4.5) — For a warmth-to-weight ratio, it’s hard to beat the Thermarest Neoair XLite . This 3-season backpacking pad weighs only 13oz and provides R-4.5 insulation.
Good for side sleepers: Sea to Summit Ether Light XT (R 3.2) — With a full 4 inches of cushion, the Ether Light XT is a great pad for side sleepers. It’s lightweight at 17.3oz, compact, and quiet.
Lightweight Budget Pick: Thermarest Trail Scout (R 3.1) — For $75 (regular length), the Thermarest Trail Scout is our budget pick. It weighs a pound and a half, offers R 3.1, and is self-inflating. However, this pad is only 1” thick, so it’s not a great choice for side sleepers who will want extra padding for their hips and shoulders.
Most Comfortable: Sea to Summit Comfort Plus SI (R 4.1) — When sleeping well is more important than packing light, look no further than the Comfort Plus SI pad . This is arguably the most comfortable sleeping pad we’ve used in the backcountry. It’s 3 inches thick, quiet to sleep on, and the stretchy fabric that it’s covered is a nice break from the plasticky feel of other pads. However, be ready for a compromise: in exchange for a great night’s sleep, this pad is the heaviest on our list and is much bulkier when packed down since it’s made with open-celled foam.
Camp Pillow [optional]
A pillow is totally optional and is entirely a personal preference. We use this lightweight Cocoon Pillow and the Sea to Summit Aeros Ultralight pillow . Or, you can just put your extra clothes in a stuff sack and call it a night!
Hiking Poles
We consider hiking poles to be part of our essential backpacking gear, but really they are optional. Poles will help you on the uphills and take the pressure off your knees on the downhills, so we think they are well worth the weight!
In My Pack: Black Diamond Trail Shock Pro — I’ve used these trekking poles for over 10 years and they have really stood the test of time.
Budget Pick: Cascade Mountain Tech Carbon Fiber — These poles will only set you back $45-$65 (depending on color) but they are solid, lightweight (just under a pound for a set), and have cork handle grips.

Backpacking Kitchen
In addition to the cooking gear below, you’re obviously going to want to pack enough food! Check out some of our best backpacking meal ideas here.
Backpacking Stove
Your cooking system is going to be very dependent on your food strategy, the number of nights you’re out for, and the number of people you’re cooking for. You can read all about the best backpacking stoves here.
Favorite Integrated System: JetBoil MiniMo — The JetBoil MiniMo is fuel-efficient, so we don’t have to worry about running out of fuel as quickly. It boils water lightning fast when we’re just cooking freeze-dried backpacking meals, but it also provides enough simmer control that we can cook our own dehydrated food. If you only boil water, check out the Jetboil Flash .
In our packs: Soto Windmaster — The Soto Windmaster is an efficient canister stove with a quick boil time, even in windy or colder conditions. It’s a lightweight 3 oz and has a lot of deluxe features like a fuel regulator and integrated ignition. What’s more, the 4-prong pot stand provides a super stable base to place larger pots.
Budget stove: AOTU Stove — You can usually find the AOTU stove for under $15. This stove is user-friendly, fairly lightweight (3.3oz), and has decent fuel efficiency and wind performance. If you are new to backpacking or on a tight budget, this stove is a great value.
Ultralight stove: BRS-3000T — This is the lightest canister stove out there at .89oz and it’s budget-friendly, too (not usually the case in the ultralight world!). It comes with some tradeoffs, namely, it requires a narrow pot for stability, and it’s kind of garbage in the wind, so you’ll want to bring a windscreen or be OK finding a sheltered spot in the field (we usually make one using a large rock and our bear canister).
Cooking pot
If you opt for a stove instead of an integrated system, you’ll need to pack a cook pot! For solo hikers, 650-750mL tends to be a good size, and for couples aim for a pot in the 1.2L+ range.
In our packs: Sea to Summit Alpha 1.2L — This is a solid lightweight pot with enough volume for two people to cook in. It’s 6.3oz and a little more compact than the MSR pot below, which is why we switched to it last season. It’s a perfect pot for our style of cooking, which is to bring our DIY backpacking meals to a boil for a few minutes and then take it off the heat to cook in our pot cozy , so we don’t have to worry about the food sticking or scorching since this is not a non-stick pot.
Best non-stick: MSR Ceramic 1.3L — If you like to cook on your backpacking trips, you can’t go wrong with MSR’s ceramic-coated pot . It’s light at 7.5 oz, the handle is removable for storage, and the ceramic coating makes cleanup a breeze. You’ll want to make sure you use non-metal cooking/eating utensils to protect the coating, but we’ve found it’s pretty durable with no flaking or scratching after several years of use.
Best ultralight titanium: TOAKS Pots — It doesn’t really get lighter than titanium, and TOAKS makes pots in a variety of sizes so you can get exactly what you need and nothing more!
Even if your backpacking stove has an auto-ignite switch, don’t rely on it 100%. Pack a lighter in the event it craps out.
Eating Utensil
We like to use a utensil that has a true spoon shape (not a spork) because it allows us to scrape down the last bits of food from our pot, making it much easier to wash it out. These Humangear GoBites utensils have served us well over the years, and they also have a fork end. This MSR folding spoon is also a good option and is a bit longer for reaching into freeze-dried meal bags.
Mug [optional]
If you’re morning coffee (or tea) drinkers like us, you’ll probably want to pack along a dedicated mug.
This GSI mug is lightweight at 3.5 oz – making it even lighter than our old titanium insulated mugs and they are a fraction of the price! Sure, this mug won’t keep your coffee hot for hours, but we find it’s perfect for backpacking mornings. Bonus, the cup has measures on the side, so you can use it for measuring out water for your breakfasts and dinners.
It’s always good to carry a small knife or multi-tool. I found that the only part of the multi-tool I ever used was the knife, so we ditched it in favor of our lighter Opinel knife .
Bear Canister
If you’re backpacking in bear country, it’s smart to use a bear canister (and in many places, it’s required!). We use the BV500 (there’s also a smaller version ). I have been able to pack 6-8 days of food for myself or 3-4 days for the two of us into it.
BearVaults are super durable and approved by nearly all agencies in the US, but they are on the heavy side. If you backpack in areas that allow it, an Ursack might be a better choice (while the Interagency Grizzly Bear Committee approved the Ursack in 2014, many places still do not allow them).
You can read more about how and when to use a bear canister here.
Water Treatment
You never know what is in the water sources you come across in the backcountry, so make sure you have a reliable way to filter water.
Here are our favorite water filters :
Best Gravity Fed: GravityWorks 4L — It’s not the lightest filter at 11.5 oz but gosh it is EASY to use! The GravityWorks filters water at 1.75L/min with essentially zero effort, and it’s easy to maintain on the trail. You simply fill the bag, then hang it so the “dirty water” bag is hung above the “clean water” bag. Gravity takes care of the rest. This is a great system for small groups or if you hike in areas where you might not set up camp right by water sources.
Best Squeeze-Style: Katadyn BeFree — The Katadyn BeFree is our pick for an ultralight squeeze-style filter and is the filter we currently use on our backpacking trips. It’s simple to use: just fill the soft flask and screw on the filter. Then you can drink right from the flask or squeeze filtered water into your pot or into another bottle.
Best UV: Steripen — The Steripen Adventurer Opti UV purifier uses a battery-powered UV lamp to kill harmful protozoa, bacteria, cysts, and viruses in your water. Simply fill your bottle and then submerge the lamp as directed. Since this isn’t a physical filter, you’ll want to pre-filter silty water with a bandana.
Water Bottles
These soft-sided bottles are great because they collapse when you don’t need them and they are super lightweight. We always bring at least one hard-sided water bottle (like a Smartwater bottle) in case the soft-sided bottles get holes in them. You could also opt for one of those water bladders with a drinking hose for easy sipping.

Dishwashing kit [optional]
If you cook in your pot, you may want to pack a small dishwashing kit. Here is what’s in ours:
✔︎ Small Piece of Sponge
✔︎ biodegradable soap.
We like the unscented Dr. Bronner’s biodegradable soap for washing dishes. Please read up on the proper way to use soap in the backcountry , and for the love of god don’t use it IN any water sources.
✔︎ Quick-Drying Dish Towel
The REI Multi Towel Mini is super light (optional, dishes can always air dry!)
Toothbrush & Toothpaste
We use folding travel toothbrushes . They take up less space and guard the bristles from touching anything else in your toiletry bag.
Travel-size toothpaste tubes are perfect for backpacking trips (no point in dragging a full tube out on the trail!). Personally, we have switched to these toothpaste tablets when backpacking—they weigh next to nothing and take up almost zero space.
An absolute must for faces, necks, and hands. We try to reduce the amount of sunscreen we need by covering up (long sleeves and pants), but a small travel container of sunscreen is critical.
Between the sun and the wind, it’s so easy for lips to get chapped on the trail. So we always make sure to pack some lip balm with SPF .
Hand Sanitizer
Let’s be honest, cleanliness becomes a relative term on a backpacking trip. But before we prepare our food and after we go to the bathroom, a quick spritz of hand sanitizer goes a long way to cover our bases.
We budget 2-3 of these wipes per day to clean off all the sweat and grime. The ingredients of these wipes are literally just water and grapefruit seed extract, so we find they don’t leave a weird residue feeling behind.
Bathroom Kit
This trowel is cheap, durable, light (3.1 oz), and is faster at digging a cathole than using a stick. If you want to spend an extra $15 to save weight and some space, check out The Tent Lab’s trowels .
✔︎ Toilet Paper + Trash Bag
If you’re following Leave No Trace principles (and we hope you are!), you’ll know that packing out all your trash is important–and that goes for your used toilet paper, too. I use a ziplock bag that I “black out” with painter’s tape.
If you’re looking for TP alternatives, you’re in luck! There are a number of products designed with backpackers in mind that will help you cut down on the trash you have to pack out.
- Kula Cloth: This is an antimicrobial pee cloth that can be used in place of toilet paper for #1. If the idea of a pee cloth is new to you, here are the answers to your first few questions: Yes, it’s sanitary when used properly, and no, it doesn’t stink. You can read allll about it on the Kula Cloth website .
- Bidet: A great TP alternative that gained attention last year is the bidet–and this TUSHY travel version is a great option for backpackers. We met a gal on the JMT who used this one and couldn’t say enough good things about the experience. It’s essentially a soft bottle that can be filled with water, then squeezed to create a gently pressurized spray to clean up after you use your cathole.
Trash Bag for Food & Misc Waste
Technically, you could have one trash bag for everything, but I like to keep opening and closing my TP bag to a minimum, so I bring a separate one for storing my used food packaging.
Health and Safety
The Biolite 325 headlamp has a minimalist headband design, which distributes the weight in a way that’s super comfortable. The light tilts, dims, and has a red light setting. Additionally, it’s USB charged so there’s no battery pack which helps make it one of the lightest headlamps we’ve found – it’s only 50 grams!
You can get up to 40 hours of use (on low) out of a charge, so you will need a solar panel or battery bank with a micro-USB port to charge it on longer trips.
First Aid Kit
You can make a DIY first aid kit, or buy a pre-packaged one like this .
Our current kit is a bit Frankensteined, but generally speaking, our basic kit includes things like band-aids of various sizes, 2nd skin/blister bandaids/moleskin, butterfly bandages/wound closure strips, gauze, tape, elastic bandage, antibiotic ointment, antiseptic towelettes, tweezers, safety pins, ibuprofen, Imodium, and antihistamine.
Backup Water Treatment
In the event something happens to our water filter, we keep these Micropur tablets in our first aid kit.
Gear Repair Kit
Usually sleeping pad patches, spare stove O-ring, duct tape, a sewing needle, and nylon thread.
Firestarter/Matches
Small mirror.
While there are plenty of expensive hand-held GPS devices out there, we have been happy over the years just using our iPhones and Gaia GPS ! The premium version will set you back a few bucks ( save 20% by using our link ) but allows you to download maps before your backpacking trip so you can use them offline, and you can create and print paper maps for your route as well.
While we usually use a GPS app on our phones for navigation while hiking, we still bring paper maps that we generate using Gaia (see above). If your phone runs out of juice, gets water damaged, or drops and the screen cracks, you don’t want to be stuck without a way to navigate. Maps are stored in a ziplock bag along with any required permits.
This Suunto A-10 Compass is a solid, lightweight option. Your map and compass will only help you if you know how to use them, so you might want to check out a navigation class at your local REI.
SOS/Satellite Device
We carry a Garmin In-Reach Mini which works outside of cell service, meaning we can text with our family or friends via satellite (for weather updates, wildfire info, or just to say “we’re having a blast!”), call for SOS help if needed, and acts as a GPS with tracking. It’s only 3.5oz, but it is a pricey item and it requires a subscription to use all the satellite functions. However, it’s been worth it for peace of mind for us and our families.

Backpacking Clothing
Insulated jacket.
For cool mornings and cold nights, a warm insulated jacket is essential. We look for jackets that can be compressed and packed down small so they don’t take up a ton of room in our packs.
- In our packs: Patagonia Down Sweater
- Ultralight (Down): Mountain Hardwear Ghost Whisperer 2
- Ultralight (Synthetic): Enlightened Equipment Torrid
- Budget: REI 650 Down Jacket 2.0
Base Layer Tops & Bottoms
Base layers can help you regulate your body temperature in camp and on the trail as the temperature fluctuates throughout the day. We opt for Patagonia Capilene base layers on warmer trips or Smartwool base layers if it’s going to be colder.
Quick Dry Shirt
Look for something that’s moisture-wicking and breathable. Avoid cotton as it holds onto moisture—opt for quick-drying material instead. Patagonia’s Capilene Cool Lightweight Shirt is a great place to start!
Long Sleeve Sun Shirt [optional]
When hiking at higher elevations and on exposed trails, we like to pack a lightweight UPF-rated long-sleeve shirt for additional sun protection.
- Hoodie: REI Sahara Shade
- Button Down: Columbia Silver Ridge Lite
Rain Jacket / Windbreaker
A lightweight waterproof rain jacket will be worth its weight in gold if you encounter rain on your backpacking trip! We’ll pack these regardless of the forecast since the weather in the mountains can be unpredictable, and it doubles as a wind-resistant layer.
- Budget: REI Rainier
- Ultralight: Outdoor Research Helium
- Ultralight *small biz made*: Enlightened Equipment Visp
- In Our Packs: Columbia OutDry
Hiking Pants / Shorts
Look for breathable, quick-drying materials. UPF sun protection is always a big plus! Here are a few of our favorites:
- Men’s Pants: Eddie Bauer Guide Pro
- Women’s Leggings: Eddie Bauer Trail Tight
- Women’s Shorts: Vuori Clementine
Quick Dry Underwear
We each pack 2-3 pairs of breathable, quick-drying, moisture-wicking hiking underwear. These get rotated daily and on longer trips, we’ll rinse them with water and some biodegradable soap.
Hiking Socks
Investing in some quality wool hiking socks will help keep your feet happy on multi-day hikes. FITS , Darn Tough , or SmartWool are all solid choices. If you’re prone to getting blisters on or between your toes, I’d highly recommend trying Injinji socks .
Hiking Boots
Footwear might be one of the most important pieces of backpacking gear! It doesn’t matter how lightweight the rest of your gear is if your feet are in pain or covered in blisters.
Spend some time really feeling things out when you’re selecting hiking boots or trail shoes. We recommend REI for this purchase because of their return policy. You can actually put your shoes to the test and if after a trip, it turns out they weren’t the right fit, you can return them for a refund within a year.
A brimmed hat is nice for keeping the sun off your face during the day, and a warm beanie is a must for when the sun goes down!
Warm Gloves
A pair of warm gloves always find their way into my pack—I personally like the REI Polartec Gloves . Michael finds that for most summer trips, a pair of merino wool glove liners are sufficient.
Camp Clothes [optional]
One of the luxuries that we bring along when backpacking is a different set of clothes to wear at camp and while sleeping.
At the end of the day, we strip off all our dirty, sweaty hiking clothes, wipe ourselves down with wet wipes, and change into our clean(ish) camp clothes. We feel fresher going to bed, and since these clothes don’t carry any residual hiking sweat, we sleep warmer, too.
We each pack a shirt, bottoms, underwear, Teva camp shoes , and cushy socks.
Camera Gear and Electronics
These are optional items, but ones that always make it into our packs!
We bring a Sony a6600 mirrorless camera on our backpacking trips, which weighs just over a pound (plus lens(es)). Or, on fast and light trips we might just use our iPhones. A smaller camera like the Canon G7X or the Sony RX100 is also a nice, lightweight option for casual picture-taking.
Peak Design Camera Clip
This handy clip attaches your camera to your backpack strap so you can have your camera easily accessible on the trail.
Battery Bank
A battery bank is optional, but if you have devices that need to stay charged, it might be worth the weight. They come in a number of mAh capacities. This 10,000mAh pack will charge your phone 2+ times.

We hope that this backpacking checklist will be helpful as you plan your next backpacking trip! If you’re looking to buy or upgrade gear, be sure to check out this post about where to buy discounted outdoor gear to save a bit of cash.
If you want to dig deeper, we have articles about choosing a backpacking stove , details on our backpacking kitchen , and articles about dehydrating food for backpacking and buying and packing backpacking food for your trip.
Megan & Michael are the creators of Fresh Off The Grid, a blog dedicated to helping you fuel your adventures by sharing camp cooking recipes, backpacking meals, and outdoor travel guides. Their recipes and outdoor cooking expertise have been featured in Backpacker Magazine, Outside, REI Co-Op Journal, Food & Wine, and New York Times Cooking.
13 Comments
Someplace you mentioned travel bottles that can hold sunscreen (maybe they aren’t silicone?) but I can’t find it now. Can you please tell me where to find them?
Yes, humangear GoToobs! You can find them here.
Great article! Can’t wait to try this!
great information i will try this tips thanks for sharing
I really like this checklist, it’s quite comprehensive to say the least. I’d only like to add one advice: always have one more pair of socks than you calculated necessary. Also, nowadays I also carry a pair of lightweight shoes to change into at the campsite.
I completely agree with you about packing an extra pair of socks! I have never once thought to myself “I packed too many socks” 😉
Really useful, thanks for sharing your advice and experience. It’s still too cold for me here in Ireland for camping but couple of months and I’ll be out! Great list.
Camping in Ireland sounds like a dream. Summer will be here soon enough!
Great list, but would love to see more budget friendly options. $50 for camp shoes when Crocs will do? No, thanks!
Thanks for the feedback! The Teva camp shoes we linked to do have multiple purposes – good for river crossings, and they are the sandals I wear around town in warmer weather too. I certainly wouldn’t shell out 50 bucks exclusively for camp shoes either 😉 But, we’ll work on including more budget-friendly options in these gear lists in the future!
You know that Crocs are also $50 right?
I really like this checklist, it’s quite comprehensive, to say the least. I’d only like to add one piece of advice: always have one more pair of socks than you calculated necessary. Also, nowadays I also carry a pair of lightweight shoes to change into at the campsite. https://bagcottage.com
Absolutely agree! We carry two pairs of socks to hike in, and one pair to sleep in. Camp shoes are a must for us these days, too. I left them behind on our last backpacking trip to see if I could get away without them, and boy did I miss them at the end of the day!!
Comments are closed.
Backpacking Checklist for 2023
We cover everything you need for a successful backpacking trip, from essentials like shelter and insulation to extras like matches and sunscreen.

Switchback Travel
We use affiliate links and may receive a small commission on purchases. Read more about us .
Whether you’re a first-time backpacker or a seasoned veteran, everyone could use a good list to make sure they’re prepared when they head out on the trail. Our detailed checklist below covers everything from critical backpacking equipment (tent, pack, sleeping bag, etc.) to kitchen gear , footwear and clothing , health and hygiene products , and personal items and extras . For more information on each product category, many of the headings link to our detailed product round-ups, which are the result of years of testing and opinions (we do love backpacking). And for all our product recommendations in one place, see the landing page for our backpacking gear reviews .
Editor's note: The table above provides a brief overview of what you'll need to get outside, but our full PDF version is printable and offers a more comprehensive breakdown of the necessities and nice-to-haves. See Our Backpacking Checklist PDF
Backpacking Equipment

Backpacking Tent
Our top pick: Big Agnes Copper Spur HV UL2 ($550) What we like: Highly competitive combination of weight, livability, and ease of use. What we don’t: Expensive; thin floor is susceptible to tears (we advise using a footprint).
Backpacking Pack
Our top pick: Osprey Atmos AG 65 ($340) What we like: Great carrying comfort, thoughtful organization, and class-leading breathability. What we don’t: On the pricey end and far from the lightest design available.
Sleeping Bag
Our top pick: Feathered Friends Hummingbird YF 20 ($509) What we like: Very warm for the weight and built by a very reputable down specialist. What we don’t: Feathered Friends bags don’t come cheap; lacking some modern features.
Sleeping Pad
Our top pick: Therm-a-Rest NeoAir XLite NXT ($210) What we like: Three-season warmth and great comfort at a competitively low weight. What we don’t: Warm-weather backpackers can save with a lower R-value pad.
Water Filter or Purifier
Our top pick: Sawyer Squeeze ($41) What we like: Impressively light, fast flow rate, and covered by Sawyer’s lifetime warranty. What we don’t: Best for the solo backpacker—groups will likely prefer a larger gravity filter like the Platypus GravityWorks 4L.
Hydration Bladder and/or Water Bottles
Our top pick: Osprey Hydraulics 3L ($37) What we like: Highly reliable and built to last. What we don’t: Rigid backer adds weight and bulk (you can’t roll it up when empty).
Our top pick: Petzl Actik Core ($80) What we like: Great output, long battery life (via AAAs or the rechargeable battery), and easy-to-use interface in a feathery build. What we don't: Expensive and not the most water-resistant option on the market.
Optional Backpacking Equipment
- Trekking poles
- Backpacking chair/sit pad
- Backpacking pillow
- Sleeping bag liner
- Tent footprint/ground cloth
- Extra stakes and guylines
Kitchen Gear

Backpacking Stove and Fuel
Our top pick: MSR PocketRocket 2 ($60) What we like: Surprisingly powerful for how light and cheap it is. What we don’t: Noticeably less stable and wind-resistant than integrated canister systems like the Jetboil Flash.
- Backpacking Food
Our top pick: Backpacker's Pantry ($10-$13) What we like: Affordably priced, easy to find, and extensive selection of tasty meals. What we don’t: Relatively long cook times and less innovative than some upstarts.
Cookware and Utensils
- Spork or long spoon
Optional Food Items
- Instant coffee
- Coffee press or dripper
- Electrolyte tablets
Footwear and Clothing

Hiking Boots or Hiking Shoes
Our top pick: Salomon X Ultra 4 Mid GTX ($175) What we like: Trail runner-like agility with hiking boot protection and stability. What we don’t: Those shuttling serious weight might want to step up to a more cushioned and supportive design like Salomon’s own Quest 4.
- Hiking Socks
Our top pick: Darn Tough Micro Crew Cushion ($21) What we like: Great padding and breathability for three-season use; backed by Darn Tough’s lifetime warranty. What we don’t: A bit too thick for sweltering summer days; highly durable build sacrifices a little plushness.
Hiking Pants or Hiking Shorts
Our top pick: Outdoor Research Ferrosi ($99) What we like: Ferrosi fabric nicely balances weight, durability, and mobility. What we don’t: No built-in belt; not the most everyday-friendly option due to the thin construction and basic pocket layout.
Rain Jacket or Hardshell Jacket
Our top pick: Patagonia Torrentshell 3L ($179) What we like: Confidence-inspiring protection and classy looks at a hard-to-beat price. What we don’t : Fairly crinkly and stiff; doesn’t have a chest pocket.
Down Jacket or Synthetic Jacket
Our top pick: Patagonia Down Sweater ($279) What we like: Comfortable fabrics, competitive warmth for the weight, and highly versatile. What we don’t: Not the lightest option for dedicated backcountry use.
Our top pick: Smartwool Classic Thermal Merino 1/4 Zip ($115) What we like: All-merino build is warm and comfortable, regulates temperature well, and doesn’t hold stink like polyester. What we don’t: Pricey, too warm for high-output use, and requires more care to last than synthetics.
Optional Footwear and Clothing
- Sun protection shirt
- Gaiters (for snow or water crossings)
- Neck gaiter/buff
Health and Hygiene

- Toilet paper and/or baby wipes
- Wag bags or trowel (check local regulations)
- Hand sanitizer
- Personal medications
- First aid kit
Sun and Bug Protection
- Insect repellent
Optional Health and Hygiene Items
- Mosquito net
Personal Items and Extras

- Basic repair kit (multi-tool, duct tape, extra cord)
- Navigation (map, GPS, compass)
- Cell phone with charger
- Extra batteries and/or solar charger
- Notebook and pen/pencil
- Book or Kindle
- Bear canister and/or bear spray (if required)
- Ziploc bags (for trash and waterproofing electronics)
- Lighter and/or waterproof matches
- Backup water purification tablets
- Pack rain cover (if not included)
- Quick-drying towel
- ID, cards, and cash
- Backcountry permit or reservation (if required)
- Forest Service/park pass (if required)
- Satellite messenger device
Additional Backpacking Tips
- Check restrictions before you go to ensure you're up to date on current fire bans, required bear-proofing measures (such as bear canisters or bear bags for food), etc.
- A balanced and organized load is key for maintaining comfort on the trail. It’s best to place heaviest gear in the middle of your back and pack in a way that allows you to access certain items easily on the go. For a detailed breakdown, see our article on How to Pack a Backpack .
- Use resealable bags for toiletries and other small items you don’t want to lose or get wet, such as lighters and matches.
- If you’re limited on space, consider using dedicated compression sacks for soft gear like your sleeping bag, clothing, etc.
- Research your route ahead of time to verify where you’ll encounter water sources for fill-ups. If they’re plentiful, you may be able to get away with carrying in less water.
- We recommend a 10-degree buffer for your sleeping bag. For example, if your bag is rated to 20 degrees Fahrenheit, expect to be comfortable down to around freezing.
- Pack foods that you know you’ll enjoy eating and remember to drink water often. It’s common to not feel hungry or thirsty after heavy exertion, but refueling properly is key to maintaining energy and feeling good on the trail.
- Always bring backup water purification in case your filter fails. Iodine tablets are a cheap and easy way to ensure you’ll have clean drinking water, and adding electrolyte tablets will help eliminate any aftertaste.
- Be sure to share your itinerary with a trusted friend or family member before heading out, including your expected route and arrival/departure dates.
Where to Buy Backpacking Gear
Perhaps our Seattle roots makes us biased, but we do much of our gear shopping at REI Co-op . The selection is excellent, the return policy is generous (make sure not to abuse it if you want it to continue), the staff generally are knowledgeable and helpful, and you get the brick-and-mortar bonus. A good option for online shopping is Backcountry.com , which has free standard shipping on orders over $50 and solid selection overall (we use Backcountry more for winter purchases but it does well in the hiking/camping world as well). For cheaper items and those who need gear quickly, it’s hard to beat Amazon.com and the sheer volume of sellers and product options. Last but not least, we always support buying gear at your local shop. It’s a great way to support the community, get real information about your trip, and be able to try things on in person. Back to Our Backpacking Checklist See Our Backpacking Gear Reviews
Learn More About Outdoor Gear

Hiking Gear Reviews

Best Backpacking Tents of 2024

Best Stuff Sacks of 2024

How to Choose a Backpacking Stove

The West Coast Trail: Vancouver Island's Iconic Hike

Best Backpacking Sleeping Pads of 2024

Best Hiking Shoes of 2024

Trekking Peru's Cordillera Huayhuash

Best Tent Brands of 2024
Mobile Menu
Megamenu - desktop hamburger menu.
- Hiking Gear
- Backpacking Gear
- Biking Gear
- Camping Gear
- Footwear Reviews
- Climbing Gear
- Skiing Gear
- Winter Gear Reviews
- In-Depth Gear Reviews
- Hiking Shoes
- Hiking Boots
- Trail Running Shoes
- Mountain Bike Shoes
- Approach Shoes
- Climbing Shoes
- Beginner Climbing Shoes
- Mountaineering Boots
- Winter Boots
- Rain Jackets
- Down Jackets
- Synthetic Jackets
- Fleece Jackets
- Hardshell Jackets
- Softshell Jackets
- Windbreaker Jackets
- Ski Jackets
- Winter Jackets
- Hiking Pants
- Trekking Poles
- Baby Carriers
- Running Vests
- Backpacking Tents
- Backpacking Packs
- Backpacking Sleeping Bags
- Backpacking Sleeping Pads
- Backpacking Stoves
- Water Filters
- Altimeter Watches
- Handheld GPS
- Mountain Bike Helmets
- Mountain Bikes
- Mountain Bikes Under $1,000
- Mountain Bikes Under $2,000
- Gravel Bikes
- Bike Brands
- Kids' Bikes
- Hitch Bike Racks
- Camping Tents
- Rooftop Tents
- Camping Sleeping Bags
- Camping Mattresses
- Camping Chairs
- Camping Stoves
- Duffel Bags
- Rock Climbing Shoes
- Climbing Helmets
- Climbing Harnesses
- Climbing Quickdraws
- Belay Devices
- Climbing Ropes
- Climbing Backpacks
- Winter Gloves
- 4-Season Tents
- Ski Helmets
- Ski Goggles
- Ski Backpacks
- All-Mountain Skis
- Ski Bindings
- Backcountry Skis
- Backcountry Ski Boots
- Skis for Beginners
- Hardpack Skis
- Mirrorless Cameras
- Full-Frame Cameras
- DSLR Cameras
- Point-and-Shoot Cameras
- Travel Cameras
- DSLR Lenses
- Mirrorless Lenses
- Lofoten Islands
- Lofoten Hiking
- Hardangervidda
- Jotunheimen
- 10 Great Norway Hikes
- Public Huts
- Torres del Paine
- Chalten and Glaciares
- Lake District
- Patagonia National Park
- Milford Sound
- Abel Tasman
- Marlborough
- Great Walks
- Adventure Towns
Add adventure to your inbox
- Privacy Policy
- Terms of Use
© 2024 Switchback Travel. All Rights Reserved. No part of this site may be reproduced without our written permission.
2-FOR-1 GA TICKETS WITH OUTSIDE+
Don’t miss Thundercat, Fleet Foxes, and more at the Outside Festival.
GET TICKETS
BEST WEEK EVER
Try out unlimited access with 7 days of Outside+ for free.
Start Your Free Trial
Powered by Outside
The Ultimate Backpacking Checklist
Heading out on your first overnight use this handy list as your guide to packing for a three-season backpacking trip..
Heading out the door? Read this article on the new Outside+ app available now on iOS devices for members! >","name":"in-content-cta","type":"link"}}'>Download the app .
A backpacking trip can be the experience of a lifetime—as long as you’re properly equipped. Using a backpacking checklist is the best way to take stock of your kit before heading out. Our handy list covers the essentials for anything from an overnight to a week out in the wilderness. This list is meant for three-season backpacking only—you’ll need additional or different gear for special situations, like snow camping, desert camping, or thru-hiking. Time to get packing! For a printable PDF checklist, click here . Taking a shorter trip? Our dayhiking checklist has you covered.
- Typically a 50- to 80-liter backpack
- Rain cover or waterproof pack liner
- Waterproof compression sacks or storage sacks (optional)
For three-season backpacking trips that take a weekend or longer to complete, you should carry a pack between 50 and 80 liters in size. If you’re simply doing an overnight trip or have an ultralight kit, you can make do with a smaller pack. There are many considerations when choosing a backpack, including carrying capacity, features like sleeping bag compartments and ice axe fasteners, pockets, materials, and overall fit. Read more about properly choosing and packing a backpack here .

- Tent , tarp, or hammock
- Trekking poles (optional, can be used to pitch certain shelters)
- Groundsheet (optional)
Tents are the most beginner-friendly option, and offer the best combination of livable space and protection. Hammocks can be a comfortable choice in warmer weather below tree line but may require extra time for setup and tree selection, along with extra equipment like a tarp to protect against rain or an underquilt to guard against cold. By themselves, tarps are a weight and space-saving option, but lack protection against bugs and take time and consideration to pitch correctly. Make sure to take stock of every pole and stake before setting off. Read more about choosing the right tent here.

Sleep System
- Sleeping bag or quilt (15°F to 30°F comfort rating)
- Sleeping pad (foam, self-inflating, or inflatable with an R-value of 2 or higher)
- Camping pillow (optional)
Traditional mummy bags offer a good warmth-to-weight ratio compared to rectangular sleeping bags while offering more coverage than quilts. Quilts can provide great weight-savings as long as you bring a beanie or detachable hood for warmth but can take some getting used to. All sleeping bags have temperature ratings, which indicate the range that the bag is designed to handle. In warmer climates, like parts of the American Southwest, you can get away with a higher comfort rating. Your bag is only as good as your pad, so make sure it has the appropriate insulating R-value for your lowest expected temperature. (Normally 2 to 5 R-value for three-season pads; 5 or above in winter). Read more about choosing a sleeping bag here .
Water Storage and Filtration
- Water bottle and/or water reservoir
- Purification system (squeeze, pump, gravity, or press filter, or a UV purifier)
- Backup filtration system (chemical purification tabs, drops, or small secondary filter)
Every filter or purifier, regardless of style, will eventually clog up; always bring the tools required to clean your filter. If using a UV purifier, bring a mesh pre-filter for sediment if you expect anything but pure mountain water. If there’s a chance of freezing temperatures, place your filter in a leak-proof bag and stash it in your sleeping bag overnight—if it freezes it is no longer safe to use. Read about some of our favorite water filters here .

Stove and Cookware
- Stove (canister, liquid fuel, or alternative style)
- Fuel (isobutane-propane canisters, liquid fuel, or alternative fuel)
- Lighter or waterproof matches
- Pots if not integrated into stove system
- Cleaning rag or mini sponge
- Mug (optional)
- Biodegradable soap (optional)
Canister stoves are great for quickly boiling water to rehydrate food, purify water, and make hot drinks. Choose a stove with a wider burner head and a non-integrated pot for easier backcountry cooking. Many backpackers opt for canisters for their ease of use, but liquid fuel stoves can be more efficient in cold temps and higher altitudes, and readily accept multiple types of fuel. Read about some of our favorite camp kitchen equipment here.

Food and Snacks
- Enough food for each day of your trip based on your caloric needs, plus an extra day’s worth of food in case of emergency
- Snacks to stave off hunger and increase your caloric intake while you hike
- Hydration/electrolyte powder or tabs (optional)
- Bear canister (if required), Ursack-type bag, or 50 feet of nylon cord and a carabiner for a hang if you’re in bear country
Deciding how much food to bring comes down to personal physiology, pace, and trail conditions, although 2,000 to 5,000 calories per day is a rough range for many people. Packing calorie-dense foods like nut butter, cheese, and olive oil will help you save weight. When in doubt, pack more food than you think you’ll need.

- At least two pairs of socks
- At least two pairs of underwear
- Shorts, pants, or other bottoms such as a skirt or kilt
- Long-sleeve shirt (for insects and sun protection)
- Insulating midlayer, such as a fleece or light puffy
- Packable down jacket
- Hardshell jacket or rain poncho
- Warm beanie
- Top and bottom baselayers (optional)
- Light gloves or liners (optional)
- Rain pants (optional)
The saying “cotton kills” is popular amongst hikers for a reason: the material holds on to moisture and doesn’t insulate when wet—the perfect recipe for hypothermia. Only wear wool or synthetic layers for the best temperature regulation. Baselayers and gloves can be lifesavers in cold or high-altitude climates but overkill in warm, low-elevation climates. Bring adequate rain gear even if precipitation isn’t in the forecast, and always stash at least two pairs of socks (wet feet mean a miserable trip). Read more about dialing in your layering system here.

- Hiking boots , hiking shoes, trail running shoes, or hiking sandals
- Camp shoes or sandals (optional)
- Gaiters for snow/scree (optional)
Choosing hiking footwear is one of the most subjective decisions a hiker can make—there are fits and options for every hiker and hiking style out there. For stability under heavy loads, rough terrain, and better durability, mid-cut or high-top boots are a safer choice. Trail running shoes will help you move faster (a pound on your feet equals five pounds on your back) and tend to breathe better. Depending on how much weight you’re carrying, lighter shoes can be more comfortable over long distances in general. Some backpackers prefer to hike in sandals for breathability, weight, and easy water crossings but must contend with the potential for cold feet and stubbed toes. Read more about how to choose the perfect footwear here.

Personal Hygiene
- Toilet paper
- Hand sanitizer
- Sunscreen and SPF lip balm
- Bug repellent
- Toothbrush, toothpaste, floss
- WAG bag (if required)
- Menstrual products and pack-out bags (if not using a menstrual cup)
- Female urination device (optional)
- Pee rag (optional)
How you take care of business in the backcountry depends on the environment. The easiest scenario involves moving 200 feet from a water source, trail, or camping area, digging a six- to eight-inch deep hole, clearly marking your spot, and cleaning your hands thoroughly. In certain environments—such as deserts or tundra—or protected and popular parks, a WAG bag may be required. And remember: tampons are always a pack-out item. Read more about backcountry hygiene here.

Electronics
- Power bank and/or solar charger (optional) with charging cables
- Headlamp with extra set of lithium batteries
- Satellite messenger or personal locator beacon (optional)
Most hikers can get away with a small power bank to charge their phone and headlamp on a backpacking trip. On extended trips with no resupply, a solar charger is the best (albeit slow) solution. Remember to keep batteries (always lithium, never temperature-sensitive alkaloid) in your sleeping bag at night—they lose juice more quickly as the mercury drops. Read more about some of our favorite backcountry electronics here.

- Map, compass, and the knowledge to use both
- GPS device (optional)
- Navigation app, like Gaia GPS (optional)
Always carry a topographic map and compass and know how to use them. GPS devices and smartphone apps are great tools, but can run out of battery or malfunction. Peace of mind requires carrying only a few extra ounces and a quick navigation course. Read more about backcountry navigation here.

Repair and Emergency
- First aid kit
- Prescription medication
- Knife or multitool
- Bear spray (in grizzly country)
- Sleeping pad patch kit
- Waterproof matches/ firestarter
You can easily buy a first aid kit that has everything you need (and more), or simply grab a waterproof bag and raid your own medicine cabinet or pharmacy for a low-cost alternative. Duct tape is one of the most useful all-purpose tools you can carry, and can help with medical emergencies and gear repair. Sleeping pad patch kits are especially important if you’re sleeping on rough ground. Read more about building emergency kits here.
Popular on Backpacker
Related content from the outside network, what’s it like to go on a 200-person hike better than you think., how to pack for backcountry skiing, the original yosemite firefall, hiker charges mountain lion.
Invalid email or password. Please try again.
You've shopped with us before!
Please set your password using the link below.
Create your Account
Already have an account?
Please correct the errors.
Passwords are case-sensitive, must be at least 8 characters in length, and must contain at least one special character.
- Include 8 or more characters.
- Include at least 1 special character.
For your free birthday gift!
Start your Expedition
Sign up with your email and start earning rewards with our exclusive loyalty program.
Explore More, Score More
Elevate your outdoor experience with Expedition Perks, where you earn points on purchases, get a bonus on your birthday, and more–it’s free to join!
Points On Purchases
Member Exclusives
Birthday Discount
What To Pack For A Backpacking Trip
Essential gear for overnight trips.
Hike & Camp
For those who want a multi-day hiking adventure, backpacking is for you. When you backpack, you’ll carry everything you need to survive in your pack and camp at various sites along the trail.
Pros: Backpacking is a beautiful way to immerse yourself in nature for an extended period of time. On foot, you’re able to access more remote locations where there are fewer people and more wildlife. Backpacking is a great athletic challenge with the added weight of your pack and the miles covered—so get prepared to get sweaty!
Cons: This is the least accessible option in that it requires more time, planning, and mobility than car camping or day hiking. You need to figure out where you’ll get water, how far you can hike per day, how much food to bring, and be comfortable using all your gear and tools.
It’s good to take a class, research, and talk to friends who’ve done similar trips before you head out. You can bathe in lakes and streams—but it’s obviously not the same as a warm shower!
Overall, backpacking is a bigger commitment but is an amazing way to experience nature, solitude, and self-reliance.
Essential Gear
This list is specifically for warm-weather adventures (temperatures around 50 degrees F and above). When packing your bag, place the larger and heavier items close to the bottom of the pack to maintain your center of gravity.
There are many ways to backpack, including ultralight, which means packing only the most essential items, and purchasing items like tents and sleeping bags specifically built to be ultralight (which often come with a more premium price tag).
The most important thing to remember is that every piece of gear, apparel, or extras (think books, playing cards, camera gear) means a little bit more weight. A full-sized toothbrush might seem insignificant in terms of weight, but all those little extra ounces of weight add up—especially as you’re hiking uphill after a long day on the trail.
Consider necessity, size, and ways to cut down on every ounce of weight when packing your bag (cut off the end of the toothbrush or get a small travel toothbrush instead, for instance). Do you really need that extra camera lens? Or can you simply use a smartphone for photos? It’s your weight to carry, choose lightly!
- Water and reusable bottle or bladder
- Food that’s lightweight and high in protein, fat, and fiber
- Cash/debit or credit card
- 2 pairs of shoes–one for hiking and another to wear in camp or on the drive home
- Insulated jacket
- Mosquito/tick repellant or a bug net
- First aid kit including: band aids, gauze, antiseptic wipes, antibacterial ointment, painkillers, tweezers, insect sting treatment, medical tape
- Map (downloaded or physical)
- Backpack and rain cover (size: 35 Liters and up)
- Tent/hammock/tarp
- Sleeping pad
- Sleeping bag
- Inflatable camping pillow
- Trekking poles
- Wool Socks (2 pairs)
- Hiking pants
- Quick dry top
- Baselayer top and bottoms (pajamas or for cold days)
- Midlayer top (fleece or wool)
- Extra batteries for headlamp
- Phone charging device
- Water filter
- Gas stove and gas canister
- Lighter/matches
- Plastic bags/stuff sacks
- Spork and knife or multi-tool
- Gear repair kit
- Trail permit
- Trowel and toilet paper
- Biodegradable soap
Nonessential Items
A few items that can make your trip more comfortable.
- Hydration tablets
This list isn’t exhaustive, and you might not need all of it depending on your location, style of backpacking, and nearby amenities. Safety and first aid kits are a priority, along with plenty of water (about a half a liter of water per hour of moderate activity in moderate temperatures, more in heat or on strenuous hikes).
Do you know the 7 Leave No Trace Principles ? If you’re new to backpacking, brush up on these easy principles to minimize your impact, preserve our outdoor spaces for generations to come, and stay safe while you’re at it.
With this gear by your side, you’ll be ready to manage any challenges you meet on your next backpacking trip. Come bears or mosquitoes, sunburns or cool nights, you’ll have everything you need to make it through alive and thriving. Here’s to you and your summer adventures. Happy trails!
Shop Hike & Camp
Bethany Clarke has her MFA from the University of New Hampshire. She lives in Portland, Maine with her partner and their two cats. You can find her art and outdoor adventures on Instagram @bethanymclarke .
Backpacking Essentials for Your Overnight Hike
Share this:.
- Click to share on Facebook (Opens in new window)
- Click to email a link to a friend (Opens in new window)

What do you need for a backpacking trip? This checklist of backpacking essentials will help you remember every important item.
The essential gear items that you bring on any backpacking trip will almost always be the same. Beginner backpackers and seasoned vets will agree that your exact backpacking essentials kit will change over time, and most of us are still refining our gear list each time we go. Yet our essentials seem to always make the list despite our unique needs and climates.
No matter your experience level, using a list can help you remember all the vital equipment. Along with the packing list we provided, we’ll break down how to choose appropriate gear for your overnight camping adventure.
Download Printable Checklist

This backpacking essentials checklist is meant to be a general guideline to give you a baseline of necessary gear. Item types and amounts will vary depending on the backpacker.
This isn’t an ultralight backpacking list, but it ensures you have all the items you need for an overnight trip in the backcountry.
Backpacking Essentials: Camping Gear
For an overnight trip, you should be able to get by with a backpack that holds 30-50 L. If you’re backpacking for an extended trip (3-5 days), then you will need a larger pack (50-70 L).
Other than the length of your trip, backpack size is determined by how bulky your gear is. Remember, all the additional layers for a winter trip will add more bulk to your bag than a standard summer outing.

Even if there’s no rain in the forecast, plan to bring something to cover your pack. A simple rain cover is fine, or you can bring a large trash bag.
Sleeping Setup
The first part of your sleeping setup to decide on is if you want to use a backpacking tent , tarp, bivy sack, or hammock. All of these sleeping shelters have their pros and cons and are very personal choices.
If you’re just busting out your tent for the season, make sure it’s in tip-top shape before your trip with our waterproofing, patching, and spring cleaning guide.

The sleeping bag you need depends on the climate and weather conditions. Be well-prepared for the night ahead by determining the appropriate bag temperature/comfort rating. Seek out a bag rated at least 10 degrees colder than the anticipated low temperature.
So if you expect the low for the night to be 30 degrees, pack a 20-degree bag or lower. Mummy bags are recommended for backpacking because they provide more warmth and are easier to pack down.
The next consideration should be if your bag is insulated with down or synthetic materials. Both have pros and cons, but the main difference is that down tends to be lighter and easy to pack down small with a higher price tag. Synthetics are bulkier, but they still insulate when wet and dry much faster.
For most skilled backpackers, keeping a bag dry isn’t too tough, so the light weight, compressibility, and long life of down bags makes them a top choice.

The Best Backpacking Sleeping Bags of 2024
A sleeping bag is one of your most important pieces of camping gear. We've found the best backpacking sleeping bags for every use and budget. Read more…
The final piece of the sleeping setup is a sleeping pad. Don’t forgo packing this item. While it’s tempting to think of a sleeping pad as only a comfort item, it provides much-needed insulation and warmth while you sleep.
No matter the shelter you’ve chosen, a sleeping pad is a must. Classic Therm-a-Rest Z Lite pads are an ideal and affordable sleeping pad choice, as you don’t have to worry about air leaks. Check out our list of the best sleeping pads on the market.
We didn’t include a pillow on the list. You may choose to bring an inflatable pillow for your sleeping arrangement. But for most backpackers, a great tip is to stuff some clothing into a stuff sack for a sufficient pillow for the trail.
Notice that we recommend a headlamp, not a flashlight. If a flashlight is all you have at the moment, it’s certainly usable. And some experienced campers love the power and versatility of a small flashlight.
However, for most people, a headlamp makes your life much easier during backpacking trips. It frees up your hands if you have to set up or cook in the dark. Plus, it makes hiking in early mornings or late at night much safer.
Even if you’re only out for one night, bring fresh batteries along. You can opt to change the batteries right before you go, but having a backup set should become a habit.
If you’re shopping for a new headlamp, pay careful attention to the battery life in the product specs. While extra lumens can be nice, you don’t need a ton of light for most backpacking, as you’re moving slowly or working close to your body. But long battery life is very helpful on multiday excursions.
Opt for a headlamp with a rechargeable battery versus disposable batteries for a more versatile headlamp. But keep in mind that you’ll likely need to bring a battery pack for recharges in the field when on longer trips.
Camp Kitchen

Stove and Fuel
For overnight trips, there are ways to get around packing a stove. Still, part of the delight of a crisp morning outdoors is a hot cup of coffee and a warm breakfast. You can cook these using old-fashioned fire and coals, but there are fire restrictions in many areas.
Having a camp stove and fuel makes cooking after a long day of hiking quick and easy. There are many options of camp stoves, ranging from very simple and small, like the proven MSR Pocket Rocket , to cooking systems like the Jetboil Mini Mo and multifuel liquid stoves that can function well even in bitterly cold weather. Then you have the more minimalistic stoves like a biofuel stove that burns biomass or alcohol stoves for a lightweight heat source.
Check out our article on the best backpacking stoves to learn more.
Cooking Gear
Beyond your stove, you’ll need a cooking pot, mug, and utensils. To keep things minimal, consider using a compact cookset that packs down together. These will usually have one utensil, one cooking pot with a lid, and a mug that all pack back down into the size of the pot.
The Sea to Summit X-Set 21 Cookset and the Stanley Camp Cookset are both excellent examples of this kind of setup.
For silverware, a spork is a standard option. Try to research the materials and read product reviews. There are many plastic spork options available, but metal or titanium utensils will last you much longer.
Minimalism on the trail may be a learned skill, but it will save you pack weight without compromising necessary creature comforts.
Dishwashing
With minimal cookware, dishwashing becomes a breeze. We recommend bringing some biodegradable soap along and a packable microfiber cloth to dry the dishes. Still, with only a few dishes, you should be able to get by without the use of a dishwashing tub.
If you prefer a dishwashing tub, some innovative and packable designs make doing the dishes easy.
For an overnight trip, it may be possible to pack a bladder of water to last for the length of the trip. However, you don’t want that to be your only available option. Having at least one water bottle ready to drink from at all times is advised, and having a water filtering system on hand will give you the security and flexibility you need to have a safe and enjoyable trek.
If you bring a water bladder along with your water bottle, bring at least a 2L bladder, although a 4L bladder is ideal. MSR makes very durable dromedary bags for backpacking.
Looking for a water filter? Check out our list of the best water filters here .
Disclaimer: Your backpacking food shouldn’t gross you out, and you need to bring enough!
There are so many fantastic backpacking food options available. Some are prepackaged, so all you have to do is add boiling water.
For an overnight trip, it’s easy to plan for food. When planning, make sure to think beyond mealtimes. Bring plenty of snacks to fuel you as you hike. Things like trail mix, power bars, and fruit such as oranges and apples are all great options.
As most of our food is packaged, especially for backpacking, be sure to follow Leave No Trace guidelines. If you pack it in, pack it out!
Depending on the area you’re traveling to, you may need to keep your food away from bears. Be sure to do your research and bring either a bear canister or bear bag when necessary.
Apparel and Footwear
Three important things to remember about backpacking clothing and shoes are as follows:
- Your clothes should be moisture-wicking materials. Avoid cotton, as it absorbs moisture easily.
- Pack and wear layers of clothing. You can pack clothing according to weather forecasts, but layering is the best way to prepare.
- Make sure your shoes are broken in before your hike. No one likes blisters. Ouch!
When you’re backpacking, you don’t need to change your pants and shirt every day. Backpacking life often means you should expect to get a little dirty (and maybe a little smelly).
So if you’re planning a simple overnight trip, you can expect to wear what you had on the first day. Bring an extra pair of underwear and socks, though. It’s nice to have a fresh pair, and you won’t have much other clothing packed, so no worries about space.
The clothing you should bring depends on the climate and current weather conditions. Even if there is no rain in the forecast, it’s better to be safe and pack at least a light waterproof jacket.
Packing layers of clothing also makes things more comfortable because temperatures vary throughout the day. So having to put on or take off one layer is much easier than having to change a complete outfit.
Your clothing and layering system should also include jackets. The type and number of jackets you bring depend on the climate and weather conditions.
Hiking boots or trail shoes should be a priority when planning a backpacking trip. They protect you from rocks and carry you over varying terrain. You need to trust that they will support you the whole way.

Most importantly, know the climate and terrain. If you’re going to be in a cold, wet environment, consider waterproof shoes or gaiters to protect yourself. If it’s hot and dry, maybe trail running shoes will fit the bill. Each trip and each person has different needs for footwear.
You’ll also want to break in your shoes properly if they’re new. This process can be done through various day hikes or just wearing them throughout daily activities.
Personal Hygiene
There are only a few backpacking essentials on the personal hygiene list, so they’re easy to keep in one place. These should include basics like a toothbrush, toothpaste, hand sanitizer, and any prescription medications.
Other than that, also bring items like a trowel for digging catholes or wag bags to pack out your waste. If you use toilet paper or wipes for sanitation, bring a sealable bag so you can pack them out after you’re done.
For female backpackers, menstrual products are essential as well. It’s a good idea to pack some even if you aren’t expecting your cycle to start. If you don’t want to carry around disposable menstrual items, you can use a menstrual cup. If you have never used one before, test it out before your trip.
Emergency Kit and Personal Items
Emergency or survival kit items are the most frequently forgotten items for most backpackers. They’re easy to forget because they won’t necessarily be used each day. Even though you won’t use one often, they play an important role in your backcountry safety. So take emergency gear seriously and add it to your backpacking essentials list.
A simple emergency backpacking kit should include a first-aid kit , whistle, firestarter, waterproof matches, emergency shelter, and a multitool.
Other safety and personal items that can make life easier on the trail include a knife, a gear repair kit, sunscreen, a sun hat, and insect repellent. If there are bears in the area where you’re backpacking, bring bear spray as well.
Having a reliable navigation system should be included on this list. Many hikers now use their smartphones for this. However, smartphones always have the potential to die or break on the trail. Having a laminated map and a compass as backup is a safe way to ensure you know your current location and where you’re going.
Finally, don’t forget other personal items like keys, identification cards, your wallet, permits, and your phone.
Packing Tips
When you’re packing for your overnight backpacking trip, lay out all of the essential backpacking items on the floor before you pack them. This way, you can inspect your gear and make sure you have everything on your list.

If you want to keep your backpacking essentials organized in your pack, using stuff sacks or organizational bags can be very helpful. Separating items in pouches or bags can make gear more accessible, organized, and compact. Using this packing process will ensure that you don’t forget any of your backpacking essentials.
The final tip we will leave you with is to print out two copies of your itinerary the night before you leave on your trip, even if it’s only an overnight adventure. Give one to a friend or family member and leave the other one in your car.
If you can’t hand off a paper copy, at least contact a trusted friend or family member and tell them where you plan to be in as much detail as possible, including when to expect you to return. This way, if something happens to you while you’re gone, someone will be able to alert the authorities right away, and they’ll know where to start looking.
Planning, packing, and embarking on a trip as a beginner can be intimidating. Because this article is focused on your packing list, not specifically how to pack, here are some more backpacking tips and tricks to help you get out there.

The Best Backpacking Tents of 2024
Whether you're looking to spend 100 nights on the trail or stick to a tight budget, we've found the best backpacking tents of 2024. Read more…

The Best Backpacking Water Filters of 2024
We tested the best backpacking water filters and purifiers for your next trip into the great outdoors. Read more…
Follow Us On
Subscribe Now
Get adventure news and gear reviews in your inbox!
Join Our GearJunkie Newsletter
Gear Top Stories Deals

My complete weekend backpacking pack list
Here I’m sharing everything I pack for a weekend backpacking trip. Feel free to use it as a complete packing check list or to get ideas and inspiration for deciding what to bring for a backpacking trip of your own.
I always love seeing what other backpackers are packing. People are so creative and have such well thought out systems. As a gear junkie, I’m on an endless mission to try new things and fine tune my own setup.
Click here for a list of all my current favorite outdoor gear
When I first started backpacking, I also started out with just the essentials, buying used and borrowing things. Since then it’s been a continuous journey of upgrading my gear and trying out lots of different things, and that’s just part of the fun! You don’t need to spend a ton of money to get backpacking, I wrote a blog post here on how to save money on gear.
About my pack style
Over the past ten years, I’ve really been able to fine tune exactly what works for me. Most of the trips I take are on the shorter side (one to two nights), and for these trips I’m looking for comfort and don’t mind carrying a little extra weight, since I’m usually not covering tons of miles in just a single weekend.
I did write a blog post about what I packed for the High Sierra Trail, which is what I would typically pack for longer trips up to a week long.
Affiliate disclaimer: this article includes some affiliate links, which means I may earn a small commission on any purchase made - at no additional cost to you. As always, all opinions are my own. Thank you for supporting the work I do to keep creating meaningful content like this for you!
Basic Backpacking Essentials
These are the items you should have in their most basic form for any trip into the backcountry. As simple as the basics might seem, you should always be prepared for anything Mother Nature might have in store for you!
Tent - out of the three tents I own I usually opt for the MSR Hubba Hubba for weekenders for its nice balance between being light weight and livable.
Backpack - for all trips, short and long, I use my trusty and comfortable Osprey Aura 65 since it can expand or pack down.
Boots - usually my Danner boots for these shorter, less rugged trips.
Sleeping bag - this will depend on the season and anticipated night time temperatures, but I will usually opt for a warmer bag rated for 21-30F even in the summer (you’ll never regret being too warm in the mountains!).
Sleeping pad - I like this one that doesn’t require blowing for inflation, and it is more comfortable and less crinkly than my ultralight option.
Stove - honestly I’ve found that most stoves work to my liking regardless of their price. I’ve been using an older, discontinued MSR version for years.
Water filter - this one by Platypus is probably my favorite piece of gear I own. I’ll never go back to pumping water ever again. The bladders have a high capacity, so it’s great for groups and even doubles as a camp sink when hung from a tree.
Utensils - as much as I love to cook at home, to avoid doing dishes, and mostly out of laziness 99% of the time I’ll go with dehydrated meals in the backcountry. This long-handled spoon is a necessity for not getting food on the back of your hand while eating.
First aid kit - I always pack a small first aid kit (did you know medical kits are FSA eligible? Score!) for any emergencies or booboos. I’ve amped mine up with moleskin , blister bandaids , sleeping pad patch kit , a small nub of duct tape, and an emergency blanket .
Knife - I’ve used the same Spyderco knife for 10+ years! Light, compact, and durable.
Water container - I use a 3L reservoir since I find having a tube encourages me to drink more water while hiking, but a Nalgene is also a budget-friendly and light option.
Headlamp - it’s super important to also know where it is at all times for quick access. This one has 400 lumens, and I also bring an extra set of batteries ( these rechargeable ones ) just in case.
Map/GPS - I use my phone with several different apps. I download offline Google maps, and I also use Gaia and the Garmin app with my Garmin watch .
Clothes - for a weekend alpine trip I will typically pack a fleece jacket, down jacket , and rain jacket for outerwear. Then always my wool base layers , one warm pair of socks for sleeping, and a pair of leggings or hiking pants (I love the fit of these sustai nable ones ). Don’t be afraid to rewear clothes, socks, sports bras, etc! See my main gear page for my current favorite women’s hiking clothes.

What I always pack
These items aren’t commonly regarded as necessary as the items above are, but these are items that I will always pack for my shorter trips since they make my time in the backcountry comfortable and more enjoyable.
Pillow - as a side sleeper, this super light and compact inflatable pillow is essential for getting a good night’s rest in the outdoors.
Sleeping bag liner - I’m a cold sleeper, so this liner not only gives me a couple degrees of warmth, but it also protects my bag from any oils, lotions, or dust on my clothes or body that could seep into the sleeping bag over time.
Hat/sunglasses - you’re more prone to sunburn at higher elevation, so be sure to pack protection. Don’t think your eyeballs can’t burn too, because I’ve seen it!
Toiletries - for me this means sunscreen, chapstick, contact solution and case, mini toothbrush and toothpaste, and a little bit of lotion.
Mug - what is a morning in the backcountry without a hot drink in hand? I either bring a collapsible one or if I have more room, this insulated one .
Trowel & toilet paper - I use this ultralight one and pack some toilet paper and a couple ziplocs to pack out any used toilet paper.
Snacks - snacks are crucial for long hikes, and I must admit I am a food-driven individual. Some of my favorites for the trail are sour candy, protein bars, and trail mix. If I’m going for an overnighter with friends, I might even include boxed wine and … a mini charcuterie spread! Always a crowd favorite. I cover backpacking food and snack ideas more in this blog post .

Location-specific gear
Bear can - California and many other mountainous regions in North America require the use of bear canisters in some areas. Be sure to know the regulations for your area. I have a full-size one for 2+ people and a mini one for individual/overnight use, and I like that these are clear so you can see inside. You can also rent from some visitor centers and outdoor gear stores like REI.
Bug repellent/head net - depending on the season and location, mosquitos can really put a damper on any trip. I like to treat my clothes with Permethrin , and also bring bug repellent and even a head net for the more extreme cases (early season destinations with water).

Optional gear to consider
Depending on the type of trip, there are several items that I might want pack. These are by no means necessary, but they are items that I occasionally pack on shorter trips and greatly enjoy having.
Trekking poles - I’ll bring these light poles if the terrain is particularly rocky or uneven, or if I’m trying to hike longer distances than usual in a day.
Packable daypack - if my weekend route involves a base camp for more than one night and doing a day hike with a lighter pack, I’ll pack this super light and compact backpack that fits in the palm of my hand.
Hammock - if I know there will be lots of trees and down time, I love this ultralight hammock to kick up my feet and relax near camp.
Camp chair - an alternative to the hammock when I know I’ll want to be relaxing a lot but not sure if there will be trees to hang a hammock. I like to pack this budget-friendly one particularly on desert or sandy trips.
Microfiber towel - a packable and quick dry towel is a must if I can get in the water.
Camp sandals - after a long day of hiking, wearing sandals is such a luxury to take a break from boots or to go swimming in. I love something really light that can clip onto the outside of my pack like these Teva sandals .

Camera gear
Camera setup - one lens is plenty enough for me, and my current favorite pairing is the Sony a7Riii + 16-35mm wide angle zoom lens. Check out the rest of my favorite camera gear here .
Camera clip - this nifty clip attaches to my backpack strap and allows me to hang my camera from my shoulder so that I can hike and shoot at the same time, which is something I often do.
Lens cap bungees - I’ve dropped too many lens caps in rock crevasses and streams to count, so you can bet I have one of these lens cap keepers on each lens.
Lens cleaner pen - being out in the elements means a lot of dust or water. This compact tool helps keep my lens clean and clear.
Don’t be daunted by this long list. As long as you have some variation of the essentials, you’re ready to go backpacking! The rest is just fluff. That is what I love most about backpacking, it truly is empowering to see how little you need in your life to thrive in the outdoors.
Do you have a favorite item to bring backpacking? Let me know in the comments!

2024’s Ultimate Backpacking Checklist for Multi-Day Hikes
- Updated on: May 5, 2023
This article may contain affiliate links. For more information, please see our disclaimer here.
Table of Contents
Prepping for a multi-day hike is one of the most exciting things to us. Packing our backpack with our gear and venturing into the great outdoors is a thrill like no other. Through our experiences , we’ve learned so much about what to bring on a hike and how to pack a backpack . That’s why we wanted to share our knowledge and provide a comprehensive backpacking checklist for you .
When you’re training for backpacking , knowing what to pack is a critical skill for backpackers . You could be in tip-top shape, but you’ll be in trouble without the hiking essentials . Before departing for any backpacking trip, you should always refer to your backpacking checklist. If you don’t, you risk getting into a dangerous situation .
After studying this checklist, you’ll have a vital resource to know what should always be in your backpack . Some items will vary based on where you go hiking , but we’ve covered all the essentials for any multi-day hike. So, grab your backpack and start packing for that next adventure.
If you’re a first-time backpacker and nervous about your adventure, also check out these 12 things you should know
Hiking essentials

For every hike, there is a list of backpacking essentials you should always have with you no matter what . Whether you’re on a day hike or going on a 7-day backpacking trip, these items should be in your backpack every trip :
- Water – You need enough water to last your entire trek. If your route has no place to refill your water bottle, you’ll need to pack a pouch full of water . A reusable water bottle and a purifier is great when there are natural sources to refill your water.
- Food – Bring the minimum amount of food you’ll need on your backpacking trip. Snacks such as trail mix and granola bars help for a few hours but pack filling meals to cook for multi-day treks .
- Extra Clothes – Other than the clothes on your back, you’ll need extra garments to change into . If you get caught in the rain or it gets freezing at night, extra layers are essential . Our layer system post shows you how to stay warm in any environment .
- Navigation – Whether you use a physical map, compass, or GPS , always know where you’re going on the trail.
- First Aid – If there’s an emergency, have the necessary tools to treat injuries . Pack items like bandages, antibiotic cream, gauze pads, hydrogen peroxide, whistle, insect repellent , and anything else you may need for your specific route.
- Shelter – For multi-day backpacking trips, you’ll always need a tent for shelter . But even for day hikes, having an emergency shelter can also be a lifesaver .
- Fire – Never underestimate how chilly it can get at night and pack the resources needed to start a campfire . But before you start your trip, ensure campfires are allowed in the area you’re hiking . You never want to risk starting a bushfire , and some hiking destinations are prone to fires .
- Knife – A reliable knife serves as protection against dangerous wildlife and helps repair damaged gear .
- Sun Protection – Some environments expose you to fierce amounts of sunlight, and you’ll need protection from UV radiation . Pack sunscreen, sunglasses, a hat, and any other gear that protects you from sunlight.
- Headlamp – If you wind up hiking in the dark, a headlamp is essential to see where you’re going . Make sure you enough batteries to last the entire backpacking trip.
Related post: 11 essentials for every ba c kpacking tri p
Camping necessities to add to your backpacking checklist

For multi-day backpacking trips, camping necessities are vital for backpackers . You’re going to sleep in the wilderness and need the proper gear to survive the elements . If you’re new to camping , these essentials will show you what to bring on a hike:
- Tent – You always need a roof over your head to protect you from rain, snow, or other adverse weather conditions . The tent should provide warmth for the lowest temperatures you’ll encounter on your backpacking trip. Also check out our guide on what to look out for when purchasing a lightweight backpacking tent.
- Tent Footprint – A groundsheet adds extra protection for your tent in rainy or snowy weather .
- Sleeping Bag – Feel snug and warm at night inside your tent for added protection against the elements . Similar to a tent, your sleeping bag should offer warmth at the lowest temperatures in your environment .
- Sleeping Pad – Sleeping on the ground can be brutal on your body and leave you aching for your next hike. For added comfort, bring a sleeping pad to slide beneath your sleeping bag .
- Repair Kit – If your camping gear gets damaged, you want the needed tools to repair it on the spot .
- Lantern – For light when you can’t see what you’re doing in the darkness .
Backpacking gear

In addition to the hiking essentials on your backpacking checklist, you’ll need other backpacking gear for your specific route . Depending on where you’re hiking, you may not require all of these items. But you must research your route to know what to bring on your hike.
- Water Purifier – If your route doesn’t offer treated drinking water, you must rely on natural sources (streams, rivers, etc). A water purifier treats the water for bacteria, viruses, parasites, and other nasty organisms that can make you sick .
- Trekking Poles – While not everyone requires trekking poles, they can help you on steep, rocky, or muddy trails . Trekking poles offer added support to ease the pressure on your knees .
- Rain Cover – A waterproof rain cover prevents your backpack from getting soaked during a thunderstorm . And you’ll keep the gear inside your backpack dry .
- Bear Spray – If you’re backpacking where bears live, then bear spray is essential for protection . Make sure you read the instructions to know how to use the spray should you encounter a bear.
- Bear Canister – These containers are designed to prevent bears from getting into your food supply .
- Multi-Tool Kit – Whenever your gear gets damaged, a tool kit can help you make repairs and extend its lifespan .
- Daypack – If there are day hikes from your campsite, a daypack lets you trek without carrying all your gear . Check out our top pick s daypacks here.
- Personal Tracking Device – For backpacking trips that take you deep into the backcountry , a personal tracking device helps you send an SOS message during emergencies .
Cooking Essentials

When you’re living in the outdoors, cooking your own meals is essential for survival . And enjoying a hot meal makes backpacking life more bearable after roughing it in the wilderness. From our experience, the best cooking gear keeps it simple and helps you maintain sustainable travel . Our cooking essentials guide covers all the basics for cooking at your campsite . Here’s what we recommend adding to your backpacking checklist:
- Camping Stove – Bring a lightweight, portable stove that can cook a variety of meals. We’ve been able to cook potatoes, pasta, meat, and vegetables on our stove.
- Pots & Pans – Pack lightweight pots and pans that are heat-resistant, have non-stick coating, and collapsible to fit in your backpack.
- Gas Bottle – You can’t use the stove without fuel, and a gas bottle is essential to cook your meals . An alternative is a reusable fuel burner that’s easy to pack.
- Utensils – Keep it simple and bring versatile cookware to help you prepare your hot meals.
- Plates – Pack reusable plates that are heat-resistant and easy to clean .
- Cutlery – An easy-to-pack cutlery set with forks, spoons, and knives to eat your meals.
- Cups – Bring the right cups based on the temperatures you’ll encounter on your backpacking trip . Collapsible cups are always fantastic for your backpacking packing list.

The attire for your backpacking checklist will vary based on the weather of your hiking route . You should prepare for abrupt changes in the forecast and be able to change clothes while trekking . It’s also important to know the type of terrain to ensure you bring the proper hiking shoes . While your specific list may differ, start with these clothing essentials:
- Hiking Boots – For rocky terrain, you’ll need sturdy hiking boots with ankle support . Trail runners are fine when hiking on dirt trails with less incline . Bring waterproof boots for backpacking trips with water crossings .
- Hiking Socks – Wool socks are our favorite to keep our feet warm in the outdoors . Here’s why we think Merino wool socks are the best.
- Several Thin Layers – Wearing multiple layers of moisture-wicking clothes helps you maintain a healthy body temperature . When the weather changes, you can add or remove layers for comfort.
- Wool/Fleece Jacket – An extra layer of protection when facing frigid temperatures .
- Waterproof Jacket – Stay dry and avoid the risk of hypothermia in case of cold, rainy weather . Find out why I never hike without my GORE-TEX rain jacket. We’ve created a rain jacket buying guide , and you’ll see why it’s the top brand on the market .
- Waterproof Pants – Bring trousers that remain dry in a torrential downpour .
- Thermal Underwear – An extra layer of warmth if you’re backpacking in chilly temperatures.
- Gaiters – Extra protection when trekking through water or snow .
- Gloves – Keep your hands warm and dry .
- Scarf – Protection for your face and neck in cold, windy conditions.
- Hat/Beanie – Retain body heat in cold temperatures by protecting your head, face, and ears .
- Spare Clothes – An extra outfit to change into once you’re finished hiking for the day.
Check out: Review of Fjallraven Keb Eco shell Jacket
Miscellaneous stuff on your backpacking packing list
We’ve covered the basics, but there are other items you should consider adding to your backpacking packing list. These items won’t be critical to your survival but will make your backpacking trip more pleasant . Consider these miscellaneous items when prepping for your trip:
- Personal Toiletries – Pack whatever you need for added comfort on your backpacking trip. This can include a toothbrush, toothpaste, lip balm, deodorant, medications, hand sanitizer, and antibacterial wipes .
- Toilet Paper – If you’re in the backcountry, bring the number of rolls you need for your trip . And the lack of plumbing means you’ll have to seal your waste .
- Hand Towel – For scorching temperatures, you’ll be glad to have a towel when sweating buckets .
- Camera – Stop for scenic photos of your journey to share with your loved ones back home.
We love to hear from you
Thanks for checking out our backpacking checklist for multi-day hikes. Hopefully, this has provided the information you need to pack your backpack for your trekking adventure . If you have backpacking experiences or other tips to recommend, please leave a comment below .
Don’t forget to check out our destination pages to see our favorite places to go backpacking. For more travel tips and inspiration, check out more of our travel tips . And for extra inspiration for your next backpacking trip, check out the greatest multi-day hikes in Europe .

All Hiking posts
Leave a comment cancel reply.
Your email address will not be published. Required fields are marked *
Related Posts

Winter Hiking Essentials: Embracing the Magic of Snowy Trails

Best Hiking Pants for Women: Your 2024 Buying Guide

2024 Osprey DayLite: A 10-Year Adventure Tested Review!

30 Best Single & Multi-Day Hikes in Europe
Interesting deals & ads, 30 best hikes: in europe, best insurance: for hiking, best hiking gear, destinations, travel tips.
Backpacking Gear List: Packing Guide for Multi-Day Hikes
Backpacking is all about balance – keeping your pack weight low while still ensuring you have everything you need to be self sufficient and comfortable in the backcountry.
It can be an overwhelming prospect for first time or novice backpackers.

With that in mind, this post features a comprehensive multi-day packing guide detailing every single item to bring on a short backpacking trip.
There’s a printable packing checklist at the end too, available to anyone who signs up to our monthly email newsletter .
I’ve also listed every item we personally use, with gear recommendations and tips from 20+ backpacking trips.
What to expect in this post:
Essential backpacking gear
Camp kitchen, food and water, health and hygiene.
- Discretionary items
Personal items
- Printable backpacking checklist
Time to dive in!
Published May 2022. This post includes some affiliate links. If you make a purchase via one of these links, we may receive a small percentage of the total sale at no extra cost to you.

What to bring on a backpacking trip
Let’s start this guide with an overview of the basics. The bare minimum for a safe backpacking trip is:
Sleeping bag
- Sleeping mat/pad
- Stove and fuel
- Cooking pot and utensil
Water storage
- Water treatment system
- Appropriate clothing
- Appropriate footwear
- The 10 Essentials (includes emergency equipment)
Experienced backpackers may swap out some of these items for lighter options e.g. tent for tarp shelter, stove/cooking pot for ‘cold soaked’ food.
When backpacking in a group, some of these items can be shared (stove, tent etc.)

Please note that a loaded backpack should not weigh more than 20% of your body weight. So a hiker weighing 150lb (68kg) should aim for a backpack weight of no more than 30lb (13.6kg).
Keep in mind that it takes a few trips to refine the best backpacking set-up (food, gear, clothing, footwear etc.) for you.
And over time, you may replace certain items to achieve a lighter pack or a more comfortable backpacking experience.
The rest of this post will discuss each of the above items in greater detail.
Backpacking for the first time? You may also find our Backpacking 101 post helpful

Along with food, water and clothing, these items are your backpacking must-haves.
You won’t get far on a backpacking trip without a backpack.
A good backpack should be comfortable and distribute the load of your gear evenly. It should also transfer the weight to the biggest and strongest muscles and bones in your body – those in your hips and legs.
Most backpackers use a backpack with 40 to 80 litres of space for trips of 3 days or more. The most common size is 50-70 litres.
More information about choosing a backpack in our Backpacking 101 guide .
What we use – Having tried and tested quite a few different backpacks over the years, we pretty sold on the Osprey Aura AG 65 and the Osprey Aether 65 . Both are on the heavy side but we find the provided support and cushioning is worth the extra weight. I usually use my Aura without the lid as I don’t need the space.

Tent and footprint
A tent is your home on the trail. It’s usually the heaviest and largest piece of equipment in your backpack. A good weight to aim for is 2lb per person.
The lighter the tent, the less durable it is. Consider a footprint for more delicate tents, to help protect the bottom of the tent and prolong its life.
More information about choosing a backpacking tent in our Backpacking 101 guide .
What we use – For more than 6 years (and 40+ backcountry trips) we used the MSR Freelite 2 . Though on the tight side for two people, it was exceptionally lightweight at 2lb 15oz. The footprint was an additional 7oz.
We recently upgraded to the Big Agnes Copper Spur 3 . At 3lb 8oz, it is a little heavier than the Freelite 2. But the increased space more than makes up for it! The Copper Spur feels like a backcountry palace. For us, weight penalty is worth it.

Sleeping bags are designed to keep you warm and comfortable while sleeping outdoors. Choose between down and synthetic insulation, mummy or barrel shapes, single or doubles. Alternatively, consider a quilt.
More information about choosing a sleeping bag in our Backpacking 101 guide.
What we use – After freezing in sleeping bags for years, I recently upgraded to Rab’s Neutrino Pro 600 (women’s specific version). Yes, being rated to -12c means that it’s overkill for most of our backpacking trips but I’m finally sleeping warm without having to wear lots of layers. JR finds mummy shaped sleeping bags to be claustrophobic but he found a compromise in the Draco -9C Wide Down Sleeping Bag from MEC . It’s more barrel shaped, which does mean it is heavier (almost 3lbs, compared to 2lb for my warmer bag). We both store our sleeping bags in OR compression dry bags . I’d highly recommend them – ours are still in almost perfect condition after 8 years of abuse!

Sleeping mat
A sleeping mat, or pad, offers insulation and cushioning for a more comfortable night. Air pads (inflated by breath or a pump) are very popular, as are self-inflating pads.
More information about choosing a sleeping mat in our Backpacking 101 guide.
What we use – Saving on both space and weight, we share the Exped Synmat Hyperlite Duo M . Though I wish we had purchased the wider version, we love this air pad. It weighs just over 2lb, so 1lb per person, with the pump bag included. The two halves have separate valves, which means a leak would only affect one side (and there is also less wobbling when the other person moves!)

First Aid Kit
A First Aid kit is invaluable for every-day irritations (bee stings, small cuts) as well as major injuries. Don’t forget the importance of blister care and prevention – consider moleskin fabric or Leukotape .
What we use: Some essential items we have in our kit are bandages, blister plasters, surgical tape, sling material, oral rehydration salts, tweezers and antihistamines. We also bring a handful of strips of Leukotape on decal backing (the smooth, shiny paper behind labels and stickers) for blister prevention.
Carry at least one navigational tool while backpacking, preferably a topographic map.
Make sure your map is in some kind of waterproof container (even a Ziplock bag would do). In areas with a less defined trail, you’ll want a compass too.
Even when primarily using a GPS unit or phone app for navigation, always have a map as a back-up.
What we use : Used in conjunction with paper maps, we love the app Maps.me . It doesn’t feature all of the trails we hike but it’s invaluable for the ones it does! Download the maps in advance and you can use them offline.

A small repair kit is one of the 10 Essentials.
Duct tape is an all-purpose, fix everything lightweight saviour. You can use it to fix tent holes, broken poles, ripped clothing, broken backpack buckles and more.
Having a knife or multi-tool is also immensely useful for a range of tasks including building shelter, creating kindling and assisting with first-aid
What we use: Tenacious tape is a great alternative to duct tape. We also bring a knife .
Communication device
If you bring a cell phone, charge it fully, turn it off and then store it somewhere waterproof (Ziplock bag, dry bag).
Use your phone for photography? Bring a portable battery charger for back-up (and don’t forget your phone cable as well).
A satellite communication device makes it possible to request assistance in remote locations without phone signal.
Popular devices include the S p ot or InReach (both brands are recommended by Search and Rescue organisations). I’ve also heard good things about Zoleo .
As an extra precaution, always have a whistle as a signaling device. Some backpacks already have these on the sternum strap.
What we use : We bring an InReach SE+ on all of our backpacking trips, which works on a subscription system. Though we’ve (thankfully!) never had to use it during an emergency situation, we do regularly communicate with friends and family. It’s free to send one of three pre-set messages with our GPS coordinates and a map. Since we use our phones for photography, we always make sure we have at least one portable battery charger. Our most used one is this inexpensive 10000mAh version from Amazon.

Light source
A flashlight will do but it’s much easier to use a headlamp . This will free up your hands and make it much easier to find items in the tent, cook food or use the outhouses at night.
When shopping for a headlamp, look are the amount of lumens. This indicates how bright the headlamp’s beam will be. Around 200-300 lumens is satisfactory for most backpacking requirements.
What we use: We love our Petzl Actik headlamp . The max light output is 350 lumens, with a red light option. It can be powered with regular AAA batteries or a rechargeable Lithium-ion battery . We prefer the latter.
Fire starters
Another of the 10 Essentials, fire starters can be a lifesaver for backcountry users needing to signal for help or suffering from hypothermia.
Firestarters, as the name implies are designed to get a fire going quickly. Bring matches at a minimum, preferably of the waterpro of kind or in a waterproof container.
What we use: We have some waterproof matches in our First Aid kit for emergencies. Depending on the trip (if campfires are allowed), we may also bring a lighter and a very small amount of kindling. Alternatively, we’ll keep an eye out for birch bark while hiking to use as kindling instead.

Food never tastes quite as good as it does in the backcountry!
Backpacking stove
Lightweight canister stoves are most popular for backpacking, with liquid fuel stoves a close second. The latter connect to refillable fuel bottles , usually filled with white gas, and are usually a bit heavier.
What we use : Our go-to backpacking stove is the Jetboil MiniMo . It has an integrated stove and pot system, which reduces the air space between the burner and the pot. It is therefore more efficient than most other systems (= fast boiling, less gas), especially in windy conditions. The MiniMo is well worth the upgrade from the Flash , in my opinion, as it features a fuel regulator, which allows you to simmer and boil water. We also prefer the wider pot.

Backpacking stoves require fuel to operate. There are a few different types so make sure to buy the right one for your stove.
Most backpacking stoves use a blend of isobutane propane , which is sold in canisters of 3.90z (110g), 8oz (227g) and 16oz (450g).
The amount of fuel needed for your backpacking trip varies depending on many factors included on the length of your trip, stove efficiency, cooking style and the temperature/elevation of your destination (the colder and higher it is, the more fuel the stove uses).
What we use: On an average 5 day backpacking trip at sea level, JR and I bring one small 110g canister to boil water on our Jetboil stove for four dinners, one breakfast and half a dozen cups of tea.
Plates, bowls and cups
Some backpackers like to bring dedicated bowls and plates for meals, as well as drinking cups. Plastic is a popular material as it is very light. Stainless steel cups are a classic choice for tea and coffee mugs.
It is possible to buy backpacking dishes and bowls separately as well as in sets.
Alternatively, you can also purchase an integrated set of dishes and cups, designed to fit inside a cooking pot. A backpacking stove is optionally included. Examples: GSI Dualist Dualist (no stove), MSR PocketRocket set (with stove).
Backpackers primarily eating prepared freeze dried food often eat from the packet (no pot needed).
What we use : Preferring to avoid the weight, we typically eat cooked meals directly from our Jetboil cooking pot . In recent years, we’ve also added a GSI Infinity Backpacker Mug to our set-up. Insulated with a sealable lid, it weighs less than 5oz. We use this mug for tea and rehydrating/eating food.

Don’t forget to bring something to eat with! The type of utensils you bring will vary depending on the food chosen.
Plastic is a common backpacking utensil material as it is very light. Sporks (yep, a spoon/fork combo) are popular.
What we use: We like to keep things simple and bring two plastic GSI Long Spoons . These extra long plastic spoons are ideal for scooping out meals from freeze dried food packets or stirring rehydrated food in our Jetboil.
Cleaning supplies
Some biodegradable soap , a small scrubber and a quick dry towel are a popular trio of cleaning backpacking supplies for washing dishes and cooking pots.
What we use: We bring a tiny scrubber (about an eight of the size of a regular one) and a very small Nalgene bottle of biodegradable soap. After washing, we air dry our cooking pot.

Not only your backpacking stove requires fuel; you do too!
Water purification
Water in the backcountry isn’t always safe to drink. While it may look fine in appearance, it could be carrying bacteria that has the potential to make you very sick.
The three most popular ways to make water safe to drink while backpacking is to use a filter , UV light or water purification tablets.
What we use : We like to bring two types of filtering/purification systems , in case of failure. One is a filtering system. We used the BeFree for a long time before switching recently to the MSR Trail Shot . If we backpacked in a larger group, I would purchase a gravity filter system instead. As backup, we also bring a handful of ultralight Aqua Tabs (water purification tablets). We store these in our First Aid kit.

Depending on the trail, you may want to bring up to 2l of water in your backpack. Using a bottle is the cheapest option, but not the most convenient. Hydration bladders , also known as reservoirs, allow you to drink on the go.
What we use : To store water, we prefer to use hydration bladders (2l). We currently have the Osprey brand, made by Hydrapak . I find these to be way more convenient than a bottle for drinking water while on the trail.

Meals and snacks
Food weight can really add up in a backpack. Prioritise calorie-dense food, with plenty of carbs and protein. Think nuts, seeds, jerky, dried fruit, granola, beans, granola, cheese and dark chocolate. Junk food (chips, candy) in small amounts too.
For dinner, a lot of backpackers purchase freeze-dried meals. These provide an easy (but expensive) solution. Backpacker’s Pantry Pad Thai is the best of all we have tried.
What we do: We bring around 1.1lb of food per person per day. So on a 5 day backpacking trip, we carry around 11lb of food for the both of us. This is on the low side but we have experimented and this works for us on short (up to 8 day) backpacking trips. We make our own dehydrated meals for dinner.

Always bring a little more food than you need. This could be an extra meal or a day’s worth of snacks. You never know what kind of delay you may have (weather, injury, illness etc.)
What we do: We always bring an extra dinner meal. As a bonus, this gives us additional choice for what to have for dinner!
Food storage
When not in use, food, toiletries, cooking equipment and garbage should be stored securely, away from your tent. Most backpackers store food in a dry bag .
Some backcountry campfires will have a food cache or bear pole system. Research the campground to see what system is in place. If there is nothing, bring a carabiner at least 15m (50 feet) of nylon cord to make a bear hang .
Alternatives include the Ursack (a lightweight, collapsible puncture-resistant bear bag) or a bear barrel/canister (a thick plastic container with a bear-resistant lid).
What we use: We store food in a dry bag (the same one each time) and always bring a carabiner and nylon cord to create a bear hang, in case the food cache/bear pole system is full or unusable.

It’s important to wear clothing that will keep you warm, dry and comfortable when backpacking. The key to this is wearing layers of clothing, made from moisture-wicking and quick-drying fabrics.
Most backpackers carry at least two outfits – one to wear and one spare.
At a minimum , I would suggest the following for a short backpacking trip in Canada:
- Moisture wicking t-shirt
- Long sleeve shirt
- Quick drying pants
- Second pair of quick drying pants or shorts
- Warm mid layer (fleece or similar)
- Waterproof jacket
- Moisture wicking underwear
- Moisture wicking socks (ideally wool)
- Suitable boots or shoes
- Warm accessories
Depending on your destination and the expected conditions, top and bottom base layers (colder weather) may be preferable additions.
What we do: For the majority of our backpacking trips, I bring:
- 2 x merino wool t-shirts
- 2 x long sleeve merino wool shirts
- 1 x quick drying pants
- 1 x quick drying shorts
- 1 x underwear per day (up to 5 maximum)
- 2 x quick drying sport bras
- 3 x merino wool socks
- 1 x merino wool base layer pants (long johns)
- Arc’teryx Atom LT Jacket (mid-layer or outer layer)
- Arc’teryx Beta Jacket (waterproof)
- Light gloves
- Buff neck gaiter
Of course, there is some seasonal variation (but not a lot). When backpacking at lower elevations in the height of summer, I’ll exchange one of the long sleeve merino wool shirts for another t-shirt. If the forecast is rain for the entire trip, I’ll bring an extra pair of socks. For longer backpacks, I’ll wash items as necessary.

A great backpacking trip starts with the first pair of shoes on your feet.
Hiking boots or shoes
Backpacking boots are designed to carry heavier loads, with stiffer midsoles and a high cut covering the ankles.
Some experienced backpackers prefer to wear lighter hiking shoes or trail runners. There are benefits and disadvantages to both options.
No matter which type of shoe you choose, be sure to test it out on shorter trails before heading out on a long backpacking trip.
What we use : We both use Salomon Quest 4 GTX for longer backpacking trails. On shorter, less intensive trips I switch to low cut Oboz Sawtooth hikers .

Camp shoes or sandals
It feels so good to get out of hikers and into a different pair of shoes at the end of a long hiking day! For some people (myself included), bringing a second pair of shoes is well worth the extra weight.
What we use: Depending on the trail, I bring either my Teva Hurricane Drift sandals (great for crossing rivers and streams as well) or some insulated booties (ideal for hut to hut hikes).

Keep yourself safe, clean and healthy on the trail with the following items.
Toothbrush and toothpaste
There’s no reason to neglect your teeth while backpacking!
What we use: Nothing special here, we bring regular toothpaste in a small travel sized tube. Our toothbrushes are travel size as well. We keep both items in a tiny toiletry bag.

Insect repellent
Using repellent is the easiest way to ward off insects, but other options include mo s quito coils , citronella candles , portable mosquito repellers and head nets .
What we use: After trying so many different types of natural repellents, we rely on Off! Deep Woods in buggy places. If I know that a backpacking trail is particularly infested, I will bring a head net (luckily, this doesn’t happen often!)

Toilet paper and hand sanitizer
Never assume that backcountry campground outhouses will have toilet paper – bring your own!
Store it in a Ziplock or light dry bag. Be sure to have some alcohol-based hand sanitizer as well.
What we use: Years ago, I won a Sea to Summit toilet paper holder. Sounds gimmicky but we’ve brought it on every trip since! It’s basically a ultralight dry bag with a detachable rod in the middle. One toilet roll clips into it. We store a small container of hand sanitizer in the middle of the toilet roll.
If there are no outhouses at your destination, you will need to plan ahead appropriately to Leave No Trace . Bring a lightweight trowel so you can dispose of human waste properly. Pack out toilet paper in a Ziplock bag.
What we use: We bring a lightweight trowel on backcountry trips with no established campgrounds along the route, as well as spare Ziplock bags.
Hairbrush and hair bands
If you have long hair, don’t forget to bring a hair band or two. Optionally, you may want to bring a hairbrush as well.
What we do : I bring a small foldable hair brush ( like this one ) with a couple of elastic hair bands.

Sun protection
One of the 10 Essentials, sun protection is a must when backpacking at any time of year. It’s so easy so get burned, even on cloudy days!
Sunscreen is a must, as well as sunglasses and a sun hat .
What we do: We bring a 100ml bottle of sunscreen (we like this local natural brand ), as well as a pair of sunglasses and a sun hat each.
Though negative bear encounters are pretty rare, having bear spray is a good idea ‘just in case.’ Keep it accessible with a holster .
What we do: We bring bear spray on every backpacking trip in Western Canada, no matter how long. We usually carry one each.

Discretionary items (extras)
The following items are completely optional but may improve your backpacking adventure. Obviously, each one comes with a weight penalty.
A tarp can provide shade on sunny days and shelter on rainier ones. Silnylon tarps (siltarps for short) are popular for backpacking, being exceptionally lightweight but also tear resistant.
If you can, practice putting up the tarp a home first before taking it on a backpacking trip. Bring some extra cord for attachment or learn how to utilise a hiking pole.
What we use : We sometimes bring a siltarp on backpacking trips, especially when staying at campsites with very few facilities and/or when the forecast features consistent rain. Though we have both the Siltarp 2 and 3 from Rab (the larger versions of this one ), we use the larger 3 on paddling trips only.

Hiking poles
Hiking poles can help with stability. They also help to reduce pressure on the knees when descending steep trails.
What we use: I bring at least one Black Diamond Distance Carbon Z pole on every backpacking trip (usually two). They are foldable so I just attach the poles to my backpack when not in use.
Planning to go for a day hike from a backcountry campground? Pack a small, lightweight daypack so you can leave your larger pack at camp.
What we use : For long dayhikes (15km+), we pack this Cotopaxi Luxon 18L bag. It’s pretty light and has plenty of space for our First Aid kit, extra layers and food.

Rest your hand at night in luxury with a pillow . Inflatables are compact and also light. Compressible versions are softer and more comfortable, but heavier.
What we use: JR brings a Klymit pillow , while I just stuff clothing into my Atom LT hoody jacket and use that as a pillow instead.
A lot of backcountry campgrounds do not have picnic tables. For this reason, some backpackers bring their own. The Helinox series is a favourite, with the Chair Zero weighing in at 8oz (510g).
What we use: We do not bring chairs on backpacking trips. For me, it’s not worth the weight.

Reading material
Some backpackers like to bring a book to read in the evenings. An eBook reader is an alternative option.
What we use: We do not usually bring reading material on backpacking trips. For me, it’s not worth the weight. I do load some articles onto the Pocket app on my phone before leaving, just in case I want something to read.
Cards or games
Amp up your evening with a game or pack of cards .
What we do: We bring a small Ziplock bag with 2-3 ‘Roll the Dice Game’ sheets (Dollar Store YAHTZEE ), a set of five dice and a half size pen.

If photography is a priority, bring your camera. Don’t forget extra memory cards!
Please be aware that drones are not allowed in Canada’s national and provincial parks.
What we do: On most trips, we use our cell phones for photography. Occasionally, we will bring our Canon DSLR.

Before finishing your packing, remember these personal items:
- Relevant permits
- Cash/credit cards
- Prescription medication
Printable checklist
Whew, that’s a lot of items!
If you’d like a handy printable backpacking trip checklist, simply sign up for our email newsletter (below) and you’ll receive a free one!
To cover all of your outdoor adventures, we’ll send you printable checklists for car camping and multi-day paddling trips as well.
Free printable backpacking checklist
Subscribe to our monthly email newsletter and receive a free PDF checklist for your next multi-day hiking adventure
We never share your information with third parties and will protect it in accordance with our Privacy Policy
Get some backpacking trip inspiration:
25 of the Best Overnight / First Time Backpacking Trips in BC, Canada
The Heather Trail, Manning Park: Complete Hiking Guide
Nootka Trail: Complete Hiking Guide
West Coast Trail Alternatives: Best Coastal BC Backpacking Trips
The HBC Heritage Trail (1849): Complete Hiking Guide
The West Coast Trail: Complete Hiking Guide
13 of the Best Shoulder Season Backpacking Trips in BC

One half of the Canadian/British couple behind Off Track Travel, Gemma is happiest when hiking on the trail or planning the next big travel adventure. JR and Gemma are currently based in the beautiful Okanagan Valley, British Columbia, Canada
The Only Backpacking Checklist You’ll Ever Need
05/04/2022 by Kristin Addis 16 Comments
I looked at my friend quizzically many times over the two days that we shopped and prepped for the 8-day circuit in Torres del Paine, Chile – my first ever backpacking trip. There were so many things he knew that I didn’t know, like putting everything in its own individual bag, to exactly what to eat in order to cut down on weight, to how to eliminate every unnecessary gram.
Had I been on my own, I would have ended up with the world’s heaviest backpack. Thank goodness I had some guidance!
Since then I’ve completed several multi-day backpacking trips on three continents, most recently, completing a 4-day trip completely on my own. The following is my ultimate backpacking checklist after all of these experiences.

Just a note: There are ultralight backpackers who sleep under just a tarp and barely bring any gear or food. That’s not my style, though I do take every effort to cut down on weight while still being safe from the elements, and comfortable.
Table of Contents
Food Checklist
I usually go one of two directions with my food. Either I’ll bring instant backpacker meals, which are convenient, pack up really nice and small, and can be quite delicious, or I shop at smaller markets and buy things like pasta and powdered sauce. Neither one are going to be incredibly amazing cuisine, mind you.
That said, food tastes a lot better on the trail. Maybe it’s the hunger from hiking all day, maybe it’s the fact that you’re staring at a glacier or gorgeous valley while you eat it. Either way, I’d say that making food I’d only be mildly disappointed eating at a restaurant back home while on the trail is a success.
If you want to bring instant backpacking meals, I have a definitive ranking of best to worst here , including organic and vegetarian options.
If you’re shopping at the grocery store, here’s what I recommend:
- 150 grams pasta, powdered potatoes, couscous, or some other quick-cooking carb per person per day. Increase or decrease depending on your personal needs.
- 4 85-gram powdered pasta sauces.
- Optional small block of cheese or salami to make pasta more exciting (one block is better than individual slices which mold more easily).
- 80-100 grams oatmeal per person per day.
- Powdered milk and chocolate milk.
- 1-2 Snicker’s or Lara bars (vegan), or some other form of nutrition bar per day.
- 100 grams dried fruit and nuts per day for lunches.
- 1 lightweight treat per day (oreos, candy bar, something you’ll look forward to).
- Enough ziplocks to portion out each meal (please reuse them after!).
This food list assumes that you will have water readily available on the trail. The only backpacking trips I’ve done are ones where I didn’t have to bring all of my own water in, though you may very well encounter that if hiking in the desert. In this case you should also bring 1-2 gallons per day for drinking, plus 0.5- 1 full gallon more for hygiene and cooking. You’ll also need a method to clean water just in case you run into an emergency and you need to take it from your environment, and are able to find it, listed in the gear section below.

Gear Checklist
The gear you bring is going to depend heavily on what kind of weather you will encounter. Almost all of the multi-day backpacking trails I’ve done have been in the mountains in Patagonia, Peru, Kyrgyzstan, and Alaska, which usually equates to cold weather and the possibility of snow. However if you are hiking in the desert you will have different needs.
In all of these cases you can count on cold temperatures at night, so that you’re list below is meant for harsher conditions where it’s cold and potentially very wet and windy:
- Light tent (compare different kinds here )
- Lightweight sleeping bag for 0-C or under : It’s very important that your bag keeps you warm and doesn’t weigh much! If I’m in sub zero like in Alaska, I use the REI Coop magma sleeping bag in long (I’m 5’8 so the regular is too short) and I’m in love with it.
- Sleeping mat (this one is so worth the money! How did I ever use anything else?)
- Backpack that can fit all of your gear inside . It will rain, a rain cover often isn’t enough to keep your sleeping bag dry, especially if it’s windy and the cover blows right off.
- Hiking boots: I love this pair, even after 8 days in Alaska I didn’t have a single blister, and they keep my feet warm and dry.
- Trekking poles – optional but very helpful for the knees. I always use them!
- SteriPEN , or some other method to sterilize your water
- Cooking stove and at least 2 gas containers (or 1 per every 4 days)
- Waterproof matches or firestarter
- Cooking pot
- Spoon/fork or spork
- Knife or multitool
- Hydration bladder
- Toilet paper and a bag to put the used paper in when you’re done – pack it out!
- Small first-aid kit with medical tape
- Any prescription medications, in a waterproof container
- Waterproof map and compass, offline map with GPS, and if really in the backcountry, a satellite phone and personal locator beacon.
For the best hiking backpacks for women, check out my post reviewing the best backpacks on the market right now.

Clothing Checklist
For those who have never backpacked before, brace yourself because this is going to sound really gross: You should only bring two sets of clothing for your trip. Extra clothing adds unnecessary weight and there’s really no point in putting on fresh clothes only to make them gross and sweaty within five minutes anyway. Regardless of the length of my hike, whether it’s one day or eight, I still follow this rule. I do bring enough underwear for each day, and I bring extra socks.
You’ll have one set of clothing to hike in, and one set for sleeping in. If your hiking set gets wet and sweaty, I recommend either putting it in your sleeping bag with you while you sleep so that it can warm up and dry from your body heat, or if you’re not too cold once you get to camp, keep wearing it and let it dry out on your body. Yes, you will stink, yes, it will be kind of disgusting, yes, it is so totally worth it!
- 1 pair waterproof gloves
- 4 pairs of thick socks
- 2 warm merino layers
- 1 sports bra
- Enough underwear to change daily
- 2 pairs of yoga pants or whatever you prefer to hike in
- 1 waterproof ski jacket
- Optional: foldable, water-resistant, lightweight down jacket
- 1 pair hiking boots
- 1 pair camp shoes
- 2 thin neck warmers that can double as ear warmers
- 1 hat with brim

Toiletries and Hygiene
Toiletries take up a lot of unnecessary space and they are very heavy. I personally only bring along:
- Menstrual products (a menstrual cup is definitely the easiest and most lightweight option)
- A small pack of wipes
I don’t usually wash my face at all on the trail, which I realize is probably really weird to most people, so if you want to be able to wash your face, bring along facial wipes and get water from the streams. If it’s glacial water and it’s way too cold, make peace with the wipes. I don’t personally think it’s worth it to bring extra gas to be able to heat up water to wash my face.
Deodorant is pointless, makeup is definitely pointless, and so are shampoo and conditioner, unless you will be able to shower along the trail. If you’re really in the backcountry there’s no point.
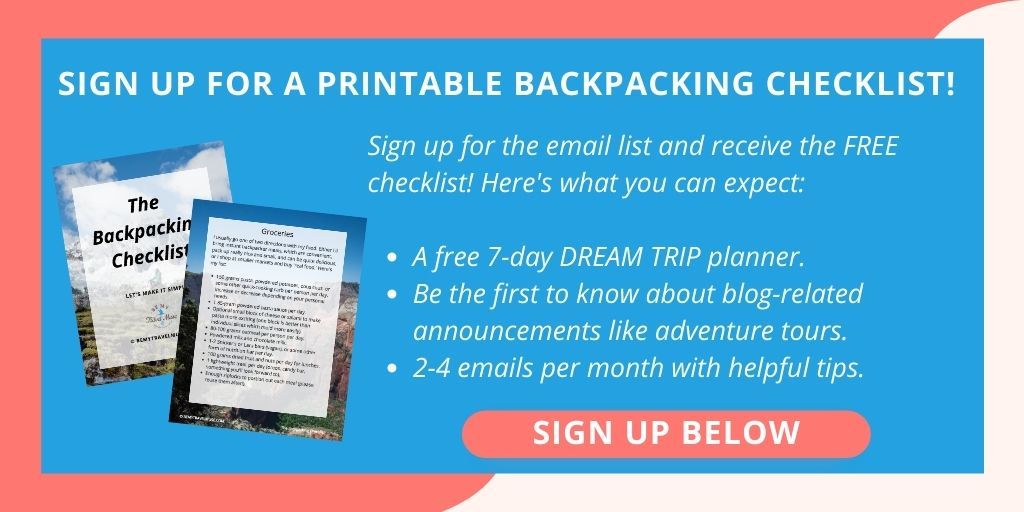
First Name:
This list is the bare bones necessities of what you’ll need when backpacking. Remember that less is more and that every small item adds up when you’re carrying everything with you on your back. Happy backpacking!
READ NEXT: 20 of the World’s Best Hikes
*Some links in this post are affiliate links for products and services we personally use and love. Any purchase you make through them supports us at no extra cost to you. Thanks so much!
About Kristin Addis
Kristin Addis is the founder and CEO of Be My Travel Muse, a resource for female travelers all around the world since 2012. She's traveled solo to over 65 countries and has brought over 150 women on her all-female adventure tours from Botswana to the Alaskan tundra.
Leave a Reply Cancel reply
Your email address will not be published. Required fields are marked *
Save my name, email, and website in this browser for the next time I comment.
subscribe to our newsletter
This site uses Akismet to reduce spam. Learn how your comment data is processed .
Ijana Loss says
06/10/2018 at 9:09 pm
This is great info! If I’m not a big photography person but still wanted to take a few pictures to have great memories to look back on, what would you recommend? I tend to take all my travel pics with my iPhone, but is there a way to keep it from dying from cold/altitude? Or is it really best to get a camera?
Kristin says
06/13/2018 at 2:18 am
I personally feel way too limited with an iPhone. However all batteries die quickly in the cold so I like to bring a battery pack or solar charger for that.
Kailey Ekstrum says
06/10/2018 at 11:21 pm
Do you use your steripen to sterilize water in the bladder? Is there a litter limit for the pens effectiveness?
06/13/2018 at 2:17 am
Yes I do use it for that!
Jenn | DayTipper28 says
06/11/2018 at 10:32 am
Hey Kristin, great resource list. When I did my first trip to the BWCA in northern Minnesota and the camps packing list didn’t mention deodorant I was shocked. Little did I know how ineffective deodorant is on the trail! Great post of tips!
06/13/2018 at 2:16 am
Yep, might as well just not bring it!
Agathe says
06/12/2018 at 2:36 am
So many tips! This is going to be very helpful, I hope to do more hiking in my next travels. I did some in Slovenia and France and it was so amazing. Thanks for such a complete article!
06/13/2018 at 2:04 am
Glad it’s helpful!
07/06/2018 at 8:29 pm
Getting a warm enough sleeping bag is SO important! Unless you run crazy hot, always go warmer than you think you’ll need. My bag is 10F, but back when I lived in CA I wished I had a warmer bag! (Summer camping on the east coast is however a bit different) Also, think what can be multipurpose. I absolutely have to wash my face – but for backpacking, the Dr. Bronner’s unscented soap we bring for washing dishes is good enough.
07/08/2018 at 9:49 am
Dr. Bronner’s is golden and agreed, go for a warmer bag than you think you’ll need!
06/13/2020 at 12:14 pm
What do you use to scrub your dishes? Just curious what has worked for you. Thank you for the post it is amazingly helpful!
06/13/2020 at 1:04 pm
Usually just my hand, a small metal wool, and some water
Rebecca says
08/01/2018 at 4:25 am
I am loving how many Snickers bars and blocks of Milka chocolate are in that photo!!! Looks like my kind of backpacking trip 🙂
05/18/2022 at 1:39 pm
Hey, I love camping/backpacking checklists. I have a few for various styles of trips. And I love your write up. But would be GREAT if you had a download to a printable version of just the list! 🤷🏻♂️
Jarin from Austin says
04/19/2023 at 4:39 am
This is an amazing resource, thank you! I’m looking for a more tropical, affordable, beach side backpacking solo trip for a young woman. Any recommendations?
04/19/2023 at 9:29 am
I’ve never done that type of backpacking trip to be honest, but the Big Island of Hawaii has a multi day trek on the volcano, if that’s of interest.

The Most Useful 3-5 Day Backpacking Packing List
A re you planning your first backpacking trip (or your 100th) and looking to get your backpacking packing list sorted? You have come to the right place. I am a super list maker and love sharing my lists with others! After tons of research and many hundreds of miles of backpacking under our belt, we wanted to share with you exactly what we take on our backpacking trips and what we leave behind. (See below to download a FREE printable backpacking checklist)
In this backpacking checklist, I share every item I bring on a 3-day backpacking trip in the late spring, summer, and fall seasons. I hope that this backpacking gear list will help simplify your planning, help you figure out what you need, and if you are just starting backpacking, give you some good recommendations for backpacking gear to invest in that will last you many years.
Don’t forget to check out our post on backpacking hacks and tips to help your packing go smoothly even on a first trip!
Disclosure: Some of the links in this post are affiliate links, meaning at no additional cost to you, I will earn a commission if you click through and make a purchase.
Backpacking Packing List Essentials: The Big Items
These are the items that will probably weight the most and cost the most, so it’s useful to save up and buy the best that you can afford at the beginning.
Again these are the items that we actually take with us while backpacking – there are tons of other options out there, but this gives you a good starting point.
Need help organizing your next backpacking trip? Download my FREE Backpacking Packing List
Just let me know where to send it along with occasional travel news and outdoor inspiration.
You can unsubscribe anytime. For more details, review our Privacy Policy.
SEND ME THE PACKING LIST
You have successfully joined our subscriber list.
Backpacking Backpack
After trying on a ton of different backpacks, I finally settled on the REI Traverse 60 . The important thing to remember is to find one that fits you the best and feels the most comfortable and fits all of your gear. I also really liked the REI Flash, but as it is SUPER lightweight, and it didn’t feel as durable when using a bear canister. For many people though it is really important what your pack weight is when empty. For me, it was comfort first. It is a good idea to get fitted by professionals at REI to really understand what size bag you need and then try them on from that point.
Other options women really like is the Gregory Deva . This was a second runner up for me, but just didn’t fit quite as well.
I had hoped to go with a smaller 40-50L backpack, but since I have to carry the larger bear canister for both of us, those just didn’t work for me.
My 12 year old has the Osprey Ace 38 , which has worked well for travel and backpacking.
Sleeping Pad
I absolutely love my car camping sleeping pad, so I was sad to get a new one for backpacking, but it was necessary. It was important for me to go with the lightest, most comfortable one on the market, because sleep is king in my book. I bought this Therm-a-Rest inflatable pad . My son uses the foam pad for himself. My inflatable pad sort of feels flimsy and like a thin garbage bag when you take it out for the first time, but it is lightweight, easy to pack and is perfect to sleep on. I am very happy with it. In recent years more and more folks have been recommending the Nemo ultralight weight pad . I find that it is pretty noisy when used with a Big Agnes tent, but maybe it’s just me!
Sleeping Bag
We are big fans of down sleeping bags and recommend getting a great lightweight bag for all of your camping adventures, not just backpacking. We do not often camp in frigid temperatures. Our bags are 10 degrees for my son and 25 degrees for myself. On our first few trips, we went with the bags we already had – this Kelty square bag and my son had this down bag from REI, but it is a bit heavier than I would purchase for him now. If that is all you have, try it out and only invest in more expensive bags once you know this is your thing.
After years of backpacking with heavier gear, we finally upgraded to more lightweight gear, including the Zenbivy quilt system . We LOVE our quilts and wouldn’t change a thing now. They are SO warm, super light and provide more warmth when needed with the clip in system. This system provides the best of both worlds – the snugness of a sleeping bag with the flexibility of a quilt.
Backpacking Tent
This is a backpacking essential where you can really shave off weight depending on how much you are willing to spend and how big of a tent you want. Since it is just me and my 12 year old at the moment, we went for the lightest tent we could afford even though it’s a bit smaller than we would normally like. But unless it is raining, you aren’t spending a ton of time in the tent anyway. (And we have spent an entire 24 hours trapped in it in torrential rain – we survived!)
We love the Nemo brand tents. We have the Nemo Hornet which is great lightweight tent for 2 smaller people. We have used our friends Nemo Dagger which we also really loved. It’s a bit heavier though so we opted for the smaller, lighter tent.
If you really have some cash to burn and can manage with fiddling, consider the super light weight tents suchs as this one that is uber lightweight and spacious.
Trekking Poles
Yes these are under essentials. Not everyone needs them, but I need them while going up hills and especially going down hills! Trekking poles are essential for crossing rivers safety with a big pack as well. The trekking poles we have are actually these children poles . We have had them forever and LOVE them, but understand they won’t work for everyone. Regardless, I highly recommend any of Black Diamond poles and to get the lightest pair you can afford. These are the ones I would upgrade to if something happened to ours!
Want to know how much everything weighs and keep track of it? Check out this cool website LighterPack where you can enter all of your gear to see what you might need to cut out.
Backpacking Gear List: Water Necessities
Water reservoir.
We have several water reservoir/bladders that we use on a regular basis. For the most part, we both use a 1.5 L Osprey hydration reservoir/bladder , however many people do recommend going higher with a 3L. For a trip where we might have less access to water we would consider bringing that, but they do not fit into our bags with the bear canister as well as the smaller bag. Also note, water weighs about 2.2 lbs for each liter, so this is where a lot of weight comes in.
Water Filter
We have tried a few different water filters through the years. What we used on our first few backpacking trips (the Platypus Quickdraw and the Sawyer Squeeze) , we now no longer use! Between the two of these, the one we preferred was the Platypus as it was light and much easier to use than the much more recommended Sawyer.
These days however, our favorite water filter is actually the Katadyn . We have this in both the 1L and the 3LZ (the 3 liter is only available on Amazon ). I prefer the 1L even though it means more water refills. It just squeezes out more easily than the 3L. However, we usually take both and end up using the 3L at night to refill all of our water bottles for the next day and for meals. For water sources that aren’t nearby it is much easier.
Some people also suggest bringing an alternative water treatment system just in case, which is why we always have the two with us in case one breaks.
Water Bottles
When you think of backpackers, you probably think of seeing them with Nalgene bottles hanging off their packs. While we like our Nalgene bottles, I will say that the most preferred water bottle for backpackers is actually a Smart Water bottle. These are sturdy water bottles, slim and still hold a liter like the Nalgene does. On our first backpacking trip, we took both – one of each and preferred the Smartwater bottle 9/10 times. It fit perfectly with the water filter we used, was light enough to always bring with us even on day hikes and was easier to drink out of without spilling. After completing the JMT and many other backpacking trips, its safe to say our nalgene doesn’t ever come with us!
Curious how it is to hike the John Muir Trail with a child? Read about our experiences .
Roll-Up Water Bag
In addition to the water bottles, we used to also take a super lightweight rollup Platypus 2L water bag . This is great to use as either an additional dirty water bag to be filtered later or to carry extra water with you during long stretches without water. It is light enough that I would always consider bringing this regardless. Now that we hike with both the 1 and 3 liter Katadyn water filters , we leave this at home.
Backpacking Kitchen Essentials
Backpacking camping stove.
While some people opt to camp without a backpacking stove, I am not one of those people! I like to have a few creature comforts and my 12 year old doesn’t think it’s a meal unless it’s hot! We decided to go for the new Jetboil Stash as it is all in one and packs into one small container. After several years of use I can attest that we still absolutely LOVE it. You can snap the fuel into the pot and it even has space for a small lighter or matchbox. Other people like the MSR pocket rocket and then you can buy/bring the different pots and pans based on what your needs are. For us, for now, we try to just go light and minimal with making foods that just need hot water.
Don’t forget your fuel canister for whatever brand stove you buy. We brought an extra fuel canister which we did not need. Would I bring an extra again.. maybe for a longer trip than 3 days, but on 3 days we boiled water 13 times and still had plenty of fuel left over. It’s hard to know exactly how many burns you will get when you are at varying elevations and depending on the wind, so I would suggest always going with one full can. For bigger groups/families, bring a few!
I bought a small Bic lighter that was perfect. There are also waterproof matches that would be good, but you would need to bring the burnt match back out with you!
We brought two of these sporks which we LOVE. These were in our regular day pack hiking packs long before backpacking. We also bought one of these long spoons which actually was pretty great to have as well. If we wanted to cut down an ounce we might consider leaving one spork at home and going with only 1 and the long spoon.
As the years have progressed, we now have 2 long spoons and that is all that we take.
Small Knife
I brought a tiny Swiss Army knife and my son brought his regular pocket knife . He used his for carving wood while at camp. I used the scissors on mine to cut moleskin. Some people recommend the Trango , but we don’t have one (yet!) so I can’t say for sure how light or useful it is at this point. But it is on my future list.
My son insisted on bringing his favorite collapsible bowl . I would not bring this bowl again, rather I would find one that didn’t have the grooves in it. I found it difficult to efficiently clean his bowl. That said, we did enjoy having a bowl to share our food more easily. This is a great bowl for pets however or just storing water. After those first few trips, we ended up with this Seat to Summit bowl , which has been a mainstay. It does not collapse, but can clip to the outside of the bag if needed and it cleans super easily.
We brought one cup for each of us – two different types. One was this GSI mug which I love, but is a bit heavier if you are really trying to save a few grams. We also had this simple measuring cup which worked great for measuring out our water for cooking as well as for hot chocolate and eating oatmeal out of.
Small Towel with Biodegradable Soap
One of my spontaneous purchases at REI was this double sided towel for cleaning up. It has a rough side to get off stuck on foods and a soft side. It is a mainstay in our backpacking supply kit. I also poured some CampSuds in a tiny Nalgene reusable bottle for camp soap (Remember your Leave No Trace principles and do not clean dishes anywhere near water sources).
Make sure to bring enough food for each day you will be backpacking. Try your backpacking meals out before you go to make sure you like them. If you don’t love it at home, you won’t love it on the trail, trust me. We like carb rich, creamy foods with plenty of indulgent snacks like Snickers, cookies, peanut M&Ms. Remember to bring a trail mix without chocolate pieces because those do melt! Our absolute favorite meals are these .
Backpacking Checklist for First Aid & Safety
Gps communication device.
This is one of the most expensive items on our backpacking packing list and one we actually borrowed from a friend for our first few trips and ended up buying one second hand. The Garmin In Reach Mini is a must have in my opinion while hiking in the backcountry where you do not have any service. We have had friends need rescuing from total accidents, so for us it is important to always have this on hand.
First Aid Kit
First aid is important to be prepared for on the trail. You never know what will happen. My son actually had a blister on the bottom of his foot before our trip even began, so we were happy to have this lightweight waterproof set from REI which included moleskin. We also added in a few tabs of Benadryl, Rocktape and Sheeps wool just in case.
Headlamp / Lantern
If you are camping in summer, you may not actually need a headlamp, but I would always considering bringing one just in case. We love these rechargeable headlamps as you don’t need to bring extra batteries. While this one is a touch cheaper, we actually prefer this one .
Bear Canister
Depending on where you are backpacking, you might need a bear canister. There are essentially only two types on the market. One is a clear box that comes in several sizes, but most often you will see – a smaller box and a larger box . These are notoriously difficult to open for some people. I am one of those people. Therefore, my only option was to use this type of bear canister , which comes in only 1 massive size!
After a few trips with my heavy bear canister I switched to this carbon fiber one . I LOVE it. I used it for 15 days on the JMT and have used it for every trip since and it is still in great condition. I believe I have the Blazer. Even though the company did not think I could fit in a 7 day food supply for 2 I did pretty easily!
To open my Bearicade can, we both wear a small washer connected to a bracelet that opens it perfectly. The flathead end on the Swiss army knife and the long spoon also opened it easily.
If there is extra space in our bear canister we include all of our kitchen gear inside for extra space in the backpack.
Emergency Rain Gear
We always check the weather meticulously before setting out on our adventure, but as you know the weather in the backcountry is unpredictable. During short adventures with no expectation of rain, we usually leave our rain gear at home. However when hiking the JMT , we had to have it (and needed it!)
I have lightweight rain pants that I purchased from a random store in Mammoth , but I used this rain jacket which worked out quite well. It doesn’t look amazing, but hey, its to keep dry!
Also, make sure you backpack has a rain cover included or buy one to keep with you. This is your entire life on your back at the moment, so it is best to keep it dry.
As I mention in my post on Backpacking Hacks and Tips , duct tape is an essential backpacking item to have with you. Our recommendation is to wrap a bit around your trekking poles or some other bottle that you will be bringing with you. I put it around a small pencil that my son brings with him.
Essential Backpacking Clothes
Hiking shoes.
For many backpackers, the rugged ankle boots are the way to go. I on the other hand believe in lighter is better and many JMT/PCT thru hikers agree with me. I wear and love my Altra Lone Peak trail runners . They do have higher top shoes as well if you need ankle support. These are lightweight, allow your feet room to spread out which helps with balance and swelling. I have nothing but love for these shoes.
My son wears Merrell high top hiking boots . He has worn these boots since he was 4 increasing in size each year obviously.
The most important factor is comfort and support. Your hiking boots should not cause blisters. If they do, you might need to evaluate them and/or your socks.
My favorite thing in the world these days is wool and this goes for my socks as well. My son wears either Smartwool or Darn Tough wool socks . I have both Smartwool and a local LA brand Comrad. I prefer my Comrad compression wool ankle socks the most because I typically hike in a dress and don’t like having socks up my legs, but they have been out of stock for ages. I have been trying these out in their place which seem to work decently well.
Whatever you like, but just make sure you get wool socks. They will absorb moisture to help prevent blisters. Wool is also antibacterial which reduces stink. I brought 2 pairs for myself and washed one pair at night to switch out. My son brought 3 pairs.
Wool Base Layer Long Sleeves
I love wool. I will say it again. The only long sleeve item I had with me was my long sleeve lightweight base layer from Smartwool. It is super comfortable so that I can wear it even in the heat of the day to keep the sun off my arms. It keeps me warm in the morning chill and doesn’t rub when I wear it with my backpack on. Highly recommend having a merino wool long sleeve base layer in your backpacking packing list arsenal. My 12 year old had his wool base layers that also acted as PJs.
These days I much prefer my ultra light wool hoodie that keeps my arms covered in the heat of the day, but can also be worn as a long sleeve layer.
Down Puffy Jacket
Everyone needs a down puffy jacket. I have a Patagonia jacket that I bought 5 years ago when we went to Alaska that is still going strong. Yes, these jackets are expensive, but they are so worth it. For children, you can consider the REI brand down puffy jacket or even this one from Shred Dog which is even more economical, but provides the same power, strength and comfort in a lightweight package.
Hiking Pants
Hiking pants for me means leggings. I love my Prana leggings , but found they were a little too heavy for much of our backpacking since it’s quite warm in the day. Instead, I opt for wool of course! I LOVE these bike shorts that I wear under my Wool& dress . I also always bring one long pant. Depending on the weather I might bring these lightweight leggings or these thicker leggings if it’s going to be cold or I’m only using them at night and in the morning.
My son wore a pair of long pants and brought a pair as extra. In the future we may cut out the second pair and opt for shorts depending on the weather forecasts.
Clean Underwear
Ladies, just bring the clean underwear for each day you are on the trail. You will be much happier putting on clean undies every day, trust me. This is the best way to feel fresh and clean without a shower. This is a must for my backpacking packing list! My go to are these wool undies.
Wool is the way to go here too! I typically just take one and it is great at the end still. This one is great .
Camp Shoes (Optional, but useful)
One item that might be included under luxury and comfort items is a pair of camp shoes. I disagree and feel it is a must have item. Your feet need to breathe and get a rest when you are at camp. After lots of trial and error using super lightweight backpacking type sandals, I have ended up loving my Birkenstocks .
Clothes for Cool Weather
If you are camping during spring or fall, your backpacking packing list might need to include items for colder weather. We did not need any items for colder weather even though we were high in the mountains. If you do, considering bringing thermals to sleep in, a beanie and gloves.
We did bring with us 2 buffs that were great to cover our heads during sunny moments, cover our necks and to get wet and wrap around our necks when we were hot.
Backcountry Toiletries
Poop shovel.
Yep, you read that correctly, you will need a poop shovel on your backpacking packing list. We love this super light weight, but very sturdy shovel. In addition to this, you will also need toilet paper and a ziplock bag to carry out your dirty paper. Yep. It’s not as bad as it sounds to be honest. As my friend calls it, poo with a view.
My favorite hiking accessory these days is my Kula Cloth pee rag. This thing is really great and really helps reduce any extra smells that can build up from drip drying. Use this for pee only.
Zip Lock Bags
As much as I hate to use zip lock bags, these were our best friend during backpacking. From food waste to trash, we used them all the time. Bring the light weight sandwich bags for dry waste and a the freezer quart size to pour hot water into while cooking.
Hand Sanitizer
While this isn’t a necessity on a backpacking packing list, I highly recommend bringing a small tube of hand sanitizer that was useful for quick uses after going to the bathroom. You don’t need a ton though, so don’t worry about a big bottle.
Sunscreen and sun protection (aka hats) are a must for all summer backpacking packing lists. We took a small tub of stick sunscreen, but next time I will take a liquid version instead even though it may not hold as much. I found that I was less likely to put the stick on my arms and legs, which did get quite a bit of sun. Bring what works best for you.
For most backpacking packing lists, it is recommended to take baby wipes. I decided to try the Sea to Summit Large Body wipes, and I was very happy with these as they are scent free (meaning they didn’t have to go in my bear box, but I put them there anyway!) and are quite large. I could easily wipe my face and neck down, legs and feet with just one wipe. Remember you must pack out what you bring, so take an extra ziplock bag for the dirty wipes.
Chapstick / Lip Balm
The mountain air always makes my lips get chapped, so I made sure to bring along my favorite SPF chapstick . Love this stuff!
Toothbrush & Toothpaste
For many people, small tube of toothpaste is the best option for backpacking. However, we have something even better! Bites Toothpaste are tiny small round pill shaped bits that are actually toothpaste. They are great because they are small, totally dissolve and are better for the environment. Pack your Bites in a small button sized bag and you are good to go. For ultra lightweight toothbrushes, consider getting bamboo brushes.
Small Hairbrush
A small hairbrush is not a necessity at all for most backpacking packing lists, but since both my son and I have long tangle prone hair, we decided at the last minute to bring our tiny hairbrush. I am so happy we did as well. It felt nice to be able to brush my hair that was super sweaty and tangled up from being in a hat. This is up to you though.. bring it or not.
Optional Backpacking Gear List
Insect repellent &/or bug spray wipes.
Depending on where you are going and what season, you may need to bring bug spray and/or wipes. I brought my favorite Doterra Bug Spray oil as well as a few packets of Natrapel wipes . I like the wipes better than spray only because I can easily get under my clothes without worrying about staining.
Pro Tip: Spray all of your clothes with Permethrin before you head out on the trails to keep your clothes bug free.
Backpacking Pillow
For me, this is a must have on my personal backpacking packing list. I took this really lightweight blow up pillow which was wonderful to have and didn’t add much weight.
Small External Battery Pack
Over time I have upgraded my battery packs to these . I take two on most trips because they are small and light and hold a good charge. For shorter trips you probably only need one as most things will hold a good charge. For long hikes and backpacking trips, I love this solar panel that is super light and helps to refill my battery packs during the day as I hike.
Lightweight Quick Dry Towel
Not a necessity on your backpacking packing list, rather a good idea if you are planning to be around lakes or rivers, is a quick dry towel. We took two small ones, which I would probably take again. One we used for dishes and the other we used for our feet and to sit on by the lake.
Printed Out Permit
For most backcountry hikes in California you will need a permit. Make sure to print out your permit and your camping stove permit to carry with you along the route.
ID, Cash & Car Key
Depending on what you are doing, it might be important to also carry your ID, a bit of cash or a credit card and your car key. It is useful to have a few of your important items in case of an emergency. I did not take any cash because I knew we were doing an out and back trail, but for any thru hikes I think it’s important to have just in case you need to catch a bus or ride.
Before you go, don’t forget to download your FREE Backpacking Checklist!
Looking for even more information on camping & backpacking? Check out these articles on the site:
—- 20 Spots for Backpacking in California
—- Backpacking Hacks & Tips for Beginners
—- Backpacking Little Lakes Valley
—- Backpacking Big Pine Lakes
—- Car Camping Essentials
—- Top 50+ Spots for Camping in Southern California
—- Our 10 Favorite Camping Meals
If You Enjoyed This Post, Sign Up To Receive Posts By Email or…
- Join us on Facebook for regular updates and related articles
- Check us out on Instagram to see what we are up to in photos
- Follow us on Twitter for links to great travel articles curated just for you
- Or share this post with others by pinning on Pinterest!

- Search Please fill out this field.
- Manage Your Subscription
- Give a Gift Subscription
- Sweepstakes
- Travel Products
- Activity + Adventure
- Camping + Hiking
The 7 Best Backpacking Backpacks of 2024
From weekend trips to long-distance treks, these backpacking backpacks have you covered.
:max_bytes(150000):strip_icc():format(webp)/Kevin-Brouillard-Bio-Photo-e1e6e2d6ae6b4bdfa33d8b1b82bd2921.jpeg "2 day backpacking trip list")
In This Article
Jump to a Section
- Our top picks
- Tips for Buying
- Why Trust T+L
We independently evaluate all recommended products and services. If you click on links we provide, we may receive compensation. Learn more .
Travel + Leisure / Brian Kopinski
I’ve been backpacking in various capacities for over a decade from off-the-grid wilderness treks to hostel hopping around Europe. Whether you’re planning to head out for a day trip , an overnight hike, or extended excursion, choosing the right backpacking backpack is essential to ensure a safe and enjoyable trip. Backpacking backpacks come in a range of designs, from ultralight models for speedy, minimalist hikers to more burly packs suited for lugging heavier loads (or even checking if you're flying).
Besides holding all your equipment, gear, and provisions, a quality pack should be comfortable to carry and fit your frame. When choosing the best backpacking pack for my trips, I consider performance, durability, value, and versatility for different durations and weather conditions. If you’re gearing up for your first backpacking trip or looking to level up with a new pack, check out my favorite options below.
Best Overall
Osprey kestrel 58 pack.
It’s a versatile, full-featured pack made with durable materials that will last for years to come.
This is quite a large and hefty pack that may be too heavy for lighter trips.
For an all-around performer that’s suitable for weekend and long-distance trips in varied climates, the Osprey Kestrel 58 is my top pick along with the women’s specific version: the Osprey Kyte 58L Pack . Osprey backpacks are well-known for their top-notch performance and lasting durability. My first Osprey Kestrel is over a decade old and accompanied me up all 12,244 feet of Indonesia's Mount Rinjani and to every corner of Cambodia during my two-year Peace Corps service. The current model incorporates a revamped back panel: the AirScape system. It offers adjustable torso lengths and breathability while delivering close contact and excellent weight distribution on the lower back.
The Kestrel’s use of 420-denier nylon in the pack body provides exceptional durability against wear and tear, even compared to other Osprey packs. I love that it’s equipped with a detachable rain cover, and how easy the cover is to pull over even fully loaded packs. There’s plenty of options for storage and organization, too. It has five external pockets, trekking pole holders, and daisy chains for adding more gear. I’m a big fan of packs with multiple access points, and the Kestrel offers easy entry from the top and front. To expand my storage options, I typically make use of the sleeping bag straps to hold dirty clothes on longer trips.
The Details: 420-denier nylon and 500-denier high-tenacity nylon | 4.7-4.9 pounds | Size S/M and L/XL | 58 liters | Waterproof
Best Lightweight
Gossamer gear mariposa 60 backpack.
Gossamer Gear
This ultralight pack offers a frame that moves with your gait and a choice of hip belt design for a tailored fit.
It’s water-resistant, not waterproof.
When every ounce counts, the Gossamer Gear Mariposa 60 is an excellent choice for lightening your load on the trail. With a 60-liter capacity, it delivers an impressive weight to storage ratio of roughly 0.54 ounces per liter. The main compartment is spacious, and there are seven exterior pockets for stashing water bottles and trail essentials. The pack is made with robic nylon, which helps save on weight, but doesn’t offer much for waterproofing. However, this can be resolved by adding Gossamer’s waterproof pack liner .
I love that the modular design allows the Gossamer to be configured for optimal weight and fit preferences (for example, the choice of a straight or curved hip belt). The Mariposa’s hip belt, back padding, and aluminum frame can be removed to make the pack even lighter, though this sacrifices comfort and ability to carry the pack fully loaded. There are also load lifters that work with the frame to relieve pressure on the shoulders, if desired.
The Details: Recycled nylon | 2.1 pounds | Size S-L | 60 liters
Best for Beginners
Rei co-op trailmade 60 pack.
It’s a highly adjustable pack with comfortable padding and intuitive organization that new and experienced hikers will appreciate.
The weight is middle of the road for a backpack this size.
The REI Co-op Trailmade 60 Pack is a user-friendly introduction to backpacking. Dialing in the right fit is essential when backpacking, and REI’s adjustable design makes this a seamless process. REI’s Trailmade collection is focused on more inclusive sizing options and affordability for new hikers and backpackers as well. To that end, the Trailmade 60 Pack is designed with an adjustable back length and a range of hip belt sizes. Both the men’s and women’s packs can fit waists and hips between 32 and 58 inches and the torso length is easily tweaked with a Velcro strap. I appreciate that adjustment directions (and packing tips) are printed on the underside of the top lid for even easier set up. The top-loading compartment is easy to use, and the option to configure a separate compartment for a sleeping bag (or dirty clothes) comes in handy on multi-day trips. I’m also a big fan of how accessible the water bottle holders are while wearing the pack.
The Details: Recycled nylon | 3.2-3.7 pounds | 60 liters
Best Organization
Deuter aircontact core 65+10l backpack.
Backcountry
It has multiple access points and numerous exterior and interior pockets.
It only comes in one size.
Having quick and easy access to essential gear saves time and hassle on the trail; not to mention, it makes setting up camp after an arduous day that much easier. The Deuter Aircontact Core Pack 65 + 10 gives backpackers a wealth of storage and functionality (do note that the women’s version of the Aircontact Core is designed as a 60 + 10 backpack). I love that gear can be packed and accessed from the top, front, and bottom of the bag. There’s a total of six exterior pockets, including zippered hip belt pockets, mesh side pockets, front stash pocket, and a zippered top pocket. The pack also features an interior pocket for valuables, trekking pole holders, and hydration system compatibility. While 65 liters of capacity is sufficient for many treks, I appreciate the ease of expanding the collar on the main compartment for an additional 10 liters of storage if needed. Though it only comes in one size, the VariSlide system allows for easy and exact adjustments to your back length for a secure fit. The hip belts and shoulder straps are supportive and adjustable, too, to ensure the pack stays in place
The Details: 235-denier polyamide and 500-denier textured polyamide | 4.9 pounds | One size | Up to 75 liters
Best Ventilation
Gregory katmai 55 pack.
The pack offers excellent air flow and ventilation for staying comfortable on the trail.
The sturdy frame and full set of features add some weight compared to ultralight models.
It’s easy to work up a sweat while backpacking — the Gregory Katmai 55 Pack offers top-notch breathability and ventilation when things heat up. The pack is equipped with Gregory’s FreeFloat 360 suspension system — a highly ventilated back panel that conforms to the shape of the lower back while allowing optimal air flow between you and the pack. I appreciate that the ventilated back panel is also treated with Polygiene Stays Fresh Technology to diminish odor-causing bacteria.
I also love that the pack offers inclusive sizing. The S/M fits waists/hips from 25 to 48 inches and torso lengths from 15 to 19 inches, while the M/L goes up to 53 inches for the waist/hips and 22 inches for torso length. The Katmai is a men’s specific pack, but the Gregory Kalmia 50 Pack is a similar model specifically designed for women.
The Details: 210-denier nylon and 420-denier nylon | 4.6 pounds | Size S/M and M/L | 55 liters | Water-repellent
Best for Heavier Loads
Osprey aether 55 pack.
The customizable fit and suspension system aid in hauling considerably more gear than models of comparable weight and capacity.
It’s on the heavier side if you don’t intend to make use of its hauling capabilities.
Whether planning for a longer trek or carrying gear for others, having the option to haul more can be a major plus. The Osprey Aether 55 Pack (or Osprey Ariel 55 Pack for women) boasts an impressive load range of up to 60 pounds (when fully expanded). To handle heftier loads comfortably, the pack employs a close-to-body carry design. This is accomplished with Osprey’s AirScape injection-molded back panel that fits snug to the body, plus adjustable hip belt and torso length and shoulder straps that can be fine-tuned on the trail as needed. As an avid hiker, I appreciate that much of the weight sits on the hip belt and lumbar area to avoid strain in the shoulders.
Multiple access points and numerous loops and pockets make it easy to keep things organized while piling on lots of gear and provisions as well. When fully loaded, the twin compression straps come in handy for balancing weight and keeping gear in place.
The Details: 420HD nylon pack cloth and 210-denier nylon Diamond | 5 pounds | Size S/M, L/XL | 55 liters
Most Comfortable
Rei co-op flash air 50 pack.
It’s ultra lightweight and adjustable so you can get a tailor-made fit.
The thin materials may not be as durable as other options.
For a lightweight backpack that doesn’t offload the pack weight onto your shoulders, we love the Flash Air 50 Pack for both men and women. The pack weighs less than two pounds, making this a great option for thru-hikers, weekend adventurers, and overnight travelers alike. While this pack is quite minimalistic with few pockets, it does have external pouches large enough to hold your water bottle and other essentials.
We love the light nylon fabric, but it is a bit thin and could snag if caught on branches. We also recommend investing in a raincover if you’re heading off on a longer adventure. But overall, the hip belt and ventilated back panel make this pack an overall comfortable option regardless of your hiking destination and style.
The Details: Ripstop nylon | 1.88 pounds for medium | Size S-L | 50 liters for medium
Tips for Buying a Backpacking Backpack
Be sure to find a proper fit.
Features aside, the best backpack is one that fits you well. Your torso length — a measurement that’s likely not top of mind — is a key determining factor in finding a proper fitting backpack . Thankfully, torso lengths are listed with any reputable backpacking backpack. Your torso length is the distance from where your shoulders and neck meet (the C7 vertebra to get technical) to the point of the lower back that’s aligned with your hip bones.
The fit along the hips and waist is also critical and, thankfully, easier to measure. Simply wrap a tape measure just above where you’d wear a belt to get your hip measurements. While at-home measurements can give a rough idea to narrow your search, trying on a pack is critical before embarking on a trek. Check that the hip belt sits on top of the hips, as this is where most of the pack weight should rest. Shoulder straps should be snug but only carrying a modest amount of weight. If a pack is sitting on the hips correctly and not touching the shoulders, shorten the torso length or change pack size.
Note that many packs offer some level of adjustability for torso length and hip belts. Extra features like load lifters and sternum straps can enhance the fit but be cautious about over-tightening these to avoid transferring too much weight onto the upper body.
Consider overall weight
The trip duration, weather conditions, and necessary gear will have some bearing on how much you need to pack, but a general rule of thumb is that a backpacking backpack should not exceed 20 percent of your weight when fully packed. To strategize your packing, start with the actual weight of the backpack plus truly essential equipment. Carefully planning out how much water, snacks, and food you should bring is best to avoid unnecessary weight. Typically, food amounts to 1.5-2.5 pounds per day per person, and this weight lessens as the trip goes on.
It can take some trial and error to figure out what gear and equipment is essential for your backpacking style and preferences. After each trip, consider which items you used frequently versus sparingly or not at all to fine-tune your backpacking packing list.
Think about breathability
A breathable and well-ventilated backpack is important for comfort and reducing sweat on the trail. If your backpacking trip has limited or no access to potable water (such as deserts and arid environments), cutting down on perspiration can make a big difference. Assess the ventilation in the back panel of any backpack when comparing options.
A good size for a hiking pack depends on your needs, but 10-30 liters is fairly standard for day trip packs. For a weekend backpacking trip or thru-hike, consider leveling up to 30-50 liters.
Most backpacking backpacks use an internal frame system. An external frame may come in handy if carrying larger gear that can’t fit within the backpack, while frameless models are popular with ultralight backpackers carrying only the essentials.
Pack denser and heavier items toward the bottom and middle of the backpack for optimal weight distribution with smaller and lighter items on top. Anything you’ll want quick access to on the trail can go in exterior pockets or the top of the backpack.
Why Trust Travel + Leisure
Kevin Brouillard specializes in outdoor gear and apparel. His work has also been published in TripSavvy, Jetsetter, and Oyster, and he served in the Peace Corps in Cambodia for two years. Kevin used his backpacking and camping experience to curate this list of the best backpacking backpacks.
Love a great deal? Sign up for our T+L Recommends newsletter and we’ll send you our favorite travel products each week.
:max_bytes(150000):strip_icc():format(webp)/TaylorFoxHeadshot-7375be27aedf4b0ea0e0189a4befe7d0.jpeg "2 day backpacking trip list")
More From Forbes
Mother's day gift guide 2024: the coolest lightweight gear for backpacking.
- Share to Facebook
- Share to Twitter
- Share to Linkedin
Backpacking gear is the perfect gift for an adventure mom who loves the outdoors.
For adventurous moms who love the outdoors, get them something they really want this year. Rather than the traditional flowers, perfume, or home goods route, why not show the intrepid mothers in your life how much you really see them and care about their interests and passions?
Whether heading to the local trail for a day hike, public lands for an overnight adventure, or the backcountry for a longer multi-day hiking trip, trail mavens will appreciate anything on the below list, curated specifically for backpackers who are interested in lightweight and hard-wearing gear.
Gnara: Go There Pants
Gnara Go There Pants
Possibly the best outdoor pants on the market, the Gnara Go There Pants have the most useful functionality for women adventurers. Yes, there are deep pockets. Yes, the fabric is stretchy and water-repellent. Yes, the legs are adjustable and cinchable for desired length. It’s the patented GoFly Pee Zipper, however, that sets these pants apart from all others. Finally, women can safely do their business on the trail while maintaining privacy and convenience. These will most certainly be the adventure-mom’s go-to hiking garment.
Available at www.gnara.com.
Best High-Yield Savings Accounts Of 2024
Best 5% interest savings accounts of 2024, sitka: women’s dew point jacket.
Anyone who has been backpacking for a while knows that it’s important to always bring along rain gear, even if you don’t think a downpour is in the cards. The Women’s Dew Point Jacket from SITKA, which is waterproof and lightweight, has an adjustable hood, deep front pockets, and an cinchable waist. Pair the jacket with the matching Women’s Dew Point Pant, which is also packable, durable, and waterproof, and your mom will be good to go.
Available at www.sitkagear.com.
Exped: Lightning 45
Exped’s Lightning 45
As the weather warms up and your mom starts planning her next big trek, make sure she’s ready with one of the best lightweight packs for backpacking. Exped’s Lightning 45 is only 39.9 ounces yet it’s big enough to carry everything she’ll need while on an overnight adventure. This bag is water-repellent with a roll top closure. Plenty of pockets, including useful ones on the hip belt, are standouts and it comes in two different colors—black or forest. Bonus: the women’s version of this pack has shorter shoulder straps and hip belt for a better fit. If she’s trying to shed some weight, but needs a sturdy bag, this is it!
Available at www.expedusa.com .
Nomadix: The Ultralight Towel
Just because your mom is camping, it doesn’t mean she’ll have to be filthy the whole time. It’s easy enough to bring along a lightweight towel and small bar of eco-soap so that she can clean up on-the-go. Or, if she’d rather eschew bathing while on the trail, she can always use this towel as a picnic blanket or place to spread out her gear. The Ultralight Towel from Nomadix is everything she’ll need in an absorbent cloth: it’s packable, odor-resistant, quick-drying, soft, and it comes in over a dozen different fun colors.
Available at www.nomadix.co.
LEKI: Sherpa FX Carbon Poles
The Sherpa FX Carbon hiking poles
The new Sherpa Collection from LEKI offers a lightweight pole that is good for year-round adventures—yes, you read that right! Whether your mom loves to tackle the slopes in the wintertime or hike to the top of mountains in warmer weather when the wildflowers bloom, these poles are sturdy and up to the task.
The Sherpa FX Carbon sticks are lightweight, foldable into three sections, and incredibly durable—even on those long multi-day backpacking trips where poles are needed to safely make accents, descents, and water crossings.
Available at www.lekiusa.com .
Copper Compression: Powerknit Knee High Socks
The Copper Compression collection is a game changer for those who suffer from achy feet and legs while hiking for long hours on the trail. Whether your mom will need arch support, foot recovery, or even bunion relief, help is on the way. You may even want to purchase calf or knee sleeves for her to make sure that her feet and gams are protected for any activity she wants to participate in. These copper-infused products provide needed respite and support for joints, tendons, and muscles.
The Powerknit Knee High Socks are an affordable way to make it through challenging training sessions, day hikes, or overnight adventures. Inflammation will stay in check and the blood will keep flowing, keeping legs and feet strong and healthy.
Available at www.coppercompression.com.
Ultimate Direction: Fastpackher 30 2.0
Flashpackher 30 2.0
For a long day hike, look no further than the Fastpackher 30 2.0 from Ultimate Direction. This lightweight pack has a great zipper in the front for important need-to-grab items. There’s a huge stash pocket that is ideal for packing out trash or stuffing a warm outer layer like a puffer or rain jacket. Two pockets in the front can carry extra water, gels, and snacks. The women’s design is made to fit shorter and smaller frames. Amazingly, the bag fits like a running vest yet the weight of extra items is secured in the back properly for comfort on the trail. Plus, the color—a powder blue—is a cool option.
Available at www.ultimatedirection.com.
MSR: PocketRocket Deluxe Stove
If your mom is on an overnight adventure, and she’ll be cooking plenty of dehydrated meals from Backpacker’s Pantry , she’ll need a stove that is lightweight and easy to pack in her bag. The MSR PocketRocket Deluxe Stove has a handy push-start igniter, and a pressure regulator means that her food will heat up fast. It’s details like the wind-blocking burner lip that really set this stove apart from others on the market.
Available at www.mrsgear.com.
Exped: FlexMat
A lightweight mat for under your sleeping bag is not only useful for comfort, but also, for warmth. The Exped FlexMat is a foam mat that is perfect for three seasons of outdoor fun. It can also be combined with an air mattress, like the Ultra 3R , as well as an air pillow, like the Ultra Pillow , should your mom need more cushion and insulation for a good night’s sleep. Additionally, the mat can be used to sit on while at camp or during hiking breaks. Every little bit counts—this well-designed product is versatile and hardwearing.
Available at www.expedusa.com.

- Editorial Standards
- Reprints & Permissions
Refurbished Apple Watch Ultra 2 GPS + Cellular, 49mm Titanium Case with Blue Ocean Band
Product Information
Originally released September 2023
S9 SiP with 64-bit dual-core processor
Water resistant to 100 meters¹
Certified IP6X dust resistant²
Wi-Fi 4 (802.11n)
Bluetooth 5.3
Built-in rechargeable lithium-ion battery (Up to 36 hours³)
Third-generation optical heart sensor
High-g accelerometer
High dynamic range gyroscope
Ambient light sensor
64GB capacity
Apple Certified Refurbished Products
Quality products at great prices
Rigorous refurbishment process prior to sale
Covered by Apple’s one-year limited warranty This will open a new window.
Covered by Apple’s 14-day returns policy This will open a new window.
AppleCare This will open a new window. product can be purchased
Engraving and gift wrap not available for refurbished products
Supplies are limited
What’s in the Box
Refurbished Apple Watch Ultra 2
Apple Watch Magnetic Fast Charger to USB-C Cable (1m)
System Requirements
Apple Watch Ultra 2 requires an iPhone Xs or later with iOS 17 or later.
Features are subject to change. Some features, applications, and services may not be available in all regions or all languages.
Looks tough. Because it is.
Apple Watch Ultra 2 is crafted for unparalleled performance. The lightweight titanium case is rugged and corrosion resistant, and it's raised to protect the sapphire crystal from edge impacts.
The biggest and brightest Apple Watch display ever.
Powered by the all-new S9 SiP, the Always‑On Retina display is 3000 nits at its peak, making it even more readable in harsh sunlight. In low-light situations, it dims to 1 nit. Night Mode now activates automatically in the dark. The large display gives you room to customize your view to suit almost any activity. And a new watch face shows dynamic info like altitude, depth, or seconds along the outermost edges.
Battery life for days.
When you’re on the second day of a backpacking trip, the final leg of a triathlon, or diving along a coral reef, the last thing you want to think about is running out of battery. With Apple Watch Ultra 2, you can take on almost anything and have energy to spare.³
Magic. At your fingertips.
Quickly and easily interact with your Apple Watch Ultra 2 without touching the display. Double tap your index finger and thumb to answer calls, pause and resume timers, and more. It makes everyday actions even easier, especially in demanding situations where you don’t have an extra hand to spare.
Goes further. So you can, too.
Whether it’s your first run in a while, a 10K, or a triathlon, it takes a certain mentality to seek out challenges that test you physically. Apple Watch Ultra 2 is the ultimate training partner, and it’s packed with new features to help you reach your goals.
Find strength in numbers.
Apple Watch Ultra 2 now connects to cycling accessories like power meters via Bluetooth. For a better view of your performance during a ride, start a cycling workout from your watch, and it will automatically show up as a Live Activity on your iPhone, which can be attached to your handlebars with optional accessories.
GPS far ahead of the curve.
GPS performance is critical for athletes who want the most precise metrics. Apple Watch Ultra 2 features a precision dual-frequency GPS system, which makes it the most accurate GPS in a sports watch in dense urban environments.⁴
Precision dual‑frequency GPS.
Two frequencies. One precise solution. Apple Watch Ultra 2 integrates both L1 and L5 GPS into an antenna design that provides greater range with incredible power efficiency. It combines data from these two frequencies to provide amazingly accurate distance, pace, and route calculations. The most accurate GPS in dense urban environments. The dual-frequency system combines with Apple Maps to include road, bike, and trail routes that better identify actual locations. Accuracy is boosted by new satellite and signal models. And a custom, advanced algorithm makes optimal use of available satellite signals.
Peak performance. Pushed.
Designed to take on a wide range of environments, elevations, and temperatures, Apple Watch Ultra 2 is an essential exploration tool that can take you everywhere. And help get you home.
The compass reimagined.
An accurate compass is as crucial for navigating the wild as a solid pair of boots. Additions to the Compass app deliver views and functionality that take wrist-driven orienteering to new heights.
Ready for Action.
The customizable Action button gives you quick, physical control over a variety of functions. It can do things like start a workout, mark a Compass Waypoint, or begin a dive. Just like you, it’s full of potential.
86-decibel Siren. Sonic salvation.
If you get lost or injured and need to attract attention, hold the Action button to activate a Siren that can be heard up to 600 feet or 180 meters away.
A full-featured dive computer.
Designed in partnership with renowned underwater innovators Huish Outdoors, the Oceanic+ app for Apple Watch Ultra 2 puts a bona fide dive computer on your wrist.⁵ Made for recreational scuba diving down to 40 meters, with all the core features divers need. It’s also refreshingly easy to use.
Innovation that goes deep.
The Depth app is ideal for tracking recreational underwater activity. It activates automatically when you submerge and shows the time, current depth, water temperature, duration under water, and maximum depth you’ve reached. It also shows a dive summary on your watch, and saves a log of each session in the Fitness app on your iPhone. This gives you a complete history of your dives, including a graph of the dive and a map showing the GPS entry point.
Ocean Band. The sea is calling.
Molded from a high-performance elastomer, it’s flexible and stretchy. The corrosion‑resistant titanium buckle and spring‑loaded titanium adjustable loop secure the band, even during high-speed water sports. Available in three colors, including two vibrant new options.
Height: 49mm
Width: 44mm
Depth: 14.4mm
Case Weight: 61.4g
4-core Apple Neural Engine
Second-generation Ultra Wideband chip⁶
Precision dual-frequency GPS: GPS, GNSS, Galileo and BeiDou
Always-on altimeter
Tested to MIL-STD 810H⁷
Electrical heart sensor (ECG app)⁸
International emergency calling⁹
Emergency SOS¹⁰
International roaming¹¹
Water temperature sensor
Depth gauge ±1m accuracy and app
Dive ready to 40m / 130 ft.
Dual speakers
Three-microphone array with beamforming and wind noise mitigation
Capacity 64GB
Ceramic and sapphire crystal back
Always-On Retina LTPO OLED display
Flat sapphire crystal display
Up to 3000 nits maximum brightness
1 nit minimum brightness
Connectivity
LTE and UMTS¹²
Power and Battery
Built-in rechargeable lithium-ion battery
Up to 36 hours³
Up to 72 hours in Low Power Mode³
USB-C magnetic fast charging cable
(1) What are Apple Certified Refurbished Products?
Apple Certified Refurbished Products are pre-owned Apple products that undergo Apple's stringent refurbishment process prior to being offered for sale. While only some units are returned due to technical issues, every unit is evaluated to ensure it meets Apple's quality standards.
- undergoes full functionality testing and any defective modules identified in testing are replaced.
- Apple Watch and Apple Pencil devices that require replacement parts are not included in the Apple Certified Refurbished Program.
- is put through a thorough cleaning process and inspection.
- is repackaged (including appropriate manuals, cables, new boxes).
- includes either the Operating System originally shipped with the unit or, in some cases, a more recent version.
- is placed into a Final QA inspection prior to being added to sellable refurbished stock.
Refurbishment procedures follow the same basic technical guidelines as Apple's Finished Goods testing procedures.
(2) What should I expect when I purchase an Apple Certified Refurbished Product?
- Substantial savings
- A fully functional unit with complete documentation
- The assurance that the unit meets Apple's premiere quality standards, and that its defective components have been replaced by genuine Apple components
(3) Can I purchase the AppleCare plan for my Apple Certified Refurbished Product?
All Apple Certified Refurbished Products are covered by a one-year limited warranty . For more coverage, you have the option of purchasing the AppleCare Plan with your Apple Certified Refurbished Product. The AppleCare Plan provides up to three years of world-class support for Mac, and up to two years of world-class support for iPad, iPod, iPhone, Apple Watch, Apple TV and HomePod.
(4) A refurbished item that I wanted is no longer available. How can I ensure that I get an item when it's in stock?
Refurbished supply is usually very limited and we often run out of refurbished inventory. We recommend that you act quickly if you see an item that you like. A product will be reserved for you once you've completed checking out and we've received full authorized payment. Please note that some payment methods take longer than others and that availability of a refurbished product is not guaranteed until we receive your full payment.
COMMENTS
BACKPACKING FOOD - Good food is really important for any backpacking trip, so it's well worth the effort to put together a simple meal plan before your trip. Keeping food weight down is a critical backpacking skill that usually takes experience to master. A good place to start is our Guide to Lightweight Backpacking Food.Most seasoned backpackers opt for lightweight, calorically-dense ...
Overnight Backpacks. For multi-day hiking & backpacking, where you'll need to carry everything in on your back, I recommend choosing a 40-65 liter backpack that will hold your tent, sleeping bag, food, water, and other backpacking essentials. Gregory Mountain Zulu 55 - This is the backpack I take with me on most 2-3 day trips.
A good micro-fibre travel towers is essential travel gear on any ultimate backpacking gear list. The Matador micro-fibre towel range are made by travellers for travellers. They are super light, and most importantly dry very quickly and are perfect for all types of backpacking trips. Check Best Price.
1 pair of hiking boots or footwear. 1 or 2 breathable, moisture-wicking tops. 1 breathable extra layer (i.e. a lightweight fleece or merino wool base layer) 1 or 2 pairs of breathable pants or shorts. 1 or 2 pairs of hiking socks. 3-4 pairs of underwear (1 pair for each day!) 1 hat with a brim. 1 rain jacket.
Clothes for 2-5 Days of Backpacking, three seasons: Down Puffy jacket. 2-3 pairs of Darn Tough Socks (1 pair worn; 3 pairs total if cold climate hiking, 2 pairs total if warm enough I expect to wear sandals for portion of time) 4 pairs of underwear. 1 pair of quick dry shorts.
Down to 20F: R 4-5.4. Below 20F: R 5.5+. Backpacking sleeping pads to consider: In our packs: Nemo Tensor Insulated (R 4.2) — After trying multiple sleeping pads, the Nemo Tensor is the pad we keep coming back to. It's lightweight at 15oz, super comfortable, easy to inflate, packs down small, and it's quiet.
Our detailed checklist below covers everything from critical backpacking equipment (tent, pack, sleeping bag, etc.) to kitchen gear, footwear and clothing, health and hygiene products, and personal items and extras. For more information on each product category, many of the headings link to our detailed product round-ups, which are the result ...
Backpack. Typically a 50- to 80-liter backpack. Rain cover or waterproof pack liner. Waterproof compression sacks or storage sacks (optional) For three-season backpacking trips that take a weekend or longer to complete, you should carry a pack between 50 and 80 liters in size.
This gear list is most applicable for 3-day backpacking trips and up to 5-day backpacking trips (and obviously this list will work for 2-day trips as well). This list isn't fully optimized for really long thru-hiking trips though, since that takes a LOT more planning and coordinating, and your gear strategy will be a bit different.
Gear. Best Backpacking Tent: MSR Freelite 2 Tent: 2-Person 3-Season. Best Sleeping Bag: Therm-a-rest Hyperion 20F/-6C Ultralight Down Mummy Sleeping Bag. Best Sleeping Pad: Therm-a-rest NeoAir ...
Sunglasses. Mosquito/tick repellant or a bug net. First aid kit including: band aids, gauze, antiseptic wipes, antibacterial ointment, painkillers, tweezers, insect sting treatment, medical tape. Headlamp. Map (downloaded or physical) Backpack and rain cover (size: 35 Liters and up) Tent/hammock/tarp. Sleeping pad.
This is a comprehensive packing checklist and packing advice for budget backpacking and light travel for adventurers (travel or hiking) — including backpacking essentials, electronics & accessories, adventure gear, toiletries, clothing, useful things and admin. Carrying all backpacking essentials on a wilderness trail in Canada.
Backpack. For an overnight trip, you should be able to get by with a backpack that holds 30-50 L. If you're backpacking for an extended trip (3-5 days), then you will need a larger pack (50-70 L ...
Clothes - for a weekend alpine trip I will typically pack a fleece jacket, down jacket, and rain jacket for outerwear. Then always my wool base layers, one warm pair of socks for sleeping, and a pair of leggings or hiking pants (I love the fit of these sustai nable ones ). Don't be afraid to rewear clothes, socks, sports bras, etc!
Related post: 11 essentials for every ba c kpacking tri p. Camping necessities to add to your backpacking checklist. For multi-day backpacking trips, camping necessities are vital for backpackers.You're going to sleep in the wilderness and need the proper gear to survive the elements.If you're new to camping, these essentials will show you what to bring on a hike:
Quick dry t-shirt. Fleece sweater. Sunglasses. Hat. Food: Package food into individual large freezer bags for each day and place them all into a dry bag for easy storage. Food for each day should weigh approximately 1lb. Store food in a bear cache whenever you are able to while camping.
Please note that a loaded backpack should not weigh more than 20% of your body weight. So a hiker weighing 150lb (68kg) should aim for a backpack weight of no more than 30lb (13.6kg). Keep in mind that it takes a few trips to refine the best backpacking set-up (food, gear, clothing, footwear etc.) for you.
80-100 grams oatmeal per person per day. Powdered milk and chocolate milk. 1-2 Snicker's or Lara bars (vegan), or some other form of nutrition bar per day. 100 grams dried fruit and nuts per day for lunches. 1 lightweight treat per day (oreos, candy bar, something you'll look forward to). Enough ziplocks to portion out each meal (please ...
My two day backpacking gear load out. Here is how to pack for your backpacking trip. It is a detailed look at everything I brought on my 2 day backpacking t...
In this backpacking checklist, I share every item I bring on a 3-day backpacking trip in the late spring, summer, and fall seasons. I hope that this backpacking gear list will help simplify your ...
A good size for a hiking pack depends on your needs, but 10-30 liters is fairly standard for day trip packs. For a weekend backpacking trip or thru-hike, consider leveling up to 30-50 liters.
Exped's Lightning 45. Exped. As the weather warms up and your mom starts planning her next big trek, make sure she's ready with one of the best lightweight packs for backpacking. Exped's ...
When you're on the second day of a backpacking trip, the final leg of a triathlon, or diving along a coral reef, the last thing you want to think about is running out of battery. ... All-day battery life is based on the following use: 180 time checks, 180 notifications, 90 minutes of app use, and a 60-minute workout with music playback from ...