
Best Hiking Crampons
When you plan to trek across icy mountains and steep glaciers, you’ll want to make sure you’ve got all the essentials: plenty of food and water, a headlamp, pocket knife, and high-quality crampons.
If you’ve never hiked through the snow, you might not even know what crampons are, or why they’re important for your journey. Or, maybe you’ve done your fair share of winter hiking, but you’re in need of a new pair of crampons. But, just as you’d need to look up the best camping tents or best sleeping pads , it never hurts to get another opinion.
Before you tackle a wintry forest or Mount Everest, I’ll break down why crampons matter, how to pick out the right pair, and which ones are the best crampons for hiking.
Why Crampons are Essential
When you hike through mountain trails in the summertime, you usually don’t need more than a pair of high-quality boots. However, add in a bit of snow and ice, and you can no longer get a grip in those same hiking boots. This is where a set of crampons can come in handy. Just as an athlete wears cleats to gain traction on the field, the pointy, metal teeth of crampons help you gain traction in the snow . These pointed ends dig into the ice and snow.
Not all wintry terrain requires a pair of crampons. If you’re only hiking in a couple of inches of snow, and the snow is already packed down from hikers before you, crampons might be unnecessary. However, if your boots begin to sink into the snow or you keep slipping on the ice, crampons can help you get a toehold.
Crampon Features to Consider
If you already know that crampons are going to be a must-have for your next wintry expedition, then your next obstacle is figuring out what to look for. When you shop online, most crampons list tons of different features and specifications, but it can be difficult to tell which ones matter—and that’s where I come in:
Type of Frame
You’ll notice that most crampons use either one of two materials: steel or aluminum. Both have their benefits, but aluminum crampons tend to be better for snow or ski mountaineering. Since they’re lightweight, aluminum is less likely to slow you down or tire you out as easily as a burly pair of steel crampons would.
However, if you plan to cover rocky terrain, you’ll want to trade those aluminum crampons in for steel ones. Steel crampons, whether it be stainless or Chromoly steel, often hold up much better, and are an ideal choice for technical mountaineering.
If you do plan to use a pair of steel crampons, you’ll have to pick between Chromoly steel and stainless steel. Chromoly steel should still hold its own, but stainless-steel crampons are significantly more rust-resistant non corrosive—but they do usually come with a higher price tag.
Construction
Besides using different materials, you’ll also notice that crampons vary by construction too. Traditional crampons use rigid designs, but most of them have a semi-rigid construction now. Semi-rigid frames work on a variety of different terrains, but if you’re also looking to use your crampons on gentle hikes, you’ll probably want to find a pair that allows you to adjust to flexible mode.
As the name suggests, a crampon in flexible mode should feel less rigid on your boots, and make navigating your hike a little easier. Not all crampons include a feature to switch to flexible mode—so, it’s really only a consideration if you plan to use that mode a lot.
Number of Points
When shopping for crampons, most of these traction devices use 10 or 12 points, but sometimes up to 14. For ski mountaineering or even heading up glaciers, mountaineering crampons with 10 points should suffice.
However, for mixed climbing that begins to get a bit more technical, you’ll probably want to bump your crampons up to 12 points. Crampons with more points may also have sharp frontpoints that you can replace if they wear down or adjust as needed. Keep in mind that points can also vary as horizontal, vertical, or monopoints:
- Vertical frontpoints work better for steep climbs and don’t get stuck in crevasses or cracks as you climb. They’re also easy to replace or adjust on your boot if you need to.
- Horizontal frontpoints are versatile and can work for most types of climbing, but specifically alpine climbing.
- Monopoints are pretty specific, and you’ll only need them if you plan to do a technical waterfall or mixed climb.
Your crampon points are also either going to be adjustable, or modular, or fixed, also called non-modular. Some people prefer to use modular points that they can replace as time goes on but easily adjust depending on the type of terrain. However, modular points can also be heavier, and you’ll have to keep an eye on any screws that come loose.
You can’t adjust non-modular points, but you can sharpen them. Like a pencil, they’ll only get shorter as they continue to wear down and need re-sharpened.
How They Attach to Your Boots
Most people want to know whether their crampons will attach to their boots, or if they’ll need a special pair just to strap on the crampons. Unfortunately, there’s no one-size-fits-all answer, and the answer depends on how the crampons attach to your boots. Semi-strap crampons, for instance, should fit on a lot of boots, as long as you’ve got a stiff sole and a heel groove.
Things get a little more complicated if your crampon requires a wire bail, or step-in binding. Your boots will need a very rigid sole, as well as a ⅜-inch welt on the toe and heel. There’s usually an ankle strap involved too, but not always. This might seem time-consuming to some, but your crampon is unlikely to go anywhere once you’ve got it on.
The most versatile system is the strap-on system, which you can attach to almost any pair of boots you own. As long as the center bar matches up, you can strap your crampons on without too much trouble.
Crampons vs. Micro-Spikes: What’s the Difference?
Some people may use the term “micro-spikes” interchangeably with crampons, but these traction cleats are very different. For first-time users, it can be difficult to discern when you only need micro-spikes, and when you should make the switch to crampons.
Generally, micro-spikes work well for wintry terrain, unless you start venturing up slopes with high angles. Or, if the mountain is coated in inches of ice, the micro-spikes might not be long or sharp enough to penetrate.
It’s at this point that most people make the switch to crampons. Not only are they sharper, but they’re also longer too. Most of the time, you’ll find that crampons, aluminum or steel, tend to be heavier than the average pair of micro-spikes. The extra weight isn’t always a plus, but it might be what you need on a heavy-duty hike.
My Favorite Crampons
Now that we’ve gone over how to find some of the best crampons for mountaineering, I’ll highlight some of my favorite picks:
Here are the best hiking crampons right now:
- Editor’s Choice - Black Diamond Contact Strap Crampons with ABS Plates
- Premium Pick - Black Diamond Snaggletooth Pro Crampons
- Bang for Your Buck - Kahtoola K-10 Crampons
- Bang for Your Buck - Hillsound Trail Crampon
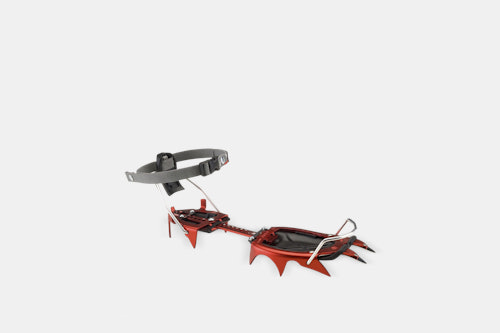
Petzl Irvis Hybrid Leverlock Crampons
Grivel g20 plus cramp-o-matic crampons, kahtoola kts steel crampons, c.a.m.p. usa skimo tour crampons, petzl lynx leverlock crampons, cassin alpinist tech crampons, filter crampons by category.

All Categories

Editor’s Choice

Premium Pick

Bang for Your Buck
Black diamond contact strap crampons with abs plates.

$123.95 at Amazon
See the black diamond contact strap crampons with abs plates, 75 reviews on amazon.
- Easy to assemble: 9/10
- Traction: 8/10
- Lightweight: 8/10
Bottom Line
If you plan to conquer any rocky inclines, you’ll probably want to opt for stainless steel crampons, like the Black Diamond Contact Strap Crampons with ABS Plates. Not only are they more lightweight than some other steel crampon options, but they’re also versatile too. The flexible bootstrap makes it easy to secure the crampons to most mountaineering boot.
You’ll also find that the ABS plates on the crampons help deter snow from sticking to your feet. As you wade through inches of snow, the last thing you want is to deal with tons of balled up snow. With its horizontal front points, I’ve named this pair my Editor’s Choice for a couple of reasons: not only are they durable and versatile to wear, but they also help you avoid the common problems that every hiker encounters on a wintry climb.
Keep in mind that if you have a boot that’s size 12 or higher, you’ll need to purchase a long center bar separately.
- Price: $123.95 on Amazon
- Weight: 1.7 pounds
Black Diamond Snaggletooth Pro Crampons

$287.99 at Amazon
See the black diamond snaggletooth pro crampons.
- Easy to assemble: 7/10
- Traction: 9/10
- Lightweight: 7/10
From the same brand, the Black Diamond Snaggletooth Pro Crampons kick things up a notch with this step-in product. For professional hikers that need a pair of crampons that feel professional, this might be the right choice for you.
The stainless steel construction is not only relatively lightweight, but the design of the crampons includes a rocker in the front rail that fits even modern boots. If you’re worried about trudging up snow while you hike, the front and rear ABS plates should prevent the wintry terrain from sticking to the crampons.
For hikers that regularly deal with low-angle climbs, you might appreciate the secondary frontpoint that helps you gain traction in treacherous ice (or “ice greWhile it’s not as lightweight as the other Black Diamond pair we’ve mentioned, you also get a front railing, extra ABS plates, and a secondary frontpoint with these crampons.
- Price: $219.95 on Amazon
- Weight: 1.9 pounds
Kahtoola K-10 Crampons

$99.99 at Cabela’s
See the kahtoola k-10 crampons, 45 reviews on amazon.
- Easy to assemble: 8/10
- Traction: 7/10
- Lightweight: 9/10
Not everyone has hundreds of dollars to spend on a pair of crampons, especially if you aren’t a regular. If you’re looking for something that can still make the climb but isn’t too extravagant, the Kahtoola K-10 Crampons offer great value.
They’re also versatile and should fit over your existing boots with few exceptions. Unlike some crampons, which use step-in bindings and tricky assembly features, these crampons shouldn’t take more than a few minutes to fit your feet.
Another perk of these crampons is that they’re also pretty lightweight at only 1.3 pounds. When you’re traipsing through the snow, these crampons shouldn’t slow you down too much.
It’s worth noting that they fit most boots up to size 13 for men and size 14 for women. If you’ve got a bigger shoe than that, you’ll probably want to look elsewhere.
- Price: $99.99 at Cabela’s
- Weight: 1.3 pounds
Hillsound Trail Crampon

$69 at Amazon
See the hillsound trail crampon, 728 reviews on amazon.
- Traction: 6/10
If you need a pair of crampons that won’t break the bank, the Hillsound Trail Crampon can still get the job done, although they probably won’t be much help on technical climbs. On backcountry hikes that have been covered in snow or even glacier walking, these Hillsound Crampons can give you the extra traction that you need.
The carbon steel spikes have been treated with heat for better durability, so they’re less likely to wear down with regular use. If you’re worried about getting these crampons on your feet, they use hook-and-loop straps that you can take on and off.
When you’re not using this Hillsound Trail Crampon, you can keep your crampons safe by placing them in the storage bag so they don’t get damaged in between hikes.
- Price: $65.00 on Amazon
- Weight: 0.9 pounds

$155.99 at Amazon
See the petzl irvis hybrid leverlock crampons, 82 reviews on amazon.
Some brands might force you to buy each crampon separately, but with the Petzl Irvis Hybrid Leverlock Crampons, these come as a pair. With 10 points, these crampons ensure that every point has a purpose. The two wide points in the front help you dig into snow while you can use the teeth in the back to stabilize yourself when you’re headed downhill.
The hybrid structure means that these Petzl crampons are also part aluminum. While that can limit how well they perform on rocky slopes, it also makes these crampons extremely lightweight as well.
- Price: $177.99 on Amazon
- Weight: 1.2 pounds

$224.99 at Amazon
See the grivel g20 plus cramp-o-matic crampons.
- Lightweight: 5/10
The Grivel G20 Plus Cramp-O-Matic Crampons might look like they’re ready for battle, and you’ll want these fierce crampons on your side. With hot drop-forged frontpoints that you can replace or adjust as needed, these traction devices do well with rocky or ice climbing.
There are also 2 center points that can help increase your stability on an incline, as well as keep you steady when you’re headed downhill. If these crampons come loose while you’re trekking in heavy snow, the safety straps on the front ensure that you won’t completely lose them.
Since they’re made for a heavy-duty climb, it only makes sense that these are heavy-duty crampons. If you’re looking for something more lightweight, you might want to check out one of the other choices we’ve highlighted.
- Price: $249.00 on Amazon
- Weight: 2 pounds

$169.95 at Amazon
See the kahtoola kts steel crampons, 13 reviews on amazon.
- Easy to assemble: 6/10
With stainless steel bars that flex with your foot as you move, the Kahtoola KTS Steel Crampons are all about flexibility and ease of movement. The 10 points are all one-inch and provide you with better stability regardless of where you’re at.
Since it uses Chromoly steel, these crampons are unlikely to wear down, even if you take them on a rocky incline. When you’re back from the hike, you’ll need to wash them with only lukewarm water, and allow them to air-dry before the next use.
- Price: $169.95 at REI
- Weight: 1.5 pounds

$179.95 at Amazon
See the c.a.m.p. usa skimo tour crampons.
If you need to move quickly across the mountain, the CAMP USA Skimo Tour Crampons won’t slow you down. Weighing just a touch shy of a pound, these crampons can trek across ski slopes without compromising traction.
Since they do use aluminum over steel, you probably don’t want to try using them on a rocky or technical climb. Not only will they function poorly, but they’ll also wear down much quicker. When it comes to fitting these on your boots, the micro-adjustable linking bars allow you to get a much more accurate fit.
- Price: $134.96 on Amazon
- Weight: 1 pound

$250 at Amazon
See the petzl lynx leverlock crampons.
- Traction: 10/10
When you’ve got a challenging mixed or technical climb ahead, you won’t want to leave home without the Petzl Lynx Leverlock Crampons. These modular crampons allow you to modify the frontpoints with a screw.
The anti-snow plates on the crampons can also prevent snow from building up and adding more weight to these already heavy-duty crampons. With fourteen frontpoints, these crampons can help you regain stability, even on tricky icy slopes.
- Price: $227.00 on Amazon
- Weight: 2.4 pounds

$249.95 at Amazon
See the cassin alpinist tech crampons.
- Lightweight: 6/10
While it might have a steep price, these Cassin Alpinist Tech Crampons are also made for steep, technical inclines. To fit the design of most modern boots, these crampons have an asymmetrical design. Speaking of the fit, the micro-adjustment linking bar helps you get a much more accurate fit.
By reducing the connection joints, you’ll lose some of your flexibility on a climb, but you’ll also be able to get a much more secure hold to the ice or snow.
- Price: $187.46 on Amazon
Subscribe to Outdoorish
- HIKING & CAMPING
- CLASSIFIEDS
Camp/Adventure 16 Ice Trek Crampons
Camp/adventure 16 ice trek crampons .
Flexible, strap
USER REVIEWS
A bargain price does not always turn into a good value! That is very much the case with CAMP crampons. The Ice Trek crampons appear to be well made of a very brittle chrome molly steel. Though the width in the forefoot and the length is adjustable I don't believe they will fit boots over size US 10. The width could not be adjusted to even snugly fit a pair of Lowa Baffin's Size US 11. There products from other manufacturers of greater value in the flex crampon market. I would not recommend any of C.A.M.P's products due to extremely poor support. (See customer service below)
Customer Service
Customer service from CAMP USA leaves a lot to be desired. They did not respond to inquiries via email or fax and only responded after two follow up phone calls and a fax to their parent / partner / manufacturer in Italy. It is not surprising given their recent relationship with Adventure 16, whose arrogance torwards their customer is only exceeded by extremely high pricing.
Similar Products Used:
Buy a well known and readily available brand such as: Black Diamond Charlet Moser / Petzl Stubai Cassin Kong This will at least ensure that repair / replacement parts are easy to obtain.
really nice classic crampon well made and suitable to a wide range of uses, not very technical but there is where its beuty lays, its lack of specific purpose makes it ver versitile, though straps are a pita as on all strap on crampons, they are widely available sold as military surplus
austrio alpin tyrol ,macko's, foot fangs
- Terms of Use
- Privacy Policy
(C) Copyright 1996-2018. All Rights Reserved.
outdoorreview.com and the ConsumerReview Network are business units of Invenda Corporation
Other Web Sites in the ConsumerReview Network:
mtbr.com | roadbikereview.com | carreview.com | photographyreview.com | audioreview.com
CAMP XLC Nanotech Crampons
Lightweight crampons for ice & snow.
Designed for mountaineering and glacier travel, the CAMP XLC Nanotech crampons help you keep your footing on ice and hard-packed snow. Made from Sandvik Nanoflex stainless steel, each pair features a lightweight 12-point design, a 3D-pressed frame, and CC4U wear indicators on the side points that show when it’s time for a replacement. The automatic bindings fit most rigid mountaineering, A/T, and telemark boots, while the semi-automatic bindings fit most semi-rigid mountaineering boots and the universal bindings fit most mountaineering and hiking boots.
Note: At checkout, choose the XLC Nanotech Semi-Automatic crampons or XLC Nanotech Automatic crampons.

XLC Nanotech Automatic
- Frame material: 7075 aluminum, Nanoflex steel
- 3-D pressed frame
- Automatic bindings
- CC4U wear indicators
- dynamic anti-balling plates
- Size: EU 36–47
- Weight: 19.8 oz (560 g)
XLC Nanotech Semi-Automatic
- Semi-automatic bindings
- Dynamic anti-balling plates
- Size: EU 36–48
- Weight: 22.9 oz (650 g)
Estimated ship date is Dec 10, 2018 PT .
Payment will be collected at checkout. After this product run ends, orders will be submitted to the vendor up front, making all orders final.

- Expedition & Alpine
- Crag Access
- Winter Climbing
- Photography
- Culture Bunker
- Lost & Found
- Lifts & Partners
- For Sale/Wanted
- Premier Posts
How to use Camp Ice Trek crampons?
I’m lending an old pair of Camp Ice Trek crampons to someone. I can’t remember how the straps go over the boot. There are a couple of threads on here but no clear answer and Google has failed me. Can anyone remember how the straps go please? I do remember it was a pain. Here’s a helpful labelled photo:

Not used those specific ones but they just look like standard old fashioned straps...
Front strap through ring (G) at the toe, then ring (E) on the far side, then back over to buckle (D).
Heel strap does a full 360 loop round the ankle to buckle (C), possibly going through ring (F) on the way if that seems sensible.
Buckles to the outside of each foot. Also as I'm sure you're aware, adjust the crampons to length first so they're a push fit onto the boot sole, that bit is crucial!
Brilliant. Thank you. That looks right, although the straps need trimming a bit I think.

Latest Jobs 5 New
Jobs Glenbrittle Campsite Wardens 2024
Elsewhere on the site.

Photography UKC/UKH Photography Awards 2023 - Winners
- Starting Out
- Expedition & Alpine
- Destinations
- Walls & Training
- Crag Access
- Winter Climbing
- Photography
- Culture Bunker
- Lost & Found
- Lifts & Partners
- For Sale/Wanted
- Premier Posts
Fitting camp ice trek crampons
Latest jobs 5 new.
Jobs Climbing Team Leader
Elsewhere on the site.
Photography UKC/UKH Photography Awards 2023 - Winners
Podcast Factor Two - S3 Ep.5: Deep Play

Black Sheep Adventure Sports
Taking the road less traveled.

Review: CAMP Alpinist Crampons

- 12 point steel mountaineering crampons
- Weight: 970g
- Available with Auto, Semi-Auto and Universal boot attachments
- Come with dynamic anti-balling plates
- Two heel bail positions
- Three toe bail positions
- Micro-adjustable linking bar
- Fantastic crampon bag included
.jpg?bwg=1565232004 "Linking Bar")
Designing a pair of crampons to fit every different make and model of boot, each with a differently shaped toe box, has got to be the bane of a crampon designers existence! Generally fully-auto attachments work fairly well across different boots, and that holds true with the Alpinist crampons. However, the Semi-Auto / Universal front boot attachment is a bit on the wider side and so struggles with some types of lighter summer mountaineering boots, basically anything with a thinner toe box. Boots with a wider toe box attach to the Alpinist crampons securely.

Performance:
I find that most mountaineering crampons perform well when mounted on a stiff pair of ice climbing boots. However, the softer the boot gets the less performance you can squeeze out of a pair of crampons. Of course this means that soft mountaineering boots appreciate a technical crampon when the going gets steep and icy. And this is where the Alpinist crampons really shine! They feature a unique heel slide design which adds rigidity to the crampon while all but eliminating any play between the heel and toe, making them feel very secure in technical terrain. They’re stiff enough to support softer boots, though a stiffer boot still feels a bit more secure in the steeps.

The Alpinist crampons also feature a fairly aggressive angle on the secondary points making front pointing up steep alpine ice much more secure. The front points have a fairly short radius bend into the nice flat downward point, a design that I prefer over front points with a gentle arc into a steepening angle towards the tip of the front points. The consistent angle is more reminiscent of technical ice crampon front point geometry and more secure in the steeps.
At 970g the Alpinst crampons are definitely on the heavier side, the price that’s paid for performance. The Petzl Vasak crampons, for example, weigh in at 880g per pair. That’s almost 100g lighter!
CAMP eliminated the rear connection point making the Alpinist crampons stiffer and more performance oriented, which also means that they cannot be packed down into as small a package when not in use.

Last, but definitely not least, the Alpinist crampons come with one of the best crampon bags I’ve ever come across. Simple and functional, this thing is fantastic!
Pros: Versatile, performance focused design
Cons: Wide-ish toe straps on semi-auto version don’t fit all boot types
Overall: A fantastic performance crampon
Black Sheep Adventure Sports was supplied with a pair of crampons for testing but of course this didn’t influence our review in any way.

Published by
Monte johnston.
Editor in Chief at Black Sheep Adventure Sports. Monte uses the combination of his guiding experience and civil engineering background to critically analyze equipment and apparel providing in-depth reviews on exhaustively tested gear. View all posts by Monte Johnston
Crampons. Where to even begin? Crampons are an essential piece of winter kit for those who enjoy adventuring on ice and snow, whether climbing up an icy gulley or trekking across a snow-covered peak. But it’s important to wear the correct crampons and pair them with the right boots.
Why? Well, in severe situations, it could be a matter of catastrophe, but generally, it’ll help prevent accidents and likely contribute to how much enjoyment you get from your adventure.
Let’s start by going back to basics.
What Are Crampons, and What Are They Used For?
Crampons are a set of metal spikes that you attach to your boots to improve mobility and traction on snow and ice. They’re often made from steel or aluminum and have a varying number of spikes on the bottom, tailored to different uses.
People often use crampons for hiking and trekking in freezing conditions, crossing glaciers, ski touring, ice climbing and winter mountaineering. They come in various weights and materials, each with their own pros and cons.
Steel vs aluminium crampons
Steel is preferred, due to its strength, although this option does weigh more. Aluminum is becoming more common, but generally isn’t suited to sparse UK conditions, where you’re more likely to kick a rock than a snowball, as this is where aluminum has the potential to break – not good for safety, or your bank balance!

The Anatomy Of A Crampon
Crampons have a front section and a heel section, joined by a bar in the middle. The more flexible the bar, the better suited to walking it is. The stiffer the bar, the better suited to climbing it is. These bars have holes which allow adjustability for accommodating different sized boots.
They also have spikes, and right underneath your toe are the front points of the crampon. Short horizontal points are better suited to walking, whilst long horizontal points are better suited to mountaineering and sharp vertical points to climbing. It’s also worth noting that the more spikes on the front section, the better suited to technical mountaineering they are.
Anti-balling plates
Underneath you’ll see plastic plates called anti-balling plates. Anti-balling plates aim to stop snow from freezing to the exposed metal on the underside of the crampons. Otherwise, without these plates, snowballs could potentially under your feet, rendering the points of the crampons useless. These plates also aim to stop snow from becoming compacted in-between the crampon and the boot, which has the potential to knock the crampon off altogether.
On the top of the crampons, you may notice differing methods for attaching them to your boots.
Strap-on crampons
Strap-on crampons feature plastic baskets at the heel and toe, joined with a strap to hold them in place. These are the most versatile, but least secure, providing a good option for walkers, although not the durability required for climbing and mountaineering.
Semi-automatic crampons
Semi-automatic crampons have a plastic toe basket and a heel clamp, with straps between them to hold them in place. This design gives the best all-round performance and offers security, as well as adjustability, when used with compatible boots.
Automatic crampons
Automatic crampons feature metal toe bails and heel clamps. They offer the most durable and secure fit when used with the right footwear.
Microspikes
Microspikes, or pavement crampons, are becoming increasingly popular. They’re great when used for their intended purpose – to gain traction over flatter, icy ground. However, they can be less effective on steeper paths, or even on slightly angled side slopes, as the only thing attaching them to your boots is some stretchy elastomer. This is because the flexibility of this elastomer makes it easy for your boot to slip out of the crampon.
Microspikes also lack the anti-balling functionality underneath, meaning in sticky snow, you spend more time knocking the snowballs off the bottom than you do walking.

Rating Systems
Neither crampons nor boots have a common rating system, either for stiffness or intended use, particularly across brands. However, labels often design boots with a particular use in mind. The requirements for a winter walker’s boot and crampon combination are very different to the needs of either a Ski Tourer or Ice Climber, for example.
To help differentiate between the sort of rigours that you’ll be putting the boots and crampons under, you’ll often hear of a system that uses B-ratings for boots and C-ratings for crampons. These letters are followed by either 1,2 or 3, denoting the stiffness of the product, 1 being more flexible, and 3 being less flexible. Each rating allows you to decipher which crampons and boots are suitable for certain activities, and which crampons need pairing with which boots.
In terms of ratings, it’s worth starting with your footwear, as your boots will indicate what crampons are suitable for use with them.
Boot Ratings
Consider a B0 boot to be the stiffest walking boot you can find. They generally possess a thick, full-grain upper, a full rubber or TPU rand, and a deep, well-spaced rubber tread. If you took the boot in your hands and tried to bend the toe to meet the heel, you’ll barely be able to bend it. Any boots less robust than this, with more flexible midsoles and uppers, are generally designed for hill walking and hiking below the snow line. If paired with a crampon, these flexible boots run the risk of popping out of place, a potentially dangerous situation if you slip or trip up. Therefore, B0 boots are suitable for pairing with microspikes on flatter easier ground, to prevent slips in icy conditions.
B1 boots are designed for four-season use and can be worn for hiking, trekking, scrambling or less technical winter walks. They take the points from B0 boots, and turn the dial up to 11. B1 boots have a stiffer midsole and chunkier tread on the outsole.
You’ll often find a more walking-orientated tread pattern on a B1 boot, when compared to some of its more winter-mountaineering-focused cousins. They also have a good amount of ‘rocker’ to allow a natural gait when walking. Manufacturers often combine these features with leather or fabric uppers that provide ample protection and durability. Walking-focused models sometimes include insulation, too.
Finding a TPU heel ledge for additional, secure crampon compatibility is becoming more common, especially in climbing-focused models. You should wear B1-rated boots with C1 crampons. This pairing will work perfectly for most UK winter fell walks and gentle adventures in the snow.

The midsole and upper of B2 boots are stiff and supportive, giving you ample protection in rocky or uneven terrain. However, they also have just enough flexibility to allow you to walk. B2 boots generally fall into two categories – faster and lighter or bigger and chunkier. The faster and lighter ones have a flatter, more climbing-focused sole, aiming for activities such as summer scrambling over rocky climbing terrain. With the ability to attach a mountaineering crampon for winter activities, the trade-off here is warmth. Chunkier and thicker boots work better for more winter-based activities. They still have a climbing sole, this time with a slight rocker, insulation and tougher uppers. You’ll also (almost) unanimously have a heel ledge that helps crampons fit securely. These boots usually need pairing with C2 crampons to create an ideal setup for winter Munro-bagging and low to mid-grade climbing in snow and ice. A B2/C2 combination would also work well for summer Alpinism.
With the ability to attach a mountaineering crampon for winter activities, the trade-off here is warmth. Chunkier and thicker boots will be aimed for more for winter-based activities. They still have a climbing sole, this time with a slight rocker, insulation and tougher uppers. You’ll also (almost) unanimously have a heel ledge that helps crampons fit securely.
These boots are to be paired with C2 crampons, which would be ideal for winter Munro-bagging and low to mid-grade climbing in snow and ice. A B2/C2 combination would also work well for summer Alpinism.

B3 boots are the stiffest boots you can buy. They provide lateral and medial support for different actions and movements on technical terrain. B3-rated footwear best suits activities like advanced mountaineering, mixed climbing, and ice climbing. This rating also includes models with extra insulation for high-altitude missions. Common features include heel and toe welts (ledges) that allow C3 crampons to fix onto the boot. These features help you to visibly identify a B3 boot compared to B2s, which only have the rear welt (ledge).

Next up are the Crampons. Again, we’ve broken down each rating to give you a clearer idea of this system.
Crampon Ratings
C1 crampons.
C1 crampons are primarily used for walking, as the shorter, less aggressive points and more flexible binding systems do not lend themselves to climbing. Whether hiking Scottish Munros in Winter or trekking across Glaciers, they give you ample grip in snow and ice. These crampons usually have 10 points and a flexible bar in the middle to accommodate stiffer hiking boots, which still tend to be a little softer than full-on mountaineering boots. You’ll also notice a more flexible heel, toe baskets and connected straps that you can use to attach them.

C2 crampons
C2 crampons usually have 12 spikes, which are more aggressive, to add extra traction in snow and ice. They’re designed for walking on more technical, icy terrain and climbing less advanced routes during the winter. Another noticeable visual difference on C2 crampons is that, unlike C1 crampons, they have specific clips on the rear. This clip attaches to the rear welt of most B2 boots, and is paired with a flexible, plastic toe basket and straps in between. The crampons will also flex less through the middle bar, lending themselves well to stiffer mountaineering boots.

C3 crampons
A C3 crampon will take all the details from C2 crampons up a notch. The rear heel clip remains, but now you have a metal toe bail, rather than the plastic basket. You’ll notice B3 boots have welts on the front and rear to accommodate this, overall creating a secure fit on a stiff boot. These metal toe bails on the front provide more durability against solid ice and rock, which is safer than plastic for more technical ascents. Some crampons also allow you to reduce the number of points on the front to just one, for more precision on delicate terrain or climbing narrow cracks. C3 crampons are generally used for technical ice climbing.

Adaptation systems
Some crampons are now being developed with ‘adaptation systems’ that allow you to transform a C2 crampon into a C3 crampon by, for example, changing the binding system. Some even have the ability to fit a different front section, one that is more aggressive, as your interests progress. This gives the user more versatility on different adventures and terrains, without spending double the price on multiple pairs. Keep an eye out for these coming into stock here shortly!
Crampons with cords?
You may also see crampons with a cord in the middle instead of a bar. A cord? Sounds a little ominous? This shouldn’t be a cause for concern; the cable is usually made with Dyneema, which is incredibly strong – so strong that it’s trademarked as the world’s strongest fibre. However, these lightweight crampons are only suited for use with rigid ski boots, for more technical levels of ski touring. Their lighter-weight construction makes them more packable and suited to consolidated snow, but not rocks and ice. These stiffer ski boots are needed to counterbalance the crampons’ flexibility – the last thing you want is your crampons popping from your boots mid-adventure!
Crampon Tips
A quick tip we’d offer to any crampon newbies is to be proactive. It can be easy to wait until you need them to wear them, but this can prove more difficult or even become dangerous if you get stuck on a snowy or icy patch with nowhere to rest and put them on. If you see a lot of snow or ice on the route ahead, put your crampons on before you reach that point. It’ll save you a lot of faff or stress and generally gives you the upper hand regarding safety.
Crampons and Microspikes at Trekitt
So, in a nutshell, the rating systems make it pretty easy to correspond your crampons to your activity and your boots. As long as you match the numbers, you’re pretty much good to go.
We stock a large variety of crampons, spikes and accessories here at Trekitt, including renowned brands like Petzl , Grivel , Nortec , Kahtoola and Black Diamond . You can shop our entire range of crampons by clicking here .
Looking for some new boots to match? We stock plenty of those, too! Check them out here .
If you have any questions, or need some further advice before you purchase, you can visit us in-store at our Hereford Service Centre, or speak with our friendly customer service team via telephone ( 01432 263 335 ) or email ( [email protected] ).
Leave a Reply Cancel reply
Your email address will not be published. Required fields are marked *
Save my name, email, and website in this browser for the next time I comment.
Mount Elbrus Ascent
Culture, Climbing and a Seven Summit — Da!
Climbing Mount Elbrus, the highest peak in Europe and one of the Seven Summits, perfectly immerses you into expedition climbing and gaining experience with the acclimatization process. The gentle slopes of Mount Elbrus beckon climbers in a range reminiscent of the Alps. Jagged peaks with glaciers that flow into mountain valleys dotted with pine forests, alpine meadows, and remote villages welcome visitors traveling into this mountain paradise.
Time spent exploring the extraordinary city Moscow also offers interesting glimpses into Russia’s rich culture and history. And if you want to see how the Russian czars really lived and explore one of the world’s most compelling cities, check out the St. Petersburg extension . If you’re looking for some serious culture, a Seven Summit, and for Kilimanjaro climbers and others looking for an introductory glacier climb, there’s no better objective for those with no experience — our guides show you the ropes during the trip. They may even lead you astray for some caviar and vodka at the end of the trip.
The ultimate combo — Elbrus/Kilimanjaro , two Seven Summits in less than three weeks!
Ski lifts take you to a hut on the mountain, meaning no heavy packs — and from there sno-cats whisk you up the mountain leaving a reasonable summit climb and a high chance of success! And then there is the dancing at the Pleasure Dome after the climb- you’ll have to find out what that is for yourself….
Description
A volcanic massif located north of the Caucasus main ridge, 18,510-foot / 5642 m Mount Elbrus rises almost 3,000 feet / 914 meters higher than surrounding peaks. The summit offers breathtaking views of the Caucasus Mountains and the impressive tributary valley systems feeding the raging waters of the Baksan River. The Baksan Valley offers trekking through fields of wildflowers, amongst poplar and pine forests.
After acclimatization hikes in the Baksan Valley and a day spent reviewing skills, we take a cable car up the mountain to the shelters at Kharabashi. Here we spend several nights before our summit attempt. The climb offers great introductory level glacier climbing that includes the use of crampons, ice axe, and roped travel.
Also, contributing to your success are decades of experience in the Caucasus. Our roots on Elbrus go way back, from Scott Fischer’s first guided trip there in the 80’s to Mountain Madness’ current owner Mark Gunlogson and his first trip to the region in 1990, shortly after the collapse of the Soviet Union. Since a time when the country experienced food shortages to now, our program has been carefully crafted to take in the best of Russian culture, food, accommodations, and people. Along with an experienced guide from the U.S. or Ecuador, you will be traveling with Russian guides that know the area as their home. All this combines for the perfect experience in an area that remains as intriguing as ever.
Short on time? Join us on our 11-day Mount Elbrus Express climbing trip — an express experience to this 7‑Summits peak that gives you an opportunity to hone your expedition climbing skills. Or double down and climb Kilimanjaro and bag two of the 7 Summits on our 19-day Mt. Elbrus and Kilimanjaro Combo trip.
La times article.
Ice Queen Demands Respect at Each Step; For the locals in southern Russia, Europe’s highest peak represents their indomitable spirit. For one climber, Mt. Elbrus is a brutal challenge.
The Los Angeles Times; Los Angeles, Calif.; MAURA REYNOLDS
Mt. Elbrus is the highest mountain in the Caucasus, whose dominant range stretches 750 miles between the Black and Caspian seas– roughly the size of the Alps and twice the length of the Sierra Nevada. Including Elbrus, the Caucasus boasts eight peaks higher than France’s Mont Blanc, the highest of the Alps, whose 15,771-foot summit lies more than half a mile closer to sea level than [Elbrus]. (The highest mountain in the contiguous United States, California’s Mt. Whitney, is lower still, at 14,494 feet.)
The writer takes in the snowy summit of Mt. Elbrus. The 18,510-foot Elbrus, in the Russian republic of Kabardino- Balkaria, is the highest mountain in Europe and sacred to the Balkarian people
Link to full article here: Full Text
(Copyright, The Times Mirror Company; Los Angeles Times 2001 all rights reserved)
One must approach Europe’s highest mountain as a supplicant, the locals warn. Slowly. with respect. She is a haughty queen, they say. Beautiful and placid on the surface, wearing her 18,510 feet of icy glaciers like ermine robes. her twin conical summits are as gently rounded as a woman’s breasts. But geologically and temperamentally, she is a volcano. When angry, she fumes foul gases and stirs fierce storms, which cause climbers to become dizzy and lose their way.
Perhaps she is petulant because so many don’t take her seriously. Europeans, enamored of their elegant Alps, resist including this downtrodden corner of Russia on the map of Europe. Mountaineers, enamored of more treacherous peaks, consider her little more than a high-altitude slog. Perhaps it is only the Balkarian people,who tend their sheep on her flanks, who love her unconditionally. “ She’s our sacred mountain,” says Iskhak Tilov, a Balkar who runs a high-altitude base for mountain climbers and skiers. “ Everything we have comes from her – our life, the water for our fields, for our flocks. The ice has been here for thousands of years. And so have we.”
Mt. Elbrus is the highest mountain in the Caucasus, whose dominant range stretches 750 miles between the Black and Caspian seas– roughly the size of the Alps and twice the length of the Sierra Nevada. Including Elbrus, the Caucasus boasts eight peaks higher than France’s Mont Blanc, the highest of the Alps, whose 15,771-foot summit lies more than half a mile closer to sea level than Elbrus. (The highest mountain in the contiguous United States, California’s Mt. Whitney, is lower still, at 14,494 feet.) “ You have to argue with some people about it,” says Mike Coleman, a 30-year-old virologist and climber from London. “ People at home all want to think that Russia is in Asia and Mont Blanc is the highest in Europe.”
But geographers agree that two mountain ranges form the border between Asia and Europe – the Urals, which divide European Russia from Siberia, and the Caucasus, which borders Russia to the south. Elbrus’ summits in the republic of Kabardino-Balkaria are eight miles north of the range’s ridge line – close but completely on the European side. The propaganda value of being the highest point in Europe was not lost on either of the 20 th century’s most notorious dictators. In the 1930s, waves of Soviet workers were sent up Elbrus, installing a long- since-gone bust of Josef Stalin on top. In 1942, Adolf Hitler sent in a crack team of alpine troops to seize the mountain.
But for the most part, considering its stature, Elbrus has been neglected. Most people, even inside Russia, have never heard of it. It may be bigger than anything else in Europe, but that’s not enough to earn it the world’s attention or respect. “ Elbrus is like Russia – diky no veliky,” says Soltan Kochkarov, 28, a mountain rescue team member and climbing guide. “ Wild, uncivilized. But mighty.”
4:30 a.m. A mountain this big is climbed 6 inches at a time. That’s about the distance from one midstep to the next as I set out before dawn with a photographer and our Balkarian guide, Soltan. Constellations drape the night sky as brightly as Christmas lights. Soltan sets a slow pace as the firmament cracks open slowly in the east. I start doing the math. Each step gains me perhaps 3 inches of vertical height. That’s four steps per foot of elevation. We have a little more than 6,000 feet between here and the summit. That’s 24,000 steps. I’m taking two steps per breath in the rarefied air. That’s at least 12,000 breaths.
I decide not to count. I remember the advice Iskhak’s wife, Khalimat, offered the day before: There is only one way to reach the top of Elbrus, she said. You must be humble. You must walk as if you will never get there.
According to legend, the Balkarian people descended to Earth from a constellation known as the She-Bear. They were sent to live in communion with the mountain “ Mingi-Tau” and the gods who ruled from her and through her. “ Mingi-Tau means ‘ a thousand mountains’ in our language,” Khalimat Tilova explains. “ It is our Mt. Olympus.”
Traditionally, it was forbidden to try to climb the mountain, she says. Those who braved Elbrus’ slopes often returned to the valley with headaches, hallucinations and other ills now generally accepted as symptoms of altitude sickness. Sulphuric gases emanating from the mountain’s active fumaroles also may have played a role. But at the time, it seemed evidence of the wrath of the gods. The ancient Greeks knew of Elbrus – in fact, it appears several times in Greek mythology, and some believe that it is the mountain to which Prometheus was eternally chained. The ancient Iranians gave it the name “ Elbrus” in about the 2 nd century BC, naming it for a mythical chain of sacred mountains.
Two men are credited with being the first to reach its summit. The first is Killar Khashirov, a native of the flatlands below the Balkars’ mountain valleys. He reached the slightly lower, eastern summit as a member of a Russian scientific expedition in 1829. The higher, western summit was climbed half a century later, in 1874, by a British expedition guided by a Balkar, Akhiya Sottayev. Sottayev is a national hero; according to Balkarian tradition, that means his name should not be spoken aloud. That makes things a little difficult for his 42-year-old great-grandson, deputy director of an alpine climbing camp, who carries his name.
“ It’s a big honor,” says the current Akhiya Sottayev, “ but people are still afraid to pronounce it.”
6 a.m. Conversation is pointless; I am wrapped in a wall of sound. The wind blows against my Gore-Tex hood. The air rushing to my lungs seems to blow through my ears. Crampons and poles scratch unpleasantly into the ice and snow, as if on a chalkboard. I am locked into a kind of two-step with the mountain. Left foot, right pole. Right foot, left pole. Inhale. Exhale. It would be hypnotic if it didn’t take so much concentration.
The first rays of direct sun strike so hard I feel knocked off balance. I look behind. The pointy peaks of the Caucasus cast baby- blue shadows against the baby-pink dawn. I wonder if I’ve ever seen anything more beautiful. If history had been different, the Caucasus might have become Switzerland. Like the Alpine countries, the Caucasus is inhabited by hardy mountain peoples, fiercely independent, who survive largely by herding cows and sheep.
The mountains are easily as impressive. One of the first Western explorers to penetrate the region, a member of the 1874 British expedition, wrote that “ in appearance of inaccessibility and in boldness of form they are beyond the Alps, and probably, when they are better known, they will be thought grander and more majestic than the Alps.” But history has not been kind. Unlike the Swiss, the mountain peoples of the Caucasus were overrun by one empire after another– the Huns, the Mongols, the Turks, the Russians. In the 19 th century, Russia asserted its claim over the Caucasus and sent in armies that looted hundreds of villages, committing massacres along the way. After the 1917 Bolshevik Revolution, the Balkars were forced to leave their villages, previously organized by clan, and join collective farms.
“ See that stream,” Soltan says, pointing to a brook tripping down a hillside so steep the cows appear ready to topple off. “ My family’s lands used to begin there. But once the Revolution came – poof.” He flaps his hands in an “ all-gone” gesture. Soltan says his grandfather lived to be 120. Once upon a time, he says, Balkars routinely lived longer than 100 years. Not anymore. Not after all that history. “ Now we die as fast as everyone else,” he says.
8 a.m. We reach a jumble of boulders known as the Pastukhov rocks- ‑at 15,700 feet, about the same altitude as Mont Blanc. On the map, we have climbed about halfway from where we started. But the toughest sections, and the thinnest air, are still ahead. It’s hard not to anthropomorphize this mountain. As we set off higher, I imagine her as a malevolent goddess. When my poles snag in the crusty snow, I imagine it’s the mountain trying to trip me up. The wind blowing down from above is her breath, trying to blast me off her flanks like an unwanted pest.
Soviet mountaineering got its start in the mid-1930s when Stalin hired a group of Austrians to jump-start a program in “ mass alpinism.” They approached the task with military fervor. Peaks were classified by degree of difficulty. Climbers were to attempt various ascents according to a preordained order of difficulty. A hotel, Priyut-11, was built high up on Elbrus’ slopes to host the large groups of climbers.
Russians still tend to climb in organized clubs, a sharp contrast to the individualized Western culture of mountaineering and adventuring. Elbrus is relatively unpopular with Russian climbers. For one thing, it’s not technically difficult – it ranks a relatively low 2A on the Russian scale from 1A to 6B. Russian climbers use Elbrus mostly for altitude acclimatization before leaving for bigger mountains – Tajikistan’s Pamirs, Kyrgyzstan’s Tian Shan, or the mighty Himalayas. “ Elbrus,” says Yuri Khokhlov, vice president of the Moscow chapter of the Russian Mountaineering Federation, “ is a training mountain.”
But many climbers have died nonetheless. Trade unions and collective farms, in Stalinist stunts of collective athleticism, sent many amateurs up Elbrus in the 1930s with inadequate training. Entire parties were wiped out. If the weather is bad, Elbrus’ slopes become sheets of ice and one slip can lead to death. But if the weather is good and a climber knows how to steer clear of the mountain’s cliffs and hidden crevasses, Elbrus’ summit can be reached with little more than spiky crampons for traction and an ice ax or trekking poles for balance.
These days, most climbers take transportation more than halfway up the mountain; two cable cars and a chairlift reach 12,500 feet. From that point, snow lasts year-round, and some wealthy foreigners even hire a SnowCat tractor to bring them to the Pastukhov rocks – giving them a summit climb of just 2,810 feet. Even so, many don’t make the summit. Near the top of Elbrus, there is half the oxygen as at sea level. On other high peaks, mountaineers spend weeks at high altitude to give their bodies time to adjust to the scarcity of oxygen.
But the climbers who come to Elbrus are generally novices on a tight schedule. For the most part, they spend three or four days hiking above 12,000 feet, and then make a one-day dash for the summit from the top of the chairlift – more often than not, braving headaches, disorientation and nausea.
11:30 a.m. I never thought my lungs could work so hard and accomplish so little. I am taking three or four breaths per step. I try to find a rhythm but can’t. I keep stopping. Just to breathe. Just to feel the heaving in my chest subside a little. We reach the saddle between the two summits – 17,500 feet. Soltan says we are going to attempt the eastern summit, which Russians prefer. Like most Westerners, I want to climb the “ real” summit, the western summit, 69 feet higher. But Soltan says ice conditions on the western summit are too treacherous. It would take an extra two hours. We are exhausted already. I nod agreement.
The eastern summit is still about 1,000 feet above us. Soltan offers a deal: We will take just 10 steps at a time, then stop to rest. We start to move our feet, and I wonder whether I’ll make the 10 steps. I do, and stop gratefully. A few feet ahead, Soltan is doubled over his ice ax, gasping as hard as I am. It dawns on me: This is the hardest thing I have done in my life.
The worst moment of 71-year-old Khazhar Temmoyeva’s life – and the lives of most Balkars of her generation – came a few minutes after dawn March 8, 1944. Soviet soldiers pulled up outside the house where she lived with her family in a village where Elbrus’ glacial streams reach the valley. They drove shiny new Studebaker trucks. She was 14. “ The soldiers gave us a half-hour and told us to get in the trucks.” The memory is 57 years old, but Temmoyeva’s voice still falters. To steady herself, she fusses with her black head scarf, which swathes her head like a nun’s habit. “ They drove us to the train station in Nalchik. Then we rode the train to Kazakhstan. We lived there for 14 years.”
Angry at the Nazis’ invasion of southern Russia and six-month occupation of Elbrus, Stalin ordered the entire Balkarian people deported to settlement camps in Central Asia. Most of the deportees were women, children and old men – the healthy men were mostly on the front line. “ I remember everything,” she says. “ I remember the war. I remember how the Germans came and killed my father and left us orphans. And then [the Russians] sent us away. No other nation has suffered as we have suffered.”
Khadzhimurat Bichekuyev, now 78, was one of the men on the front line during the deportation. He sent money home throughout the war, but it started coming back “ undeliverable.” He was never told why. When he made his way home, his family and neighbors were nowhere to be found. He was a decorated artillery officer who had fought in Odessa and Stalingrad, then chased the Nazis back to Germany, meeting American allies at the Elbe. But now he was only a member of a suspect ethnic group. “ The Germans shot my father. My brother was in the army. I was in the army. It wasn’t fair to punish us all,” Bichekuyev says.
Only about half the prewar population returned to the valleys after Stalin’s death; the rest died on the journey or in the deserts, or lost heart and remained in Central Asia. When Temmoyeva made it back from Kazakhstan, she took up backbreaking labor on a state farm, which pays her about $5 a month. These days, in the village where she was born, she stoops over soft layers of sheep wool, combing it with her fingers and dousing it with boiling water to make traditional felt hats, capes and carpets. The state farm buys what she makes in an effort to keep the old crafts from dying out. “ Our traditions were ruined,” she says. “ Our way of life isn’t the same.”
Bichekuyev was luckier. After the war, the Soviets set up a research center in the village of Terskol, and he found work as a laboratory assistant. He would climb around Elbrus with the scientists to take samples from the mountain’s 54 glaciers. In the course of his work, he reached the summit 10 times – eight on the eastern summit, twice on the western. “ But my hero is my father-in-law,” Bichekuyev says, picking up a faded photo of a man wearing a lambskin hat and clunky black eyeglasses. “ He climbed the mountain 209 times. And died at 116 years old.”
1:15 p.m. I try not to look up. There’s something about the thinness of the air and the brightness of the snow that make distances deceiving. I have no idea how far we’ve come. I have no idea how much is left.
I stop to catch my breath. I don’t know if I’ve been standing for a minute or five minutes when I hear a voice up ahead: Just 50 more feet. For a second, I wonder if it’s worth it. Then I begin to move my feet. Suddenly, the ground is no longer sloping up. My crampons crunch on volcanic gravel and wind-packed snow. I look up. The other summit stretches out to the west like a companion on a beach; nothing is higher, not even clouds. Below, the mighty peaks of the Caucasus have shriveled. They are spread out as far as the eye can see, gray and white like a dusty expanse of day-old meringue. All I feel is relief.
Iskhak Tilov was born in exile in the deserts of Kazakhstan. In 1957, four years after Stalin’s death, he saw the mountains of his homeland for the first time. He was 6. “ I never imagined mountains could be so high,” he remembers.
As Balkars trickled back, the Soviet Union launched a building boom in the Elbrus region, constructing six health resorts and eight alpine training camps. A ski school opened, and Iskhak was one of the first students. In 1967, he became the Soviet Union’s junior downhill champion – one of the first Balkars to achieve national stature in alpine sports. In 1969, he placed second in the European Junior championship. And soon, young Balkars began to realize that the mountains weren’t just a place to raise sheep. With enough luck and training, sports could provide not just fortune but also fame.
In the 1980s, Iskhak received permission from the Soviet Sports Committee to build a high-altitude training base for skiers on Elbrus, and soon the national team was training on snow year-round. But then the Soviet Union collapsed, taking with it money for training, travel and equipment. Then, war began in Chechnya and tourists shunned the region, which is only 130 miles from the war zone. Balkars lost their jobs at the camps and tourist centers. Iskhak’s ski base fell into disrepair. “ Everything was hard for our country,” Iskhak says. “ It was like a 10-year gap in our lives.”
2:30 p.m. The snowstorm hits quickly. A new sound is added – the tinkle of snow pellets hitting Gore-Tex. I see Soltan fading into the white fog ahead of me. My knees whine in pain as my crampons sink deeper into the snow on the downward slope. I remember the stories I’ve heard about climbers on Elbrus who have died in storms– disappeared over cliffs, slid into crevasses, died of exposure. On the way up, boulders are speckled with memorial plaques. I feel nauseated. I’m not sure if it’s the snow swirling dizzily in front of my eyes, the energy bar I choked down, the lack of oxygen or the mountain’s noxious gases. I just know that if I walk any faster, I will get sick and my knees will give out. I am reminded: Climbing a mountain doesn’t end at the summit. You also have to get down.
The sun shines. Iskhak’s base bustles. Shirtless snowboarders bask in the warm sunshine between trips off a jump ramp, impressing each other with half-pipes, full pecs and the latest in board gear. Behind them, a simple rope tow carries ski school students up the slope. Every so often, a crampon-shod climber stumbles past.
Iskhak wafts through it all, radio in hand, baseball cap on head. Like many Balkars, he has strangely pale eyes, in his case light brown. He shields them behind an oversized pair of sunglasses. He keeps an eye on the snowboarders, whom he doesn’t fully trust. “ Skiers and climbers are serious, hard-working,” he says. “ These kids are young. They just like to have a good time.”
The last three years have seen a kind of revival in the Elbrus region, fueled by three new breeds of thrill seekers who come despite the Chechen war: snowboarders drawn to its nearly year-round snows; “ extreme” skiers and “ free riders” seeking danger and pristine terrain; and a certain kind of amateur mountain climber eager for boasting rights to a “ highest” summit. Elbrus is one of the so-called seven summits, the highest peak on each continent. (The others are Asia’s Everest (29,028 feet); South America’s Aconcagua (22,834 feet); North America’s Denali/McKinley (20,320 feet); Africa’s Kilimanjaro (19,340 feet); Antarctica’s Vinson Massif (16,067 feet); and Australia’s Kosciusko (7,310 feet).)
Since 1983, when a pair of middle-age executives set out to climb all seven – Frank Wells, then of Warner Bros., and Dick Bass, a Texas businessman – the idea has caught on among a certain kind of ambitious, moneyed adventurer. These days, Iskhak leases the base from the government and charges climbers about $5 a night to stay in one of the 10 red-and-white school-bus-sized barrels he has outfitted with bunks. Since the high- altitude hotel Priyut-11 burned down in 1998, he knows that all aspiring “ seven summiters” will come through his camp, that they are his ticket to the future. “ Without Elbrus, they can’t do it.” He smiles broadly.
Still, Elbrus is a long way from becoming a major tourist attraction. Poorly developed by Western standards even in its heyday, the mountain has suffered severely from post-Soviet decay. There are no amenities – no warming huts, no snack bars, no place to buy sunscreen or water or beer. Instead of a café, climbers fend for themselves in a primitive communal kitchen with food they bring up themselves. There is no plumbing or running water; snow must be melted to be drunk.
Things are primitive in the valley as well. There are few hotels, and for the most part they have no maids, infrequent hot water and crude cafeterias. There is no transportation system between the hotels and the slopes. The chairlift runs when the operator feels like it. Those who seek extreme sports here must have not an aversion to extreme discomfort. “ This is another degree beyond adventure travel,” says Mort Gerson, a 67-year-old retired lawyer from Santa Monica who hopes to summit Elbrus and ski down. “ The people I know wouldn’t want to come here.” A number of adventure tour companies that offered Elbrus climbs in the early 1990s have since pulled out, in part because of the Chechen conflict and because conditions for travelers are too unpredictable.
“ It takes a certain kind of person to enjoy this place,” says Tom Milne, a guide with Mountain Madness, a Seattle-based alpine tour company that still brings several groups to Elbrus each summer. What kind of person is that? “ Flexible,” he says euphemistically.
6:30 p.m. The storm has lifted. Below, a row of red barrels comes slowly into focus. I can’t believe that it has taken so long to get down. My knees no longer whine; they howl.
I stumble past snowboarders with bleached locks and mirrored shades. I must appear like a prophet descending from the heights– shaggy, unsteady and more than a little disreputable.
Iskhak stands outside his trailer. He breaks into a big smile. “ Congratulations. The mountain was kind to you.” Then he adds: “ But you must come back, you know. After all, there’s still another summit.”
Frequently asked Elbrus questions
What kind of food is eaten? Can you accommodate a vegetarian diet or other dietary restrictions?
All of the meals served on Mountain Madness trips are a combination of the best local and regional fares along with some specialty items brought from the U.S. Your guide or your personal cooks are experienced in working with vegetarian diets and dietary restrictions due to food allergies or intolerances.
Can I arrive earlier or depart later than the trip dates?
Mountain Madness is happy to help you arrange accommodations before and after your trip. Our area directors can recommend side excursions and restaurants for the extra time.
How do I get from the airport to the hotel when I arrive?
A Mountain Madness guide or representative will pick you up at the Moscow airport on the scheduled arrival date and time. For easy identification consider wearing your Mountain Madness T‑shirt!
Can I leave luggage in Moscow?
Yes, there is a secure place to store your valuables in Moscow while you are away on the climb. There is a nominal charge of about $5 to $10 per day for this service.
Should I get insurance?
Mountain Madness highly recommends the purchase of trip cancellation, travel and medical evacuation policies. Once we have received your application and have confirmed your spot on the expedition we will send you information about the various types of insurance and the companies we recommend.
How heavy will my pack be?
On Elbrus we stay in huts so there are no camps to supply and no heavy backpacks to carry. On the acclimatization hikes and the summit climb you will need to carry your own snacks, camera, water and some extra clothing which should be less than 20 pounds. Not too bad, huh?
Can I rent my gear through Mountain Madness? Will the guide check my gear before we leave for the mountain?
Yes, some items will be available- call our office for details. We will check your gear in Moscow. Our equipment list is very complete and we ask that you bring all the items listed. Russia is a very difficult place to purchase gear and as such it is unlikely that we could find the proper items. We will be happy to help you solve any gear issues prior to departure!
What if someone on my rope team gets sick? Will I have to descend and lose my summit opportunity?
Safety is the primary consideration on all Mountain Madness trips. For all of our trips participants must remember that they are part of a team and that the safety and security of everyone on the team is more important than any one individual reaching the summit. If the entire group is required to get a team member down, they will be called to assist the guides and staff. However, we have a very high success rate in part because we often hire skilled local guides to assist on summit days, decreasing the client-to-guide ratio. This offers additional safety and increases everyone’s chance for success. Additionally, our schedule has an extra summit day built in which gives us all a second opportunity if weather or other problems cause us to miss the first opportunity.
Is this climb adequate preparation for Aconcagua?
Yes, if you are able to reach the summit and feel that your performance on the climb was strong. Aconcagua is however a full-blown expedition and has multiple days about the summit elevation of Mount Elbrus. So, it can be a good indicator that you will do well on Aconcagua, but on the other hand you may find out that you don’t do well at elevations above 20,000 feet or 6,000 meters. For that reason would ideally suggest that you have an additional expedition experience above the elevation of Elbrus.
Have a Question? Contact Us!
- (800) 328-5925
- [email protected]
Mount Elbrus
$5,700 – 14 Days / Includes travel time
*Due to the ongoing conflict, we will not be leading any trips to Mount Elbrus in 2024
Single Supplement – $350
Price Includes
- Assistance with obtaining visa vouchers for visa applications (extra fees may apply for non-US citizens)
- Domestic flight from Moscow to/from Mineralnye Vody
- Moscow city tour
- Scheduled restaurant meals in Moscow
- Three scheduled hotel nights in Moscow (double or triple occupancy)
- Four scheduled hotel nights in Cheget (double or triple occupancy)
- All food during the climb
- All team climbing gear and cooking gear
- All expedition support staff
- Lift fees on Mt. Elbrus
- 1 Sno-Cat ride
- Airport transfers at the beginning of trip
Price Does Not Include
- International airfare
- Russia entry visa and airport fees
- St. Petersburg extension
- Excess baggage fees on flight to Mineralnye Vody from Moscow
- Airport transfer at end of trip
- Personal climbing gear and clothing
- Personal expenses (phone calls, laundry, room service, extra meals, etc.)
- Travel insurance with trip cancellation, medical and evacuation policy
- All expenses associated with non-scheduled departure
- Breakfast and lunch Day 2
- Lunch and dinner Day 14
- Alcoholic and bottled beverages
- Guide/Staff gratuities
Payment Schedule
- $700 deposit at time of registration, which includes a $300 non-refundable registration fee
- Balance due 120 days prior to departure
- The balance may be paid by check, wire transfer, ACH or credit card with a 3% convenience fee
Add St. Petersburg Extension
Mount elbrus 2024 — cancelled, mount elbrus 2025 — tbd, cancellation / refund policy.
- MMI strongly recommends trip cancellation/interruption and evacuation insurance for all trips. Our insurance partner, Ripcord , offers comprehensive travel insurance including trip cancellation, as well as rescue/evacuation policies and can assist in answering any questions. In addition, Participant is expected to have sufficient medical insurance as prescribed by their country of origin. Participant understands that MMI does not include any type of insurance with the cost of the trip.
- If you decide to cancel your trip or change your itinerary, MMI must be notified in writing. Your trip will be cancelled from the date written notice is received. If proper written cancellation notice is not received, amounts paid and reservations made will be forfeited.
- Non-refundable fees may apply for certain trips in order to secure permits and other services. MMI must strictly adhere to cancellation policies outside MMI’s control.
- Due to the personalized service we offer on our trips, MMI reserves the right to waive any fees. We will attempt to accommodate changes and cancellations, waiving certain fees when feasible.
- Circumstances outside the control of MMI and its partners, may require amended cancellation/refund policies. Such circumstances may include, but are not limited to COVID-19, natural disasters, wildfires, terrorism and so forth.
International Trips/Courses:
- Full refund, less the non-refundable registration fee, will be provided 121 days or more before the departure date
- No refunds will be provided 120 days or less before the departure date
Trip Insurance
We strongly recommend the purchase of travel cancellation insurance to protect you from the unexpected. You aren’t likely to think of it now, but people do get ill, break a bone, have a family emergency or get assigned to a last-minute business trip. If you are in remote areas, please note that emergency rescue & evacuation can be very expensive.
We also strongly urge you to consider rescue and evacuation insurance if your own policy does not provide the coverage needed. Services available may include, but are not limited to, helicopter evacuation, medical care, etc.
If you choose not to purchase insurance, you assume full responsibility for any expenses incurred in the event of a medical emergency and/or evacuation, as well as for trip cancellation, interruption, lost luggage, etc. We are not the experts and therefore ask that you please consult our travel insurance partner directly with any specific questions.
To protect against losses due to illness, accident, or other unforeseen circumstances, Mountain Madness strongly recommends the purchase of travel insurance as soon as possible after making a deposit. Mountain Madness has partnered with Redpoint Resolutions as our preferred travel insurance provider. Redpoint’s Ripcord Rescue Travel Insurance™ is designed for adventurers.
For a quote, or to purchase travel insurance, please click this link Ripcord Rescue Travel Insurance™ or call +1 – 415-481‑0600. Pricing varies based on age, trip cost, trip length, and level of coverage.
Critical benefits of Ripcord Rescue Travel Insurance include:
- A completely integrated program with a single point of contact for emergency services, travel assistance, and insurance claims
- Evacuation and rescue services from your point of injury or illness to your hospital of choice
- Comprehensive travel insurance for trip cancellation/interruption, primary medical expense coverage, baggage loss or delay, emergency accident and emergency sickness medical expense, emergency dental, accidental death and dismemberment, and more
- Optional security evacuation coverage in case of an unplanned natural disaster or other security events
- Waiver for pre-existing conditions (must be purchased within 14 days of tour deposit)
- Optional “ Cancel for Any Reason” coverage (must be purchased within 14 days of tour deposit)
Flight Information
The total number of days for your trip includes all travel to and from your destination, with some exceptions. Dates listed on the website start with a departure date from the U.S. and include the day you arrive home. For this trip you will need to arrive in Moscow, Russia on Day 2 anytime during the day. You will be met at the airport by a Mountain Madness representative and transferred to your hotel.
If you are traveling from Europe it’s possible you can eliminate one day from the itinerary as long as you arrive on Day 2 of the itinerary. Return flight is scheduled for Day 14 of the trip.
Domestic flights to Mineralnye Vody are included in the cost of your trip. If you choose to fly direct to Mineralnye Vody, thus eliminating time in Moscow, we can carefully coordinate this with you so that you meet your group at the domestic terminal in Moscow or in Mineralnye Vody.
Please contact our office for any help needed with your flight schedule.
Mount Elbrus Day by Day
The first day is allocated for those requiring an overnight flight to Moscow.
A Mountain Madness representative will meet you at the airport. You will be transferred to your hotel where you will spend the night.
Tour the city of Moscow, including a visit to the Kremlin Cathedral and Armory. Overnight at hotel. Orientation meeting and gear check.
Mineralnye Vody / Terskol
Elevation: 7,030 ft / 2143 m
Transfer to domestic airport for the two hour flight to the city of Mineralnye Vody (Mineral Water) or Nalchik. Continue by bus to a hotel in the town of Terskol in the Baksan Valley, where you spend the next several nights.
To prepare for our summit attempt of Elbrus, and to enjoy the magnificent Caucasus Range, we take a day hike in the Baksan River Valley. At the end of the day you overnight in the hotel.
To further prepare for the climb, we ride the cable car and practice crampon and ice climbing skills. Overnight at hotel.
Elevation: 12,467 ft / 3800 m
Ride the cable car up to Kharabashi, which is Balkarian for “ where black rock meets glacier.”. We settle in for a rest day in comfortable barrel shelters. More skills review possible.
Acclimatization hike
Acclimatization hike to Pastukhov Rocks and return for another night at the barrels.
Review Skills
Further review basic mountaineering skills. Rest and prepare for the climb.
Summit Attempt
Two days are scheduled for our summit attempt. We increase our chances for a successful summit climb by riding a snowcat to just below our previous highpoint near the Pastukhov Rocks. If weather allows our group to summit on the first day, we descend the following day and have an extra day in the Baksan Valley.
Overnight at Hotel.
Mineralnye Vody / Moscow
Drive to Mineralnye Vody. Fly back to Moscow. Transfer to hotel.
Depart Moscow and fly home.
Note on Itinerary: Although we do our very best to follow the schedule listed, this itinerary is subject to change due to inclement weather, unsafe route conditions, or other reasons beyond our control and in the guide’s best judgement.
Equipment for Mount Elbrus Ascent
Carrying gear, summit pack (40-50l).
Lightweight as possible with a volume between 2,500-3,500 cubic inches (40-50 liters) serves most people’s needs well
Osprey Mutant 38, Black Diamond Speed 40
Large duffel bag (150L)
One at least 7,000 cubic inch capacity (150 liters). Must be durable and waterproof
Patagonia Black Hole
Small padlock for duffel bags
Extra security
Baggage tags
Makes identifying your bags easy at airports or hotels
Sleeping Gear
Expedition quality sleeping bag (15-20f).
One down or synthetic bag rated from 15-20°F /-9 to -7°C
Marmot Helium, Marmot Trestles, Western Mountaineering Apache, North Face Guide 20
Sleeping pad (inflatable or closed cell foam)
A foam pad will be provided but a supplemental pad is recommended. This can be an inflatable or closed cell foam pad. Make sure to purchase a pad rated for cold conditions.
Therm-a-Rest NeoAir & Therm-a-Rest Z Lite Sol
Climbing Gear
Alpine climbing harness.
Must have adjustable leg loops and fit over all clothing
Black Diamond Couloir, Petzl Altitude, Petzl Hirundos
Locking carabiners (2)
Two large, pear-shaped carabiners are best
Black Diamond Rock Lock, Petzl William, Petzl Attache
Mountaineering ice axe
under 5’7” use 60cm, 5’7”-6’2” use 60 or 65cm, over 6’2” use 70cm
Black Diamond Raven, Petzl Glacier
Crampons w/ anti-balling plate
Steel 12-pont. Must be fit to climbing boots prior to trip, new-matic/hybrid type
Black Diamond Sabretooth, Petzl Vasak
Adjustable trekking poles
Three piece poles recommended
Black Diamond Trail Back Pole
Climbing helmet
Lightweight
Black Diamond Half Dome, Petzl Elios
Head and Face
Fleece or wool hat.
It must cover the ears
Shade hat or baseball cap
A visor hat with a good brim is essential for protection from the sun
Mountain Madness trucker hat
Bandanas or neck gaiter
Various uses, i.e. cleaning glasses, sun protection when tied around the neck, etc. We have our own Mountain Madness neck gaiter available for purchase!
Mountain Madness neck gaiter
Balaclava or Buff
A thin balaclava will add significant warmth on that cold summit day
Outdoor Research, Marmot
Glacier glasses
100% UV protection with side shields and a hard-sided storage case
Ski goggles
To fit over glacier glasses in high wind. Rose or amber lenses
Smith, Oakley
Liner gloves
Two pairs thin fleece or synthetic
Warm gloves
One pair fleece or wool with water resistant shell
Outdoor Research Arete
Expedition mitts
One pair Gore-Tex or equivalent, with textured palms and taped seams. Synthetic or down filled. Warm, heavy duty for cold temperatures
Outdoor Research Altimitt
Thin socks (2 pair)
Two pairs of synthetic or wool socks to wear under heavy wool socks to help prevent blisters and keep feet dry
Smartwool or Cool Max
Thick socks (3 pair)
Three pairs of synthetic or wool socks, medium to heavyweight. Check boot fit with thin and thick socks on
Smartwool or Thorlo
One pair of gaiters made of breathable material; keeps dirt and snow out of boots. Make sure they fit over your boots
Outdoor Research Verglas or Crocodiles
Plastic mountaineering boots
Depending on your future mountaineering endeavors, a boot such as the La Sportiva Spantik is a good investment for those who are pursuing other high-altitude climbs (such as Aconcagua or Denali), whereas the Koflach Degre would be the choice for those looking for a warm boot in moderate conditions. If you are looking at hybrid leather/plastic boots, make sure it is rated for 6,000-meter peak climbs or winter mountaineering
Light hiking boots or trail shoes
For acclimatization hikes
Salomon X-Ultra 3 Mid, Merrell Moab, La Sportiva Boulder Ex
Synthetic t-shirts
Two synthetic or merino wool t-shirts. No cotton!
Long-sleeved Base Layer
Two lightweight to mediumweight, pull-over is best
Patagonia Capilene
Sports bras
Two, synthetic, no cotton!
Softshell Jacket w/ hood
This is what you will be wearing while hiking at higher altitudes or while kicking around camps at lower altitude. This jacket should be full-zip
Outdoor Research Ferrosi
Hardshell jacket w/ hood
A good jacket made of Gore-Tex (recommended) or waterproof nylon, roomy enough to fit over multiple layers
Outdoor Research Foray, Patagonia Triolet
Down or synthetic jacket w/hood
This is your most important piece of warm gear and will mean the difference between an enjoyable climb or a miserable one. A warm, full zip jacket with hood is ideal.
Helly Hansen Vanir, Feathered Friends Volant, Marmot Guide’s Down Hoody, Outdoor Research Virtuoso Hoody
This piece with a high SPF rating and lightweight fabric offers protection from high altitude sun
Outdoor Research
Undergarments
Adequate supply for the entire trip
Bathing suit (optional)
lightweight and packable
Hiking shorts
One pair of quick-drying shorts. Good for hiking at lower elevations on the mountain
Long base layer
Two pairs light or mediumweight
Softshell pants
Softshell pants are water resistant, yet highly breathable and durable. Great for colder conditions over a pair of long underwear or tights higher on the mountain or summit day
Outdoor Research Voodoo, Mountain Hardwear Touren, Patagonia Guide
Hardshell pants
waterproof and breathable with side zips (minimum of ¾ zips recommended) Gore-Tex or equivalent
Outdoor Research Furio, Arcteryx Beta AR
Miscellaneous
Stuff sacks/ditty bags/plastic bags.
To organize gear in your duffle and pack. All clothing should be kept dry using waterproof stuff sacks or large heavyweight plastic bags (trash compactor bags work great)
Toothbrush and paste, comb, tampons, biodegradable soap (small amount), etc. Bring enough for the entire trip
Toilet paper
1 – 2 rolls stored in a plastic bag
Must have SPF rating of 20 or more. Bring two just in case!
Bring plenty of sun block with SPF of 40 or more. It's easy to underestimate the amount necessary for your trip!
To block out snoring and other noise to ensure a good night's sleep
Water bottles with insulators
Two one-liter wide-mouthed plastic bottles
Small stainless-steel thermos (optional)
For hot beverages on summit day
Water purification
Steri Pen, Potable Aqua, Polar Pure crystal iodine. Purifies drinking water while on the trip.
Water flavoring
Powdered additives like Gatorade or NUUN are a nice change of pace to water and help replenish much needed electrolytes.
Bring extra batteries!
Pocket knife or multitool
Simple Swiss Army type with scissors. Make sure you transport in checked bag, not carry-on!
Personal first aid and drug kit
small personal first aid kit with ample bandaids and moleskin
Nausea medications
Pepto Bismol tablets; Maalox, Gelusil M or Mylanta antacid tablets. Donnatal for stomach cramps. Probiotic capsules taken daily may help keep your gastro-intestinal system working smoothly
For wash up in camp
Handi-Wipes
A small pack or two anti-bacterial are great for general hygiene
Spare contacts and glasses
Contacts can be a problem in dusty conditions, so make sure you have your back-up glasses with you. Glasses wearers should have a spare set
Snacks (general)
Bring your favorite snacks and power/energy bars or if there is something else you particularly like to eat while hiking and climbing
Spare bottle for a pee bottle, and a pee funnel (Lady J or Freshette) for women
It can be a cold walk to the toilet at night
Insect repellent
Personal electronics.
Phone with camera, and/or separate camera. Bring extra batteries and memory!
Electronics charging
If you want to charge your electronics along the way, a small, lightweight solar panel to charge batteries or portable charging device may be a good addition
Travel power adapter
Most come in kits with all the plugs you need. Double-check to make sure you’re taking the correct adapter/plugs
Travel clothing
Comfortable clothing for travel before and after the expedition
14 Days / Includes travel time
18,510 ft / 5642 m
Client to Guide Ratio
St. petersburg option.
Spend two full days taking in the sights of this UNESCO gem.
Advanced Beginner
Climbers should have basic snow and ice-climbing skills and should be comfortable with glacier travel, which includes moving in a rope team, self arrest, and basic crevasse rescue. Basic knowledge and experience would be required for objectives with some rock climbing.
Extend Your Trip
Warm-up before elbrus.
North America Washington
Mount Baker Coleman Deming Glacier
- 3 Days / Includes Transportation, Tents and Food
Difficulty Beginner
Climbing the Seven Summits Africa Tanzania
Kilimanjaro Seven Summit Ascent & Safari
Difficulty Advanced Beginner
Introduction to Mountaineering
- 2 Days / Includes Transportation, Tents and Food
North America Mexico
Mexico Volcanoes Expedition
Do You Need Crampons For Everest Base Camp?

Before I completed my Everest base camp trek I had quite a few questions about the gear I need to take, crampons being one of them. So let me answer.
Do you need crampons for Everest base camp? No, you do not need crampons to complete the Mt Everest base camp trek. You just need some good quality hiking boots or shoes and hiking poles if you want extra support and stability.
I understand why you would ask as I wanted to know myself before going. After having now been and experienced the base camp journey I know the terrain isn’t what you would use crampons for.
Why You Don’t Need Crampons For Everest Base Camp.
The main reason you don’t need them is that you won’t be doing any ice climbing or walking which crampons are used for. Crampons are used for ice or packed snow and you don’t really walk on those surfaces on the Everest base camp trek.
Nearly all the way up to base camp you are on worn paths or rocks but not any Icy surfaces.
Crampons are used for:
- Ice climbing
- Crossing glaciers
- Snowfields and ice fields
- Ascending snow slopes
- Scaling ice-covered rock
You won’t be in the situations that crampons are required. Good hiking boots or shoes with a good grip will be all you need to minimize any risk or slipping on the surfaces.
When I imagined the trek to base camp I pictured crossing icy glaciers and trekking through deep snow. In reality, it was not quite like that. It was more like rock and gravel.
That was on my trek through and every trek is different. You can most definitely encounter heavy snow on the way to base camp but the need for crampons is not needed.
As I said before, just good hiking boots with a good grip will be sufficient.
Is There Any Ice Or Snow On The Everest Base Camp Trek?
Yes and no. You will see plenty of mountain views which are covered in snow and you will sometimes get snow as you head higher up the base camp trail.
On my trek, I only had snow on the last few mornings before reaching base camp but it was only light snow. We had reasonably good weather all the way up.
I had a friend who did the trek about 6 months before me and he had plenty of snow and it was a lot colder.
At points though, my water bottle had ice in from just being inside my room in the tea house. But still, overall you probably won’t be trekking on heavy snow or ice.
The paths are usually just stony and gravelly without snow or ice.
On the last day when we left for base camp, I remember climbing over some big boulders.
Especially the last few hours before base camp there are some rough paths with big boulders to navigate but it’s pretty easy if you take your time.
What Kind Of Boots Are Needed For The Everest Base Camp Trek?
So if you don’t need crampons for the trek what kind of boots do you need for good grip?
I wore the Salomon Men’s Quest 4d 3 GTX.
Here’s what they look like.

These griped the surface absolutely fine and rarely did I slip. They felt quite light which helps on long treks.
Something like those will be all you need for your feet to trek to Everest base camp.
As long as they good quality and durable then you’ll be fine.
You MUST wear your boots in though because if don’t you could get heal blisters which will cause considerable discomfort when walking 4-7 hours a day.
If you wear them in you’ll be fine.
What Is The Everest Trek Like?
I’ll only touch on this briefly as I go into more detail in my Everest base camp trek guide here.
Everest base camp is one of the most beautiful and picturesque places I’ve been to. It was very challenging due to the altitude.
Fitness wise I think most people can do it as long as they can walk over long periods of time. Most days you trek between 4-7 hours at a slow pace.
The altitude is what makes the trek hard.
If you take your time and drink plenty of water then you should be able to do it without any problems.
I even made the journey to basecamp as a smoker and with asthma! I know, it’s terrible I shouldn’t be smoking especially with Asthma, but I’ve finally quit now which is good.
The point is, if a smoking asthmatic can do it then I’m sure most people with just average fitness can do it.
So anyway I hope I’ve answered the question do you need crampons for Everest base camp.
I’m sure you’re excited about doing it, believe me, it will be an experience you’ll never forget and one which you’ll cherish forever.
Good luck and have fun!

Can Smokers Do The Mt Everest Base Camp Trek?
How much money should you take on your everest base camp trek, you may also like, 15 things no one tells you about hiking..., choosing the best backpack for everest base camp..., 10 everest base camp training tips you must..., how hard is the everest base camp trek..., choosing the best sleeping bag for your everest..., is everest base camp trek dangerous or safe, what is the oxygen level at mount everest..., how much money should you take on your..., can smokers do the mt everest base camp..., leave a comment cancel reply.
Save my name, email, and website in this browser for the next time I comment.
- Best Hikes In The World
- Appalachian Trail
- European Hikes
- Nepal Hikes
- Patagonia Hikes
- See All Hikes
- Mount Kenya
- Mount Kilimanjaro
- Mount Toubkal
- See All Mountains
- South Africa
- New Zealand
- Switzerland
- United Kingdom
- Packing Lists
Mount Elbrus Climb – Complete Guide To Europe’s Highest Summit

Climbs & Mountaineering , Europe , Mountains , Seven Summits

The Mount Elbrus climb is a fantastic mountain challenge and an incredibly rewarding experience. But like any serious mountain climb, Elbrus can be dangerous. This inactive volcano is one of the seven volcanic summits .
Below we have provided a summary of useful information that you will want to read before you go. This guide is particularly useful for Elbrus climbs from the south side (i.e. less technical side of the mountain), but also covers information on the North-side approach.
Mount Elbrus Climb Overview
Mount Elbrus is considered the highest mountain on the European continent . The mountain is part of the Caucasus range and is situated on the southwestern side of Russia.
Elbrus consists of two summits, both of which are dormant volcanoes. At 5,642 metres (18,510 ft), the West Summit is the highest, whilst the East Summit stands at 5,621 meters (18,442 ft).
Elbrus was successfully summited via the East summit in 1829, by Khillar Khachirov. In 1874 an English expedition led by F. Crauford Grove reached the West summit. Since then Elbrus has been climbed by 1000s of mountaineers, including some of the world’s best climbers who bag the mountain as part of their Seven Summits bid.

View of Mount Elbrus and it's East (5,621m) and West (5,642m) Summits.
There are two main approaches to Mount Elbrus - the south side approach and the north side approach. The South side is significantly easier than the north side. We estimate su mmit success rates from the south side of Elbrus at about 80-90%.
In contrast, summit success rates on the North side could be as low as 50%. There are also route options from the Eastern and Western flank of the mountain, but these are very rarely used.
Although Mt Elbrus is not a technical climb, it should not be underestimated. The cold weather and altitude can make the climb pretty challenging and dangerous. Both the south side and north side approach involves basic technical skills, like rope travel, crampons , glacier crossings (North side only) and the use of ice axes on some steep snow slopes.
Due to the number of people who climb Elbrus every year, there are unfortunately a number of deaths on the mountain. We estimate the death rate at Mount Elbrus could be as high as 25 people a year . We don't have statistics on the split between North and South side deaths, but most deaths occur due to bad weather and/or altitude sickness issues.
Climbing Mount Elbrus is a 5-6 day expedition from the South side, and a 6-7 day journey from the North side. Here is a brief summary on the popular routes.
Mount Elbrus VS Mont Blanc
Many people think Mont Blanc is the highest mountain in Europe, but Elbrus is in fact the highest mountain on the European continent. It is part of the Caucasus main range that is considered the border between Europe and Asia.
In terms of difficulty, both mountains are graded PD and are about the same difficulty. In the words of mountaineer, Alan Arnette: "Mount Elbrus is kind of like an extra high Rainier or Mont Blanc".
The main difference is the altitude (4,810m vs 5,642m) making acclimatisation more important on Elbrus. Also, Elbrus is much colder than Mont Blanc and requires more organisation.
Popular Elbrus Routes
There are two main approaches to climb Elbrus - the South and North side routes. Elbrus has several other routes, but these only get a few ascents every year.

Map of the south side routes to the summit. Image credit: Kavkaz Ski Tur
South Side Via The Cable Car
The most popular route on Mount Elbrus is via the south side. If you have limited high altitude mountaineering experience, then this route is for you!
It is the easiest, safest and fastest way to climb Elbrus.
The south side approach from the Azau village uses a unique cable car system to ferry climbers up to 12,500 feet (3,658 m).
From here, you will see the Barrels (bochki). These are steel containers where you will sleep and cook meals. There are three barrel sections on the south side of Elbrus

The Elbrus barrels with the twin summit peak of Mount Elbrus in the background. Image credit: Matteo Leoni
Mir Station (3,500m)
This station is used by day visitors and skiers on Elbrus. At the Mir Station there is a coffee shop and a few souvenir shops. This station is busy and is not a great place to stop unless you are feeling the altitude! Generally climbers continue on a chairlift to Garabashi Station (3,800m).
Garabashi Station (3,800m)
At Garabashi you will find several barrel hut containers. The first few are near the chairlift and are generally quite busy. We recommend walking further up to the top barrel huts as these are quieter, and by staying further up you will shorten your summit push. At Garabashi you will find a few coffee shops (one of which stays open 24 hours). You can charge your phone in these coffee shops, as well as buy food and water.
Shelter Maria (4,100m)
At Shelter Maria you will find large containers, each with a kitchen and gas stove. Shelter Maria's electricity supply stays on until 19:00 each night and the toilet is outside. You will find no drinking water here and no coffee shops. You will need to either melt snow for water or collect water from the streams near by (make sure to bring purification tablets to purify your water). Shelter Maria is a great option to stay at if you are well acclimatised as it shortens the summit push.
Most climbers start their summit climb at the second "Barrels" stop - Garabahsi. The summit climb takes about 8-9 hours of ascent and 3-5 hours to descend. Summit bids start early at around 12am, allowing climbers to have just enough time to get back down to the chairlift, which closes at 16:00pm.
Using Snowcats: From Garabashi it is possible to get a Snowcat or Snowmobile to Shelter Maria and onto Pastukhov Rocks (4700m). This shortens the summit push by a good few hours but is of course cheating and will set you back about $90 pp.

A schematic of the Southern route profile from Azau to Mir, up to Image credit: Kavkaz Ski Tur
North Side Approach to Mt Elbrus
The North side approach to Mount Elbrus is significantly more challenging and, therefore, gets only a few climbers each year.
Unlike the south side, there are no cable cars or chairlifts on the North side. You will therefore need to carry all your gear from base camp, which is situated at about 8,200 feet.
The route includes a glacier crossing where crevasses are a risk. If you decide to do this route option it is important that you and your group have some experience with crevasse rescue and are comfortable using short-rope techniques.
The route is particularly challenging as it includes lots of elevation gain - from ~8,200 feet at base camp to ~18,500 feet, with a 6,000 foot summit push. It also has relatively steeper exposures on snow slopes than the Southern route.
The Northern route is however increasing in popularity due to the high number of climbers on the south side.
Register With The Rescue Centre
Whether you decide to do the south or north route, we recommend registering with the Rescue Centre in Terskol (MCHS) before you set out. They will take your name, surname, passport number, contact phone number and return date. After the climb, you should sign out with them in person or by phone. If you do not sign out they will call you to make sure you made it off the mountain safely. Their contact number is: +7 928 694 51 19 or +7 866 387 14 89.
Before Your Climb

The red cable car that takes climbers from Azau to Mir Station. Image credit: Lev Yakupov
Getting To Mount Elbrus
To get to Mount Elbrus you will need to first fly into Moscow. You will need to get a visa to enter Russia; this can be a lengthy process so please make sure you apply early.
From Moscow you will need to catch an internal flight to Mineralnye Vody Airport or Nalchik Airport. There are also flights from Istanbul to Nalchik. If you are joining an organised tour it is likely that all transport and accommodation before and after the climb will be arranged for you.
If you are planning to climb Elbrus independently or join a group once at the base of the mountain then the information below will be helpful.
There are three towns near Mount Elbrus:
- Terskol : This is the largest town near the mountain, and the best spot to stay in our opinion. The town has a number of accommodation options, including hotels, hostels. homestays and camping facilities (if you are on a tight budget). We recommend the Hotel Elbrusia. You can leave some of your valuables / non-climbing gear at your hotel in safe lock-up for collection when you return from your climb.
- Cheget : This town is furthest from Elbrus but closest to Cheget mountain (3,601m), which most climbers use for an acclimatisation hike before Elbrus.
- Azau : This is the closest town to Elbrus and the location of the cable car that will take you up to Mir Station. Azau is about a 5 min drive from Terskol
From Mineralnye Vody Airport or Nalchik you will need to get a minibus to one of the small towns near Elbrus - Terskol, Cheget or Azau. The journey from Nalchick to Terskol takes about 1.5 hours and costs about $5 in a minibus or $10 in a taxi. The journey from Mineralnye Vody Airport to Terskol takes about 3 hours and costs more.
Please note: It is best to bring Russian rubles in cash with you to Elbrus. There is only one ATM in Terskol and it is often out of cash. Some hotels will exchange US dollars or Euros, but they will not give a favourable rate. When you arrive in Terskol your hotel or hostel will require you to complete registration papers and pay a small registration fee ~$5 - this is a government requirement for all foreigners.
Acclimatisation
Before you climb Mount Elbrus it is imperative that you spend a few days acclimatising. You can do some of this acclimatisation on Mount Elbrus itself, but we recommend undertaking a hike or two before getting the cable car up to Mir Station.
The most popular acclimatisation hikes are on Cheget Mountain and to the Observatory / Terskol Peak (3127m). Both have well marked walking paths and are relatively easy hikes. Just make sure you don't push yourself too hard! These hikes are meant to help you acclimatise to the altitude, so slowly does it!
The views of Elbrus from both peaks is very impressive!
Once on the mountain itself, there are few options for acclimatisation. One of them is a hike to and back from the Pastokov Rocks (4680m) from the barrels - this adds a day to the climb but is well worth it! A conservative approach to climbing Mount Elbrus takes fives days of acclimatisation before attempting a summit bid.
Read our guide to altitude sickness and acclimatisation .
Getting To The Barrels
From Terskol we recommend getting a taxi to Azau where you can get the cable car to Mir Station. There are two cable car options - the old red option (this takes you direct to Mir and is cheaper) or the white option (this is a newer car and more expensive. It also goes via Krugozor station where you have to change cars to get to Mir).
The cars run from 09:00am to 16:00pm (16:30 is the last car down). This is important to remember as missing the last car after descending from the summit will mean staying another night at the barrels.
From Mir you take a one-person chairlift to Garabashi. Please note that you cannot take a pack that is heavier than 10kg on the chairlift! It is possible to walk from Mir to Garabashi (it's about 300m and takes an hour), but most people don't as it can tire one out. It is also possible to walk from Azau to Garabashi, but this will take around 4-6 hours and is pretty tiring!
Pro tip: Make sure that you keep your ticket safe as you will need it to descend. We also recommend leaving Terskol early so you can get on one of the first cable cars up the mountain. This will ensure that you get the best picks of accommodation further up the mountain.
Best Time To Climb Elbrus

A particularly bad day of weather at Krugozor Station (2,900m). Image credit: Lev Yakupov
The main climbing season is from June through early September , with July being the busiest month.
The permanent snow line is around 3350m with temperatures rarely rising above freezing at night.
The best time to ski Mount Elbrus is in June, when there is more snow. This however makes climbing more challenging!
Afternoon clouds and thunderstorms are common during summer season.
Due to its hight, Mount Elbrus has dynamic weather, making it hard to predict weather conditions. Prepare for very cold temperatures and high winds above 4,000 meters.
How Difficult Is The Elbrus Climb?

High on Mount Elbrus. Image credit: Matteo Leoni
From the south side, the ascent of Mount Elbrus is not technically difficult. Climbers only need basic experience in using crampons and ice axes to be well-prepared.
However, in serious weather the climb can be quite hazardous.
Also, despite being technically easy, the lack of high mountain camps on Elbrus (all of them are quite close to each other) causes the elevation gain to be one of the most demanding of the seven summits. Climbers need to ascent as much as 1,900 meters of altitude for the summit push.
The most technically challenging part of the climb is just above the Pastukhov rocks and the saddle between the two summits. The slopes in both these spots are relatively steep and clipping into a fixed rope is highly recommend.
The north side is more challenging as the elevation gain is greater (base camp on the north side sits at around 8,200 meters) and snow slopes are steeper, which means rope work and experience with crampons and ice axes are required.
There are no cable cars, chairlifts or Snowcats on the North side. So one needs to carry all their gear up the mountain.
Besides the technical challenge of climbing Elbrus, the logistics of the climb, if you are not using a tour operator, can be challenging. The visa process via Russian authorities can be lengthy. Also the ethnic conflicts in the area can cause problems.
Training To Climb Mount Elbrus

The West summit of Mount Elbrus (5,642m). Image credit: Jason Blue-Smith
To successfully climb mount Elbrus a good level of aerobic fitness and leg strength is required.
Climbing Elbrus takes roughly a week, including acclimatisation hikes. Summit day is a lengthy one with over 1,900 meters of altitude to be gained, taking about 12-14 hours (descent included).
The climb is also cold, meaning you will lose energy quickly. It is advised to set yourself a training schedule that includes aerobic exercise and long hikes.
Even someone in very good physical shape can fail to summit Mount Elbrus.
You should not be overconfident in your own abilities, because there is the factor of dealing with the altitude that will determine whether you summit or not.
Climbers who are overconfident tend to rush up the mountain and as a result they fail in their attempt to summit.
Here are a few things to implement in your training schedule.
Develop your endurance and stamina
The first thing to do is to make sure you have built enough endurance and stamina before traveling to Russia. Undertaking practice climbs and hikes are the best options, but if you don’t have hills or mountains to climb in your home country, running is a decent alternative. Build a routine, but don’t push yourself over the limit as you will want to avoid injuries.
Get comfortable carrying weight
The ideal way to train is carrying a pack and going uphill and downhill, since this simulates what you will be doing on Mount Elbrus. Start with a light pack and gradually increase the weight as you get closer to the climb. Never run with a pack on and use hiking boots if you can.
Prepare yourself mentally
At some point in your Mount Elbrus climb you will likely find yourself in a difficult situation that is way out of your comfort zone. Cold weather, strong winds and a long summit day will not only be a physical challenge. Make sure that you prepare yourself mentally as well.
What you eat during your training weeks and climb should not be underestimated. A diet rich of carbs is as important as your training. It might even be a good idea to consult a professional nutritionist.
Strength training
Training with weights is an important part of your training routine as this improves anaerobic metabolism and feeds much of muscular work you will do on Elbrus. Developing your back and shoulder muscles are necessary to comfortably carry your backpack during the climb, while calve muscles and hamstrings are needed to climb uphill and descend the snowy slopes.
Consume lots of water during your training sessions. Not only does your body need fluids, but it is the best way to get used to hydrating a lot. When you climb in cold conditions, you might not feel thirsty, but it is vital to drink lots of water. Drinking a lot of water helps in getting acclimatised to the high altitude and avoiding dehydration.
Specific skills
Mount Elbrus may well be a basic alpine climb, but it still requires some specific skills including using an ice axe and crampons. Since the slopes are quite steep on Mount Elbrus, being familiar with the ice axe arrest technique is recommended. You can learn these skills on smaller snow-covered peaks in your region or during a winter mountaineering course where you develop / fine tune your skills.
Mount Elbrus Gear List

A Elbrus Snowcat with a number of climber's rucksacks on the front plough. Image credit: Matteo Leoni
An expedition like Elbrus requires some specific gear.
To make sure you don’t forget to bring anything, this is a recommended list of gear to pack, based on our own experience.
Travel Gear
- Passport with valid visa: Entering Russia requires an international passport and visa. Be sure to start your application early as this might well be a time-consuming process.
- 90-120L Duffel Bag : This will be used to carry all your gear to the "barrels". You definitely want the duffel to be waterproof, have back straps and have a capacity of at least 90L. We recommend the Patagonia Duffel (with back-straps) or the Yeti Panga 100 Dry Duffel (this bad boy is the ultimate duffel / dry bag!)
- Daypack: Lightweight 25-30L daypack that will be used as your carry-on luggage for flights, and as your pack for acclimatisation hikes and the summit push on Elbrus. We recommend the Osprey Talon 33L (Unisex).
Climbing Gear
Despite being a relatively straightforward alpine climb, Elbrus requires some mountaineering gear.
- Alpine Ice Axe: Go for a straight shaft ice axe. Choose the right size according to your height; under 5'2'' use a 50 cm axe, 5'3'' to 5'5'' use a 55 cm axe, 5'6'' to 5'9'' use a 60 cm axe, 5'10'' to 6'0'' use a 65 cm axe, above 6'0'' use a 70 cm axe. We recommend Petzl Glacier Ice Axe .
- 12 Point Crampons : Make sure you go for adjustable 12-point crampons. 10-point crampons offer less traction. Avoid single-piece rigid crampons or aluminium frames. We recommend the Black Diamond Sabertooth Crampons .
- 2 Locking Carabiners: Auto-locking carabiners are best. Petzl AM'D Triact Carabiners are good.
- 2 Non-Locking Carabiners: Wiregate carabiners are stronger and better than round-gate carabiners. Go for the Black Diamond Neutrino Wiregate Carabiners .
- Climbing Harness and Accessory Cor d: Make sure you go for a newer model of harness, one that has gear loops, adjustable leg loops and a waist belt. Also make sure you bring an 5 foot (6mm) accessory cord . Our recommended harness is the Black Diamond Couloir Harness .
Clothing & Accessories
Elbrus is a cold weather climb, despite being summer season. Freezing temperatures on the mountain are normal. During your summit attempt you will start off in the middle of the night well before sunrise; temperatures as low as -30 degree Celsius are common . Wearing sufficient layers and high quality clothing is important for your own comfort.
- Double climbing boots - plastic-shelled models are fine, but modern non-plastic boots are better. We recommend the LA Sportiva Spantik or the Scarpa Phantom 6000 .
- Mid-weight hiking boots . We recommend the Salamon Quest ( Men's ) or ( Women's ).
- 3 pairs of climbing socks. Smartwool or Bridgedale socks are good.
- Full-sized gaiters . See Outdoor Research Crocodiles .
Lower Body Layers
- 2-3 pairs synthetic underwear.
- Bottom synthetic base under layer. We recommend Smartwool Base Layers .
- Lightweight synthetic hiking trousers. We recommend The North Face L4 Soft Pants .
- Hard shell trousers. These need to be able to fit over your base layer and soft shell pants. Full-length side-zippers are best so you can take on or offer without removing your boots.
Upper Body Layers
- Top synthetic base under layer. We recommend Smartwool Base Layers .
- Lightweight climbing shirt
- Medium weight climbing parka / fleece with hood. We recommend Rab Baseline Jacket .
- Soft shell jacket. Wind and water resistant. Should be able to fit over your fleece. The Arc'Teryx Gamma Jacket is brilliant.
- Hard shell jacket. Must be able to fit over your fleece, an soft shell jacket. The Arc'Teryx Alpha SL is our recommend option.
- Soft shell down winter jacket. The North Face L3 Down Hoodie is excellent.
Headgear and Handwear
- Warm ski hat / beanie
- Buff / Balaclava
- Ski goggles. We recommend Zeal Optics Goggles .
- Sunglasses - We recommend the Julbo Glacier Explorer Sunglasses .
- Head lamp with extra batteries. Go for the Black Diamond Storm Headlamp .
- Inner gloves - Go for Outdoor Research Base Gloves .
- Insulated climbing gloves. Go for Rab Baltoro Gloves .
- Insulated and waterproof mittens. Go for Outdoor Research Highcamp Mitts .
Other Essentials
- 4-season sleeping bag rated to 0F (-18C). We recommend Mountain Hardwear Lamina or Mountain Hardwear Phantom sleeping bags.
- Inflatable sleeping pad. The Therm-a-rest sleeping pads are great.
- Ski / trek poles. These are highly recommend on Elbrus. Our preferred poles are adjustable and lightweight, like the Black Diamond Trail Trekking Poles .
- 2 wide mouth 1 litre water bottles. Avoid hydration bladders or metal bottles as these freeze. Go for a co-polyester (BPA plastic free) bottle like the Nalgene Titan .
- Insulated bottle covers. Go for the Outdoor Research Water Bottle Parka .
Accessories
- Personal Medications - standard painkillers, personal prescriptions. diamond for altitude and meds for nausea and vomiting. Also bring a small personal first aid kit .
- Water purification tablets
- Lip scream and sunscreen
- Toiletries and toilet paper
- Hand sanitiser
- Pee funnel (women) / bottle (men)
- Snacks and drinks, for example energy gels and instant coffee packs and energy bars.
- Toe-warmers
- Altimeter watch. The Suunto Ambit 3 Peak watch is amazing!
- Camera and Book
Typical Itinerary For The Elbrus Climb
The itinerary below is for the most popular south side route:
Depending on where you live, you might be heading for a long flight towards Moscow.
Most climbers spend a day in Moscow before traveling further to the Elbrus region. With highlights like the Red Square and the Kremlin, it is one of world’s most impressive metropoles.
From Moscow, you can fly to Mineralnye Vody or Nalchik Airport, the closest airports to the Caucasus and Elbrus Region. Drive to Terskol from Mineralnye Vody Airport is about 3 hours. It's about an 1.5 hour drive from Nalchik airport.
After having settled in Terskol, the next thing you will probably do is an acclimatisation hike. Terskol Peak (3900m) and Mount Cheget (3404m) are popular options. Both offer great views of Mount Elbrus. If you have an extra day for acclimatisation, a 4 hour walk from the Terskol Valley to the Observatory provides a great first acclimatisation hike.
The next day you move from the Terskol Valley to Barrels (3800m). The easiest approach is to take the cable car system from Azau to Mir Station. From there you can either walk for 1 hour, or take a 1 person chairlift to Garabashi - "The Barrels". It is about a 50 meter walk from the top of the chairlift.
After having settled, it is best to do an acclimatisation hike up to 4,100 meter in the afternoon. ‘Climb high, sleep low’, accelerates adjusting to the altitude.
To complete your acclimatisation process, a hike to Pastukhova Rocks (4700m) is recommended. It takes about 3 hours from the Barrels.
A short night of sleep since you will start your summit bid at 2am or 3am. You will be climbing about 1,900 meters of altitude making for a long summit day (12 hours up and down). Most climbing operators make use of snowcats to start their bid at Pastukhova Rocks (4800m) making their summit day significantly shorter, but true mountaineers don’t use the aid of snowcats.
In case you had bad weather the day before, the summit bid is today. This means that you will not only be summiting today, but will also descend to Terskol Valley. Starting early is recommended to catch the last cable car to the valley (otherwise there is very long descent waiting for you).
After having had a good nights sleep in your hotel in Terskol, you will drive back to Nalchik Mineralnye Vody airport to catch your flight home.
Costs And Permits

Epic picture of climbers pushing up past the Pastukhova Rocks. Image credit: Matteo Leoni
The cost to climb Mount Elbrus ranges depending on how you tackle the mountain. Here are three rough estimates:
Budget Independent Climb
It is possible to climb Mount Elbrus independently. The cost (excl. international and domestic flights) could be as low as $500 pp, but this would be super budget. You will need to budget for your transfers to and from Nalchik, accommodation in Terskol pre and post the climb, cable car journeys, food and water on the mountain and accommodation stays on the mountain.
Climbing with a Local Guide
Their are a number of good Russian guiding organisations who charge about $1000 pp for an Elbrus climb. This often covers accomodation pre and post your climb, all logistics and expenses on the mountain, and a professional guide. Quality can however vary.
Climbing with a Western Operator
There are a number of Western operators who offer Mount Elbrus. Prices range from $2000 to $5000 pp. The service quality tends to be excellent, with professional guides on the expedition. The cost generally includes everything from Moscow and back.
Like on most mountains, you need a permit to climb Elbrus. But unlike the high cost of a climbing permit on Aconcagua (~$1000) or Kilimanjaro (~$1000), Elbrus only costs $25.

Helicopter rescue on Mount Elbrus. Image credit: Ilya Bogin
Travel insurance is important when climbing a mountain like Elbrus. If you climb with an guided organisation, you will likely need adequate climbing insurance before joining their tour.
Most general travel insurance providers will not cover Mount Elbrus as the activities of the climb involve high altitude and mountaineering with fixed ropes. You will need to source specialist insurance that covers you for high altitude mountaineering.
We recommend contacting the BMC in the UK or the American Alpine Club in the US .

About the author
Mark Whitman
Mark has trekked extensively in Asia, Europe, South America and Africa. He founded Mountain IQ in 2014 with the sole aim to be the best online information portal to some of the most popular mountain destinations around the world. When not writing for Mountain IQ, Mark is out exploring the outdoors with his wife!
Leave a Reply
Your email address will not be published. Required fields are marked
i am flying out to Terskol on 9th october,HOW CAN I GET A MOUNT ELBRUS CLIMBING PERMIT QUICK ?
Hi Michael, Elbrus climbing permits currently cost €25 and can be bought in Elbrus town or from the rangers at the ski lifts.
Hello, Thank you very much for this detailed report. We are happy to hear that we can climb mount Elbrus independently. We are now looking forward to do the climb this year. Best regards, Doreen and Jean-Christophe
Hi, I’m planning an alpine attempt of Elbrus, starting the trek from Azau (no cheating), both summits in 3 days, tentative 7~9 July 2019; looking for like-minded mountaineers
I have an interview for a school project and I want to ask some questions.
1. What measures can you take if someone has a medical emergency during a climb?
2. What type of clothing do you recommend for protection from the cold or to deal with the climate?
3. What happened on your most dangerous Elbrus expedition?
Hello Mr. Whitman, I think my earlier comment wasn't posted. My name is Juliana J, and I'm doing a research paper on climbing Mount Elbrus. I'd like to ask you (as an expert) what measures can be taken if someone has a medical emergency during a climb? Also, what type of clothing do you recomend for protection from the cold to deal with the harsh climate, and what happened on your most dangerous Elbrus expedition? Thanks for your time in answering these questions for me.
Hello Mr. Whitman, I think my earlier comment wasn't posted. My name is Juliana J, and I'm doing a research paper on climbing Mount Elbrus. I'd like to ask you (as an expert) what measures can be taken if someone has a medical emergency during a climb? Also, what type of clothing do you recomend for protection from the cold to deal with the harsh climate, and what happened on your most dangerous Elbrus expedition? Thanks for your time in answering these questions for me.
Hi Juliana, I’m not too sure of the answers. I recommend contacting Vitaly at Russian Mountain Holidays (if you Google them, you will find their site). He is an experience Elbrus guide and should be able to help.
We work with local guides to offer great value adventures at unbeatable prices
Search here...
- Are you a new customer? Sign Up Now

The ideal, reliable and convenient crampon, which with its twelve steel points guarantees a secure and precise grip on flat and uneven ground.
CAMP - ICE Master - hiking crampon

Order it before 12:00 of tomorrow and receive it between Thu 9 and Fri 10 with Fedex
Description
Camp - ice master, hiking crampon.
The ideal, reliable and convenient crampon, which with its twelve steel points guarantees a safe and precise grip on flat and uneven ground, allowing you to avoid dangerous slips and falls in the presence of ice.
At the base of the Ice Master is the same commitment to quality and innovation that, for more than a hundred years, has placed CAMP at the forefront in the conception of technical articles for mountaineering and climbing. Available in four sizes for all shoes and boots from size 36 to 47.
- Crampon for greater stability on icy surfaces
- 13 powder coated hardened steel tips
- Maximum resistance when walking on uneven surfaces thanks to the galvanized steel links
- Articulated front to ensure a natural walk
- Simple and safe fixing system in elastic rubber with nylon webbing
- Available in 4 sizes for shoes and boots from size 36 to 47
- Case supplied
- Weight 455g (size S 36-38), 478g (size M 39-41), 495g (size L 42-44), 500g (size XL 45-47)
The color is not selectable but identifies the size.
Product Details
Specific references, related products ( 7 other products in the same category ), ct - ice traction plus, hiking crampons, camp - ice master run - hiking and running crampon, camp - ice master light - hiking crampon, ct - ice traction, hiking crampons, camp - ice master evo - hiking crampon, grivel - explorer light, hiking balloon, grivel - explorer, hiking crampon, customers who bought this product also bought:, camp - k warm primaloft padded glove, ivel-axe-guard, camp - corsa alpine, super light ice ax, camp - skimo tour, superlight crampons, ferrino - silk liner mummy, ortovox - diract, avalanche search transceiver, camp - material holder hub, existing account login login to your account, reset password, new account register.
- 0 Shopping Cart ₹ 0.00 -->

5289 Meters | Himachal
Friendship peak, 2024 batches: 8 & 19 jun | 31 aug | 14 & 28 sept | 12 oct, may – oct.

Friendship Peak is a stunning mountain that forms a part of the Pir Panjal range, situated in the Kullu District of Himachal Pradesh, India. Its towering summit, which stands at an elevation of 5289 meters, provides a breathtaking view of the surrounding peaks like Hanuman Tibba, Shetidhar, Ladakhi, Manali peak, Makar Beh, and Shikar Beh. Along with the picturesque views of the Pir Panjal and Dhauladhar ranges, the Beas Kund basin enhances the beauty of the landscape.
The Indian Mountaineering Foundation has recognized Friendship Peak as an ideal trekking peak for trained and professional mountaineers. The route to the top includes several mountain topographic features like moraines, glaciers, crevasses, and ice patches, which vary depending on the season. The trek is considered a moderate to hard grade, making it a good option for experienced trekkers who are looking to switch to mountaineering.
The surroundings of Friendship Peak are adorned with lush green meadows and dense forests. The summit, however, is covered with thick layers of snow. The trek to the peak is challenging, yet it rewards trekkers with panoramic views of the majestic Himalayan ranges. The best time to attempt this trek is from May to October when the weather is favorable and the conditions are suitable for climbing.
If you are looking for something even more challenging but in the same area, you could also go for 5K DUET CLIMB – Friendship Peak + Shitidhar. Climb two 5000m peaks in one attempt. Know more about it by clicking here.
Day 1: Arrival at Manali. After some rest, we would go on a normal walk in order to acclimatize.
Day 2: Drive to Dhundi (road-head) and trek to Bakarthach (3,300 meters) (4-5 hours).
Day 3: Trek from Bakarthach to Lady leg (3,900 meters) (4-5 hours).
Day 4: Acclimatization & load ferry to summit camp. Night stay at lady leg.
Day 5: Trek from Lady leg to summit camp (4,400 meters) (2-3 hours)
Day 6: Trek from Summit camp to Friendship peak (5289 meters) & back to lady leg (8-9 hours)
Day 7: Trek down from Lady leg to Road-head. Drive to Manali. Night stay in Hotel along with Expedition Celebration Party!
Day 8: End of trek. Departure after breakfast.

- 2 nights in a nice hotel with breakfast
- 5 nights’ accommodation in Camps as per the itinerary
- Breakfast, lunch and dinner on all days
- Tea every Morning & Evening
- Soup in the Evening
- Highly qualified Guides during the trek
- Camping in tents along with sleeping bags
- Climbing boots & Crampons
- Seatharness & Ice axe
- Firstaid medical kit
- Oxygen cylinder till Summit for emergency
- All the necessary technical equipment required for the expedition
- All fees & Permits
- Participants will get an exclusive discount on all Fast&Up products
- Travel till Manali
- Personal clothing & Personal Porter
- Lunch & Dinner when in hotel
- Any kind of personal expenses
- Tips to guide/porter
- Anything not mentioned in inclusions of the package.
- Personal Insurance
FREQUENTLY ASKED QUESTIONS
Q) Who should go on this expedition? A) Those who have been trekking for a while and now want to push their limit or try their hand, particularly at mountaineering should go for this expedition. You’ll get to learn and practice proper mountaineering skills here.
Q) Is this expedition suitable for beginners? A) You must not be an absolute beginner. Some prior trekking experience is required.
Q) What will be the pickup point? A) You will have to arrive at the Manali bus stand by yourself. Our cab will be waiting there for you and that’s where your journey with B&C starts. Someone from our internal team and many trekkers usually go via Delhi/Chandigarh. So, we can book our bus seats accordingly and travel together.
Q) What are the best months to visit Friendship Peak? A) In summer, the best months are April-June. Whereas in winter, it’s September-October.
Q) How different is this from a usual trek? A) Most of the days would feel like a regular trek except for the summit push when you have to start climbing in the middle of the night using proper mountaineering gears
Q) Can this trek be reduced to 6-7 days? A) Yes, it can be reduced by a day or two but for an extra charge since you’ll be given a personal guide while coming back. Please WhatsApp us on +919000603444 to know more.
Q) What to pack? A) You’ll need to pack the basic clothing and accessories you’ve used on your previous treks. Mountain gear that you require after the summit camp, such as Ice-axe, Snow boots, Crampons, Harness, etc., will be provided by us.
Q) What will be the accommodation type for this trek? A) At Manali, we will stay at hotels or guesthouses. During the trek, you will stay in a 3-man tent/camp on a twin-sharing basis.
Q) Can I get a personal tent? A) Of course, you can get a separate tent for yourself if you don’t want to share your sleeping space with someone. However, you’ll have to pay an extra charge for that.
Q) What will the temperatures be like during this trek? A) Maximum temperature you’d witness on the trek will be around 25 degree Celsius. At a minimum, it could go -5 after summit camp during the night.
Q) Who will lead us on the trek? A) Your trek will be led by one of our experienced and knowledgeable mountain guides, who will be supported by a team of skilled coordinators, helpers, and cooks.
Q) Is a trekking pole necessary? A) Though it is not necessary, a trekking pole is extremely helpful since the terrain could get
Q) Do I have to buy all the gear required? A) We can help you get trekking poles, hiking shoes, gloves, warm trousers, raincoats & jackets on rent. Connect with us to know the charge.
Q) What are the gears we will be using? Is it easy climbing with those gears for the first time? A) Till the base camp, you’ll not require any typical mountaineering gear but from the summit camp, you will. You will also be provided with enough training so that you can climb with gear such as snow boots, crampons, ice-axe, harnesses, ropes, helmets, etc. Not to mention, there will always be people around you for supervision.
Q) Will I be carrying my bags the whole time? A) No, mules will be there to carry your bags till the base camp (Ladyleg). After Lady Leg, you carry some of the basic stuff you’ll require on your summit day and leave them at the summit camp for next-day use. We call it the load ferry.
Q) What’s the success ratio for the summit attempt? A) Most of the climbers on friendship peak are first-time mountaineers, i.e., they may have gone on treks before but it’s their first time climbing mountaineering gears. Still, about 70% of people are successful at their attempts.
Q) What kind of fitness level is required? A) You must be ideally fit, untouched by any sort of physical injury, illness, or overweight. Should be able to walk for 6-8 hours easily.
Q) How can I prepare for this expedition? A) You must start preparing at least 1.5-2 months prior to the kick-off date. Below are some of the exercises you could add to your fitness regime: -Jog/Run for 5 Kms in 25-30 mins Or walk continuously for 10 km (with 3-4 small breaks) on plain terrain (a slight incline is better), even better if done with some weight on your back -3 sets of Climbing 30 – 40 steps in one stretch -Push Ups – 10 x 3 -Lunges & Squats – 15 X 2 sets -Planks
Q) Is transportation included? Where will you pick us up and where will you drop us off? A) We will pick you up from Manali private bus stand and drop you at the same place. Other domestic transportation, i.e. from the hotel to Dhundi (where the trek starts), will also be provided by us.
Q) Is mobile network available during the trek? A) Your number will go unreachable as soon as you start your trek from Dhundi and will stay like that until you’re back. You’ll be out of network for about 6 days.
Q) What are the toilet facilities during the trek? A) A separate toilet tent with a portable toilet chair will be available on all days except on the summit push day.
Q) What kind of food is available during the trek? A) A variety of highly nutritious veg & non-veg food is available during the whole journey. However, at the summit camp, limited food can be carried. That day, you’ll be given noodles, soup, tea, sandwiches, etc.
Q) For what other things will I be charged? A) We don’t work with any hidden costs. You’ll get everything required and mentioned in the brochure from when you arrive in Manali, till we bid you adieu.
PREPARATION GUIDE
- Have Previous Trekking/Mountaineering Experience.
- Weight train the body. Walk uphill or stairs steps with a weighted back pack.
- Strength training for the lower body and core. Do planks, crunches and cycling.
- Climbing Friendship peak requires a fit body and a conscious mind. One needs to be exercising regularly for the past couple of months.
- Any high altitude trek requires you to build a good amount of cardiovascular endurance. Jogging is the best exercise to increase your stamina.
- You need strong legs to success fully finish a high altitude trek. Squats are the best way to build leg strength quickly. Especially your thighs, glutes and knees.
- For detailed advice and coordination, we’ll have a WhatsApp group.
YOU MAY ALSO LIKE
Everest Base Camp

Mt Aconcagua

Patalsu Peak

SHARE THIS PLAN
B&C specializes in providing premium-quality & safe mountaineering experiences around the world. We are committed to protecting & conserving the natural environment in which we operate . Our highly experienced support team & certified guides make for a hassle-free journey throughout.
Important Links
Book a Trek/Expedition Gift A Trek Terms & Conditions Cancellation Policy Sitemap Privacy Policy
Get In Touch
+91 9000 603 444

You are using an outdated browser. Please upgrade your browser .
- Gorky Central Park of Culture and Recreation, Moscow
- Guide to Russia
What is the history of Gorky Park?
- In the pre-revolutionary period, Gorky Park was a city dump and wasteland, which was cleared in 1923 to host the All-Russian Agricultural and Artisan Industrial Exhibition
- In 1928, a huge park was planned on the former site of the exhibition. It would not just be a place of leisure, but a place to proudly display Soviet culture and daily life
- Gorky Park has remained a cultural hub ever since, and has been renovated and added to over the years to make it one of Moscow’s top attractions today
Gorky Central Park of Culture and Recreation
Gorky Park is the most famous park of Moscow, created during the Soviet period as a hub for relaxation and cultural activities. The park is beloved by Muscovites and tourists alike, who visit in all seasons to stroll, enjoy sports, admire the park’s attractions, and attend cultural events. Gorky Park is the central part of an ensemble of four green spaces – Muzeon Park of Arts, Neskuchny Garden, and Sparrow Hills Nature Reserve – which curve around the southern bank of the Moskva River to the south-west of Moscow city centre. Here you may spend some time and enjoy nature and contemprary art during your vacation in Moscow .
History of Gorky Park
Imperial russia.
In the 17th century, the eastern bank of the Moskva River beyond Moscow’s city limits was home to floodplain meadows, where palace horses grazed. From the mid-1850s, events such as cockfights, fistfights, and races were held here, and by the 20th century this area had become a city dump where the unemployed and homeless people of Moscow lived, which remained this way until the Soviet period. This wasteland lay in stark contrast to the adjoining Neskuchny Sad – ‘merry garden’ – which lay to its south, an area of aristocratic country estates and elaborate gardens.
Soviet Russia

Photo from https://parkseason.ru/
Following the October Revolution, Vladimir Lenin travelled around Moscow to find a suitable site for the first All-Russian Agricultural and Artisan Industrial Exhibition, which would reveal opportunities for socialist development of agriculture and industry. Lenin decided on the wasteland alongside the Moskva River, which was cleared with a programme of community work. In 1923, the exhibition began. It encompassed 250 pavilions dedicated to different themes of agriculture and industry, and was divided into thematic zones, such as villages, livestock, crops, engineering, railways, republics of the USSR, and foreign countries. The organisation of the exhibition demarcated the future layout and size of Gorky Park, and the paths, ‘zones’, and main square of the exhibition have been preserved until the present day. In March 1928, Moscow City Council decided to establish a park of culture and recreation on the site of the former exhibition, which would also encompass the Neskuchny Garden. Moscow’s residents were instrumental in the construction of the park – they voiced their desires for events spaces, physical education and leisure facilities, and gave up their weekends to build the park. The park’s main architect was Konstantin Melnikov.
Did you know? Konstantin Melnikov also helped to construct Lenin’s Mausoleum and the Rusakov Worker’s Club, one of Moscow’s Constructivist masterpieces .
Over 100,000 Muscovites flocked to the opening of the park on 12th August 1928. The brand-new park was equipped with two theatres, a cinema, nursery, reading room, restaurant and café, music stages, sports arenas, rowing boats, and even a giant helter-skelter slide. Unfortunately, because of the vast size of the crowd and the general excitement, the park was damaged and closed until September.
Did you know? The park was not named after Maxim Gorky, writer and founder of Socialist Realism, until 1933.
In 1929, Betty Glan – at the mere age of 26 – became director of the park. She decided to reconceptualise it, uniting leisure, design, and ideology with the help of Moscow’s most eminent architects, designers and artists. Over the next decade, more cultural venues were established in the park, the Pushkinskaya Embankment along the Moskva River was developed, and the landscaping of the park was carefully cultivated. Architect Alexander Vlasov was particularly influential, and won the Grand Prix at the 1937 World Exhibition in Paris for his design of Gorky Park. This period under Glan’s directorship until 1937 was known as the ‘golden age’ of Gorky Park, which became not just a place for recreation, but a public space where Soviet culture and everyday life could be proudly displayed.
Did you know? During the Second World War topical events were held in Gorky Park, such as the championship in bayonet combat, grenade-throwing competitions, and air defence training. What’s more, an exhibition of captured enemy weapons – tanks, artillery, aeroplanes, and more – was organised in Gorky Park and continually updated throughout the war.
In the post-war decades new attractions were continually added to Gorky Park. These included the majestic 24-metre triumphal arch at the entrance to the park, an astronomical observatory (which remains open today), the famous Ferris wheel (unfortunately dismantled in 2008), and a fountain with lights and music.
Russia today

Photo from https://countryscanner.ru/
The Gorky Park ensemble continued to flourish as a centre of culture and recreation in post-Soviet Russia. The adjoining Muzeon Park of Arts was founded in 1992, and Garage Museum of Contemporary Art was established in Gorky Park in 2008. The ensemble underwent serious reconstruction in 2011. Many new sports facilities were added, including centres for beach sports and extreme sports, bicycle paths and sports equipment rental hubs, and much effort was devoted to reviving original buildings, sculptures, and landscape compositions. Two years later, the embankment of the Moskva River from the southern tip of Zamoskvorechye Island all the way to Sparrow Hills was redeveloped and pedestrianised, making it possible to peacefully walk or cycle along the Moskva for many kilometres.
What can you do at Gorky Park today?
- Explore the park and see architectural attractions, fountains, and beautiful gardens
- Visit Garage Museum of Contemporary Art and the Gorky Park Museum
- Go boating on the lakes and stroll down the Pushkinskaya Embankment
- Rent bicycles or scooters, skateboard, and visit the sports centres
What can you do at Gorky Park?
Park attractions.
While exploring the treelined paths of Gorky Park, you’ll come across a number of attractions. To the west of the main entrance, near the river, is a beautiful geometric bandstand used for music and literary evenings in the Soviet period. As you head down the central alley of Gorky Park from the main entrance, you’ll see a statue of Maxim Gorky on your right, and discover the light and music fountain with its dancing jets of water – find the schedule of its performances here .
Did you know? Don’t be afraid to feed the red squirrels and birds you encounter on your walk around Gorky Park – there are even vending machines which sell special food for the animals!
The southern section of Gorky Park is occupied by the Golitsynsky Garden. In 1802, the Golitsyn Hospital was founded here as a hospital for the poor; it still adjoins Gorky Park today. Gardens were created as a relaxation place for patients, extending from the hospital building to the riverbank, and included landscaped gardens, a Chinese Bridge, and two ponds. On the riverbank is the Rotunda of the Golitsyn Hospital, which has been preserved since the 19th century. There is also a rose garden and fountain by the Bolshoi Golitsynsky Pond.
Did you know? In the Golitsynsky Garden is also located an unusual architectural monument – a public toilet designed by Alexander Vlasov in the 1930s, which is recognised as an ‘object of cultural heritage’!
Outdoor activities

Gorky Park’s extensive and varied grounds aren’t only good for walks! You can relax on the water by renting boats to sail on the Pionersky and Bolshoi Golitsynsky Ponds, or visiting the Olivkovy Beach on the Pushkinskaya Embankment to sunbathe. As well as this, you can hire bicycles, electric scooters, longboards or even roller skates to explore the park and embankments, play table tennis, visit the sports complex to play football, basketball, handball, badminton or volleyball, or visit the Vans skatepark or Nike sports centre for workouts and classes such as rooftop yoga.
Gorky Park Museum

Photo from http://themedium.ru/
Visit the Gorky Park Museum, located in the left pier of the entrance arch. The current exhibition is dedicated to Gorky Park in the ‘golden age’ of the 1930s, and shows the development of Moscow’s central park through the eyes of Betty Glan. There is an observation deck on top of the arch, which offers a lovely view over the park and Moscow’s skyline.
Did you know? In the entrance arch there is also a gift shop where you can purchase balls, frisbees, blankets, and other items to enjoy your visit to Gorky Park.
Garage Museum of Contemporary Art

Photo from https://muzeolog.com/
In Gorky Park you will find Garage Museum, Russia’s first philanthropic institution dedicated to contemporary art, founded in 2008 by Roman Abramovich and Dasha Zhukova. 10 major exhibitions are hosted each year to showcase the work of established and up-and-coming artists. Also organised are a rich programme of events including curator-led excursions, workshops, masterclasses, lectures, concerts, performances, festivals, and film screenings at Garage’s outdoor cinema. Read our article about Garage Museum of Contemporary Art to learn more.
Food and drink
There are plenty of excellent cafes and restaurants dotted around Gorky Park, where you can stop for a quick coffee or enjoy a long meal with a view. They include the stylish lakeside café Ostrovok (Little Island) and upmarket restaurant Vremena Goda (Seasons) which serve European and Russian food, colourful lakeside Thai restaurant Lebedinoe Ozero (Swan Lake), trattoria Merkato with its huge summer terrace, restaurant Syrovarnya (Cheese Factory) with a menu focused on its homemade cheese, food-truck court Restoparking which is stylised as a drive-in café, and ice-cream and tea shop Chaynaya Vysota.
What’s nearby?
Gorky Park is bordered by Muzeon Park of Arts, Neskuchny Garden, and Sparrow Hills Nature Reserve. This huge ensemble curves for eight kilometres along the bank of the Moskva River, providing a beautiful oasis of green in Europe’s biggest city.
Muzeon Park of Arts

Photo from https://new-magazine.ru/
Muzeon Park of Arts is the largest open-air sculpture museum in Russia, home to 1,000 sculptures by Soviet and Russian sculptors, including those by famous artists. A large part of Muzeon is occupied by the New Tretyakov Gallery , which houses Russia’s most complete exhibition of national art from the 20th century to the present day. The pedestrianised Krymskaya Embankment which extends alongside Muzeon has recently undergone redevelopment, and is one of Moscow’s most popular spots to relax.
Neskuchny Garden
Neskuchny Garden is the oldest park in Moscow, founded in 1728 by Prince Nikita Trubetskoy, who threw fantastic festivities in his manor house and gardens – neskuchny means ‘merry’ in Russian. Many other noble families also built their country estates in this area, which became a public park and garden after being acquired by the royal family. Today, the Neskuchny Garden is home to historical buildings, fountains, and gardens from the 18th and 19th centuries, sports facilities, an open-air theatre, and a huge greenhouse which supplies flowers to Gorky Park.
Sparrow Hills
Sparrow Hills Nature Reserve is a huge forest park lining the steep bank of the Moskva River and the only specially protected nature area near the city centre. It is home to ecological trails, ponds, natural springs, rare species of plants and animals, many spots for picnicking, cafes, and a mini zoo. At the bottom of the park lie the Vorobyovskaya and Andreevskaya Embankments, with promenades along the Moskva River, a beach, and piers offering boat trips. As with Gorky Park, Sparrow Hills is hugely popular for sports and outdoor activities in all seasons. A new winter sports complex with snowboarding, ice skating, and ski tracks and jumps is currently under construction. When the weather is pleasant, you can rent a bicycle to ride the 8 kilometres along the river from Muzeon to Sparrow Hills.
Essential information for visitors Address and contact details Gorky Park, Krymsky Val, 9, Moscow, 119049 Website: https://park-gorkogo.com/ Email: [email protected] Telephone: +7 (495) 995-00-20 Nearest metro: Oktyabrskaya (570m), Park Kultury (860m) Opening hours and tickets
Related Tours

Highlights of Two Capitals
This is a well-balanced tour of Moscow and St. Petersburg that includes all must-see sights, such as the Kremlin, Red Square, the Peter and Paul Fortress, Peterhof with its world-famous fountains and, of course, the Hermitage Museum.
Accommodation
PRIVATE TOUR

Jewels of Two Capitals
It is our most complete and popular tour of Moscow and St. Petersburg. In addition to visiting all the emblematic places, you will also have free time for your own discoveries. On your free nights you can watch the shows at the Bolshoi and Mariinsky Theaters or a folkloric show.

Classic Moscow
This is our most popular Moscow tour that includes all the most prominent sights. You will become acquainted with ancient Russia in the Kremlin, admire Russian art in the Tretyakov Gallery, listen to street musicians as you stroll along the Old Arbat street, and learn about Soviet times on the Moscow Metro tour.

Group Tour Moscow Break by Intourist
Russia's capital has so much to offer, from the Kremlin and the Metro to the Old Arbat street and the Tretyakov Gallery. Besides these sites, you will also visit a fascinating country estate which today is quite off the beaten path, Gorky Estate, where the Soviet leader Lenin spent the last months of his life.
Our travel brands include

Express to Russia
Join us on Facebook
We invite you to become a fan of our company on Facebook and read Russian news and travel stories. To become a fan, click here .
Join our own Russian Travel, Culture and Literature Club on Facebook. The club was created to be a place for everyone with an interest in Russia to get to know each other and share experiences, stories, pictures and advice. To join our club, please follow this link .
We use cookies to improve your experience on our Website, and to facilitate providing you with services available through our Website. To opt out of non-essential cookies, please click here . By continuing to use our Website, you accept our use of cookies, the terms of our Privacy Policy and Terms of Service . I agree
COMMENTS
Camp Ice Trek Crampons - any experience. This topic has been archived, and won't accept reply postings. While I was in Austria I purchased a pair of these rather cheaply to use with 2 pairs of leather boots. Tried them on steepish ground on a glacier and found them much more secure than the very old Stubais that have worn down over the years.
Traction: 8/10. Lightweight: 8/10. Bottom Line. If you plan to conquer any rocky inclines, you'll probably want to opt for stainless steel crampons, like the Black Diamond Contact Strap Crampons with ABS Plates. Not only are they more lightweight than some other steel crampon options, but they're also versatile too.
The CAMP Ice Master Run hiking crampon is minimalist but performing, specifically designed for racing. The 13 stainless steel spikes guarantee a secure grip and precise traction, preventing dangerous slips in the presence of snow, ice or in any case on low-grip terrain. The tips are 8 mm long, compact and do not create discomfort while running.
Camp/Adventure 16 Ice Trek Crampons. A bargain price does not always turn into a good value! That is very much the case with CAMP crampons. The Ice Trek crampons appear to be well made of a very brittle chrome molly steel. Though the width in the forefoot and the length is adjustable I don't believe they will fit boots over size US 10.
Top Crampons For Climbing (Detailed Reviews) We reviewed over 16 crampons for this article. Below are the best crampons that made our short list: Petzl VASAK Crampons - Best Overall. PETZL Irvis Hybrid Leverlock - Best Lightweight. Black Diamond Serac. Camp Stalker Universal - Best Value. PETZL Leopard LLF.
The supplied case, light and compact, completes the proposal, making the Ice Master Light a product to always have in your backpack, ready to guarantee the essential safety during long excursions, high routes and trekking. Available in four sizes for all shoes and boots from size 36 to 47. Crampon for greater stability on icy surfaces.
The CAMP XLC 490 crampon has a spike length of 3 cm. That's about 50% longer than on Hillsound Crampon Pro's. But these CAMP Crampons aren't your everyday winter hiking spikes and are best used on low-angle ice and packed snow (often referred to as glacier travel) high up on a mountain, where you want deeper penetration for hiking uphill ...
At 34.2 oz for the pair (with anti-balling plates), these are not the lightest universal crampons that CAMP makes (see the 24.4 oz Nano Tour Universals) but they are an excellent and hard-wearing choice for general mountaineering and glacier travel. Likes. Aggressive 12 point crampons provide excellent bite in ice
Designed for mountaineering and glacier travel, the CAMP XLC Nanotech crampons help you keep your footing on ice and hard-packed snow. Made from Sandvik Nanoflex stainless steel, each pair features a lightweight 12-point design, a 3D-pressed frame, and CC4U wear indicators on the side points that show when it's time for a replacement.
Saved Content. Photo Galleries; My Photo Gallery; Latest Photos; Weekly Top 10; Videos; Latest Videos; Categories; Hashtags; Athletes; Search
Fitting camp ice trek crampons. New Topic Reply to Topic This topic has been archived, and won't accept reply postings. LJJ77 19 Mar 2015. ... You need to adjust the crampon's length so that the upright "posts" fit snuggly against the sides of the sole at toe and heel, and the side posts may also need adjusting. ...
Just as a heavier ice axe swings better and places more securely in hard ice, heavier crampons also have a place in the alpine. The design of CAMP's Alpinist crampons were based on the Blade Runners, a steep ice and mixed climbing crampon. ... For comparison, the CAMP crampons front bail is about 67mm wide (center), the Petzl's are about ...
ICE MASTER - 12-POINT ICE CRAMPON Camp 12-point steel crampon, designed for greater stability on icy surfaces.The ideal small, reliable and inexpensive crampon that, with its twelve points, guarantees a safe and precise grip on flat and uneven ground, preventing dangerous slips and falls in the presence of ice.
Crampons are a set of metal spikes that you attach to your boots to improve mobility and traction on snow and ice. They're often made from steel or aluminum and have a varying number of spikes on the bottom, tailored to different uses. People often use crampons for hiking and trekking in freezing conditions, crossing glaciers, ski touring ...
Warm-Up Before Elbrus. 3 Days / Includes Transportation, Tents and Food. 12 Days. 2 Days / Includes Transportation, Tents and Food. 10 Days. Join us on our guided mountaineering trip climbing Mount Elbrus, one of the world's 7-Summits peaks. Hone your expedition climbing skills on this ascent.
The main reason you don't need them is that you won't be doing any ice climbing or walking which crampons are used for. Crampons are used for ice or packed snow and you don't really walk on those surfaces on the Everest base camp trek. Nearly all the way up to base camp you are on worn paths or rocks but not any Icy surfaces.
You will therefore need to carry all your gear from base camp, which is situated at about 8,200 feet. ... Climbers only need basic experience in using crampons and ice axes to be well-prepared. ... starting the trek from Azau (no cheating), both summits in 3 days, tentative 7~9 July 2019; looking for like-minded mountaineers. Reply .
Crampon for greater stability on icy surfaces. 13 powder coated hardened steel tips. Maximum resistance when walking on uneven surfaces thanks to the galvanized steel links. Articulated front to ensure a natural walk. Simple and safe fixing system in elastic rubber with nylon webbing. Available in 4 sizes for shoes and boots from size 36 to 47.
Day 3: Trek from Bakarthach to Lady leg (3,900 meters) (4-5 hours). Day 4: Acclimatization & load ferry to summit camp. Night stay at lady leg. Day 5: Trek from Lady leg to summit camp (4,400 meters) (2-3 hours) Day 6: Trek from Summit camp to Friendship peak (5289 meters) & back to lady leg (8-9 hours) Day 7: Trek down from Lady leg to Road-head.
Hermitage garden. Hermitage Garden has 2 ice rinks, one with natural ice and 1 with artificial ice. If you have young children we recommend you to go here as the park's facilities are perfect for ...
Telephone: +7 (495) 995-00-20. Nearest metro: Oktyabrskaya (570m), Park Kultury (860m) Opening hours and tickets. Gorky Park is Moscow's most famous park, beloved by Muscovites and tourists alike who visit in all seasons to stroll, play sports, admire the park's attractions, and attend events.