

Google Maps Not Working: 7 Ways to Fix It
Now you'll never get lost again
You’re driving along and suddenly Google Maps navigation is not working properly. Either the app is crashing, the app is navigating in the wrong direction, or Google Maps can’t find a proper route for you at all.
These issues with Google Maps have a number of different causes that create many different behaviors. In this guide, you’ll learn about which fix to use for the Google Maps app problem that you’re experiencing.
In most cases, Google Maps will stop working properly because of an issue related to the software itself. For this reason, it’s important to start from the simplest solution (updating the app) and work your way down to the more complicated solutions (checking phone settings).
We’ll walk you through each of these steps in this guide.
1. Update Google Maps
Google frequently updates software to patch bugs or close any security holes. For this reason, it’s important to make sure your Google Maps app is up to date.
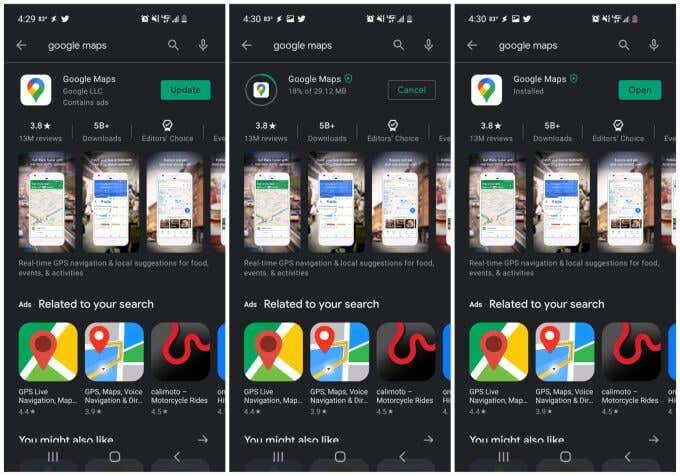
- Open the Google Play app on your device and search for Google Maps.
- Search for “Google Maps”.
- Select the green Update button.
- Wait for Google Play to finish installing the app updates.
- Select the green Open button to relaunch Google Maps.
To avoid running into this problem again, consider making Google Maps update automatically.
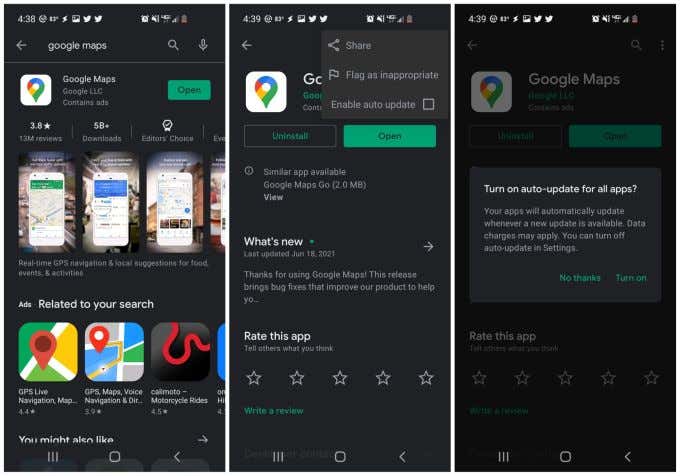
- Instead of selecting Open, tap the name of the app, Google Maps .
- Select the three dots at the upper right to open the menu.
- Select the checkbox to the right of Enable auto update .
- Select Turn on in the confirmation window.
2. Recalibrate the Google Maps Compass
Google Maps utilizes the sensor in your phone called the magnetometer in order to determine what direction your phone is pointed.
This sensor works by measuring the strength and direction of the Earth’s magnetic fields around you. This provides very accurate compass functionality, but like a regular compass, it can be influenced by magnetic or electromagnetic fields around you. This can be from other electronic devices like computers, television sets, and more.
The result of that interference is that the magnetometer isn’t quite as accurate as normal. Strange Google Maps behaviors that result because of this include:
- Difficulty pinpointing your exact location on the map.
- Inaccurate determination of your direction, resulting in the map spinning back and forth.
- Incorrect determination of services and businesses near you when you search your map.
Fixing this issue requires recalibrating the magnetometer. Don’t worry, this is an easy process and only takes less than 30 seconds.
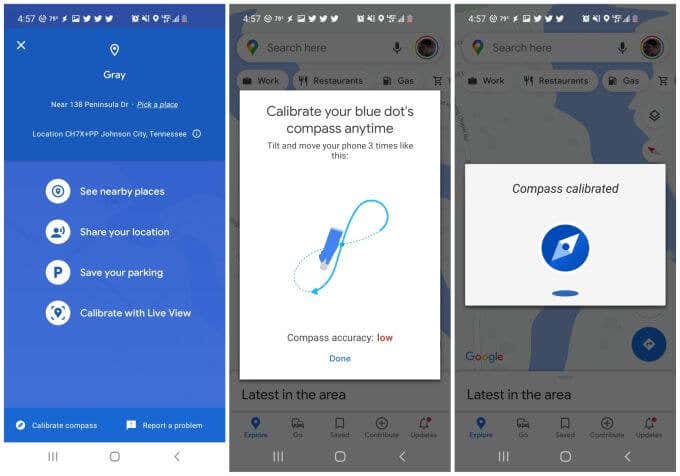
- Open the Google Maps app and tap the little blue dot that shows your current location.
- Select Calibrate compass at the bottom left of the screen.
- Follow the instructions in the pop-up window (move your phone in a figure-eight pattern with a small twist at each end).
- When finished, you’ll see a confirmation that your phone’s compass is now calibrated.
Note : You’ll also notice another option to calibrate with Live View . If you choose this option, you can point your camera at store signs or public buildings around you, and Google Maps will use this information to determine your location and the direction you’re standing.
Once you’re done calibrating, restart your phone and launch Google Maps again.
3. Enable Location Permissions
If Google Maps can’t pinpoint your location at all, it’s possible that the Location settings on your phone aren’t set properly for the Google Maps app.
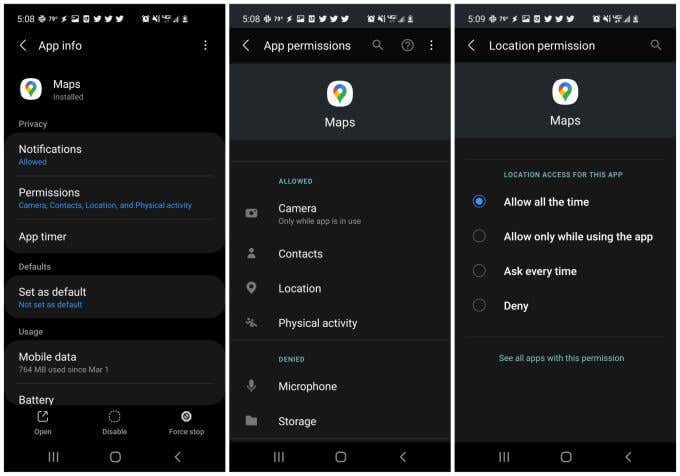
- Open your Android Settings and select Apps.
- Scroll down to the Maps app and select it.
- Select Permissions .
- Select Location .
- Make sure Allow all the time is selected.
Once you’ve updated this setting, restart your phone and confirm that Google Maps is now working properly for you.
4. Turn On High Accuracy Location
If you’re still having problems with Google Maps locating your position accurately, you may want to make sure you’ve enabled high accuracy mode for your Android location .
This mode will use GPS satellites in addition to Bluetooth, Wi-Fi, and nearby cell towers to improve the accuracy of your position. Without High Accuracy, Google Maps won’t use GPS for your location and won’t work properly.
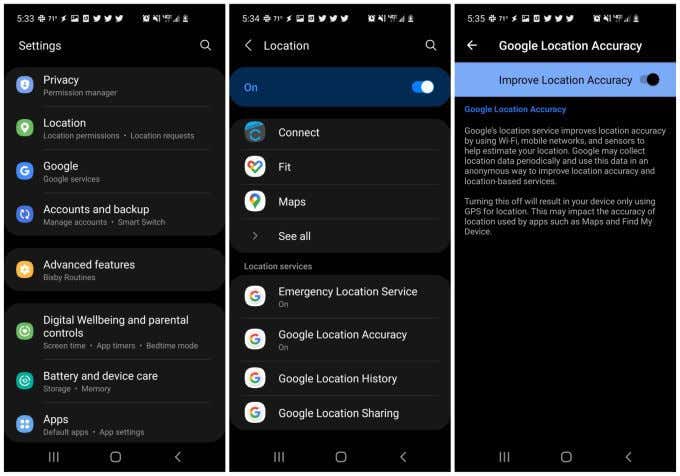
- Open Android Settings and select Location .
- Scroll down to Google Location Accuracy and select it.
- Make sure the toggle to the right of Improve Location Accuracy is enabled.
Restart your device and relaunch Google Maps. Check that the accuracy of your position in Google Maps is now working properly.
5. Clear Google Maps Cache and Data
Like most apps, Google Maps will retain information about where you’ve been, your map searches, and more. This information is contained in the app’s cache.
Sometimes, the data in the cache can get outdated or even corrupted. Clearing the cache and all saved data for Google Maps can resolve issues with Google Maps not working.
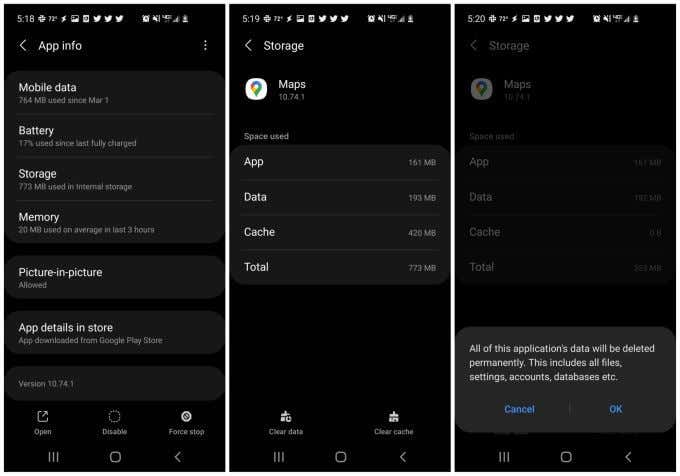
- Open Android Settings and select Apps .
- Scroll down to Maps and select it.
- Select Storage .
- Select Clear cache at the bottom of the screen.
- Select Clear data at the bottom of the screen.
- Select OK on the confirmation window.
Once you’re finished, relaunch Google Maps and check if the issues you were experiencing are now resolved.
6. Reset Google Play Services
While it’s rare, sometimes issues with the Google Play app cache can affect installed apps on your Android. Clearing the app for Google Play services can resolve unusual issues with Google Maps.
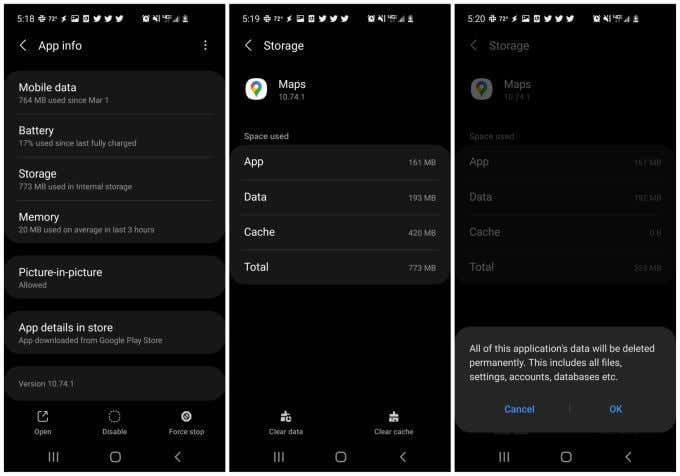
- Scroll down to Google Play Services and select it.
- Scroll down and select Storage .
- Select Manage storage at the left bottom of the screen.
- Select Clear All Data .
Now relaunch Google Maps and check that it’s now working properly.
7. Reinstall Google Maps
If all else has failed, you’ll need to completely uninstall and then reinstall the Google Maps app. This will reset all settings and app permissions back to default and should fix all issues you’ve been experiencing with Google Maps.
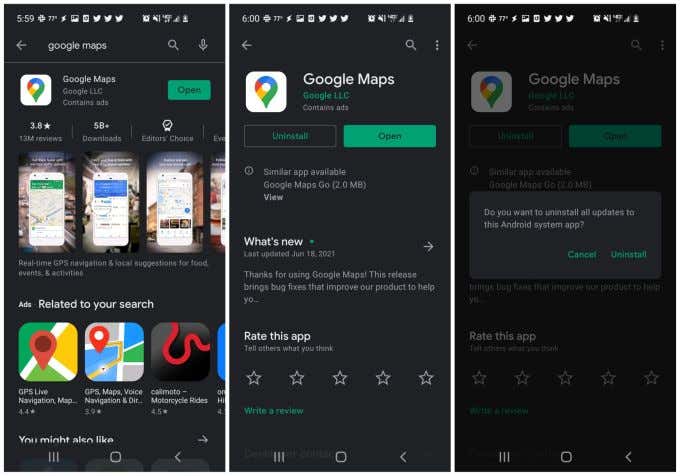
- Launch Google Play and search for “Google Maps”. Tap the name of the app.
- On the app page, select Uninstall .
- On the confirmation window, select Uninstall .
- In Google Play, search for “Google Maps” again, and select Install .
Once installed, launch Google Maps again, and hopefully, at this point, all issues you were experiencing with Google Maps are all resolved.
Ryan has been writing how-to and other technology-based articles online since 2007. He has a BSc degree in Electrical Engineering and he's worked 13 years in automation engineering, 5 years in IT, and now is an Apps Engineer. Read Ryan's Full Bio
Read More Posts:


We explain and teach technology, solve tech problems and help you make gadget buying decisions.
How to View and Manage Your Location History in Google Maps
While Google Maps helps you to look for new places and find the best routes, it also saves these things in your Location History. You can use the Timeline feature on Google Maps to track every place you have visited. However, you might want to remove some visits from your history.
Among all the neat tricks Google Maps has up its sleeve, Timeline has to be the most useful one. It can help you retrace your steps easily. Whether it’s the name of the gift shop you visited last month or photos you took along your last trip, Timeline can help you relive all those memories.
Let’s see how you can view, edit or delete your location history in Google Maps.
Google Maps app works pretty much the same on both Android and iOS. So, for this post, I am using an Android device.
How to View Location History on Google Maps
To view your travel history of any particular day, week or month, follow the steps mentioned below.
Step 1: Open the Google Maps app on your phone and tap on your account circle in the top right corner. Then, select the Your Timeline option from the list.

Step 2: Swipe down on the bottom half of the screen to see detailed information about each trip, including place, distance covered, travel time, and mode of transportation. In case of incorrect or missing information, Google Maps also lets you edit or remove the trip from your timeline.
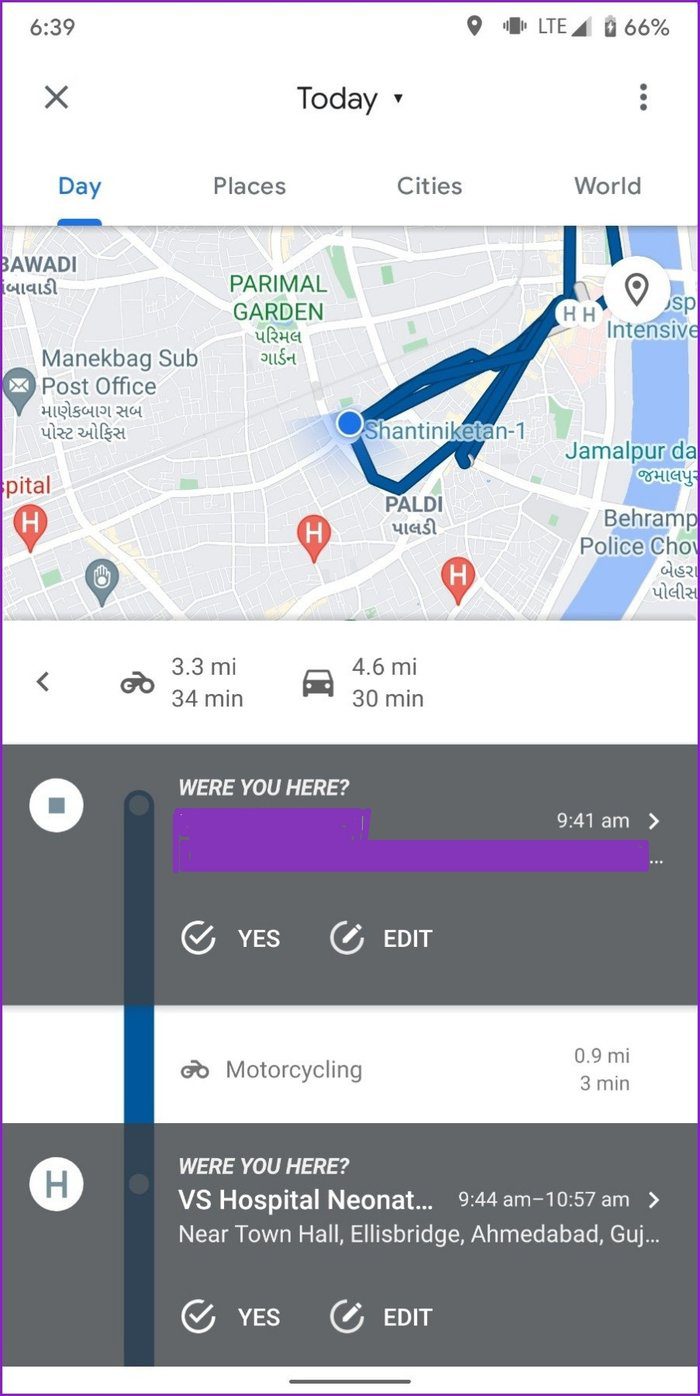
With the Timeline feature, you can also view your location history of any particular day by selecting a date from the calendar on top.
Additionally, It also keeps a list of all sorts of places, cities, and countries visited throughout your history.
How to Turn Off Location History on Google Maps
Although the Timeline feature can be handy in certain situations, the idea of Google tracking your location can be creepy for some. Thankfully, you can disable the timeline feature with a few easy steps.
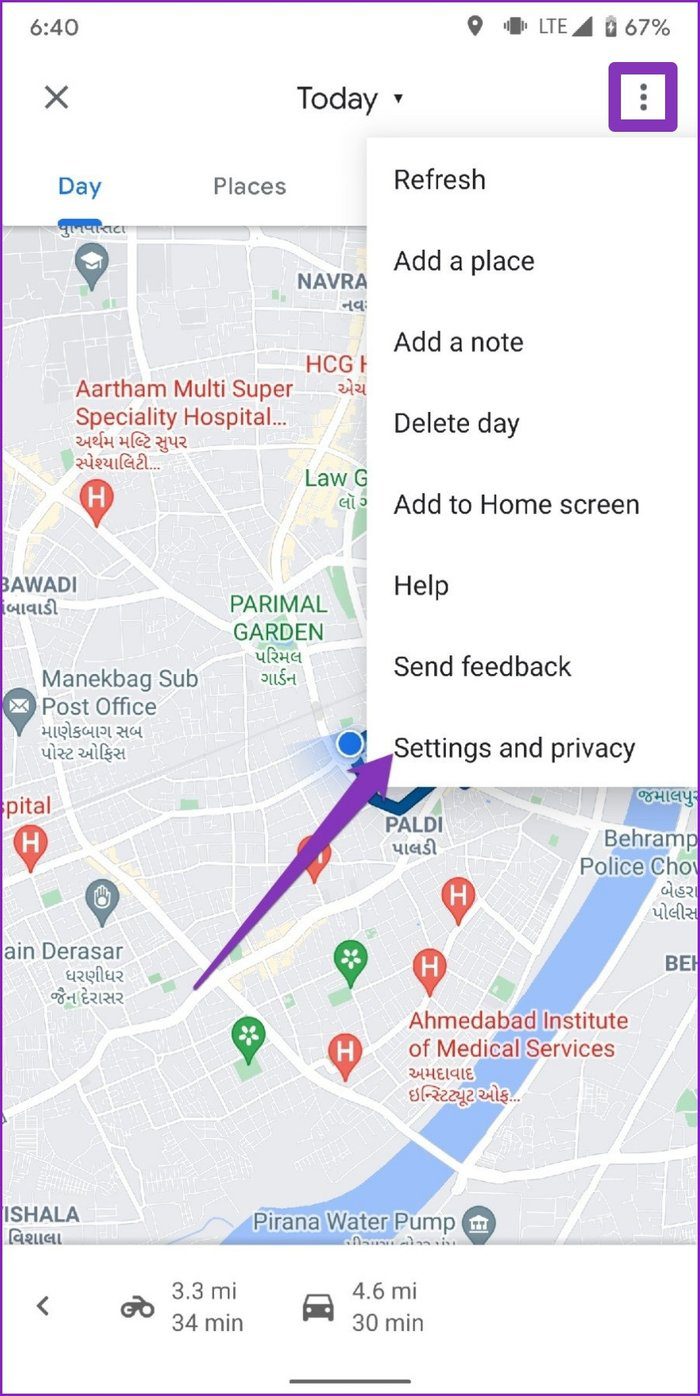
Step 2: Now click on the three-dot menu icon in the top right corner and go to ‘Settings and privacy’. Swipe down to the Location settings, and tap on ‘Location History is on.’
Step 3: In the Activity controls window, toggle off the Location History button. Then, the app informs you about what will work and what won’t once it’s turned off. Finally, click on the Pause button to turn off the location history.
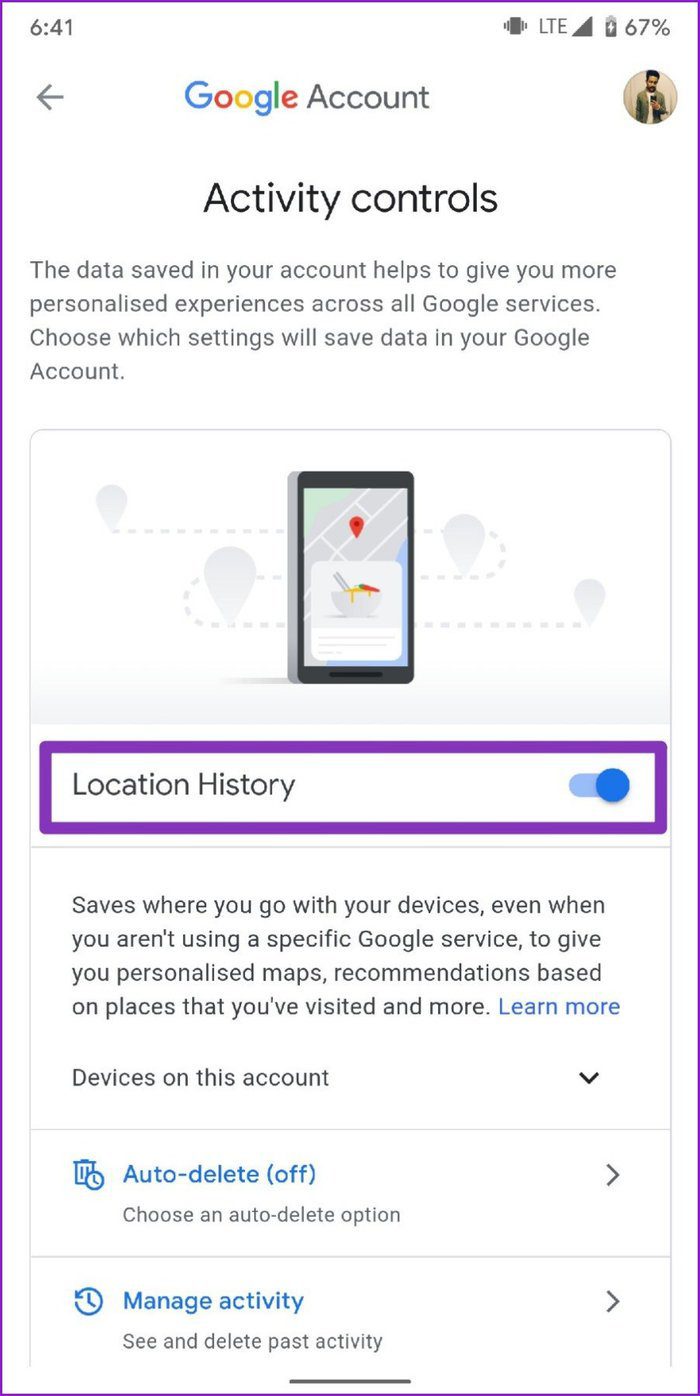
Note: Turning off the timeline feature doesn’t remove Google’s access to your location data as long as you use it for navigation and Google searches.
If you’re concerned about your map activity being saved, Google Maps also has an incognito mode just like the one on Google Chrome and YouTube.
How to Delete Location History on Google Maps
If you don’t intend to use your past location data, Google Maps also has an option to delete it. Here’s how to do it.
Step 2: Click on the three-dot menu icon in the top right corner and go to ‘Settings and privacy’.
Step 3: To delete the entire location history, tap on ‘Delete all Location History’. After that, select the checkbox that says ‘I understand and want to delete’ and press the Delete button.

Alternatively, you can choose to delete the location history of a specific time period by tapping on ‘Delete Location History range’ and entering the start and end date.
On top of that, you can also set up an auto-delete feature to delete history periodically by selecting ‘Automatically delete Location History’.

Bonus: How to Create a Heat Map with Google Location History
By combining your location history with third-party API and tools, you can create your own heat map of all the places visited during a trip. Here’s how.
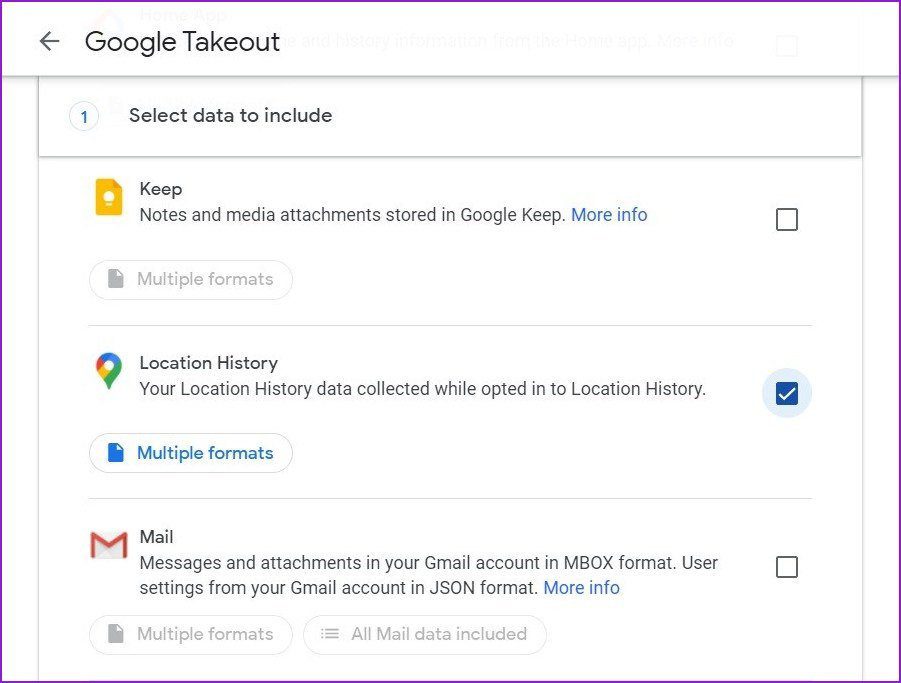
Step 1: Go to Google Takeout to download your location data. Under ‘Select data to include’ click on Deselect all. Now scroll down and mark the checkbox that says Location History then click on Next step.
Visit Google Takeout
Step 2: Choose the Delivery method, File type & size, and Frequency, then click on Create export. Once the export is created, click on the download button, and a zipped file will be downloaded to your device.
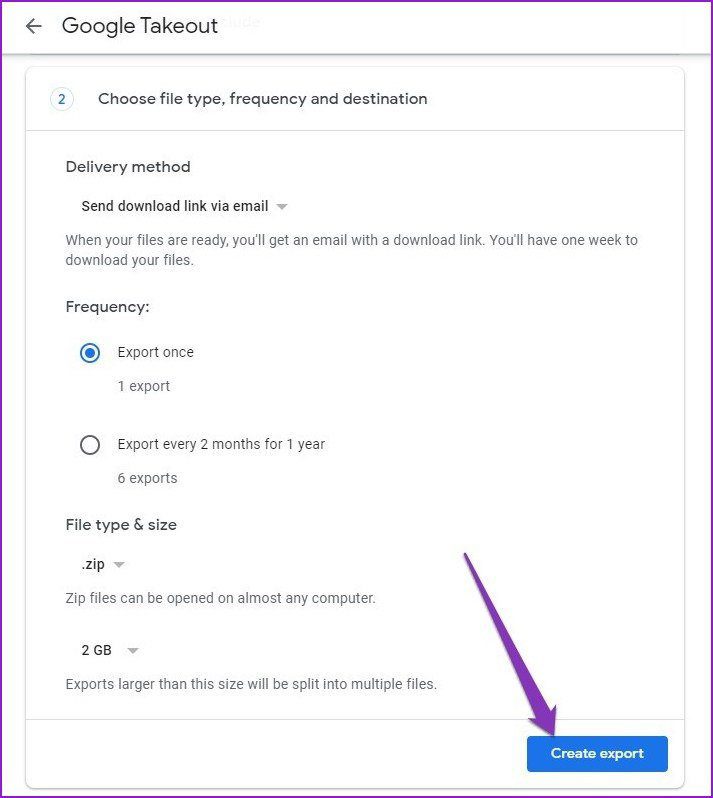
Note: The download process can take a while depending on the size of your Google maps data.
Step 3: Now unzip the downloaded file and open the Location History folder within.
Step 4: Head over to the heat map feature on Location History Visualizer and upload the LocationHistory.json file.
Visit Location History Visualizer
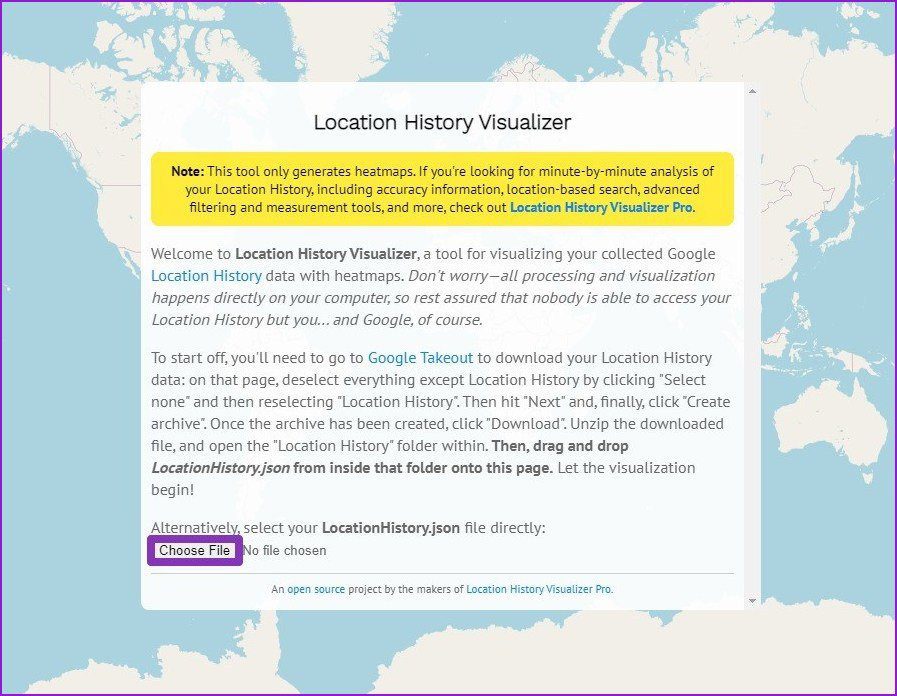
And there you have it. Your own heat map made of your location data. You can navigate the heat map just like Google Maps and take screenshots of it.
A Trip Down Memory Lane
You can revisit old memories by checking out your location history and also helpful to pass on the same route to friends and others. In case you don’t want to leave a trace on Google Maps, you can remove those routes too. Let us know how do you plan to use the Timeline feature in the comments below.
Last updated on 13 July, 2021
The above article may contain affiliate links which help support Guiding Tech. However, it does not affect our editorial integrity. The content remains unbiased and authentic.
DID YOU KNOW

Pankil Shah
Pankil is a Civil Engineer turned freelance writer from Ahmedabad, India. Since his arrival at Guiding Tech in 2021, he delves into the world of how-tos, and troubleshooting guides on Android, iOS, Windows, and the Web at Guiding Tech. When time permits, he also writes at MakeUseOf and Techwiser. Besides his new-found love for mechanical keyboards, he's a disciplined footfall fan and continues to plan his international travels with his wife.
More in Android
How to Get Satellite Image Wallpapers on iPhone, Android

Top 6 Ways to Fix Android RCS Not Working on Your Smartphone
Join the newsletter.
Get Guiding Tech articles delivered to your inbox.
- Help Center
- Google Maps
- Privacy Policy
- Terms of Service
- Submit feedback
Find and improve your location’s accuracy
Google Maps may have trouble finding your location. If the GPS location of your blue dot on the map is inaccurate or missing, you can take steps to help fix the problem.
Tip: These steps will also improve your search results and make them more relevant to you.
Find your current location on the map
- On your computer, open Google Maps .
How Maps finds your current location
Give maps location permission.
To centre the map where you are, you must give Maps permission to find your location.
On macOS, you may need to turn on Location Services for your browser before you can grant Maps permission in your browser:
- To allow for changes, in the bottom left, click the lock.
- Next to 'Enable Location Services', tick the box.
- Next to your browser, tick the box.
- Give Maps location permission in your browser.
Give Maps location permission in your browser
- On your computer, open Chrome and go to Google Maps .
- If you're asked to share your location, choose Allow .
- If the blue dot appears and shows your location, then Maps already has location permission in your browser.
- If there’s a message that says 'Google Maps does not have permission to use your location', continue to the next steps.
- Tick Always allow http://www.google.com to access your location .
- Refresh your browser.
- On your computer, open Firefox and go to Google Maps .
- When asked to share your location, choose Allow or Allow location access .
- You might find 'Show your location' instead.
- If the blue dot appears and shows your location, then Maps already has location permission in your browser.
- On your computer, open Safari and go to Google Maps .
- You should be asked to share your location. Choose Allow .
- On your computer, open Microsoft Edge and go to Google Maps .
- If you’re asked to share your location, chose Allow .
- Click Permissions for this site .
- To the right of 'Location', choose Allow .
More ways to improve location accuracy
If you get an error like 'Your location cannot be determined' or your location is still wrong, here are some steps that you can take:
- Reload your browser (such as Chrome, Firefox or Safari).
- Make sure that you have a strong Internet connection.
- Double-check your browser’s permission settings using the instructions above.
- Restart your computer.
Find your location on other sites & apps
To find your location in Google Maps on other sites and apps, follow the steps above. However, some features will be different:
- You’ll use a different site or app, not Google Maps.
- You must first give location permission to the site or app used, not Google Maps.
- If you open Google Chrome or Safari, you'll only find your location on secure web pages. You'll find 'https' in the address bar.
Was this helpful?
Need more help, try these next steps:.

COMMENTS
Step 1: Open the Google Maps app on your phone and tap on your account circle in the top right corner. Then, select the Your Timeline option from the list. Step 2: Now click on the three-dot menu ...
Give Maps location permission in your browser. On your computer, open Chrome and go to Google Maps. In the bottom right, click My location . If you're asked to share your location, choose Allow. If the blue dot appears and shows your location, then Maps already has location permission in your browser.