How to change tab behavior on iPad

- How to switch to a Compact Tab Bar
- How to set new tabs to open in the background
- How to have Safari close tabs automatically
There are some pretty significant changes to Safari in iPadOS 15, and you can further customize your experience with a few hidden-away settings relating to the Tab Bar. Here's how you can change iPadOS 15 tab behavior.

How to switch to a Compact Tab Bar in Safari for iPadOS 15
You have a couple of options when it comes to your Tab Bar's appearance in iPadOS 15 : Separate or Compact.
Separate takes up more space but offers a more familiar-looking appearance with the address bar displayed above your open tabs.
Compact takes up less space by having your currently viewed tab act as an address bar, meaning you can get more content on screen. Compact also matches the Tab Bar's color to the site you are viewing, effectively extending the page to the edge of your iPad's screen.
- Open your Settings app.
- In the sidebar, scroll down and tap Safari .

- Scroll down and tap Compact Tab Bar .

If you already have Compact Tab Bar selected and didn't like it, you can tap Separate Tab Bar to return to the old way of doing things.
How to set new tabs to open in the background in Safari for iPadOS 15
This feature was already present in earlier versions of iPadOS, but it's another way to fine-tune your Safari experience to your liking in iPadOS 15.
- Scroll down and toggle Open New Tabs in Background to On .

Want every new tab that you open to be front-and-center? Then, set this toggle to the off position.
Master your iPhone in minutes
iMore offers spot-on advice and guidance from our team of experts, with decades of Apple device experience to lean on. Learn more with iMore!
How to have Safari close tabs automatically in iPadOS 15
If you find your iPad soon becomes an unmanageable mess of open tabs, you can have Safari take the hassle out of cleaning that up for you with tabs that close automatically after going unviewed for a set period of time.
- Tap on Close Tabs .
- Select your preferred timeframe .

If you don't want your tabs to close automatically, you can change this setting to Manually to take total control.
All the tabs
If you want the very best iPad experience, the above power-user features are well worth knowing about. Though hidden away in the Settings app, these little tweaks can help you customize your Safari experience to suit your needs and preferences.
Updated April 2022: Updated for iPadOS 15.

Adam Oram is a Senior Writer at iMore. He studied Media at Newcastle University and has been writing about technology since 2013. He previously worked as an Apple Genius and as a Deals Editor at Thrifter. His spare time is spent watching football (both kinds), playing Pokémon games, and eating vegan food. Follow him on Twitter at @adamoram .
iPadOS 18: Rumored features, supported devices, and more
3 features iPadOS 18 needs to make up for another predictable year for iPad software
Want better iPhone photo quality without taking up lots of storage? You’re not using your 48MP camera properly unless you use this HEIF Max tip
Most Popular
- 2 2024 "might be a turning point for Apple" — suppliers look elsewhere as Apple faces "frightening" question with no clear answer
- 3 Apple's entire M4 Mac lineup just leaked — here's where Apple is taking computing next
- 4 You can now play Game Boy games on your iPhone after Apple's App Store changes
- 5 Apple doubles down on 8GB Macs despite calls to increase the base spec ahead of M4 devices
Apple revives dedicated tab bar in Safari on iPad, with compact tabs now entirely optional
Safari’s compact tabs on iPad are now entirely optional, and that’s awesome news—the latest iPadOS beta now defaults to showing a separate row of tabs, just like Safari on your Mac.
STORY HIGHLIGHTS:
- Apple has tweaked the new Safari in iPadOS 15 beta 4
- The usual separate row of tabs is now back, turned on by default
- Optionally, revert to the controversial compact tab interface
- This shows Apple listens when users prove it wrong
iPadOS 15: Safari’s compact tabs vs. dedicated tab bar
The fourth beta of iPadOS 15 brings back Safari’s dedicated tab bar on iPad while making the annoying compact tab redesign entirely optional.
The separate tab bar is now the new default after installing iPadOS 15 beta 4.
A few people who grew accustomed to Apple’s terrible tab experience in prior betas can still activate Apple’s original compact tab bar that merged separate tab and URL bars together.
Apple is continuing to tweak Safari for iPadOS 15. In iPadOS 15 beta 4, the separate tab bar is back, and it's the default setting now. If you want, you can *optionally* enable the new compact tab bar in Settings. Good call. 👍 pic.twitter.com/26GNfeJSyE — Federico Viticci (@viticci) July 27, 2021
If you have the fourth beta of iPadOS 15, you can decide how your tab experience will look like.
Head to the Safari settings and you can switch between the compact tab bar from prior betas and having your tabs live in their own dedicated row from there. On macOS, the separate row of tabs was added in the third macOS Monterey beta.
→ 8 outstanding new iPad features in iPadOS 15
This is the first time Apple has made such a drastic change to Safari’s tab interface in years only to step back from it after hearing negative feedback from testers.
I would be astounded if the new Safari tab UI makes it into the final release of iPadOS or macOS. It’s not better at anything than the previous design, and it’s so much worse to use. It has all the same problems as the ‘tabs on top’ design they scrapped years ago, and then some pic.twitter.com/ftyw6dJvuT — Steve Troughton-Smith (@stroughtonsmith) June 17, 2021
Why has Apple changed its mind regarding Safari tabs?
Apple is clearly addressing criticism that the reimagining of the Safari interface in iOS 15 and iPadOS 15 is just bad design, especially in terms of usability. That being said, however, there’s still more work left to do as the updated tab interface feels a bit rough around the edges.
John Gruber, Daring Fireball :
My big problem with this tab bar—both on Mac and now iPad—is that it’s very hard to see which tab is the current (selected) tab. The visual indication for “selected” is just a very slightly different background tint—whether you’ve got “Show color in tab bar” enabled or not. You can even scroll the current tab out of view. Why is that possible? I don’t see how this is better than the Safari 14 tab bar in any way, and I see a lot of ways that it’s worse.
You can see for yourself how user-unfriendly Apple’s original vision for compact tabs and other usability changes in Safari is by watching our hands-on video, embedded ahead.
Subscribe to iDB on YouTube
Apple will continue testing iPadOS and other updates with its registered developers and public beta testers over the next few weeks. The updates will launch publicly sometime in the fall.
Other Safari changes in iPadOS 15 beta 4
Apple has tweaked other problematic aspects of the new Safari with iPadOS beta 4.
For example, a dedicated Reload button is now again available within Safari’s URL bar. The problem is, the button itself is inexplicably small as a touch target. The Reload command continues to also be available via Safari’s contextual menu (…) in the toolbar.
A button for Reader mode has been re-added to the URL bar in iPadOS 15 beta 4.
Unfortunately, the entire Safari Reader experience continues to be half-baked just as it is in prior betas. For starters, what’s the purpose of barely displaying a Reader button when a page loads only to have it disappear a few seconds later?
True, Reader is still available through the Share menu and by long-pressing the URL bar, but does Apple seriously expect ordinary users to figure all of this out on their own?
I really do appreciate the experimentation, but the new Safari feels like something I’d take to the UI Design Labs at WWDC and they’d push me to use native controls that users expect and already know, have better tap targets, & stop cramming too many things in a small space. https://t.co/hdlhBcOK5Z — Curtis Herbert (@parrots) July 27, 2021
Speaking of which, a Share button is now available via Safari’s tab bar in iPadOS 15 beta 4.
Overhauling Safari on iPad with Monterey-style design we got in the third macOS beta seems like a good idea, but what iPhone? That’s another area ripe for some major rethinking—as noted on Twitter , the Safari toolbar in iOS 15 beta 4 has more than half a dozen touch targets.
I think it’s fair to say there are *8* touch targets, because the left and right sides are effectively previous/next tab buttons. pic.twitter.com/QMqYkmmod3 — John Gruber (@gruber) July 27, 2021
Hey, but at least now you can long-press the URL bar to reveal the “Show Bookmarks” option.
- Buying Guides
3 Ways to Close or Manage Safari Tabs on iPad

- November 15, 2021
If you are an iPhone or iPad user and use Safari for your browsing requirements, then you must be aware of how bad is safari when it comes to managing tabs. Things turn even worse when you use multiwindow or split-screen, as managing all the tabs becomes more difficult. That’s why today I’ll be sharing a few tips to help you manage tabs when using multiwindow on your iPhone or iPad.
Also, Read | 8 Best iOS 15 Safari Tips and Tricks and New Features You Should Know
Ways to Manage Multiple Windows in Safari on iPad
iPadOS allows you to arrange or group multiple safari tabs, for easy and faster surfing, and there are two ways to do so.
2 Ways to Open Safari Tab in Multi Window on iPadOS
If you want to open a safari tab in a multiwindow tab, then can do so by following these steps:

If for some reason, this method doesn’t work, as generally, Safari does experience random glitches, then you use the second method to open multiple tabs in different windows.

- If you chose Split View, the second app appears side-by-side with the current app.

Note: Method 2 works with any app combination on your iPad.
Also, Read | 3 Ways To Make Your iPad Air Fast Like iPad Pro In User Interface
3 Ways to Close Safari Tabs in MultiWindow
There are a few ways to close Safari Tabs when using multiwindow on your iPad. Let’s have a look at them.
Close Any Safari Tab From the Multi Window Screen
Close All Safari Tabs From the Multi Window Screen

Merge All the Safari Tabs Windows Into One Window
You can merge all the Safari Tabs Window into one main window, killing the split or slide window if any.

Also, Read | How to Get Free Unlimited iCloud Storage on iPhone, iPad Temporarily
Wrapping Up
This is how you can manage and close the safari tabs on your iPad. I hope this article cleared the confusion around managing safari tabs and making your browsing experience on Safari a pleasant one.
You can also follow us for instant tech news at Google News or for tips and tricks, smartphones & gadgets reviews, join GadgetsToUse Telegram Group or for the latest review videos subscribe GadgetsToUse Youtube Channel.

Gaurav Sharma
As an editor, Gaurav ensures the delivery of quality-rich, detailed, and accurate content tailored to the right audience. His three years of experience as a reviewer allow him to provide comprehensive evaluations of various consumer gadgets. On the video front, Gaurav serves as a video production manager for both long and short formats and anchors short videos at GadgetsToUse.
Related Topics

How to Use the Community Notes Feature on X
… Read More » How to Use the Community Notes Feature on X

2 Ways to Cancel Your Midjourney Subscription
… Read More » 2 Ways to Cancel Your Midjourney Subscription

3 Ways to Record a Time Lapse Video With Screen off on Android
… Read More » 3 Ways to Record a Time Lapse Video With Screen off on Android
How to set your iPad to automatically close tabs in Safari, in 4 steps
- You can automatically close tabs on your iPad with iPadOS 13 or later through the Settings app, where you can configure Safari to automatically close open tabs after a period of time, such as after a day, week, or month.
- By default, your iPad's Safari browser never closes tabs, so you'll probably accumulate a lot of open tabs over time.
- If you prefer, you can leave the tab control set to manual, but you'll have to close unwanted tabs yourself.
- Visit Business Insider's homepage for more stories.
One of the mundane inconveniences of using Safari on your iPad is that open tabs tend to accumulate. If you use Safari often, it's likely that right now you have a veritable rat's nest of a dozen or more tabs open in your iPad's browser.
However, starting in iPadOS 13, you can configure your iPad to automatically close tabs in Safari after a period of time. Here's how.
Check out the products mentioned in this article:
Ipad (from $329.99 at best buy), how to automatically close tabs on your ipad.
1. Start the Settings app.
2. Tap "Safari."
3. Tap "Close Tabs."
4. On the Close Tabs page, you can choose how frequently you want tabs to be automatically closed. You can select "After One Day," "After One Week," or "After One Month."
If you prefer, you can leave the setting on "Manually," in which case tabs will never close on their own — meaning that you will need to close unwanted tabs yourself.
Related coverage from How To Do Everything: Tech :
How to change the notification sound on your ipad for built-in apps and alerts, how to mirror your ipad's screen onto a roku, to watch videos and view pictures on a tv screen, how to adjust the brightness on your ipad or enable auto-brightness, 'why is my ipad screen black': 3 ways to troubleshoot your ipad if the screen is unresponsive, how to find the imei and serial number on an ipad in 4 different ways.
Insider Inc. receives a commission when you buy through our links.
Watch: A professional race car driver turned the luxurious Porsche 911 into a rugged off-road sports car
- Main content
- PRO Courses Guides New Tech Help Pro Expert Videos About wikiHow Pro Upgrade Sign In
- EDIT Edit this Article
- EXPLORE Tech Help Pro About Us Random Article Quizzes Request a New Article Community Dashboard This Or That Game Popular Categories Arts and Entertainment Artwork Books Movies Computers and Electronics Computers Phone Skills Technology Hacks Health Men's Health Mental Health Women's Health Relationships Dating Love Relationship Issues Hobbies and Crafts Crafts Drawing Games Education & Communication Communication Skills Personal Development Studying Personal Care and Style Fashion Hair Care Personal Hygiene Youth Personal Care School Stuff Dating All Categories Arts and Entertainment Finance and Business Home and Garden Relationship Quizzes Cars & Other Vehicles Food and Entertaining Personal Care and Style Sports and Fitness Computers and Electronics Health Pets and Animals Travel Education & Communication Hobbies and Crafts Philosophy and Religion Work World Family Life Holidays and Traditions Relationships Youth
- Browse Articles
- Learn Something New
- Quizzes Hot
- This Or That Game New
- Train Your Brain
- Explore More
- Support wikiHow
- About wikiHow
- Log in / Sign up
- Computers and Electronics
- Internet Browsers
- Safari Browser
Simple Steps to Change Your General Preferences on Safari
Last Updated: June 13, 2023 Fact Checked
This article was co-authored by wikiHow staff writer, Darlene Antonelli, MA . Darlene Antonelli is a Technology Writer and Editor for wikiHow. Darlene has experience teaching college courses, writing technology-related articles, and working hands-on in the technology field. She earned an MA in Writing from Rowan University in 2012 and wrote her thesis on online communities and the personalities curated in such communities. This article has been fact-checked, ensuring the accuracy of any cited facts and confirming the authority of its sources. This article has been viewed 224,272 times. Learn more...
Do you want to increase your privacy on Safari or maybe make it more useful for you? To change your Safari preferences on an iOS device, you'll need to use your device's Settings app instead of the Safari app. On macOS computers, you can change the settings from Safari's Preferences menu. Both the mobile and the desktop share some similar settings, but the desktop version has many more options available.
Things You Should Know
- On an iPhone or iPad, go to your device's Settings app to change the general preferences of Safari.
- On Mac, change your general preferences in "Safari > Settings > General."
- Changing things like your search engine and preventing trackers will provide you with more privacy and increase your security.

- This method works for iPhone, iPad, and iPod Touch.
- Forgot your iPhone's password? You can reset it in 2 ways !

- The "Search Engine Suggestions" toggle will provide search suggestions from your default search engine as you type.
- The "Safari Suggestions" toggle provides search suggestions curated by Apple.

- Use the Safari app instead of Settings to change how your Home page behaves .

- You can enable or disable various search preferences underneath this menu, including using Safari Suggestions.

Community Q&A
You Might Also Like

- ↑ https://support.apple.com/en-us/HT201265
- ↑ https://support.apple.com/guide/iphone/customize-your-safari-settings-iphb3100d149/ios
- ↑ http://www.macworld.com/article/2042451/exploring-safaris-preferences.html
About This Article

- Send fan mail to authors
Is this article up to date?

Featured Articles

Trending Articles

Watch Articles

- Terms of Use
- Privacy Policy
- Do Not Sell or Share My Info
- Not Selling Info
Keep up with the latest tech with wikiHow's free Tech Help Newsletter
We explain and teach technology, solve tech problems and help you make gadget buying decisions.
How to View Safari Tabs From Another iPhone or iPad
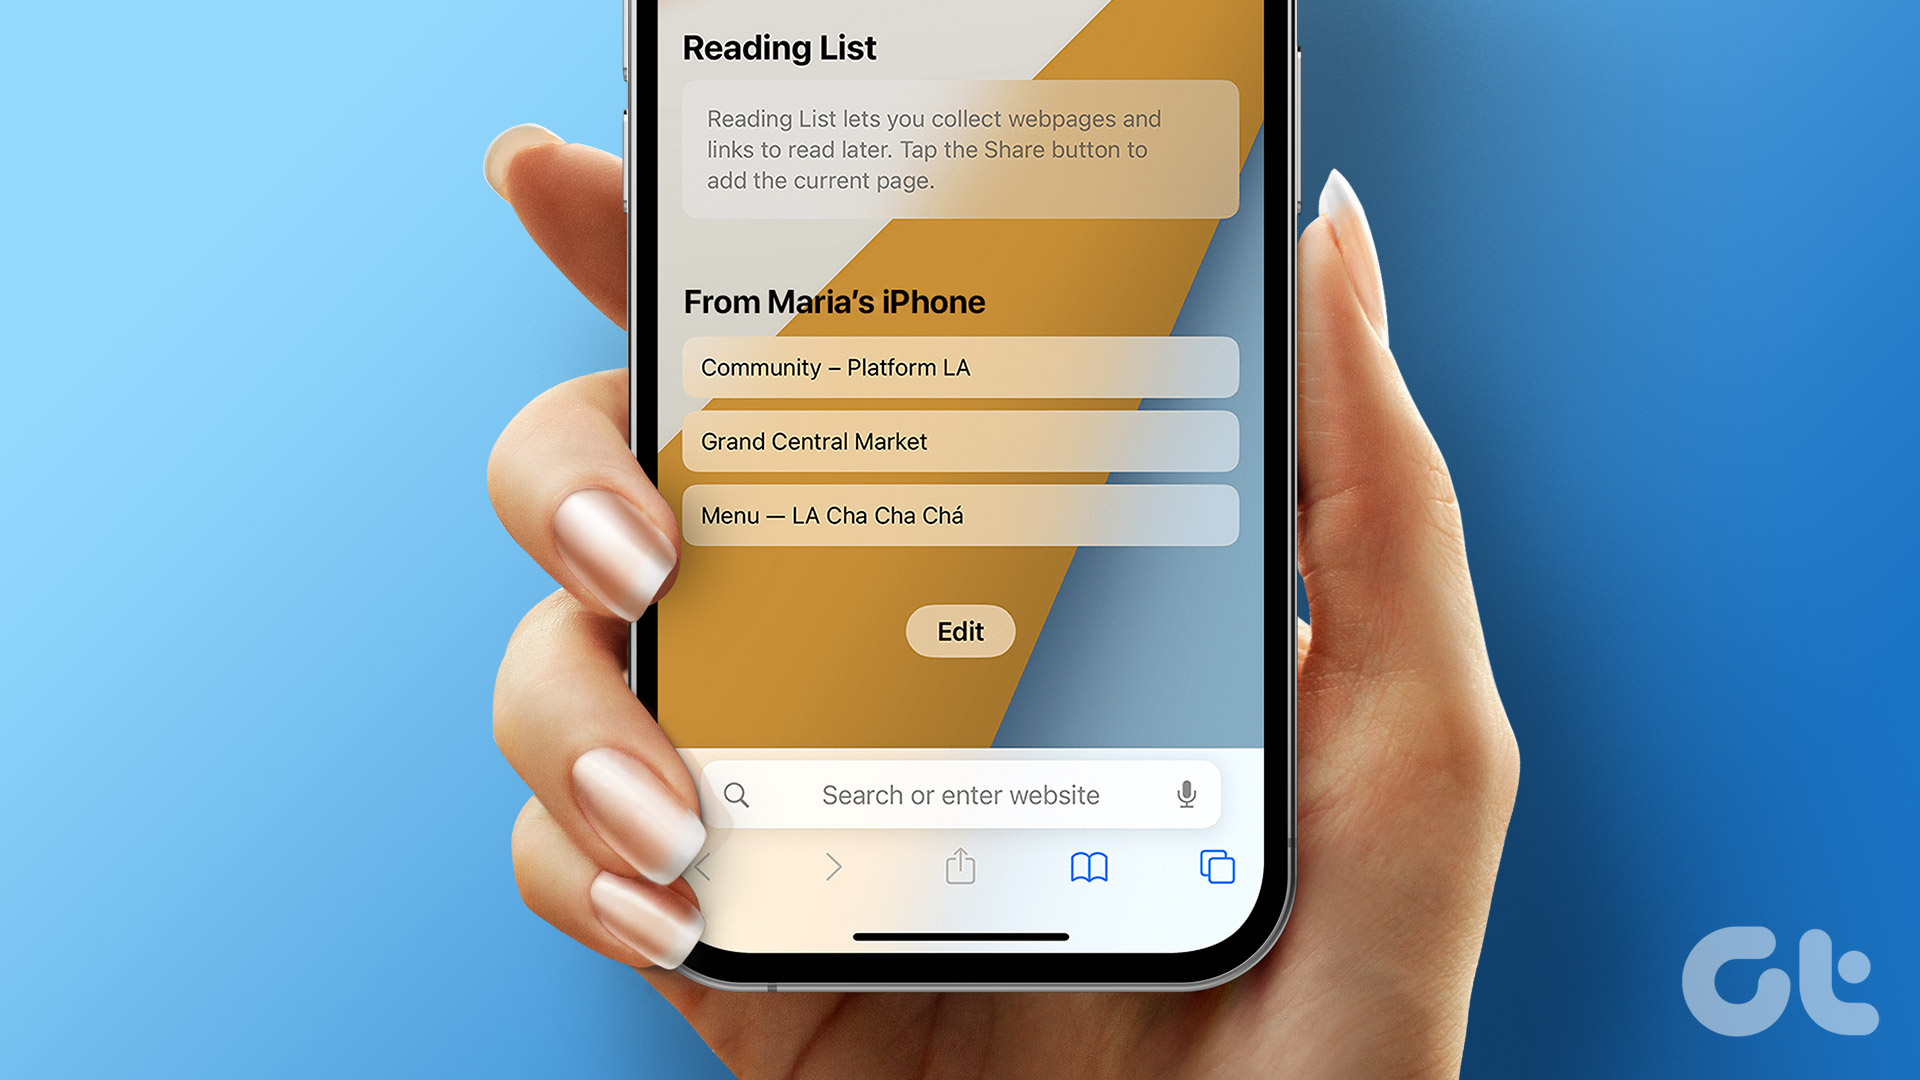
If you have multiple Apple devices, for example, an iPhone and an iPad, there is a high likelihood that you have different apps and activities ongoing with them. However, this does not mean those activities are restricted to the devices they originate from. For example, with the Safari app, Apple has a feature that lets you keep tabs and tab groups updated across devices. That is, if you are using Safari on your iPad and have tabs open, you can also view these Safari tabs on your iPhone.
However, Apple devices users need to satisfy certain conditions: signing in to iCloud with the same Apple ID across devices. Also, you’ll need to enable iCloud tabs on the Safari start page and in iCloud Settings. Here’s how to do so:
How to Sign In With Your Apple ID
To use most Apple services such as the App Store, Apple Music, iCloud, etc., Apple users must sign in with their Apple IDs. In most cases, this is usually done during the setup of the Apple device. If you aren’t signed in during set up, here’s how you can sign in from Settings.
Step 1: Launch the Settings app from your iPhone or iPad.

Step 2: Tap Sign in to your iPhone at the top of the page.

Step 3: Enter your Apple ID and password to complete sign-in.

When you scroll to the bottom of the Apple ID page, you can see the option to sign out.
How to Enable iCloud Safari Settings
A second condition that your device needs to meet view your Safari tabs across Apple devices is turning on Safari in your iCloud settings. This ensures your Safari tabs get synced to iCloud, making them easily accessible from any location. Here’s how to do so:
Step 2: Tap your Apple ID at the top of the page.

Step 3: Tap the iCloud option.

Step 4: Under the Apps Using iCloud setting, tap Show All.

Step 5: Scroll down to the Safari option and tap the toggle beside it.

Step 6: Tap Merge when asked what you want to do with your iPhone’s existing local Safari data.

How to Enable iCloud Tabs From the Safari Start Page
With iCloud Tabs turned on in the Safari Settings , your Safari tabs are stored in the cloud. However, to view the open tabs across your iPhone or iPad, you also need to enable iCloud tabs. The option is available on the Safari start page. Here’s how to do so:
Step 1: Tap the Safari app on your iPhone or iPad’s home screen.
Step 2: Scroll to the bottom of the Safari tab and tap Edit to view the Customize Start Page.

Step 3: Tap the toggle beside the iCloud tabs option to enable it.

By tapping the toggle beside the iCloud tabs option, Safari will show open tabs from your other Apple devices.
How to View Open Tabs on Other Apple Devices
With iCloud tabs and iCloud sync enabled on Safari, here’s how to view open tabs across your Apple devices:
Step 2: Tap the tab icon on Safari.

Step 3: Tap the + sign to open the Safari Start Page.
Step 4: Scroll to the bottom of the Safari Start Page, and you’ll need to see the name of your other Apple device.

Step 5: Tap Show All to view all open tabs.
How to Close Open Tabs on Other Apple Devices
Apart from viewing the open tabs across your Apple devices, you can also close them. Here’s how to do so:
Step 6: Touch and hold down the tab to launch a menu.
Step 7: Tap Close from the menu to close the tab.

Clearing Safari Browsing History
With iCloud sync turned on, you can access all your browsing history across all your devices. At the same time, you can clear the browsing history of your individual devices or all your devices simultaneously.
Was this helpful?
Last updated on 31 May, 2023
The above article may contain affiliate links which help support Guiding Tech. However, it does not affect our editorial integrity. The content remains unbiased and authentic.
Leave a Reply Cancel reply
Your email address will not be published. Required fields are marked *

The article above may contain affiliate links which help support Guiding Tech. The content remains unbiased and authentic and will never affect our editorial integrity.
DID YOU KNOW

Maria Victoria
Maria is a Content Writer with a keen interest in Technology and Productivity Tools. Her articles can be found on sites such as Onlinetivity and Delesign. Outside of work, you can find her mini-blogging about her life on social media.
More in iOS

How to Check the Temperature of Your iPhone

What Does SOS Only Mean on iPhone and 11 Ways to Fix It
Join the newsletter.
Get Guiding Tech articles delivered to your inbox.
- a. Send us an email
- b. Anonymous form
- Buyer's Guide
- Upcoming Products
- Tips / Contact Us
- Podcast Instagram Facebook Twitter Mastodon YouTube Notifications RSS Newsletter
Disappearing Safari Tabs on iPhone or iPad? How to Find Them
Every so often, a seemingly small bug in Apple's operating systems survives the company's annual OS launches and continues to cause users huge frustration from one software update to the next.

While there isn't an accepted solution to the problem of disappearing tabs, there are cases where it might seem that your tabs are gone, when in fact they are just hidden from view. Here are some ways that you may be able to get them back or stop them from disappearing in the first place.
Reveal Hidden Tabs
On iPadOS, for example, if you press and hold the Show Tab Overview button (four squares in a quadrant) in the top-right corner of the Safari window, this will reveal a dropdown menu that includes an option to Merge All Windows .

Reveal the Shelf
Another action worth trying on iPadOS is pressing and holding the Safari icon in the Dock or on the Home Screen and selecting Show All Windows from the popup menu that appears.

Recently Closed Tabs
If you have an inkling that some of the tabs you're missing have been inadvertently closed, you can always use the Recently Closed Tabs option to re-open them. All you have to do is open up the tab view in Safari and long press on the "+" icon to get a look at all of the tabs that you've recently closed.
Turn Off Auto-Close Tabs
If you still haven't been able to find some of your tabs, make sure that Safari isn't closing them after a certain duration on your behalf: Open Settings , tap through to Safari -> Close Tabs and ensure that Manually is selected.

Bookmark All Open Tabs
If the above suggestions haven't worked for you, there is a workaround: Consider bookmarking your open tabs after each browsing session. This might sound like more hassle than it's worth, but since iOS 13 Apple has included a one-tap option to just that.

A popup menu will appear at the on the screen from which you can select Add Bookmarks for X Tabs , the X being the number of tabs open.
Once you've tapped this option, you'll be asked to save the tabs in a new bookmarks folder (remember to give it a recognizable name). Alternately, you can choose a location from the existing folder list in which to save the tabs.

To access your bookmarks in Safari at any time, simply tap the Bookmarks icon in the main browsing interface or the sidebar to reveal all of your saved favorites and folders. Press and hold on the folder of bookmarks and select Open in New Tabs , or alternatively, Open in Tab Group if you want them grouped.
Get weekly top MacRumors stories in your inbox.
Popular Stories

iOS 18 Will Add These New Features to Your iPhone

NES Emulator for iPhone and iPad Now Available on App Store [Removed]

Apple Removes Game Boy Emulator iGBA From App Store Due to Spam and Copyright Violations

Delta Game Emulator Now Available From App Store on iPhone
Game boy emulator for iphone now available in app store following rule change [removed].

All iPhone 16 Models to Feature Action Button, But Usefulness Debated
Next article.

Our comprehensive guide highlighting every major new addition in iOS 17, plus how-tos that walk you through using the new features.

App Store changes for the EU, new emoji, Podcasts transcripts, and more.

Get the most out your iPhone 15 with our complete guide to all the new features.
A deep dive into new features in macOS Sonoma, big and small.

Revamped models with OLED displays, M3 chip, and redesigned Magic Keyboard accessory.

Updated 10.9-inch model and new 12.9-inch model, M2 chip expected.

Apple's annual Worldwide Developers Conference will kick off with a keynote on June 10.

Expected to see new AI-focused features and more. Preview coming at WWDC in June with public release in September.
Other Stories

11 hours ago by MacRumors Staff

1 day ago by MacRumors Staff

3 days ago by MacRumors Staff

5 days ago by MacRumors Staff

How To Sync Safari Tabs Across Devices

- Software & Applications
- Browsers & Extensions

Introduction
Safari, Apple's native web browser, offers a seamless browsing experience across all your Apple devices. One of its most convenient features is the ability to sync tabs, allowing you to access the same webpages on your Mac, iPhone, and iPad effortlessly. Whether you're researching a topic on your Mac and want to continue reading on your iPhone while on the go, or you simply want to pick up where you left off on your iPad, Safari's tab syncing functionality ensures a smooth transition between devices.
In this comprehensive guide, we'll delve into the intricacies of syncing Safari tabs across your Apple devices. From setting up iCloud for Safari to troubleshooting common sync issues, you'll gain a thorough understanding of how to make the most of this convenient feature. So, whether you're a seasoned Safari user or just getting started with Apple's ecosystem, this guide will equip you with the knowledge and tools to seamlessly sync your browsing experience across all your devices. Let's dive in and unlock the full potential of Safari's tab syncing capabilities.
Setting Up iCloud for Safari
To begin harnessing the power of Safari's tab syncing feature, you need to ensure that iCloud is set up to sync Safari data across your devices. This involves enabling Safari within iCloud settings to seamlessly share your browsing history, bookmarks, and open tabs across your Apple devices.
Here's how to set up iCloud for Safari:
- Open System Preferences and click on Apple ID.
- Select iCloud from the sidebar.
- Ensure that the Safari option is checked. This allows Safari to sync your browsing data across your devices.
On iPhone and iPad:
- Open the Settings app and tap on your Apple ID at the top.
- Select iCloud and ensure that Safari is toggled on. This enables Safari to sync your browsing data across your iPhone and iPad.
Once iCloud is set up to sync Safari data, you're ready to seamlessly access your browsing history, bookmarks, and open tabs across all your Apple devices. This ensures a cohesive browsing experience, allowing you to effortlessly transition between devices without losing track of your open tabs and saved webpages.
By following these simple steps to set up iCloud for Safari, you'll unlock the full potential of Safari's tab syncing capabilities, enhancing your browsing experience and productivity across your Mac, iPhone, and iPad.
Syncing Safari Tabs on Mac
Syncing Safari tabs on your Mac is a straightforward process that allows you to seamlessly access open tabs from your other Apple devices. Whether you're researching a topic on your iPhone or iPad and want to continue on your Mac, or you simply want to pick up where you left off, Safari's tab syncing feature ensures a smooth transition between devices.
To sync Safari tabs on your Mac, follow these simple steps:
Ensure iCloud Sync is Enabled :
- Open Safari on your Mac and click on "Safari" in the top menu bar.
- Select "Preferences" and navigate to the "General" tab.
- Ensure that the "Safari" option is checked under iCloud preferences. This allows Safari to sync your browsing data, including open tabs, with your other Apple devices.
Accessing Synced Tabs :
- Once iCloud sync is enabled, you can access your synced tabs by clicking on the "Show All Tabs" button in the Safari toolbar. This button looks like two overlapping squares and is located on the right side of the Safari toolbar.
- Clicking on "Show All Tabs" will display a grid of all open tabs from your other synced devices, allowing you to seamlessly pick up where you left off.
Continuity and Handoff :
- If you have multiple Apple devices nearby, you can take advantage of Continuity and Handoff features to seamlessly transition your browsing session from one device to another.
- For example, if you're viewing a webpage on your iPhone and want to continue reading on your Mac, simply click on the Safari icon in the Dock of your Mac to instantly open the same webpage, thanks to the Handoff feature.
By following these steps, you can effortlessly sync Safari tabs on your Mac, ensuring that your browsing experience remains consistent across all your Apple devices. Whether you're working on a project, conducting research, or simply enjoying leisurely browsing, Safari's tab syncing feature enhances your productivity and convenience by seamlessly integrating your browsing experience across your Mac, iPhone, and iPad.
Syncing Safari Tabs on iPhone and iPad
Syncing Safari tabs on your iPhone and iPad allows for a seamless browsing experience across all your Apple devices. Whether you're researching a topic on your Mac and want to continue reading on your iPhone while on the go, or you simply want to pick up where you left off on your iPad, Safari's tab syncing functionality ensures a smooth transition between devices.
To sync Safari tabs on your iPhone and iPad, follow these simple steps:
- Open the Settings app on your iPhone or iPad and tap on your Apple ID at the top.
- Select "iCloud" and ensure that Safari is toggled on. This enables Safari to sync your browsing data, including open tabs, across your iPhone and iPad.
- Once iCloud sync is enabled, you can access your synced tabs by tapping the "Tabs" button in Safari. This button is located in the lower-right corner of the Safari interface and displays the number of open tabs.
- Tapping on the "Tabs" button will reveal a list of all open tabs from your other synced devices, allowing you to seamlessly continue your browsing session.
Handoff and Continuity :
- Apple's Handoff feature allows for a seamless transition of your browsing session from one device to another. For instance, if you're viewing a webpage on your iPad and want to continue reading on your iPhone, simply swipe up from the bottom of the iPhone's lock screen to open the same webpage, thanks to the Handoff feature.
By following these steps, you can effortlessly sync Safari tabs on your iPhone and iPad, ensuring that your browsing experience remains consistent across all your Apple devices. Whether you're working on a project, conducting research, or simply enjoying leisurely browsing, Safari's tab syncing feature enhances your productivity and convenience by seamlessly integrating your browsing experience across your Mac, iPhone, and iPad.
This seamless integration of browsing data across devices not only saves time but also ensures that you can easily pick up where you left off, regardless of which Apple device you are using. With Safari's tab syncing feature, your browsing experience becomes more fluid and adaptable to your dynamic lifestyle, allowing you to transition between devices without missing a beat.
Troubleshooting Sync Issues
Despite the seamless nature of Safari's tab syncing feature, occasional sync issues may arise, disrupting the continuity of your browsing experience across devices. When faced with sync issues, it's essential to troubleshoot and resolve them promptly to ensure that your browsing data remains consistent and accessible across all your Apple devices.
Here are some common troubleshooting steps to address sync issues with Safari tabs:
Check iCloud Status
Ensure that iCloud is functioning properly and that there are no service disruptions. You can check the status of iCloud services on Apple's System Status page. If there are any reported issues with iCloud, it's advisable to wait until the service is restored before attempting to troubleshoot further.
Verify iCloud Settings
Double-check the iCloud settings on all your devices to ensure that Safari syncing is enabled. Sometimes, settings may inadvertently change or become disabled, leading to sync issues. By verifying that Safari syncing is enabled within iCloud settings, you can rule out any potential configuration issues.
Restart Devices
A simple yet effective troubleshooting step is to restart the devices experiencing sync issues. This can help refresh the connection to iCloud and resolve any temporary glitches that may be impeding the syncing process.
Update Software
Ensure that your Mac, iPhone, and iPad are running the latest version of their respective operating systems. Software updates often include bug fixes and improvements that can address sync-related issues, so keeping your devices up to date is crucial for maintaining seamless sync functionality.
Clear Safari Cache
On your Mac, clearing the cache in Safari can help resolve sync issues related to browsing data. Navigate to Safari's preferences, select the "Privacy" tab, and click on "Manage Website Data" to clear the cache. On iPhone and iPad, you can clear Safari's cache by going to Settings > Safari > Clear History and Website Data.
Sign Out and Sign Back In
If sync issues persist, signing out of iCloud on the affected devices and signing back in can sometimes resolve underlying synchronization problems. This process can reestablish the connection to iCloud and refresh the syncing mechanism.
By following these troubleshooting steps, you can effectively address sync issues with Safari tabs and restore the seamless syncing functionality across your Mac, iPhone, and iPad. Maintaining consistent and reliable sync capabilities ensures that your browsing experience remains uninterrupted, allowing you to seamlessly transition between devices without losing track of your open tabs and saved webpages.
In conclusion, Safari's tab syncing feature, powered by iCloud, offers a seamless and integrated browsing experience across all your Apple devices. By setting up iCloud for Safari and enabling tab syncing, users can effortlessly access their browsing history, bookmarks, and open tabs on their Mac, iPhone, and iPad. This level of synchronization not only enhances productivity but also ensures a consistent browsing experience, allowing users to seamlessly transition between devices without losing track of their open tabs and saved webpages.
The convenience of syncing Safari tabs becomes particularly evident in various scenarios. Whether you're conducting research, working on a project, or simply enjoying leisurely browsing, the ability to seamlessly continue your browsing session from one device to another adds a layer of adaptability to your dynamic lifestyle. For instance, you can start reading an article on your Mac, continue on your iPhone while commuting, and pick up where you left off on your iPad when you arrive home, all without missing a beat.
Furthermore, the Handoff and Continuity features enrich the tab syncing experience, allowing for a smooth transition of browsing sessions from one device to another. This seamless integration of browsing data across devices not only saves time but also ensures that users can easily pick up where they left off, regardless of which Apple device they are using.
However, despite the robust nature of Safari's tab syncing, occasional sync issues may arise. In such cases, troubleshooting steps such as verifying iCloud settings, restarting devices, updating software, and clearing Safari cache can help resolve any synchronization hiccups, ensuring that the browsing experience remains consistent and uninterrupted.
In essence, Safari's tab syncing feature, when utilized in conjunction with iCloud, exemplifies the seamless integration of browsing data across devices, reflecting Apple's commitment to enhancing user experience within its ecosystem. Whether for work, study, or leisure, the ability to seamlessly transition between devices while maintaining access to your browsing history and open tabs underscores the adaptability and convenience that Safari's tab syncing brings to users' digital lives.
Leave a Reply Cancel reply
Your email address will not be published. Required fields are marked *
Save my name, email, and website in this browser for the next time I comment.
- Crowdfunding
- Cryptocurrency
- Digital Banking
- Digital Payments
- Investments
- Console Gaming
- Mobile Gaming
- VR/AR Gaming
- Gadget Usage
- Gaming Tips
- Online Safety
- Software Tutorials
- Tech Setup & Troubleshooting
- Buyer’s Guides
- Comparative Analysis
- Gadget Reviews
- Service Reviews
- Software Reviews
- Mobile Devices
- PCs & Laptops
- Smart Home Gadgets
- Content Creation Tools
- Digital Photography
- Video & Music Streaming
- Online Security
- Online Services
- Web Hosting
- WiFi & Ethernet
- Browsers & Extensions
- Communication Platforms
- Operating Systems
- Productivity Tools
- AI & Machine Learning
- Cybersecurity
- Emerging Tech
- IoT & Smart Devices
- Virtual & Augmented Reality
- Latest News
- AI Developments
- Fintech Updates
- Gaming News
- New Product Launches
- AI Writing How Its Changing the Way We Create Content
- How to Find the Best Midjourney Alternative in 2024 A Guide to AI Anime Generators
Related Post
Ai writing: how it’s changing the way we create content, unleashing young geniuses: how lingokids makes learning a blast, 10 best ai math solvers for instant homework solutions, 10 best ai homework helper tools to get instant homework help, 10 best ai humanizers to humanize ai text with ease, sla network: benefits, advantages, satisfaction of both parties to the contract, related posts.

Why Do My Tabs In Safari Disappear

Why Does Safari Keep Opening Closed Tabs

How To Unlink Safari From Mac And IPhone

How To Reopen Closed Tab On Safari IPhone

How To Save Passwords In Safari

Why Did My Bookmarks Disappear In Safari

How To Look Up Safari History

How To Make Safari Save Passwords
Recent stories.

How to Find the Best Midjourney Alternative in 2024: A Guide to AI Anime Generators

How to Know When it’s the Right Time to Buy Bitcoin

How to Sell Counter-Strike 2 Skins Instantly? A Comprehensive Guide

10 Proven Ways For Online Gamers To Avoid Cyber Attacks And Scams

- Privacy Overview
- Strictly Necessary Cookies
This website uses cookies so that we can provide you with the best user experience possible. Cookie information is stored in your browser and performs functions such as recognising you when you return to our website and helping our team to understand which sections of the website you find most interesting and useful.
Strictly Necessary Cookie should be enabled at all times so that we can save your preferences for cookie settings.
If you disable this cookie, we will not be able to save your preferences. This means that every time you visit this website you will need to enable or disable cookies again.
You are using an outdated browser. Please upgrade your browser to improve your experience.
How to make the most of your Mac's trackpad

The Mac's trackpad is great, but it can be better.

One of the best features of any Apple device is multi-touch. With a MacBook or a Magic Trackpad, multi-touch can be used to speed up and simplify all sorts of processes across your daily Mac usage. However, there are a few ways you might want to customize your Mac's trackpad to get the most out of its multi-touch capabilities.
Modifying your trackpad's settings in System Settings
The simplest way to customize your Mac's trackpad is, of course, in the macOS System Settings. Doing so only requires a few clicks to find your way to the correct settings menu.

- Open System Settings .
- Search for or click on Trackpad .
Once you've made your to the trackpad settings menu, you'll be met with a range of options to modify your trackpad experience. These settings include sensitivity, haptic feedback, scroll direction, and enabling tap to click, as well as a list of extra multi-touch gestures that include:
- Zooming in and out
- Swiping between pages
- Swiping between full-screen applications
- Opening Notification Center
- Opening Mission Control
- Opening App Expose
- Opening Launchpad
- Showing the Desktop
With these settings alone, you can add a lot of extra utility to your trackpad. However, you don't have to stop at the settings offered in System Settings.
Customizing your trackpad with third-party apps
There are a few third-party apps that allow you to do a little more with your Mac's trackpad, but by and far the best out of the pack is BetterTouchTool . BTT is a paid app that allows you to add a range of custom inputs to your Mac's trackpad, as well as modify other input devices, such as the MacBook Pro Touch Bar .

Setting up inputs in BTT is as simple as selecting a gesture, and then selecting an action to go with that gesture. You can even go so far as to create custom gestures in BTT. With these custom inputs, you can truly add a whole new level of customization to your trackpad.
A BTT License starts at $10, but a generous 45-day trial period is offered for those who wish to try out the app before committing to a purchase.
By utilizing the Mac's built-in trackpad setting as well as third-party apps such as BTT, you can enhance the usefulness of your Mac's already useful trackpad.
Sponsored Content

Clean junk files from your Mac with Intego Washing Machine X9
Top stories.

Apple Notes in iOS 18 looks to up the ante with Microsoft OneNote

Game emulator Delta arrives on App Store after controversies

Apple's iOS 18 AI will be on-device preserving privacy, and not server-side

Apple wants to make grooved keys to stop nasty finger oil transfer to MacBook Pro screens

When to expect every Mac to get the AI-based M4 processor
Featured deals.

Lowest price: Apple's M3 MacBook Air 16GB RAM, 512GB SSD, 10C GPU drops to $1,349
Latest comparisons.

M3 15-inch MacBook Air vs M3 14-inch MacBook Pro — Ultimate buyer's guide

M3 MacBook Air vs M1 MacBook Air — Compared

M3 MacBook Air vs M2 MacBook Air — Compared
Latest news.

iPhone 17 Plus display might be a hair smaller than the iPhone 16 Plus
Apple may make a controversial change, with a new rumor claiming that the size of the iPhone 17 Plus screen could shrink a bit, when compared to iPhone 16 Plus.

First third party App Store in the EU is live
Following changes in iOS 17.4 and legislation allowing them, the first new alternative app store has launched in the EU, that promises to help distribute "indie" apps at a low-cost yearly fee.

Following controversy over the weekend, the Delta game emulator has been made available in the App Store, for potential users outside of the European Union.

All of the specs of the iPhone SE 4 may have just been leaked
A leak that is chiefly rounding up previous rumors about the iPhone SE 4 has added that it will have AI-based camera features, and contrary to expectations, will resemble the iPhone 13 more than the iPhone 14.

The 'For All Mankind' universe is about to get a whole lot bigger
Apple TV+ hit "For All Mankind" has been renewed for a fifth season, and a spin-off is also going back to the beginning for a new look at the Soviet space race.

How to make Apple Music more private by turning off 'Discoverable by Nearby Contacts'
Apple Music has a setting that automatically opts users into sharing your musical tastes with contacts by default. Here's what the problem is, and how to keep what you listen to a bit more private.

From iPhones to Apple Watch, Apple fans keep showing broad device adoption
A considerable segment of Apple's customer base own more than one of the company's products, and their loyalty is a better indicator of the company's success than just numbers.

Amazon's latest Apple deals make perfect Mother's Day gifts (and prices start at just $24)
Mother's Day is Sunday, May 12, 2024 and that means it's time to start picking out the perfect gift for Mom. With Amazon's Apple deals that offer prices as low as $24, these gift ideas won't break the bank, while still treating Mom to a wonderful surprise.

How to organize Safari tabs using tab groups in iPadOS 17
Safari tab groups have been in iPadOS for several years, and can really help you organize pages you've browsed. Here's how to use them in iPadOS 17.

How to add a Quick Link for locations in Apple Maps in macOS
Apple Maps on macOS allows you to add Quick Links to locations in the sidebar for easier access. Here's how to add the shortcuts.
Latest Videos

The best game controllers for iPhone, iPad, Mac, and Apple TV
Latest reviews.

Ugreen DXP8800 Plus network attached storage review: Good hardware, beta software

Espresso 17 Pro review: Magnetic & modular portable Mac monitor

Journey Loc8 MagSafe Finder Wallet review: an all-in-one Find My wallet

{{ title }}
{{ summary }}
How-To Geek
How to move safari tabs between iphone, ipad, and mac.
Shifted to the Mac and want to open that web page you were just browsing on your iPad? Here's how you can do this quickly move Safari tabs between all your Apple devices!
Quick Links
Use handoff to move safari tabs, use icloud tabs to move safari tabs, use airdrop to move safari tabs.
If you routinely switch between your iPhone, iPad, and Mac, you might want to move web pages from one device to another. Instead of using the History or Reading List features, try these seamless methods to move Safari tabs between Apple devices.
Related: How to Copy URLs of All Open Tabs in Safari
Handoff is Apple's feature for seamlessly moving a task from one Apple device to another. It works for many apps, including Safari.
First, ensure that Handoff is enabled on your devices. From there, launch the Safari browser and then open the website on the primary device. This can be your iPhone, iPad, or Mac. Ensure that your device doesn't go to sleep or else the feature won't be able to hand the tab over to the secondary Apple device.
Now, let's move over to the device where you want to open the Safari tab.
Related: How to Set Up and Use Handoff on Your iPhone and iPad
Handoff Tabs to iPhone
If you have a newer iPhone with the Home bar, swipe up from the bottom of the screen and hold for a second for the App Switcher to appear. If you're using an older iPhone, double-press on the Home button.
At the bottom of the screen, you'll see a "Safari" bar with the device name where the tab is open. Tap on it to instantly open the web page in Safari on your iPhone.
Handoff Tabs to iPad and Mac
When it comes to the Mac and the iPad, the handoff process works using the Dock. On your Mac, you'll see a new Safari icon appear in a separate section at the beginning of the Dock. When you hover over it, it will show you the device where the Safari tab is open.
Click on the icon to instantly open the tab in Safari on your Mac.
On your Mac, this feature is browser-agnostic. Even if you've set your default browser to Chrome or Firefox, this feature will still work.
For your iPad, you'll find the "Safari" icon at the right edge of the Dock , with a little badge at the top-right corner of the icon showing the source device. Tap on it to open the web page in Safari.
The Handoff feature is great if you have multiple Apple devices handy. But what if you want to open a website that you were looking at a couple of days ago on one of your devices without having to pick it up.
This is where the iCloud Tabs feature comes in. As long as all your devices are using the same Apple ID and you've enabled iCloud sync for Safari, you can use the iCloud Tabs feature.
iCloud Tabs let you pick up your browsing history where you left off. The feature resides inside the Safari tab switcher.
On your iPhone or iPad, open the "Safari" app and tap on the Tabs button from the toolbar.
Here, you'll first see a list of all open tabs. Swipe to the bottom of the screen, and you'll now see different sections for all of the devices connected to your Apple ID, with the respective tabs that are currently open on that device. Browse around and tap on a page to open it.
On your Mac, click on the Tabs button in the top-right corner.
Here, scroll to the bottom of the screen to find all your devices. Click on a web page to quickly open it.
If you want to open the web page in a new tab, hold the "Command" key when you click on the web page link.
The Handoff feature isn't always reliable; sometimes it just doesn't show up. This is where you can use the AirDrop feature (which was much improved in iOS 13, iPadOS 13, and macOS Catalina).
On your iPhone or iPad, tap on the Share button while viewing a website in Safari.
Next, select the device you want to send it to.
On your Mac, click on the Share button from the Safari toolbar. Here, select the "AirDrop" option.
Now, select a device from the AirDrop menu. Once the web page is sent, click on the "Done" button to go back.
Using Safari as your default browser? Now is the time to master Safari tabs .
- Apple Watch
- Accessories
- Digital Magazine – Subscribe
- Digital Magazine – Log In
- Smart Answers
- New iPad Air
- iPad mini 7
- Next Mac Pro
- Best Mac antivirus
- Best Mac VPN
When you purchase through links in our articles, we may earn a small commission. This doesn't affect our editorial independence .
That scary Safari malware that infected your Mac? There might be a very simple fix

I was recently visiting my parents when I got the dreaded question: I think my Mac has a virus but I thought Macs didn’t get viruses? They were obviously a little concerned and somewhat embarrassed that they could have allowed something to happen to their Mac.
First off: yes, your Mac can get a virus , though it is still somewhat rare. After all, there are far fewer viruses in the wild to attack macOS than Windows, and way more PCs than Macs in the world. But there are Mac attacks in the wild and many of them originate within a web browser.
There are plenty of ways to scan your Mac for viruses and protect it from incoming attacks. Apple even has its own built-in antivirus tech called XProtect that constantly scans for known malware. But even with all that protection, things can get through.
Still, if you’re getting messages popping up on your Mac warning you about a critical virus with scary emoji, it’s probably not a virus. There’s a good chance it’s just an application notification masquerading as a critical system alert.

In the Safari settings, you can turn individual website notifications on and off.
Here’s what happened. While browsing with Safari, my parents either clicked on an ad or were served a pop-up that brought them to the updates-mac.com site. When they got there, another box asked them if they wanted to receive notifications from the site. In a fit of clicking to get away, they somehow clicked “Allow” when asked whether they wanted to receive notifications. That told Safari that it was OK to spam them with scary-looking alerts.
Thankfully there’s an easy fix—head over to the Websites tab in the Safari Settings in the menu bar and deny permission for the site to send alerts under the Notifications tab—but had they clicked the alert, there might not have been. The truth is, these alerts aren’t just designed to annoy, they’re hoping to fool you into clicking the wrong thing or signing into the wrong box and giving access to your accounts or computer.
Apple also has a malware tracker built into macOS called XProtect and is constantly updating the OS to patch any known vulnerabilities. To limit any further damage, you can download an antivirus app , which will protect you from inadvertently installing something malicious and help you get rid of it if something gets through. But for everything else, just check your Safari notifications first.
Author: Michael Simon , Executive Editor

Michael Simon has been covering Apple since the iPod was the iWalk. His obsession with technology goes back to his first PC—the IBM Thinkpad with the lift-up keyboard for swapping out the drive. He's still waiting for that to come back in style tbh.
Recent stories by Michael Simon:
- The second beta of macOS 14.5 is here
- This USB-C dock turns your MacBook Air into a MacBook Pro for just $16
- Apple’s ambitious M4 Mac roadmap will finally give every model the latest chip
Tips & Tricks
Troubleshooting, how to use hover text on mac to magnify on-screen text.

Hover Text is an interesting macOS accessibility feature that magnifies the text that’s displayed on your screen. This can be any regular text, a menu item, or a button. As the name suggests, when you hover your mouse cursor over the text, macOS will magnify and display a high-resolution zoomed version of the text in a separate window. This makes reading content a whole lot easier, whether the font size is tiny, or even if the screen is far away from where you’re seated.
This is an accessibility feature, but really anyone who use computers with high-resolution displays can potentially find utility in this capability. Anyone who has used any modern device knows how difficult it can be to read tiny text sometimes, so having the ability to magnify text is obviously helpful. Sure, you can increase system text size by using a scaled display resolution , but that’s not always practical, or even possible. Whether you have a multi-monitor setup, are using a display that’s at a range (as is often the case when giving presentations or using a TV as external display ), or even if your eyesight is less than perfect, this is exactly where Hover Text comes in handy on the Mac.
How to Use Hover Text to Magnify Any Text on Mac
Before you get started, make sure your Mac is running macOS Catalina or later since Hover Text isn’t available in older versions. Now, let’s see what you need to do:

There you go. You’ve learned how to make use of Hover Text to make reading easier on your Mac.
By default, the Command key is the activation modifier for Hover Text. However, this can be changed to a different key if desired, but you cannot completely remove it.
Having to press the activation key every time you want to use Hover Text might be inconvenient for a lot of users, especially if you rely on it quite often. In such cases, what you can do is press the activation key three times to lock Hover Text and then use it as much as you want. Once you’re done, you can triple-press the key again and exit Hover Text mode.
If you use a MacBook with a Touch Bar, you’ll have access to another similar feature called Touch Bar Zoom in the same menu right below Hover Text. Enabling this will bring up the Touch Bar at the bottom of your MacBook’s screen whenever you hold your finger on the Touch Bar.
We hope you were able to make good use of Hover Text whenever you needed an extra hand to read written content on your screen. What’s your overall take on this nifty accessibility feature and how often do you use it? What other macOS accessibility features have you tried so far? Do share your experiences and drop your valuable opinions in the comments section down below.
Enjoy this tip? Subscribe to our newsletter!
Get more of our great Apple tips, tricks, and important news delivered to your inbox with the OSXDaily newsletter.
You have successfully joined our subscriber list.
Related articles:
- Magnify Dock Icons Instantly in Mac OS X
- How to Turn Off Tab Hover Card Previews in Chrome
- How to Disable Safari Tab Previews on Mac
- How to Increase All System Font Size in Mac OS X
Leave a Reply
Name (required)
Mail (will not be published) (required)
Subscribe to OSXDaily
- - How to Use Hover Text on Mac to Magnify On-Screen Text
- - How to Bulk Image Edit on iPhone & iPad wth Copy & Paste Edits to Photos
- - How to Use Apple Watch as Viewfinder & Remote for iPhone Camera
- - How to Hide the Sidebar in Microsoft Edge
- - The Best Way to Clean a MacBook Air Keyboard: Microfiber Cloth & KeyboardCleanTool
- - Opinion: Shiny Keys on MacBook Air & Pro Are Ugly and Shouldn’t Happen
- - MacOS Ventura 13.6.6 & Safari 17.4.1 Update Available
- - Using M3 MacBook Air in Clamshell Mode May Reduce Performance
- - First Beta of iOS 17.5, macOS Sonoma 14.5, iPadOS 17.5 Released for Testing
- - iOS 16.7.7 & iPadOS 16.7.7 Released for Older iPhone & iPad Models
iPhone / iPad
- - What Does the Bell with Line Through It Mean in Messages? Bell Icon on iPhone, iPad, & Mac Explained
- - Fix a Repeating “Trust This Computer” Alert on iPhone & iPad
- - Create a Resume with Pages on Mac, iPhone, iPad
- - How to Check Disk Health on Mac with smartctl
- - 3 Mac Tips for Working with International Teams
- - Fix “warning: unable to access /Users/Name/.config/git/attributes Permission Denied” Errors
- - How to Fix the Apple Watch Squiggly Charging Cable Screen
- - NewsToday2: What it is & How to Disable NewsToday2 on Mac
- - Why Did My iPhone Alarm Stop Automatically & Turn Itself Off?

About OSXDaily | Contact Us | Privacy Policy | Sitemap
This website is unrelated to Apple Inc
All trademarks and copyrights on this website are property of their respective owners.
© 2024 OS X Daily. All Rights Reserved. Reproduction without explicit permission is prohibited.
- GTA 5 Cheats
- What is Discord?
- Find a Lost Phone
- Upcoming Movies
- Nintendo Switch 2
- Best YouTube TV Alternatives
- How to Recall an Email in Outlook
These 6 tweaks take MacBooks from great to nearly perfect

I love getting a new MacBook. The slow-opening box, the fresh install of macOS, even the enchanting new Mac smell (which people have been rhapsodizing about for decades ) — it’s all part of the experience.
Unlock some trackpad tricks
Optimize battery life, turn off the auto brightness adjustment, set new default apps, web browser extensions, turn filevault on.
But you know what? MacBooks don’t arrive perfect out of the box. There are a few things that I always have to adjust, regardless of how powerful the laptop is. From changing the default apps to unlocking a few hidden extras, here are the first six things to do with your new MacBook before putting it to work.
Apple’s trackpads are the best in the business, bar none. They’re spacious, responsive, and feel exceptionally well made. So why does Apple hide some of their features by default?
- A new wave of powerful laptops rises to challenge the MacBook Pro
- The biggest threat to the MacBook this year might come from Apple itself
- I’m worried about the MacBook’s next big rival
If you open the System Settings app and scroll down to the Trackpad section in the sidebar, you’ll see what I mean. There are tons of features here that you can enable, disable, or customize to your heart’s desire. Yet one super-useful feature called App Exposé remains switched off. This lets you swipe downwards to show all the open windows for the currently selected app. It’s like Mission Control , except far less busy and chaotic. And yet most people don’t even know it exists.
To fix that, go to the More Gestures section of the trackpad settings and, next to App Exposé , choose to enable it by swiping down with either three or four fingers. I also like to change right-clicking to include both tapping and clicking with two fingers, change moving between full-screen apps to be triggered by a four-finger swipe, and a few other things. It all ensures Apple’s excellent trackpad is working to its full potential.
One more thing: Go to System Settings > Accessibility > Pointer Control > Trackpad Options , then enable Use trackpad for dragging and select With Drag Lock from the menu. With this done, if you double-tap a file and keep your finger down on the second tap, the item “attaches” to your pointer, and it will stay there until you click. Why do this? It makes it far easier to move items without bumping into the edge of your trackpad, as you can let go of the trackpad and your file will not be dropped in place. If you’ve ever struggled to move things around on a MacBook without hitting the sides of your trackpad, you’ll want to enable this setting.
When you’re on a laptop, battery life matters. Apple knows this, and these days, many MacBooks can last close to 30 hours on a single charge, blowing past their rivals with consummate ease. But that’s not to say you won’t want even more juice from your Apple laptop, and there are a couple of tweaks I make to tune things up.
One of the ways I do this is by going to the Lock Screen section of the System Settings app and telling macOS to start a screen saver after about five minutes (down from the default 20). I also make sure my MacBook isn’t waiting too long to turn the display off when it’s on battery power.
I also head to the Battery section in System Settings and adjust one parameter. If you scroll to the bottom of the page and select Options , you’ll get a few extra choices. I make sure Slightly dim the display on battery is enabled, but I leave the rest of the settings as they are.
I could enable options like Put hard disks to sleep when possible or Optimize video streaming while on battery , but my laptop’s battery life is so impressive that I don’t feel like I need to wring every last drop of juice out of it. But by ensuring the display dims a little when required, one of the biggest battery hogs — the screen — is kept in check.
Given how portable MacBooks are, chances are that you’ll be using yours in a variety of locations and conditions. What might be easily visible in a dimly lit room is suddenly barely readable when you’re trying to use your laptop in bright sunlight, but you can fix this by going to System Settings > Displays and enabling Automatically adjust brightness . With that turned on, your MacBook will use its ambient light sensor to ramp the brightness up or down as needed, with no input from you required.
There’s another good setting to check if you go to Displays > Night Shift . Here, I always create a custom schedule that lasts from 9 p.m. to 7 a.m. This ensures that my MacBook cuts out blue light and adopts a warmer tone right as my eyes are starting to get tired, which helps if I’m still going late in the evening.
Finally, don’t forget to make sure that the True Tone toggle is enabled and I’ve selected ProMotion from the Refresh rate dropdown menu. It’s worth turning these on so that you don’t miss out on Apple’s adaptive color setting and variable refresh rate feature.
One of the first things I do with any new MacBook is dive into my macOS settings and change the default apps . Some ways of doing this are extremely simple, while others take a little bit more effort, but I find they’re all worth doing, especially when it comes to web browsers. Listen Safari, I think you’re great, but I’m really more into Firefox . We just vibe. I’m sorry, you’re no longer my default web browser.
Once you’ve installed a new browser, open the System Settings app and go to Desktop & Dock . Scroll down until you see Default web browser (it’s under Widgets , for some reason) and pick your choice from the dropdown menu.
To change your email app, open Mail, then go to Mail > Settings in the menu bar. Select the General tab and pick a new app from the Default email reader menu.
Finally, the following method will let you change the default app for any other file. Just repeat it for each file type. First, find a file where you want to change the app that opens it, then right-click it and pick Get Info from the context menu. Under Open with , choose a new app from the dropdown menu, then select Change All > Continue .
Any web browser is made a whole lot better with the help of some carefully curated extensions. I’ve already written about my favorite Safari extensions (I install these even after I change my default browser to Firefox, just in case I have to switch back for whatever reason), and these are essential additions to any MacBook I buy.
Consent-O-Matic , for example, automatically opts me out of all those incredibly irritating (and deeply shady) cookie consent notices. Honey saves me cash by suggesting coupon codes on a huge range of websites. And the 1Password password manager stores all my logins and helps me create tough-to-break new ones. All these extensions and more are some of the first things I reach for when I get a new MacBook.
You can find Safari extensions in the App Store — just open Safari and go to Safari > Safari Extensions in the menu bar. Other browsers like Chrome, Edge, and Firefox have their own extension stores, which you can find by searching “[browser name] extensions” on the web.
Apple devices are well-known for their strong stance on privacy and security, but there are still a few improvements I make on a new MacBook that strengthen these credentials even further.
First things first, I open the System Settings app and head to Privacy & Security . Here, I make sure that FileVault is switched on. This encrypts the contents of your laptop so that they are inaccessible to anyone who doesn’t have your login password, which can help keep your personal data out of the wrong hands if your MacBook gets stolen.
Still in Privacy & Security , I also go to the Analytics & Improvements and Apple Advertising sections and opt out of every entry, as I’d rather not have my usage info leave my laptop (even if it is anonymized). That means opting out of personalized advertisements and macOS analytics, among other things.
It’s also a good idea to periodically come back to macOS’ Privacy & Security settings and check through the sections there, noting down which apps have been granted access to your location, camera, microphone, and more. If you don’t think an app should be in there, revoke its access using the toggle next to its name.
Editors' Recommendations
- Don’t download the latest macOS Ventura update just yet
- If you buy one MacBook Air alternative, make it this one
- I was wrong about using Stage Manager on Mac
- The case for buying the M2 MacBook Air over the M3 model
- Why you should buy a MacBook Pro instead of a MacBook Air

Apple has just announced the dates for its Worldwide Developers Conference (WWDC) 2024. WWDC will take place from June 10 through June 14, 2024. A special event will be held at Apple Park in Cupertino, California, on June 10, and we expect to see the reveal of iOS 18, iPadOS 18, watchOS 11, tvOS 18, macOS 15, and visionOS 2.
WWDC will be free for all developers online. Developers will be able to access a variety of online sessions and labs that will showcase the latest advancements in software across all of Apple’s hardware.
Apple’s MacBook laptops come in a range of colors, and selecting which is right for you can be a tricky business. Sure, it’s perhaps not as important as deciding which chip to pick or how much memory you should buy, but it’s still a vital part of the equation. After all, you’re going to see that color every time you reach for your MacBook. You don’t want it to be something that fills you with regret.
But how should you pick a MacBook color? And what do the colors even look like in the first place? We’ve got the answers to those questions in this guide. We’d also advise you to go to an Apple Store to take a look at the MacBook colors in person, as some can be hard to appreciate just by browsing Apple’s website.
The MacBook Air has officially caught up. Now with the M3 on board, the MacBook Air has gained the benefits of the new chip, which was previously available just on the MacBook Pro and iMac.
Choosing between the M3 15-inch MacBook Air and the 14-inch MacBook Pro is tough, and requires an in-depth look at differences in ports, displays, speakers, and more. It's a legitimately hard decision to make.
iPhone User Guide
- iPhone models compatible with iOS 17
- R ' class='toc-item' data-ss-analytics-link-url='https://support.apple.com/guide/iphone/iphone-xr-iph017302841/ios' data-ajax-endpoint='https://support.apple.com/guide/iphone/iphone-xr-iph017302841/ios' data-ss-analytics-event="acs.link_click" href='https://support.apple.com/guide/iphone/iphone-xr-iph017302841/ios' id='toc-item-IPH017302841' data-tocid='IPH017302841' > iPhone X R
- S ' class='toc-item' data-ss-analytics-link-url='https://support.apple.com/guide/iphone/iphone-xs-iphc00446242/ios' data-ajax-endpoint='https://support.apple.com/guide/iphone/iphone-xs-iphc00446242/ios' data-ss-analytics-event="acs.link_click" href='https://support.apple.com/guide/iphone/iphone-xs-iphc00446242/ios' id='toc-item-IPHC00446242' data-tocid='IPHC00446242' > iPhone X S
- S Max' class='toc-item' data-ss-analytics-link-url='https://support.apple.com/guide/iphone/iphone-xs-max-iphcd2066870/ios' data-ajax-endpoint='https://support.apple.com/guide/iphone/iphone-xs-max-iphcd2066870/ios' data-ss-analytics-event="acs.link_click" href='https://support.apple.com/guide/iphone/iphone-xs-max-iphcd2066870/ios' id='toc-item-IPHCD2066870' data-tocid='IPHCD2066870' > iPhone X S Max
- iPhone 11 Pro
- iPhone 11 Pro Max
- iPhone SE (2nd generation)
- iPhone 12 mini
- iPhone 12 Pro
- iPhone 12 Pro Max
- iPhone 13 mini
- iPhone 13 Pro
- iPhone 13 Pro Max
- iPhone SE (3rd generation)
- iPhone 14 Plus
- iPhone 14 Pro
- iPhone 14 Pro Max
- iPhone 15 Plus
- iPhone 15 Pro
- iPhone 15 Pro Max
- Setup basics
- Make your iPhone your own
- Take great photos and videos
- Keep in touch with friends and family
- Share features with your family
- Use iPhone for your daily routines
- Expert advice from Apple Support
- What’s new in iOS 17
- Turn on and set up iPhone
- Wake and unlock
- Set up cellular service
- Use Dual SIM
- Connect to the internet
- Sign in with Apple ID
- Subscribe to iCloud+
- Find settings
- Set up mail, contacts, and calendar accounts
- Learn the meaning of the status icons
- Charge the battery
- Charge with cleaner energy sources
- Show the battery percentage
- Check battery health and usage
- Use Low Power Mode
- Read and bookmark the user guide
- Learn basic gestures
- Learn gestures for iPhone models with Face ID
- Adjust the volume
- Find your apps in App Library
- Switch between open apps
- Quit and reopen an app
- Multitask with Picture in Picture
- Access features from the Lock Screen
- View Live Activities in the Dynamic Island
- Perform quick actions
- Search on iPhone
- Get information about your iPhone
- View or change cellular data settings
- Travel with iPhone
- Change sounds and vibrations
- Use the Action button on iPhone 15 Pro and iPhone 15 Pro Max
- Create a custom Lock Screen
- Change the wallpaper
- Adjust the screen brightness and color balance
- Keep the iPhone display on longer
- Use StandBy
- Customize the text size and zoom setting
- Change the name of your iPhone
- Change the date and time
- Change the language and region
- Organize your apps in folders
- Add, edit, and remove widgets
- Move apps and widgets on the Home Screen
- Remove apps
- Use and customize Control Center
- Change or lock the screen orientation
- View and respond to notifications
- Change notification settings
- Set up a Focus
- Allow or silence notifications for a Focus
- Turn a Focus on or off
- Stay focused while driving
- Customize sharing options
- Type with the onscreen keyboard
- Dictate text
- Select and edit text
- Use predictive text
- Use text replacements
- Add or change keyboards
- Add emoji and stickers
- Take a screenshot
- Take a screen recording
- Draw in documents
- Add text, shapes, signatures, and more
- Fill out forms and sign documents
- Use Live Text to interact with content in a photo or video
- Use Visual Look Up to identify objects in your photos and videos
- Lift a subject from the photo background
- Subscribe to Apple Arcade
- Play with friends in Game Center
- Connect a game controller
- Use App Clips
- Update apps
- View or cancel subscriptions
- Manage purchases, settings, and restrictions
- Install and manage fonts
- Buy books and audiobooks
- Annotate books
- Access books on other Apple devices
- Listen to audiobooks
- Set reading goals
- Organize books
- Create and edit events in Calendar
- Send invitations
- Reply to invitations
- Change how you view events
- Search for events
- Change calendar and event settings
- Schedule or display events in a different time zone
- Keep track of events
- Use multiple calendars
- Use the Holidays calendar
- Share iCloud calendars
- Camera basics
- Set up your shot
- Apply Photographic Styles
- Take Live Photos
- Take Burst mode shots
- Take a selfie
- Take panoramic photos
- Take macro photos and videos
- Take portraits
- Take Night mode photos
- Take Apple ProRAW photos
- Adjust the shutter volume
- Adjust HDR camera settings
- Record videos
- Record spatial videos for Apple Vision Pro
- Record ProRes videos
- Record videos in Cinematic mode
- Change video recording settings
- Save camera settings
- Customize the Main camera lens
- Change advanced camera settings
- View, share, and print photos
- Use Live Text
- Scan a QR code
- See the world clock
- Set an alarm
- Change the next wake up alarm
- Use the stopwatch
- Use multiple timers
- Add and use contact information
- Edit contacts
- Add your contact info
- Use NameDrop on iPhone to share your contact info
- Use other contact accounts
- Use Contacts from the Phone app
- Merge or hide duplicate contacts
- Export contacts
- Get started with FaceTime
- Make FaceTime calls
- Receive FaceTime calls
- Create a FaceTime link
- Take a Live Photo
- Turn on Live Captions in a FaceTime call
- Use other apps during a call
- Make a Group FaceTime call
- View participants in a grid
- Use SharePlay to watch, listen, and play together
- Share your screen in a FaceTime call
- Collaborate on a document in FaceTime
- Use video conferencing features
- Hand off a FaceTime call to another Apple device
- Change the FaceTime video settings
- Change the FaceTime audio settings
- Change your appearance
- Leave a call or switch to Messages
- Block unwanted callers
- Report a call as spam
- Connect external devices or servers
- Modify files, folders, and downloads
- Search for files and folders
- Organize files and folders
- Set up iCloud Drive
- Share files and folders in iCloud Drive
- Share your location
- Meet up with a friend
- Send your location via satellite
- Add or remove a friend
- Locate a friend
- Get notified when friends change their location
- Notify a friend when your location changes
- Add your iPhone
- Add your iPhone Wallet with MagSafe
- Get notified if you leave a device behind
- Locate a device
- Mark a device as lost
- Erase a device
- Remove a device
- Add an AirTag
- Share an AirTag or other item in Find My on iPhone
- Add a third-party item
- Get notified if you leave an item behind
- Locate an item
- Mark an item as lost
- Remove an item
- Adjust map settings
- Get started with Fitness
- Track daily activity and change your move goal
- See your activity summary
- Sync a third-party workout app
- Change fitness notifications
- Share your activity
- Subscribe to Apple Fitness+
- Find Apple Fitness+ workouts and meditations
- Start an Apple Fitness+ workout or meditation
- Create a Custom Plan in Apple Fitness+
- Work out together using SharePlay
- Change what’s on the screen during an Apple Fitness+ workout or meditation
- Download an Apple Fitness+ workout or meditation
- Get started with Freeform
- Create a Freeform board
- Draw or handwrite
- Apply consistent styles
- Position items on a board
- Search Freeform boards
- Share and collaborate
- Delete and recover boards
- Get started with Health
- Fill out your Health Details
- Intro to Health data
- View your health data
- Share your health data
- View health data shared by others
- Download health records
- View health records
- Monitor your walking steadiness
- Log menstrual cycle information
- View menstrual cycle predictions and history
- Track your medications
- Learn more about your medications
- Log your state of mind
- Take a mental health assessment
- Set up a schedule for a Sleep Focus
- Turn off alarms and delete sleep schedules
- Add or change sleep schedules
- Turn Sleep Focus on or off
- Change your wind down period, sleep goal, and more
- View your sleep history
- Check your headphone levels
- Use audiogram data
- Register as an organ donor
- Back up your Health data
- Intro to Home
- Upgrade to the new Home architecture
- Set up accessories
- Control accessories
- Control your home using Siri
- Use Grid Forecast to plan your energy usage
- Set up HomePod
- Control your home remotely
- Create and use scenes
- Use automations
- Set up security cameras
- Use Face Recognition
- Unlock your door with a home key
- Configure a router
- Invite others to control accessories
- Add more homes
- Get music, movies, and TV shows
- Get ringtones
- Manage purchases and settings
- Get started with Journal
- Write in your journal
- Review your past journal entries
- Change Journal settings
- Magnify nearby objects
- Change settings
- Detect people around you
- Detect doors around you
- Receive image descriptions of your surroundings
- Read aloud text and labels around you
- Set up shortcuts for Detection Mode
- Add and remove email accounts
- Set up a custom email domain
- Check your email
- Unsend email with Undo Send
- Reply to and forward emails
- Save an email draft
- Add email attachments
- Download email attachments
- Annotate email attachments
- Set email notifications
- Search for email
- Organize email in mailboxes
- Flag or block emails
- Filter emails
- Use Hide My Email
- Use Mail Privacy Protection
- Change email settings
- Delete and recover emails
- Add a Mail widget to your Home Screen
- Print emails
- Get travel directions
- Select other route options
- Find stops along your route
- View a route overview or a list of turns
- Change settings for spoken directions
- Get driving directions
- Get directions to your parked car
- Set up electric vehicle routing
- Report traffic incidents
- Get cycling directions
- Get walking directions
- Get transit directions
- Delete recent directions
- Get traffic and weather info
- Estimate travel time and ETA
- Download offline maps
- Search for places
- Find nearby attractions, restaurants, and services
- Get information about places
- Mark places
- Share places
- Rate places
- Save favorite places
- Explore new places with Guides
- Organize places in My Guides
- Delete significant locations
- Look around places
- Take Flyover tours
- Find your Maps settings
- Measure dimensions
- View and save measurements
- Measure a person’s height
- Use the level
- Set up Messages
- About iMessage
- Send and reply to messages
- Unsend and edit messages
- Keep track of messages
- Forward and share messages
- Group conversations
- Watch, listen, or play together using SharePlay
- Collaborate on projects
- Use iMessage apps
- Take and edit photos or videos
- Share photos, links, and more
- Send stickers
- Request, send, and receive payments
- Send and receive audio messages
- Animate messages
- Change notifications
- Block, filter, and report messages
- Delete messages and attachments
- Recover deleted messages
- View albums, playlists, and more
- Show song credits and lyrics
- Queue up your music
- Listen to broadcast radio
- Subscribe to Apple Music
- Play music together in the car with iPhone
- Listen to lossless music
- Listen to Dolby Atmos music
- Apple Music Sing
- Find new music
- Add music and listen offline
- Get personalized recommendations
- Listen to radio
- Search for music
- Create playlists
- See what your friends are listening to
- Use Siri to play music
- Change the way music sounds
- Get started with News
- Use News widgets
- See news stories chosen just for you
- Read stories
- Follow your favorite teams with My Sports
- Listen to Apple News Today
- Subscribe to Apple News+
- Browse and read Apple News+ stories and issues
- Download Apple News+ issues
- Listen to audio stories
- Solve crossword puzzles
- Search for news stories
- Save stories in News for later
- Subscribe to individual news channels
- Get started with Notes
- Add or remove accounts
- Create and format notes
- Draw or write
- Add photos, videos, and more
- Scan text and documents
- Work with PDFs
- Create Quick Notes
- Search notes
- Organize in folders
- Organize with tags
- Use Smart Folders
- Export or print notes
- Change Notes settings
- Make a call
- Answer or decline incoming calls
- While on a call
- Set up voicemail
- Check voicemail
- Change voicemail greeting and settings
- Select ringtones and vibrations
- Make calls using Wi-Fi
- Set up call forwarding and call waiting
- Avoid unwanted calls
- View photos and videos
- Play videos and slideshows
- Delete or hide photos and videos
- Edit photos and videos
- Trim video length and adjust slow motion
- Edit Cinematic mode videos
- Edit Live Photos
- Edit portraits
- Use photo albums
- Edit, share, and organize albums
- Filter and sort photos and videos in albums
- Make stickers from your photos
- Duplicate and copy photos and videos
- Merge duplicate photos and videos
- Search for photos
- Identify people and pets
- Browse photos by location
- Share photos and videos
- Share long videos
- View photos and videos shared with you
- Watch memories
- Personalize your memories
- Manage memories and featured photos
- Use iCloud Photos
- Create shared albums
- Add and remove people in a shared album
- Add and delete photos and videos in a shared album
- Set up or join an iCloud Shared Photo Library
- Add content to an iCloud Shared Photo Library
- Use iCloud Shared Photo Library
- Import and export photos and videos
- Print photos
- Find podcasts
- Listen to podcasts
- Follow your favorite podcasts
- Use the Podcasts widget
- Organize your podcast library
- Download, save, or share podcasts
- Subscribe to podcasts
- Listen to subscriber-only content
- Change download settings
- Make a grocery list
- Add items to a list
- Edit and manage a list
- Search and organize lists
- Work with templates
- Use Smart Lists
- Print reminders
- Use the Reminders widget
- Change Reminders settings
- Browse the web
- Search for websites
- Customize your Safari settings
- Change the layout
- Use Safari profiles
- Open and close tabs
- Organize your tabs
- View your Safari tabs from another Apple device
- Share Tab Groups
- Use Siri to listen to a webpage
- Bookmark favorite webpages
- Save pages to a Reading List
- Find links shared with you
- Annotate and save a webpage as a PDF
- Automatically fill in forms
- Get extensions
- Hide ads and distractions
- Clear your cache
- Browse the web privately
- Use passkeys in Safari
- Check stocks
- Manage multiple watchlists
- Read business news
- Add earnings reports to your calendar
- Use a Stocks widget
- Translate text, voice, and conversations
- Translate text in apps
- Translate with the camera view
- Subscribe to Apple TV+, MLS Season Pass, or an Apple TV channel
- Add your TV provider
- Get shows, movies, and more
- Watch sports
- Watch Major League Soccer with MLS Season Pass
- Control playback
- Manage your library
- Change the settings
- Make a recording
- Play it back
- Edit or delete a recording
- Keep recordings up to date
- Organize recordings
- Search for or rename a recording
- Share a recording
- Duplicate a recording
- Keep cards and passes in Wallet
- Set up Apple Pay
- Use Apple Pay for contactless payments
- Use Apple Pay in apps and on the web
- Track your orders
- Use Apple Cash
- Use Apple Card
- Use Savings
- Pay for transit
- Access your home, hotel room, and vehicle
- Add identity cards
- Use COVID-19 vaccination cards
- Check your Apple Account balance
- Use Express Mode
- Organize your Wallet
- Remove cards or passes
- Check the weather
- Check the weather in other locations
- View weather maps
- Manage weather notifications
- Use Weather widgets
- Learn the weather icons
- Find out what Siri can do
- Tell Siri about yourself
- Have Siri announce calls and notifications
- Add Siri Shortcuts
- About Siri Suggestions
- Use Siri in your car
- Change Siri settings
- Contact emergency services
- Use Emergency SOS via satellite
- Request Roadside Assistance via satellite
- Set up and view your Medical ID
- Use Check In
- Manage Crash Detection
- Reset privacy and security settings in an emergency
- Set up Family Sharing
- Add Family Sharing members
- Remove Family Sharing members
- Share subscriptions
- Share purchases
- Share locations with family and locate lost devices
- Set up Apple Cash Family and Apple Card Family
- Set up parental controls
- Set up a child’s device
- Get started with Screen Time
- Protect your vision health with Screen Distance
- Set up Screen Time
- Set communication and safety limits and block inappropriate content
- Charging cable
- Power adapters
- MagSafe chargers and battery packs
- MagSafe cases and sleeves
- Qi-certified wireless chargers
- Use AirPods
- Use EarPods
- Apple Watch
- Wirelessly stream videos and photos to Apple TV or a smart TV
- Connect to a display with a cable
- HomePod and other wireless speakers
- Pair Magic Keyboard
- Enter characters with diacritical marks
- Switch between keyboards
- Use shortcuts
- Choose an alternative keyboard layout
- Change typing assistance options
- External storage devices
- Bluetooth accessories
- Share your internet connection
- Allow phone calls on your iPad and Mac
- Use iPhone as a webcam
- Hand off tasks between devices
- Cut, copy, and paste between iPhone and other devices
- Stream video or mirror the screen of your iPhone
- Start SharePlay instantly
- Use AirDrop to send items
- Connect iPhone and your computer with a cable
- Transfer files between devices
- Transfer files with email, messages, or AirDrop
- Transfer files or sync content with the Finder or iTunes
- Automatically keep files up to date with iCloud
- Use an external storage device, a file server, or a cloud storage service
- Intro to CarPlay
- Connect to CarPlay
- Use your vehicle’s built-in controls
- Get turn-by-turn directions
- Change the map view
- Make phone calls
- View your calendar
- Send and receive text messages
- Announce incoming text messages
- Play podcasts
- Play audiobooks
- Listen to news stories
- Control your home
- Use other apps with CarPlay
- Rearrange icons on CarPlay Home
- Change settings in CarPlay
- Get started with accessibility features
- Turn on accessibility features for setup
- Change Siri accessibility settings
- Open features with Accessibility Shortcut
- Change color and brightness
- Make text easier to read
- Reduce onscreen motion
- Customize per-app visual settings
- Hear what’s on the screen or typed
- Hear audio descriptions
- Turn on and practice VoiceOver
- Change your VoiceOver settings
- Use VoiceOver gestures
- Operate iPhone when VoiceOver is on
- Control VoiceOver using the rotor
- Use the onscreen keyboard
- Write with your finger
- Use VoiceOver with an Apple external keyboard
- Use a braille display
- Type braille on the screen
- Customize gestures and keyboard shortcuts
- Use VoiceOver with a pointer device
- Use VoiceOver for images and videos
- Use VoiceOver in apps
- Use AssistiveTouch
- Adjust how iPhone responds to your touch
- Use Reachability
- Auto-answer calls
- Turn off vibration
- Change Face ID and attention settings
- Use Voice Control
- Adjust the side or Home button
- Use Apple TV Remote buttons
- Adjust pointer settings
- Adjust keyboard settings
- Adjust AirPods settings
- Turn on Apple Watch Mirroring
- Control a nearby Apple device
- Intro to Switch Control
- Set up and turn on Switch Control
- Select items, perform actions, and more
- Control several devices with one switch
- Use hearing devices
- Use Live Listen
- Use sound recognition
- Set up and use RTT and TTY
- Flash the LED for alerts
- Adjust audio settings
- Play background sounds
- Display subtitles and captions
- Show transcriptions for Intercom messages
- Get Live Captions (beta)
- Type to speak
- Record a Personal Voice
- Use Guided Access
- Use built-in privacy and security protections
- Set a passcode
- Set up Face ID
- Set up Touch ID
- Control access to information on the Lock Screen
- Keep your Apple ID secure
- Use passkeys to sign in to apps and websites
- Sign in with Apple
- Share passwords
- Automatically fill in strong passwords
- Change weak or compromised passwords
- View your passwords and related information
- Share passkeys and passwords securely with AirDrop
- Make your passkeys and passwords available on all your devices
- Automatically fill in verification codes
- Automatically fill in SMS passcodes
- Sign in with fewer CAPTCHA challenges
- Use two-factor authentication
- Use security keys
- Manage information sharing with Safety Check
- Control app tracking permissions
- Control the location information you share
- Control access to information in apps
- Control how Apple delivers advertising to you
- Control access to hardware features
- Create and manage Hide My Email addresses
- Protect your web browsing with iCloud Private Relay
- Use a private network address
- Use Advanced Data Protection
- Use Lockdown Mode
- Use Stolen Device Protection
- Receive warnings about sensitive content
- Use Contact Key Verification
- Turn iPhone on or off
- Force restart iPhone
- Back up iPhone
- Return iPhone settings to their defaults
- Restore all content from a backup
- Restore purchased and deleted items
- Sell, give away, or trade in your iPhone
- Erase iPhone
- Install or remove configuration profiles
- Important safety information
- Important handling information
- Find more resources for software and service
- FCC compliance statement
- ISED Canada compliance statement
- Ultra Wideband information
- Class 1 Laser information
- Apple and the environment
- Disposal and recycling information
- Unauthorized modification of iOS
View your Safari tabs from another Apple device on iPhone
Note: You must be signed in to iCloud with the same Apple ID on all your devices to manage Safari tabs across your devices.
View tabs that are open on your other Apple devices
To close a tab on another Apple device, touch and hold the link, then choose Close.
Note: To view tabs open on your other devices, you must have iCloud Tabs turned on for your start page. See Customize your start page .
Keep tabs and Tab Groups updated across your devices
Note: To also see tabs open on your Mac, you must have Safari turned on in iCloud settings on your Mac, be signed in with the same Apple ID , and use two-factor authentication .

Setting Up iPhone and iPad Parental Controls and Security Settings
A sk a child or teenager which phone or tablet they want, and nine times out of 10 they’ll say iPhone or iPad. Youngsters like iPhones and iPads. Maybe it’s the smooth graphics, or the simplicity of the OS, or just the fact that everyone in school has one. Whatever the reason, Apple has positioned itself as the top mobile device choice for kids and teenagers.
As parents, that actually works in our favor. Apple knows what it’s doing when it comes to protecting users’ privacy and digital well-being . That includes offering a robust set of resources for controlling how our kids use their devices so we can better protect them.
But how do we set up those parental controls? Where do we even begin? Let this be every parent’s guide to setting up iPhone and iPad parental controls.
Screen Time: The Gateway to Parental Controls
Screen Time is Apple’s ultimate parental-control tool. Its primary function is setting a screen-time limit, but it also lets you create content filters to protect your kid online .
Start, of course, by turning on Screen Time in the Settings. Just scroll down to Screen Time, turn it on, and follow the on-screen prompts. You can do this from your iPhone or iPad or from your child’s device.
At the end of the process, you’ll set up a Screen Time passcode. You’ll use the passcode to edit your Screen Time settings, so it should be different from the passcode used to unlock the iPhone or iPad. You should also keep the Screen Time passcode under your hat to prevent your tech-whiz youngster from changing the settings.
Content Filters
Once Screen Time is on, you’ll gain access to content restrictions. The ability to filter content is one of the reasons parental control is necessary, so you should set aside some time to customize this feature.
A smartphone or tablet is your youngster’s gateway to the internet, and it can go downhill very fast if you don’t set up content filters. They’ll be able to download apps that are not age-appropriate or even apps that are dangerous to them. Inappropriate search results may turn up even from seemingly innocent search keywords. Even Siri, with all its wisdom, can give disturbing answers to random questions.
Did You Know? Siri has a flirtatious side, and asking questions a child may be curious about may trigger a suggestive response. Turning off Siri on a younger child’s iPhone or iPad may be a good idea.
One thing to remember is that content filters on Screen Time affect only Apple’s services, which includes the App Store, iTunes content, Safari, and Siri. It doesn’t affect content from third-party apps such as Netflix, Chrome, and YouTube Kids.
There are actually two ways to edit content filters. While setting up Screen Time, it will ask you to set up high-level restrictions. Alternatively, you can set your child’s age using the slider and it will adjust the settings to recommended levels.
If you want to really get into it, you can skip the part above and access more detailed content-filtering settings once Screen Time is set up. Just open Screen Time in the Settings app and look for Content & Privacy Restrictions.
You’ll be able to fully customize the restrictions. You can set up age restrictions for downloadable content; allow or deny access to location, microphone, and other device features; and much more. We recommend going through the entire list of restrictions one by one to make sure you’re in full control, but here are a few ideas for things to set.
- Web content: You can limit Safari to allow only a list of websites hand-picked by you. For older kids, Safari can filter adult websites but allow everything else.
- Turn Siri on or off: If you’re worried Siri may be bad for your kid, you can turn it off completely. Otherwise you can restrict Siri from being used to search the web or have it filter explicit language.
- Online games: Game Center lets your kid play multiplayer online games with other iPhone users online, but you can limit with whom they are allowed to be paired to just friends. You can also turn off multiplayer matching completely.
- Location services: See which apps have access to the iPhone or iPad’s location data, and edit their permissions as well. You can also turn off location services for all apps.
- App Store purchases: You can set whether installing apps, deleting apps, and making in-app purchases is allowed on your child’s device. You can also set it so a password is required when buying or installing apps.
Did You Know? In 2020, a child reportedly spent $16,000 on in-app purchases without his parents’ knowledge. 2 To prevent this from happening to you, it’s best to turn off in-app purchases completely.
The next part is for your child’s digital well-being. We can all agree that too much screen time is bad for their mental and physical health, so setting limits is a must.
With Apple devices, screen-time limits are taken to the next level. You can schedule Downtimes, for example, a period of time wherein the iPhone or iPad’s features are limited only to what you allow. You can use it to create a regular bedtime routine for your kids, especially on school nights.
Once Downtime is turned on, the prompt pictured below will appear when they try to open an app.
By default, they can keep ignoring the time limit by pressing “Ask For More Time,” but you can prevent that by turning on Block at Downtime. Here’s how:
- Go to Settings and open Screen Time.
- Select Downtime.
- Enter your Screen Time passcode.
- Toggle the “Block at Downtime” button.
After that, they will only be able to extend the screen time once for one minute in case they’re doing homework or something important. If they attempt to bypass the limit again, they’ll need your Screen Time passcode.
FYI: You can allow your kid to use certain apps during Downtime. They can still use FaceTime or Messages, for example. You can, however, limit with whom they are allowed to communicate during Downtime. For instance, you can set it so they can still call or text you but no one else.
Aside from Downtime, you can limit how much time your youngster spends on an app, which is really useful in limiting their use of social media and mobile games.
This feature is under Screen Time in the “App Limits” section. The apps are categorized for your convenience, and you can even limit entire categories at once.
Next you’ll have to set how much time they are allowed to spend on an app or type of app per day. You can also customize the time limit per day, such as fewer hours on weekdays and an extra hour on weekends.
Once they reach the limit, a prompt will appear similar to the Downtime prompt.
Conclusion: Are iPhone and iPad Parental Controls Enough?
Apple devices have some of the most comprehensive parental controls among mobile operating systems, but they’re far from perfect.
Teenagers know to use third-party browsers to bypass Safari web filters, for example. Of course, you can tighten the grip and take away their iPhone’s ability to download apps, but remember: Setting parental controls isn’t about being in control. It’s about keeping our children safe. If you catch your child trying to bypass parental controls, discussing why these features are in place may yield better results than just adding more restrictions.
Overall, iPhone and iPad parental controls are enough for most, but there are plenty of parental-control software options available in the App Store if you need a tighter handle on things.

IMAGES
VIDEO
COMMENTS
Change the display controls for a website on Safari. You can hide the search field, switch to Reader, and more. Open the Safari app on your iPad. Tap , then do any of the following: Hide the search field: Tap Hide Toolbar (tap the top of the screen to get it back). See a streamlined view of the webpage: Tap Show Reader (if available).
Here's how. First, open Settings by tapping the grey gear icon. In Settings, tap "Safari" in the sidebar. In Safari settings, navigate to the "Tabs" section, then select "Compact Tab Bar" until it has a check mark below it. Next, launch Safari and open several websites at once. Previously, with "Separate Tab Bar" selected, you'd see a dedicated ...
How to have Safari close tabs automatically in iPadOS 15. If you find your iPad soon becomes an unmanageable mess of open tabs, you can have Safari take the hassle out of cleaning that up for you with tabs that close automatically after going unviewed for a set period of time. Open your Settings app. In the sidebar, scroll down and tap Safari.
3. Adjust the font size. The default zoom amount (100%) appears at the top of the menu. Tap the smaller A on the left to decrease the default font size, or the larger A on the right to increase it. Continue taping until you're satisfied with the new size, then tap anywhere on the page to close the window. [1] 4.
In this lesson from our full Safari for iOS tutorial learn about the new Tab Layout options in iOS 15 and later. On both iPhone and iPad we can choose from t...
Add Safari back to your Home Screen. If you don't see Safari on your Home Screen, you can find it in App Library and add it back. On the Home Screen, swipe left until you see the App Library. Enter "Safari" in the search field. Press and hold , then tap Add to Home Screen. In Safari on iPad, view websites, preview website links, translate ...
In Safari settings, swipe upward until you locate the "Tabs" section. Tap the switch beside "Show Tab Bar" to turn it off. If you previously turned off the tab bar and want it back, tap the "Show Tab Bar" switch instead to turn it back on here. After that, launch Safari. You'll notice that the tab toolbar is now hidden.
Creating tab groups in Safari. To create a new tab group in Safari on iPadOS, first tap the sidebar icon in the upper-left corner, then tap the button to the right with the + in it: This presents ...
How to Pin Tabs in Safari on iPhone and iPad; Tab Group Start Pages. Every Tab Group has its own separate Start Page in iOS 16, so you can have different favorites, frequently visited sites, and ...
The fourth beta of iPadOS 15 brings back Safari's dedicated tab bar on iPad while making the annoying compact tab redesign entirely optional. ... Head to the Safari settings and you can switch between the compact tab bar from prior betas and having your tabs live in their own dedicated row from there. On macOS, the separate row of tabs was ...
Method 2: Open Safari on Your iPad. Tap the Multitasking button at the top of the screen. Tap the Split View button or the Slide Over button. The current app moves aside and your Home Screen appears. Tap on the Safari app on your Home Screen. If you chose Split View, the second app appears side-by-side with the current app.
Now, here are 30 tricks to help you have a better experience when using Safari. 1. Navigate Tab Bar. (Credit: Lance Whitney / Apple) The jump to iOS 15 moved Safari's address bar to the bottom of ...
First, open Safari on your iPhone or iPad and open a new tab by tapping the tabs button (two overlapping rectangles), then tapping the plus ("+") button. You'll see Safari's "Start Page" by default. To edit what's on the Start Page, scroll down if necessary and tap the "Edit" button. When you tap "Edit," a "Customize Start Page" window will appear.
If you have the tab open and selected in Safari, simply long press the URL bar and select Pin Tab from the popover menu. If you're viewing Safari's open tabs browser screen, find the open tab that ...
1. Start the Settings app. 2. Tap "Safari." 3. Tap "Close Tabs." 4. On the Close Tabs page, you can choose how frequently you want tabs to be automatically closed. You can select "After One Day ...
On an iPhone or iPad, go to your device's Settings app to change the general preferences of Safari. On Mac, change your general preferences in "Safari > Settings > General." Changing things like your search engine and preventing trackers will provide you with more privacy and increase your security. Method 1.
Here's how to do so: Step 1: Tap the Safari app on your iPhone or iPad's home screen. Step 2: Tap the tab icon on Safari. Step 3: Tap the + sign to open the Safari Start Page. Step 4: Scroll ...
To access your bookmarks in Safari at any time, simply tap the Bookmarks icon in the main browsing interface or the sidebar to reveal all of your saved favorites and folders. Press and hold on the ...
Here's how to set up iCloud for Safari: On Mac: Open System Preferences and click on Apple ID. Select iCloud from the sidebar. Ensure that the Safari option is checked. This allows Safari to sync your browsing data across your devices. On iPhone and iPad: Open the Settings app and tap on your Apple ID at the top.
Here's my settings for Safari for easy trackpad switching between tabs, new tab, close tab, go to top of page, open link in new tab etc ... iPad, Mac, and Apple TV ...
Edge on iPad has a setting under appearance (Settings → Appearance) to enable dark themes for all websites that was interfering with SO's native dark theme.I turned it off. Everything has gone back to normal. Weirdly, it doesn't affect other websites that have native dark themes. It makes sense why the website would load fine for a second and then the browser would do its thing after.
First, ensure that Handoff is enabled on your devices. From there, launch the Safari browser and then open the website on the primary device. This can be your iPhone, iPad, or Mac. Ensure that your device doesn't go to sleep or else the feature won't be able to hand the tab over to the secondary Apple device. Now, let's move over to the device ...
Thankfully there's an easy fix—head over to the Websites tab in the Safari Settings in the menu bar and deny permission for the site to send alerts under the Notifications tab—but had they ...
But in Safari (17+), the natural focusable elements like buttons and anchors are not accessible by pressing a Tab on the keyboard. Note: They are only accessible after enabling the settings on Safari > Settings... > Advanced and enable "Press Tab to highlight each item on a webpage.".
Fix 5 - Use Private browsing mode. If you can't reach the website from a regular tab, open a private tab and try to get there. Step 1 - In the Safari app, tap the tabs icon on the right-bottom corner. Step 2 - Next, switch to the "Private" tab. Step 3 - Tap the " " icon to open a new tab in private browsing mode. Open the website from this private browser tab.
Click on the Apple menu from the top-left corner and choose "System Settings" (macOS Sonoma, Ventura, and newer) or "System Preferences" (macOS Monterey and earlier) from the dropdown menu. Once the System Preferences panel opens up, click on "Accessibility" as shown in the screenshot below.
To change your email app, open Mail, then go to Mail > Settings in the menu bar. Select the General tab and pick a new app from the Default email reader menu.
Go to Settings > [ your name ] > iCloud > Show All, then make sure Safari is turned on. Note: To also see tabs open on your Mac, you must have Safari turned on in iCloud settings on your Mac, be signed in with the same Apple ID, and use two-factor authentication. In Safari on iPhone, view the tabs that are open on your other Apple devices and ...
Start, of course, by turning on Screen Time in the Settings. Just scroll down to Screen Time, turn it on, and follow the on-screen prompts. ... Safari, and Siri. It doesn't affect content from ...