Toyota Owners
Toyota Español
Welcome, here you'll have access to your Support Dashboard where you can see your support requests status or create a new request.

How do I operate the adaptive cruise control in my vehicle?
Adaptive cruise control supplements conventional cruise control with an active vehicle-to-vehicle distance control feature. designed for use on freeways and express ways, in vehicle-to-vehicle distance control mode, your car automatically acceler... sep 24, 2022 • knowledge, new section, only answer.
Adaptive cruise control supplements conventional cruise control with an active vehicle-to-vehicle distance control feature. Designed for use on freeways and express ways, in vehicle-to-vehicle distance control mode, your car automatically accelerates or decelerates in order to maintain a preset following distance from the vehicle traveling directly ahead of you.
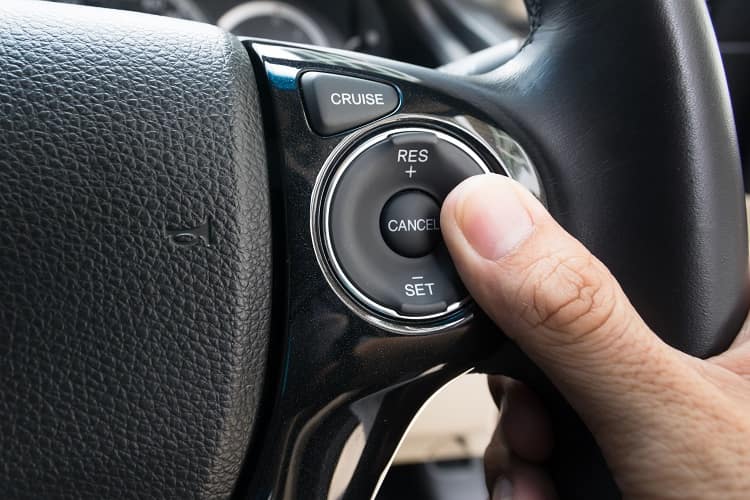
To activate the system, press the "ON/OFF" button at the end of the stalk on the lower end of the right side of the steering wheel. The radar-ready indicator will appear in the Multi Information Display.
Accelerate or decelerate to your intended speed, then press the stalk down to set it. If you want to go faster, push the stalk upward and hold until you've reached the desired speed and then release it. Or, if you want to slow down, push the stalk down and hold as you decelerate, then release it once you've reached the desired speed.
To cancel cruise control, tap the brakes, pull the stalk towards you or turn the system off with the ON/OFF button.
Adaptive Cruise Control was designed to maintain the preset distance between your car and the car driving in the same lane directly ahead of you.
When it’s active, it automatically adjusts for changes in the speed of the vehicle traveling directly ahead of you in order to maintain the vehicle-to-vehicle distance you set.
In the event that you would like to change the preset distance between vehicles, you can do so by using the radar range button located on the lower right side of the steering wheel. Simply press the button repeatedly to cycle through the ranges available. You'll find them displayed on the Multi Information Display. And finally, you can disable the distance holding feature by pushing the cruise control stalk away and holding it until the indicator disappears and the conventional cruise control indicator lights up.
Please click here to view a video.
Disclaimer: Adaptive Cruise Control is designed to assist the driver and is not a substitute for safe and attentive driving practices. See your Owner's Manual for important instructions and cautions.
Not all features are available on all vehicles and model grades. Please see your Owner's Manual for further details and important safety information.
Related Articles
- How do I operate the cruise control in my vehicle?
- How do I operate the dual zone automatic climate control in my vehicle?
- How do I operate the audio steering wheel controls in my vehicle?
Not finding your answer?
- History of TOYOTA CAMRY
- Specifications
- Maintenance
- Latest News
Toyota Camry Cruise Control
You can use Toyota Camry cruise control to maintain a set speed without depressing the accelerator pedal.
- Must Have Accessories For Toyota Camry Owners
Toyota Camry Driving assist systems
- Toyota Camry Intelligent Clearance Sonar
- Toyota Camry Blind Spot Monitor
- Toyota Camry Rear Camera
System Components
Meter display
Operation switches
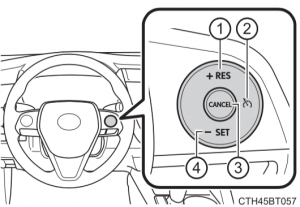
- “+ RES” switch
- Cruise control main switch
- Cancel switch
- “SET” switch
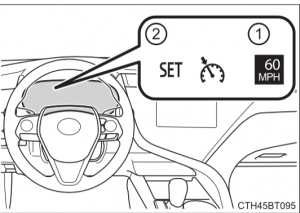
Setting the vehicle speed
1. Press the cruise control main switch to activate the cruise control. Cruise control indicator will be displayed. Press the switch again to deactivate the cruise control.
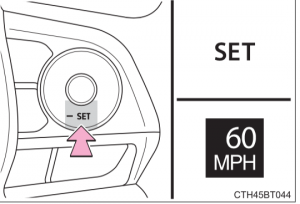
2. Accelerate or decelerate the vehicle to the desired speed, and press the “SET” switch to set the speed. Cruise control “SET” indicator will be displayed. The vehicle speed at the moment the switch is released becomes the set speed.
Adjusting the set speed
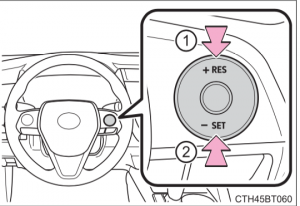
To change the set speed, operate the “+ RES” or “SET” switch until the desired set speed is obtained.
- Increases the speed
- Decreases the speed Fine adjustment: Press the switch. Large adjustment: Press and hold the switch to change the speed, and release when the desired speed is reached.
The set speed will be increased or decreased as follows:
- When the set speed is shown in “MPH” Fine adjustment: By approximately 1 mph (1.6 km/h) each time the switch is operated. Large adjustment: The set speed can be increased or decreased continually until the switch is released.
- When the set speed is shown in “km/h” Fine adjustment: By approximately 1 km/h (0.6 mph) each time the switch is operated Large adjustment: The set speed can be increased or decreased continually until the switch is released.
Canceling and resuming the constant speed control
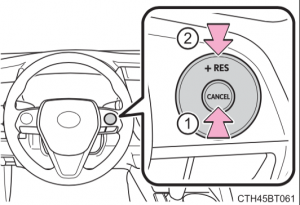
- Pressing the cancel switch cancels the constant speed control. The speed setting is also canceled when the brakes are applied.
- Pressing the “+ RES” switch resumes the constant speed control. Resuming is available when the vehicle speed is more than approximately 25 mph (40 km/h).
Cruise control can be set when
- The shift lever is in D or range 4 or higher of S has been selected.
- Range 4 or higher of D has been selected by using the paddle shift switch. (vehicles with paddle shift switches)
- Vehicle speed is above approximately 25 mph (40 km/h).
Accelerating after setting the vehicle speed
- The vehicle can be accelerated normally. After acceleration, the set speed resumes.
- Even without canceling the cruise control, the set speed can be increased by first accelerating the vehicle to the desired speed and then pressing the “SET” switch to set the new speed.
Automatic cruise control cancelation
Cruise control will stop maintaining the vehicle speed in any of the following situations.
- Actual vehicle speed falls more than approximately 10 mph (16 km/h) below the preset vehicle speed.
- At this time, the memorized set speed is not retained.
- Actual vehicle speed is below approximately 25 mph (40 km/h).
- VSC is activated.
- TRAC is activated for a period of time.
- When the VSC or TRAC system is turned off.
If the warning message for the cruise control is shown on the multiinformation display
Press the cruise control main switch once to deactivate the system, and then press the button again to reactivate the system.
If the cruise control speed cannot be set or if the cruise control cancels immediately after being activated, there may be a malfunction in the cruise control system. Have the vehicle inspected by your Toyota dealer.
To avoid operating the cruise control by mistake
Switch the cruise control off using the cruise control main switch when not in use.
Situations unsuitable for cruise control
Do not use cruise control in any of the following situations. Doing so may result in loss of control and could cause an accident resulting in death or serious injury.
- In heavy traffic
- On roads with sharp bends
- On winding roads
- On slippery roads, such as those covered with rain, ice or snow
- On steep hills Vehicle speed may exceed the set speed when driving down a steep hill.
- During emergency towing
Toyota Camry Dynamic Radar Cruise Control

How To Set Cruise Control 2019 Toyota Camry
Using cruise control when traveling across the country is a terrific function. On order to activate the cruise control in your Toyota Camry, follow these instructions:
- Holding the button on the top left of the cruise control will allow you to change the distance between you and the car in front of you.
- On the right side of the steering wheel, find the cruise control setting.
- When you reach your preferred speed, press the set button on the ring’s bottom.
Make sure you have the appropriate auto insurance coverage with Jerry before starting your cross-country road trip.
Jerry is a free insurance comparison software that shops for the best deals from reputable insurance providers. You may make adjustments at any time, receive prices instantly, and text an agent with any queries you may have.
In This Article...
Are there adaptive cruise controls in the 2019 Camry?
A hybrid powertrain is also offered, although the standard Camry comes with a 2.5-liter, normally aspirated I4 engine with 203 horsepower. However, this test vehicle features a bigger, 3.5-liter V6 engine that generates a respectable 301 horsepower and 267 pound-feet of torque.
An eight-speed automatic transmission that seems straightforward enough sends power to the front wheels, but there’s an odd peculiarity. The shift indicator will read “4” while the shifter is in the Sport position. This is what Toyota refers to as a “range hold,” which does not imply that you are in fourth gear. In other words, after the transmission automatically changes through the first four ratios, you should be on your own. However, the car upshifts no matter how hard I push it in fourth gear. Shift paddles on the XSE allow you to disable this odd Sport feature, although they aren’t very fun to use. Leave the automobile in Drive only. Believe me.
The Camry is a comfortable and simple car to drive for daily commute. Off the line and during middle acceleration, it accelerates fairly quickly, and on more interesting back roads, the steering is responsive. Although this vehicle won’t outperform a Mazda6, the myth that the Camry is a bad driver is out of date and untrue.
According to EPA estimates, the XSE V6 will get 26 combined miles per gallon, which is competitive for its class and matches the Honda Accord’s 2.0-liter turbo I4 engine. But if you want to get greater gas mileage, stick with the four-cylinder Camry, which gets 34 mpg combined. While the Camry Hybrid is predicted to achieve an extremely remarkable 52 mpg.
There is a ton of driver aid technology aboard, and the Camry comes with many technologies that are options on rival sedans. Standard features include adaptive cruise control, forward collision warning and braking, and lane-departure avoidance.
Thank heavens, adaptive cruise control operates in stop-and-go traffic. The fact that there is so much room between you and a lead car, even at the closest gap option, caused a number of other drivers to cut me off. Oddly, when I got close to a toll booth on the San Francisco Bay Bridge, the ACC system entirely shut off.
The technologies for lane departure and forward collision warning are extremely sensitive. The former barks at me as I approach a stopped automobile even though my foot is already on the brake, and the latter tries to steer me back toward the middle of a lane even if I haven’t swerved off. Give me a little more credit, Camry, for my driving skills.
How does the cruise control icon appear?
The controls needed to operate it are often located on the steering wheel or one of the car’s indicator stalks.
You’ll frequently need to depress a button labelled with the cruise control icon, which is a speedometer symbol with an arrow pointing in a specific direction (seen on the stalk below).
The following buttons are typically used to activate cruise control:
Cancel Instead of the off switch, there should be a button that just pauses the system, in case you get stopped behind a slower vehicle. The similar effect is produced by pressing the brake pedal.
Resume or Res After pausing the cruise control, press here to resume it. The vehicle will resume moving at the predetermined pace.
Up and Down, plus and minus These change the preset speed of the cruise control. You can hit the minus button to slow down, for instance, if you’re on a highway and come to a set of roadworks with a lower speed restriction.
Using the brake pedal will immediately pause the system and cause the car to slow down just as if the system were turned off, allowing you to override cruise control whenever necessary. The speed of the car will rise if the accelerator is pressed. The cruise control typically stays on when you release the gas pedal and brings the vehicle back to its predetermined pace.
On a 2020 Toyota Camry, how do you activate cruise control?
Turn on the cruise control setting by pressing the button in the center of the circle on the right side of the steering wheel. Push set, the button along the bottom of the ring, when you are moving at the desired speed. Use the button on the top of the ring to change the speed.
On a Toyota Camry, where is the cruise control sensor located?
Your car will automatically return to the dynamic radar cruise control setting once the engine is shut off. The right side interior panel of the trunk conceals the 2018 Toyota Camry parking sensor module.
Are there cruise controls on the 2019 Toyota Corolla?
L is the base grade for the 2019 Toyota Corolla. The L trim comes standard with a 6.1-inch touchscreen interface, Bluetooth connectivity, USB connectivity, a sound system with six speakers, and a CD player in addition to LED headlights, a tilt-and-telescoping steering wheel, a height-adjustable driver seat, automatic high beams, a 60/40-split folding rear seat, and other features. The 2019 Corolla comes equipped with a number of driver assistance systems as standard equipment, including a rearview camera, adaptive cruise control, lane departure warning with steering assistance, forward collision warning with automated emergency braking, and pedestrian recognition.
Toyota Corolla Optional Features
Of course, each of the 2019 Corolla’s higher trims contributes in some way to the addition of more features. The heated mirrors, keyless entry, metallic cabin elements, improved upholstery, a back row armrest, and automatic climate control are all added to LE models. An efficient engine is substituted for the normal one in the LE Eco trim. Conveniences like heated front seats and a leather-wrapped steering wheel are added in the 2019 Corolla XLE. Sunroof, sport-style instrument cluster, keyless ignition and entry, and a rear spoiler are added to SE models. The XSE level also has paddle shifters and full SofTex upholstery.
Looking to purchase a 2019 Toyota Corolla? Discover your new car right now by browsing our online inventory.
How does the cruise control on a Toyota work?
The Toyota automobiles’ adaptive cruise control operates by spotting other cars in its lane. Depending on how close you are to other vehicles, it might both speed up and slow down your car. If necessary, it can even automatically apply the brakes.
You must push the On/Off button to turn on the ACC. The stalk must then be turned on by accelerating to the desired speed. Press the stalk and keep it down to set the ACC to that speed; after that, you can let go of it. You can use the On/Off Button once more to turn off the ACC.
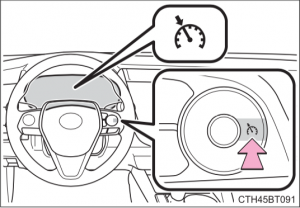
How do you utilize the dynamic Toyota cruise control?
Simply press the Dynamic Radar Cruise Control button for around two seconds to enter standard cruise control. The indicator light will flash to let you know this has happened. Your Toyota vehicle will automatically return to Dynamic Radar Cruise Control once you turn it off.
Use of cruise control and fuel usage
Yes, generally speaking. Due to its capacity to maintain a constant pace, cruise control can help you become more fuel-efficient and can help you save on gas on average by 714%. In contrast, the constant acceleration and deceleration caused by the driver’s foot on the pedals might use up more gas.
Toyota first used adaptive cruise control when?
On the Japanese market Celsior, Toyota featured a “laser adaptive cruise control” (lidar) system. Instead of using the brakes to slow down, it used throttle control and downshifting. In 1999, Mercedes-Benz launched “Distronic,” the company’s first radar-assisted ACC, to the CL-Class and S-Class models.
Is there adaptive cruise control on the Toyota Camry?
It’s hardly surprising that the Camry has managed to change into the car it is now given that it has withstood the test of time. The adaptive cruise control technology, commonly known as Dynamic Radar Cruise Control (DRCC), is one of the most recent upgrades to the Camry. Toyota developed DRCC to handle cruise control on congested roadways. This reflects the culmination of years of work by the Toyota research and development teams and represents a significant shift in the paradigm of cruise control systems. The Toyota Pre Collision System and Brake Assist may be smoothly integrated with the DRCC to produce a significantly safer vehicle. Let’s examine the DRCC’s operation.
Mechanical Details of the DRCC
With cruise control on, the car will automatically maintain its current pace while reliant on your input for modest steering and braking adjustments, allowing you to take a break on any stretch of road. The DRCC goes a step further by employing active vehicle-to-vehicle distance control to instantly apply the brakes whenever a different automobile moves into the lane in front of you. The car uses radar technology to measure the speed of the car in front of you and then automatically adjusts its own speed to keep the predetermined following distance. It’s similar to letting your car drive itself.
How does the Toyota Camry 2022’s cruise control work?
speeding up the car To turn on the cruise control, press the primary switch. An indicator for the cruise control will be shown. To turn off the cruise control, press the switch one more time.
On a Toyota Corolla 2021, how do you activate cruise control?
Pressing the On/Off button at the end of the arm activates the Adaptive Cruise Control system. The Adaptive Cruise Control switch is located on the bottom right side of the steering wheel, and the Corolla’s display screen will display a radar-ready indicator.
Why is the radar cruise control in my car unavailable?
The front sensors of your Toyota could be obstructed by snow or dirt. Simply clean the front grill of your car to make room for the sensor. You should be able to utilize cruise control once more after doing this, which should turn off the notification. Try it again after taking your car through the car wash if you’re still experiencing issues.

Toyota Camry (2018) manual

manual Toyota Camry (2018)

- Pictorial index
and security
Operation of, interior features, maintenance, when trouble, specifications.
View the manual for the Toyota Camry (2018) here, for free. This manual comes under the category cars and has been rated by 9 people with an average of a 9.2. This manual is available in the following languages: English. Do you have a question about the Toyota Camry (2018) or do you need help? Ask your question here
- TABLE OF CONTENTS
- Before driving
- For safe driving
- SRS airbags
- Exhaust gas precautions
- Riding with children
- Child restraint systems
- Engine immobilizer system
- Warning lights and indicators
- Gauges and meters
- Multi-information display (4.2-inch display)
- Multi-information display (7-inch display)
- Head-up display*
- Fuel consumption information
- Smart key system*
- Front seats
- Rear seats (folding type)*
- Head restraints
- Steering wheel
- Inside rear view mirror
- Outside rear view mirrors
- Power windows
- Panoramic moon roof*
- Driving the vehicle
- Cargo and luggage
- Vehicle load limits
- Trailer towing
- Dinghy towing
- Automatic transmission
- Turn signal lever
- Parking brake*
- Electric parking brake*
- Brake Hold*
- Headlight switch
- Automatic High Beam*
- Windshield wipers and washer
- Opening the fuel tank cap
- Toyota Safety Sense P*
- PCS (Pre-Collision System)*
- LDA (Lane Departure Alert with steering control)*
- Dynamic radar cruise control*
- Cruise control*
- Driving assist systems
- BSM (Blind Spot Monitor)*
- Rear Camera Detection Function*
- Intuitive parking assist*
- Intelligent Clearance Sonar (ICS)*
- Driving mode select switches*
- Winter driving tips
- Manual air conditioning system*
- Automatic air conditioning system (without “SYNC” button)*
- Automatic air conditioning system (with “SYNC” button)*
- Seat heaters*
- Interior lights list
- List of storage features
- Trunk features
- Other interior features
- Garage door opener*
- Safety Connect*
- 6-1. Maintenance and care
- Maintenance requirements
- General maintenance
- Do-it-yourself service precautions
- Positioning a floor jack
- Engine compartment
- Tire inflation pressure
- Air conditioning filter
- Checking and replacing fuses
- Light bulbs
- Emergency flashers
- If your vehicle needs to be towed
- If you think something is wrong
- Fuel pump shut off system
- If a warning message is displayed
- If the engine will not start
- If the vehicle battery is discharged
- If your vehicle overheats
- If the vehicle becomes stuck
- Maintenance data (fuel, oil level, etc.)
- Fuel information
- Tire information
- Customizable features
- Items to initialize
- Reporting safety defects for U.S. owners
- Seat belt instructions for Canadian owners (in French)
- SRS airbag instructions for Canadian owners (in French)
- What to do if... (Troubleshooting)
- Alphabetical index
- GAS STATION INFORMATION
Do you have a question about the Toyota and is the answer not in the manual?
- Receive updates on solutions
- Get answers to your question
Question and answer
Hi thank you for the comprehensive effort, i want to ask how can i download the PDF of Toyota Camry Hybrid 2018 cuz i don't have internet all the time, please.
The Toyota Camry (2018) is a midsize sedan that offers comfortable seating for up to five passengers. It is powered by a standard four-cylinder engine, providing adequate acceleration and fuel efficiency. There is also an available V6 engine option for those seeking more power. The exterior of the Camry features a sleek and modern design, with distinctive LED headlights and a prominent front grille. Inside, the cabin is well-appointed with high-quality materials and a user-friendly infotainment system. The Camry offers a spacious trunk with ample cargo space for everyday items. In terms of safety, the Camry comes equipped with a suite of advanced features, including forward collision warning, lane departure warning, and adaptive cruise control. These technologies help prevent accidents and provide peace of mind on the road. The driving experience in the Camry is comfortable and smooth, thanks to its refined suspension and precise steering. It handles well, with responsive brakes and good overall stability. Fuel efficiency is also a highlight, with the Camry achieving respectable mileage in both city and highway driving. Overall, the Toyota Camry (2018) is a reliable and practical choice for those in the market for a midsize sedan. Its combination of comfort, safety, and fuel efficiency make it a popular option among consumers.
Can't find the answer to your question in the manual? You may find the answer to your question in the FAQs about the Toyota Camry (2018) below.
How do I convert miles into kilometres?
1 mile equals 1.609344 kilometers and 1 kilometer equals 0.62137119 miles.
Where can I find the VIN number of my Toyota?
The location of the VIN number of the car differs per brand and type of car. The code may be stamped on the frame of the car or mounted on a plate. It is best to consult the manual of the Toyota Camry (2018)for the exact location of the VIN number.
What is a VIN number?
The VIN number of a car is an identification number unique to each car. The abbreviation VIN therefore stands for Vehicle Identification Number.
When does my Toyota need maintenance?
Regular maintenance is necessary for every car. How often the car needs maintenance and what exactly needs to be done can be found in the maintenance instructions. For major periodic service, this should generally be done every 2 years or after 30,000 kilometres.
When should I change the brake fluid of my Toyota?
It is recommended to change the brake fluid every two years.
What is the difference between E10 and E5 petrol?
E10 petrol consists of up to ten per cent ethanol while E5 petrol will contain less than five per cent ethanol. As a result, the percentage of E10 petrol is lower than that of E5 petrol, making it less bad for the environment.
One or more doors won't open from the inside. Now what?
The lock is most likely set to the child safety lock so it cannot be opened from the inside. How to unset the child safety lock differs per brand and type.
My car radio does not turn on, now what?
If your car radio does not turn on, it will not receive any power. Check that the red wire is connected to the contact power supply and the yellow wire to the constant power supply.
How do I connect my smartphone to the car's Bluetooth system?
To connect your smartphone to the car's Bluetooth system, navigate to the audio settings on the car's infotainment system. Look for the "Bluetooth" option and select it. Then, follow the on-screen prompts to pair your phone with the car.
How can I set the cruise control on my Toyota Camry?
To set the cruise control, locate the cruise control buttons on the steering wheel. Press the "On" button to activate it. Then, use the "Set" button to set your desired speed. Adjust the speed using the "+" and "-" buttons.
What should I do if the tire pressure warning light comes on?
If the tire pressure warning light illuminates, it indicates that one or more of your tires may be underinflated. Find a safe place to park and manually check the tire pressure using a tire pressure gauge. If needed, inflate the tires to the recommended pressure stated on the driver's door jamb.
How do I change the headlights on my Toyota Camry?
To change the headlights, first, locate the headlight assembly behind the front grille. Twist and remove the bulb cover. Then, disconnect the electrical connector from the bulb. Remove the old bulb and replace it with a new one, ensuring it is securely in place. Finally, reattach the electrical connector and the bulb cover.
How can I adjust the climate control settings in my Toyota Camry?
To adjust the climate control settings, locate the climate control buttons on the center console. Use the temperature control buttons to increase or decrease the desired temperature. You can also select different airflow options and adjust the fan speed to your preference.
Is the manual of the Toyota Camry (2018) available in English?
Yes, the manual of the Toyota Camry (2018) is available in English .
Is your question not listed? Ask your question here

Toyota Camry (2012)

Toyota Camry (2015)

Toyota Camry (2014)

Toyota Camry (2013)

Toyota Camry (2011)

Toyota Camry (2010)

Toyota Camry (2008)

Toyota Camry (2016)

Toyota Camry (2019)

Toyota Camry (2017)
- Cars for Sale
- Research & Reviews
- News & Videos
- Sell Your Car
- Sign in with Google
- Sign in with Facebook
- Sign in with Apple
EXPERT REVIEW
2025 Toyota Camry Review: Thank Goodness for Sedans

By Conner Golden
The verdict: We’re going to miss the old V-6, but the refreshed 2025 Toyota Camry’s hybrid-only drivetrain, stylistic rework and impressive uplevel trims make the segment superstar one of the best mid-size sedans you can buy.
Versus the competition: The class is getting smaller, but the 2025 Camry is the freshest in the mid-size sedan segment, though others have their merits. From a value and efficiency perspective, the Camry is king, but look to the Hyundai Sonata for style and the Honda Accord for driving feel.
Why, yes! Folks still buy sedans in 2024. Despite SUVs of all types and trade gulping down more than half of the U.S.’ market share last year, non-luxury sedans are still big business. Just look to the Toyota Camry as the primary bellwether; just over 290,000 buyers snapped up the perennially popular mid-size sedan last year, handily outselling mega-popular SUVs like the Nissan Rogue and Hyundai Tucson.
Related: 2025 Toyota Camry: All Hybrid, All the Time

This was enough sales success to earn a significant refresh for the new model year, but Toyota wasn’t content with leaving the proven formula as-is. So, the new 2025 Toyota Camry is now hybrid-only in the States, with the only drivetrain-related choice being front- or all-wheel drive. This is arguably the Camry’s most significant powertrain shake-up since a V-6 engine was first offered back in 1988.
Power Struggle
Speaking of that beloved sixer — well, it’s dead. That hybridized four-banger is your sole source of propulsion, presenting both good and bad news depending on your preferences. Base fuel economy is, predictably, way, way up, with Toyota estimating the thriftiest FWD Camry LE returning 53/50/51 mpg city/highway/combined, a moonshot away from the outgoing Camry LE’s EPA-estimated 28/39/32 mpg EPA rating.
This is, of course, not a completely fair comparison. Compared with the prior Camry Hybrid LE, the numbers are far closer; the 2024 Hybrid LE sipped fuel to the tune of 51/53/52 mpg. The fifth-generation hybrid system in the 2025 Camry makes more power — 225 horsepower with FWD and 232 hp with AWD — and the system still uses a naturally aspirated 2.5-liter four-cylinder engine. Also rote is the new Camry’s significant mpg spread; between extra weight, suspension changes and aerodynamic differences, the new Camry’s manufactured-estimated fuel efficiency falls as low as 44 mpg combined for the AWD XSE grade.

That’s the good news. The not-so-great news is the distinct lack of a higher-output powertrain option previously filled by the 301-hp V-6. Now, all FWD trims buzz around with 225 hp and at least 163 pounds-feet of torque, with the AWD configuration bumping output to 232 hp. We say “at least” due to Toyota’s persistent refusal to publish combined torque figures, so all we’re left with is that 163 pounds-feet rating for the engine and a separate 153 pounds-feet output for the hybrid system’s electric motor.
It’s a bummer, but if we had to guess, the six joined the great engine dyno in the sky due to a combination of efficiency priorities and likely low take rate when compared with the base four-cylinder model and the popular hybrid. If we’re being goofy for a moment — and we love being goofy — we could see Toyota filling that void with the Crown’s 340-hp Hybrid Max powertrain, perhaps in a forthcoming TRD performance trim.
Related Video:
Same-Same Size
We might be onto something there, at least on the TRD front. Toyota has split the Camry into two distinct suspension configurations, with sportier SE and XSE trims riding on stiffer shocks and incorporating a larger front stabilizer bar. This practice isn’t entirely removed from the prior generation, though Toyota is quite proud of the SE/XSE differentiation this time around.
Dimensionally, there’s not a whole lot different from the old car, with the base LE adding only 1.4 inches in overall length, leaving width, height and wheelbase unchanged. More hybrid hardware to lug around boosts curb weight of the base LE by 140 pounds to 3,450 pounds, but the 2025 XSE with FWD is 42 pounds lighter than the same trim of the 2024 Camry Hybrid.

The same can’t be said stylistically, as Toyota went to town on the new car to make sure you won’t mistake the 2025 Camry for anything else. The new car is more angular and hard-edged than before, wearing a “hammerhead” grille design, according to Toyota. What hasn’t been sharpened is sleekened, especially the headlights and taillights, the former channeling more than a smidge of Prius in the face.
Based on those dimensions and the general appearance, it’s clear most of the structure under the new skin is carried over from the last Camry, but the exterior is peppered with plenty of little details that complement the broader stylistic strokes. Our favorite touches are the micro-canards found at the lower, outer edges of the front bumper that are tres- TRD, even if they’re purely for improved aero efficiency.
Lovely When Loaded
All of this continues to the interior, where you’ll interact with a design language Toyota calls “open-concept.” We interpret that this refers primarily to the cavernous, open portion under the center of the dash and the scalloped portion of the passenger-side dash. Either way, tech and creature comforts are the centerpiece of at least the higher trims; the high-grade Camry XSE we tested was decked out to a genuinely impressive degree.
Latest news

GM Launches GM Energy to Provide Home Energy Independence, Flexibility

Tesla Recalls 2024 Cybertrucks for Accelerator Pedal Malfunction Risk

New 2025 Toyota Camry Priced From $29,495

Given that “Camry” is a rough transliteration of the Japanese word for “crown,” it’s fitting that chunks of the interior appear grafted straight from the Crown premium sedan. Specifically, our test car’s 12.3-inch center infotainment display is right from the bigger, more expensive car, supported by a matching 12.3-inch digital gauge cluster and an optional head-up display.
Top-spec Camrys were always well equipped, but not to this degree. After futzing around, we struggled to find any feature we’d like to see added, enjoying niceties like dual-zone automatic climate control, heated and ventilated power-adjustable leather-trimmed front seats, a panoramic glass roof, wireless charging and a nine-speaker JBL premium audio system. You’re going to pay for the privilege — more on that later — but there is nothing “Camry” about this loaded example. We can’t say the same for lower trims just yet, but we’ll restrict our opinions to what we experienced on the open road.

Haven’t I Driven You Before?
It will come as no surprise that the 2025 Camry drives a whole heck of a lot like, ah, the 2024 Camry with a raft of powertrain improvements. Despite our moaning, the power of the revamped hybrid drivetrain is well beyond what the average buyer requires, with confident passing capability and strong (enough) merging speed. Noise, vibration and harshness are remarkably improved over the outgoing hybrid thanks in no small part to the development team’s focus on boosting battery power to intentionally reduce engine revs during aggressive acceleration.
This makes for a markedly more refined experience. One of the most effective ways to elevate a car past its price is to reduce thrash ‘n gnash, and this goes a long way in this case. For the first time in recent memory, we’re not left pining for better sound isolation after an extended drive in an “affordable” sedan.
Similarly upscale is the Camry’s body composure. Ride quality of the XSE’s sport-tuned suspension is excellent for the class, with well-tuned damping and bump isolation. We’ve long been fans of the Camry’s TNGA-K platform, and maybe we’re just too accustomed to SUVs and ultra-heavy electric vehicles, but for a non-performance car, the 2025 Camry’s confident handling through the California canyons was a breath of fresh air. It’s not a remote replacement for your GR86 or GR Corolla, but you’ll at least crack a half-smile the next time you must meet your weekend hiking crew at that alpine trailhead.

Other elements of the driving experience are more pedestrian but not unexpected, including the continuously variable automatic transmission’s understandable languidness, the artificial steering feel and the noticeable regenerative portion of the brake pedal’s travel. Don’t mistake any of this for derision; the 2025 Camry is exactly what it needs to be and is far better to drive than any SUV could ever hope to be.
More From Cars.com:
- 2025 Toyota Camry Up Close: Still Kicking, Now With Even More Style
- 2024 Hyundai Sonata Vs. 2025 Kia K5 Vs. 2025 Toyota Camry: Auto Show Faceoff
- Toyota Camry Hybrid Vs. Honda Accord Hybrid: Which Is Best?
- 2023 Honda Accord Hybrid Vs. 2023 Toyota Camry Hybrid: Which Gets Better Real-World Gas Mileage?
- Shop for a 2025 Toyota Camry
Sweet Safety
We thankfully never overstepped the car’s capabilities and engaged the rather large suite of active safety features, but we’d be remiss if we didn’t mention that Toyota Safety Sense 3.0 is standard. Aside from all the usual features like automatic high-beam headlights, pre-collision braking, adaptive cruise control, and lane departure warning with steering assist, Proactive Driving Assist is an interesting feature that automatically assists with keeping distance from the car ahead of you and any cyclists you come near. For those trying to win the configurator high score, XLE and XSE trims are available with additional safety tech, including front cross-traffic alert, lane change assist, a 360-degree camera system, and front and rear parking sensors.

Even if you aren’t super careful with the order form, the inevitable pricing increase isn’t too bad when compared with the older Camry. Let’s start with the base LE, which starts at $29,495 (all prices include destination); trim for trim, the 2025 Camry adds a not-insignificant $1,980 compared with the never-gonna-find-it, stripped-out 2024 LE. Ouch, but compare it with the 2024 LE Hybrid, and the new car is cheaper by $455. This type of subtle price difference goes all the way up the chain, with hybrid-to-hybrid differences of $305 and $310 extra for the new XSE and SE trims, and a $345 price decrease for the 2025 XLE.
This pricing pattern is a fitting metaphor for the 2025 Toyota Camry as a whole — some things are vastly different, while others are right where you left them. Toyota’s latest mid-size sedan is an impressive and well-executed update to an automotive touchstone that should (read: hopefully) give the shrinking sedan segment a shot in the arm.
Cars.com’s Editorial department is your source for automotive news and reviews. In line with Cars.com’s long-standing ethics policy, editors and reviewers don’t accept gifts or free trips from automakers. The Editorial department is independent of Cars.com’s advertising, sales and sponsored content departments.

- Toyota Manuals
- Owner's manual
Toyota CAMRY 2016 Owner's Manual
- Owner's manual (572 pages)
- Owner's manual (568 pages)
- Quick reference manual (48 pages)
- page of 571 Go / 571
Table of Contents
Troubleshooting.
- For Your Information
- Event Data Recorder
- Reading this Manual
- How to Search
- Pictorial Index
- Instrument Panel
- Before Driving
- For Safety Drive
- Adjusting the Mirrors
- SRS Airbags
- Front Passenger Occupant Classification System
- Safety Information for Children
- Child Restraint Systems
- Installing Child Restraints
- Exhaust Gas Precautions
- Engine Immobilizer System
- Instrument Cluster
- Gauges and Meters
- Multi-Information Display
- Drive Information
- Fuel Consumption Information
- Operation of each Component
- Smart Key System
- Front Seats
- Head Restraints
- Steering Wheel
- Inside Rear View Mirror
- Outside Rear View Mirrors
- Power Windows
- Driving the Vehicle
- Cargo and Luggage
- Vehicle Load Limits
- Trailer Towing
- Dinghy Towing
- Smart Key System)
- Engine (Ignition) Switch (Vehicles with a Smart Key System)
- Automatic Transmission
- Turn Signal Lever
- Operating Instructions
- Parking Brake
- Headlight Switch
- Operating the Lights and
- Automatic High Beam
- Windshield Wipers and Washer
- Opening the Fuel Tank Cap
- Cruise Control
- Approach Warning
- (Lane Departure Alert)
- Rear View Monitor System
- (Pre-Collision System)
- The Blind Spot Monitor Function
- The Rear Cross Traffic Alert Function
- Winter Driving Tips
- 5-1. Basic Operations
- Using the Multimedia System
- Listening to a USB
- Use Wireless
- Audio Player for the
- Connecting a Bluetooth
- Displaying a Bluetooth
- Detailed Bluetooth
- Audio System Types
- Audio System
- Steering Wheel Audio Switches
- USB Port/Aux Port
- Basic Audio Operations
- General Settings
- Audio Settings
- Display Settings
- Voice Settings
- Selecting the Audio Source
- List Screen Operation
- Optimal Use of the Multimedia System
- Radio Operation
- CD Player Operation
- MP3/WMA/AAC Discs
- Memory Device
- Communication
- Connecting Bluetooth ® Preparations to Use Wireless Communication
- Registering a Bluetooth
- Phone for the First
- Registering a Bluetooth ® Device
- Bluetooth Devices
- Connecting a Bluetooth Device
- Device Details
- Displaying a Bluetooth Device Details
- System Settings
- Detailed Bluetooth System Settings
- Bluetooth ® Audio
- Listening to Bluetooth ® Audio
- Bluetooth ® Phone
- Making a Call
- Receiving a Call
- Speaking on the Phone
- Using the Steering Wheel Switches
- Bluetooth ® Phone Settings
- Contact/Call History Settings
- (Troubleshooting)
- Using the Voice
- Voice Command
- Command List
- Interior Features
- Using the Air Conditioning System and Defogger Manual Air Conditioning System
- Air Outlets
- Automatic Air Conditioning System
- Other Functions
- Seat Heaters
- Interior Lights
- Personal Lights
- Console Box
- Coin Holder
- Bottle Holders
- Cup Holders
- Auxiliary Boxes
- Trunk Features
- Vanity Mirrors
- 6-4. Other Interior Features
- Power Outlets
- Assist Grips
- Garage Door Opener
- Safety Connect
- Maintenance and Care
- 7-1. Maintenance and Care
- Cleaning and Protecting the Vehicle Interior
- Maintenance Requirements
- Maintenance
- General Maintenance
- Vehicle Interior
- Emission Inspection and Maintenance (I/M) Programs
- Precautions
- Do-It-Yourself Maintenance Do-It-Yourself Service Precautions
- Positioning a Floor Jack
- Engine Coolant
- Brake Fluid
- Washer Fluid
- Tire Inflation Pressure
- Air Conditioning Filter
- Wireless Remote Control/Electronic Key Battery
- Checking and Replacing Fuses
- Light Bulbs
- When Trouble Arises
- Emergency Flashers
- If Your Vehicle Has to be Stopped in an Emergency
- If Your Vehicle Needs to be Towed
- If You Think Something Is Wrong
- Fuel Pump Shut off System
- If a Warning Light Turns on or a Warning Buzzer Sounds
- If a Warning Message or Indicator Is Displayed
- If You Have a Flat Tire
- If the Engine will Not Start
- If the Shift Lever Cannot be Shifted from P
- If the Electronic Key Does Not Operate Properly
- If the Vehicle Battery Is Discharged
- If Your Vehicle Overheats
- If the Vehicle Becomes Stuck
- Vehicle Specifications
- (Fuel, Oil Level, Etc.)
- Lubrication System
- Cooling System
- Electrical System
- Ignition System
- Automatic Transaxle
- Fuel Information
- Tire Information
- Customizable Features
- 9-3. Items to Initialize
- Reporting Safety Defects for U.S. Owners
- Seat Belt Instructions for Canadian Owners (in French)
- SRS Airbag Instructions for Canadian Owners (in French)
- What to Do if
- Alphabetical Index
- Gas Station Information
Advertisement
Quick Links
- 1 Multi-Information Display
- 2 Garage Door Opener
- Download this manual
- What to do if 313
Related Manuals for Toyota CAMRY 2016

Summary of Contents for Toyota CAMRY 2016
- Page 1 I n f o r ma t i o n P r o v i d e d b y :...
- Page 2 I n f o r ma t i o n P r o v i d e d b y :...
- Page 3 Pictorial index Search by illustration For safety Make sure to read through them and security Instrument How to read the gauges and meters, the variety of cluster warning lights and indicators, etc. Operation of Opening and closing the doors and windows, each adjustment before driving, etc.
Page 4: Table Of Contents
- Page 5 4-5. Using the driving Driving support systems Cruise control ....181 Dynamic radar cruise 4-1. Before driving control......186 Driving the vehicle..... 140 Cargo and luggage.... 147 (Lane Departure Alert)..199 Vehicle load limits ..... 150 Rear view monitor Trailer towing..... 151 system ......
- Page 6 TABLE OF CONTENTS 5-5. Playing an audio CD and Audio system MP3/WMA/AAC discs CD player operation...261 5-6. Using an external 5-1. Basic Operations device Audio system types ... 240 Listening to an iPod ...267 Audio system..... 242 Listening to a USB Steering wheel audio memory device ....271 switches ......
- Page 7 ® 5-8. Bluetooth Audio Interior features ® Listening to Bluetooth Audio ....... 288 ® 5-9. Bluetooth phone 6-1. Using the air conditioning ® Using a Bluetooth system and defogger Phone......289 Manual air conditioning Making a call ..... 291 system ......326 Automatic air conditioning Receiving a call ....
- Page 8 TABLE OF CONTENTS Maintenance and care When trouble arises 7-1. Maintenance and care 8-1. Essential information Cleaning and protecting Emergency flashers...438 the vehicle exterior..374 If your vehicle has to Cleaning and protecting be stopped in an the vehicle interior... 377 emergency.......
- Page 9 Vehicle specifications Index 9-1. Specifications What to do if... (Troubleshooting).....548 Maintenance data (fuel, oil level, etc.) ..498 Alphabetical index ......552 Fuel information ....507 Tire information ....510 9-2. Customization Customizable features ..523 9-3. Items to initialize Items to initialize....532 For owners Reporting safety defects for U.S.
Page 10: For Your Information
- Page 11 ● Usage of data collected through Safety Connect (U.S.mainland only) If your Toyota has Safety Connect and if you have subscribed to those ser- vices, please refer to the Safety Connect Telematics Subscription Service Agreement for information on data collected and its usage.
Page 12: Event Data Recorder
- Page 13 Be sure to have the systems of the SRS airbag and seat belt pretensioner removed and disposed of by a qualified service shop or by your Toyota dealer before you scrap your vehicle.
Page 14: Reading This Manual
Page 15: how to search, page 16: pictorial index.
- Page 17 Pictorial index Windshield wipers ....... . . P. 176 Precautions against winter season ..... P. 234 Fuel filler door .
Page 18: Instrument Panel
- Page 19 Pictorial index Parking brake ........P. 165 Applying/releasing .
- Page 20 Pictorial index ■ Switches BSM (Blind Spot Monitor) main switch ....P. 226 VSC OFF switch ....... P. 215, 216 LDA (Lane Departure Alert) switch .
- Page 21 Pictorial index Audio remote control switches ..... P. 244 Telephone switches ......P. 301 Talk switch .
- Page 22 Pictorial index Wireless charger switch ......P. 347 Seat heater switches ......P. 337 : If equipped I n f o r ma t i o n P r o v i d e d b y :...
- Page 23 Pictorial index ■ Interior SRS airbags ........P. 34 Floor mats.
- Page 24 Pictorial index Auxiliary boxes ........P. 346 Moon roof switches .
- Page 25 For safety and security 1-1. For safe use Before driving...... 24 For safety drive ....26 Seat belts ......28 SRS airbags......34 Front passenger occupant classification system ..47 Safety information for children ......53 Child restraint systems..54 Installing child restraints..
Page 26: 1-1. For Safe Use
- Page 27 When installing the driver’s floor mat ● Do not use floor mats designed for other models or different model year vehicles, even if they are Toyota Genuine floor mats. ● Only use floor mats designed for the driver’s seat. ●...
Page 28: For Safety Drive
Page 29: adjusting the mirrors, page 30: seat belts.
- Page 31 1-1. For safe use Adjusting the seat belt shoulder anchor height (front seats) Push the seat belt shoulder anchor down while pressing the release button. Push the seat belt shoulder anchor up. Move the height adjuster up and down as needed until you hear a click.
- Page 32 Toyota dealer free of charge. ■ Rear seat belt Use the seat belt after passing it through the guide if the seat belt comes free from the guide.
- Page 33 Each seat belt should be used by one person only. Do not use a seat belt for more than one person at once, including children. ● Toyota recommends that children be seated in the rear seat and always use a seat belt and/or an appropriate child restraint system. ●...
- Page 34 ● Ensure that the belt and plate are locked and the belt is not twisted. If the seat belt does not function correctly, immediately contact your Toyota dealer. ● Replace the seat assembly, including the belts, if your vehicle has been involved in a serious accident, even if there is no obvious damage.
- Page 35 1-1. For safe use WARNING ■ Using a seat belt extender ● Do not wear the seat belt extender if you can fasten the seat belt without the extender. ● Do not use the seat belt extender when installing a child restraint system because the belt will not securely hold the child restraint system, increas- ing the risk of death or serious injury in the event of an accident.
Page 36: Srs Airbags
- Page 37 1-1. For safe use ◆ SRS side and curtain shield airbags SRS front side airbags Can help protect the torso of the front seat occupants SRS rear side airbags Can help protect the torso of occupants in the rear outer seats SRS curtain shield airbags ●...
- Page 38 1-1. For safe use SRS airbag system components Front impact sensors “AIR BAG ON” and “AIR BAG OFF” indicator lights Front passenger occupant classification system (ECU SRS warning light and sensors) Front passenger’s seat belt Knee airbags buckle switch Side impact sensors (front Airbag sensor assembly doors) Side impact sensors (rear)
- Page 39 1-1. For safe use WARNING ■ SRS airbag precautions Observe the following precautions regarding the SRS airbags. Failure to do so may cause death or serious injury. ● The driver and all passengers in the vehicle must wear their seat belts properly.
- Page 40 An infant or child who is too small to use a seat belt should be properly secured using a child restraint sys- tem. Toyota strongly recommends that all infants and children be placed in the rear seats of the vehicle and properly restrained. The rear seats are safer for infants and children than the front passenger seat.
- Page 41 1-1. For safe use WARNING ■ SRS airbag precautions ● Do not sit on the edge of the seat or lean against the dashboard. ● Do not allow a child to stand in front of the SRS front passenger airbag unit or sit on the knees of a front passenger.
- Page 42 1-1. For safe use WARNING ■ SRS airbag precautions ● Do not attach anything to or lean any- thing against areas such as the dash- board, steering wheel pad and lower portion of the instrument panel. These items can become projectiles when the SRS driver, front passenger and knee airbags deploy.
- Page 43 If the areas where the SRS airbags are stored, such as the steering wheel pad and front and rear pillars garnishes, are damaged or cracked, have them replaced by your Toyota dealer. ● Do not place anything, such as a cushion, on the front passenger's seat.
- Page 44 Modification and disposal of SRS airbag system components Do not dispose of your vehicle or perform any of the following modifications without consulting your Toyota dealer. The SRS airbags may malfunction or deploy (inflate) accidentally, causing death or serious injury.
- Page 45 1-1. For safe use ■ If the SRS airbags deploy (inflate) ●Bruising and slight abrasions may result from contact with a deploying (inflating) SRS airbag. ●A loud noise and white powder will be emitted. ●Parts of the airbag module (steering wheel hub, airbag cover and inflator) as well as the front seats, parts of the front and rear pillars, and roof side rails, may be hot for several minutes.
- Page 46 1-1. For safe use ■ Conditions under which the SRS airbags may deploy (inflate), other than a collision The SRS front airbags and SRS side and curtain shield airbags may also deploy if a serious impact occurs to the underside of your vehicle. Some examples are shown in the illustration.
- Page 47 1-1. For safe use ■ Types of collisions that may not deploy the SRS airbags (SRS side and curtain shield airbags) The SRS side and curtain shield airbags may not activate if the vehicle is subjected to a collision from the side at certain angles, or a collision to the side of the vehicle body other than the passenger compartment.
- Page 48 When to contact your Toyota dealer In the following cases, the vehicle will require inspection and/or repair. Con- tact your Toyota dealer as soon as possible. ●Any of the SRS airbags have been inflated. ●The front of the vehicle is damaged or...
Page 49: Front Passenger Occupant Classification System
- Page 50 1-1. For safe use Condition and operation in the front passenger occupant classi- fication system Adult ■ “AIR BAG ON” and “AIR BAG OFF” indi- “AIR BAG ON” cator lights Indicator/ SRS warning light warning light Seat belt reminder light flashing Front passenger airbag Side airbag on the front...
- Page 51 1-1. For safe use Child restraint system with infant ■ “AIR BAG ON” and “AIR BAG OFF” indica- “AIR BAG tor lights OFF” Indicator/ SRS warning light warning light Seat belt reminder light flashing Front passenger airbag Deactivated Side airbag on the front passenger seat Activated Devices...
- Page 52 1-1. For safe use There is a malfunction in the system ■ “AIR BAG ON” and “AIR BAG OFF” “AIR BAG indicator lights OFF” Indicator/ warning light SRS warning light Seat belt reminder light Front passenger airbag Deactivated Side airbag on the front passenger seats Activated Devices...
- Page 53 1-1. For safe use WARNING ■ Front passenger occupant classification system precautions Observe the following precautions regarding the front passenger occupant classification system. Failure to do so may cause death or serious injury. ● Wear the seat belt properly. ● Make sure the front passenger’s seat belt plate has not been left inserted into the buckle before someone sits in the front passenger seat.
- Page 54 SRS warning light may come on to indicate a malfunction of the front passenger occupant classification system. In this case, contact your Toyota dealer immediately. ● Child restraint systems installed on the rear seat should not contact the front seatbacks.
Page 55: Safety Information For Children
Page 56: child restraint systems.
- Page 57 1-1. For safe use Types of child restraints Child restraint systems are classified into the following 3 types according to the age and size of the child: Rear facing Infant seat/con- Forward facing Convertible vertible seat seat Booster seat ■...
- Page 58 ● Toyota strongly urges the use of a proper child restraint system that con- forms to the size of the child, installed on the rear seat. According to acci- dent statistics, the child is safer when properly restrained in the rear seat than in the front seat.
- Page 59 1-1. For safe use WARNING ■ When children are in the vehicle Do not allow children to play with the seat belt. If the seat belt becomes twisted around a child’s neck, it may lead to choking or other serious injuries that could result in death.
Page 60: Installing Child Restraints
- Page 61 1-1. For safe use Installation with LATCH system Widen the gap between the seat cushion and seatback slightly. Type A Latch the hooks of the lower straps onto LATCH anchors. If the child restraint has a top tether strap, the top tether strap should be latched onto the top tether strap anchor.
- Page 62 1-1. For safe use Installing child restraints using a seat belt (child restraint lock function belt) Rear-facing Infant seat/convertible seat ■ Place the child restraint sys- tem on the rear seat facing the rear of the vehicle. Run the seat belt through the child restraint system and insert the plate into the buckle.
- Page 63 1-1. For safe use While pushing child restraint system down into the rear seat, allow the shoulder belt to retract until the child restraint system is securely in place. After the shoulder belt has retracted to a point where there is no slack in the belt, pull the belt to check that it cannot be extended.
- Page 64 1-1. For safe use While pushing child restraint system into the rear seat, allow the shoulder belt to retract until the child restraint system is securely in place. After the shoulder belt has retracted to a point where there is no slack in the belt, pull the belt to check that it cannot be extended.
- Page 65 1-1. For safe use Removing a child restraint installed with a seat belt Push the buckle release button and fully retract the seat belt. Child restraint systems with a top tether strap Secure the child restraint sys- tem using the seat belt or LATCH anchors.
- Page 66 1-1. For safe use WARNING ■ When installing a booster seat To prevent the belt from going into ALR lock mode, do not fully extend the shoulder belt. ALR mode causes the belt to tighten only. This could cause injury or discomfort to the child. (→P. 30) ■...
- Page 67 1-1. For safe use WARNING ■ When installing a child restraint system ● When a booster seat is installed, always ensure that the shoulder belt is positioned across the center of the child’s shoulder. The belt should be kept away from the child’s neck, but not so that it could fall off the child’s shoulder.
Page 68: Exhaust Gas Precautions
Page 69: theft deterrent system.
- Page 70 1-2. Theft deterrent system ■ System maintenance The vehicle has a maintenance-free type engine immobilizer system. ■ Conditions that may cause the system to malfunction ●If the grip portion of the key is in contact with a metallic object ●If the key is in close proximity to or touching a key to the security system (key with a built-in transponder chip) of another vehicle ■...
Page 71: Alarm
- Page 72 1-2. Theft deterrent system ■ System maintenance The vehicle has a maintenance-free type alarm system. ■ Items to check before locking the vehicle To prevent unexpected triggering of the alarm and vehicle theft, make sure of the following: ●Nobody is in the vehicle. ●The windows and moon roof are closed before the alarm is set.
Page 73: Instrument Cluster
Page 74: instrument cluster warning lights and indicators.
- Page 75 2. Instrument cluster Warning lights Warning lights inform the driver of malfunctions in the indicated vehi- cle’s systems. Electric power steering Brake system warning system warning light light (→P. 446) (→P. 447) (U.S.A.) 1, 2, 3 Brake system warning Pre-collision system light (→P.
- Page 76 There may be a mal- function in a system if a light does not come on, or if the lights do not turn off. Have the vehicle inspected by your Toyota dealer. : If equipped : The light turns on when the system is turned off.
- Page 77 2. Instrument cluster Indicators The indicators inform the driver of the operating state of the vehicle’s various systems. Turn signal indicator Cruise control “SET” (→P. 164) indicator (→P. 181) 1, 2, 5 Headlight indicator Pre-collision system (→P. 166) warning light (→P. 219) (U.S.A.) LDA (Lane Departure 2, 4...
- Page 78 Have the vehicle inspected by your Toyota dealer immedi- ately if this occurs.
Page 79: Gauges And Meters
- Page 80 2. Instrument cluster Changing the odometer/trip meter display Pressing the display change but- ton changes the display as fol- lows. Odometer ■ Displays the total distance the vehicle has been driven. Trip meter A /trip meter B ■ Displays the distance the vehicle has been driven since the meter was last reset.
- Page 81 2. Instrument cluster ■ Eco driving indicator light During Eco-friendly acceleration (Eco driving), Eco Driving Indicator Light will turn on. When the acceleration exceeds the Eco driving accelerator upper limit, or the vehicle is stopped, the light turns off. Eco Driving Indicator Light will not operate in the following conditions: ●The shift lever is in anything other than ●The paddle shift switch is used.
- Page 82 2. Instrument cluster NOTICE ■ To prevent damage to the engine and its components ● Do not let the indicator needle of the tachometer enter the red zone, which indicates the maximum engine speed. ● The engine may be overheating if the engine coolant temperature gauge is in the red zone (H).
Page 83: Multi-Information Display
- Page 84 2. Instrument cluster Warning message display Select to display warning messages and measures to be taken if a malfunction is detected. (→P. 454) Settings display Select to change the meter display settings. (→P. 84) Operating the meter control switches ■ Scroll up/down the screen and move up/down the cur- Switch menu...
Page 85: Drive Information
- Page 86 2. Instrument cluster Settings display Changing the settings ■ Select using the meter control switch. Select an item and then set it with the center button. Customizable items ■ ● Language Select to change the language displayed on the multi-information display.
- Page 87 2. Instrument cluster ● Maintenance system (U.S.A.) Select to reset the message after the required maintenance is performed. ( → P. 381) ● Initialization Registered or changed meter settings will be deleted or returned to their default setting. : Speed limit display may not be available for some regions. ■...
- Page 88 2. Instrument cluster WARNING ■ The information display at low temperatures Allow the interior of the vehicle to warm up before using the liquid crystal information display. At extremely low temperatures, the display monitor may respond slowly, and display changes may be delayed. For example, there is a lag between the driver’s shifting and the new gear number appearing on the display.
Page 89: Fuel Consumption Information
- Page 90 2. Instrument cluster Resetting the consumption data Average vehicle speed since the engine was started Elapsed time since the engine was started Fuel consumption in the past 15 minutes Cruising range (→P. 89) Current fuel consumption Vehicles without a smart key system: Average fuel consumption for the past 15 minutes is divided by color into past averages and averages attained since the engine switch was last turned to the “ON”...
- Page 91 2. Instrument cluster Past record Entune Audio system with “CAR” button Press the “CAR” button. If the “Trip Information” screen is displayed, select “Past Record”. Entune Audio system or navigation system with “APPS” button Press the “APPS” button. Touch “Eco” on the “Apps” screen. If the “Trip Information”...
- Page 92 2. Instrument cluster I n f o r ma t i o n P r o v i d e d b y :...
Page 93: Operation Of Each Component
Page 94: 3-1. key information.
- Page 95 (if equipped) (→P. 99) Opens the trunk (→P. 108) : This setting must be customized at your Toyota dealer. Vehicles without a smart key system (type B) Locks all the doors (→P. 99) Unlocks all the doors (→P. 99) Pressing the button unlocks the driver’s door.
- Page 96 (→P. 99) Opens the trunk (→P. 108) Sounds the alarm (→P. 95) : This setting must be customized at your Toyota dealer. Using the mechanical key (vehicles with a smart key system) To take out the mechanical key, push the release button and take the key out.
- Page 97 ■ If you lose your keys New genuine keys can be made by your Toyota dealer using the other key (vehicles without a smart key system) or the other mechanical key (vehicles with a smart key system) and the key number stamped on your key number plate.
- Page 98 3-1. Key information ■ Conditions affecting operation Vehicles without a smart key system The wireless remote control function may not operate normally in the follow- ing situations: ●When the wireless key battery is depleted ●Near a TV tower, electric power plant, gas station, radio station, large dis- play, airport or other facility that generates strong radio waves or electrical noise ●When carrying a portable radio, cellular phone or other wireless communi-...
- Page 99 If a wrong key is used (vehicles with a smart key system) The key cylinder rotates freely to isolate inside mechanism. ■ Customization that can be configured at Toyota dealer Settings (e. g. smart key system) can be changed. (Customizable features: →P. 523) ■...
- Page 100 When an electronic key is lost (vehicles with a smart key system) If the electronic key remains lost, the risk of vehicle theft increases signifi- cantly. Visit your Toyota dealer immediately with all remaining electronic keys that were provided with your vehicle.
Page 101: Doors
- Page 102 Press and hold to open the driver’s window and moon roof. (→P. 132, 135) : This setting must be customized at your Toyota dealer. ◆ Turning the key operates the doors as follows: Vehicles without a smart key system...
- Page 103 3-2. Opening, closing and locking the doors ■ Operation signals Doors: A buzzer sounds and the emergency flashers flash to indicate that the doors have been locked/unlocked. (Locked: Once; Unlocked: Twice) Driver’s window and moon roof: A buzzer sounds to indicate that the driver’s window and moon roof are open- ing.
- Page 104 3-2. Opening, closing and locking the doors Unlocking and locking the doors from the inside ◆ Door lock switches Locks all the doors Unlocks all the doors ◆ Inside lock buttons Locks the door Unlocks the door The front doors can be opened by pulling the inside handle even if the lock buttons are in the lock position.
- Page 105 3-2. Opening, closing and locking the doors Rear door child-protector lock The door cannot be opened from inside the vehicle when the lock is set. Unlock Lock These locks can be set to prevent children from opening the rear doors. Push down on each rear door switch to lock both rear doors.
- Page 106 3-2. Opening, closing and locking the doors Setting and canceling the functions ■ The automatic door locking and unlocking functions can be set or canceled on the audio system screen (→P. 523) or by following the procedure below. Vehicles without a smart key system: Close all the doors and switch the engine switch to the “ON”...
- Page 107 3-2. Opening, closing and locking the doors ■ Switching the door unlock function (vehicles with a smart key system) It is possible to set which doors the entry function unlocks using the wireless remote control. Turn the engine switch off. When the indicator light on the key surface is not on, press and hold for approximately 5 seconds while pressing and holding The setting changes each time an operation is performed, as shown below.
- Page 108 3-2. Opening, closing and locking the doors WARNING ■ To prevent an accident Observe the following precautions while driving the vehicle. Failure to do so may result in a door opening and an occupant falling out, resulting in death or serious injury. ●...
Page 109: Trunk
- Page 110 3-2. Opening, closing and locking the doors ◆ Wireless remote control Vehicles without a smart key system Press and hold the switch. Type A Type B Vehicles with a smart key system Press and hold the switch. I n f o r ma t i o n P r o v i d e d b y :...
- Page 111 3-2. Opening, closing and locking the doors ■ Operation signal A buzzer sounds to indicate that the trunk has been opened. ■ Trunk light The trunk light turns on when the trunk is opened. ■ Function to prevent the trunk being locked with the electronic key inside (vehicles with a smart key system) ●When all doors are being locked, closing the trunk lid with the electronic key left inside the trunk will sound an alarm.
- Page 112 3-2. Opening, closing and locking the doors WARNING Observe the following precautions. Failure to do so may result in death or serious injury. ■ Before driving ● Make sure that the trunk lid is fully closed. If the trunk lid is not fully closed, it may open unexpectedly while driving and hit near-by objects or luggage in the trunk may be thrown out, causing an accident.
- Page 113 ● Do not attach any accessories other than genuine Toyota parts to the trunk lid. Such additional weight on the trunk lid may cause the lid to suddenly shut again after it is opened.
Page 114: Smart Key System
- Page 115 3-2. Opening, closing and locking the doors ■ Effective range (areas within which the electronic key is detected) When locking or unlocking the doors The system can be operated when the electronic key is within about 2.3 ft. (0.7 m) of either of the front outside door handles.
- Page 116 3-2. Opening, closing and locking the doors Alarm Situation Correction procedure An attempt was made to lock either front door by opening a door and Interior alarm pings Retrieve the electronic putting the inside lock once and exterior alarm key from the vehicle button into the lock sounds once for 5 sec- and lock the doors...
- Page 117 3-2. Opening, closing and locking the doors ■ Electronic Key Battery-Saving Function When battery-saving mode is set, battery depletion is minimized by stopping the electronic key from receiving radio waves. Press twice while pressing and holding . Confirm that the electronic key indicator flashes 4 times.
- Page 118 3-2. Opening, closing and locking the doors ■ Note for the entry function ●Even when the electronic key is within the effective range (detection areas), the system may not operate properly in the following cases: • The electronic key is too close to the window or outside door handle, near the ground, or in a high place when the doors are locked or unlocked.
- Page 119 3-2. Opening, closing and locking the doors ●If the electronic key is inside the vehicle and a door handle becomes wet during a car wash, a message may be shown on the multi-information dis- play and a buzzer will sound outside the vehicle. To turn off the alarm, lock all the doors.
- Page 120 (→P. 112) The radio waves may affect the operation of such devices. If necessary, the entry function can be disabled. Ask your Toyota dealer for details, such as the frequency of radio waves and timing of the emitted radio waves.
Page 121: Adjusting The Seats
- Page 122 3-3. Adjusting the seats WARNING ■ When adjusting the seat position ● Take care when adjusting the seat position to ensure that other passen- gers are not injured by the moving seat. ● Do not put your hands under the seat or near the moving parts to avoid injury.
Page 123: Rear Seats
- Page 124 3-3. Adjusting the seats WARNING ■ When folding the rear seatbacks down Observe the following precautions. Failure to do so may result in death or serious injury. ● Do not fold the seatbacks down while driving. ● Stop the vehicle on level ground, set the parking brake and shift the shift lever to P.
Page 125: Head Restraints
- Page 126 3-3. Adjusting the seats ■ Adjusting the height of the head restraints (front seats) Make sure that the head restraints are adjusted so that the center of the head restraint is closest to the top of your ears. WARNING ■ Head restraint precautions (front seats) Observe the following precautions regarding the head restraints.
Page 127: Steering Wheel
- Page 128 3-4. Adjusting the steering wheel and mirrors WARNING ■ Caution while driving Do not adjust the steering wheel while driving. Doing so may cause the driver to mishandle the vehicle and cause an acci- dent, resulting in death or serious injury. ■...
Page 129: Inside Rear View Mirror
- Page 130 3-4. Adjusting the steering wheel and mirrors Auto anti-glare inside rear view mirror Responding to the level of brightness of the headlights of vehicles behind, the reflected light is automatically reduced. Changing automatic anti-glare function mode On/off When the automatic anti-glare function is in ON mode, the indica- tor illuminates.
Page 131: Outside Rear View Mirrors
- Page 132 3-4. Adjusting the steering wheel and mirrors ■ Mirror angle can be adjusted when Vehicles without a smart key system The engine switch is in the “ACC” or “ON” position. Vehicles with a smart key system The engine switch is in ACCESSORY or IGNITION ON mode. ■...
Page 133: Opening And Closing
- Page 134 If you release the switch while the window is moving, start again from the beginning. If the window continues to close but then re-open slightly even after perform- ing the above procedure correctly, have the vehicle inspected by your Toyota dealer. ■...
- Page 135 3-5. Opening and closing the windows WARNING Observe the following precautions. Failure to do so may result in death or serious injury. ■ Closing the windows ● The driver is responsible for all the power window operations, including the operation for the passengers. In order to prevent accidental operation, especially by a child, do not let a child operate the power windows.
Page 136: Moon Roof
- Page 137 3-5. Opening and closing the windows ■ The moon roof can be operated when Vehicles without a smart key system The engine switch is in the “ON” position. Vehicles with a smart key system The engine switch is in IGNITION ON mode. ■...
- Page 138 Check to make sure that the moon roof is completely closed and then release the switch. If the moon roof does not fully close even after performing the above proce- dure correctly, have the vehicle inspected by your Toyota dealer. ■ Moon roof open warning buzzer...
- Page 139 3-5. Opening and closing the windows WARNING Observe the following precautions. Failure to do so may cause death or serious injury. ■ Opening the moon roof ● Do not allow any passengers to put their hands or heads outside the vehi- cle while it is moving.
- Page 140 3-5. Opening and closing the windows I n f o r ma t i o n P r o v i d e d b y :...
Page 141: Driving
Page 142: driving the vehicle.
- Page 143 Your vehicle has a drum-in-disc type parking brake system. This type of brake system needs bedding-down of the brake shoes periodically or whenever the parking brake shoes and/or drum are replaced. Have your Toyota dealer per- form the bedding down operation.
- Page 144 4-1. Before driving WARNING Observe the following precautions. Failure to do so may result in death or serious injury. ■ When starting the vehicle Always keep your foot on the brake pedal while stopped with the engine running. This prevents the vehicle from creeping. ■...
- Page 145 If you hear a squealing or scraping noise (brake pad wear limit indica- tors) Have the brake pads checked and replaced by your Toyota dealer as soon as possible. Rotor damage may result if the pads are not replaced when needed.
- Page 146 4-1. Before driving WARNING Observe the following precautions. Failure to do so may result in death or serious injury. ■ When the vehicle is stopped ● Do not race the engine. If the shift lever is any position other than P or N, the vehicle may acceler- ate suddenly and unexpectedly, causing an accident.
- Page 147 4-1. Before driving WARNING Observe the following precautions. Failure to do so may result in death or serious injury. ■ When the vehicle is parked ● Always apply the parking brake, shift the shift lever to P, stop the engine and lock the vehicle.
- Page 148 Short in electrical components ● Engine damage caused by water immersion In the event that you drive on a flooded road and the vehicle is flooded, be sure to have your Toyota dealer check the following: ● Brake function ●...
Page 149: Cargo And Luggage
- Page 150 4-1. Before driving Calculation formula for your vehicle Cargo capacity Total load capacity (vehicle capacity weight) (→P. 498) When 2 people with the combined weight of A lb. (kg) are riding in your vehicle, which has a total load capacity (vehicle capacity weight) of B lb.
- Page 151 4-1. Before driving WARNING ■ Things that must not be carried in the trunk The following things may cause a fire if loaded in the trunk: ● Receptacles containing gasoline ● Aerosol cans ■ Storage precautions Observe the following precautions. Failure to do so may prevent the pedals from being depressed properly, may block the driver’s vision, or may result in items hitting the driver or passengers, possibly causing an accident.
Page 152: Vehicle Load Limits
Page 153: trailer towing, page 154: dinghy towing, page 155: engine (ignition) switch (vehicles without a.
- Page 156 If the engine becomes difficult to start or stalls frequently, have your vehi- cle checked by your Toyota dealer immediately. I n f o r ma t i o n P r o v i d e d b y :...
Page 157: Engine (Ignition) Switch (Vehicles With A Smart Key System)
- Page 158 4-2. Driving procedures Changing engine switch modes Modes can be changed by pressing the engine switch with the brake pedal released. (The mode changes each time the switch is pressed.) The emergency flashers can be used. The multi-information display will not be displayed.
- Page 159 If the engine does not start ●The engine immobilizer system may not have been deactivated. (→P. 67) Contact your Toyota dealer. ●Check that the shift lever is securely set in P. The engine may not start if the shift lever is displaced out of P.
- Page 160 4-2. Driving procedures ■ If the electronic key battery is depleted →P. 420 ■ Operation of the engine switch ●When operating the engine switch, one short, firm press is enough. If the switch is pressed improperly, the engine may not start or the engine switch mode may not change.
- Page 161 Do not race a cold engine. ● If the engine becomes difficult to start or stalls frequently, have your vehi- cle checked by your Toyota dealer immediately. ■ Symptoms indicating a malfunction with the engine switch If the engine switch seems to be operating somewhat differently than usual, such as the switch sticking slightly, there may be a malfunction.
Page 162: Automatic Transmission
- Page 163 4-2. Driving procedures Shift position purpose Shift position Objective or function Parking the vehicle/starting the engine Reversing Neutral Normal driving S mode driving (→P. 161) : Shifting to the D position allows the system to select a gear suitable for the driving conditions.
- Page 164 4-2. Driving procedures Shift ranges and their functions ■ ● The vehicle is allowed to shift up and down to provide the most suitable gear selection based on your driving situation. (e.g. S4: 1 to 4 or, 4 to 1) ●...
- Page 165 S This may indicate a malfunction in the automatic transmission system. Have the vehicle inspected by your Toyota dealer immediately. (In this situation, the transmission will operate in the same manner as when the shift lever is in D.) ■...
Page 166: Turn Signal Lever
Page 167: parking brake, page 168: headlight switch.
- Page 169 4-3. Operating the lights and wipers Turning on the high beam headlights With the headlights on, push the lever away from you to turn on the high beams. Pull the lever toward you to the center position to turn the high beams off.
- Page 170 4-3. Operating the lights and wipers ■ Automatic light off system Vehicles without a smart key system ●When the headlights are on: The headlights and tail lights turn off 30 sec- onds after the engine switch is turned to the “ACC” or “LOCK” position and a door is opened and closed.
- Page 171 4-3. Operating the lights and wipers ■ Battery-saving function In the following conditions, the remaining lights will go off automatically after 20 minutes in order to prevent the vehicle battery from being discharged: ●The headlights and/or tail lights are on. ●Vehicles without a smart key system: The engine switch is in the “ACC”...
Page 172: Automatic High Beam
- Page 173 4-3. Operating the lights and wipers High beam automatic turning on or off conditions When all of the following conditions are fulfilled, high beam will be automatically turned on: ● Vehicle speed is above approximately 21 mph (34 km/h). ● The area ahead of the vehicle is dark. ●...
- Page 174 4-3. Operating the lights and wipers ■ The Automatic High Beam can be operated when The engine switch is in IGNITION ON mode. ■ Camera sensor detection information ●High beam may not be automatically turned off in the following situations: •...
- Page 175 4-3. Operating the lights and wipers ●In the situations below, the system may not be able to correctly detect the surrounding brightness levels, and may flash or expose nearby pedestrians to the high beam. Therefore, you should consider turning the high beams on or off manually rather than relying on the Automatic High Beam system.
- Page 176 4-3. Operating the lights and wipers ■ If a warning message for the Automatic High Beam is shown on the multi-information display It may indicate a malfunction in the system. Contact your Toyota dealer. ■ Customization The Automatic High Beam can be deactivated.
- Page 177 Do not overload the vehicle. ● Do not modify the vehicle. ● If the windshield needs to be replaced, contact your Toyota dealer. I n f o r ma t i o n P r o v i d e d b y :...
Page 178: Windshield Wipers And Washer
- Page 179 ■ When a nozzle becomes blocked In this case, contact your Toyota dealer. Do not try to clear it with a pin or other object. The nozzle will be damaged. I n f o r ma t i o n P r o v i d e d b y :...
Page 180: 4-4. Refueling
- Page 181 4-4. Refueling WARNING ■ When refueling the vehicle Observe the following precautions while refueling the vehicle. Failure to do so may result in death or serious injury. ● After exiting the vehicle and before opening the fuel door, touch an unpainted metal surface to discharge any static electricity.
- Page 182 WARNING ■ When replacing the fuel tank cap Do not use anything but a genuine Toyota fuel tank cap designed for your vehicle. Doing so may cause a fire or other incident which may result in death or serious injury.
Page 183: Cruise Control
- Page 184 4-5. Using the driving support systems Setting the vehicle speed Press the “ON-OFF” button to activate the cruise control. Cruise control indicator will be dis- played on the multi-information dis- play. Press the button again to deacti- vate the cruise control. Accelerate or decelerate the vehicle to the desired speed, and push the lever down to set...
- Page 185 4-5. Using the driving support systems Adjusting the set speed To change the set speed, operate the lever until the desired set speed is obtained. Increases the speed Decreases the speed Fine adjustment: Momentarily move the lever in the desired direc- tion.
- Page 186 Have the vehicle inspected by your Toyota dealer. I n f o r ma t i o n P r o v i d e d b y :...
- Page 187 4-5. Using the driving support systems WARNING ■ To avoid operating the cruise control by mistake Switch the cruise control off using the “ON-OFF” button when not in use. ■ Situations unsuitable for cruise control Do not use cruise control in any of the following situations. Doing so may result in loss of control and could cause an accident resulting in death or serious injury.
Page 188: Dynamic Radar Cruise Control
- Page 189 4-5. Using the driving support systems Setting the vehicle speed (vehicle-to-vehicle distance control mode) Press the “ON-OFF” button to activate the cruise control. Radar cruise control indicator will be displayed. Press the button again to deacti- vate the cruise control. Accelerate or decelerate the vehicle to the desired speed, and push the lever down to set...
- Page 190 4-5. Using the driving support systems Adjusting the set speed To change the set speed, operate the lever until the desired set speed is displayed. Increases the speed Decreases the speed Fine adjustment: Momentarily move the lever in the desired direc- tion.
- Page 191 4-5. Using the driving support systems Changing the vehicle-to-vehicle distance Pressing the button changes the Preceding vehicle-to-vehicle distance as fol- vehicle mark lows: Long Medium Short Preceding vehicle mark The vehicle-to-vehicle distance is set automatically to long mode when the engine switch is turned to IGNITION ON mode.
- Page 192 4-5. Using the driving support systems Driving in vehicle-to-vehicle distance control mode This mode employs a radar sensor to detect the presence of vehicles up to approximately 400 ft. (120 m) ahead, determines the current vehicle-to-vehicle following distance, and operates to maintain a suit- able following distance from the vehicle ahead.
Page 193: Approach Warning
- Page 194 4-5. Using the driving support systems Selecting conventional constant speed control mode When constant speed control mode is selected, your vehicle will main- tain a set speed without controlling the vehicle-to-vehicle distance. Select this mode only when vehicle-to-vehicle distance control mode does not function correctly due to dirt etc.
- Page 195 ●The windshield wipers are operating at high speed (when the wiper switch is set to the high speed wiper operation position). If vehicle-to-vehicle distance control driving is automatically canceled for any other reason, there may be a malfunction in the system. Contact your Toyota dealer. ■...
- Page 196 4-5. Using the driving support systems ■ Radar sensor and grille cover Always keep the sensor and grille cover clean to ensure that the vehicle-to- vehicle distance control operates properly. (Some obstructions, such as snow, ice and plastic objects, cannot be detected by the obstruction sensor.) Dynamic radar cruise control is canceled if an obstruction is detected.
- Page 197 4-5. Using the driving support systems WARNING ■ Before using dynamic radar cruise control Do not overly rely on vehicle-to-vehicle distance control. Be aware of the set speed. If automatic deceleration/acceleration is not appropriate, adjust the vehicle speed, as well as the distance between your vehicle and vehicles ahead by applying the brakes etc.
- Page 198 4-5. Using the driving support systems WARNING ■ Situations unsuitable for dynamic radar cruise control Do not use dynamic radar cruise control in any of the following situations. Doing so may result in inappropriate speed control and could cause an acci- dent resulting in death or serious injury.
- Page 199 4-5. Using the driving support systems WARNING ● Motorcycles traveling in the same lane ● When water or snow thrown up by the surrounding vehicles hinders the detecting of the sensor ● When your vehicle is pointing upwards (caused by a heavy load in the trunk, etc.) ■...
- Page 200 Do not modify or paint the sensor and grille cover. ● If the radar sensor needs to be replaced, contact your Toyota dealer. I n f o r ma t i o n P r o v i d e d b y :...
Page 201: (Lane Departure Alert)
- Page 202 4-5. Using the driving support systems Operating conditions ● When the vehicle speed is approximately 32 mph (50 km/h) or more ● When the lane width is more than approximately 8.2 ft. (2.5 m) ● When driving on a straight road or through a curve with a radius of more than approximately 328 ft.
- Page 203 4-5. Using the driving support systems ■ Temporary cancelation of the LDA system functions If any of the following occurs, the LDA system functions will be temporarily canceled. The functions will resume after the necessary operating conditions have returned. ●The turn signal lever is operated. ●The vehicle speed deviates from the operating range of the LDA system functions.
- Page 204 4-5. Using the driving support systems ■ Conditions in which the function may not operate correctly In the following situations, the camera sensor may be unable to recognize lane markers causing the lane departure warning function to operate incor- rectly. However, this does not indicate a malfunction. ●When driving through an area with no lane markers, such as a tollbooth, a crossing or before a ticket checkpoint ●When driving on a sharp curve...
- Page 205 4-5. Using the driving support systems WARNING ■ Before using the LDA system Do not rely solely on the LDA system. The LDA system does not drive the vehicle automatically, nor does it reduce the amount of care you need to take.
- Page 206 Do not subject the camera sensor to strong impact or force, and do not disassemble the camera sensor. ● If the windshield needs to be replaced, contact your Toyota dealer. I n f o r ma t i o n P r o v i d e d b y :...
Page 207: Rear View Monitor System
- Page 208 4-5. Using the driving support systems Using the rear view monitor system Screen description ■ Vehicle width guide lines The line indicates a guide path when the vehicle is being backed straight up. The displayed width is wider than the actual vehicle width. Vehicle center guide lines These lines indicate the estimated vehicle center on the ground.
- Page 209 4-5. Using the driving support systems Rear view monitor system precautions Area displayed on screen ■ The rear view monitor system displays an image of the view from the bumper of the rear area of the vehicle. To adjust the image on the rear view monitor system screen.
- Page 210 4-5. Using the driving support systems Differences between the screen and the actual road ■ The distance guide lines and the vehicle width guide lines may not actually be parallel with the dividing lines of the parking space, even when they appear to be so. Be sure to check visually. The distances between the vehicle width guide lines and the left and right dividing lines of the parking space may not be equal, even when they appear to be so.
- Page 211 4-5. Using the driving support systems ● When any part of the vehicle sags When any part of the vehicle sags due to the number of pas- sengers or the distribution of the load, there is a margin of error between the fixed guide lines on the screen and the actual distance/course on the A margin of error...
- Page 212 4-5. Using the driving support systems Vehicle width guide lines ■ Visually check the surroundings and the area behind the vehicle. In the case shown below, the truck appears to be outside of the vehi- cle width guide lines and the vehicle does not look as if it hits the truck.
- Page 213 If you notice any of the following symptoms, refer to the likely cause and the solution, and re-check. If the symptom is not resolved by the solution, have the vehicle inspected by your Toyota dealer. Likely cause Solution The image is difficult to see •...
- Page 214 4-5. Using the driving support systems WARNING ■ When using the rear view monitor system The rear view monitor system is a supplemental device intended to assist the driver when backing up. When backing up, be sure to check visually behind and all around the vehicle before proceeding.
- Page 215 ● Do not expose the camera to strong impact as this could cause a malfunc- tion. If this happens, have the vehicle inspected by your Toyota dealer as soon as possible. I n f o r ma t i o n P r o v i d e d b y :...
Page 216: Driving Assist Systems
- Page 217 4-5. Using the driving support systems When the TRAC/VSC systems are operating The slip indicator light will flash while the TRAC/VSC systems are operating. Disabling the TRAC system If the vehicle gets stuck in mud, dirt or snow, the TRAC system may reduce power from the engine to the wheels.
- Page 218 When the message is displayed on the multi-information display show- ing that TRAC has been disabled even if has not been pressed TRAC cannot be operated. Contact your Toyota dealer. ■ Sounds and vibrations caused by the ABS, brake assist, TRAC and VSC systems ●A sound may be heard from the engine compartment when the brake pedal...
- Page 219 4-5. Using the driving support systems ■ Automatic reactivation of TRAC and VSC systems After turning the TRAC and VSC systems off, the systems will be automati- cally re-enabled in the following situations: ●When the engine switch is turned off ●If only the TRAC system is turned off, the TRAC will turn on when vehicle speed increases If both the TRAC and VSC systems are turned off, automatic re-enabling will...
- Page 220 The ABS, TRAC and VSC systems will not function correctly if different tires are installed on the vehicle. Contact your Toyota dealer for further information when replacing tires or wheels. ■ Handling of tires and the suspension Using tires with any kind of problem or modifying the suspension will affect the driving assist systems, and may cause a system to malfunction.
Page 221: (Pre-Collision System)
- Page 222 4-5. Using the driving support systems Changing the pre-collision system Changing the alert timing of the pre-collision system ■ Each time the PCS switch is pressed, the response to the distance changes as follows. Middle Near : Default setting Turning off the pre-collision system ■...
- Page 223 4-5. Using the driving support systems ■ The pre-collision system is operational when The pre-collision system is on (→P. 220) and the following conditions are met: ●Pre-collision warning: • Vehicle speed is greater than approximately 10 mph (15 km/h). • The speed at which your vehicle is approaching the obstacle or the vehi- cle running ahead of you is greater than approximately 7 mph (10 km/h).
- Page 224 4-5. Using the driving support systems ■ Obstacles not detected The sensor cannot detect plastic obstacles such as traffic cones. There may also be occasions when the sensor cannot detect pedestrians, animals, bicy- cles, motorcycles, trees, or snowdrifts. ■ Situations in which the pre-collision system does not function properly The system may not function effectively in situations such as the following: ●On roads with sharp bends or uneven surfaces ●If a vehicle suddenly moves in front of your vehicle, such as at an intersec-...
- Page 225 4-5. Using the driving support systems ■ Certification For vehicles sold in the U.S.A. FCC ID : HYQDNMWR007 This device complies with part 15 of the FCC Rules. Operation is subject to the following two conditions : (1) This device may not cause harmful interfer- ence, and (2) this device must accept any interference received, including interference that may cause undesired operation.
- Page 226 Do not modify or paint the sensor and grille cover. ● If the radar sensor needs to be replaced, contact your Toyota dealer. I n f o r ma t i o n P r o v i d e d b y :...
- Page 227 4-5. Using the driving support systems WARNING ■ Cautions regarding the assist contents of the system By means of alarms and brake control, the pre-collision system is intended to assist the driver in avoiding collisions through the process of LOOK- JUDGE-ACT.
Page 228: (Blind Spot Monitor)
- Page 229 4-5. Using the driving support systems Rear Cross Traffic Alert buzzer (Rear Cross Traffic Alert function only) When a vehicle approaching from the right or left rear of the vehicle is detected, a buzzer sounds from behind the rear seat. ■...
- Page 230 If the sensor moves even slightly off position, the system may mal- function and vehicles that enter the detection area may not be detected. If the sensor or surrounding area is subject to a strong impact, always have the area inspected by your Toyota dealer. ● Do not disassemble the sensor.
Page 231: The Blind Spot Monitor Function
- Page 232 4-5. Using the driving support systems ■ Conditions under which the Blind Spot Monitor function will not detect a vehicle The Blind Spot Monitor function is not designed to detect the following types of vehicles and/or objects: ●Small motorcycles, bicycles, pedestrians etc. ●Vehicles traveling in the opposite direction ●Guardrails, walls, signs, parked vehicles and similar stationary objects ●Following vehicles that are in the same lane...
Page 233: The Rear Cross Traffic Alert Function
- Page 234 4-5. Using the driving support systems The Rear Cross Traffic Alert function detection areas The areas that vehicles can be detected in are outlined below. To give the driver a more consistent time to react, the buzzer can alert for faster vehicles from farther away. Example: Approximate Approaching vehicle...
- Page 235 4-5. Using the driving support systems ■ Conditions under which the Rear Cross Traffic Alert function may not function correctly The Rear Cross Traffic Alert function may not detect vehicles correctly in the following conditions: ●When ice or mud etc. is attached to the rear bumper ●During bad weather such as heavy rain, fog, snow etc.
Page 236: 4-6. Driving Tips
- Page 237 4-6. Driving tips When driving the vehicle Accelerate the vehicle slowly, keep a safe distance between you and the vehicle ahead, and drive at a reduced speed suitable to road con- ditions. When parking the vehicle Park the vehicle and move the shift lever to P without setting the park- ing brake.
- Page 238 NOTICE ■ Repairing or replacing snow tires Request repairs or replacement of snow tires from Toyota dealers or legiti- mate tire retailers. This is because the removal and attachment of snow tires affects the opera- tion of the tire pressure warning valves and transmitters.
- Page 239 4-6. Driving tips I n f o r ma t i o n P r o v i d e d b y :...
Page 240: 5-1. Basic Operations
Page 241: using an external device, page 242: audio system types.
- Page 243 5-1. Basic Operations Entune Premium Audio with Navigation Owners of this system should refer to the “NAVIGATION AND MULTI- MEDIA SYSTEM OWNER'S MANUAL”. I n f o r ma t i o n P r o v i d e d b y :...
Page 244: Audio System
- Page 245 5-1. Basic Operations Operating the touch screen By touching the screen with your finger, you can control the multime- dia system, etc. Drag ■ Touch the screen with your finger, and move the screen to the desired position. ● Scrolling the lists Flick ■...
Page 246: Steering Wheel Audio Switches
Page 247: usb port/aux port.
- Page 248 5-1. Basic Operations WARNING ■ While driving Do not connect a device or operate the device controls. I n f o r ma t i o n P r o v i d e d b y :...
Page 249: Basic Audio Operations
- Page 250 5-1. Basic Operations WARNING ■ Laser product This product is a class 1 laser product. Do not open the cover of the player or attempt to repair the unit yourself. Refer servicing to qualified personnel. ● Laser products • Do not take this unit apart or attempt to make any changes yourself. This is an intricate unit that uses a laser pickup to retrieve information from the surface of compact discs.
Page 251: Setup Menu
Page 252: general settings.
- Page 253 5-2. Setup Delete personal data Select “Delete Personal Data” on the “General Settings” screen. Select “Delete”. Check carefully beforehand, as data cannot be retrieved once deleted. A confirmation screen will be displayed. Select “Yes”. The following personal data will be deleted or changed to its default settings.
Page 254: Audio Settings
Page 255: display settings, page 256: voice settings, page 257: selecting the audio source, page 258: list screen operation.
- Page 259 5-3. Using the Multimedia system Selecting a track/file/song from the track/file/song list ■ Select “Browse” or cover art. Select the desired track/file/ song. When an MP3/WMA/AAC disc or USB memory device is being used, ® the folder can be selected. When a Bluetooth device or iPod is being used, the album can be selected.
Page 260: Optimal Use Of The Multimedia System
Page 261: using the radio.
- Page 262 5-4. Using the radio Setting station presets Search for desired stations by turning the “TUNE/SCROLL” knob or pressing the “∧” or “∨” button on “SEEK/TRACK”. Select “(add new)”. To change the preset station to a different one, select and hold the preset station.
Page 263: Cd Player Operation
- Page 264 ■ Error messages If an error message is displayed, refer to the following table and take the appropriate measures. If the problem is not rectified, take the vehicle to your Toyota dealer. Message Cause Correction procedures • The disc is dirty or •...
- Page 265 5-5. Playing an audio CD and MP3/WMA/AAC discs ■ MP3, WMA and AAC files MP3 (MPEG Audio LAYER3) is a standard audio compression format. Files can be compressed to approximately 1/10 of their original size by using MP3 compression. WMA (Windows Media Audio) is a Microsoft audio compression format. This format compresses audio data to a size smaller than that of the MP3 for- mat.
- Page 266 5-5. Playing an audio CD and MP3/WMA/AAC discs ●Compatible disc formats The following disc formats can be used. • Disc formats: CD-ROM Mode 1 and Mode 2 CD-ROM XA Mode 2, Form 1 and Form 2 • File formats: ISO9660 Level 1, Level 2, (Romeo, Joliet) UDF (2.01 or lower) MP3, WMA and AAC files written in any format other than those listed above may not play correctly, and their file names and folder names may...
- Page 267 5-5. Playing an audio CD and MP3/WMA/AAC discs ●Playback • To play MP3 files with steady sound quality, we recommend a fixed bit rate of at least 128 kbps and a sampling frequency of 44.1 kHz. • CD-R or CD-RW playback may not be possible in some instances, depending on the characteristics of the disc.
- Page 268 5-5. Playing an audio CD and MP3/WMA/AAC discs NOTICE ■ Discs and adapters that cannot be used Do not use the following types of CDs. Also, do not use 3 in. (8 cm) CD adapters, Dual Discs or printable discs. Doing so may damage the CD player and/or the CD insert/eject function.
Page 269: Listening To An Ipod
- Page 270 5-6. Using an external device ■ About iPod ●“Made for iPod”, “Made for iPhone” and “Made for iPad” mean that an elec- tronic accessory has been designed to connect specifically to iPod or iPhone, or iPad, respectively, and has been certified by the developer to meet Apple performance standards.
- Page 271 5-6. Using an external device ■ Error messages Message Cause/Correction procedures “Connection error. Please consult your Owner’s Man- This indicates a problem in the iPod or its con- ual for instructions on how nection. to connect the iPod.” This indicates that there is no music data in “No music files found.”...
- Page 272 5-6. Using an external device ■ Compatible models ® ® ® ® ® The following iPod , iPod nano , iPod classic , iPod touch and iPhone devices can be used with this system. ●Made for • iPod touch (5th generation) •...
Page 273: Memory Device
- Page 274 5-6. Using an external device ■ USB memory functions ●Depending on the USB memory device that is connected to the system, the device itself may not be operable and certain functions may not be avail- able. If the device is inoperable or a function is unavailable due to a mal- function (as opposed to a system specification), disconnecting the device and reconnecting it may resolve the problem.
- Page 275 5-6. Using an external device ●MP3 file compatibility • Compatible standards MP3 (MPEG1 AUDIO LAYERII, III, MPEG2 AUDIO LAYERII, III) • Compatible sampling frequencies MPEG1 AUDIO LAYERII, III: 32, 44.1, 48 (kHz) MPEG2 AUDIO LAYERII, III: 16, 22.05, 24 (kHz) •...
- Page 276 5-6. Using an external device ●MP3, WMA and AAC playback • When a device containing MP3, WMA and AAC files is connected, all files in the USB memory device are checked. Once the file check is fin- ished, the first MP3, WMA and AAC file is played. To make the file check finish more quickly, we recommend that you do not include any files other than MP3, WMA and AAC files or create any unnecessary folders.
Page 277: Using The Aux Port
Page 278: communication.
- Page 279 ® 5-7. Connecting Bluetooth ■ Certifications for the Bluetooth FCC ID: BABFT0049B FCC ID: AJDK068 ●CAUTION: Radio Frequency Radiation Exposure This equipment complies with FCC radiation exposure limits set forth for uncontrolled equipment and meets the FCC radio frequency (RF) Exposure Guidelines in Supplement C to OET65.
- Page 280 ® 5-7. Connecting Bluetooth Device registration/connection flow ® 1. Register the Bluetooth device to be used with multimedia system (→P. 280, 281, 282) ® 2. Connect the Bluetooth device to be used (→P. 284) To be used for audio To be used for hands-free phone ®...
- Page 281 ® 5-7. Connecting Bluetooth Registering and connecting from the “Bluetooth* Setup” screen To display the screen shown below, press the “SETUP” button and select “Bluetooth ” on the “Setup” screen. Select to connect the device to be used with multimedia sys- tem.
Page 282: First Time
Page 283: first time, page 284: device.
- Page 285 ® 5-7. Connecting Bluetooth Select “OK” when the connection status changes from “Connect- ing...” to “Connected”. If an error message is displayed, follow the guidance on the screen to try again. Registration can be performed from screens other than the “Bluetooth* Setup”...
Page 286: Device
- Page 287 ® 5-7. Connecting Bluetooth Manual connection When auto connection has failed or “Bluetooth* Power” is turned off, ® you must connect the Bluetooth device manually. ® Follow the steps in “Connecting a Bluetooth device” from step (→P. 284) : Bluetooth is a registered trademark of Bluetooth SIG, Inc. ®...
Page 288: Device Details
Page 289: system settings, page 290: listening to bluetooth, page 291: bluetooth ® phone.
- Page 292 ® 5-9. Bluetooth phone Telephone switch (→P. 301) ■ Microphone ■ The vehicle’s built in micro- phone is used when talking on the phone. The person you are speaking to can be heard from the front speakers. ® To use the hands-free system, you must register your Bluetooth phone in the system.
Page 293: Making A Call
- Page 294 ® 5-9. Bluetooth phone Press the switch on the steering wheel. If the phonebook is empty, a message will be displayed. ® For a PBAP compatible Bluetooth phone and “Automatic Transfer” is off Select the desired item. Select to transfer new con- tacts from a cellular phone, select “Always”...
- Page 295 ® 5-9. Bluetooth phone Calling using favorites list You can make a call using numbers registered in the contact. Display the phone screen. (→P. 289) Select “Favorites” tab. Select the desired number to make a call. Dialing from call history You can make a call using the call history, which has the 3 functions below.
Page 296: Receiving A Call
Page 297: speaking on the phone.
- Page 298 ® 5-9. Bluetooth phone ■ Release Tones ●A continuous tone signal is a character string that consists of numbers and the characters p or w. (e.g.056133w0123p#1∗) ●When the “p” pause tone is used, the tone data up until the next pause tone will be automatically sent after 2 seconds have elapsed.
- Page 299 ® 5-9. Bluetooth phone Call waiting When a call is interrupted by a third party while talking, an incoming call message will be displayed. To talk with the other party: • Press the switch on the steering wheel. • Select To refuse the call: •...
Page 300: Bluetooth ® Phone Message Function
- Page 301 ® 5-9. Bluetooth phone Checking the messages Display the message inbox screen. (→P. 298) Select the desired message from the list. Check that the message is dis- played. E-mails: Select “Mark Unread” or “Mark Read” to mark mail unread or read on the message inbox screen.
- Page 302 ® 5-9. Bluetooth phone Replying to a message Display the message inbox screen. (→P. 298) Select the desired message from the list. Select “Quick Message”. Select the desired message. Select “Send”. Editing quick reply message ■ Select “Quick Message”. Select corresponding to the desired message to edit.
Page 303: Using The Steering Wheel Switches
Page 304: bluetooth ® phone settings, page 305: contact/call history settings.
- Page 306 ® 5-9. Bluetooth phone Update contacts from phone Operation methods differ between PBAP compatible and PBAP ® incompatible but OPP compatible Bluetooth phones. If your cellular phone is neither PBAP nor OPP compatible, the con- tacts cannot be transferred. ® For PBAP Compatible Bluetooth Phones ■...
- Page 307 ® 5-9. Bluetooth phone Updating the contacts in a different way (From the “Call His- ■ tory” screen) ® For PBAP compatible Bluetooth phones, this function is available when “Automatic Transfer” is set to off. (→P. 303) Display the phone screen. (→P. 289) Select the “Call History”...
- Page 308 ® 5-9. Bluetooth phone Editing the contact data ® For PBAP compatible Bluetooth phones, this function is available when “Automatic Transfer” is set to off. (→P. 303) Select “Edit Contact”. Select the desired contact. Select corresponding to the desired name or number. For editing the name Follow the steps in “Registering a new contact to the contacts list”...
- Page 309 ® 5-9. Bluetooth phone Favorites list setting Up to 15 contacts (maximum of 4 numbers per contact) can be regis- tered in the favorites list. Registering the contacts in the favorites list ■ Select “Add Favorite”. Select the desired contact to add to the favorites list. Dimmed contacts are already stored as a favorite.
- Page 310 ® 5-9. Bluetooth phone Deleting the contacts in the favorites list ■ Select “Remove Favorite”. Select the desired contacts and select “Remove”. Select “Yes” when the confirmation screen appears. Check that a confirmation screen is displayed when the opera- tion is complete. Deleting contacts in the favorites list in a different way (from the “Contacts”...
- Page 311 ® 5-9. Bluetooth phone Message Settings Display the “Phone/Message Settings” screen. (→P. 302) Select “Messaging Settings”. Select the desired item to be set. automatic message transfer on/off. automatic message readout on/off. Set the SMS/MMS notifica- tion popup on/off. Set the e-mail notification popup on/off.
- Page 312 ® 5-9. Bluetooth phone Displaying the “Messaging Settings” screen in a different way ■ Display the phone screen. (→P. 289) Select Select “Settings”. Phone Display Settings Display the “Phone/Message Settings” screen. (→P. 302) Select “Phone Display Settings”. Select the desired item to be set.
Page 313: What To Do If
- Page 314 ® 5-9. Bluetooth phone When registering/connecting a cellular phone A cellular phone cannot be registered. An incorrect passcode was entered on the cellular phone. → Enter the correct passcode on the cellular phone. The registration operation has not been completed on the cellular phone side.
- Page 315 → For a list of specific devices which operation has been confirmed on this system, check with your Toyota dealer or the following web- site: http://www.toyota.com/entune.html Automatic phonebook transfer function on this system is set to off.
- Page 316 ® 5-9. Bluetooth phone In other situations Even though all conceivable measures have been taken, the symptom sta- tus does not change. The cellular phone is not close enough to this system. → Bring the cellular phone closer to this system. The cellular phone is the most likely cause of the symptom.
Page 317: Bluetooth ® Bluetooth
- Page 318 ® 5-10. Bluetooth ® ■ Bluetooth antenna The antenna is built into the display. If the portable audio player is behind the seat or in the glove box or console box, or is touching or covered by metal objects, the connection status may deteriorate.
- Page 319 ® 5-10. Bluetooth ■ Compatible models ® The Bluetooth audio system supports portable audio players with the follow- ing specifications ® ●Bluetooth specifications: Ver. 2.0, or higher (Recommended: Ver. 3.0+EDR or higher) ●Profiles: • A2DP (Advanced Audio Distribution Profile) Ver. 1.0, or higher (Recommended: Ver.
- Page 320 ® 5-10. Bluetooth ■ Certification NOTE: This device complies with part 15 of the FCC Rules. Operation is subject to the following two conditions: (1) This device may not cause harmful interfer- ence, and (2) this device must accept any interference received, including interference that may cause undesired operation.
- Page 321 ® 5-10. Bluetooth WARNING ■ While driving Do not use the portable audio player, cellular phone or connect a device to ® the Bluetooth system. ■ Caution regarding interference with electronic devices ® ● Your audio unit is fitted with Bluetooth antennas.
Page 322: Voice Command System
- Page 323 5-11. Using the voice command system ■ Microphone →P. 290 ■ When using the microphone ●It is unnecessary to speak directly into the microphone when giving a com- mand. ●When “Voice Prompt Interrupt” set to on, it is not necessary to wait for the confirmation beep before speaking a command.
Page 324: Command List
- Page 325 5-11. Using the voice command system Mobile Assistant ® The Mobile Assistant feature will activate Apple’s Siri Eyes Free mode via the steering wheel switches. To operate the Mobile Assis- tant, a compatible cellular phone must be registered and connected to ®...
- Page 326 5-11. Using the voice command system ■ Notes about Mobile Assistant ●The available features and functions may vary based on the iOS version installed on the connected device. ●Some Siri features are limited in Eyes Free mode. If you attempt to use an unavailable function, Siri will inform you that the function is not available.
Page 327: Interior Features
Page 328: system.
- Page 329 6-1. Using the air conditioning system and defogger Other functions Switching between outside air and recirculated air modes ■ Press The mode switches between outside air mode (indicator off) and recir- culated air mode (indicator on) each time is pressed. Defogging the windshield ■...
Page 330: Air Outlets
- Page 331 6-1. Using the air conditioning system and defogger ■ Outside/recirculated air mode ●When driving on dusty roads such as tunnels or in heavy traffic, set the out- side/recirculated air mode button to the recirculated air mode. This is effec- tive in preventing outside air from entering the vehicle interior. During cooling operation, setting the recirculated air mode will also cool the vehicle interior effectively.
- Page 332 6-1. Using the air conditioning system and defogger WARNING ■ To prevent the windshield from fogging up ● Do not use during cool air operation in extremely humid weather. The difference between the temperature of the outside air and that of the windshield can cause the outer surface of the windshield to fog up, block- ing your vision.
Page 333: System
- Page 334 6-1. Using the air conditioning system and defogger Change the airflow mode ■ To change the airflow mode, press outlets used switched each time the button is pressed. Air flows to the upper body. Air flows to the upper body and feet.
Page 335: Other Functions
- Page 336 6-1. Using the air conditioning system and defogger Air outlets Location of air outlets ■ The air outlets and air volume change according selected airflow mode. Adjusting the position of and opening and closing the air out- ■ lets Front Rear Direct air flow to the left or right, up or down.
- Page 337 6-1. Using the air conditioning system and defogger ■ Using automatic mode Fan speed is adjusted automatically according to the temperature setting and the ambient conditions. Therefore, the fan may stop for a while until warm or cool air is ready to flow immediately after is pressed.
- Page 338 6-1. Using the air conditioning system and defogger ■ Ventilation and air conditioning odors ●To let fresh air in, set the air conditioning system to the outside air mode. ●During use, various odors from inside and outside the vehicle may enter into and accumulate in the air conditioning system.
Page 339: Seat Heaters
- Page 340 6-1. Using the air conditioning system and defogger ●Vehicles without a smart key system: The seat heaters can be used when the engine switch is in the “ON” posi- tion. Vehicles with a smart key system: The seat heaters can be used when the engine switch is in IGNITION ON mode.
Page 341: Using The Interior Lights
Page 342: interior lights.
- Page 343 6-2. Using the interior lights ●Illuminated entry system: Vehicles without a smart key system: The lights automatically turn on/off according to the engine switch position, whether the doors are locked/unlocked, and whether the doors are open/ closed. Vehicles with a smart key system: The lights automatically turn on/off according to the engine switch mode, the presence of the electronic key, whether the doors are locked/unlocked, and whether the doors are open/closed.
Page 344: 6-3. Using The Storage Features
Page 345: glove box, page 346: coin holder, page 347: cup holders, page 348: auxiliary boxes.
- Page 349 If the LED indicators flash even though the surface of the tray is not hot, the wireless charger may be malfunctioning. Consult your Toyota dealer. ■ When charging of the wireless charger stops temporarily If any of the following operations are performed with the electronic key present, charging may stop temporarily.
- Page 350 ■ Certification for the wireless charger For vehicles sold in the U.S.A. This device complies with Part 18 of the FCC Rules. Toyota Motor Sales, U.S.A., Inc. 19001 S. Western Avenue Torrance, CA 90501 For vehicles sold in Canada This ISM device complies with Canadian ICES-001.
- Page 351 If in situations other than above the wireless charger does not operate prop- erly or the operation indicator light is blinking, the wireless charger may be malfunctioning. Contact your Toyota dealer. I n f o r ma t i o n P r o v i d e d b y :...
Page 352: Open Tray
Page 353: trunk features, page 354: other interior features other interior features, page 355: clock, page 356: ashtray, page 357: power outlets, page 358: armrest, page 359: coat hooks, page 360: garage door opener.
- Page 361 6-4. Other interior features Press and hold one of the HomeLink buttons and the transmitter button. When the HomeLink indicator light changes from a slow to a rapid flash, you can release both buttons. If the HomeLink indicator light comes on but does not flash, or flashes rapidly for 2 seconds...
- Page 362 6-4. Other interior features Programming a Rolling Code system (for U.S. owners) ■ If your device is Rolling Code equipped, follow the steps under the heading “Programming HomeLink ” before proceeding with the steps listed below. Locate the learn button on the ceiling mounted garage door opener motor.
- Page 363 6-4. Other interior features Programming other devices ■ To program other devices such as home security systems, home door locks or lighting, contact your Toyota dealer for assistance. Reprogramming a button ■ The individual HomeLink buttons cannot be erased but can be reprogrammed.
- Page 364 6-4. Other interior features ■ Before programming ●Install a new battery in the remote control transmitter. ●The battery side of the remote control transmitter must be pointed away from the HomeLink button. ■ To prevent battery discharge Vehicles without a smart key system: ...
- Page 365 6-4. Other interior features WARNING ■ When programming a garage door or other remote control devices The garage door or other devices may operate, so ensure people and objects are out of danger to prevent potential harm. ■ Conforming to federal safety standards ...
Page 366: Safety Connect
- Page 367 ●Phone calls using the vehicle’s Bluetooth technology will not be possible during Safety Connect. ●Safety Connect is available beginning Fall 2009 on select Toyota models. Contact with the Safety Connect response center is dependent upon the telematics device being in operative condition, cellular connection availabil- ity, and GPS satellite signal reception, which can limit the ability to reach the response center or receive emergency service support.
- Page 368 ● Green indicator light flashing = Safety Connect call in process ● Red indicator light (except at vehicle start-up) = System malfunction (contact your Toyota dealer) ● No indicator light (off) = Safety Connect service not active Safety Connect services Automatic Collision Notification ■...
- Page 369 In addition to assisting law enforcement with recovery of a stolen vehicle, Safety-Connect-equipped vehicle location data may, under certain circumstances, be shared with third parties to locate your vehicle. Further information is available at Toyota.com. Emergency Assistance Button (“SOS”) ■...
- Page 370 6-4. Other interior features Safety information for Safety Connect Important! Read this information before using Safety Connect. Exposure to radio frequency signals ■ The Safety Connect system installed in your vehicle is a low-power radio transmitter and receiver. It receives and also sends out radio frequency (RF) signals.
Page 371: Compass
- Page 372 6-4. Other interior features Calibrating the compass The direction display deviates from the true direction determined by the earth’s magnetic field. The amount of deviation varies according to the geographic position of the vehicle. If you cross over a map boundary shown in illustration, the compass will deviate.
- Page 373 6-4. Other interior features Circling calibration ■ When “C” appears on the dis- play, drive the vehicle at 5 mph (8 km/h) or less in a circle until a direction is displayed. If there is not enough space to drive in a circle, drive around the block until a direction is dis- played.
- Page 374 6-4. Other interior features NOTICE ■ To avoid compass malfunctions Do not place magnets or any metal objects near the inside rear view mirror. Doing this may cause the compass sensor to malfunction. ■ To ensure normal operation of the compass ●...
Page 375: Maintenance And Care
Page 376: maintenance and care cleaning and protecting.
- Page 377 If the paint of the rear bumper is chipped or scratched, the system may mal- function. If this occurs, avoid using the system and consult your Toyota dealer. I n f o r ma t i o n P r o v i d e d b y :...
- Page 378 7-1. Maintenance and care NOTICE ■ To prevent paint deterioration and corrosion on the body and compo- nents (aluminum wheels etc.) ● Wash the vehicle immediately in the following cases: • After driving near the sea coast • After driving on salted roads •...
Page 379: Cleaning And Protecting The Vehicle Interior
- Page 380 7-1. Maintenance and care ■ Caring for leather areas Toyota recommends cleaning the interior of the vehicle at least twice a year to maintain the quality of the vehicle's interior. ■ Shampooing the carpets There are several commercial foaming-type cleaners available. Use a sponge or brush to apply the foam.
- Page 381 7-1. Maintenance and care NOTICE ■ Cleaning detergents ● Do not use the following types of detergent, as they may discolor the vehi- cle interior or cause streaks or damage to painted surfaces: • Non-seat portions: Organic substances such as benzene or gasoline, alkaline or acidic solutions, dye, and bleach •...
Page 382: 7-2. Maintenance
Page 383: maintenance.
- Page 384 7-2. Maintenance WARNING ■ If your vehicle is not properly maintained Improper maintenance could result in serious damage to the vehicle and possible death or serious injury. ■ Handling of the battery ● Engine exhaust, some of its constituents, and a wide variety of automobile components contain or emit chemicals known to the State of California to cause cancer and birth defects and other reproductive harm.
Page 385: General Maintenance
Page 386: vehicle interior.
- Page 387 7-2. Maintenance Items Check points • Do seat belts operate smoothly? Seat belts • The seat belts should not be dam- aged. • Do the seat controls operate prop- Seats erly? • Does the steering wheel rotate smoothly? • Does the steering wheel have the Steering wheel correct amount of free play? •...
- Page 388 7-2. Maintenance WARNING ■ If the engine is running Turn the engine off and ensure that there is adequate ventilation before per- forming maintenance checks. I n f o r ma t i o n P r o v i d e d b y :...
Page 389: Emission Inspection And Maintenance (I/M) Programs
Page 390: 7-3. do-it-yourself maintenance.
- Page 391 7-3. Do-it-yourself maintenance WARNING The engine compartment contains many mechanisms and fluids that may move suddenly, become hot, or become electrically energized. To avoid death or serious injury, observe the following precautions. ■ When working on the engine compartment ● Keep hands, clothing and tools away from the moving fan and engine drive belt.
Page 392: Hood
Page 393: positioning a floor jack, page 394: engine compartment.
- Page 395 7-3. Do-it-yourself maintenance 3.5 L V6 (2GR-FE) engine Fuse boxes (→P. 424) Radiator (→P. 398) Engine oil filler cap (→P. 395) Electric cooling fans Engine oil level dipstick Condenser (→P. 398) (→P. 394) Engine coolant reservoir Brake fluid reservoir (→P. 397) (→P.
- Page 396 7-3. Do-it-yourself maintenance Engine oil With the engine at operating temperature and turned off, check the oil level on the dipstick. Checking the engine oil ■ Park the vehicle on level ground. After warming up the engine and turning it off, wait more than 5 minutes for the oil to drain back into the bottom of the engine.
- Page 397 7-3. Do-it-yourself maintenance Wipe the dipstick and reinsert it fully. Adding engine oil ■ If the oil level is below or near the low level mark, add engine oil of the same type as that already in the engine. Make sure to check the oil type and prepare the items needed before adding oil.
- Page 398 Dispose of used oil and filters only in a safe and acceptable manner. Do not dispose of used oil and filters in household trash, in sewers or onto the ground. Call your Toyota dealer, service station or auto parts store for information concerning recycling or disposal. ●...
Page 399: Engine Coolant
- Page 400 Radiator and condenser Check the radiator and condenser and clear away any foreign objects. If either of the above parts is extremely dirty or you are not sure of their condition, have your vehicle inspected by your Toyota dealer. WARNING ■...
Page 401: Brake Fluid
- Page 402 Take extra care when connecting the bat- tery if the engine switch mode prior to discharge is unknown. If the system will not start even after multiple attempts, contact your Toyota dealer. I n f o r ma t i o n P r o v i d e d b y :...
- Page 403 7-3. Do-it-yourself maintenance WARNING ■ Chemicals in the battery Batteries contain poisonous and corrosive sulfuric acid and may produce hydrogen gas which is flammable and explosive. To reduce the risk of death or serious injury, take the following precautions while working on or near the battery: ●...
Page 404: Washer Fluid
Page 405: tires.
- Page 406 ID codes must be registered in the tire pressure warning computer and the tire pressure warning system must be initialized. Have tire pressure warning valves and transmitter ID codes registered by your Toyota dealer. (→P. 405) ◆ Initializing the tire pressure warning system The tire pressure warning system must be initialized in the fol- ■...
- Page 407 ID code. When replacing a tire pressure warning valve and transmitter, it is necessary to register the ID code. Have the ID code registered by your Toyota dealer. I n f o r ma t i o n P r o v i d e d b y :...
- Page 408 A tire goes flat repeatedly or cannot be properly repaired due to the size or location of a cut or other damage If you are not sure, consult with your Toyota dealer. ■ Replacing tires and wheels (vehicles with a tire pressure warning...
- Page 409 7-3. Do-it-yourself maintenance ■ Tire types ● Summer tires Summer tires are high-speed performance tires best suited to highway driving under dry conditions. Since summer tires do not have the same traction performance as snow tires, summer tires are inadequate for driving on snow-covered or icy roads.
- Page 410 ● In the following cases, the tire pressure warning system may not operate properly. • If non-genuine Toyota wheels are used. • A tire has been replaced with a tire that is not an OE (Original Equip- ment) tire. • A tire has been replaced with a tire that is not of the specified size.
- Page 411 7-3. Do-it-yourself maintenance ■ The initialization operation (vehicles with a tire pressure warning system) ● Make sure to carry out initialization after adjusting the tire inflation pres- sure. Also, make sure the tires are cold before carrying out initialization or tire inflation pressure adjustment.
- Page 412 After performing initialization, the tire pressure warning light blinks for 1 minute then stays on while driving. If the inflation pressure of each tire is still not displayed, have the vehicle inspected by your Toyota dealer. ■ Tire pressure warning system certification...
- Page 413 Do not mix tires of different makes, models or tread patterns. Also, do not mix tires of remarkably different treadwear. ● Do not use tire sizes other than those recommended by Toyota. ● Do not mix differently constructed tires (radial, bias-belted or bias-ply tires).
- Page 414 When a tire is repaired with liquid sealants, the tire pressure warning valve and transmitter may not operate properly. If a liquid sealant is used, contact your Toyota dealer or other qualified service shop as soon as possible. Make sure to replace the tire pressure warning valve and transmitter when replacing the tire.
Page 415: Tire Inflation Pressure
- Page 416 Reduced safety ● Damage to the drivetrain If a tire needs frequent inflating, have it checked by your Toyota dealer. I n f o r ma t i o n P r o v i d e d b y :...
- Page 417 7-3. Do-it-yourself maintenance ■ Instructions for checking tire inflation pressure When checking tire inflation pressure, observe the following: ● Check only when the tires are cold. If your vehicle has been parked for at least 3 hours or has not been driven for more than 1 mile or 1.5 km, you will get an accurate cold tire inflation pressure reading.
Page 418: Wheels
- Page 419 Because tire repair or replacement may affect the tire pressure warn- ing valves and transmitters, make sure to have tires serviced by your Toyota dealer or other qualified service shop. In addition, make sure to purchase your tire pressure warning valves and transmitters at your Toyota dealer.
Page 420: Air Conditioning Filter
- Page 421 7-3. Do-it-yourself maintenance ■ Checking interval Inspect and replace the air conditioning filter according to the maintenance schedule. In dusty areas or areas with heavy traffic flow, early replacement may be required. (For scheduled maintenance information, please refer to the “Schedule maintenance guide”...
Page 422: Wireless Remote Control/Electronic Key Battery
- Page 423 7-3. Do-it-yourself maintenance Vehicles without a smart key system (type B) Remove the cover. To prevent damage to the key, cover the tip of the screwdriver with a rag. To prevent the buttons from being disassembled, face the button sur- face downward.
- Page 424 7-3. Do-it-yourself maintenance Vehicles with a smart key system Take out the mechanical key. Remove the cover. To prevent damage to the key, cover the tip of the screwdriver with a rag. Remove the depleted battery using a small flathead screw- driver.
- Page 425 Use a CR2016 (vehicles without a smart key system) or CR2032 (vehicles with a smart key system) lithium battery ●Batteries can be purchased at your Toyota dealer, local electrical appliance shops or camera stores. ●Replace the battery only with the same or equivalent type recommended by the manufacturer.
Page 426: Checking And Replacing Fuses
- Page 427 Replace the blown fuse with a new fuse of an appropriate amperage rat- ing. The amperage rating can be found on the fuse box lid. Type C: Contact your Toyota dealer. I n f o r ma t i o n P r o v i d e d b y :...
- Page 428 After a fuse is replaced ●If the lights do not turn on even after the fuse has been replaced, a bulb may need replacement. (→P. 427) ●If the replaced fuse blows again, have the vehicle inspected by your Toyota dealer. ■...
Page 429: Light Bulbs
- Page 430 7-3. Do-it-yourself maintenance Replacing light bulbs Headlight high beams (halogen bulb)/daytime running light ■ (halogen bulb) Turn the bulb base counter- clockwise. Pull the bulb out while press- ing the lock release of the connector. When installing, reverse the steps listed. I n f o r ma t i o n P r o v i d e d b y :...
- Page 431 7-3. Do-it-yourself maintenance Headlight low beams (halogen bulb) ■ Turn the bulb base counter- clockwise. Pull the bulb out while press- ing the lock release of the connector. When installing, reverse the steps listed. Front side marker lights ■ Turn the bulb base counter- clockwise.
- Page 432 7-3. Do-it-yourself maintenance Front turn signal/parking lights (bulb type) ■ To ensure enough space to perform work, turn the steer- ing wheel to rotate the front wheel away from the bulb to be replaced. Turn the steering wheel to the left when replacing the right side light bulb, and turn the steering wheel to the right when replac-...
- Page 433 7-3. Do-it-yourself maintenance Remove the light bulb. When installing, reverse the steps listed. Stop/tail/rear side marker lights and rear turn signal lights ■ Open trunk remove the luggage trim cover clips. (→P. 435) Pull the hook while depress- ing the button. Partly remove the luggage trim cover.
- Page 434 7-3. Do-it-yourself maintenance Turn the bulb base counter- clockwise. Rear turn signal light Stop/tail/rear side marker light Remove the light bulb. Rear turn signal light Stop/tail/rear side marker light When installing, reverse the steps listed. I n f o r ma t i o n P r o v i d e d b y :...
- Page 435 7-3. Do-it-yourself maintenance Back-up lights ■ Open trunk remove the clips. (→P. 435) Then partly remove the trunk panel cover. Unplug the connector while depressing the lock release. Turn the bulb base counter- clockwise. Remove the light bulb. When installing, reverse the steps listed. I n f o r ma t i o n P r o v i d e d b y :...
- Page 436 When installing, reverse the steps listed. Replacing the following bulbs ■ If any of the lights listed below has burnt out, have it replaced by your Toyota dealer. ● Headlight low/high beams (LED type) ● Parking lights/daytime running lights (LED type) ● High mounted stoplights...
- Page 437 The headlight low/high beams (LED type), parking lights/daytime running lights (LED type) and high mounted stoplights consist of a number of LEDs. If any of the LEDs burns out, take your vehicle to your Toyota dealer to have the light replaced.
- Page 438 7-3. Do-it-yourself maintenance I n f o r ma t i o n P r o v i d e d b y :...
Page 439: When Trouble Arises
Page 440: emergency flashers, page 441: if your vehicle has to be stopped in an emergency.
- Page 442 8-1. Essential information WARNING ■ If the engine has to be turned off while driving ● Power assist for the brakes and steering wheel will be lost, making the brake pedal harder to depress and the steering wheel heavier to turn. Decelerate as much as possible before turning off the engine.
Page 443: Steps To Take In An Emergency
- Page 444 8-2. Steps to take in an emergency Towing with a wheel-lift type truck From the front From the rear Release the parking brake. Use a towing dolly under the front wheels. Using a flatbed truck If your vehicle is transported by a flatbed truck, it should be tied down at the locations shown in the illustration.
- Page 445 8-2. Steps to take in an emergency WARNING Observe the following precautions. Failure to do so may result in death or serious injury. ■ When towing the vehicle Be sure to transport the vehicle with the front wheels raised or with all four wheels raised off the ground.
Page 446: If You Think Something Is Wrong
Page 447: fuel pump shut off system, page 448: if a warning light turns on or a warning buzzer sounds.
- Page 449 Electric power steering system warning light (warning buzzer) Indicates a malfunction in the EPS (Electric Power Steer- ing) system → Have the vehicle inspected by your Toyota dealer immediately. Pre-collision system warning light Indicates a malfunction in the PCS (Pre-Collision System)
- Page 450 Toyota dealer. When the light comes on after blinking for 1 minute: Malfunction in the tire pressure warning system → Have the system checked by your Toyota dealer. : Parking brake engaged warning buzzer: →P. 455 : If equipped : Driver’s seat belt buzzer:...
- Page 451 ●Is the fuel tank cap loose? If it is, tighten it securely. The light will go off after several driving trips. If the light does not go off even after several trips, contact your Toyota dealer as soon as possible. ■...
- Page 452 1 minute (vehicles with a tire pressure warning system) If the tire pressure warning light frequently comes on after blinking for 1 minute when the engine switch is turned on, have it checked by your Toyota dealer. ■ Warning buzzer In some cases, the buzzer may not be heard because of noisy place or an audio sound.
- Page 453 ■ If both the ABS and the brake system warning lights remain on Stop your vehicle in a safe place immediately and contact your Toyota dealer. The vehicle will become extremely unstable during braking, and the ABS system may fail, which could cause an accident resulting in death or serious injury.
- Page 454 8-2. Steps to take in an emergency WARNING ■ Maintenance of the tires Each tire, including the spare (if provided), should be checked monthly when cold and inflated to the inflation pressure recommended by the vehicle manufacturer on the vehicle placard or tire inflation pressure label (tire and load information label).
- Page 455 8-2. Steps to take in an emergency NOTICE ■ To ensure the tire pressure warning system operates properly (vehicles with a tire pressure warning system) Do not install tires with different specifications or makers, as the tire pressure warning system may not operate properly. I n f o r ma t i o n P r o v i d e d b y :...
Page 456: If A Warning Message Or Indicator Is Displayed
- Page 457 Indicates a malfunction in the EPS (Electric Power Steering) system A buzzer also sounds. → Have the vehicle inspected by your Toyota dealer. Indicates that the vehicle is being driven at 3 mph (5 km/h) or more with the parking brake still engaged A buzzer also sounds.
- Page 458 Indicates a malfunction in: • The ABS; or • The brake assist system (U.S.A.) A buzzer also sounds. → Have the vehicle inspected by your Toyota dealer. (Canada) Indicates a malfunction in the VSC (Vehicle Sta- bility Control) system. → Have the vehicle inspected by your Toyota dealer.
- Page 459 Press the “ON-OFF” button once to deactivate the system, and then press the button again to reactivate the system. A buzzer also sounds. → Have the vehicle inspected by your Toyota dealer. Indicates a malfunction in the LDA (Lane Depar- ture Alert) system A buzzer also sounds.
- Page 460 8-2. Steps to take in an emergency Warning message Details/Actions Indicates a malfunction in the PCS (Pre-Collision system) A buzzer also sounds. → Have the vehicle inspected by your Toyota dealer. (Flashes) (If equipped) Indicates a malfunction in the BSM (Blind Spot Monitor) system A buzzer also sounds.
- Page 461 (If equipped) Indicates a malfunction in the Automatic High Beam system A buzzer also sounds. → Have the vehicle inspected by your Toyota dealer. (If equipped) Indicates that the tire inflation pressure is low → Check the tire inflation pressure, and adjust to the appropriate level.
- Page 462 (Vehicles with a tire inflation pres- sure display function) there is a malfunction in the system. Have the vehicle inspected at your Toyota dealer. (If equipped) Indicates that the tire position information can- not be recognized → Drive for a short while and check if the display updates.
- Page 463 8-2. Steps to take in an emergency Warning message Details/Actions Indicates that remaining fuel is approximately 2.6 gal. (9.7 L, 2.1 Imp. gal.) or less → Refuel the vehicle. Indicates that the TRAC (Traction Control) sys- tem has been deactivated →...
- Page 464 8-2. Steps to take in an emergency Warning message Details/Actions Indicates that, since the VSC (Vehicle Stability Control) system was turned off, the pre-collision brake system operation is stopped → Turn the VSC on. (→P. 216) (If equipped) Indicates that the PCS (Pre-collision system) is not currently functional because the grille cover or the sensor is dirty →...
- Page 465 8-2. Steps to take in an emergency ■ Warning message in dynamic radar cruise control mode (if equipped) In the following situations, the warning message may not be displayed even if vehicle-to-vehicle distance decreases: ●When your vehicle and the vehicle ahead are traveling at the same speed or the vehicle ahead is traveling more quickly than your vehicle ●When the vehicle ahead is traveling at a very low speed ●Immediately after cruise control speed is set...
- Page 466 8-2. Steps to take in an emergency Have the malfunction repaired immediately. (vehicles with a smart key system) After taking the specified steps to correct the suspected problem, check that the warning message and light go off. Interior Exterior Warning message Details/Actions buzzer buzzer...
- Page 467 8-2. Steps to take in an emergency Interior Exterior Warning message Details/Actions buzzer buzzer The driver’s door was opened and closed while the electronic key was not in the vehicle, the shift lever was in P and the engine switch was not turned off.
- Page 468 8-2. Steps to take in an emergency Interior Exterior Warning message Details/Actions buzzer buzzer An attempt was made to drive when the electronic key was not inside the vehicle. → Confirm times that elec- tronic key is inside the vehicle.
- Page 469 (Flashes) right. Indicates a malfunction in the smart key system Once → Have the vehicle inspected by your Toyota dealer. (Flashes) • When doors were unlocked with the mechanical key and then the engine switch was pressed, the elec-...
- Page 470 8-2. Steps to take in an emergency Interior Exterior Warning message Details/Actions buzzer buzzer An attempt was made to start the engine with the shift lever in Once an incorrect position. → Shift the shift lever to P and start the engine. (Flashes) The engine switch has been turned off with the shift lever in...
- Page 471 8-2. Steps to take in an emergency Interior Exterior Warning message Details/Actions buzzer buzzer During a engine starting proce- dure in the event that the elec- tronic key was not functioning properly (→P. 486), the engine Once switch was touched with the electronic key.
Page 472: If You Have A Flat Tire
- Page 473 8-2. Steps to take in an emergency Location of the spare tire, jack and tools Luggage floor cover Jack handle Wheel nut wrench Jack Spare tire I n f o r ma t i o n P r o v i d e d b y :...
- Page 474 8-2. Steps to take in an emergency WARNING ■ Using the tire jack Observe the following precautions. Improper use of the tire jack may cause the vehicle to suddenly fall off the jack, leading to death or serious injury. Do not use the tire jack for any purpose other than replacing tires or ●...
- Page 475 8-2. Steps to take in an emergency Secure the luggage floor cover using the hook provided. Remove the jack. Taking out the spare tire Lift up the hook of the luggage floor cover on the trunk floor. Secure the luggage floor cover using the hook provided.
- Page 476 8-2. Steps to take in an emergency Remove the tool tray. Loosen the center fastener that secures the spare tire. When taking out or stowing the spare tire, make sure to firmly hold opposite ends of the tire. WARNING ■ When storing the spare tire Be careful not to catch fingers or other body parts between the spare tire and the body of the vehicle.
- Page 477 8-2. Steps to take in an emergency Replacing a flat tire Chock the tires. Flat tire Wheel chock positions Left-hand side Behind the rear right-hand side tire Front Right-hand side Behind the rear left-hand side tire Left-hand side In front of the front right-hand side tire Rear Right-hand side In front of the front left-hand side tire...
- Page 478 8-2. Steps to take in an emergency Turn the tire jack portion “A” by hand until the notch of the jack is in contact with the jack point. The jack point guides are located under the rocker panel. They indicate the jack point positions. Raise the vehicle until the tire is slightly raised off the ground.
- Page 479 • If there are any cracks or deformations in the bolt screws, nut threads or bolt holes of the wheel, have the vehicle inspected by your Toyota dealer. • When installing the wheel nuts, be sure to install them with the tapered ends facing inward.
- Page 480 8-2. Steps to take in an emergency Installing the spare tire Remove any dirt or foreign mat- ter from the wheel contact sur- face. If foreign matter is on the wheel contact surface, the wheel nuts may loosen while the vehicle is in motion, causing the tire to come off.
- Page 481 8-2. Steps to take in an emergency Firmly tighten each wheel nut two or three times in the order shown in the illustration. Tightening torque: 76 ft•lbf (103 N•m, 10.5 kgf•m) Stow the flat tire, tire jack and all tools. ■...
- Page 482 8-2. Steps to take in an emergency WARNING ■ When using the compact spare tire ● Remember that the compact spare tire provided is specifically designed for use with your vehicle. Do not use your compact spare tire on another vehicle. Do not use more than one compact spare tires simultaneously.
- Page 483 When a tire is repaired with liquid sealants, the tire pressure warning valve and transmitter may not operate properly. If a liquid sealant is used, contact your Toyota dealer or other qualified service shop as soon as possible. Make sure to replace the tire pressure warning valve and transmitter when replacing the tire.
Page 484: If The Engine Will Not Start
- Page 485 ● There may be a malfunction in the steering lock system (vehicles with a smart key system). Contact your Toyota dealer if the problem cannot be repaired, or if repair procedures are unknown. Emergency start function (vehicles with a smart key system)
Page 486: If The Shift Lever Cannot Be Shifted From P
Page 487: if the electronic key does not operate properly.
- Page 488 Press the engine switch. In the event that the engine still cannot be started, contact your Toyota dealer. I n f o r ma t i o n P r o v i d e d b y :...
- Page 489 8-2. Steps to take in an emergency ■ Stopping the engine Shift the shift lever to P and press the engine switch as you normally do when stopping the engine. ■ Replacing the key battery As the above procedure is a temporary measure, it is recommended that the electronic key battery be replaced immediately when the battery is depleted.
Page 490: If The Vehicle Battery Is Discharged
- Page 491 8-2. Steps to take in an emergency 3.5 L V6 (2GR-FE) engine 2.5 L 4-cylinder (2AR-FE) engine Connect a positive jumper cable clamp to the positive (+) battery terminal on your vehicle. Connect the clamp on the other end of the positive cable to the positive (+) battery terminal on the second vehicle.
- Page 492 Once the vehicle’s engine has started, remove the jumper cables in the exact reverse order from which they were connected. Once the engine starts, have the vehicle inspected at your Toyota dealer as soon as possible. ■ Starting the engine when the battery is discharged The engine cannot be started by push-starting.
- Page 493 8-2. Steps to take in an emergency ●Vehicles with a smart key system: The engine switch mode is memorized by the vehicle. When the battery is reconnected, the system will return to the mode it was in before the battery was discharged. Before disconnecting the battery, turn the engine switch off.
Page 494: If Your Vehicle Overheats
- Page 495 (The fans may not operate in freezing temperatures.) If the fans are not operating: Stop the engine immediately and contact your Toyota dealer. If the fans are operating: Have the vehicle inspected at the nearest Toyota dealer.
- Page 496 8-2. Steps to take in an emergency WARNING ■ When inspecting under the hood of your vehicle Observe the following precautions. Failure to do so may result in serious injury such as burns. ● If steam is seen coming from under the hood, do not open the hood until the steam has subsided.
Page 497: If The Vehicle Becomes Stuck
- Page 498 8-2. Steps to take in an emergency ■ When it is difficult to free the vehicle Press to turn off TRAC. WARNING ■ When attempting to free a stuck vehicle If you choose to push the vehicle back and forth to free it, make sure the surrounding area is clear to avoid striking other vehicles, objects or people.
Page 499: Vehicle Specifications
Page 500: specifications maintenance data, page 501: specifications, page 502: lubrication system.
- Page 503 9-1. Specifications Engine oil selection ■ “Toyota Genuine Motor Oil” is used in your Toyota vehicle. Use Toyota approved “Toyota Genuine Motor Oil” or equivalent to sat- isfy the following grade and viscosity. Oil grade: ILSAC GF-5 multigrade engine oil...
Page 504: Cooling System
Page 505: automatic transaxle.
- Page 506 9-1. Specifications Tires and wheels Type A Tire size P205/65R16 94S, T155/70D17 110M Driving under normal conditions Front: 35 psi (240 kPa, 2.4 kgf/cm bar) Rear: 35 psi (240 kPa, 2.4 kgf/cm bar) Spare: Tire inflation pressure 60 psi (420 kPa, 4.2 kgf/cm or bar) (Recommended cold tire Driving at high speeds (above 100 mph [160...
- Page 507 9-1. Specifications Type C Tire size P225/45R18 91V, T155/70D17 110M Driving under normal conditions Front: 33 psi (230 kPa, 2.3 kgf/cm bar) Rear: 33 psi (230 kPa, 2.3 kgf/cm bar) Spare: Tire inflation pressure 60 psi (420 kPa, 4.2 kgf/cm or bar) (Recommended cold tire Driving at high speeds (above 100 mph [160...
- Page 508 9-1. Specifications Light bulbs Light bulbs Bulb No. Type Headlights Low beam (halogen bulbs) High beam 9005 (halogen bulbs) Front side marker lights Front turn signal/ Exterior parking lights 7444NA 28/8 (bulb type) Rear turn signal lights WY21W Stop/tail/rear side 7443 21/5 maker lights...
Page 509: Fuel Information
- Page 510 Non-recommendation of the use of gasoline containing MMT Some gasoline contains an octane enhancing additive called MMT (Methylcy- clopentadienyl Manganese Tricarbonyl). Toyota does not recommend the use of gasoline that contains MMT. If fuel containing MMT is used, your emission control system may be adversely affected.
- Page 511 9-1. Specifications NOTICE ■ Notice on fuel quality ● Do not use improper fuels. If improper fuels are used, the engine will be damaged. ● Do not use leaded gasoline. Leaded gasoline can cause damage to your vehicle’s three-way catalytic converters causing the emission control system to malfunction.
Page 512: Tire Information
- Page 513 9-1. Specifications Tire size (→P. 513) DOT and Tire Identification Number (TIN)(→P. 512) Uniform tire quality grading For details, see “Uniform Tire Quality Grading” that follows. Location of treadwear indicators(→P. 403) Tire ply composition and materials Plies are layers of rubber-coated parallel cords. Cords are the strands which form the plies in a tire.
- Page 514 9-1. Specifications Typical DOT and Tire Identification Number (TIN) DOT symbol Tire Identification Number (TIN) Tire manufacturer’s identifica- tion mark Tire size code Manufacturer’s optional tire type code (3 or 4 letters) Manufacturing week Manufacturing year : The DOT symbol certifies that the tire conforms to applicable Federal Motor Vehicle Safety Standards.
- Page 515 9-1. Specifications Tire size Typical tire size information ■ The illustration indicates typical tire size. Tire use (P = Passenger car, T = Temporary use) Section width (millimeters) Aspect ratio (tire height to section width) Tire construction code (R = Radial, D = Diagonal) Wheel diameter (inches) Load index (2 digits or 3 digits)
- Page 516 9-1. Specifications Tire section names Bead Sidewall Shoulder Tread Belt Inner liner Reinforcing rubber Carcass Rim lines Bead wires Chafer I n f o r ma t i o n P r o v i d e d b y :...
- Page 517 U.S. Department of Transportation. It provides the purchasers and/or prospective purchasers of Toyota vehicles with information on uniform tire quality grading. Your Toyota dealer will help answer any questions you may have as you read this information. DOT quality grades ■...
- Page 518 9-1. Specifications Temperature A, B, C ■ The temperature grades are A (the highest), B, and C, representing the tire’s resistance to the generation of heat and its ability to dissi- pate heat when tested under controlled conditions on a specified indoor laboratory test wheel.
- Page 519 9-1. Specifications Glossary of tire terminology Tire related term Meaning Tire pressure when the vehicle has been Cold tire inflation pres- parked for three hours or more, or has not sure been driven more than 1 mile or 1.5 km under that condition The maximum cold inflated pressure to which Maximum...
- Page 520 9-1. Specifications Tire related term Meaning The combined weight of installed regular pro- duction options weighing over 5 lb. (2.3 kg) in excess of the standard items which they Production options replace, not previously considered in curb weight weight or accessory weight, including heavy duty brakes, ride levelers, roof rack, heavy duty battery, and special trim A metal support for a tire or a tire and tube...
- Page 521 9-1. Specifications Tire related term Meaning A pneumatic tire in which the ply cords that extend to the beads are laid at alternate Bias ply tire angles substantially less than 90 degrees to the centerline of the tread The tire structure, except tread and sidewall Carcass rubber which, when inflated, bears the load The breaking away of pieces of the tread or...
- Page 522 9-1. Specifications Tire related term Meaning A tire designated by its manufacturer as pri- Light truck (LT) tire marily intended for use on lightweight trucks or multipurpose passenger vehicles The maximum load that a tire is rated to carry Load rating for a given inflation pressure The load rating for a tire at the maximum per- Maximum load rating...
- Page 523 9-1. Specifications Tire related term Meaning The linear distance between the exteriors of the sidewalls of an inflated tire, excluding ele- Section width vations due to labeling, decoration, or protec- tive bands That portion of a tire between the tread and Sidewall bead The parting of the rubber compound from the...
- Page 524 9-1. Specifications Designated seating Occupant distribution Vehicle normal load, capacity, Number of in a normally loaded Number of occupants occupants vehicle 2 through 4 2 in front 2 in front, 1 in second 5 through 10 seat 2 in front, 1 in second 11 through 15 seat, 1 in third seat, 1 in fourth seat...
Page 525: Customization
- Page 526 9-2. Customization Customizable features Some function settings are changed simultaneously with other func- tions being customized. Contact your Toyota dealer for further details. Definition of symbols: O = Available, —=Not available Gauges, meters and multi-information display (→P. 77, 81) ■...
- Page 527 9-2. Customization Customized set- Function Default setting ting Blue Accent color Light blue Orange O O — Yellow On with the speed limit cau- On with the tion indicator speed limit cau- Speed limit display — O O (yellow) not tion indicator enabled (yellow) enabled...
- Page 528 Settings that can be changed using the Entune Audio Plus system or Entune Premium Audio with Navigation system Settings that can be changed by your Toyota dealer Definition of symbols: O = Available, — = Not available Door lock (→P. 99, 107, 485) ■...
- Page 529 9-2. Customization Smart key system and wireless remote control (→P. 99, 107) ■ Customized set- Function Default setting ting Operation signal — O O (Emergency flashers) Operation signal — — O (Buzzer) Operation buzzer vol- Level 5 Off to level 7 O O O Time elapsed...
- Page 530 9-2. Customization Wireless remote control (→P. 92, 99, 107) ■ Customized set- Function Default setting ting Wireless remote control — — O Driver’s door unlocked in one All doors Unlocking operation step, all doors unlocked in one O O O unlocked in two step steps...
- Page 531 9-2. Customization Turn signal lever (→P. 164) ■ Customized set- Function Default setting ting The number of times the turn signal lights flash automatically when the turn signal lever — — O 4 to 7 moved to the first posi- tion during lane...
Page 532: Automatic Air Conditioning System
- Page 533 9-2. Customization WARNING ■ During customization As the engine needs to be running during customization, ensure that the vehicle is parked in a place with adequate ventilation. In a closed area such as a garage, exhaust gases including harmful carbon monoxide (CO) may collect and enter the vehicle.
Page 534: 9-3. Items To Initialize
Page 535: for owners, page 536: reporting safety defects for u.s. owners, page 537: seat belt instructions for canadian owners (in french).
- Page 538 AVERTISSEMENT ■ Dommage et usure de la ceinture de sécurité Inspectez la ceinture de sécurité périodiquement. Vérifiez si elles ne sont pas entaillées, effilochées et que leurs ancrages ne sont pas desserrés. N’utilisez pas une ceinture de sécurité défectueuse avant qu’elle ne soit remplacée.
Page 539: Srs Airbag Instructions For Canadian Owners (In French)
- Page 540 ◆ Coussins gonflables latéraux et rideaux SRS Coussins gonflables latéraux avant SRS Participent à la protection du torse des occupants de siège avant Coussins gonflables latéraux arrière SRS Participent à la protection du torse des occupants des sièges latéraux arrière Coussins gonflables rideaux SRS ●...
- Page 541 Composants du système de coussins gonflables SRS Capteurs d'impact avant Témoins indicateurs “AIR BAG ON” et “AIR BAG OFF” Système de classification de l'occupant du siège passager Témoin d'avertissement SRS avant (ECU et capteurs) Contact de boucle de ceinture Coussins gonflables de sécurité...
- Page 542 Votre véhicule est équipé de COUSSINS GONFLABLES INTELLI- GENTS conçus selon les normes de sécurité américaines applicables aux véhicules à moteur (FMVSS208). L'ensemble de capteurs de coussins gonflables (ECU) régule le déploiement des coussins gon- flables sur la base des informations qu'il reçoit des capteurs, etc., indi- qués ci-dessus dans le schéma illustrant les composants du système.
- Page 543 AVERTISSEMENT ■ Précautions relatives aux coussins gonflables SRS Respectez les précautions suivantes concernant les coussins gonflables SRS. Le non-respect de ces précautions peut occasionner des blessures graves, voire mortelles. ● Le conducteur et tous les passagers du véhicule doivent porter correcte- ment leur ceinture de sécurité.
- Page 544 Un nourrisson ou un enfant trop petit pour utiliser une ceinture de sécurité doit être correctement attaché au moyen d'un siège de sécurité enfant. Toyota recommande vivement d'installer tous les nour- rissons et enfants sur les sièges arrière du véhicule et de prévoir pour eux des systèmes de retenue adaptés.
- Page 545 AVERTISSEMENT ■ Précautions relatives aux coussins gonflables SRS ● Ne vous asseyez pas sur le bord du siège et ne vous appuyez pas contre la planche de bord. ● Ne laissez pas un enfant rester debout devant le coussin gonflable passager avant SRS ou s'asseoir sur les genoux du passager avant.
- Page 546 AVERTISSEMENT ■ Précautions relatives aux coussins gonflables SRS ● Ne fixez rien et ne posez rien sur des emplacements tels que la planche de bord, la garniture du volant et la partie inférieure du tableau de bord. Ces éléments peuvent se transformer en projectiles lorsque les coussins gon- flables conducteur, passager avant et genoux SRS se déploient.
- Page 547 Si les parties renfermant les coussins gonflables SRS, comme les garnitu- res du volant et des montants avant et arrière, sont endommagées ou cra- quelées, faites-les remplacer par votre concessionnaire Toyota. ● Ne placez rien sur le siège du passager avant, comme un coussin par exemple.
- Page 548 SRS Ne mettez pas votre véhicule au rebut et ne procédez à aucune des modifi- cations suivantes sans consulter votre concessionnaire Toyota. Les cous- sins gonflables SRS peuvent ne pas fonctionner correctement ou se déployer (se gonfler) accidentellement, provoquant la mort ou de graves blessures.
Page 549: Index
- Page 550 You lose your keys ● If you lose your keys or mechanical keys, new genuine keys or mechanical keys can be made by your Toyota dealer. (→P. 95) ● If you lose your keys or electronic keys, the risk of vehicle theft increases significantly.
- Page 551 What to do if... (Troubleshooting) If you think something is wrong The engine does not start (vehicles without a smart key system) ● Is the shift lever in P? (→P. 153) ● Is the steering wheel unlocked? (→P. 153) ● Is the battery discharged? (→P.
- Page 552 What to do if... (Troubleshooting) The steering wheel cannot be turned after the engine is stopped ● Vehicles without a smart key system: It is locked to prevent theft of the vehicle if the key is pulled from the engine switch.
- Page 553 What to do if... (Troubleshooting) An alarm is activated and the horn sounds (vehicles with an alarm) ● Did anyone inside the vehicle open a door during setting the alarm? The sensor detects it and the alarm sounds. (→P. 69) ●...
Page 554: Alphabetical Index
- Page 555 Alphabetical index Back-up lights Care ........374, 377 Replacing light bulb ....433 Aluminum wheels ....375 Wattage ........ 506 Exterior ......... 374 Interior ........377 Battery ........400 Battery checking ....400 Seat belts......378 If the vehicle has discharged Cargo capacity......
- Page 556 Alphabetical index Child safety ........ 53 Airbag precautions....37 Daytime running light Battery precautions..401, 491 system........167 Child restraint system ..... 54 Defogger How your child should wear Outside rear view the seat belt......30 mirrors ......327, 333 Installing child restraints ..
- Page 557 Alphabetical index Door lock Doors ........99 Eco Driving Indicator ....79 Key........100 EDR (Event data recorder)..10 Smart key system ....99 Electric Power Steering Wireless remote control ..99 (EPS) ........214 Doors .......... 99 Function........ 214 Automatic door locking Warning light......
- Page 558 Alphabetical index Engine switch ....153, 155 Engine........500 Compartment ......392 Entune Audio system ... 240 Engine switch....153, 155 Audio input......245 Hood ........390 AUX port/USB port ....245 ® How to start the Bluetooth audio ....288 engine......
- Page 559 Alphabetical index Fuel ........... 178 Capacity........ 500 Flat tire........470 Fuel gauge......77 Floor mats ........24 Fuel pump shut off system ... 445 Fluid Information......507 Automatic transaxle ....503 Refueling ......178 Brake ........503 Type......178, 500 Washer .........
- Page 560 Alphabetical index Hands-free system I/M test ........387 (for cellular phone) ..276, 289 Identification ......499 Head restraints ......123 Engine ........499 Vehicle........499 Headlights ........ 166 Automatic High Beam Ignition switch system ........ 170 (engine switch)....153, 155 Light switch ......
- Page 561 Alphabetical index Keyless entry Lane Departure Alert (LDA) ..199 Smart key system ... 99, 107 LATCH anchors ......59 Wireless remote LDA (Lane Departure Alert) ..199 Lever control......99, 108 Keys ..........92 Auxiliary catch lever....390 Battery-saving function ..115 Fuel filler door opener...
- Page 562 Alphabetical index Mobile Assistant ....323 Moon roof......... 134 Maintenance Jam protection function ..135 Do-it-yourself maintenance... 388 Operation......134 General maintenance ... 383 MP3 disc ......... 261 Maintenance data ....498 Multi-information display..81 Maintenance Audio system-linked ....81 requirements ......
- Page 563 Alphabetical index Odometer........77 Paddle shift switches....162 Parking brake......165 Engine oil ......500 Operation......165 Parking brake engaged Opener Fuel filler door ....... 180 warning buzzer... 446, 455 Hood ........390 Parking brake engaged Trunk........107 warning message ....455 Warning light......
- Page 564 Alphabetical index Radar cruise control (dynamic Safety Connect ......364 radar cruise control) ..... 186 Seat belt reminder light ..447 Radiator ........398 Seat belts ........28 Adjusting the seat belt .... 29 Radio ........259 Rear personal lights ....340 Automatic Locking Wattage ........
- Page 565 Alphabetical index Spark plug........ 502 Sensor Automatic headlight Specifications ......498 system ........ 167 Speech command system Automatic High Beam Speedometer......77 system ........ 175 Steering lock Inside rear view mirror ..128 Column lock release ..... 154 LDA (Lane Departure Warning message....
- Page 566 Alphabetical index Switches Audio remote control Tachometer ........ 77 switches ......244 Tail lights........166 Automatic High Beam Light switch......166 switch ......... 170 Replacing light bulbs .... 431 BSM (Blind Spot Monitor) Wattage ........ 506 switch ......... 226 Talk switch ......
- Page 567 Alphabetical index Transmission ......160 Tires .......... 403 Chains........235 Automatic transmission ..160 Checking....... 403 If the shift lever cannot be If you have a flat tire ..... 470 shifted from P ..... 484 Paddle shift switches .... 162 Inflation pressure ....
- Page 568 Alphabetical index USB port ......... 245 Warning buzzers Brake system......446 Downshifting ......163 Electric power steering Valet key ........92 system........ 447 Vanity lights ......352 Key reminder ....154, 466 Wattage ........ 506 Open door......455 Vanity mirrors ......352 Open hood......
- Page 569 Alphabetical index Washing and waxing ....374 Weight........498 Cargo capacity...... 150 Load limits......150 Vehicle capacity weight ..498 Wheels ........416 Replacing......416 Size........504 Window lock switch ....131 Windows........131 Power windows..... 131 Rear window defogger ..... 327, 333 Windshield wipers ....
Page 570: Gas Station Information
- Page 571 I n f o r ma t i o n P r o v i d e d b y :...
This manual is also suitable for:
Rename the bookmark, delete bookmark, delete from my manuals, upload manual.
2025 Toyota Camry Is Why Sedans Remain Relevant
What the world needs now is some sedan love—and hybrid fuel economy.

- For the first time, Toyota’s Camry goes hybrid only but retains the available all-wheel drive.
- We observed 48 mpg in real-world fuel economy during a 36-mile jaunt back to downtown San Diego in a 2025 Camry XLE AWD.
- Production of the 2025 Toyota Camry has just started at Toyota’s plant in Georgetown, Kentucky, and sales begin in May.
The 2025 Toyota Camry, styled at studios in Newport Beach, California, and Ann Arbor, Michigan, sits low and hugs the ground, and the optional 19-inch alloy wheels fill out the wheel wells. Headlamps across the industry are seemingly disappearing into narrow, pointed, shafts of light, and that execution works well on the new Camry.
Crimps in the sheetmetal are applied at just the right spots, cascading inward down the hood and along the beltline. And the design elements on the rear quarter panels appear to be pulled taut as they converge at the back. While the Camry has a standard trunk lid hinged below the rear window, this design could have also worked as a liftback.
An available 12.3-inch multimedia touchscreen blends nicely into the dashboard, but many shoppers will appreciate the hard buttons for climate control positioned below the screen, as well as an actual volume knob along the left side of the touchscreen.
The 2025 Camry XLE AWD we drove near San Diego last week (sticker priced at $40,780 with destination, including a $4760 Premium Plus package) featured a handsome two-tone off-white and black interior punctuated with a soft checkerboard pattern trim on the front doors and instrument panel. Subtle, but very effective.

Unless you really need to spend more for the Lexus badge on your sedan, Toyota’s best-selling four-door does quite nicely, both inside and out, in the aesthetic department.
There are other reasons to like the new Camry. How about 48 mpg in real-world fuel economy during a 36-mile jaunt back to downtown San Diego?
It wasn’t long ago that V6 power was standard in this segment, but lately the four-cylinders have taken over, with very few compromises. Pair up a capable 2.5-liter DOHC I4 with a 100-kW electric motor (with 208 Nm of torque) powered by a lithium-ion battery, and you can sail on past lots of gas stations with a combined 232 hp with on-demand all-wheel drive (or 225 hp with front-wheel drive).
.css-ov6gys{font-family:Paralucent,Paralucent-roboto,Paralucent-local,Arial,sans-serif;font-size:1.5rem;line-height:1.1;margin:0rem;}@media(min-width: 48rem){.css-ov6gys{font-size:2.1875rem;line-height:1.2;}}@media(min-width: 64rem){.css-ov6gys{font-size:2.625rem;line-height:1.2;}}.css-ov6gys b,.css-ov6gys strong{font-family:inherit;font-weight:bold;}.css-ov6gys em,.css-ov6gys i{font-style:italic;font-family:inherit;} Engineers dialed in a much better formula for smoothly accelerating, decelerating, and cruising.
The best fuel-economy rating for the 2025 Camry is the LE FWD trim, at 53/50 mpg city/highway. At the low end is the XSE AWD trim, certified at 44/43 mpg. The only way to buy this new Camry is as a hybrid.
Since the Prius first reached American shores in 2020, Toyota has owned the hybrid space more than any other automaker, especially now as hybrids find their way into just about every new Toyota, including the pickup trucks and even the new Land Cruiser and 4Runner.
See what the Prius started?

The brand’s early hybrids came along with ragged continuously variable transmissions that reacted to throttle inputs with more noise than actual propulsion, and the engine would cycle on and off much too abruptly.
But the powertrain team has dialed in a much better formula for smoothly accelerating, decelerating, and cruising with this fifth-generation hybrid system, thanks to increased power from the lithium-ion traction battery.
I was behind the wheel for 20 minutes before I realized this new two-motor CVT—and all the necessary programming to integrate with the engine—was doing its job without me even noticing. I thought I would miss the conventional eight-speed automatic from the previous Camry. A third electric motor is added at the rear axle for AWD models.
Where does this powertrain go from here? The Camry could do fine with a 2.0-liter engine (like in the new Prius), especially if more juice can be applied to the hybrid side to boost fuel economy.
But for now, Toyota has positioned the Camry to maintain its front-runner status among midsize sedans.
Full Disclosure: I’m a sedan guy. A lot of sedans were frumpy, boat-like, and boring in the 1970s, but I met a girl in 1985 whose family had a new, light blue Honda Civic sedan, and I connected with that car immediately. I sorely miss my 1996 Nissan Maxima with the five-speed manual and my 2011 Mazda6. But my 2016 Mazda6 Grand Touring is going strong with its 19-inch smoked alloy rims, and I could argue that it’s the best-looking sedan on the road.
As SUVs and pickup trucks have gotten ridiculously large—and as smaller, anonymous crossovers are now a dime a dozen—I find myself even more enamored with the three-box body style for aesthetic reasons, for the fuel economy and aerodynamics, and for better handling with a lower center of gravity. And the trunk of a midsize sedan can handle a Costco run, no problem.

Despite being all-new, the Camry carries over certain dimensions, including wheelbase (111.2 inches), overall width (72.4 inches), and EPA cargo volume (15.1 cubic feet). The new Camry is slightly longer overall (at 193.5 inches); AWD models now sit a bit lower (at 56.9 inches tall); and ground clearance is down as well (to 5.4 inches). Curb weight changes little from the previous model, with the range-topping XSE trim being the heaviest, at 3538 pounds.
There are four trim levels for the new Camry: LE, SE, XLE, and XSE, and the last two are quieter inside, thanks to standard front-side acoustic laminated glass to reduce wind noise and harshness.
Standard safety features across all trims include blind-spot monitor and rear cross-traffic alert, while other driver-assistance technologies (such as dynamic radar cruise control, pre-collision with pedestrian detection, and lane-departure alert), are available in some of the 10 feature packages offered.
Toyota says the base 2025 Camry LE FWD with a starting price of $29,495 with destination represents a price cut of $400 compared with the outgoing Camry Hybrid base grade, while including more standard features.
But at the other end of the range, the $37,220 starting point for the 2025 Camry XSE AWD is about $1800 more expensive than its 2024 counterpart. Production of the new Camry has just started at Toyota’s plant in Georgetown, Kentucky, and sales begin in May.
Toyota says its Camry has dominated the midsize sedan segment for 22 years in the US, which probably explains why Chevrolet, Buick, Ford, Lincoln, and Chrysler have largely (or completely) abandoned the segment.
True, Toyota sold more than 290,000 Camry sedans in 2023 in the US, topping the No.2 Honda Accord by nearly 100,000 units. Toyota also sold 435,000 RAV4s in the US in 2023, which generates enough cashflow to keep sedans like the Camry available to shoppers.
Does the new Toyota Camry pique your curiosity about a sedan? Please comment below.
Tom joined Autoweek in 2022 after nearly 25 years as an editor at WardsAuto, and 10 years as a daily newspaper reporter before that. He’s been in metro Detroit all his life. His personal cars have been downright practical, and he’s happy paying them off and enjoying several years of debt-free motoring. The craziness of COVID drove him to buy a 1953 Packard Patrician, in honor of his grandfather, who worked at the Packard plant until production ceased in the mid-1950s.
.css-1u92ux6:before{background-color:#ffffff;border:0 solid transparent;bottom:38%;color:#000;content:'';display:none;height:0.3125rem;position:absolute;right:0;width:100%;z-index:under;}@media(min-width: 40.625rem){.css-1u92ux6:before{height:0.625rem;}}@media(min-width: 64rem){.css-1u92ux6:before{bottom:25%;}} Toyota

Gallery: 2024 Toyota Land Cruiser

‘24 Toyota Land Cruiser Is Risky Move Down Market

Gallery: 2025 Toyota 4Runner Interior Photos

2025 Toyota 4Runner 6th Gen Gets All Turbo Power

Gallery: 2025 Toyota 4Runner Exterior Photos

How Will the New and Old Toyota 4Runners Stack Up?

2025 Toyota 4Runner Teased on Social Media

Toyota bZ4X Joins the EV Party Just in Time

Gallery: 2023 Toyota bZ4X Limited AWD

2024 Land Cruiser Starts at $57,345

TWCB: 2023 Toyota Corolla Cross and Mazda CX-5
IMAGES
VIDEO
COMMENTS
To use Cruise Control, turn it on first by pressing the button on the end of the control stalk behind the lower right side of the steering wheel. The green cruise control icon will appear in the instrument display to show the system is ready. Then accelerate to the speed you want, and press the stalk down to set it.
Disclaimer: Adaptive Cruise Control is designed to assist the driver and is not a substitute for safe and attentive driving practices. See your Owner's Manual for important instructions and cautions. Not all features are available on all vehicles and model grades. Please see your Owner's Manual for further details and important safety information.
Setting the vehicle speed. 1. Press the cruise control main switch to activate the cruise control. Cruise control indicator will be displayed. Press the switch again to deactivate the cruise control. 2. Accelerate or decelerate the vehicle to the desired speed, and press the "SET" switch to set the speed. Cruise control "SET" indicator ...
This video gives instructions on how to operate the cruise control feature in your new Toyota. SUBSCRIBE: http://bit.ly/ToyotaSubscribeAbout Toyota:We're in ...
The new 2018 Camry has a different way to set cruise control, this is how you do it now.Toyota How-To: Cruise Control | Toyota#SuperEdgar10 to the rescue!
Options shown. Not all features available on all vehicles and model grades. Please see your Owner's Manual for further details and important safety informati...
View and Download Toyota CAMRY 2021 owner's manual online. CAMRY 2021 automobile pdf manual download. Sign In Upload. Download Table of Contents Contents. Add to my manuals. Delete from my manuals ... Page 170 • Dynamic radar cruise control with full-speed range (if equipped) ( P. 346) • LTA (Lane Tracing Assist) (if equipped) ( P. 325 ...
View and Download Toyota Camry 2018 owner's manual online. Camry 2018 automobile pdf manual download. Sign In Upload. Download Table of Contents Contents. Add to my manuals ... Turn signal indicator Brake hold standby ( P. 211) indicator ( P. 217) Headlight indicator Cruise control indicator ( P. 219) ( P. 263, 276, 289) (U.S.A.) Tail light ...
Page 185: Cruise Control 4-5. Using the driving support systems Cruise control Summary of functions Use the cruise control to maintain a set speed without depressing the accelerator pedal. Display Indicators Set speed Cruise control switch Setting the vehicle speed Press the "ON-OFF" button to activate the cruise control. Page 186 4-5 ...
2 If this light flashes, refer to "Cruise control" or "Dynamic Radar Cruise Control," Section 4-5, 2017 Owner's Manual. 3 If equipped. 1 If indicator does not turn off within a few seconds of starting the engine, there may be a malfunction. Have vehicle inspected by your Toyota dealer. Master warning1,3 Low Tire Pressure Warning1,3
CAMRY 2020 This Quick Reference Guide is a summary of basic vehicle ... The Quick Reference Guide is not intended as a substitute for the Owner's Manual located in your vehicle's glove box. We strongly encourage you to review the Owner's Manual and sup- ... Dynamic Radar Cruise Control (DRCC) or Full-Speed Range DRCC 37-39 Lane Departure ...
On order to activate the cruise control in your Toyota Camry, follow these instructions: On the right side of the steering wheel, find the cruise control setting. When you reach your preferred speed, press the set button on the ring's bottom. Holding the button on the top left of the cruise control will allow you to change the distance ...
To use Toyota's Dynamic Radar Cruise Control On-The-Go: Turn on the cruise control setting located on the right hand side of the steering wheel, it's the button in the middle of the circle. If you're at the speed you'd like to be, push set, which is the button along the bottom of the ring. To adjust the speed, use the button at the top ...
Manual Toyota Camry (2021). View the Toyota Camry (2021) manual for free or ask your question to other Toyota Camry (2021) owners. Manua. ls. Manua. ls. ... To set the cruise control feature, first ensure that you are driving at a steady speed above 25 miles per hour. Then, locate the cruise control buttons on the steering wheel. ...
Here's how to use cruise control in a Toyota Camry: 1. Press the "ON/OFF" button on the steering wheel to turn on the cruise control. 2. Use the accelerator pedal to increase your speed to the desired speed, then release the pedal. 3. Press the "SET/RES" button on the steering wheel. The cruise control system will maintain your ...
On order to activate the cruise control in your Toyota Camry, follow these instructions: Holding the button on the top left of the cruise control will allow you to change the distance between you and the car in front of you. On the right side of the steering wheel, find the cruise control setting. When you reach your preferred speed, press the ...
View the Toyota Camry (2018) manual for free or ask your question to other Toyota Camry (2018) owners. Manua. ls. Manua. ls. Toyota cars · Toyota Camry (2018) manual. 9.2 · 9. give review. PDF manual · 612 pages. ... To set the cruise control, locate the cruise control buttons on the steering wheel. Press the "On" button to activate it. Then ...
Welcome to Belleville Toyota!In this video, I am demonstrating the Dynamic Radar Cruise Control feature, which, in addition to traditional cruise control fea...
The verdict: We're going to miss the old V-6, but the refreshed 2025 Toyota Camry's hybrid-only drivetrain, stylistic rework and impressive uplevel trims make the segment superstar one of the ...
View and Download Toyota CAMRY 2016 owner's manual online. CAMRY 2016 automobile pdf manual download. Also for: 2016 camry. Sign In Upload. Download Table of Contents Contents. Add to my manuals. ... Cruise control indicator will be dis- played on the multi-information dis- play. Press the button again to deacti- vate the cruise control.
Toyota. For the first time, Toyota's Camry goes hybrid only but retains the available all-wheel drive. We observed 48 mpg in real-world fuel economy during a 36-mile jaunt back to downtown San ...
Constant speed cruise control/ Dynamic Radar Cruise Control (DRCC)4 indicator 1 If the indicator does not turn off within a few seconds of starting the vehicle, there may be a malfunction. Have the vehicle inspected by your Toyota dealer. 2 If the indicator flashes, there may be a malfunction. Refer to the Owner's Manual.