

Your Ultimate Patagonia O Trek Packing List

1. Start with a Good Back Pack
2. clothing and shoes, a) base layers.
A running top with sleeves that fit well is excellent for keeping you warm while protecting your arms and hands from the sun. These are also light, so they will feel more comfortable and dry quickly. We tend to not recommend cotton shirts, as they may take twice as long to dry and feel bulky for an outdoor activity.
Merino wool socks offer great heel support, are super durable, and dry fast. Bring multiple pairs of these to change into if it rains (prolonged hiking in wet socks is a sure way to get blisters).
Underwear, swimwear (for exploring lakes, pools, and rivers), a fast-drying microfiber towel and handkerchiefs.
Buff/neck gaiter.

Hiking pants: You need hiking pants to protect you from the grass and wind. For women, running tights are super light, stretchy, and comfortable and will only take up a little space in your backpack.
Rain pants are a great option for hiking in the fall or winter.
For bedtime, bring a pair of thermal leggings.
c) Outerwear
A rain jacket: Rain is usually the biggest concern on Patagonia's O trek, so bring a robust windproof rain jacket with a hood and zipped pockets.
A fleece jacket for the windy and chilly days.
Bring a sun hat to protect your head and neck from the sun and a beanie for the chillier days.
Warm, windproof gloves.
Bring high UV protection sunglasses with polarised lenses. Being close to the Antarctic ozone hole, Patagonia receives UV-B radiation, and your eyes need extra protection from these harmful rays.

Hiking shoes: Invest in high-quality hiking shoes that fit well and have ankle support because you will spend a significant portion of your day in them. Your hiking shoes should also be waterproof, breathable, and have excellent grip for days when the trail is muddy.
Lightweight shoes: These can be a pair of Crocs or flip-flops that you can easily walk around in at camp and will dry quickly.
3. Hiking Gear
A 1-litre water bottle with a wide mouth allows for easy refilling. Remember, constant hydration is vital on any hike. Luckily, there are numerous places you can refill your bottle with the park's natural springs (you can use filtration tablets if you refill near a farm - animals can contaminate the water).
Trekking poles: Areas like the John Garner Pass are particularly steep, and the terrain can get muddy, slippery, or rocky. Hiking poles will help you keep steady on such terrain and will be super helpful if you have knee issues. Choose a brand that offers anti-slip handles, anti-shock mechanisms, and a rubber tip.
A GPS watch.

4. Other Personal Items
A small, waterproof day pack for your camera, phone, cash, and other essentials. 220V and 2-pin electronic chargers (you can recharge devices on campsites and refuges).
A small first aid kit with any prescription medication, allergy medicine, painkillers, and ointment.
Bug spray and sunscreen.
Toiletries, including a small shampoo bottle and bar of soap.
Weather-resistant and solar-charging flashlight.
Earplugs for the night because the nights are windy, and you still need good-quality sleep.
Find your next adventure

Torres del Paine W Trek Self-Guided (5 Days)
$1,728 per person

Torres del Paine Guided W Trek (5-days)
$2,533 per person

Torres del Paine O Circuit Self Guided
$2,238 per person

Guided Torres del Paine O Circuit
$3,232 per person

Tour du Mont Blanc (4-Days)
Switzerland
€775 per person

Hike Mount Toubkal (4,167m)
£299 per person
5. Essential Documents
Passport and copies. You'll also need a driver's license to rent a car, plus identification documents for minors.
Travel insurance policy copies.
Visa (depending on your country of origin). Generally, citizens of the European Union, the UK, the United States, and Canada do not require one.
Spanish Phrasebook can be useful when learning a phrase or two!
Cash tips for guides. Often, tourist areas will accept US dollars but having some local Chilean Pesos is wise.
A debit or credit card for shopping and other applicable fees.

Self-sufficient O Trek
A sleeping mat or lightweight inflatable mattress (this is comfortable and takes the least amount of space).
A sleeping bag with synthetic fillings (better suited for Patagonia's wet conditions) and a comfort rating between 0°C to -7°C degrees or lower comfort rating of -5°C to -12°C (different manufacturers use different comfort ratings).
All your food. We recommend items that are light while containing plenty of calories and nutrients like oatmeal, fruits, meat or vegan jerky, sausages, bread, protein bars, and beverages. You will also need cooking essentials like a stove, Isobutane fuel canisters, pots, a bowl, and a spoon.

Related Articles:
Patagonia hiking
O trek Patagonia
TrekkingTorress del Paine
Best time to hike in Patagonia
Hiking Patagonia without a guide
Trekking Chile
Best mountains to climb in South America
- Best Hikes In The World
- Appalachian Trail
- European Hikes
- Nepal Hikes
- Patagonia Hikes
- See All Hikes
- Mount Kenya
- Mount Kilimanjaro
- Mount Toubkal
- See All Mountains
- South Africa
- New Zealand
- Switzerland
- United Kingdom
- Packing Lists
Torres Del Paine O Trek – Guide To Hiking The Full Circuit

Chile , Hikes , Patagonia , South & Central America

The Torres Del Paine O Trek delivers some of nature’s most dramatic landscapes. This multi-day hike allows you to spend more than a week adventuring in true wilderness.
Expect to see spectacular glaciers, emerald lakes, ancient forests, and tranquil rivers. It’s no surprise that this is not only one of the most popular hikes in Chile , but also famous across the globe!
The hype is definitely worth it!
In this article, I break down everything you need to prepare for and undertake this amazing hike. It’s time to check Torres Del Paine’s O Trek off your bucket list.
The O Trek Torres Del Paine: Know Before You Go
O trek in torres del paine - location.
Located on the southern tip of South America, the Torres del Paine National Park was made a World Biosphere Reserve by UNESCO in 1978. This pristine wilderness hosts some of the most diverse flora and fauna in the Americas.
The Torres Del Paine Full Circuit is situated in Chile near the southern tip of South America. The park itself is located 112 km north of Puerto Natales and 312 km north of Punta Arenas.

When is the best time to trek the Torres Del Paine Full Circuit circuit?
The Torres del Paine national park can actually be hiked all year round. This makes it one of the most accessible trekking regions in the world. However, this and other self-guided hiking is only open from October-April.
To give you a sense of the season, we have written an overview of each below. It’ worth also reading our article on the when to hike Torres Del Paine .
Spring - September to November
This is a great time of year to visit the park if you want warm, clear weather but without the crowds. Although not quite as warm as the summer months, the skies are often clear and you'll get stunning views across the park.
This is also the best season to see the region’s blooming flora. Spring is the breeding season for wildlife. Who doesn’t love baby animals?
Summer - December to March
This is the high season. Although the hiking trails in Torres Del Paine are at their capacity now, the weather is also at its warmest and you'll get the clearest days for your trek. If you're the active type, then summer is also the period when you can book other activities. You can horse ride, go kayaking or mountain biking.
Fall - March to June
My favourite season. The landscape comes alive with colour and the trails start to empty out as days become colder. It's often windy, but the spectacularly beautiful views are worth it!
Winter - June to August
Although the majority of refugios are closed during this period, this season has the benefit of being the quietest. If you want to do the O Trek in Winter, you will need to go with a guide.
Without independent trekkers, the trails are almost empty. This is the coldest period though and you will certainly experience near-freezing nights and high winds.
How difficult is the Torres Del Paine O Trek?
The Torres Del Paine full circuit trek is not considered a difficult route. Torres del Paine’s full circuit is around 130km/ 80 miles and should take you 7 days. Those who wish to hike slower can extend it to 9 days.
The circuit is considered a fairly good entry-level trek. The elevation remains relatively flat and trekkers generally stay near sea level.
Therefore, unlike some of the more famous treks in Nepal , altitude sickness is not an issue on the circuit. The trail is very well signposted, making it near impossible to get lost. Water can be found throughout the circuit and ranger stations are dotted along the route.
A solid level of fitness is still required. You will need to be fit enough to walk several hours a day carrying your belongings.
Personally, I found the most difficult part of the O Trek is carrying a heavy bag. You can make the trek easier by staying in refugios or buying meals and renting all camping equipment at the sites. This way you would only have to carry clothes and a few other essentials.
This form of ‘slack packing’ is much more expensive. Ultimately the level of comfort will depend on your budget.
If you are looking to do a shorter hike and still see the highlights of Torres Del Paine, consider doing the W Trek . There are also some day hikes in Torres Del Paine that cover parts of the O Trek trails.
You may also like : complete guide to Fitz Roy hikes
Are permits required for the Torres Del Paine Full Circuit Trek?
Yes, a permit is required to enter the park. Permit costs around $49 for more than 4 days (which the O Trek is). According to the CONAF website , you need to buy tickets online, 24hrs before entry. Although, I got away with booking the night before so they may not be too strict about this. Better to be safe than sorry and reserve early!
You can simply show park officials your permit on your phone (remember to download it!). The park officials will also need to see that you have booked your accommodation in advance.
Accommodation And Food On The O Trek Torres Del Paine
There are 11 campsites in the park which are run by three different companies. Currently, you can book campsites through Vertice Patagonia and Las Torres.
Campsites cost between $10-$25 (Site only). Both companies also have the option to rent camping gear.
As well as tents, there are also options to stay in dormitories, cabins, and refugios. You can book these with the same companies mentioned above. I suggest using only one company to book your entire trek, for simplicity's sake.
At the camps, you will find bathrooms, shops, and even small restaurants. You may need to pre-order your meal so check beforehand.
Note : As of 2022/2023, the free CONAF campsites are closed for renovation. It is unclear when these will re-open. It’s better to budget in paying for all your sites. If this has changed, please drop us a comment.
How Far In Advance Should You Book The O Trek, Patagonia?
Torres Del Paine treks are not something you can decide to do last minute. It's recommended to book at least 6 months in advance, especially if you plan to visit during the peak season (November to March).
It is almost impossible to find vacant campsites a few weeks before. Weather conditions can also affect availability and camps are sometimes closed for maintenance.
My travel style is usually going where the wind takes me, but this is one trek worth the extra planning! The O circuit is often the cherry on top of a Patagonia backpacking adventure .
How much does the Torres Del Paine Circuit Trek cost?
The cost of a Torres Del Paine Circuit Trek varies depending on when you book flights and when you trek (out-of-season tends to be a little cheaper).
If you use a trekking agency, using local operators is cheaper than an international outfitter. The best choice for budget travelers is to do this trek without a guide.
You should budget for the following key expenses:
- Tour Agency: ~$800 for a cheap local agency to ~$2,500 for a pricey Western trekking agency.
- Tips: ~$10-20
- Visa, Vaccinations, Insurance etc:~$300-$500
- Equipment (buying and hiring):~$500-$800
- Return flights to Punta Arenas: ~$1,500
- Misc (additional food, unplanned travel/hotels etc): $50
Total Costs : $2,500 – $5,000
You could hike the Torres Del Paine O Trek trek independently for less than $400. This price includes food, park entrance, and camping. Be sure to book early! Food can be purchased from refugios throughout the park, however, it is very expensive. It would be cheaper to prepare beforehand and buy ingredients for camp meals in Puerto Natalensis.
Torres Del Paine O Trek - Essential Gear List
Trekking the Torres Del Paine Full Circuit requires a certain amount of essential pieces of trekking clothing and equipment. The Torres Del Paine Full Circuit Trek is a multi-day trek that travels through a number of landscapes. Many pieces of equipment can be rented at the campsites. However, the free, CONAF campsites do not offer equipment. If you want to save money, We recommend bringing the most important pieces of gear with you.
Other than a tent and sleeping bag. Some essentials to pack for this trek include:
- Camping utensils, bowl, and mug
- Good boots or trail shoes
- Weatherproof trekking jacket
- Beanie or neck scarf and gloves (for those icy winds)
- A lighter/ matches
I also recommend a power bank, although you will be able to recharge your phone at most of the camps. Having a portable device is much more convenient.
We have written a detailed trek gear list that covers everything you need for multi-day treks.
Hiking The O Circuit In Torres Del Paine - Route Guide
The Full Circuit takes hikers on the standard 'W' Trek before continuing around the backside of the park to Refugio Dickson. Trekkers then climb over John Gardner Pass before descending back down to Campamento Grey.
An Important Note On The John Gardner Pass
The John Gardner pass is often closed due to bad weather and it is always advised to add a few extra days to your itinerary to accommodate this.
When the pass is closed the best option is to hike back to Campamento Los Perros and stay there for another night or two.
Torres Del Paine O Trek Map
The best map we have found for the Torres Del Paine Full Circuit the Torres del Paine Waterproof Trekking Map by Sergio Zagier.
The map provides a compressive satellite relief, contour lines, shelters, timed trails, camping and inns.
8-Day Torres Del Pain Circuit Trek Itinerary
Below is some detailed information on what to expect, day by day on the Torres Del Paine O Trek. This is the typical itinerary that is generally followed by tour operators.
You can use the information to do this trek as an independent O hike. Trek length for each day can vary greatly depending on the weather, available campsites, and your own trekking experience.
Day 1: Puerto Natales - Campamento Serón (12 km)
You leave early from the town of Puerto Natales. The first buses leave just after 7 or you can hire a transfer service. Take your transportation to the Torres Del Paine park administration office which lies at the southern end of the national park. You will probably arrive around lunch. By the time you sort out the admin elements (permits etc.), aim to get your hike underway before 3 pm. You begin by trekking for several hours before you bed down at Las Carrettas - one of the free camping grounds (if this is available).
Day 2: Campamento Serón – Refugio Dickson (18km)
You have time to sleep in a bit or enjoy the campsite. Aim to get hiking sometime around 10-11 am. The first part of the trail takes you along a river path before ascending up and over a small pass. There will be heavy winds near the top and you'll need to be careful with your footing. In the afternoon you'll arrive at lake Dickson where there is a campsite. Relax here and take in the beautiful lake and surroundings.
Day 3: Refugio Dickson – Campamento Los Perros (11 km)
Today is a short trek so it’s okay if you start later. The trail leads uphill through a forest and you'll get fabulous views back over lake Dickson. After crossing the river several times you'll come to Mirador Britanico. Here you get incredible views of both Los Perros and Glacier lake! From here your campsite is just a short 20-minute walk.
Day 4: Campamento Los Perros – Paso (12 km)
Make sure you leave early - around 6 am - to get the most out of the long day ahead. Today is one of the most difficult parts of the trek as it encompasses crossing a fairly high pass. Start the day trekking uphill for 3 hours as you make your way through a lovely forest before coming out onto an open rocky terrain. There will be orange path markers along this point. Pay attention to the skies if the weather is coming in. You will need to turn back if it becomes severe. When you reach the highest point of the pass you'll be greeted with a stunning panoramic view that sticks as you continue over the trail. There will most likely be tremendous amounts of wind. You may need to crouch at the top just to stop from falling over! After lunch, you'll arrive Campamento Paso where you stay the night. If you have the energy, explore this gorgeous area.
Day 5: Campamento Paso – Refugio Grey – Paine Grande (21 km)
Get up early as you have a long day trekking ahead! You begin by hiking downhill for 4-5 hours with incredible views of Grey Glacier as you descend. After a long morning, you'll reach Refugio Grey. This is a good spot to have lunch. After lunch, continue downhill for 2-3 hours until you reach Paine Grande, the camp for the night.
Day 6: Valle del Frances – Los Cuernos (22,5 km)
This section is one of the tougher and longer stretches of the Torres Del Paine Circuit Trek. Try to leave around 8 am and head towards Campamento Italiano. The trek will take you several hours and you'll get a nice breather when you arrive. Once in camp, leave your main bag there and continue with your day pack and lunch to Mirador Frances.
The Mirador is roughly a two-hour walk away. Take your time to enjoy this viewpoint before you head back down to Campamento Italiano. Retrieve your main pack and then continue on. You still have a few hours of walking to Los Cuernos campsite where you stay the night.
Day 7: Los Cuernos – Campamento Torres (20 km)
This is the final real trekking day! After a leisurely breakfast, you should head off around 9 am towards Campamento Chileno. Your trek begins on flat ground as you make your way along the Lago Nordernskjöld.
After a few hours, you'll come to a sign saying “shortcut to Chileno”. Take the shortcut and walk for several hours until you reach the Refugio Chileno. You can have lunch here. After lunch, you will walk uphill for an hour until you reach Campamento Torres. Leave your bags (but take your camera) here and head upwards for 45 minutes until you reach the Torres! Have a well-deserved break whilst you take in this iconic sight. I advise you hit the sack early as you'll need to be up before sunrise the following day.
Day 8: Torres – Puerto Natales (10 – 15 km)
Even if it’s tough, rise early (around 5 am) to get the sunrise views at the Mirador of the Towers! Sunrise happens around 6 am in summer and there is just a short walk to the viewing and picnic area.
If you’re lucky with the weather, you will get to witness one of the most beautiful sunrises on our planet! Watching the sunrise is one of my biggest highlights when trekking Patagonia .
If it's raining in camp, don't give up - the weather is often very different up near the viewing area. Also, the weather here can clear up fast. After your sunrise moment, head back down to camp and pack up all your gear.
From camp, you head down to the Hotel Las Torres. This will take roughly 3 hours. From there you can either walk to the park entrance (7km/ 4.3 miles, 1.5 hrs) or take a minibus for a small fee ($10).
The minibuses leave at 2 pm to be on time for the 2:30 pm bus back to Puerto Natales from the entrance. You are going to be EXHAUSTED at this time, it’s worth paying that extra $10 for the bus!
Frequently Asked Questions About Torres Del Paine Full Circuit
Is the torres del paine trek dangerous.
Generally speaking, hiking in Torres Del Paine is safe. The only concern along the route is the weather. Patagonia is famously windy and produces frequent storms that often make trekking quite dangerous. Always be aware of the weather forecast and, if traveling with a guide, follow their lead and advice.
Can I camp anywhere on the Torres Del Paine O Trek?
No. You may only set up a tent in the established campsites. Most of which charge a fee.
Can you do the O Circuit without a guide?
Yes, you can hike the O circuit in Torres Del Paine without a guide. Independent hiking is allowed through all seasons except for Winter (beginning of May to end of September). Read more about self guided hiking in Patagonia here.
Is altitude sickness a risk on the O trek in Torres Del Paine?
There is almost no risk of altitude sickness on the Toress Del Paine Full Circuit Trek.
The highest point reached is under 700 meters which is far too low to bring on altitude sickness.
For more information, read our comprehensive guide to altitude sickness .
What guidebook do you recommend?
The one guide book that stands above all other is Trekking Torres del Paine: Chile’s Premier National Park and Argentina’s Los Glaciares National Park by Rudolf Abraham. The guide book covers eight major trails within the park including the Full Circuit and the ‘W’ Trek. Maps, tips and detailed information is provided for each trek and the book is a must for trekkers hiking solo.
Other guide books available include Fodor’s Chile: with Easter Island & Patagonia (Travel Guide), Backpacking in Chile: Travel Guide & Trekking Guide for Independent Travelers and Torres del Paine (Chile) 1:50 / 100,000 Trekking Map, GPS, waterproof by Trekking Chile.
About the author
Mark Whitman
Mark has trekked extensively in Asia, Europe, South America and Africa. He founded Mountain IQ in 2014 with the sole aim to be the best online information portal to some of the most popular mountain destinations around the world. When not writing for Mountain IQ, Mark is out exploring the outdoors with his wife!
Leave a Reply
Your email address will not be published. Required fields are marked
We work with local guides to offer great value adventures at unbeatable prices
Subscribe & get your free guide to going abroad!!
Torres del Paine O Circuit [2022]: An Ultimate Guide and Itinerary for a Self Guided Adventure
The Torres del Paine O Circuit trek is the ultimate trek in Torres del Paine National Park, one of the most amazing ranges of land in Patagonia. The O circuit improves on the 5 day W Trek by adding 4 more days of trekking through the more remote and less trafficked “backside” of Torres del Paine. The additional views, of Glacier Grey and the lands around Refugio Dickson, are well worth the extra 4 days of walking.

I’ve done both the Torres del Paine W Trek and the O Circuit, and though the W trek is one of the most beautiful yet accessible that I’ve hiked, the O circuit’s fewer trekkers and remote feel made a it even better experience by far.
If your feet can handle the walking and you’re comfortable hiking and camping for a week+, opt for the Torres del Paine O circuit trek. You’ll thank yourself for years to come.
A Note on the images in this article: This guide has some amazing imagery, courtesy of other travelers, willing to share their adventures with you (and me). Feel free to support them by following the photo credit link to discover their other adventures …
Contents of the Guide to doing the O Circuit Trek of Torres del Paine, On Your Own
Overview of the torres del paine o circuit trek.
- Highlights of the Torres del Paine O Circuit Trek
- Map of the O Trek in Torres del Paine
Quick Costs of Torres del Paine O Circuit Trek
Full torres del paine o circuit trek guide.
- Day 1: Bus to Torres del Paine’s Laguna Amarga Gate, hike to Camp Seron (5hrs, 8mi / 13km)
Day 2: Camp Seron to Camp Dickson (6 hrs, 18km/11mi)
Day 3: camp dickson to camp los perros (4.5 hrs, 12km/7.5mi), day 4: camp los perros to camp grey (11 hrs, 15km/9.5mi).
- Day 5: Camp Grey to Camp Paine Grande (3.5 hrs, 11km/7mi)
Day 6: Camp Paine Grande to Camp Italiano (2.5 hrs, 7.5km/5mi) (or Camp Frances)
Day 7: hike up campamento britanico for a view passing valle frances, hike back down to campamento los cuernos (7.5 hrs, 10.5km/16.5mi.).
- Day 8: Hike up to Campamento Torres or Campamento El Chileno (6 hrs, 10mi/16km)
Day 9: Wakeup early and see the Torres del Paine by sunrise, hike down to Torres Hotel, bus out(5hrs, 5.5mi/10km)
Full torres del paine o circuit trek costs.
- Campsites and Refugios List
Torres del Paine O Circuit Trek Preparation Checklist
Gear and essentials for the torres del paine o circuit trek, torres del paine packing list, where to buy food for the torres del paine trek, getting to torres del paine.
- Safety in the Park
- 10 More Torres del Paine O Circuit Tips
Frequently Asked Questions on the Torres del Paine O Circuit Trek
Torres del paine o circuit trek quick facts.
- Distance of the “W” Trek: ~120km / ~77 Miles
- Average Distance and time per Day: 13.5km / 8 miles / ~6 hours of hiking per day
- Total Time for the W Trek: 9 days
- Low end costs (camping): $330, campsite reservations, and tent, sleeping bag, and camp cooking kit rented from Puerto Natales, transportation, and park fees
- Mid-range costs (Refugios without meals): $560 , refugios, transportation, and park fees
- High end Costs (Refugios with meals): ~$1400 , refugios, 3 prepared meals daily, transportation, park fees
Note: The only refugio on the “backside” of Torres del Paine is Refugio Grey, so all trekkers will need to camp at a couple points on “The Circuit” trek
Major Highlights of the Torres del Paine O Circuit Trek
Refugio Dickson: Nestled in what feels like true wilderness, at the base of massive mountains, this campsite and refugio look and feel quintessentially Patagonian
An Irreplaceable View of Glacier Grey: A magnificent glacier, miles long that seems to run into the sky, seen during the first couple days of the trek

The Torres del Paine : The rock “Towers of Paine” Namesake of the park a final viewpoint– huge rock spires with a backdrop of sunrise if you make the morning hike on the final day

Valle Frances: A forested valley crawling up towards the mountains and cascading glaciers serves as the trek midpoint

Map of the Torres del Paine Trek

(Read this article for a full review of the Torres del Paine Campsites and Refugios on the W and O treks)

Full Torres del Paine O Circuit Trek Itinerary and Guide
Preparation before day 0: reserve all campsites and refugios.
In preparation for your Torres del Paine O Circuit trek, book your accommodations (refugios and campsites) in the park and Puerto Natales as soon as possible. Campsites and refugios require advanced reservation and they all fill up quickly, so booking your campsite or refugio as early as possible is best. Note that on the O circuit, you will be checked at Refugio Dickson and Los Perros to confirm you have copies of your booking documents – and if you don’t, you’ll be turned away.
Print all of your campsite and refugio booking confirmations. Though email confirmation on a smart phone works, things go wrong and you won’t be allowed a site if you can’t show proof of your accommodation booking.
Buy your staple trekking gear before arriving. This gear is the gear that’s hard to find with a perfect fit, that can be costly, and that’ll you’ll (hopefully) for years to come. By choosing the right gear and buying it in advance you’ll save lots of money and be much more comfortable along the way.
For anyone who plans to spend time in the outdoors, here are the trekking staples I recommend buying:
- Rain jacket (waterproof and windproof)
- Compressible, insulated coat aka “loft layer” – water resistant down or synthetic insulation
- A lightweight “mid layer” – such as a light quarter zip or full zip fleece
- A “base layer” t-shirt that is moisture wicking and quick drying
- Pants suitable for trekking – quick drying at minimum, wind and water resistance is plus, but avoid cotton
- Long underwear – wool or synthetic
- Hiking socks – merino wool ideally, synthetic works, avoid cotton
- Headlamp with extra batteries
- Trekking backpack – between 40L and 60L, with a padded hip belt
- Beanie – Ideally wool, any other insulating material will work, avoid cotton
Also consider
- Windproof and waterproof gloves
For more information on the best packing list for this trek check out our Torres del Paine Packing list
Day 0: Arrive in Puerto Natales, buy ticket for bus to park, buy food and rent gear
When you arrive in Puerto Natales, and the day before your departure to Torres del Paine, use the day get the information for your trek, rent gear, to buy your bus ticket to the park, and get enough cash
Go the Torres del Paine Trek information session at Erratic Rock Hostel: Go to the daily Torres del Paine trek information at Erratic Hostel at 3:00PM. If you only take one piece of advice from this guide, then do that. The information session is absolutely free, given by staff that have done the trek countless times, and tell you everything you need to know for the trek. This session is especially good for first time trekkers as they’ll coach you through gear, packing, food, the right itinerary (the same one on this page), “need to know” info, and everything else necessary to do the trek successfully, comfortably, and on a budget.
Rent and Buy Your Gear: Using our Torres del Paine Gear List , pick up all of the missing pieces of gear you’ll need for the trek. Erratic Rock Hostel is great for renting good gear from knowledgeable and helpful staff, and if they’re out of gear they’ll point you in the right direction. Outside of Erratic Rock, just wander and look for the many “gear rental” signs.
Inspect your gear closely for damage and make sure tents, sleeping bags, and anything that inflates is free of holes.
Buy your bus ticket to the park if you have time. Buy a roundtrip ticket for 7AM. The ticket will cost $15,000 CLP (~$22 USD) and can be purchased at the Puerto Natales bus terminal. Buying in advance ensures you leave on the morning bus and avoid wasting time in line buying tickets the morning of departure.
If researching transportation in advance, these are the websites for the major bus companies
- www.busesfernandez.com
- www.busespacheco.com
- www.bus-sur.cl
- www.busesgomez.com
Get cash in Chilean Pesos: Fees in the park, for entry, shuttles, catamarans, and food at the refugios, is all paid in cash, Chilean currency, so bring plenty with you.
Day 1: Bus to Torres del Paine’s Laguna Amarga Gate, shuttle to the eastern trailhead (near hotel las torres) (5hrs, 8mi / 13km)
Costs: Bus: $22, park fee $31, Shuttle to Hotel Las Torres $4.50, Camp Seron $21 = Total $78.50
On day 1 of the trek, arrive at least 10-15 minutes before your bus and depart at 7AM.
The bus will arrive at the entrance to Torres del Paine (Laguna Amarga Gate) at ~9:45AM. At the Laguna Amarga gate you’ll offload the bus and pay the Torres del Paine park entrance fee ($21,000 CLP / ~$31 USD for foreign adults). Here trekkers doing the 9 day Torres del Paine Circuit hike will begin their hike by taking the shuttle bus to the Hotel Las Torres, next to the start of the eastern trailhead
Your trek truly starts here, so hit the trail!
Head northeast for Camp Seron, for a nice, 5 hour, 8 mile (13km) walk along country hillsides and grassy fields.
Stay at Camp Seron for the night, for a cost of $21. Feel free to head into the Refugio to buy a delicious beer to celebrate the start of your trek.
Camp Seron (managed by Fantastico Sur) is a simple, peaceful site set in an open grassy field with a fence around the campsites. When I was there, a friendly fox shared our space, running in to play with us and then running out into the grassy field where the horse grazed. Hopefully you’re as lucky.
Costs: $21/night
The hike from Camp Seron will be long, yet peaceful. Lightly rolling hills, like grasslands, interspersed with trees and brush give a very wilderness like feel, accentuated by the fact that views in all directions are land. Even when you can see through the trees, you’ll see only mountains, lakes, and hills. The trek to Seron is serene. Enjoy.
The last kilometer of hiking into Camp Dickson is amazing, walking down into a campsite nestled against a river and a towering mountain. This view was one of my favorites in Torres del Paine.
Refugio Dickson is fully equipped, with well placed campsite, and beer & wine for sale. Get in, set up early and enjoy a night of truly relaxing camping.
If you love forests, today will be your day of hiking as the route is almost entirely through trees, sometimes giving way to a river or stream.
Camp Los Perros is extremely basic, with no refugio facilities or hot water, so be prepared – and get your shower in at Dickson if you’re craving one.
Prepare yourself as the following day’s trek, from Los Perros, to Paso, and on to Grey via the John Gardner pass is going to be a rough day…but still filled with beauty.
Leave early (right at sunrise if possible). Today’s hike will be long and strenuous, but if you allow yourself time to go slowly, you’ll enjoy it more.
The trail crawls through the mountains along the John Gardner pass by barren rocks, boulders, and scree getting harder with every step… but , the trail hits its most difficult point at its most beautiful, so hang in there.
On the otherside of the of the seemingly never ending ascent you’ll climb lies Glacier Grey and the southern Patagonian ice field. This glacial ice flow is one of the most beautiful things I’ve seen in nature.
On a clear day, you can see the magnificent carpet of ice run away from you for miles, seeming to dissolve into the sky. To this date, I haven’t seen a picture that truly captures its beauty.
I recommend enjoying your lunch, or a break, in view of the glacier. You’ve earned it.

After a well earned rest, pack up and continue to Refugio Grey.
Day 5: Camp Grey to Camp Paine Grande ( 3.5 hrs, 11 km/ 7 mi)
Costs: $7.50/night
Count on a short, easy day for day 5, after day 4’s strenuous hike through the John Gardner pass. Mostly downhill and with beautiful glimpses of Glacier Grey and the rest of the park, the ease of the hike will be a welcomed relief.
Paine Grande will be busy, but a very well stocked refugio with food to restock if you need (eggs, bread, meats, etc.) and even a coffee shop. Paine Grande’s lodge and living room is luxurious but only open to guests, so, if you planned spending a single night in a refugio, this might be a good one to recharge.
If you are craving a rest day and an adventure, consider taking a tour to kayak up to Glacier Grey or even hike on Glacier Grey as most tours for the Glacier leave from Refugio Grey.
Costs: Camp Italiano (Free) or Camp Frances ($21/night)
Given the short trek on the agenda today (7.5km/5 miles over 2.5 hours) consider it a lazy day and take fll advantage of Paine Grande, coffee service and all. When you’re feeling rested up and awake, start the jaunt over to Camp Italiano
Camp Italiano is free, but count on there being minimal services at the camp. Note that though Camp Italiano (Run by CONAF) is free, you will still need a reservation and proof of that reservation.
If open, also staying at Camp Frances (run by Fantastico Sur) instead of Camp Italiano. Camp Frances does cost $21 per night, compared to Camp Italiano which is free, but you’ll get nicer bathrooms, hot showers, and more comfortable accommodation in
Costs: Camp Cuernos $21
Wake up with the sunrise, leave your tent with gear at camp Italiano, and start the 7 mile and 5 hour hike through Valle Frances towards Camp Britanico and the mirador (viewpoint). Bring your daypack, lunch (or snacks) and your coffee kit if you have it, to enjoy at the mirador.
This hike has two highlights, the views in the cascading Valle Frances that slides down the hillside, and the hanging glacier, seen from the viewpoint near Britanico.
After plenty of pics, start the return hike toward Camp Italiano. Pack up your tent and gear and continue moving for 3.5 miles and 2 hours to Camp Cuernos (run by Fantastico Sur for $21 per night).
Day 8: Hike up to Campamento Torres or Campamento El Chileno (6 hrs, 10mi/16km)
Costs: Camp Torres or Chileno $21
Start this day early as a strenuous hike is ahead, not too long, but the uphill might be annoying at times and you’ll carry all of your gear the entire way, so pack up everything and get moving.
When booking, choose either Camp Torres or Camp Chileno. Either option is great though Camp Torres is closer to the Torres del Paine making the following morning’s hike significantly shorter.
After you’ve arrived and checked in, visit the refugio to relax. If you haven’t yet, try the local Patagonia beer “Austral Calafate Ale” made from the Calafate berry. It’s a beer that’s only made in Patagonia and uses a berry that is found only in Patagonia…and quite delicious. When traveling I love quintessential experience that can’t be replicated elsewhere and have a beer made locally, available nowhere else, and in some of the most beautiful territory on the planet definitely makes for a “quintessential experience”.

Treat yourself to a hearty meal and an early night, as you’ll need to wake well before first light to make the full Torres del Paine sunrise experience.
I recommend prepping your daypack for the Torres experience the night before to making starting easier in the AM.
Don’t forget to bring your head lamp, insulating layers, an on the go breakfast, and a kit to make coffee or soup if you have. Read on to see why….
Costs: Shuttle from Hotel Las Torres to gate of Torres del Paine $5
Wake up early to make it to the Torres del Paine viewpoints with enough time to settle in before first light. If leaving from Camp Torres, plan on the hike to Torres del Paine taking one hour. If leaving from Camp Chileno, plan on the hike taking 1.5 hours.
Bring everything you prepared the night before, and bring your sleeping bag with you as well. Here’s why…
How to do the Torres del Paine sunrise experience properly:
The Torres del Pain sunrise experience is the climax of the Torres del Paine treks, for both the W and the O.
The spires of rock tower above everything around for miles with an icy blue lake sitting just in front with rocky nooks and crannies throughout. To do the sunrise experience right, stake out a comfortable hole, curl into your sleeping bag wearing your warming layers, and relax.
As sunrise approaches, the golden light will shine from behind the spires, gradually setting them on fire with an orangish glow. Making it before first light makes all of the difference. As you sit there with this beautiful view, likely cold and tired, offset it by making a cup of coffee, cocoa, or soup to enjoy, and this experience will go into your memory bank as one of the best in the outdoors.
After the sun has risen behind the Torres del Paine and you feel completely satisfied pack up and return to your campsite, pack up the rest of your gear, and hike down towards the Hotel Las Torres. At the hotel, the shuttle (~$5) will leave at roughly 2PM taking you to the park’s entrance (Laguna Amarga gate) for the 2:30PM bus from Torres del Paine to Puerto Natales. Your original ticket purchased was a round trip ticket and you’ll need it for your ride back to Puerto Natales, so keep it safe and have it handy.
Relax, reflect on the memories, and soak up the view on the ride “home”.
Congratulations, you’ve finished the quintessential hike of Patagonia!
Average Costs for Trek
- Average campsite cost per day: $21 USD per night
- Average refugio cost per day: $116 USD per night
- Average food cost per day purchased at refugios: $107 USD per day
- Average food cost per day bought in Puerto Natales: $5 to $10 per day
- Average daily gear rental from Puerto Natales: $17 USD – Tent, sleeping bag, camp kitchen
- Foreign Adults: $21,000 CLP (~$31 USD)
- Foreign Children: $6,000 children (~$9 USD)
**Fee includes park map
Transportation Fees
- Bus ticket from Puerto Natales to Torres del Paine (roundtrip): $15,000 CLP (~$22 USD)
- Catamaran ride from Pudeto to Paine Grande: $18,000 CLP (~$26 USD) One Way
Individual Campsite Costs
- Camp Las Torres (Fantastico del Sur): $21 USD/Night (High Season), $16 USD/Night (Low Season)
- Camp El Chileno (Fantastico del Sur): $21 USD/Night (High Season), $16 USD/Night (Low Season)
- Camp Torres (CONAF – unavailable 2018-2019): $21 USD/Night (High Season), $16 USD/Night (Low Season)
- Camp Seron (Fantastico del Sur): $21 USD/Night (High Season), $16 USD/Night (Low Season)
- Camp Dickson/Los Perros (Vertice Patagonia): $21 USD/Night (High Season), $16 USD/Night (Low Season)
- Camp Paso ( CONAF ): Free but requires reservation via CONAF reservation site and email confirmation
- Camp Grey (Vertice Patagonia): ~$7.50 USD/Night ( $ 5,000 CLP)
- Camp Italiano ( CONAF ): Free but requires reservation via CONAF reservation site and email confirmation
- Camping El Frances (Fantastico del Sur): $21 USD/Nigh (High Season), $16 USD/Night (Low Season)
- Cuernos Cuernos (Fantastic Sur): $21 USD/Nigh (High Season), $16 USD/Night (Low Season)
Individual Refugio Costs
- Refugio Chileno: $116 USD/Night (High Season), $95 USD/Night (Low Season) [ Fantastico Sur ]
- Refugio Cuernos: $116 USD/Night (High Season), $95 USD/Night (Low Season) [ Fantastico Sur ]
- Refugio French: $116 USD/Night (High Season), $95 USD/Night (Low Season) [ Fantastico Sur ]
- Refugio Paine Grande: $57 USD / $34,000 CLP [ Vertice Patagonia ]
- Refugio Grey: $37 USD / $22,000 CLP [ Vertice Patagonia ]
- Refugio Dickson/Los Perros: $37 USD / $ 22,000 CLP[ Vertice Patagonia ]
- Hotel Los Torres Patagonia: From ~$80 USD per night
Fantastico Sur Campsites and Refugios Price List
Average Gear Rental Costs (when rented from Puerto Natales)
- Sleeping bag: $3,000 CLP
- 2 person tents: $4,500 CLP
- Cooking kit (complete): $4,000 CLP
- Sleeping mat: $1,500 CLP
- Trekking poles (2): $3,500 CLP
- Waterproof jacket: $3,000 CLP
- Waterproof pants: $3,500 CLP
- Backpack: $4,000 CLP
- Down Jacket: $2,500 CLP
- Gloves: $1,500 CLP
- Headlamp: $1,500 CLP
Gear Rental (in park at campsites and refugios)
- Two person tent: $27 USD/Night ($20 USD Low Season)
- Sleeping Bag : $23 USD/Night ($16 USD Low Season)
Meal Costs (in Park, served at refugios)
- Breakfast: $21 USD
- Boxed Lunch: $26 USD
- Full Lunch: $39 USD
- Dinner: $39 USD
- Beer (celebratory): $4,000 CLP (~$6.50 USD) each
Meal Costs (for campers bring food from Puerto Natales)
- Food (daily): ~$5 USD to $10 USD per day, if purchased in Puerto Natales
- Eggs:~$300 CLP each (~$.50 USD) (purchased in park)
To make your Torres del Paine W trek or circuit trek the best possible, ensure you’ve done everything on this checklist prior to departure
- Book (or plan) transportation into Puerto Natales
- Book transportation by bus from Puerto Natales to Torres del Paine
- Book refugios or campsites for the duration of the trek
- Print and bring all bookings
- Rent or buy all necessary gear (tent, sleeping bag, camp kitchen, etc.) in Puerto Natales or reserve online (with accommodation bookings)
- Go through the Patagonia packing list to ensure you have gear for rain, cold, shelter, sleeping, and cooking
- Waterproof pack all gear by lining backpack using trash bags, and bring a couple extra
- Bring cash in Chilean Pesos to pay for park fees, boat trips, shuttles, food, beers, and incidentals
- Get familiar with all of the campsites you’ll be camping and the best departure times for experiences (e.g., Torres del Paine by sunrise), avoiding crowds, and arriving before dark
The Torres del Paine Treks, both the W and the circuit, are very enjoyable walks in the park (literally) as long as you’re prepared.
To stay warm, dry, and comfortable you’ll need to plan for Patagonia’s notoriously schizophrenic weather. Due to the height and shape of the mountain range and the surrounding topography, weather through Patagonia (including in Torres del Paine) can change drastically and quickly. You could start the morning with clear skies and sunshine, yet endure a monsoon like rainstorm or light snow in the afternoon. As such, plan for the right equipment to stay warm and dry both during the day and at night.
The enjoyable walks each day will be taxing. To stay fueled up you’ll need to plan satisfying, comforting, and nutritious meals that are still light to carry and easy to prepare. Pair this with a good camp stove and mess kit to keep the nights enjoyable.
Last, there are small things that can make potential disasters or large inconveniences simply laughable stories. Using a trash bag to waterproof your backpack. Carry hand sanitizer to clean hands and cuts. A hot beverage (I love my cocoa) and a headlamp (not a regular flashlight) for the evenings. These, and other things listed, will add a level of camper’s luxury to your trek.
Read on for the full packing list
Should you buy gear or rent?
For trekkers on a budget that spend time outdoors often enough (or plan to) a combination of purchasing some pieces of gear and renting others in Puerto Natales will be the best option.
If you’re traveling around South America out of a backpack, some large items are too bulky to carry continuously. Given how cheap and accessible gear rental is in Puerto Natales, I would recommend renting your tent, sleeping bag, and cooking kit in Puerto Natales at Erratic Rock or another gear renting establishment (there are plenty).
Note that though you can rent tents and sleeping bags in Torres del Paine, directly, from the campsite or refugio, these require reservation and the prices are ridiculously expensive.
Which gear should you buy? Which should you rent?
If you plan to explore the rest of Patagonia and the outdoors of South America, such as El Chalten, Bariloche, and the newest national park then it may be worth purchasing a sleeping bag and tent when you reach Patagonia. The costs will even out and the money will buy you better gear – or just bring your own from home.
In 2012, before my first Torres hike, I hadn’t even planned on going to Patagonia, so the entire trip was impromptu. I ended up buying a tent and camp stove in Bariloche, using them throughout the trek, and I actually still use them today, so don’t worry about finding good gear to rent or purchase
In any case, I recommend bringing your own clothing and layers (e.g., rain jacket, insulating layers, gloves, socks, etc.), your own well-worn boots, and your own trekking backpack. It will be harder to find high quality versions of these items that fit you (for cheap) so you’re better off bringing them.
Where to buy gear
Puerto Natales and Punta Arenas: several shops rent and sell gear, most of decent quality but expect to pay prices comparable to US or Europe
San Carlos de Bariloche, Argentina: If you are passing through Bariloche and the lake districts, name brand gear and local brands of good quality can be purchased for a decent price. If you’re camping and trekking in Bariloche, feel free to load up on gear to use later.
Thrift stores throughout Patagonia: Throughout southern Argentina and Chile and Patagonia in general have an amazing array of outdoor gear of high quality for extremely cheap. As long as you don’t mind off colors or something a few years old, you’ll find plenty of Patagonia and Northface gear for pennies on the dollar.
Where to rent gear
Erratic Rock hostel is the most reliable place to rent gear, in terms of quality, but they’re frequently rented out of everything during high season. Erratic Rock is still a great place to start as they’ll point you in the right direction for the next best place to rent.
Wander around and look for gear rental signs: Puerto Natales almost exists solely for Torres del Paine meaning if you wander the streets it will be hard not to miss the countless gear shops.
Check gear thoroughly and take pictures of “busted bits” as you’ll be responsible for it on return
(For a more detailed packing list and choosing the right gear check out our Patagonia and Torres del Paine Packing List )
Trekking Backpack: Comfortable trekking backpack between 40L to 60L with waistbelt recommend the REI Trail 40
Light, stowable daypack: Recommend the REI Flash 18 or REI Flash 22
Camp gear (if staying in campsites and not refugios)
- Tent (go lightweight)
- Camp stove with gas and one plate, bowl, cup, and fork/knife per person. I recommend bringing a jet boil (also available on Amazon for cheap) or a solo stove and rent plates, cups, bowls, and utensils in Puerto Natales
- Synthetic sleeping bag
- Sleeping pad
Trekking Clothing
Also check out our expanded packing list with details on how to pick each item
- Comfortable trekking shoes or boots (need to be broken in)
- Rain jacket
- Insulation’/loft layer (down or synthetic insulated coat)
- Sweat wicking base layer (shirt), synthetic or wool
- Long underwear, synthetic or wool
- Pants for Trekking
- Pants for hanging out in camp (clean pair) and sleep in
- Shirt for lounging
- Shorts (optional)
- 2-3 Pairs of underwear
- 2-3 pairs socks for trekking
- Gloves (windproof and waterproof)
- Hiking boots or trekking shoes
- Flip flops or Trekking sandals
- Flushable Baby wipes
- Hand sanitizer
- Basic first aid kit (sports tape, gauze, sanitizer, pain reliever, superglue)
- Quick drying camp towel
- Toilet paper roll
Accessories
- Trash bags for waterproofing (instead of dry bags)
- Large Ziploc bags for organizing and waterproofing (instead of dry bags)
- Portable charger
- Smartphone or camera
- A good book or kindle
- Gorilla tape or duct tape
- Two liter sized water bottles or Nalgene bottles
- Trekking poles
(View our Detailed Patagonia and Torres del Paine Packing List for more info on exactly what to take to make your trek the best possible and keep your bag light)
How to layer and wear your clothes on the trek
Packing a trekking wardrobe of strategig “layers” allows you to add or remove layers to increase, decrease, and maintain your body’s temperature through heat, rain, and snow. Adding a couple extra items that are windproof and waterproof allows you stay dry and avoid losing warmth even better.
Make sure your kit includes the following layers for trekking
(From outer to inner)
- Rain jacket with sealed seams to keep out wind and water
- Loft layer coat for warmth ( down jacket, synthetic jacket, or heavy fleece )
- Mid layer shirt/jacket for light warmth (a lighter fleece or half zip)
- Base layer shirt that dries quickly and wicks sweat
- Beanie – synthetic or wool
- Gloves – windproof if possible
- Quick drying, sweat wicking, funk resistant underwear
- Water and wind resistant pants
- Long underwear made of wool or synthetic
- Wool or synthetic socks (one pair for warmth at night, one for hiking by day)
Food and water on the trek
To stay happy and healthy on the trek, good food and water is necessary. Though good water is easy to come by, good food (for cheap) is a little more difficult and requires planning. Read on for how to plan for both food and water during the Torres del Paine treks.
Prepared food is available at refugios throughout the park, but if you’re not careful then food costs (at $30 to $40 per meal) can total more than the price of your entire trek. Additionally on some points of the O Circuit, like Los Perros, food is not available, so plan accordingly.
For budget travelers, the best option is to plan and pack the meals for your entire trip, purchasing the food in Puerto Natales, and hiking it in.
For the most fulfilling experience yet lightest bag, plan a quick and tasty breakfast (candy bars alternated with single bag hot cereal), on the go lunch (dried fruits, nuts, granola, cured meats), and a hearty dinner.
You’ll need 9 breakfasts, 10 lunches, and 9 dinners.
Here is a meal by meal tip list for trekking Torres del Paine National Park
Breakfast: Bring two types of breakfasts: candy bars, and readymade hot cereal
- Candy bars: Snickers are the most underrated trekker’s breakfast. They’re delicious (which starts you off with a smile), packed with carbs, fats, and sugar to readily burn, and you can eat them on the go – which saves you time. Any candy bar with a mix of nuts will work. Aim for 400-700 calories to get enough nutrients, depending on your body type
- Readymade Hot Cereal: There is something comforting about a warm meal, so start off half of your days with readymade hot cereal – like oatmeal or porridge. Make this by combining your choice of instant hot cereal (like oat meal), powdered milk, and sugar/sweetener into a single bag, and set aside just enough for your trek. To prep in the morning, just boil water for your cereal, pour in, and use the rest for your coffee/cocoa.
Lunch: Keep lunch simple by going for high nutrient “on the go” foods.
Aim for foods that you can eat while walking. Granola, nuts, and dried fruits make the best option. Shelf stable meats and bread (for sandwiches) are a close second. Peanut butter and jelly sandwiches are just as great
- Granola, nuts, and dried fruits: Staples for most trekkers, but beware these can get old quickly. Bring enough to have 500-700 calories for every serving. I highly recommend hitting the dried fruit shops in Puerto Natales as they have a selection of dried goods that taste like candy but are great for you – dried strawberries, hibiscus flowers, tropical fruit, and many others to keep you smiling.
- Shelf stable meats and cheeses with bread : Meats such as salami and prosciutto paired with dinner rolls make perfect bite sized, on the go sandwiches. No refrigeration required makes it easy to still get your protein (and tastiness) on your trek.
- Peanut butter and jelly (or honey) sandwiches: Possibly the most perfect adventure food. The sugar will give you a quick boost of energy, the fats (from the peanut butter) provide the slow burning fuel needed for trekking, and the combination of peanut butter and bread makes a complete protein. The peanut butter and jelly is one of the cheapest, most balanced, and most complete trekking food options
Dinner: Go big, go comfort
- For dinner, pack in hot meals with comfort foods, lots of calories, and protein. You’ll want your dinner meal to be at least between 700 to 1000 calories in total.
- Pairing a starchy dry good, like rice or pasta, with a flavorful topping, like a dry packaged gravy or sauce, and adding a source of protein to the side is the best way to go.
- To step up your camp meal, bring garlic, onion, or a small container of spices. DO NOT forget pepper and salt.
Limit canned goods because any trash you create has to be dragged out – by you or someone else
Here are a few ideas for building your hearty camp dinners with filling, flavorful meals.
Dinner Meal Cheat List
Simply take a starch, sauce, and protein and improvise some magic. You should have something tasty, but at least you’ll have the nutrition to get through the next day
- Starch (for calories): Rice, pasta, dried potatoes
- Sauce: Dry packaged dressings, gravies, or sauces
- Protein: Spam, shelf stable meats, eggs
- Spices and seasonings: Salt, pepper, garlic powder, onion powder, hot sauce
General Suggestions for camp meals
- Plan daily in individual meals – aim for single bag meals – only take what you’ll eat
- Go dry (less moisture) for lighter weight
- Hit the dried foods stores in Puerto Natales , “Frutos Secos” (Google Map Location) I highly recommend the dried hibiscus
Food hack #1: Olive oil
Quick on-the-go hunger fix
Olive is a healthy and dense source of good fats. A single tablespoon has over 100 calories, which ¼ of a candy bar, about the same as a handful of nuts, and other options. Though you can’t survive on olive oil alone, you can stave off hunger and stay fueled by downing a tablespoon of olive on the move.
Similar to the trendy “bulletproof coffee” this hack gives your body a shot of healthy calories – as long as you’re walking them off they won’t stick to your butt.
Take a small bottle with you to add calories (and flavor) while cooking, and keep this food hack in mind when you’re hungry but racing to make it to your campsite before dark.
Food hack #2: Peanut butter or almond butter
On the go meal
Just like a spoonful of olive oil, a spoonful of peanut butter can do wonders when you’re starving/dying/moody as it delivers fats and carbs – the two main fuels you need to stay moving. If you happen to have a piece of bread around, shove that in your mouth and you have a complete proteins as well and ultimately everything your body needs to keep moving.
In prep for the Torres del Paine O Circuit trek, you have three main options for purchasing food:
- Bulk food stores and small markets around Puerto Natales
- Punta Arenas
Unimarc is the town supermarket, and every trekker in town will raid this place first. Plan on the selection varying between pricey and scarce depending on how soon after restocking you arrive. You’ll find most of your standard brands and plenty of other options here, but check out the bulk food stores and local markets before committing to too much.
Bulk food stores in Puerto Natales are my favorite as they have a great selection of dry goods such as dried fruits (even dried, sweetened hibiscus leathers), rice, beans, pastas, and plenty of other great trekking options
Punta Arenas is a great place to stock as the selection of foods will be wider and cheaper here. If you’re passing through, stop by the grocery stores and if you find some foods you really like then pick them up – you’re not likely to find them in Puerto Natales
Water on the Trek
Sources of water are plentiful, and the park advertises that stream water is clean, however, I recommend sticking to marked potable water resources (faucets) and bringing water purification tablets that can be purchased cheaply in Puerto Natales to use on stream water.
Thought the water in Patagonia is much cleaner than other places, the high traffic in the park makes it possible that you collect water downstream from where a human or animal has contaminated it.
Play it safe and collect water only from marked potable water resources, or use purification tablets on your water.
Bring 2 to 3 water bottles that are about a liter in size. The “cheap” plastic water bottles are the best as they’re cheap and lightweight – if you don’t feel like purchasing reusable water bottles. The average woman requires at least 2 liters of water daily and the average man requires 3 at minimum.
Having 2 liters of water on you at the start of your trekking day will be more than enough to get you between watering points, and will make cooking and cleaning easier without
To start your trek in Torres del Paine from Puerto Natales you’ll take a public bus from Puerto Natales to Torres del Pane entrance gate (Laguna Amarga), a shuttle from the entrance gate to the lake (Pudeto station), a catamaran across the lake to Paine Grande Lodge, and finally start your trek there.
Now for the details
Once you’re in Puerto Natales, getting to Torres del Paine is quite easy. Buy your ticket one day in advance (if possible) from the main bus station in Torres del Paine for $15,000 CLP (~$22 USD) including return trip. The main bus companies that operate these buses are
- www.bus-sur.clb
The busses from Puerto Natales to Torres del Paine leave daily at the 7AM or 2:30 bus from Puerto Natales bus station. They arrive at Laguna Amarga gate ~9:45AM and 4:45PM respectively, at the entrance to Torres del Paine, a few hours later.
Aim for the 7AM bus and you’ll make it into the park and trekking by 11AM
After the dropoff at Laguna Amarga gate, you have the choice of hiking in (90 minutes) or taking a shuttle to “Pudeto”, at the edge of the lake. The shuttle will cost ~$5 USD payable in Chilean Pesos and arrives at ~10:30AM and ~5:30PM respectively.
At Pudeto, take the Catamaran to Guaradaria Lago Peho / Paine Grande Lodge (in the same location). This ferry ride will cost $18,000 CLP (~$26 USD) One Way.
From here…start trekking! Head north to Grey Glacier and your trek has started.
Leaving Torres del Paine
To get from Torres del Paine to Puerto Natales, the process happens in reverse with pickup at Pudeto at pickup at Laguna Amarga at 2:30PM and a shuttle leaving from Hotel Las Torres for Laguna Amarga at 2:00PM daily.
Other Routes in Torres del Paine
- The Torres del Paine W Trek: At half the length and time (5 days) the Torres del Paine W trek still offers a great “best of Patagonia” trek with great infrastructure
- Torres del Paine Day Trek : Take the 7AM bus from Puerto Natales to Torres del Paine, start hiking by 11 to make the 8 hour /11 mile trek up to the Torres and back to the Hotel Las Torres – taking a shuttle and bus, or private transport back to Puerto Natales. Consider hiring a full tour for this trek due to transportation issues that arise with late returns to Puerto Natales.
Safety and travel insurance
When you’re venturing into the unknown, travel insurance is often a good idea. On treks like these in remote areas, small mishaps (like sprained ankles or deep cuts) can turn into big costs when the nearest hospital is hours away. The extra $50-$100 of travel insurance may save you $1000’s later.
On the Everest Trek, I specifically used World Nomads due to great reviews from close friends. Though I didn’t need to use it, they were responsive to any inquiries, gaining my trust – and my friends that had a staph infection and another who was helicopter lifted out were taken care of fairly by World Nomads. Whether you choose the World Nomads Standard or Explorer plan , you’ll have the coverage you
Beyond prepping with travel insurance, here are a few good tips for safety and health
- Avoid refilling with water near where people camp or walk
- Bring hand sanitizer and use it liberally
10 More Tips to make your Torres del Paine Circuit Trek better, easier, and cheaper
- Use garbage bags as liners to waterproof your bag – don’t count on backpack covers
- Have a beer at the refugio near the Torres, and have the Calafate berry beer
- Use Snickers bars (or some other ready to eat item) for breakfast – avoid hot meals for breakfast
- Do one hot meal daily
- Take a synthetic (not down) sleeping bag
- Count on rain at some point
- Book accommodation (campsites and refugios) well in advance
- Stay at the Tin House (they have amazing mattresses)
- Plan for warm weather, cool nights, and wet weather (rain shells, synthetics/wool, good attitude)
- Bring a sleeping bag with you to the Torres del Paine (morning coffee tools are a good bonus too)
- Bring a sleeping bag liner!
- Download Maps.me with Torres del Paine maps and bring a portable charger
- Don’t be afraid to smile and make friends with singletons on the trail
- Consider doing the circuit instead
Other Patagonia attractions near Puerto Natales
- Perito Moreno Glacier: An immense glacier that is still growing and will leave you breathless
- El Chalten: Another mecca of trekking and home to the mountains on the Patagonia emblem
- Ushuaia (and penguins…and Antarctica…): The southernmost city in the world, gateway to Antarctica, filled with penguin tours
Should I book refugios in advance or just show up?
All accommodation must be booked before entering the park. You will e allowed to enter without accommodation bookings, but you won’t be allowed to stay
To book, checkout our article on the Torres del Paine Campsites and Refugios which includes links to the appropriate booking website for each individual camp or refugio (CONAF, Vertice Patagonia, or Fantastico Sur).
Can tickets be purchased in the park? How?
The entry fee to the park will be paid at the Laguna Amarga gate, where the bus will drop you off (and where the shuttles will pick you up). Be prepared with $ 21,000 CLP (~$31 USD) in cash, Chilean currency to pay on arrival.
How does hiking west to east compare to hiking east to west
I highly recommend hiking west to east. West to east, on a 5 day pace, gives tons of great buildup to the finale, Torres del Paine. The Torres del Paine are best seen in the morning, before first light as the sun rises up behind them. This climactic and early day culminates with a short walk down to the Hotel Las Torres and ride down to complete the trek.
Doing the trek west to east would either mean sacrificing the sunrise at the Torres or waking up extremely early for the hike the following day and then trekking through the day tired. Personally, I’m not a fan of trekking on little sleep.
Last, if you decide to travel west to east, you’ll be walking against the flow of hundreds of trekkers on narrow trails, which will get old quick. All in all, east to west is your best bet.
How does the O circuit compare to the W?
The W trek is a 4 to 5 day trek that is perfect for beginner trekkers or trekkers with limited time and provides breathtaking views along the way… but …if you have the time, do the circuit instead. The Circuit includes the “backside” of the park, more remote, more wild, more quiet, and just…more. There
On the circuit there are fewer trekkers and more modest accommodations. Unlike on the W side of the trek, on the circuit you’re always surrounded by towering mountains and expansive landscapes. Plus, on the Circuit I was often trekking alone – and it felt amazing. If you have the choice between the two and the time, do the Circuit. If you’ve done the W and fell in love, go back and do the backside of Torres del Paine. Youu won’t regret it
How can I do the trek cheapest?
By doing a few things:
- Stay at campsites, bringing your own (or a rented) tent and sleeping bag
- Bring your own food for meals and kit for cooking
- Take public transportation (the bus) into parks
- Make all of your reservations, so you’re not stuck with overpriced accommodation
- Go in off season, as all prices are roughly 25% outside of October to April (high season
What tour companies do you recommend?**
I don’t commonly take tours but I’m looking for tours to recommend to others. Do you have any to recommend?
Is it possible to do Torres del Paine on day trips?
Yes, if you trek quickly. You can take the 7AM bus in from Puerto Natales and hike from Hotel Las Torres up to the Torres del Paine, hike down, and take a bus (or private transport) out of the park. You may also hire private transport into and out of the park to free up timelines.
If you are doing day trips, the most magnificent thing to see will be the Torres and the second most magnificent thing will be Glacier Grey. Plan accordingly.
Is there an itinerary with just the highlights?
Consider day treks to Torres del Paine or a trek to Glacier Grey, and a trek on Glacier Grey, as options for a highlights only trek. You’ll likely need to organize one way private transport to or from the park to complement the available buses. Alternatively, you could join an organized tour.
Is it difficult to hike Torres del Paine solo?
Absolutely. I’ve hiked the W and the circuit and hiked the W trek solo. The national park is so highly trafficked that you are never actually solo, you’ll always be near another trekker
If you’re new to trekking and camping and just generally nervous about the experience, its very much possible. I recommend attending Eratic Rock’s 3PM info session daily which tells you everything you need to know to do the trek. In Puerto Natales, you can rent all of the equipment you need. New trekker or experience, solo or in a team, this trek is very possible.
Should I stay in refugios or campgrounds?
If you are trying to stay on a budget or are truly outdoorsy, bring a tent and sleeping bag and stay in campsites. If you are elderly, not used to sleeping on the ground, or uncomfortable carrying weight and roughing it – and have plenty of cash – opt for refugios.
Can I rent equipment in the park?
You can rent sleeping bags and tents in the park, but they are very costly compared to renting it in Puerto Natales. At camps/refugios, a sleeping bag costs $23 USD per night and a tent costs $27 USD per night.
Can I buy food in the park?
Meals are served at the refugios but they are very costly at $20 USD a meal for breakfast and ~$40 USD for lunch and dinner
When is the best time to go to Torres del Paine?
High season is October to April. Going during the shoulders of the season will make for less traffic but cooler weather. Going outside of high season will translate to about 25% lower prices.
Can children make the trek?
Absolutely. If you have a system for trekking with your child for ~10 miles, then they can do at least part of the trek. During my trek, a couple with an infant too small to walk hiked the highlights of the W (Valle Frances and the Torres del Paine) staying at refugios along the way.
When does the bus to Torres del Paine leave from Puerto Natales?
7:30 and 14:30 daily (more info at www.busesgomez.com )
When is high season in Torres del Paine?
1 October – 30 April
How do I get back to Puerto Natales
Take the return bus from Porteria Laguna Amarga. You can get to Laguna Amarga gate via the shuttle from Hotel Las Torres
How do I get from the trail (Las Torres area) to Laguna Amarga?
A shuttle bus leaves from Hotel Las Torres at 9:00AM and 2:00PM daily. The ticket price is $2,800 CLP (~$4)
How can I prepare for the trek
Attend the 3PM info session at Erratic Rock that discusses the trek
What Now? Considering our other Patagonia Recommendations…
Use our ultimate Patagonia packing list and guide to ensure you have the right gear for a fun and comfortable journey
Get to know your future overnight homes in our guide to the campsites and refugios of Torres del Paine , with locations, prices, booking, and all of your available options.
If the O Circuit is a little too long for you, considering hiking the shorter yet still amazing W-Trek, and use our Guide to Hiking Torres del Paine’s W-trek to prep for and do the journey on your own.
Also, if you want to keep the costs down and keep to thinner crowds, consider heading into Argentina to hike and camp El Chalten, Argentina’s most beautiful frontier town and gateway to Los Glaciares National Park.
After you’ve experienced all of Patagonia, check out our guide to traveling South America for the best next place for your itinerary according to our 9 epic routes through South America.
ABOUT THE AUTHOR
Carlos is a nomad, slow traveler, and writer dedicated to helping others live abroad and travel better by using his 7+ years of experience living abroad and background as a management consultant and financial advisor to help other nomad and expats plot better paths for an international lifestyle. Click here to learn more about Carlos's story.

A Full Backpacking Guide to the ‘O Trek' in Patagonia: Where & How to Go
Exploring Patagonia is an adventure of all adventures, a premier spot for virtually every type of outdoor activity you could imagine. This region, located at the tip of South America, spans both Chile and Argentina and has rivers, mountains, vistas, and glaciers that are inscribed in the brains of dirtbag climbers and bucket-list travelers alike.
But logistically, exploring Patagonia (and the surrounding area) is far from convenient. Flights into the region are sparse, and the bus systems, while perfectly nice, take a long time and can be tricky to book. Cell service is even more unreliable. Exploring between both Chile and Argentina also requires border crossings (of course), currency exchanges (bring plenty of high-value USD bills), and a lot of squandered plans due to bad weather.
Regardless of inconveniences, one of the region's most popular areas for recreation - Torres del Paine National Park - draws visitors of all walks of life to its entrance. The park, located in Chile, is markedly different from what you might find in U.S. National Parks.
Instead of a network of roads, there is a hiking loop spanning the majority of the park, creating a broad O shape. To see the whole expanse of the park, hiking the O Trek is the only way to do so, beyond getting a permit to rock climb some of the park's famous peaks.
But for most, devoting dollars and logistics to an international climbing expedition is out of the question. Luckily, hiking the O Trek is accessible to a wider swath of outdoor recreators, with gear rentals and hostel stays available along the trail.
Guide to the ‘O Trek’ in Los Torres National Park
What is the o trek.
Put simply, the O Trek or O Circuit, is a trail that loops within Torres del Paine National Park (also known as ” Los Torres”). Visitors must book campsites in advance and walk counter-clockwise on the loop.
Most folks hike the trail in 8 days, offshooting to include famous lookout points like the Mirador Britanico and Mirador Base de Las Torres. One of the trail's most famous and the most difficult sections, Los Perros to Glacier Grey, is a beautiful stretch with spanning views of the Southern Patagonian Icefield.
Overall, Torres del Paine is one of the largest and most popular national parks in Chile - and the O Trek is the picturesque, full treatment of what the park has to offer.
The trek also coincides with a shorter section of trail called the "W trek," this section (the lower part of the "O") connects Guardería Glacier Grey with Guardería Torres, the starting and ending point of the trail. Visitors can hike in either direction on the "W," as a ferry services Refugio Paine Grande. This also means that visitors can hike the upper part of the "O" and end early at the ferry for a 5-day loop.
The best - and only - time to complete the O Circuit is in the Chilean summer, from late November to mid-March. Travel in the winter months is limited, but guided trips in the winter along the W-Trek are possible.
Getting There
The easiest and most direct way to get to Torres del Paine is by flying from Santiago, Chile, to Puerto Natales, the closest town to the park. From there, the bus ride into the park is about 2 hours to the Laguna Amarga ranger station, where you will pay your park entry fee (bring cash). From there, a small bus (bring cash for this, too) will take you to Hotel Las Torres/Ecocamp Patagonia where you will start the trek to Campamento Serón.
To clarify, there are no cars inside the majority of Torres del Paine National Park. Driving is limited to the hotel area near the Las Torres trailhead, and a small section near the O Trek start. Unlike what you might find in most U.S. National Parks, you will not be able to tour the loop by vehicle. It is highly suggested you take a bus into the park. It is far cheaper and almost everyone does it, especially other trekkers.
In our experience, the bus system in Patagonia was nice and reliable once there, although making reservations can be difficult. Busing from other destinations like El Calafate and Punta Arenas to Puerto Natales is possible as well.
The day before our trek we flew into Puerto Natales and checked into our hostel. Our reservation was with Bus Sur, so we went to the physical Bus Sur office to get our tickets and departure time when we arrived. Booking at the main bus depot is also an option.
Day-to-Day on the ‘O Trek’ Trail
The O Trek is a 7-night route that covers roughly 80 miles with roughly 13,000 feet of elevation gain. If you plan to hike to Mirador Las Torres, plan to tack that onto your last day (day 8) before departing for your bus: it's an early wakeup but well worth it. Note that posted distances (especially on the trail signs in the park) are often inaccurate, which makes for a fun guessing game while you hike!
The O Trek route is simple to book and follow for the first 4 days. There are only a select number of sites to camp at and no variations when hiking the first section of the trail, unless you stay an extra day at a refugio or decide to combine 2 days. (Hiking from Portería Laguna Amarga to Refugio Dickson, for example, would be a long day, but definitely feasible.)
Booking can get complicated when the O Trek begins to overlap with the W Trek. Here, a higher number of refugio options vary the distance that travelers may hike per day. The variations here are not drastic, but note that camping at Refugio Chileno on your last night will add elevation to your backpacking distance, but shorten your morning hike to Mirador Las Torres.
The most difficult day is from Refugío Los Perros over John Gardner's Pass (the highest point of the loop at 4,000 feet) to Refugio Grey. The total day is roughly 15 miles with an elevation gain of roughly 700 feet and elevation loss of roughly 2,000 feet.
The climb is hard but steady; the descent is muddy and brutal. Hiker beware, there are three bridge crossings that'll get your heart rate going, especially if you are scared of heights.
But while braving difficult terrain and weather, you will find a trail community on the O Trek like no other. I will always be grateful for the smattering of hikers from around the world who we met. Informally, our trail group would cook together and hike sections together. We still have a GroupMe chat to this day.
The first 4 days of the O Trek bonds folks. So, if you plan to hike solo, know that there will be plenty of other folks on the trail and at the campsites with you, but not such a large amount to make the experience crowded or unenjoyable.
Accommodations and Food
At every stop along the O Trek there are "refugios" - think mountain huts and small ski lodges with bathrooms and small markets attached. Each site has a base price for folks who plan to set up their own tent and cook their own meals. Enclosed cooking huts are provided.
From there, hikers can upgrade and rent pre-erected tents, domes, hostel beds, and more depending on each site. Sleeping bags can also be rented at refugio sites.
Both my hiking partner and I were shocked by how well-stocked the refugio markets were. Even the most "rugged" hut (Guardería Los Perros) had basic items, like ramen and energy bars, stocked. This was the only hut without showers. Other huts provided beer, pizza, hamburgers, pay-for-Wi-Fi, and more.
Packing out enough food for 7 days is not necessary if you are willing to spend some money (roughly moderate ski lodge prices) for a meal or snacks here and there. Cooking-wise, a small canister of gas and a pocket rocket-style stove is ideal. We used an MSR International Stove . If you plan to pack out all of your own food, plan to shop in Puerto Natales; the grocery store is picked over but fine. We personally lugged our food in from Santiago, which was overkill.
The great thing about the O Trek is that gear is readily available for rent and purchase in Puerto Natales. For peace of mind, reserving gear in town (like tents and sleeping bags) before your arrival is easiest. Or, opt to spend more money and have a sleeping bag waiting for you at each refugio along the way.
We brought an MSR fuel canister along with us from Santiago, unsure of what options would be available in town. This was unnecessary; there were abundant fuel canisters (and stoves ) for purchase at many stores in Puerto Natales.
Weather shifts fast in Patagonia. If you are hiking the O Trek, expect to brave torrential winds and all weather conditions. The westerly gales are often referred to as "Escoba de Dios" or God's Broom. Have full rain gear (pants and jacket ), layers, and a sturdy tent ready for wind gusts.
If you are unsure if your tent can take the wind, rent an appropriate one in town. We saw enough tent disasters on the trail to know that taking a poorly built tent on the O Trek isn't worth it. During the day, the weather can get hot, so a T-shirt and shorts are also nice to have.
Booking & Cost
Ready to take the plunge? Our total booking cost was $507 for two people and 7 nights of camping. This cost did not include groceries and food, our park pass, or travel to, or accommodations in, Puerto Natales. Booking in advance is highly recommended, especially if you want to camp. Booking last minute is possible, but there may only be expensive lodging options (like a hostel bed) left.
The easiest way to book your campsites is through the site Booking Patagonia . Two different vendors operate the campsites within the park, which makes booking independently tricky and confusing. Booking Patagonia automatically checks availability at all of the campsites to create your itinerary on the loop. The site also books your bus ticket from Puerto Natales.
Ultimately, we never received a departure time so we went to the bus depot in person to solve the issue. Additionally, the booking site doesn’t include the shorter bus ride from the ranger station into the park. Bring extra cash for this and for snacks in the refugíos (the cheese empanadas in the park are * chef’s kiss* ).
‘O Circuit’ in Torres del Paine, Patagonia: Can I Do it?
Broadly, if you are fit and have backpacked before, this loop is for you. You will also need the proper gear. We saw several people on the W Trek with traditional duffel bags and school backpacks. You will be miserable (and unable to hike the O) if you approach terrain like this without proper gear. It doesn’t need to be fancy, but backpacking-specific gear is a must. If you don't know if your gear will work, rent in town.
Additionally, this loop is not for folks who refuse to brave bad weather. John Gardner's Pass is no joke, especially in wind and rain. Plus, once you are on the loop, you are on the loop. Few rangers exist in the park, so if you get into trouble, it is not easy to get help. Know your limits. Opt to carry less and pay for gear at the refugíos if you are nervous about how much weight you can carry.
Overall, if you have the time and funds, definitely opt for the O Trek over the W Trek. The views from John Gardner's Pass are worth it alone. Plus, the limited crowds on the O-Trek-only sections make the backpacking experience well worth the advance planning.
We Almost Died Trekking Nepal: Here's What Went Wrong
A hapless guide, poison tea, and fatal flooding - these are the hard lessons we learned about the avoidable dangers of trekking in Nepal. After getting a glorious 105 miles through the Upper Mustang region of Nepal under our belts, the sky seemed the limit to our Himalayan hiking endeavors. Read more…
The post A Full Backpacking Guide to the ‘O Trek’ in Patagonia: Where & How to Go appeared first on GearJunkie .
")
Torres del Paine O Trek of Patagonia (Complete 2023/2024 Circuit Overview)
By: Author Charles
Posted on October 25, 2023

The O Trek of Torres del Paine National Park in Chilean Patagonia is one of the most sought after multi day treks in the world.
During these 8 beautiful days, you will have the chance to trek from campsite to campsite as you get to experience the best that Patagonia has to offer. Lakes, mountains, rivers, glaciers, & more make up the surrounding landscape.
This guide is here to give you a complete overview of what the O Trek is all about and how to prepare yourself for your time out on the trail.
* Affiliate Disclosure : This post may contain affiliate links, which means I may receive a commission if you make a purchase through the links provided, at no additional cost to you. Thanks for supporting the work I put into TripTins!
1) What is the O Trek
When it comes to multi day hikes in Torres del Paine National Park, there are two main options to choose from.
There is the W Trek, a 4-5 day one-way hike, and the O Trek, an 8 day loop trail around the entirety of the park.
These two treks are named after the shape of the trails. As you will see on the map in the following section, the routes of the O and W treks create the letters they represent.
It is helpful to note that the O Trek includes the entirety of the W Trek. So, if you head on the O Trek, you are also completing the W Trek (in addition to a few extra days on the trail). Be sure to read through this W Trek overview to learn more about that trail as well!
For the O Trek, you will have a few different options on how to go about your hiking accommodations. You can choose from ready-made campsites, comfortable refugios, or you can decide to bring your own camping gear. Note that not every overnight has all three of these options to choose from (more on that soon).
Depending on availability and what you are most interested in will dictate what your accommodation is on a nightly basis. Many people (including myself) mix and match these options to get a little bit of everything out on the trail.
What also makes Torres del Paine such a comfortable trekking experience is that you can also expect full meals at these refugios/campsites if you choose to. That means you don’t necessarily need to carry along so much additional food weight with you during the trek.
Overall, the O Trek of Torres del Paine has a vast array of options to align with trekkers’ desires .
On one hand, you can decide to go about it completely self-supported bringing along your own tent and food. While on the other hand, you can simply take advantage of the refugios/ready-made campsites & food offerings.
However you decide to go about it, you are sure to enjoy this once in a lifetime type of trek.
If you enjoy this hike, you are sure to enjoy the various hikes in El Chalten , like the multi day Huemul Circuit & the Laguna de Los Tres day hike

2) Hiking Map
To better grasp the layout of Torres del Paine, below is the O Trek map. Here you will find the route, campsites/refugios, and other points of interest.
Learn More : Check out this Patagonia Itinerary that can better help you put together a complete trip to the region, including the O Trek.
3) Patagonia O Trek Itinerary
In general, there is really only one main route to consider on the O Trek – a counterclockwise route starting & ending at the Torres del Paine Welcome Center.
This route will take 8 days and 7 nights to complete. While I can think of certain ways to make it shorter, it is not something I would recommend for hikers.
As mentioned, the route will encircle Torres del Paine National Park as you get to experience the best that the region has offer. Each night you will be sleeping at a campsite or refugio (these are also referred to as “sectors”) .
For the most part, you will just have one campsite/refugio to choose from for each night on the route. However, during the final two nights out on the trail, there will be more than one option (which I will talk through).
So, with that said, below is how you should plan a Patagonia O Trek itinerary:
- Day 1 : Bus to Laguna Amarga | Van to Welcome Center | Hike to Seron
- Day 2 : Hike from Seron to Dickson
- Day 3 : Hike from Dickson to Los Perros
- Day 4 : Hike from Los Perros to Grey
- Day 5 : Hike from Grey to Paine Grande
- Day 6 : Hike from Paine Grande to Frances (or Italiano or Cuernos) via Valle del Frances
- Day 7 : Hike from Frances to Chileno (or Central or Las Torres Hotel)
- Day 8 : Hike to Mirador Base Las Torres & hike back to welcome center | Bus to Puerto Natales

Hiking Resources & Checklist Before heading out for the trails, be sure to read up on some of the hiking resources up on the site. These are here to better prepare you for all types of outdoor adventure. Gear : Hiking Packing List Weather : How to Prepare for Hiking Weather Navigation : Hiking GPS & Navigation Tips : 20+ Hiking Tips & Tricks for the Trail Accommodation : Book Your Hotel Today Rental Car : Book Your Car Rental Today
4) How Long is the Trek
The O Trek comes in just around 72 miles / 116 km in total length over the course of 8 days. That means on average you should be comfortable with hiking 9 miles / 14.5 km per day.
Based on the itinerary mentioned above, here is a breakdown of the mileage to expect on a daily basis:
- Day 1 : TDP Welcome Center to Seron: 8.1 miles / 13.0 km
- Day 2 : Seron to Dickson: 11.2 miles / 18.0 km
- Day 3 : Dickson to Los Perros: 7.0 miles / 11.3 km
- Day 4 : Los Perros to Grey: 8.9 miles / 14.3 km
- Day 5 : Grey to Paine Grande: 6.6 miles / 10.6 km
- Day 6 : Paine Grande to Frances via Valle del Frances: 12.0 miles / 19.3 km
- Day 7 : Frances to Chileno: 9.6 miles /15.4 km
- Day 8 : Chileno to Mirador Base de La Torres to Welcome Center: 8.6 miles / 13.8 km
Note: the elevation profile below shows closer to 130 km altogether, but that does seem just a bit overstated

5) Is the Trek Difficult
While the O Trek comes in at 8 days, 72 miles, and over 17,000 feet of elevation gain (~5,200 meters), I would not consider this a difficult hike from a technical standpoint.
The trail is easily navigable, without many technical aspects to it (although you will find some). With that said though, there are certainly some tougher days out on the trail (in particular days 4, 6 & 8).
The biggest consideration when taking part of the O Trek is whether or not you are in the physical state to be on your feet hiking for 8 days straight (some of which may be in less than ideal conditions with less than ideal sleeping situations).
You will also need to consider how you are going about it. If you are carrying all your own gear and food, it will be much more difficult than if you are staying in refugios and have all meals taken care of for you.
In my opinion, if you are comfortable with being on your feet for over a week, then you will find the O Trek to be quite rewarding. While there are some tougher days spread throughout, I did find the O Trek to be just a moderate trekking experience altogether.

6) Refugios & Campsites
Now that you have a better idea of what the itinerary for the O Trek will look like, let’s talk a bit more about these Torres del Paine refugios and campsites that I keep on mentioning.
While all of these refugios and campsites are located within the Torres del Paine National Park, they are not all operated by the same company. Instead you will find 3 different companies operating within the National Park. These include Vertice, Las Torres (formerly Fantastico Sur), and CONAF:
Vertice runs 4 campsites – two of which are on just the O (Dickson & Los Perros), and the other two which also overlap with the W (Grey & Paine Grande).
- Dickson (night 2) -> campsites & refugio
- Los Perros (night 3) -> campsites only
- Grey (night 4) -> campsites & refugio
- Paine Grande (night 5) -> campsites & refugio
Las Torres (formerly Fantastico Sur)
Las Torres now runs the other 5 campsites in Torres Del Paine. For the O Trek, you will utilize them on night 1, and then the on the final two nights (choosing between a couple options for each).
- Seron (night 1) -> campsites only
- Frances (night 6) -> campsites & refugio
- Cuernos (night 6 alternative) -> campsites, refugio, & mountain cabin
- Chileno (night 7) -> campsites & refugio
- Central (night 7 alternative) -> campsites & refugio
CONAF runs two free campsites in TDP National Park, however these are closed for the time being and booking them has always been a bit of an issue. While the Paso camp is not really needed on the O, the Italiano camp can be used on night 6. For the purpose of this guide I will not be really mentioning these as options.
- Paso (not needed for O) -> campsites only
- Italiano (night 6 alternative) -> campsites only
With all that said, you are most likely looking at booking 4 nights with Vertice (2, 3, 4, 5) and 3 nights with Las Torres (1, 6, 7), when taking part of the O Trek.

7) Campsite & Refugio Pricing
Each one of the sectors offers various options for visitors, with some offering more or less than others. Below you can find accommodation & food options along with the relevant prices.
As you go through some of the options and prices below, do note a few important details:
Options : For those that opt for the campsites, you will essentially have two main options to consider:
- If hiking with all the appropriate gear (tent, sleeping bags, etc), you will just need to pay an individual camping site fee.
- However, if you are coming without any gear, then you will need to pay the camping site fee + the rental fee for the tent, mat and sleeping bag. Note, that you can rent these items individually if you happen to bring along one or more of them already.
Sheets Discount : Some refugios offer discounts if you don’t want sheets. Rather you would be bringing your own sleeping bag. This option may be best for those who may be camping on their own but want a night in a refugio here or there.
Buying Meals : If you want to eat at the refugios, I would recommend buying meals when you are booking. With that said, at some refugios (such as Grey), you will have the chance to buy meals a la carte. Snacks are also available at many campsites/refugios.
Meal Hours : Meals are only served during certain hours of the day. For example, don’t expect to show up at 4PM for lunch or 10PM or dinner. Each sector has their specific hours, which match up with standard hiking times.
Note that the prices below are for the 2023/2024 season in USD. I will be updating this yearly to reflect the latest.
Las Torres Pricing
Below are the accommodation and food options for Las Torres (Seron, Frances, Cuernos, Chileno, Central):
Accommodation
- Campsite (single/double) : $56 / $70
- Campsite Equipment Rental : Tent $46 / Sleeping Bag $30 / Mat $10
- Premium Campsite (single/double) : $190 / $220
- Mountain Hostel Bed (refugio) : $144 (not available at Seron)
- Mountain Cabin (single/double) : $430 / $460 (Cuernos Sector Only)
- Full Board : $100
- Breakfast : $28
- Lunch / Box Lunch : $50 / $30
- Dinner : $50
Seron Note : only camping options available
Vertice Pricing
Below are the accommodation and food options for Vertice (Dickson, Los Perros, Grey, Paine Grande)
- Individual Camping Fee per Person : $11 ($13 at Paine Grande)
- Campsite Equipment Rental : Tent $40, Sleeping Bag $25, Mat $12
- Simple Bunk Bed in Shared Room : $100 (with bedding kit) | $43 without bedding ($65 at Paine Grande)
- Full Board : $80
- Breakfast : $25
- Lunch / Box Lunch : $25
- Dinner : $40
Los Perros Note : only camping & full board options available

8) Booking Process
Now that you have a better idea about the overall route and the refugios, campsites, & meals, let’s talk through how to book the O Trek.
The overall booking process is pretty simple as Vertice and Las Torres have online booking systems to utilize. The tougher part here is making sure there is availability between the two for the exact dates you are looking for.
I would not recommend making a booking for either until you have both websites open and have confirmed that the refugios/campsites are available for the appropriate nights.
However, there now seems to be a solution to that problem:
Booking Patagonia
Recently a new site called Booking Patagonia now offers the opportunity to book both Vertice & Las Torres through a single site . Prices seem to be in line with the two companies, so that may be an easier option moving forward.
I gave it a try, and the site offers a very friendly interface, where you can build your route as you go. In addition to purchasing the food and accommodation, you can also purchase bus tickets and entrance tickets to the park (more on both of those soon).
So, instead of booking through 4 separate website (Vertice, Las Torres, bus tickets, entrance tickets), you can do it all through a single site. They also have a live customer support in case you have questions or changes to your booking.

If you do want to still book directly with the providers, below is how you would go about it.
Vertice Booking
Below are the steps to go about booking with Vertice on nights 2, 3, 4, & 5.
- Step 1 : Go to the Vertice website
- Step 2 : Choose the number of people, your nationality, & currency
- Step 3 : Choose the W or O Circuit (Paine Massif)
- Step 4 : Choose your starting point (Dickson or Los Perros)
- Step 5 : Continue choosing your next nights
- Step 6 : Once complete, click the red button “Yes, I want to choose my date”
- Step 7 : Choose your starting date (the rest will fill out automatically)
- Step 8 : Once you choose your accommodation and additional services (food, rental gear) for each night, click Continue. From there you will be shown your booking summary and you will have 25 minutes to then put in your personal details and pay for the reservation.

Las Torres Booking
Below are the steps to go about booking with Las Torres on nights 1, 6, & 7.
- Step 1 : Go to the Las Torres website
- Step 2 : You will be taken directly to the booking page where you will find the five campsites/refugios to choose from with check in / check out dates (change these initially before continuing to the next step).
- Step 3 : By clicking the magnifying glass icon on the right hand side of each sector, you will be shown booking options for that sector.
- Step 4 : Choose your accommodation and food options for each of the three nights needed
- Step 5 : Click the “Book Here” button, and follow the instructions to fill in your personal details & pay for the reservation.

Additional Booking Notes
All Inclusive : On the Vertice & Las Torres sites, you can also choose “O Trek”, which puts together a total package for you. This seems to be an all inclusive type of deal, where you can’t pick and choose what you want each night. Because of this, the price will be on the higher end.
Third Party : You may also come across third party websites that offer O Trek packages. This companies usually buy allotments of spots at campsites/refugios and then upsell them as packages. I would say the main reason to book through a third party is if your dates are sold out through Vertice/Las Torres, but the company happens to have openings.
Last Minute Openings : Going off of that last note – don’t be surprised if you see any last minute openings for Torres del Paine. These third parties seem to give back any unused nights a couple weeks prior. I met several people, who were able to make reservations just days in advance due to these cancellations.
Torres Del Paine Entrance Fee
While you will need to pay for your accommodation, food, and transport to Torres Del Paine, you will also need to pay for entrance tickets.
I would recommend simply purchasing your tickets online through the official website . Scroll down to Torres Del Paine and complete the forms on the following pages to make your purchase.
Since you will be taking part of the O Trek, you will want to purchase the 3+ Day ticket at $49 . Once you stay over three days, there is no additional cost per day.
Be sure to keep your tickets handy, as you will need to show them at the Torres del Paine Welcome Center before beginning the O Trek.
9) How to Get to Torres del Paine
Now that you have some info about the booking process, let’s get into how to get yourself to Torres del Paine National Park.
In general, there are three main logistical aspects to consider to get yourself to the O Trek starting point:
- To Puerto Natales
- Puerto Natales to Laguna Amarga
- Laguna Amarga to Torres del Paine Welcome Center
The first section below will talk through getting to Puerto Natales, and the second section will dive into getting yourself to the starting point of the hike at the Torres del Paine Welcome Center.
Step #1: Getting to Puerto Natales
The closest major hub to Torres del Paine National Park is Puerto Natales, Chile. Here is where you should plan to base yourself before and after your time in TDP.
I would recommend spending one day/night there prior to the trek, and then one night after finishing up with the trek (depending on your overall itinerary).
Puerto Natales has its own airport (PNT), located just 10 minutes outside of the city center. Currently, the only direct flights to Puerto Natales are through Santiago and Puerto Montt.
While flying in and out of Puerto Natales is one option, you can also take a bus to PN from other places in Patagonia. The main two closest hub cities would be El Calafate, Argentina (3.5 hours) and Punta Arenas, Chile (3 hours).
If visiting El Calafate be sure to check out the Perito Moreno Glacier , Cerro Frias , and a Todo Glaciares Boat Tour
Once in Puerto Natales, it is time to then make the 2 hour journey to the Torres del Paine National Park.
If you are looking for hotels in Puerto Natales, check out Hotel Vendaval and Vinnhaus – two highly rated & recommended hotels downtown.

O Trek Starting & Ending Point
The starting & ending point of the O Trek will be at the Torres del Paine Welcome Center, which is a 10-minute drive from the Laguna Amarga TDP entrance.
You may also see people mention the starting point is at Hotel Las Torres (a 15 minute walk from the Welcome Center).
Let’s talk a little about logistics though and how to get yourself to the Torres del Paine Welcome Center.
Step #2: Puerto Natales to Laguna Amarga
The first step in the process will be getting yourself from Puerto Natales to the Laguna Amarga park entrance.
Unless you are going for an expensive two hour taxi, most people opt for an early 7:00AM morning bus ride with Bus-Sur (check the site for the latest schedules). One way tickets are very affordable, around $10-$12 USD.
The bus will make 5 stops, however, the first stop is Laguna Amarga. So, for those doing the O Trek, you can simply get off here and be on your way.
Step #3: Laguna Amarga to Torres del Paine Welcome Center
Now, since the bus does not go to the welcome center, you will have one more logistical aspect of the day. Once off at Laguna Amarga, you have two main options:
1) Begin your hike from here , which is about 7 km / 4.3 miles of additional hiking for the day. The walk should take just about 1.5 hours.
2) The more popular and easier option is to hop into a waiting van that will take you the rest of the distance . These vans are run by Hotel Las Torres (as well as some independent third parties), and charge ~$5 per person. You will find yourself squeezed in with a bunch of random people, but the ride takes less than 10 minutes altogether.
After checking in at the welcome center, you can then begin the counter clockwise hike to the first campsite of Seron.
On the way back at the end of the hike, you will just do the opposite. Hop in a van from the welcome center to Amarga. And from there, grab a bus back to Puerto Natales. I would recommend booking a bus later in the afternoon (most likely the 3:00PM bus).

10) Best Time to Hike
You never know what 8 days in Patagonia will offer in terms of weather. When they say you will get all 4 seasons in one day, that is not an exaggeration. I fondly remember one day out on the trail, when the sun was shining in one direction and snow was blowing in from another direction.
With that said though, the best time to hike the O Circuit in general will be during the summer months of the region between December and February. During this time, you have the best chance for the most stable of weather with less rain and overcast skies.
A trip during the shoulder months of November and March are also potential options for you. During this time you will have a quieter park altogether, and may be just as lucky with the weather.
This also holds true if you are visiting places like Ushuaia, home to Tierra del Fuego National Park , which has plenty of top Ushuaia hikes to choose from, and the chance to walk with penguins .
Opening Times
When it comes to the O Trek, you will only be able to complete it during the times that the refugios and campsites are open.
To simplify things, that means the O Trek is only possible between November 1 2023 and March 30 2024 (I will update this each year).
While some of the sectors are open before or after these dates, the sectors that are only part of the O Trek are not. Below you can find the latest (note that the Las Torres sectors only had opening dates):
- Central Sector : September 1 – April 30
- Chileno Sector : September 15 – April 30
- Frances Sector : September 1 – April 30
- Grey Sector : September 1 – April 30
- Paine Grande Sector : September 1 – April 30
- Seron Sector : November 1 – March 30
- Dickson Sector : November 1 – March 30
- Los Perros Sector : November 2 – March 31
- Cuernos Sector : November 1 – March 30

11) Packing List
Perhaps the most important aspect of the O Trek will be the gear that you bring along with you. Since this is 8 days out in Patagonia, you simply will need to be prepared for it all.
If you would like more detail, check out the Torres del Paine packing list I put together that deep dives into all of the below.
Below is my recommended packing list for all hikers that you put into your hiking backpack (Hyperlite Southwest recommended)
From a clothing perspective, you will want to bring along what is needed for eight days on the trail. I am usually a bit more lightweight here as I use the same layers on a day to day basis.
Note that the weather can change quickly, so you will want to be prepared with the appropriate layers (all outlined below). Also, be sure to have moisture wicking materials for your clothing items.
- Hiking Boxers (3-4)
- Hiking Socks (3-4)
- Hiking Pants (1-2)
- Hiking Shorts (1)
- Long Sleeve Sun Hoodie (1)
- Short Sleeve Hiking Shirt (2)
- Puff Jacket (1)
- Hard Shell Jacket (1)
- Baseball Hat
- Quick Dry Towel
- Packing Cubes & Laundry Bag
Hiking Shoes
A hike like the O Circuit must be done with the appropriate footwear. Be sure to invest in quality hiking shoes for your time on the trail. Some of my recommended shoes include:
- Keen (Targhee Series)
- Merrill (Moab Series)
- North Face (Ultra Series)
- Salomon (X Ultra Series)
Electronics
Most of my electronics were used for photography and navigation purposes, so each person may be a bit different here (note you can recharge your electronics at campsites).
- iPhone & USB Cable
- Headlamp | Petzl Actik Core
- Portable Charger | Anker Portable Charger 10,000 mAH
Action Camera
- GoPro Stick
- Extra GoPro Batteries
Mirrorless Camera
- Extra Battery
- 256GB SD Card
- Mini Tripod
Satellite Communicator | Garmin inReach 2 Mini
While there are many people along the trails of the O Circuit, having a satellite device like the Garmin inReach is always going to be a good idea. This small device gives you the chance to communicate with family, track your route, and call for SOS in case of emergency.
Food & Drink
Remember, you will also need to bring all food for eight days out on the trail if you do not want to purchase food along the way. There are supermarkets in Puerto Natales where you can stock up on certain items.
If you want to come prepared with food that you prefer, then check out my usual food purchases below (high calorie / low weight).
Lunch/Snacks
- Variety of Bars including PROBAR Bars , Honey Stinger Bars , Clif Builder Protein Bars
- Fruit & Nut Mixes
- Variety of dehydrated meals including Peak Refuel , Outdoor Herbivore , and GOOD TO-GO
Note that you will easily be able to fill up your water bottle consistently throughout the trek. Along most of the hike you will find rivers and streams, where you can get some fresh Patagonian water.
During my time on the circuit, I just filled up directly from these without any filtration. However, if you do want to play it safe, you can get a filtered water bottle like the Katadyn BeFree water bottle.
I also brought along some Liquid IV hydration packets to keep hydrated at the beginning of the day.
Cooking Gear
- Cooking Stove : Jetboil Micromo
- Spork : TiTo titanium spork
- Cooking Gas (purchase in Puerto Natales)
This last section of the packing list will be toiletries. Each person will also be different here, but below are the main items I brought along with me.
- Deodorizing Body Wipes | Alcala Bamboo Deodorizing Body Wipes
- Body Deodorant
- Toothbrush / Toothpaste
- Contact Lenses / Solution
- Travel Shampoo & Soap
- Moisturizer
- Personal Creams & Medications
- Bandaids
- Nail Clipper
- Small Mirror
- Toilet Paper
Camping Gear
Now if you plan to bring your own sleeping gear on the trek, you will need to account for those items as well. Below is a list of the hiking & camping gear essentials for your time on the trail. Note that much of these can be rented or bought in Puerto Natales if you do not have everything already.
- 3-Season Tent | Big Agnes Copper Spur HV UL
- Sleeping Bag (20 F – 40 F) | Thermarest Questar 20 ; Thermarest Hyperion 32
- Sleeping Bag Liner | Sea to Summit Liner
- Sleeping Pad | Thermarest NeoAir Xlite
- Camping Pillow | Thermarest Camping Pillow
- Hiking Poles | Black Diamond Distance Carbon FLZ Trekking Poles
12) Patagonia Travel Insurance
Considering travel insurance for the O Circuit? World Nomads offers coverage for more than 150 adventure activities as well as emergency medical, lost luggage, trip cancellation and more (making it an option for those taking on the O Trek in Torres del Paine). For years, World Nomads has been protecting, connecting & inspiring independent travelers, offering travel insurance & safety advice to help you travel confidently. Their mission is to support and encourage travelers to explore their boundaries . World Nomads has simple and flexible travel insurance that has been designed by travelers for travelers. Even if you leave home without travel insurance or your policy runs out, you can buy or extend out on the road. Get a quote for a World Nomads travel insurance policy today!
13) Torres del Paine Tips & Things to Know
I did want to layout a few helpful tips and things to know as you go about your time in Torres del Paine.
WiFi : You will find WiFi throughout the trek at most sectors that you have to pay for on an hourly basis. Dickson and Los Perros were the two sectors, where WiFi still does not seem to be offered.
Closing Times : Be very aware of closing times around the National Park for certain trails. For example, during my time there, the Britanico Mirador closed at 1:00PM and the Mirador Base Torres closed at 4:30PM. These times seem to change, so be sure to keep an eye out at the campsites and ranger stations for the latest.
Reservations : Remember, there is no open camping or entering the park for overnights without accommodations reserved. Be sure to come prepared with your bookings prior to your arrival.
Cooking : For those cooking your own food, camping stoves are allowed in authorized areas at campsites. There are no open fires allowed whatsoever.
Forecasts : If checking weather prior to and along your hike (using the WiFi), I would recommend using Windguru or Meteoblue. This can give you a better idea if certain parts of the day may be better or worse than others (although you can never really trust the weather in Patagonia).
Showers : Hot showers can be found at all campsites besides Los Perros. As I mentioned in the packing list section, be sure to bring a small quick dry towel with you.
Food : If you are bringing your own food, you do have the option to purchase some in Puerto Natales. There are supermarkets there, so that should not cause too much trouble. You will also find gear shops if you need to rent or purchase any last minute essentials for the hike.
GPS : Lastly, I would highly recommend downloading the O Trek route onto you phone for navigation purposes. Apps like AllTrails or Maps.me would work here. While the route is easy to follow, the apps also give you a heads up when you are approaching viewpoints and other highlights.

14) Torres del Paine O Trek of Patagonia
Now that you have all the background you will need to take part of the O, let’s talk through the day by day of the hike itself.
O Trek Day 1
Starting Point : TDP Welcome Center Ending Point : Seron Sector Distance : 8.1 miles / 13.0 km Elevation Gain : 1,110 feet / 338 meters Duration : 4 hours
If you take the 7:00AM bus from Puerto Natales, you should expect to arrive at Laguna Amarga by 9:00AM. After hopping into a shared van, you should then arrive at the welcome center by 9:15AM, and be ready to hike by ~9:30AM .
Once you have made your way from Puerto Natales to the Torres del Paine Welcome Center (via Laguna Amarga), you will need to check in at the front desk with your park tickets & reservation details.
After checking in, it is then time to begin the first day of trekking as you head to the Seron Sector. You should see some hiking signs pointing you in various directions – one of which will say “Sector Seron”. Follow the signs and be on your way!
The first day of hiking will cover 8 miles on a relatively flat trail (gaining just 1,000 feet over the course of the day).
Throughout this day, you will get to experience the eastern side of the park with views of rolling hills, winding rivers, and more Patagonian scenery surrounding you every step of the way.
You will find yourself hiking through fields (potentially with some friendly horses along the way), and get some glimpses of those unique Torres del Paine shaped mountains as you continue along.
Soon enough, you will be pointed along towards the Seron Campsite, where you will check in and be shown your tent for the night.

O Trek Day 2
Starting Point : Seron Sector Ending Point : Sector Dickson Distance : 11.2 miles / 18.0 km Elevation Gain : 1,790 feet / 545 meters Duration : 6 hours
Day 2 of the O Trek will take you all along the northern “backside” of Torres del Paine. This was one of my favorite days on the trail as the views are just beautiful all the way through.
Throughout the hike you will find layers of scenic landscape out in front of you. Whether that is the golden fields, rolling green hills, pristine rivers, or larger mountains out in the distance.
As you make your way along, you are sure to get some great elevated views of the surrounding lakes and rivers that wind their way through. Snowcapped peaks will dominate the skyline further out in the distance, making this a great overall day.
After a couple hours of hiking you will arrive at a Torres del Paine ranger station. Here you simply just need to check in and then continue along the trail.
While I had some clouds obstructing some of those glacier and mountain views, you are sure to come across plenty more from the ranger station to the campsite.
Be on the lookout to your left hand side, where you will get views of the famous Torres del Paine towers from the backside.
Soon enough, the Dickson campsite will come into view, and you will follow the path downwards to check in and get settled for the night.

O Trek Day 3
Starting Point : Sector Dickson Ending Point : Sector Los Perros Distance : 7.0 miles / 11.3 km Elevation Gain : 1,670 feet / 509 meters Duration : 4 hours
After a long couple of days out on the trail, day 3 will be a bit easier of hike at just 7 miles. Total hiking time for the day will be between 3-4 hours, so feel free to spend some time enjoying a morning at Dickson before heading off to Los Perros.
You will find a good portion of the day will be walking through forests and across some rivers as mountains come in and out of view.
Out in the distance you are sure to see the Los Perros glacier, which you will continue to walk towards. As you get closer and closer, the glacial lake will then come into view, with the overhanging glacier up above.
During my time here, I ended up just spending an hour by the lakeside, enjoying the view and the surrounding landscape.
Just a bit further down the trail, you will come across another ranger station, where you will check in and continue to the Los Perros campsite.
Be sure to get some rest tonight, as the next day is going to be a big one!

O Trek Day 4
Starting Point : Sector Los Perros Ending Point : Sector Grey Distance : 8.9 miles / 14.3 km Elevation Gain : 3,330 feet / 1,015 meters Duration : 8 hours
When it comes to the O Trek, the trail from Los Perros to Grey is certainly going to be the toughest day of the circuit. Over the course of 9 miles, you will gain over 3,300 feet of elevation and reach the highest point of the trek at the John Gardner Pass.
While this is certainly a tough day, it is also going to be a very rewarding one. Getting to enjoy the views of the Grey Glacier from the top of the pass, in addition to the glacier views from the suspension bridges, is going to be well worth it.
I would recommend starting this day very early on (in the 6AM – 7AM range) to give yourself enough time altogether.
Expect the first portion of the day from the campsite to the John Gardner Pass to be filled with elevation gain as you slowly rise above the treeline.
You will come across some more technical terrain during this section too, so be sure to watch your step all the way through.
While most of the hiking until this point as been on an easy to follow, well maintained path, the trail up to the pass is on a much rockier terrain. As you continue the climb up, you will come by waterfalls, glaciers, and mountains all around you.
Continue the push up until you reach the top of the pass with the Grey Glacier now in view. Take some time to enjoy the view, and have a rest break, before beginning the descent.

The first part of the descent will continue to give you more and more views of the glacier, before heading into the forest for the remainder of the downhill.
After finishing up with the more grueling downhill, the trail will begin to flatten out as you then make your way southbound towards the Grey Sector.
Be on the lookout for a great little wooden bridge that offers some great photo ops with the glacier!
Just past the bridge you will come by the free Paso campsite, and from there begins the last portion of the hike towards Grey.
During this portion of the trail, you will just be overwhelmed by the vast amount of glacier views. It is truly a beautiful section of trail to enjoy as you get more and more Grey Glacier views off to the side.
As you continue along, you will make your way across a couple suspension bridges, viewpoints, and waterfalls, before passing the tongue of the glacier and onto the campsite.

O Trek Day 5
Starting Point : Sector Grey Ending Point : Sector Paine Grande Distance : 6.6 miles / 10.6 km Elevation Gain : 1,315 feet / 400 meters Duration : 4 hours
After a long previous day, the fourth day on the O Trek will be quite easier as you head along to Paine Grande.
Before you head to Paine Grande though, I would recommend heading on the short trail to the Grey Glacier lookout point near the campsite. Here you will get up close and personal to some icebergs with the glacier further out in the distance.
It is then off to Paine Grande, as you follow the path along the Lago Grey to your right and some Torres del Paine peaks to your left.
There will be some truly dramatic landscapes on either side of you as you make your way along the trail. Some of the lookout points will even have you turning backwards as you get to see Grey Glacier from a distance.
Soon enough those views will disappear though, as you now will be heading towards the blue waters of Lago Toro. Follow the path down and you will soon arrive at the Paine Grande sector.
Don’t think your day is done just yet though. Before or after checking into your campsite, I would recommend heading on the path that heads south along the lake. This path actually heads out on the park, but you can just walk along it for 20-30 minutes to get some awesome views.
The blue waters of Lago Toro, surrounding green landscape, and the famous Los Cuernos mountains out behind make for just the perfect overall view.

O Trek Day 6
Starting Point : Sector Paine Grande Ending Point : Sector Frances or Cuernos Distance : 12.0 miles / 19.3 km Elevation Gain : 2,995 feet / 913 meters Duration : 8 hours
Up next on the O Trek of Torres del Paine is heading from Paine Grande to Frances with a hike up the Valle del Frances. During this day you will be completing that “middle line of the W”.
Feel free to learn more about the Valle del Frances hike .
Remember, this is also one of those days where you have more than one overnight to choose from – either Sector Frances or Sector Cuernos (another 2 miles further).
Most of this first portion of the day will entail hiking through the surrounding greenery with Los Cuernos out in the distance. Your aim is to hike to the base of the mountainside before exploring the Valle del Frances.

After reaching the turnoff point for the Valle del Frances, you will begin the uphill hike towards the first of two viewpoints – Mirador Frances . Be sure to also look up in the opposite direction during the hike up with Los Cuernos hovering up above.
It is then further up the valley until you reach the final viewpoint – Mirador Britanico . Here you will get a fantastic panorama of the various mountains that make up Torres del Paine.
Once you have enjoyed both viewpoints, it is then back down the same way you came, until you reach the Valle del Frances turnoff.
It is then another 20 minutes walk until you reach the Frances sector (or another hour or so I you opt for the Cuernos sector).

O Trek Day 7
Starting Point : Sector Frances or Cuernos Ending Point : Sector Chileno Distance : 9.6 miles / 15.4 km Elevation Gain : 2,810 feet / 856 meters Duration : 5 hours
On the second to last day of the O Trek, the circuit takes you from Frances to Sector Chileno. This will be a beautiful day as you get to walk right alongside the Nordenskjöld Lake for much of the day.
I ended up waking up early and I opted to just get started hiking around sunrise. This in turn led me to experience some beautiful colors lighting up Torres del Paine. If you have it in you for one (or more) days of the trek, I would recommend a sunrise at some point.
After walking along and above the lake, there is an intersection. To the right is back to the starting point of the trail, and to the left is Sector Chileno.
From here you will begin the hike up the valley along the pathway etched into the hillside. Down below will be a winding river and further in the distance will be more peaks.
After hiking above the river, the trail descends towards Chileno, where you can check in and get ready for the final day of the hike.
This is another day in which you can choose to opt for alternate accommodation. However, I would highly recommend going with Chileno for your first choice. If it is sold out, then you could end up going with Sector Central or even the Hotel Las Torres.

O Trek Day 8
Starting Point : Sector Chileno Ending Point : TDP Welcome Center Distance : 8.6 miles / 13.8 km Elevation Gain : 2,665 feet / 812 meters Duration : 5 hours
The final day of the O Trek takes you from Sector Chileno to the famous Mirador Base Torres, where you will see the three towering peaks of Torre Sur, Torre Central, and Torre Norte above a lake.
This is going to be one of the more technical days out on the trail, as there is a good portion of the hike that is on uneven, rocky, and steep terrain.
You will first make your way through the forest portion as you continue to gain elevation. Once out of the forest, the tougher section begins as you head up the rocky and steep hillside to get to the lake itself.

Most people opt for a sunrise at the lake. This means you will need to wake up in the middle of the night and hike in the dark. During my times in the park, it was pouring rain when I woke up. While some people did opt to hike in the wet darkness, most people waited it out a couple of hours.
I am sure glad that I did because, the weather ending up clearing and the remainder of the morning was a memorable one.
Remember though, you will need to catch a bus out later in the afternoon. Be sure to always check the latest schedules, but currently there are 3:00PM and 7:45PM options.
Odds are you will want to make the first one, meaning you should plan to be back at the welcome center by 2:00PM.
Below are a bunch of photos from the Mirador Base Torres to give you a better idea of what to expect.

After enjoying your time at the viewpoint, make the hike back down to Chileno, grab your stuff, and follow the pathway out of the valley towards the welcome center.
That will end a successful 8 day O Trek of Torres del Paine, Patagonia!
15) O Trek Cost
From a cost perspective, the O Trek of Torres del Paine covers an entire spectrum of budgets.
On one side of the spectrum you have the chance to bring all your own gear and food, and simply pay for campsites. On the other end of the spectrum you have refugio rooms and full board to choose from.
Obviously, the budgets for these two trips can be vastly different. And while those are the two ends of the spectrum, many people fall right in between (mix between campsites/refugios & bringing some food but not all).
From a high level perspective, below is what you should expect the Torres del Paine O Circuit to cost from a few different standpoints (note all currency in USD).
Low Cost Option
- Accommodation : bring all of you own gear = ~$220 (campsite fees)
- Food : bring all of you own food = ~$150 (can vary greatly based on food choice)
High Cost Option
- Accommodation : refugios only (except Seron and Los Perros) = ~$750
- Food : full board = ~$620
Mid Cost Option
During my time out on the trail, I brought most of my food with me, and ending up buying a couple meals along the way (not guaranteed everywhere). For accommodations, I split up my time between refugios and ready made campsites.
My total cost came out to be around $500 for accommodation and $150 for food.
In addition to the food and accommodation, your other cost considerations should be:
• Puerto Natales Hotel (before/after): varies • Round Trip Bus Tickets: ~$25 • Round Trip Laguna Amarga Van: $10 • Torres Del Paine Entrance Tickets: $49

16) Self Guided vs Guided
Many people ask can you do the O Trek without a guide? The answer to that question is certainly yes. In general, I would imagine most people who hike the O Trek do so unguided.
For the vast majority of the hike, the trail is obvious with trail markers sprinkled throughout. Getting from campsite to campsite should not be an issue given the trail (and having a navigation app just in case).
I would say a guided O Trek can be valuable for those with less hiking experience.
If you are someone who has just not completed multi day hikes and are not comfortable doing something like this on your own, then a guide can be very valuable to help lead the way (and help you out with some tips).
In general, if you are not one of those people, then a self guided hike is going to be more than doable. This also gives you the chance to be on your own schedule, and not worry as much about the larger group.

17) W vs O Trek Patagonia
Lastly, you may be asking yourself whether to take part of the W Trek or the O Trek during your time in Torres del Paine. That will all depend on your preferences and the amount of time you have to spare.
Remember, the W is part of the O. So if you complete the O, you are completing the W. The main difference is that you get to hike the backside of Torres del Paine during your extra three days in the park. This section is much quieter than the W side of the park.
From a duration perspective, you will need just 4-5 days to complete the W but 8 days to complete the O .
You need to ask yourself whether you even want to hike for 8 days in a row. That can be a lot of hiking for most people. Given the W can be completed in as little as 4 days, some people may be more than happy with that amount of hiking days.
Fitness will also come into play. While the O Trek is 70+ miles, the W Trek is just about 45 miles . So, that is another 25+ miles your body will need to make its way through (including the toughest part of Torres del Paine up the John Gardner Pass).
A final consideration will also be your budget . By doing the W, you are sure to save on accommodation and food within the park. While on the O, you are certainly going to spend more based on the longer duration.
I want to say if you can answer these questions, you should be able to choose which circuit is right for you.

I hope this guide to the O Trek of Torres del Paine, Patagonia has better helped you understand what this circuit is all about.
If you have any questions or comments, feel free to add them down below. Also be sure to check out the other Patagonia itineraries and guides up on the site.
- Hotels : Top Hotels in Torres del Paine
- Hikes : Best Hikes in Torres del Paine
Have fun out there and safe travels!

Related posts:

Sharing is caring!
Monday 27th of November 2023
This is amazingly helpful information! I was wondering if you had any information or recommendations on modifying the itinerary for doing the Q trek.
Thursday 30th of November 2023
@Charles, thank you!
Tuesday 28th of November 2023
Hey Mike - if you would like to do the Q Trek, then you would want to start at Paine Grande and begin the counter clockwise hike from there (to get to Paine Grande, you will need to take the bus to Pudeto and then the boat across the lake). After getting back to Paine Grande at the end of the trek, it is then one last hike out to the Administration entrance.
Hope you have a great trip!
Wednesday 12th of July 2023
Firstly congratulations, and many thanks, for putting together and making available this comprehensive guide to the two TDP multi-day treks - much better (more detailed) than a guide book.
Questions re the O Circuit:
1. Going solo: Would you recommend for or against attempting the O Trek solo for an experienced multi-day hiker who intends to utilize refugios and full board food option where possible (carrying sleeping bag & mat but NOT tent, stove or food supplies other than snacks & lunch)? (Joining a packaged tour seems exhorbitantly expensive!)
2. Electricity: Is electricity to recharge electronic devices available at refugios & campsites? If so, what is the voltage & plug style?
3. Clothing: I see no mention of thermal underwear in your packing list. Would a set of these, together with other layers including fleece & hard-shell rain jacket overcome the need for a puffer jacket?
Cheers Col Australia
Friday 14th of July 2023
@Charles, Thanks for the response - I feel more confident now of tacking the TDP O circuit on my own. Whilst it doesn't beat having a hiking partner, I have a satellite linked PLB for emergency situations should I get into any trouble (providing I'm still capable of activating it, of course! :-0|).
My last multi-day trek (albeit 5 years ago) was the Alta Via 2 (High altitude trek #2) in the Italian Dolomites: 13 days & 160km with all of it above 1000m and reaching to 2900m, with several "challenging" sections. There is no camping option there so I ate and slept in a refugio each night, meaning that I did not have to carry my own food, stove or tent (but packed a sleeping bag in case I got lost / caught out overnight), so my pack weight was just 10-15kg. It was a fantastic journey which I highly recommend.
No doubt crossing of the John Gardner Pass on day 4, together with the distance & elevation gain on days 6-8 will be challenging - & why I've started training already for a early 2024 trip!
One more question if I may: As I plan to trek solo I can set my own schedule, so would it be feasible/sensible adding a 'rest day' on day 5 after crossing JGP (day 4) - or would adding it further into the W be a better option?
Thanks again.
Hi Col - glad the overviews have helped! To answer your questions:
1) If you are an experienced multi day hiker, then you should not have much issues doing this solo (I did this solo just an FYI). The route is pretty straightforward (you should still download offline maps though!) and the refugios/campsites really make this whole experience much easier in general.
2) Yes, every campsite/refugio will offer outlets to plug in. These may not be in individual rooms but rather in common areas. I honestly dont remember the voltage/plug style though.
3) Everyone is a bit different when it comes to layering. I personally am not a fan of thermal underwear because it is hard to take off if it gets too warm (unless I am hiking in much colder weather). I would say that your idea should be ok though theoretically.
Enjoy the trip!
Sherifa Marei
Tuesday 17th of January 2023
Hi I was wondering if you have any available tours for the O Trek between end of March and beginning of April 2023. Thank you Sherifa Marei
PATAGONIA DREAMING TRAVEL BLOG

- Outdoor tips
- Region of Magallanes and Chilean Antarctica
- Torres del Paine National park
- Travel tips
The Guide Recommends: Packing list for Torres del Paine
- November 24, 2016
18 Comments
This is the ultimate packing-list for Torres del Paine National Park and any other treks in Patagonia. The guide is made in collaboration with Victor, who has 15 years of experience at mountain guide and works as a guide in Torres del Paine doing the W trek, the O trek, and day treks. Can you find anyone more qualified?
I have done the W trek twice, the O trek once and various day treks in the park and each time I learn something new. Also, new things are happening in the park and this is why I continuously update this article: to give you readers the most updated and professional information and pieces of advice. This
Table of Contents
The ultimate Patagonia Packing List
Remember YOU have to carry all the stuff you bring. So you want to make sure you are not carrying more than necessary because it all adds to the total weight. Patagonia is cold, windy, wet and warm and the weather changes in minutes so you need to bring clothes for the cold, the wind and the rain – most importantly. Make sure your tent is of good quality, you do not want the wind to tear it up or the water to enter. You can rent tents many places in Puerto Natales. Always check the equipment, put up the tent with the owner and let him/her show how to put it up properly. Don’t bring your festival or summer tent! This packing list is based on the experiences made in Torres del Paine National Park but can be applied to any wet and cold national park in Patagonia.
How to choose the right backpack for trekking
Let us start with where all your stuff goes: the backpacker. Personally, I am a big fan of the brand Osprey, but my own backpacker is an old one called “Sigma Trail 60” which was a Christmas gift I got from my mom back in 2008 when I was going 6 months to Mexico. Victor hates it and calls it a shitty backpacker, but until I can afford a fancy backpacker like Osprey , Arc’teryx, LowPro or another good brand, I stick with my 10 years old backpack.
- Looking for the right backpack? Read the review of women’s best travel backpack
When buying a backpacker, most important is that it fits you and your size. For a five days hike, we will recommend a 50-65 liter. Nothing bigger – people tend to put more stuff in their backpacker if they have more space than necessary. Ask the seller if it is made for trekking – and not just backpacking. One thing is to carry a 10kg heavy backpacker 15km a day and to move your stuff from hostel to hostel. I personally like that there is like a pocket for the sleeping bag at the bottom with a zip-line so I don’t have to take all stuff out to take the sleeping bag out. Look for a rain cover. If it is not built-in, make sure to buy one or buy plastic bags for your things. It rains sometimes heavily in Torres del Paine!
Sleeping bag for Patagonian weather
Patagonia can be cold during the nights, even in summertime. You will be sleeping up in the mountains so make sure to buy a sleeping bag that keeps you warm during the night. Women feel colder than men so take a look at what the comfort temperature is for men and for women. The sleeping bags made of downs are the lightest sleeping bag you can get (and most expensive), but if it happens to get wet it gets heavy and doesn’t work for keeping your warm. Synthetic is therefore better. To stay warm, you need to have a sleeping bag that fits your size. If you are 160cm, find a sleeping bag around that length. This will make sure the warmth stays around your body. Do you often feel cold (which I always do) and you are traveling as a couple, I can recommend buying sleeping bags that can be zipped together.
Sleeping mattress
You can use any type, most important is that it fits your size to keep the isolation. We have two types of Therma-rest mattresses; one simple and one inflatable. Therma-rest is a good brand of good quality. The simple one we cut to fit our size (they are normally like 190cm) to keep isolation and to minimize wasted space and weight. The inflatable one is 155 cm, a bit shorter than us. It covers the whole body except for the head. As a pillow, we make a pile of clothes. Since I am doing more and more trekkings in Patagonia, I am considerating buying an inflatable one for me as well, it is so much more comfortable and it hurts my hips to sleep on the side when I am sleeping on the simple one.
- Renting the equipment in TDP? Check out the packing list for the comfortable trekker

What to pack: Camping kitchen Gear
Stove: There is a European brand (maybe French?) that needs a particular kind of gas that you cannot find in Puerto Natales. Make sure to bring a universal one so you don’t end up renting one because you cannot find the matching gas anywhere here. Use small stoves. Good brands are MSR or Doite.
Pots: One pot for boiled water and one for cooking. You don’t want to cook and boil water in the same since its more difficult to clean the one you use for cooking.
Gas: For five days, two persons I recommend two small gas. The issue with the big gas is that it has less pressure to use the last gas at the bottom. Furthermore, the risk of the gas overturning with a big bottle is greater. Trust me; I have seen delicious pasta on the floor thanks to overbalancing of gas and pot! It was a sad moment in my life.
Sponge: By one and cut it in 4 and bring one piece. This is enough. Remember if you are using soap it has to be biodegradable to protect the environment.
Plastic containers: If you are bringing oil, spices etcetera bring it in small containers and write what is inside.
- Tip: Get 6 great camping and hiking hacks for your next adventure!
What to pack: General hiking gear
Dry bags: I am not a big fan of rain covers for the backpacker. When the rain is heavy, and the wind is strong, it’s not working anyways. It would be better to put all your stuff in dry-backs instead. Next, you put all your stuff in a black plastic back, like the one you usually use for garbage. That will keep your things dry and organized. Or, buy a rain cover that can be locked on the backside of the backpacker.
Flashlight: Flashlight for the head and extra batteries. Sometimes it happens that you by accident turn on your flashlight in the bag, then its good to have some extra (done that like a ton of times..).
Toilet paper: Put it in a plastic bag or a zip-lock. One for each person. Make sure to bring extra plastic bags for the used toilet paper if you are somewhere without a toilet.
First Aid Kit
Lighter: Minimum 2 and make sure to pack them in different places if one should get lost. Put one together with the pot and the other one with the toilet paper.
Water Bottle: Make sure to buy one in good quality that doesn’t leak. The water in Torres del Paine is supposed to be clean, also in the rivers. But sadly they have had some issues with contaminated water. If you are very sensitive to this, bring some pills that can clean the water. Buy it before going to Puerto Natales, they never have it in the pharmacies.
Thermo bottle: For the warm water.
Which clothes to pack: The 3 Layer Principle
It is so hard to pack for a place where the sun is burning, the wind is strong, the nights are freezing cold and it is raining. When hiking in cold and wet national parks it is important to keep yourself warm and dry. Let us introduce you to the 3 layer principle:
1. Layer: Keep yourself dry
The first layer should be a base layer. There are two main types of fabric you can choose for a base layer, Merino wool, or synthetic materials. It could be training pants as well, Nike has a collection called dry-fit, its the same concept; its made to keep you dry when sweating.
2. Layer: Keep yourself warm
Next layer should be a jacket that keeps you warm. As it can have rainy days in the park I recommend a synthetic jacket, e.g., primalof, and not a down jacket. Why? If its raining and it gets wet it won’t keep you warm. Furthermore, the water makes marks from the oil in the jacket. I would use the down jacket for the dry climate and not wet. Women are feeling colder, so I recommend them to bring as well a polar or fleece. The pants should be trekking pants, light or medium soft shell.
3. Layer: Keep yourself protected from external circumstances
The third layer should protect you from rain and wind. If you are only planning on doing Torres del Paine trek, it’s not necessary to invest in an expensive GORE-TEX. A simple rain jacket and pants will do. But are you going all in on hiking it would be worth investing in some good quality rain clothes with GORE-TEX protection.
The same principle when it comes to your feet: Put on base layer socks that don’t have any stitching. Next layer should be synthetic fabric or wool merino.
Shoes should have a tall “neck” to protect your ankles. Don’t take the risk with a low neck! GORE-TEX is optimal; waterproof is not enough.
I recommend four pairs of socks, two sets of baselayers. One long shirt and one short. Since female underwear doesn’t take up too much space, you can bring for each day. For a guy bring three pairs of underwear. Your amount of clothes should not exceed 4 kilos. 5 kilos is maximum!
What to wear: Protection from sun and cold weather
Then there’s all the rest when it comes to clothing and what to wear.
Gathers: It doesn’t have to be mountain gathers, trekking gathers are fine and also less heavy to carry around. It can be pretty muddy sometimes in the park, so it’s always nice to have in the case.
Gloves: For your hands use liners as the first layer. The second layer should be more ruff like a soft shell. You don’t need gloves for climbing; hiking is enough.
Hat: To keep warm you need to protect your head. I recommend two kinds of buffs, one for the neck and one for the head. Bring a cap as well for the sun and another type of hat made of wool if its cold the time you are in the park.
Sunglasses: The sun and radiation are strong here, and you need to protect your eyes! I always bring two pairs. If one gets broken, you have an extra. I have blue eyes, and I don’t go anywhere here without sunglasses.
Sunscreen: Bring sunscreen SPF 50+. Don’t put it higher than your eyes because if you sweat the sunscreen can run into your eyes, and it is very unpleasant!
Prepare yourself for all kind of weather
Number one concern of travelers is always the weather. They try to predict how it’s going to be before arriving, but in Patagonia, it’s almost impossible to predict how the weather is going to be. Patagonia is known for its quick changes and you can experiences all four season in one day: warm weather, cold weather, strong wind, snow… So don’t worry about the weather – worry about what you have in your backpack!

We hope you will have a tremendous and enjoyable trip to Torres del Paine. Remember to make your reservations if you are staying multiple days.
Please share on Pinterest if you liked it! 🙂

- Click to share on Twitter (Opens in new window)
- Click to share on Facebook (Opens in new window)
This looks like an incredible hike. I haven’t been to chile but it is high on my list. I like your three layers principal – will definitely be using it for other hikes too.
This is such a great post! I would love to do this one day. Looking forward to reading your other posts about the trek!
This is a great and useful guide for backpacking. I absolutely love hiking. I did my first wild camping experience last summer in Dartmoor and planning many more. We are regular hikers and will implement these tips when we are out exploring!
Great list here! Will be helpful when I’m planning for a hiking / camping trip to a cold climate country next time.
This is a great list! Definitely come in handy when I’m planning for my hike / camping in cold climate next time.
Great list! Not really a big hiker – more long walks now! I am off to Denmark next month! Looks absolutely amazing in Chile!!
So helpful! I wish I had this prior to my most recent trip where I was uncertain what I needed. I’ll be checking this for my future south america trip!
This list seems really helpful in general for hiking even though I have never been to Torres del Paine. I especially like the tip about the three kinds of layers. I will definitely keep that in mind for the future. Great photos too!
Great guide thank you. I am just on my way to Patagonia, maybe I can visit you 🙂 Hope to see great things in Chile’s beautiful south.
Nice extensive list. I did the 9 day trek called the Q circuit and loved the remote areas more than the busy W. It does get unpredictable with the weather there and we had rain on some days. Nonetheless, it’s one of my favorites for a solid multi day trek.
It is an awesome hike there! And actually there are so many hikes around the area, you just need to know them and have a map
Really useful! I think this can be used as reference for any similar mountain hiking. I love going for hike once in a while and often confuse what to bring. This provide me all information I need. Thanks for sharing. 🙂
Great post! I love planning what to bring for treks like this. I recently became obsessed with bringing dry bags – they are so lightweight and absolutely worth it on the trail. And the extra batteries are such good reco… you don’t wanna be on day 2 of a 5 day trek and run out of batteries for your headlamp 🙂
dry bags are awesome! and its just a better way to keep things separated so you don’t have to drag out everything when you are looking for a pair of socks 🙂
This will be so useful to hikers! I am pretty apprehensive about hiking in snow so its great to have lists like this to help with planning!
Glad you liked it :))
I have actually been to Chile this year and reached Chiloe Island as the Southeast point of my trip. I would have loved to go to Torres del Paine but I considered that it requires much more time than I actually had. The layer suggestion for how to dress is really good, I felt the cold in Puerto Montt and it was summer, i can imagine that in Torres del Paine it gets even colder and unpredictable.
You have to come back, its really something special you need to experience! all these glaciers here, its amazing. But yes, its cold and windy sometimes 😉
Leave a Comment Cancel Reply
Notify me of follow-up comments by email.
Notify me of new posts by email.
Currently you have JavaScript disabled. In order to post comments, please make sure JavaScript and Cookies are enabled, and reload the page. Click here for instructions on how to enable JavaScript in your browser.
Latinspirations' story ends here.
New adventures are waiting for us.
We would like to thank everybody who has supported our project.
If you would like to get in touch please feel free to contact us at: [email protected]


Patagonia Packing List: Hiking the W Trek in Torres Del Paine
- Last Updated March 17, 2024
- Chile , South-America
The W is the classic route to take around Patagonia’s spell-binding Torres del Paine National Park. This 80km walk winds its way up 3 different valleys, past magnificent blue glaciers, through haunting lenga forests, and up to spectacular miradors that sit beneath monolithic granite towers. It takes in the park’s most spectacular sights: from the iconic spires of Mirador Las Torres and the enormous Grey Glacier to the steep trail along Valle Francis and the contorted, multicoloured horns of Los Cuernos.
I knew that I couldn’t visit Patagonia without walking the route, but lasting 4 or 5 days, the hike takes preparation: from booking your accommodation well in advance, figuring out which route to take, and knowing what to take with you considering you will be carrying everything with you for almost the entire length of the trail. After hiking the W myself, I have a good insight into what essentials you will need to pack. Here’s my detailed guide.
Read More : Everything You Need to Known before Hiking the W in Torres Del Paine National Park
Get Your Documents in Order
You will need to carry all of your travel documents with you in Torres del Paine National Par when hiking the W or O Trails. Not only will you need them upon registration at the park’s office, but you will also need to present your passport and immigration forms upon check-in at the refugios in order to avoid paying an additional tax, which is 19%.
- Passport & immigration card
- Travel insurance documents
- Booking information & confirmation numbers for refugios or campsites
- Cash & credit/debit cards
- Emergency contact details

Camping vs Refugios: Booking Accommodation
You have two options of where to stay while hiking the W: In a refugio or on a campsite. Deciding which is best for you will determine how much equipment you need to carry during the hike and is generally a toss-up between ease and cost. While refugios offer an extra level of comfort, they can be much more expensive than camping.
A refugio is basically rustic hostel-meets-hotel and they are dotted around all the major stopping points on the trek. They’re open year-round and have dorm-style rooms, shared bathroom facilities with hot showers and a basic, on-site restaurant/canteen and bar. The rooms are generally warm and clean with comfortable beds and the refugios themselves often have open and sociable communal areas where you can relax in front of a roaring fire after a hard day of hiking.
There is also the added bonus of not having to haul camping equipment, bedding (although I recommend bringing your own sleeping bag to avoid the extra rental cost at the refugios), and food with you throughout your trek. All refugios provide meals on a full-board (breakfast, dinner, & a packed lunch), half-board (breakfast and dinner) or meal-by-meal basis. The food is expensive, even by Patagonian standards, so there is the option of using the refugios kitchen to cook your own food if you wish.
Most refugios also have campsites with separate facilities if you would prefer to camp out of the main building.
If you prefer a wilder experience in which you get to sleep under the stars and stare at the park’s incredible views through your doorway, you can camp at certain points along the W Trek’s trail. At refugio campsites you have the option of sleeping in pre-erected tents, meaning you don’t need to carry your own equipment. Sleeping mats and warm sleeping bags are available to rent (although I would recommend bringing your own as they don’t add much extra weight) to keep you cosy. As these campsites are often on the grounds of nearby refugios, you have access to toilets, warm showers, and the communal spaces of the refugios where you can enjoy a hot meal or cook your own dinner.
There is also a free campsite at Italiano, run by the National Park Authority (CONAF). You will need to bring your own tent and facilities are a little basic, but they do have on-site toilets, running water and a cooking shelter. Note: You still have to book this free campsite in advance.
BOOKING YOUR ACCOMMODATION
With Torres Del Paine being one of Chile’s most popular attractions and the W-trek being the most desirable hiking routes on the South American continent, it’s safe to say that booking your accommodation in advance – even up to 2 months in advance during the high season – is essential. All refugios and campsites can be booked online but to complicate matters slightly, there are 3 different companies that you will potentially have to use, depending which camping spots you choose: CONAF, Vertice Patagonia, and Fantastico Sur.
To check which campsites you will need to book, check out my hiking itinerary lower down this page.
Fantastic Sur run Chileno, Frances, Los Cuernos and Las Torres and their booking site can be found here . The booking system is fairly simple. You just select your dates and then choose whether you would like to camp or stay in a dorm room using the drop-down boxes. After this, you can add additional extras such as sleeping bags and mats, full-board, half-board, or sperate meals. If you have any issues with the booking, you can email them at [email protected] or drop into their office in Puerto Natales.
Vertice Patagonia run both Paine Grande and Grey. Their booking site can be found here . The process for booking with Vertice is slightly different from the one for booking with Fantastico Sur. First, you will need to select the number of people, set your nationality to ‘another’ if you are not Chilean, and the currency to US dollars. On the next page, you will select the W-trek option and then on the following page, you can choose which accommodation you would like to book. If you follow my itinerary below, you will need to select the Grey and Paine Grande option, however, there are multiple combinations as well as the ability to book each one separately. If you have any issues, you can contact them at [email protected] .
The only free campsite on the trek route is Italiano, managed and maintained by the National Park authority (CONAF). Although the site is free, you still need to make a booking in advance via the CONAF booking site . Make sure to print out your reservation and bring it with you.
Camping Equipment
If you plan on spending as little money as possible when hiking the W, you will need to bring plenty of camping equipment to avoid having to rent it at the refugio campsites. However, if you choose to stay in the dorm rooms or pre-erected tents, you will obviously avoid having to bring your own tent. I still recommend carrying a sleeping mat and sleeping bag as otherwise, you will have to pay to rent these each night despite forking out for a pre-erected camping spot.
Please remember that whatever you pack you will have to carry with you on your back for up to 7 hours a day so try to pack as lightly as possible.
- A Lightweight tent. Winds can get rather ferocious in Torres del Paine national park so you need to find a good balance between picking up a sturdy and reliable tent and one that is lightweight enough to carry for 5 days. It also has to be large enough to fit both you and your backpack. The Snugpak Ionosphere is nice and compact and weighs just 1.8kg. Note that some campsites are on top of wooden platforms so you will need a way to secure the tent that doesn’t involve pegs.
- A lightweight, compact sleeping bag that’s good for minus temperatures. If you are not taking your own sleeping bag, I recommend packing a sleeping bag liner as you never know how clean the rental sleeping bags are.
- Mess kit (including pan, cup, plate, knife, fork and spoon).
- A small, foldable camping stove and gas canisters.
- Swiss Army Knife.
- Padlocks so that you can lock away valuables or bags in lockers at the camsites or refugios.
RENTING OR BUYING CAMPING EQUIPMENT IN PUERTO NATALES
If you are spending an extended length of time travelling around Patagonia or the South American continent without doing any other hiking or camping trips, it’s understandable that you may not want to carry a full range of camping equipment with you for your entire trip. If this is the case, you have 3 options: Buy equipment; Rent equipment in Puerto Natales ; Or rent equipment at each campsite in the park.
As Puerto Natales is heavily tourist-focused, you should have no problem finding all of the equipment that you need in the myriad hiking and camping shops. However, for high-ticket items such as tents and sleeping bags, you may be better off purchasing them in Punta Arenas (if you have come from southern Patagonia) as the city’s duty-free status reduces the prices significantly.
I chose to rent all of the equipment that I needed from Erratic Rock in Puerto Natales. Not only is this a fantastic hostel, but they also host a daily seminar, nicknamed the 3 o’clock talk. You can join their expert guides each day at 3pm for a cup of coffee and seminar that covers everything you need to know about Torres Del Paine. This includes current weather conditions, accommodation, equipment, trail routes and transportation.
Erratic rock don’t allow reservations on gear and so operate on a first-come-first-serve basis, so you may just have to hope that they have everything you need. Their prices are below and listed as Chilean pesos per day.
Sleeping bag – CH$3000; Sleeping mat – CH$1500; Trekking poles x 2 – CH$3500; Waterproof jacket – CH$3000; Backpacks – CH$4000; Down Jackets – CH$2500; Gloves – CH$1500; Headlamp – CH$1500; Cooking kits for 3 people (Stove, bowls, cups, cooking pot, & water bottle) – CH$4000

The Best Backpack for Hiking the W
I always recommend packing light for multi-day treks like the W or O-Circuit. If you plan at staying at the refugios, you should only have to carry clothes, food and accessories so look for a relatively small backpack with between 30 – 50 litres capacity, depending on how heavy of a packer you are. The lighter your bag, the better. If you are carrying a tent, stove and other camping essentials, a 70-litre bag should be fine.
On some of the hiking days, you will be able to leave your main equipment and larger bag at refugios or with park rangers, so ensure you take a daypack to carry just valuables and essentials on these sections of the trail.
For the majority of the W Trek, you will be hiking with your main backpack. However, on two days – when hiking from Refugio Grey up to the glacier of the same name and when hiking to Valle Frances – you will have the option of leaving your gear at a refugio and just taking a daypack. Something compact and foldable will be your best option. The Osprey Ultralight Stuff Pack can be packed down to the size of its very small pouch yet holds 18 litres and has side pouches that can hold water bottles up to 600ml in volume.
Main Backpack
If you are staying in dorm beds at the park’s refugios, you will only be carrying clothing and essentials so a 40-50 litre backpack will be more than enough. The Osprey Fairpoint 40 litre pack is rugged and durable ( Osprey Fairview for women) but the Osprey Talon 33 litre pack is my favourite option if you’re willing to forgo a little capacity for additional comfort and features: it comes with external hiking pole straps, a lightweight frame and additional lumbar support.
If you are lugging a tent, sleeping bag, and camping accessories, the Osprey Aether Ag 70 is perfect. I have been using mine for the last 6 years through multiple hikes and long-term backpacking trips and it is still going strong.
You will need to give a little forethought when it comes to what clothing to pack for hiking the W-Trek or O-Circuit in Torres del Paine. The weather on the trails can be rather unpredictable and is known to subject hikers to a mix of sunshine, snow, rain and sleet all in one day. I should know: on one day of the hike I went from walking alongside Lago Skottsberg in just shorts and a t-shirt in bright sunshine, to having to wrap up warm as I encountered a blizzard while ascending Valle Frances. In the summer months, temperatures can get quite high but you are still likely to encounter weather that ranges anywhere between 0 and mid-twenty degrees celsius at lower altitudes.
This means layering your clothes. Avoid cotton and wear quick-drying, synthetic base layers with both a fleece layer and wind/water proof jacket to wear on top for when you are making your way up Valle Frances or to the Torres.
- A good pair of hiking boots: Ensure that you wear in any new pair of boots before the trek as any unbroken-in boots will give you blisters and make the hike much more challenging.
- 2 or 3 pairs of warming hiking socks with 5 pairs of breathable, anti-bacterial liner socks to reduce the chance of blisters.
- 2 pairs of waterproof hiking trousers. I recommend getting a pair that zip off and convert to shorts to make hiking in warm weather a little more comfortable.
- Long johns or thermal leggings to wear under your trousers when hiking in snow or keep you warm on cold nights in your tent.
- A warm, fleece layer such as the North Face Glacier or Berghaus Prism. If you don’t own a fleece, a good hoody will do the trick.
- A Gortex jacket to protect you from the wind and rain such as the Berghaus Ridgemaster.
- A warm hat and waterproof gloves
- A snood to keep your neck protected from the sun and wind.

Although a hot meal at the end of a hard day of hiking may sound tempting, food in refugios can be incredibly expensive, even by Patagonian standards. They are generally set menus and can be pre-booked online when booking accommodation. Many of the refugios do have shops where you can buy basic food supplies such as rice, pasta and sauces as well as snacks but the prices of these are also inflated.
I recommend bringing enough food for the entire trek, packing plenty of non-perishable items that are easy to carry and cook such as rice, pasta and cans/jars of sauces. Noodles, powdered soups and pasta pots will go a long way to keep you fed and energised throughout the hike. Cured meats or sausages also make a great addition to liven up the meal slightly. For breakfast, bring some sachets of quick-cook porridge and instant coffee. You will not need to bring any bottles of water with you as you can re-fill bottles in the park’s rivers and streams or at the refugios.
Note : You are only able to use stoves at certain spots within camp sites. If you think you will need a warm coffee or tea while hiking, boil water in a morning and take an insulated flask with you.
Hiking Gear
- Hiking Poles (can be hired in Puerto Natales)
- A headlight or torch. This is useful for the last morning of the hike when you will be hiking up to Las Torres before dawn in order to watch the sunrise.
- A waterbottle that you can refill from rivers and streams along the trail. Collapsable bottles will save you a lot of space.
Toiletries and Accessories
Hiking is a strenuous and sweaty business and while you may want to embrace the wild and spend 5 days camping without setting your eyes on a shower, each of the refugios have good bathroom facilities that allow you to freshen up each evening or morning.
- Toothbrush and toothpaste
- Soap or shower gel
- Toilet paper
- Hand sanitiser
- A lightweight, quick-drying microfiber towel
- Insect repellent
- A small first aid kit. While hopefully you will get through the hike without any injuries, it is always good practise to carry a small kit with painkillers, bandages, Imodium, plasters for any blisters

Electronics and Gadgets
Plug sockets and power are not available at all refugios and they are often in demand amongst other campers when they are. Assuming you will be travelling with a phone (you will struggle to get a signal in the park but WiFi is available at campsites for a fee) and camera, it’s a good idea to bring your own portable power supply.
- Camera and accessories. I don’t travel anywhere without my camera gear.
- Universal plug adapter

Dave McClane

David McClane is a photographer and travel writer based in Leeds, UK. Since first picking up a camera on a yearlong journey through Central and South America in 2014/2015, He has carefully documented his travels through almost 50 countries.

A Guide to San Pedro de Atacama, Chile

Patagonia Itinerary: 3 Weeks in Argentina and Chile

10 Beautiful Day Hikes in Torres Del Paine National Park

A Backpacker’s Guide to Puerto Natales, Chile
Leave a reply cancel reply.
Your email address will not be published. Required fields are marked *
Subscribe to my Newsletter
Sign up for my newsletter to get a monthly dose of beautiful photography and travel stories that are bound to fuel your next adventure.
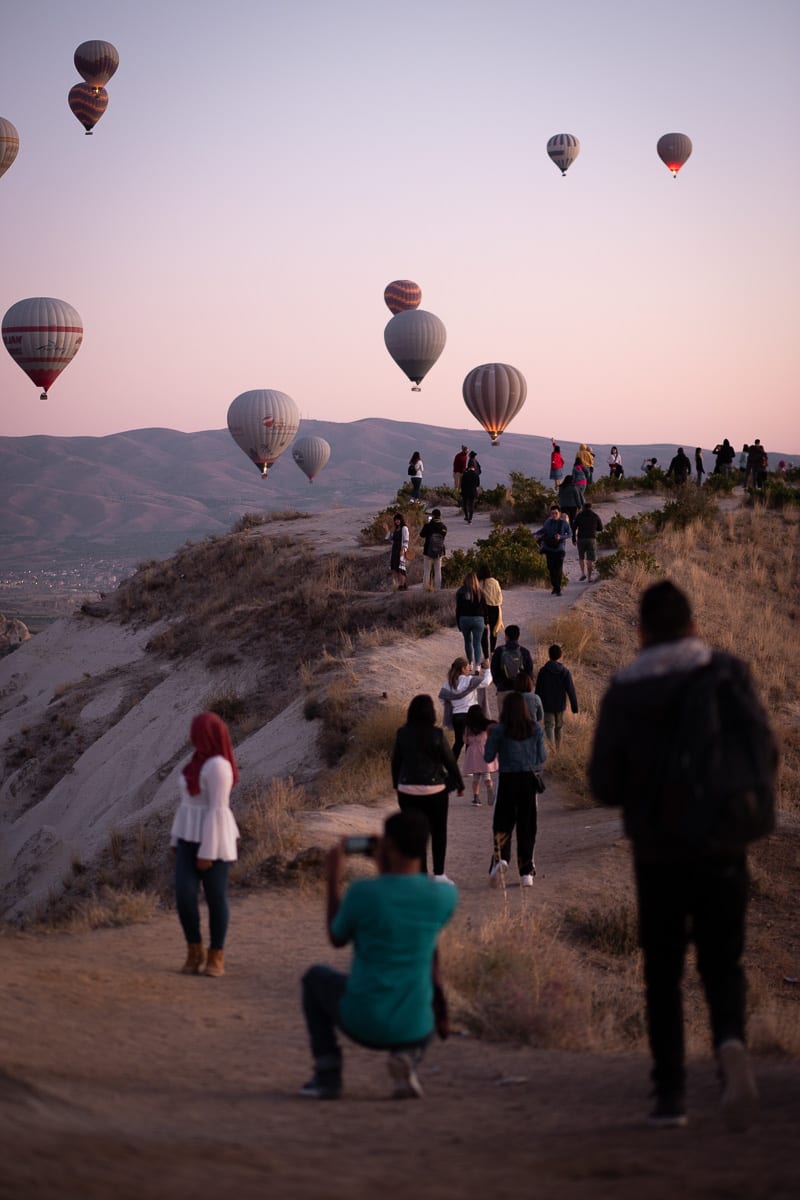
Copyright © 2024 Man Vs Globe
Hiking the ‘O’ or Circuit: Torres del Paine Trekking Equipment List
By Author Steph Dyson
Posted on Last updated: 6th October 2023
As one of Chilean Patagonia’s top adventure travel destinations, Torres del Paine National Park attracts thousands of hikers each year. But despite its burgeoning popularity, it can be difficult to find all the information you need about what to pack for your trip.
It’s for this reason that I’ve compiled this Torres del Paine trekking equipment list to help you in your preparations for hiking the Circuit or ‘O’, Patagonia’s most adventurous multi-day walking route .
This hiking equipment list is also a good guide for if you’re planning on trekking the W, the shorter route around Torres del Paine.
Find a complete guide to the W trek here , an essential guide to the O Circuit here or read up on the 14 essential things to know before embarking on the O Circuit .
Click to navigate this article:
Torres del Paine Trekking Equipment List
As I’ve written previously in my packing list for adventure travel in Patagonia , the quality of your camping equipment for Torres del Paine can mean the difference between a rucksack that weighs 16kg and one that’s well over 20kg.
A bag as heavy as the latter is guaranteed to give you sore shoulders and make the whole experience of hiking in the stunning Torres del Paine National Park one you’ll remember for all the wrong reasons .
When we hiked the Circuit in March 2017, we planned carefully exactly what equipment we needed in terms of camping, clothing and food. This is a list of exactly what we carried in our rucksacks (with a handful of this I wish we’d had thrown in).

Want a free pdf download of the full gear list for trekking in Torres del Paine National Park? Scroll to the bottom to get access to the link!
Essential Equipment for Camping and Hiking in Torres del Paine National Park
Remember that you can rent all gear from shops in Puerto Natales and for around $76,500 CLP ($114 USD) per person for the duration of the hike and the equipment is generally reasonable quality – although you’ll want to check it thoroughly before committing.
For us, we wanted lightweight gear that would make the hike more pleasant and we were also planning on camping in other parts of Patagonia during our trip. We also had a lot of this equipment before we went to Patagonia, so don’t feel that you need to buy absolutely everything on this list.
It’s a guide for you if you’re willing to invest in some good quality hiking gear that will making hiking in Torres del Paine a really enjoyable experience and outlast your trip – meaning you can use it on your next vacation.
So, here’s an overview of exactly what we packed.
Planning Your Trip to Chile?
Save time, stress & money with a customized travel itinerary planned for you by a Chile expert
What previous clients have said:
Steph’s help laying out an itinerary for Chile was huge toward us having a great trip. She listened to our interests and compiled a framework that we could follow to make our plans. She included many practical tips as well as numerous options. She truly saved us many, many hours of research.
All of us had 60-litre rucksacks, which was entirely sufficient to pack all of our items for the trek.
Berghaus Trailhead 60 Litre Rucksack
I found 60 litres was perfectly big enough for hiking the full O Circuit – any bigger and you can start to overpack to fill the space.
I highly recommend Berghaus , a brand that I’ve personally been using for the past five years. Their bags have fully adjustable back systems and are available on Amazon .
Unfortunately, they’re a British company so harder to get in the US. Instead, I’ve heard fantastic things about Osprey (and have one of the 40-litre packs myself), so these are a great alternative. They have rucksacks for women on REI | Osprey | Amazon and for men on REI | Osprey | Amazon .
Between the four of us, we carried two lightweight tents.

Big Agnes Copper Spur HVUL 2 Tent (1.4kg/3lb 1oz)
I was in this, a two-man tent that we bought specifically for the Torres del Paine hike and it is seriously one of the best quality tents for backpacking on the market.
You can read my full review of the Big Agnes Copper Spur HVUL for more information, but the salient points are that a) it withstood the strong Patagonian winds with barely a flinch, b) it was very waterproof (believe us: it was tested well!), c) it’s super light and packs small and d) it’s very quick and easy to put up and take down.
Wild Country Zephyros 2 (1.81Kg/3lb 16oz)
My dad and brother were in the Terra Nova Superlite Solar 2, which is unfortunately no longer available to buy.
It’s actually the two man tent is the predecessor to my Wild Country Zephyros 2 (1.81Kg/3lb 16oz), a tent I love because it’s both incredibly lightweight, very quick to erect and has kept me dry and warm during all my times camping in South America . The company just makes excellent tents at very affordable prices.
It’s cheapest for readers in the UK, but you can find it on Amazon in the US and other countries, too. If you’re in the US or Canada, I recommend checking out the North Face Stormbreak 2 (buy it on REI | Backcountry | Amazon .
I’ve heard great things about it as a lightweight backpacking tent – although it’s cosy for two people! You can find the North Face Stormbreak 3 (which is roomier for two) on REI .
Sleeping equipment
We had a range of sleeping equipment between the four of us, but this what I packed in my rucksack.
Rab Ascent 700 Women’s sleeping bag (1.24kg/2.7lb)
This is a very cosy 3-4 season sleeping bag that withstood even the coldest temperatures when we slept at Campamento Paso – directly next to the Southern Patagonian Icefield.
It’s down filled (so don’t let it get wet!) and packs down small so that it fits into the bottom of my rucksack and only weighs 1.24kg (2.7bs), which is really light for a down sleeping bag. However, it’s hard to find outside of the UK.
If you’re in the States or Canada , the Nemo Disco 15 sleeping bag is a great choice. It’s filled with down and appropriate for three-season camping, meaning it’s comfortable down to 25 degrees Fahrenheit (-4°C) and a good choice for travelling in Patagonia during spring, summer, and even the shoulder seasons (September through November and March through May) when the night time temperatures start to fall.
It also only weighs 2.6lbs (1.21g) and packs down small enough to fit in the bottom section of my Berghaus rucksack. It’s available for men and women and is a great investment for both camping in Patagonia and other parts of the world.
Therm-a-rest sleeping mat (510g/18oz)
Therm-a-rest make sleeping pads at a variety of price points.
You can find the Therm-a-Rest ProLite , which comes well recommended ( REI | Backcountry | Amazon ).
A cheaper option is a more basic foam sleeping pad : you can easily find them on REI | Backcountry | Therm-a-Rest | Amazon .
Cooking equipment
There are covered areas in all of the campgrounds for cooking and also sinks for washing up your equipment.
You can also buy standard gas canisters in some of the campsites along the Circuit (we saw some in Refugio Chileno but don’t count on finding them everywhere) but it’s worth making sure you have enough fuel to keep you going.
I love the MSR PocketRocket 2 (73g/2.6oz). It’s tiny and lightweight, and uses Isobutane-propane fuel, which you can buy very easily from all fuel stations in Patagonia. Make sure the fuel canisters are fitted with a Lindal valve.
We also used the Quechua Camping Pots with Heat Diffuser (382g/13oz) which are regular camping pots but with a twist: they have a heat diffuser underneath which means it allows the contents to heat far quicker than normal pots – while saving you fuel.

This set includes a large pot suitable for boiling water or cooking a meal and a frying pan that doubles as a lid. We also had a smaller pan for cooking pasta and rice. Unfortunately, they’re only available to buy in the UK.
Luckily, you can get pots like this fairly easily in most camping stores, but a good brand is always MSR pots : check them out on Backcountry | Amazon .
My brother had a collapsible bowl (88g/2.8oz) and it was a great choice. It has flexible silicone walls and a thicker nylon base, this bowl packs down flat when not in use and was excellent for saving space in his rucksack. Find them at REI | Backcountry | Amazon .
You also need a camping mug (around 62g/2oz), which are easy to pick up in most supermarkets or camping stores and you should opt for a cheap, plastic or metal, and durable one. Find them on REI | Backcountry | Amazon .
You’ll also want a spork. A titanium spork with a long handle is sturdier than a plastic spork (we actually broke one towards the end of the hike), but you can also use it to stir your food as it cooks. You can find them on REI | Backcountry | Amazon .
Camping and cooking packing essentials for the O Circuit:
- A comfortable 60 litre rucksack; I highly recommend Berghaus, which has a fully adjustable back system and is the available on Amazon or check out the highly-regarded Osprey rucksacks for women on REI | Osprey | Amazon and for men on REI | Osprey | Amazon .
- A lightweight backpacking tent; I recommend the Big Agnes Copper Spur HVUL 2 Tent (1.4kg/3lb 1oz), which you can find on REI | Backcountry | Amazon . If you’re after a cheaper option and are in the UK, the Wild Country Zephyros 2 is a great alternative. For those on a budget in the US or Canada, check out the North Face Stormbreak 2 ( REI | Backcountry | Amazon ) or the North Face Stormbreak 3 ( REI ).
- A warm, lightweight sleeping bag; I recommend the Rab Ascent 700 Women’s . If you’re in the States or Canada, for women, the Marmot Trestles 30 (find it on REI | Backcountry | Amazon ); for men, the cheaper Marmot Eco Elite 30 ( REI | Backcountry ) or Sierra Designs Cloud ( Backcountry | Amazon ).
- A lightweight sleeping pad; Therm-a-Rest ProLite is good ( REI | Backcountry | Amazon ) or you find a more inexpensive sleeping pad on REI | Therm-a-Rest | Backcountry | Amazon .
- A camping stove and fuel; I really rate the smaller, cheaper pocket stoves (find the MSR Pocket Rocket on REI | Backcountry | Amazon . You can get fuel for your stove in Puerto Natales, at Grey and Paine Grande.
- Camping pots; Head into your local camping store or buy the MSR pots ( REI | Backcountry | Amazon ).
- Collapsible bowl; Several companies are now offering these. You can find Sea to Summit bowls on REI | Backcountry | Amazon .
- Camping mug; Go for a durable and lightweight plastic or metal one. Pop into your local supermarket or camping store for a cheap one or buy one on REI | Backcountry | Amazon .
- Spork or similar; Opt for a titanium for more durability such as these ones on REI | Backcountry | Amazon .
- Dehydrated meals and snacks; Dehydrated meals are a great option for dinner, and it’s worth bringing these with you from home. You can then purchase oatmeal for breakfast, and nutritious snacks for lunches (breads, cheese, nuts etc) once in Chile.
Clothing and footwear for hiking the Torres del Paine Circuit or ‘O’
We aimed to keep our clothing to a minimum for this Torres del Paine hike, while also making sure we stayed warm and dry.
When we were there in March, temperatures reached as low as 5˚C (41˚F) and we just about avoided some of the worst rainstorms they’ve had in the park for the past 20 years! (Read more about the weather with this handy guide ).
Salomon Quest hiking boots
I have been using Saloman hiking boots for the past four years (I have these Salomon Quest hiking boots ; they are seriously comfortable, provide excellent ankle support and survived 2+ years of heavy wear. They finally gave up as we were finishing the hike – and I’ve since replaced them.

The hike back down the John Gardener Pass is very very steep and can be horribly slippy with mud so I strongly recommend investing in good-quality hiking boots. Once you’ve bought a pair that fits well (and has a little bit of room at the end of your toes to stop them getting squashed), break them in by first wearing them around the house and then taking them on a couple of short day hikes.
This will teach you how many pairs of socks you need (I personally always use two: a thin pair as a base layer and a thicker pair as an outer layer ) to stop them rubbing and whether you need to break them in further – along with some Compeed on your heels.
For Torres del Paine, if you only wear one pair of socks, three in total should be sufficient – just remember to give them a wash every few days!
Most shoes rub when I first wear them and my second set of Salomons did this (the first fitted perfectly!), so I’ve got in the habit of just putting Compeed on my heels before I start hiking as a preventative measure.
You can find Salomon hiking boots on REI | Backcountry | Amazon .
Trekking Poles
Given the steepness of the descent from the John Gardner Pass, hiking poles are an excellent investment for the walk as they’ll give you a little more support – something really useful in muddy conditions.
Again, you can hire these in Puerto Natales, or you can get some inexpensive ones on the internet. I recommend some from Black Diamond ( REI | Backcountry | Amazon ).
Other shoes
I’ve invested in Teva sandals and found that, unlike my flip flops, they didn’t try and slip off my feet when fording a river in Torres del Paine National Park.
Admittedly the river was swollen because of torrential rain – so it’s unlikely you will face these conditions, however, they were also far more comfortable to wear with socks at night when you just wanted to have your feet out of your walking boots!
General clothes
The trick with packing for Torres del Paine is to avoid overpacking . I kept my clothing to a minimum and had the following:
- Basic short-sleeved top (x2) and long-sleeved top (x2).
Because the weather is extremely changeable in Patagonia, you want plenty of layers that you can put on or strip off in response to the weather. Bring a long-sleeved shirt (merino wool if you can).
- Fleece jumper (x2) and down jacket
Again, keep the chill out (it gets cold at night, particularly around the back of the Circuit near all of the glaciers) by layering up with a warm fleecy jumper and a down jacket for when it gets extra chilly.
- Hiking trousers , zip off at the knee (x2)
I almost hate to admit this, but I love my zip off hiking trousers! They are much more versatile than carrying a pair of shorts and trousers. You can also find those that don’t zip-off; prAna does a great line in women’s hiking trousers.
You’ll need more than one pair of pants as the sun is intense, and you’ll need a dry pair if they get wet.
- Thermal underwear
I feel the cold, so thermal underwear was essential for me at night time when temperatures can drop close to zero degrees Celsius (32 Fahrenheit). You’ll likely want both a thermal top and bottoms .
- Leggings (x1)
Again, leggings are excellent for layering purposes and are good for sleeping in too.
- Gore-Tex waterproof jacket and waterproof trousers
I almost didn’t take waterproof trousers but they were an excellent decision! I also loved my Sprayway Gore-Tex jacket, but I’ve since upgraded it to the Patagonia Storm10 Jacket . It’s ultralight, extremely easy to pack and impressively windproof and waterproof given how lightweight it is. It’s also very breathable – which is important as you don’t want to get too warm when you’re hiking.
For cheaper budgets, North Face is always a good choice, too. Their Alta Vista jacket is a breathable, lightweight option at an affordable price point.
For waterproof trousers, you can find inexpensive ones in hiking gear shops, but be aware that the more plastic feeling they are, the less breathable they will be – and they hotter they’ll make you when hiking. These Marmot rain pants are great.
- Warm hat, gloves and scarf or a Buff
Keep your head, neck and hands warm and protected from the wind. Buffs are great because of how versatile they are; they can be used as head bands, sweat bands and scarfs.
- Hiking boots; You want some that are comfortable and that you’ve broken in so that they don’t give you blisters! Check out my Salomon hiking boots on REI | Backcountry | Amazon or the men’s version on REI | Backcountry | Amazon .
- Base layer hiking socks (x3 pairs): Get them on REI | Darn Tough | Amazon
- Outer layer hiking sock (x2 pairs); Get them on REI | Darn Tough | Amazon
- Gore-Tex waterproof jacket; For her: I love the Patagonia Storm10 Jacket as it’s an ultralight, easy to pack but fully waterproof jacket ( Patagonia ); the North Face Alta Vista Jacket ( Amazon | REI ) is significantly cheaper but offers good weather protection. For him: check out the men’s version of the Patagonia Storm10 Jacket on REI | Backcountry | Patagonia , the more affordable North Face Alta Vista ( Amazon| REI ) or the industry-leading Arc’teryx ( REI | Amazon )
- Trekking trousers (x2) or shorts; The prAna hiking pants ( REI | Backcountry | Amazon ) are great for women; for men, the Columbia Silver Ridge is a good option ( REI | Backcountry | Amazon )
- Trekking poles; You don’t need to spend loads on them but you do want some that pack down small so they can fit in your suitcase on the plane over to Patagonia and ones that are sturdy. Check them from Black Diamond ( REI | Backcountry | Amazon )
- Sandals; They don’t look very stylish but they serve a purpose! I’m a convert of Teva sandals . Find them for women on REI | Backcountry | Amazon and for men on REI | Backcountry | Amazon
- Basic short-sleeved top (x2)
- Long-sleeved top (x2) ; Opt for merino wool if you can.
- Fleece jumper (x2) or down jacket ; Check fleece jackets out for women: REI | Backcountry | Amazon ; for men: on REI | Backcountry | Amazon . I also love my new Jack Wolfskin down jacket ( Amazon ), as it’s extremely warm and lightweight
- Insulated down jacket; I’m no expert on down jackets but REI have a great selection and a helpful guide to choosing one . Find them here: REI | Backcountry | Amazon
- Waterproof and windproof trousers; Find them on REI | Amazon . For men, check these out on REI | Amazon .
- Thermal underwear; For women: Top ( Under Amour ) and bottoms ( Under Amour | Amazon ) and for men: Tops ( REI | Amazon ) and bottoms ( REI | Amazon )
- Leggings (x1) For women: REI | Amazon
- Warm hat, gloves and scarf or a Buff; Get a buff from REI | Amazon
Top Tip: If hiking earlier or later in the season like we did (October/November or March/April), it is colder than you think in Torres del Paine. Pack more clothing than you’d planned so as to avoid being caught out. We found that at night it got very chilly and I was struggling to find enough layers to wear!
Other equipment for trekking the Circuit or ‘O’ in Torres del Paine

Other equipment
These are other essential items that you will need for hiking in Torres del Paine National Park:
- Dry bags; You want to keep your sleeping bag and any electronics nice and dry when it rains. Many people just line their backpacks with a bin bag but these can easily tear. I always travel with dry bags and have never had an issue with valuables getting damp. Check out the Sea to Summit dry bags ( REI | Backcountry | Amazon )
- Lighter (x2); Matches run the risk of getting wet
- Headlamp; This is easier than a torch for when you’re getting up or going to bed in the dark. Get one from REI | Black Diamond | Amazon
- Pen knife; I don’t go hiking without my Swiss Army penknife; Find them on REI | Amazon
- Pack of cards or even a book; We got to the campsites each day at no later than 4pm and while the camp shelters where you cook are great for meeting other hikers, a pack of cards or something to read would have been a good idea to soak up some of the free time.
- Cable ties; I carry these EVERYWHERE I go when hiking. They can fix anything, including my hiking boots!
- First aid kit; Including plasters (and blister plasters), a bandage for sprains and a gauze dressing for wounds, hydrocortisone cream for insect bites, ibuprofen and paracetamol. You can easily make one of these up by yourself, otherwise find them on REI | Amazon . Blister plasters can be hard to come by in Chile, so make sure you bring a good amount with you!
- Face or body wipes; Some days you may not be able to get a shower
- Microfibre travel towel; These towels are super light and there are some showers along the O Circuit (hurray!) so you’ll definitely want one. Find them on REI | Amazon
- Washing powder; A small plastic bag with washing powder is useful for giving your underwear and socks a good wash every few days (your feet – and friends – will thank you!)
- Washing pegs and a washing line; I used this for hanging up clean socks at campsites overnight.
- Hand sanitizer; There’s not much soap to be found in toilets around the campsites and some of the toilets are grim .
- Toilet paper; We generally found this in most campsite toilets but better safe than sorry.
- Sun glasses, sun cream and insect repellent; When it’s sunny in Torres del Paine, it’s really sunny. During summer, you can also expect to be savaged by insects so bring some spray .
- Steripen or purifier for silt water; Our first night (at Refugio Serón) the water system had broken due to a huge storm that had basically drowned the park in rain. As a result, there was no clean water, except from some very silty stuff that you could take from the stream. We had my steripen , but this wasn’t hugely useful in the situation (although it has been perfectly good for all the other camping experiences I’ve had in South America). I genuinely think this was an unusual situation, and so I still highly recommend the Steripen for your trip – buy it on Amazon or the newer Steripen UV Ultra at REI . You’ll need a wide-mouth water bottle, such as the Nalgene (buy it on REI | Backcountry | Amazon ) to go with it. If you want to consider bringing a different water filter with you. I’ve used both the Sawyer Water Filter (get it on REI | Amazon ) and the Grayl filter (get it on REI | Backcountry | Amazon ) and you can read my reviews of travel water filters , too. Remember that you can find clean water at all of the campsites along both the ‘O’ and ‘W’ Torres del Paine hikes so this is really just for emergencies.
- Universal adaptor plug and phone or camera charger; We found that there are plug sockets in Paine Grande and Los Perros campsites. Get a universal adaptor plug from Amazon .
- Power pack; I used a battery pack to keep my phone charged and ready for taking photographs. Check them out on REI | Amazon

Get the Torres del Paine trekking equipment list as a PDF
All you need to do is subscribe to Worldly Adventurer and you’ll receive this Torres del Paine trekking equipment list as a free PDF download!
And if you want a guide to what to take on your trip to Chile and Argentina, check out this checklist for packing to travel in Patagonia and get tips on how to have a Patagonian adventure .
Was this trekking equipment list for camping in Torres del Paine useful? Pin it to help other adventurers!
Christoffer
Monday 11th of September 2023
Hi Steph Awesome post. I couuldn't find anything about the laws on knives. I plan on bringing my SAK as well. I assume you just brought yours in the checked in baggage. Did it cause you any trouble at all at the airport? Thanks Christoffer
Steph Dyson
Wednesday 20th of September 2023
Hi Christoffer, yes checked luggage and no issues! Steph
Monday 24th of July 2023
Many thanks for all the amazing content yo're providing us. I'm hiking the O circuit in early January with my wife and we're carrying a down filled millet sleeping bag which has a comfort limit set at 5° celsius. We thought that could be enough as the average temperature at night doesn't fall under 5-6° during that season but I see you recommend a warmer sleeping bag. Should we go for something heavier? Thank you!
Hi Francesco, it depends how much you feel the cold! I do feel it, but if you've got thermal underwear that you can put on if you get chilly, then it should be fine. Steph
Thursday 24th of November 2022
Hi Steph, thanks for the detailed list! I've got 1 question: you mentioned so many gears are available for rent in Puerto Natales, how about rucksack/tripods/trekking pole? I'm traveling alone so i want to minimize what i have to buy.
Friday 25th of November 2022
Hi Jerry, you can rent gear here: https://rentalnatales.com/ They have rucksacks (and not tripods). Steph
Saturday 20th of August 2022
Hi Steph, Thank you for your blog. We are going in the 2nd week of April 2023 to hike the W. What will we miss out comparing with the O? Will there still be many visitors during that time?
Sunday 21st of August 2022
Hi Charles, you miss out all of the back of the Paine Massif, which is very beautiful and much quieter compared with the W. I definitely think it's worth it if you have the time. There will be fewer visitors in April because it's the very end of the season. Steph
Sunday 31st of July 2022
Hi! we are 2 girls eager to explore Torres del Paine October this year. Apparently, it´s low season, so there is little information and recommendations about what to pack for early Spring, so we would love a little advice on that if you could. Also, we have been adviced by some friends to hire a guide, but seems from what you are saying that it is not really necessary as indications along the way are good... still we are a bit worried, as we might not find much people on the way as it´s low season. Lastly, we have read some information mentioning that O circuit is not technically more difficult than W circuit, but more exigent "just because" it is longer, could you corroborate this? THANK YOU SO MUCH FOR YOUR WORK!
Monday 1st of August 2022
Hi Alba, you really don't need a guide for it! The O Circuit is harder if you're planning on carrying all of your camping equipment (unlike the W, where you can typically drop your packs before hiking up the French Valley or up to the Towers, and then pick them up when you come back again, the O has climbing sections such as over the John Gardner Pass where you do have to carry everything). October will likely be colder at night, so just bring plenty of layers and a decent tent. I hope that helps! Steph
The Ultimate Torres del Paine W Trek Packing List
Hiking the W or O trek in Chile’s Torres del Paine National Park is at the top of many an adventurer’s bucket list. Planning a trip to the Torres del Paine and not sure what to pack? I’ve got you covered.
The Torres del Paine is a place of legend – soaring peaks, jewel-coloured lakes, stunning scenes and some of the best hiking you can find in Chile, South America . It’s hands-down one of the best things to do in Chile and should be at the top of your list if you’re planning a trip to Patagonia.
Hiking the W Trek in Torres del Paine National Park had been something of a lifelong dream – but it took four trips to South America before I finally got down to Patagonia, strapped on my hiking boots and set off to tackle the region’s best-known trek.

I loved my time in the Torres del Paine National Park and, without a doubt, the W trek was one of the best experiences I had on my last trip to South America.
I’d wavered about whether I’d be able to do the hike solo, or whether I had enough time to complete the trek and still see more of Patagonia. In the end, I’m so glad I went.
Read more about my experience of hiking the W trek in Torres del Paine.
That said, preparing for the trek wasn’t the easiest of tasks. When you’re travelling for a long-term (or even if you’re not) we all know that every kilogram counts.
Thanks to some savvy advice from friends and travellers, I think I got my W Trek packing just right – not too much but enough stuff to keep me comfortable throughout the trip – I’ve written it in as much detail as possible to help you plan for your travels.
Handy Tips for Your Torres del Paine Packing List

- Deciding what you need and what to bring is a tough call – the park has notoriously changeable weather conditions meaning you need to come prepared for rain, hot sunshine, gale force winds and even snow in the course of one day (this actually happened to me while I was on the hike).
- I’ve assumed that you are going to be camping and eating your own food during your hike – if you’re not, you can cut out the camping kit and most of the food items and rejoice in the knowledge that your pack is going to be significantly lighter.
- Leave anything you don’t need with you on the trek at your hostel in Puerto Natales – my hostel The Singing Lamb (highly recommended) had huge lockers just for this purpose, as do most of the hostels in the town.
- You can bring your own camping gear – but I’d only recommend doing that if you are camping in other places in South America. If you’re just going to be camping on this trip, Erratic Rock in Puerto Natales has a fully-stocked rental outfit for you to rent your stuff from.
The Torres del Paine W Trek Packing List
- Backpack

I’d recommend packing as light as possible, so you don’t need a massive backpack. That said, if you’re camping, you’ll need to allow for your tent and sleeping bag – so pick a bag that has plenty of straps to attach stuff with.
If you’re going straight to the Torres del Paine, you’re best off with a small carry on backpack and a packable daypack.
The Lowe Alpine Cholatse 45 is a good option – it has hiking pole attachments, is lightweight, front opening (as well as top opening) and has a waterproof cover to keep your stuff dry if it rains.
I also use the Osprey Fairview ( Farpoint for men), which is tough, stands up to the elements and lasts a very long time. The Osprey Fairview and Farpoint 70 come with a detachable 13 litre daypack that can be clipped to the back of your pack, or to the front harness to help with your balance.
Daypack

You’ll mostly be hiking with your main backpack on – apart from the day when you hike up to the Mirador Frances when I recommend leaving your backpack at the camp at the bottom and when you hike up to the Torres themselves.
I’d recommend bringing a small, foldable daypack to use on these days, unless your main backpack has a detachable daypack too.
For the packable daypack, the Matador Freerain24 Backpack is a good choice if you have the money, as it’s fully waterproof, light and rolls up into a tiny bundle.
Lightweight Tent
*Can be hired in Puerto Natales*
You need to tread a careful balance between making sure your tent is up to the task of keeping you snug and dry during the park’s notoriously unpredictable weather, and yet light enough for you to carry with ease.
The Snugpak Ionosphere 1 man tent is the best one man tent for camping that I’ve used. It’s pretty small and low but is really quick to pitch and only weighs 1.5kg.
Four Season Sleeping Bag
Don’t skimp on a sleeping bag – this, along with the tent, is going to be the thing that makes you warm and comfy in the night, setting you up for a good day’s hike the next day.
The Venom 600 from Vango is a great value option.
One thick enough to make it worth bringing and to stop you feeling like the princess in the princess and the pea.
Clothing For Your Torres del Paine Packing List

- Hard Shell Jacket. You’ll need a Hard shell jacket . The Patagonia Torrent Hardshel l is good value and packs up into its own pocket so you can put it away when the sun is shining.
- Fleece jumper or hoodie – The North Face Women Osito 2 does the trick for me.
- Thermal base layer top.
- Hiking trousers or leggings.
- Hiking shorts (optional)
- Thermal bottoms
- Sports Bras
- Hat with a brim
- Waterproof Gloves
- Neck gaiter or buff (optional but really useful for keeping your neck warm)
- 3 pairs of hiking socks (don’t forget your base layer socks to help stop blisters)
- Hiking boots – I’ve had my Berghaus Expeditor AQ Ridge boots for a while and they’ve always been reliable as well as being lightweight. I hiked all across Patagonia, including on the W Trek in them without any blisters or sore feet. Yep, you heard me right. No blisters.
- Toiletries
I know some people are perfectly comfortable going for days on the trail without bringing any toiletries but I’m not one of them and I’m guessing that you aren’t either.
If you are, feel free to skip this section and make sure you’re not sharing a tent with anyone along the way 🙂
- Toothbrush and toothpaste
- Eco-friendly soap
- Dry shampoo
- High factor suncream
- Lip balm with sunblock
- Insect repellent
- A fast-drying travel towel (I’ve reviewed my favourites here )
- Toilet paper

Food to Pack for the Patagonia W Trek
If you’re staying in refugios, you can book breakfasts and dinners to eat at the refugios and packed lunches that they give you to bring along with you.
The food in the refugios is varied – my advice is to expect for it to be bland and then be pleasantly surprised if it turns out to have some flavour. Better than the other way round. Even if you are booking all your meals at the refugios, make sure that you bring some extra snacks to keep you going throughout the day.
If you’re not staying on refugios then it goes without saying that it’s completely up to you to make sure that you’ve brought enough food for the trip.
The people you meet on the trail are nice, but not so nice that they’re going to share their post-hike meal with you like it’s the last supper (some are though, ‘cos hikers are a lovely bunch overall).
The quantities that you will need of the food listed will vary depending on how many days you’re hiking in the park. Be generous to yourself.
- Quick-cook oats (oat-so-simple’s a great choice) or oatmeal mixed with meal powder
- Dried pasta, couscous or rice (can bring boil in the bag instead)
- Ramen noodles
- Instant potatoes
- Instant packet soup
- Sachets of tuna in oil
- Salami or cured meat
- Oatcakes or crackers
- Dried fruit and nuts
- Beef or vegetarian jerky
- Tea bags and coffee granules (this is a hike, not the end of the world – coffee is necessary)
Other Essentials for Your Torres del Paine Packing List
- Collapsible water bottle or water bladder – you’ll need to drink plenty on the hike, but there are lots of glacial streams for you to fill up from.
- Mess kit (can be rented from Erratic Rock)
- Camping stove (same as above)
- Swiss army knife
- Camera (for all those awesome photos you are going to take) + spare battery or portable charger – I travel with a Sony a6500 – you can also read my travel camera reviews here .
- Printouts of refugio or campsite confirmations (if relevant).
- Travel insurance details – make sure you have travel insurance.
- Cash (US dollars or pesos) and cards. Make sure you have enough cash for what you need though, the refugios have card machines but they’re not that reliable.
- Earplugs and an eyemask – there’s always someone in camp who snores really loudly and the sunrise can be pretty early.
- First Aid Kit. Bringing a first aid kit might feel a bit OTT but can come in handy. At the very least make sure you have a few emergency painkillers, diarrhoea tablets (trust me on this one, you can save yourself a lot of difficulties) and plasters.
Looking for more travel inspiration? Read my full range of South America travel guides and tips
Optional Items for The Torres del Paine Packing List

- Kindle or book
- Playing cards
- Hiking poles (optional)
The Complete Torres del Paine Packing List: At a Glance
- Waterproof cover if your backpack doesn’t have one
- A lightweight tent
- Four seasons sleeping bag
- Collapsible water bottle
- Clothes + Underwear
- Camping stove
- Small first aid kit with any medicine you need
- Camera (for all those awesome photos you are going to take) + spare battery or portable charger
- Earplugs and eyemask
- Booking confirmations of all bookings.
So there it is, the ultimate Torres del Paine Packing List! I hope you have a brilliant trip and enjoy the experience as much as I did.
I’d love to hear your favourite parts of the trek or if there’s something that you think should be added to the list. Otherwise, happy hiking and have a great trip. Going backpacking in South America? Check out my handy backpacker’s packing list .
Read More South America Travel Guides
- Hiking the W Trek: A Step by Step Guide
- The Ultimate South America Bucket List
- Two Weeks in South America – Five Itineraries to Help You Plan Your Travels
- 13 Unmissable Things to do in Chile
- How to Camp in Torres del Paine like a Pro
Love This? Save and Share on Pinterest

I’m Julianna Barnaby - a professional travel writer and geek extraordinaire. I started The Discoveries Of to help you to discover the best of new destinations from around the world.
Discovering new places is a thrill - whether it’s close to home, a new country or continent, I write to help you explore more and explore differently.
Related Posts

3 Days in the Atacama Desert: The Perfect Atacama Itinerary

Visiting Casablanca Valley, Chile – Delve into Chile’s Winemaking Heritage

The Best Things to do in Valparaíso, Chile: Cultural Charms and Colourful Murals

9 Unforgettable Day Trips from Santiago, Chile
Wow. Thanks for the list. I have backpacked, but it helps to hear it from someone who’s been there. Based on your pictures, I’m going to need those warm layers.
Hey Mike – you’re really welcome! Have an absolutely brilliant time and yep, bring layers 🙂
Leave a Reply Cancel reply
Your email address will not be published. Required fields are marked *

Follow me on Instagram for travel inspiration, tips, and guides.
IMAGES
VIDEO
COMMENTS
1. Start with a Good Back Pack. A 35-40 litre mountain rucksack should be sufficient for all your personal items on your O trek packing list. Ensure it wears well, is not bulky, and has a hip strap to distribute weight around your hips and shoulders. Pick a bag with compartments to make packing small items and reaching a water bottle easier.
The O-Trek Packing Guide, Patagonia. Gear. Mar 17. Written By Andrea Ference. 9 DAY/8 NIGHT SOLO BACKPACKING TRIP. This is my full and complete packing guide for solo backpacking the O-Trek in Torres del Paine, Patagonia (Chile). I planned this as a solo hike but half way through my friend Jess met up with me so the breakdown was: four nights ...
My medical kit includes ibuprofen, paracetamol, plasters, eye drops, a bandage for sprains, arnica cream, blister plasters, cream for insect bites and stings, rehydration sachets, hydrocortisone cream, and allergy tablets. Patagonia packing list: toiletries and reading material. Sunglasses. Sunscreen.
Toilet paper in a zip lock bag (for emergency, all camp bathrooms had TP) One poop bag - Cleanwaste GO Anywhere Toilet Kit Waste Bag (did not need since you could dig a hole if needed, and again all camps had flushing toilets) Wet toilet wipes - travel size pack of Charmin flushable wipes. Small hand sanitizer. Pepto Bismol tablets.
The O trek, O Circuit or Full Circuit all refer to the 136-kilometer (85-mile) hike that is the second most popular trail in Torres del Paine National Park in Patagonia*. ... Keep Reading: The Complete Patagonia Travel Packing List. For a complete list of the food we carried (on a budget of only $17,000 CLP ($27 USD) per person for the entire ...
The ultimate, in depth guide to hiking the infamous "O" Trek through Torres del Paine National Park in Patagonia. You'll learn how to book campsites, plan your itinerary, and get a full snapshot of every section of the trail so you can be prepared for the trip of a lifetime. ... For a full checklist of exactly what items I recommend packing for ...
This, in contrast to the Haute Route, is one set route with very few variations (I noted the four additional hikes and activities I found as "side quests" in the overview of my hike described in this blog). The O-Circuit in its essence is: Location: Torres del Paine National Park, Chile. Distance: 73.7 miles / 119 km.
Equipment (buying and hiring):~$500-$800. Return flights to Punta Arenas: ~$1,500. Misc (additional food, unplanned travel/hotels etc): $50. Total Costs: $2,500 - $5,000. You could hike the Torres Del Paine O Trek trek independently for less than $400. This price includes food, park entrance, and camping.
For more information on the best packing list for this trek check out our Torres del Paine Packing list. Day 0: Arrive in Puerto Natales, buy ticket for bus to park, buy food and rent gear ... Use our ultimate Patagonia packing list and guide to ensure you have the right gear for a fun and comfortable journey.
In Patagonia, Torres del Paine National Park's 'O Trek' combines European hostel-style accommodations with a rugged hiking experience. The post A Full Backpacking Guide to the 'O Trek' in ...
Deciding what to pack for the O Circuit or W Trek in Patagonia can be really difficult! In general, packing for multi-day hikes is a challenging task, but Pa...
In this post, you'll find a detailed Patagonia packing list that contains the 15 basic hiking items and must-have camping gear. Patagonia is a waste region in the extreme south of South America. We spent two months hiking and camping in Patagonia mostly in Chilean Patagonia. During that time we had all kinds of weather; from hot sunny days to ...
Most notably the 4-5 day W Circuit and the longer 8 day O Circuit. Adventures that take you to some of the best landscapes and panorama viewpoints that Patagonia has to offer. Since these are a multi-day hikes, you must come prepared with a comprehensive Torres del Paine packing list. This will include camping gear, clothes, food, and other ...
From the peaks of Torres del Paine to the Perito Moreno glacier, the W Trek, the O Circuit, or the ultra-challenging Dientes de Navarino… the opportunities for hiking, trekking, camping, and falling in love with the region are endless. The following Patagonia packing list will provide you with some guidance about the necessities to bring.
The O Trek of Torres del Paine National Park in Chilean Patagonia is one of the most sought after multi day treks in the world. During these 8 beautiful days, you will have the chance to trek from campsite to campsite as you get to experience the best that Patagonia has to offer. Lakes, mountains, rivers, glaciers, & more make up the ...
This is the ultimate packing-list for Torres del Paine National Park and any other treks in Patagonia. The guide is made in collaboration with Victor, who has 15 years of experience at mountain guide and works as a guide in Torres del Paine doing the W trek, the O trek, and day treks.
There are 3 companies for camping Torres del Paine on both the Circuit & W trails: Vertice Patagonia - Campsites: Dickson, Los Perros, Grey and Paine Grande. Fantasticosur - Campsites: Serón, Los Cuernos, El Chileano, Central and Frances. CONAF - Free Campsites: Italiano, Paso and Torres Ranger Station & Camping.
Latinspirations' story ends here. New adventures are waiting for us. We would like to thank everybody who has supported our project. If you would like to get in touch please feel free to contact us at: [email protected]. Ecotourism & Adventure Travel.
For a day hike in Patagonia, it is enough to have a maximum of 20 liters backpack where you can store your extra layers, snack, camera, and water. Backpack 45-55L| For traveling between hiking destinations in Patagonia, you'll need a bigger backpack that will contain all your things. Footwear.
The ultimate packing list for hiking the W Trek or O Circuit in Torres Del Paine National Park, Patagonia from camping gear to clothes and food. Torres del Paine National Park is one of South America's most spectacular attractions and hiking the park's W-Trek or O Circuit should be the top of any intrepid backpacker's list of adventures ...
Torres del Paine Trekking Equipment List. As I've written previously in my packing list for adventure travel in Patagonia, the quality of your camping equipment for Torres del Paine can mean the difference between a rucksack that weighs 16kg and one that's well over 20kg.. A bag as heavy as the latter is guaranteed to give you sore shoulders and make the whole experience of hiking in the ...
45 - 55 L PACK. You'll need a lightweight hiking backpack to wear every day to carry your water, snacks, and all your belongings for the trek (sleeping bags & pads are provided at the campsites, so you don't have to carry these). We recommend getting a pack with a hip belt that is compatible with a water bladder/hose.
Daypack. Lightweight Tent. Four Season Sleeping Bag. Roll Mat. Clothing For Your Torres del Paine Packing List. Toiletries. Food to Pack for the Patagonia W Trek. Other Essentials for Your Torres del Paine Packing List. Optional Items for The Torres del Paine Packing List.