- Find a Location

How Often Should You Grease RV Wheel Bearings

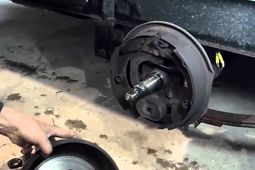
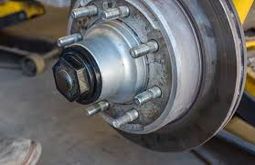
Your wheel bearings are located inside the hub of your RV wheels. They allow the wheels to spin properly and they also carry the weight of your RV. So one way to protect your wheel bearings is to understand your trailer’s weight ratings and never exceed them.
Some vehicles have something called sealed bearings. This design prevents debris from getting into the bearings and also traps the bearing grease inside. Sealed bearings do not need to be cleaned and repacked regularly like unsealed bearings do.
Unfortunately, you’ll find unsealed bearings on all but the most top-of-the-line trailers and RVs. So, for the purposes of this tutorial, we’re referring to unsealed wheel bearings.
Additionally, wheel bearings are packed with a special type of grease that prevents friction and allows the wheels to spin freely. While wheel bearings themselves are theoretically designed to last for the entire life of your RV, unsealed wheel bearings need to be cleaned and repacked with fresh grease at regular intervals.
Why Grease RV Wheel Bearings?

Over time, the grease packed inside wheel bearings breaks down and it will also start to acquire debris that gets inside unsealed bearings. If that grease isn’t cleaned out and your RV bearings aren’t re-packed with fresh grease regularly, the worst-case scenario is your entire wheel will seize when you’re driving your RV.
If a wheel seizes while you’re traveling at high speeds, it will put you and everyone on the road around you at risk. Even if a wheel seizes at slow speeds, it will leave you seeking roadside assistance and saddled with the costs of expensive RV repairs.
How Often Should You Grease RV Wheel Bearings?

Start by referring to your RV manufacturer’s specifications for wheel bearing maintenance.
For starters, all recreational vehicles come with multiple manuals for all of their components. If you can’t locate the manual for your axle, contact the manufacturer of your used motorhome or used trailer , or reach out to your local Camping World service center ASAP to get a physical or digital copy for reference.
Inside that manual, you should find service tables that specify mileages for recommended service and maintenance on your vehicle. Following that table closely will help you keep your RV in tip-top shape as it ages.
RV wheel bearings should be repacked with grease once a year or every 10,000 to 12,000 miles, whichever comes first.
If you travel frequently, this is a useful metric to go by, even if it means having your RV wheel bearings repacked a couple of times each year.
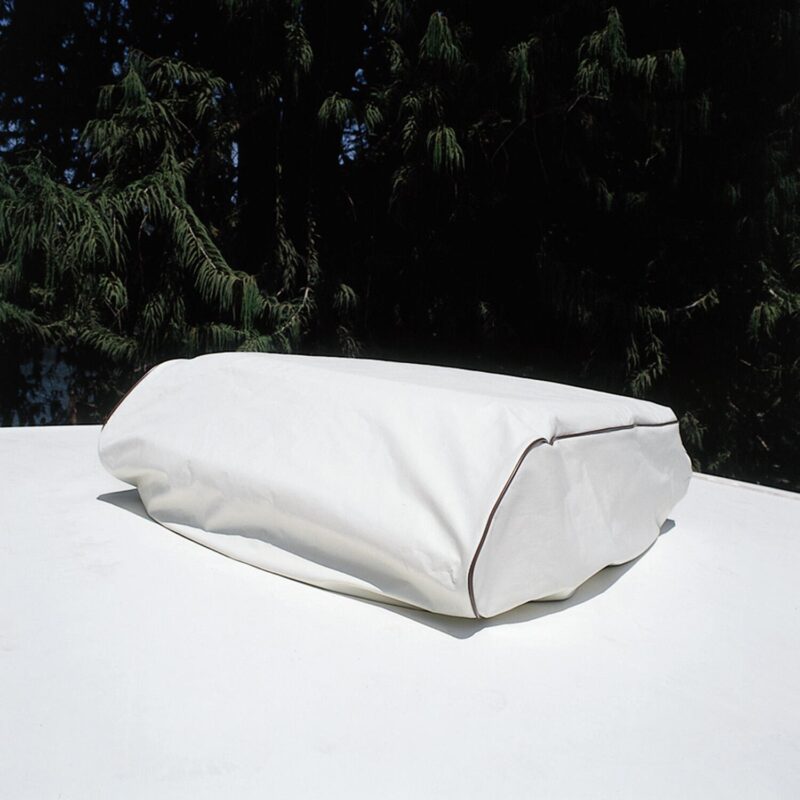
If you only go on a few short trips every year, some specifications recommend repacking your bearings once a year or every 2,000 miles, whichever comes first. While using RV tire covers will reduce the amount of debris that gets into bearings if your RV is just sitting, that grease can still break down and should be replaced regularly.
Note for new RV owners: If you’ve recently acquired a new or used motorhome, have a service technician inspect your wheel bearings before you hit the road. Unless you know exactly when your wheel bearings were last serviced, it’s best to take care of this essential RV maintenance check before you set out on your next adventure.
Selling , trading in, and buying an RV is also the ideal time to have a technician inspect, clean, and make any necessary adjustments to your brakes. Any adjustments should always be made according to manufacturer specifications.
How To Tell When Wheel Bearings Need to Be Repacked

If you stick to your RV manufacturer’s recommended service intervals for wheel bearing maintenance, you should be safe. But you should still be aware of the main signs that your wheel bearings may be wearing out.
A Visual Sign
If you can visibly see grease or an oily film coming out of the hub or coated around the wheel, it may signal that the grease is breaking down and your bearings need to be repacked.
An Audible Clue
If you hear a screeching or grinding sound coming from inside your tires while your RV is in motion, your bearings may need to be serviced.
A Physical Test
If you can jack up your RV so that the weight is off your tires, place your hands on the top and bottom of a tire. Push with your top hand first and then your bottom hand to see how much your tire moves. Repeat this test with your hands across from each other on the sides of your tire.
The tire should barely move on the axle and if you can move it enough to hear an audible clunk, this is a definite sign that your wheel bearings need to be serviced.
However, jacking up a heavy RV or travel trailer requires a heavy-duty floor jack, so only attempt this test if you have experience doing this safely and you know what you’re feeling for in terms of play in the bearing.
A Steering Feel
A more practical test for RVers is how your RV handles on the road. If it’s veering to one side of the road consistently or you’re noticing more play in the steering wheel than normal, it may be a sign that bearing maintenance is needed.
Keep in mind that axle and hub issues can be complex. If you suspect issues with your wheel bearings or other components on your RV, your best bet is to take your coach to your closest Camping World service center for further inspection.
How To Grease RV Wheel Bearings

Cleaning and repacking RV wheel bearings is something you can do at home. However, it requires a heavy-duty floor jack, jack stands underneath your axle(s) and/or the tongue of your trailer, and the right mechanic’s tools to get the job done.
Unless you know how to jack up a trailer, disconnect the electric brakes, remove the wheel, take the hub apart, clean and repack the bearings, replace the wheel bearing seal, and put everything back together exactly as it came apart, we recommend leaving this RV service item up to the professionals.
It does also require the willingness to get dirty too. Few, if any, RV mechanics have cleaned and repacked bearings without winding up with a good deal of grease on their hands. So if you want to save yourself time, energy, and a substantial clean-up, have your RV wheel bearings inspected and serviced by a trained professional at the regular intervals recommended in your RV’s owner’s manual.
Book a service appointment to get your RV wheel bearings inspected today.
Best Grease for RV Wheel Bearings

Bearing grease for travel trailers is something that most RV mechanics stock in bulk. However, it is available in smaller quantities if you need it. If you are cleaning and repacking RV wheel bearings on your own, try this high-temp disc brake wheel bearing grease from MAG1.
RV wheel bearings are just one critical piece of the RV maintenance puzzle, but all of those pieces are essential to guarantee your safety on all your RV journeys. Trust this maintenance task to a trained professional as part of your annual RV checkup to keep your tires spinning free and easy down the road!
When is the last time you had your travel trailer’s wheel bearings serviced? Leave a comment below.
If you’re still learning the ins and outs of RV maintenance, check out our downloadable RV ownership and maintenance booklet !
How often do you grease your travel trailer’s wheel bearings? Leave a comment below.

- Comment (10)

When your pumping in the grease n you don’t see the old grease coming out. What’s wrong ?

With a larger travel trailer, you should grease your trailer wheel bearings every 10,000 miles or once a year

Once you are on the side of the freeway changing wheel bearings, you get learned up fast!
I use that sticky red grease, the kind that sticks to everything ten feet away.
I also stay away from Chinese made bearings. I have had those burn up within 4000 miles. I like Timkins made in the USA.
We use our RV fairly hard, and do many dirt roads also. Dirt roads, for what it’s worth, I would cut the regrease time in half if you do dirt roads often, 5000 miles. I just changed my bearings, if I see any issues, such as the grease is runny and black (indication of bearing wear), I just put in new bearings. Trust me on this, it isn’t worth the cost and angst of roadside repairs. for $20 a wheel. And when you burn up the spindle, you need welder work done to replace the spindle, or the whole axle replaced.
I always carry a full set of spare bearings in the RV. Along with a good hammer, a drift (to remove the races) and I bought a bearing race driver kit, it wasn’t much money, but makes changing bearing races much easier. I also use one of those cone shaped bearing greaser devices that pushes grease through the bearings, you use a grease gun. I keep a thread die in my tool kit to clean up the threads on the bearing spindle. Once the spindle is gone, break out your wallet. Sometimes a fine flat bastard file is needed to clean up the spindle. Keep a can of brake cleaner along, makes cleaning parts easier when you don’t have compressed air while on the side of the road.
I also avoid using the grease zerks seen on Dexter axles. Grease will end up pushing past the seals, onto the brakes, rendering those useless. If you do use the zerks, jack up the wheel, and rotate the wheel and give two slow strokes.
Regreasing your bearings is not a difficult job, and can be done in a day. Always replace the seals when regreasing, they are cheap and non-reusable. A tub of solvent with a stiff paint brush along with compressed air and a air nozzle is needed to totally clean things up proper.
My wife and I did a 14.5k mile trip last year, Alaska to Florida and back, it took ten weeks. I had two bearings burn up. I was able to do repairs on the side of the road, because I keep spare parts and tools handy. The second bearing that failed was replaced mid trip with made in China bearings, they are made with inferior metals and wear quickly. Avoid! RV part houses sell those, you can tell, if it’s hanging on a rack do not buy. If the new bearings come wrapped in a little box, with a name like Timken, FAG, National Bearing, etc, you’re good to go.
Check for black runny grease and that smell of heat when removing the bearing cap. If you see black grease when red grease was used, the black is from metal wear, you must regrease. At that point, I’ll replace the bearings. Why mess around for about $20 a wheel?
I never go anywhere without a full kit of bearings, seals, and grease. I also keep new caps, washers, nuts, and retainers in my “kit”. Those small parts just about always get wasted when a bearing goes out. Another handy thing to keep is a new wheel hub, already packed with grease and new bearings. This would work for braking or non braking axles, unless you packed a hub with brake drum. But those are heavy and take up space, a non-braking hub isn’t big or heavy, but would help to get you back on the road to somewhere better then the side of I-70! Just turn your brake controller to zero and slow down.

Those Timken bearings that have USA stamped on the are actually made in China. The stamping of USA signifies they are a US based company but that L44649 bearing is not made in US. The problem is not China. The problem is the use of inferior metals and that is not specific to China.

what about sealed wheel bearings

I grease my RV wheel bearings about every 7500 miles

I’m glad to know that greasing the wheel bearings will help the travel trailer to spin freely and easily. My brother is taking his family camping this weekend, and I don’t think he’s ever greased the bearings. I’ll get him a grease gun so he can carry it in case he needs it.

Great advice from this man, follow his instructions and you’ll be fine.

more often than recommended is never a bad thing

What grease do I need to use?
Leave Your Comment Cancel Reply
Save my name, email, and website in this browser for the next time I comment.
Shop By RV Type

Your Adventure Awaits
Copyright © 2023 cwi, llc all rights reserved.
- RV Glossary |
- Privacy Policy |
- California Privacy Rights |
- Do Not Sell or Share My Personal Information |
- Targeted Advertising Opt Out |
- Terms of Use
- You are here:
- Home »
- Blog »
- » When and How to Grease RV Wheel Bearings (Helpful Guide)
")
When and How to Grease RV Wheel Bearings (Helpful Guide)
- June 21, 2019 /
- RVing 101 /
- By R. Geraldi
Preventive maintenance saves you money. It also saves you a lot of time when you need to be in your RV and trucking down the road. Plus, preventive maintenance on the little things like wheel bearings can save you both.
As they say, it is the little things that count and caring for the little wheel bearings can make the difference between a good and bad vacation.
When and how to grease RV wheel bearings? An RV wheel bearing maintenance should be done roughly every 10,000 miles. Some trailers can go 12,000 miles before needing some maintenance on their wheel bearings. After removing the wheel, dust cap and cotter, pin just remove the old grease and replace it with the new.
To learn all the details on how to grease your wheel bearings just continue to read our article. Its filled with the information you need to know to save you time and money. You will also learn how easy it is to do yourself.
How to Check RV Wheel Bearings
First off, re-packable bearings are usually found in the non-driving wheels on your vehicle. This means the front wheels if you have a rear drive RV. Secondly, you do not have to remove the tires to check them. Just follow these simple steps:
- Jack up your RV under the wheels you need to check
- Grab the wheel and rock it. If there is no play, then the bearings are still good. If there is a lot of side to side movement, then you need to repair or replace the bearing
- Next, put your RV in neutral
- Then grab the wheel and give it a spin
- As it spins, listen for any strange noises
- Use your hands as the wheel spins to feel if there is any roughness as the wheel goes around.
- If there is noise or roughness to the spin, then you probably need to repair or replace the wheel bearings
How to Tell if Your Wheel Bearings are Bad
Without removing the tire, you need to elevate the non-driving wheels far enough off the ground to test the wheel bearings. Once you have the wheels high enough, first grab the wheels with two hands and try to rock the wheel.
If the wheel moves or feels loose then there is something wrong with the bearing. The next step to take is to put your RV in neutral and give the wheel a firm but steady spin. If you hear noise or feel a little roughness in the spin, then you have a problem with the wheel bearing.
In each case you have a choice. You can repack the wheel bearings or replace them with better ones. There is a third way to test to see if your wheel bearings are bad. And you do not have to get your hands dirty.
As you drive and you start hearing a noise like a bearing is going bad, to find which wheel bearing it is, you just have to turn the steering wheel. If you turn to the right, and the noises goes quieter, then it might be the wheel bearing on the left wheel.
If you turn to the left and the noise subsides, then it may possibly be the right wheel bearing that is going bad. The only thing you have to be careful about in this instance is that a wheel bearing noise sounds a lot like the noise a bad brake pad makes.
Cost to Repack RV Wheel Bearings
If you take your RV to a qualified RV mechanic, the cost could run you as much as $200 for all wheels. The job may take the mechanic around 2 hours to fix 4 wheels. In calculating the cost, you need to know the shop time rate plus the labor cost.
If you want to do it yourself, there are kits available. These kits run about $15 per wheel and the price will depend on your location and the store you bought it at. A tube of grease runs approx. $6 and it shouldn’t take a beginner more than a couple of hours to get the job done.
You may want to do it yourself, so you know the job was done right the first time.
How Often Should RV Wheel Bearings be Repacked
Depending on the size of your RV each wheel bearing can go about 12,000 miles before needing repacking. You can check them sooner than that but not too much later. For RV trailers, their wheel bearings should be checked every 10,000 miles.
Smaller wheels do not have the endurance larger RV wheels have. When you have small wheels, you should check them every 2,000 miles and repack them if needed. Driving too far is not good and can lead to the wheel bearings breaking down and needing replacement.
That will cost you a lot more money and a little more frustration if you are not near a city.
How to Repack RV Wheel Bearings
Here is how to repack your RV wheel bearings when you have drum brakes:
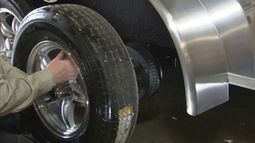
- First, jack up your RV and remove the tire
- Next, remove the dust cap and cotter pin
- Then remove the retaining nut, washer and outer bearing
- After that slide the hub assembly off and knock the inner bearing out of the hub
- Clean all the old grease out and then clean the brake shoes, backing plate, drum and so on.
- Now, lightly grease the bearing races and then pack grease into the bearings
- Replace the inner bearing into the hub and put on a new grease seal
- Place a thin coat of grease on the seal and slide the assembly back over the axle. Be careful not to damage the seal
- Next, slide the outer bearing over the axle, then the washer and then the retaining nut. Tighten the nut as you rotate the drum
- Install a new cotter pin and replace the dust cap
- Then just repeat this procedure on the rest of your RV’s wheels
How Often Should RV Wheel Bearings be Greased
The good aspect about bearings and their parts is that they are made to last along time. But that durability does not mean they can go forever without repacking. On larger RV wheels, it is recommended that the wheel bearings be repacked once a year.
Or if you travel a lot, then you should repack them every 12,000 miles . The thing about bearings is that they like to be used. The longer the sit the worse they get. This means that if your RV is stored for long periods of time you should check them before you hit the road again.
Larger trailer owners should have their bearings repacked once a year or if used a lot, then every 10,000 miles. Those RV owners with small trailer wheels should repack their bearings every 2,000 miles.
How to Grease RV Wheel Bearings
The process to grease your RV wheel bearings is quite simple. It doesn’t take an experienced mechanic to get the job done. All you have to do is follow the following simple steps.
- First, jack up the wheel you are going to work on and make the RV safe
- Second, remove the rubber plug on the axle end
- Third, place the nozzle of the grease gun on the grease jerk
- Pump the grease gun until the grease appears. Using a different color of grease each time helps you see where the new grease begins and the old grease ends
- Replace the plug and gap and then move on to the next wheel and repeat the process.
Best Grease for RV Wheel Bearings
The best grease depends on the type of RV vehicle or trailer you are using. For small boat trailers a good marine wheel bearing grease will handle the job. This type of grease is made for high speeds and for moisture or water.
When it comes to larger RV trailers or vehicles just about any high temperature grease will handle the task. Although not all wheel bearing grease will work with different brands of RVs.
You should check your owner’s manual to see what recommendations the manufacturer makes concerning wheel bearing grease. The key to repacking the bearings and using the new grease is to make sure you remove all of the old grease from the bearings first.
To make sure you are getting the right grease, you should check the high drop point spec on the grease container. The minimum needed is 450 rating.
How to Replace RV Wheel Bearings
When you start to repack your wheel bearings, before you add the new grease and after you have cleaned out the old grease inspect your old bearings. You are looking for pits, scratches, excessive wear, dents in the roller cage, and nicks in the roller.
If you find these imperfections, then you need to replace your bearings. To do this you all you have to do is disassemble the hub and remove the seals, races and inner bearings and so on. Clean the hub and get it ready for the new parts.
- Then place the inner bearing into the hub and put the new seal on, making sure you lightly grease the spindle. Tap the seal in a circular fashion until the seal is flush
- Slide the hub into place and add the outer bearing and its seal. Rock the hub back and forth gently until the bearing sits properly in the race
- Place the washer on the spindle and slide it into place. Using a wrench turn the nut until it is firm against the hub.
- Add your new cotter pin and replace the cap
Always use a new cotter pin whether you repack or replace the bearings
How to Tell What Wheel Bearings I Need
This is easier than you would expect. RV manufacturers have place serial numbers on its wheel bearing parts to make replacing the bearings a lot easier. To find these numbers you just need to remove the hub and look on the inner and outer bearings to find them.
Once you get these numbers finding your replacement should be simple. Two things you need to know. First, the axle determines the bearing size and the bearings need to be rated for the weight load.
Second, there are types of bearings. One is known as the Japanese style and it is designed for long hauls. The other is known as the Chinese and these are made for short tips
RV Wheel Bearing Adjustment
When trying to make an adjustment to your RV wheel bearings think about Goldilocks and her story. If you tighten the bearings so that there is resistance, then you have made it too tight.
If you back off too far and have a little play, then it is too loose. In between those two points will be just right. In other words, if you can spin the wheel easily when jacked up and there is no play, then you have the right adjustment.
Then tapered wheel bearings need to be tightened between .001 and .005 end play and you should have a little wiggle room but not a lot when you have the right adjustment.
RV Wheel Bearing Dust Covers
These are held into place by a small flange and they may not be that sturdy. If they get damaged, they can fall off at any time and you might not notice until you do your regular bearing maintenance check.
A missing duct cover can allow all sorts of problems to invade your bearings, hub and brakes. Repairs to these unfortunate instances can run high. You should make sure your dust covers are securely on every time you move your RV.
If you find one of yours missing, do a quick check to make sure there is no damage to the interior of your hub or bearings. Replacement dust covers can be found anywhere, and they are not that expensive.
Some Final Comments
Taking care of the little items on your RV is taking care of you and your pocketbook. When you do proper preventive maintenance to your wheel bearings, they should last you a long time and help you avoid expensive repair bills.
Also, repacking or replacing your wheel bearings doesn’t take along time. The task is not difficult to do and if you do not want a qualified mechanic to do it and charge a lot of money, then you can find good repair kits at an affordable price.
When you check your bearings remember to check your dust caps. If this little item falls off, it may be the source of your next high repair bill.
Related Posts
Does CarMax Buy RVs? (CarMax RV Trade-In Guide)
300 Lbs Over Payload: What Happens If I Exceed My Payload?
Thor Vegas Problems (Windshield, Battery, Fridge, Swivel Chair)
Leave a Comment:

How Often Should You Grease Travel Trailer Wheel Bearings

Sharing is caring!
Greasing travel trailer wheel bearings is an important part of RV maintenance. Yet wheel bearing upkeep is often overlooked. Many RVers don’t know that they need to grease and repack their wheel bearings on a regular basis. Others may be aware but unsure of when or how to perform this task.
We’ll unpack some of this ambiguity so you can easily grease your travel trailer wheel bearings.
Why Do You Need to Grease Travel Trailer Wheel Bearings?

Wheel bearings are the part of the wheel that allows it to turn freely. The wheel bearings also carry the entire weight of the camper. This very important part of your rig requires grease in order to function properly.
Grease breaks down over time, so periodically repacking travel trailer wheel bearings with grease is a must. Failing to do so can result in the wheel bearings drying out and seizing up as you travel down the road. The friction created can cause serious damage to your camper.
How Often Should You Grease Travel Trailer Wheel Bearings?

You should grease a travel trailer’s wheel bearings annually or every 10,000 – 12,000 miles, whichever comes first. Even with low mileage, grease can still dissipate over time, so both benchmarks are important.
Failing to regularly grease your travel trailer’s wheel bearings is a big risk-small reward situation. If you skip this maintenance, you chance a wheel literally falling right off your travel trailer.
What Are the Signs That Your Travel Trailer Wheel Bearings Need Grease?

A temperature check is a quick way to tell if it’s time to grease your travel trailer’s wheel bearings. Next time you park, walk to each tire and hover your hand close to the center of the lugnuts.
Be cautious because particularly dry wheel bearings can cause enough friction to burn. If the area isn’t too hot to touch, let your hand rest there for a minute. You’re in good shape if you can comfortably keep your hand there.
Perform this check on each tire. They should all be cool enough to touch and feel like they’re around the same temperature. If one wheel is significantly warmer than the others, you’ll want to grease that wheel’s bearings.
Visible grease on the wheel or screeching/grinding sounds while driving are additional indicators of concern. If your RV wants to veer towards one side while being towed, that indicates that your travel trailer wheel bearings need to be serviced.
How to Grease Your Travel Trailer Wheel Bearings
Some newer pop-up campers and travel trailers now have an easy lube axle feature that allows you to inject new grease into the travel trailer wheel bearings through a designated tube. Your RV’s owner’s manual or local RV service center can give you more information about this feature.
The easy lube feature is great for emergencies, but you should still follow the steps below to ensure you’ve correctly greased your travel trailer’s wheel bearings.
1. Consult Your Owner’s Manual Before Adding Grease to Travel Trailer Wheel Bearings

Always reference your owner’s manual before greasing your travel trailer’s wheel bearings. The manual will have critical information like where to place a car jack to access the trailer wheels safely.
The manual should also give you any camper-specific information about wheel bearing maintenance on your rig. If your travel trailer is only compatible with certain products, your manual will tell you that too.
Travel Trailer Pro Tip on Jacks: Your travel trailer’s stabilizer jacks aren’t a substitute for a car jack. Stabilizer jacks prevent your RV from rocking when you’re inside. They can’t support the weight of the rig. car, truck, and heavy-duty hydraulic jacks have the capability to lift and hold the travel trailer’s axle up while you’re working on the tires.
2. Gather Your Equipment Before Beginning to Grease Your Travel Trailer Wheel Bearings

Greasing travel trailer wheel bearings is a messy business. Gather all your equipment before you begin. This avoids fumbling through your toolbox with grease-covered hands.
Things you will need include:
- Car jack(s)
- Disposable nitrile gloves
- Flat head screwdriver
- Kerosene, acetone, or mineral spirits
- A small pan
- Wrench or tire iron
Things you may need:
- Additional wrenches
- Brake cleaner
- Hammer or mallet
- Thread loosener
- A wooden dowel
3. Jack Your Trailer Up to Grease Your Travel Trailer Wheel Bearings

Once you have your materials ready to go, it’s time to lift the trailer for easy wheel access. Always start by placing a wheel chock in front of the trailer wheels to prevent rolling.
Reference your owner’s manual for the optimal place to position a car jack on the frame of your camper. In many cases, a best practice is to place one car jack on either side of the wheel.
4. Remove the Dust Cap and Wheel to Grease the Travel Trailer Wheel Bearings

Use a tire iron or wrench to remove the lug nuts. Pull the wheel towards you until it slides off. Set the wheel and lug nuts off to the side for safekeeping while you finish greasing your travel trailer’s wheel bearings. You may want to keep them in a plastic bowl so the “RV gremlins” don’t walk off with them.
If the lug nuts are rusted, you may need to spray them with a thread loosener. Similarly, if the tire is stuck, you may need to tap it with a mallet to break it free.
You’ll also need to remove the dust cap. Slide the tip of your flathead screwdriver between the hub and the lip of the dust cap. Then, gently wiggle the screwdriver around the edge until the dust cap slips off.
5. Access the Bearings

Once the dust cap is off, you’ll see the spindle nut and, if equipped with one, the cotter pin securing this nut. Use pliers to remove the cotter pin. Then remove the spindle nut by hand, or use your screwdriver to pop it out.
Next, remove the wheel hub. The wheel bearings are inside the wheel hub. Be careful because they may come loose and fall out on their own.
6. Remove and Clean Everything Before Adding Grease to the Travel Trailer Wheel Bearings

If you need to remove the bearings manually, push them out by hand or gently pry them out with a screwdriver. If the bearings are dry and stuck, use a wooden dowel and gently tap the front of the hub until the bearings come free.
Fill the bottom of a small pan with 2-3 inches of kerosene. If you prefer, you could choose acetone or mineral spirits instead. Whichever cleaner you choose, soak the greasy bearings and the spindle nut for about ten minutes. As an optional way of ensuring your bearings are extra clean, you can spray them with brake cleaner after soaking.
While the bearings are soaking, use a clean rag to wipe any visible grease from the inner and outer races. If you need to, you can dip your rag in the kerosene to help remove stubborn grease.
Be sure to inspect the clean bearings and the races for any damage. You’ll need to replace the damaged part if you see scratches, dents, pitting, or discoloration.
7. Repack the Travel Trailer Wheel Bearings with Grease

When you repack the wheel bearings, you’ll want to use fresh grease and new grease seals. You may want to put on disposable nitrile gloves before beginning the repacking process, as it can get messy.
Start with about a tablespoon of grease. Gently push the grease into the bearings, rotating the rollers as you go. Ensure you coat the entire bearing thoroughly, including the bearing’s interior.
8. Tune Up the Brakes After Adding Grease to the Travel Trailer Wheel Bearings

Be sure that grease hasn’t come into contact with the trailer brakes. Grease is a flammable lubricant and, therefore, extremely incompatible with the friction generated from braking. If grease has gotten on your brake pads, you’ll need to replace them.
9. Reassemble, Greasing Everything Along the Way

Place the bearings back into the hub. You may need to tap it with a wooden dowel and hammer to get the bearings to set properly into place.
Next, you’ll need to reassemble the pieces you’ve removed carefully. This should be done in the reverse of how they were taken apart. Be sure to grease everything as you reassemble.
The greasing process ends when you pop the dust cap back into place. You may need to tap it with a hammer to ensure it’s secure.
Finally, put the wheel back on and secure the lug nuts. Once the wheel is in place, you can safely lower the jacks, so your travel trailer rests on its tires once again.
How Much Grease Should You Use on Travel Trailer Wheel Bearings?

If you grease and repack your wheel bearings yourself, a good rule of thumb is to use about a tablespoon of grease per wheel.
You can over-grease travel trailer wheel bearings, so proceed with caution. If there’s too much grease, the rollers will slide rather than roll. Excess grease is also more likely to make its way to your brake pads, damaging them.
The goal is to pack the wheel bearings and apply a thick grease coat to the races. Any more grease is unnecessary and could be damaging.
Campers and travel trailers with easy lube technology are particularly susceptible to over-greasing. If your rig has a tube within its wheel components specifically designed to inject grease, this feature is intended to be used on an emergency basis only. Inject just one squirt of grease at a time, or you could do more harm than good.
Should You DIY Grease Your Travel Trailer Wheel Bearings or Hire a Professional?

Unlike other RV problems, you can fix yourself; greasing travel trailer wheel bearings is a fairly complex DIY project. If the inner mechanics of a wheel hub are unfamiliar to you, this DIY can be downright intimidating.
You’ll need patience and finesse to carefully take apart, clean, inspect, and reassemble all of the small pieces involved in repacking travel trailer wheel bearings. Not surprisingly, this task takes several hours to complete and involves getting very dirty.
With patience and care, an above-average DIYer can save a few hundred dollars by re-greasing their travel trailer wheel bearings themselves.
But with literally the entirety of your travel trailer riding on your handiwork, if you aren’t 100% confident in your skills, it’s best to leave wheel-bearing maintenance to the professionals.
5 Best Travel Trailer Wheel Bearing Grease Products
If you decide to tackle greasing your travel trailer wheel bearings yourself, you’ll need the best product. While most RV maintenance shops buy grease in bulk, we’ve compiled a list of the best grease for DIYers.
1. Lucas Oil Red ‘N’ Tacky Grease

Lucas Oil’s Red ‘N’ Tacky grease is a superb multi-purpose grease that’s also perfect for travel trailer wheel bearings. This grease has both rust and oxidation inhibitors.
It’s also thicker and stickier than other similar products. This means that it stays just where you want it to, which helps protect other components of your camper.
2. STAR BRITE Wheel Bearing Grease

Star Brite Wheel Bearing Marine Grease is engineered to protect against rust, corrosion, water, and extreme temperatures.
Although this grease was designed for boat trailers, its resilience and ability to protect against salt air and salt water make it especially well-suited for beach-loving RVers.
3. Red Line 80401 CV-2 Grease

Red Line 80401 Grease has great high and low-temperature stability. It also boasts extreme pressure protection, which makes it well-suited for heavy loads.
It’s great at preventing oxidation and corrosion. Red Line Grease also is water resistant, promotes temperature stability, and doesn’t fail in heavy load-bearing situations. All of these properties make it an excellent choice for RVs.
4. Green Grease 101 Synthetic Grease

Green Grease 101 has a temperature rating of 500° Fahrenheit. It also has additives that make it both waterproof and extraordinarily capable of bearing heavy loads. These characteristics mean that it’s uniquely well-suited for travel trailers. This grease is a great option for extreme climates and heavy campers.
5. Valvoline VV985 Moly-fortified Full Synthetic Grease

The compounds that make up the moly-fortified Valvoline VV985 full synthetic grease are superb at protecting metals against wear. The lithium complex means this grease retains its protective capabilities in temperatures as extreme as -60° or as hot as 425° Fahrenheit.
Although it’s not 100% waterproof, it remains the preferred grease of both Ford and GM. Motorhome RVers may want to use this for their Ford and Chevy chassis.
Keep Up with Wheel Bearing Maintenance

Forgetting to grease your travel trailer wheel bearings can be a big mistake. This routine task is crucial to prevent damage to the wheel hubs. A dry wheel bearing can seize and cause an accident while traveling down the road.
Keeping up with wheel bearing maintenance is crucial to your RV’s health. Although it requires time, patience, and skill, you’ll prevent aggravation down the road. Whether you tackle this project yourself or leave it to the professionals, be sure to add this task to your RV maintenance routine.
Related Reading:
– Do RVs Have Spare Tires? – How Often Should Travel Trailer Tires be Replaced? – Should You Fill Your Travel Trailer Tires With Nitrogen?
About the Author:
Laura Tyrell is a part-time RVer and full-time mom of three. Long-time campers and RVers before children, Laura, and her husband have fallen even more in love with the RV lifestyle since becoming parents to a child with food allergies.
Having her own kitchen on wheels makes her RV trips amazing. Laura is passionate about finding ways to make traveling with young children fun, easy, and attainable.

Recent Posts

RV Power Surge at a Campground: Who’s Liable?
Do You Need An RV Air Conditioner Cover?
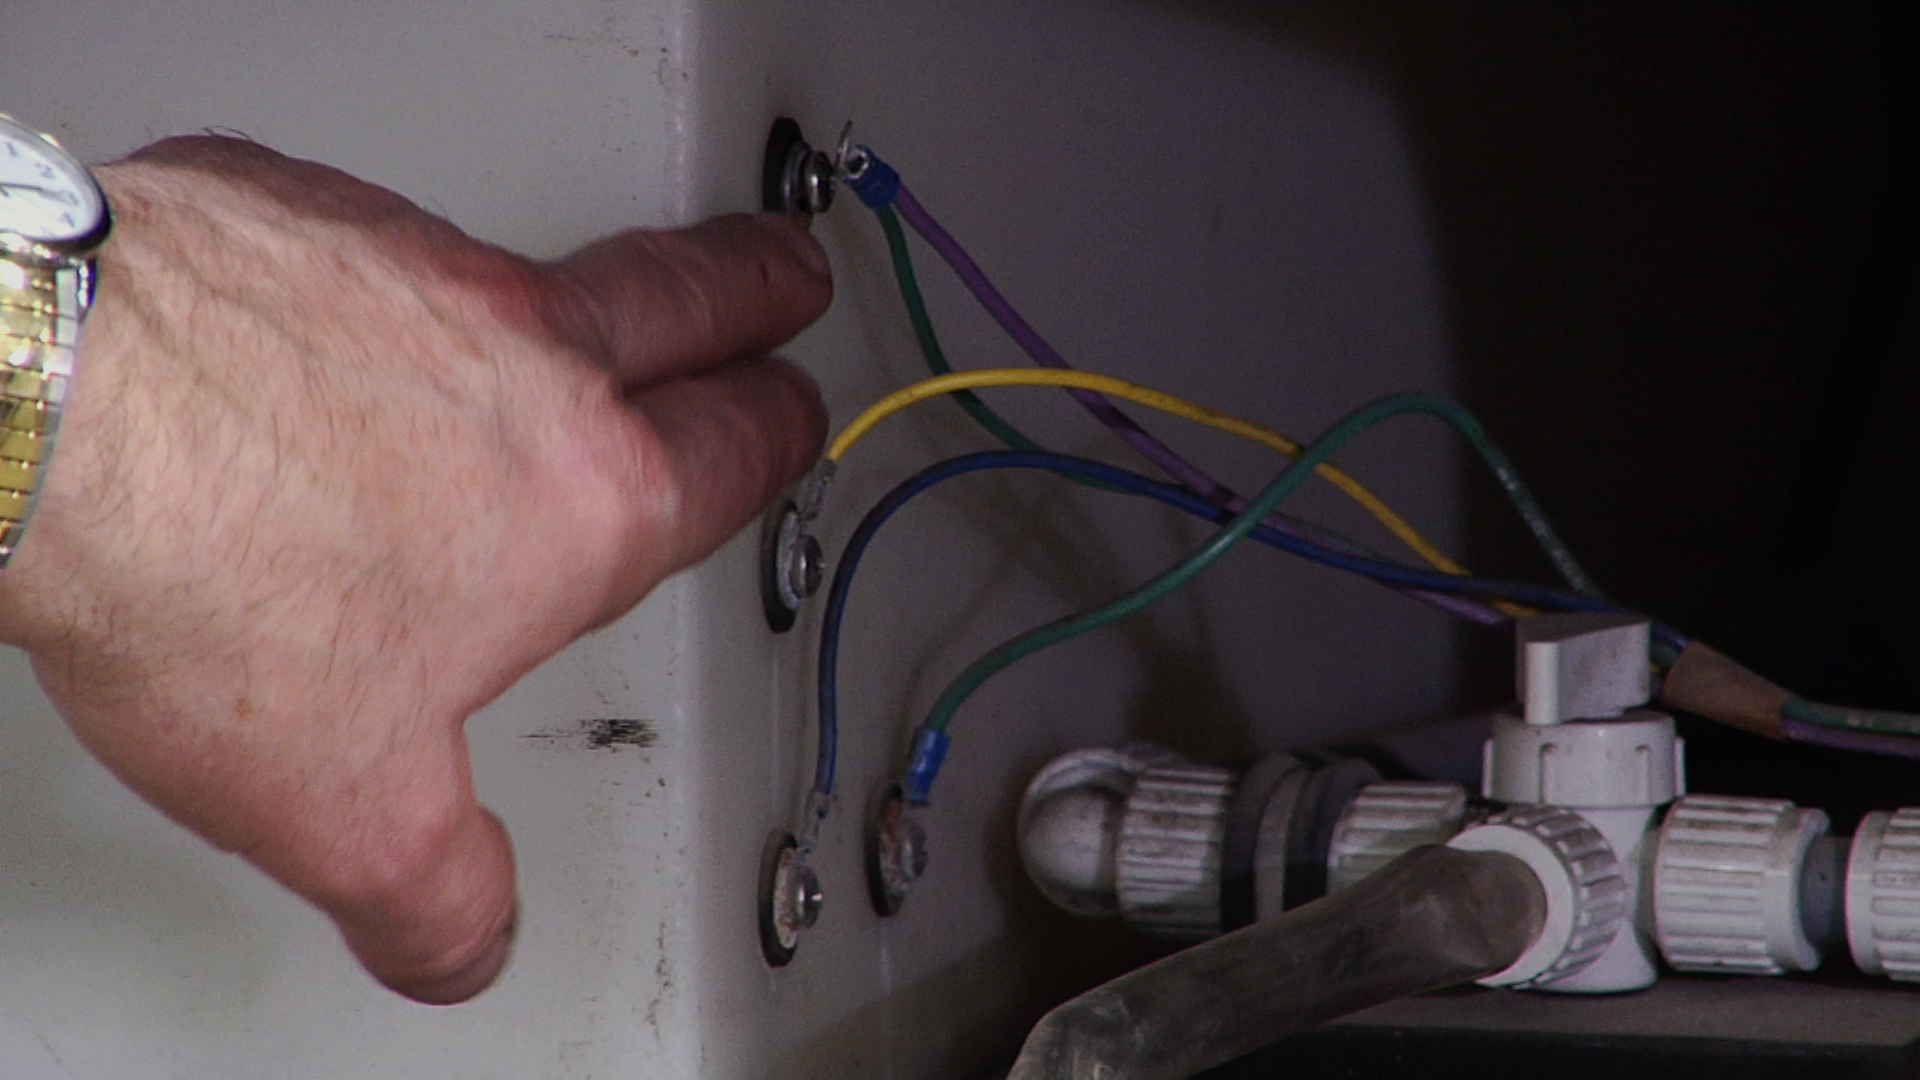
Maintaining Your Trailer’s Wheel Bearings
- Description
- Discussions
An important maintenance step for any trailer is making sure the trailer’s wheel bearings are greased. If you neglect this you could get caught on the road with burned up bearings. Bearing Buddies provide a simple solution for this issue. Once they’re installed (which is simple) you simply connect a grease gun to the Buddies and pump in wheel bearing grease. Carefully match the size of the Bearing Buddies to your trailer. Be sure you get the right stuff, wheel bearing grease , for your grease gun. Follow the instructions for installing and maintaining the Bearing Buddies, and you’ll have a more worry-free trip. Bearing Buddy reduces air and moisture penetration into the hub, it does not replace routine maintenance including repacking and inspection of the axle assembly.
Share tips, start a discussion or ask one of our experts or other students a question.
Already a member? Sign in
One Response to “Maintaining Your Trailer’s Wheel Bearings”
This isn’t what Bearing Buddies are for and you’re really not greasing the bearings. You’re confusing Bearing Buddies with Dexter EZ Lube axles, which have channels to route grease through both bearings and then push out through the front instead of blowing out rear seal. Bearing Buddies are really for boat trailers. Towing the boat down the road gets the bearings and grease warm. Then the trailer is backed into the water to launch the boat, and the rapid cooling effect of the water causes the air in the cap to contract which causes a slight vacuum and pulls water into the bearing assembly. When this is done repeatedly the water contaminates the grease, which can destroy the bearings. Bearing Buddies allow you to pump in a reserve of grease to displace that air pocket and the whole front is a diaphragm on a spring. When the trailer is dunked and everything is rapidly cooled, the diaphragm contracts so there is no vacuum in the bearing assembly to draw water in.
Explore videos by George Vondriska

You may be interested in
Premium Membership
Unlock exclusive member content from our industry experts.
- 24/7 Access to Premium RV Maintenance Videos, Travel Inspiration, and Lifestyle Tips
- Step-by-Step Instructional Demos, Projects, and Guides
- 50% Off Video Downloads Purchased in the RV Lifestyle & Repair Shop
- Access to Ask the Expert Program
- 2 Full-Length Video Downloads to Watch Offline
Gold Membership
Get everything included in Premium plus exclusive Gold Membership benefits.
- 9 Full-Length Video Downloads to Watch Offline
- 2 Full-Length RV Repair Classes to Keep for Life
- Discounts on Purchase-to-Own Content in the RV Lifestyle & Repair Shop
- Exclusive GOLD LIVE Streaming Events
Username or email *
Remember me
Lost your password?
Privacy Policy
Best Wheel Bearing Grease for Travel Trailers On The Market
- Latest Posts

- Best Bunkhouse Travel Trailer: Top Models & Options! - September 15, 2022
- Best Wheel Bearing Grease for Travel Trailers On The Market - October 28, 2021
- Best RV Jackknife Sofa Cover Ideas That Are Low Maintanance - October 15, 2021
You know you’re in trouble when cars passing you on the highway are honking their horns and waving their hands, then pointing back toward your trailer.
One clear, sunny day just before Thanksgiving, this happened to us as we were driving through the high desert of California. We pulled over to try to figure out what was wrong and it didn’t take long to see what the problem was. We were missing a wheel from our travel trailer. Not a tire… the whole wheel . The axle stuck out like an amputated stump with absolutely nothing on it. We’d never seen anything like it.
My Top Picks
In case you want to learn about the best wheel bearing grease for travel trailers, we put the top three here:
- Plews & Edelmann UltraLube 11320 LMX
- Lucas Oil 10301 Heavy Duty

For reasons we will never know, something on that wheel assembly locked. As we drove, the other 3 wheels kept us rolling, but the pressure was building on the locked wheel until it finally exploded, shooting the wheel off into the desert. We explored several miles of the highway but never found that wheel.
We spent several hours waiting for roadside assistance, then slept in a repair shop parking lot for a few nights while it was being fixed, and we nearly missed our planned Thanksgiving celebrations. The moral of the story? Make sure you keep your wheels rolling smoothly! Crazy things can happen on the road. That’s part of RV life. But proper maintenance can help prevent a lot of mishaps, and when it comes to keeping your wheels moving, well-greased wheel bearings are very important.
Is your RV wheel bearing in need of a little attention? You need to find the best wheel bearing grease for travel trailer wheels ASAP. Don’t wait and risk a costly and inconvenient repair. The first step to making sure your wheel bearings are properly lubricated is to choose and purchase trailer wheel bearing grease. There are many different types of travel trailer wheel bearing grease and a wide variety of brands, so the choice might seem overwhelming at first. Here’s what you need to know in order to choose wisely.
Factors to Consider When Choosing Wheel Bearing Grease
Keeping the wheels rolling on your travel trailer subjects your wheel bearing grease to harsh conditions, including extreme temperatures and pressures. All lubricants will break down over time, especially under these conditions, so choose a wheel bearing grease that is able to stand up to the strain for miles and miles. It is important to note that while longevity is a factor worth considering, maintaining your wheel bearings is something that still must be done regularly. Long-lasting grease may extend the time between maintenance slightly, but it will not enable you to postpone the need for you to grease wheel bearings for very long.
Temperature Ratings
The ordinary friction of driving and braking creates extremely high temperatures in the wheel of your travel trailer. Different kinds of grease are able to tolerate a different range of temperatures without breaking down. Grease that has broken down is not lubricating as it should, and then you’re headed for trouble. Most wheel bearing grease will give its temperature rating on the package. The minimum temperature rating you should consider is 300°F, but higher is better. The lower end of the temperature rating spectrum is also worth paying attention to, especially if you use or store your travel trailer in cold weather conditions.
For this reason, multipurpose regular grease is not a suitable choice for the wheel bearings of a travel trailer.
Pressure Tolerance
Similar to temperature, different types of grease are rated for different pressure ranges. The wheels of your travel trailer are under a lot of pressure, and subjecting your wheel bearing grease to a higher pressure than it is rated for can cause it to break down and fail. Look for a product that is able to withstand high-pressure use.
The viscosity of the grease is a measure of its consistency. Higher viscosity indicates a thicker consistency, while lower viscosity is more liquid in consistency. The National Lubricating Grease Institute (NLGI) has a standardized chart that classifies the consistency of lubricating greases according to a scale from 000 to 6.
Most travel trailers should have a wheel bearing grease with an NLGI rating of 2, which is similar to peanut butter inconsistency. This can vary between rigs, however, so be sure to consult your owner’s manual before purchasing your grease.
Ease of Use
Wheel bearing grease can be… greasy. It can be messy and difficult to both apply and remove. Its water-resistant qualities can make it very difficult to clean up if things end up in the wrong place. There are different types of packaging to look for when purchasing the best grease. You may find it convenient to use a grease gun when applying it, though some people prefer packaging that makes it easier to use their fingers.
Water Resistance
Water-resistant grease will help protect your wheel bearings when your grease trailer wheel bearing to-do comes up and other nearby parts from damaging effects of water or moisture. The water resistance of your lubricant is related to its oil content. While most grease offers at least some protection, the degree of water resistance varies from low-resistance all the way to fully waterproof. Evaluate how much time you spend driving in wet conditions and decide how high of a priority this is for your circumstances.
Compatibility
Some types of grease are not easily compatible with other types of grease. If you are replacing your existing grease with a new kind and the two are not compatible, it is vital that your wheel bearings and the surrounding area are thoroughly cleaned of the old lubricant before applying the new one.
Choosing a grease with higher compatibility saves you this time and effort both now and later, since you may need to thoroughly clean everything again if you choose a new lubricant in the future.
Environmental Impact
While the wheel bearing grease market is still dominated by petroleum-based products, there are bio-based grease products available that reduce the environmental impact significantly. Bio-based greases do not consume non-renewable petroleum resources, and they are also fully biodegradable.
In most cases, choosing a bio-based product does not mean compromising on quality or function at all, and in some cases, it even results in improved function. If you are interested in making environmentally-responsible choices, consider finding a bio-based wheel bearing grease.
While the prices of different wheel bearing greases can vary, none of them would usually be deemed expensive. The cost of lubricating wheel bearings should be considered a normal part of regular maintenance for your travel trailer, just as regularly changing oil and filters is an ordinary part of owning a vehicle. All the same, it isn’t worth spending more for similar performance, so it’s worth weighing cost as a factor.

Types of Wheel Bearing Grease for Travel Trailers
There are several different types of grease available that can be considered for use on travel trailers. Consider the advantages and disadvantages of each before choosing a wheel bearing grease.
Moly EP grease is named for the key ingredient molybdenum disulfide, which increases its tolerance for extreme pressure (EP).
- Advantages: Moly EP is unmatched for high-pressure conditions. Molybdenum disulfide is also resistant to corrosion and tolerates very high temperatures.
- Disadvantages: Shop carefully. Most Moly EP greases have a lower viscosity than is recommended for trailer wheel bearings. It can be hard to find a Moly EP grease that will meet your needs.
Disc/Drum grease is specifically designed to lubricate disc and drum brakes and related parts such as wheel bearings.
- Advantages: This type of grease is specifically designed for wheel bearings, so the temperature and pressure tolerances, viscosity, and water resistance are ideal for typical travel-trailer use.
- Disadvantages: This is the most recommended type of grease for wheel bearings, so there aren’t many disadvantages. It is sufficient in all important factors but it is not the best in any one area. Other types of grease have higher tolerance for pressure or temperature, and still, others are more waterproof.
LMX stands for lithium complex . LMX Red greases are often considered to be a premium grease option.
- Advantages: LMX Red greases are known for excellent pressure and temperature tolerance, good water resistance, and for adhering well to moving parts.
- Disadvantages: These tend to be among the most expensive lubricating greases on the market. Their excellent adhesion can make them difficult to remove and therefore messy, especially given their red color.
As the name suggests, marine grease is specially formulated for the needs of boat trailers and other items that regularly come into contact with water, even saltwater.
- Advantages: Marine grease is top of the line when it comes to being waterproof and resisting the corrosive effects of both water and salt. While you’re unlikely to back your travel trailer into the water like a boat trailer, marine grease might be a good choice if you spend a lot of time at the coast or driving on roads that are brined with saltwater in the winter.
- Disadvantages: Marine grease is often made with calcium sulfonate, which is incompatible with lithium complex greases. Any old grease needs to be removed completely to avoid compatibility issues.
Bio-based / Biodegradable
Bio-based greases use vegetable oils instead of petroleum as the base for the grease. They are not their own specific type of grease, but rather the above types of grease, such as LMX Red, can be either bio-based or petroleum-based.
- Advantages: Bio-based greases deliver all the same functions as their petroleum-based counterparts, but they are biodegradable and made with renewable resources. Their natural viscosity is higher, so they are less likely to thin out due to heat or other conditions.
- Disadvantages: Because bio-based greases still represent a very small portion of the lubricating grease market, there aren’t as many to choose from, they are sometimes hard to find, and they often cost more
Top 10 Recommendations for Wheel Bearing Grease
#10: triax spheron ht-2.

In addition to the features that most wheel bearing grease offers, such as high temperature and pressure tolerance and excellent water resistance, the Triax Spheron HT-2 grease is also formulated to help protect against dust. This may be an extra advantage if you are spending a lot of time in the desert or other high-dust environments.

You can expect all the basic benefits you hope from a wheel bearing grease with this product, plus protection from dust.
#9: Valvoline VV985 Full Synthetic

As the name implies, this lithium complex grease is fully synthetic. It is also moly-fortified to withstand extreme pressures. Valvoline is a trusted brand in the automotive industry. This grease can tolerate high loads and extreme temperatures. It is a multi-purpose grease that will serve well in your travel trailer’s wheel bearings.

Valvoline is a trusted brand in the automotive industry. This grease can tolerate high loads and extreme temperatures. It is a multi-purpose grease that will serve well in your travel trailer’s wheel bearings.
#8: Royal Purple 01312 Ultra Performance

Royal Purple is well-known for quality and performance and this aluminum, synthetic, multi-purpose grease does the job well.
#7: LubriMatic 11404 Marine Corrosion Control

This marine grease is highly suitable for non-marine uses as well. It is a calcium sulfonate complex that is insoluble in water and provides excellent corrosion protection. It is temperature rated for up to 550°F so there is no question that it can stand up to the heat of your travel trailer’s wheel bearings, including disc brake wheel bearings.

This marine grease is highly suitable for non-marine uses as well. It is a calcium sulfonate complex that is insoluble in water and provides excellent corrosion protection.
#6: Timken GR224C

Timken’s GR224C is an EP (extreme pressure) disc/drum grease that includes additives to protect against corrosion. Timken is a reliable brand when it comes to wheel bearings and this grease claims a proprietary formula that will enhance the life of your wheel bearings. Take note that this grease is designed for light to medium duty applications, so it may not be the ideal choice for a heavier travel trailer or one that is used extensively.

This light medium duty grease includes additives to protect against corrosion formula that will enhance the life of your wheel bearings.
#5: Timken Allstar ALL78241

Designed specifically to lubricate wheel bearings, and other automotive purposes, this is a great disc/drum grease with added elements to protect against corrosion. This is a great compromise if you are considering using a marine grease due to water and salt exposure but want the peace of mind of a disc/drum grease that’s perfectly suited for your travel trailer’s wheel bearings.

This is a great grease if you are considering using a marine grease due to water and salt exposure but want the peace of mind of a disc/drum grease that’s perfectly suited for your travel trailer’s wheel bearings.
#4: Sta-Lube SL3121

This aluminum complex grease is blue in color to reflect its marine qualities. This grease is highly water resistant and comes in a tub or in a tube for use with grease guns. It is temperature rated to over 500°F so it should meet all your needs for travel trailer wheel bearings. Just be careful with compatibility and be sure to clean out other types of grease before repacking the bearings with this.

This grease is highly water-resistant and it is temperature rated to over 500°F so it should meet all your needs for travel trailer wheel bearings.
#3: Star Brite

Star Brite is a trusted name in the marine industry, so if your travel trailer’s wheel bearings are in need of superior waterproof protection that will resist the corrosive effects of salt and moisture, look no further.

If your travel trailer’s wheel bearings are in need of superior waterproof protection that will resist the corrosive effects of salt and moisture, look no further!
#2: Lucas Oil 10301 Heavy Duty

Excellent performance for a budget-friendly price is possible! This heavy-duty grease from Lucas Oil does the job without a lot of bells and whistles.
#1: Plews & Edelmann UltraLube 11320 LMX

This bio-based grease combines all the premium advantages of LMX Red greases with the quality and natural advantages that come with being vegetable-based. Plews and Edelmann is a reputable and reliable brand. As you explore beautiful places with your travel trailer, you’ll rest easy knowing that your choice of wheel bearing grease isn’t polluting them.

This bio-based grease combines all the premium advantages of LMX Red greases with the quality and natural advantages that come with being vegetable-based.
Comparison Chart
How often should you grease travel trailer bearings.
The wheel bearings on a travel trailer should be greased and repacked at least once per year or every 10,000 miles, whichever comes first. Even if your travel trailer isn’t used frequently or if you don’t tow it long distances, grease begins to break down over time. If you haven’t serviced your wheel bearings within the last year, it is time to do so.
How do you grease travel trailer bearings?
Servicing your travel trailer bearings is something you can pay a qualified technician to do, but if you have the interest and some basic mechanical skills, it is also a job that you can learn to do yourself. It is important to your safety that your wheel bearings are repacked properly and that your wheels are re-installed according to the proper specifications. Consult your owner’s manual for information specific to your travel trailer. Search YouTube for video instructions, or consult this step-by-step guide .
How much grease will I need for my travel trailer bearings?
One 14 oz. tube of wheel bearing grease should be enough to repack your travel trailer’s bearings. To make sure you have enough of the same kind, consider purchasing a second tube. Stocking up is not advised, though, unless you have multiple vehicles to service. The grease will break down over time, so you’ll need to purchase a new tube for next year.
What are EZ Lube travel trailer bearings?
EZ Lube bearings are designed in such a way that the grease can be replaced easily, by simply squeezing new grease into a specific opening. The pressure will push the old grease out until all of the wheel bearing grease has been replaced.
What does it mean to repack the bearings on a travel trailer?
Repacking is the process of removing the wheel of your travel trailer in order to access the bearings, then cleaning them and adding new grease in order to keep these vital moving parts properly lubricated.
Top Choice: Plews & Edelmann UltraLube 11320 LMX
There are many options for wheel bearing grease that will keep your wheels rolling and keep you and your travel trailer safely on the road for miles to come. Any of the 10 lubricating greases on the list will do the job well, and the price variation isn’t large. Ultimately the decision comes down to which specific functions and features are a priority for you and your travel choices.
For our money, if we have the option to make an environmentally-friendly choice, then it is worth a few extra dollars to do so. In this case, the biodegradable, bio-based UltraLube from Plews and Edelmann offers an eco-friendly option without sacrificing quality or function, and with only a marginal price difference. That’s what makes the Plews and Edelmann UltraLube 11320 LMX stand out from the crowd.
Similar Posts

The Best Material for RV Ceiling on the Market

New Zealand is a top tourist destination–one that already enjoyed popularity as home to the set of the multi-billion-dollar Lord of the Rings franchise–and still climbing, with a record 3.82 million visitors in 2018. And for some, the best way to experience New Zealand and beyond is nothing utter than an RV, equipped with quality material for a sturdy ceiling.
<a href="https://skift.com/2020/01/19/an-rv-road-trip-is-a-family-friendly-

The Best 30 Amp RV Plugs Out There!
If you own an RV for travel, it’s likely you need a power cord. You could boondock and use your generator or solar panels for the week, but it’s much more convenient to have full hookups.
However, one of the most important things you can do before you hook up is to figure out the type of power cord you need. It can prevent fire or damage to your RV. If you need a 30-amp RV plug for your rig, here are some of the best you can buy.
Choosing a 30 Amp Plug

There are 30-amp plugs and 50-amp plugs. Generally, larger RVs have 50 amp plugs because they have more things they need to power. They may have multiple air conditioners, residential refrigerators, and larger appliances.
If you’re looking for a 30-amp plug, it’s likely you’ll have an easier time finding what you need at an affordable price. They’re

How to Install Laminate Flooring in an RV With Slide Outs
About Latest Posts Christine LindstromFull Time RVer at RV PioneersChristine Lindstrom is a full-time RVer. She loves traveling the country with her husband and three children and hopes her writing can help others discover the joys of the RV lifestyle. Latest posts by Christine Lindstrom (see all) Best Bunkhouse Travel Trailer: Top Models & Options!…

Best Replacement Flooring for RV: RV Flooring Picks

How to Find the Best RV Sewer Hose

Zero Breeze Review: Is it Worth it?
Tech Talk: RV wheel bearings 101
This is one maintenance job you don’t want to forget . . . or you might find yourself stranded on the roadside.

Avoid a wheel bearing failure that can leave you stranded on the roadside by knowing the trouble signs
Include a wheel bearing repack in your annual maintenance for your travel trailer or fifth wheel , carry a complete wheel bearing kit in your rv so you or a qualified technician can do the repair if replacement is needed.
Many RV parts or components require routine inspections or servicing, but with wheel bearings a great vacation adventure is literally “riding on them.”
A wheel bearing failure is one of the leading causes of RV roadside repairs. It is not only an inconvenience but can create a very dangerous situation that can result in loss of control, a fire, an accident, serious injury or death.
More than 35 per cent of bearing failures can be attributed to improper lubrication. The cost of labour and parts for this preventative maintenance procedure can be considered an investment with respects to the repair costs incurred with damaged components, not to mention the frustrating downtime on a well-deserved vacation.
All axle manufacturers strongly recommend an annual repack of wheel bearings as scheduled maintenance.
The wheel bearings on your RV axle are a tapered configuration and basically have two functions: to support the trailer loaded weight when parked or travelling down the highway and to allow the wheels to turn with the least amount of friction.
Know the signs when your RV wheel bearings are on their last legs
In most cases, RVs are parked in the off-season, and without proper scheduled maintenance, condensation can be a factor. Rust can form inside the bearing assembly, and when travelling the rust will start to scratch the bearing roller surface, which will cause excess friction and heat. This will eventually lead to fatigue, disintegration of the wheel bearing and welding of the centre of the bearing to the spindle. The axle and brake assembly also will be destroyed in many cases.
The first sign of trouble for most RV owners will be a rumbling, grinding or squealing sound or smoke emitting from the wheel. Worst of all is that feeling you get when another motorist pulls up, flashing their lights and pointing back to your trailer.
You can increase your line of defence by purchasing an infrared temperature gun to accurately display temperature differentials between each wheel hub assembly during your daily excursions.
Tips for DIY wheel bearing repacks
If you decide to complete a wheel bearing repack yourself, there are safety precautions that must be taken. For proper stabilization of the trailer, use quality jack stands that are rated to the weight of your trailer. Never place the hydraulic jack under the axle during lifting, as damage can occur in regards to the preset camber engineered by the manufacturers.
Never spin a wheel bearing with compressed air. Serious injury can occur if the rollers explode from the bearing case assembly.
The grease installed in the wheel bearing provides a thin film between the contact areas in a bearing to reduce friction, dissipate heat and inhibit corrosion on the rollers and races. The grease has two ingredients: the lubricant and a thickener, which gives the grease its consistency that will hold it in place next to the moving parts. It is basically a metal soap that can be lithium, sodium or calcium. These elements are not always compatible with each other and should never be mixed to avoid adverse effects.
The wheel seal is an important part of the hub assembly and protects the bearings from dirt, debris and other materials. Never reuse wheel seals or cotter pins.
Carry a wheel bearing kit in your travel trailer or fifth wheel
Even if you are not a DIYer, a great tip is to always carry a complete wheel bearing kit with all the parts and tools required to do a roadside repair. That way you have the parts readily available for a qualified service technician to get you safely back on the road. Or if you are confident, you can do the wheel bearing repack yourself.
Related Articles

Understanding RV and tow vehicle weights
RV technician Reg DeYoung talks about the importance of knowing the actual weight your tow vehicle can pull—including your RV, passengers and other equipment.

Accessories for your RV
RVers can find numerous practical gadgets, products and accessories for their RVs.
Find your oasis at Carefree Village Resort: A premier 55+ RV resort
Luxury living and a vibrant community have RVers flocking to this manufactured home and RV resort in Yuma.

This post may contain affiliate links or mention our own products, please check out our disclosure policy .
What is the best grease for travel trailer wheel bearings?
Published on August 8th, 2019 by Ray & Tammy Roman This post was updated on February 23rd, 2021
Maintenance is important to the overall safety of your travel trailer. Greasing your wheel bearings is a crucial step in that process.
The best grease for travel trailer wheel bearings is the Lucas Oil 10301 Heavy Duty Grease . It lasts 4X longer than regular grease, is virtually waterproof, and is stable in all temperatures. It’s the ultimate grease for high-speed bearing.
The Right Type of Grease For Your Travel Trailer Wheel Bearing
Not only is it important to choose the best grease you also have to choose the right type of grease. They are not all the same as you might have guessed.
DON’T MISS OUT ON RV LIVING UPDATES
Sign up for the newsletter today.
Please enter a valid email address.
An error occurred. Please try again later.
Thank you for subscribing to the RV Living newsletter, keep your eye on your inbox for updates.
You will find both natural grease and synthetic grease. Both have their pros and cons. For instance, some lubricants include added thickeners to prevent the greasing from leaking out. Other additives can be used by manufacturers to prolong the life of the grease or extend its operating temperature.
Grease Types and Applications
For your travel trailer wheel bearing you cannot use just any grease. The grease you use needs to hold up well in high temperatures and high-pressure use.
High Temp Disc/Drum Brake Wheel Bearing Grease, such as the Lucas Oil 10301 is the recommend grease type for the wheel bearings. This type of grease is designed to handle extreme temperatures that come from the high speed of the wheel. They resist water and can help transfer heat from the disc brakes as well.
If you are in a pinch and need a quick lubrication solution this type of grease can be used for that too.
How Often Should You Grease Your Travel Trailer Wheel Bearing?
How often you grease your wheel bearing depends on how much you travel in your camper. Every few months is the recommended interval if you travel quite a bit. For those who travel occasionally greasing your travel trailer wheel bearing once a year or every 10,000 to 12,000 miles should be sufficient.
Additional Reading:
Here are some of our most popular articles.
- Best Travel Trailer Brands
- The Airstream Nest – How Much It Costs?
- Awesome Luxury Travel Trailers
- Best Travel Trailers Under 4,000 Lbs
If you enjoyed this post Please Share:
Related posts:.

High Winds Flipped Their Parked Motorhome, and their Dog Survived!

Tips for RV Seal and Seam Maintenance

How a Full-time RVing Musician Finds Harmony on the Open Road
About the author:.
The Basics of Travel Trailer Maintenance

Tom and Beth Boswell
Tom and Beth have been RVing for over 6 years. In 2018, they downsized their life and in 2020 they moved into their fifth wheel after Tom retired. Together they are on a journey to see, explore and experience the USA. They travel in a 2019 Keystone Alpine .
- Follow Thor Industries on Facebook
- Share this story on Pinterest
Whether you live in an RV full-time, sometimes, or just call yourself a “weekend warrior,” your RV will require maintenance. Some types of maintenance need to be done regularly, and some need to be done before each trip. Other maintenance needs are less frequent, but no less important, because we all know it’s much easier and cheaper to keep something running smoothly than to fix it when it goes wrong.
I’ll walk you through some of the main things you’ll want to check as an RV owner, but these are by no means the end all, be all of rig maintenance. As you learn more about how to care for your unit, you’ll no doubt uncover other little ways to keep things running as they should on the road. And if you ever have questions, there are great dealers and communities of owners who can lend a helping hand, wherever you go. Let’s dive in.
Disclaimer: Make sure you know how to safely use all of the tools mentioned below. Every RV is unique and will require different safety checks and maintenance. If you need help, please be sure to consult a professional.
Before Each Trip

First off, do a full systems check. When you bought your RV, the seller should have demonstrated how every system is operated or used in your particular model. So for every journey you take, do a full systems check before you hit the road. This will help you become more familiar with your rig and help prevent possible problems, because you’ll have a frame of reference for how everything should work when it’s working well.
Make sure your rigs fuel tanks are filled and working. In the course of your systems check, ensure that your tanks are filled with the appropriate fuel, and that any appliances or elements that run on that fuel are working. For instance, if your kitchen appliances run on gas, top off the propane and make sure the appliances are connected and running correctly. You don’t want to be on a cold weather trip and find out your heater doesn't work or you can’t cook on the stove.
Don’t forget to check the generator. The next step in your full systems check is to test your generator, if you have one. Make sure it starts up easily and that its capacity can carry the load. Failure to do so could mean you might not have the ability to recharge your RV’s batteries or run any systems that require AC power. Your RV batteries run all the 12-volt DC-powered items, like the lights, vent fans, slide and leveling systems. They also provide power to the water heater and refrigerator ignitors when running on propane. If your RV has the standard deep-cycle lead-acid batteries, you should check the electrolyte level in your batteries, too.
Now that you are confident your RV’s systems are good to go, there are a few more items you need to check before you hit the road.
Always, always, always check your tires. Check the pressure in all your tires and visually inspect each one for signs of abnormal wear or damage before you leave for a trip. Every time. Tire failures are a common problem faced by RVers––maybe the most common, because more tires equals a greater chance something can go wrong. These failures can be caused by things like the age of your tires, overloading your RV with excess weight, under-inflation, over-inflation and damage from road hazards.
Make sure you check the tire pressure “cold,” meaning before you’ve driven them, and when they haven’t been sitting outside in the sun for several hours. Your tires should be inflated to the pressures listed on the tire sidewall, unless specifically instructed differently in your RV’s owner’s manual. Due to the size and weight of RVs, the damage can potentially be severe––so look for every opportunity to check your tires and avoid any preventable accidents.
Check your lug nuts. Next, while you’re giving attention to the tires anyway, check the lug nuts on your camper’s wheels. You want to ensure none of them are loose, and if they are, tighten them up. Check your owner’s manual about the correct torque to use on lug nuts, then use a torque wrench and the proper-sized socket to give them a twist.
Look for anything unusual. Sometimes, abnormal wear or damage on a tire can point to a system failure elsewhere. For example, earlier this year, we did a walk around and noticed a tire was wearing out oddly. It turned out a bushing in the suspension had gone bad, resulting in the unusual wear pattern on the tire. We should’ve been looking at our suspension springs and hangers more frequently, but because we were attuned to our tires and normal wear and tear, it alerted us to the fact that something was wrong. But finding that suspension issue earlier would have saved us the cost of replacing the tire.

Every 3-6 Months

Grease up your wet bolts. Our fifth wheel has wet bolts in the suspension and they need to be greased every couple of months. Greasing them regularly helps ensure your suspension keeps you going down the road smoothly. While you’re doing that maintenance anyway, check the nuts on the axle U-bolts and the wet bolts to make sure they are at the proper torque, too. Otherwise, an axle might move from its intended location, causing excessive tire wear or loss of control on the road.
Take a look at your hitch, too. Are all the pins and bolts in your hitch locked properly? Your hitch may also have some bolts that need to be torqued and areas that require grease. Give them a once over and consult your manual about regular hitch upkeep. And while many hitches come off the factory line using grease as a lubricant, lots of RVers install aftermarket lubrication pads that need to be regularly checked for wear and tear. When you inspect your hitch, make sure you look at all nuts, bolts, safety pins and hitch-related hardware.
Wipe down your leveling/stabilizing jacks and then test them. Before you operate your hydraulic jacks, wipe down the legs with a cloth to remove any debris that might get in the seals and cause leaks. Then ensure that the jacks are functioning properly by doing a test run leveling on an uneven surface.
Inspect your roof seams and seals. If leaks aren’t repaired immediately, they can lead to major issues like mold and mildew. So be proactive and inspect your seams and seals every 3-6 months. If any sealant is cracked, has any voids or is separating from the roof, repair or reseal it using the sealants recommended for use with your roof material.

As needed, check the propane lines for leaks. When you refill and reinstall the removable propane tanks, check the connections on the propane tank lines to make sure they don’t leak. You can do this with a soapy solution or a leak detector solution. Giving this system some attention when it comes time to swap out tanks is an easy way to prevent accidents.
Clean, test and maintain your slides. Before operating your slides, make sure the tops of the slides are clean. Then, when you’re operating your slides, take a look at the seals. A stick or a pine cone stuck in a seal, or a seal with a rip in it can cause water to leak in, so performing this check can prevent future water leaks.
Does the hydraulic reservoir have the correct amount of fluid in it? Checking this will ensure your slides extend and retract properly. In June, we noticed the level in our reservoir was less than it had been. With this as a starting point, we soon identified a slide hydraulic cylinder was leaking.
If you have a cable driven slide, are the cables in good condition? Or are they frayed? If they are frayed, get them replaced. If your slides are “rack and pinion,” make sure your gear packs are in good condition and not wearing abnormally.
There are other types of slide systems in addition to the ones I mentioned. If you have a slide system I left out, make sure you’re up to date on the manufacturer’s recommendations for maintenance around your model’s slide systems.

Every 12 Months

If appropriate, winterize your RV. If you live in a climate that gets cold in the winter, you’ll want to take a few extra steps for storing your RV in the off-season. In addition to the roof and slide seal inspections I’ve already mentioned, you’ll want to make sure to completely drain the water system and that you pour RV antifreeze in the sink and shower traps. This will help keep hardware and pipes from freezing and bursting or springing a leak. This is also a good time to flush your water heater and check the anode for wear, if applicable.
Repack the wheel bearings every 12 months or 12,000 miles. Our axle manufacturer recommends repacking the wheel bearings once a year or every 12,000 miles, whichever comes first. So if you travel a lot, you’ll need to do this more frequently. Skipping this check can lead to axle or brake failure. When we walked through this step this year, we realized it had been incorrectly performed for us last year, and we had been towing our rig with only three out of four brake assemblies working correctly. We were lucky we didn’t have an accident. But it was a good reminder that nothing can replace the knowledge you get from becoming familiar with all systems of your rig and doing your own inspections regularly.

With regular maintenance––all the things listed above, and any other steps specific to your RV’s particular features––your RV and its systems should function well and last for many years. A well-maintained RV can provide you with the opportunity to make new memories each time you use it.
Tom and Beth Boswell travel in a 2019 Keystone Alpine .
Related Stories

My First Frigid Night in the RV
Cold weather can sneak up on you -- but Anthony Tori has some tips and tricks to share.

Our First Black Water Mistake
When the Griffins first hit the road, they had a lot to learn about black water.

The Best RV Gadgets and Gifts
This extensive RVer and tech enthusiast shares her absolute favorite RV gadgets and gifts.
Find Your Perfect RV
Whether you're new to the world of RVing or you're ready to narrow your search, we're here to help you sort through it all and find the RV that's right for you. Explore RVs based off of your lifestyle and the features important to you.

The Savvy Campers
22 Simple Tips to Easily Maintain your Travel Trailer
Why should you maintain your travel trailer.
Maintaining the possessions in your life should be important if you want to keep them working and in top condition for years to come. Your travel trailer deserves simple maintenance to keep it working to the best of its ability for your travels, safety, as well as when you pass it along to another buyer to give them the best camping experience they will have.
Slide Out Maintenance
The slide outs on your RV will need to be maintained to function properly and to stop future leaks from developing. Make sure to keep all moving parts lubricated with a proper lubricant for slide outs. Along with lubricating the moving parts, gears, and rollers, you will want to lubricate the seals on your slide outs to keep them flexible and in good condition.
We use a premium rubber seal conditioner to keep our seals like new. It is also important to check all screws or rivets holding down your slide out seals, and to have someone operate the slide to make sure they are operating properly and coming in contact nicely.
Periodically, you will want to make sure your slide out is going in and out straight. Once it gets off its tracks, it can become very hard to get back on. Read your manual and become familiar with how your slide out works if you ever have to override it and it becomes off its tracks.
Axle Maintenance
The bearings on your travel trailer will need to be inspected and packed with grease periodically. Depending on what type you have, consult your manufacturer to find out what brand are on your trailer. Look up the brand that you have to find instructions of how to re grease the bearings specific to your trailer. Before you re grease the bearings on your trailer, make sure to use a compatible grease to what is originally used on the bearings to not cause damage.
Also, take and note the measurements from wheel center cap to centre cap to make sure your axles are tracking straight. This will keep wear of your tires minimal as well as tell you there is nothing structurally wrong with your travel trailer.
Travel Trailer Tire and Wheel Maintenance
Before every trip you take in your travel trailer, you should always check your tire pressure to make sure it is in range. It is also a good idea to get a tire pressure monitor to monitor tire pressure and temps remotely to prevent a blowout. A blow out can be very dangerous when on the road, so proper prevention is key. We also check our lug nuts torque before every trip when we leave. A loose lug nut can lead to others stripping out or even failure. Keeping a simple torque wrench and sockets which go to different items on your truck or trailer is handy to have in your tool kit. Make sure you have proper sockets to adjust your trailer hitch if needed. Read our article about tire maintenance here.
RV Body and Undercarriage Maintenance
Keep the body of your travel trailer maintained by checking all screws, nuts, and bolts for tightness. While checking for tightness, check for rust anywhere on the trailer and determine what is causing it. Some causes could be scrapes in undercarriage paint, to fix this you would want to sand down the rust spot to bare metal, then apply a paint and clear coat over with an undercarriage paint to match your trailer. Doing this will prevent further rusting of your travel trailer and keep it as good as new. Bare metal is a huge weakness on a travel trailer.
Roof Maintenance
The roof on your RV is one of the most important parts. A leaky roof can permanently damage your travel trailer walls, flooring, or insulation. If you get a rip in it from a low hanging branch, you will want to fix this immediately with roof tape or dicor sealant . We always keep a roll of tape handy just in case something happens.
Washing the roof in your RV with a soft bristle brush and a mild detergent will ensure it is clean and free of debris. We usually do this a few times a year. There is also a roof conditioner you can apply if you have a rubber membrane roof to condition it that will lengthen the life.
Hitch and Towing Maintenance
The hitch is one of the most important parts when you are towing your camper. It is the connection point between your vehicle and travel trailer. If something goes wrong here, you will have problems. If your hitch ball requires grease, make sure to grease the ball with the correct grease recommended by the hitch manufacturer. On our hitch, the Andersen No Sway, it does not require grease as the ball moves with the travel trailer. It is not recommended on our hitch to grease it. Always tow your travel trailer level, to find out why, read our article on how to level your travel trailer for towing.
Make sure your pin or hitch lock is in good condition and free of rust. Keep an eye to make sure it is not causing wear on the hitch mount. The nuts and bolts on your ball mount will need to be checked for correct torque and check this every time you tow your trailer. Read our top hitch guide to find out more information about weight distribution hitches.
RV Electrical Maintenance
Along with checking your trailer lights as already discussed, your electrical system will need to be periodically tested.
Check your battery terminals in your battery box to ensure they are free of corrosion. If your battery terminals are corroded, use a wire bristle brush to clean them off and reinstall. Make sure to only pull one terminal at a time so you do not get your wires mixed up. If your vehicle is equipped with a battery shut off switch, make sure it is in good condition and freely operating. If you have no power in your trailer, always check the outgoing terminals on your cut off switch to see if there is 12v power. If there is no power, you may have a bad switch.
The shore power system will also need to be periodically checked as well. We check this to make sure breakers are working and GFCI outlets are working. This requires a simple GFCI tester that will flip your GFCI breaker or switch on your GFCI outlet. If it flips, than it is protecting you.
Co2 and Smoke Alarm
Periodically hit the test button on both your smoke detector and co2 alarm, as well as check and replace batteries on them. A simple 9v battery is cheap insurance to make sure these items are fully working.
Interior cleaning
Keep your interior clean by using a soft bristle brush and mild detergent and water for all surfaces. Use all purpose cleaner to keep your counters, refrigerator, microwave, bathroom and other items cleaned. Keeping your trailer clean after every use will make one less thing to complete before you get ready for your next trip.
Exterior Cleaning
Periodically clean the exterior of your travel trailer with a soft bristle brush and mild detergent. We use an automotive detergent. As we have a fiberglass trailer, we wax ours in the same way one would wax an automobile. If you have a corrugated metal trailer, you can also keep it waxed and cleaned in the same way, it will just take a bit more time to get in and out of all the groves.
We have this extension brush to reach all heights of our trailer and a good bucket to dip it in. Make sure the bristles are soft enough as to not do damage to your sides, seals, or roofing.
Awning Maintenance
The awning is one thing that tends to be forgotten when it comes to maintenance as it is always tucked away. Make sure to roll it out and wash it just as you do the exterior of the trailer. Always wait for it to completely dry before retracting. Once a year, we condition our awning with a 303 cleaner and conditioner to keep it soft and waterproof. You will also need to maintain all moving parts on your awning. Use some silicone lubricant on the moving parts and slides to ensure a noise free and bind free operation.
RV Holding Tank Maintenance
If kept maintained, the holding tanks on your RV will be the least of your worries. Keep your water tank sanitized by adding bleach to your tank and using your water system. Find out more about the process on our article about fresh water tank maintenance .
The black tank should be rinsed out after each use with a black tank flush if installed or fill the tank about half up with water, throw a bag of ice in, then drive down the road. This will agitate solids which become stuck to the side of the tank and will allow them to be flushed. Also black tanks should have an additive added each use to ensure the waste is able to breakdown naturally.
The gray tank should also be filled and flushed periodically. There are also chemicals you can use to clean your gray tank if it develops any nasty smells. We drop a tab in about once a month when in use to keep it sparkling clean.
Travel Trailer Air Conditioner Maintenance
The air conditioner is something that is often overlooked. We also clean our pre filter which is located in our RV before we go out as it is simple and easily accessible. Once a year, we clean the fins on our condenser of excessive buildup which can cause the air conditioner to not be as efficient. The condenser fins can be located on the roof of the unit. You can use a specialized cleaner with a very soft brush and rinse them off. Doing this will keep your air conditioner blowing the coldest air possible.
RV Furnace Maintenance
The furnace on your RV typically takes little maintenance. Periodically you will need to inspect the exhaust vent for proper airflow. Insects, mice, and birds like to build nests in these vents. If there is a blockage in your exhaust vent, the heater can overheat and cause a fire. Fires are bad.
The ductwork and vents have a tenancy to become disconnected due to being jarred around when driving. Make sure these ducts are connected as well as the return ducts so that there is proper airflow. If you do not have proper airflow, this can cause your motor to run faster and overheat causing premature failure of your furnace.
Water Heater Maintenance
Every time you work on your water heater, remember that most are ran off of electricity as well as propane. Take precautions to turn off your propane gas as well as electricity to the water heater so you do not get electrocuted or your heater does not try and fire up. To do this, turn your propane off at the tank, flip the breaker in your fuse panel, and make sure your hot water tank power is shut off on the switch. Some heaters have an anode rod which is supposed to corrode so the tank does not. You can pull this out and inspect, if it is uncleanable then order a new one and install. If it looks good, reinstall the anode.
Flushing the water tank will go a long way with its longitivity. Empty your water tank, then use a wand to spray around in the tank or fill it up and empty it a few times. This will remove all the buildup and gunk from hard water at campsites.
If you have an electric heating element, remove it and inspect to make sure it is in good condition. If not, replace.
Check your propane burner for buildup and clean with a towel or sandpaper.
Inspect your heater to make sure there has been no water leaks or is no excessive soot buildup from the burner. If there is excessive build up, consult your dealer.
Break and Tail Lights
Before each trip, you should grab a partner and run through your break lights, turn signals, running lights, marker lights, hazzards, and any other exterior lights. This will ensure you get these bulbs replaced asap in case one goes out so you are not a hazard on the road.
Battery Maintenance
Make sure to check water levels monthly when you are using your RV or even more often if you are a full timer or are using and charging frequently. If water levels go low, this can damage your batteries permanently. Keep your batteries charged up so they are ready to go for each trip. Make sure not to discharge your batteries under 60% as this can permanently damage and lower the life of your batteries greatly.
If you live in the colder regions, remove your batteries from your RV over the winter and keep indoors on a piece of wood. Make sure to not directly store batteries on concrete as it is bad for them. Keep them on a battery maintainer or periodically charged over the winter months to keep them happy and working as long as they can. Read more on how long travel trailer batteries last .
Roof Vent Maintenance
The vents on the top of your RV in your bathroom as well as your living area if equipped will need to be checked for leaks. You can apply a seal conditioner to your seals on these vents to keep them supple and water free. While at it, apply some lubricant to your gears that open and close the vent.
Travel Trailer Breaks
The breaks on your travel trailer will need to be checked and adjusted periodically. Consult your owners manual to learn how to service your brakes. If you have questions, have your local dealer complete this service to give you piece of mind.
Travel Trailer Towing Electrical Connection
The 7 way connector will need to be checked as well to ensure all the wires are getting a good connection and there are no breaks in the wire. Make sure there is no nicks or kinks in this wire, or rust or items stuck in your connector. Always store facing down so rain does not build up and cause the rusting of your wire terminals
Inspect Propane Gas Lines
The propane lines will need to be checked for leaks periodically. To do this, make a soapy water solution in a spray bottle. Spray on all fittings, wait to see if there are any bubbles that come up. If no bubbles appear, then you should be fine. If some appear than you have a leak. This is also a good leak finder if you in fact do smell propane.
If you have a leak, shut off all propane, do not use any gas appliances, and fix immediately.
These are just some quick tips to keep an eye on to keep your travel trailer in good working condition. There are many items to maintain depending on your make and model and what accessories you have installed. If you keep these items up you should be a happy camper for years to come.
Be the first to be notified about FREE tips, hints, coupon codes, and email-exclusive information. All for FREE!
Related Posts:

Similar Posts

Do Travel Trailers have Titles, VINS, Odometers, Plates, and Insurance?
Does a Travel Trailer have a title? Most vehicles on the road today have titles to prove ownership. Travel Trailers or RV’s are not any different. Does a travel trailer have a title? Yes, travel trailers, RV’s, Campers, and tent trailers all will have titles. Titles are for the owners protection to prove ownership. If…

How To Fix an Open Ground on My RV: A Step-By-Step Guide
An open ground in an RV electrical system can be both frustrating and potentially dangerous for RV owners. It is vital to address this issue as soon as possible to ensure the safety and proper functioning of the electrical components inside the RV. Open ground on an RV means that your vehicle has somehow lost…

Can I Ride in a Travel Trailer or Fifth Wheel While it is Being Towed?
How many times have you driven down the road and noticed a cozy looking travel trailer or fifth wheel cruising by? I know I have thought about how nice it would be to ride in the comfort of a travel trailer instead of in the passenger seat, especially after a particularly long trip when your…

How do I Keep a RV Water Hose From Freezing?
As living in an RV on a year-round basis is becoming more and more popular, it’s essential to know how to keep your water from freezing. Even if you’re not living in your RV, many people like to go camping during parts of the year when temperatures drop below freezing. Either way, keeping the RV…
Should You Use A RV Surge Protector When Plugged Into A House?
The opportunity to plug your RV into a household electrical system is ideal for keeping the RV battery bank charged and topped up, and also to enable the use of lights and low draw electrical appliances. RVs are fitted with 30 Amp or 50 Amp systems and require a special adapter to connect to normal…

9 Dumb Travel Trailer Mistakes We Made (and how to solve them)
It takes a lot of work to plan a trip, pack, tow, and get settled in a campsite; as we know in life not everything goes as planned. We did not grow up with travel trailers, or by doing that much camping. We have had to learn the hard way by doing as much online…
Join our Newsletter to stay up to date on the latest RV topics and receive our FREE RV Inspection Cheat Sheet Today. Use this tool to inspect new or used campers you are looking at purchasing.
No thanks, I’m not interested!
- Skip to primary navigation
- Skip to main content
- Skip to primary sidebar
- Skip to footer
Journey With Confidence
10 Preventative Maintenance Tips That Could Save Your RV

- Maintenance, Modifications and Repairs

RV Repairs are a costly part of RV ownership
But, regular preventative maintenance can help reduce the chances of these expensive repairs from happening. It’s far easier to prevent a problem than to repair it. Stay ahead of the repairs and stay on the road with our tips every RVer needs to know.
Biggest 10 Preventative Maintenance Tips for Any RV
1. inspect roof coatings.
RV roofs are open to direct sunlight for most of the year and in some locations snow cover them for part of the year. A roof leak can cause major damage to your RV if preventive maintenance isn’t done.
RVs have a few different roof coating options depending on the manufacturer. Whichever kind you have, it is important to check it yearly for damage or deterioration from drying out.
When possible, keep your RV out of direct sunlight. Roof-mounted items will have sealant used around openings and mounting hardware. Check and replace this sealant if it looks to be dried out or missing.
2. Check window and door seals
Water leaks in an RV are one of the worst things that can happen. Leaks in walls and ceilings can go unnoticed until the damage has already been done. This can lead to structural damage to wooden materials used throughout your RV and of course, mold.
Before the season and before storage, do a thorough inspection of all window and door seals looking for dried out seals. Use a small screwdriver or something solid to check the area around these openings on the inside of the RV for soft spots.
Check for bubbles in the paint or discoloration. When in use, check for drafts around the doors and windows which would indicate poor sealing.
3. Perform RV water heater service
Hot water: we don’t necessarily need it but we all want it. Your RV’s water heater is a basic system that provides great convenience. Water heaters require maintenance at least once yearly to continue to run trouble-free.
Drain and flush at least once annually. Flushing with a flush wand is the best way to fully clean the tank. While the tank is empty, this is also the time to check the condition of the anode rod if equipped. Signs of rust or tank coating during the flushing are signs of a tank that may fail.
4. Service your wheel bearings
Wheel bearings are another item that goes unnoticed due to them being hidden. RV wheel bearings must withstand heat and constant movement while underway. Preventative maintenance is much easier and faster than the replacement of a bearing, which for many people will require paying a service center to do.
Before heading out for the season, check wheel bearings to ensure they don’t need to be replaced. When needed, pack the bearings with proper bearing grease. Wheel bearing grease breaks down over time so it is important to not only make sure you have grease but that it is still performing its job.

Wheel bearing inspection
5. Continuously check your tires
RV tires require the most preventative maintenance of any item on this list. On travel days, it is a minimum once-a-day check that should be done. The cost of replacing a single tire may not be great but the added cost of damage to the underneath and side of your RV as the result of a blowout can add up quickly.
Proper tire pressure is key, so make sure you carry a portable tire inflater . On travel days, tire pressure must be checked at least at the start of the day and ideally periodically thereafter.
Keep tires covered and out of the sun when possible and consider using a UV tire treatment to help keep the rubber compound from breaking down. Always drive within the recommended speed and load rating of your tires.
6. Be aware of humidity
Another silent killer, humidity is a problem with RVs that if not caught can cause major problems. Some of the best camping locations are hot, humid locations.
Proper airflow in your RV is important to minimize humidity build-up. Open doors and windows to improve the airflow when possible.
Utilize your roof vents and fans as well. Consider an upgrade to your roof vent for better two-way airflow. If you are in a more humid area, having an RV dehumidifier is a smart way to prevent problems.
7. Provide sun protection
We all love the sun but it can be harmful if you’re not careful. The same goes for your RV. Direct sunlight can fade paint, dry out fiberglass, and crack decals.
Many RVs have fancy paint and graphic designs. Keeping your exterior surfaces looking new can be labor intensive but the results are worth it and it will help keep up the resale value of your RV.
Yearly waxing your RV will help protect the paint and graphics. Waxing also helps to keep bugs and road grime from adhering to your RV, making it easier to wash between trips. When not in use, consider a cover for your RV and parking in shaded areas when possible.
8. Winterize your RV
It sucks to pack up your RV and store it for the winter but it is a very important time to perform some preventative maintenance that can save you repairs when the camping season comes.
Have a checklist. It can be tempting to park your RV and walk away dreaming of the next camping season. There are many little things to do while winterizing your RV so having a checklist will ensure nothing gets missed.
9. Maintain your RV furnace
We never think of the furnace ’til we need it. Furnaces often go unused for most of the season. In some cases, not using something can actually be harmful as well. Furnace repairs are something most RVers will have to deal with at some point and are often uncomfortable doing the repairs themselves.
Before the season starts, clean your furnace. Your furnace has lots of electrical connections, sensors, and sensitive switches. Dust, pet hair, and debris brought in by rodents can all affect the operation. It is important to remove anything that may affect the safe operation of your furnace.
10. Rodent proof your RV
Who hasn’t had an uninvited roommate in their RV? Whether it’s mice or insects of some sort, unwanted pests can cause a variety of problems. From building nests inside your furnace to removing insulation in walls and floors, or chewing wires, resulting in hours of searching for an electrical problem.
Before storing your RV, make sure all locations that have wires, gas lines, etc. passing through to the inside are tightly sealed. Spray foam is a good way to seal up these areas. Spray foam does dry out so make sure it is in good condition.
There are many rodent and insect deterrents on the market to help prevent unwanted guests both during storage and while in use. Steel wool is another tried-and-true method for sealing up holes where pests could get inside.
Use an online tool like RV LIFE Maintenance to track your maintenance
Preventative maintenance can save you money on unnecessary repairs and help to ensure problem-free trips. It is also a great way to get to know your RV systems and become more comfortable with future repairs and troubleshooting.
Use an online tool such as RV LIFE Maintenance to help keep track of all your RV maintenance. Not only can you keep all of your documents in one place, but it will also send you reminders when maintenance is due to potentially save you from a costly repair or accident. RV LIFE Maintenance comes included as one of the many useful tools with RV LIFE Pro. Head to our homepage to learn more.
Continue reading:
- Go RVing – How To Find An RV Education
- Propane Tank Safety: Here’s What Every RV Owner Should Know

RV Axle, Brake & Bearing Maintenance
Axle, brake, and bearing maintenance sounds like a daunting task, but it is something that every RV owner should be aware of. Your home on wheels is undergoing a lot of movement each time it travels to your next destination, causing wear and tear on important, moving parts. By keeping these systems in good working order, you can help prevent expensive repairs down the road.
Preventing Mechanical Damage to Your RV
Any signs of damage to the mechanical parts of your RV should always be brought to the attention of a qualified technician for further inspection right away. However, the best way to catch any problems before they occur is through regular maintenance. Routinely servicing your RV’s axles, brakes, and bearings will prevent unwanted outcomes like rust and corrosion.
- Lubricate moving parts
- Check for rust and corrosion
- Repack your wheel bearings
- Perform a tug test to ensure your brakes are working properly
Hiring Mobile RV Maintenance and Repair Services
RxRV provides regular maintenance services that will save you money in the long run, and keep your RV safe and reliable on the road. Call us today to schedule your appointment and avoid having to take your rig into a shop.
IMAGES
VIDEO
COMMENTS
Inside that manual, you should find service tables that specify mileages for recommended service and maintenance on your vehicle. Following that table closely will help you keep your RV in tip-top shape as it ages. RV wheel bearings should be repacked with grease once a year or every 10,000 to 12,000 miles, whichever comes first.
1. Perform a Visual Inspection. Inspecting a travel trailer's wheel bearings isn't as extensive as a pre-purchase trailer inspection. However, it's still important. Check each wheel's hub on your travel trailer, and inspect the grease seals on the inside of the hub. You should also check the cap on the outside of the wheel hub.
An RV wheel bearing maintenance should be done roughly every 10,000 miles. Some trailers can go 12,000 miles before needing some maintenance on their wheel bearings. After removing the wheel, dust cap and cotter, pin just remove the old grease and replace it with the new.
You should grease a travel trailer's wheel bearings annually or every 10,000 - 12,000 miles, whichever comes first. Even with low mileage, grease can still dissipate over time, so both benchmarks are important. Failing to regularly grease your travel trailer's wheel bearings is a big risk-small reward situation.
In this video lesson on trailer bearings, RV repair expert Dave Solberg teaches you how to inspect, lubricate and maintain the bearings on your RV. Bearings ought to be inspected every 12 months or 20,000 miles, and lubricated when necessary. Dave teaches you about the various types of trailer bearings you might find, explains what they do, and ...
An important maintenance step for any trailer is making sure the trailer's wheel bearings are greased. If you neglect this you could get caught on the road with burned up bearings. Bearing Buddies provide a simple solution for this issue. Once they're installed (which is simple) you simply connect a grease gun to the Buddies and pump in ...
Bearing Maintenance is extremely important!! We replace our RV wheel bearings, seals, and races. Pack and grease the bearings, and show how to use a torque w...
The cost of lubricating wheel bearings should be considered a normal part of regular maintenance for your travel trailer, just as regularly changing oil and filters is an ordinary part of owning a vehicle. ... The wheel bearings on a travel trailer should be greased and repacked at least once per year or every 10,000 miles, whichever comes ...
With a larger travel trailer, you should grease your trailer wheel bearings every 10,000 miles or once a year, whichever comes first. If you have a smaller travel trailer, however, you'll need to grease your wheel bearings every 2,000 miles. This is because the wheels are smaller and spin faster. The faster they spin, the more stress they ...
All axle manufacturers strongly recommend an annual repack of wheel bearings as scheduled maintenance. The wheel bearings on your RV axle are a tapered configuration and basically have two functions: to support the trailer loaded weight when parked or travelling down the highway and to allow the wheels to turn with the least amount of friction.
Trailer wheel / hub bearing maintenance tips provided by Dexter Axle company. Shop at https://www.easternmarine.com/ for all your RV & trailer bearing needs!
As we mention in the video, David had an experience with a boat trailer where he was stranded on the side of the road due to the wheel bearings overheating w...
Maintenance is important to the overall safety of your travel trailer. Greasing your wheel bearings is a crucial step in that process. The best grease for travel trailer wheel bearings is the Lucas Oil 10301 Heavy Duty Grease.It lasts 4X longer than regular grease, is virtually waterproof, and is stable in all temperatures.
Recommended Trailer Maintenance Schedule. To Do Per Trip Per Season Per Year Helpful Videos. Tires: Check pressure and tread wear. Lights: Check for proper light functions Trailer light install and test. Breakaway Switch: Pull pin and test for proper function Breakaway install kit and test. Breakaway Battery: Check battery charge level ...
Etrailer recommends having trailer bearings repacked every 12,000 miles. It may help you to remember if you have it done every spring at the same time as other maintenance jobs such as de-winterizing and spring cleaning. TrailersPlus recommends having the bearings inspected every six months or every 6,000 miles.
After any wheel work has been done on your RV wheels, they should be torqued to the correct amount after 60 miles (100 km), 300 miles (500 km), and 600 miles (1000 km). You should also retorque trailer wheels after driving on steep terrain that requires a lot of braking. Always torque your wheels in a star pattern.
Repack the wheel bearings every 12 months or 12,000 miles. Our axle manufacturer recommends repacking the wheel bearings once a year or every 12,000 miles, whichever comes first. So if you travel a lot, you'll need to do this more frequently. Skipping this check can lead to axle or brake failure.
Did you know that travel trailer wheel bearing maintenance should be done every 12 months or every 12,000 miles? This video explains what a wheel bearing is...
The bearings on your travel trailer will need to be inspected and packed with grease periodically. Depending on what type you have, consult your manufacturer to find out what brand are on your trailer. ... Bare metal is a huge weakness on a travel trailer. Roof Maintenance. The roof on your RV is one of the most important parts. A leaky roof ...
4. Service your wheel bearings. Wheel bearings are another item that goes unnoticed due to them being hidden. RV wheel bearings must withstand heat and constant movement while underway. Preventative maintenance is much easier and faster than the replacement of a bearing, which for many people will require paying a service center to do.
Wheel bearings should be inspected every year or two depending on usage. Overused wheel bearings may cause friction that generates heat, leading to premature bearing failure and potentially dangerous situations. ... When it comes to travel trailer maintenance, one crucial aspect that you should never overlook is the brakes. ...
Important! RV MaintenanceLearn how to pack the bearings on your RV, with our DIY If you are interested in keeping up on your RV Maintenance, repacking your ...
RV Axle, Brake & Bearing Maintenance Axle, brake, and bearing maintenance sounds like a daunting task, but it is something that every RV owner should be aware of. Your home on wheels is undergoing a lot of movement each time it travels to your next destination, causing wear and tear on important, moving parts.