- PRO Courses Guides New Tech Help Pro Expert Videos About wikiHow Pro Upgrade Sign In
- EDIT Edit this Article
- EXPLORE Tech Help Pro About Us Random Article Quizzes Request a New Article Community Dashboard This Or That Game Popular Categories Arts and Entertainment Artwork Books Movies Computers and Electronics Computers Phone Skills Technology Hacks Health Men's Health Mental Health Women's Health Relationships Dating Love Relationship Issues Hobbies and Crafts Crafts Drawing Games Education & Communication Communication Skills Personal Development Studying Personal Care and Style Fashion Hair Care Personal Hygiene Youth Personal Care School Stuff Dating All Categories Arts and Entertainment Finance and Business Home and Garden Relationship Quizzes Cars & Other Vehicles Food and Entertaining Personal Care and Style Sports and Fitness Computers and Electronics Health Pets and Animals Travel Education & Communication Hobbies and Crafts Philosophy and Religion Work World Family Life Holidays and Traditions Relationships Youth
- Browse Articles
- Learn Something New
- Quizzes Hot
- This Or That Game
- Train Your Brain
- Explore More
- Support wikiHow
- About wikiHow
- Log in / Sign up
- Computers and Electronics
- Internet Browsers
- Safari Browser

3 Easy Ways to Transfer and Import Bookmarks with Safari
Last Updated: April 8, 2024 Fact Checked
Importing Chrome or Firefox Bookmarks (Desktop)
Importing a bookmarks file (desktop), importing bookmarks to safari (mobile), troubleshooting.
This article was co-authored by wikiHow staff writer, Rain Kengly . Rain Kengly is a wikiHow Technology Writer. As a storytelling enthusiast with a penchant for technology, they hope to create long-lasting connections with readers from all around the globe. Rain graduated from San Francisco State University with a BA in Cinema. This article has been fact-checked, ensuring the accuracy of any cited facts and confirming the authority of its sources. This article has been viewed 166,585 times. Learn more...
Are you trying to back up or import your bookmarks to Safari? It's an easy process if you're using a computer! If you want to sync your bookmarks to your iPhone or iPad, you'll need to do a few extra steps. This wikiHow article teaches you how to import bookmarks to Safari whether you're moving from Google Chrome, Firefox, or any other browser.
Quick Tips to Move Your Safari Bookmarks
To import bookmarks from another browser in Safari, click File , Import From , and then select a browser. You can also export your bookmarks into an HTML file in Chrome, Firefox, or another browser, and then import it with Safari.

- Use this method if you want to import bookmarks from Google Chrome or Mozilla Firefox into Safari on your Mac device.
- If this is your first time opening Safari, importing from Chrome or Firefox can be automatic if you choose Keep your imported items . If you didn't opt for that, continue reading to manually import bookmarks from Chrome and Firefox.

- If this button is greyed out and unclickable, make sure Chrome or Firefox is not open in the background.
- If you imported passwords, you may need to enter your admin password before you can continue.

- Click ⋮ in the top-right corner.
- Hover over Bookmarks and lists .
- Click Bookmark manager .
- Click Export bookmarks . [3] X Research source
- Select a save location.
- Click ☰ in the top-right corner.
- Click Bookmarks .
- Click Manage bookmarks .
- Click Import and Backup .
- Click Export Bookmarks to HTML… [4] X Research source

- Imported bookmarks will appear under "Bookmarks" in the sidebar. [7] X Research source

- Safari is unavailable for Windows devices.

- Enter your password if prompted.

- You may need to tap Show all to see it. [12] X Research source

Community Q&A
- Keep a copy of your bookmarks' HTML file on hand as a backup in case you lose your bookmarks. Thanks Helpful 0 Not Helpful 0
- You can continue to add bookmarks to your library from within Safari by pressing ⌘ Command + D . Thanks Helpful 0 Not Helpful 0
- To see a non-Safari browser's favorites on mobile, export that browser's HTML file to your desktop, import it into Safari, and then sync your mobile with iCloud. Thanks Helpful 0 Not Helpful 0

You Might Also Like

- ↑ https://edu.gcfglobal.org/en/safari/bookmarking-in-safari/1/
- ↑ https://support.google.com/chrome/answer/96816?hl=en
- ↑ https://support.mozilla.org/en-US/kb/export-firefox-bookmarks-to-backup-or-transfer
- ↑ https://support.apple.com/en-al/guide/safari/ibrw1015/mac
- ↑ https://support.apple.com/en-us/102314
- ↑ https://support.apple.com/guide/iphone/bookmark-favorite-webpages-iph42ab2f3a7/ios
About This Article

1. Open Safari. 2. Go to the File tab and hover over Import From . 3. Click Google Chrome or Firefox . 4. Select the items you want to import. 5. Click Import . Did this summary help you? Yes No
- Send fan mail to authors
Is this article up to date?

Featured Articles

Trending Articles

Watch Articles

- Terms of Use
- Privacy Policy
- Do Not Sell or Share My Info
- Not Selling Info
wikiHow Tech Help:
Tech troubles got you down? We've got the tips you need
How To Save Safari Bookmarks

- Software & Applications
- Browsers & Extensions

Introduction
Welcome to the world of Safari browsing! Safari is a popular web browser known for its sleek interface, robust performance, and seamless integration with Apple devices. Whether you're a seasoned Safari user or a newcomer to the browser, managing your bookmarks is an essential part of organizing your online life. Bookmarks allow you to save and access your favorite websites with just a click, making it easier to revisit your go-to pages without the hassle of typing in URLs every time.
In this guide, we'll walk you through the process of saving your Safari bookmarks. Whether you're looking to back up your bookmarks for safekeeping or transfer them to another device, we've got you covered. By following the simple steps outlined in this article, you'll be able to export and import your Safari bookmarks with ease, ensuring that your carefully curated collection of websites remains accessible across your devices.
So, if you're ready to take control of your Safari bookmarks and streamline your browsing experience, let's dive into the step-by-step process of saving your valuable bookmarks. Whether you're a casual user or a power browser , mastering the art of managing your Safari bookmarks will undoubtedly enhance your online journey. Let's get started!
Step 1: Open Safari and Access Bookmarks
To begin the process of managing your Safari bookmarks, the first step is to open the Safari web browser on your device. Whether you're using a Mac, iPhone, iPad, or any other Apple device, Safari provides a consistent and user-friendly experience across platforms. Once Safari is launched, you'll need to access your bookmarks to initiate the process of exporting or importing them.
Accessing Bookmarks on Mac
If you're using Safari on a Mac, accessing your bookmarks is a straightforward process. Simply open Safari and look for the bookmarks icon in the toolbar. It's represented by an open book icon and is typically located near the top-left corner of the browser window . Clicking on this icon will reveal a drop-down menu displaying your bookmarks and bookmark folders. You can then select the specific bookmarks or folders you wish to manage.
Accessing Bookmarks on iPhone or iPad
For users of Safari on iPhone or iPad, accessing bookmarks follows a similar pattern. Upon opening Safari, look for the bookmarks icon at the bottom of the screen. Tapping on this icon will bring up your bookmarks and bookmark folders, allowing you to view and select the ones you want to work with.
Navigating Bookmarks
Once you've accessed your bookmarks, you can navigate through the list to locate the specific bookmarks or folders you intend to manage. Safari provides a user-friendly interface for organizing and accessing bookmarks, making it easy to find the websites you've saved for quick access.
By following these simple steps to open Safari and access your bookmarks, you're now ready to proceed with the next stages of managing your Safari bookmarks. Whether you're looking to export your bookmarks for backup purposes or import bookmarks from another source, accessing your bookmarks is the crucial first step in this process. With your bookmarks readily available, you're well-equipped to take the next steps towards efficient bookmark management within Safari.
Step 2: Export Bookmarks
Now that you've accessed your bookmarks in Safari, the next step is to export them. Exporting your bookmarks allows you to create a backup or transfer them to another device or browser. Safari provides a simple and efficient method for exporting bookmarks, ensuring that your valuable collection of saved websites is always within reach.
Exporting Bookmarks on Mac
If you're using Safari on a Mac, the process of exporting bookmarks is seamless. Here's how you can do it:
- Open Safari on your Mac and access your bookmarks using the method outlined in Step 1.
- From the Safari menu at the top of the screen, select "File" and then "Export Bookmarks." This action will prompt Safari to create a file containing your bookmarks.
Exporting Bookmarks on iPhone or iPad
For users of Safari on iPhone or iPad, exporting bookmarks follows a slightly different approach due to the mobile interface. Here's how you can export bookmarks from Safari on your iOS device:
- Open Safari on your iPhone or iPad and access your bookmarks using the method outlined in Step 1.
- Tap the bookmarks icon at the bottom of the screen to bring up your bookmarks and bookmark folders.
- Tap "Edit" at the bottom of the bookmarks screen, then select "Export Bookmarks." This action will generate a file containing your bookmarks.
Saving the Exported File
Once you've initiated the export process, Safari will create a file containing your bookmarks. You'll be prompted to choose a location to save this file on your device. It's advisable to select a location that's easily accessible and memorable, such as your desktop or a specific folder.
By following these steps, you've successfully exported your Safari bookmarks, ensuring that they are safely backed up or ready for transfer to another device or browser. With the export process completed, you're now equipped with a safeguard for your valuable collection of bookmarks, providing peace of mind and seamless accessibility across your digital ecosystem.
Step 3: Import Bookmarks
Importing bookmarks into Safari is a convenient way to transfer your saved websites from another browser or device, ensuring that your browsing experience remains consistent and streamlined across platforms. Whether you're transitioning to Safari from a different browser or simply looking to consolidate your bookmarks, the import process is designed to be straightforward and user-friendly.
Importing Bookmarks on Mac
If you're using Safari on a Mac and wish to import bookmarks from another browser, follow these steps:
Open Safari on your Mac and ensure that you have access to the bookmarks you intend to import.
From the Safari menu at the top of the screen, select "File" and then "Import From" followed by the name of the browser from which you wish to import bookmarks. Safari supports the import of bookmarks from popular browsers such as Google Chrome and Mozilla Firefox, allowing you to seamlessly transition your bookmark collection.
After selecting the browser from which you want to import bookmarks, Safari will initiate the import process, bringing in your saved websites and organizing them within your Safari bookmarks.
Importing Bookmarks on iPhone or iPad
For users of Safari on iPhone or iPad, the process of importing bookmarks from another source is equally intuitive:
Open Safari on your iPhone or iPad and ensure that you have access to the bookmarks you wish to import.
Tap the bookmarks icon at the bottom of the screen to access your bookmarks and bookmark folders.
Tap "Edit" at the bottom of the bookmarks screen, then select "Import" to initiate the import process. Safari on iOS devices allows you to import bookmarks from files or other sources, enabling a seamless transfer of your saved websites.
Organizing Imported Bookmarks
Once you've completed the import process, Safari will neatly organize the imported bookmarks within your existing bookmark structure. This ensures that your newly imported websites are easily accessible and integrated into your browsing experience.
By following these simple steps, you can effortlessly import your bookmarks into Safari, allowing you to consolidate your saved websites and enjoy a unified browsing experience across your Apple devices. Whether you're switching browsers or syncing bookmarks across devices, Safari's import feature empowers you to maintain a cohesive and personalized web browsing environment.
In conclusion, mastering the art of managing your Safari bookmarks empowers you to streamline your browsing experience and ensure seamless access to your favorite websites across your Apple devices. By following the step-by-step process outlined in this guide, you've gained valuable insights into exporting and importing your Safari bookmarks, allowing you to safeguard your collection and integrate it into your digital ecosystem with ease.
The ability to export your bookmarks provides a crucial layer of protection, ensuring that your carefully curated list of saved websites is backed up and readily available for transfer to other devices or browsers. Whether you're using Safari on a Mac, iPhone, or iPad, the export process is designed to be intuitive and efficient, allowing you to create a secure copy of your bookmarks with just a few simple clicks.
Furthermore, the import feature in Safari enables you to seamlessly bring in bookmarks from other browsers or devices, facilitating a smooth transition and consolidation of your saved websites. Whether you're switching to Safari from a different browser or looking to sync your bookmarks across multiple Apple devices, the import process ensures that your browsing experience remains consistent and personalized.
By organizing and managing your Safari bookmarks effectively, you're not only enhancing your own browsing convenience but also optimizing your digital workflow. The ability to access your favorite websites with a single click, whether on your Mac, iPhone, or iPad, reflects the seamless integration that Safari offers across the Apple ecosystem.
In essence, the process of saving Safari bookmarks is more than just a technical task; it's a means of curating and preserving your digital preferences, ensuring that your online journey is tailored to your individual needs and preferences. With the knowledge and skills gained from this guide, you're well-equipped to take full control of your Safari bookmarks, creating a personalized web browsing experience that aligns with your unique interests and browsing habits.
So, as you continue to explore the vast expanse of the internet, remember that your Safari bookmarks are not just links; they're gateways to your digital world, and by mastering their management, you're enhancing your online experience in ways that resonate with your individuality and preferences. Happy browsing!
Leave a Reply Cancel reply
Your email address will not be published. Required fields are marked *
Save my name, email, and website in this browser for the next time I comment.
- Crowdfunding
- Cryptocurrency
- Digital Banking
- Digital Payments
- Investments
- Console Gaming
- Mobile Gaming
- VR/AR Gaming
- Gadget Usage
- Gaming Tips
- Online Safety
- Software Tutorials
- Tech Setup & Troubleshooting
- Buyer’s Guides
- Comparative Analysis
- Gadget Reviews
- Service Reviews
- Software Reviews
- Mobile Devices
- PCs & Laptops
- Smart Home Gadgets
- Content Creation Tools
- Digital Photography
- Video & Music Streaming
- Online Security
- Online Services
- Web Hosting
- WiFi & Ethernet
- Browsers & Extensions
- Communication Platforms
- Operating Systems
- Productivity Tools
- AI & Machine Learning
- Cybersecurity
- Emerging Tech
- IoT & Smart Devices
- Virtual & Augmented Reality
- Latest News
- AI Developments
- Fintech Updates
- Gaming News
- New Product Launches
Learn To Convert Scanned Documents Into Editable Text With OCR
Top mini split air conditioner for summer, related post, comfortable and luxurious family life | zero gravity massage chair, when are the halo awards 2024, what is the best halo hair extension, 5 best elegoo mars 3d printer for 2024, 11 amazing flashforge 3d printer creator pro for 2024, 5 amazing formlabs form 2 3d printer for 2024, related posts.

How To Export Bookmarks In Safari

How To Delete Bookmarks In Safari

How To Bookmark On Safari

How To Delete Bookmark In Safari

How To Transfer Safari Bookmarks To Chrome

How To Bookmark Page On Safari

How To Create Folders On Safari

How To Organize Safari Bookmarks
Recent stories.

Fintechs and Traditional Banks: Navigating the Future of Financial Services

AI Writing: How It’s Changing the Way We Create Content

How to Find the Best Midjourney Alternative in 2024: A Guide to AI Anime Generators

How to Know When it’s the Right Time to Buy Bitcoin

Unleashing Young Geniuses: How Lingokids Makes Learning a Blast!
- Privacy Overview
- Strictly Necessary Cookies
This website uses cookies so that we can provide you with the best user experience possible. Cookie information is stored in your browser and performs functions such as recognising you when you return to our website and helping our team to understand which sections of the website you find most interesting and useful.
Strictly Necessary Cookie should be enabled at all times so that we can save your preferences for cookie settings.
If you disable this cookie, we will not be able to save your preferences. This means that every time you visit this website you will need to enable or disable cookies again.
- Editor's Choice: Tech Gifts for Mom
- iPad Pro vs. Surface Pro: What's the Difference?
Back up or Move Your Safari Bookmarks to a New Mac
Easily back up or share your bookmarks with any Mac you use
Tom Nelson is an engineer, programmer, network manager, and computer network and systems designer who has written for Other World Computing,and others. Tom is also president of Coyote Moon, Inc., a Macintosh and Windows consulting firm.
:max_bytes(150000):strip_icc():format(webp)/ryanperiansquare-de5f69cde760457facb17deac949263e-180a645bf10845498a859fbbcda36d46.jpg "how to download bookmarks safari")
- Western Governors University
What to Know
- Navigate to Home Directory / Library / Safari . Then, hold down the option key and drag the Bookmarks.plist file to a new location.
- You can also right-click the file and select Compress Bookmarks.plist . This creates a .zip file you can move anywhere on your Mac.
- To move the file to a new Mac, email it to yourself or use a cloud storage service like Dropbox or iCloud.
This article explains how to backup your Safari bookmarks for safe-keeping or move them to a new Mac without using the Bookmarks manager to sort through the imported bookmarks and manually putting them where you want them.
Backup Safari Bookmarks
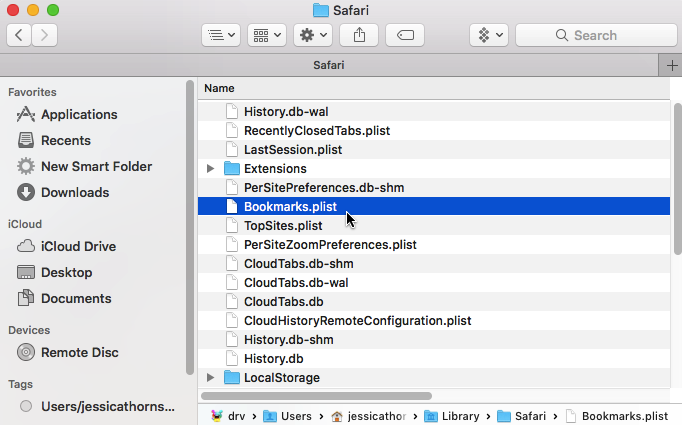
Safari stores bookmarks as a plist (property list) file named Bookmarks.plist. It's located under Home Directory / Library / Safari . Bookmarks are stored on a per-user basis, with each user having their own bookmarks file. If you have multiple accounts on your Mac and want to back up or move all of the bookmarks files, access the above directory location for each user.
To back up your Safari bookmarks, copy the Bookmarks.plist file to a new location. You can do this in one of two ways.
Open a Finder window and navigate to Home Directory / Library / Safari .
With OS X Lion , Apple hid the Home Directory/Library folder, but you can still access the Library folder in a variety of ways. Once you gain access to the Library folder, you can proceed with the instructions below.
Hold down the option key and drag the Bookmarks.plist file to another location. By holding down the option key, you ensure that a copy is made and that the original stays in the default location.
The other way to back up the Bookmarks.plist file is to right-click the file and select Compress "Bookmarks.plist from the pop-up menu. This command will create a file named Bookmarks.plist.zip , which you can move anywhere on your Mac without affecting the original.
Restore Your Safari Bookmarks
All you need to restore your Safari bookmarks is to have a backup of the Bookmarks.plist file available. If the backup is in the compressed or zip format, you will need to double-click the Bookmarks.plist.zip file to decompress it first.
Quit Safari, if the application is open.
Copy the Bookmarks.plist file you backed up earlier to Home Directory / Library / Safari.
A warning message will display: "An item named "Bookmarks.plist" already exists in this location. Do you want to replace it with the one you're moving?" Select Replace .
Once you restore the Bookmarks.plist file, launch Safari. All your bookmarks will be present, just where they were when you backed them up. No importing and sorting required.
Move Safari Bookmarks to a New Mac
Moving your Safari bookmarks to a new Mac is essentially the same as restoring them. The only difference is that you will need a way to bring the Bookmarks.plist file to your new Mac.
Because the file is small, you can easily email it to yourself. Other options are to move the file across a network, store it in the cloud using a storage solution such as Dropbox or iCloud, or put it on a USB flash drive or external hard drive .
Once you have the Bookmarks.plist file on your new Mac, use the steps outlined above to make your bookmarks available.
iCloud Bookmarks
If you have an Apple ID, you can take advantage of iCloud's bookmarks feature to sync Safari bookmarks across multiple Macs and iOS devices. To gain access to the iCloud-synced bookmarks, you need to set up an iCloud account on each Mac or iOS device that you wish to share bookmarks between.
For sharing bookmarks, make sure there is a checkmark next to the Safari item in the list of iCloud services. As long as you're signed in to your iCloud account on each Mac or iOS device you're using, you should have all of your Safari bookmarks available across multiple devices and platforms.
When you add a bookmark on one device, the bookmark will appear on all devices; more importantly, if you delete a bookmark on one device, all the devices that are synced via iCloud Safari bookmarks will also remove that bookmark.
Use Safari Bookmarks on Other Macs or PCs
If you travel a lot, you may want to bring along your Safari bookmarks. One method is to store your bookmarks in the cloud, so you can access them from anywhere you have an internet connection. This is helpful when you need to access your bookmarks from a public computer.
When you use Safari's Export Bookmarks option, the file Safari creates is actually an HTML listing of all of your bookmarks. You can take this file with you and open it in any browser, just like a normal web page. Of course, you don't end up with bookmarks per se; instead, you end up with a web page that has a clickable list of all of your bookmarks. Though not as easy to use as the bookmarks in a browser, the list can still come in handy when you're on the road.
Here's how to export your bookmarks.
Select File > Export Bookmarks .
In the Save dialog window that opens, select a target location for the Safari Bookmarks.html file, then select Save .
Copy the Safari Bookmarks.html file to a USB flash drive or to a cloud storage system.
To use the Safari Bookmarks.html file, open a browser on the computer you're using and either drag the Safari Bookmarks.html file to the browser's address bar or select Open from the browser's file menu and navigate to the Safari Bookmarks.html file.
Your list of Safari Bookmarks will display as a web page. To visit one of your bookmarked sites , just select the corresponding link.
Get the Latest Tech News Delivered Every Day
- How to Recover Lost Safari Bookmarks
- How to Back up Chrome Bookmarks
- How to Add, Edit, and Delete Bookmarks in iPhone's Safari
- How to Back Up or Move Calendar Data to a New Mac
- Use the Recovery HD Volume to Reinstall or Troubleshoot OS X
- How to Move Your Apple Mail to a New Mac
- How to Add Safari Bookmarks on iPad
- How to Add Safari Bookmarks on an iPhone or iPod Touch
- How to Bookmark on an iPad
- How to Import Bookmarks and Other Browsing Data to Firefox
- How to Back Up Firefox Bookmarks
- Keyboard Shortcuts for the Safari Bookmarks Toolbar
- The Top 10 Internet Browsers for 2024
- How to Back up Microsoft Edge Favorites
- How to Organize Safari Bookmarks and Favorites
- How to Fix: Can't Add Bookmarks in iPad's Safari

- Latest News
Import and export all of your Safari bookmarks, as a single file

Apple manage to pack a lot into their Safari web browser, including a dedicated Reader Mode , the ability to block push notifications , and a whole bunch of privacy and security settings. However, Safari does lack an effective way to import and export bookmarks, particularly when compared to other modern web browsers.
Although there is an “File > Import From” option in Safari’s menu, this isn’t the easiest way to import bookmarks! If you select “File > Import From” then it’ll import your bookmarks as a folder that cannot be accessed from Safari’s “Bookmarks” menu. You’ll need to use Safari’s Bookmarks manager to manually sort through the folder of imported bookmarks, before you can even access and use any of these bookmarks!
This manual importing and sorting can become a serious problem when you’re moving to a new Mac, as you could potentially have hundreds of bookmarks that you want to bring with you.
In this article, I’ll show you how to export all of your Safari bookmarks as a single file, and then import them into a new version of Safari with a few clicks of the mouse, and with no manual sorting required.
Export all of your bookmarks as a single file
In Safari 3 and later all of your bookmarks are saved as a Bookmarks.plist file in macOS’ Library/Safari directory. The easiest way to move your entire list of bookmarks from one Mac to another, is to make a copy of the Bookmarks.plist file, and transfer it to your new Mac.
To locate and copy the Bookmarks.plist file:
- Open a new “Finder” window.
- Select “Go > Go to Folder…” This should launch a new popup.
- Copy/paste the following into the popup:
~/Library/Safari
- Click “Go.” This takes you to a folder containing your Mac’s Bookmarks.plist file.
- You now need to make a copy of the Bookmarks.plist file, so either Control-click the file and select “Copy Bookmarks.plist,” or drag it to a new location while holding the “alt/option” key.
You now need to move this copy to your new Mac, for example you might transfer it using a USB stick or external hard drive, email it to yourself, or upload it to an online hosting service such as Dropbox or OneDrive, and then download the Bookmarks.plist file to your new Mac.
Import your Safari bookmarks
Once you’ve downloaded the Bookmarks.plist file, you need to import it into Safari. Note that this process will override your Mac’s original Bookmarks.plist file.
To import your Bookmarks.plist file:
- If Safari is currently open, close it.
- Select “Go > Go to Folder…”
- Copy/paste the following into the subsequent popup:
- Click “Go.”
- Drag and drop your new Bookmarks.plist file into this folder.
- When macOS warns you that it’s about to override the original Bookmarks.plist file, click the “Replace” button.
- Launch Safari – all of your bookmarks should now be available!
Automatically sync your bookmarks with iCloud
If you have an iCloud account, then you can sync your Safari bookmarks across multiple Macs and iOS devices. You just need to sign into the same iCloud account on all of your devices, and then make sure Safari is enabled as an iCloud service on each device.
To enable the Safari service on your Mac:
- Click the “Apple” logo in your Mac’s menu bar.
- Navigate to “System Preferences… > iCloud.”
- In the left-hand menu, find the “Safari” item and select its accompanying checkbox.
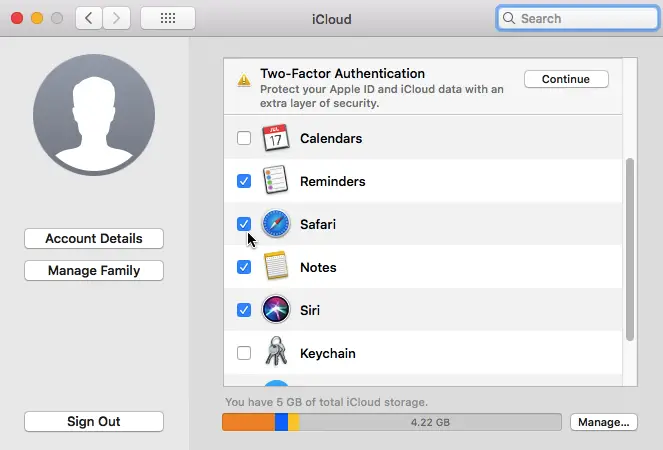
Now, as long as you’re signed into the same iCloud account on each of your Apple devices, you’ll have access to all of your Safari bookmarks.
Before you go
After spending over 20 years working with Macs, both old and new, theres a tool I think would be useful to every Mac owner who is experiencing performance issues.
CleanMyMac is highest rated all-round cleaning app for the Mac, it can quickly diagnose and solve a whole plethora of common (but sometimes tedious to fix) issues at the click of a button. It also just happens to resolve many of the issues covered in the speed up section of this site, so Download CleanMyMac to get your Mac back up to speed today.

You may also like

Do you really need additional RAM? Analyze your memory usage, with Activity Monitor

Convert audio files to MP3, AAC, AIFF, Apple Lossless, or WAV format

Having problems with Mojave’s Dynamic Desktop?
About the author.

Jessica Thornsby
Jessica Thornsby is a technical writer based in Sheffield. She writes about Android, Java, Kotlin and all things Apple. She is the co-author of O'Reilly's "iWork: The Missing Manual," and the author of "Android UI Design," from Packt Publishing.
Add Comment
Leave a reply cancel reply.
This site uses Akismet to reduce spam. Learn how your comment data is processed .

How to Transfer Bookmarks To And From All Major Browsers
Collect and move your favorites easily
When you browse the internet and come across a helpful resource, one of the ways you can save it for later is to use apps like Google Keep or Evernote . However, you can also use your browser’s built-in tool to create a bookmark.
Bookmarks are saved shortcuts that store the title, favicon, and URL of a specific webpage. This way, you don’t have to remember the URL and next time you want to go to that specific web page, you can access it on the web via the saved bookmark.

Whether you’re using Google Chrome, Safari, Firefox, or Microsoft Edge, this guide explains the steps you can take to transfer bookmarks to and from all major browsers.
How To Transfer Bookmarks To & From Google Chrome
You can transfer your personal data to Google Chrome from another browser. This data includes your browsing history, saved passwords, default search engine, and bookmarks.
- To move your bookmarks from Chrome, open Chrome and click the menu (three dots) at the upper right side of the browser screen. Select Settings .

- Under the You and Google section, click Import bookmarks and settings .

- Select the menu on the Import bookmarks and settings window, and click the Favorites/Bookmarks box.

- Click the drop down arrow at the top to select the browser you’d like to transfer your bookmarks from and bring them into Chrome.

- If you have a Bookmarks HTML file, select the option from the drop down menu and upload the file from your drive. Click Open .

Chrome will transfer the contents of the HTML file and they’ll appear in the bookmark manager.
To transfer bookmarks from Chrome to another browser:
- Click the menu and select Bookmarks .

- Select Bookmark manager .

- The Bookmarks window will open in a new tab. Click the menu (three dots).

- Select Export Bookmarks .

- Select a destination for the HTML file and then import them to your new browser.
How To Transfer Bookmarks To & From Microsoft Edge
You can transfer your bookmarks to Microsoft Edge from another browser without using an import or export file.
- Open Microsoft Edge and click on the three dots (horizontal) at the top right side of the screen. Click Settings.

- In the Settings window, click Import browser data on the right pane.

- Click the drop down arrow in the Import from box, and select the browser you’re transferring bookmarks from into Microsoft Edge.

- If you’re transferring bookmarks from Mozilla Firefox, Microsoft Edge Legacy or Internet Explorer, select bookmarks and then click the blue Import button.

- If you’re moving bookmarks from Google Chrome to Microsoft Edge, you have to select your profile, select Favorites and Bookmarks , and then click Import .

- You’ll get a confirmation that says “We’ve brought your data over” meaning the transfer was successful.

To transfer bookmarks from Microsoft Edge to other browsers:
- Open Microsoft Edge and click on the Menu > Favorites > Manage Favorites .

- In the Manage Favorites window, click the menu and select Export Favorites .

- Save the HTML file to your preferred location and then export the file to another browser.

How To Transfer Bookmarks To & From Firefox Browser
- To transfer your bookmarks to Firefox, open the browser and click on the three-line menu at the top right corner of the screen. Select Library . Alternatively, click on the Library icon on the browser menu.

- Click Bookmarks .

- Next, click Show All Bookmarks .

- Click Import and Backup .

In the drop down menu, you’ll get the following options:
- Backup , which backups up your bookmarks as a JSON file
- Restore , which restores bookmarks from a saved JSON file or previous date/time
- Import Bookmarks from HTML , which allows you to import bookmarks saved from Firefox or another browser in HTML format
- Export Bookmarks to HTML , which lets you store all your bookmarks in an HTML file
- Import Data From Another Browser , which lets you import bookmarks and other personal data from another browser

4. Select the Import Data from Another Browser option.

- From the Import Wizard , select the browser you want to transfer your bookmarks from and into Firefox. The browser options available will depend on the browsers installed on your computer, and those that are compatible with the Firefox import functionality.

- Click Next and repeat this step depending on the number of browsers you’re transferring your bookmarks from.

- In the Items to Import window, select the data you’d like to transfer to Firefox, in this case it would be Favorites/Bookmarks (the term used depends on the source browser and available data). Click Next to start transferring the bookmarks.

- When the transfer process is completed, click Finish to go back to the Firefox Library interface. Your bookmarks folder should now be in the Firefox browser with all the transferred sites and any other data you chose to transfer.
To transfer bookmarks to another browser, use the same steps, but select Export Bookmarks to HTML in the Import and Backup section.

How To Transfer Bookmarks To & From Safari
When you first start using Safari and your default browser is Chrome or Firefox, you can import your bookmarks and other personal data manually or automatically. You can also import bookmarks exported from Safari and other browsers in HTML format.
To automatically transfer bookmarks from Chrome and Firefox to Safari, open Safari and select an option from the following:
- Keep your imported items
- Remove your imported items
- Decide later
- If you prefer to transfer bookmarks to Safari manually, open Safari and select File > Import From and click Google Chrome or Firefox .

- Select the items you want to import and then click Import .

Note : You must install Chrome or Firefox on your Mac if you want to import bookmarks to Safari.
- You can also import a Bookmarks HTML File to transfer bookmarks from Chrome or Firefox to Safari. To do this, open Safari and click File > Import From > Bookmarks HTML File .

- Choose the file you want to import, and then click Import . Once the bookmarks are imported, they’ll be saved in the Imported folder at the bottom of the sidebar.
- To transfer bookmarks from Safari to other browsers, open Safari and click File > Export Bookmarks .

The exported file will be labeled Safari Bookmarks.html , and you can use it to transfer the bookmarks to another browser.
How To Transfer Bookmarks To & From Opera Browser
- Type opera://settings/importdata in the address search bar to open Opera Settings.
- In the Import bookmarks and settings popup, select the browser containing the bookmarks you’d like to transfer.

- Add a checkmark to select Favorites/Bookmarks . You can select other options such as browsing history, cookies, or saved passwords if you want those moved along with the bookmarks to the new browser. Click Import .

You can also transfer bookmarks to Opera via an HTML file you exported from another browser. Select Bookmarks HTML File from the drop down menu and click Import to import the bookmarks file directly from another browser.

To transfer bookmarks from Opera to another browser,you can use an add-on if your version of the browser doesn’t have the export tool.
Save All Your Favorite Bookmarks
Were you able to transfer your bookmarks to and from your browser? Share with us in a comment below. If you want to switch from your current browser, check out our guide on alternative browsers you may not have heard of before. We also have an in-depth review of the Brave browser if you’re looking for a privacy-focused browser.

Elsie is a technology writer and editor with a special focus on Windows, Android and iOS. She writes about software, electronics and other tech subjects, her ultimate goal being to help people out with useful solutions to their daily tech issues in a simple, straightforward and unbiased style. She has a BCom degree in Marketing and currently pursuing her Masters in Communications and New Media. Read Elsie's Full Bio
Read More Posts:

- a. Send us an email
- b. Anonymous form
- Buyer's Guide
- Upcoming Products
- Tips / Contact Us
- Podcast Instagram Facebook Twitter Mastodon YouTube Notifications RSS Newsletter
How to Import Your Safari Bookmarks to Chrome
Apple's native desktop browser is Safari, but just because it comes pre-installed on every Mac doesn't mean you have to use it. Chrome is actually more popular than Safari by far, and if you're new to Mac, it might already be your preferred browser.

How to Import Safari Bookmarks to Chrome

- Name the file containing your bookmarks and save it in a convenient location on your Mac.
- Launch Google Chrome on your Mac.

- Check the box next to Favorites/Bookmarks .

- Click the Import button. Once the import is complete, click Done .
To sync your imported bookmarks to your Google account, click the circular profile icon in the top-right corner of the Chrome window and log into your Google account.
Get weekly top MacRumors stories in your inbox.
Popular Stories

iOS 18 Rumored to Add New Features to These 16 Apps on Your iPhone

Check Out This Apple Watch iPad Demo Unit From 2014

Report: Five Things Apple Won't Announce at Its Event Next Week

Tim Cook on Generative AI: 'We Have Advantages That Will Differentiate Us'

Will the New iPad Pro Really Have the M4 Chip?
Next article.

Our comprehensive guide highlighting every major new addition in iOS 17, plus how-tos that walk you through using the new features.

App Store changes for the EU, new emoji, Podcasts transcripts, and more.

Get the most out your iPhone 15 with our complete guide to all the new features.
A deep dive into new features in macOS Sonoma, big and small.

Revamped models with OLED displays, M3 or M4 chip, and redesigned Magic Keyboard accessory.

Updated 10.9-inch model and new 12.9-inch model, M2 chip expected.

Apple's annual Worldwide Developers Conference will kick off with a keynote on June 10.

Expected to see new AI-focused features and more. Preview coming at WWDC in June with public release in September.
Other Stories

2 days ago by Tim Hardwick

5 days ago by Tim Hardwick

1 week ago by Joe Rossignol

1 week ago by MacRumors Staff

The Easiest Way To Transfer Safari Bookmarks To Google Chrome

If you're well integrated into Apple's ecosystem, sticking to Safari makes the most sense. The default browser is designed and optimized for macOS and iOS, allowing you to effortlessly pass tabs between devices or make purchases secured with FaceID or TouchID. There is a downside, though: Safari is an Apple exclusive. Because of that, you can't sync Safari with your Android or Windows devices, making Google Chrome a more appealing — and universal — alternative.
Right now, Chrome can beat Safari speeds on macOS. Google tested the latest build of Chrome using Apple's Speedometer browser benchmark, where it outperformed Safari, giving reasons a pretty good reason to switch. Chrome's browser extension support is also unparalleled, offering thousands of free web extensions via the Chrome Web Store. Beyond that, you can seamlessly sync Chrome history, passwords, settings, and bookmarks across all your devices by signing into the browser with your Google account.
Whether you want to take Google Chrome for a test drive or make the switch from Safari, you don't need to lose your bookmarks or settings. Here's the easiest way to transfer all your Safari bookmarks to Google Chrome.
How to transfer Safari bookmarks to Google Chrome on Mac
Moving bookmarks between desktop browsers is fairly straightforward. You can either let Chrome automatically import the bookmarks or do it manually yourself, as explained on the Google Support website.
To auto-import browser bookmarks from Safari:
1. Fire up Chrome on your computer.
2. Click the three-dot menu button located in the upper right corner of the browser.
3. Navigate to Bookmarks > Import Bookmarks and Settings.
4. Pick Safari from the drop-down menu.
5. Browsing history, Bookmarks, and Search are checked by default. Uncheck the other items if you only want to import the bookmarks.
6. Click Import and then Done.
As mentioned, you can also transfer the bookmarks manually, but you'll need the related HTML file. This is also a simple process, but it takes a few extra steps.
1. Open Safari on your computer.
2. Go to File > Export Bookmarks.
3. Save the HTML file in your local Mac storage.
4. Open Chrome and go to Bookmarks > Import Bookmarks and Settings
5. This time, pick Bookmarks HTML File from the drop-down menu.
6. Locate the .html file and click Choose File.
On a fresh installation of Chrome, the imported bookmarks will appear on the bookmarks bar (you can show or hide the bar with Ctrl + Shift + B.) But if you've already created new bookmarks on Chrome, you'll find the imported Safari bookmarks in a folder called "Other bookmarks."
How to transfer Safari bookmarks to Google Chrome on iPhone and iPad
While importing and exporting bookmarks is a breeze on desktop, there's no direct way to do so on iOS or iPadOS. However, you can use Chrome sync and iCloud sync to transfer bookmarks from Safari on Mac to Chrome on iPhone or iPad. Note that you need a Google account for Chrome sync to work, and this process relies on having access to a macOS computer.
Start by syncing your Safari bookmarks on iOS or iPadOS via iCloud. On your iPad or iPhone, navigate to Settings > Profile > iCloud and turn on the switch for Safari.
Next, enable Safari sync on Mac. Find the iCloud in the System Preferences and check the toggle for Safari.
Open Google Chrome on your Mac and import Safari bookmarks using the steps laid out in the previous section.
Sign into Chrome with your Google account. The imported bookmarks (also the history, passwords, and preferences) will be synced across all your devices.
Install Chrome on your iPhone or iPad and sign in with the same Google account.
Android devices also support Chrome sync. After you sync the bookmarks using iCloud, Google will import them to your Android device, too (provided you sign in with the same account).
- Help Center
- Google Chrome
- Privacy Policy
- Terms of Service
- Submit feedback
Import Chrome bookmarks & settings
You can switch browsers without losing your settings and bookmarks for your favorite websites. Depending on the browser, your settings can include the following info:
- Browsing history
- Default homepage
- Default search engines
- Saved passwords
Add bookmarks to Chrome
To import bookmarks from most browsers, like Firefox or Safari, follow that browser's instructions to save or export bookmarks as an HTML file, then:
- On your computer, open Chrome.
- Select Choose file .
Tip: You can import passwords from other apps with Google Password Manager on Chrome. Learn how to import passwords with Chrome .
On a Chromebook
- If you haven't created any bookmarks in Chrome , the bookmarks show up in the bookmarks bar.
- If you already have bookmarks in Chrome , the bookmarks are in a new folder labeled "Imported."
- Open Chrome.
- At the top left, click Organize .
- From the drop-down menu, select Import Bookmarks from HTML file .
- Upload the saved HTML.
Open your bookmarks
- If you already had bookmarks in Chrome, find a new folder named "Other bookmarks."
Tip: You can also reorder, edit, and delete your bookmarks in the side panel.
How bookmarks are imported
If you didn't have any bookmarks in Chrome, the imported bookmarks appear in the bookmarks bar.
If you already have bookmarks in Chrome, the imported bookmarks are added to the "Other bookmarks" folder at the end of the bookmarks bar.
Learn more about the bookmarks bar .
Move or export bookmarks to another browser
If you decide to use a different browser, you can take your Chrome bookmarks with you.
Chrome exports your bookmarks as an HTML file. Use this file to import your bookmarks into another browser.
Related resources
- Get your bookmarks, passwords, and more on all your devices
- Manage Chrome Side panel
- Read pages later and offline
Was this helpful?
How-To Geek
How to export chrome bookmarks.
Take all your Google Chrome bookmarks with you.
Key Takeaways
To export your Google Chrome bookmarks, open the Bookmark Manager window, click the three-dot menu icon, then click "Export Bookmarks." Chrome saves exported bookmarks as an HTML file. You can import the HTML file into another browser to transfer your bookmarks.
A finely curated list of bookmarks makes your web browsing experience a lot easier. We'll show you how to export your Google Chrome bookmarks so you can bring them to any new browser and feel at home.
Exporting your bookmarks creates an HTML file that you can then import into many browsers and have all of your bookmarks transferred over. You could move them from one Chrome browser to another---if you don't like Chrome Sync ---or to a completely different browser.
First, open Google Chrome on your Windows, Mac, Chromebook, or Linux PC. Click the three-dot menu icon in the top-right corner.
Next, mouse over "Bookmarks" and select "Bookmark Manager."
On the Bookmark Manager page, click the three-dot menu icon in the top blue bar and select "Export Bookmarks."
This will create an HTML file that contains all of your bookmarks. Now you can choose where you want to save the file. Rename the file if you want and click "Save" when you've picked a location.
That's all there is to it! You can use the HTML file to set up a new browser, but don't forget to delete your bookmarks that are no longer needed. Take good care of your precious bookmarks !
Related: How to Create, View, and Edit Bookmarks in Google Chrome

Contribute to the Microsoft Edge forum! Click here to learn more 💡
April 9, 2024
Contribute to the Microsoft Edge forum!
Click here to learn more 💡
- Search the community and support articles
- Favorites, history, and downloads
- Microsoft Edge
- Search Community member
Ask a new question
Syncing Microsoft Edge and Safari bookmarks via icloud
With my previous laptop, i could sync my chrome bookmarks on my laptop with the safari bookmarks in my ipad using icloud and choosing 'chrome' in the browser selection in the icloud application in the laptop (there are 3 choices there: internet explorer, Firefox and Chrome). That worked fine.
Now I have a new laptop with Microsoft Edge on it. Suppose I import all the bookmarks from Chrome to Edge, can i now sync the Edge bookmarks with the safari bookmarks on the ipad using icloud in the same way. I am asking because there is no "Edge" entry in the icloud application. What shall i choose (if possible at all..) in this case (IE-?, Firefox-No!, Chrome-No!). Is this doable or shall i stay with chrome on new laptop and safari on ipad ?
Report abuse
Reported content has been submitted
Replies (3)
- Microsoft Agent |
Hi sh1406 ,
Thanks for your post in Microsoft Community.
It sounds like that you currently need to sync bookmarks to the Microsoft Edge. As Chrome and iClound are not a product of Microsoft, we cannot provide you with more help, but here are some suggestions:
Since there is no option to sync directly to the Edge, it seems like you have to take two steps.Since IE and Edge are the products of Microsoft, you can try to sync IE first and then sync to Edge.And Since Edge and Chrome are the same core, you can try to sync Chrome first and then sync to Edge.
If direct synchronization does not solve the problem, you can try to export bookmarks from other browsers and then import Edge.
For this,kindly check:
What's imported to the new Microsoft Edge
Import favorites in Microsoft Edge
Set up and use iCloud for Windows - Apple Support
Disclaimer: There is a non-Microsoft website. The page appears to be providing accurate and safe information. Watch out for ads on the site that may advertise products frequently classified as PUP (Potentially Unwanted Products). Thoroughly research any product advertised on the site before you decide to download and install it.
Feel free to post back if you need further assistance.
Best Regards,
Sawa | Microsoft Community Support Specialist
-----------------------
* Beware of scammers posting fake support numbers here.
* Kindly Mark and Vote this reply if it helps, as it will be beneficial to more community members reading here.
Was this reply helpful? Yes No
Sorry this didn't help.
Great! Thanks for your feedback.
How satisfied are you with this reply?
Thanks for your feedback, it helps us improve the site.
Thanks for your feedback.
This is easily doable, though not necessarily intuitive. Since Microsoft Edge can install Chrome extensions, you simply need to install the iCloud Chrome extension in Edge ( iCloud Bookmarks - Chrome Web Store (google.com) ) and select Chrome in the iCloud application (you might want to remove the extension from your Chrome application in order to prevent conflicts).
I've just used this setup successfully to sync Edge bookmarks with Safari on iOS (iPhone and iPad); it seems the iCloud application accepts the sync instructions from Edge because it is the same engine (Chromium).
34 people found this reply helpful
This is easily doable, though not necessarily intuitive. Since Microsoft Edge can install Chrome extensions, you simply need to install the iCloud Chrome extension in Edge ( iCloud Bookmarks - Chrome Web Store (google.com) ) and select Chrome in the iCloud application (you might want to remove the extension from your Chrome application in order to prevent conflicts). I've just used this setup successfully to sync Edge bookmarks with Safari on iOS (iPhone and iPad); it seems the iCloud application accepts the sync instructions from Edge because it is the same engine (Chromium).
Thank you for your reply.
For the time beeing , i decided to stay with chrome/safari combo, since it works fine and sufficiently fast for me and i am familiar with it.
I will keep your post anyway if i need it in the future.
Thanks again.
1 person found this reply helpful
Question Info
- Norsk Bokmål
- Ελληνικά
- Русский
- עברית
- العربية
- ไทย
- 한국어
- 中文(简体)
- 中文(繁體)
- 日本語
Apple Event: May 7th at 7 am PT
> Learn more
> Add to your calendar
How to move bookmarks in Safari and not make sub-folder
When I am trying to move a folder in my safari bookmarks, it keeps trying to make it a sub-folder of the folder below the space I'm trying to drop it in. I've noticed the line with the circle on it is slightly indented, indicating that it is going to drop into that folder, however I haven't been able to work out how to keep the folder at the same level as it always wants to make it a sub-folder.
The only time I have some success is if I am moving the folder to the bottom of the list, however that doesn't always work. Sometimes it tries to make it a sub-folder of the folder that is already at the bottom of the list.
I've googled it and found a reddit post from someone with the same issue, however there was no solution beyond making sure to only move it up and down and to keep the circle to the left of the folder icon (which I can't seem to get it to do).
I am using Safari 17.4.1 on a 2023 Mac mini with Sonoma 14.4.1.
Mac mini, macOS 14.4
Posted on Apr 30, 2024 11:24 AM
Loading page content
Page content loaded
There are no replies.
How to install & set up AltStore to sideload apps on iPhone or iPad
So you’ve decided that you want to learn more about AltStore , a sideloading application for iPhones and iPads that lets you install .ipa files (raw iPhone application files) on your device with your own Apple ID . Well, you’ve come to the right place.

In this tutorial, we’ll not only talk about how AltStore works, but we’ll show you how to install it and get things set up so that you can effortlessly sideload apps on your iPhone or iPad in the future using this handy utility.
What is AltStore?
If you’ve never heard of AltStore before, it’s essentially on one of the most popular sideloading methods for iPhones and iPads. This means that you can acquire almost any .ipa file (a raw iPhone application file) and install it on your iPhone or iPad with this utility without using Apple’s App Store .
Hint: That’s why it’s called AltStore (or Alternative Store).
AltStore is a two-part application. While the AltStore application resides on your iPhone or iPad, ready to accept .ipa files at any moment, you also have another program installed on your macOS or Windows computer called AltServer.
AltServer is what allows you to install AltStore onto your iPhone or iPad. Once installed, you can use AltStore to sideload .ipa files for at least seven days using only your Apple ID. When those seven days are up, you must re-sign them – a relatively easy task, albeit sometimes inconvenient.
AltStore itself promotes certain apps and repositories where you can get apps from. These are most notably game emulator apps and stuff of that nature; however, most users will source their own .ipa files from trusted app developers and sideload those.
A lot of times, but not all the time, people will use AltStore to sideload jailbreak applications or other hacks on their iPhone or iPad. These applications are used to exploit the device so that a jailbreak can be installed. Examples of this include Dopamine , XinaA15 , Taurine , and unc0ver , just to name a few.
There’s a lot you can do with AltStore, which makes it a popular choice. Fortunately, this tutorial will cover how to install and set up AltStore on macOS so that you’re ready to sideload apps whenever you’re ready to.
How to install AltStore
Installing AltStore on your iPhone or iPad is an easy process that anyone can do. We’ll walk you through the steps required below:
1) Visit the following URL in the Safari web browser:

2) Click on the Download button under AltServer macOS (you would use the button for Windows if installing this on a Windows PC).
3) Click the Allow button in the prompt to allow Downloads if you get it:

4) Go to your Downloads folder to find the downloaded AltServer file and drag it into your Applications folder to install:

5) Go to your Applications folder and double-click on AltServer :

6) In the next pop-up, click the Open button:

7) Then, in the next pop-up, click the Check Automatically button:

8) Connect the iPhone or iPad that you wish to install AltStore on via a MFi-certified Lightning cable.
9) If prompted to allow the accessory to connect, click the Allow button:

Note: You may not see the aforementioned pop-up if you have connected this device to your computer previously.
10) Go to Finder and select your device in the side bar:

12) Click the Trust button.
13) On your device, tap the Trust button in the pop-up:

Note: You may not see this step if your iPhone is already trusted by your computer, and vice-versa. If so, just move to the next step.
14) Enter your passcode to confirm your selection:

15) With all devices now trusted, click the AltServer icon in your Mac’s Menu Bar and navigate to: Install AltStore… → [Your Device Name] :

16) Enter your Apple ID email and password in the following prompt, then click the Install button:

Note: We understand there may be some hesitancy to enter your credentials, but this is safe and is only shared with Apple to authenticate your Apple ID’s free developer status. You may create a burner Apple ID specifically for AltStore if you want to, but it isn’t necessary.
17) AltStore will appear on your Home Screen in a few short moments, but don’t launch it yet. Instead, launch the Settings app and navigate to: Privacy & Security → Developer Mode :

18) Toggle on the Developer Mode switch:

19) In the pop-up, tap the Restart button.
Note: Your device will reboot. When it starts back up, move on to the next step.
20) In the pop-up that appears, tap the Turn On button:

21) Enter your passcode to confirm enabling Developer Mode.
22) After Developer Mode is turned on, launch the Settings app again and navigate to: General → VPN & Device Management → [Your Apple ID] :

23) Tap the Trust [Your Apple ID] button:

24) Tap the Trust button.
Note: Now that you’ve trusted AltStore on your device, you can begin setting it up in the next few steps.
25) Launch the AltStore app from your Home Screen:

26) In the pop-up prompt, tap the Allow button to allow AltStore to connect to your network:

27) In the next pop-up prompt, tap the Allow button to allow AltStore to send you notifications:

28) Tap the Settings tab at the bottom of the app:

29) Tap the Sign in with Apple ID button.
30) Enter your Apple ID email and password, then tap the Sign in button.
31) Tap the Got it button.
Congratulations! You have successfully set up AltStore on your iPhone or iPad, setting the stage for you to sideload any application file on your device.
Now that you have installed AltStore on your iPhone or iPad, you’re ready to begin sideloading any application you can find from reputable developers. Those may be hosted on GitHub, or given to you via direct message from a developer.
Please note that AltStore can’t jailbreak your device, but it may be able to sideload a jailbreak app that can. See our “ Can I Jailbreak? ” page to learn what tools are available to you.
How are you going to be using AltStore on your iPhone or iPad? Let us know in the comments section down below.
Safari User Guide
- Change your homepage
- Import bookmarks, history, and passwords
- Make Safari your default web browser
- Go to websites
- Find what you’re looking for
- Bookmark webpages that you want to revisit
- See your favorite websites
- Use tabs for webpages
- Pin frequently visited websites
- Play web videos
- Mute audio in tabs
- Pay with Apple Pay
- Autofill credit card info
- Autofill contact info
- Keep a Reading List
- Hide ads when reading articles
- Translate a webpage
- Download items from the web
- Share or post webpages
- Add passes to Wallet
- Save part or all of a webpage
- Print or create a PDF of a webpage
- Customize a start page
- Customize the Safari window
- Customize settings per website
- Zoom in on webpages
- Get extensions
- Manage cookies and website data
- Block pop-ups
- Clear your browsing history
- Browse privately
- Autofill user name and password info
- Prevent cross-site tracking
- View a Privacy Report
- Change Safari preferences
- Keyboard and other shortcuts
- Troubleshooting
Sort, alphabetize, or rearrange bookmarks in Safari on Mac
You can sort, alphabetize, and rearrange bookmarks in the Safari sidebar.
Open Safari for me
Drag a bookmark or folder to a new location.
To copy a bookmark, Option-drag it.
To sort bookmarks in a bookmarks folder, Control-click the folder in the sidebar, then choose Sort By > Name or Sort By > Address. Address is the website URL.
We've detected unusual activity from your computer network
To continue, please click the box below to let us know you're not a robot.
Why did this happen?
Please make sure your browser supports JavaScript and cookies and that you are not blocking them from loading. For more information you can review our Terms of Service and Cookie Policy .
For inquiries related to this message please contact our support team and provide the reference ID below.
IMAGES
VIDEO
COMMENTS
Click Bookmarks HTML File. The Finder will open so you can find your files. 5. Navigate to and select the HTML file to import. You can double-click the file name in Finder or you can single-click it to select it, then click Import . Imported bookmarks will appear under "Bookmarks" in the sidebar.
To open the Editor click Bookmarks > Edit Bookmarks. Here are three ways to create a folder: Click Bookmarks > Add Bookmark Folder from the menu bar. Right-click inside the Bookmarks Sidebar and select New Folder from the shortcut menu. Click New Folder at the top of the Bookmarks Editor. Give your folder a name and hit your Return key.
In the Safari app on your Mac, do any of the following:. Rearrange your Favorites: Drag them to different locations. Edit the name of a favorite website or folder: Control-click the name you want to change in the Favorites page or Favorites bar, then choose Rename from the shortcut menu.You can also force click the name, or click and hold it until it's highlighted, then enter a new one.
Here's how: Chrome: Open Chrome on your Mac and click the three dots icon from the top right. Here, pick Bookmarks > Import Bookmarks and Settings. Next, click the dropdown menu and choose Bookmarks HTML File. Finally, click Choose File, select the Safari Bookmarks HTML file and hit Open. Firefox: Launch Firefox on Mac and press Command ...
In the Safari app on your Mac, choose File > Import From > Passwords CSV File. Select the CSV file to import. Click Import. Enter the login password for your Mac. If a password you're importing doesn't match a password you've saved to your Mac, you can see the related account, username and password saved to your Mac, then choose which one ...
Here's how you can export bookmarks from Safari on your iOS device: Open Safari on your iPhone or iPad and access your bookmarks using the method outlined in Step 1. Tap the bookmarks icon at the bottom of the screen to bring up your bookmarks and bookmark folders. Tap "Edit" at the bottom of the bookmarks screen, then select "Export Bookmarks ...
Navigate to Home Directory / Library / Safari. Then, hold down the option key and drag the Bookmarks.plist file to a new location. You can also right-click the file and select Compress Bookmarks.plist. This creates a .zip file you can move anywhere on your Mac. To move the file to a new Mac, email it to yourself or use a cloud storage service ...
Open a new "Finder" window. Select "Go > Go to Folder…". This should launch a new popup. Copy/paste the following into the popup: ~/Library/Safari. Click "Go.". This takes you to a folder containing your Mac's Bookmarks.plist file. You now need to make a copy of the Bookmarks.plist file, so either Control-click the file and ...
Chrome will transfer the contents of the HTML file and they'll appear in the bookmark manager. To transfer bookmarks from Chrome to another browser: Click the menu and select Bookmarks . Select Bookmark manager. The Bookmarks window will open in a new tab. Click the menu (three dots). Select Export Bookmarks.
Tap . Tap Edit, then do any of the following: Create a new folder: Tap New Folder at the bottom left, enter a name, then tap Done. Move a bookmark into a folder: Tap the bookmark, tap below Location, then tap a folder. Tap to return to your bookmarks. Delete bookmarks: Tap , then tap Delete. Rename bookmarks: Tap the bookmark, enter a new name ...
Click the menu button to open the menu panel. Click Bookmarks and then click the Manage bookmarks bar at the bottom. In the toolbar of the Library window click the Import and Backup button. Import and Backup and choose Export Bookmarks to HTML… from the drop-down menu. In the Export Bookmarks File window that opens, choose a location to save ...
On your iPhone, open the Safari app. Tap on the bookmarks icon. Tap on the bookmarks tab at the bottom of the screen. Tap on the Edit button in the top-right corner of the screen. Tap on the bookmark you want to export. Tap on the Share button (it looks like a box with an arrow coming out of it).
Check the box next to Favorites/Bookmarks. Select Bookmarks HTML file in the dropdown, then click Choose File and select the Safari-exported file. Click the Import button. Once the import is ...
Click the three-dot menu button located in the upper right corner of the browser. 3. Navigate to Bookmarks > Import Bookmarks and Settings. SlashGear. 4. Pick Safari from the drop-down menu. 5 ...
To import bookmarks from most browsers, like Firefox or Safari, follow that browser's instructions to save or export bookmarks as an HTML file, then: On your computer, open Chrome. At the top right, select More Bookmarks and lists Import bookmarks and settings. Select Choose file. Choose a file and select Open Done.
Click the three-dot menu icon in the top-right corner. Next, mouse over "Bookmarks" and select "Bookmark Manager." On the Bookmark Manager page, click the three-dot menu icon in the top blue bar and select "Export Bookmarks." This will create an HTML file that contains all of your bookmarks. Now you can choose where you want to save the file.
On your Windows computer, open iCloud for Windows. To the right of Bookmarks, click , then turn on "Sync your Safari bookmarks to other browsers.". Click Install Extension next to each browser you want to use Bookmarks with, then follow the onscreen instructions. Click Done. Click Merge to share your current PC bookmarks data with iCloud.
To import your bookmarks, open a Chrome window and click the three-dot icon in the top-right corner. Then go to Bookmarks > Bookmark manager and click the other three-dot icon in the top-right corner. Finally, click Import and select the HTML file you previously exported. Open a Chrome window and click the three-dot icon in the top-right corner.
With my previous laptop, i could sync my chrome bookmarks on my laptop with the safari bookmarks in my ipad using icloud and choosing 'chrome' in the browser selection in the icloud application in the laptop (there are 3 choices there: internet explorer, Firefox and Chrome). That worked fine. Now I have a new laptop with Microsoft Edge on it.
Open the Opera browser and click the meatballs menu icon (⋯) from the bottom left corner. Click the arrow icon beside bookmarks to open them in a new tab. Alternatively, you can visit opera ...
I've googled it and found a reddit post from someone with the same issue, however there was no solution beyond making sure to only move it up and down and to keep the circle to the left of the folder icon (which I can't seem to get it to do). I am using Safari 17.4.1 on a 2023 Mac mini with Sonoma 14.4.1. Thanks.
In the Safari app on your Mac, click the Sidebar button in the toolbar, then click Bookmarks. Control-click in the sidebar and choose New Folder. Enter a folder name. To change the name, Control-click the folder, then choose Rename. Drag the folder to the location you want. In Safari on your Mac, organize bookmarks into folders.
4) Go to your Downloads folder to find the downloaded AltServer file and drag it into your Applications folder to install: 5) Go to your Applications folder and double-click on AltServer: 6) In the next pop-up, click the Open button: 7) Then, in the next pop-up, click the Check Automatically button: 8) Connect the iPhone or iPad that you wish ...
In the Safari app on your Mac, click the Sidebar button in the toolbar, then click Bookmarks. Drag a bookmark or folder to a new location. To copy a bookmark, Option-drag it. To sort bookmarks in a bookmarks folder, Control-click the folder in the sidebar, then choose Sort By > Name or Sort By > Address. Address is the website URL.
Apple Inc. 's iPad has been added to a list of Big Tech products and services hit by strict new European Union rules aimed at stopping potential competition abuses before they take hold. The ...